
Struggling to reset your PC or perform a “Fresh Start” because the Recovery partition is missing? You’re not alone! Many Windows users face this issue, especially after reinstalling the operating system. It can be frustrating to realize that even after reinstalling Windows 10 or 11, the recovery partition—essential for restoring your system—didn’t appear as expected.
The absence of this partition can leave you wondering how to fix it and regain the ability to quickly reset or repair your PC. The good news is that you can manually recreate it without starting from scratch. This guide will show you how to create recovery partition with 2 methods, ensuring you have a reliable fallback option when you need to troubleshoot or refresh your system. Ready to bring your recovery partition back? Let’s dive in!
Why You Need a Recovery Partition
A recovery partition is an essential component of your computer’s system that can save you from major headaches when something goes wrong. This hidden partition stores tools and files that allow you to troubleshoot problems, reset your PC, or even reinstall Windows without needing external media. But why is this partition so critical, and what happens if it’s missing?
First, a recovery partition acts as a safety net. If your system crashes or becomes unstable due to malware or corrupted files, you can use the recovery partition to access built-in tools for repairs or restoration. It eliminates the need to create a bootable USB drive or hunt for your original installation media.
Second, this partition is crucial for creating a system image – a complete snapshot of your current system configuration, including all installed programs and settings. A system image allows you to restore your PC exactly as it was, making it easier to recover from issues without losing personalized configurations.
Without a recovery partition, troubleshooting becomes more complicated and time-consuming. That’s why recreating it is essential, especially after reinstalling Windows. In the next section, we’ll show you exactly how to bring back this critical feature and keep your PC prepared for any situation.
Method 1. Auto Recreate a Recovery Partition in Windows 10/11
Recreating a recovery partition doesn’t have to be complicated, especially if you have the right tools. With Wittytool DiskClone, the FIRST software which really support the function of recreating recovery partition, you can effortlessly manage recovery partition creation while also handling other critical disk tasks like upgrades or backups. Whether you’ve reinstalled Windows or need to replace my HDD with a new drive, Wittytool DiskClone simplifies the entire process. Don’t hesitate to download and follow the steps below to get started!
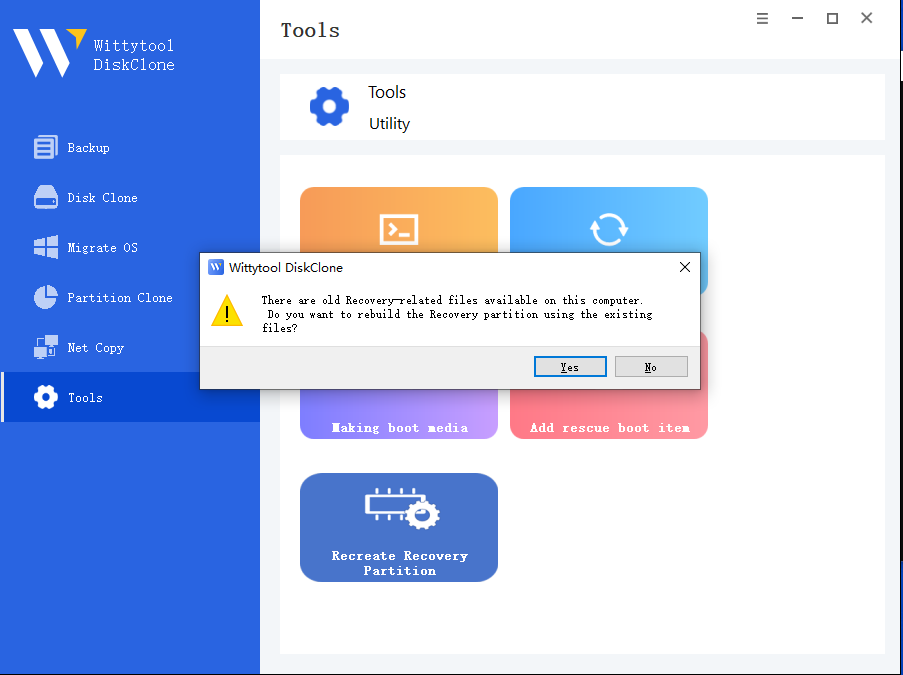
Step 1. Open the software and in the Tools section, find and click on the recreate recovery partition feature.
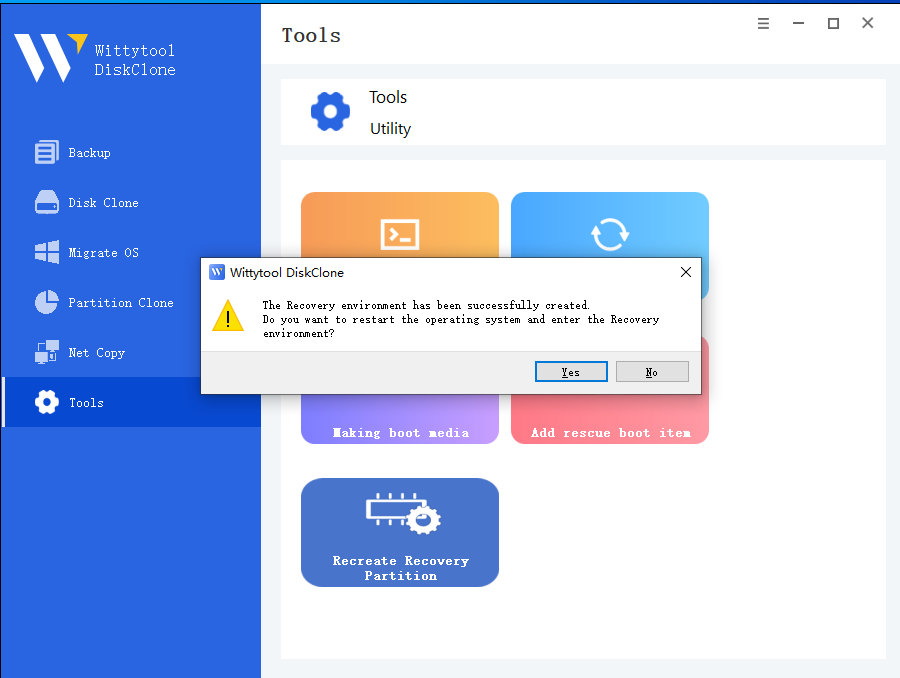
Step 2. If the relevant file exists on the system, you will be prompted, and if you select “Yes”, you will use the system file to create it.
After successful creation, you can reboot the system into Recovery mode as prompted.
Step 3. If you can’t find your recovery partition, you can create it with the Windows Installation ISO.
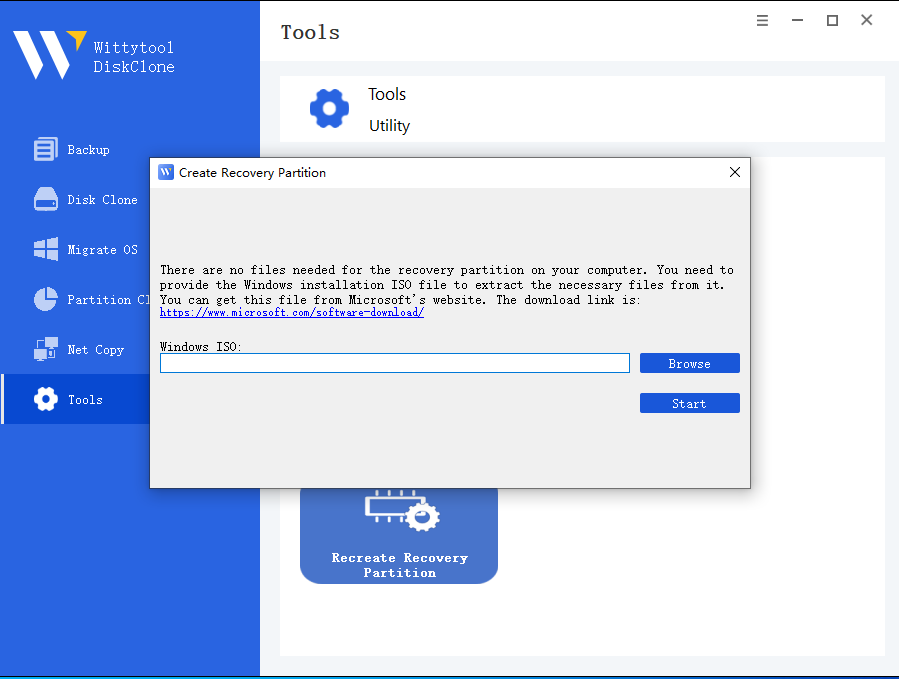
After successfully creating it, you can reboot the system into Recovery mode as instructed.
Wittytool DiskClone’s user-friendly approach makes this process straightforward, ensuring your system is ready for resets or repairs whenever needed. With this tool, you can restore a vital safety feature to your computer with minimal effort!
Method 2. Recreate Manuelly a Recovery Partition in Windows 10/11
Manually Recreate a Recovery Partition in Windows 10/11″ describes the process of rebuilding the recovery partition on a Windows 10 or 11 system without using automated tools. This involves manually creating the partition, assigning it the appropriate size and type, and configuring it to serve as a recovery environment, ensuring the system can be restored in case of issues.
Step 1: Shrink the Volume in Disk Management
- Press the Windows key and search for “Disk Management.”
- Right-click on C: (or the boot and primary partition).
- Select Shrink Volume…
- In the “Enter the amount of space to shrink in MB” field, input 1024.
- Click Shrink.
Step 2: Create a New Simple Volume
- Right-click on the newly created unallocated space.
- Select New Simple Volume.
- Click Next twice.
- Select Do not assign a drive letter or drive path, then click Next.
- Format the volume with these settings:
- Volume label: System Reserved
- Click Next, then Finish.
Step 3: Locate or Restore Winre.wim
- Open File Explorer and navigate to
C:\Windows\System32\Recovery.- If
Winre.wimis not visible:- Open Command Prompt in administrator mode.
- Run
reagentc /info. If Windows Recovery is enabled, runreagentc /disable. - If still not visible, proceed to the next step.
- In File Explorer, go to the View tab, right-click, and check Hidden items.
- Click Options, then the View tab, and uncheck Hide protected operating system files (Recommended).
- If
Winre.wimis still missing:- Obtain a new copy of
Winre.wim:- For a USB Windows installation image:
- Navigate to the Sources folder and right-click on
install.esd. - Use 7-Zip to select Open Archive.
- Navigate to folder
1\Windows\System32\Recovery. - Copy the files to
C:\Recovery\WindowsRE.
- Navigate to the Sources folder and right-click on
- For a Windows ISO:
- Extract the files and follow the same steps as for the USB.
- For a USB Windows installation image:
- Obtain a new copy of
- If
Step 4: Configure the New System Reserved Partition
- Determine the Partition Style:
- Open Disk Management.
- Right-click on Disk 0 (or the disk containing the OS).
- Select Properties, then go to the Volumes tab.
- Note the Partition Style (GPT or MBR).
- Open Command Prompt in administrator mode and enter the following commands:
diskpartlist dissel dis 0lis parsel par 3(select the newly created partition)det par(verify the correct partition is selected)
- Set the Partition ID:
- For MBR:
set id=27 - For GPT:
set id=de94bba4-06d1-4d40-a16a-bfd50179d6ac
- For MBR:
- Verify the Partition Type Change:
- Run
det parand confirm the changes. - Type
exitto leave DiskPart.
- Run
- Enable the Recovery Environment:
- Run
reagentc /enable. - Verify the configuration using
reagentc /infoto ensure the Windows Recovery Environment (WinRE) is located on the correct partition.
- Run
Conclusion
When it comes to recreating a recovery partition, the auto recreate option with Wittytool DiskClone is by far the most effective and efficient solution. Unlike the manual creation method, which can be complicated and requires advanced computer knowledge, Wittytool simplifies the process with just a few clicks. It’s the ideal choice for those who want to restore their recovery partition quickly without diving into technical details.
A Recovery Partition is a crucial partition for Windows 11/10. Windows creates this partition automatically when you perform a Clean Installation of Windows OS or Upgrade Windows OS. It contains the system image and other crucial operating system files that are required to restore the Windows OS to a working state when a problem occurs. This article shows how to add a Recovery Partition in Windows 11/10.

Recovery Partition in Windows 11
The Recovery Partition does not have a drive letter. Therefore, it is not visible in the File Explorer. You can view it in the Disk Management app. However, some users found the Recovery Partition missing from their computers. If this is the case with you, you can add a Recovery Partition in Windows 11/10 manually. This article shows how to do that.

If you are a Windows user, you might have heard about Windows Recovery Environment, and some of you might have accessed it. WinRE is the short term used for Windows Recovery Environment. If the Recovery Partition is missing on your system or you have accidentally deleted it, you cannot boot into the Windows Recovery Environment.

Some reports also show that users found more than one Recovery Partition on their computer systems. This happens when you upgrade the Windows operating system from a lower version to a higher version, say from Windows 10 to Windows 11, and there is not enough space on the existing Recovery Partition for the upgrade. In this case, Windows creates another Recovery Partition and leaves the previous Recovery Partition as it is. In such cases, you can delete the older Recovery Partition.
You will also find two Recovery Partitions on your computer if the OEM creates one and the other is created while installing the Windows OS.

When the Recovery Partition is missing, you will not find the Advanced Recovery Options in the Windows Recovery Environment (refer to the above image).
How to view Windows Recovery (WinRE) file on Windows 11/10
The WinRE file is the Windows Recovery Environment file that contains the system image and other crucial operating system files needed to perform required actions in the Windows Recovery Environment. This file is located in the root directory but is hidden. To view this file, you have to force Windows 11/10 to show the hidden files and protected system files.

To force Windows to display the protected operating system files, follow the steps provided below:
- Open File Explorer.
- In Windows 11, click on the three dots and select Options. In Windows 10, go to View > Options.
- Select the View tab.
- Uncheck the Hide protected operating system files (recommended) checkbox.
- Click Apply and then click OK.
Now, go to the following location in File Explorer:
C:\Windows\System32\Recovery

You will see the Winre.wim file there. It is the Windows Recovery Environment file.

If you do not see this file, disable the Windows Recovery Environment by executing the following command in the elevated Command Prompt window.
reagentc /disable

As you run the above command, the Winre.wim file will appear on the above-mentioned location on your C drive. The following command will show you the status of the Windows Recovery Environment.
reagentc /info
To create or add a Recovery Partition on Windows 11/10, you have to create a new partition on your C drive without assigning a drive letter, then assign it the ID of Recovery Partition based on the partition style of your hard disk.
To view your hard disk’s partition table, open the Disk Management app, right-click on your hard disk, and select Properties. Then, go to the Volumes tab to view its partition style.
Let’s see this process.
First, create a new Recovery Partition in Disk Management. Follow the steps provided below:

- Open Disk Management.
- Right-click on your C drive and select Shrink Volume.
- Enter 1024 and click Shrink. This will create a new Unallocated volume of 1 GB next to your C drive.
- Now, right-click on the Unallocated volume and select New Simple Volume.
- Click Next and select the Do not assign a drive letter or drive path option.
- Click Next and select the Format this volume option. Name this partition as Recovery Partition, and click next.
- Click Finish.
After performing the above steps, a new partition with the name Recovery Partition has been created. However, this partition does not contain the system image needed for the Windows Recovery Environment.
Now, open Command Prompt as an administrator and type the following command. Hit Enter after that.
diskpart
The above command will launch the Diskpart tool in the Command Prompt. Enter the following commands and hit Enter after entering each command:
list disk

select disk #

list partition

select partition #
In the above commands, replace # with the correct Disk number and Partition number. The Recovery Partition has an ID 27 (if the hard disk is MBR) and it is displayed as Type in the cmd. You have to assign this ID to the newly created Recovery Partition.
Now, type the following command and hit Enter:
detail partition

The above command will show you the details of the newly created Recovery Partition. That partition does not have ID 27 (refer to the above image). Set the ID=27 if the partition style of your hard disk is MBR.
Change the partition ID of the new Recovery Partition by executing the following command:
set id=27

After the successful execution of the above command, the Winre.wim file will be copied to the new Recovery Partition. To confirm, you can view the details of the Recovery Partition. First, exit the Diskpart then type the following command:
reagentc /info
If your hard disk has a GPT partition style, you need to replace the ID 27 with the following ID:
de94bba4-06d1-4d40-a16a-bfd50179d6ac
Hence, in this case, the command will be:
set id=de94bba4-06d1-4d40-a16a-bfd50179d6ac
Those who have a GPT partition style have to execute one more command.
gpt attributes=0X8000000000000001
Now, the Recovery Partition has been created on your GPT hard disk.
That’s it. I hope this helps.
These posts will help you if you receive errors:
- REAGENTC.EXE The Windows RE image was not found
- REAGENTC.EXE Operation failed, An error has occurred
How to enable Recovery Partition in Windows?
The Recovery Partition is enabled or active by default on Windows 11/10. You need not enable it manually. You can check its status by executing the reagentc /info command in the elevated Command Prompt window. If it shows the status of the Recovery Partition disabled, you can enable it by running the reagentc /enable command in the Command Prompt as administrator.
Is recovery partition necessary?
A Recovery Partition contains a file called Winre.wim. This file contains the system image and other necessary files required to restore your system to a working state if any problem occurs. Recovery Partition also allows you to repair corrupted Windows OS. Therefore, a Recovery partition is necessary on Windows.
Read next: How to use Recovery Drive to restore Windows.
What is recovery partition? Can I delete recovery partition and how do I delete? And if I want to recreate, how to do that? Now reading this post to find all answers towards these questions put forwarded by MiniTool.
About Windows Recovery Partition
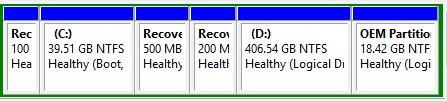
If you buy a computer with Windows 10 or Windows 8 preinstalled, you will find that there is a recovery partition in Disk Management, with no drive letter and no executable functions except Help (see the image attached below).
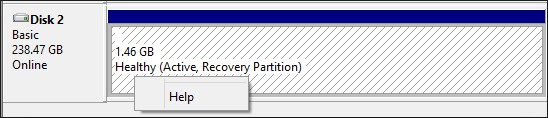
Well, what is recovery partition? To put it simple, a recovery partition is a portion of your disk drive that is set aside by the manufacturer to hold an image of your system before it was shipped from the factory. Recovery partition contains the files of system backup image and files that guide system restoration.
In a word, recovery partition is a function of one key computer recovery when the system runs into an error.
How to Create Windows 10 Recovery Partition?
Although a recovery partition takes up a couple of GBs of disk space, you can save a lot of time finding a way to quickly restore your PC to factory conditions when your PC runs abnormally. Thanks to the huge disk space of today’s hard drives, the disk space taken by recovery partition is only a drop in the bucket.
Besides, when you have a recovery partition at hand, you don’t need to worry about where you should keep a recovery drive or recovery disc and make an effort to keep it well. Thus, Windows 10 create recovery partition is also a frequently asked issue.
However, unlike creating a normal partition, creating a recovery partition is not easy. Usually, when you buy a brand-new computer that has been pre-installed with Windows 10, you can find that recovery partition in Disk Management; but if you reinstall Windows 10, it is likely that no recovery partition can be found.
Luckily, our previous post How to Create Recovery Partition Windows 10 shows step-by-step guidance, you can follow the instruction and try creating a recovery drive by yourself.
Can I Delete Recovery Partition Windows 10?
You may ask: can I delete recovery partition Windows 10? The answer is positive: you can delete recovery partition without affecting the performance of Windows 10, provided that you have made a backup or you are not planning to do factory reset when Windows runs into an error.
However, please note that you cannot delete recovery partition in Disk Management utility, only a Help option can be found there.
Well, how to delete recovery partition Windows 10 to release available space?
Luckily, we have MiniTool Partition Wizard, which can easily and safely remove recovery partition Windows 10/8/7. Here, we recommend using MiniTool Partition Wizard Free edition which is qualified to do this job, you only need to click several buttons to finish.
Recommended: curious about some strange partitions on your drive? Read this post to make them clear.
Way 1: Delete Recovery Partition using Partition Wizard
Let’s see how MiniTool Partition Wizard works on deleting recovery partition Windows 10:
Step 1. Download MiniTool Partition Wizard Free Edition. Install it on computer and run it.
MiniTool Partition Wizard FreeClick to Download100%Clean & Safe
Step 2. Right click on the recovery partition you want to delete and select “Delete Partition”.
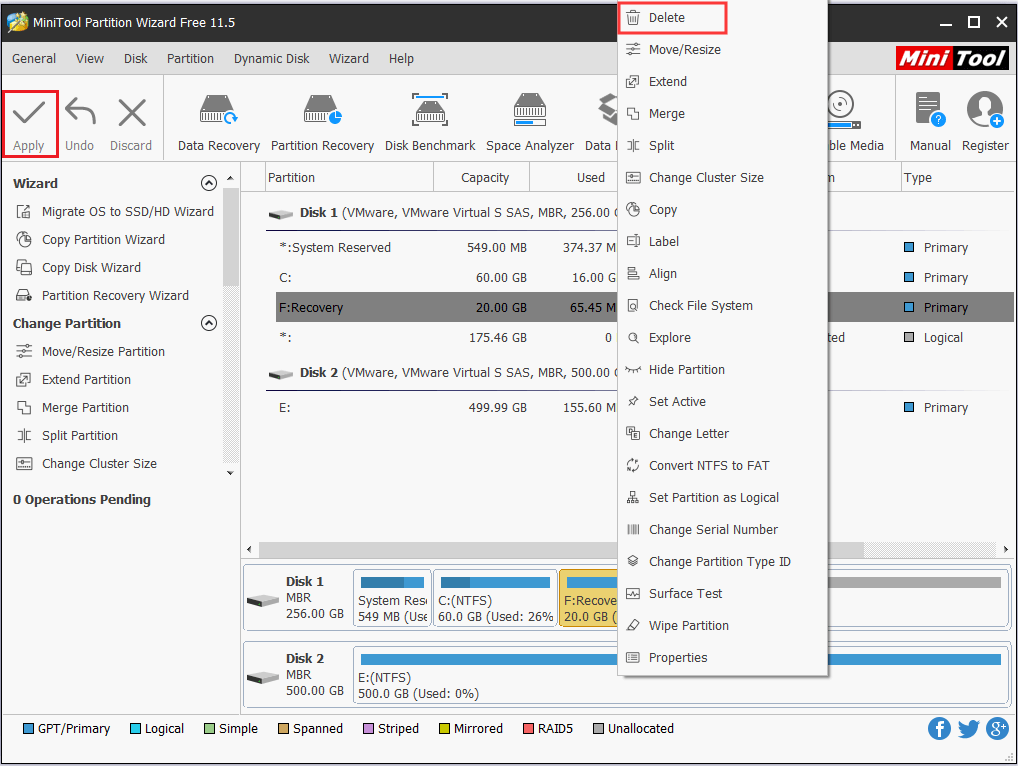
Step 3. The recovery partition will be displayed as unallocated space for your preview. Now click “Apply” to make the operation into effect.
Within a few seconds, you will have Windows 10 recovery partition deleted. Then you can use MiniTool Partition Wizard to add this unallocated space to any partition so as to extend partition or you may just create new partition on this location.
Way 2: Delete Recovery Partition using Diskpart
In fact, Windows also provides you a way to delete recovery partition, that is to use Diskpart.exe to delete partitions from Diskpart command prompt. Please follow these steps to remove Windows 10 recovery partition.
Let’s see how to delete recovery partition Windows 10 using Diskpart.
Step 1. Navigate to Windows 10 Start menu, type “diskpart” in the search box, and then Windows 10 will show you the best match. Right-click on “diskpart” and select “Run as administrator”, then confirm that you want to allow this app to make changes to your computer.

Step 2. At Diskpart window, type the following commands in order. Please end each command with the Enter key:
- Type “list disk” to display all your disks. Please pay attention to the disk number that contains the recovery partition.
- Type “select disk n” where “n” should be replaced with the correct disk number.
- Type “list partition” to list all the partitions on the selected disk. By viewing the partition label and other partition information, you will know which one is the recovery partition to be deleted.
- Type “select partition n” where “n” should be replaced with the partition number of the recovery partition.
- Type “delete partition” to delete the recovery partition.
- Type “exit” to quit.
Kindly reminder:
Sometimes, you may fail to delete recovery partition and an error message which reads “cannot delete a protected partition without the force protected parameter set” appears:

This error message is likely to appear on GPT disk. If the recovery partition you intend to delete is marked as protected partition by Windows, then deletion is prevented. At this time, you can type “gpt attributes=0x8000000000000000” and then repeat “delete partition” to solve this issue.
If you are familiar with Diskpart, you can continue creating a new partition on the released unallocated space before you exit. Or you can use this unallocated space to enlarge partition. But probably you will encounter “Virtual Disk Service error” during the process. Here I suggest using MiniTool Partition Wizard Free Edition to save time, which can break some limitations in Diskpart.
So the bottom line here is: both MiniTool Partition Wizard and Diskpart are useful to delete recovery partition Windows 10. But in my opinion, the former one is easier to operate, and the latter is likely to lead to errors.
Although Diskpart is able to delete recovery partition, without a clear interface to display the details, there are chances that you may delete a wrong partition and the operations are irreversible. For those who are unfamiliar with Diskpart, obviously this is not a good choice.
“MiniTool Partition Wizard Free Edition is able to delete Windows 10 recovery partition. Use this freeware to help you delete recovery partition, then the released unallocated space can be used to extend other partition.”Click to Tweet
After knowing how to delete recovery partition using two methods, you might be interested in whether it is possible to restore deleted Windows recovery partition. See the following part to get specific tutorial.
Restore Windows Recovery Partition
Sometimes, you may regret of deleting recovery partition, for you may need it to restore Windows to factory settings someday. Is it possible to restore recovery partition Windows 10? Yes, and MiniTool Partition Wizard is always the best solution.
MiniTool Partition Wizard provides a powerful feature called “Partition Recovery” to guide users through the process of recovering lost partitions due to wrong deletion or wrong diskpart clean. Let’s see how to retrieve Windows 10 recovery partition in detail:
Note: Only when you have not made any change to the unallocated space that is released by recovery partition, you can use MiniTool Partition Wizard to help you do the recovery. Free Edition helps to scan for lost partition while only paid editions can be used to execute the final partition recovery.
MiniTool Partition Wizard FreeClick to Download100%Clean & Safe
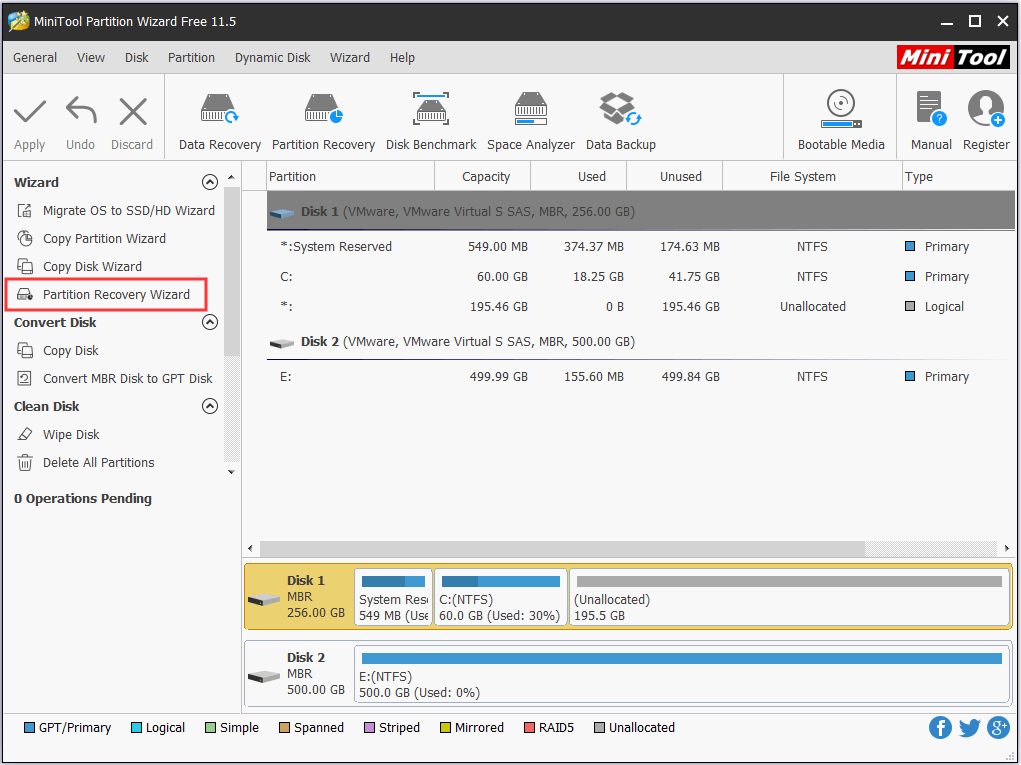
Step 1. Run Partition Wizard Free Edition to the main interface. Then right click on the disk that used to contain the recovery partition and choose “Partition Recovery Wizard” from the option box.
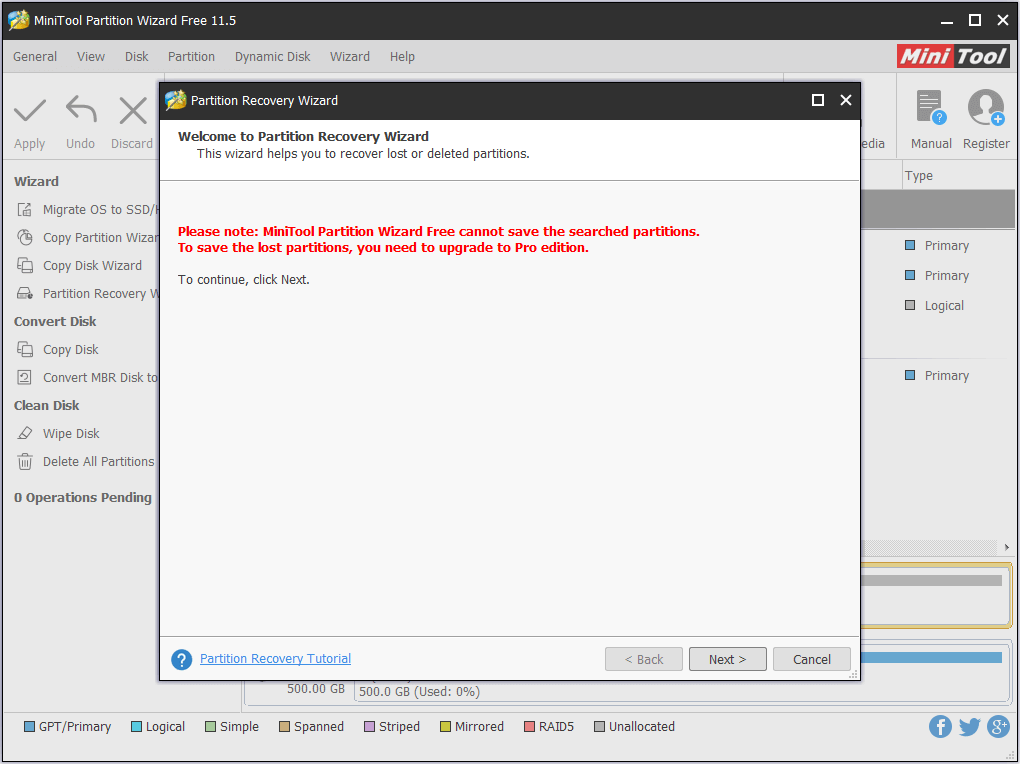
Step 2. If you are using the Free Edition, you will see notice saying Free Edition is only capable of scanning for lost partitions. To recover, you need to upgrade software to Pro Edition. If you are already running the Pro Edition, the red notice will not show up. Now to continue, click “Next“.
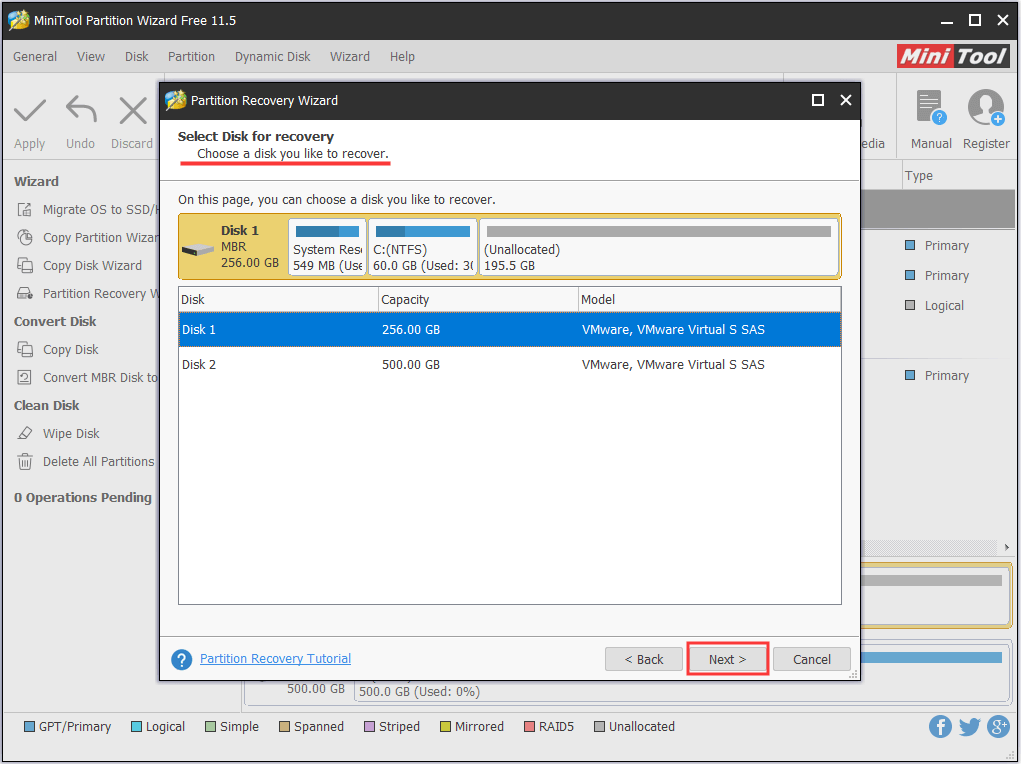
Step 3. Now choose a disk you want to recover partitions from.
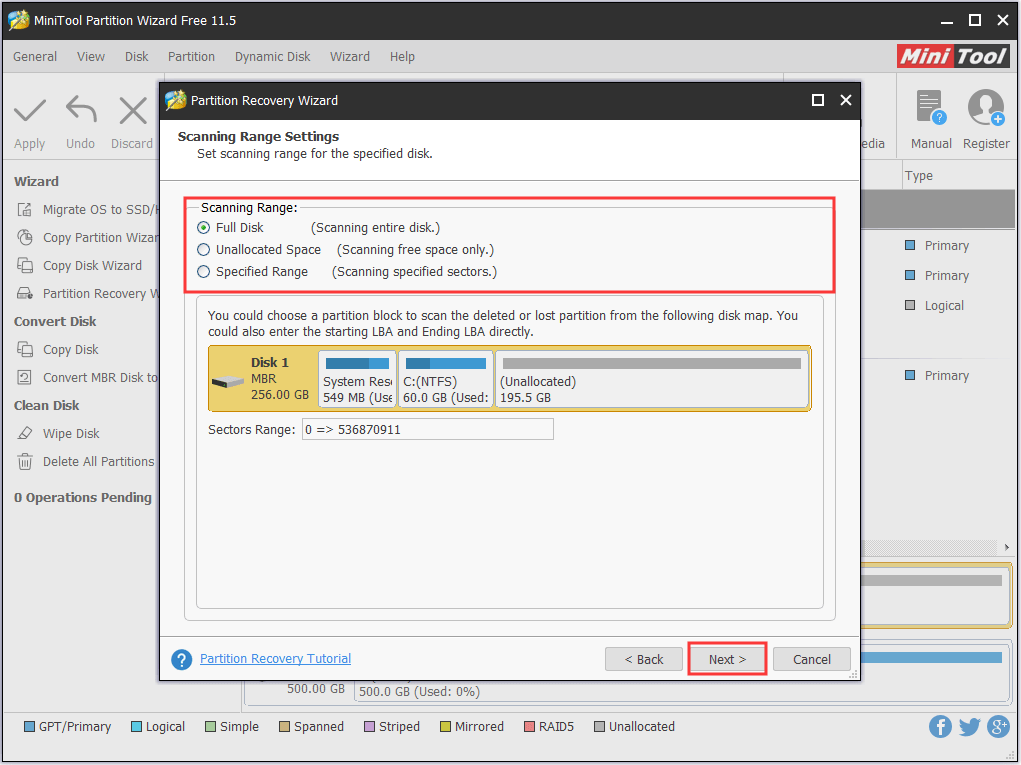
Step 4. Then set a scanning range to search for the deleted recovery partition. It is recommended to choose Full Disk or Unallocated Space here for they are easy for users to carry out. Then click “Next” to go on.
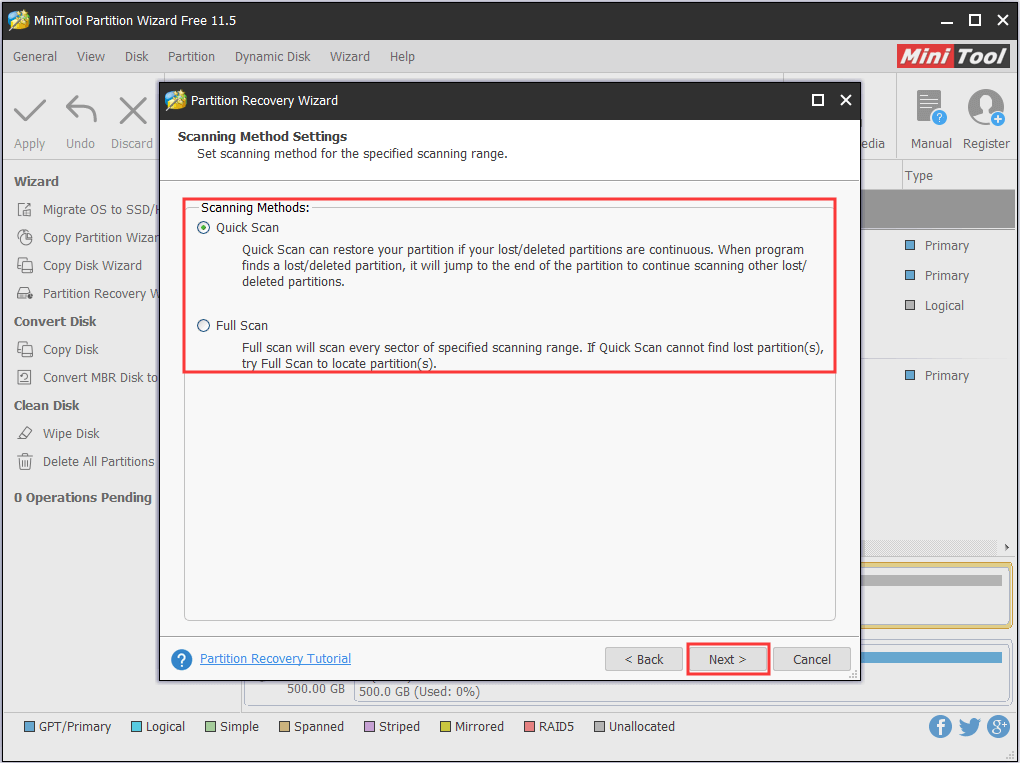
Step 5. In the next page choose a scanning method. Do you want a Quick Scan or would you prefer a Full Scan? I suggest using Quick Scan which saves a lot time first to take your chance. Click “Next” and continue.
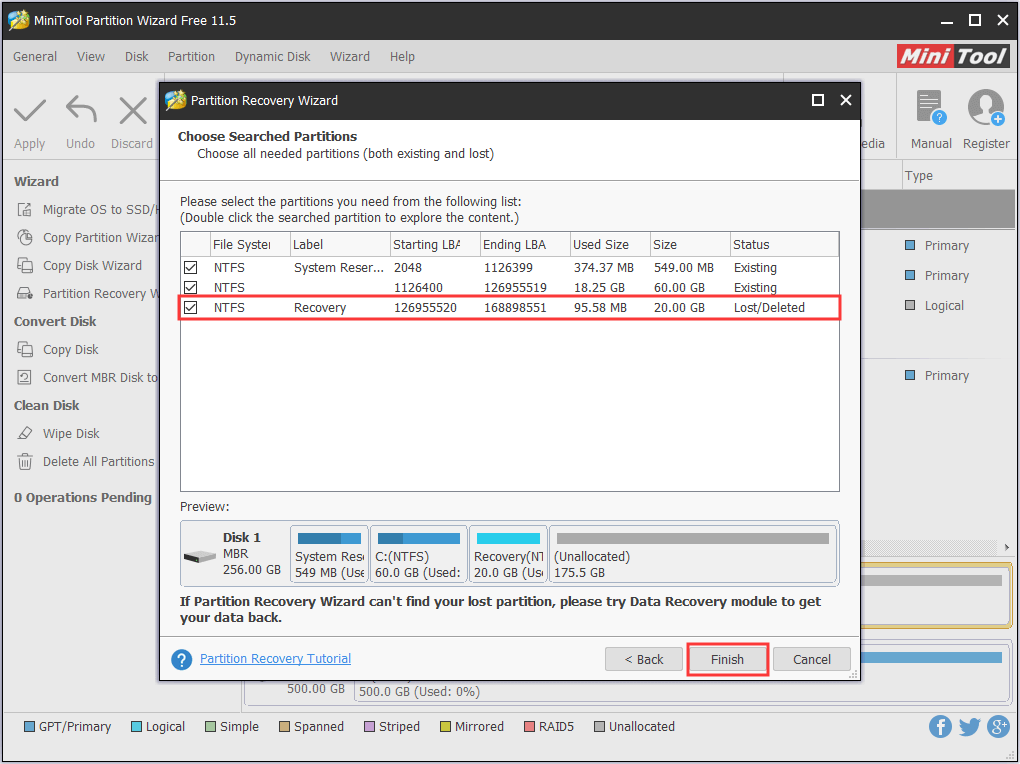
Step 6. Here comes to the scanning result page. Now you need to tick ALL partitions you need to do the recovery. Look! The recovery partition is successfully found by Partition Wizard. So here I just tick this partition along with the rest important ones. Then click “Finish” to go back to the main interface.
Step 7. Finally, hit the “Apply” button to start the recovery process (only the paid editions allow you to do so).
MiniTool Partition Wizard FreeClick to Download100%Clean & Safe
Related Article: HP Recovery Drive Full Windows 10/8/7? Here’re Full Solutions!?
Back up Recovery Partition Windows 10
Some users are quite indecisive on whether they need to delete the recovery partition or not. If they keep the recovery partition there, it seems that they will never have the chance to make use of it, and the disk space it occupies is wasted; if they just choose to delete it, they feel someday they need this partition to do Windows reset. In such case, it is wise to back up the recovery partition to another location before deleting recovery partition.
Well, how to back up recovery partition Windows 10?
MiniTool Partition Wizard offers an easy way to do partition backup. As long as you employ the “Copy Partition” feature, you can finish backing up recovery partition Windows 10 easily and quickly.
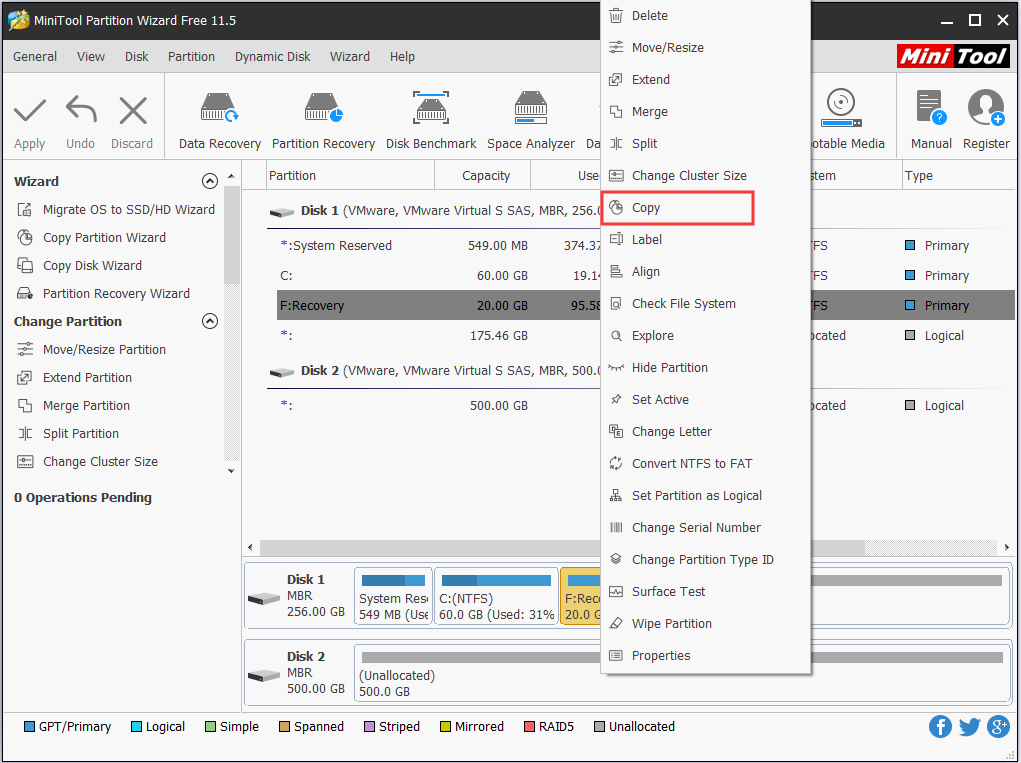
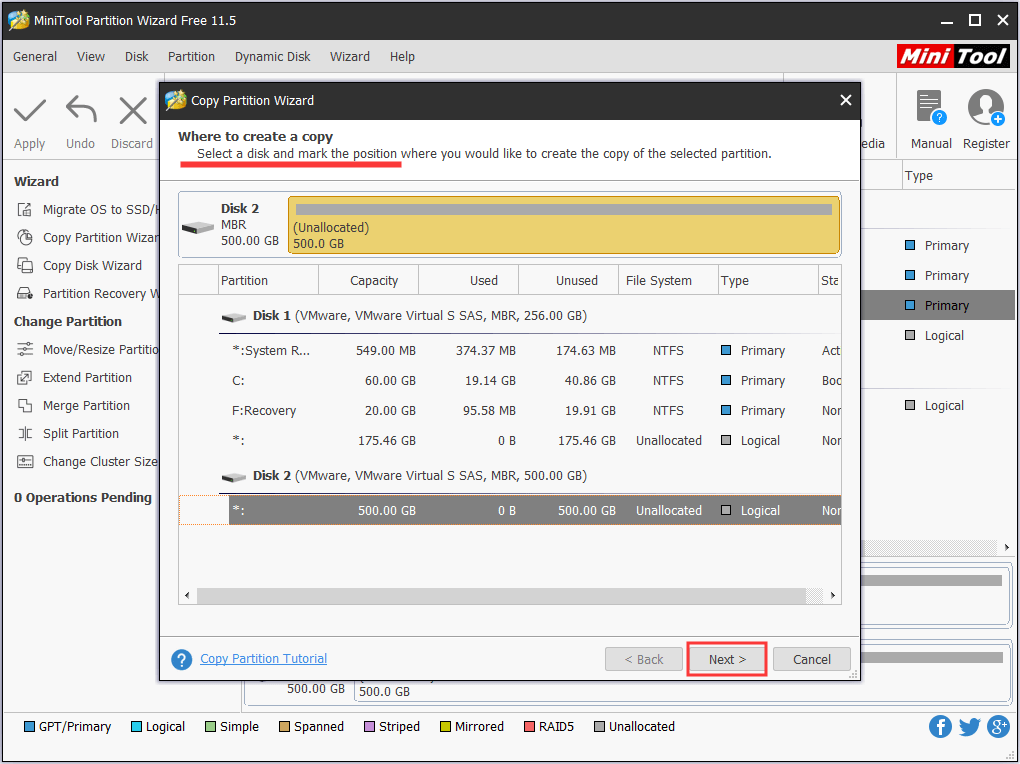
Step 1. On the main interface of MiniTool Partition Wizard, select the recovery partition to choose “Copy” from the Partition group.
Step 2. In the pop-up mini window, select unallocated space on another disk to hold the copy of the recovery partition. Then click “Next” to continue.
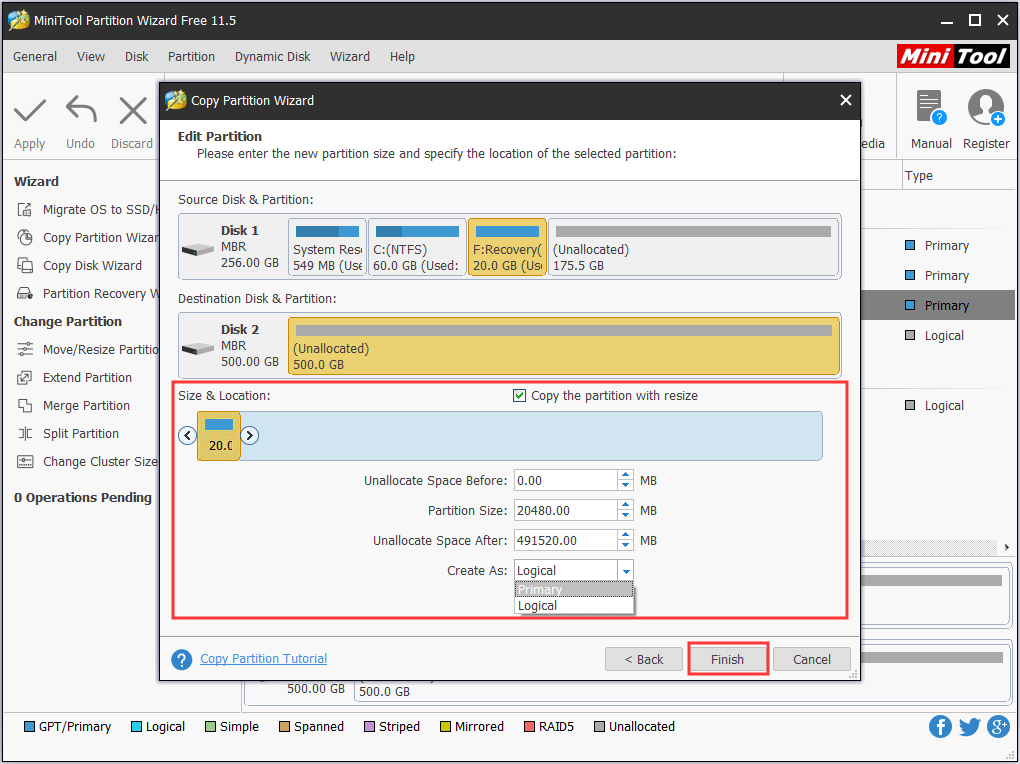
Step 3. Here you can edit the size of the new partition which will hold the copy of the recovery partition. Then click “Finish” to go back to the main interface.
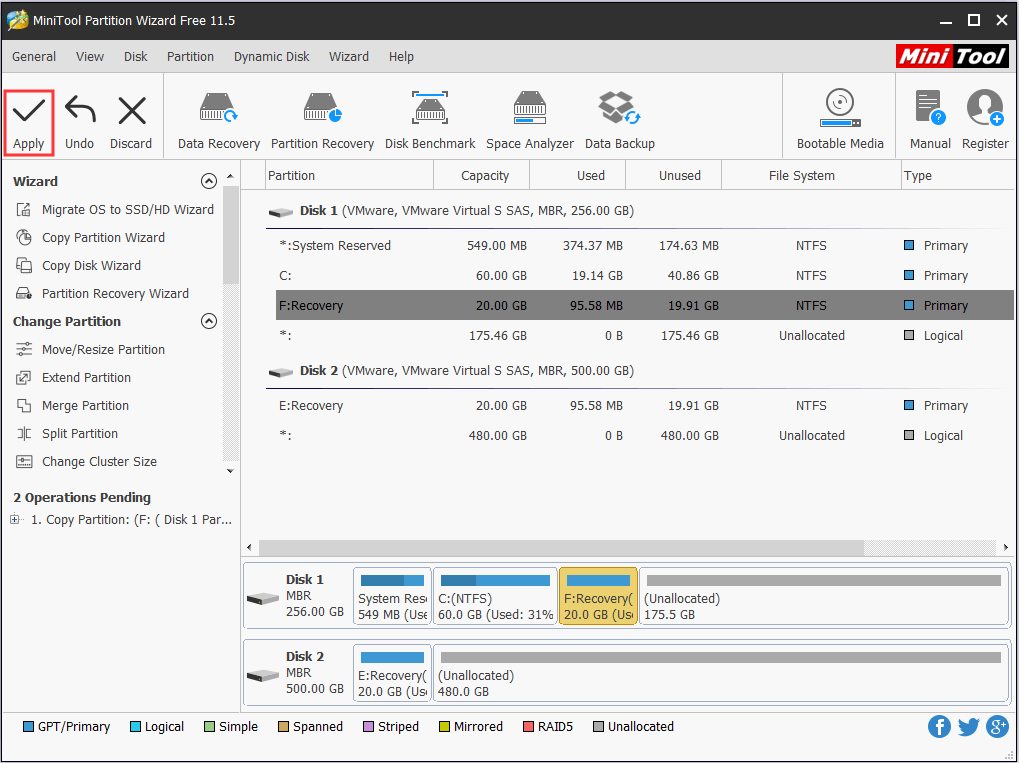
Step 4. Finally, click “Apply” to start the backup process.
Related Article: How to Clone Recovery Partition to External HDD?
Reading here, you can see MiniTool Partition Wizard is really of great help to deal with issues related to recovery partition. In fact, there are more features MiniTool Partition Wizard can offer, such as merge recovery Partition Windows 10 (paid edition), move recovery partition Windows 10, explore the content of recovery partition, and so on. Now grasp this freeware to help manage you recovery partition Windows 10.
“MiniTool Partition Wizard offers many features towards recovery partition management, such as explorer recovery partition, back up recovery partition, etc. So I recommend it to all you guys to save time and effort.”Click to Tweet
Restore Windows from Recovery Partition
If your computer isn’t running the way it should and keeps sending out error messages, or you just want to make a reset to its default state, then Windows 10 recovery partition plays an rather important role. How to factory reset a Windows 10 laptop? Well, the process of restoring windows 10 from recovery partition is rather easy. Just follow these steps:
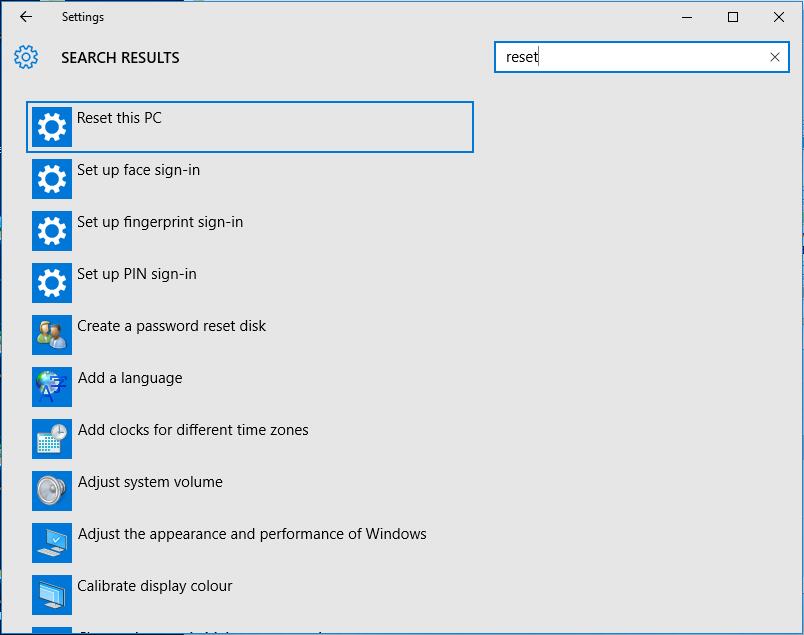
Step 1. Navigate to Windows 10 Start menu to choose “Settings”. Then in the pop-up new window, input “reset” to select “Reset this PC”.
Step 2. Under UPDATE & SECURITY -> Recovery, click “Get Started”.
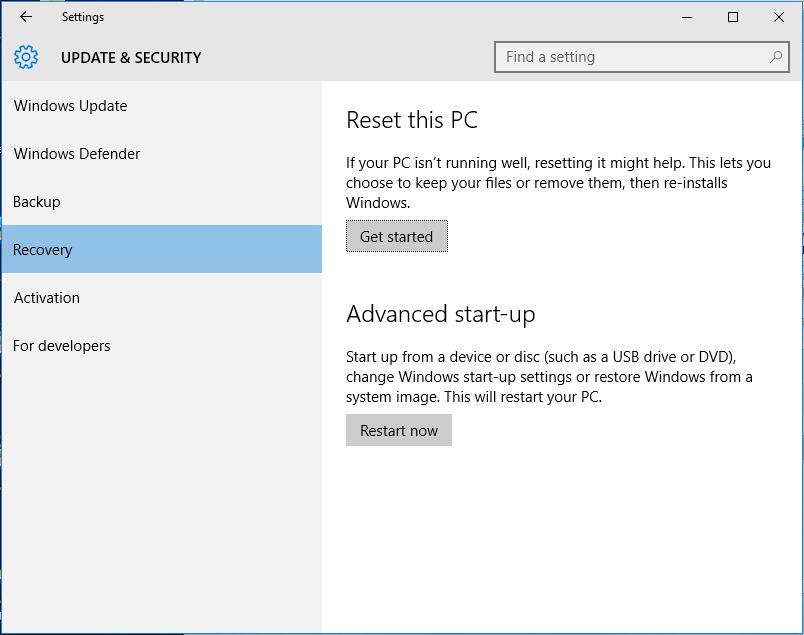
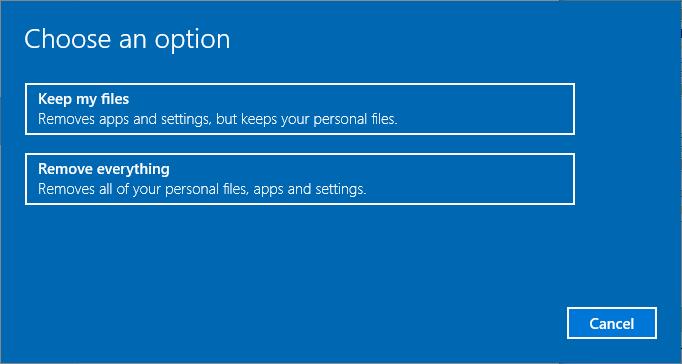
Step 3. Here you can choose how to carry out the recovery: to keep your files or to remove everything. Depending on your own needs, you should make your own decision. Then the reset process begins.
This is the end of how to restore Windows 10 from recovery partition. Rather easy right? But for Windows 8 and Windows 7, things are more complicated. You can refer to How to Factory Reset a Laptop – Windows 7 & 8 to get the detailed steps.
Summary
In this post, I mainly talk about what is recovery partition, how to create recovery partition, can a recovery partition be removed and how to delete it, how to back up recovery partition, etc. Hope these information are helpful. In addition, I strongly recommend using MiniTool Partition Wizard Free Edition to help you since it is free, reliable and easy to use.
If you have any question towards using this freeware, you can email us via [email protected] or leave us comment below. Thanks in advance!
Windows 10/11 is perhaps one of the best creations of the Microsoft Incorporation. However, it is still far from being flawless. As always, you will eventually encounter errors as you continue to use the operating system. Nevertheless, developers keep on creating ways for us to have a better user experience. One of the most useful features that they’ve developed is the Windows 10 recovery partition.
Despite that, there are many people who don’t know about it. What is a Windows 10 recovery partition? How does it work? How can I use it? Without the answers to these questions, it would be no more than a useless function. So today, we’re going to delve deeper into this topic.
Before We Discuss Windows 10/11 Recovery Partition:
After several years of writing programs for computers, we’ve created a powerful tool for everyone.
Here is a tip: Download FoneDog Data Recovery to retrieve a lost Windows 10/11 recovery partition. It can easily and safely recover your lost data from a Windows computer.
Data Recovery
Recover deleted image, document, audio and more files.
Get deleted data back from computer (including Recycle Bin) and hard drives.
Recover loss data caused by disk accident, operation system crushes and other reasons.
Free Download
Free Download

If you do not need to retrieve the recovery partition, read below to know more about Windows 10/11 recovery partition.
Part 1. An Overview of Windows 10/11 Recovery PartitionPart 2. How to Retrieve a Lost Windows 10/11 Recovery PartitionPart 3. How to Create a Windows 10/11 Recovery PartitionPart 4. How to Delete a Windows 10/11 Recovery PartitionPart 5. How to Reset Windows from Recovery PartitionPart 6. Wrapping Up
Part 1. An Overview of Windows 10/11 Recovery Partition
The first question a Windows user will have about Windows 10/11 recovery partition is its definition.
What is a Windows 10/11 Recovery Partition?
A recovery partition can be defined in many ways. Firstly, it not only helps us fix errors, but it also allows us to make our job easier by offering a quick and easy-to-follow way to restore our Windows 10.
So where does it come from?
When you buy a computer, you will often see an operating system already preinstalled. In the case of Windows 10/11, or even Windows 8, you will always notice that there’s a recovery partition stored in the system. Although it may not have a drive letter or any functions, in the beginning, you will find its uses in the future when the need arises.
Then what is a recovery partition?
What is a recovery partition? A recovery partition, regardless of whether it is from a Windows 8 or Windows 10/11 operating system, is a portion of your disk drive that is set aside by the manufacturer to hold an image of your system before it was shipped from the factory. Recovery partition contains the files of system backup image and files that guide system restoration.
What Is The Importance of Recovery Partitions?
Since it holds the configurations of the operating system from when it was manufactured, you can already assume that it can be used to factory reset your Windows OS. Thus, a Windows 10/11 recovery partition is often used when the user encounters an error and in the need of a factory reset.
Does Windows 10/11 need a recovery partition?
The Recovery Partition is an essential part of the installation of Windows system , it may be used to restore the operating system if issues are encountered. One of the main issues associated with the Recovery Partition on Windows was that it was often placed at the very beginning of the disk.
What Are The Types of Recovery Partitions?
It is important to remember that there are not one, but two types of recovery partitions. The first one is a Windows recovery partition, which is our main topic, while the second one is the OEM recovery partition. The Windows recovery partition contains the default settings of the manufacturer, while the OEM recovery partition contains the default settings of the supplier.
For this reason, the OEM recovery partition usually has a larger size than the Windows recovery partition. Since the manufacturer is more credible, using the Windows 10/11 recovery partition is more preferable. As previously mentioned, it doesn’t have any drive letter so it won’t easily get lost. So what if you lose it?
Due to its utmost importance, a Windows 10/11 recovery partition should always be used in case of emergencies. But in some cases, users somehow tend to lose them due to various reasons. Regardless of that reason, if this happens, your priority should be to retrieve that lost Windows recovery partition, which takes us to the next topic.
Part 2. How to Retrieve a Lost Windows 10/11 Recovery Partition
We’ve said over and over that a recovery partition is very important, and that’s exactly why you can’t just use a simple recovery tool to recover partition windows 10 once it is lost. There are security features that you will need to bypass. That is why we recommend using FoneDog Data Recovery to retrieve your lost Windows 10/11 recovery partition.
Data Recovery
Recover deleted image, document, audio and more files.
Get deleted data back from computer (including Recycle Bin) and hard drives.
Recover loss data caused by disk accident, operation system crushes and other reasons.
Free Download
Free Download
An Overview of FoneDog Data Recovery
FoneDog Data Recovery is a specialized software that can retrieve all sorts of files, including lost partitions, which is a pretty rare feature for a recovery tool. You can also retrieve partitions regardless of how it was lost, be it due to accidental deletion, formatting, improper cloning, virus attack, disk errors, and more. Lastly, you won’t have to worry about losing data as it specializes in accurate recovery.
FoneDog Data Recovery User Guide
Fortunately, despite its generous functions, you don’t have to go through a lot just to use it. You will only need your computer, nothing else, and just follow these simple steps:
- Launch the FoneDog Data Recovery tool after downloading and installing it.
Free Download
Free Download
The next window will show the different File Types you can recover and Drives you can recover from.
- Choose all the items under the File Types.
This is because you don’t know what kind of files Windows 10/11 recovery partition must-have.
- Check the WinRE_DRV under the Hard Disk Drives.
The WinRE_DRV stands for the Windows 10 recovery partition.
- Click on the Scan
Wait for the scanning process to finish. Once it does, you will see a list of files.
- Select all the files that were scanned.
- Click on the Recover
At this point, all you have to do is to wait for the process to complete. With this, you’ll be able to recover the Windows 10/11 recovery partition that you lost. Now, what if you don’t have anything to recover, but you need an extra Windows 10/11 recovery partition?
Part 3. How to Create a Windows 10/11 Recovery Partition
Recovery tools can only recover files that were lost. However, for files that are hidden, you have to find them yourself in order to use them. Unfortunately, Windows 10/11 recovery partitions tend to be hidden.
Although it may take up to a few GBs of your storage space, it would be worth it as long as you have a quick way to restore your PC to its best condition in case of an abnormality. Regardless, you will have to know how to create a Windows 10/11 recovery partition. However, remember that it won’t be as easy as creating a normal partition.
Recovery partitions are special cases and you will have to utilize utmost cautiousness.
- On your Windows 10/11, go to the Start menu by clicking on the icon located at the bottom-left corner of the screen or by pressing the Win key on your keyboard.
- Under the Settings tab, click on Create a recovery drive. If there’s a message that pops up, just click on Yes.
Remember that this will only show up on Windows 10/11 and not on other versions.
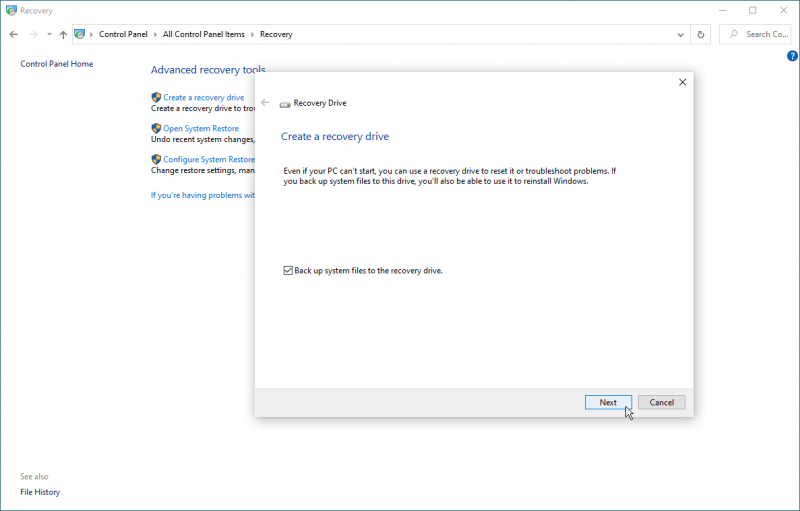
You should see a pop-up window at this point.
- Click on the checkbox for Back up system files to the recovery drive then click on the Next
- You will be asked to choose the drive where the partition should be stored. If you don’t have enough space, simply connect a USB drive to the PC then select that drive and click on Next.
- Click Create.
- Wait for the process to complete.
With that, you’ll be able to create as many Windows 10/11 recovery partitions as you want, as long as you have enough space. Now, what if your disk space is already full?
Part 4. How to Delete a Windows 10/11 Recovery Partition
When the time comes for you to delete some files to store new ones, you’ll ask yourself, “Can I delete Windows 10/11 recovery partition? Fortunately, the answer to that is a big YES. In addition to that, it is also fine to delete a Windows 10/11 recovery partition. There won’t be any severe damage to your system.
However, that is only assuming that you don’t plan on doing a factory reset for a while. Additionally, please note that this cannot be done by simple means. Nevertheless, Windows still has a way for you to delete Windows 10/11 recovery partitions without spending a dime. You just have to use the Command Prompt and follow these steps:
- Go to the Start menu of your Windows 10/11.
- Type in “Diskpart” on the search bar.
- Right-click on the first option that pops up and click on Run as administrator.
- Type in “list disk”. This will display all the disks installed on your Windows 10/11.
- Type in “select disk #”, replacing # with the number of the disk that contains the Windows 10/11 recovery partition.
- Type “list partition”, which should show you all the partitions on that disk.
- Type “select partition #” replacing # with the number assigned on the partition you want to delete.
- Type “delete partition”. This should delete the partition you selected.
- Type “exit” to close the window.
By following these steps, you will be able to delete any partition you like, even if it is not a recovery partition. Though in case you need the Windows 10/11 recovery partition, you should know how to use it before you delete it.
Part 5. How to Reset Windows from Recovery Partition
The main function of a recovery partition is to reset your Windows system. This can be due to various reasons, such as the appearance of errors or abnormalities. Either way, a recovery partition plays an important role in keeping your system safe. Regardless, it would be pointless if you don’t know how to use it.
And so, here are the steps you need to follow to reset windows from a recovery partition:
- Go to the Start menu and click on Settings.
- On the pop-up window, type in “reset” and select on the option that says “Reset this PC”.
You will be taken to another window.
- Under the Update & Security, click on the Recovery
- Here you can select which type of recovery you want to execute, whether it’s a simple Reset or an Advanced Reset.
Compared to deleting or creating a Windows 10/11 recovery partition, using it is actually easier. This might also be because deleting or creating a recovery partition can lead to significant changes in your system. This is the main reason why it is more difficult to accomplish.
Either way, now that you know how to create, delete or use Windows 10/11 recovery partition, you should be able to solve any errors that will occur to your device.
Data Recovery
Recover deleted image, document, audio and more files.
Get deleted data back from computer (including Recycle Bin) and hard drives.
Recover loss data caused by disk accident, operation system crushes and other reasons.
Free Download
Free Download
Part 6. Wrapping Up
No matter how amazing a system is, there will always be a flaw. For Windows products, one of the most common flaws is the occurrence of errors. But the important thing is that there is a way to solve these issues.
One of the most helpful features that were introduced to us is the development of Windows 10/11 recovery partitions. It allows you to recover your Windows system, on top of solving your errors for you. The bottom line is, you don’t have to worry about encountering some major errors, but at the same time, you should always be prepared for them.
In this article, we will give a complete guide on what a recovery partition is and how you can create one. We will also discuss how to delete a recovery partition as well as recover an accidentally deleted recovery partition.
This is the complete Windows 10 recovery partition guide that you have been waiting for.
What Is A Recovery Partition And Why Is It Required?
Recovery partition in simple words is that portion of the disk drive on your PC that holds the factory settings of the OS (or Windows 10 in this case).
So, if your computer undergoes some kind of system failure, then you will be able to factory reset your computer directly.
How To Create A Windows 10 Recovery Partition?
Now that you understand how useful recovery partitions are, here is how you can create one.
To create a recovery partition in Windows 10, follow the steps given below:
- Type Create a recovery drive in the Windows search bar and open the appropriate option.
- Click on Yes if any dialogue appears on your screen.
The Recovery Drive will now open on your screen. - Make sure that the Back up system files to the recovery drive box is checked and then click on the Next option.
- Now, connect a USB drive and then click on the Next option.
- Select the Create option to create the recovery drive.
Some Other Things You Need To Know About Recovery Partitions
1) Restoring Recovery Partition
If you are facing any problems related to your OS or if your OS has become corrupted and you are in urgent need to restore your PC, then you can do so using the recovery partition.
To use the recovery partition for restoring your PC, follow the steps given below:
- First, connect the recovery drive that you have created to your PC and restart the computer.
The Choose an Option panel should be up on your screen when the PC boots. - Click on the Troubleshoot option and then click on the Recover from a drive option.
Now, follow the instructions on your screen and wait until the system gets completely restored.
You can also recover the deleted operating system using the recovery partition.
2) Deleting A Recovery Partition
You are probably wondering now that how you can delete a recovery partition now that you have created it. To delete a recovery partition, follow the steps given below:
- Open the Run utility by pressing the Windows + R keys on your keyboard.
- Type cmd and press the Ctrl + Shift + Enter keys to open an elevated Command Prompt.
- Type diskpart and press Enter.
- Next, type list disk and again press Enter.
A list of disks will appear on the Command Prompt.
Note down the number of the disk with the recovery partition. - Now, type select disk # (Note: # is the number of the recovery partition disk) and press Enter.
- Type list partition and again press Enter.
The list of partitions of the disk will be displayed on your screen.
Note the number of the recovery partition. - Type select partition # (Note: # is the number of the recovery partition) and again press Enter.
- Finally, type delete partition override and press Enter.
Close the Command Prompt and check if the partition has been deleted.
Wrapping Up
So, we have come to the end of this article and now you have gotten an idea about Windows 10 recovery partition from this guide. As always, feel free to share your thoughts on this article in the comment section below.