
What’s the best way to restart a Windows Service remotely from our central domain server?
— Sylvia W.
Hi Sylvia.
We know of at least five ways to restart a Windows Service on a remote machine. Let’s review each method, focusing on the pros and cons to help you select the approach that best fits your situation.
Note: If any of the methods fail with security related errors (such as “access denied”), you may need to update security settings on the remote machine.
Method #1: Use the Services application to connect to the remote PC
Did you know that the Services application works with remote computers? For some reason, Microsoft buried that feature in the interface, making it very easy to miss!
To view services on another computer:
-
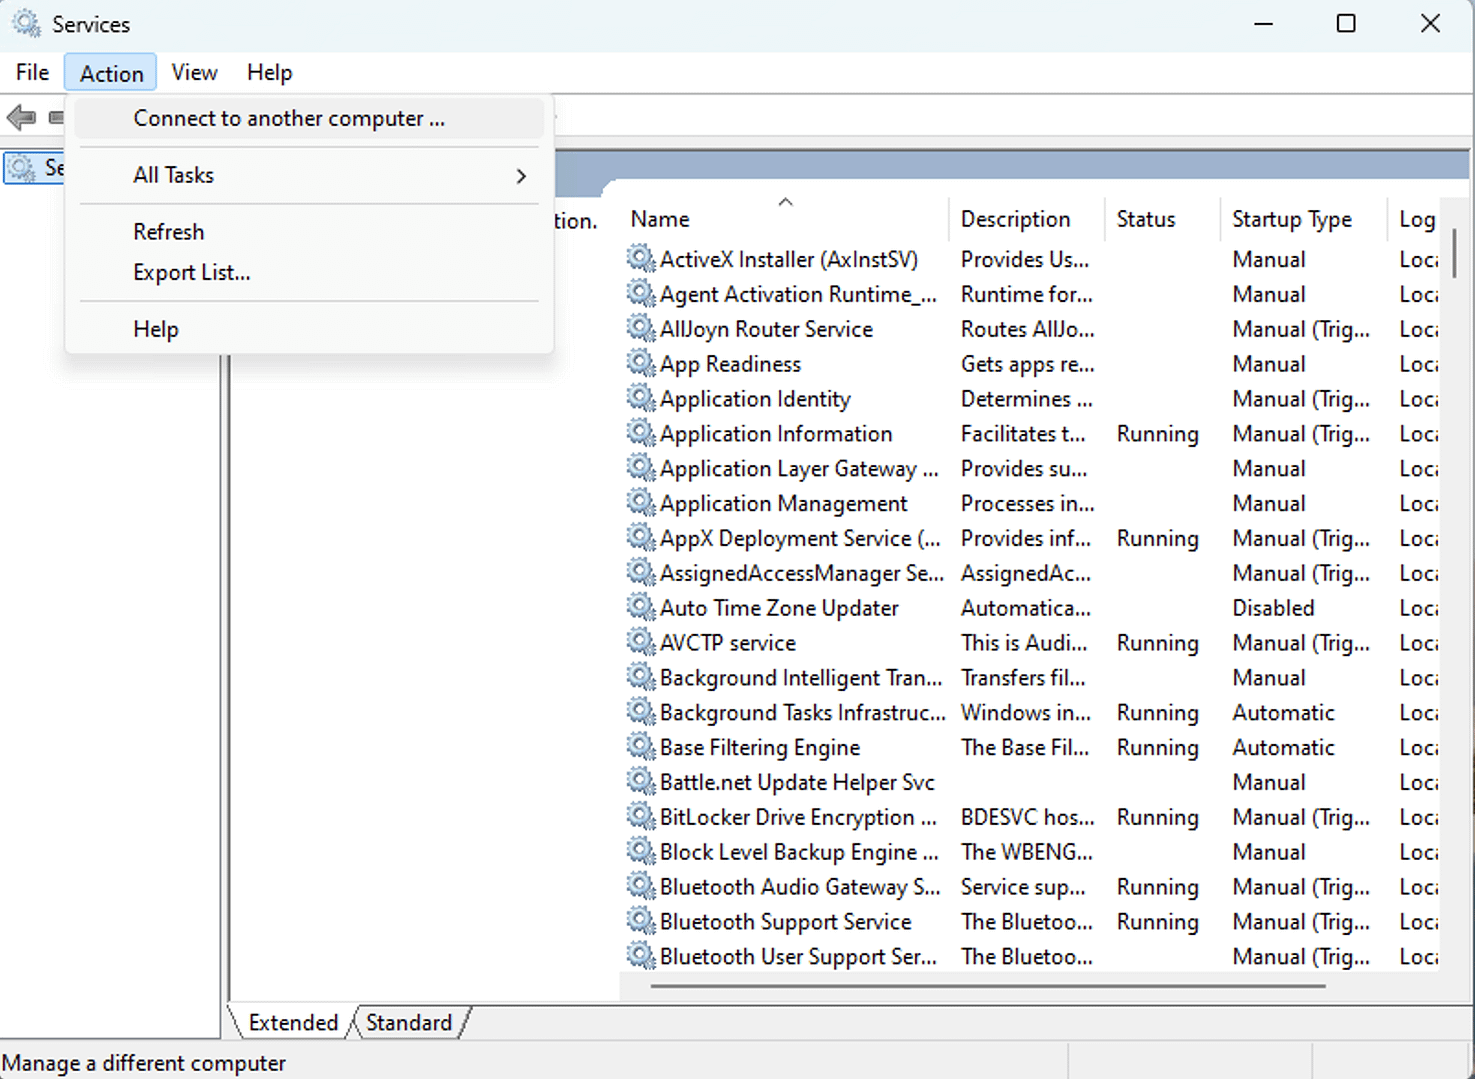
Start the Services application
-
In the left panel, right-click Services (Local) and select Connect to another computer from the menu:
")
-
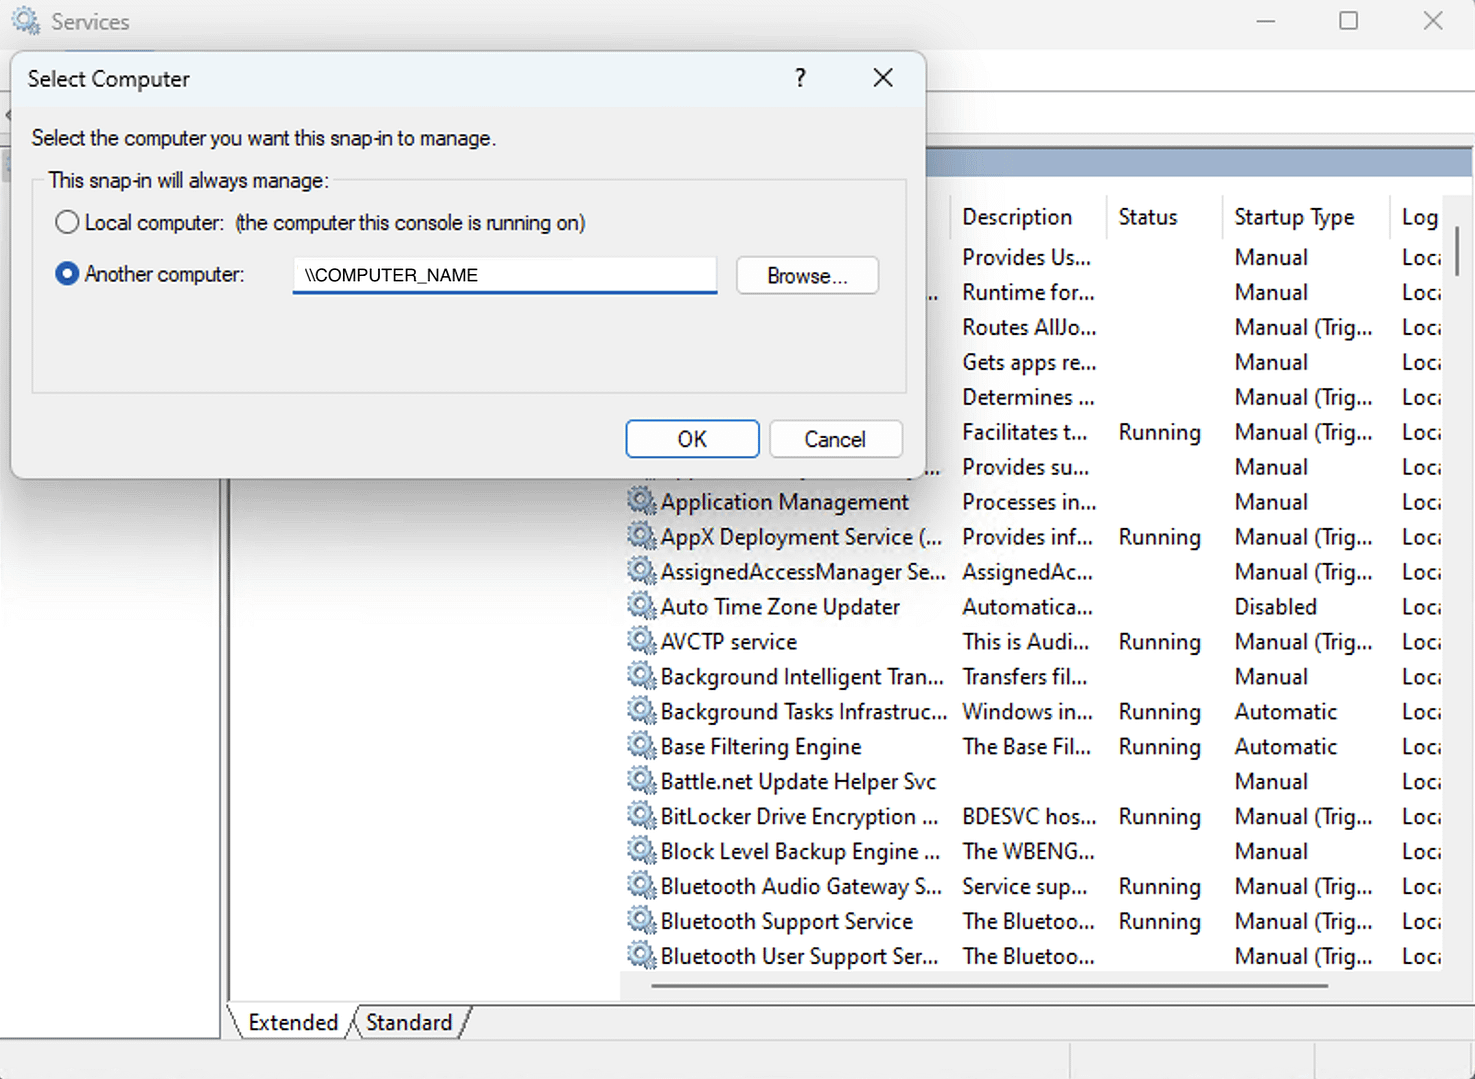
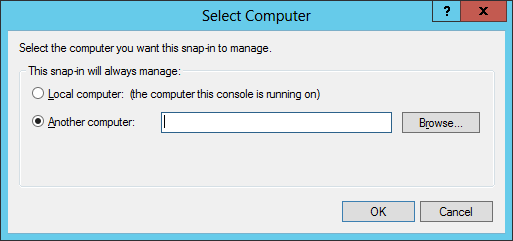
In the Select Computer window, specify the computer hosting your Windows Service:
")
-
Click OK to access the remote PC
-
The Services application should refresh to list the services on your other computer. From there, you can start or stop any service you like:
")
")
")
If that didn’t work, you may need to update your security settings.
Pros
-
Services is a standard utility that is available on every Windows computer.
-
Services is very easy to use.
-
Besides starting or stopping the service, you can also update the service’s properties. For example, you can disable the service, setup failure actions or change the log on account.
Cons
-
Working with Services is interactive. You (or your tech) must log in, start Services, connect to the remote PC and start the service. You can’t call Services from a batch file. As a result, this approach is not suitable for non-interactive situations.
Method #2: Run SC with the “server” command line parameter
If you’re comfortable working from the command prompt, the SC utility should be in your toolbox.
To stop a Windows Service on another machine, run:
SC \\<SERVER-NAME> STOP <SERVICE-NAME>
For example, to stop the Spooler service on our file server (named “ctc-file-server”), we run:
SC \\ctc-file-server STOP Spooler
Be sure to run SC from an elevated command prompt — run as an administrator. If not, the command could fail because of insufficient permissions.
Pros
-
SC is a standard utility that is available on every Windows computer.
-
With SC, you can easily start or stop a service.
-
You can call SC from a batch file, which makes it suitable for non-interactive scenarios.
-
SC can do much more than start or stop a service. You can use it to change a service’s properties as well. In fact, it supports many more settings than the Services application does. Run SC /? to see the full set of options available.
Cons
-
When starting or stopping a service, SC simply makes a request and exits. It will not wait for the service to transition to the desired state. Unfortunately, that behavior can cause complications in batch files. For example, if you call “SC STOP” immediately followed by “SC START”, the start command will fail if the service takes a few seconds to stop.
Method #3: Install and run Microsoft’s PsService
If you’re familiar with the amazing (and free) tools from Microsoft’s SysInternals group, you should definitely check out their PsService utility.
Like SC, PsService allows you to start, stop or restart your service from the command line. And importantly, PsService works with remote computers.
In fact, PsService offers a rich set of command line options. Run PsService /? to see them:
")
Look closely and you’ll see that PsService offers one important capability that neither SC nor Services does — the ability to specify the account to use on the remote computer. That feature comes in handy if your account doesn’t have enough rights or if you want to use a specific account to control the service.
For example, to start the Spooler service on our “ctc-file-server” computer, we run:
PsService \\ctc-file-server start Spooler
Pros
-
PsService is safe, free, reliable and endorsed by Microsoft.
-
With PsService, you can easily start or stop a service.
-
You can call PsService from a batch file, which makes it suitable for non-interactive scenarios.
-
With PsService, you can specify the username and password of an administrative account on the remote PC. As a result, your account doesn’t need to have administrative rights on the remote computer.
Cons
-
PsService does not come pre-installed on your computer. You will have to download and install/unzip the PSTools suite to use PsService. This may be an issue if you are operating in a “locked down” environment where adding new software is difficult.
-
When starting or stopping a service, PsService simply makes a request and exits. It will not wait for the service to transition to the desired state. Unfortunately, that behavior can cause complications in batch files. For example, if you call “PsService stop” immediately followed by “PsService start”, the start command will fail if the service takes a few seconds to stop.
Method #4: Use Microsoft’s PsExec to run NET
PsExec is another powerful tool in the SysInternals arsenal. It allows you to run arbitrary commands on a remote computer.
Running the NET command with PsExec produces a command that will start or stop your service and wait for it to complete. That may be an important improvement over SC and PsService, which simply put in a request and exit.
For example, this command stops the Spooler service on our “ctc-file-server” computer:
PsExec \\ctc-file-server NET STOP SPOOLER
Pros
-
PsExec is safe, free, reliable and endorsed by Microsoft.
-
With PsExec and NET, you can easily start or stop a service.
-
You can call PsExec from a batch file, which makes it suitable for non-interactive scenarios.
-
With PsExec, you can specify the username and password of an administrative account on the remote PC. As a result, your account doesn’t need to have administrative rights on the remote computer.
-
PsExec with NET will wait for your service to start or stop before returning.
Cons
-
PsExec does not come pre-installed on your computer. You will have to download and install/unzip the PSTools suite to use PsExec. This may be an issue if you are operating in a “locked down” environment where adding new software is difficult.
-
NET waits up to 30 seconds for the service to start or stop. That may not be enough time for a service that takes a long time to transition.
Method #5: Use PsExec to run ServicePilot
If your service takes a while to start or stop, you may want to use our free ServicePilot utility instead of NET. With ServicePilot, you are not limited to a 30-second timeout.
ServicePilot is better than NET in other ways too. For example, ServicePilot can restart a service in one operation (instead of issuing a stop followed by a start) or forcibly terminate a misbehaving service.
This command uses ServicePilot to start the Spooler service on our “ctc-file-server” computer:
PsExec \\ctc-file-server C:\Apps\ServicePilot.exe -start Spooler
Note that the command above assumes that the ServicePilot executable is available on the remote machine. If that is not the case and you only have ServicePilot on the local machine, you must instruct PsExec to copy the executable to the remote PC by specifying the -c parameter. Here is what that command looks like:
PsExec \\ctc-file-server -c «C:\Apps\ServicePilot.exe» ServicePilot.exe -start Spooler
Even though it’s less efficient, having PsExec copy the executable each time might be the better option for occasional (and unplanned) use cases.
Pros
-
ServicePilot is safe and free.
-
With PsExec and ServicePilot, you can easily start or stop a service.
-
You can call PsExec from a batch file, which makes it suitable for non-interactive scenarios.
-
With PsExec, you can specify the username and password of an administrative account on the remote PC. As a result, your account doesn’t need to have administrative rights on the remote computer.
-
PsExec with ServicePilot will wait for your service to start or stop before returning.
Cons
-
Neither PsExec nor ServicePilot come pre-installed on your computer. You will have to download them. This may be an issue if you are operating in a “locked down” environment where adding new software is difficult.
That’s it. Hopefully one of these five methods works for you.
Appendix: Update security settings to access your remote service
Windows does a great job of locking down services. As such, you may have to relax the rules if you want to start or stop a service remotely.
Ensure that your account has sufficient rights on the remote machine
Are you sure that your Windows account can update the service?
Can you log in to the remote machine and start or stop the service?
If not, you’re probably missing permissions. You may have to:
-
Make your account an administrator on the remote computer. By default, only administrators can manipulate Windows Services.
-
Give your account permission to access the service. Log in to the remote computer and use our free Service Security Editor utility to adjust the service’s permissions:
Disable UAC remote restrictions
If you are not in a domain, your requests may be blocked by User Account Control (UAC) remote restrictions. Essentially, to enforce the principle of least privilege, Windows may not respect your administrative rights on the remote computer.
But there is a simple fix. You can disable UAC remote restrictions by updating the registry as follows:
-
Open the Windows Registry Editor (regedit)
-
Navigate to this key:
HKEY_LOCAL_MACHINE\SOFTWARE\Microsoft\Windows\CurrentVersion\Policies\System
-
Look on the right side. If there is no value named LocalAccountTokenFilterPolicy, create it by selecting Edit > New > DWORD (32-Bit) Value and naming it.
-
On the right side, right-click LocalAccountTokenFilterPolicy and select Modify. Enter a value of 1:
-
Click OK to save your changes.
-
Close Registry Editor
")
")
You may also like…
This guide demonstrates how to start & stop Windows service remotely, which will allow you to configure Windows services across multiple devices with PowerShell, the Windows Services Manager, or by remote desktop. Furthermore, we explore why it’s important to deploy tools for managing Windows services for secure remote management in an enterprise environment.
About Remote Windows Services Management
Windows services are programs that run in the background and don’t require your input. They do not have an application window or icon on the taskbar, so they’re mostly hidden from view. Their purpose is to provide system functionality from the point your computer starts up, including things like sound and networking that are built into the Windows operating system, and software you install yourself like antivirus and VPNs.
Windows services can be managed remotely, allowing you to start and stop service over a network connection. This is useful in enterprise and corporate scenarios for IT administration (for example, to start a VPN service on a remote machine after it has been installed), but also useful for home users with multiple Windows devices they want to keep control over.
There are several built-in ways to start/stop Windows services remotely, including using PowerShell, the Windows Management Instrumentation (WMI) interface, and remote desktop.
How to find a Windows service name
To start or stop a Windows service you need to know its name. This can be found in Windows Services Management by following these steps:
- Right-click on the Start menu.
- Click Run.
- Type services.msc and hit enter to launch Windows Services Manager.
- All configured services will be listed. This also works when using the remote Windows Management Instrumentation (WMI) steps shown below.
If you are working in PowerShell, you can run the following command to list all services using the Get-Service cmdlet:
Get-Service | Sort-Object Name
Note that the service name may be different from its display name.
How to start and stop Windows service remotely using PowerShell
The most efficient way to start or stop a Windows service remotely is using PowerShell. Before you can do this, you need to enable remote management on the remote computer by running the following command:
Enable-PSRemoting -Force
This executes the Enable-PSRemoting cmdlet with the -Force option, so it will not prompt for confirmation.
Note that it is vital that you read and understand PowerShell commands before running them, so that you do not accidentally perform an action that may damage your system.
On non-server versions of Windows, the Enable-PSRemoting command will automatically create a Windows Firewall rule allowing remote management. To enable this rule, run the following PowerShell command on the remote computer:
Enable-NetFirewallRule -Name “WINRM-HTTP-In-TCP-Public”
Finally, prompt for credentials and run the Start-Service cmdlet remotely to start a service:
$credentials = Get-Credential
Invoke-Command -ComputerName “COMPUTER_NAME” -ScriptBlock {
Start-Service -Name “SERVICE_NAME”
} -Credential $credentials
In the above command, you will need to replace:
- COMPUTER_NAME with the network name of the remote computer you want to start the service on.
- SERVICE_NAME with the name of the service you want to start.
If you want to stop a service, replace the Start-Service cmdlet with Stop-Service
$credentials = Get-Credential
Invoke-Command -ComputerName “COMPUTER_NAME” -ScriptBlock {
Stop-Service -Name “SERVICE_NAME”
} -Credential $credentials
In both of the above start/stop examples, the Get-Credential cmdlet is used to prompt the user for the username and password for the remote machine.
Then, Invoke-Command is called to send a block of code (using the -Scriptblock parameter, and the code surrounded by curly braces) containing the Stop- or Start-Service cmdlet, along with the previously stored $credentials.
How to start or stop a service on multiple Windows PCs
The above PowerShell commands can be adapted to run on multiple remote Windows machines simultaneously, allowing you to start and stop services on all of them with a single command:
$computers = “COMPUTER_NAME_1”, “COMPUTER_NAME_2”, “COMPUTER_NAME_3”
$credentials = Get-Credential
Invoke-Command -ComputerName $computers -ScriptBlock {
Stop-Service -Name “SERVICE_NAME”
} -Credential $credentials
Above, a list of remote computers’ network names have been listed in the $computers variable. This variable is then passed to the -ComputerName parameter in Invoke-Command (rather than passing a single computer’s name in the previous examples). The command will be sent to all of those computers and executed. This does, however, depend on the provided user credentials matching on all the listed machines.
How to start and stop Windows service remotely using Windows Management Instrumentation (WMI)
The Windows Service Management console used to find the names of services, mentioned earlier in this article, can also be used to remotely manage Windows services.
To do this, click on Action in the menu bar, and then Connect to another computer…
You will then be prompted to enter the network name of the remote computer to connect. Windows Management Instrumentation (WMI) allows you to use Windows Services Management to control the services on the remote machine, as if you had run services.msc on that machine itself.
Once connected, you can view the list of services and can right-click on them to stop or start them.
Using Remote Desktop Protocol (RDP) for remote IT administration
Windows contains built-in remote desktop functionality. When using this, you have a full view of the remote computer’s desktop, with full control over the keyboard and mouse, just as if you were sitting in front of it.
This allows you to use all the local service management tools, including the Windows Services Manager console and PowerShell.
To connect to a Windows computer using Remote Desktop, follow our guide here.
Use cases for remotely managing Windows services
There are several common scenarios for managing Windows services remotely:
- Managing Windows services on small networks: Small office and home networks can be administered with simple tools. Using remote desktop to perform system maintenance tasks is not unusual in this environment, though it is inefficient if you manage multiple small networks.
- Managing Windows services on medium-sized networks: On medium-sized networks, using WMI tools and the tools provided by Windows domain controllers can streamline IT operations and make managing remote machines, including running services, more efficient.
- Managing Windows services remotely on enterprise-scale networks: In education and large-scale business networks, especially those where users may bring their own devices (BYOD) or work remotely via VPN, maintaining the security and usability of Windows devices can be a challenge. Remote Monitoring and Maintenance (RMM) can assist by providing a unified and automated management platform for all of your devices in an end-to-end solution.
Which method you use will probably depend on whether this is a once off task, or whether you will be regularly starting and stopping Windows services on multiple computers.
Scripting and automation play a key role in efficiently managing fleets of Windows devices. For example, if you are constantly restarting services on remote machines, you can use the PowerShell command shown in the above example in a script that runs periodically.
Remote windows management
In mission-critical environments, the best solution for ensuring that remote services are running correctly is to use a remote monitoring and management solution. NinjaOne RMM gives your IT team full visibility over your entire IT infrastructure, including what services are running on each machine, and can alert you of any programs that may be making computers run slowly.
Integration with antivirus and firewall solutions means that if a user installs a service that acts suspiciously, you can be alerted and take proactive measures to isolate and deal with the problem before it affects your business operations.
You may need to manage a Windows service or a process on a remote computer if you are a sysadmin. One of the common remote tasks is restarting a service, a process, or the computer itself.
A remote computer may be at another location, on the cloud, or simply in another room. It is convenient to manage it remotely rather than physically accessing it.
There are a bunch of methods that can be used to manage Windows processes or services remotely, as long as the remote computer is on the same network as yours, or joined to the same domain. These include both command-line methods and GUI-based consoles.
Today, we will be showing you how to manage a Windows process or a service on a remote computer using both Windows-native and aftermarket tools.
Table of Contents
Table of Contents
List, Kill, Start, or Restart Windows Processes and Services Remotely
Just like on your local PC, you can view all the processes running on a remote computer, kill a process, start a process/task, or even restart a service. Most of the method shared in this post are performed through the Windows Command Line Interface (CLI), which include both the Command Prompt and PowerShell.
The tasklist cmdlet can be used with parameters to view the processes and tasks running on a remote PC. Similarly, the PsList.exe tool, which is a part of Sysinternals PsTool, also lists the same information as tasklist.
Alternatively, you can also use the two aforementioned tools in combination to view and list the processes on a remote computer; where the PsExec tool is used to connect to the remote computer’s Command Prompt, and then other command-line tools can be used to list the processes, like tasklist, Get-Process, etc.
Likewise, you can control and manage the different Windows services of a remote computer. This can be done through the command line as well as the Services console.
Before we get into the details of using these tools to manage remote services and processes, there are a few conditions that the remote computer should meet:
- The remote PC must be on the same network as yours, or the same domain.
- You need to use an administrative computer account to manage the remote computer’s services and processes, complete with a username and password.
- Remote connection should be allowed through the firewall, or the firewall must be turned off (not recommended).
- The User Access Control (UAC) Remote Restrictions must be turned off.
If these conditions are not met, you will not be able to use many of the tools discussed above to manage processes and services on a remote PC.
Allow Remote Connection through Windows Firewall
Use the following steps to allow remote connection through the firewall, if not already enabled:
-
Open the Windows Firewall applet by typing in “firewall.cpl” in the Run Command box.
Open the Windows Firewall applet -
Click “Allow an app or feature through Windows Defender Firewall” on the left.

Allow app or feature through the Firewall -
Click “Change settings.”
Change firewall settings -
Scroll down and allow “Remote Desktop” through the available network profiles, and then click “Ok.”
Allow remote desktop through Windows Firewall


These steps will allow you to use the command-line and GUI-based tools to connect remotely to the other computer. Now, you must also disable the UAC Remote Restrictions on the remote computer.
Disable UAC Remote Restrictions
The UAC Remote Restrictions can be removed both remotely and physically on the computer as well. Below are the steps used to disable the feature and allow a remote connection if you are physically preset on the PC. Note that this method involves manual changes to the Windows Registry.
Note: To enable the remote desktop connection remotely, refer to this guide.
Note: Misconfiguration of critical values in the system’s registry could be fatal for your operating system. Therefore, we insist that you create a system restore point before proceeding forward with the process.
You can also use our top selection of disk imaging and backup software so you never lose your data or operating system again.
-
Open the Registry Editor by typing in “regedit” in the Run Command box.
Open the Registry Editor -
Paste the following in the navigation bar for quick navigation:
Computer\HKEY_LOCAL_MACHINE\SOFTWARE\Microsoft\Windows\CurrentVersion\Policies\System

Navigate to the System key -
Right-click the System key, expand New, and click “DWORD (32-bit Value).” Name the DWORD “LocalAccountTokenFilterPolicy.”
Create the DWORD LocalAccountTokenFilterPolicy -
Set the “LocalAccountTokenFilterPolicy” Value Data to “1.”
Set LocalAccountTokenFilterPilicy Value Data to 1 -
Close the Registry Editor.


You are now set to use different tools to manage Windows services and processes remotely.
List, View all Processes on Remote Computer
List all Processes Remotely using Tasklist
Tasklist is a command-line tool you can use to view the details of the processes running on the remote computer. This lists different information regarding the processes, such as their Process ID (PID), memory usage, etc.
Note that if you use the method below first when the remote connection is not allowed through Windows Firewall or the UAC Remote Restrictions are still enabled, you will see the following error message:
ERROR: The user name or password is incorrect
To avoid this error, we suggest that you first use the steps given above to allow RDC through the firewall and disable UAC Remote Restrictions, then continue to use the steps below:
-
Launch an elevated Command Prompt.
-
Use the following syntax to obtain information on the processes running on the remote PC:
Replace [ComputerName] with the name of the remote computer, [Username] with an administrative user account on the remote PC, and [Password] with the correct password for the associated username.
tasklist.exe /S [ComputerName] /U [Username] /P [Password]
View all process list remotely using Tasklist

As you can see in the image above, all running tasks on the remote computer are now listed inside the Command Prompt.
Query Processes Remotely using PsList
As mentioned earlier, PsList is part of the PsTools utility by SysInternals. This can also be used to display a list of processes running on the remote computer. It gives more detailed information about a process when compared to the tasklist method, such as the time the process has been running, the number of threads and handles, etc.
-
Start by downloading the PsTools.

Download PsTools -
Extract the contents of the PsTool file.

Extract PsTools -
Now launch an elevated Command Prompt and then use the
CDcmdlet to change your directory to the extract PsTools folders.CD [PathToPsTools]
Change directory to PsTools folder -
Now use the following cmdlet to list all the running processes on the remote computer while replacing [ComputerName] with the name of the remote PC:
PsList \\[ComputerName]
View all processes list remotely using PsList


Alternatively, you can also use the “-t” switch in the following syntax to show the process tree instruction:
PsList \\[ComputerName] -t
List all Processes Remotely using Get-Process (PowerShell)
The Get-Process is a PowerShell cmdlet that lists all the running processes as well as their relevant information, like PID, handles, etc. It can be used alone to obtain a list of processes and tasks on the local computer, or together with switching to obtain a list of processes running on a remote computer.
-
Launch an elevated PowerShell instance.
-
Use the following cmdlet while replacing [ComputerName] with the name of the remote PC:
Get-Process -ComputerName [ComputerName]
Query all processes on a remote computer using Get-Process (PowerShell)

Other methods to View All Processes Remotely
You can also use other methods to obtain a list of processes on a remote computer. For instance, you can connect to a remote computer’s Command Prompt using the PsExec tool and run cmdlets that list the local process details. This includes the Tasklist cmdlet, as well as others, like WMIC.
Here are the steps to connect to the remote computer’s Command Prompt:
-
Start by downloading the PsTools.
Download PsTools -
Extract the contents of the PsTool file.
Extract PsTools -
Now launch an elevated Command Prompt and then use the
CDcmdlet to change your directory to the extract PsTools folders.CD [PathToPsTools]
Change directory to PsTools folder -
Now use the following cmdlet to connect to the remote computer’s Command Prompt while replacing [ComputerName] with the name of the remote PC:
PsExec \\[ComputerName] CMD
Connect to remote computer’s Command Prompt As you will observe, your directory will now change. This means that the computer has successfully connected to the remote computer’s Command Prompt.

Now that you have successfully established a remote cmd connection, you can use any of the following cmdlets to list the processes and their details:
Tasklist
WMIC Process
These are all the methods to view and list all the processes on a remote computer. Let us now see how to kill a process.
How to Kill a Process Remotely
The methods shared below to kill a process require the name or PID of a process that you want to kill, which can be done using the methods listed above to list/query the processes on a remote computer.
Kill Process Remotely using Taskkill
Like Tasklist, the Taskkill tool is a Windows-native command-line tool that can be used to kill tasks and processes on a remote computer. To kill a process on a remote computer, use the following steps:
-
Launch an elevated Command Prompt.
-
Now use either of the following commands to kill a process remotely using its PID or process name.
Remember to replace [ComputerName] with the name of the remote PC, [Processname] with the name of the process, and [PID] with the process ID that you want to kill.
Taskkill /s [ComputerName] /IM [ProcessName]
Taskkill /s [ComputerName] /PID [PID]
Kill process remotely using Taskkill -
Now enter the password for the user account.
Provide the password The process will now be terminated successfully.


Kill Process Remotely using PsKill
PsKill comes with the SysInternals PsTool suite. It can also be used to kill a process on a remote computer. Here is how:
-
Start by downloading the PsTools.
Download PsTools -
Extract the contents of the PsTool file.
Extract PsTools -
Now launch an elevated Command Prompt and then use the
CDcmdlet to change your directory to the extract PsTools folders.CD [PathToPsTools]
Change directory to PsTools folder -
Now use the following cmdlet to kill a process using its name or PID:
Replace [ComputerName] with the name of the remote PC, [Username] with the user account to connect with, [Password] with the password of the associated username, and [ProcessNameOrID] with either the name of the process that you wish to terminate or its PID.
PsKill \\[ComputerName] -U [Username] -P [Password] [ProcessNameOrID]
Terminate Windows process remotely using PsKill The selected process will now be terminated on the remote computer.

Kill Process Remotely using Stop-Process (PowerShell)
Similar to the methods above, you can also kill a process using Windows PowerShell. This can be done using the Stop-Process cmdlet. One caveat of this command is that you cannot provide the name of the remote computer directly. However, it can be achieved using the Invoke-Command cmdlet and providing the credentials initially to connect to the remote PC.
Invoke-Command allows you to run commands on other computers.
Use the following steps to kill a process remotely using PowerShell:
-
Launch an elevated PowerShell instance.
-
Run the following command to invoke a request to save the credentials:
$Credentials=Get-Credential -
Now enter the credentials for the remote computer and click Ok.
Provide and save credentials -
Now use the following command to terminate a process remotely:
Replace [ComputerName] with the name of the remote PC, and [ProcessName] with the name of the process that you want to kill without its file extension.
Invoke-Command -ComputerName [CompuetrName] -Credential $credentials {Stop-Process -name "[ProcessName]"}
Kill process remotely using Stop-Process (PowerShell) Note: If you experience any connectivity errors when running this command, make sure that the “Windows Remote Management” service is running on the remote computer.


The selected process will now be terminated on the remote computer. This concludes our discussion on managing the different tasks and processes on a remote Windows computer.
Manage Windows Services Remotely
Like the processes, you can also manage Windows services remotely. This section covers both the command-line methods and the GUI-based method to start, stop, or restart Windows services remotely.
Let us start with the GUI method that involves using the local Windows Services Console.
Start, Stop, Restart Windows Services Remotely using Services Console
If you have prior experience with the Service Console, you would know that it is used to manage the various Windows services, and can be used to start, stop, restart, and disable Windows services on the local computer. Today, we are going to tell you that it can also be used to manage the services on other computers on your network.
The Services Console can connect to other computers directly and manage them as well.
Here are the steps to use the built-in Services Console to manage Windows services remotely:
-
Open the Services Console by typing in “services.msc” in the Run Command box.
Open the Services Console -
Click “Action” from the ribbon menu and then click “Connect to another computer.”
Connect Services to another computer -
Select “Another computer,” enter the name of the remote PC, and click Ok.
Enter the remote computers name -
Ensure that the Services Console has successfully connected to the remote computer.
Services Console successfully connected to remote computer -
You may now continue to Start, Stop, or Restart a service simply by right-clicking it.
Start, Stop, Restart a service from the Service Console


If you would rather use the command line to manage Windows services remotely, refer to the remaining methods down below.
Start, Stop, Restart Windows Services Remotely using SC.exe
“sc.exe” is a Windows-native command-line tool used to manage Windows services. It is also capable of controlling the services on another PC on the network.
You can use either of the following syntaxes to start or stop a service remotely on another computer using an elevated Command Prompt:
SC \\[ComputerName] Start [ServiceName]
SC \\[ComputerName] Stop [ServiceName]
Start, Stop, Restart Windows Services Remotely using PsService
Like PsExec, PsList, and PsKill, PsService is another tool part of the Sysinternals PsTools suite used to manage Windows services remotely. Use the following steps to use PsService to start or stop a Windows service on a remote PC:
-
Start by downloading the PsTools.
Download PsTools -
Extract the contents of the PsTool file.
Extract PsTools -
Now launch an elevated Command Prompt and then use the
CDcmdlet to change your directory to the extract PsTools folders.CD [PathToPsTools]
Change directory to PsTools folder -
Now use the following cmdlets to start or stop a Windows process on the remote computer:
Replace [ComputerName] with the name of the remote PC, [ServiceName] with the name of the service, and [Action] with either “Start”, “Stop”, or “Restart”, depending on what you want to do with the service.
PsService \\[ComputerName] [Action] [ServiceName]
Start, Stop, Restart Windows service using PsService

Final Verdict
This article lists the various methods that can be used to manage Windows services and processes remotely, so you do not need to have physical access to a server/computer.
As you may notice, most of the methods discussed are using the command-line interfaces on Windows OS. This is because the command line usually provides more options to better control and manage the various Windows components when compared to the regular GUI-based interface.
If you are a sysadmin, then surely this article is worth a read.
Tagged:
PowerShell
Problem
In this blog post, we will walk you through how to restart service on remote computer using PowerShell.
Solution
To connect to remote computer, we can use Enter-PSSession that will create interactive session or Invoke-Command which is not interactive.
In this context, we have two computers named vm1 and vm2 respectively. The client will be vm1 and we want to restart wuauserv service in vm2. This service is responsible for automatically download and install Windows update.
Since the computers are not in the same domain, we should use Windows Remote Management (WinRM) for remote communication or remoting.
Below are several prerequisites to use WinRM for remote communication:
- Enable Windows Remote Management (WinRM) service on both computers
Set-Service -Name WinRM -Status Running -StartupType Automatic
- Add servers we want to connect to
TrustedHostslist on client computer
Set-Item -Path WSMan:\localhost\Client\TrustedHosts -Value 'vm2'
- Enable firewall rule for WinRM to allow other IPs to connect
Set-NetFirewallRule -Name 'WINRM-HTTP-In-TCP' -RemoteAddress Any
Enable-NetFirewallRule -Name 'WINRM-HTTP-In-TCP'
Or you can also do it manually:
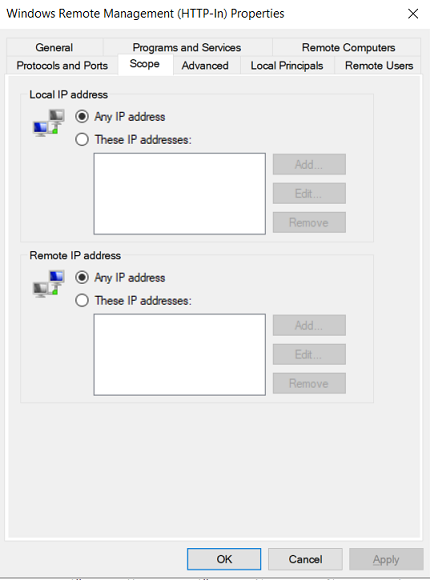
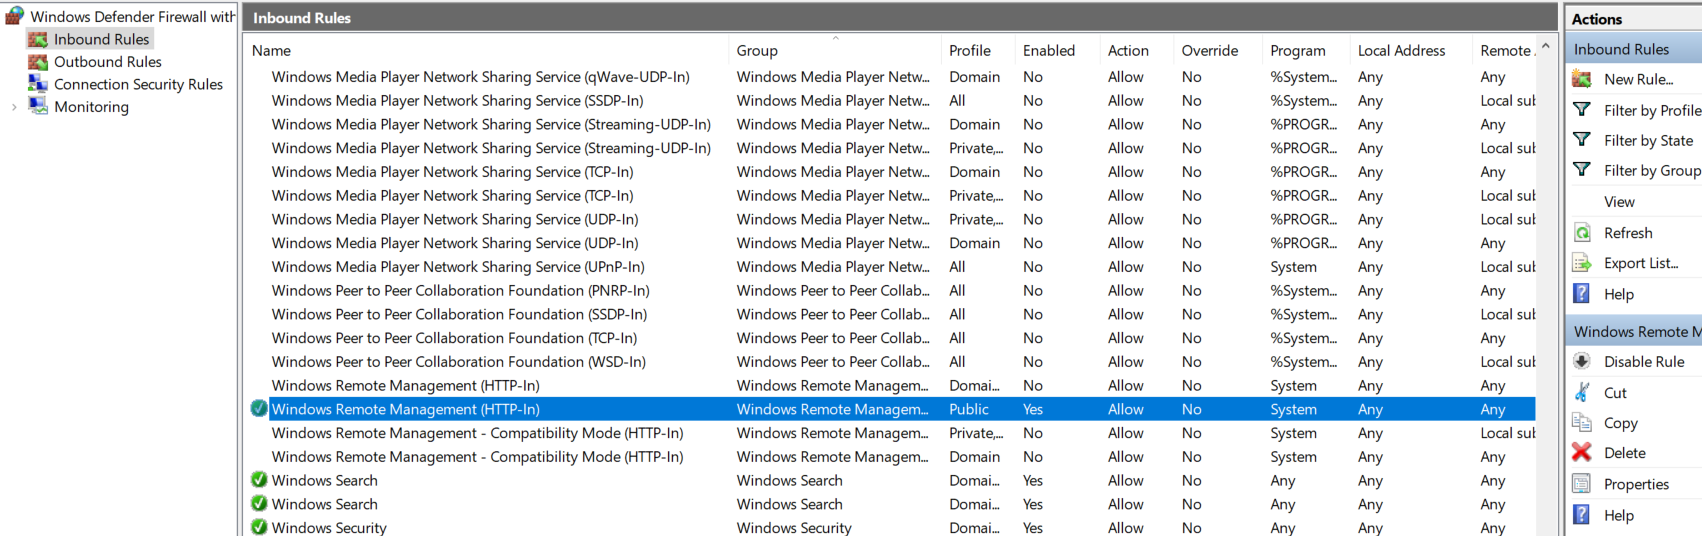
1. Open Windows Defender Firewall with Advanced Security
2. Click Inbound Rules
3. Double-click Windows Remote Management (HTTP-In) for the Public profile
4. Click the Scope tab
5. Under Remote IP address, set it to `Any IP Address`
6. Enable Rule
Using Enter-PSSession cmdlet
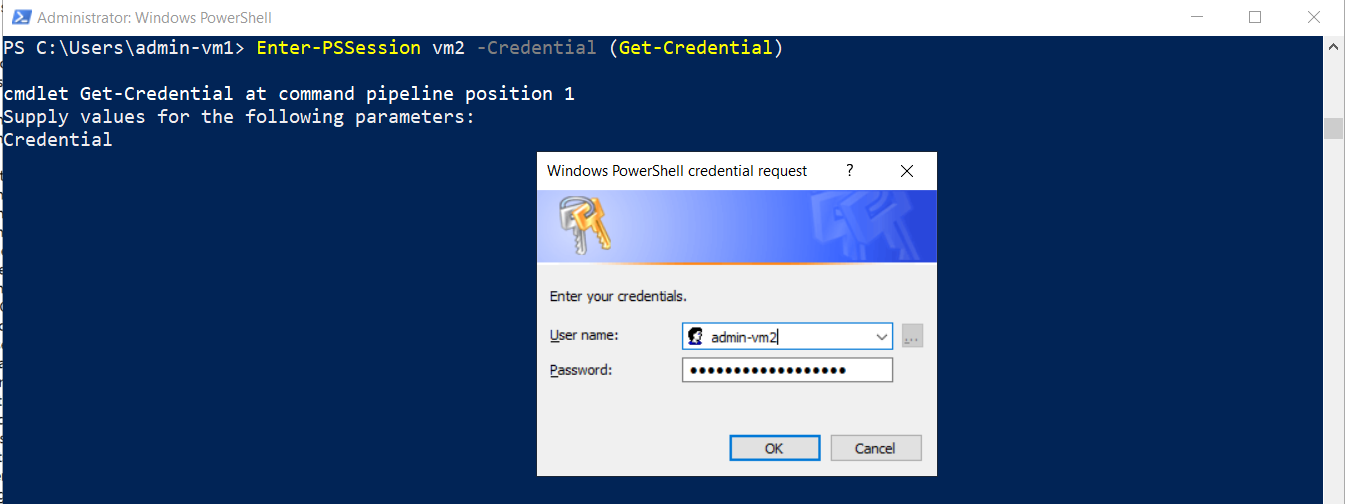
To create session to remote computer, we can use Enter-PSSession and specify the computer name we want to connect as well as the credential (username and password). After connected, we can run Restart-Service command. Then to close the session, we use Exit-PSSession cmdlet.
Enter-PSSession vm2 -Credential (Get-Credential)

Restart-Service -Name wuauserv

Exit-PSSession

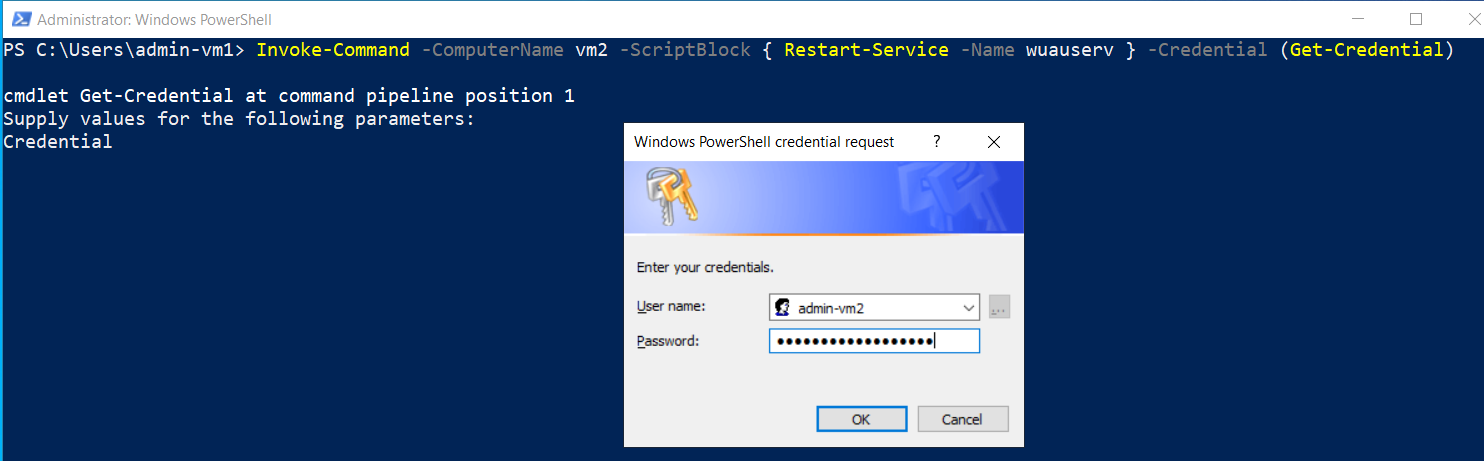
Using Invoke-Command cmdlet
With this cmdlet, you are still able to restart service on remote computer but you won’t have interactive session. The commands will be executed in one go in a ScriptBlock.
Invoke-Command -ComputerName vm2 -ScriptBlock { Restart-Service -Name wuauserv } -Credential (Get-Credential)
You still have to enter credential before the ScriptBlock is executed.

Conclusion
Before restarting the service on remote computer, we need to establish connection to remote computer (remoting). If the computers are not in the same domain, we should use Windows Remote Management (WinRM). Then, we can use Enter-PSSession or Invoke-Command combined with Restart-Service to restart the service on remote computer.
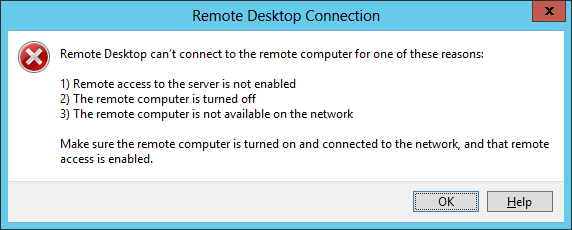
After a power outage, I found I was unable to connect to a Microsoft Windows
10 system from a Windows Server 2012 system on the local area network (LAN)
using the
Remote Desktop Protocol (RDP). When I tried to connect, I saw the
message «Remote Desktop can’t connect to the remote computer for one of these
reasons…»
I knew the system had rebooted after the power outage, because I could
ping it and see its shared folders using the command net view where systemName is the system’s name.
systemName
C:\>net view \\anaheim
Shared resources at \\anaheim

Anaheim

Share name     Type  Used as  Comment

-------------------------------------------------------------------------------
Moon           Disk
Users          Disk  (UNC)
The command completed successfully.


C:\>
You can start, stop, and restart
Windows services by running services.msc. You can run
that from an administrator command
prompt, Cortana’s
«Type here to search» field, etc. by entering the command
services.msc or you can access the services via the
Control
Panel. When you run it, you can click on Action from the menu
bar and select «Connect to another computer».
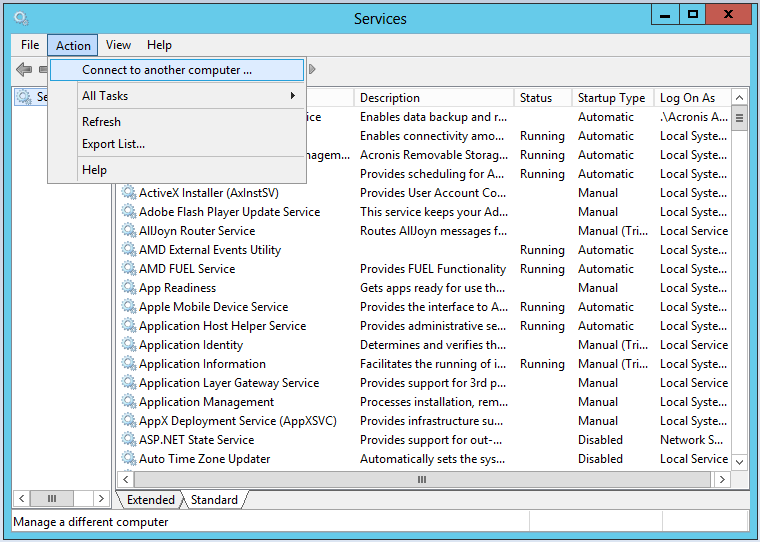
You will then see a window where you can type the name of the remote computer
or browse the network for it.
You can scroll through the list until you find the service you wish to
restart and then double-click on that service or right-click on it to stop it.
You can then repeat the procedure to start it again.
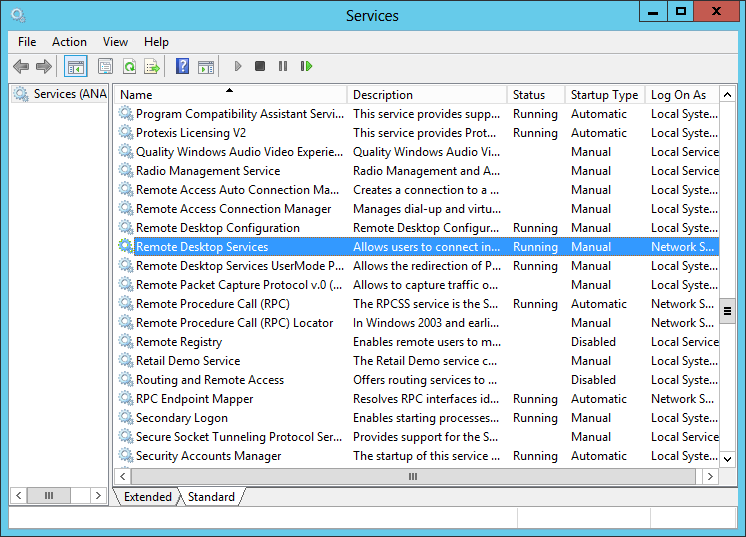
E.g., in this case I first tried stopping and restarting the Remote Desktop
Services by double-clicking on that service.
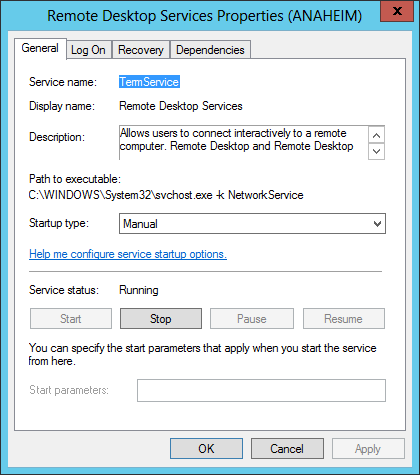
After stopping and restarting the Remote Desktop Services, I was still
unable to connect to the remote system by RDP, which I had attempted to do
from a command prompt with the command mstsc /v:anaheim (the
system is named Anaheim), so I attempted to turn off the Windows Firewall
from the command line to see if that was the point where the problem lay.
But that didn’t work.
C:\>netsh -r anaheim Advfirewall set allprofiles state off

WARNING: Could not obtain host information from machine: [anaheim]. Some comman
ds may not be available.
The RPC server is unavailable.


An error occurred while attempting to connect to the remote computer. Make sure
that the Windows Firewall service on the remote computer is running and configur
ed to allow remote management, and then try your request again.


C:\>
So I then turned off the firewall service through the Services window;
the service is named Windows Firewall.
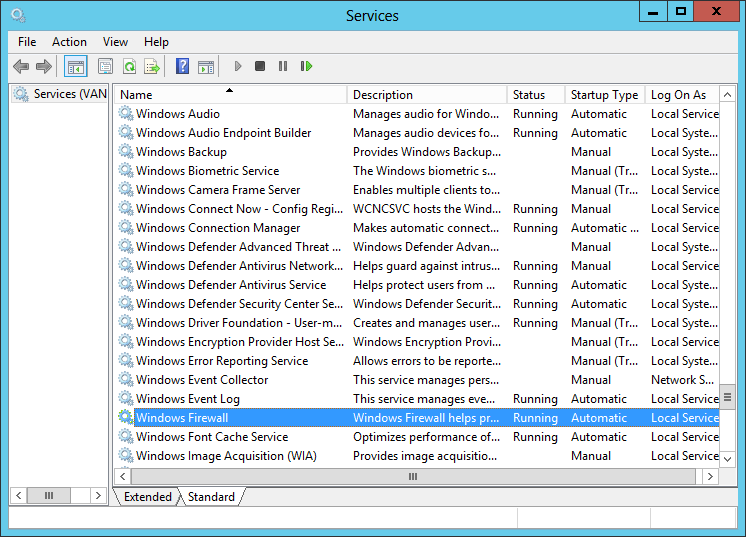
I right-clicked on it and chose Stop.

That produced an error message and I was unable to stop the service, but
when I right-clicked on the service again and chose Restart, I was
able to restart the Windows Firewall service. Unfortunately, that didn’t
resolve the problem with RDP access, either, though, so I rebooted the
remote computer with the shutdown command.
C:\>shutdown /r /f /m \\anaheim

C:\>
With the shutdown command you can specify the remote system with
/m \\sysName where sysName is the name of the remote
computer. The /r option indicates the system should shutdown and
restart rather than simply shut down. The /f option
forces running applications to close without forewarning users and can be
used to ensure the shutdown process proceeds even if some applications might
otherwise refuse to quit. After the system rebooted, I was able to log into
via RDP.
Update: When I later encountered the same problem with RDP access no longer
working after a power outage, I was able to resolve the problem by
disabling and re-enabling the
network interface on the Windows 10 system.