
Out of over 500 BSoD errors known so far, the Resource Not Owned is the most commonly encountered one. If not treated initially, the error can further lead to other PC-related issues, such as instability, data loss, poor system performance, and the like.
Thus, you should act quickly and solve the error code. In this article, I have discussed the top causes of the error and the quick solutions that helped me in avoiding a major issue. So, let’s get started.
But before that, it would be wise to understand what BSoD signifies.
Understanding “Resource Not Owned” BSoD Error
Let’s first understand what BSoD is. BSoD is the short form for Blue Screen of Death. Its other names include stop error and stop screen as it puts the entire system on hold or in a non-working situation. Hence, it is very difficult to deal with.
The BSoD error strikes from nowhere and results in a complete data loss and other issues such as the Resource Not Owned error.
If the above error message appears on your screen, recently downloaded apps or programs may not be compatible with your Windows. So, consider removing them. In most cases, WinDVD is one such application.
Let’s now understand the other causes of the above error message and its solutions.
What Causes The Resource Not Owned BSoD Error On Windows 11/10/7?
Various causes contribute to the Resource Not Owned error on Windows 11/10/7. These are:
- Software corruption
- Faulty hardware (i.e., inconsistent power supply, bad memory, or overheating)
- Damaged hard disk
- Corrupt or damaged system files
- Outdated or incompatible drivers
- Outdated Windows
Once you have understood the reason behind the Resource Not Owned BSoD error, you can try the following solutions.
How To Fix Resource Not Owned BSoD Error On Windows 11/10/7?
Here are the top eleven solutions you can try to resolve the BSoD error codes.
- Update Windows to the latest version
- Perform Windows 10 reset
- Update your device drivers
- Uninstall and reinstall your device drivers
- Perform an SFC scan
- Use CrystalDiskMark to check your hard drive
- Uninstall unnecessary or unwanted programs and applications
- From the Start menu
- From the Control Panel
- From the Settings
- Run the DISM tool
- Use the Memory Diagnostic Tool
- Run the troubleshooter
Read on as I present to you the step-by-step guides to implementing the above solutions on Windows.
-
Update Windows to the latest version
Keeping your Windows updated to the latest build is necessary to avoid bugs and compatibility issues among the hardware and software. If you are frequently experiencing the Resource Not Owned error, an outdated Windows is to be blamed here.
To update your Windows to the latest version, follow these steps.
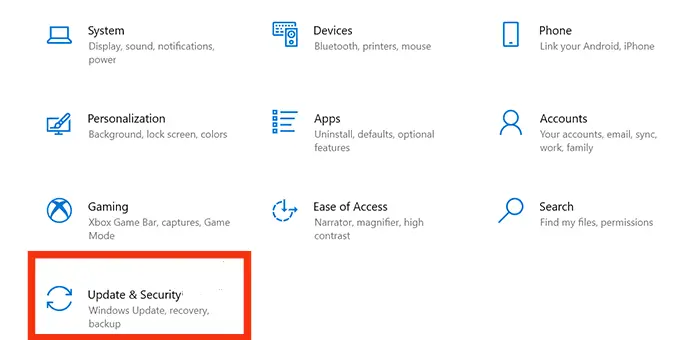
- Hit the Windows key on your keyboard. You can also click on its icon on the bottom left corner of the screen.
- Click on the Settings
- On the settings page, find the Update & Security option and click on it.
- Select the Windows Update option from the left side panel.
- On the right side of the screen, click on the Check for updates option to let the system check and install the update, if any.
Your Windows will get updated to the latest version. If you want, you can also schedule the update from the Advanced settings. Now, check if the resource not owned Blue Screen of Death error appears. If so, try the next solution.
-
Perform Windows 10 reset
To perform a Windows 10 reset, follow these steps.
- Launch the Settings.
- Select the Update & Security
- Click on Recovery from the left side panel.
- Under the Recovery section, you will find three options. These are Reset this PC, Go back to the previous version of Windows 10, and Advanced startup. Click on Get started under the Reset this PC.
- On the next screen, either choose to Keep my files or Remove everything.
- Follow the on-screen steps and when prompted, click on Reset.
Windows 10 reset
Now, check if the Resource not Owned error still appears or not. If yes, you are using outdated device drivers.
-
Update your device drivers
Sometimes, the old version drivers of a particular device are at fault. As a result, you get unwanted BSoD errors. To avoid this, always keep the drivers updated to the latest version. You can do so either manually or automatically.
Follow the given steps for the same.
- Launch the Control Panel and click on Device Manager. Alternatively, you can open the device manager directly from the Start
- On the Device Manager window, scroll down to the Network Adapters option and expand it by clicking over it.
- Now, select the available driver and right-click on it to open a context menu.
- Click on the Update driver option from the menu.
- On the Update driver page, click on Search automatically for drivers or Browse my computer for drivers as per your preference. Nevertheless, I recommend the former to avoid extra steps to update the drivers.
Repeat the above steps for the other drivers installed on your system. Restart your PC and check if the Resource not Owned error persists or not. If yes, try the next method.
-
Uninstall and reinstall your device drivers
If updating the drivers doesn’t work for you, you might need to uninstall and reinstall the disputed driver to solve the issue.
Here are the steps to uninstall and reinstall the device drivers on Windows 11/10.
To uninstall the drivers:
Follow the steps discussed in the method “update the drivers” till the point you expand the Network adapters option. Next, follow the given steps.
- Right-click on the disputed driver and select Uninstall device from the context menu. A confirmation dialog box will appear.
- Tick the checkbox next to Delete the driver software for this device. Click on Uninstall.
- Restart the PC to apply the changes.
To reinstall the drivers:
Now, you would need to reinstall the driver. To do so, on the Device Manager, click on the Action tab, and select the Scan for hardware changes option.
The Windows will scan the PC for any hardware changes i.e. the uninstalled device driver and reinstall it.
-
Perform an SFC scan
Another great way to fix the resource not owned BSoD error on Windows 11/10/7 is by running the SFC tool and checking for the disputed files. To run the SFC tool, follow these steps.
- Type cmd in the Search box and select Command Prompt from the results. Right-click on it and select Run as Administrator.
- As the Command Prompt opens up, type the command sfc /scannow and hit the Enter
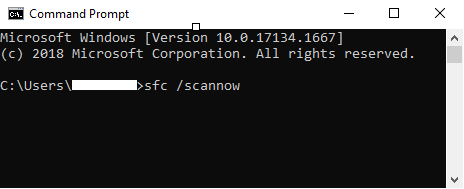
WerFault Error sfc scan now command
The system file checker (SFC) tool will run, scan, and repair all the disputed files on your system to fix the resource not owned issue.
-
Use CrystalDiskMark to check your hard drive
Next comes checking your hard drive’s health. As you would know, hard drives use the S.M.A.R.T technology to analyze their health and reliability. You can also view the drive’s health status and other pieces of information as a user.
However, you would need to use a program called CrystalDiskMark installed on your system. It is open-source, free, and very straightforward to use.
Once installed, it will examine your hard drives and return the results with different markings. For example, “good” if your drives are in good condition, “bad” if your drives are in bad condition, “caution” if your drives are at risk and you must keep an eye on them, and “uncertain” if the program could not collect enough info.
-
Uninstall unnecessary or unwanted programs and applications
Do you have multiple third-party programs or applications installed on your PC? Did you start getting the unwanted BSoD error after you installed such applications? If yes, you can get rid of the errors by uninstalling them.
Here are some ways to search for and uninstall unnecessary or unwanted programs and applications on your Windows.
- From the Start menu
- Click on the Start
- Now, look for the unnecessary or unwanted apps or programs you wish to delete. Right-click on them and select Uninstall from the menu. Click on Yes if prompted.
- From the Control Panel
- Launch the Control Panel.
- Click on the Programs and Features option to find the various programs present on your computer.
- Right-click on the desired program and select Uninstall.
- From the Settings
- Launch the Settings.
- On the left sidebar, select Apps.
- You will find the entire list of installed apps on the right-hand side.
- Search for the unnecessary apps and programs, click on the three vertical dots, and select Uninstall.
- Allow if prompted.
These are the three ways to uninstall unnecessary or unwanted apps and programs on your PC.
-
Run the DISM tool
The DISM or Deployment Image Servicing and Management is a built-in command-line tool that prepares, modifies, and repairs system images. However, it is also a great option to try for other system issues like BSoD errors.
To run the DISM tool, follow these steps.
- Click on the Search
- Type cmd in the search box and select Command Prompt from the results.
- Right-click on it and select Run as Administrator.
- Enter the command – DISM /Online /Cleanup-Image /CheckHealth and hit the Enter
Run DISM
Let the command-line tool scan your system and repair the image and probably, the BSoD error. Are you still getting the Resource not Owned error? Let’s test the RAM then.
-
Use the Memory Diagnostic Tool
You must check your RAM when your system is running slow, apps crash, or the overall PC performance is down. Right? However, you should also test your memory for BSoD errors as they are also associated with the RAM.
Now, Windows has a built-in RAM monitoring tool, called the Memory Diagnostic Tool, on all its versions, including Windows 11/10/7.
To launch the Memory Diagnostic tool, here is the step-by-step guide.
- Click on the Search
- Type Memory Diagnostic Tool in the search box and select the top result. Alternatively, open the Run box and run the command – exe to launch the tool.
- The Memory Diagnostic Tool dialog box will open. Click on the Restart now and check for problems (recommended).
As soon as you select the option, your PC will restart and you will see the status of the scan on your screen. It is a time-consuming process and may take several minutes to complete.
Once completed, the tool will display the results as you log in to your PC.
Note: If Windows built-in diagnostic tool does not yield the desired results, you can also use a third-party tool, called MemTest86. It uses the latest algorithms and is completely free to use for the x86 and ARM computers.
Now, check if the Resource not Owned error shows up or not. If yes, try the next method.
Windows Memory Diagnostic
-
Run the troubleshooter
If none of the above options work for you, I recommend running the BSoD troubleshooter. Follow these steps.
- Launch Settings.
- Click on the Update & Security
- On the left side panel, select Troubleshoot.
- Look for the troubleshooter for BSoD and click on it.
The troubleshooter will run and scan the main cause of Blue Screen of Death.
These are the top 10 solutions to fix the Resource not Owned BSoD error on Windows 11/10/7.
Conclusion
So, here you go. The Blue Screen of Death (BSoD) is the second most unwanted issue one can come across on their system after ransomware. It leads to a complete loss of data and may introduce several other errors, such as Resource not Owned.
If you are facing the same problem, try out the above methods and let us know if you face any problems.
Resources not owned is a rare system error in Windows 10 computers, this error can cause blue screen errors on your computer. This error can cause several serious issues with your computer which can lead to a total system failure. Therefore, if you have this error you should try some methods to fix it. In this guide we will discuss resource not owned in Windows 10 errors; we will also look into some of the methods to fix stop code resource not owned error on Windows 10 computers.

Table of Contents
There can be various reasons for resource not owned error on Windows 10. Some of the possible reasons are listed below.
- Errors with system files or corrupt system files are a common reason for this error
- Faulty, outdated, or corrupt system drivers can also cause this error
- A third-party antivirus can also interfere with system files and cause this error
- Various hard drive and disk issues can also cause this error on Windows 10
- Faulty system hardware can also cause this issue, resulting in a blue screen error
- Multiple BSOD issues are also sometimes responsible for this error
- Bugs and errors with Windows are also responsible for this issue.
In the following guide, we will discuss the methods to resolve the resources not owned on Windows 10 issues.
Method 1: Run Hardware and Devices Troubleshooter
It is common for resource not owned error to occur on your computer due to various hardware issues. This can be resolved by checking and resolving the hardware issues. Windows computers provide various built-in troubleshooters to resolve several system issues; you can try to run a hardware and devices troubleshooter to resolve the issues. Check out the How to Run Hardware and Devices Troubleshooter to fix issues with your computer hardware to resolve the issue.

Method 2: Run chkdsk Scan
The resources not owned error on Windows 10 can also be caused by corrupted Disk Drivers on your computer; these driver errors can also be fixed by scanning and repairing disk drivers using in-built scans on Windows 10. Check Disk scan or CHKDSK Scan is a utility on Windows that scans for corrupted system drivers and tries to fix and repair the drivers. Check out the How to Check Disk for Errors Using chkdsk guide to scan for the disk drivers for your Windows 10 computers.

Also Read: Fix Error Code 0x80070490 in Windows 10
Method 3: Repair System Files
The most common reason for this stop code resource not owned error to occur on Windows 10 is corrupt system files. You can check out How to Repair System Files on Windows 10 guide to fix the issue in your computer by running an SFC and DISM scan. If repairing system files do not fix stop code resource not owned on Windows 10 and you can’t fix this error, move on to the next method.

Method 4: Update Windows
If there are any bugs, errors and patch related problems in your Windows 10 computer, you may not be able to install any new apps and games. This issue can be resolved by installing a Windows update. Firstly, check if you are using an updated version of the OS, or if there is an update pending in action follow the steps as instructed in our guide How to Download and Install Windows 10 Latest Update.

Also Read: Fix Windows 10 File System Error 2147219196
Method 5: Update Device Drivers
One of the most common reasons for resource not owned issues is caused by outdated or corrupted system drivers. If the drivers on your computer are not up to date, they may not configure and work properly. To avoid issues such as resource not owned on your Windows 10 computer, you may want to update your computer drivers. Check out the How to Update Device Drivers on Windows 10 guide to safely install the latest versions of drivers on your computer. In most cases, updating computer drivers can easily resolve this issue. If the issue continues, and you can’t figure out a solution for same, try the next method.

Method 6: Rollback Device Driver Updates
If your system had been working correctly and began to malfunction after an update, rolling back the drivers might help. The rollback of the driver will delete the current driver installed in the system and replace it with its previous version. To do so Read out our guide to Rollback Drivers on windows 10.

Also Read: Fix Network Error 0x00028001 on Windows 10
Method 7: Reinstall Device Drivers
If updating the system drivers does not fix the system driver issues, you can try to reinstall the drivers on your computer. You can check out the How to Uninstall and Reinstall Drivers on Windows 10 guide to resolve the issue.

If reinstalling the drivers doesn’t help, try the next method.
Method 8: Disable Antivirus Temporarily (If Applicable)
Sometimes, if you try to install any peculiar apps or games from Microsoft Store, the antivirus suite in your computer identifies it as a threat and prevent the app from being installed. So, wisely disable any third-party antivirus program or inbuilt security suite in your PC by following the steps as demonstrated in our guide How to Disable Antivirus Temporarily on Windows 10.

Method 9: Uninstall Third-party Antivirus (Not Recommended)
If resource not owned error in Windows 10 was not caused by the system drivers the issue can be with your antivirus, if the third-party antivirus keeps causing this error on your computer; you can consider uninstalling it completely. You can check out the 5 Ways to Completely Uninstall Avast Antivirus in Windows 10; to uninstall the antivirus from your computer to fix the issue.

If removing the antivirus doesn’t resolve the issue, move on to the next method to resolve stop code resource not owned error.
Also Read: Fix Avast Not Updating Virus Definitions
Method 10: Reset PC
If none of the above-mentioned methods work for you, the issue can be caused by the bugs and errors in Windows 10; you can try to reset Windows to resolve these Windows issues and resource not owned issues. You can check out the How to Reset Windows 10 Without Losing Data guide to safely reset Windows 10 on your computer.

Frequently Asked Questions (FAQs)
Q1. What causes resources error on Windows?
Ans. There can be various reasons for resource errors on Windows such as system file errors, BSOD errors, and driver errors.
Q2. How can I resolve the Blue Screen error on Windows 10?
Ans. To fix the Blue Screen errors on Windows 10 computers you can try to run an in-built Blue Screen troubleshooter.
Q3. How to repair system files to fix resource errors?
Ans. System file errors are common errors on Windows and can be fixed by running an SFC scan.
Recommended:
- Fix Error Code 0x8078012D in Windows 10
- Fix System Could Not Find the Environment Option That Was Entered
- Fix Error Code 0xc1800103 0x90002
- Fix The Group or Resource is Not in the Correct State to Perform the Requested Operation
We hope this guide was helpful to you and you were able to fix resource not owned error on Windows 10. Let us know which method worked for you. If you have any suggestions or queries, please let us know in the comment section.
Have you ever encountered the Resource Not Owned error on your PC? It can cause annoying computer crashes and freezes when you encounter it. In this post, MiniTool Partition Wizard provides some useful solutions for you to fix it.
What Causes the Resource Not Owned Error?
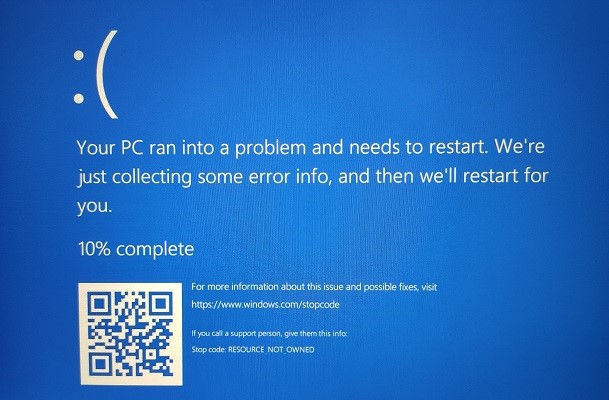
The Resource Not Owned error is one kind of Blue Screen of Death (BSOD) error. It may result in data loss and other issues. When the Resource Not Owned error occurs, you will see one of those error messages on your screen:
- A problem has been detected and Windows has been shut down to prevent damage to your computer. The problem seems to be caused by the following file: RESOURCE_NOT_OWNED.
- 🙁 An error from RESOURCE_NOT_OWNED has caused a problem and your PC must restart.
- 0x0000000A: IRQL_NOT_LESS_EQUAL – RESOURCE_NOT_OWNED
- 0x0000001E STOP: KMODE_EXCEPTION_NOT_HANDLED – RESOURCE_NOT_OWNED
- 0x050 – RESOURCE_NOT_OWNED: PAGE_FAULT_IN_NONPAGED_AREA – RESOURCE_NOT_OWNED
- …
The RESOURCE_NOT_OWNED BSOD error usually happen after a fresh install of new hardware or software (Windows 10 64-bit). So, the RESOURCE_NOT_OWNED error is often related to hardware, software, device drivers, or firmware. The following are the primary causes of this error:
- System file errors or corrupt system files
- Incorrect, outdated, or corrupt system drivers
- Incompatibilities between third-party antivirus and system files
- Disk and hard drive problems
- Faulty system hardware
- Outdated Windows
After knowing the reasons for the Resource Not Owned error, you can try the solutions below to solve it.
Solution 1. Update Windows
The outdated Windows can cause many errors on your computer. The Resource Not Owned error is one of them. So, if you encounter the Resource Not Owned error on your computer, you can try updating your Windows to solve this error. Here’s the way:
- Press Windows and I keys at the same time to open the Settings window.
- Click on the Update & Security in the Settings window.
- In the Windows Update window, click on Check for updates button to let the system check and install the update.
- If a new update is available, then click Install Now and follow the instructions to update. If the Windows is up-to-date, then it will show You’re up to date message.
- Once done, check if the Resource Not Owned error is fixed.
Solution 2. Update Device Drivers
Outdated or corrupted system drivers are also the reasons for the Resource Not Owned error. If the drivers on your computer are not up to date, they may be unable to configure and work properly. So, you can also try updating the drivers on your computer to fix this error. Here’s the guide:
- Click the Search icon on the taskbar and type “device manager” into the search box.
- Then you will see Device Manager under Best Match. You need to click Open to open the Device Manager window.
- Expand those hardware categories whose hardware driver you wish to update.
- Next, you need to right-click on that driver and then select Update Driver from the menu.
- In the next window, choose the “Search automatically for updated driver software” option. Then your computer will automatically look for and install the latest driver of the hardware from the Internet.
- Once done, check if the error is fixed.
Solution 3. Reinstall Device Drivers
If updating the system drivers does not fix the Resource Not Owned error, you can try to reinstall the drivers on your computer. Here’s the way:
- Press Windows and R keys at the same time to open the Run window.
- Type “msc” in the box and press the Enter key to open the Device Manager window.
- Expand those hardware categories whose hardware driver you wish to reinstall.
- Then you need to right-click on that driver and then select Uninstall device from the menu.
- Now, check the box Delete the driver software for this device and confirm the warning prompt by clicking Uninstall.
- Next, go to the manufacturer’s website (Intel, AMD, or NVIDIA) to manually download the driver as per system specifications.
- After that, run the downloaded .exe file to install the drivers.
- Once done, check if the error is fixed.
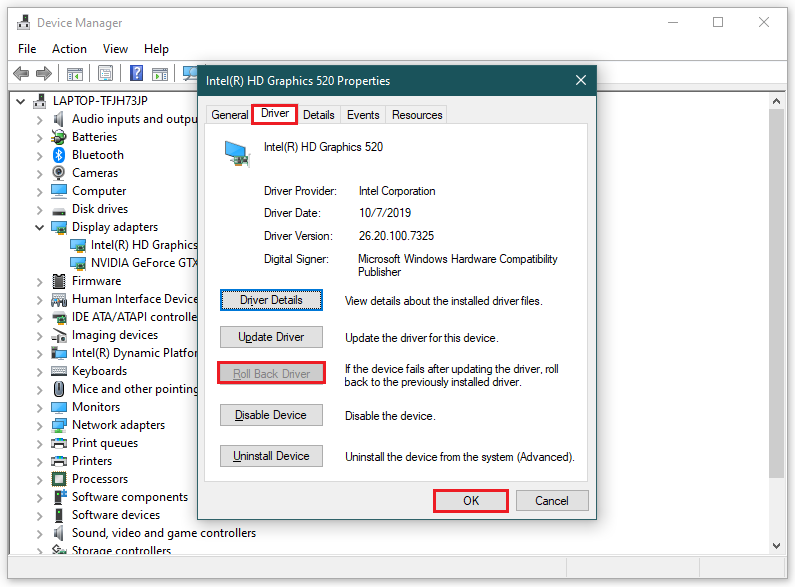
Solution 4. Rollback Device Driver Updates
If you encounter the Resource Not Owned error after you update your drivers, you can do as follows to roll back the drivers to solve this error.
- Press Windows and I keys simultaneously to open the Settings window.
- Next navigate to System > About, and then scroll down and click Device Manager to open the Device Manager window.
- Expand those hardware categories whose hardware driver you wish to roll back.
- Then you need to right-click on that driver and then select Properties from the menu.
- In the properties window, click on the Roll Back Driver button.
- After that, you need to provide your reason for “Why are you rolling back?” in the new window.
- Once done, click on Yes and OK to apply this change. Finally, restart your PC and check if the RESOURCE_NOT_OWNED error is fixed.
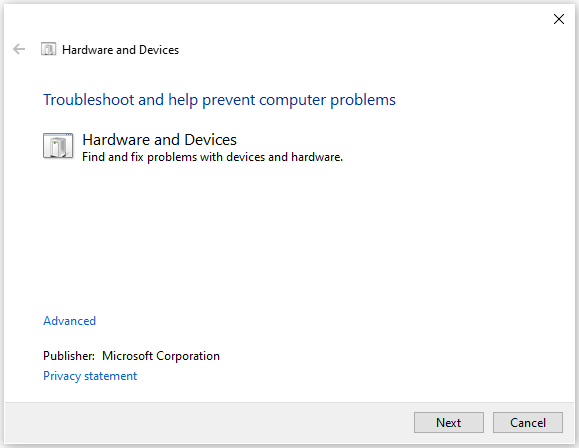
Solution 5. Run Hardware and Devices Troubleshooter
Faulty system hardware can also cause the Resource Not Owned error, so you can run the Hardware and Devices troubleshooter to fix this error.
The Hardware and Device troubleshooter can help you to find and fix common problems with the keyboard, printer, Bluetooth, USB, audio playback, etc.
However, the Hardware and Devices troubleshooter has been removed from the Troubleshoot page because Microsoft considers this feature to be used infrequently according to their survey. So, you need to use a command to run this tool. The steps are listed below:
- Press the Windows and R keys at the same time to open the Run window.
- Input “cmd” in the box and click OK.
- Input “exe -id DeviceDiagnostic” and press Enter key on the keyboard.
- Then you will see the Hardware and Devices window, then click the Next It will start to run the troubleshooter.
- If the system detects any problem, you can click Apply this Fix to resolve it.
Solution 6. Examine the Hard Disk Drive
The Resources Not Owned error on Windows 10 can also be caused by a corrupted disk driver on your computer. So, you need to use software or some commands to scan and repair the disk driver. Here’re two methods you can choose from.
Method 1. Check Hard Disk Errors via MiniTool Partition Wizard
MiniTool Partition Wizard is a comprehensive partition management tool that provides various functions to help you manage the hard disk, including two functions that can help you check and fix the errors on your hard disk. One is Check file system and the other is Surface Test.
MiniTool Partition Wizard FreeClick to Download100%Clean & Safe
1. Examine and Repair the Corrupted File System
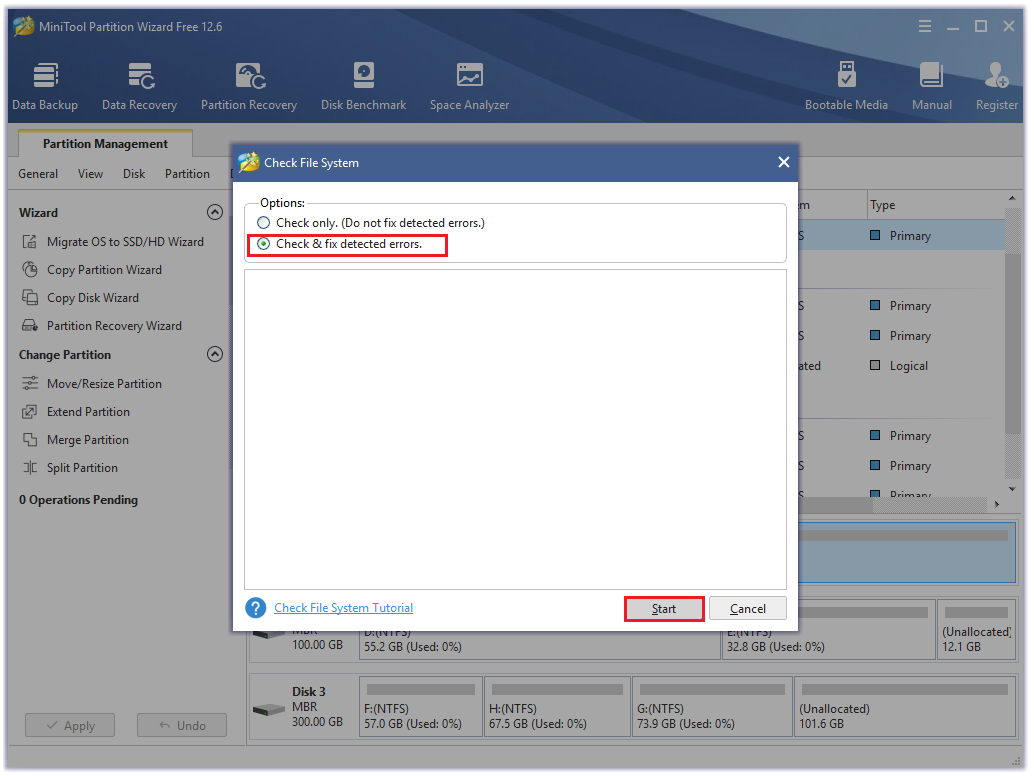
The Check File System function can help you check and fix the file system problem on your hard disk.
Step 1. Launch MiniTool Partition Wizard on your computer.
Step 2. Right-click the partition one by one and select Check File System.
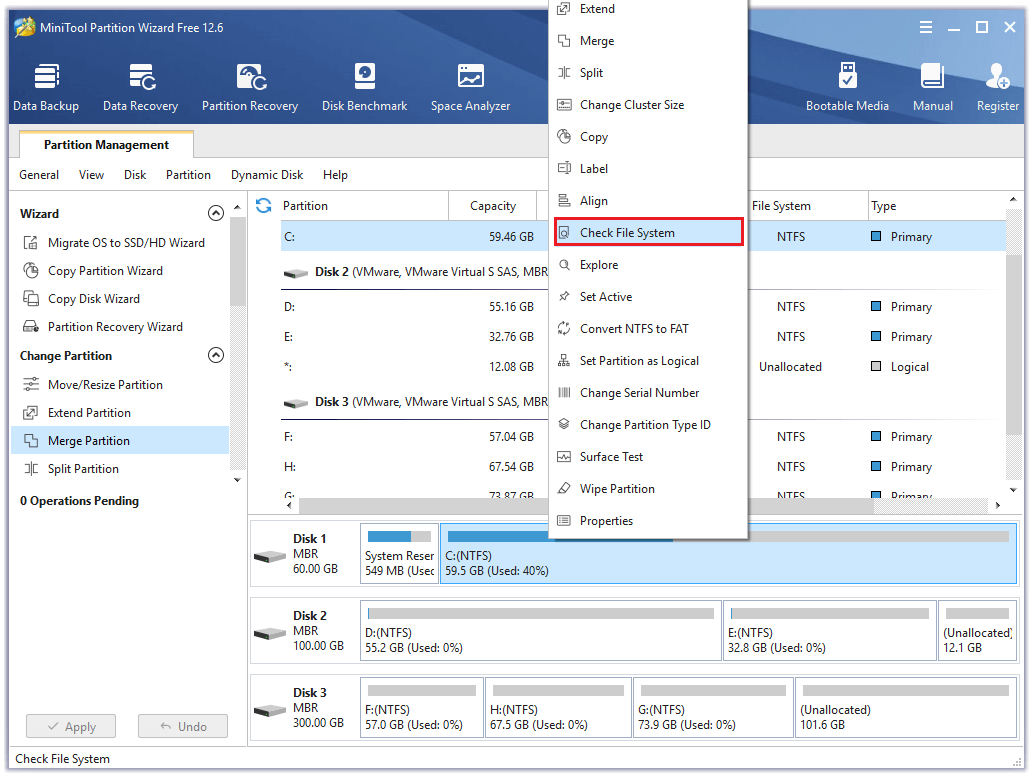
Step 3. Select the Check & fix detected errors option and then click on the Start button.
2. Check for Bad Sectors on the Hard Disk
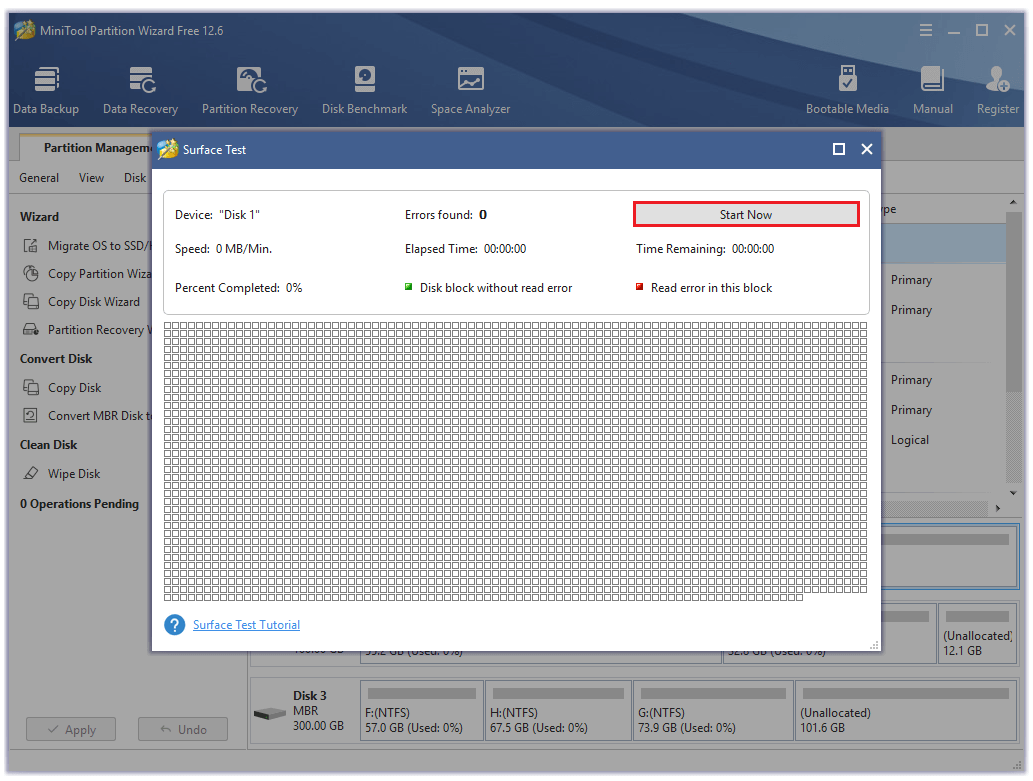
The Surface Test feature of MiniTool Partition Wizard can help you check for bad sectors on the disk.
Step 1. Launch MiniTool Partition Wizard on your computer.
Step 2. Right-click the whole disk and then select Surface Test from the menu.
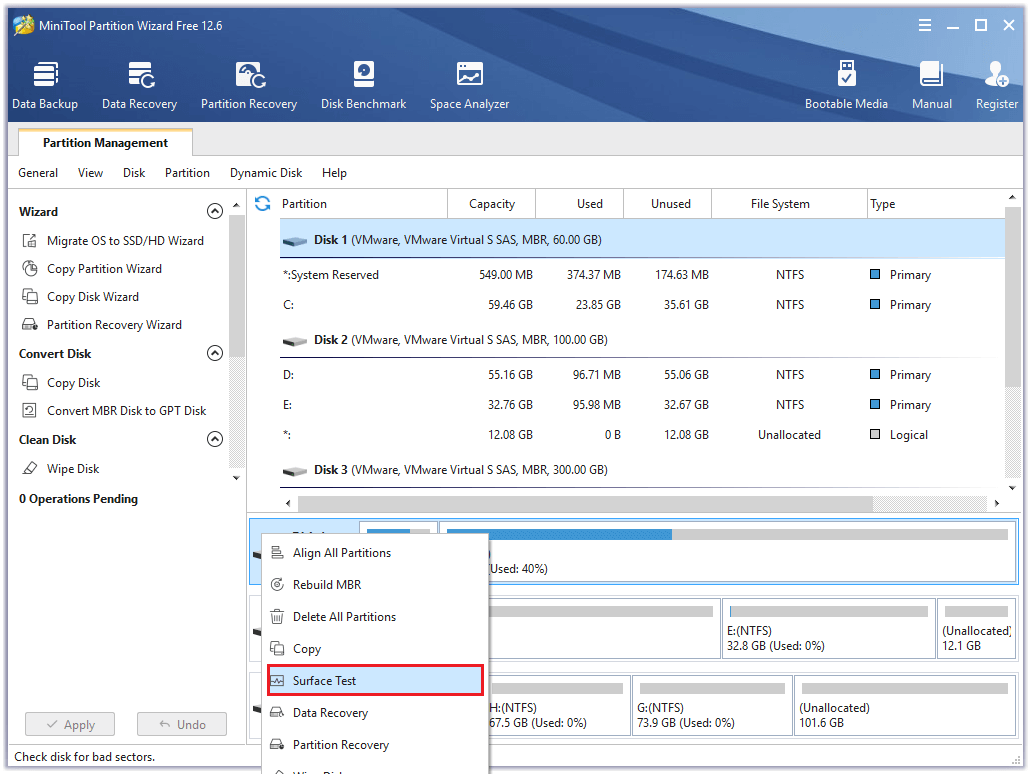
Step 3. Click on the Start Now button to start the scan process. If there are any bad sectors, they will be marked in red color.
Tips:
If there are too many red blocks, you need to replace the disk. But if there are just a bit of red blocks, you can mark them as unreadable or shield them with third-party software.
Method 2. Check Hard Disk Errors via CMD
You can also use the built-in Command Prompt to check and fix the errors on your hard disk. Here’re the steps:
Step 1. Create a USB bootable media for Windows 10 and insert it into your computer.
Step 2. Next, go to the BIOS and set the bootable media as the first boot option.
Step 3. Then select the Repair your computer option at the left bottom.
Step 4. On the new page, choose Troubleshoot.
Step 5. Next, select the Advanced options and then select Command Prompt.
Step 6. Enter the following commands in the Command Prompt window and press the Enter key after entering each command line.
- Bootrec.exe /rebuildbcd
- Bootrec.exe /fixmbr
- Bootrec.exe /fixboot
Step 7. Next, you can execute additional chkdsk commands for all the disks. The commands are like this:
Tips:
If you have E, F, or many other disks, check those disks, too. You just need to change the last letter in the commands below.
- chkdsk /r c
- chkdsk /r d
Step 8. Once done, restart your PC and check if the RESOURCE_NOT_OWNED error is fixed.
Solution 7. Repair System Files
If your Windows has any corrupted system files, you may encounter the Resource Not Owned error too. You can run SFC and DISM to fix this error. Both the System File Checker (SFC) and Deployment Image Servicing Management (DISM) allow you to scan and delete corrupt files.
You can run SFC first, because it doesn’t need a steady Internet connection. Here’re the steps:
- Click the Search icon from the taskbar and then type “command prompt” in the search box.
- Click Run as administrator from the right side of this window.
- Type “sfc /scannow” and press the Enter key.
- After that, type “Exit” and press the Enter key to close the Command Prompt window.
- Once done, restart your computer to check if the error is fixed.
If the error still exists, you need to run the DISM command. Here’s the guide:
- Run the Command Prompt as administrator on your computer.
- In the Administrator: Command Prompt window, type “exe /Online /Cleanup-image /Scanhealth” and press Enter key.
- Type “exe /Online /Cleanup-image /Checkhealth” and press the Enter key.
- Type “exe /Online /Cleanup-image /Restorehealth” and press Enter.
- Type “Exit” and press the Enter key to close the Command Prompt window.
- Once done, restart your computer to check if the RESOURCE_NOT_OWNED error is fixed.
Solution 8. Disable Antivirus Temporarily or Uninstall Third-party Antivirus
Sometimes, the antivirus can also cause the Resource Not Owned error. If you suspect the error on your computer is caused by an antivirus, you can try to disable the antivirus temporarily or uninstall third-party antivirus to fix it.
Solution 9. Reset PC
If all the solutions above don’t work for the Resource Not Owned error on your computer, you can suspect the error is caused by the bugs and errors in Windows 10. You can do the following steps to reset your PC.
Step 1. Press the Windows and I keys at the same time to open the Settings window.
Step 2. Now go to Update & Security > Recovery.
Step 3. Under Reset this PC, click on the Get started button.
Alt= click on the Get started button to start resetting Windows 10
Step 4. Then choose either Keep my files or Remove everything option.
- Keep my files: This option will remove apps and settings but keep your personal files.
- Remove everything: It will remove all your personal files, apps, and settings.
Step 5. Select your Windows version and click on Only the drive where Windows is installed.
Step 6. Next, select the Remove my files option and then click on Reset button to start the process.
Step 7. Follow the on-screen instructions to complete it and restore PC to an earlier date on Windows 10.
The Resource Not Owned error bothers me a lot. Recently, I succeeded in resolving the Resource Not Owned error with this post. It is very useful! I want to share this with you.Click to Tweet
Bottom Line
The Resource Not Owned error can be caused by hardware, software, device drivers, or firmware problems. But luckily, you can find nine solutions in this post for this error. If you encounter the same error, you can choose one to fix it.
If you have any problems that bother you a lot, you can leave your comments to discuss them here. In addition, if there are any problems with MiniTool Partition Wizard when you use it, please send us an email via [email protected].
Readers help support Windows Report. We may get a commission if you buy through our links.
Read our disclosure page to find out how can you help Windows Report sustain the editorial team. Read more
Blue Screen of Death errors, such as RESOURCE NOT OWNED, aren’t that common, but these can cause a lot of problems, especially when encountered in a loop. The fixes are rather simple and shouldn’t take much time. So let’s dive straight into the subject.
What does the Resource Not Owned error mean?
The RESOURCE_NOT_OWNED BSOD, as per Microsoft, basically points to the fact that a thread tried to release a resource that it did not own in the first place. Here are a few cases you may encounter the error:
- Resource Not Owned in Edge – Many reported that Edge first stopped responding, and then the PC crashed with this stop code.
- Resource Not Owned with Surface Pen – The error appeared for several users with a Surface Pen, though the issue was primarily limited to a particular version.
- Resource Not Owned on Surface Pro 7 – Some Surface Pro 7 users came across the error, but our solutions worked flawlessly in this case.
How can I fix the stop code Resource Not Owned?
Before we try the slightly complex solutions, here are a few quick ones that might help:
- Restart the computer.
- Update Windows to the latest available version. Microsoft has identified the bug and released a patch for it, so updating the OS should fix things.
- Update Microsoft Edge if you are facing the error when running the browser. Many managed to fix things this way.
- In case you are using a Surface Pen, disconnect it and try the solutions here before reconnecting.
If these didn’t work, head to the ones listed next.
1. Use a third-party repair solution
The blue screen RESOURCE NOT OWNED error is not so common, neither is it so scary either, but it’s not really a piece of cake either. You need to allocate a little bit more time if you want to tackle the problem manually.
However, there is an easier and quicker solution that might fix the problem in no time, using a third-party repair software that will get the job done automatically.
2. Update your drivers
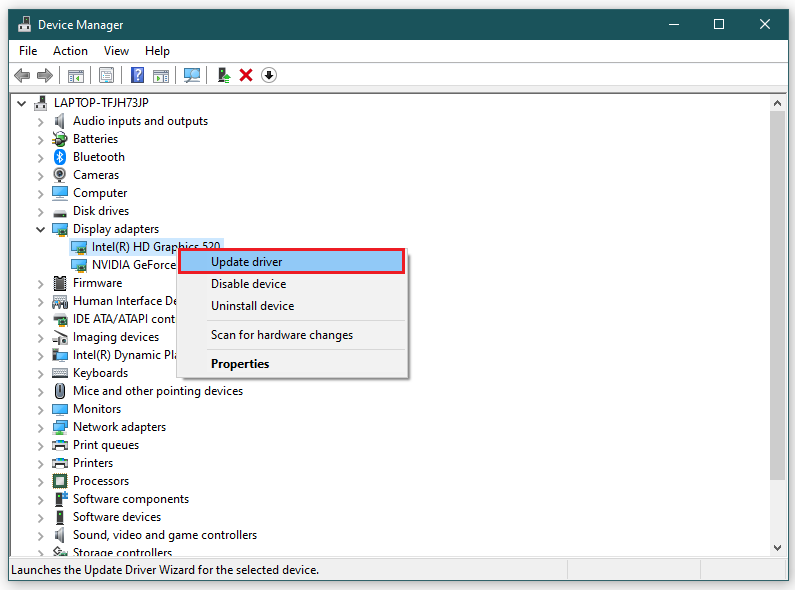
- Press Windows + R to open Run, type devmgmt.msc in the text field, and hit Enter.

- Expand the Display adapters entry, right-click on the graphics adapter, and select Update driver.

- Now, select Search automatically for drivers and wait for Windows to install the best one.


Corrupt or outdated drivers are likely to lead to the Resource Not Owned error in Windows 10 and even the latest iteration. So, update the drivers, starting with the one for your graphics adapter, since it’s usually responsible for the error.
If Windows can’t find a better version, you can also manually update the drivers. Bear in mind that you will have to do it for all the drivers on the PC. Also, sometimes, you may have to roll back the driver updates in case a newer version is not available.
Update drivers automatically
Searching for drivers on your own can be time-consuming. So, we advise you to use a tool that will do this for you automatically.
Using an automatic driver updater will certainly save you from the hassle of searching for drivers manually, and it will always keep your system up to date with the latest drivers. You can check these 10 best driver updaters for more efficiency.
3. Uninstall conflicting software
- Press Windows + R to open Run, type appwiz.cpl in the text field, and click OK.
- Now, select the app(s) installed around the same time the error first appeared and click Uninstall.

- Follow the on-screen instructions to complete the process.


Several users reported that they encountered the error due to a conflicting application. You could identify it using the log file, though the process isn’t as straightforward. But remember, it usually has to do with drivers.
Furthermore, if you use CCleaner to uninstall the troublesome software, it will wipe up all entries, ensuring that no files remain to cause BSOD issues.
⇒ Get CCleaner
4. Modify Internet options
- Press Windows + S to open the Search menu, enter Internet Options, and click on the relevant search result.

- Navigate to the Advanced tab, and scroll down to Security.
- Now, make sure the following four entries are checked, and then click on OK to save the changes.
- Use SSL 3.0
- Use TLS 1.0
- Use TLS 1.1
- Use TLS 1.2


If you are encountering the RESOURCE_NOT_OWNED blue screen error when using Edge, modifying the Internet Options should do the trick the way it did for other users.
- D3dx11_42.dll Not Found: How to Fix it
- Windows 11 Shutdown After Inactivity: 4 Ways to Stop it
- Windows Shuts Down Instead of Restarting: 4 Ways to Fix it
- Error no Ace Condition 804 (0x324): Fix it With 4 Steps
- Windows 11 Shutdown But User Stays Logged in: How to Fix it
5. Get the hardware checked
If none of the methods have worked yet, it’s likely a hardware problem to blame. First, check for RAM issues using the built-in Windows Memory Diagnostic tool, or run Memtest86+, an open-source third-party tool that runs extensive tests on the memory.

Also, check for dust accumulation and overheating (usually a sign of the former),and make sure all the connections are in order.
In case that, too, doesn’t work, you will have to get the hardware looked at by an expert for a thorough check. Some users had to get the CPU replaced for things to get up and running.
That’s it! By now, the RESOURCE NOT OWNED error should be fixed, and your computer working fine if it’s not a major hardware problem to blame.
Before you leave, do not forget to find out how to check a BSOD log to help effortlessly troubleshoot things.
If you have any other queries or know of a method not listed here, drop a comment below.
Milan Stanojevic
Windows Toubleshooting Expert
Milan has been enthusiastic about technology ever since his childhood days, and this led him to take interest in all PC-related technologies. He’s a PC enthusiast and he spends most of his time learning about computers and technology.
Before joining WindowsReport, he worked as a front-end web developer. Now, he’s one of the Troubleshooting experts in our worldwide team, specializing in Windows errors & software issues.
Mar. 13, 2023 / Updated by
Renata to
Windows 10

The Resource Not Owned error is one kind of Blue Screen of Death (BSOD) error. It may result in data loss and other issues. When the Resource Not Owned error occurs, you will see one of those error messages on your screen: A problem has been detected and Windows has been shut down to prevent damage to your computer. This article introduces six solutions to fix the Resource Not Owned Error BSoD issue.
The Resource Not Owned error typically occurs when a user does not have proper permissions to access a resource or file in Windows 10.
Here are some solutions you can take to fix this error:
Solution1. Update Drivers
Solution2. Run the Troubleshooter
Solution3. Take Ownership of the File or Folder
Solution4. Change Permissions
Solution5. Disable Antivirus Software
Solution6. Use Command Prompt
Solution1. Update Drivers
Blue screen of death errors is mostly related to drivers. You can have all the drivers installed on the system, for which you can use a third-party application to automatically check your system’s driver status and install all the drivers’ latest version.

With Driver Talent, you can easily detect outdated or missing drivers and update them with the latest versions. It also allows users to backup and restore drivers, which can be useful in case of system crashes or hardware failures. Additionally, the software provides information about the hardware components of a computer, including the manufacturer, model, and version of the drivers installed.
Download Driver Talent
Solution2. Run the Troubleshooter
Windows 10 has a built-in troubleshooter that can identify and fix common issues including Resource Not Owned Error(blue screen of death). To access the troubleshooter, go to the Settings app > Update & Security > Troubleshoot > select the appropriate troubleshooter for your problem.
Solution3. Take Ownership
If you are trying to access a specific file or folder, it may be necessary to take ownership of it.
You can follow the below methods to fix the Resource Not Owned Error:
Right-click on the file or folder and select Properties > Security tab > Advanced > Owner tab > Edit > select your user account > check the box for «Replace owner on subcontainers and objects» > OK.
Solution4. Change Permissions
In some cases, you may need to change the permissions on a file or folder to access it. Right-click on the file or folder and select Properties > Security tab > Edit > Add > enter your user account > OK > select your user account > check the box for «Full Control» > OK.
Solution5. Disable Antivirus Software
If you are still unable to access the resource, try disabling your antivirus software temporarily you might fix the Resource Not Owned Error.
Sometimes, antivirus software can interfere with certain file operations.
Solution6. Use Command Prompt
You can also try using the Command Prompt to fix the Resource Not Owned Blue Screen of Death. Open Command Prompt as an administrator and type the following command: «takeown /f [file path] /r /d y» (without quotes).
This will take ownership of the file or folder and give you the necessary permissions to access it.
Recommended Download
|
ExplorerMax |
Driver Talent for Network Card | |||
| Smart and advanced file explorer tool for Windows platforms | Download & Install Network Drivers without Internet Connection | |||
|
30-day Free Trial |
Free Download |