
Applies ToWindows 11 Windows 10
Support for Windows 10 will end in October 2025
After October 14, 2025, Microsoft will no longer provide free software updates from Windows Update, technical assistance, or security fixes for Windows 10. Your PC will still work, but we recommend moving to Windows 11.
Learn more
Resetting your PC in Windows is a powerful feature that allows you to restore your device to its original state, which can be useful whether you’re experiencing performance issues, software problems, or simply want a fresh start. This feature is designed to be user-friendly and provides several options to suit different needs.
Reset options
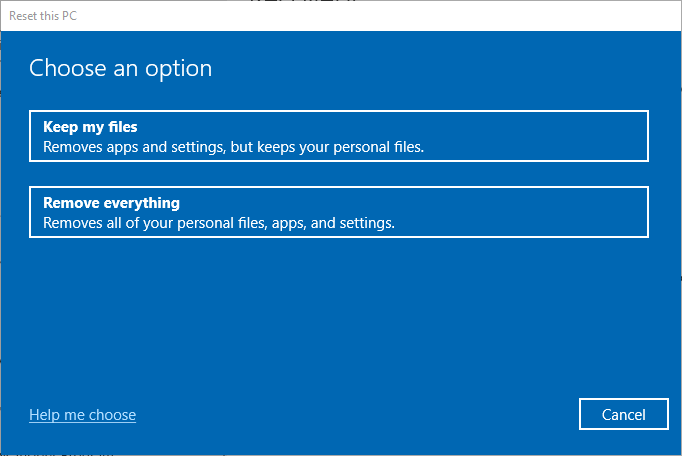
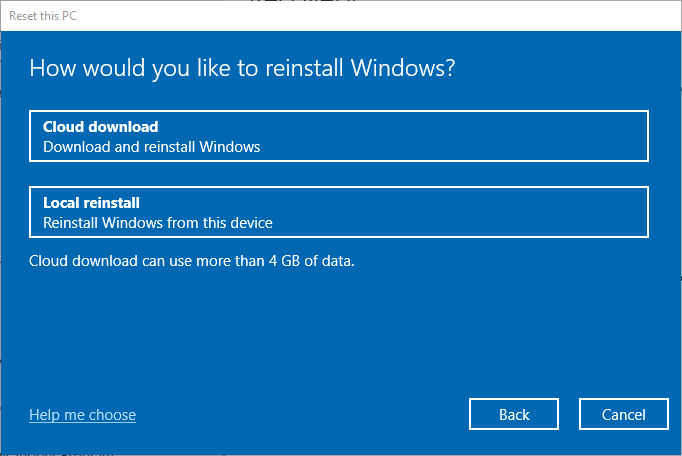
Here’s a list of options when resetting your PC:
|
Option |
Description |
|---|---|
|
Keep my files |
Also known as Refresh, this option reinstalls Windows while keeping your personal files intact. It removes apps and settings but preserves your documents, photos, and other personal data.
|
|
Remove everything |
Also known as Reset, this option reinstalls Windows and removes all your personal files, apps, and settings. It’s ideal for a fresh start or when you are giving away or selling your PC.
|
|
Cloud download |
This option downloads a fresh copy of Windows from the cloud, ensuring you get the latest version with all updates. It’s useful if your local files are corrupted or missing. |
|
Local reinstall |
This option uses the files already on your PC to reinstall Windows. It’s faster if you have a slow internet connection but may not include the latest updates. |
Note: The data erasure functionality is targeted at consumers and does not meet government and industry data erasure standards.
Reset steps
You can reset your PC when you are signed in to Windows or from the Windows Recovery Environment (Windows RE).
Important: During the resetting process, it’s possible that your screen might go black for a long period of time (occasionally upwards of 15 minutes) and that your device might attempt to restart itself. Manually attempting to restart the device yourself during this process could cause the reset to fail.
Select the option that best suits your needs:
-
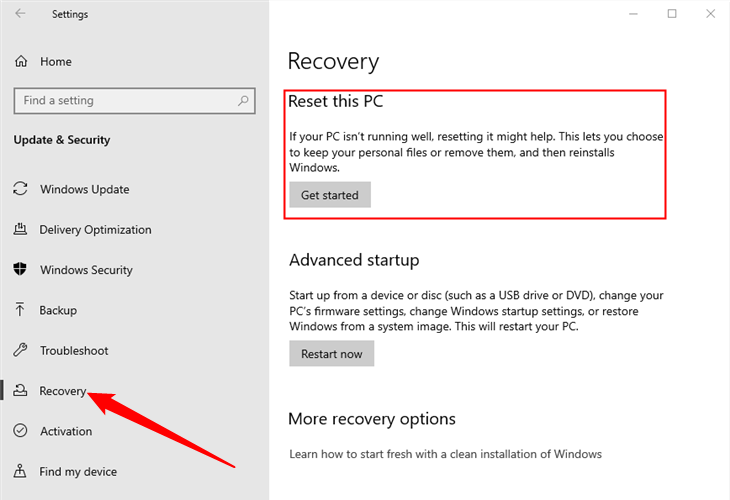
In the Settings app on your Windows device, select System > Recovery or use the following shortcut:Open Recovery settings
Note: In Windows 10, you can access from Update & Security > Recovery

-
Select Reset PC
-
Choose from the options and/or settings in the reset options table

Need more help?
Want more options?
Explore subscription benefits, browse training courses, learn how to secure your device, and more.
304
304 people found this article helpful
Reset This PC: Repair Tool for Serious Problems
Use Reset This PC to fix major problems in Windows 11, Windows 10, and Windows 8
Updated on October 8, 2021
Reset This PC is a repair tool for serious operating system problems, available from the Advanced Startup Options menu in Windows 11 and Windows 10.
The Reset This PC tool keeps your personal files (if that’s what you want to do), removes any software you have installed, and then reinstalls Windows.
In Windows 8, Reset This PC exists as two independent repair features under slightly different names: Refresh Your PC and Reset Your PC. More on those below.
When to Use Reset This PC (and When Not To!)
Reset This PC is almost always a fix-it tool of last resort. Reset This PC is a really big hammer—great for really big nails but probably overkill for a thumbtack. In other words, Reset This PC tool is a fantastic choice when the blame looks to be Windows-related and all other troubleshooting has failed.
For example, say you’re troubleshooting a major problem after a Windows update and now Windows 11 won’t start correctly. You’ve done everything you can think of to fix the problem, scoured the internet for advice, and you’re left with no more ideas. At this point, Reset This PC is your lifesaver—a guaranteed fix for a really frustrating problem.
When a webpage won’t load, your wireless mouse isn’t connecting, or you haven’t even tried restarting your computer to fix an annoying error message, Reset This PC probably isn’t the way to go.
Reset This PC removes all of your software, meaning a follow-up task on your part will be to reinstall that software. That’s a time-consuming task that’s well worth it if it means your computer is back to working order, but a huge waste of time if all you needed to do was clear your browser’s cache.
The word «reset» is often used synonymously with «restart,» but they’re actually different. See Reboot vs Reset for why the differences matter.
Reset This PC Availability
The Reset This PC tools is available in Windows 11 and 10, and as Refresh Your PC and Reset Your PC in Windows 8.
Windows 7 and Windows Vista do not have repair tools that work anything like Reset Your PC. The Repair Install process, available only in Windows XP, is very similar to the Keep my files version of Reset Your PC.
Reset This PC is pretty easy to use. Usually the most difficult thing to figure out is how to get to the right place (Advanced Startup Options) to get it started.
Reset This PC: A Complete Walkthrough
One of the easiest ways to get to the ASO menu is to hold down your Shift key while you tap or press any Reset option, available from any of the Power icons you’ll find all over Windows 11, Windows 10, and Windows 8.
-
Once you’re in, choose Troubleshoot and then Reset this PC if you’re using Windows 11/10. On Windows 8 computers, choose either Refresh your PC or Reset your PC.
-
Choose Keep my files in Windows 11/10 (or Refresh your PC in Windows
 to reinstall Windows but retain all of your personal files, like your saved documents, downloaded music, etc.
Choose Remove everything in Windows 11/10 (or Reset your PC in Windows
to reinstall Windows without saving anything at all (every installed program will be removed and all of your personal files deleted). This process starts you over completely fresh and is identical to the Windows clean install process.
On some computers, you may also see a Restore factory settings option. Choose this option to return your computer to the state it was in when you purchased it, which could mean a previous version of Windows if you’ve upgraded it since then.
-
Follow the directions given to start the «reset» process which, depending on the choices you make, could take as little as 10 minutes or as long as a few hours or more.
 to reinstall Windows but retain all of your personal files, like your saved documents, downloaded music, etc.
Thanks for letting us know!
Get the Latest Tech News Delivered Every Day
Subscribe
Время на прочтение2 мин
Количество просмотров23K

Microsoft признала наличие проблемы, затрагивающей некоторые устройства с Windows 10 и не позволяющей пользователям использовать функцию «Сбросить этот компьютер» для переустановки ОС.
Функция Reset this PC поставляется со всеми версиями Windows 10 и позволяет пользователям переустановить операционную систему с помощью локального образа для восстановления, либо последней версии Windows 10, на серверах Microsoft. При перезагрузке своего ПК пользователи также могут решить, хотят ли они сохранить свои файлы, удалить приложения и настройки или удалить все.
Согласно сообщению, опубликованному Microsoft, устройства под управлением Windows 10 версии 2004 оказались единственными, подверженными этой проблеме. При попытке сбросить ПК появляется сообщение об ошибке «Возникла проблема при перезагрузке компьютера».
Чтобы обойти эту проблему, Microsoft рекомендует клиентам использовать средство командной строки для обслуживания образов развертывания и управления ими (DISM) для подготовки образов в формате образа Windows (.wim) или виртуального жесткого диска (.vhd или .vhdx) для Windows PE, среды восстановления Windows (Windows RE) и программы установки Windows.
Согласно рекомендации Microsoft, пользователи должны использовать DISM для восстановления онлайн-образа Windows, используемого для перезагрузки компьютера, прежде чем пытаться снова использовать эту функцию.
Полная инструкция выглядит так:
- Откройте командную строку с повышенными привилегиями. Для этого нажмите кнопку «Пуск, введите «Командная строка» или cmd в поле поиска, выберите «Командная строка» и выберите «Запуск от имени администратора». Если вам будет предложено ввести пароль администратора или подтверждение, введите пароль или щелкните «Разрешить».
- Введите следующую команду и нажмите Enter: dism /online /cleanup-image /restorehealth.
- Перезагрузите систему и попробуйте сбросить ПК.
См. также:
- «Все нововведения Windows 10 October 2020 Update»
- «Инсайдеры объяснили, почему на Windows 10 без ведома пользователя устанавливались веб-приложения Office»
- «Вышел Microsoft Edge для Linux»
Quick Links
-
How Resetting Your PC Works
-
How to Reset Your PC in Windows 10 and Windows 11
-
How to Reset Your PC From the Boot Menu
-
How to Get a Fresh Windows 10 or Windows 11 System Without the Bloatware
Summary
To use «Reset this PC», navigate to Settings > Updates and Security > Recover on Windows 10, or Settings > System > Recovery on Windows 11. Reset This PC can be used to repair damaged Windows installations, remove bloatware that came pre-installed with Windows, or as a «nuclear option» to remove most malware.
Windows includes a «Reset your PC» option that quickly restores Windows to its factory default configuration. It’s faster and more convenient than reinstalling Windows 10 or Windows 11 from scratch.
How Resetting Your PC Works
When you use the «Reset this PC» feature in Windows, Windows resets itself to its factory default state. If you purchased a PC and it came with Windows 10 or Windows 11 installed, your PC will be in the same state you received it in. By default, all manufacturer-installed software and drivers that came with the PC will be reinstalled, though you can force it to install a clean version of Windows. If you installed Windows 10 or Windows 11 yourself, it will be a fresh Windows system without any additional software.
You can choose whether you want to keep your personal files or erase them. However, all your installed programs and settings will be erased. This ensures you have a fresh system. Any problems caused by third-party software, system file corruption, system settings changes, or malware should be fixed by resetting your PC.
If your computer came with Windows pre-installed, you may also see a third option, «Restore Factory Settings.» This will restore the original version that came with your PC — so if your computer came with Windows 10, and you upgraded to Windows 11, it will reset back to Windows 11.
This process is very similar to reinstalling Windows from scratch or using a manufacturer-supplied recovery partition, but it’s more convenient.
Windows 8 had separate «Refresh your PC» and «Reset your PC» options. Refresh kept all your files and personalization settings but set your PC settings to the defaults and uninstalled your desktop apps. Reset removed everything, including your files — like doing a complete Windows reinstall from scratch.
Under the Hood
Microsoft explained what’s actually going on under the hood when it originally introduced this feature. When you reset your PC and remove everything:
-
- The PC boots into Windows RE, the Windows Recovery Environment
- Windows RE erases and formats the Windows partitions before installing a fresh copy of Windows.
- The PC restarts into the new copy of Windows.
When you choose to keep your files, the same steps occur. However, before erasing your Windows partition, Windows RE scans the hard drive for your files and personal settings. It places them aside, installs a fresh copy of Windows, and puts them back where they were found.
Whether you choose to keep your personal files or not, this process involves a completely fresh Windows system. That’s why your desktop programs are erased.
How to Reset Your PC in Windows 10 and Windows 11
To reset your PC to its factory default settings on Windows 10, just open the Settings app and head to Update & Security > Recovery. Click or tap the «Get Started» button under «Reset this PC.»
To reset a PC running Windows 11, open the Settings app, then navigate to System > Recovery instead. The rest of the process is identical.
You can choose to either «Keep my files» or «Remove everything.» If you select «Keep my files,» Windows will reset Windows to its default state, removing your installed applications and settings but keeping your personal files. If you select «Remove everything,» Windows will erase everything, including your personal files.
If you just want a fresh Windows system, select «Keep my files» to reset Windows without deleting your personal files. You should use the «Remove everything» option when selling a computer or giving it to someone else, as this will erase your personal data and set the machine to its factory default state. Either way, it’s a good idea to have backups of your important files before using this feature.
In Windows 8, the «Keep my files» option was named «Refresh your PC» and the «Remove Everything» option was named «Reset Your PC». Windows 10 and Windows 11 simplify things by calling this process «Reset your PC» and asking what you want to do with your files.
You must pick between downloading a new copy of Windows from Microsoft and reinstalling Windows from the assets on your PC. Whether you use the cloud download or the local reinstall depends on your needs. If you’ve got fast internet without a data cap, you have nothing to lose going with the cloud download.
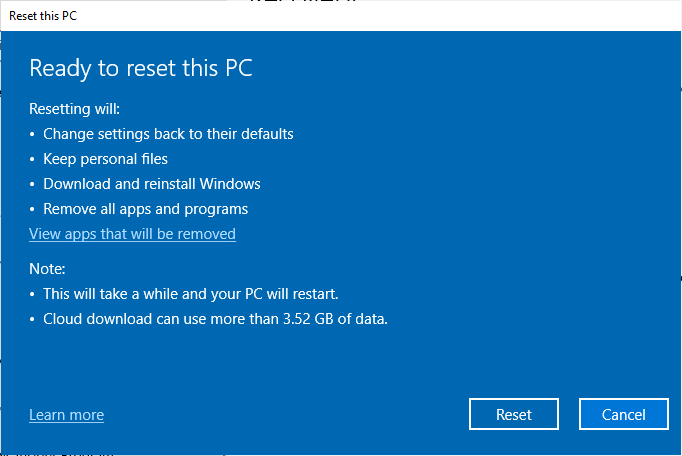
If you’re okay with a factory reset, just click through the next few pages until you get to the «Ready to Reset this PC» page, then click «Reset.»
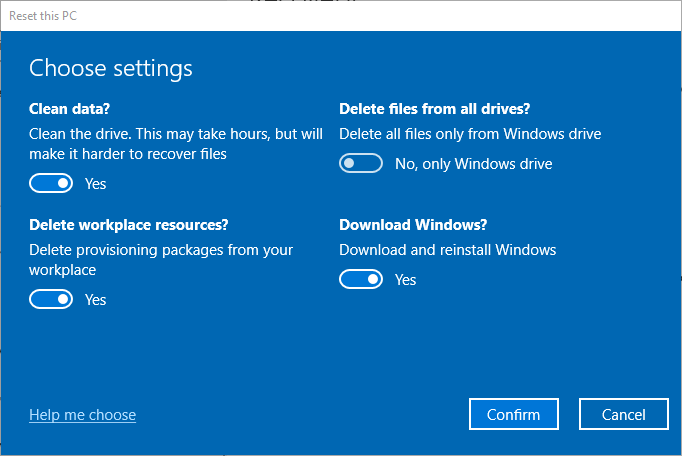
If you choose to remove everything instead of keeping your files, you’ll have an option to «clean» your drives, too. Whether or not you should spend the time on that depends on a few considerations:
- Is your boot drive a conventional hard disk drive (HDD), or some kind of solid-state drive (SSD)?
- Were you using Bitlocker, or any other kind of drive encryption?
- Are any of the drives you’re wiping hard disk drives (HDDS)?
- Are you planning on giving away, selling, or getting rid of your computer?
If you’re wiping conventional mechanical hard drives and you’re going to be selling or giving away your computer, and you were not using any kind of drive encryption, you should absolutely use the cleaning function. The clean function will overwrite the existing data on the drive to make it unrecoverable. Without that special precaution, it is easy to recover «deleted» data from an HDD. That means whoever winds up with your computer could conceivably recover pictures, videos, passwords, and other files if you’re not careful!
SSDs present much less of a security risk than older HDDs because of TRIM — files that you delete are typically removed from the SSD immediately, or at worst removed via a scheduled retrim.
If your drive was encrypted, you don’t need to worry as much about cleaning the data, regardless of whether it was an SSD or an HDD. Modern encryption schemes are quite robust, and while files might be recoverable, they’re going to be unreadable. Breaking into them would require an encryption backdoor, a supercomputer, or several trillion years of free time to spend brute-forcing the Bitlocker Recovery Key on an RTX 4090.
Other attacks exist besides a brute force approach, but the odds of someone working that hard to get your data is very low.
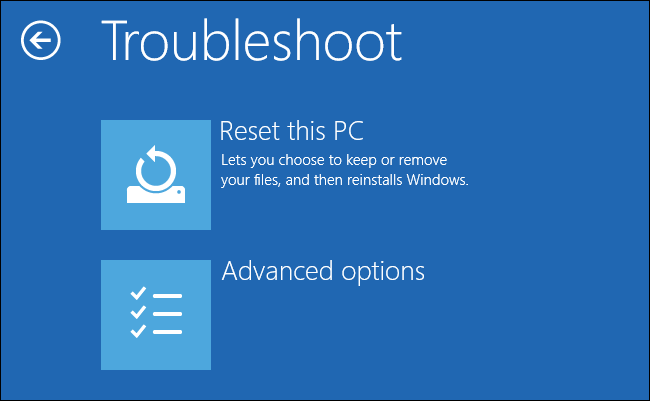
If you end up getting a «There Was a Problem Resetting This PC» message, learn how to fix when you can’t reset your Windows PC.
If your Windows PC isn’t booting properly, you can reset it from the boot options menu. We’ve covered several ways to access this menu. However, this menu will also appear automatically if Windows can’t boot.
Select Troubleshoot > Reset this PC to reset your PC from the menu.
How to Get a Fresh Windows 10 or Windows 11 System Without the Bloatware
The «Reset this PC» option is convenient, but there’s one big problem with it: if your PC manufacturer installed a lot of junk software you don’t want at the factory, resetting your PC can bring all that junk back.
Thankfully, Windows 10 and Windows 11 include an easy way to ensure you get a fresh-from-Microsoft Windows system. Open up the «Reset This PC» utility like you normally would, but carefully look for the page that has «Change Settings» on it, then click «Change Settings.»

Make sure to click the toggle under «Restore Preinstalled Apps» to the «No» position, then click confirm.
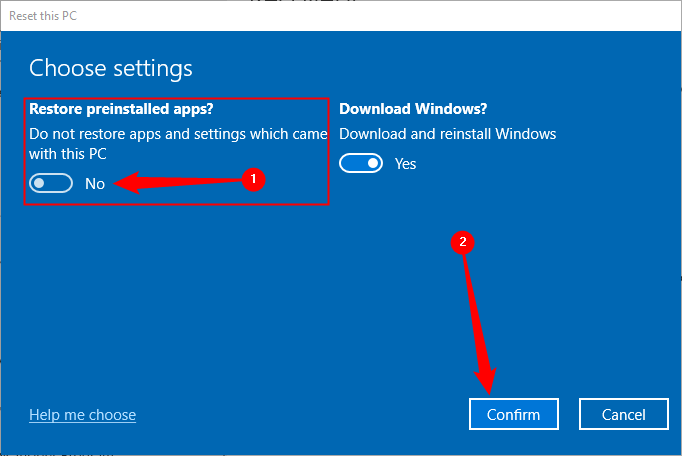
Then just proceed with the reset like you normally would — it will download a Windows image straight from Microsoft and install it on your system or rebuild a clean copy from your existing local files, giving you a fresh-from-Microsoft system with none of that factory software installed.
The hardware drivers you need should be automatically downloaded from Windows Update after you’re done. If you need a hardware driver or utility that isn’t automatically installed from Windows Update, you’ll find them on your PC manufacturer’s download site. Typically, you’ll want to manually download drivers for your graphics card at least. If you have a dedicated sound card, or a fancy mouse or keyboard, you’ll probably want to manually download those drivers too.
Windows 8 allowed you to create a custom refresh image. Whenever you refreshed or reset your PC, it would use your custom image instead of the default one. For example, you could uninstall bloatware that came with your PC, install important software, or change system settings and then create a refresh image with the current system state. However, this option is no longer present in Windows 10 or Windows 11 — but the bloatware-less option is at least a nice consolation prize.
Table of contents
- Causes of the Endless Reboot Loop After Trying to Bring it back to Its Factory Settings?
- How to Fix Endless Reboot Loop
- Method 1: Repairing the System using a Bootable USB Flash Drive or Disk
- Method 2: Waiting it Out
- Method 3: Disabling your Internet connection
- Method 4: Changing your BIOS Settings
- Method 5: Reinstalling Windows 10
- Final Thoughts
According to Microsoft, Windows 10 has around 400 million active users to date, making it four times more popular than Mac. While that is still a far cry from the tech company’s initial estimate of 1 billion users by 2018, the figures are still relatively astonishing.
However, nothing in this world can be absolutely perfect. So, like many other new technologies, Windows 10 can run into some bugs and problems that are quite challenging to solve.
The operating system is riddled with glitches and issues, including one that affects the reset process.
In this article, we will show you several ways to resolve that problem. However, before you learn how to fix Windows 10 stuck in a boot loop after a reset, let’s take a look at the common scenarios related to the issue.
Causes of the Endless Reboot Loop After Trying to Bring it back to Its Factory Settings?
- Resetting this PC stuck at 35 – It is possible for the reset process to get stuck at any time. In most cases, you just have to wait it out until it is complete. Do note that the process may sometimes take several hours.
- Dell, HP, and ASUS laptop factory reset got stuck – This problem can affect various laptops. If you are the unlucky victim, you can try removing your device’s battery. Insert it again, then resume the factory reset process.
- Computer’s factory reset got stuck – If this happens to you, you can try using the Startup Repair feature to resolve the issue.
- Surface Pro 4 factory reset got stuck – The problem can affect Surface Pro 4 too. However, you can resolve it, using the solutions we’ve shared in this post.
- Factory reset stuck in a boot loop – This issue can be fixed by performing a clean install. However, remember to create a backup of your files before deciding to proceed with that option.
PRO TIP
Regular system maintenance is key to avoiding these issues and keeping your PC running smoothly. Auslogics BoostSpeed can help by optimizing your PC’s performance, fixing registry errors, and clearing out unnecessary files.
With BoostSpeed, you can avoid potential problems during processes like factory resets, keeping your device in top condition.
Further Reading: The Ultimate Guide to Windows 10 Backup and Restore
How to Fix Endless Reboot Loop
Method 1: Repairing the System using a Bootable USB Flash Drive or Disk
One of the ways to fix this issue is to run the Startup Repair. Before proceeding, you need to download the Media Creation Tool and create a bootable media.
Once you’ve done that, you can proceed to the following steps:
- Insert the bootable USB flash drive or disk to your computer, then restart your device. After plugging the bootable media, you should see a list of options, asking whether you want to boot your PC from the USB stick or DVD. On the other hand, if you do not see that message, you must go to your BIOS, then place the USB stick or DVD on top of the boot order.
- After booting into the Windows installation, select Repair your Computer, then click Advanced Options.
- Now, you have to select Troubleshoot, then click Startup Repair.
- Follow the on-screen instructions to complete the process.
Once the Startup Repair process is done, check if the issue persists.
Also Interesting: How to Perform a Clean Boot in Windows 10?
Method 2: Waiting it Out
When the factory reset gets stuck, one of your best options is to simply wait it out. Several factors can cause this issue.
If your hard drive LED indicator is still blinking, then it means the reset process is still running. In this case, you just need to wait for it to complete.
Many users reported that this can take several hours. You might even need to leave your computer running overnight to ensure that the process finishes completely.
Method 3: Disabling your Internet connection
You might ask, “What if Windows 10 gets stuck in an endless reboot loop?” Well, it is possible that your Internet connection is interfering with the process.
Your computer might have gotten stuck after downloading some updates. To resolve the problem, you need to disable your Internet connection.
Simply unplug the Ethernet cable from your computer or switch off your wireless router. Once you’ve disabled your network, you will be able to complete the factory reset.
Related: Why Is My Internet Not Working? Pro Tips for a Quick Fix
Method 4: Changing your BIOS Settings
The issue might have something to do with your BIOS settings. It is possible that some features are interfering with your system, disrupting the factory reset process.
To resolve this problem, you need to go to your BIOS settings and perform the following:
- Disable Secure Boot.
- Enable Legacy Boot.
- If the option is available, enable CSM.
- If necessary, enable USB boot.
- Place your bootable disc or USB drive on top of the boot order.
Once you’ve done that, remember to save the changes you made. Try performing a factory reset and see if you can now complete it successfully.
Also Read: What is BIOS on a Computer: Everything You Need to Know
Method 5: Reinstalling Windows 10
If you’ve tried the previous methods and none of them worked, then your last resort is performing a clean installation of Windows 10.
However, before you do that, we strongly advise that you create a backup of your files. Keep in mind that this solution will remove all the files in your C drive.
Once you’ve created a backup of your files, use the Media Creation Tool to create an installation media. If you have your bootable disc or USB flash drive ready, you can proceed to these steps:
- Plug the installation media to your computer.
- Boot your device via the installation media.
Note
You might need to go to your BIOS settings to change the boot order, ensuring that the installation media is at the top of the options.
- You will now be asked to choose your preferred installation language. Once you’ve made your selection, click Next.
- To proceed, click the Install Now button.
- You will be asked to submit your product number. If you wish, you can skip this step and opt to activate your system later.
- Read the Terms of Service. If you agree with them, select Accept, then click Next.
- Choose the Custom: Install Windows only (advanced) option.
- The next thing you need to do is select the drive where Windows is installed.
Note
Typically, this is the System and Primary drive. However, that is not always the case. So, to be certain that you’re selecting the system drive, check everything before you proceed.
Keep in mind that if you choose the wrong drive, you will end up formatting it and removing all the files it contains.
Moreover, you will have two versions of the operating system on your computer. So, it is important that you take precautions, ensuring that you are selecting the drive with Windows.
- You can proceed by clicking Next.
- Follow the on-screen instructions to complete the installation process.
After finishing the installation, the problem should be resolved. Remember that this is a drastic solution. That said, you should only use this method if the other solutions did not work for you.
Related: [SOLVED] Hard Drive Not Detected During Windows 10 Installation
Final Thoughts
If you decided to perform a Windows 10 factory reset because your computer was intolerably slow, you should get to the bottom of the problem to prevent it from happening again.
In this case, we recommend installing a powerful tool that can consistently maintain the speed and performance of your PC.
There are many programs out there that can perform this job, but you can truly rely on Auslogics BoostSpeed.
Download Auslogics BoostSpeed
Your one-stop PC maintenance and optimization tool, this program will clean, speed up, repair and tweak your system to ensure maximum speed and efficiency.
What this tool does is tweak non-optimal system settings, helping operations and processes go at a faster pace.
Moreover, it adjusts your Internet connection settings, ensuring faster downloads, smooth browsing, and better audio/video call quality.
What’s more, you can schedule its cleaning module to regularly sweep out all kinds of junk in your PC, including temporary files, web browser cache, leftover Windows Update files, temporary Sun Java files, and unnecessary system files, among others.
It will locate and address speed-reducing issues that may cause application or system crashes or glitches.
We want to know if our solutions helped you fix the error.
Share your thoughts in the comments section!