
Today lets go through a bit long step on how to configure DNS Zone transfer.
Before i start with the step by step, let go through some information about DNS Zone Transfer.
DNS zone transfers determine how the DNS infrastructure moves DNS zone information from one server to another. Without zone transfers, the various name servers in your organization maintain disparate copies of zone data.
*_* You also should consider that the zone contains sensitive data, and securing zone transfers is important.
A zone transfer occurs when you replicate the DNS zone that is on one server to another DNS server.
Zone transfers synchronize primary and secondary DNS server zones. This is how DNS builds its resilience on the Internet.
DNS zones must remain updated on primary and secondary servers. Discrepancies in primary and secondary zones can cause service outages and host names that resolve incorrectly.
Reminder : Please practice this step in your isolated network & in your own VM.
Infrastructure Requirement :
- 1 DC SERVER (DC-CLOUD.Windows.ae) ADDS, DNS
- 1 SUB SERVER (SUB-01.Windows.ae) DNS
Let start with my 1st Server which is DC-CLOUD.Windows.ae
1 – Before we start with the DNS Zone transfer, lets add some information in DNS, for this demo, i will add New Host in my DNS. right click domain name (Windows.ae), and then click New Host (A or AAAA).

2 – Next, on the New Host box, i enter Server-Exchange2016 under the Name (this server is my demo Exchange Server), and then key in the server IP address.

3 – It should prompt the host record was successfully created.

4 – Next, right click domain name again to create New mail Exchange (MX) record.

5 – On the New Resource Record box, enter FQDN name for the my mail server (Exchange Server) and click OK.


6 – It should appear in your DNS source list.

7 – Next, still on the DC-CLOUD.Windows.ae Server, in the DNS console, right click Reverse Lookup Zone and click New Zone.
*_* reverse lookup zone resolves an IP address to a domain name, and hosts start of authority (SOA), name server (NS), and pointer (PTR) resource records.

8 – On the New Zone Wizard, click Next.

9 – On the Zone Type, click Primary Zone and click Next to continue.

10 – On the Active Directory Zone Replication Scope, click button no.2 (refer to pic)

11 – Next on the Reverse Lookup Zone Name box, click IPv4 Reverse Lookup Zone and click Next to continue.

12 – Next on the Reverse Lookup Zone Name, type 712.16 and click Next.

13 – On the Dynamic Update box, click Allow only secure dynamic updates (recommended for Active Directory), then click Next.

14 – Next, click Finish.

15 – Now, let continue installing DNS Services on the SUB-01.Windows.ae (Domain Member Server) which is this server will replicate all the DNS information.
*_* On the SUB-01.Windows.ae server, in the Select server roles list click DNS Server and click Next to proceed.

16 – Then on the Select features page, click Next to proceed.

17 – Then on the DNS Server page, click Next to proceed.

18 – Next, click Install.

19 – Once the DNS installation is completed, click Close.

20 – Next, lets create secondary zone by using Windows PowerShell. Type:
Add-DnsServerSecondaryZone -Name “Windows.ae” -ZoneFile “Windows.ae.dns” -MasterServers 172.16.1.254

21 – Next, return to domain server (DC-CLOUD.Windows.ae), and open PowerShell, type this cmdlet to enable zone transfer.
Set-DnsServerPrimaryZone -Name “Windows.ae” –Notify Notifyservers –notifyservers “172.16.1.240” -SecondaryServers “172.16.1.240” –SecureSecondaries TransferToSecureServers

22 – Next, still on the DC-CLOUD.Windows.ae Domain server, open DNS console to refresh the information then right click domain name (Windows.ae) then click properties.

23 – On the Windows.ae properties box, click Zone Transfer tab and then verify the IP address and server FQDN. then click notify.

24 – Next, on the Notify box, verify that SUB-01 IP Address has been validated and click cancel.

25 – Next, let configure Aging/Scavenging for All our existing Zones, right click Server Name (DC-CLOUD.Windows.ae) and click Set Aging/Scavenging for All Zones.

26 – On the Server Aging/Scavenging Properties, click Scavenge stale resource records box and click OK to proceed.

27 – Next, in the Server Aging/Scavenging Confirmation box, click Apply these settings to the existing Active Directory–integrated zones and then click OK.

28 – Our final step, lets verify that our both Domain Server & member server should replicate the DNS resource record.

that’s all for now.., any Doubts type a commend.. 🙂
Active Directory это надежный, но в то же время крайне сложный и критичный сервис, от работоспособности которого зависит работа всей вашей сети. Системный администратор должен постоянно мониторить корректность работы Active Directory. В этой статье мы рассмотрим основные методики, позволяющие вам быстро проверить и диагностировать состояние вашего домена Active Directory, контроллеров домена и репликации.
Содержание:
- Проверка состояния контроллеров домена с помощью Dcdiag
- Проверка ошибок репликации между контроллерами домена Active Directory
Проверка состояния контроллеров домена с помощью Dcdiag
Базовая встроенная утилита для проверки состояния контролеров домена – dcdiag.
Чтобы быстро проверить состояние конкретного контроллера домена AD воспользуйтесь командой:
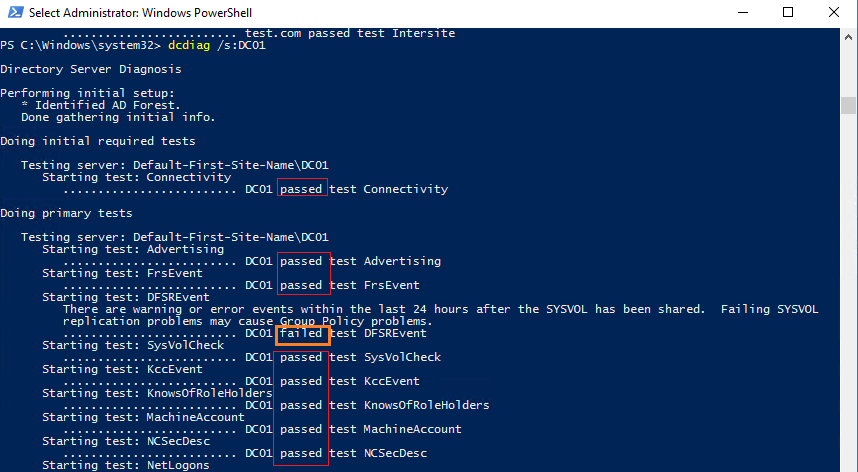
dcdiag /s:DC01
Данная команда выполняет различные тесты указанного контроллера домена и возвращает статус по каждому тесту (Passed| Failed).
Типовые тесты:
- Connectivity – проверяет регистрацию DC в DNS, выполняет тестовые LDAP и RPC подключения;
- Advertising – проверяет роли и сервисы, опубликованные на DC;
FRSEvent – проверяет наличие ошибок в службе репликации файлов (ошибки репликации SYSVOL); - FSMOCheck – проверяет, что DC может подключиться к KDC, PDC, серверу глобального каталога;
- MachineAccount — проверяет корректность регистрации учетной записи DC в AD, корректность доверительных отношения с доменом;
- NetLogons – проверка наличие прав на выполнение репликации;
- Replications – проверка статуса репликации между контроллерами домена и наличие ошибок;
- KnowsOfRoleHolders – проверяет доступность контроллеров домена с ролями FSMO;
- Services – проверяет, запущены ли на контроллере домена необходимые службы;
- Systemlog – проверяет наличие ошибок в журналах DC;
- И т.д.
Полное описание всех доступных тестов есть здесь.
Помимо стандартных тестов, которые выполняются по-умолчанию, можно выполнить дополнительные проверки контроллера домена:
- Topology – проверяет, что KCC сгенерировал полную топологию для всех DC;
- CheckSecurityError
- CutoffServers – находит DC, который не получает репликацию из-за того, что партнёр недоступен;
- DNS – доступны 6 проверок службы DNS (/DnsBasic, /DnsForwarders, /DnsDelegation, /DnsDymanicUpdate, /DnsRecordRegistration, /DnsResolveExtName)
- OutboundSecureChannels
- VerifyReplicas – проверяет корректность репликации разделов приложения
- VerifyEnterpriseReferences
Например, чтобы проверить корректность работы DNS на всех контроллерах домена, используйте команду:
dcdiag.exe /s:DC01 /test:dns /e /v
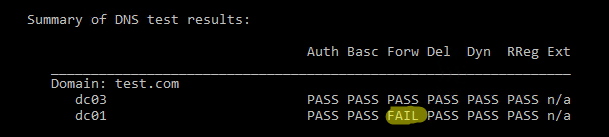
В результате должна появится сводная таблица по проверкам разрешения имен службой DNS на всех контроллерах (если все ОК, везде должно быть Pass). Если где-то будет указано Fail, нужно выполнить проверку этого теста на указанном DC:
dcdiag.exe /s:DC01 /test:dns /DnsForwarders /v
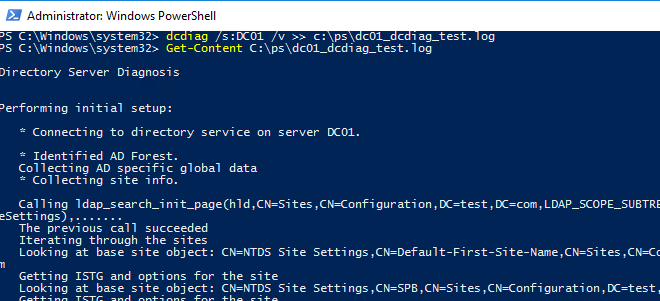
Чтобы получить расширенную информацию по результатам тестов контроллера домена и сохранить ее в текстовый файл, используйте команду:
dcdiag /s:DC01 /v >> c:\ps\dc01_dcdiag_test.log
Следующая команда PowerShell позволяет вывести только информацию о выполненных тестах:
Dcdiag /s:DC01 | select-string -pattern '\. (.*) \b(passed|failed)\b test (.*)'

Чтобы получить состояние всех контроллеров домена, используйте:
dcdiag.exe /s:winitpro.ru /a
Если нужно вывести только найденные ошибки, используйте параметр /q:
dcdiag.exe /s:dc01 /q

В моем примере утилита обнаружила ошибки репликации:
There are warning or error events within the last 24 hours after the SYSVOL has been shared. Failing SYSVOL replication problems may cause Group Policy problems.
......................... DC01 failed test DFSREvent
Чтобы утилита dcdiag попробовала автоматически исправить ошибки в Service Principal Names для данной учетной записи DC, используйте параметр /fix:
dcdiag.exe /s:dc01 /fix
Проверка ошибок репликации между контроллерами домена Active Directory
Для проверки репликации в домене используется встроенная утилита repadmin.
Базовая команда проверки репликации:
repadmin /replsum
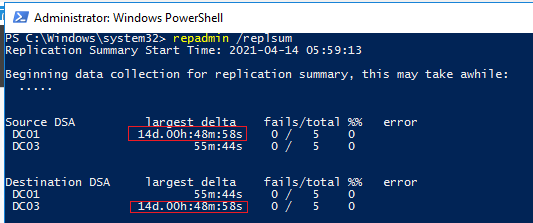
Утилита вернула текущий статус репликации между всеми DC. В идеальном случае значение largest delta не должно превышать 1 час (зависит от топологии и настроек частоты межсайтовых репликаций), а количество ошибок = 0. В моем примере видно, что одна из последних репликаций заняла 14 дней, но сейчас все OK.
Чтобы выполнить проверку для всех DC в домене:
repadmin /replsum *
Проверку межсайтовой репликции можно выполнить так:
repadmin /showism
Для просмотра топологии репликации и найденных ошибках, выполните:
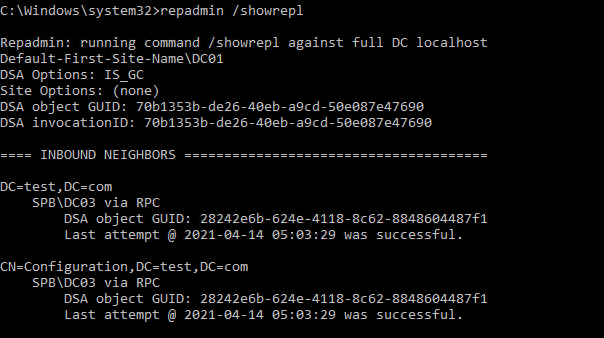
repadmin /showrepl
Данная команда проверит DC и вернет время последней успешной репликации для каждого раздела каталога (last attempt xxxx was successful).
Для вывода расширенной информации, используйте:
repadmin /showrepl *
Для запуска репликации паролей с обычного контроллера домена на контроллер домена на чтение (RODC) используется ключ /rodcpwdrepl.
Опция /replicate позволяет запустить немедленную репликацию указанного раздела каталога на определенный DC.
Для запуска синхронизации указанного DC со всеми партнерами по репликации, используйте команду
replmon /syncall <nameDC>
Для просмотра очереди репликации:
repadmin /queue
В идеальном случае очередь должна быть пуста:

Проверьте время создания последней резервной копии текущего контроллера домена:
Repadmin /showbackup *
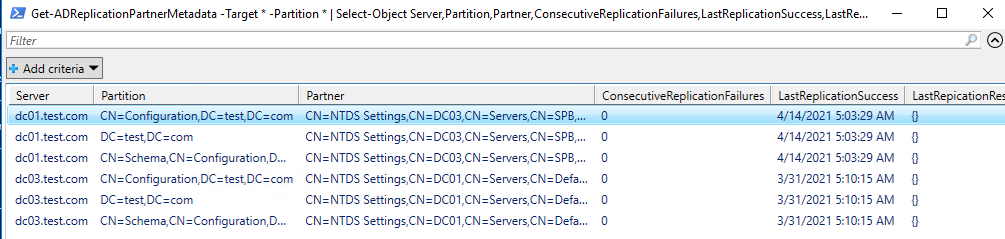
Вы также можете проверить состояние репликации с помощью PowerShell. Например, следующая команда выведет все обнаруженные ошибки репликации в таблицу Out-GridView:
Get-ADReplicationPartnerMetadata -Target * -Partition * | Select-Object Server,Partition,Partner,ConsecutiveReplicationFailures,LastReplicationSuccess,LastRepicationResult | Out-GridView
Можете дополнительно с помощью Get-Service проверить состояние типовых служб на контроллере домена:
- Active Directory Domain Services (ntds)
- Active Directory Web Services (adws) – именно к этой службе подключаются все командлеты из модуля AD PowerShell
- DNS (dnscache и dns)
- Kerberos Key Distribution Center (kdc)
- Windows Time Service (w32time)
- NetLogon (netlogon)
Get-Service -name ntds,adws,dns,dnscache,kdc,w32time,netlogon -ComputerName dc03

Итак, в этой статье мы рассмотрели базовые команды и скрипты, которые можно использовать для диагностики состояния вашего домена Active Directory. Вы можете использовать их во всех поддерживаемых версия Windows Server, в том числе на контроллерах домена в режиме Server Core.
Home » Immediate AD DNS Replication
Any kind of AD changes need to be registered on a writable domain controller. These changes include adding, modifying or deleting user- or computer accounts, group policy objects, etc. When these changes are actioned on a member DC, it takes time for that change to replicate to all other domain controllers across the domain.
In this lab we take a look at triggering instant replication of both AD objects and their special subset: DNS zones.
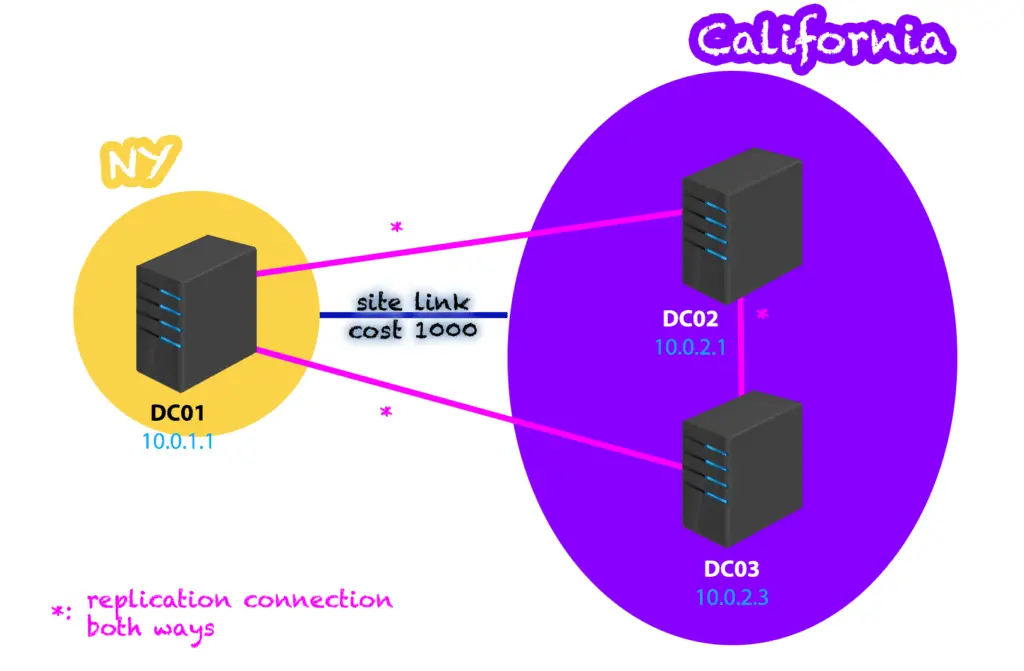
We use the following topology in our lab: two AD sites, one called NY and contains DC01, the other is called CA and contains DC02 and DC03 domain controllers. The link cost between the two sites is set to 1000. All servers have replication-connections with all the others, forming a proper mesh topology.
I. Active Directory Replication
1. Intra-Site replication
Replication is almost instantaneous between domain controllers in the SAME AD site. When a change happens, the source DC waits 15 seconds and then it starts notifying the partner DCs of the change, if there are multiple partners, notifications are sent 3 seconds apart to each separately. After they receive the notifications, each of them will request replication from the source.
2. Inter-Site replication
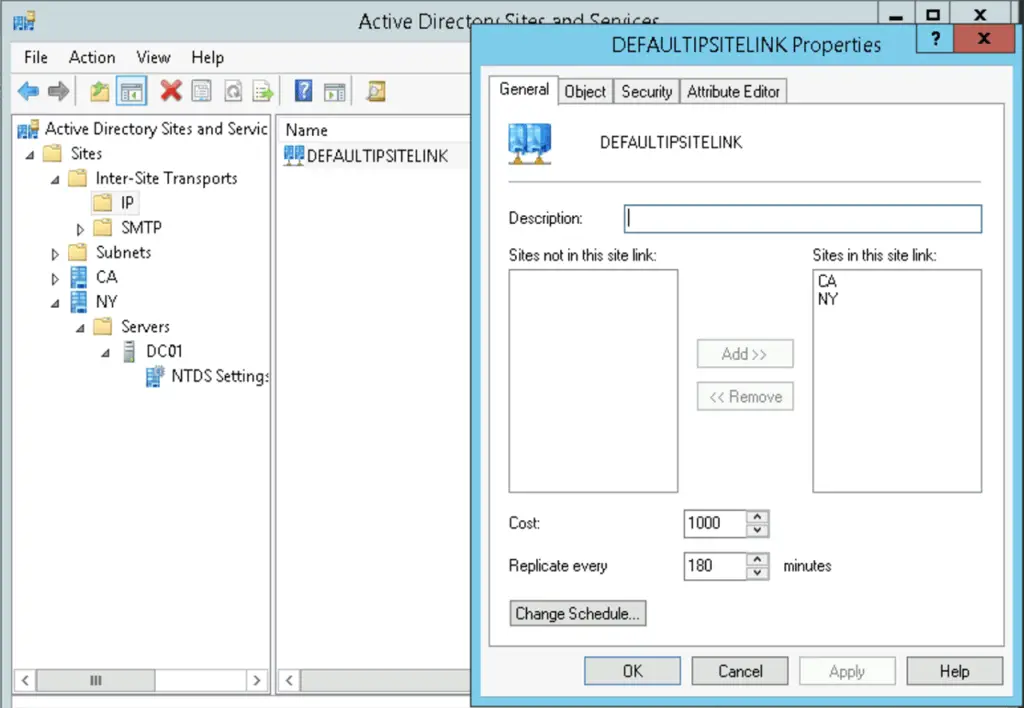
Replication between sites happen less frequently to save precious bandwidth, as sites are usually connected with slower WAN connections. By default, inter-site replication happens every 180 minutes, but can be set as low as 15 minutes if needed, using the Active Directory Sites and Services snippet.
To trigger an immediate replication cycle, use the following command on a member DC:
This will trigger replication across the whole domain between all connected DCs.
Switches:
- /syncall Synchronizes a specified domain controller with all replication partners
- /A Synchronizes all naming contexts that are held on the home server
- /P Pushes changes outward from the specified domain controller
- /e Synchronizes domain controllers across all sites in the enterprise. By default, this command does not synchronize domain controllers in other sites
- /d Identifies servers by distinguished name in messages
1. Intra-Site replication
Replication of domain record changes inside a single AD site is almost as instant as AD object replication, in our tests we added the «NewIntraTest.protectigate.com» A record on DC02. The new record was replicated within 2 minutes to DC03, without any intervention.

2. Inter-Site replication
Similar to the AD replication cycle, when we make DNS changes on a DC and force replication to push out changes to the other domain controllers, the DNS records are replicated as well.
However, DNS changes are polled every 15 minutes by default for AD integrated zones.
To speed up that process we can use the following command to update the zone records on the target DC after AD replication, but before DNS polling
dnscmd /zoneupdatefromds protectigate.com
So remember: first use the repadmin command ON THE SOURCE DC, where the change happened. Then use the dnscmd command ON THE TARGET domain controller, where we want to replicate the DNS changes!
The following diagram shows successful instant inter-site DNS replication.

* the
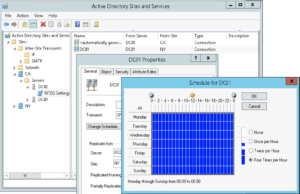
polling frequency can be set to hourly, 30min, 15min (default), or no polling in the AD Sites and Services snippet, right-clicking on individual server connections, Properties and click on «Change Schedule«
Reader Interactions
The Domain Name System (DNS) stands as a pivotal service, serving the purpose of executing the process of name resolution. This procedure involves the intricate task of mapping domain names to their corresponding IP addresses and the reciprocal mapping of IP addresses to domain names. Despite the fundamental communication between systems relying on IP addresses, the daunting challenge of retaining the multitude of IP addresses for numerous clients within an expansive enterprise network becomes apparent. This is where the DNS service emerges, granting the capability to interact with systems via domain names, a far more manageable and memorable alternative to the labyrinthine realm of IP addresses.
Within the scope of this discourse, we shall elucidate the methodology to install and configure a DNS server on a Windows Server 2016 platform. Prior to embarking on the configuration journey of the DNS server, it is imperative to acquaint oneself with the underlying topology that we are poised to employ. Our elucidation of this meticulous guide will be accompanied by the utilization of the ensuing set of systems:
DC1: This designated entity embodies a preconfigured Windows Server 2016 domain controller, meticulously structured for the mcsalab.local domain. Its allocated IP address is set as 10.0.0.100/8, and its designated roles as a Primary DNS Server and Secondary DNS Server correspond to the IP addresses 10.0.0.100 and 10.0.0.101, respectively.
Server1: An integral component of the mcsalab.local domain, Server1 manifests as a Windows Server 2016 member server. Its assigned IP address reads as 10.0.0.101/8, while it dutifully undertakes the mantle of both a Primary DNS Server and Secondary DNS Server, the former being represented by the IP address 10.0.0.101, and the latter by 10.0.0.100.
3.1 Implementing DNS on Windows Server 2016 (Step by Step guide)
Transforming a Domain Member to a Domain Controller
When one aims to elevate a server’s status to become an additional domain controller, it is essential to have a DNS server in place. Such a DNS server aids in the efficient resolution of domain names within a network, thereby facilitating communication. The options available are either to leverage an already-established DNS server within the domain or to pave the way for its installation and configuration at a later juncture. It’s worth noting that during the configuration of the primary domain controller (often referred to as the root domain), direct modifications to the DNS Server role aren’t permitted, resulting in it being non-accessible or grayed out. For illustrative purposes, let’s use a situation where a pre-established DNS server exists on the root domain server (named DC1). The goal is to initiate the installation and adjustment of the DNS server on an additional domain controller, labeled Server1. For a smooth transformation of a domain member (Server1) into a domain controller, the following procedures need diligent execution:
Initiation Phase:
- Access the Server Manager dashboard;
- Initiate the ‘Add roles and features’ assistant.
Selection Phase:
- Navigate through the wizard until reaching the ‘Select server roles’ screen;
- Opt for ‘Active Directory Domain Services’ by marking its checkbox;
- Proceed by selecting ‘Add Features’ to integrate any requisite additional functionalities.
Completion Phase:
- Progress through the subsequent screens, keeping the default choices intact;
- Finalize the installation process.
Promotion Stage:
- Within the Server Manager interface, identify and click the Notifications symbol;
- Choose the ‘Promote this server to a domain controller’ option;
- DNS Server Configuration for Additional Domain Controller (ADC).
Deployment Settings:
- On the Deployment Configuration screen, ensure the choice ‘Add a domain controller to an existing domain’ is active;
- Within the ‘Supply the credentials for this operation’ segment, opt for ‘Change’ and provide credentials, ideally in the ‘DomainName\Administrator’ pattern.
Domain Controller Specifics:
- Navigate to the Domain Controller Options screen;
- Deselect the Domain Name System (DNS) server option. Further details on manual DNS Server Role installation are provided below.
Manual Installation of DNS Server Role
Password Configuration:
Designate a preferred DSRM (Directory Services Restore Mode) password.
Final Steps:
Navigate seamlessly through the assistant until reaching the ‘Prerequisites Check’ screen.
Opt to ‘Install’. Once the process concludes, a server restart is advised to ensure all changes take effect seamlessly.
Creation and Configuration of DNS Zones
Setting up a domain controller is the precursor to creating a DNS zone. Once the server (referred to as Server1) is established as a domain controller (DC1), the next step is the creation of the DNS zone. The process of establishing this zone, replicating it, and subsequently testing it on Server1 involves specific steps. These steps are outlined below:
Accessing the DNS Manager Console:
- Launch the Server Manager console on DC1;
- Under the Tools menu, locate and select the DNS Manager console to open it.
Zone Creation:
- Within the DNS Manager, you will find an option to expand the domain server. Do so;
- Seek out the ‘Forward Lookup Zones’ and give it a right-click. From the context menu that pops up, choose the ‘New Zone’ option.
Setting the Zone Type:
- You’ll then be directed to the ‘Zone Type’ page;
- Ensure the ‘Primary zone’ radio button is chosen;
- There’s an option that says ‘Store the zone in Active Directory’; deselect this by removing the check mark.
- Click on ‘Next’ to proceed.
Naming the Zone:
- When you reach the ‘Zone Name’ page, enter a name for your zone;
- Once done, click on ‘Next’.
Dynamic Update Settings:
- Move on to the ‘Dynamic Update’ page;
- Select the ‘Do not allow dynamic updates’ radio button;
- To continue, click ‘Next’. Conclude the process by completing the wizard.
Integrating Hosts to the DNS Zone
Having created the DNS zone, the next step involves adding specific hosts. For instance, in the provided scenario, the objective is to integrate the host ‘Server1’ into the established DNS zone. Here’s how you can go about it:
Access the Desired Zone:
- Within the DNS Manager console, find and expand the ‘Forward Lookup Zones’;
- Once you locate the zone you’ve created, right-click it. From the dropdown, select ‘New Host (A or AAAA)’.
Host Details Entry:
- A dialog box titled ‘New Host’ will appear;
- Here, you’ll need to input the Hostname and IP address corresponding to your host;
- To add the host, click on the ‘Add Host’ button.
Completion:
- After integrating all the necessary hosts, finalize the process by clicking ‘Done’.
Note: Familiarity with the DNS server settings, especially when working with platforms like Windows Server 2016, can be beneficial for smooth operations. Always ensure you have the correct permissions and backup configurations when making changes.
DNS Server Role Installation
DNS (Domain Name System) is a foundational element for internet infrastructure, converting human-readable domain names to IP addresses. In previous operations, a DNS zone was set up on the domain controller and a host was added to this zone. To further strengthen the DNS architecture, consider installing the DNS Server role on a secondary server. This action bolsters redundancy and can improve reliability. Here’s how to undertake this crucial task:
- Accessing the Server Management Tool: Begin by launching the Server Manager console on the secondary server, termed ‘Server1’ for reference. This console is pivotal for managing server roles and features;
- Launching the Wizard: Within the Server Manager, initiate the “Add roles and features” wizard. This tool streamlines the process of augmenting the server’s capabilities;
- Choosing the DNS Server Role: Navigate through the wizard until reaching the “Select server roles” page. Here, pinpoint and select the ‘DNS Server role’ option;
- Finalizing the Installation: Upon choosing the role, opt for the ‘Add Features’ button. Then, click ‘Next’ on the subsequent pages. Once all selections are appropriately made, finalize the process to install the role.
Replication of DNS Zones
With the DNS server role now active, replication becomes paramount. This ensures the secondary DNS server mirrors the configurations of the primary, enhancing fault tolerance. Here’s how to execute this replication process on Server1:

DNS Zone Verification:
On Server1, initiate the DNS Management console. Upon refreshing, it should display the DNS zones of the primary DNS server. It’s imperative to check this to ascertain the accuracy of replication.
Special Note: If zones aren’t visible, do not worry. Continue to the steps outlined below.
Active Directory Sites Replication:
- Launch the Active Directory Sites and Services console;
- Expand the ‘Sites’ category and then tap on ‘Default-First-Site-Name’;
- Delve into the ‘Servers’ section and select the primary domain controller, referred to as ‘DC1’;
- Navigate to ‘NTDS Settings’. Once there, locate the replication connection for Server1. Right-click and opt for ‘Replicate Now’. This initiates the replication of DNS modifications.
Attention: An error message might occasionally pop up during this process. Should this occur, there’s a further step to address it.
Addressing Replication Errors:
Within the NTDS Settings area, pinpoint the replication connection for DC1. Right-click, select ‘Replicate Now’, and affirm with an ‘OK’. Afterward, head back to the DNS Manager console, refresh, and inspect if the DNS zones now appear. This step rectifies replication issues and ensures a consistent DNS environment.
Conclusion
Within this article, we’ve thoroughly examined the process of setting up and fine-tuning a DNS Server on the Windows Server 2016 platform. However, your journey doesn’t conclude at this juncture; there’s more to accomplish. Keep yourself engaged for our upcoming publication, where we’ll delve into the meticulous steps of configuring a DNS forwarder within the Windows Server environment. If you’ve found this content compelling, we encourage you to spread the love by sharing this article with your peers.
This manual describes how to configure DFS data replication in the Active Directory domain on servers running Windows Server 2016.
There are two types of Distributed File System (DFS):
- Namespace DFS – DFS allows you to create virtual directory trees that unite shared folders across the network. It is possible to configure multiple DFS namespaces. It uses simplified user access to geographically distributed files;
- Replication DFS – creates a replicated shared folder and tracks changes in files.
Installing DFS Namespaces and DFS Replication Roles on Windows Server 2016
Install the DFS Namespaces and DFS Replication roles on the two servers running Windows Server 2016 between which the replication will be configured.

Use the DFS Management console (dfsmgmt.msc) to create a new DFS namespace.
You can create a domain-based namespace or stand-alone namespace.
- Domain-based namespace – namespace integrated into the AD. Allows you to hide the DFS namespace server name from the users, simplifies the replacement of the namespace server as well as transfer the namespace to another server;
- Stand-alone namespace – allows you to create DFS structures without using an Active Directory Domain Services (AD DS). The high availability of the namespace can be achieved using a failover cluster.

Create a folder in the new namespace. Make sure that the new directory is accessible over the network by the path\\dfsnamespacename\foldername (in our example it is \\contoso.com\public\shareddocs).

Configuring DFS Replication Between 2 Servers Running Windows Server 2016
Now you can configure DFS replication. DFS Replication allows you to synchronize directories with files (replicated folders) between servers that are part of a DFS replication group. The servers into DFS replication group are connected to each other using DFS connections.
Changes are replicated using the Remote Differential Compression Algorithm (RDC). Only the changed parts of the files are replicated. DFS replication is performed asynchronously, i.e. at a specific point in time, sources may not be consistent.
It is necessary to distinguish between simple FRS replication (File Replication Service) and DFSR (Distributed File System Replication). DFSR appeared in Windows Server 2008, it became possible to use differential compression when performing some changes in the file, but not the entire file, are transferred over the network. In FRS replication, the entire file is copied.
DFS replication is advantageous to use folders between remote branches over slow WAN link for replicating.
When communication between replication partners is lost, replication stops. After the network is restored, replication will continue.
A replication group is a set of servers (members) that participate in the replication of one or more folders.
Before configuring replication, you need to add a network shared folder on the second DFS server. Open the DFS Management console, select the desired namespace, and select Add Folder Target from the context menu.

Enter the name of the shared folder and click OK (in our example this is \\host2\dfssharedocs).

You will be prompted to create a new replication group. Click Yes.

Tip. If you clicked No, then to create a new replication group in the DFS management console, right-click on the Replication section and select New Replication Group.
In the DFS Replication Configuration Wizard, you need to verify the name of the replication group and the directory you want to replicate.

Check the paths to the shared folders on the servers.

Select the primary member node on which the initial data is stored and from which initial replication will be performed.

As a rule, Full mesh is selected as the replication topology. In this topology all changes on one node are immediately replicated to all the others.

It remains to adjust the schedule and bandwidth that can be used to replicate data. Check the settings and click Create.
A message should appear after the successful creation of a new replication group.

This completes the configuration of the DFS distributed file system and data replication in it.
Try creating a new file in the shared folder on the one of the member server. If the file size is very large, its replication can take several hours or even days, depending on the bandwidth of the communication channel between DFS servers and the DFS replication settings.

If 2 users simultaneously edit (or create) the same file, then DFS replicates the version of the file that was changed (created) last. An earlier version of the file is stored in DfsrPrivate\ConflictandDeleted directory on the server that resolves the DFS replication conflict. In this case, an entry about the conflict that has occurred appears in the ConflictandDeletedManifest.xml file.
Tweaking DFS Replication
After creating a DFS replication group, you can change various settings to provide better performance.
In the DFS Management console, expand the Replication section, which contains all the replication groups.
Select the replication group you created. In the right window you will see 4 tabs:
- Membership – this is a list of network folders between which data is replicated;
- Connections – describes the topology of relationships between DFS replication partners;
- Replicated Folders – DFS folder settings;
- Delegation – replication group permissions.
On the Membership tab, note the Staging Quota value — 4 GB. What it is? When replicating, the DFS service uses intermediate hidden folders that store modified files that need to be transferred to replication partners. These files are stored on each server in a local folder DfsrPrivate\Staging.

On the Membership tab, open the properties of any folder and go to the Staging tab. As you can see, here you specify the path to the Staging folder and its maximum size (Quota). The default is 4 GB. In large infrastructures, it is desirable to increase the quota size to increase the performance of the DFS file replication service.
Microsoft recommends that this quota should be not less than the total size of the 32 largest files in the replication directory. The total size of the 32 largest files in the directory can be obtained using the following PowerShell command:
Get-ChildItem C:\SharedDOCS -recurse –force | Sort-Object length -descending | select-object -first 32 | measure-object -property length -sum).sum /1gb
If the staging quota for the DFS server is insufficient, events with EventID 4208 will often be recorded in the event log. In this case, it is recommended to increase the staging quota size by 20%.
Tip. Some admins believe that a file that is larger than the quota on the Staging folder cannot be replicated via DFS. This is not true. Such a file can also be replicated normally, just the replication process will take place in several stages (the file will be cut into several parts and transferred in parts), which will somewhat slow down the process.

On the Advanced tab, you can specify whether to save the files deleted by users in the ConflictandDeleted folder (it is very convenient to restore) and the quota for this folder (by default, it is also 4 GB).
To switch the DFS directory on a specific server to read-only mode, click the directory and select Make read-only. As a result, users won’t be able to edit or create files in this directory.

On the Connection tab, you can temporarily suspend replication to one of the servers in the DFS replication group (Disable), or start forced replication (Replication Now).

On the Replication Folders tab open the properties of any folder. The File filter field contains a list of file extensions that are not replicated between DFS servers. The default file extensions are .bak, and .tmp. You can add other types of file extensions that don’t need to be replicated, for example video (*.avi, *.mpeg), audio (*.mp3, *.wav), image files (*.iso, *.wim) or other file types.

To diagnose DFS replication, you can use system event logs, as well as the current (%windir%\debug\DFSR*.log) and archive DFSR replication log (%windir%\debug\DFSR*.log.gz).
Information about DFS replication settings on the server can be obtained using the PowerShell cmdlet Get-DFSRConnection.
