

This is more for my benefit in the future, but hopefully it can help someone else too.
We recently had problems with a development server not installing Windows Updates. The fix was to repair the installation using the Deployment Image Servicing and Management (DISM) tool.
All commands should be run from an elevated command prompt.
- Run
dism /online /cleanup-image /scanhealth - Run
dism /online /cleanup-image /checkhealth - Run
dism /online /cleanup-image /restorehealth - Mount the Windows Server 2016 ISO as a drive (E: in this case)
- Run
dism /online /cleanup-image /restorehealth

/source:WIM:E:\sources\install.wim:1 /limitaccess - Run
sfc /scannow - Run Windows Update
Good luck!
Photo by Matt Artz on Unsplash
Welcome to our comprehensive guide on repairing Windows Server 2016 using the command prompt. If you’ve encountered issues with your server and are looking for a solution, you’re in the right place. In this article, we will walk you through the steps to fix common problems on Windows Server 2016 using simple command prompt commands. Let’s dive in!
Understanding the Command Prompt
Before we begin the repair process, let’s first understand what the command prompt is. The command prompt is a powerful tool that allows you to interact with your computer through text commands. It provides a way to perform various tasks, including troubleshooting and repairing system issues.
Accessing the Command Prompt
To repair Windows Server 2016 using the command prompt, you need to access it first. Here’s how you can do it:
- Press Win + X on your keyboard to open the Power User menu.
- Select Command Prompt (Admin) from the list.
- Click Yes if prompted by User Account Control.
Now that you have the command prompt open, let’s look at some common issues you may encounter on Windows Server 2016 and how to repair them using command prompt commands:
1. Fixing Boot Issues
If your server is having trouble booting up, you can use the following command to repair the boot configuration:
bootrec /rebuildbcd
This command will scan for Windows installations on your server and repair any issues with the boot configuration data.
2. Repairing System Files
Corrupted system files can cause various problems on Windows Server 2016. To repair these files, you can use the System File Checker tool with the following command:
sfc /scannow
This command will scan and repair any corrupted system files it finds on your server.
3. Restoring the Registry
If your server is experiencing issues due to a corrupted registry, you can restore it to a previous state using the following command:
cd %systemroot%\system32\config
copy *.* c:\RegBack
These commands will create a backup of your current registry files in the RegBack folder, allowing you to restore them if needed.
Conclusion
Congratulations! You now have the knowledge to repair Windows Server 2016 using the command prompt. By following the steps outlined in this guide, you can troubleshoot and fix common issues that may arise on your server. Remember, the command prompt is a powerful tool that can help you maintain the stability and performance of your Windows Server 2016 system.
“`
There are many reasons you may want to start Windows Server 2016 Recovery Mode such as:
- Fix boot errors
- Uninstall problematic Windows updates
- Restore the server to the previous restore point
- Access the Safe Mode boot option
Whatever reason you need to start Windows Server 2016 Recovery Mode, this guide will provide two options for doing this.
1. Boot into Windows Server 2016 Recovery Mode without installation media
If you do not have access to the Windows Server 2016 installation media (DVD or USB), you can still boot into Recovery Mode.
Here are the steps to take:
Press the power button to start the server. When the white circles start showing, press the power button to turn off the server power.

Press the power button to start the server
Note : The image in the example shows Hyper-V because the article author is running this demo with the VM. Your server will display the manufacturer name. All you need to keep in mind is when the circles appear. Then turn off the server power.
Turn the power back to the server. Then turn it off when the boot circle appears.
When you start the server a third time, it will start Preparing Automatic Repair . This process can take 2 to 5 minutes (depending on your server). Please wait patiently.

When you start the server a third time, it will start Preparing Automatic Repair
Then it will boot into Recovery Mode! To display the Recovery Mode options, click Troubleshoot.
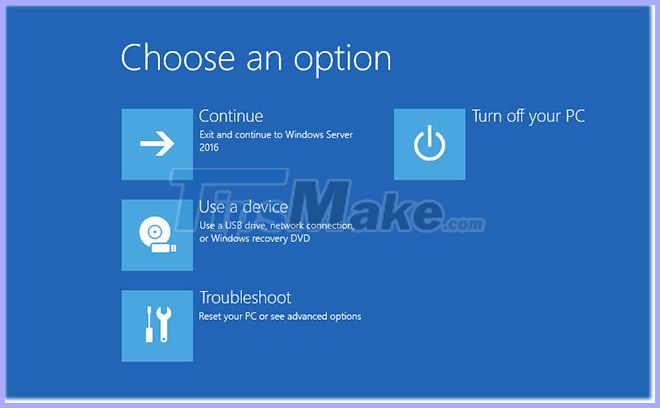
To display the Recovery Mode options, click Troubleshoot
When you click Troubleshoot , the Advanced options screen below is displayed.
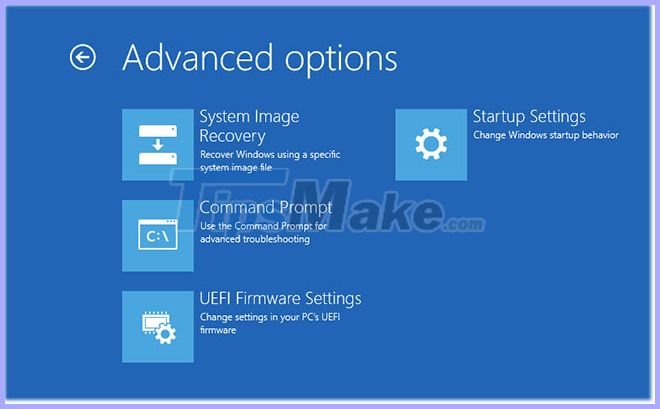
The Advanced options screen appears
The options are explained below:
— System Image Recovery : Click this option if you have previously enabled the system recovery feature and have available restore points available.
— Command Prompt : This option will load a Command Prompt. You can then run the cmd commands. A very useful command to fix most problems is DISM.exe / Online / Cleanup-Image / Restorehealth .
— UEFI Firmware Settings : When you click this option, the server will boot into UEFI BIOS.
— Startup Settings : This is a ‘hidden gem’! Startup Settings gives you Safe Boot boot options.
2. Boot into Windows Server 2016 Recovery Mode from the installation media
To boot into Recovery Mode with a DVD or USB containing Server 2016, do the following:
Insert media into server (USB or DVD).
Then modify the boot sequence to boot from the above media.
Power on the server. Carefully pay attention to this screen to confirm booting from CD or DVD. Then press any key to continue.
At Windows Boot Manager , select Windows Setup [EMS Enabled] . Then press Enteron the keyboard.

Select Windows Setup [EMS Enabled]
At the Windows Server 2016 installation screen, click Next.
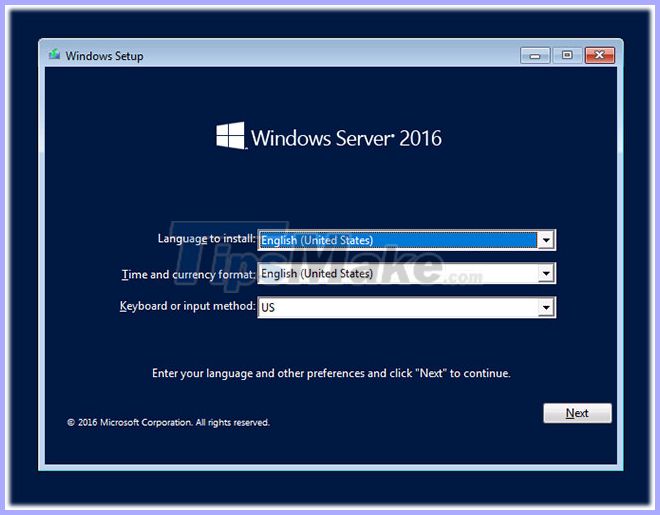
Windows Server 2016 installation screen
Then click on Repair your computer .
After about a minute, Recovery Mode will be displayed. This is the same page booting into Recovery Mode as the first method.
As in the first method, to display the Recovery Mode option, click on Troubleshoot. But, as you can see, this provides fewer repair options. It only provides the first 3 options and does not include Startup Repair.
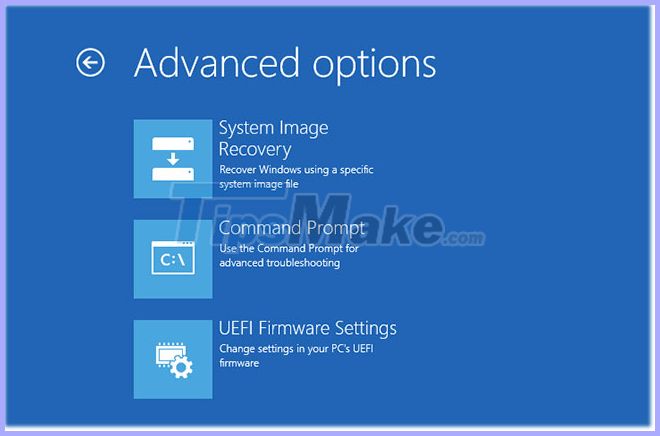
There are only 3 options, excluding Startup Repair
,
In this article I’ll show how to recover your Windows Server 2016, 2012 or 2012R2, from a previous system image backup which was created using the Windows Server Backup feature, if Windows fails to start normally.
This article will explain how to restore Server 2016/2012/2012R2, from the Windows Recovery Environment, by using a Windows Server Backup Image, if your server could not start, or if the main hard drive has failure and you have to recover everything on a new hard drive.
Related articles:
- How to Create System Restore Points on Server 2016/2012 using Windows Server Backup.
- How to Restore Server 2016 or 2012 in a Previous System State if Windows can start normally (Online Method)
How to Restore Windows Server 2016/2012/2012R2 from a System Image Backup if Windows could not boot.
The only way to recover your server, if the machine fails to boot, is by using the System Image Recovery option, from the Windows Recovery Environment (WinRE). To be able, to restore your server from WinRE, you will need the following:
Requirements:
1. A Windows Server Installation Media (USB or DVD).
2. A previous System Image backup, that was taken with the Windows Server Backup application.
To recover your Server 2016, 2012 or 2012R2, from a WinRE:
1. Boot your Server from the Windows Server installation Media.
2. Click Next at the first screen.

3. Then click Repair your computer.

4. At ‘Choose an option’ screen, click Troubleshoot.

5. At ‘Advanced options’ click System Image Recovery.

6. At the next screen, choose Windows Server 2016.

7. At ‘Select a System Image Backup’ screen, you can use the latest available system image to restore your server,* or you can click at «Select a System Image» option to select a different system image. Then click Next to continue.
* Note: Always prefer to recover your server with the most recent system image, in order to restore all the recently changes on your server (policies, network shares, etc.). Keep in mind that any changes made to your server after the system image’s backup date, must be reapplied.

8. At ‘Choose additional restore options’ screen, click Next if you haven’t problems with the disk format or partition, or, select the «Format and repartition disks»* option to delete any existing partitions and reformat all disks on the computer to match the layout of the system image. *
* e.g. Use the «Format and repartition disks» option, only if you have replaced the hard drive on your server (e.g. after a HDD hardware failure, you want to restore your server to a new hard drive.)

9. Review your settings and click Finish to proceed.

10. Finally, click Yes to restore your server to the selected date/time.

11. After the restoration, remove the Windows Server 2016 installation media and restart the server.
That’s it! Let me know if this guide has helped you by leaving your comment about your experience. Please like and share this guide to help others.
If this article was useful for you, please consider supporting us by making a donation. Even $1 can a make a huge difference for us in our effort to continue to help others while keeping this site free:
- Author
- Recent Posts
Konstantinos is the founder and administrator of Wintips.org. Since 1995 he works and provides IT support as a computer and network expert to individuals and large companies. He is specialized in solving problems related to Windows or other Microsoft products (Windows Server, Office, Microsoft 365, etc.).