
You are here:
Home » Windows 7 Guides » How To Repair Windows 7 Startup Issues Without Installation Media
Repairing a corrupt Windows installation is always a difficult task for beginners especially when you are not able to boot into Windows. Even though one can always use the Windows 7 installation media to boot into Windows Recovery Environment (WinRE) to fix startup problems, it’s also possible to repair Windows 7 boot issues without any installation media.

Unlike previous versions of Windows, Windows 7 automatically installs the Startup Repair tool onto the operating system partition, so that the user can access diagnostic tools without the help of installation media.
By default, after an unsuccessful boot, Windows 7 automatically loads up the startup repair tool and tries to rectify the problem, if possible. If you can’t see Windows 7 automatically loading startup repair after the unsuccessful boot, you can manually run the startup repair tool without the installation media.
Repair Windows 7 startup problem without the Windows 7 DVD/USB
Here is how to run the Startup Repair tool without installation media:
1. Power on the machine and press F8 key to see Windows Error Recovery menu.
2. Select the Launch Startup Repair option and hit Enter key to run the startup repair tool.

3. Startup Repair tool tries to automatically fix the problem. And, if it couldn’t find an issue or solve the issue, it offers you the various advanced options available for system recovery and support.

4. There are many advanced tools present in the Recovery Environment to help you fix boot issues. Command Prompt, System Restore, System Image Restore, Windows Memory Diagnostic are some the tools available to fix your system issues.

5. Follow our how to use advanced system recovery tools to repair Windows 7 boot problems guide to know more about these advanced options. Good luck!
Все способы:
- Причины появления синего экрана смерти
- Причина 1: Установка новой программы или оборудования
- Причина 2: Отсутствие свободного места
- Причина 3: Обновление системы
- Причина 4: Драйвера
- Причина 5: Системные ошибки
- Причина 6: BIOS
- Причина 7: Аппаратная составляющая
- Коды ошибок
- Вопросы и ответы: 26
Синий экран смерти (Blue Screen of Death, BSoD) — это критическая системная ошибка в операционных системах Майкрософт Виндовс. Когда возникает эта неисправность, система зависает и данные, которые были изменены во время работы, не сохраняются. Она является одной из самых распространенных в операционной системе Windows 7. Чтобы устранить данную неполадку, сначала необходимо разобраться в причинах ее появления.
Причины появления синего экрана смерти
Причины, из-за которых появляется ошибка BSoD, можно разделить на 2 обобщенные группы: аппаратная и программная. Неполадки аппаратного характера – это проблемы с «железом» в системном блоке и различными комплектующими. Чаще всего, неисправности возникают с оперативной памятью и жестким диском. Но всё же, возможны сбои и в работе других устройств. BSoD может возникнуть из-за следующих аппаратных проблем:
- Несовместимость установленного оборудования (к примеру, установка дополнительной планки «оперативки»);
- Поломка комплектующих (чаще всего выходят из строя жесткий диск или ОЗУ);
- Некорректный разгон процессора или видеокарты.
Программные причины появления неполадки гораздо обширнее. Сбой может возникнуть в системных службах, неправильно инсталлированных драйверах или из-за действия вредоносных программ.
- Неподходящие драйвера или конфликт некоторых драйверов (несовместимость с операционной системой);
- Деятельность вирусного ПО;
- Cбои в работе приложений (чаще всего, в таких сбоях виновниками являются вирусы или программные решения, которые производят эмуляцию приложения).
Причина 1: Установка новой программы или оборудования
Если вы произвели инсталляцию нового программного решения, это может привести к появлению синего экрана смерти. Ошибка могла возникнуть и из-за программного обновления. При условии, что вы провели подобные действия, необходимо вернуть всё в прежнее состояние. Чтобы сделать это, нужно произвести откат системы к моменту, когда ошибок не было замечено.
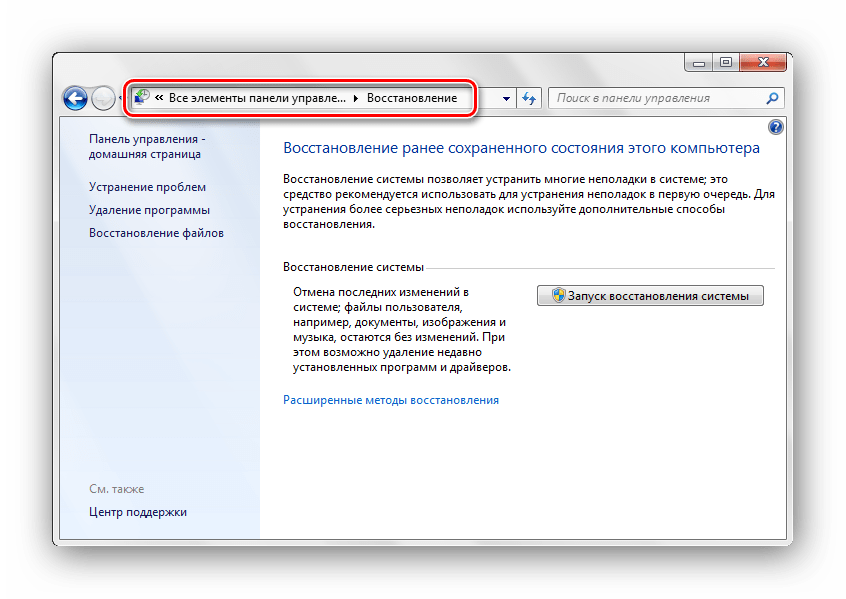
- Совершаем переход по пути:
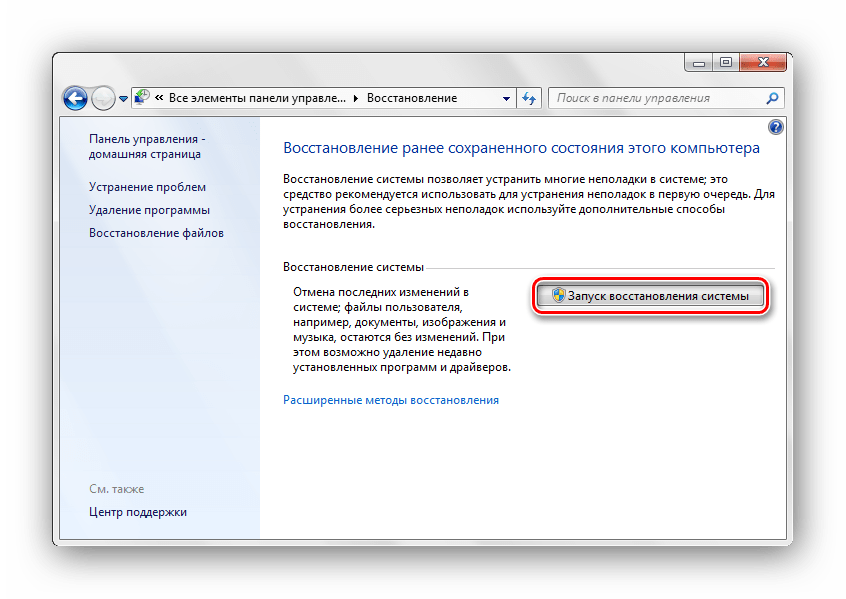
Панель управления\Все элементы панели управления\Восстановление - Для того чтобы запустить процесс отката Виндовс 7 в состояние, в котором не наблюдалось неисправности BSoD, необходимо нажать по кнопке «Запуск восстановления системы».
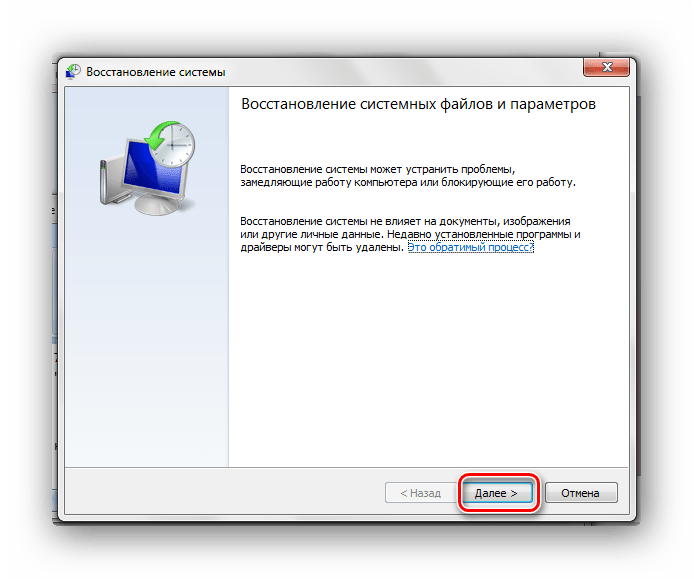
- Чтобы продолжить процесс отката ОС, нажмите на кнопку «Далее».
- Необходимо сделать выбор даты, когда не было неисправности. Запускаем процесс восстановления, кликнув по кнопке «Далее».
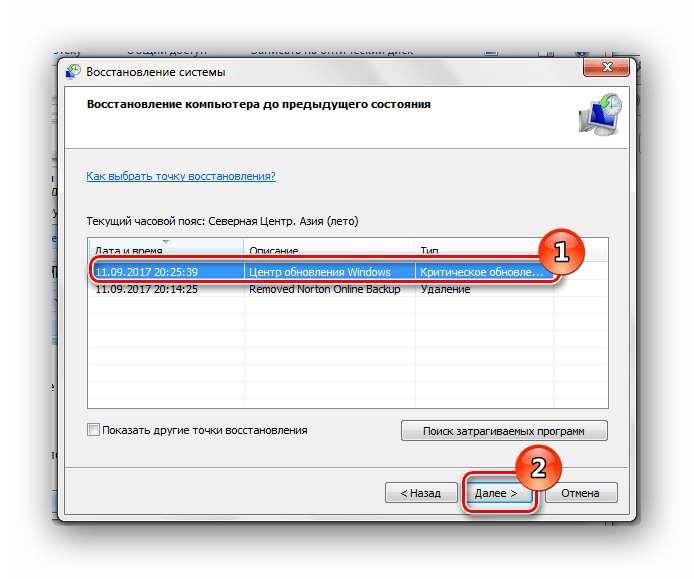
Произойдет запуск восстановительного процесса Виндовс 7, после чего перезагрузится ваш ПК и неисправность должна исчезнуть.
Читайте также:
Способы восстановления Windows
Создание резервной копии системы Windows 7
Причина 2: Отсутствие свободного места
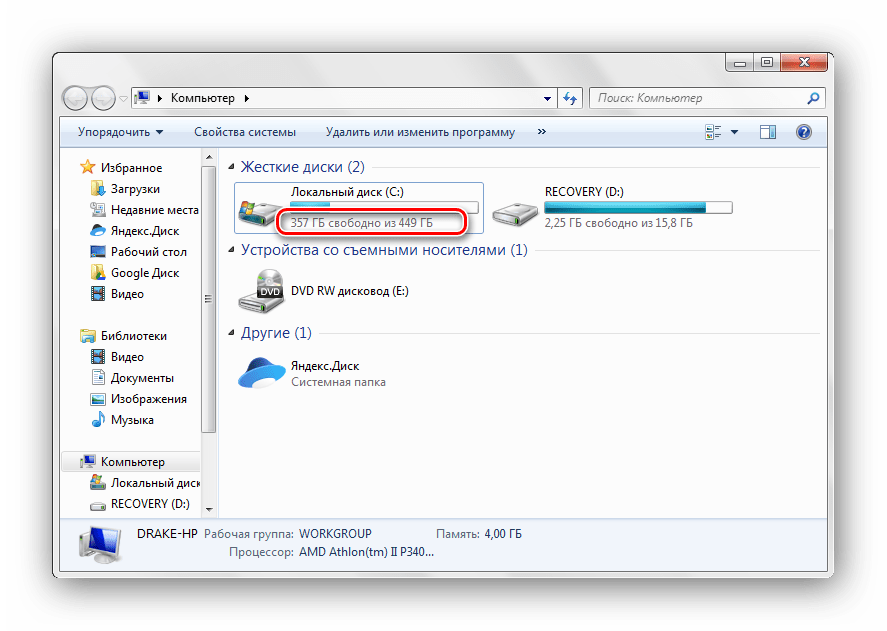
Необходимо убедиться, что на диске, где находятся файлы Windows, имеется необходимое свободное пространство. Синий экран смерти и различные крупные неполадки возникают, если пространство диска переполнено. Произведите очистку диска с системными файлами.
Урок: Как очистить жесткий диск от мусора на Windows 7
Майкрософт советует оставлять свободными минимум 100 мб, но как показывает практика, лучше оставлять 15% от объёма системного раздела.
Причина 3: Обновление системы
Попробуйте обновить Виндовс 7 до последней версии Сервис Пака. Microsoft стабильно производит выпуск новых патчей и пакетов с обновлениями для своего продукта. Зачастую, они содержат фиксы, которые помогают устранить неисправность BSoD.
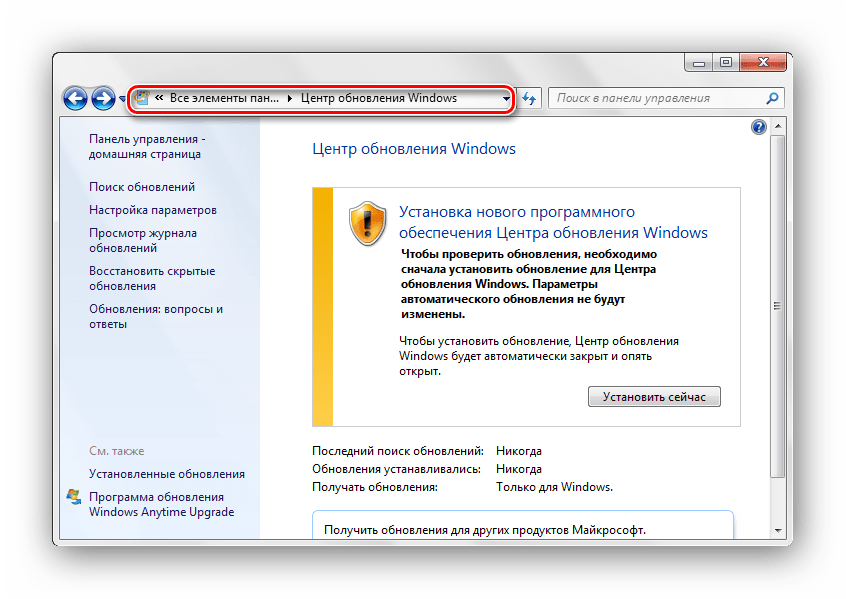
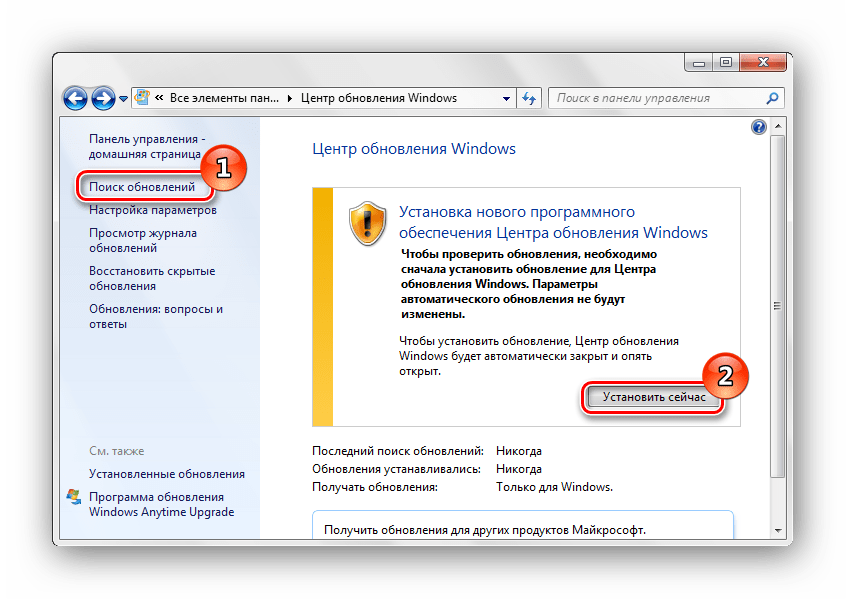
- Перейдите по пути:
Панель управления\Все элементы панели управления\Центр обновления Windows - В левой части окна нажмите по кнопке «Поиск обновлений». После того, как будут найдены необходимые обновления, кликаем по кнопке «Установить сейчас».
Рекомендуется в настройках центра обновления задать автоматическое обновление системы.

Подробнее: Установка обновлений в Windows 7
Причина 4: Драйвера
Произведите процедуру обновления драйверов вашей системы. Подавляющее большинство ошибок BSoD связаны с неправильно инсталлированными драйверами, которые вызывают подобную неисправность.
Урок: Установка драйверов стандартными средствами Windows
Причина 5: Системные ошибки
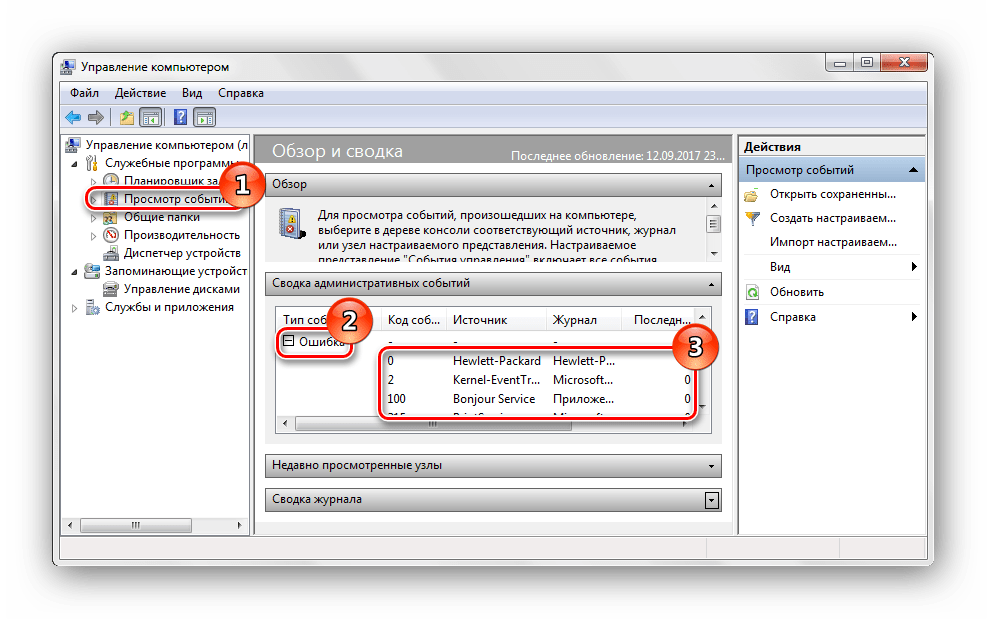
Произведите проверку журнала событий на присутствие предупреждений и неисправностей, которые могут быть связаны с появлением синего экрана.
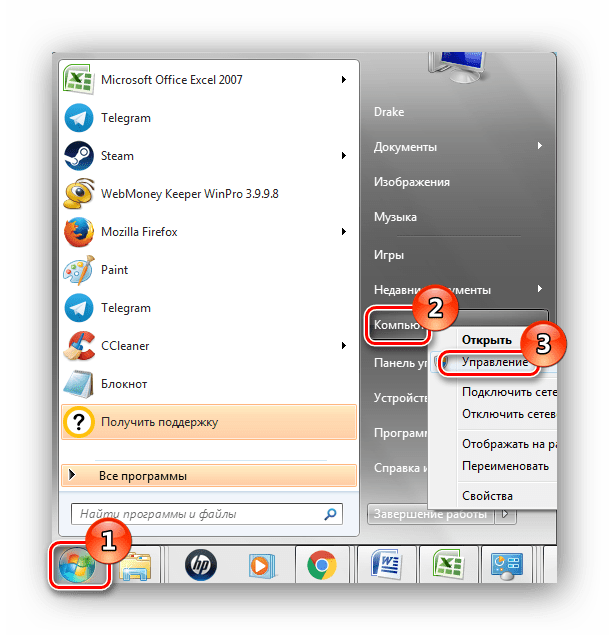
- Чтобы провести просмотр журнала, открываем меню «Пуск» и нажимаем ПКМ по надписи «Компьютер», выбираем подпункт «Управление».
- Необходимо переместиться в «Просмотр событий» и в перечне выбрать подпункт «Ошибка». Здесь могут быть расположены неполадки, которые вызывают синий экран смерти.
- После обнаружения неисправностей необходимо произвести восстановления системы в точку, когда не возникало синего экрана смерти. Как это сделать, описано в первом методе.
Читайте также: Восстановление загрузочной записи MBR в Windows 7
Причина 6: BIOS
Некорректные настройки BIOS могут привести к появлению ошибки BSoD. Сбросив данные параметры, вы сможете устранить неполадку BSoD. Как это сделать, рассказано в отдельном материале.
Подробнее: Сбрасываем настройки BIOS
Причина 7: Аппаратная составляющая
Необходимо произвести проверку на правильность соединения всех внутренних кабелей, карт и других компонентов вашего ПК. Элементы, которые плохо соединены, могут вызвать появление синего экрана.
Коды ошибок
Рассмотрим самые распространенные коды ошибок и их трактовку. Это может помочь в устранении неисправности.
| Название ошибки | Описание |
|---|---|
| INACCESSIBLE BOOT DEVICE | Данный код означает, что нет доступа к разделу загрузки. Диск загрузки имеет дефект, неисправность контроллера, также несовместимые системные компоненты могут служить причиной возникновения неполадки |
| KMODE EXCEPTION NOT HANDLED | Неполадка скорее всего возникла из-за проблем с аппаратными составляющими ПК. Неправильно инсталлированные драйвера или физическая поломка оборудования. Необходимо провести поочередную проверку всех комплектующих |
| NTFS FILE SYSTEM | Проблема вызвана сбоями системных файлов Виндовс 7. Такая ситуация возникает из-за механических повреждений в жестком диске. Вирусы, записавшиеся в область загрузки винчестера, вызывает данную неисправность. Поврежденные логические структуры системных файлов также способны привести к неисправности |
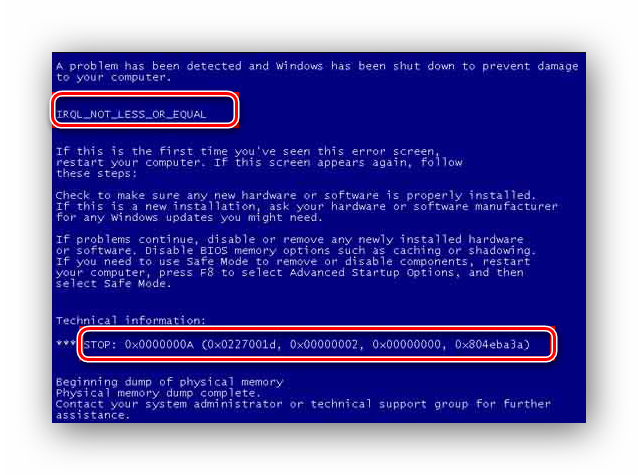
| IRQL NOT LESS OR EQUAL | Такой код означает, что неисправность BSoD появилась из-за ошибок в служебных данных или драйверах Виндовс 7 |
| PAGE FAULT IN NONPAGED AREA | Параметры, которые запрашиваются, не могут найтись в ячейках памяти. Чаще всего, причина кроется в дефектах оперативной памяти или некорректной работе антивирусного ПО |
| KERNEL DATA INPAGE ERROR | Системе не удалось прочесть данные, которые были запрошены из раздела памяти. Причинами здесь являются: сбои в секторах винчестера, проблемные моменты в контроллере HDD, неисправности в «оперативке» |
| KERNEL STACK INPAGE ERROR | ОС не способна совершить чтение данных из файла подкачки на винчестер. Причины возникновения такой ситуации — повреждения в HDD-устройстве или RAM-памяти |
| UNEXPECTED KERNEL MODE TRAP | Неполадка связана с системным ядром, она бывает как программной, так и аппаратной |
| STATUS SYSTEM PROCESS TERMINATED | Логическая неисправность, которая напрямую связана с драйверами или с неправильно работающими приложениями |
Итак, чтобы провести восстановления корректной работы Виндовс 7 и избавится от ошибки BSoD, в первую очередь, необходимо откатить систему на момент стабильной работы. Если нет такой возможности, то следует инсталлировать последние доступные обновления для вашей системы, проверить инсталлированные драйвера, протестировать работоспособность «железа» ПК. Помощь по устранению ошибки также присутствует в коде неисправности. Воспользовавшись методами, которые приведены выше, вы сможете избавится от синего экрана смерти.
Наша группа в TelegramПолезные советы и помощь
Нужен хороший совет, как произвести восстановление загрузчика Windows 7, если восстановление запуска с помощью установочного диска семёрки не помогло. Вкратце объясню в чём дело: на компьютере сначала была установлена Windows 7, затем второй системой понадобилась Windows XP, после установки естественно запускалась она одна, для загрузки двух операционных систем использовал программу EasyBCD. В дальнейшем XP стала не нужна и раздел на котором она находилась я форматировал из Windows 7. Сейчас при загрузке кроме чёрного экрана ничего. Что можно предпринять в таком случае? Поподробнее если можно. Сергей.
Привет друзья! Самое главное не волнуйтесь, проблема у вас несложная и в принципе простое средство «Восстановление запуска Windows 7» описанное в нашей статье должно помочь, но! Если данная статья вам не поможет, то должны помочь две другие:
- Ошибка BOOTMGR is missing press CTR-Alt-Del for restart при загрузке Windows 7
- Ошибка NTLDR is missing при загрузке Windows 7
- Форматирование в командной строке скрытого раздела «Зарезервировано системой» объём 100 МБ содержащего файлы загрузки Windows 7 и дальнейшее автоматическое восстановление системы
в этих статьях описаны ещё несколько хороших способов восстановить загрузку вашей операционной системы, кроме них есть ещё одна Как восстановить систему Windows 7, так что пробуйте и просто так не сдавайтесь.
Напомню вам, что нельзя устанавливать старшую операционную систему после младшей, Windows 7 ни в коем случае не будет загружаться после установки на компьютер Windows XP, так как последняя при установке переписывает главную загрузочную запись (MBR) на себя. Поэтому вы установили дополнительный менеджер загрузки EasyBCD, который используется для настройки загрузки нескольких операционных систем и имеет в свою очередь свой загрузчик.
- Ещё хочу сказать, что часто в неудачной загрузке Windows 7 виноваты ошибки файловой системы, исправить их можно даже в том случае когда операционная система не загружается, все подробности в другой нашей статье «Программа Chkdsk«
- Друзья, в этой статье мы будем работать со средой восстановления Windows 7, а если точнее с командной строкой среды восстановления. Необходимые команды я Вам дам, но если Вам их будет трудно запомнить, можно создать шпаргалку — текстовый файл со списком необходимых реанимационных команд и открыть его прямо в среде восстановления. Это сильно облегчит Вам работу.
- Главная загрузочная запись (MBR) — это первый сектор на жёстком диске, в котором находится таблица разделов и маленькая программа загрузчик, которая считывает в данной таблице данные с какого раздела жёсткого диска производить загрузку ОС, в дальнейшем информация передаётся в раздел с установленной операционной системой, для её загрузки. Если в главной загрузочной записи находится неправильная информация о расположении системы, значит мы при загрузке получим разные ошибки, вот одна из них «BOOTMGR is missing press CTR-Alt-Del for restart» или будем наблюдать чёрный экран. Исправляется проблема восстановлением загрузчика Windows 7.
Когда вы удалили старушку XP вместе с EasyBCD, то оставили свой компьютер на произвол судьбы с непонятной ему загрузочной записью и он в знак благодарности выдаёт вам чёрный экран. Для исправления ситуации, мы с вами проведём восстановление загрузчика Windows 7, а именно перезапишем главную загрузочную запись с помощью утилиты Bootrec.exe, находящейся на диске восстановления или на установочном диске Windows 7 (друзья, если у вас нетбук и вы хотите использовать среду восстановления находящуюся на флешке, то прочтите сначала комментарии). Так же данной утилитой мы запишем новый загрузочный сектор, понятный Windows 7.
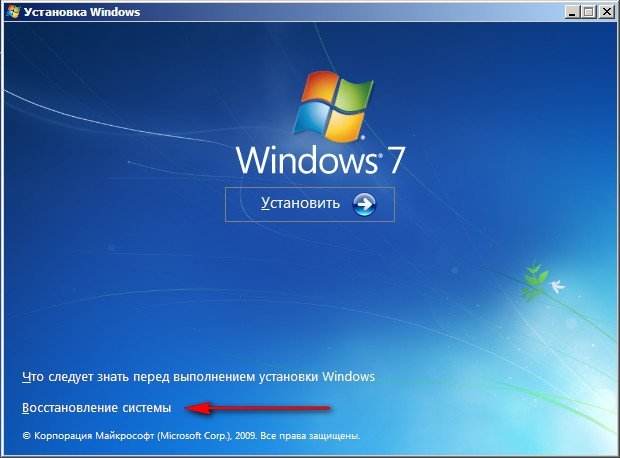
Загружаемся с диска восстановления или установочного диска с Windows 7, в начальной фазе загрузки компьютера, при появлении предложения загрузиться с диска «Press any key to boot from CD…», жмём в течении 5 секунд на любую клавишу клавиатуры, иначе с диска вы не загрузитесь

далее Восстановление системы.
Происходит недолгий поиск установленных систем Windows и анализ проблем мешающих их загрузке
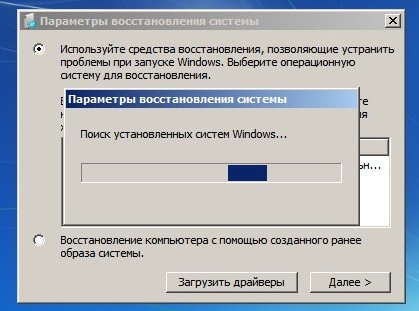
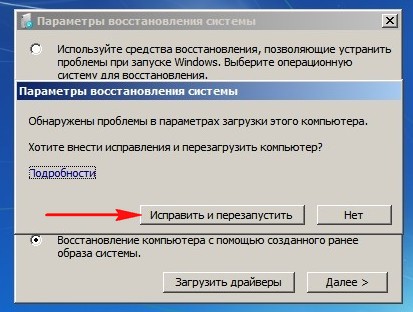
Обычно проблемы быстро бывают найдены и среда восстановления предлагает устранить их автоматически. Нажмите на кнопку «Исправить и перезапустить», после этого компьютер перезагрузится и загрузка Windows 7 будет восстановлена.
Если проблемы с загрузкой системы продолжатся или вам не будет предложено исправить проблемы автоматически, значит в этом окне нужно выбрать операционную систему, которую нужно восстановить, она у вас скорее всего одна и Далее.
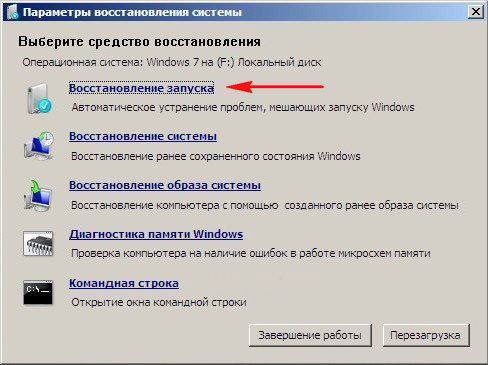
В первую очередь выберите средство Восстановление запуска, оно тоже может решить проблемы с загрузкой Windows 7
Восстановление загрузчика Windows 7 вручную
Если и это средство не поможет, выбираем средство Командная строка

Вводим команды:
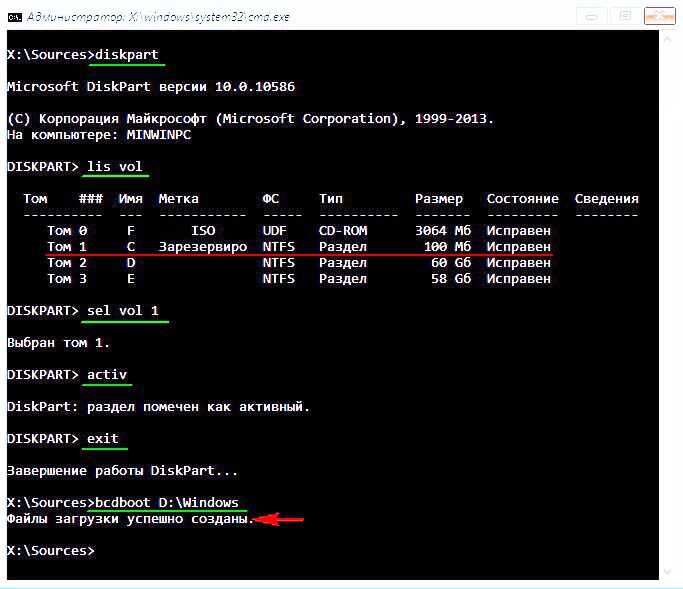
diskpart
lis vol (выводим список разделов жёсткого диска и видим, что «Том 1» является скрытым разделом System Reserved (Зарезервировано системой), объём 100 Мб, на нём должны располагаться файлы загрузки Windows 7 и именно его нужно сделать активным). Также видим раздел с установленной Windows 7, у него буква D:, объём 60 Гб.
sel vol 1 (выбираем Том 1)
activ (делаем его активным)
exit (выходим из diskpart)
bcdboot D:\Windows (где D: раздел с установленной Windows 7), данная команда восстанавливает файлы загрузки Windows 7 (файл bootmgr и файлы конфигурации хранилища загрузки (BCD))!
«Файлы загрузки успешно созданы»
В окне командной строки вводим команду Bootrec и Enter
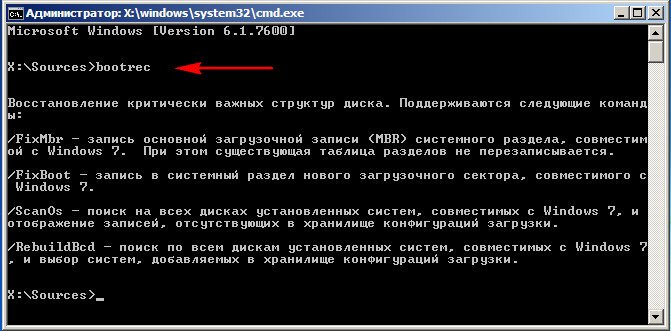
выходит полная информация о возможностях утилиты. Выбираем запись основной загрузочной записи Bootrec.exe /FixMbr.
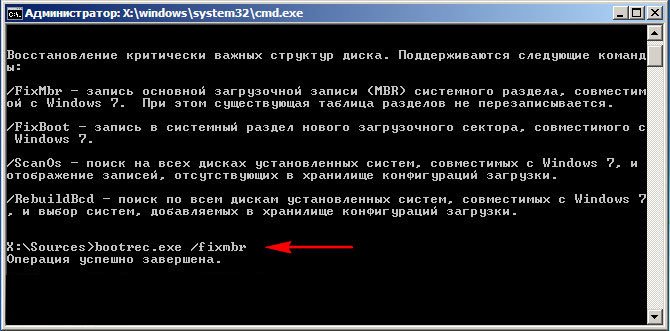
Операция успешно завершена. В первый сектор загрузочного раздела записана новая загрузочная запись.
Вторая команда Bootrec.exe /FixBoot записывает новый загрузочный сектор.
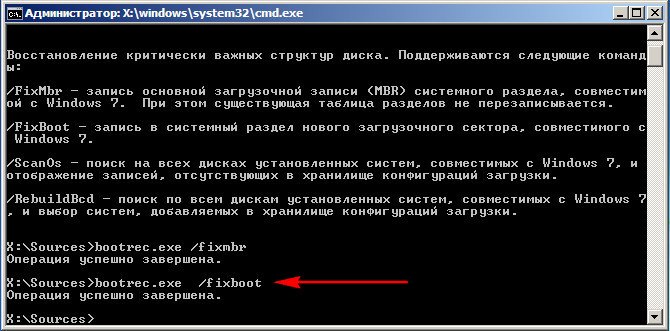
Операция успешно завершена. Exit. Далее пробуем загрузить нашу Windows 7.
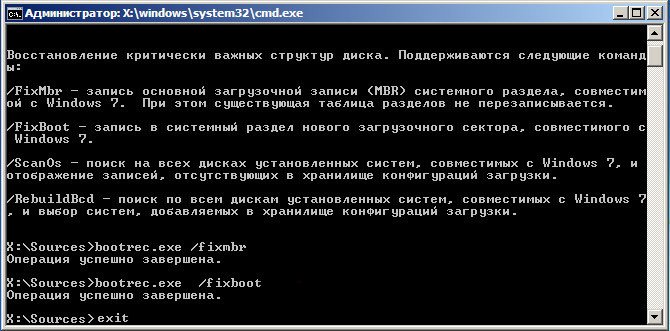
Друзья, если команды Bootrec.exe /FixMbr и Bootrec.exe /Fixboot Вам не помогут, не отчаивайтесь, есть ещё одно средство.
Способ №3
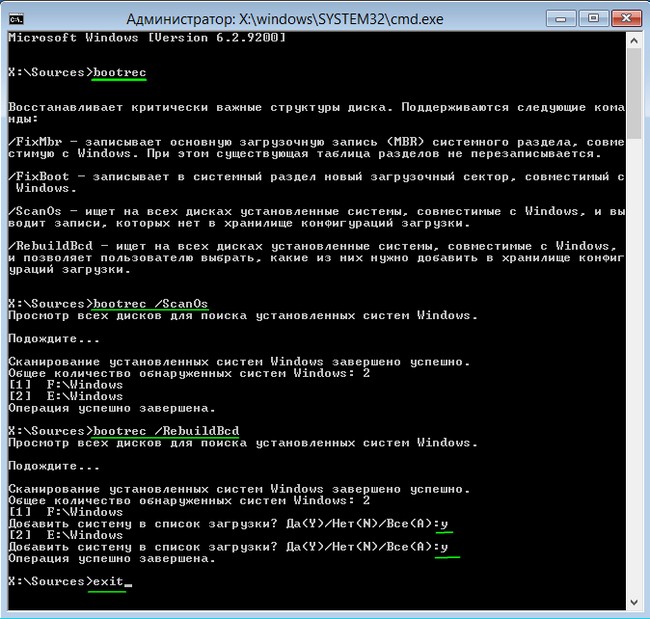
Вводим команду Bootrec /ScanOs, она просканирует все ваши жёсткие диски и разделы на наличие операционных систем и если такие будут найдены, то выйдет соответствующее предупреждение. Затем нужно ввести команду Bootrec.exe /RebuildBcd, данная утилита предложит внести найденные Windows в меню загрузки, соглашаемся и вводим Y и жмём Enter, всё найденная Windows добавлена в меню загрузки.
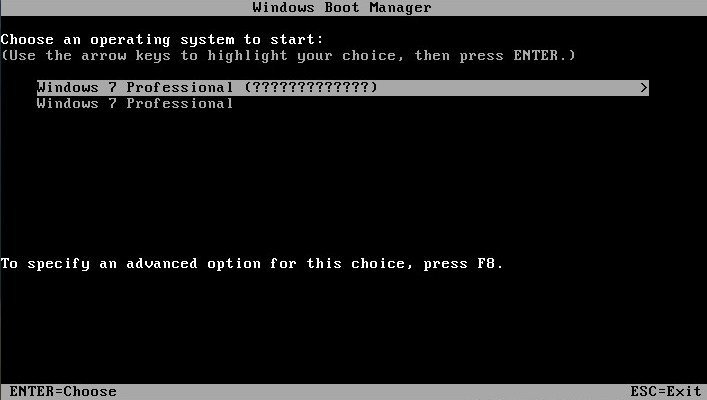
В моём случае найдено две операционные системы. Всё видно на скришноте.
Кроме вышеприведённого способа, есть ещё один, вводим в командной строке bootsect /NT60 SYS, основной загрузочный код, так же будет обновлён.
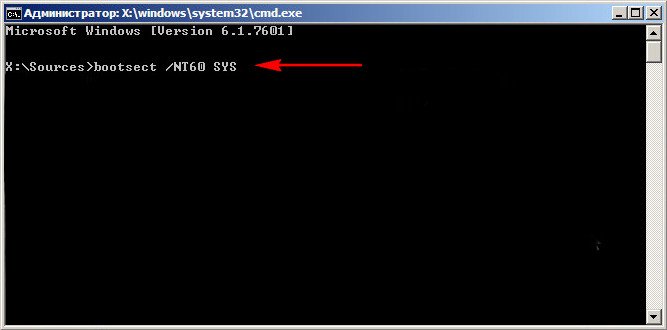
Exit
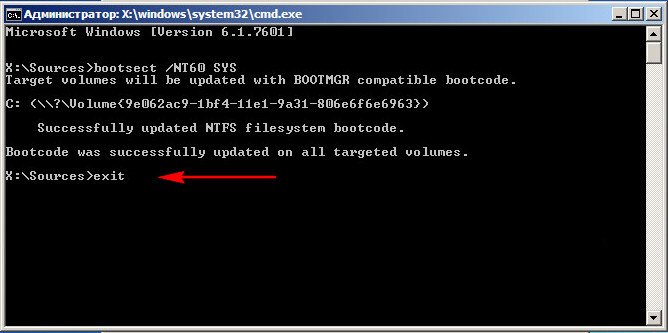
Наша найденная Windows 7 появляется в меню загрузки операционных систем
Если всё, что сказано выше не помогает, попробуйте заново перезаписать все файлы хранилища загрузки BCD, повторятся не буду, всё подробно объяснено в этой статье
http://remontcompa.ru/421-ntldr-is-missing-v-windows-7.html
Недавно один мой знакомый принёс мне компьютер с жалобой на то что две установленные у него на разных жёстких дисках операционные системы Windows 7 и Windows 8 не загружаются выдавая разные ошибки при загрузке.
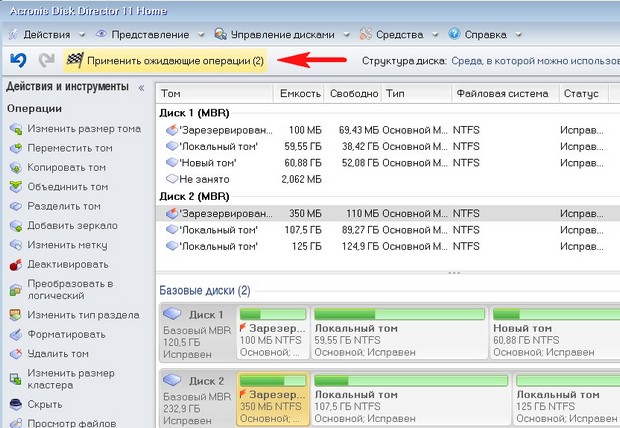
Первым делом я загрузил компьютер с загрузочного диска Acronis Disk Director и увидел такую картину. Как видим имеются два жёстких диска, первый Диск 1 с установленной Windows 7, а второй Диск 2 с установленной Windows 8. Обратите внимание на два красных флажка, которыми помечены совсем не те разделы, которые нужно. Почему? Красный флажок означает то, что данный раздел активен и с него должна происходить загрузка операционной системы.
Так вот, ошибка в том, что у нас на обоих жёстких дисках должны быть отмечены красным флажком первые скрытые разделы System Reserved (Зарезервировано системой). На Windows 7 объём такого раздела составляет 100 МБ, а на Windows 8 350 МБ, именно эти разделы носят атрибуты: Система. Активен и именно на этих разделах находятся файлы конфигурации хранилища загрузки (BCD) и файл менеджера загрузки системы (файл bootmgr). А у нас получается эти атрибуты носят другие разделы. Из-за этого Windows 7 и Windows 8 не загружаются.
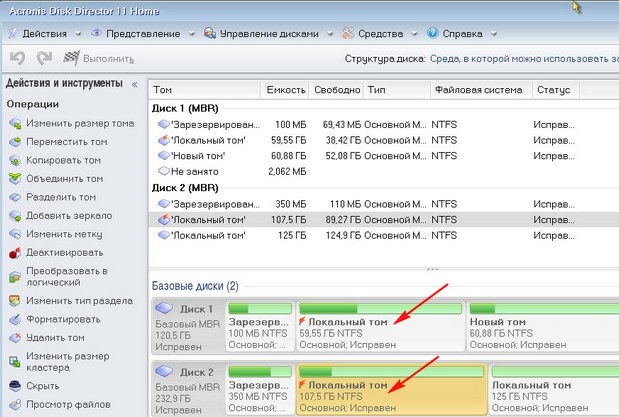
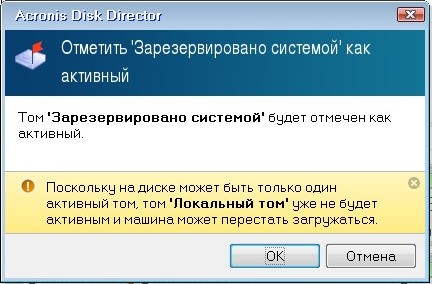
Выбираем первый жёсткий Диск 1, щёлкаем на первом разделе System Reserved (Зарезервировано системой) правой мышью и выбираем «Отметить как активный»

Том «Зарезервировано системой» будет отмечен как активный. Нажимаем ОК.
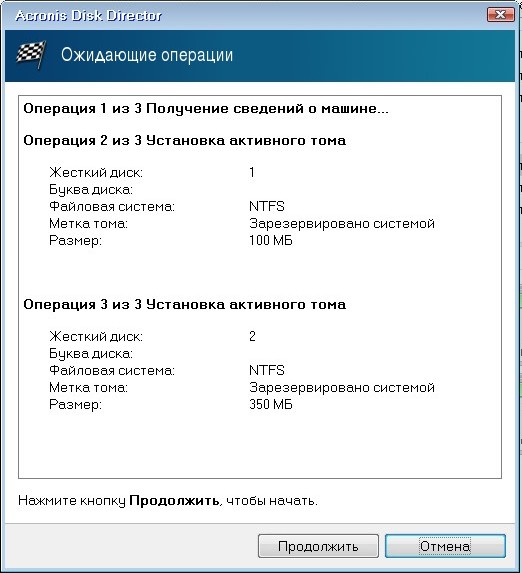
То же самое делаем с Диском 2. Программа Acronis Disk Director работает в режиме отложенной операции, чтобы изменения вступили в силу нажимаем кнопку «Применить ожидающие операции»
Продолжить.
Как видим, после наших изменений активными стали те разделы которые нужно.
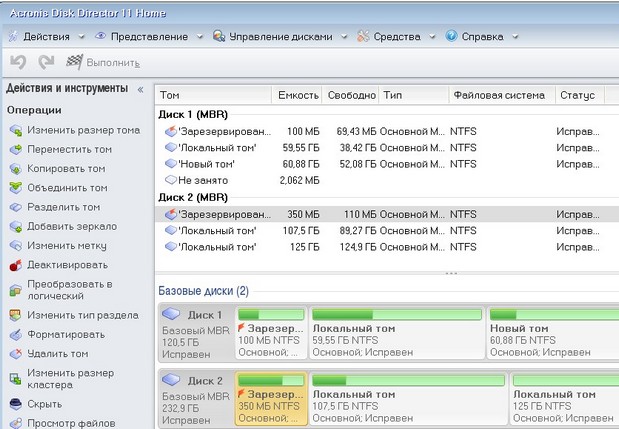
Выходим из программы и перезагружаемся. Результат работы положительный — поочерёдно загружаются обе операционные системы.
Download Article
Explore 2 repair methods: System Recovery or an installation or recovery disc
Download Article
- Using System Recovery
- Using Installation or Recovery Disc
|
This wikiHow will teach you how to repair Windows 7 using the Startup Repair tool. If for some reason Startup Repair isn’t able to fix the problem, you can use System Restore to restore Windows to a date when it was working properly. We’ll walk you through how to do both! Check out the steps below to get started.
How to Repair Windows 7 at Startup
Open the Advanced Boot Options menu when restarting your computer. Then, select «Repair your computer.» If your computer turns on but won’t boot Windows, try using your Windows 7 installation or recovery disc to repair the system.
-

If your PC turns on but won’t boot into Windows, you can use the built-in Startup Repair tool to repair the operating system. Start by disconnecting all removable media.[1]
-

You can lift your finger once the PC is off.
Advertisement
-
Continue holding this key down until Windows boots into the Advanced Boot Options screen.
- If the PC has more than one operating system, you’ll have to select the Windows 7 installation when prompted to do so.
-
Use the arrow keys to scroll down and select the option.
- If you don’t see this option, see the «Using a Windows 7 Installation or Recovery Disc» method.
-
This opens the System Recovery Options.
-
The Startup Repair tool will scan Windows for errors and try to fix them automatically.
-
If Startup Repair fixed your issues, your PC should now boot into Windows 7.
-
If you see an error that says the system cannot be repaired, follow these steps to perform a system restore:
- Boot the computer while holding down the F8 key as you did earlier.
- Select Repair your computer and press ↵ Enter.
- Select a language and click Next.
- Select System Restore.
- Follow the on-screen instructions to select a restore point from when the computer was last functioning properly.
-
If you have a Windows 7 installation or recovery DVD, you can use it to reinstall Windows 7. See the » Using a Windows 7 Installation or Recovery Disc» method to learn how.


Advertisement
-
If your PC turns on but won’t boot into Windows, you can your Windows 7 installation DVD to repair the operating system. If you created a system repair disc, you can insert that instead.[2]
- If you don’t have a Windows 7 DVD or system repair media but have access to a working computer with a DVD burner, you can use it to create a new installation disc. See How to Create a Recover Disc in Windows 7 to learn how. You’ll need your Windows product key to do this, and you’ll usually find it on a rainbow sticker somewhere on your PC.
-
This includes flash drives.
-
You can lift your finger once the PC is off.
-
The PC should prompt you to press any key to boot from the installation/repair disc.[3]
-
You should see a message that says «Windows is loading files.»
- If you are not prompted to boot from the DVD, you probably need to access the BIOS and make the DVD drive the first option in the boot order. See Change Computer BIOS Settings to learn how to change the boot order.
-
This will bring you to the «Install Windows» screen if you’re using an installation DVD, or the «System recovery options» screen if you’re using a repair disc.[4]
-
The recovery tool will attempt to find Windows 7 on your computer.
-

-
The Startup Repair tool will scan Windows for errors and try to fix them automatically.
-
If Startup Repair fixed your issues, your PC should now boot into Windows 7.
-
If you see an error that says the system cannot be repaired, follow these steps to perform a system restore:
- Reboot the PC from the DVD as you did a moment ago.
- Select your language and click Repair your computer.
- Select your installation and click Next.
- Click System Restore.
- Follow the on-screen instructions to select a restore point from when the computer was last functioning properly.
-
If you are not able to fix your computer using these tools, you’ll typically have to perform a system recovery. This will wipe your hard drive clean and reinstall Windows 7. To perform a recovery:
- Reboot from the DVD again and select your operating system.
- Click System Image Recovery on the «System Recovery Options» screen.
- Follow the on-screen instructions to reinstall the operating system.


Advertisement
Ask a Question
200 characters left
Include your email address to get a message when this question is answered.
Submit
Advertisement
Thanks for submitting a tip for review!
About This Article
Thanks to all authors for creating a page that has been read 105,468 times.
Is this article up to date?
BOOTMGR is missing windows 7 install error repairing, after a failed Windows 7 install, you may encounter the “BOOTMGR is missing” error when you make another attempt to install or run the operating system.
It will show you a black screen with nothing else provided. There are no fixes along with an error message that says to do either “CTRL+ALT+DELETE” or “RESTART” your computer.
Just like many illogical Microsoft solutions, this solution is also stupid and shouldn’t be followed.
For people who aren’t familiar with computer error messages or haven’t mastered the nuances of their operating system.
They often rely on trial-and-error fixes like reinstalling their operating systems again and trying different things like putting in new hard drives with partitions, or messing with BIOS configurations.
If you have encountered this error before, you’ve probably taken some time to try to fix it. (Take a deep breath. We understand that we’ve all been there.)
The major problem you are experiencing is with the Windows 7 boot loader and you need to repair the MBR (Master Boot Record).
This is actually the most common problem and solution. Other issues may arise and require different solutions, but they are far less frequent so they are not something you will worry about.
Just like any other software or computer error, the “Blue Screen Of Death” can sometimes occur when one is trying to “boot up” from a shut-down state.
The BSOD comes with an ominous blue background and it might prompt a small error message – which will most likely include the cause of the issue.
In this case, the issue could be due to overheating of your system, power failure issues and so on.
To help you better understand this issue I’m going to provide you with some typical solutions for common causes of this problem, but before we begin let’s get familiarized with how a computer boots from powered-off state first.
What is BOOTMGR and Why this Error?
This is a tiny bit of program code which automatically runs when you start your computer. It loads your operating system from your hard drive.
So, you see it’s kind of like the middle-manager between hardware and software or in other words hardware and operating system.
You see without an operating system there is no use of hardware and without this boot loader, there is no startup of OS.
Earlier there was a boot loader with names such as NTLDR in the XP and NT era but from Vista to Win 10, currently this “little code piece” links the hardware to OS.

First thing’s first: if you find yourself on this message, that’s because the computer is currently having some serious trouble booting up.
- Corrupt and Misconfigured files
- Hard-drive and Operating system upgrade issues
- Corrupt Hard-drive sectors (hardware related)
- Outdated BIOS
- Damaged or Loose Hard-Drive Interface cables

In order to know the process for this error, let us know a few more things.
- When your PC starts, the BIOS starts a set of processes known as POST (short for Power On Self Test). This happens just before the Windows boot.
- POST generally checks for RAM, peripheral devices, hardware etc. The error appears just after this little process is complete.
- After these tasks are completed by BIOS, the Windows BOOTMGR starts, where this error appears. The common reason for “BOOTMGR is missing” is, when the BIOS fails to find this “tiny piece of program”.
- It can be due to several reasons – BOOTMGR file may be missing, may not be existent on the boot drive, boot sector viruses, faulty hardware, BOOTMGR corrupted by failed Windows installs etc.
Different Things to Try to Eliminate “Bootmgr is Missing” Error
If you’re experiencing this error, there could be many reasons, but – as a troubleshooter who doesn’t know why the error is occurring – I will try to empirically determine which solutions are best depending on what’s causing your website not to load.
Fix #1
First, we will implement the Microsoft support software package solution.
- Run Startup Repair from Windows Recovery Environment (WinRE)
(or) - Rebuild the boot configuration data (BCD) from WinRE.
(or) - Run System Restore from WinRE.
(or) - Use Startup Repair on Windows OEM machines like laptop etc.

Fix #2
Before attempting to install Windows 7, BOOTMGR is missing windows 7 install error repairing check your bootable media. The next step is to make sure that the ISO image of the installation disc you’re using is from a trusted source and has not been tampered with in any way.
Sometimes, an end-user can be fooled into installing malware alongside their genuine software.
You may want to watch some information security and privacy protection websites before deciding which ISO you wish to download online because they will warn you if there are any dangerous files lurking around the web.
BOOTMGR is missing windows 7 install error repairing, also make sure you have everything you need for installation; a small oversight now could end with disaster later.
Fix #3
Never, ever insert a DVD into a CD drive. Do you have any idea how infuriating it is when people do this? Especially if they’re not even aware that they’re doing something wrong in the first place.
This can actually lead to getting an error now and then known as “Bootmgr is missing”.
It’s important to be aware of some fundamental causes for this problem, including the type of DVD drive that was used during installation or failure to start up the PC (or laptop) after the installation.
In many cases, BOOTMGR is missing windows 7 install error repairing the solution is simply installing a reliable DVD drive and restarting your device without fail.
Fix #4
This can be fixed in the settings of your computer. Sometimes you need to adjust the BIOS settings—which will require your computer’s user manual or a quick Google search—or booting into Safe Mode which prevents unnecessary processes from auto-launching, like Startup programs.
For Dell, this may mean pressing F12 (depending on your model) during startup; Sony Vaio owners are sometimes instructed to hold down ‘Fn’ while restarting; and HP users usually aren’t presented with any buttons when common startup prompts do not reveal anything extra, although the number of keys pressed at startup can vary.
Asus – F8
HP/Compaq – Esc
Sony – F2
Acer – F12
Gateway – F10
e-Machnes – F10
Toshiba – F12
Dell – F12
IBM/Lenovo – the blue Think vantage button
If you are having trouble starting your operating system from your installation media, before trying this make sure you’ve made any necessary changes in the BIOS (usually set to boot from CD/DVD by default) so that it will be booted from the hard drive once you restart.
Once the installation disc or media is started, choose to apply Fix #1:
Fix #5
Check the hardware on your computer. These can be faulty hard-disk, BOOTMGR is missing windows 7 install error repairing RAM, or any other media that connects to your computer in multiple ways [i.e., SATA cables].
It’s better you run a memory test or a hard-disk test so you can make sure each block or sector is working fine [not corrupted] before continuing to use them for work.
Fix #6
Sometimes choosing the easiest route possible is a smart idea. BOOTMGR is missing windows 7 install error repairing For example, bypassing a Hard Disk Drive (HDD) and booting from an installable media source like a DVD.
First, remove all the USB devices, any secondary hard-disks that do not contain Windows 7 and finally restart your computer.
This is generally the cure for getting around problems with Windows 7 that may occur when there are too many files on your drive, or if some of them are corrupt.
In order to fully fix everything, you’ll need to have an external drive as well as the hard disk from your computer.
When your hard drive gives you issues, one way to fix it is just to disconnect the HDD altogether.
You’ve probably seen a message that says “DISK ERROR – PLEASE INSERT,” BOOTMGR is missing windows 7 install error repairing which usually means you need remove the problem drive and boot up from scratch again.
Just plug things back in after BIOS has detected built-in storage (usually “Booting from Hard Disk…”) and resume normal operation; Your computer should now be good as new again.
Fix #7
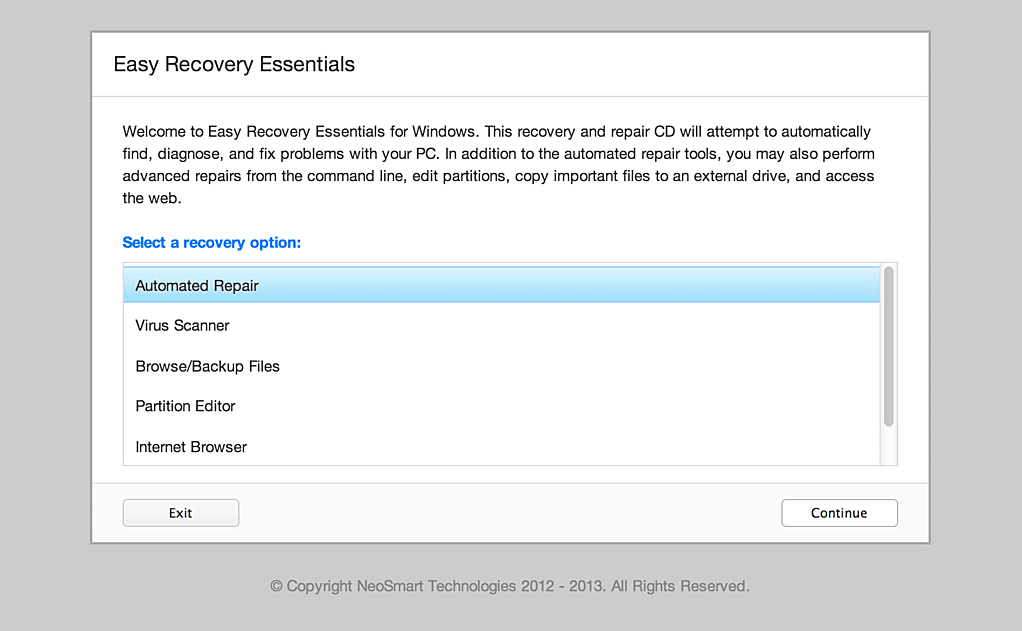
Any third-party boot software like Easy Recovery Essentials or Windows 7 Repair Disc can be used to resolve this issue in case the system could not get into Windows on its own.
- Easy BCD
- Easy Recovery Essentials.

Fix #8
In Windows 7, the active partition is usually the one containing bootmgr. BOOTMGR is missing windows 7 install error repairing In many cases, this will be the only OS installed on a system. The BOOTMGR adds a Boot menu entry to allow you to choose which operating system to load upon startup.
But because of unknown reasons (like tickling with disk management software or computer management applications) the partition can become inactive.
In such cases, it’s better to make that partition active again and fix boot files related to its operating system again.
Fix #9
You can try issuing the /force command with the bootsect option.
The command that is generally used in this case is –
bootsect /nt60 h: /force
where h: is the bootable and active drive.
Fix #10
Sometimes compression is a useful tool to help conserve disk space, BOOTMGR is missing windows 7 install error repairing but it can also unintentionally affect other important files too.
So for instance, compressing your main partition like “C:” can make the system a bit more fragile and open to potential errors if your boot records get compressed along with everything else.
Fix #11
This solution mainly helps in dual-boot issues related to “BOOTMGR is missing”.
![bootmgr is missing_thumb[3] 5](https://www.outlookappins.com/wp-content/uploads/2021/12/bootmgr-is-missing_thumb3-5.png)
Another reason why you may be seeing this problematic error is the computer trying to boot from a source that was not designated for bootable media.
This could mean if you are attempting to load your operating system from an external hard drive, BOOTMGR is missing windows 7 install error repairing USB flash drive or even want to try and format a floppy disk.
Your computer’s BIOS (or Bootable Media) settings may not officially recognize whatever devices as bootable so you would see that pop-up message when it happens.
BOOTMGR is missing windows 7 install error repairing, the most general case for this computer error is that you have somehow broken something and Windows has made an error.
Another major cause for this issue is when you have installed a version of Windows operating system like Windows XP on a computer that already has an older version of the same operating system installed, example like Windows 7.
This will wipe out the boot loader and you need to reinstall it if you wish to continue booting into Windows smoothly.
For best results, BOOTMGR is missing windows 7 install error repairing you should always install Windows on a machine with no other existing versions of different operating systems installed.
And then use the free DOS Bootable CD or USB to create your own backup boot disk which you can then use every time one needs to enter Safe Mode ( warm start) during startup.
Boot from the Windows 7 Installation DVD
- Change your BIOS settings to boot from CD/DVD and boot off the install disc. Click through until you see “Repair your computer” link in the lower left hand corner.
- Select the correct installation of Windows (if you’re multiple booting Windows or have more than 1 Windows installed) and click the Next button.
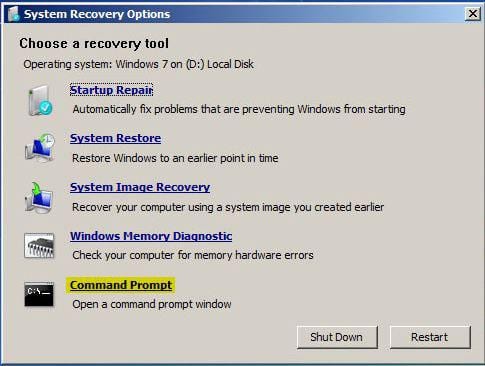
- There you’ll get the System Recovery Options, where you find the option of going to “Command Prompt”.
- To restore the master boot record, you can simply type in the following command.
bootrec /fixmbr
- To write a new boot sector onto the system partition use this command. (more helpful)
bootrec /fixboot
- To see the remaining options for the base command, you need to type
bootrec /?
Replace Win XP NTLDR Boot loader with Win 7 BOOTMGR
If you installed Windows 7 first and added XP onto that OS, BOOTMGR is missing windows 7 install error repairing you’ll find that you can’t still boot into the original Windows 7 partition.
This tutorial will guide you through how to restore your Windows 7 boot loader from a backup copy of it using a file explorer program.
bootrec /FixMbr
bootrec /FixBoot
bootrec /RebuildB—
If you’re familiar with how to fix a Windows 7 boot menu but would rather not use a Windows XP Disc, then check out this simple tweak that’s related to an item called NT or NTLDR.
This one step process will let you get rid of that pesky “BOOTMGR is missing” message and boot into Windows 7 again.
Fix #12
As a last resort, you may consider wiping your hard disk drive clean and starting from scratch. In such cases, it would be advisable to keep one HDD in addition to the installation firmware for Windows 7 as well as a single, uncorrupted Windows 7 ISO image file on another medium like a DVD or USB stick.
You can use DBAN Boot and Nuke to completely erase the drive. BOOTMGR is missing windows 7 install error repairing Generally, it may take some time, depending on how much data you have.
(For example, 6 to 12 hours.) Then you can install Windows 7 fresh using an upgrade disc or an installation ISO file written to a DVD.
Here are what are said to be several solutions for BOOTMGR failure, BOOTMGR is missing windows 7 install error repairing fixing MBR records and boot files:
Conclusion
Most of the times when our research says that Windows 7 will fail to install, you may get this error or something similar.
BOOTMGR is missing windows 7 install error repairing, if it only occurs on one partition and one hard drive, you can try simply reformatting the disk and restarting the installation.
This should resolve any issues with the software (disease), and in most cases it fixes them (dispels the effects). This is like “attacking a wound” – because then we are dealing with many viruses (unknown defects).
But if you have an existing Windows 7 installation, then you cannot do the above. In that case, use a piece of software called Easy-BCD to correct your boot entries and installing the BOOT Manager is the easiest and working solution.
Also, BOOTMGR is missing windows 7 install error repairing we must remind you to check your software (like Microsoft Windows or Mac OS X) before you try these solutions.
Also, always use valid and functioning installation discs or digital media downloaded from their respective website of origin.
Hello, My name is Shari & I am a writer for the ‘Outlook AppIns’ blog. I’m a CSIT graduate & I’ve been working in the IT industry for 3 years.