
This article shows you how to create a recovery disk for Windows XP, if you have the original CD (can be used as a recovery disk) or, if not, how to create a recovery diskette (floppy disk).
It also shows you how to download our recovery disk for Windows XP, if you don’t have the original CD available or can’t boot into Windows XP.
Download recovery disk for Windows XP
If you aren’t able to boot into Windows or don’t access to the recovery partition to create a system recovery disk, you can use our recovery and repair disk Easy Recovery Essentials to repair your Windows XP.
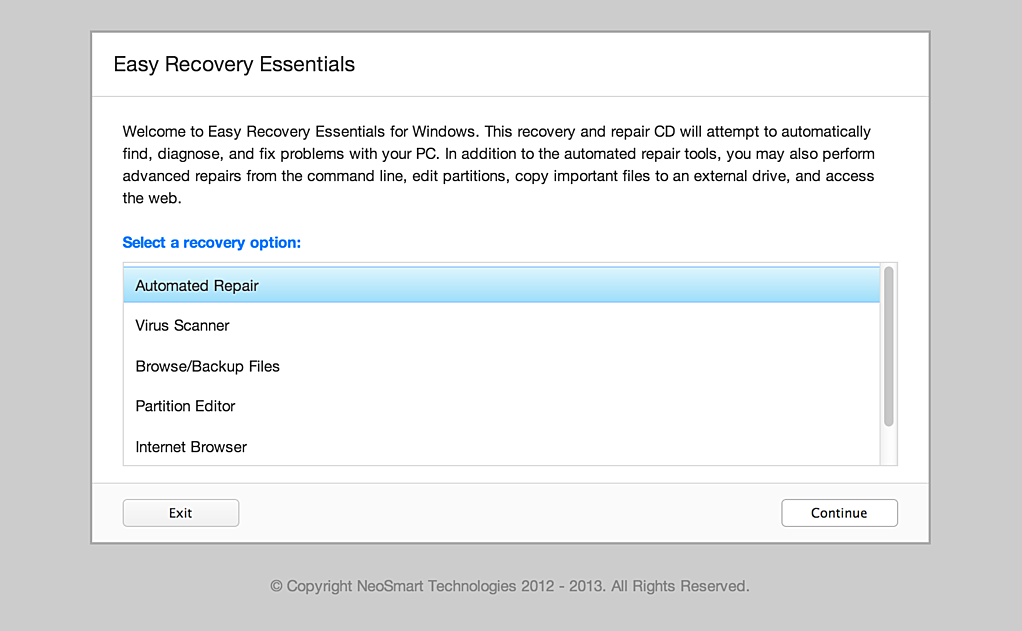
Download Easy Recovery Essentials
Features of Easy Recovery Essentials include:
- Automatically find and fix boot errors and blue screens
- Works even when you can’t get into Windows
- Recover from virus infections
- Restore your PC to a working state
- Access and backup your important data
- Advanced tools for IT experts
Easy Recovery Essentials is an ISO download image ready to be burned directly to a CD, DVD or a USB flash drive.
Easy Recovery Essentials can be used as a recovery disk for computers with Windows XP installed to repair the computer, including the full list of Windows XP editions with Service Packs installed:
- Microsoft Windows XP SP1 (Service Pack 1)
- Microsoft Windows XP SP2 (Service Pack 2)
- Microsoft Windows XP SP3 (Service Pack 3)
It’s compatible with both the Home and Professional editions of Windows XP:
- Microsoft Windows XP Home
- Microsoft Windows XP Professional
It’s compatible with newer versions of Windows, up to Windows 8.1:
- Our recovery disc for Windows 8 computers
- Our recovery disk for Windows 7 computers
- Our recovery disc for Windows Vista computers
It’s also compatible with Windows Server editions:
- Our recovery disc for Windows Server 2003, 2008 and 2012 computers
Create a recovery disk for Windows XP
Before you continue, check if you still have the original Windows XP installation CD.
That original installation CD can act as a recovery disk that you can use to run Recovery Console (Command line utility) to repair your computer with.
From Recovery Console, you can run the bootcfg, chkdsk, and more commands.
If you have the original CD
If you have the disk, follow these steps to open Recovery Console:
- Insert the CD in the optical drive
- Restart your computer
- At the Welcome to Setup screen, press R to load Recovery Console

- You’ll need to log in as an Administrator or with any user that has administrative rights to the system. Do so and enter the password.
- Press Enter
- The Recovery Console should now be available
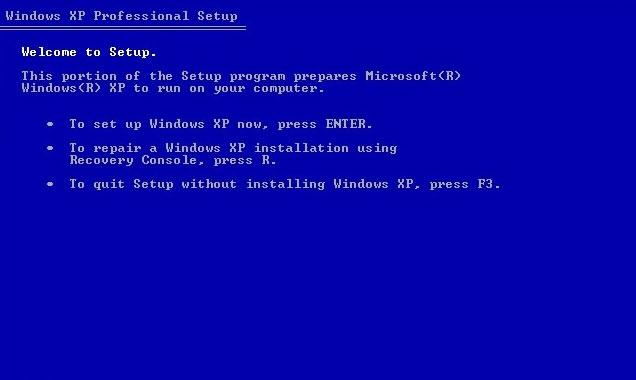
To read more about bootcfg, read the Bootcfg guide. To read more about chkdsk (check disk), read the chkdsk guide.
If you don’t have the original CD
If you don’t have the original CD with Windows XP, you can create a bootable floppy diskette.
It’s required that you can boot into Windows XP to create the bootable diskette. Otherwise, if you can’t boot into Windows XP, go to Download recovery disk for Windows XP.
You’ll need to make sure your computer’s floppy disk is working properly first. Your computer with Windows XP must have the floppy disk functioning.
To create the bootable diskette for Windows XP, follow these steps:
- Boot into Windows XP
- Insert the diskette in the floppy disk
- Go to My Computer
- Right-click on the floppy disk drive. This is usually the
A:\drive. - Click Format
- Check the Create an MS-DOS startup disk option at the Format options section
- Click Start
- Wait for the process to finish
- Once it’s completed, safely remove the diskette for the floppy disk
Once the recovery diskette is created, follow these instructions everytime you need to use it:
- Check if the diskette is in write-protect mode
- Insert the diskette in the floppy disk
- Restart the computer
- Follow the instructions on the screen after you’ve booted your sytem from the diskette
More Information
Linked Entries
- bootcfg
- chkdsk
Support Links
- Easy Recovery Essentials for Windows – our repair and recovery disk.
It’s an easy-to-use and automated diagnostics disk. It’s available for Windows 8, Windows 7 and Windows Vista. It’s also available for Windows XP and Windows Server.
Read more at Windows Recovery Disks.
- The NeoSmart Support Forums, member-to-member technical support and troubleshooting.
Applicable Systems
This article applies to the following operating systems:
- Windows XP (all editions)
There are a few ways to create a System Repair Disk for your Windows XP computer. Whether you want to create a USB recovery drive or a CD/DVD disc, you can follow these instructions to create a Windows XP System Repair Disk. A USB-based recovery drive is only good for the PC you created it on, so it’s best to create a system repair disk to use on other PCs.
Before you create a Windows XP System Repair Disk, you’ll need to insert a writable blank disc into your PC. Select Backup and Restore from the left pane, and then click on Create a System Repair Disk. A window will pop up, identifying the CD/DVD and creating the disk. When you right click on it, you can choose a name for your disc, such as recovery drive.
Another way to create a System Repair Disk for XP is to use the original installation CD. If you have one, it should work as a recovery drive. You will have to have administrator rights and the master password to access Recovery Console. Once you’ve logged in to the system, you can run the bootcfg and chkdsk commands. You will also need to run a system repair disk to fix any problems with the computer.
When your computer is not booting, you can use a recovery program to reset it to its last known good configuration. The recovery software can be downloaded from the Internet. You’ll need a disk or USB flash drive to complete the process. Alternatively, you can boot from the CD. Either way, the next step is the same. If you don’t have a disk, you can use the recovery software to restore your computer to its previous good configuration.
First, find the Control Panel. Click Start > Control Panel. Click on System Restore. On the System Restore tab, uncheck “Turn off System Restore for all drives” to make it available to all users. This will help you restore your system to its previous state and fix errors. However, keep in mind that if you attempt to repair your computer with this method, you will not be able to install any new updates.
How Do I Create a Recovery Media For Windows XP?
The first step in creating recovery media is to boot the computer. Open the Windows Recovery Console. Type the Administrator’s password if you have one. If not, type the password. Then, press Enter. The Recovery Console will begin. You can then make changes to the system, such as changing the default settings. If you have a Windows disc, remove it before you proceed to the next step.
You can also use System Restore, which lets you restore your computer to a previous point in time. This feature is only available on some computers, so if yours doesn’t have a CD-ROM drive, you’ll need to use floppy disks. Once your recovery disc is created, you can use it to restore your system to an earlier time. You can also use System Restore for more complex problems.
Next, you can use the Command Prompt to run a Windows XP recovery disk. Type in “cmd” in the search bar, and then press enter. A window will pop up with a list of recovery options and instructions. Make sure to follow all instructions carefully. If the computer doesn’t recognize any of them, you can try the steps again. The process will be more efficient if you create a recovery disk yourself.
Can I Download Windows XP Recovery Disk?
If you have ever experienced a hard drive crash, you’ve probably wondered, Can I Download Windows XP Recovery Disck? The simple answer is yes. It’s not that difficult. The process of creating a Windows recovery disk is actually incredibly simple. You simply need to have a working floppy disk. Fortunately, you don’t need to be a computer genius to create one.
To create a recovery disk, first make a backup of all important files and settings on your computer. Next, create a USB flash drive with at least 16GB of space. A USB drive with less space may not be compatible with 64-bit Windows. Format the drive with the NTFS file type. Once the partition is created, install the recovery software and reboot the computer. Once it’s ready, you’re good to go!
If you’ve been wondering, “Can I Download Windows XP Recovery Disk?”, you’re not alone. Fortunately, there are a number of ways to create one. The original Windows XP installation disc works just like the Recovery Console. However, you must make sure that the recovery disc is created for the right version of Windows XP. To do this, you must close all open applications and turn off any WiFi or other wireless connections before downloading the file.
How Do I Fix a Corrupted Windows XP?
If you’re wondering how to fix a corrupted Windows xp installation, you’ve come to the right place. There are several different methods available to fix corrupted Windows XP files. Some of them will require you to create a recovery CD, while others will just work without a recovery disc. Regardless of what you’re looking for, these methods should get your PC running again.
First of all, you need to understand that you cannot use your system until the damaged files are replaced. If this is the case, you’ll need to fix the files one by one. The first method will require you to use the system restore tool. This method will restore the system to an earlier point and attempt to fix bad sectors. Once the system restore tool has done its job, you can use the CHKDSK command or the SFC /scannow command to test your hard drive for bad sectors. If this doesn’t work, you can try re-formatting the files, or use disk recovery software.
Once you’ve changed the folders, you can try to restore your windows XP installation. Make sure you have administrative privileges, or you won’t be able to complete the process. Another option is to restore your system from the Automated System Recovery backup. Another method is to repair a corrupted Windows XP installation manually. To do this, open the Recovery Console from the XP installation disk. Choose “Recovery Console” on the Welcome to Setup screen. Now, copy the files that you need from the WindowsSystem32config directory. Make sure to back up any files you want to keep before you start.
How Can I Repair Windows XP with Command Prompt?
If your computer is not booting up, you can perform the following procedure to fix the problem. Boot the PC using the original Windows XP install CD. Make sure to select the ‘R’ option from the windows Advanced Options menu. If the computer still won’t boot up, try using the network install CD. Otherwise, use a standard Windows XP install CD. You must follow the instructions on the CD to repair the computer.
To change the value of this entry, open the Registry. Home Edition users can use direct editing. You can find the value of the command in the figure below. Remember to back up the Registry before you edit it. Once you’ve completed the process, restart your computer. Hopefully, your computer will boot up in a few minutes. If the problem persists, try using another copy of Windows.
If you’ve tried all the previous methods without success, you may be wondering what to do next. In most cases, you need to reinstall Windows. It’s not a good idea to delete personal files. You should wait for the installation to complete and the necessary files to copy. If you are unsure whether or not the system will boot, backup all your data before you start the repair.
How Do I Make a Recovery Disk?
Windows XP users who experience unexpected computer problems need a way to recover lost data. Fortunately, Windows includes a built-in recovery mechanism. The Windows XP recovery CD has an application known as the Recovery Console that can run the bootcfg command, chkdsk, and more. In order to create this recovery disk, you’ll need to have Administrator privileges and a password.
To create the system repair disc, go to the Control Panel, System and Security, and then click on the Create system repair disk option. Once you select this option, a window will open asking you to insert a blank CD or DVD. Select “Create system repair disk.”
After you’ve selected the “Windows” option, click on “Repair.” To create a system repair disk, you must have the correct Windows license key. Once you’ve done this, press the “F3” or “Quit” options to boot into the system. Afterwards, click “Yes” or “OK” to confirm the procedure. Once you’re done, you should see a success message.
How Do I Make a Recovery CD?
You may be wondering how to make a recovery disk for your computer. These disks are designed to restore the computer to its original state and contain all the drivers and programs installed when it was first purchased. A recovery disk is the perfect way to get your PC running again. If your computer gets damaged, you can create a recovery disk by wiping out the entire hard drive and reinstalling Windows and any programs you have installed.
Creating a recovery disk for your computer is not difficult. Windows XP comes with a feature called Automated System Recovery (ASR) which is a useful feature when your computer gets damaged or crashes. It uses the Windows XP Professional Backup utility and a floppy disk with three critical files. If you lose your system, you can restore it by using your System Recovery CD.
Learn More Here:
1.) Windows Help Center
2.) Windows – Wikipedia
3.) Windows Blog
4.) Windows Central
Программы для ремонта и восстановления жесткого диска
- Recuva
Система для восстановления съемочного накопителя, запуска диагностики, включения полного и выборочного форматирования, удаления вирусов, проверки всех секторов на работоспособность.
- Defraggler
Отличное решение для работы с жестким диском персонального компьютера. Работает с огромным количеством карт памяти, проводит анализ и тестирование файловой системы и томов винчестера.
- HDD Regenerator
Программа проверяет файлы на съемном носителе информации, используется для ремонта и восстановления работы устройства, выводит список ошибок, сбоев, неисправностей, улучшает быстродействие.
- Victoria
Версия утилиты для ноутбука, которая проверяет все параметры работы внутреннего или внешнего жесткого диска, запускает процесс очистки материала, проводит резервное копирование важных документов. Выполняет лечение ssd дисков. Удаляет битые кластеры.
- R-Studio
Бесплатное приложение осуществляет дефрагментацию HDD, добавляет количество свободного места на устройстве с помощью удаления и форматирования, проводит сканирование и восстановление.
- Partition Table Doctor
Продукт отслеживает проблемы винчестера и помогает восстановить устройство с помощью принудительного запуска. Он позволит провести операцию изменения файловой системы или очистить хранилище.
- Zero Assumption Recovery
Программная платформа проводит чтение данных на жестком диске, следит за потерями медиафайлов и документов, восстанавливает информацию и доступ к устройству, осуществляет поиск проблем.
- BadCopy Pro
Софт проводит резервное копирование информации и восстановление данных на жестком диске, следит за записью и тестирует быстродействие, улучшает работу, контролирует файловую систему.
Программное обеспечение дает возможность восстановить работу винчестера при условии внутренних повреждений, либо ошибок чтения файлов. Оно имеет огромный набор рабочих инструментов для проведения диагностики, тестирования, резервного копирования. Предлагаем скачать программы для восстановления жесткого диска на Windows XP SP1/SP2/SP3 без регистрации и смс на русском языке. Представлены последние версии 2025 года (32/64 bit).
Категории программ
- Все программы для Windows XP
- Создание анимации
- Запись дисков
- Раздача WiFi с ноутбука
- Просмотр видео
- Создание презентаций
- Чтение fb2
- Восстановление удаленных файлов
- Создание загрузочного диска
- Нарезка видео
- Блокировка рекламы
- Запись видео с веб камеры
To create the bootable diskette for Windows XP, follow these steps: Boot into Windows XP. Insert the diskette in the floppy disk. Go to My Computer. Right-click on the floppy disk drive. Click Format. Check the Create an MS-DOS startup disk option at the Format options section. Click Start. Wait for the process to finish.
Can you create a system repair disk on a flash drive?
For example, you cannot create a system repair disc on USB and make it as bootable flash drive. What’s worse, if you want to create an ISO file and move to other places, you need to turn to other tools to create a system repair disc to ISO file.
Using System Restore Log in to Windows using an administrator account. Click “Start | All Programs | Accessories | System Tools | System Restore.” Select “Restore my computer to an earlier time” and click “Next.” Choose a restore date from the calendar and select a specific restore point from the pane to the right.
How do I create a recovery USB for Windows XP?
How to Create a Bootable Windows XP USB Drive Go to the Windows XP SP3 ISO download page. Select the language from the drop-down menu and click the big red Download button. Download a free programme such as ISOtoUSB to burn the image to a pen drive. Install ISOtoUSB on your computer and open it.
How do I make a Windows recovery disk?
Create a recovery drive In the search box next to the Start button, search for Create a recovery drive and then select it. When the tool opens, make sure Back up system files to the recovery drive is selected and then select Next. Connect a USB drive to your PC, select it, and then select Next. Select Create.
How do I make a disk bootable?
Step by Step Guide on How to Create a Boot Disk Step 1: Go to Application Home. Step 2: Select Disaster Recovery. Step 3: Select Boot CD Option. Step 4: Select Boot Disc. Step 5: Select Boot Media Type. Step 6: Create Your Boot Image. Step 7: Write Bootable Image.
Can I download a Windows 10 recovery disk?
To use the media creation tool, visit the Microsoft Software Download Windows 10 page from a Windows 7, Windows 8.1 or Windows 10 device. You can use this page to download a disc image (ISO file) that can be used to install or reinstall Windows 10.
How can I repair my Windows XP?
Create a Windows System Repair Disc Insert the Windows XP disk in the CD drive. Restart your computer. Press any key if you are prompted to boot from the CD. At the Welcome to Setup screen, press R to open Recovery Console. Type your Administrator password. Command Prompt should now be available.
How do I restore my Windows XP operating system?
How to Use System Restore in Windows XP Save everything. From the Start button menu, choose All Programs→Accessories→System Tools→System Restore. Choose the option Restore My Computer to an Earlier Time. Click the Next button. Choose a restore point from the cute calendar-like thing. Click the Next button.
How do I use Rufus on Windows XP?
Create a bootable USB drive with Rufus Rufus requires an account with admin access in order to make the necessary changes to hardware. Click the optical drive button next to the Create a bootable disk using checkbox, and you’ll be prompted to search for the ISO image to use (Figure B).
How can I install Windows XP on my laptop without CD drive?
How To Install Windows without a CD/DVD Drive Step 1: Install Windows from ISO file on a Bootable USB Storage Device. For starters, to install windows from any USB storage device, you need to create a bootable ISO file of the windows operating system on that device. Step 2: Install Windows Using Your Bootable Device.
How can I run Windows XP from USB?
How to install and run Windows XP from flash drive? Restart your computer and enter the BIOS (Basic Input/Output System). In the BIOS screen, check your boot settings under the “Boot Device Manager” or “Boot Device Property” Menu. Check the USB disk manual and see if it is bootable.
Can I use a recovery drive on another PC?
Now, please be informed that you can’t use the Recovery Disk/Image from a different computer (unless it is the exact make and model with exactly the same devices installed) because the Recovery Disk includes drivers and they won’t be appropriate for your computer and the installation will fail.
How long does it take to create a recovery drive?
This is the simplest way to create a recovery disk and takes around 15-20 minutes depending on how fast your computer is and how much data you need to back up. Navigate to Control Panel and Recovery. Select Create a recovery drive and insert your USB or DVD.
How do I restore Windows 10 without a disk?
Hold down the shift key on your keyboard while clicking the Power button on the screen. Keep holding down the shift key while clicking Restart. Keep holding down the shift key until the Advanced Recovery Options menu loads. Click Troubleshoot.
What is the best USB bootable software?
Top 7 USB Bootable Software Rufus – Best for Windows. Windows USB/DVD Tool – For both USB and DVD. UNetbootin – Cross-platform. Etcher – Validated burning. YUMI Multiboot USB Creator – Best for Linux. RMPrepUSB – For all type of bootable media. WinToUSB – Portable Windows creator.
How do I make an ISO into a bootable USB?
If you choose to download an ISO file so you can create a bootable file from a DVD or USB drive, copy the Windows ISO file onto your drive and then run the Windows USB/DVD Download Tool. Then simply install Windows onto your computer directly from your USB or DVD drive.
How can I tell if my USB is bootable?
To check if the USB is bootable, we can use a freeware called MobaLiveCD. It is a portable tool which you can run as soon as you download it and extract its contents. Connect the created bootable USB to your computer and then right-click on MobaLiveCD and select Run as Administrator.
A recovery disk can be a very helpful repair-tool when a serious error occurs in the Windows operating system installed on your computer. In this Techspirited article, we will show you how to create a recovery disc for Windows XP.
Windows XP comes with numerous full-system recovery features, which allow the users to easily create the re-installation and recovery disks for this operating system. A recovery disk can be used for restoring the software, files, and settings of the computer, back to the way they were at the time of installation of the operating system. It can prove to be very beneficial in case of system failure, computer virus infestation, hard drive malfunction, and numerous other problematic situations that might prevent you from optimally using your PC. The following procedure shows how to create a recovery disk for Windows XP.
How to Make a Windows XP Recovery Disk
If you are using the Windows XP Home Edition, then it might not be equipped with the Backup Utility, and hence, you need to create it first. Here’s you how you can do that.
Create Backup Utility for a Home Edition
First of all, insert the Windows XP Home Edition disk in your DVD/CD drive, and then go to ‘My Computer’. Now, open the Windows XP disk folder and run the backup utility installer. For that, click open VALUEADD > MSFT, and then double-click on ‘Ntbackup.msi.’, which is the Backup Utility installation wizard. Once the installation completes, click the ‘Finish’ tab. You have now successfully installed the backup utility, which is the basic step for making the disk.
Create a Windows XP Recovery Disk
After creating the backup utility, you need to open it by clicking on ‘Start Menu’ > ‘All Programs’ > ‘Accessories’ > ‘System Tools’ > ‘Backup’ > ‘Advanced Mode’. Now click on the ‘Advanced Backup Wizard’, and then click ‘Next’. This will take you to a page showing the message – ‘What to Backup’. Make sure you select the ‘Backup Everything on this Computer’ option, and then click on the ‘Next’ tab. Lastly, insert a blank disk in the DVD/CD drive and select the correct option from the available options list. Then click on ‘Next’ in order to initialize the process of making the disk.
How to Download a Windows XP Recovery Disk
You can follow the above mentioned steps to create the recovery disk for Windows XP, or you can download one from the official website of Microsoft for free. These ready-to-install recovery disks come with almost all the computer software files that can assist you in rebuilding your operating system. Note that this process requires a computer having a floppy disk drive.
Go to Microsoft’s Download Center on their website, and download the appropriate Setup disks corresponding to the version of Windows XP installed on your PC. If you are not sure, you can get the XP version-name from its installation CD-ROM.
The download is one large program file. It creates the Setup boot disks for Windows XP. You will have to use 6 blank formatted, high-density floppy disks. When you are ready, click on the downloaded file to start extracting the contents. When you are prompted, insert the floppy disks one by one, until all six disks are created. Remember to label each disk with the number that is specified by the program. You have to use the same order during the setup process.
Now, insert the first disk that you have created into the floppy disk drive, and restart the computer. You may need to change the BIOS settings to configure your PC to load from the floppy disk drive. The setup should start automatically, and all you will need to do is keep inserting the floppy disks as you are prompted.
You will have to use the Windows XP CD-ROM to reinstall it on your PC. You can also do it through the USB. All in all, it is important to make the backup utility before you make the Windows XP recovery disk. It is one of the most useful computer repair tools, which you should now be able to employ for fixing your operating system.