
В этой статье мы разберемся, как восстановить загрузчик Windows 10 или 11 на современном компьютере, на котором используется UEFI интерфейс вместо классического BIOS и таблица разделов диска GPT (вместо MBR). Повреждение загрузчика Windows может быть вызвано установкой второй ОС (Dual Boot — конфигурация), повреждением файловой систему, некорректным восстановлении Windows после сбоя, удалением скрытых разделов, вирусом-вымогателем и рядом других причин.
Данная статья содержит подробную пошаговую процедуру восстановления поврежденного или удаленного загрузчика ОС в Windows 11/10/8.1 и Windows Server 2022/2019/2016/2012R2 на компьютерах, которые работают в нативном (не legacy) режиме UEFI. Инструкцию можно использовать как для восстановления бинарных файлов загрузчика Windows, так и конфигурационного файла загрузчика EFI\Microsoft\Boot\BCD (в случаях, когда Windows не загружается из-за отсутствия или повреждения файла конфигурацией загрузка BCD.
Содержание:
- Не загружается Windows: Boot configuration data is missing EFI\Microsoft\Boot\BCD
- Автоматическое восстановление загрузчика Windows
- Ручное восстановление загрузчика Windows с помощью BCDBoot
Не загружается Windows: Boot configuration data is missing EFI\Microsoft\Boot\BCD
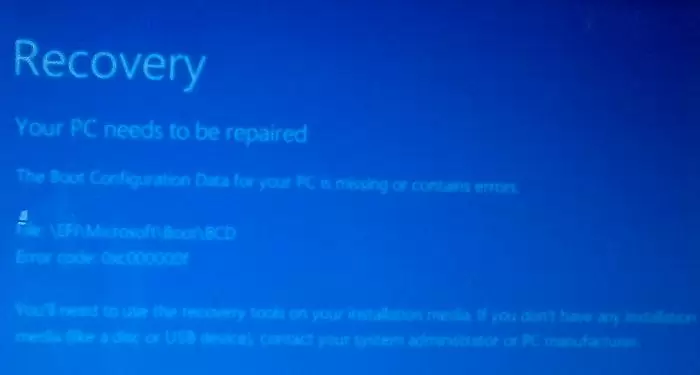
UEFI компьютер с Windows, установленной в наивном режиме, не сможет загрузиться при повреждении EFI загрузчика Windows. При попытке загрузиться с диска с повреждённым или отсутствующим EFI загрузчиком появится BSOD (синий экран смерти) с ошибкой:

The boot configuration data for your PC is missing or contains errors.
File :\EFI\Microsoft\Boot\BCD
Error code: 0xc000000f
или
Error code: 0xc000014c
В русской версии Windows ошибка может быть такая:
Ваш компьютер нуждается в ремонте Данные конфигурации загрузки для вашего ПК отсутствуют или содержат ошибки Файл:\EFI\Microsoft\Boot\BCD

Код ошибки: 0xc000000f
Эта ошибка говорит о повреждении или даже полном удалении конфигурации загрузчика Windows — Boot Configuration Data (BCD). Если вы попытаетесь восстановить загрузчик на UEFI компьютере с помощью утилиты
bcdedit
, вы получите такую ошибку:
The boot configuration data store could not be found.
The requested system device cannot be found.
Дело в том, что если Windows 10/11 установлена в нативном режиме UEFI на GPT диск, то EFI загрузчик Windows (Windows Boot Manager) хранит программу управления загрузкой и конфигурацию BCD на отдельном скрытом разделе EFI (размером 100 мб с файловой системой FAT32). Утилита bcdedit не видит этот EFI раздел, и соответственно не может управлять конфигурацией загрузчика на нем.
Если при загрузке Windows появляется только черный экран с надписью “Operating System not found”, скорее всего у вас полностью удален загрузчик Windows. Следуйте инструкции по ссылке.
Автоматическое восстановление загрузчика Windows
Процедура автоматического восстановления загрузчика, зашитая в среду восстановления Windows (WinRe), как правило, в таких случаях бессильна. Но попробовать все-же стоит:
- Загрузитесь с диска загрузочного диска, диска восстановления или установочной флешки с Windows 10 или 11;
- На экране установки нажмите кнопку Восстановление системы;
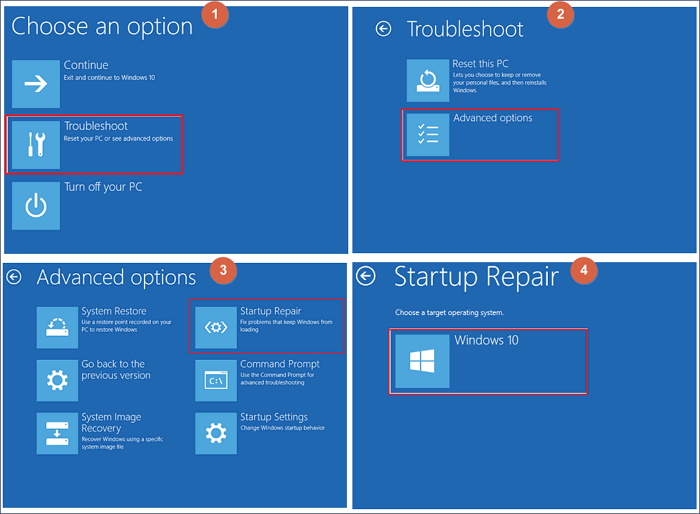
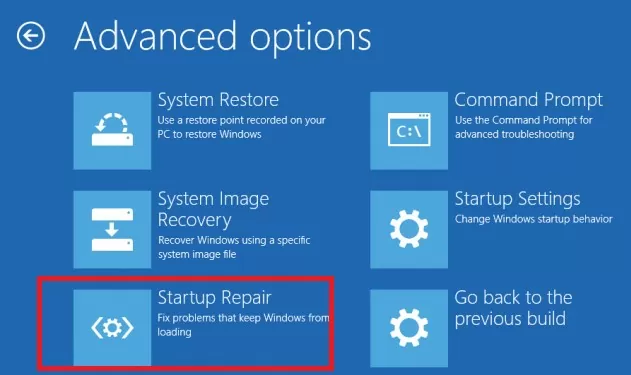
- Затем выберите пункт Поиск и устранение неисправностей -> Восстановление при загрузке и выберите ОС, загрузчик которой нужно попытаться восстановить;
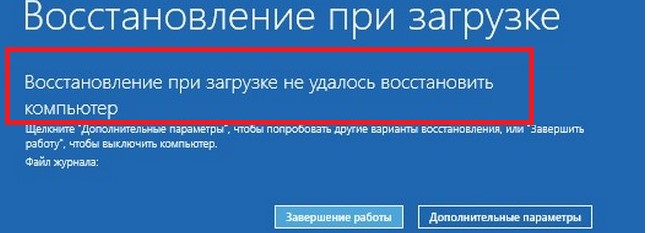
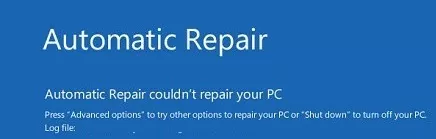
- Но скорее всего результат будет отрицательный: Восстановление при загрузке не удалось восстановить компьютер

Ручное восстановление загрузчика Windows с помощью BCDBoot
Перейдем к процедуре ручного восстановления EFI загрузчика Windows на UEFI компьютере.
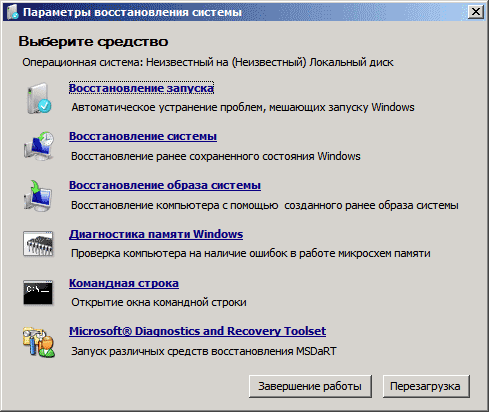
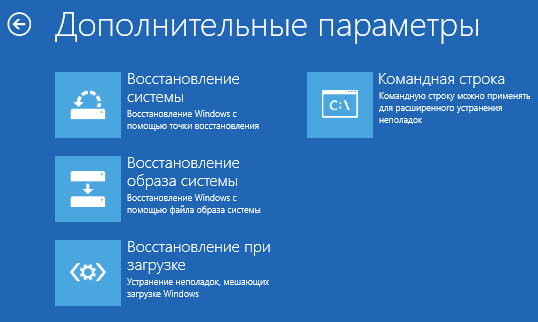
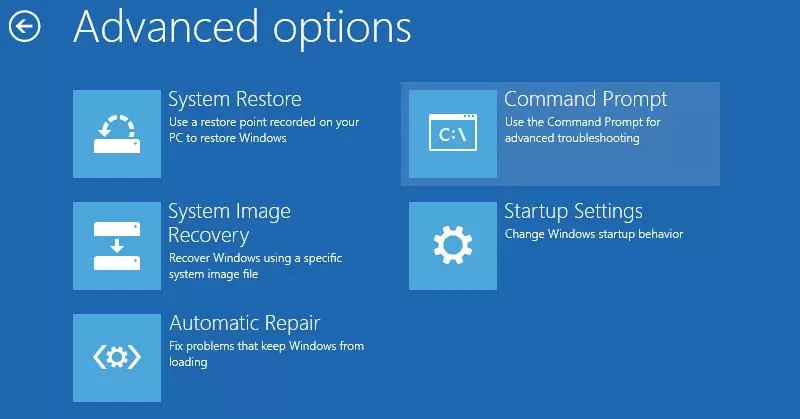
Для восстановления конфигурации загрузчика (BCD), вам нужно загрузить компьютер с оригинального установочного диска с Windows (диска восстановления или специально подготовленной установочной USB флешки с Windows ). После загрузки в среде восстановления нужно открыть окно командной строки: выберите Восстановление системы -> Диагностика -> Командная строка (System Restore -> Troubleshoot -> Command Prompt).
Командную строку также можно запустить, если у вас под рукой есть только установочный диск с Windows. Для этого достаточно на самом первом этапе установки Windows (при выборе языка и раскладки клавиатуры) нажать комбинацию клавиш Shift+F10 (или Shift+Fn+F10 на некоторых моделях ноутбуков).

В открывшейся командной строке выполните запустите утилиту управления дисками, набрав команду:
diskpart
Выведите список дисков в системе:
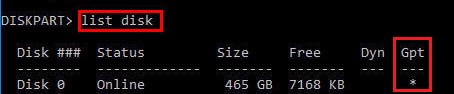
list disk
На этом этапе очень важно определить тип таблицы разделов на диске, на котором установлена Windows: MBR или GPT. Дело в том, что EFI загрузчик используется только на дисках с GPT разметкой.
Если у диска в столбце Gpt указана звездочка (
*
), тогда на диске используется таблица разделов GPT, если нет – MBR.
Если с помощью diskpart вы определили, что на вашем диске используется GPT разметка, следуйте дальнейшим шагам инструкции по восстановлению загрузчика.
Если у вас разметка MBR, тогда данная инструкция не применима к вашему компьютеру. Скорее всего у вас компьютер с BIOS, или в настройках UEFI включен режим совместимости Legacy/Compatibility Support Module/CSM.
На MBR дисках загрузчик хранится на отдельном разделе System Reserved, а не на EFI разделе (ни в коем случае не конвертируйте таблицу разделов MBR в GPT, пока не исправите загрузчик!!) Используйте другую инструкцию по восстановлению BCD загрузчика на MBR (Master Boot Record) диске.
Выберите диск, на котором установлена ваша Windows (если жесткий диск в системе один, его индекс должен быть равен 0):
sel disk 0
Выведите список томов и разделов в системе:
list partition
list volume
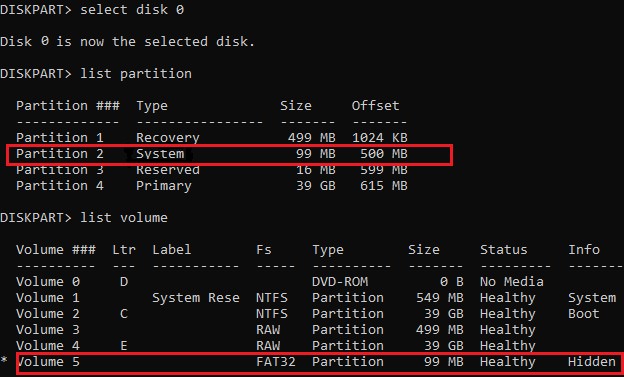
В нашем примере видно, что загрузочный раздел EFI имеет индекс Partition2 (он же Volume 5 с меткой Hidden). Проще всего определить EFI размер по файловой системе FAT32, размеру 100 Мб (это стандартный минимальный размер для Windows компьютеров, в редких случая размер раздела может быть). Чаще всего для него используется метка — System EFI или ESP/ EFI System Partion).
В нашем примере основной раздел, на который установлена Windows, имеет индекс volume 2, отформатирован в файловая система NTFS и ему назначена буква C:.
В вашем случае назначенная буква диске может отличаться. Это зависит, как вы загрузили свой компьютер в среде WinPE. Проще всего определить его по размеру. Если вы не уверены, нужно проверить что на этом диске есть каталог Windows. Выйдите из утилиты diskpart (команда exit) и выполните команду:
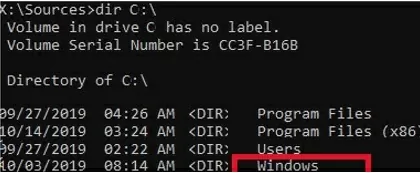
dir C:\
Убедитесь, что на этом диске есть каталоги
Windows
,
Program Files
,
Users
и прочие.
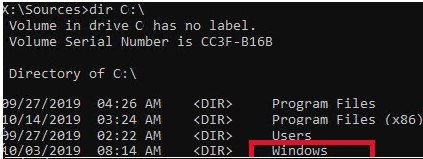
Если этих каталогов нет, значит вашему диску с Windows назначена другая буква диска. Проверьте содержимоет дисков с другими буквами.
Запомните букву диска, назначенную разделу с Windows, чуть ниже мы будем использовать ее в качестве одного из аргументов команды bcdboot.
В таблице также обязательно должен быть раздел MSR (Microsoft System Reserved) размером 16 мб в Windows 10/11 (или 128 Мб в Windows 8.1).
Назначьте скрытому EFI разделу произвольную букву диска (например, M:):
select volume 5
assign letter M:
Должна появится строка, свидетельствующая об успешном назначении буквы диска разделу EFI:
DiskPart successfully assigned the drive letter or mount point.
Завершите работу с diskpart:
exit
Перейдите в каталог с загрузчиком на скрытом разделе:
cd /d m:\efi\microsoft\boot\
В данном случае M: это буква диска, присвоенная разделу EFI чуть выше. Если каталог \EFI\Microsoft\Boot\ отсутствует
The system cannot find the path specified
), попробуйте следующие команды:
cd /d M:\Boot\
или
cd /d M:\ESD\Windows\EFI\Microsoft\Boot\
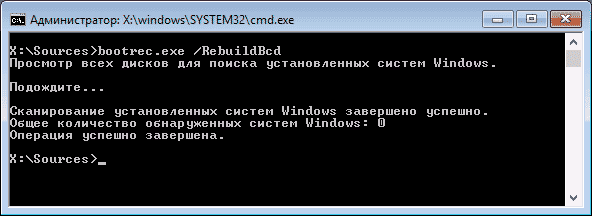
На этом этапе многие рекомендуют выполнить следующие команды, которые должны перезаписать загрузочную запись раздела, найти установленные Windows и добавить их в BCD:
bootrec /fixboot
bootrec /scanos
bootrec /rebuildbcd
или даже:
bootrec /FixMbr
(восстановление MBR записи для GPT диска выглядит странным)
Все эти команды применимы только для дисков с MBR. Если ваш компьютер загружается в UEFI режиме, то на нем обязательно используется таблица разделов GPT (как раз наш случай). Поэтому при запуске команд
bootrec
вы увидите ошибку:
access is denied
Для исправления загрузочных записей на EFI разделе нужно использовать утилиту
BCDBoot
, а не bootrec.
Утилита BCDBoot позволяет восстановить файлы загрузчика на EFI разделе, скопировав их системного каталога на разделе с Windows. Конфигурация загрузчика BCD пересоздается с помощью шаблона %WINDIR%\System32\Config\BCD-Template.
С помощью команды
attrib
снимите атрибуты скрытый, read-only и системный с файла BCD:
attrib BCD -s -h -r
Удалите текущий файл с конфигурацией BCD, переименовав его (так вы сохраните старую конфигурацию в качестве резервной копии):
ren BCD BCD.bak
С помощью утилиты bcdboot.exe нужно скопировать из системного каталога критические файлы среды загрузки UEFI в загрузочный EFI раздел и пересоздать конфигурацию загрузчика в хранилище BCD:
bcdboot C:\Windows /l en-us /s M: /f ALL
где,
- C:\Windows – путь к корневому системному каталогу Windows на диске (это ваш диск, на который была установлена ваша Windows, мы узнали его ранее с помощью команды diskpart);
- /f ALL – означает, что необходимо скопировать файлы среды загрузки Windows, включая файлы для компьютеров с UEFI и BIOS (теоретическая возможность загружаться на EFI и BIOS системах). Чтобы скопировать только EFI загрузчик, используйте команду /f UEFI;
- /l en-us — определяет языковой стандарт, который используется при инициализации хранилища BCD. По умолчанию используется en-US — английский язык (США);
- /s M: — скопировать файлы EFI загрузчика на указанный раздел;
- /с – эта новая опция BCDBoot в Windows 10, которая позволяет перезатереть имеющиеся загрузочные записи при создании нового хранилища (в том числе debugsettings). Используйте этот параметр, чтобы игнорировать старые настройки и создать полностью чистую конфигурацию BCD загрузчика;
- /v – используется для включения режима вывода подробной информации BCDBoot..
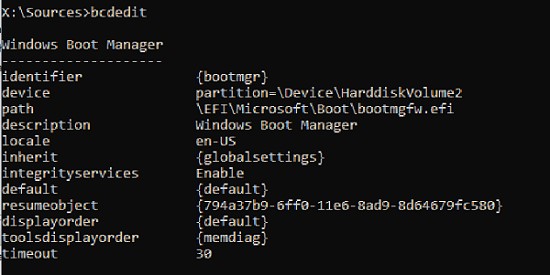
Теперь, если выполнить команду bcdedit, вы увидите следующую картину:
В секции диспетчера загрузки Windows (Windows Boot Manager) должна появится запись, указывающая на полный путь к файлу управления загрузкой UEFI. В этом примере он находится на разделе 2 (
partition=\Device\HarddiskVolume2
), путь
\EFI\MICROSOFT\BOOT\BOOTMGFW.EFI
.
Windows Boot Manager
--------------------
identifier              {bootmgr}
device                  partition=\Device\HarddiskVolume2
path                    \EFI\Microsoft\Boot\bootmgfw.efi
description             Windows Boot Manager
locale                  en-US
inherit                 {globalsettings}
bootshutdowndisabled    Yes
default                 {CURRENT}
resumeobject            {xxxxxxxx-xxxx-xxxx-xxxx-xxxxxxxxxxxx}
displayorder            {default}
toolsdisplayorder       {memdiag}
timeout                 30
Windows Boot Loader
-------------------
identifier              {current}
device                  partition=C:
path                    \Windows\system32\winload.efi
description             Windows Server 10
locale                  en-US
inherit                 {bootloadersettings}
recoverysequence       {xxxxxxxx-xxxx-xxxx-xxxx-xxxxxxxxxxxx}
recoveryenabled         Yes
isolatedcontext         Yes
allowedinmemorysettings 0x15000075
osdevice                partition=C:
systemroot              \Windows
resumeobject            {xxxxxxxx-xxxx-xxxx-xxxx-xxxxxxxxxxxx}
В секции Windows Boot Manager должен быть указан путь к EFI разделу (
=\Device\HarddiskVolume2
), путь к файлу управления загрузкой (bootmgfw.efi). В секции Windows Boot Loader указан раздел Windows и путь к EFI загрузчику Windows (
\Windows\system32\winload.efi
). При включении компьютер передаст управление диспетчеру загрузки EFI, который запустит загрузчик Windows.
Возможные ошибки:
Перезагрузите компьютер, отключите загрузочный диск. Если вы все сделали правильно, в выборе устройств загрузки должен появиться пункт Windows Boot Manager в котором можно выбрать загрузку нужной операционной системы. Ваш EFI загрузчик и конфигурация BCD успешно восстановлены!
В некоторых случаях после восстановления BCD загрузчика, при загрузке Windows появляется ошибка
BAD SYSTEM CONFIG INFO
. Чтобы исправить ошибку:
Убедитесь, что вы не вносили недавно изменения в настройки UEFI
Загрузитесь с установочной/загрузочной флешки и измените конфигурацию загрузчика командами:
-
bcdedit /deletevalue {default} numproc -
bcdedit /deletevalue {default} truncatememory
Applies ToWindows 7 Starter Windows 7 Starter N Windows 7 Home Basic Windows 7 Home Premium Windows 7 Professional Windows 7 Professional N Windows 7 Enterprise Windows 7 Enterprise N Windows 7 Ultimate Windows 7 Ultimate N Windows Vista Ultimate Windows Vista Enterprise Windows Vista Business Windows Vista Home Premium Windows Vista Home Basic Windows Vista Business 64-bit Edition Windows Vista Enterprise 64-bit Edition Windows Vista Home Premium 64-bit Edition Windows Vista Home Basic 64-bit Edition Windows Vista Ultimate 64-bit Edition
Аннотация
При использовании среды восстановления Windows (Windows RE) для устранения неполадок при запуске сначала воспользуйтесь параметром Восстановление запуска в диалоговом окне Параметры восстановления системы. Если это не помогает устранить проблему или необходимо вручную выполнить дополнительные действия по устранению неполадок, следует использовать средство Bootrec.exe. В этой статье рассказывается об использовании средства Bootrec.exe в среде Windows RE для устранения неполадок указанных ниже компонентов Windows Vista и Windows 7.
-
Основная загрузочная запись (MBR).
-
Загрузочный сектор.
-
Хранилище данных конфигурации загрузки.
Для устранения ошибки В файле данных конфигурации загрузки Windows отсутствуют требуемые данные можно также использовать средство Bootrec.exe.
Как запустить средство Bootrec.exe
Для работы со средством Bootrec.exe необходимо сначала запустить среду восстановления Windows RE.
-
Вставьте установочный диск Windows 7 или Windows Vista в DVD-дисковод и включите компьютер.
-
При появлении запроса нажмите клавишу.
-
Выберите язык, время и валюту, а также метод ввода данных (с клавиатуры или другой) и нажмите кнопку Далее.
-
Выберите пункт Восстановить компьютер.
-
Укажите операционную систему, которую требуется восстановить, и нажмите кнопку Далее.
-
В диалоговом окне Параметры восстановления системы выберите пункт Командная строка.
-
Введите команду Bootrec.exe и нажмите клавишу ВВОД.
Примечание. Чтобы запустить компьютер с помощью DVD-диска Windows Vista или Windows 7, следует настроить компьютер для загрузки с DVD-дисковода. Для получения дополнительных сведений о том, как это сделать, обратитесь к документации, прилагаемой к компьютеру, или к производителю компьютера.
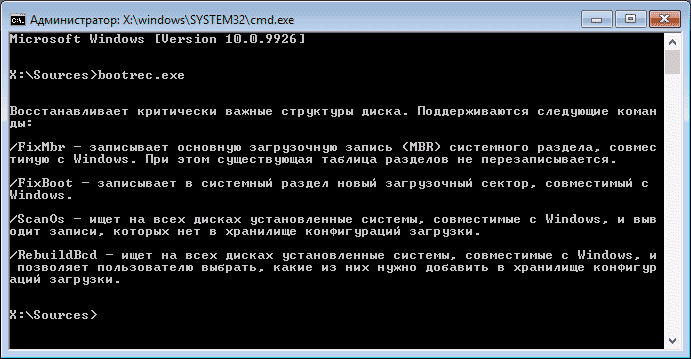
Средство Bootrec.exe поддерживает перечисленные ниже параметры, из которых можно выбрать наиболее подходящий.
/FixMbr
Этот параметр записывает в системный раздел основную загрузочную запись, совместимую с Windows 7 или Windows Vista. Он не перезаписывает существующую таблицу разделов. Данный параметр следует использовать для устранения проблем, связанных с повреждением основной загрузочной записи, или если необходимо удалить из основной загрузочной записи нестандартный код.
/FixBoot
Это параметр записывает новый загрузочный сектор в системный раздел, используя загрузочный сектор, совместимый с Windows Vista или Windows 7. Этот параметр следует использовать, если выполняется хотя бы одно из перечисленных ниже условий.
-
Загрузочный сектор заменен на нестандартный загрузочный сектор Windows Vista или Windows 7.
-
Загрузочный сектор поврежден.
-
После установки Windows Vista или Windows 7 на компьютер была установлена более ранняя версия операционной системы Windows. В данном случае для запуска компьютера вместо диспетчера загрузки Windows (Bootmgr.exe) используется загрузчик Windows NT (NTLDR).
/ScanOs
Этот параметр выполняет на всех дисках поиск установленных систем, совместимых с Windows Vista или Windows 7. Он также отображает все записи, не включенные в хранилище данных конфигурации загрузки. Этот параметр следует использовать в том случае, если на компьютере присутствуют установленные операционные системы Windows Vista или Windows 7, которые не отображаются в меню диспетчера загрузки.
/RebuildBcd
Этот параметр выполняет на всех дисках поиск установленных систем, совместимых с Windows Vista или Windows 7. Кроме того, он позволяет выбрать установленные системы, которые необходимо добавить в хранилище данных конфигурации загрузки. Этот параметр следует использовать в том случае, если необходимо полностью перестроить хранилище данных конфигурации загрузки.
Примечание. Используйте средство Bootrec.exe для устранения ошибки с сообщением «Bootmgr отсутствует». Если перестройка хранилища данных конфигурации загрузки не приводит к устранению проблемы, можно экспортировать и удалить данные конфигурации загрузки, а затем выполнить этот параметр повторно. Это обеспечит полную перестройку хранилища данных конфигурации загрузки.
Для этого в командной строке среды восстановления Windows введите следующие команды:
-
bcdedit /export C:\BCD_Backup
-
c:
-
cd boot
-
attrib bcd -s -h -r
-
ren c:\boot\bcd bcd.old
-
bootrec /RebuildBcd
Нужна дополнительная помощь?
Нужны дополнительные параметры?
Изучите преимущества подписки, просмотрите учебные курсы, узнайте, как защитить свое устройство и т. д.
Updated on Apr 28, 2025
Are you tired of dealing with boot issues on your Windows 10 computer? Whether it’s the Blue Screen of Death or a won’t boot error, these problems can be frustrating and time-consuming. Below is a typical case from the Microsoft forum:
When I try to turn my computer on, I get a screen saying, «Windows failed to start,» and that I should restart, insert, and install the disc.
Calm down! In this article, EaseUS will explore six effective ways to apply Windows 10 boot repair. From simple troubleshooting techniques to advanced system recovery options, we’ve got you covered. So, if you’re ready to get your computer up and running smoothly again, let’s dive in and discover some invaluable solutions to your Windows 10 startup problems.
This page can apply to most Windows boot errors and startup problems. You may share it via the social buttons below:
How to Perform Windows 10 Boot Repair — 6 Ways
This section will offer you six valuable solutions with a step-by-step guide. Before taking action, you can get more basic information in the following table:
| ⏱️Duration | 5-10 Minutes |
| 💻Goal | Fix Windows 10 won’t boot |
| 👩💻Suitable User | For all users: beginners and experienced users |
| 🧰Preparation |
✔️Prepare a healthy computer and a USB. ✔️Download and launch EaseUS Partition Master on a healthy computer. |
| 🛠️Methods |
|
Fix 1. EaseUS Partition Master — Best Boot Repair Tool
Regarding Windows boot repair, EaseUS Partition Master Professional is our best recommendation. Using its «Boot Repair» feature, you can seamlessly repair various boot failure and startup issues, including the black/blue/white screen of death. Its user-friendly interface, enhanced data protection, and comprehensive features make it the ideal choice for repairing Windows boot problems without compromising data integrity.
Refer to the simplified steps to apply Windows 10 boot repair using EaseUS Partition Master:
Step 1. Start EaseUS Partition Master after connecting the external drive/USB to your computer, go to «Bootable Media,» and click «Create bootable media.»

Step 2. Select an available USB Drive or CD/DVD and click «Create.» You can also burn the Windows ISO file to the storage media.

Step 3. Connect the created bootable drive to the new computer and reboot the computer by pressing and holding F2/Del to enter the BIOS. Then, set the WinPE bootable drive as the boot disk and press F10 to exit.
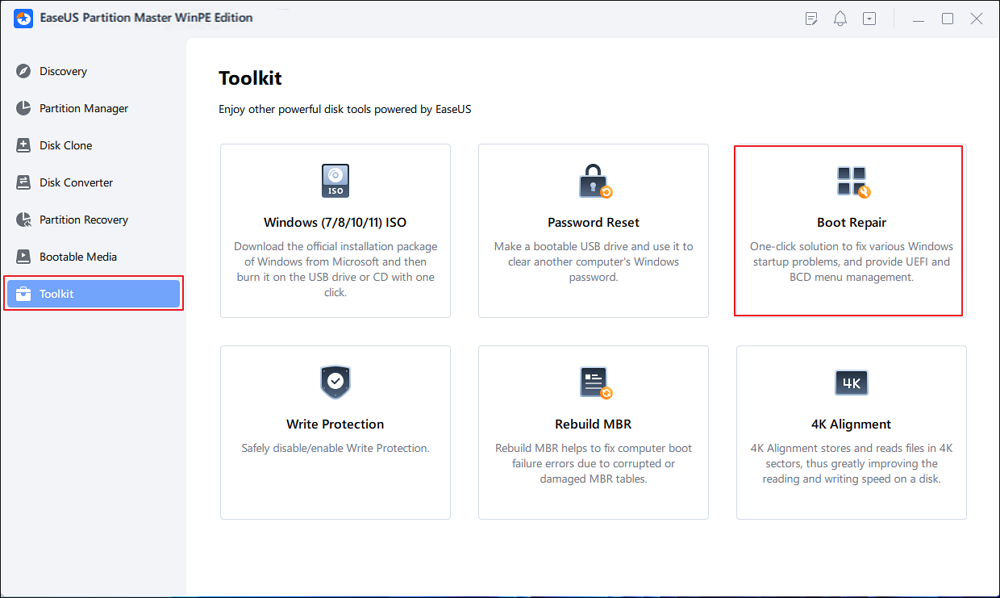
Step 4. Boot the computer again and enter the WinPE interface. Then, open EaseUS Partition Master and click «Boot Repair» under the «Toolkit» option.
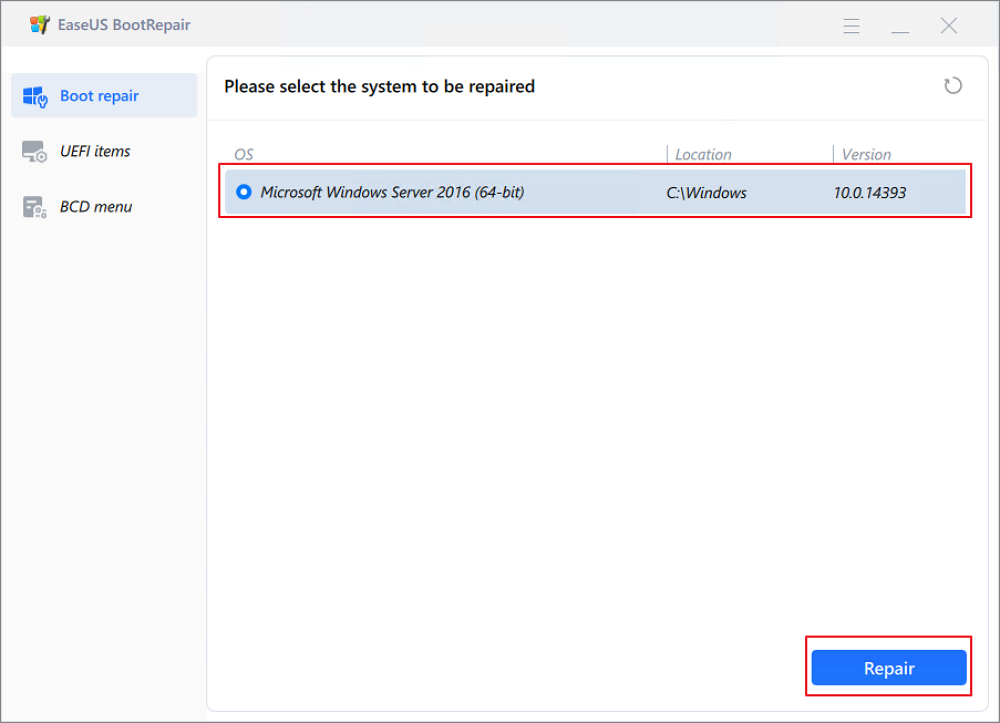
Step 5: Select the system you want to repair and click «Repair.»
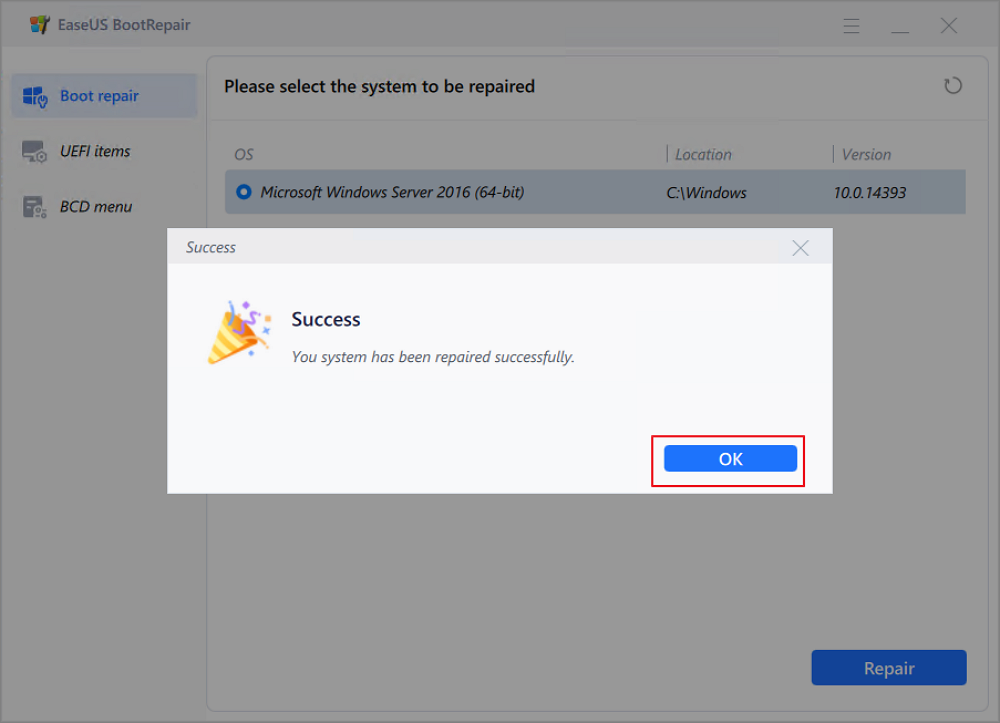
Step 6. Wait a moment, and you will receive an alert that the system has been successfully repaired. Click «OK» to complete the boot repair process.
Other Noble Functions of EaseUS Partition Master
Beyond SSD formatting, this tool also lets you perform a wide range of partition-related tasks:
- Solve the Default Boot Device Missing or Boot Failed error
- Fix UEFI Boot on Windows 11/10/8/7
- Fix Windows 10 startup repair not working
- Repair hard drive won’t boot
Download EaseUS Partition Master today now! It’s a reliable Windows 10 boot repair tool.
Fix 2. Change Boot Order in BIOS
If you have another available boot device that is already set in the BIOS settings, you can change the boot order and make the computer boot from it:
Step 1. To access BIOS settings, restart the computer and long-press the F2/Del/F8/F10/F12 keys.
Step 2. Go to the Boot tab and use the arrow keys to adjust the order.

Step 3. Save the above settings and try to restart the computer.
There is a built-in tool of Windows 10 that enables you to repair the boot errors automatically. Learn the quick steps below to learn how to use the «Startup Repair» feature:
Step 1. Insert Windows 10 installation USB and reboot this computer.
Step 2. Refer to fix 2 to set the installation USB as the first boot disk.
Step 3. Then, you will enter the Windows Setup window and choose «Repair your computer.»
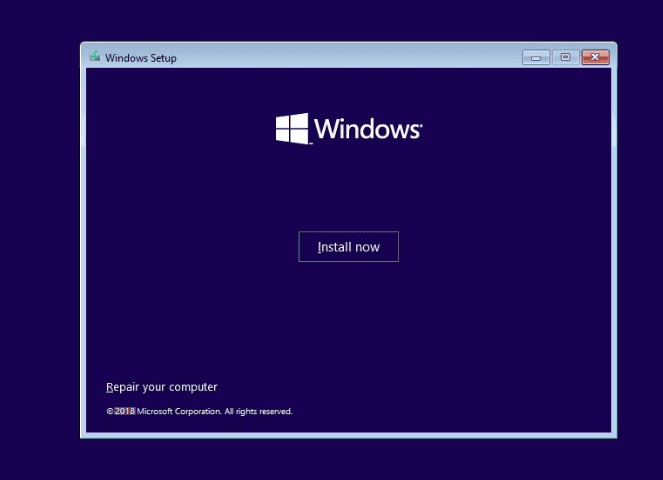
Step 4. Click «Troubleshoot» to access the advanced options tab. Click «Startup Repair» and choose Windows 10 from the list.
Fix 4. Rebuild MBR via Bootable Media
The MBR is a critical component of your system that contains essential information about the partitions and the operating system installed on your hard drive. When the MBR becomes corrupted or damaged, it can lead to boot failures. In this case, you can retort to EaseUS Partition Master. With the assistance of its «Rebuild MBR» feature, you can repair the system disk as follows:
Step 1. Create a WinPE bootable disk
- Launch EaseUS Partition Master, and click «Bootable Media» on the toolbar. Select «Create bootable media».
- Click «Next» to finish the process.
Step 2. Boot EaseUS Partition Master Bootable USB
- Connect the bootable USB or CD/DVD to your PC.
- Press F2 or Del when you restart the computer to enter the BIOS screen. Set and boot your computer from «Removable Devices» or «CD-ROM Drive». And then EaseUS Partition Master will run automatically.
Step 3. Rebuild MBR
- Click «Toolkit» and choose «Rebuild MBR».

- Select the disk and the type of MBR. Then, click «Rebuild».

- After that, you can see «MBR has been successfully rebuilt on Disk X».

Fix 5. Run CHKDSK to Repair the Corrupted Drive
CHKDSK commands is a built-in Windows utility designed to scan and repair errors on your computer’s hard drive. It can detect and fix issues with the file system and bad sectors.
Step 1. Choose your preferred keyboard input, language, and time when booting from a Windows installation media.
Step 2. Select «Repair your computer,» then find the C:\ drive, where Windows is stored, and click «Next.»
Step 3. Select the CMD option in the «System Recovery Options» box, type the following command, and then hit «Enter»:
- chkdsk C: /f (where «C:» is the letter of the boot device.)
Fix 6. Rebuild BCD File
The BCD is a crucial database that stores important information about the installed operating system. When the BCD becomes corrupted or damaged, it can lead to problems such as the inability to boot into Windows, error messages during startup, or a missing operating system. Rebuild BCD can resolve the corrupted or lost BCD file:
Step 1. Access the Run search box by the «Windows +R» keys, write cmd, and hit «Enter.»
Step 2. Enter the CMDs below and hit «Enter» for each one:
- Bcdedit /export C:\BCD_Backup
- ren c:\boot\bcd bcd.old
- Bootrec /rebuildbcd
Step 3. Type exit to quit the utility and restart your computer.
Conclusion
To sum up, this post gives you six solutions for various unbootable errors in Windows 10. Among these methods, EaseUS Partition Master is the preferred choice for Windows 10 boot repair. It provides a tested and proven «Boot Repair» function and can also be applied for rebuilding MBR. If you are bothered by a similar issue, you can install this software and eliminate the annoying startup problems in Windows 10.
FAQ of Windows 10 Boot Repair
If your problems are not solved in the above parts, you will find further information about Windows 10 boot repair in this FAQ section:
1. How to repair Windows 10 boot problems without reinstalling?
Corrupted or lost system files can lead to Windows 10 won’t boot. In this case, users can run the system file checker using CMD. Follow the tutorial below carefully and learn how to repair Windows 10:
Step 1. Restart your computer from the Windows boot media.
Step 2. Navigate to the Windows Setup window and click «Next».
Step 3. Select «Repair your computer» > «Troubleshoot» > «Advanced options» > «Command Prompt.»
Step 4. Type the CHKDSK commands below and hit «Enter» for each.
- sfc /scannow
- chkdsk /f /r /x C:
2. Can I fix Windows 10 failed to boot without a disk?
Press F11 to bring up the Windows 10 Advanced Startup Options menu during the boot process. Select «Startup Repair» after clicking «Troubleshoot» > «Advanced Options.» Then, you can wait till Windows 10 resolves the startup issue.
3. How do I factory reset a Windows 10 computer?
Navigate to «Start» > «Settings» > «Update & Security» > «Recovery» > «Reset this PC» > «Get Started to reset your computer.» Next, click Keep My Files, then pick Local or Cloud storage, adjust your preferences, and then select «Restore preloaded apps.»
Если ваш компьютер не загружается, автоматическое исправление ошибок запуска не помогает или вы попросту видите одну из ошибок наподобие «No bootable device. Insert boot disk and press any key» — во всех этих случаях может помочь исправление загрузочных записей MBR и конфигурации загрузки BCD, о чем и будет говориться в этой инструкции. (Но не обязательно поможет, зависит от конкретной ситуации).
Я уже писал статьи на похожую тему, например Как восстановить загрузчик Windows, но в этот раз решил раскрыть ее более подробно (после того, как меня спросили о том, как запустить восстановление Aomei OneKey Recovery, если оно было убрано из загрузки, а Windows перестала запускаться).
Обновление: если у вас Windows 10, то смотрим здесь: Восстановление загрузчика Windows 10.
Bootrec.exe — утилита исправления ошибок загрузки Windows
Все описываемое в этом руководстве применимо для Windows 10, Windows 8.1 и Windows 7, а использовать мы будем имеющийся в системе инструмент восстановления запуска bootrec.exe, запускаемый из командной строки.
При этом, командную строку потребуется запускать не внутри запущенной Windows, а несколько иначе:
- Для Windows 7 потребуется либо загрузиться с заранее созданного диска восстановления (создается в самой системе), либо с дистрибутива. При загрузке с дистрибутива внизу окна начала установки (после выбора языка) следует выбрать «Восстановление системы», а затем запустить командную строку.

- Для Windows 8.1 и 8 вы можете использовать дистрибутив так, почти как это описано в предыдущем пункте (Восстановление системы — Диагностика — Дополнительные параметры — Командная строка). Или, если у вас есть возможность запустить «Особые варианты загрузки» Windows 8, командную строку можно также найти в дополнительных параметрах и запустить оттуда.

Если в запущенной таким образом командной строке вы введете bootrec.exe, можно будет познакомиться со всеми доступными командами. В целом, их описание достаточно понятно и без моих пояснений, но на всякий случай я опишу каждый пункт и сферу его применения.
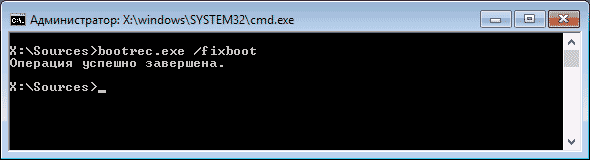
Запись нового загрузочного сектора
Запуск bootrec.exe с параметром /FixBoot позволяет записать новый загрузочный сектор на системном разделе жесткого диска, при этом будет использоваться загрузочный раздел, совместимый с вашей операционной системой — Windows 7, 8.1 или Windows 10.
Применение данного параметра пригодится в тех случаях, когда:
- Загрузочный сектор поврежден (например, после изменения структуры и размеров разделов жесткого диска)
- Была установлена более старая версия Windows после более новой (Например, вы установили Windows XP после Windows

- Был записан какой-либо не Windows-совместимый загрузочный сектор.

Для записи нового загрузочного сектора просто запустите bootrec с указанным параметром, как это показано на скриншоте ниже.
Исправление MBR (Master Boot Record, Главная загрузочная запись)
Первый из полезных параметров bootrec.exe — FixMbr, позволяющий исправить MBR или загрузчик Windows. При его использовании, поврежденная MBR перезаписывается новой. Загрузочная запись располагается на первом секторе жесткого диска и сообщает БИОС, каким образом и откуда начинать загружать операционную систему. При повреждениях вы можете видеть следующие ошибки:
- No bootable device
- Missing operating system
- Non-system disk or disk error
- Кроме этого, если у вас появляется сообщение о том, что компьютер заблокирован (вирус) еще до начала загрузки Windows, тут тоже может помочь исправление MBR и загрузки.
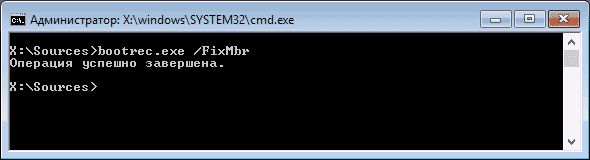
Для того, чтобы запустить исправление загрузочной записи, введите в командной строке bootrec.exe /fixmbr и нажмите Enter.
Поиск потерянных установок Windows в меню загрузки
Если на вашем компьютере установлено несколько систем Windows старше Vista, однако не все они появляются в меню загрузки, вы можете запустить команду bootrec.exe /scanos для поиска всех установленных систем (и не только, например, таким же образом можно добавить в меню загрузки раздел восстановления OneKey Recovery).
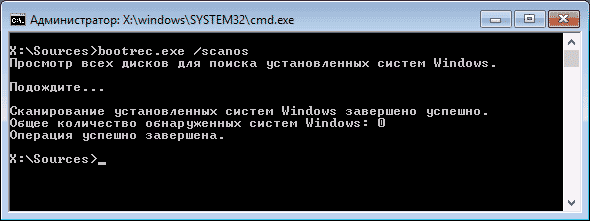
В случае, если на вашем компьютере были найдены установки Windows, то для добавления их в меню загрузки используйте пересоздание хранилища конфигураций загрузки BCD (следующий раздел).
Пересоздание BCD — конфигураций загрузки Windows
Для того, чтобы перестроить BCD (конфигурацию загрузки Windows) и добавить в нее все утерянные установленные Windows системы (а также разделы восстановления, созданные на базе Windows), используйте команду bootrec.exe /RebuildBcd.
В некоторых случаях, если указанные действия не помогают, стоит попробовать выполнить нижеследующие команды перед выполнением перезаписи BCD:
- bootrec.exe /fixmbr
- bootsect.exe /nt60 all /force
Заключение
Как видите, bootrec.exe довольно-таки мощный инструмент для исправления разнообразных ошибок загрузки Windows и, могу сказать достоверно, один из наиболее часто используемых при решении проблем с компьютерами пользователей специалистами. Думаю, и вам однажды пригодится эта информация.
In this article, we will learn how to repair the Windows bootloader on a modern computer that uses UEFI instead of a classic BIOS and GPT disk partition table (instead of MBR). The corruption of the Windows bootloader can occur after installing a second OS (in Dual Boot configurations), file system corruption, incorrect actions during Windows recovery, removal of some data on hidden partitions, malicious software (virus, ransomware, etc.), and for some other reasons.
This article contains a step-by-step guide for repairing a damaged or deleted bootloader in Windows 11/10/8.1 and Windows Server 2022/2019/2016/2012R2 on computers running in native (non-compatible) UEFI mode. You can use this guide both to repair the binary files of the Windows bootloader, and the bootloader configuration \EFI\Microsoft\Boot\BCD file (in cases where Windows doesn’t boot due to the missing or corrupted BCD boot configuration file).
Contents:
- Windows Boot Error: Boot Configuration Data is Missing (EFI\Microsoft\Boot\BCD)
- Automatic Windows Bootloader Repair with WinRE
- Using BCDBoot to Manually Repair EFI Bootloader in Windows
Windows Boot Error: Boot Configuration Data is Missing (EFI\Microsoft\Boot\BCD)
A UEFI computer with Windows installed in native mode will not be able to boot if the Windows EFI bootloader is corrupted. When trying to boot from a disk with a damaged or missing EFI bootloader, the following BSOD (Blue Screen of Death) error appears:
The boot configuration data for your PC is missing or contains errors.
File :\EFI\Microsoft\Boot\BCD
Error code: 0xc000000f
or:
Error code: 0xc000014c
This error indicates that the Windows bootloader configuration (Boot Configuration Data, BCD) has been corrupted or even completely removed. If you try to repair the bootloader on a UEFI computer using bcdedit tool, you will receive an error:
The boot configuration data store could not be found.
The requested system device cannot be found.
If Windows 10/11 is installed in native UEFI mode on a GPT disk, then the Windows EFI bootloader (Windows Boot Manager) stores the boot manager and BCD configuration on a separate hidden EFI volume (100 MB in size with the FAT32 file system). The bcdedit tool doesn’t see this EFI partition, and cannot manage the bootloader configuration on it.
If you only see a black screen with the message “An operating system wasn’t found” when you boot your computer, it’s likely that the Windows bootloader has been completely removed. Follow the instructions on the link.
Automatic Windows Bootloader Repair with WinRE
The procedure for the automatic repair of the EFI bootloader used in the Windows Recovery Environment (WinRE) is usually useless in such cases. But it’s still worth a try:
- Boot your device from the recovery disc or Windows 10/11 installation media;
- Click the Restore System on the installation screen;
- Then select Troubleshoot -> Startup Repair and select the OS whose bootloader you want to try to repair;

- But most likely the result will be negative:
Automatic Repair couldn’t repair your PC.
Using BCDBoot to Manually Repair EFI Bootloader in Windows
Let’s move on to the procedure for manually repairing the EFI Windows bootloader on a UEFI computer.
To repair the bootloader configuration (BCD), you have to boot from the original Windows installation media (also, you can use a recovery disk or a special UEFI bootable USB flash drive). After booting into the recovery environment, you need to open a command-line console: select System Restore – > Troubleshoot-> Command Prompt).
You can run the Command Prompt even if you only have a Windows installation media at hand. To do this, it is enough to press the key combination Shift + F10 (or Shift + Fn + F10 on some laptop models) on the first Windows setup screen (when choosing a language and keyboard layout).
In the command prompt that opens, run the disk management tool:
diskpart
Display the list of drives on the computer:
list disk
At this stage, it is very important to determine the type of partition table on the disk on which your Windows is installed: MBR or GPT. The point is that the EFI bootloader is used only on disks with a GPT partition table.
If the asterisk (*) is in the Gpt column, then the GPT partition table is used on disk. If not, the MBR is used.

If your disk uses a GPT partition table, follow the steps below in the instructions to repair the Windows EFI bootloader.
If you have an MBR partition table on your disk, this guide won’t work for your computer. Most likely you have a computer with BIOS or Legacy/Compatibility Support Mode (CSM) option enabled in the UEFI settings.
On MBR disks, the Windows bootloader is stored on a separate System Reserved partition, and not on the EFI partition (in any case, don’t convert the MBR partition table to GPT until you fix the Windows bootloader !!). Use another guide to restore the BCD bootloader on a BIOS computer with an MBR (Master Boot Record) disk.
Select the drive where your Windows is installed (if there is only one hard drive in the system, its index should be 0):
sel disk 0
Display the list of partitions and volumes on this disk: list partition
list volume
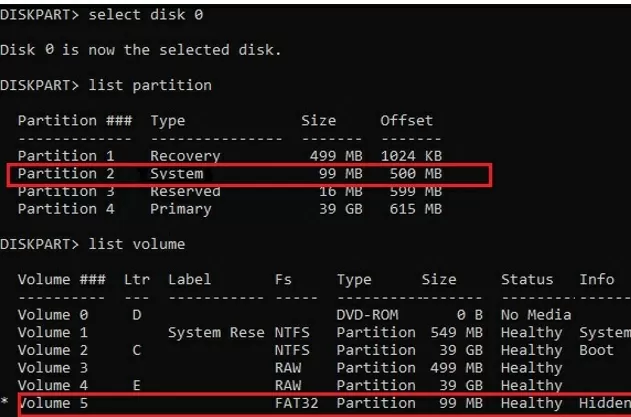
In this example, you can see that the EFI boot partition has the partition 2 index (aka Volume 5 with the Hidden label). The easiest way to identify an EFI partition is by the FAT32 file system and 100 MB in size (this is the standard minimum size of EFI partition for Windows computers; in rare cases, the partition size may differ). The most commonly used label for it is System EFI or ESP/EFI System Partition).
In our example, the main partition on which Windows is installed has a volume 2 index, is formatted in the NTFS file system, and is assigned the drive letter C:.
dir C:\
Make sure that this drive contains the Windows, Program Files, Users, and other directories.
If these directories are missing, then your Windows drive has a different drive letter. Check the contents of drives with different drive letters assigned.
Write down the drive letter assigned to the Windows partition. We will use it as one of the arguments of the bcdboot command a little later.
The partition table must also contain an MSR (Microsoft System Reserved) partition of 16 MB in Windows 10/11 (or 128 MB in Windows 8.1).
Assign the drive letter K: to the hidden EFI volume:
select volume 5
assign letter K:
A message that the drive letter has been successfully assigned to the EFI partition should appear:
DiskPart is successfully assigned the drive letter or mount point.
Close the diskpart:
exit
Go to the bootloader directory on the hidden volume:
cd /d K:\efi\microsoft\boot\
In this case, K: is the drive letter assigned to the EFI partition just above. If the \EFI\Microsoft\Boot\ directory is missing (error The system cannot find the path specified), try the following commands:
cd /d K:\Boot\
or
cd /d K:\ESD\Windows\EFI\Microsoft\Boot\
At this point, many guides recommend running the following commands, which should overwrite the partition boot record, find the installed Windows, and add them to the BCD:
 bootrec /fixboot
 bootrec /scanos
 bootrec /rebuildbcd
or even:
bootrec /FixMbr (preparing MBR record for a GPT disk looks strange)
You can use all these commands only for MBR-based disks. If your computer boots in UEFI mode, then it uses the GPT partition table (as in our case). Therefore, when you run bootrec commands, you will see an error: access is denied
You need to use the BCDBoot.exe tool to restore bootloader files and fix the boot records on the EFI partition by copying them from the system directory on the Windows partition. The BCD bootloader configuration is recreated using the %WINDIR%\System32\Config\BCD-Template file.
Use the attrib command to remove the hidden, read-only, and system attributes from the BCD file:
attrib BCD -s -h -r
Delete the current BCD configuration file by renaming it (this will keep the old boot configuration as a backup): ren BCD BCD.bak
Using the bcdboot tool, you need to copy the critical files of the UEFI boot environment from the system directory to the EFI boot partition and recreate the BCD bootloader config file:
bcdboot C:\Windows /l en-us /s k: /f ALL
- C:\Windows – the path to the root Windows system directory on the disk (this is your disk on which your Windows is installed, we determined it earlier using the diskpart command);
- f ALL –means that you need to copy the Windows Boot Environment files, including those for UEFI and BIOS computers (theoretically able to boot both on UEFI and BIOS computers). To copy only the EFI bootloader, use the /f UEFI command;
- /l en-us —specifies the system locale that is used when initializing the BCD store. By default, en-us – English (USA) is used;
- /s K: — copy the bootloader EFI files to the specified partition;
- /c – this is a new BCDBoot option in Windows 10 that allows you to overwrite existing boot records (including debugsettings). Use this option to ignore old boot settings and create a clean BCD configuration;
- /v – used to enable BCDBoot verbose output.
Now, if you run the bcdedit command, you will see the following :
An entry should appear in the Windows Boot Manager section containing the full path to the UEFI boot file (\EFI\MICROSOFT\BOOT\BOOTMGFW.EFI).In this example, it is located on volume 5 (partition=\Device\HarddiskVolume5).
Windows Boot Manager
--------------------
identifier              {bootmgr}
device                  partition=\Device\HarddiskVolume5
path                    \EFI\Microsoft\Boot\bootmgfw.efi
description             Windows Boot Manager
locale                  en-US
inherit                 {globalsettings}
bootshutdowndisabled    Yes
default                 {CURRENT}
resumeobject            {xxxxxxxx-xxxx-xxxx-xxxx-xxxxxxxxxxxx}
displayorder            {default}
toolsdisplayorder       {memdiag}
timeout                 30
Windows Boot Loader
-------------------
identifier              {current}
device                  partition=C:
path                    \Windows\system32\winload.efi
description             Windows 10
locale                  en-US
inherit                 {bootloadersettings}
recoverysequence       {xxxxxxxx-xxxx-xxxx-xxxx-xxxxxxxxxxxx}
recoveryenabled         Yes
isolatedcontext         Yes
allowedinmemorysettings 0x15000075
osdevice                partition=C:
systemroot              \Windows
resumeobject            {xxxxxxxx-xxxx-xxxx-xxxx-xxxxxxxxxxxx}
The Windows Boot Manager section must contain the path to the EFI partition (=\Device\HarddiskVolume5 ) and the path to the boot manager file (bootmgfw.efi). The Windows Boot Loader section contains the Windows partition info and the path to the Windows EFI bootloader ( \Windows\system32\winload.efi). When you turn it on, your computer will pass control to the EFI bootloader, which will start the Windows bootloader.
Possible errors:
Now you need to restart your computer and disconnect the bootable media. If you did everything correctly, the Windows Boot Manager should appear in the list of bootable devices, where you can choose a desired operating system to boot. Your EFI bootloader and BCD configuration have been restored successfully!
In some cases, after repairing the BCD bootloader, when Windows boots, a BAD SYSTEM CONFIG INFO error appears. To fix the error:
Make sure you haven’t made any recent changes to UEFI settings. Undo all changes.
Boot your computer from the installation/bootable flash drive and change the bootloader configuration with the commands:
bcdedit /deletevalue {default} numprocbcdedit /deletevalue {default} truncatememory