
*
Password
*
Password requirements:
-
At least one capital letter
-
At least one special character or number
-
Minimum of 8 characters
Successfully registered, please login
Please enter email address associated to your account
Password changed successfully.
You need to answer all of the questions before submitting.
Read our Privacy Policy.
Deleting your account will permanently delete all of your saved data.
Follow these simple steps to get your windows and doors looking like new again
From time to time, wooden windows and doors need a little love, care and attention. With Dulux Gloss Finish, we’ve made it quick and easy to give them a makeover. Our paint is also easy to clean and scratch resistant, so the transformations will last.
You’ll need:
- Dulux Gloss Finish for windows and doors
- Floor and furniture dustsheets
- Triangular shave hook
- Masking tape
- Screwdriver
- Cloth
- Degreaser
- Sand paper and sanding block
- Sealer
- Brush
- Small roller
- Paint tray
- Paint stirrer
Prepare
- Start by putting down dustsheets to protect your floor and any furniture that’s nearby then remove any old sealer and scrape off loose, flaky paint with a shave hook. Tape over or remove locks, hinges doorknobs, catches and handles.
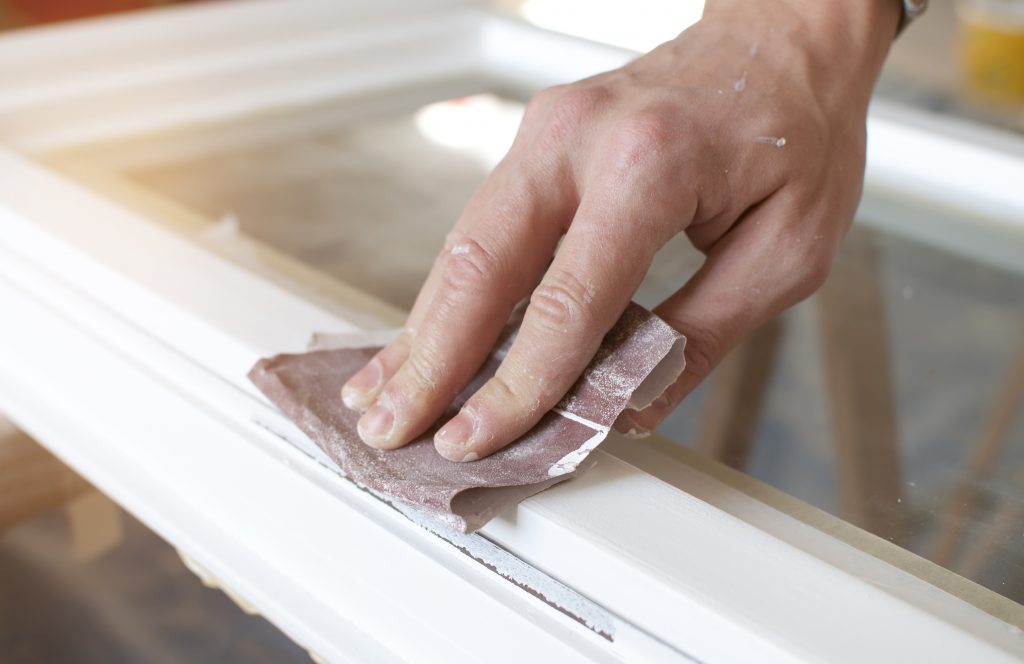
- Next, give your woodwork a good clean with a degreaser to remove all traces of dirt, dust and grease and then let it dry. Lightly sand the wood down and wipe it again to remove the dust.
Top tip: When sanding large flat surfaces like a door, use a sanding block to achieve a smooth and consistent finish.
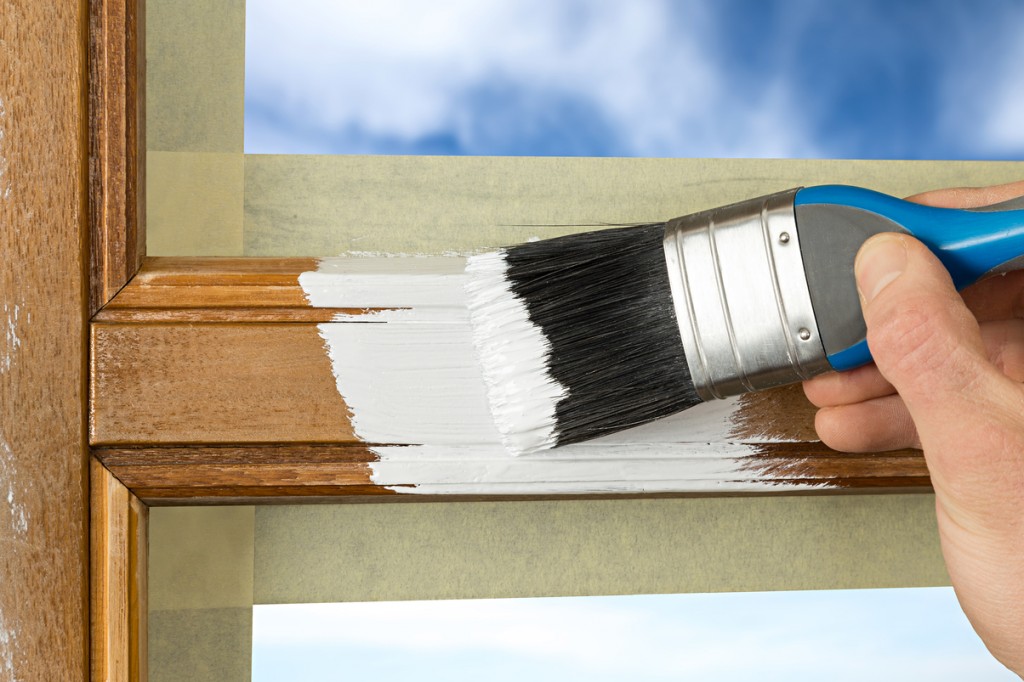
- Mask off any edges where glass meets the frame, using a putty knife to tuck the tape neatly into the corners. Keep your knife pushed into place and tear the tape for crisp, neat lines. Also mask the edges of the frame that meet the wall, and apply fresh sealer around the edges where any glass meets the wood and smooth it out with a sponge. Refer to packaging for information on drying times.
Paint
With Dulux there’s no need to apply primer, saving you time and money.
- Start by giving your Dulux paint a good stir and then pour it into the paint tray. Using a brush, paint your window or door with your chosen color. If you’re painting a door, start with a brush for the detailed parts and then switch to a small roller for the larger areas. Use upward strokes to avoid dripping.
- Follow the recommended drying times, which can be found on the back of your paint tin before applying the second coat to your window or door. In between coats, simply put your brush and roller in a plastic bag to keep them moist, so you can use them again for your next coat without having to wash them.
- Let your newly painted window or door dry thoroughly before opening and closing it.
Clean
- Carefully peel off the masking tape and clean any paint that has got onto the glass.
- Remove as much paint as you can from your brush and roller and give them a thorough wash in water – there’s no need to use white spirit, as Dulux Gloss Finish is water based.
- Firmly close your paint tin and store it in a dry and frost-free environment.
Want to try something unusual for your doors and windows? Here are some ideas that might help you get creative.
Job name
*
- Kitchen
- Bedroom
- Living room
Job name
*
- Kitchen
- Bedroom
- Living room
Are you sure? All notes, photos and saved items will be deleted.

How to paint front door without removing it — Come on, repaint the doors and windows to update the look of your home, before the year changes.
The wooden doors and frames on the windows in your house are starting to look dull because of the weather? Or are you tired of looking at it so you want a more beautiful display of doors and windows?
If the answer is «yes», it means it’s time for you to repaint the doors and window frames. No need to call a handyman, you can do everything yourself.
Gmboel has tips and tutorials on how to paint wooden doors and windows yourself, especially for beginners like you. Come on, see!
Types of Door Paint and Their Functions
Before you start painting your own doors and windows, you should know the differences between the different types of paint used to paint wooden doors and window frames.
The various paints for wood have their respective functions. So, don’t just buy paint, then you can’t even use it.
1. Wood filler

In general, the function of wood filler is to cover defects in the wood texture such as knots, insect holes, or cracks in wood.
If you find any texture defects on the door or window that you want to paint, you should use this type of paint first before entering the painting stage.
This type of wood filler paint can help to cover wood texture defects and close large wood pores. That way, the final result of the doors and windows after being painted will look better.
2. Wood stain

This type of wood stain paint is a paint that we all know as wood varnish. Actually this type of paint only covers the surface of the wood media and gives a transparent effect that shows the natural beauty of the wood grain.
Well, if you only intend to repaint a door or window with a natural color, this is the paint you should use.
For the color, you can set it yourself at the time of application. The thicker you coat the wood media with this paint, the darker the resulting color will be.
3. Pigmented colors

Pigmented color paint is an ordinary paint with various color variants that is used to paint the surface of the wood media completely so that the wood fibers will not be seen.
This type of paint is suitable for those of you who want to paint doors and windows using various colors. Duco paint is an example of a pigmented color paint that you can use.
4. Clear coat

Clear coat paint or varnish serves to produce a transparent color appearance while strengthening the wood grain and exposing the beauty of the grooves and wood grain.
However, different from the type of wood stain paint, this paint is only used during the finishing process in painting wood media.
Varnishes come in a variety of colors that you can choose for yourself, while the final result will vary. Starting from semi-transparent, glossy, to dove.
You must use varnish because it can protect the wood media from various effects of heat, rain, wind, dirt, and insect attacks so that the condition of the wood media color becomes more durable.
HOW TO PAINT FRONT DOOR WITHOUT REMOVING IT

You already know the various types of paints and their functions in the process of painting various wood media. Now it’s time for us to get into how to paint wooden doors and windows.
Suitable for beginners who want to try it themselves. Here are the preparations and steps!
Tools Required:
Here are various tools that you must prepare, before starting to paint the doors and wooden frames on the windows at home.
1. 3-inch brush or sponge brush

The choice of this type of brush is intended so that the results of painting your doors and windows are free of brush marks or brush traces.
You should also choose a brush with soft bristles or a sponge brush.
Sponge brushes have the advantage of being able to absorb paint well and don’t leave brush marks thanks to the soft sponge strokes.
2. Paint wood stain / pigmented color

As explained earlier, you can choose your own type of paint and paint color for wooden doors and windows according to your needs.
For wood stain paint, you can choose Bio Varnish wood paint or other brands that are water based so that the application is easier and safer for health and the environment.
3. Solvent (thinner or water)

Make sure you provide the appropriate solvent/diluent according to the instructions on the paint package you will be using.
4. Sandpaper aluminum oxide no. 400

This sandpaper is better known as fine sandpaper. The use of this sandpaper is only to smooth the surface of the wood media that is rough and looks untidy after the first painting.
5. Clean and dry cloth

The rag will later serve to wipe and dry the wooden parts of the windows and doors that are wet or damp. It can also be used to wipe off excess layers of paint.
6. Masking tape / duct tape

Make sure to cover the sides of the walls that are attached to the door or window using masking tape or duct tape. This is to prevent paint splatter from hitting the wall.
See other articles: paint colors for hallways and stairs.
Steps for how to paint the front door without removing it
After all the tools are ready, it’s time to get into the tutorial on painting doors and wood frames on windows. Here are 6 steps!
1. Make sure the condition of the window or door frame is dry

First make sure the surface of the window or wooden door is clean and dry. If you are coating or re-coating, first remove the old paint layer until it is clean.
2. Mix the wood paint with the appropriate amount of solvent

Before painting, first mix the paint with the solvent according to the type and dosage written on the package. Stir until everything is properly mixed.
Always make sure to stir the paint before application. The nature of the paint that always settles can give a different color appearance if it is not stirred before use.
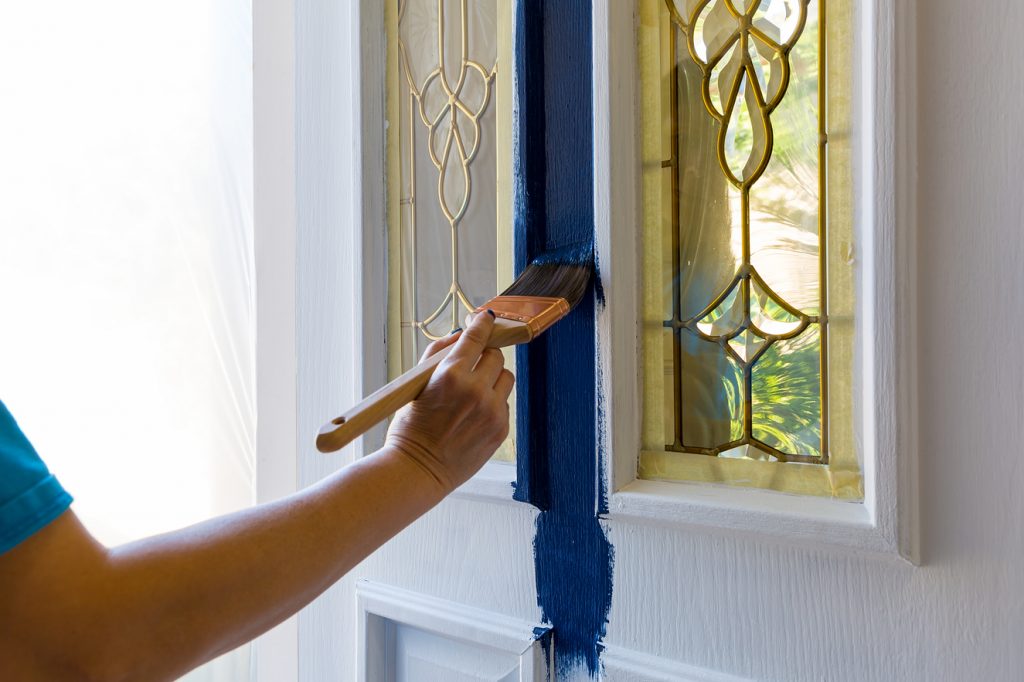
3. Do the first painting

Do the painting from the left side to the right side, for example, starting from the top for the door, then proceeding back from the left side to the right side at the bottom.
For windows, do the painting starting from the side, then proceed to the top and bottom.
Sweep the paint in the direction of the wood grain using a brush or sponge so that the wood grain is not covered by the brush strokes.
4. Sandpaper to smooth the texture

After the first painting, wait for the paint to dry completely and then sand the surface.
Do threshold sanding to smooth out the texture. Try not to peel all the paint off.
5. Cover again with a layer of paint

After finishing the sandpaper, do the painting again using a brush in the direction of the wood grain. If you use wood stain paint, you can do this step repeatedly until you get the desired color.
6. Give a clear coat

The last thing is the provision of clear coat paint to beautify according to the appearance you want.
Once you’ve read an explanation of the different types of paint and how to paint wooden door and window frames, you’re ready to do it yourself. Come on, try updating the color of the wooden door and window frames at home during the weekend!
Every nook and cranny of your home needs at least some amount of maintenance, and this also includes the portals in your home in the form of doors and windows. In fact, these are the very first thing you should coat with your preferred shade of colour, when beginning with your painting arrangements.
External doors and windows are susceptible to chipping or damage because of how often they are used by us. The only way to protect them from this inevitable wear and tear is by making sure you cover them with top quality door and window paint.
Doing this every now and then in set intervals of time will not only grace your thresholds with the protection they need, but also give them a visually arresting appeal pertaining to the colour and texture you bestow upon them during the painting process.
Now if you are someone who is proficient enough to push a paint brush or paint roller across the surface of a door, then by all means carry on with confidence. As for others, doing something as ostensibly simple as painting the doors or windows of your house can be a tad bit challenging.
So we at Creative Resins would like to acquaint you with a few steps and tips that you can learn to paint your external doors and windows like a pro. Along the way, we will also introduce you to a few of our best selling paint products and equipment that can make your entire painting experience all the more convenient and fun.
1 – Getting Ready
If you are attempting a full makeover of your doors and windows, then you must set aside a time wherein you will not be interrupted by work or mundane choirs. Weekends are often more suitable to carry out such excursions. Take your time in selecting the colour, buying all the necessary supplies and equipment you will need to execute your task.
We highly recommend days which are clear and sunny with moderate temperature to begin painting your doors. Such weathers are preferable as they afford your painted surface with enough leeway to dry completely.
2 – Choosing Colour
Sticking colour paint swatches to your door or window surface is one of the many ways by which you can make a decision regarding the colour you will ultimately choose. If you are confused between two or three options then purchase small paint samples and apply them to small areas of your intended surface in order to get an idea of what that particular colour may look like on your door or window.
It’s a good idea to view them at different times in a day to gauge exactly how the colour appears as the natural light outside dims and brightens. There is no need to get overwhelmed here with the amount of options at your disposal. With a few sample tries you will definitely land on an aesthetic you’re looking for.
3 – Choosing the Paint
The paint you ultimately choose, especially on your exterior door, will largely depend on your preference. With regards to creative resins vast gallery of surface coating products, we have a few remarkable suggestions to make to assist you in your endeavors.
For an enhanced, albeit fancier look, Creative Resins brings a plethora of options in the PlasPaint special effects category that allows you to cover your doors with unique and attractive designs. You can coat your door entirely with metallic paint, to give it a shiny, silver, gold or bronze appearance or apply the new rust paint, to give it a grainier texture. Other variants such as ‘pearl’, ‘crackle’ etc. are also available to grace your doors and windows with visually arresting designs.
Depending on the material used to construct your doors and windows you can also try the PlasPaint H2O. This specially formulated VOC-free water-based Polyurethane dispersion for coating various types of plastics especially PVCu, (uPVC). The coating has a unique dual adhesion system that forms a molecular cross bond with PVCu and other plastics becoming an integral part of the substrate surface. It also forms an excellent chemical bond with composite materials, steel, and aluminium. This also makes it an excellent paint for external doors and windows.
Finally, to make matters even simpler, you can try Creative Resins’ PlasPaint Brush ‘n’ Roll, a paint variant specifically designed for self-application via a paint brush or paint roller. PlasPaint Brush ‘n’ Roll is an all in one primer and topcoat combined making the whole process even more straight forward.
All of the above products are weatherproof, UV stable, water and heat resistant. As such, they come with a formidable 10 year warranty period.
4 – How to Start Painting Your Doors and Windows
Once you have your equipment and paint colour set, you can proceed with the painting process. Now to start painting, you can either choose to paint the door while it is attached to the frame or to make matters simpler, detach it from its hinges and paint in a place more comfortable. We would recommend painting it in situ and taking the time to mask areas you don’t want painted with masking tape.
Remove all the hardware present on the door like letter box, numbers, knocker etc for seamless painting. Keep all the parts in a safe place so they can be simply reinstalled when the paint is dry.
Use a sandpaper to lightly key the surface to be painted so that the new paint can adhere much better to the surface of the door or window. Once done, clean the entire surface using a degreaser which will remove any remaining dust and grease. You want your surface nice and clean in order to paint over it without any hassle and achieve that real professional finish.
Now take a roller and begin by applying a first light coat to cover the surface completely. Leave this base coat to dry for a short time, normally around 15 minutes. Once done use a small paintbrush to carefully cut into and around areas such as hinges or door locks or any hardware items that have not been removed from the door or window. Now start the actual final top coat painting process by dipping your paint brush and roller in the paint and covering the door with it. You can start with a roller and then use the paint brush to cut into those difficult areas.
Once you’ve covered the door with your desired paint product, leave it to dry completely. Reattach all the hardware that had removed.
Buy the Best Door and Window Paint Products at Creative Resins.
We at Creative Resins are home to some of the best Door and Window paint products online to give the entrance of your residence or office building the protection and visual appeal they need and deserve. Creative Resins offers you a diverse range of paint products that come in an array of finishes such as matt, satin, gloss and even super gloss which can be used to experiment with versatile aesthetics that make your doors and windows look outstanding.
Our paint products are available in an array of colours from white to grey to black and every colour in-between in order to suit varying preferences. We can match the most popular colour swatches such as Dulux, Farrow and Ball etc. We also offer accessories to make your painting endeavors more fun and convenient. To help you in this regard, we’ve got spray guns, pre-filled Aerosol cans, brush ‘n’ roll equipment, special effect paint products to add a little character to your doors/windows, and so much more.
Creative Resins are your one-stop shop for door and window trim/frame paint products. So if you have any ingenious door and window paint ideas, we have just the right tools and paint products to turn your ideas into breathtaking reality.
If your home is looking a little tired and you reckon it’s time for a bit of DIY, you may want to consider giving your wooden doors and/or windows a fresh coat of paint.
There’s a misconception that wooden doors and windows need to be repainted frequently, however this is not the case; well-treated wood will provide serious longevity. Recoating is only necessary when it shows signs of wear, such as colour fading or a loss of sheen, or after repairing any damage to the timber.
However, you may want to paint those windows and doors because you fancy a change of colour, or you’re trying to sell your home and want to make sure it’s in tip top condition for people to come and view. Whatever the reason, painting wooden windows and doors doesn’t have to be an arduous task, or something that you need to get a professional in to do. Here’s a brief guide to the basics of painting your wooden windows and doors.
Clean and Prep
Before you can go anywhere near your doors or windows with paint, it’s important to clean them thoroughly of any debris, dust or existing paint. With a soft brush, remove any existing debris that you can see, and then using an old toothbrush you can work on the corners and any indentations in the frames. If there are any holes in the woodwork, you should fill these up with an appropriate filler after cleaning them out meticulously with a brush.
To remove any existing paint and strip it back to its bare timber, you are going to need to sand the wood. This will also make the surface as smooth as possible, as any flaws will show through the paint. You can use a sanding block or a mechanical sander to sand down the entire window frame or door to remove any existing paintwork.
Always go in the direction of the wood grain and be extremely careful to avoid scratching the glass of the windows or any glass door panels – it may be worth sticking down some newspaper to cover the glass before you proceed to sanding. Finally, wipe everything down to remove the dust left over from sanding, now you’re ready to move on.
Priming
The next step is to apply the primer, primer is important to ensure an even coverage and so that the paint will grip effectively to the surface. The type of primer you select may be dependent on the type of timber your windows and/or doors are made from. For example, hardwood likely contains an excessive amount of oil, making the first coat of paint difficult to apply, so it’s important to use a good quality primer.
Primers can be bought in a range of colours, so make sure you choose a colour based on the colour of the top coat. If you’re painting in a light colour, the primer should be white; for darker shades, a grey primer is a better choice.
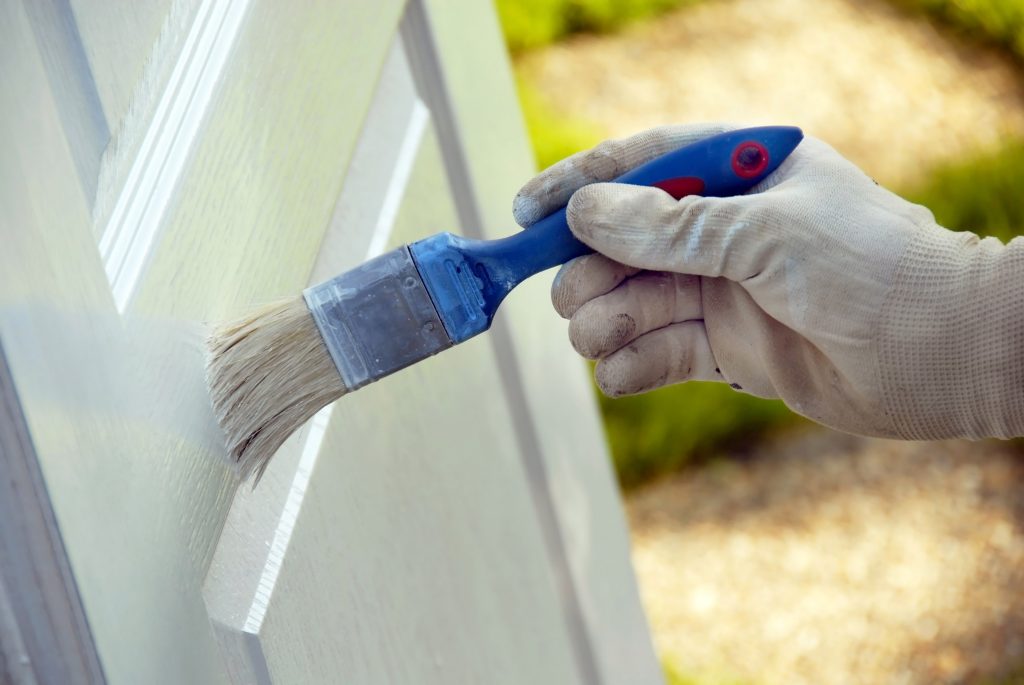
Painting
Once the primer has dried you can apply the first layer of paint. For the glass in your windows or any glass panels in doors, apply masking tape to the edges of the glass to prevent any paint splatter, it will also create a nice, sharp edge to the paintwork. For windows, it’s also a good idea to unscrew the window catches, handles and hinges to prevent these from getting coated in paint.
Once this is done you can start painting with your chosen colour. You don’t need to apply the paint too thickly, as you can always apply more coats after it’s dried – also, an overloaded brush will cause the paint to run. For windows, start horizontally from the top and work your way down, then go back to paint the vertical. Avoid painting sporadically as this will make it hard to create even paintwork.
Use careful, even brush strokes to prevent uneven thickness. Apply the paint in thin layers and build them up gradually as each one dries until you have the desired look you’re after. The lifespan of your chosen paint will be dependent on its quality and composition, so consider researching the different types of paints and their use and effect on the type of timber you’re planning to use them on.
Hopefully you’re now better equipped to start a bit of DIY paintwork on those windows and doors. At Darcy Joinery, we provide bespoke doors and windows carefully crafted and made to measure to your exact specifications. So, if you’re looking for bespoke joinery, such as casement windows in Manchester, contact us today to find out more.
This step-by-step tutorial will show you how to paint aluminum windows and door frames. It’s a quick and easy way to update your old doors and windows for just a few dollars.
While we’ve made lots of improvements and updates to our home over the last several years, replacing the aluminum windows and sliding glass doors just isn’t in the budget right now.
We have two sets of sliding doors that lead out to our huge screened porch and as much as I love all the light they let in, the bare metal finish really just made them look a bit cheap and unfinished.

I painted the interior of the sliding doors several years ago and the paint has held up really well.
There is a bit of chipping on the door handle, but everything else still looks pristine.
I’m in the middle of updating our screened porch so this seemed like the perfect time to tackle the exterior of the doors.
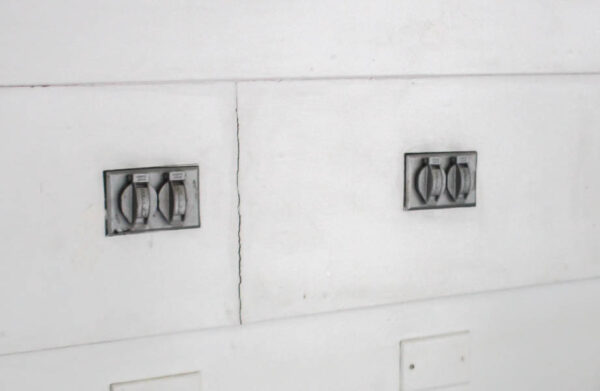
And while I was at it, I also painted the aluminum windows on our porch as well as all of the metal outlet covers.

Today I’m sharing step-by-step instructions and photos as well as a video tutorial of the entire process.
This post contains affiliate links which means if you make a purchase after clicking a link I will earn a small commission but it won’t cost you a penny more. Click here to see my full disclosure policy.
Materials
- Vacuum (for cleaning sliding glass door tracks and window sills)
- All-purpose cleaner
- Painter’s tape ( 2-3 inch thick tape is best for this project)
- Roll of kraft paper or wrapping paper
- Spray paint
The first step of any painting project is cleaning. Our sliding doors had accumulated quite a bit of pollen and dust in the door track so I started by vacuuming it out.
Then I used an all-purpose cleaner and rag to clean everything I was going to be painting.
Spray paint is definitely the best paint for painting almost anything metal.
It adheres well and goes on quickly. Most general use spray paints will work for this project.
Just double-check that your paint says it is appropriate for use on metal and can be used outdoors.
I used Rustoleum Semi-Gloss Protective Enamel in white for my own doors and windows.
You will need to do a bit of extra prep when using spray paint to make sure the overspray doesn’t mess up anything nearby.
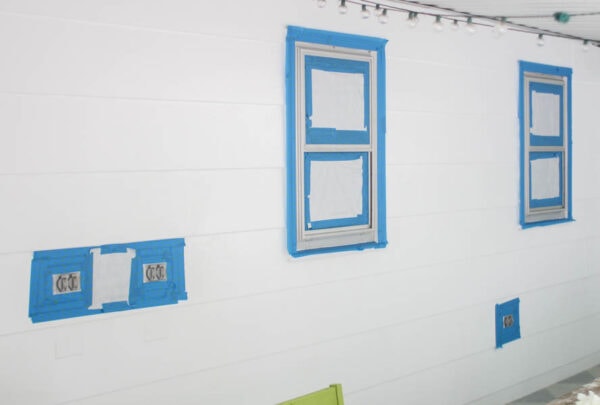
Start by using painter’s tape to tape all along the edges of where you will be painting.
This would be a great time to use 3″ Painter’s tape to provide more protection.
I only had the regular 1″ painter’s tape on hand, so I did a few rows of tape around my windows and doors.
I also covered the entire glass section of the windows and doors. This isn’t completely necessary but I like the extra protection it gives.

My money-saving trick is to use any old rolls of wrapping paper if you don’t have brown kraft paper on hand.
I always seem to have an excess of wrapping paper somehow and this is a great way to repurpose it.
Once you have everything prepped, you can start painting.
Any time you spray paint, start by shaking your paint thoroughly for about a minute and then shaking it every few minutes as you work.
It’s also a good idea to wear a protective mask when working with spray paint.
Hold the spray paint 6 to 8 inches from the surface you are painting and slowly move it over the surface with a steady back and forth motion.
Make sure you keep the can moving to avoid thick, drippy areas.
You want to do 2-3 thin coats of paint. Don’t be tempted to try for one very thick coat, you’ll just end up with drips and uneven coverage.
Check the instructions on your can of spray paint to see how long you need to wait before adding a second coat of paint – usually, it is only a minute or two.

When you’re done painting, turn the paint upside down and spray for five seconds.
This will make sure the can doesn’t clog and will work just as smoothly for your next project.
Once the paint is mostly dry, you can carefully remove the painter’s tape and paper.
If you find any little spots where paint managed to sneak through your barrier onto the glass, it’s easy to remove using a razor blade scraper.
Painted Metal Doors and Windows
Here are some before and after photos so you can really see the difference the paint made.
Even though the color difference from bare aluminum to white is subtle, the windows and doors look so much nicer (and less cheap) now.
I love how they blend in with everything else instead of standing out.


I also built new shutters for the windows, but even without the shutters, I was really surprised at just how much better those windows look.

And the metal outlet covers to blend in nicely now. Which is great, since we have at least a dozen scattered around our porch.

This project was particularly quick and easy. I used three cans of spray paint to paint two sets of sliding glass doors, two windows, and a dozen outlets.
And the entire project was done in a couple of hours.
The majority of that time was spent cleaning and taping everything.
The actual painting took less than ten minutes.
Video Tutorial
I’d love for you to subscribe to my Youtube channel!
Please share this post on Pinterest!

Materials
- All-purpose cleaner
- Painter’s tape
- Roll of kraft paper or wrapping paper
- Spray paint
Instructions
- Start by removing any pollen and dust in the door frame by vacuuming it out.
- Use an all-purpose cleaner and rag to clean the surfaces you will be painting.
- Secure painter’s tape all along the edges of the surfaces you will be painting.
- Cover the entire glass section of the windows and doors with kraft paper or wrapping paper.
- Shake your paint thoroughly for about a minute and then begin painting.
- Hold the spray paint 6 to 8 inches from the surface and move it with a steady back and forth motion.
- You will need 2-3 thin coats of paint.
- Once the paint is dry, remove the painter’s tape and paper.
Recommended Products
As an Amazon Associate and member of other affiliate programs, I earn from qualifying purchases.
-
Rust-Oleum 338945 Stops Rust Advanced Spray Paint, 12-Ounce, Semi-Gloss White
-
Made in USA Brown Kraft Paper Jumbo Roll 17.75” x 1200” (100ft) Ideal for Gift Wrapping, Art, Craft, Postal, Packing, Shipping, Floor Covering, Dunnage, Parcel, Table Runner 100% Recycled Material
-
ScotchBlue Original Multi-Surface Painter’s Tape, 2.83 inch x 60 yard, 1 Roll
A few other posts I think you will like:
The Best Paintbrushes for a Perfectly Smooth Paint Finish
Caulk or Wood Filler: Choose the Right One for Every Project
Painting Sliding Glass Doors: One Less Eyesore
Google Web Story: Painted Aluminum Windows and Door Frame
Hi I’m Carrie and I’ve been sharing approachable, budget-friendly home DIY projects here at Lovely Etc. for over 14 years! I firmly believe that you can transform the house you already have into a home you love — on your real life budget. I’m here to share creative DIY projects and helpful tutorials to help you create a space you love to come home to.