
Download Windows Speedup Tool to fix errors and make PC run faster
It may happen that after installing a Windows Update, Quality Update, or Feature Update, your Windows 10 computer does not boot. In this case, you may have to uninstall the update. In this post, we will show you how to uninstall the latest Quality Update or Feature Update, when your Windows 11/10 computer will not boot, by entering Advanced Options.
To uninstall the latest Quality Update or Feature Update, do the following:
- Boot into Advanced Startup Options screen
- Select Troubleshoot
- Select Advanced Options
- Press Uninstall Updates
- Choose to uninstall the Quality Update or Feature Update.
- Follow on-screen instructions.
1] Boot into Advanced Startup Options screen
Since your system does not boot normally, you have the following three options to get to the Advanced Options screen:
- Press F2 or F8: When your Windows PC boots up, press F2 to access your BIOS settings or press F8 to access the boot or startup menu. This can vary from OEM to OEM. When you access the boot menu, you may have to press F11 to open the Choose an option screen. From here you have to press Troubleshoot and then Advanced Options.
- Power-down PC thrice: Abruptly power down the PC when you have powered it up. Do it multiple times. After 3 times this may force Windows to think that there is some problem with your PC, and it will force push the Automatic Repair screen. From here, you can get access to the Advanced Startup Options.
- Use Installation Media: On the first screen, look for a link “Repair your computer.” Click on it. It will boot your computer into the Advanced Options screen.
2] Select Troubleshoot
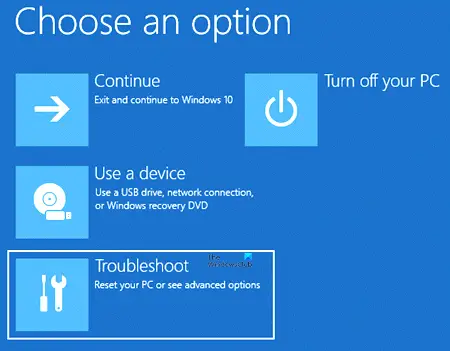
Once you have reached the Recovery environment, click on Troubleshoot.
3] Select Advanced Options
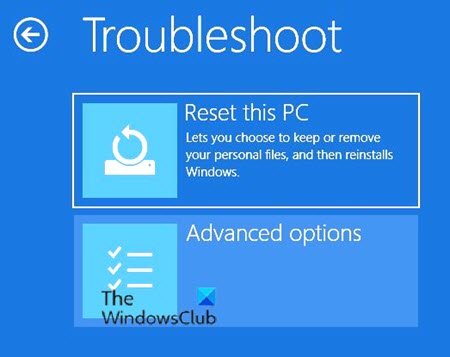
You will next be offered two options. Select Advanced options.
4] Press Uninstall Updates
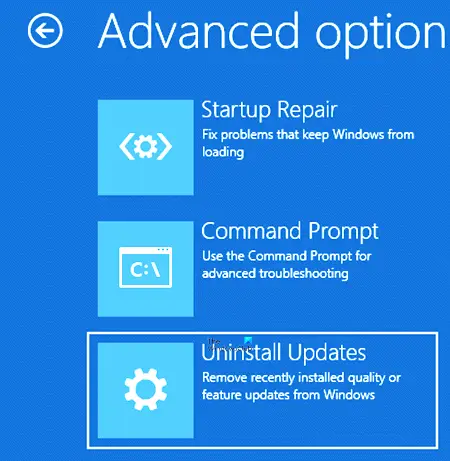
On the next screen select Uninstall Updates.
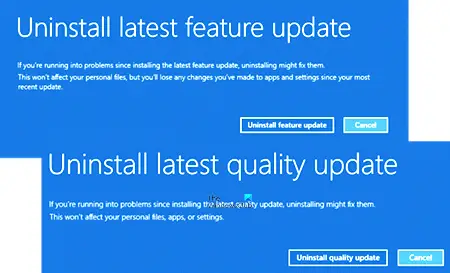
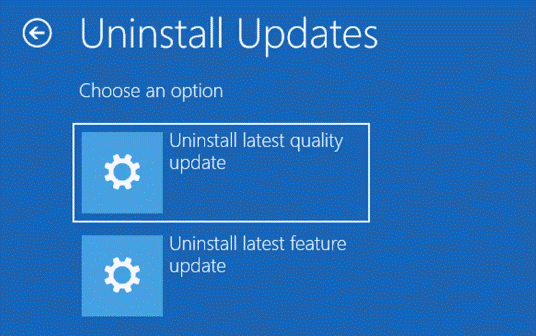
5] Choose to uninstall Quality Update or Feature Update

Depending on what your requirement is, you may opt to:
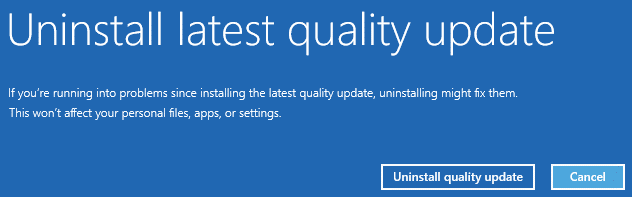
- Uninstall latest quality update
- Uninstall latest feature update
6] Follow on-screen instructions
Once you have made your choice, you will be offered a screen to select the particular Update.
Click on it, follow the on-screen instructions and wait for Windows to uninstall the problematic update.
Once done, your system should reboot normally.
Related: Windows stuck at the log-in screen after upgrade.
Anand Khanse is the Admin of TheWindowsClub.com, a 10-year Microsoft MVP (2006-16) & a Windows Insider MVP (2016-2022). Please read the entire post & the comments first, create a System Restore Point before making any changes to your system & be careful about any 3rd-party offers while installing freeware.
В некоторых случаях автоматически устанавливаемые обновления Windows 10 могут вызывать проблемы в работе компьютера или ноутбука — с момента релиза ОС такое случалось несколько раз. В таких ситуациях может потребоваться удалить последние установленные обновления или конкретное обновление Windows 10.
В этой инструкции — три простых способа удаления обновлений Windows 10, а также способ сделать так, чтобы конкретные удаленные обновления не устанавливалось в дальнейшем. Для использования описанных способов требуется иметь права администратора на компьютере. Также может быть полезно: Как полностью отключить обновления Windows 10.
Примечание: Для некоторых обновлений при использовании способов ниже может отсутствовать кнопка «Удалить», а при удалении с помощью командной строки вы можете получить сообщение: «Обновление для Microsoft Windows является обязательным компонентом для этого компьютера, поэтому удаление невозможно», в этой ситуации используйте руководство: Как удалить обязательное обновление Windows 10, которое не удаляется.
Удаление обновлений через Параметры или Панель управления Windows 10
Первый способ — использовать соответствующий пункт в интерфейсе параметров Windows 10. Для удаления обновлений в данном случае потребуется выполнить следующие шаги.
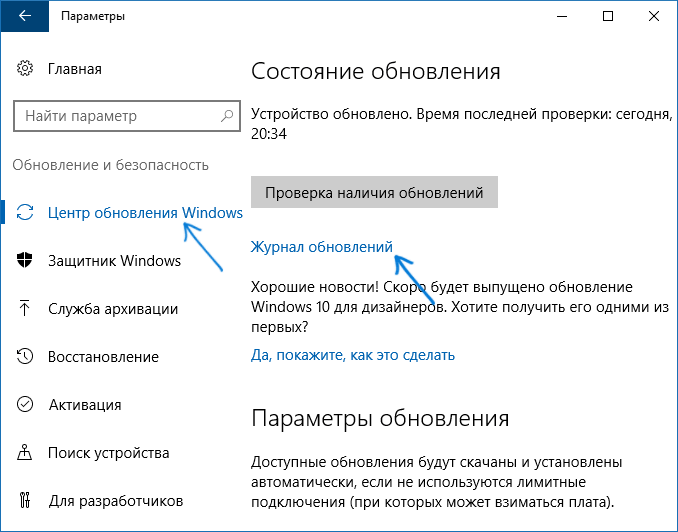
- Зайдите в параметры (например, с помощью клавиш Win+I или через меню Пуск) и откройте пункт «Обновление и безопасность».
- В разделе «Центр обновления Windows» нажмите «Журнал обновлений».

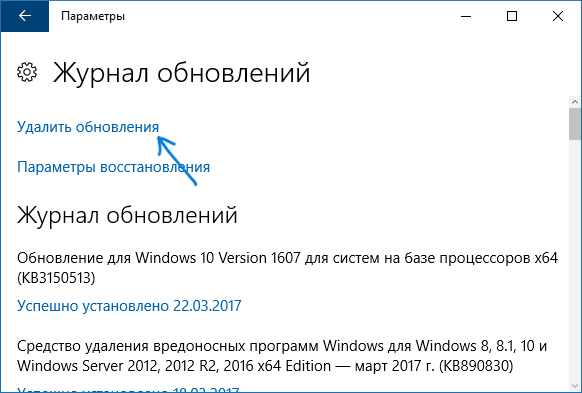
- Вверху журнала обновлений нажмите «Удалить обновления».

- Вы увидите список установленных обновлений. Выберите то, которое требуется удалить и нажмите кнопку «Удалить» вверху (или используйте контекстное меню по правому клику мыши).

- Подтвердите удаление обновления.
- Дождитесь завершения операции.
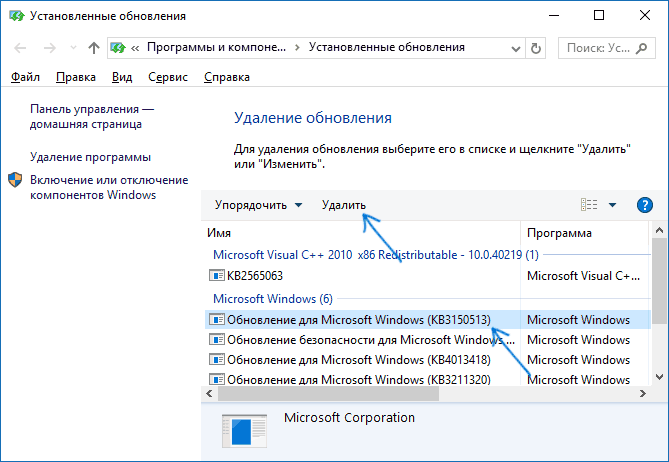
Попасть список обновлений с возможностью удалить их можно и через Панель управления Windows 10: для этого зайдите в панель управления, выберите «Программы и компоненты», а затем в списке слева выберите пункт «Просмотр установленных обновлений». Последующие действия будут теми же, что и в пунктах 4-6 выше.
Как удалить обновления Windows 10 с помощью командной строки
Еще один способ удаления установленных обновлений — использование командной строки. Порядок действий будет следующим:
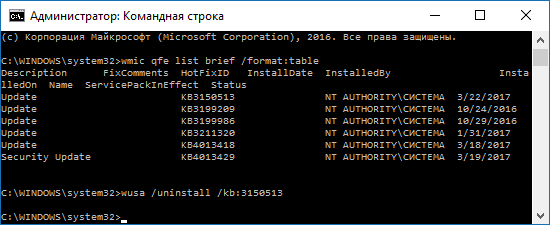
- Запустите командную строку от имени Администратора и введите следующую команду
- wmic qfe list brief /format:table
- В результате выполнения этой команды вы увидите список установленных обновлений вида KB и номер обновления.

- Для удаления ненужного обновления используйте следующую команду.
- wusa /uninstall /kb:номер_обновления
- Далее потребуется подтвердить запрос автономного установщика обновлений на удаление выбранного обновления (запрос может и не появиться).
- Дождитесь завершения удаления. После этого, если это необходимо для окончания удаления обновления, появится запрос о перезагрузке Windows 10 — выполните перезагрузку.

Примечание: если на шаге 5 использовать команду wusa /uninstall /kb:номер_обновления /quiet то обновление будет удалено без запроса подтверждения, а перезагрузка автоматически выполнена в случае, если необходима.
Как отключить установку определенного обновления
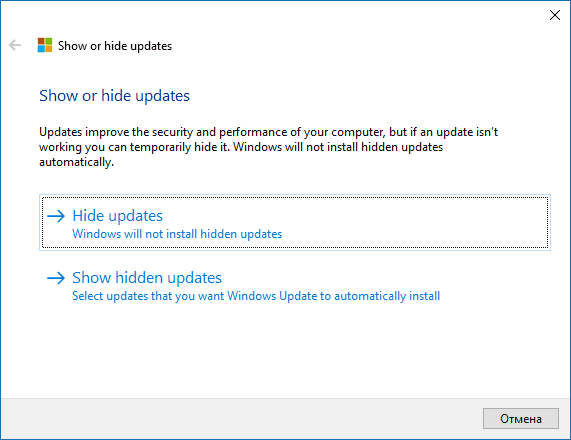
Через короткое время после выхода Windows 10 Microsoft выпустила специальную утилиту Show or Hide Updates (Показать или скрыть обновления), позволяющую отключить установку определенных обновлений (а также обновление выбранных драйверов, о чем ранее писалось в руководстве Как отключить обновление драйверов Windows 10).
Скачать утилиту можно с официального сайта Майкрософт. (ближе к концу страницы пункт «Загрузить пакет Показать или скрыть обновления»), а после её запуска потребуется выполнить следующие шаги
- Нажмите «Далее» и подождите некоторое время, пока будет выполняться поиск обновлений.
- Нажмите Hide Updates (скрыть обновления) для того, чтобы отключить выбранные обновления. Вторая кнопка — Show Hidden Updates (показать скрытые обновления) позволяет в дальнейшем просмотреть список отключенных обновлений и снова задействовать их.

- Отметьте обновления, которые не следует устанавливать (в списке будут не только обновления, но и драйверы оборудования) и нажмите «Далее».
- Дождитесь завершения «устранения неполадок» (а именно — отключение поиска центром обновлений и установки выбранных компонентов).

На этом всё. Дальнейшая установка выбранного обновления Windows 10 будет отключена, пока вы снова ее не включите с помощью той же утилиты (или пока Майкрософт что-то не предпримет).
Windows updates are crucial for maintaining a secure and efficient computer system. They deliver new features, improve performance, and close security gaps. However, sometimes updates can cause unexpected problems like system crashes, application failures, or performance degradation. In such cases, you might want to roll back to a previous version of Windows or uninstall specific updates. Here, we explore five effective methods for manually uninstalling Windows 10 and 11 updates.
Understanding Windows Updates
Before delving into the methods of uninstalling updates, it is imperative to comprehend the different types of Windows updates:
-
Feature Updates: Major updates that introduce new features and improve existing functionality. They’re usually released twice a year.
-
Quality Updates: Smaller updates that focus on security, reliability, and performance improvements. These are typically released monthly.
-
Driver Updates: Updates that provide new drivers for your hardware devices.
Each type of update can be uninstalled, though the methods may differ.
Reasons to Uninstall Updates
There are various reasons you might need to uninstall updates. They can introduce bugs, render software incompatible, or even slow down your system. If a feature update has caused significant issues, it may be necessary to revert to a previous version. Similarly, quality updates that address specific problems might create new ones that warrant removal.
Method 1: Uninstalling Updates via Settings
The most straightforward way to remove updates is through the Settings app in Windows 10 and 11. This method is user-friendly and does not require any special technical skills.
Steps:
-
Open Settings: Press the Windows + I keys together to open the Settings menu.
-
Navigate to Update & Security: Click on «Update & Security.»
-
Check Update History: Select «Windows Update» from the left sidebar and then click on «View update history.»
-
Uninstall Updates: You will see a list of installed updates. Click on «Uninstall updates.» This option brings up a list of all installed updates managed by Control Panel.
-
Choose Update to Uninstall: From the list, right-click on the update you wish to remove and select «Uninstall.» Follow the prompts to complete the process.
-
Reboot the System: After uninstallation, you will likely need to restart your computer for the changes to take effect fully.
Important Note:
If you’ve uninstalled a feature update, Windows might give you the option to reinstall it later. However, for quality updates, once uninstalled, Windows Update may prompt you to reinstall them if they are deemed necessary for system security and stability.
Method 2: Uninstalling Updates via Control Panel
If you prefer a more traditional approach, you can uninstall updates through the Control Panel. This method offers a more granular view of your updates, specifically for applications and drivers.
Steps:
-
Open Control Panel: Type «Control Panel» in the Windows search bar and hit Enter.
-
Navigate to Programs: In the Control Panel window, click on «Programs and Features.»
-
View Installed Updates: In the left pane, click on «View installed updates.» A window will open displaying a list of installed updates for Windows and various applications.
-
Select Update to Uninstall: Browse through the list, identify the update you want to uninstall, right-click on it, and select «Uninstall.»
-
Follow Prompts: Follow any additional prompts or confirmations required to complete the uninstallation.
-
Reboot Your PC: After uninstalling the update, restart your computer to finalize the process.
Method 3: Using Command Prompt to Uninstall Updates
For users who are comfortable with command-line interfaces, Windows provides Command Prompt as a powerful tool to uninstall updates.
Steps:
-
Open Command Prompt as Administrator: Right-click on the Start button, select Windows Terminal (Admin) or Command Prompt (Admin).
-
List Installed Updates: To show all installed updates, enter the command:
wmic qfe list briefThis displays a list of installed updates along with their respective KB numbers.
-
Uninstall an Update: To uninstall a specific update, use the following command:
wusa /uninstall /kb:KBxxxxxxxReplace «KBxxxxxxx» with the actual KB number of the update you wish to remove.
-
Confirm Uninstallation: You may receive prompts during this process; follow them to complete the uninstallation.
-
Restart the Computer: After the process is complete, it’s wise to restart your system to ensure everything is applied correctly.
Method 4: Uninstalling Updates via Recovery Environment
If your system is severely malfunctioning and prevents you from using the regular Windows interface, the advanced recovery options can be a lifesaver.
Steps:
-
Enter Recovery Environment: Restart your computer. When it begins to restart, repeatedly press the F11 key (or whichever key corresponds to your PC’s recovery menu).
-
Select Troubleshoot: In the Recovery Environment, select «Troubleshoot.»
-
Advanced Options: Navigate to «Advanced Options» and then select «Uninstall Updates.»
-
Choose Which Update to Remove: You will usually have options to uninstall the latest quality update or the latest feature update. Choose the appropriate option based on your needs.
-
Follow Instructions: Follow the on-screen prompts to uninstall the selected update.
-
Reboot the System: Once the uninstallation is complete, restart your PC.
Method 5: Using Windows Powershell
For those who prefer using Windows PowerShell, this powerful scripting shell can also facilitate the uninstallation of Windows updates.
Steps:
-
Open Windows PowerShell as Administrator: Right-click on the Start menu, and select «Windows PowerShell (Admin).»
-
List Installed Updates: To view all installed updates, enter the following command:
Get-HotFixThis command lists all updates with various details including the KB numbers.
-
Uninstall the Update: To remove a specific update, run:
wusa /uninstall /kb:KBxxxxxxxAgain, replace “KBxxxxxxx” with the actual KB number of the update you wish to uninstall.
-
Confirm and Follow Prompts: As before, follow the prompts to complete the uninstallation.
-
Restart Your Computer: Ensure you restart your computer after the process to finalize the uninstallation.
Conclusion
Uninstalling updates in Windows 10 and 11 can effectively resolve issues arising from flawed installations. Each method outlined above provides a unique approach, catering to varying user preferences and technical comfort levels. From the user-friendly Settings app to the versatile Command Prompt and PowerShell, Windows offers multiple avenues to manage updates effectively.
Always remember, before making any significant changes, it’s advisable to back up your critical data. While most updates can improve your system’s performance and security, those that cause issues should be approached with caution. With these methods, you now have the tools to maintain control over your Windows environment and ensure it runs smoothly according to your needs.
-
Home
-
News
- How to Uninstall Quality Updates or Feature Updates?
By Aurelie | Follow |
Last Updated
Microsoft offers two types of updates for Windows: quality updates and feature updates. What are the differences between them? When do you need to uninstall the latest quality update or feature update? How to remove them from your device? In this post on MiniTool Website, we will share some detailed instructions for you.
What Are Quality Updates & Feature Updates for Windows?
Quality updates – It usually don’t contain new features, visual changes, and other minor enhancements. This type of update will increase in size each month. The download and install will be much faster than feature updates because their package is smaller and you don’t need to reinstall your system.
Feature updates – These updates include new features, visual improvements, and some important enhancements to improve the overall experience and security. When installing a feature update, you are technically installing a new version. Compared to quality updates, it will take longer to apply because it is a complete reinstallation of Windows 10/11.
Tips:
If you are downloading and installing feature updates, it might take a pretty long time because you are installing a new Windows version. Therefore, you are likely to run into all types of issues during the process. Before taking any further steps, you had better create a backup of your crucial data with MiniTool ShadowMaker as a prevention. It is a free Windows backup software that allows you to backup & restore files, folders, partitions, disks, and partitions within only a few steps. Get the free trial and have a whirl!
MiniTool ShadowMaker TrialClick to Download100%Clean & Safe
How to Uninstall Quality Updates or Feature Updates?
Although Microsoft releases some updates each month to help improve your system performance, these updates might lead to some errors like system crashes, blue screen of death, and so on. To solve such errors, you need to remove the problematic update and then your system can back to normal. Here’s how to uninstall problematic Windows update:
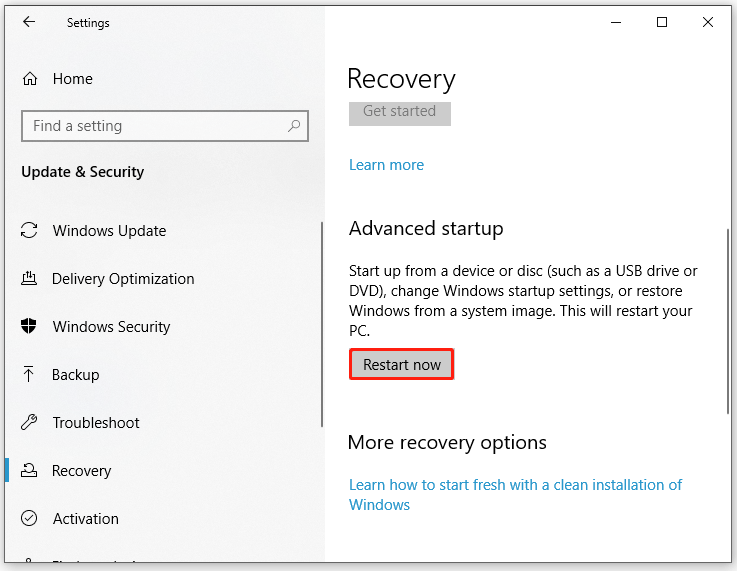
Step 1. Press Win + I to open Windows Settings.
Step 2. Go to Update & Security > Recovery > hit Restart now under Advanced startup.
Step 3. In the Choose an option screen, click on Troubleshoot > Advanced options > Uninstall Updates > Uninstall latest quality update or Uninstall latest feature update.
Tips:
If you choose to uninstall the latest feature update, you need to wait patiently because it will take much longer.
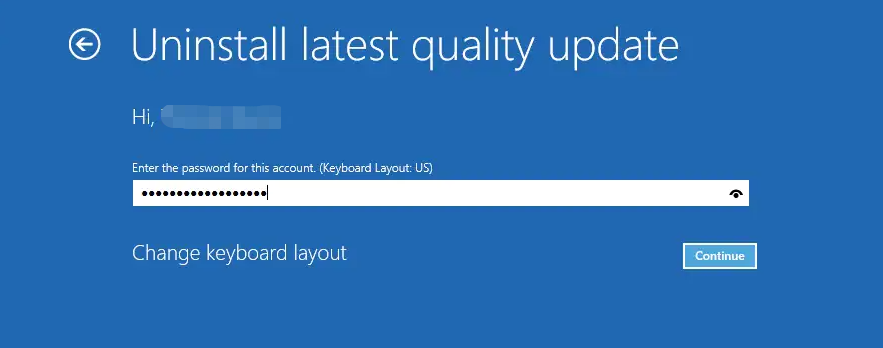
Step 4. Then, you will need to log into your Windows 10 with your user name and password. After that, hit Continue.
Step 5. Click on Uninstall quality update or Uninstall feature update and then the system will perform a restart to remove the latest installed cumulative update from your computer.
Step 6. After the uninstallation is done, you had better to pause the updates to prevent problematic quality or feature updates from being installed automatically again. To do so: go to Windows Settings > Update & Security > Windows Update > Advanced options > select a date to delay the update.
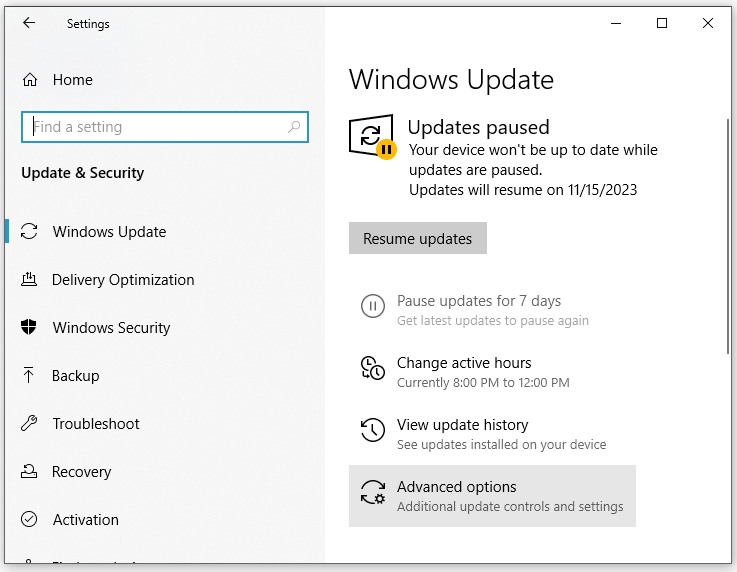
Tips:
Temporarily pause updates from being installed on your computer for up to 35 days. If you reach the pause limit, your Windows machine will need to get new updates before you can pause again.
Final Words
That is all about how to uninstall quality updates and how to uninstall feature updates. We’ve tried our best to walk through the process as detailed as we can and hope that this post can do the trick for you. Have a nice day!
About The Author
Position: Columnist
Aurelie is a passionate soul who always enjoys researching & writing articles and solutions to help others. Her posts mainly cover topics related to games, data backup & recovery, file sync and so on. Apart from writing, her primary interests include reading novels and poems, travelling and listening to country music.
To uninstall a Feature Update, head to Settings > Update & Security > Recovery, and scroll down to Go Back to the Previous Version of Windows 10. Click the Get Started button to start the uninstallation process.
- How do I get rid of Windows 10 Update quality?
- What is uninstall latest quality update?
- How long does it take to uninstall latest quality update Windows 10?
- How do I uninstall latest update?
- What happens if I uninstall updates on Windows 10?
- Can’t uninstall an update Windows 10?
- Does resetting PC remove virus?
- What is latest quality update?
- Does resetting Windows 10 remove updates?
- How do I force a Windows update to uninstall?
- What is the latest Windows version 2020?
- How do I repair the latest Windows 10 update?
How do I get rid of Windows 10 Update quality?
How to uninstall latest Quality Update or Feature Update in Windows 10
- Boot into Advanced Startup Options screen.
- Select Troubleshoot.
- Select Advanced Options.
- Press Uninstall Updates.
- Choose to uninstall the Quality Update or Feature Update.
- Follow on-screen instructions.
What is uninstall latest quality update?
The “Uninstall latest quality update” option will uninstall the last normal Windows Update you installed, while “Uninstall latest feature update” will uninstall the previous major once-every-six-month update like the May 2019 Update or October 2018 Update.
How long does it take to uninstall latest quality update Windows 10?
Windows 10 only gives you ten days to uninstall big updates like the October 2020 Update. It does this by keeping the operating system files from the previous version of Windows 10 around.
How do I uninstall latest update?
Procedure
- Tap Settings.
- Tap Apps. Some phones may have it listed as Apps & Notifications.
- Ensure it says All Apps at the top. If not, Tap the drop-down menu and select All Apps.
- Tap Google Play Store.
- Tap Menu. The 3-vertical-dot button on the Top Right Corner.
- Tap Uninstall Updates.
- Tap OK.
What happens if I uninstall updates on Windows 10?
If you uninstall all the updates then your build number of the windows will change and revert back to older version. Also all the security updates you installed for your Flashplayer,Word etc will be removed and make your PC more vulnerable especially when you are online.
Can’t uninstall an update Windows 10?
Open the Start menu and click the gear-shaped Settings icon. Go to Update & security > View Update History > Uninstall updates. Use the search box to find “Windows 10 update KB4535996.” Highlight the update then click the “Uninstall” button at the top of the list.
Does resetting PC remove virus?
Running a factory reset, also referred to as a Windows Reset or reformat and reinstall, will destroy all data stored on the computer’s hard drive and all but the most complex viruses with it. Viruses can’t damage the computer itself and factory resets clear out where viruses hide.
What is latest quality update?
Quality updates (also are referred to as «cumulative updates» or «cumulative quality updates») are the mandatory updates that your computer downloads and installs automatically every month through Windows Update. Usually, every second Tuesday of every month («Patch Tuesday»).
Does resetting Windows 10 remove updates?
Yes a factory reset puts your machine back to new condition, as you bought it.. All updates, programs data, etc, are removed; everything. And NO, you can not save installed updates.
How do I force a Windows update to uninstall?
Click the Start button, then click the Settings cog. Once the Settings app opens, click Update & Security. From the list in the centre of the window, click “View update history,” then “Uninstall updates” in the top-left corner.
What is the latest Windows version 2020?
The latest version of Windows 10 is the October 2020 Update, version “20H2,” which was released on October 20, 2020. Microsoft releases new major updates every six months. These major updates can take some time to reach your PC since Microsoft and PC manufacturers do extensive testing before fully rolling them out.
How do I repair the latest Windows 10 update?
Open Settings > Update & Security. Click on Troubleshoot. Click on ‘Additional Troubleshooters’ and select «Windows Update» option and click on Run the troubleshooter button. Once done, you can close the Troubleshooter and check for updates.