
In my last article “How to remove node from File Share Cluster (DFS) on Windows Server” we had three nodes in DFS Namespace Server role that was clustered. I removed one node from DFS Namespace, but that node is still available in Failover Cluster Manager. In this short guide we will learn how to remove node from Failover Cluster.
Before we begin
This article is in relation with guide “How to remove node from File Share Cluster (DFS) on Windows Server” I wrote earlier.
Before you start – make sure that you have backups.
If you want to remove node from Failover Cluster, you need to make sure that roles you have on that cluster do not depend on that node. Be careful not do destroy cluster completely (if you don’t plan to do that – and make sure you plan downtime and have backup in place).
So, I first removed DFS1 from DFS Namespace role, and next step is to remove DFS1 from Failover Cluster.
Prerequisites
All is referenced in “How to remove node from File Share Cluster (DFS) on Windows Server” so you can go to that article and articles I mentioned in that guide to see how the whole lab is set.
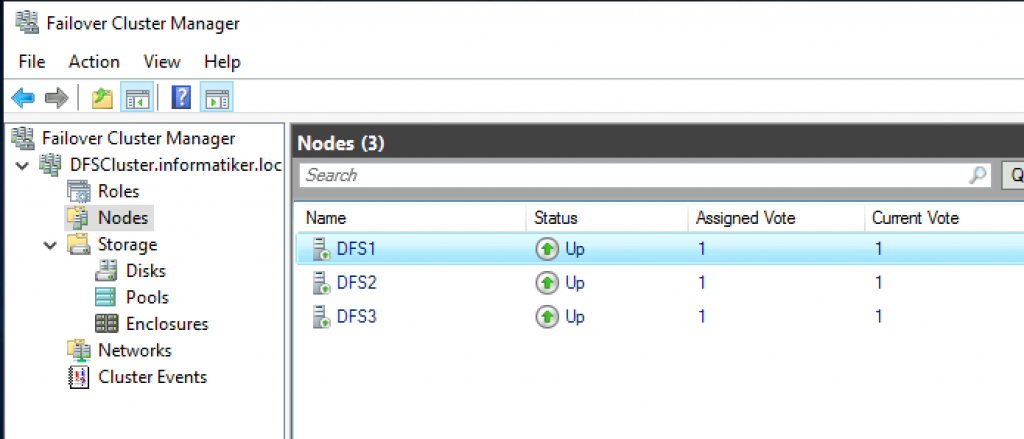
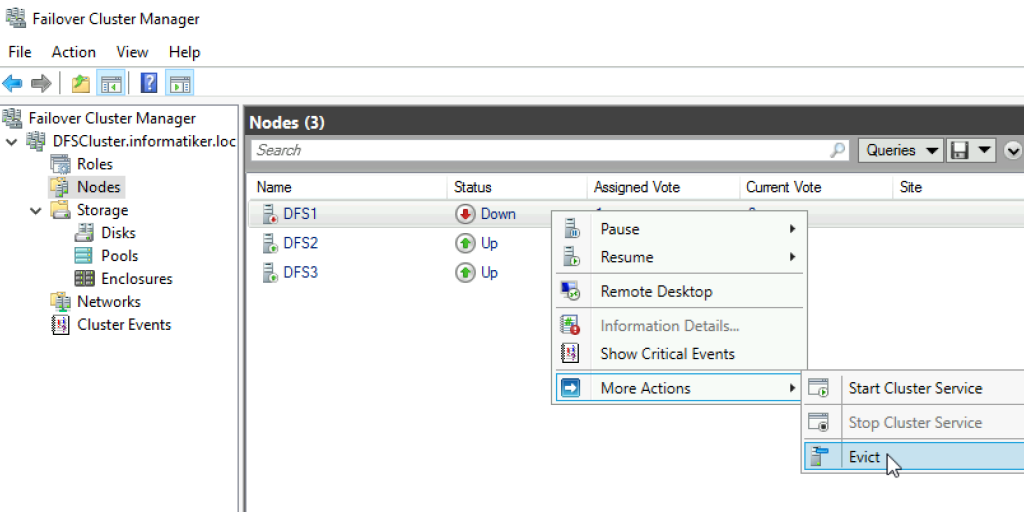
In short. I have three nodes – DFS1, DFS2 and DFS3.
I want to remove DFS1 from Failover Cluster.
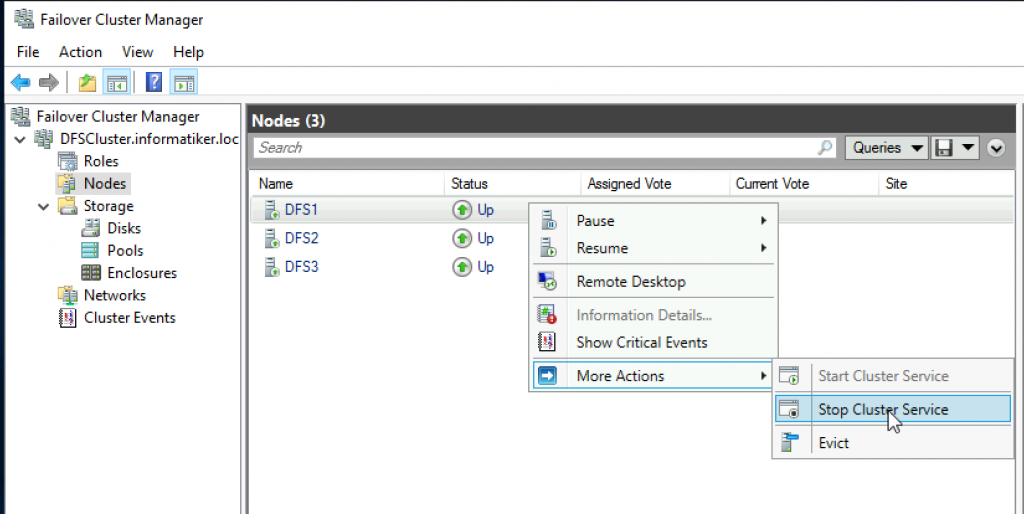
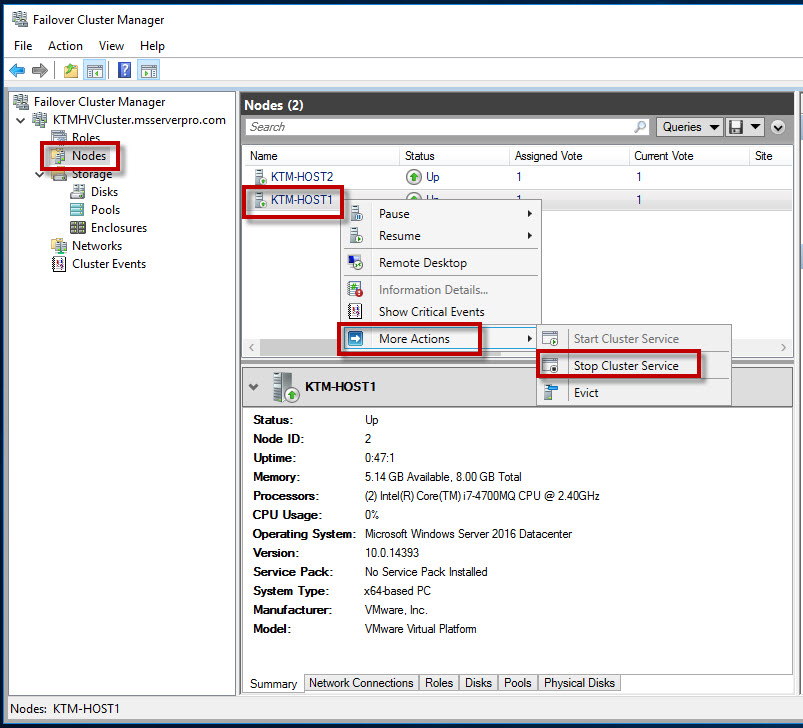
I will be doing this from DFS3. I will open Failover Cluster Manager and click on Nodes section. I will right click on DFS1 and select Stop Cluster Service from More Actions
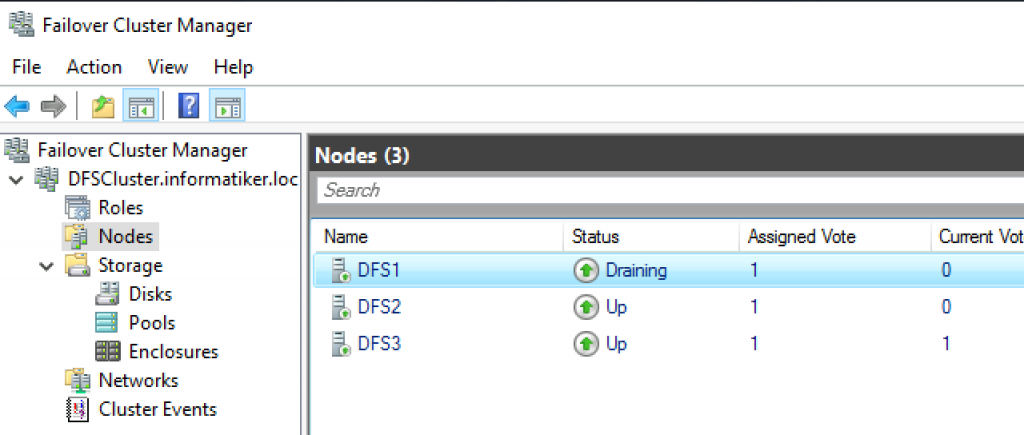
Draining…
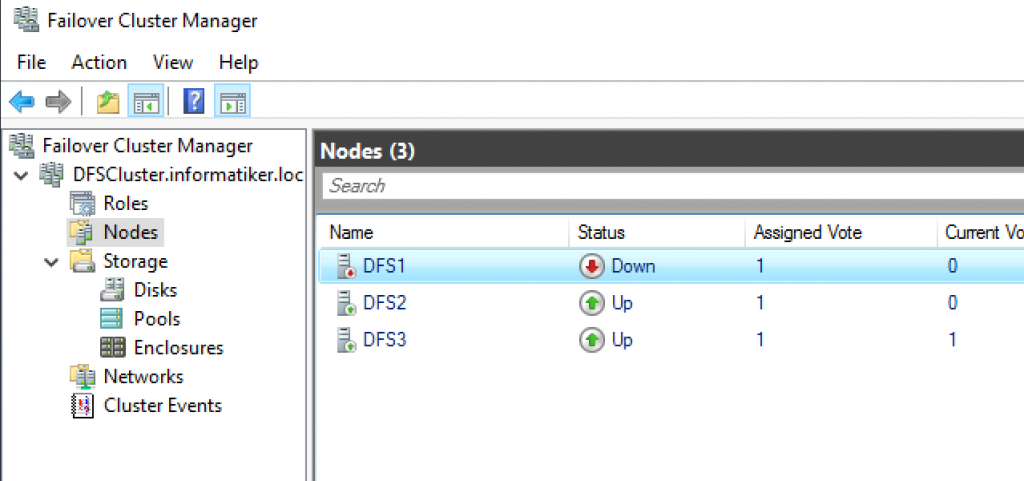
Down
Now, again right click on DFS1, More Actions, Evict
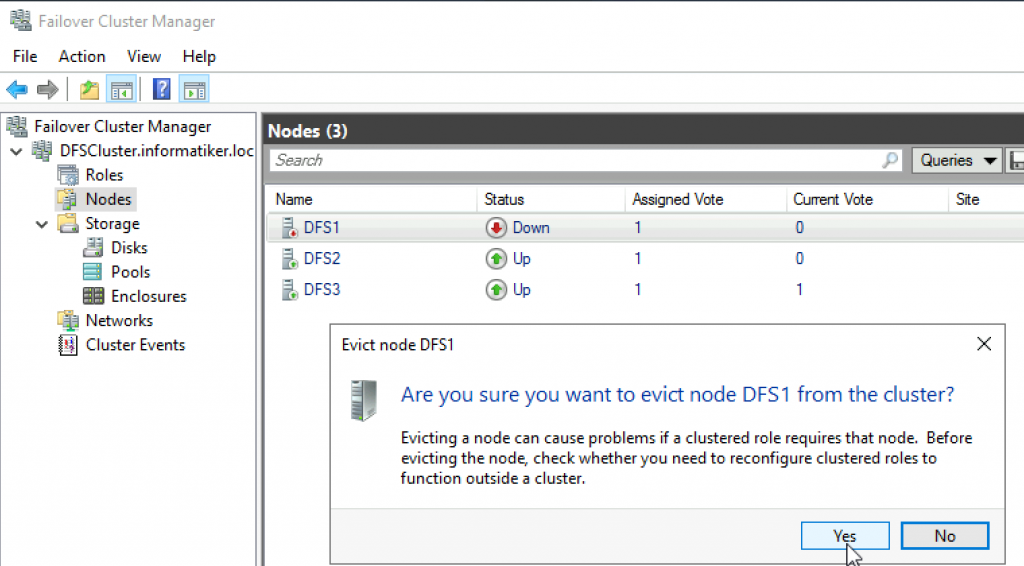
Warning will be displayed. Of course make sure your services will function after you evict the node, and make sure you have a backup. Yes
And just like that – we have two nodes left in cluster
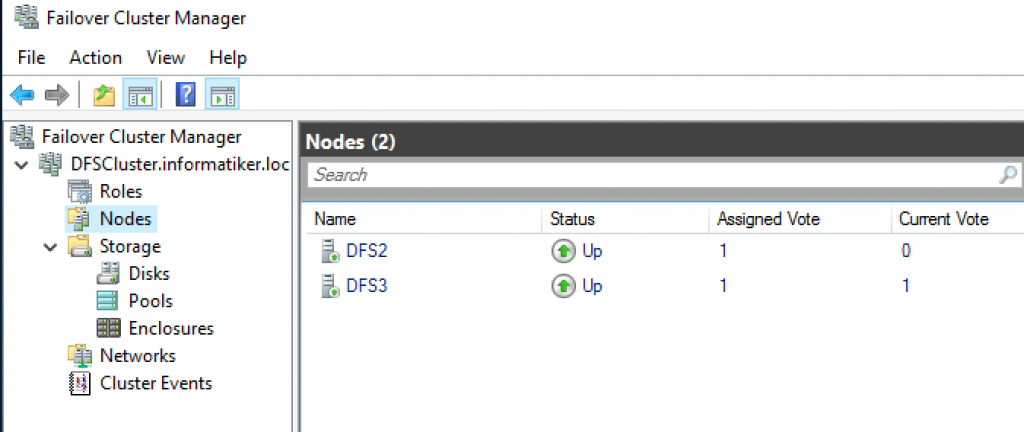
I turned off DFS1 to make sure everything will function. I also tried to move roles from DFS2 to DFS3 and vice versa, everything works flawlessly.
Disclaimer
Failover clustering supports up to 64 nodes and 8000 virtual machines per cluster with 1024 virtual machines per node. In production environment you need to Add a Node to an Active cluster and sometimes remove a Node from the cluster. Even some scenario you need to destroy a cluster as well. Normally, when a node is damaged or no longer needed in the cluster, you evict node from a cluster, which removes the node from the cluster configuration. You should evict a node under the following scenarios:
- Operating system problem
- Hardware replacement
- Permanently removing a node from a cluster
- Renaming a node of a cluster
- Test environment
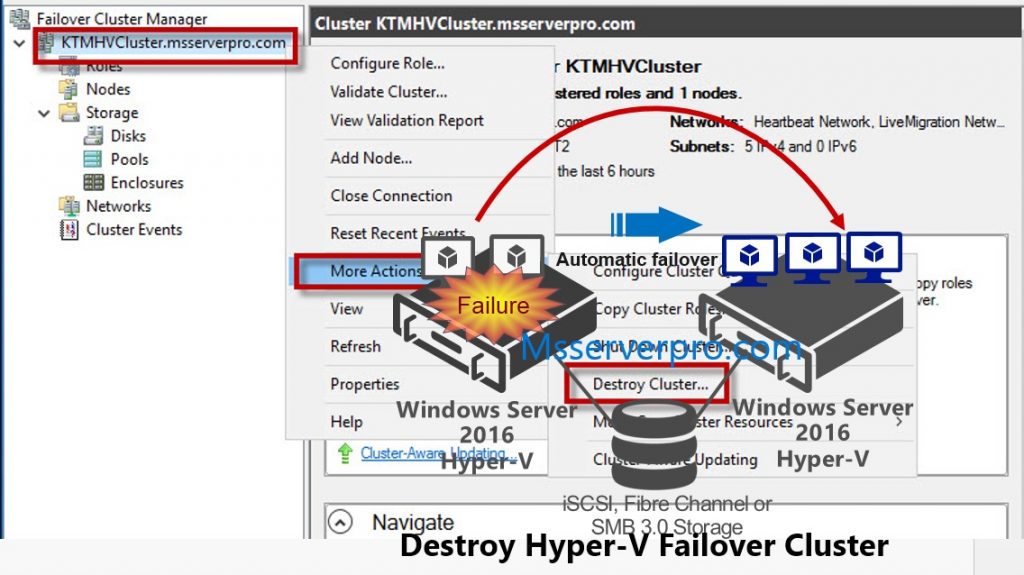
In this article you can remove a node from a Windows Server 2016 Hyper-V cluster and destroy a cluster.
Remove a Node from Windows Server 2016 Hyper-V Cluster:
In Failover Cluster Manager, expand KTMHVCluster.msserverpro.com, click Nodes. In the Node pane, right-click the Nodes that you want to remove a Node from the cluster, KTM-HOST1, select More Actions, and then click Stop Cluster Service. The status of that node will change to Draining to Down. You might need to click Refresh in the Actions pane to see this.

In the Node panes, right-click KTM-HOST1, select More Actions, and then click Evict.

In the Evict node KTM-HOST1 window, click Yes.

Verify that KTM-HOST1 is no longer present in the Nodes pane and make sure all the virtual machines are in second Node, KTM-HOST2. Here, you have stop all highly available virtual machines.

As you have already stop all highly available virutal machines, now its ready to remove a last Node from the cluster. In the Nodes pane, right-click KTM-HOST2, select More Actions, and then click Stop Cluster Service.

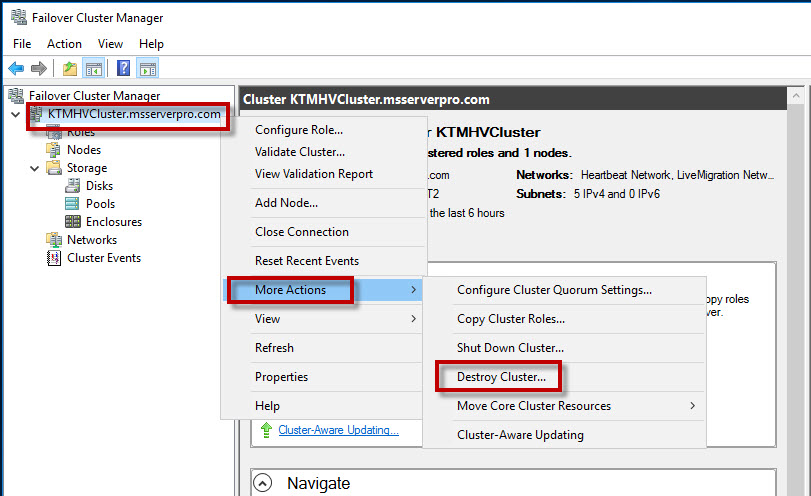
Destroy a Cluster:
In Failover Cluster Manager, right-click KTMHVCluster.msserverpro.com, select More Actions, and then click Destroy Cluster…
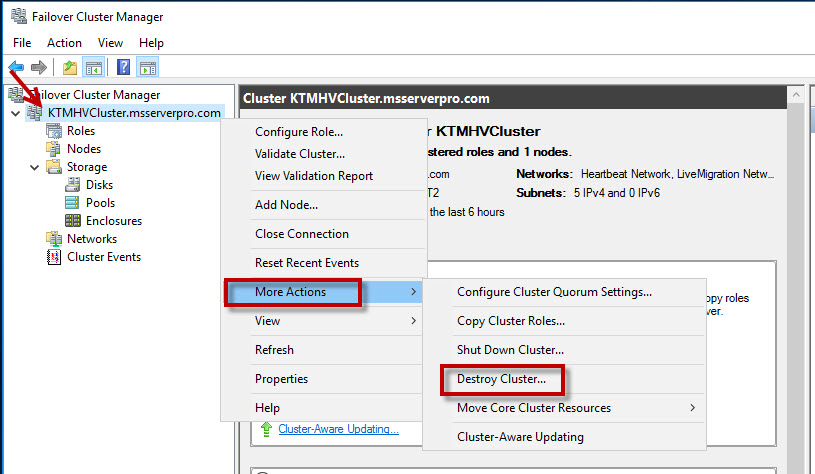
In the Error window, “You cannot destroy a cluster that contains clustered roles. First delete all clustered roles from this cluster, and then try this action again” click OK.

Delete all Clustered Roles from Cluster:
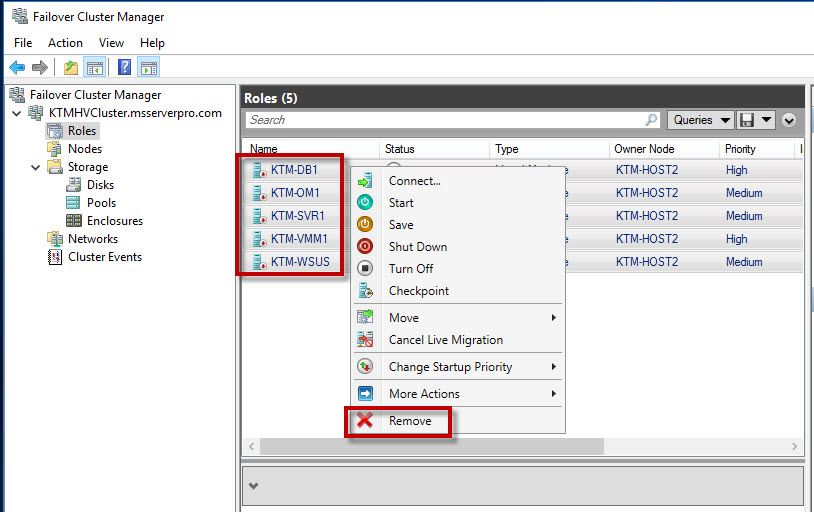
In Failover Cluster Manager, click Roles. In the Roles pane, right-click a single highly available virtual machine or select all highly available virtual machines and click Remove.
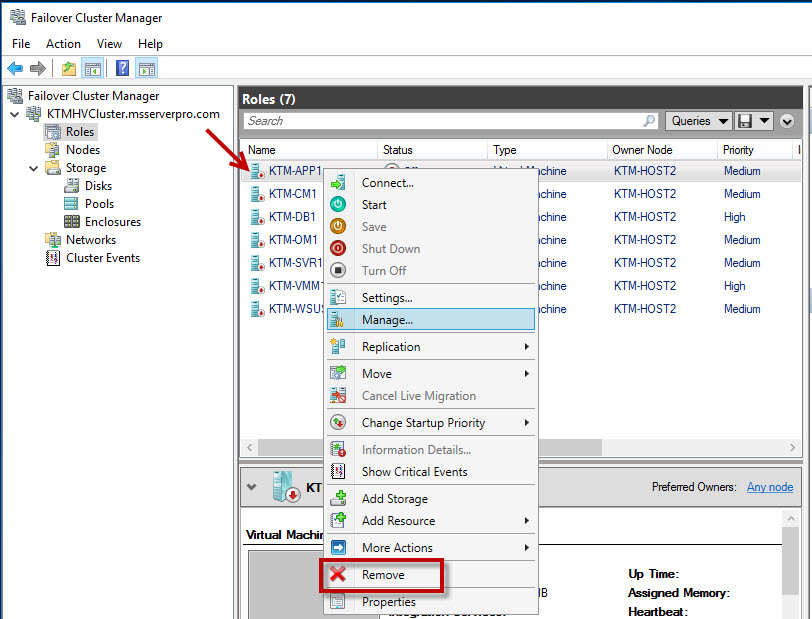
In Remove Virtual Machine windows, click Yes to removing highly available virtual machines from cluster.


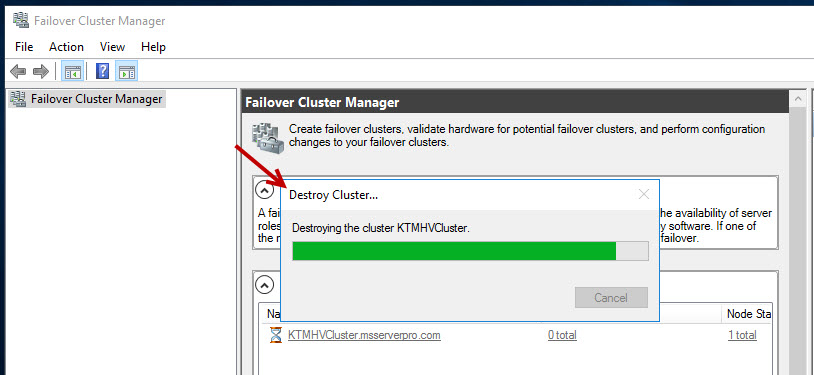
After removing all these virtual machines from cluster,now its ready to Destroy Cluster…. In the Failover Cluster Manager, Expand KTMHVCluster.msserverpro.com, select More Actions, and then click Destroy Cluster…
In the Destroy Cluster windows, click Yes to permanently destroy cluster… KTMHVCluster.

Verify that Destroy Cluster… KTMHVCluster… and no longer present KTMHVCluster.

Lastly, remove cluster computer name from Active Directory User and Computers.


Summary:
I hope this article, “Remove a Node from a Hyper-V 2016 Cluster and Destroy a Cluster Procedure” helps in modifying a Failover Cluster such as remove a Node from the cluster and Destroy a Cluster in Windows Server 2016 Hyper-V.
Estimated Reading Time: 3 minute(s)
Table of Contents
- Case
- Solution
Case #
You have a Windows Failover Cluster (WFC) comprising one or more nodes. The WFC cluster can be a physical cluster (for example a Hyper-V cluster) or a virtual (aka guest) cluster, for example a SQL Server virtual machine cluster. This article provides guidance on how to delete a Windows Failover Cluster via Powershell.
If you need to deploy a Hyper-V Windows Failover Cluster via Powershell, you should consult the following KB article: https://docs.cloudschool.tv/kb/how-to-deploy-a-hyper-v-cluster-with-powershell/.
For more details and design considerations about Windows Failover Clusters, you should review my book at https://docs.cloudschool.tv/windows-failover-clustering-design-handbook/.
Solution #
Carry out the following steps to delete a Windows Failover Cluster via Powershell.
- First off, review the current state of your WFC cluster by running the following cmdlets.
Get-Cluster
Get-ClusterNode
Get-ClusterResource
Get-ClusterLog
- Ensure that the cluster nodes do not service any application workloads or end user traffic.
- Gracefully stop all WFC roles, for example stop all SQL Server clustered instances running on a SQL Server guest cluster. Run the following cmdlets to accomplish this.
#Identify the resources or resource group which includes all resources related to the cluster roles you need to stop
Get-ClusterResource
Stop-ClusterGroup "Resource Name"
- At this point, you must uninstall and cleanup any software installed on the WFC nodes which is related to the clustered roles, for example SQL Server cluster node or Hyper-V. Unless you perform this task, you may have issues with your cluster nodes being left in an inconsistent state (for example Active Directory stale objects) and you may receive unexpected errors. An example of graceful removal of a SQL Server guest cluster node is shown below.


- After you have removed the underlying guest cluster services from each node, then run the Remove-ClusterNode cmdlet on that node: https://docs.microsoft.com/en-us/powershell/module/failoverclusters/remove-clusternode?view=windowsserver2022-ps. The Remove-ClusterNode cmdlet removes a node from a failover cluster. After the node is removed, the node no longer functions as part of the cluster unless the node is added back to the cluster. Removing a node is also called evicting a node from the cluster. Note: This cmdlet cannot be run remotely without Credential Security Service Provider (CredSSP) authentication on the server computer.
Remove-ClusterNode [Node name]
- Run the Clear-ClusterNode cmdlet: https://docs.microsoft.com/en-us/powershell/module/failoverclusters/clear-clusternode?view=windowsserver2022-ps. The Clear-ClusterNode cmdlet clears the cluster configuration from a node that was evicted from a failover cluster. This cmdlet helps ensure that the failover cluster configuration has been completely removed from a node that was evicted.
Clear-ClusterNode [Node name]
- Repeat the above three (3) steps for all remaining WFC nodes, except for the last cluster node. If you try to remove the last cluster node you will receive the following error. At this point you are ready to run the Remove-Cluster cmdlet as described below.

- After all above tasks have been completed for all WFC nodes except for the last node, run the Remove-Cluster cmdlet: https://docs.microsoft.com/en-us/powershell/module/failoverclusters/remove-cluster?view=windowsserver2022-ps.
Get-Cluster -Name [Cluster Name] | Remove-Cluster -CleanupAD
Finally validate there are no leftovers in file system, in registry and in cluster objects in the operating system of the cluster nodes. Double check the operating system event logs that there are no warnings or errors which may impact your server(s).

Problem
I need to remove one of the SQL Server cluster nodes from our failover cluster configuration. Can you please provide the step by step process to complete this?
Solution
A Windows failover cluster is a group of servers that work together to maintain high availability of applications. The basic unit of a cluster is a single computer, also called a “node”. Now suppose you have to remove a node from your failover cluster configuration, what are the steps?
To do this, we will run SQL Server setup on the node to be removed from the SQL Server failover cluster. We will choose the “Maintenance” tab in the left-hand pane to proceed with the removal of a node from a SQL Server failover cluster. Follow the steps below.
Removing a node from SQL Server failover cluster
Step 1: I have a two node cluster based on the Windows Server 2012 R2 operating systems where we have SQL Server 2014 installed. We will check both nodes in SQL Server using DMV sys.dm_os_cluster_nodes, so that post node removal we can validate the node was actually removed by comparing the original results with the final results of this query.

We can see both nodes in the above screenshot, so our task is to remove SQL-NODE2 from this failover cluster configuration. To do this copy or mount the SQL Server setup on the server where we will perform the SQL Server node removal. Go to the setup.exe file location, right click on setup.exe and choose “Run as administrator” as shown in the below screenshot.

Step 2: The SQL Server Installation Center window will appear on your screen to proceed with the node removal. Now click on the “Maintenance” option from left pane as highlighted in the figure below.

Step 3: Once you click on “Maintenance” from the left pane, multiple options will be displayed in the right pane for this tab. Click on “Remove node from a SQL Server failover cluster” link in the right pane. Setup will ask you to wait with the below window displayed.

Step 4: The Remove a Failover Cluster Node window will be displayed and it will check the Global Rules for this configuration as per the screenshot below. You can see all the mandatory rules have passed. Now click on the “Next” button to proceed.

Step 5: Once you click on the “Next” button, the “Remove Node Rules” step will be checked. All rules have passed, so we can proceed to the next as shown in the figure below. If any rule fails, it is recommended to fix those rules first then proceed with the node removal.

Step 6: As all rules in the above window have successfully passed, click on the “Next” button to proceed. The next window is the Cluster Node Configuration page. You do not need to do anything here. This window will automatically display the node configuration information like the SQL Server Instance name, SQL Server network name, node names, and features which have been installed for this cluster in the right pane. Just verify the information and then click on the “Next” button to proceed.

Step 7: The next window is the Cluster Network Configuration which will verify the network configuration of the failover cluster. The virtual IP address for SQL Server failover cluster will be listed in the “Address” column along with the subnet mask address and network name. You do not need to do anything here, just verify the details of this failover cluster and click the “Next” button.

Step 8: Once you click the “Next” button, a final window will appear to validate the steps that will be performed. Since we want to remove the node from the SQL Server failover cluster, click the “Remove” button as highlighted in the screenshot below.
Step 9: When you click the Remove button, the node removal process will start and it will show a screenshot as shown below.

Once the node has been successfully removed from the SQL Server failover cluster, you will get this window noting the successful removal of all components and features as shown below. Click on the “Close” button to close the setup windows.

Validate SQL Server Cluster Node Removal
We have successfully removed this node from this failover cluster. We will run the same command as in step 1, so we can determine if SQL-NODE2 node has been removed from this SQL Server failover cluster.

Above you can see there is only one node in the failover cluster which is SQL-NODE1. So we have validated that SQL-NODE2 node has been removed from this SQL Server failover cluster.
Next Steps
- Explore more knowledge on SQL Server Database Administration Tips
- Check out the remainder of the SQL Server Clustering Tips
We have done this a few times in different ways with slightly different success rates. We were tasked with removing three old nodes from a 6 node cluster recently, so I revisited best practices.
What did I find? Nada. Isn’t it wonderful when Microsoft and Google both simultaneously let you down? In fairness there are a few decent videos regarding Hyper-V failover clusters but almost all documentation deals with adding or creating. We needed to remove or delete.
Robert McMillen’s Youtube channel came the closest
Oreilly Learning is another decent resource
PluralSight also has several courses on Hyper-V
The core issue is that we couldn’t find decent documentation of what exactly each cluster action actually does. Failover clusters also support multiple environments. We were interested in Hyper-V but the majority of failover clustering seems to be SQL Server.
One piece of documentation that I could find from Microsoft is specific to Powershell and provides almost no information on how the actual command works.
https://docs.microsoft.com/en-us/powershell/module/failoverclusters/remove-clusternode?view=win10-ps
The main hyper-v clustering page seems to be this one.
https://docs.microsoft.com/en-us/windows-server/failover-clustering/failover-clustering-overview
Once again, the only mention to a cluster node being removed was specific to VMWare which I find very amusing.
The two posts that we tried to work off of are:
So, armed with almost nothing, we ventured off.
There are a couple of concerns. One, we need to migrate the VMs to other nodes. We also have storage disks that have the nodes that we want to delete as owner. We first attempted to migrate our VMs manually using live migration but a couple of them appeared to fall back to the same node. If this happens to you, the node is likely failing migration but the errors aren’t obvious. Check the Cluster Events in the Failover Cluster Manager. It also wasn’t clear how to change ownership of the disks. We saw a move option on some of our disks but not all of our disks showed this option. This alludes to another issue that we will cover later. As a note, all of our disks are cluster shared volumes which are commonly referred to as CSVs.
Our process.
- Go to the Node tree, right click on the node that we wished to remove. Select Pause and Drain Roles. If this fails, you will want to resume the node as it stays paused even if it fails.
- From more actions select stop cluster service
- From more actions select evict.
The documentation that we could find seems to suggest that there is more than one way to do this. It sounds like you could simply stop the cluster service and it would drain roles. We were uncomfortable with taking a chance so we followed the steps above.
Regarding draining roles. This will not only live migrate your VMs to another node, but it will also change ownership of your CSVs.
Some failures.
- Failed migrations usually point to local media. For example, a mounted dvd or a drive that is local to the host. Correct the issue and try again.
- We had one issue with a VM with a gen2 bios that had secureboot enabled. This prevented the VM from migrating. We used the powershell command set-vmfirmware to disable secureboot which allowed the VM to migrate. Note, the VM must be shutdown to run this command.
- We had an issue with one of our CSVs. This wasn’t immediately evident through the logs which by the way are almost worthless. Thank you Microsoft. The issue and solution was that one of our CSVs was only available to one of our nodes. We added the missing volume using the Nimble Connection Manager to one of the nodes which we were keeping which resolved this issue. This was even a little more involved since we didn’t provide connection access to this volume on all of our servers. Just a note that you may need to make a change at the SAN level.
The last thing we did to cleanup the servers after they had been removed from the cluster was remove the connections to the SAN. This process will be different depending on your SAN.
That’s it. I hope this helps someone else.