
Environment variables are special settings that store information about the system and the programs installed on it. They can be used to customize the behavior of applications, scripts, and commands. But can environment variables be deleted? The answer is yes, and that’s a good thing, as sometimes, you may need to modify or remove an environment variable. For example, to change a configuration option or to fix a problem. In this article, I’ll show you how to edit or delete environment variables, as well as how to unset environment variables in Windows using different methods and tools, including Command Prompt and PowerShell.
NOTE: The instructions in this guide apply to both Windows 11 and Windows 10, as everything related to handling environment variables is the same in both operating systems.
Open the Environment Variables window
To make many of the edits shown in this article, you first need to open the Environment Variables window. This guide explains how to do that and shows you the basics about working with environment variables: What are environment variables in Windows?.
The Environment Variables window in Windows
If you want to skip reading it, one path that works the same in Windows 11 and Windows 10 is to open the Run window (Win + R) and execute the command:
rundll32.exe sysdm.cpl,EditEnvironmentVariables
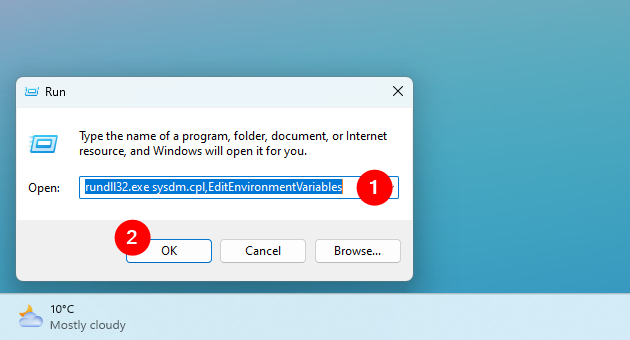
How to open the Environment Variables in Windows
TIP: You can run the command in Command Prompt, PowerShell, or Windows Terminal to the same end, too.
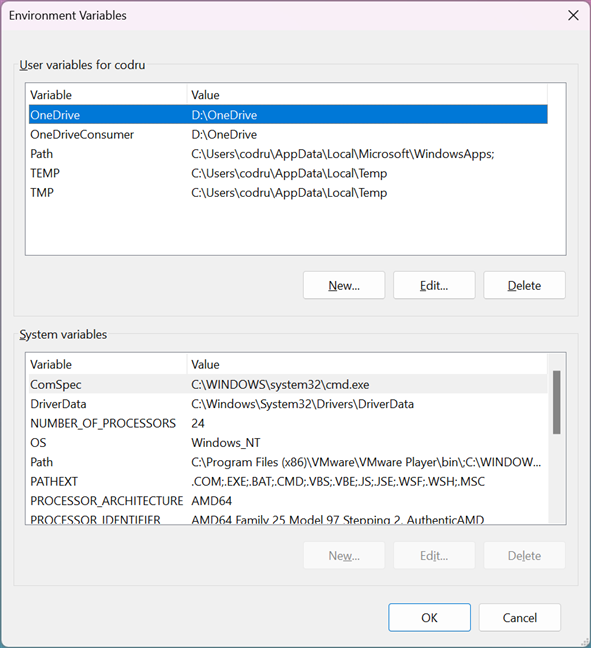
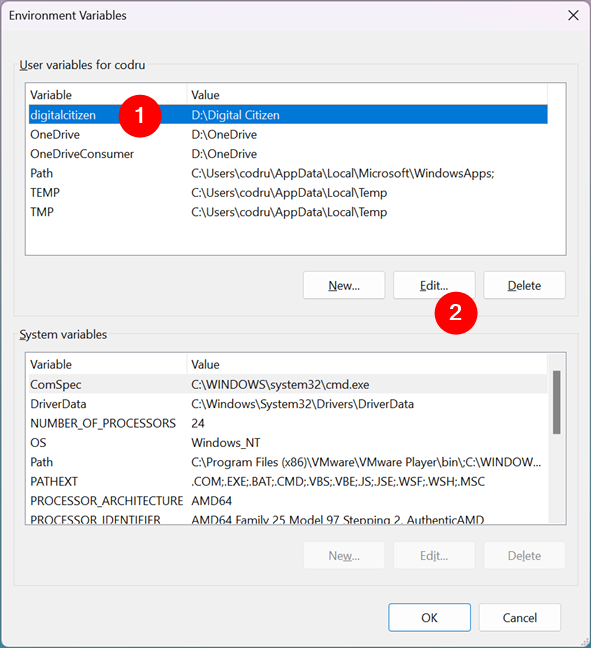
How to edit an environment variable in Windows
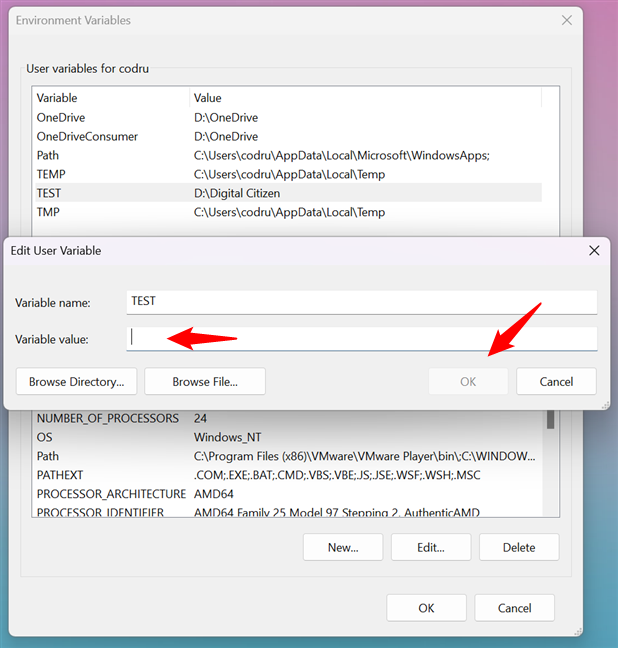
If you want to change the value of an existing environment variable, first select it in the Environment Variables window. Then, click or tap Edit.
How to edit an environment variable in Windows
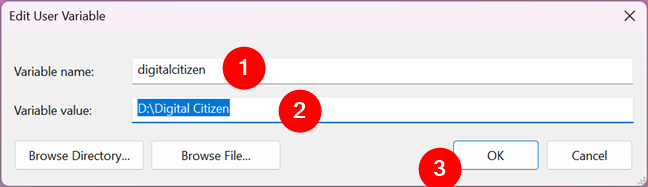
You are shown a window where you can edit both the name and the value of the variable. Make the modifications you want and press OK. Then, press OK one more time in the Environment Variables window.
Editing an environment variable
How to edit an environment variable from Command Prompt
You can create a new environment variable or edit the value of an existing environment variable (but not its name) from the Command Prompt too. If you want to create a user environment variable, enter this command:
setx variable_name “value”
If you want to create a system environment variable, add the m argument to the command like this:
setx variable_name “value” /m
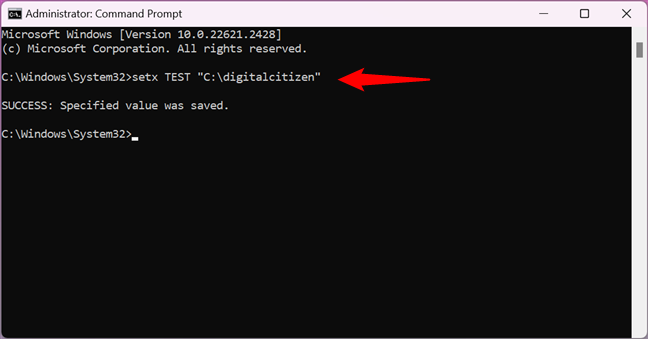
For example, I wanted to create a user variable named TEST with the value C:\digitalcitizen. To that end, I had to run this command:
setx TEST “C:\digitalcitizen”
How to set an environment variable using Command Prompt
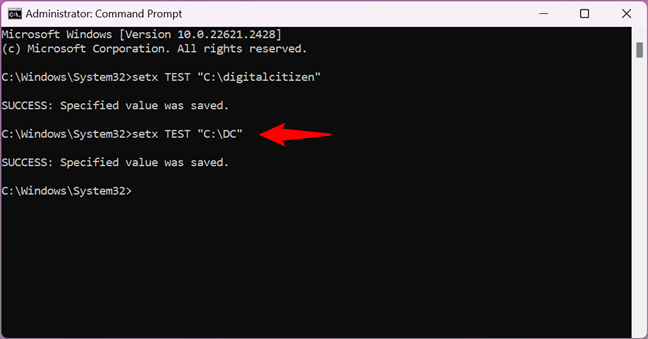
To change the value of an environment variable, run the same setx command but specify a new value for the variable. For instance, to change the value of my TEST environment variable to C:\DC, I have to execute this command:
setx TEST “C:\DC”
How to change the value of an environment variable in Command Prompt
That works because the setx command rewrites the existing value with the last one you type. Therefore, if you use this command multiple times on the same variable, the variable will keep the last value you typed.
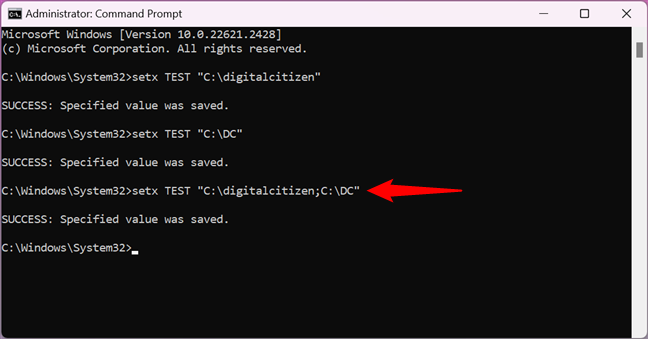
If you want a variable to have multiple paths in its value, you must specify them all in a single setx command, like in the next screenshot. Make sure that each value you enter is separated from the previous one by a semicolon, without spaces.
Add multiple values to an environment variable using CMD
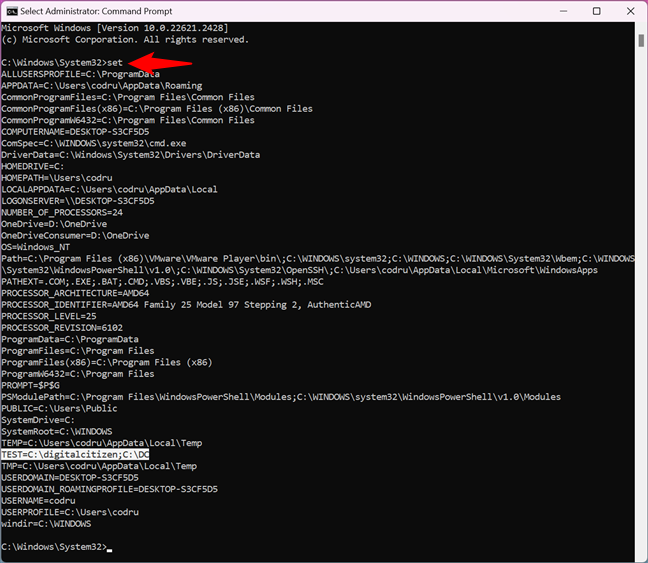
TIP: You can get a list of all the environment variables available by running the command:
set
Note that the command is set, not setx, and there aren’t any parameters added to it. Moreover, if you just created or edited an environment variable, you must close and reopen Command Prompt for the changes to show up.
How to see all the environment variables in Command Prompt
How to edit an environment variable from PowerShell
You can also create or edit the value of an existing environment variable from PowerShell. If you want to create a user environment variable, the PowerShell command is:
[Environment]::SetEnvironmentVariable(«variable_name»,»variable_value»,»User»)
If you want to create a system environment variable, the command is this one:
[Environment]::SetEnvironmentVariable(«variable_name»,»variable_value»,»Machine»)
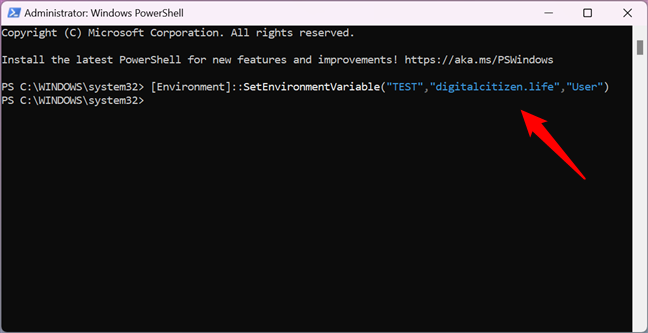
For instance, in order to create a user environment variable called TEST with the value digitalcitizen.life, I ran the command:
[Environment]::SetEnvironmentVariable(«TEST»,»digitalcitizen.life»,»User»)
To change the value of the variable later, you can run the same command using a different value. Just like setx in Command Prompt, this command rewrites the value of the specified variable each time you run it.
How to set an environment variable with PowerShell
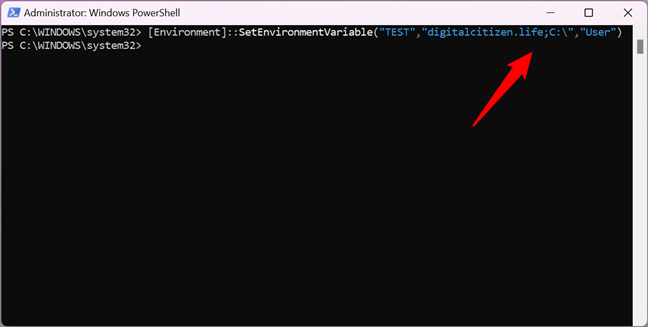
If you want to assign multiple values to a variable, type all of them in the command, with semicolons between each value, as illustrated below.
How to add multiple values to an environment variable in PowerShell
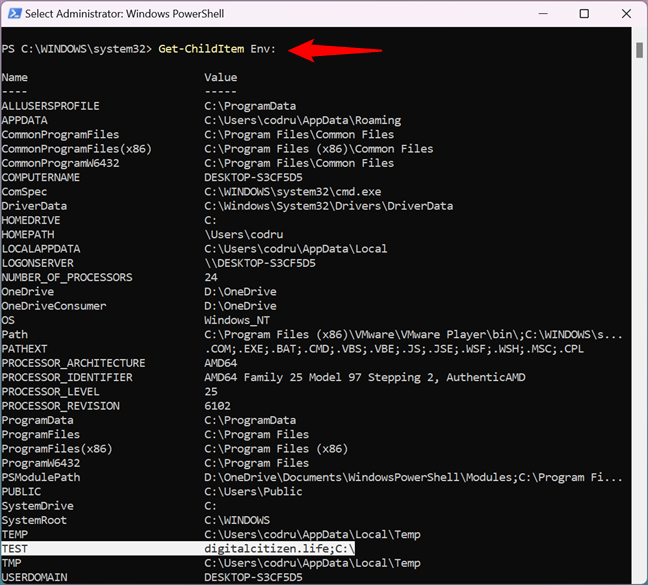
TIP: In PowerShell, you can get a list of all the environment variables by running the command:
Get-ChildItem Env:
However, if you just created or edited an environment variable, you must close and reopen PowerShell for the changes to show up.
How to see all the environment variables in PowerShell
How to clear the value of an environment variable in Windows (from Command Prompt)
If you want to remove the value of an environment variable (while keeping its name), you can’t do it with the mouse and keyboard from the Environment Variables window. If you select a variable and press Edit, you can delete the value, but you cannot press OK, as this button gets grayed out. Therefore, you can’t save your changes.
Attempt to clear an environment variable in Windows
However, you can clear the value of an environment variable using Command Prompt. To unset an environment variable from Command Prompt, type the command:
setx variable_name “”
For example, because I wanted to unset my TEST variable and give it an empty value, I ran this command:
setx TEST “”
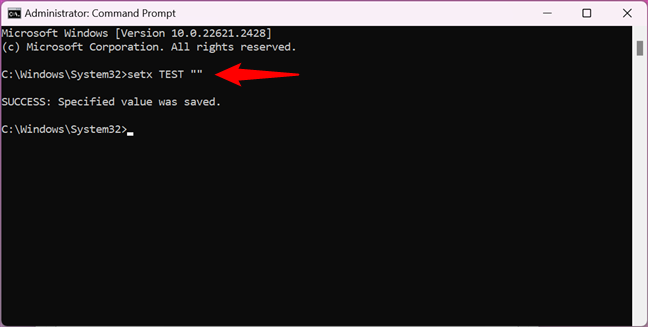
How to clear an environment variable with Command Prompt
Next, let’s see how to remove an environment variable.
How to delete an environment variable in Windows
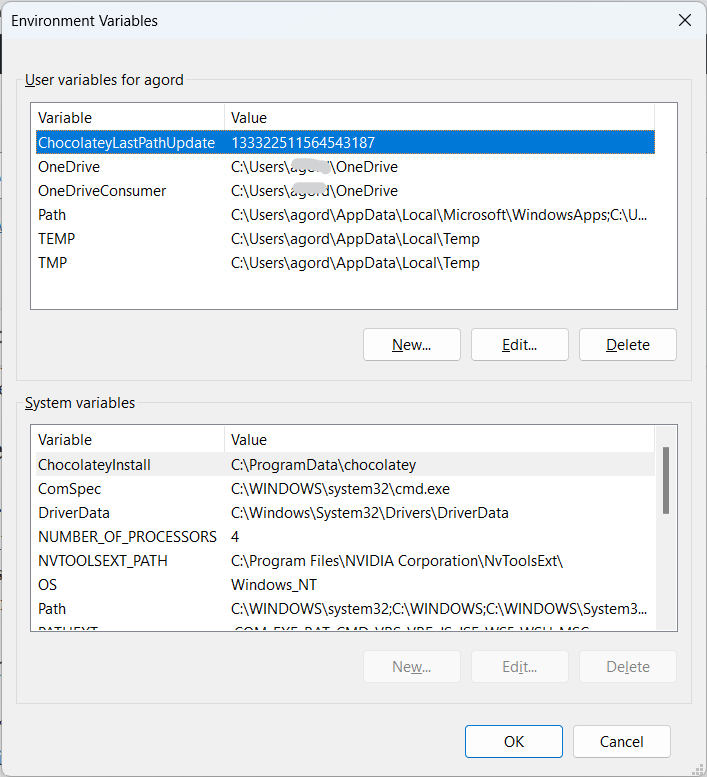
If you no longer want to use a particular environment variable, select it in the Environment Variables window. Then, press Delete. Windows does not ask for any confirmation of this action.
How to delete an environment variable in Windows
Therefore, if you’ve changed your mind, you must press Cancel to NOT apply the removal. If you want to proceed with the deletion, press OK.
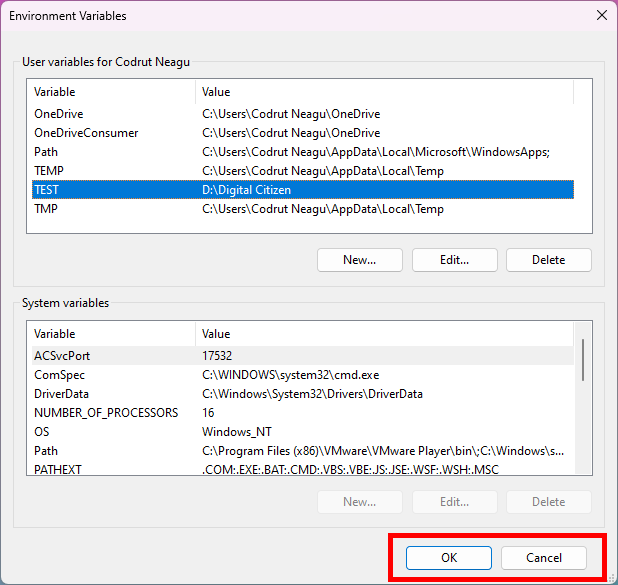
Press OK to delete the variable, or Cancel to keep it
How to use Command Prompt (CMD) to delete an environment variable
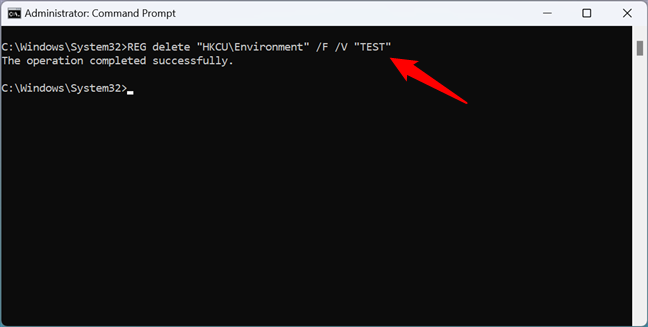
To delete an environment variable from Command Prompt, run this command:
REG delete “HKCU\Environment” /F /V “variable_name”
… if it’s a user environment variable, or run this command if it’s a system environment variable:
REG delete “HKLM\SYSTEM\CurrentControlSet\Control\Session Manager\Environment” /F /V “variable_name”
For example, to remove my TEST environment variable from my user’s profile, I ran:
REG delete “HKCU\Environment” /F /V “TEST”
How to unset an environment variable in Windows using Command Prompt
How to use PowerShell to delete an environment variable
To unset and remove an environment variable with PowerShell, type the command:
[Environment]::SetEnvironmentVariable(«variable_name», $null, «User»)
…if it’s a user profile variable, or run this command if it’s a system-wide variable:
[Environment]::SetEnvironmentVariable(«variable_name», $null, «Machine»)
For example, to have PowerShell remove my TEST environment variable from my user profile, I had to run this command:
[Environment]::SetEnvironmentVariable(«TEST», $null, «User»)
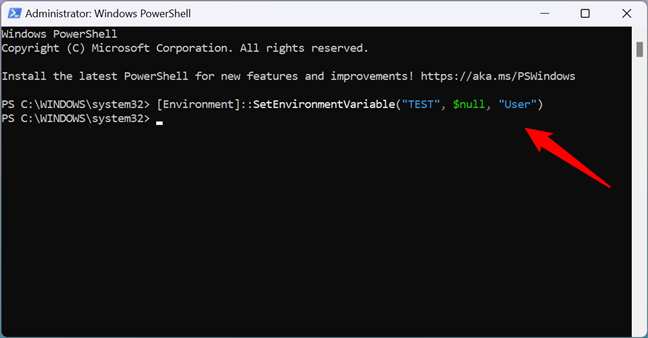
How to delete an environment variable from PowerShell
That’s it!
Why did you need to edit or delete environment variables in Windows?
You now know that Windows can unset environment variables. You’ve seen how to use PowerShell to delete environment variable values and how to use PowerShell to remove environment variables completely. Moreover, you also know how to use CMD to delete any environment variable. But why did you want to change or edit environment variables? Was it because there were leftover variables on your system from certain apps that you no longer used? Or was it because you have a special setup and you need to work with environment variables? Let me know in the comments section below.
This article explains how to delete or remove environment variables in Windows 11.
Environment variables in Windows are a set of dynamic values that can affect how running processes behave on a computer.
They store configuration data and system state information that can be accessed by different software applications and services running on a Windows system.
You may need to remove environment variables in Windows 11 if you have created variables that are no longer required or are causing conflicts with other programs.
Sometimes, applications or software installations create environment variables that are no longer needed after the program is uninstalled or removed. Removing the unused environment variables can help improve system performance and stability.
Accessing Environment Variables
To begin, you need to access the environment variables window. To do that, follow the steps below.
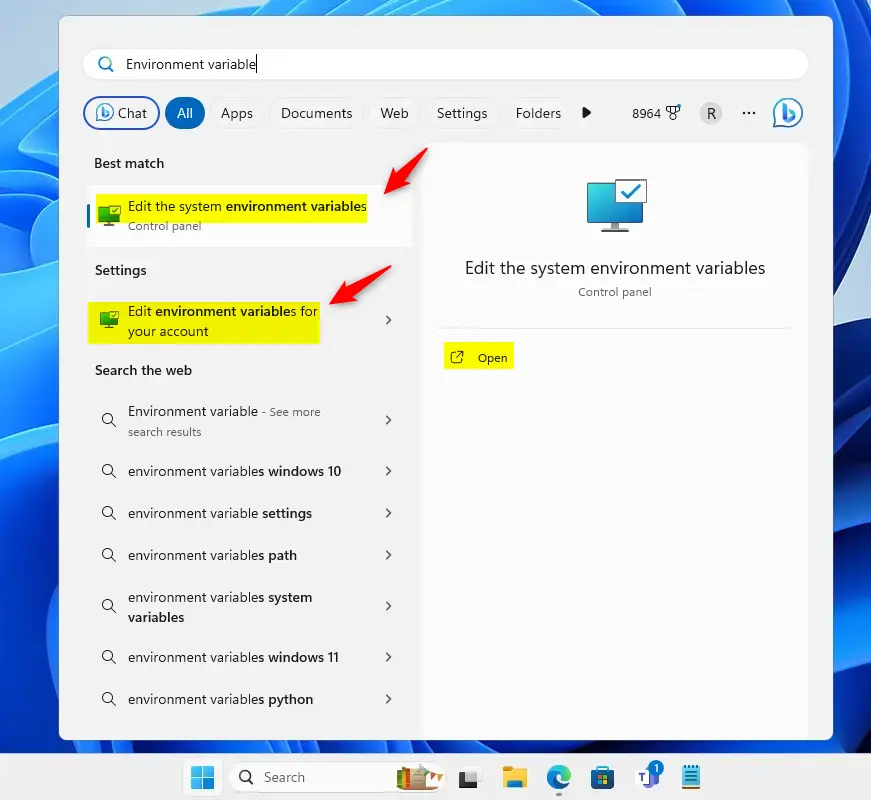
First, click on the Start button or press the Windows key on your keyboard to open the Start menu.
Then, type Environment Variables in the search box.
Click on the result that says Edit the system environment variables or Edit environment variables for your account.
Alternatively, you can access the System Properties window directly:
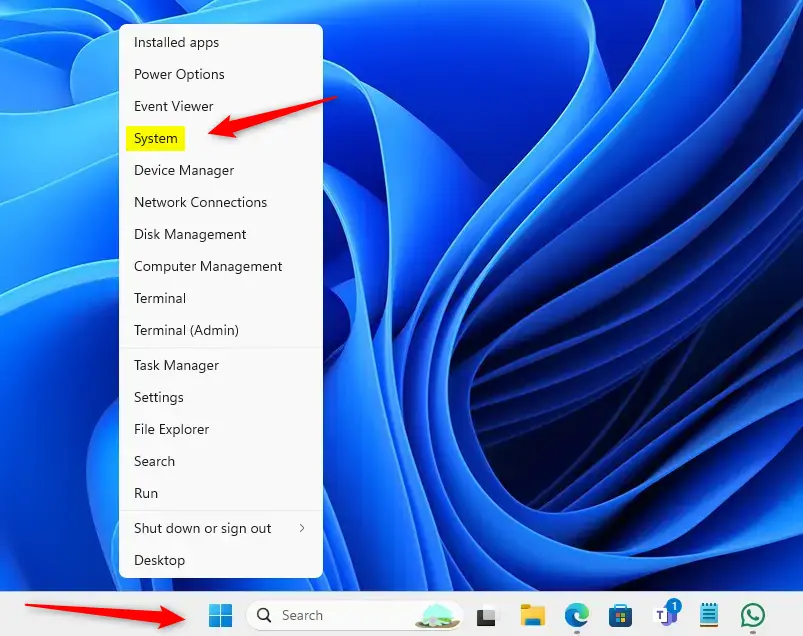
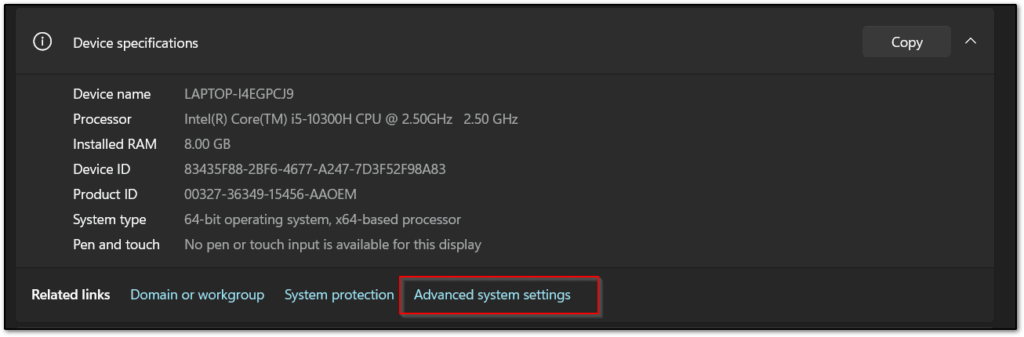
Right-click on the Start button to launch the Power User menu.
Select System.
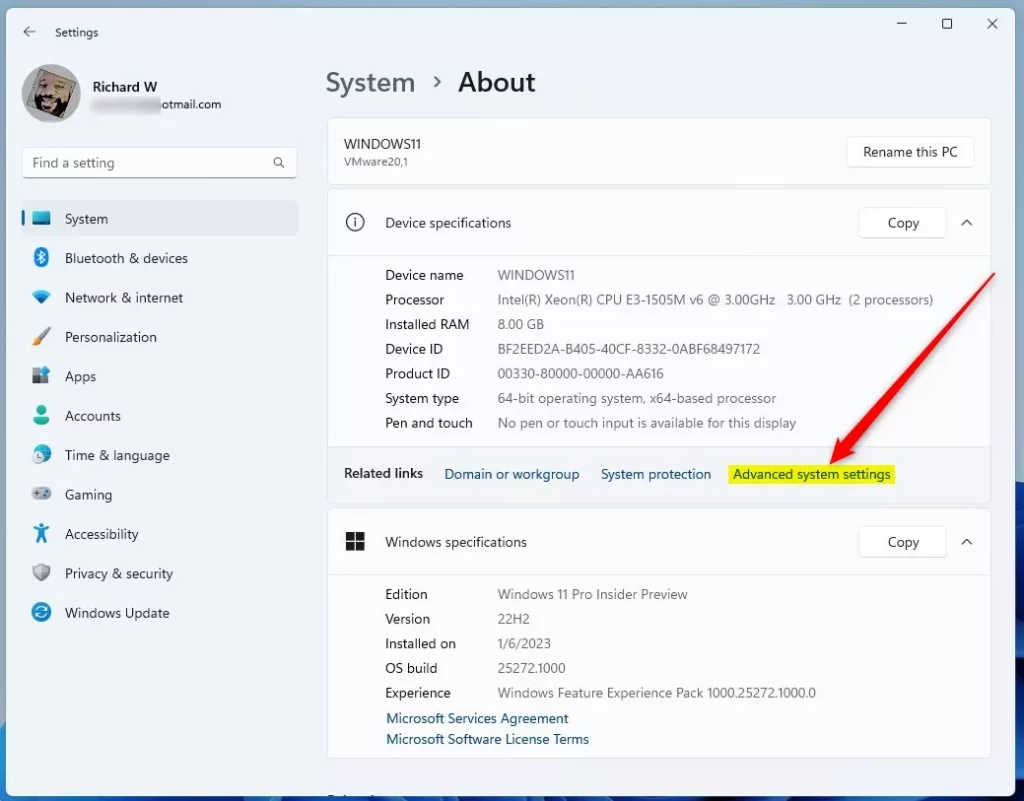
Scroll down and click on About. Under Related settings, click on Advanced system settings.
In the System Properties window that opens, go to the Advanced tab.
Click on the Environment Variables... button towards the bottom.
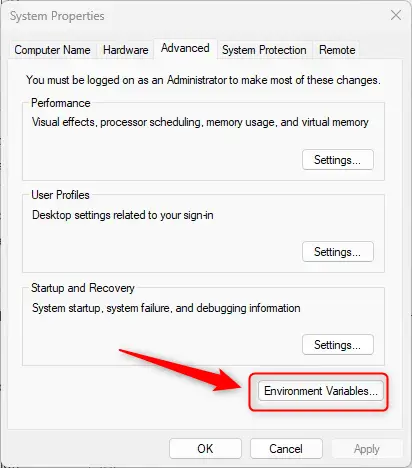
Now, you should be in the Environment Variables window.
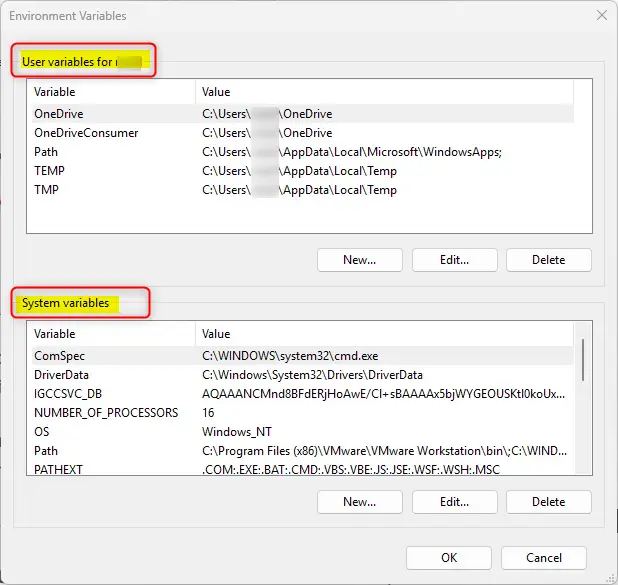
Deleting User Environment Variables
To delete an environment variable that is only set for your user account:
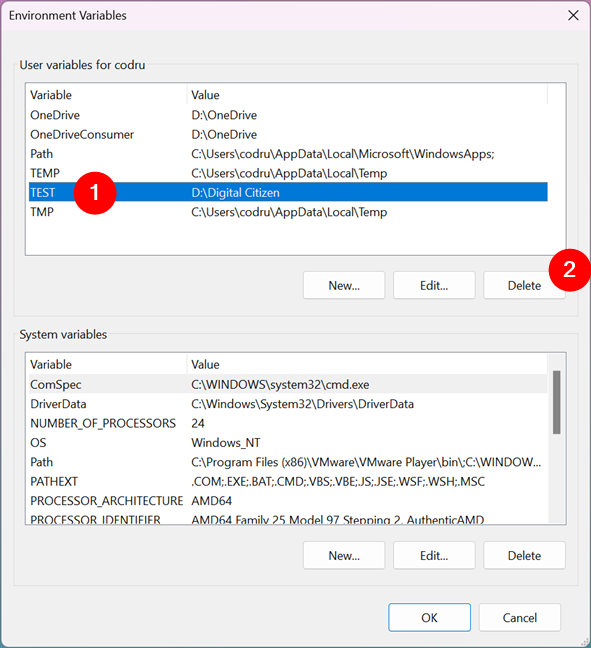
Under the User variables for [YourUsername] section, scroll through the list to find the variable you want to delete.
Click on the variable to select it. Click the Delete button below the list.
Deleting System Environment Variables
Deleting a system variable requires administrative access. Proceed with caution, as this affects all users on the system.
Under the System variables section, scroll through the list to find the variable you want to delete.
Select the variable by clicking on it. Click the Delete button below the list.
Note: You should only delete environment variables you have created or are certain are no longer required by any applications on your system. Deleting certain system environment variables can cause system instability.
After you have deleted the environment variable, click OK on the Environment Variables window to close it.
Deleting a User Environment Variables using PowerShell
You can delete environment variables using the Windows PowerShell app. Here’s how to do that.
First, open the Windows Terminal app. Then select the PowerShell tab if it isn’t opened.
Then, run the command format below to remove a user variable.
[Environment]::SetEnvironmentVariable("variable name",$null,"User")
Replace the variable name with the actual variable name you want to remove.
Example:
[Environment]::SetEnvironmentVariable("Downloads",$null,"User")
Deleting a System Environment Variables using PowerShell
To delete a system environment variable, use the steps below.
First, open the Windows Terminal app as administrator.
Then, run the command format below.
[Environment]::SetEnvironmentVariable("variable name",$null,"Machine")
Replace the variable name with the actual variable name you want to remove.
Example:
[Environment]::SetEnvironmentVariable("Downloads",$null,"Machine")
Removing User Environment Variables using Windows Registry
Another way to delete or remove User Environment Variables is to use the Windows Registry Editor.
Use the steps below to do that.
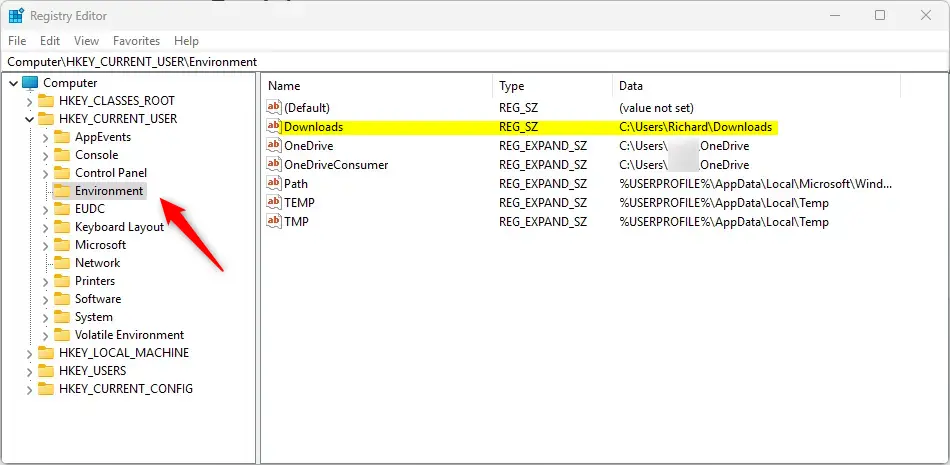
First, open the Windows Registry Editor.
Then, navigate to the key folder path below.
Computer\HKEY_CURRENT_USER\Environment
Select the variable on the list, right-click it, and delete it.
Remove System Environment Variable using Windows Registry
The system-wide Environment variables are stored in the key below.
Computer\HKEY_LOCAL_MACHINE\SYSTEM\CurrentControlSet\Control\Session Manager\Environment
Select the variable name, right-click it, and delete it

Confirming Deletion
To confirm that an environment variable has been deleted:
- Open the Command Prompt by typing
cmdin the Start menu search and click on Command Prompt. - At the command prompt, type
echo %VARIABLE_NAME%(replaceVARIABLE_NAMEwith the name of the variable you deleted). - The result should be
%VARIABLE_NAME%a blank line if the variable was successfully deleted.
Alright, you’ve successfully deleted an environment variable in Windows 11. Remember that any open applications using the variable must be restarted to reflect the change.
Conclusion:
- Deleting environment variables in Windows 11 can help improve system performance and stability by removing unused or conflicting variables.
- It’s important to proceed with caution when deleting system environment variables as it can affect all users on the system and cause system instability.
- Users may also use PowerShell or the Windows Registry Editor to delete environment variables, providing alternative methods for managing system configuration.
- After successfully deleting an environment variable, it’s essential to restart any open applications that were using the variable to reflect the change.
- This article provides comprehensive guidance on deleting environment variables in Windows 11, offering users the knowledge and tools to manage their system configuration effectively.
In this article, we are going to see how to set, edit and delete environment variables in Windows 11 operating system along with step by step guide with the help of appropriate screenshots. Different-2 programs require different environment variable settings to be executed.
The environment is mainly used to store the information about the system environment running in the current machine.
Basically, The meaning of setting the environment variable is creating a shortcut to start a program instead of remembering the location of the program. By creating the environment you can start the program just by typing a single keyword.
That’s why it is one of the most important for windows users to know how to set environment variables in windows 11.
Headings of Contents
- 1 What is Environment Variable in Windows?
- 2 Why You Need to Environment Variable
- 3 How to Set Environment Variables in Windows 11?
- 4 How to Change the Environment Variable in Windows 11
- 5 How to Delete Environment Variable in windows 11
- 6 How to Set Environment Variable using Command Prompt
- 7 Changing environment variable using command prompt
- 8 Access Environment Variable using Command Prompt
- 9 Setting Environment Variable using Windows Powershell
- 10 How to Access Environment Variable using Powershell
- 11 Changing Environment Variable using Windows PowerShell
- 12 Deleting Environment Variable using Windows Powershell
- 13 Conclusion
What is Environment Variable in Windows?
The environment variable is the process of setting the dynamic variable value in the machine. In other words, the Environment variable is the way to store the global variable value that is used by all the processes and users that are running under the machine. Environment variables represent the new software installation directory location, Windows Operating system file location, etc. The value of the environment variable is used by the programs to determine where the files are stored actually.
These are some common environment variables available in the windows operating system.
- Path:- Path is one of the most popular environment variables in the windows operating system that is used to store the list of directories to search for executable programs and also it is one of the most frequently used environment variables.
- Username:- This is for the username of the system.
- OS:- The operating system name.
There are other environment variables available except all of the above.
Why You Need to Environment Variable
Windows Environment variables are used to store the data that are used by windows and other programs. For example, windir environment variable stores the location of the Windows installation directory. Programs can query the value of this variable to find where the files of the Windows operating system are located.
There are two types of environment variables available in windows machines first are system variables and the second is user variables that are logged in. Logged-in users can only change their own environment variable if they don’t have administration permission even another user can not change the environment variable.
Let’s take another example about environment variable so that you can get more clarity, Suppose you are going to install Python on your machine and then during the installation of the Python it will ask you, to add a python executable file to your environment variable if you do not check that setting and continue the installation. After successfully the installation of Python you are ready to execute any Python script but you have to remember one thing each time you have to specify the location of the Python executable to execute the Python script but if you check that setting during the installation then you don’t need to specify the location of the Python executable each time.
But after the installation of Python or any software you can manually set the environment variable.
Let’s see how can you set a new environment variable in your windows 11 machine.
Note:- All the variable names which I will set, edit and delete throughout this article will just be for testing. You can set your own required environment variable.
How to Set Environment Variables in Windows 11?
With the help of the following points you can set your environment variable in your windows machine.Here I will go with windows 11 machine.
- To set the environment variable in Windows you have to right-click on
This PCicon and again click onProperties.
- Now you have to click on “Advanced system settings“.
- Click on “Environment Variables“.
- After clicking on Environment variables, you can see all your system environment variables ( User and System ) very clearly.
- User Variables:- User variable will contain environment variables about the current logged-in user, If you want to change the environment variable of the logged-in user then you have to change it inside this variables section.
- System Variables:- System variable contains variables and values system-wide.This variable will be available for all the users across the machine which means it is a system-wide change.
You can choose according to your need. Here I am going with User variables.
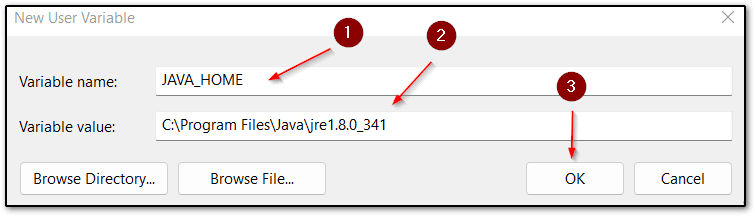
- After deciding your appropriate environment variables section, click on New.
- Now, It will ask you to provide the variable name and value of the variable. Here I am setting the Java executable environment variable and after that click OK until all the open environment variables windows are gone.
So finally we have seen the whole process to set new environment variables in the windows 11 machine.
How to Change the Environment Variable in Windows 11
Here I’m gonna show you, how you can change or edit the environment variable.
- To change the environment variable, press “Windows + R” and type “sysdm.cpl” and hit enter.
- Go to Advanced > Environment variables section
- Select the environment variable which you want to change and click edit
- Provide variable name and variable value as your wish and then click Ok
How to Delete Environment Variable in windows 11
Sometimes you require to delete existing environment variables. With the help of these steps, you can delete any existing environment variables.
- To delete the environment variable, press “Windows + R” and type “sysdm.cpl” and hit enter.
- Go to Advanced > Environment variables section.
- Select the environment variable which you want to delete and click delete.
- After clicking on delete, your environment variables will be deleted successfully.
How to Set Environment Variable using Command Prompt
Windows command prompt also provides us with some useful commands to work with windows environment variables. here I am going to show how to set environment variables using a command prompt.
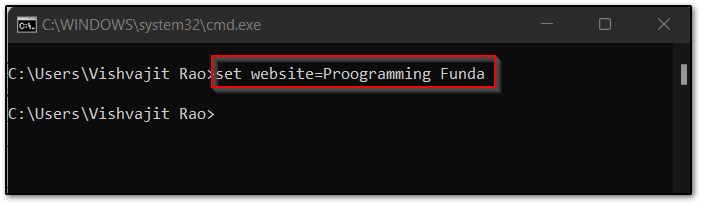
- First, you need to open your command prompt, To open the command prompt press “Windows + R” and type “cmd“, and hit enter.
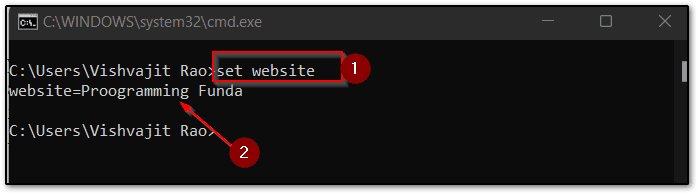
- Windows provide a useful command “set” to set the environment variable. The syntax for setting the new environment variable is that
set variable_name=variable_value. Here I am going to set an environment variable website=Proogramming Funda so my whole command would beset website=Proogramming Funda.
To verify whether the environment variable was created or not, you can execute the set command. This command shows all the environment variables with values.
Changing environment variable using command prompt
To change the existing environment variable, you have re-assign the value of the existing environment variable by using the following command.
set variable_name=variable_valueNote:- Make sure you are not going to change the variable name.
Access Environment Variable using Command Prompt
To access the existing environment variable in the windows machine, Open the command prompt and issue the set variable_name statement.
Here variable_name represents the name of the variable which you want to access.
As you can see from below the screenshot, I am accessing the website environment variable.
Setting Environment Variable using Windows Powershell
Here I’m gonna show you can set, edit and delete the environment variable using Windows PowerShell.
- To open Powershell, Press “Windows + R” type “PowerShell” and hit enter.
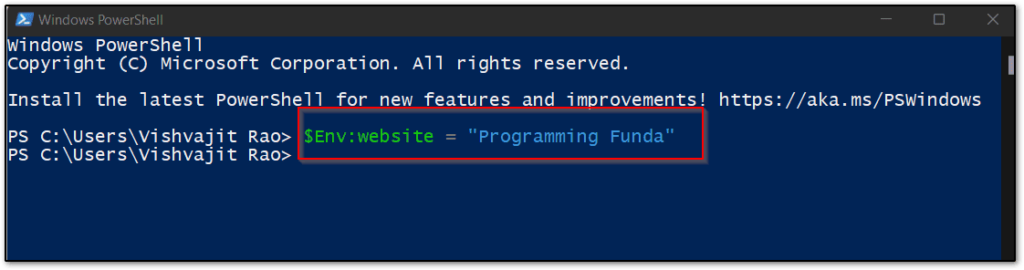
- The following is the syntax of the setting new environment variable in windows with help of the windows PowerShell.
$Env:<variable-name> = valueIn the above syntax, variable-name represents the name of the variable which you want to keep, and the value represents the value of a variable.
So here I am going to set a variable name website along with the value “Programming Funda“.
How to Access Environment Variable using Powershell
- To access the existing environment variable using Windows Powershell, Search “Powershell” in the search bar and open windows power shell.
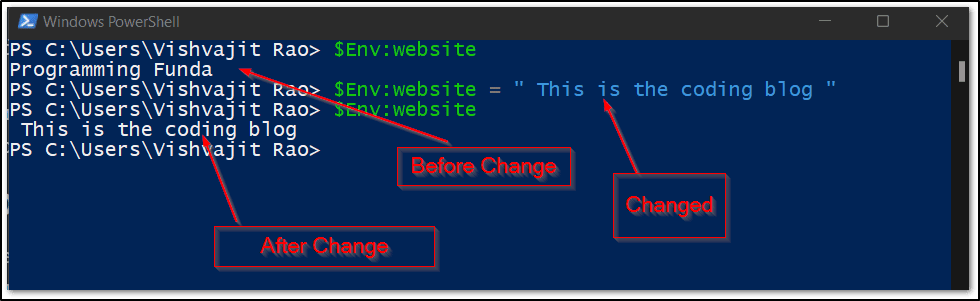
- The syntax for accessing the environment variable is “$Env:variable_name“. Here I am going to see the value of an environment variable named website.
Changing Environment Variable using Windows PowerShell
If you want to change the value of the existing environment variable using windows PowerShell, Then you have to re-assign the value of the environment variable. As you can see below the image.
Deleting Environment Variable using Windows Powershell
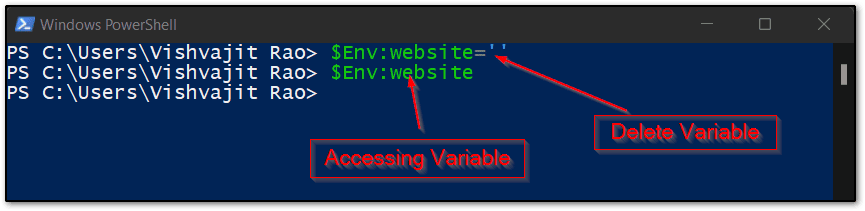
To delete the environment variable in a windows machine using PowerShell you have to assign the blank string to that variable. As you can see below screenshot.
Conclusion
So in this article, we have seen all about how to set, edit, and delete environment variables in windows 11. Here I have more than one method to set, delete and edit windows environment variables as per your choice.
Environment variables is basically a process of storing variables and their values globally in the system so that programs, processes, and users determine where the configuration files, installation directory, drivers, and executable
are stored.
I hope this article is very useful for you. If you like this article please share and keep visiting for further interesting tutorials.
Ref:- Click Here
Thanks for your valuable time …

This tutorial will show you how to delete user and system environment variables in Windows 10 and Windows 11.
Environment variables are a set of dynamic named values that can affect the way running processes will behave on a computer. The variables can be used both in scripts and on the command line. Environment variables makes it easy when certain standard directories and parameters need to be referenced but where the actual locations or names can vary from computer to computer.
The variable (ex: «%UserProfile%» for command and «$Env:UserProfile» for PowerShell) is used as a type of shortcut of the value (ex: «C:\Users\<username>»).
There are two types of environment variables: user environment variables (set only for current user) and system (machine) environment variables (set for all users).
Contents
- Option One: Delete User Environment Variables in Environment Variables
- Option Two: Delete User Environment Variables in PowerShell
- Option Three: Delete User Environment Variables in Registry Editor
- Option Four: Delete System Environment Variables in Environment Variables
- Option Five: Delete System Environment Variables in PowerShell
- Option Six: Delete System Environment Variables in Registry Editor
Option One
Delete User Environment Variables in Environment Variables
1 Open the Control Panel (icons view), and click/tap on the User Accounts icon.
2 Click/tap on the Change my environment variables link on the left side, and close the User Accounts control panel window if you like. (see screenshot below)
This opens rundll32.exe sysdm.cpl,EditEnvironmentVariables.

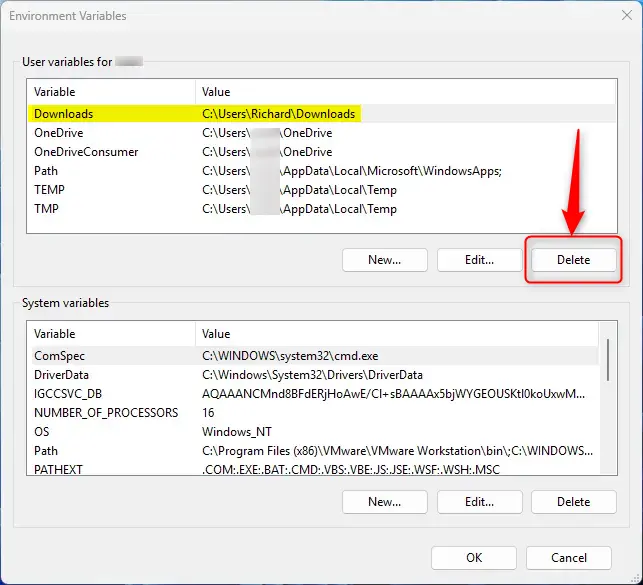
3 Under the top User variables for <current user name> section, select the variable (ex: «Downloads») you want to remove, and click/tap on Delete. (see screenshot below)

4 When finished deleting user variables for your account, click/tap on OK to apply. (see screenshot below)
Option Two
Delete User Environment Variables in PowerShell
1 Open Windows Terminal, and select Windows PowerShell.
2 Type the command below into Windows Terminal, and press Enter. (see screenshot below)
[Environment]::SetEnvironmentVariable("[variable name]",$null,"User")
Substitute [variable name] in the command above with the actual variable name (ex: «Downloads») you want to delete.
For example: [Environment]::SetEnvironmentVariable("Downloads",$null,"User")
3 You can now close Windows Terminal if you like.

Option Three
Delete User Environment Variables in Registry Editor
1 Open Registry Editor (regedit.exe).
2 Navigate to the key below in the left pane of Registry Editor. (see screenshot below step 3)
HKEY_CURRENT_USER\Environment
3 In the right pane of the Environment key in Registry Editor, right click or press and hold on the value name (ex: «Downloads») of the variable you want to delete for your account, and click/tap on Delete. (see screenshot below)

4 Click/tap on Yes to confirm. (see screenshot below)

5 When finished deleting user variables for your account, you can close Registry Editor if you like.
Option Four
Delete System Environment Variables in Environment Variables
You must be signed in as an administrator to use this option
1 Open Advanced System Properties (SystemPropertiesAdvanced.exe).
2 Click/tap on the Environment Variables button. (see screenshot below)

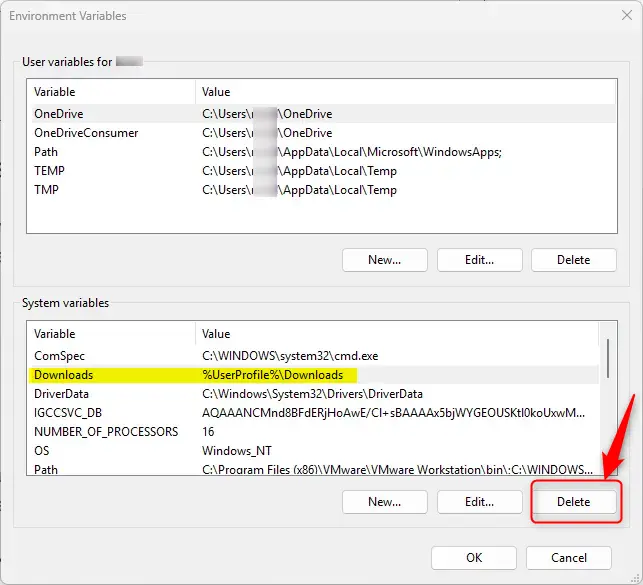
3 Under the bottom System variables section, select the variable (ex: «Downloads») you want to remove, and click/tap on Delete. (see screenshot below)
4 When finished deleting user variables for your account, click/tap on OK to apply. (see screenshot below)
5 Click/tap on OK. (see screenshot below)
Option Five
Delete System Environment Variables in PowerShell
You must be signed in as an administrator to use this option
1 Open Windows Terminal (Admin), and select Windows PowerShell.
2 Type the command below into Windows Terminal (Admin), and press Enter. (see screenshot below)
[Environment]::SetEnvironmentVariable("[variable name]",$null,"Machine")
Substitute [variable name] in the command above with the actual variable name (ex: «Downloads») you want to delete.
For example: [Environment]::SetEnvironmentVariable("Downloads",$null,"Machine")
3 You can now close Windows Terminal (Admin) if you like.
Option Six
Delete System Environment Variables in Registry Editor
1 Open Registry Editor (regedit.exe).
2 Navigate to the key below in the left pane of Registry Editor. (see screenshot below step 3)
HKEY_LOCAL_MACHINE\SYSTEM\CurrentControlSet\Control\Session Manager\Environment
3 In the right pane of the Environment key in Registry Editor, right click or press and hold on the value name (ex: «Downloads») of the variable you want to delete for your account, and click/tap on Delete. (see screenshot below)

4 Click/tap on Yes to confirm. (see screenshot below)
5 When finished deleting system variables, you can close Registry Editor if you like.
That’s it,
Shawn Brink
This guide shows how to manage environment variables in Windows, including how to edit, clear, and delete them.
Requirements
- Windows 7 or newer
- Administrative rights for some actions
What are Environment Variables?
Environment variables are key-value pairs that store configuration settings and can influence the behavior of software and operating systems.
In Windows, there are two types:
- System-Wide: These variables apply to all users and are typically to manage the operating system or shared applications.
- User-Specific: These variables are set per user and won’t impact other users on the same machine.
- Open the Start Menu: Simply press the
Windows key. - Search for Environment Variables: Type “Edit the system environment variables” and click on it.
- Access Environment Variables: Click the “Environment Variables” button in the new window.
- Edit or Add: You can either edit an existing variable or add a new one. Make your changes and click “OK”.
How to Delete Environment Variables
- Follow Steps 1-3 from above: This will get you to the list of environment variables.
- Select and Delete: Select the variable you wish to clear, and click the “Delete” button.
PowerShell Script for Automation
# Display current environment variables
Get-ChildItem Env:

# Remove a specific environment variable
[Environment]::SetEnvironmentVariable('VAR_NAME', $null, [EnvironmentVariableTarget]::User)
Caution
- System Stability: Be cautious when editing or deleting system-wide environment variables as it can affect system stability.
- Administrative Rights: You’ll need administrative rights to modify some system-wide variables.