
-
Home
-
News
- What Is Removable Storage Devices Folder and How to Delete It
By Tina |
Last Updated
What is the Removable Storage Devices folder? Can the Removable Storage Devices folder on desktop be deleted? How to delete it? This post from MiniTool will show you what it is and how to delete it.
What Is the Removable Storage Devices Folder?
Some users reported that they have noticed the Removable Storage Devices folder suddenly occurred on their desktop and they do not know what to do with it. Then what is the Removable Storage Devices folder?
The Removable Storage Devices folder on desktop is commonly caused by incorrectly configured system settings or irregular entries in the Windows Registry. The Removable Storage Devices folder desktop is the error that contains details of the error, including why it occurred, which system component or application malfunctioned to cause the error along with some other information.
In general, the error Removable Storage Device folder can be caused by the incorrect or failed installation or uninstallation of software that may have left invalid entries in your Windows registry. It also may be caused by virus or malware attack, improper shutdown due to power failure or other factors, mistaken deletion of the system files or registry entries.
So, the most important thing is to delete the Removable Storage Devices folder. But, do you know how to do that? If not, keep on your reading and we will show you how to delete the Removable Storage Devices folder on startup.
How to Delete Removable Storage Devices Folder?
In this part, we will show you how to delete the Removable Storage Devices folder on desktop.
Way 1. Refresh the Desktop
First of all, to remove the Removable Storage Devices folder, you can choose to refresh the desktop. This way works for most users.
Now, here is the tutorial.
- Right-click on the Desktop.
- Then choose Refresh.
This way will remove the temporary files. After that, you can check whether the Removable Storage Devices folder is removed.
Way 2. Run DISM Tool
As we have mentioned in the above part, the Removable Storage Devices folder may be caused by the improper Windows Registry. So, in order to remove the Removable Storage Device folder desktop, you can choose to run the DISM tool to detect and fix the Windows Registry errors.
Now, here is the tutorial.
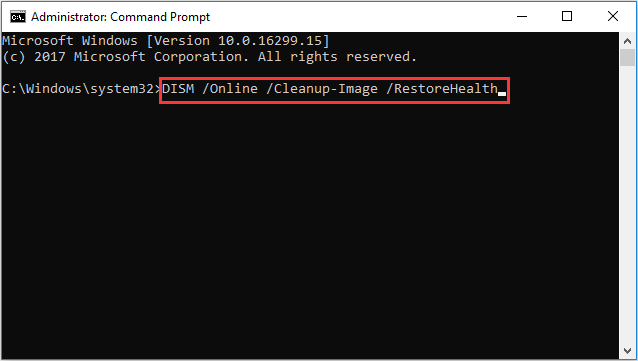
- Open Command Prompt and run it as administrator.
- Then type the command DISM /Online /Cleanup-Image /RestoreHealth and hit Enter to continue.
Then this process will take a while. Please wait patiently for the process to be finished. When it is finished, please check whether the Removable Storage Device folder is removed.
Way 3. Run a Virus Scan
If there is virus attack on your computer, you may also come across the Removable Storage Device folder on desktop. In this situation, you can choose to run a virus scan.
Now, here is the tutorial.
- Press Windows key and I key together to open Settings.
- In the pop-up window, choose Update & Security.
- Then choose Windows Defender.
- On the right panel, choose Open Windows Defender Security Center.
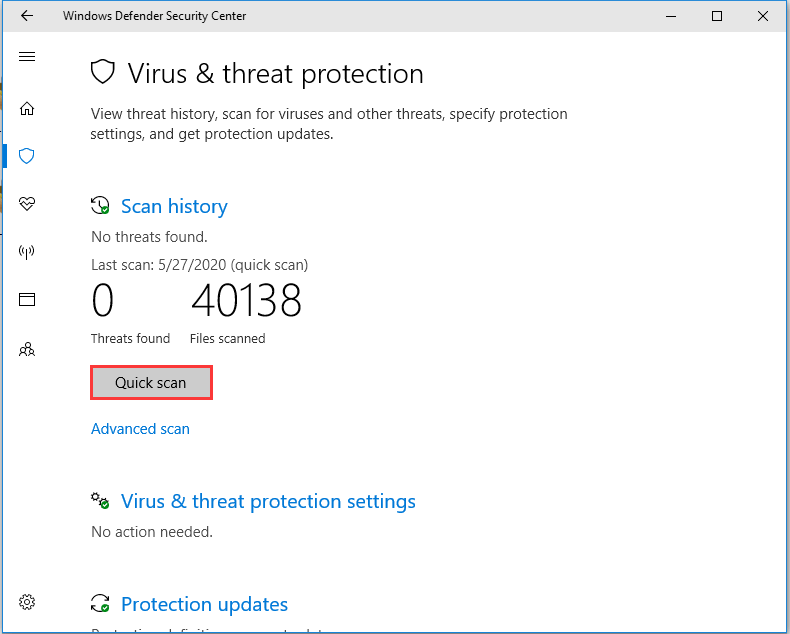
- Then select Virus & threat protection.
- Then choose Quick Scan to continue.
When it is finished, reboot your computer and check whether the Removable Storage Devices folder is removed.
Final Words
To sum up, this post has introduced what the Removable Storage Devices folder is and how to fix the Remove Storage Devices folder on desktop. If you have any better idea to remove the Removable Storage Devices folder, you can share it in the comment zone.
About The Author
Position: Columnist
Tina is a technology enthusiast and joined MiniTool in 2018. As an editor of MiniTool, she is keeping on sharing computer tips and providing reliable solutions, especially specializing in Windows and files backup and restore. Besides, she is expanding her knowledge and skills in data recovery, disk space optimizations, etc. On her spare time, Tina likes to watch movies, go shopping or chat with friends and enjoy her life.
You are here: Home / Windows / How To Delete The Removable Storage Devices Folder On Desktop?
Have you noticed any unknown folder named “Removable Storage Devices” on your desktop? Recently, many users have reported of the Removable Storage Devices folder on desktop that has appeared out of nowhere.
This folder is basically a Windows bug that has likely been triggered by incorrect Windows Registry entries or incorrectly configured system settings. In this article, I have discussed how you can delete the Removable Storage Devices folder from your desktop.
We have shown a VIDEO walk through at the end of the post for easy solution.
After working on your computer for some time, like editing photos or transferring files from your flash drive, you may notice the Removable Storage Devices folder on your desktop. If you open this folder, you can find available devices and drives on the computer or the folder may even be empty.
When you try to remove it by using the delete option, you may find it is not working. Exactly why this folder appears remains unknown, but it is definitely a bug. Also, incorrect Windows Registry entries or incorrectly configured system settings, seems some of the likely causes of this bug.
This folder is useless and serves no purpose. You can remove it with some simple methods as mentioned below.
How To Delete The Removable Storage Devices Folder On Desktop?
Here are some simple methods that you can use to remove this folder from your desktop.
Method 1: Restart Your PC
Restarting your PC fixes most minor bugs and errors, including this one. After you restart your computer, you will likely find that the folder has been removed from desktop. This likely happens as restarting clears the system cache of Windows 10.
However, restarting each time this bug appears on your screen is definitely not the most feasible solution. If restarting isn’t a viable option for you, check out the other methods mentioned below.
Method 2: Refresh Desktop
Another method to get rid of this folder is refreshing the desktop. Refreshing the desktop has removed this bug folder for many users. As you know, it is also very easy to perform in Windows 10. The only reason I haven’t made this the 1st method is that it is not foolproof. The bug folder tends to reappear after sometime.
Even though there is a chance that the folder will reappear, it is still a easy temporary solution. To refresh your desktop, follow the steps given below:
- Right-click on the desktop.
- Select the Refresh option from the right-click context menu.
Refresh a couple of times if refreshing the first time doesn’t remove the bug folder.
Method 3: Run SFC And DISM Scan
Another likely cause of this bug folder is corrupted system and Registry files. In this case, restarting or refreshing your computer will only remove the folder temporarily. A more permanent solution would be to run the SFC and DISM scan to fix the corrupted system and Registry files.
To run the SFC and DISM scan, follow the steps given below:
- Type cmd in the Start menu and right-click on the Command Prompt option.
- Select the Run as Administrator option to open an elevated Command Prompt.
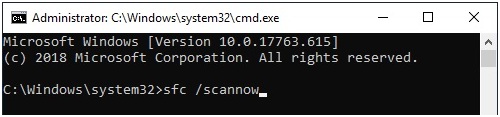
- Now, type sfc /scannow and press Enter to run the SFC scan.
- The SFC scan will take some time to complete so, don’t close it prematurely. After it finishes, restart your computer.
- Now, open the elevated Command Prompt again and type the following command:
DISM /Online /Cleanup-Image /RestoreHealth, and press Enter.
This will run the DISM scan.
- Wait for the DISM scan to finish and then restart the computer.
After running both the SFC scan and DISM scan, you should get rid of the Removable Storage Devices folder on desktop permanently.
Method 4: Run Antivirus Scan
If running the SFC scan and DISM doesn’t remove this bug folder permanently, it is possible that this error folder is being triggered by a virus or malware. If your PC has been infected by a virus or malware, you can try running an antivirus scan to remove it.
Malwarebytes is a powerful anti-malware and antivirus software that you can use in this situation. If you don’t want to install any 3rd party antiviruses, then you can always run the Windows Defender Offline scan, which is very thorough in its removal of malware and viruses.
To run the Windows Defender Offline scan, follow the steps given below:
- Type Windows Security in the Windows search bar and select the top result.
- Click on the Virus & Threat Protection option.
- Select the Scan options in the Current Threats section.
- Scroll down and check the Microsoft Defender Offline scan and select the Scan now option.
- The scan will start now and will approximately take 15-20 minutes. Wait for the scan to finish and don’t close it prematurely. After the scan finishes, Windows will restart automatically.
When Windows boots into the desktop, you will likely find the Removable Storage Devices folder removed from the desktop.
Wrapping Up
So, there you have it. Now you know how to delete the Removable Storage Devices folder on desktop. One or a combination of a couple of the above methods should delete this bug folder from your desktop permanently. If you have any other questions related to this article, ask them in the comment section below.
Readers help support Windows Report. We may get a commission if you buy through our links.
Read our disclosure page to find out how can you help Windows Report sustain the editorial team. Read more
After editing some photos on their PC or after using an SD card as an additional drive, many users reported that a new folder, called Removable Storage Devices, suddenly appeared on the desktop.
The folder contains the available devices and drives on the computer (sometimes it’s empty), and cannot be removed.
The folder was reported for the first time back in 2018, and it was also related to the same year’s October Windows 10 which caused many issues.
Subsequent cumulative Windows 10 updates don’t seem to have fixed the situation. Actually, the users were reluctant to remove it, fearing that this might affect the entire OS.
Although the exact reason why this folder appears is unknown, users have tried several ways to get rid of it without damaging the system.
How do I delete the Removable Storage Devices folder on Desktop?
1. Refresh your desktop to get rid of the Removable Storage Devices folder

This is the simplest and most commonsensical solution that many users applied to get rid of the folder.
Namely, with a right-click on your desktop and selecting the Refresh option, the temporary files should be deleted. This solution removed the folder, but only for a certain time.
Many users mentioned that the folder reappeared. In this case, you might want to try the next solutions from our guide.
2. Run an antivirus scan to get remove the Removable Storage Devices folder

Your device might be missing important updates or might not work properly because of a virus or some malware.
We recommend an in-depth antivirus scan just to be sure. You can use Windows’ built-in security tool, Windows Defender, or a third-party antivirus tool.
It is best to use a dedicated security tool instead of Windows Defender because the last one offers only basic protection.
To secure and protect your computer, sensitive data, online payments, passwords, smart home devices, and webcam we recommend you to use one of the best cybersecurity tools.
ESET HOME Security Essential
Protect your important computer data files and remove malware that can cause the Removable Storage Devices folder to appear.
- Omen Gaming Hub Keeps Installing: How to Get Rid of It
- How to Properly Uninstall Asus Armoury Crate on Windows
3. Perform a DISM scan to delete the folder
-
1. Press the Windows key and type cmd in the search bar.
-
2. You should see the Command Prompt application in the results.
-
3. Click on Run as administrator.

-
4. In the command prompt window, type the following command:
DISM /Online /Cleanup-Image /RestoreHealth -
5. Press Enter to execute the command.
-
6. Wait for the DISM scan to complete. The process should take about 10-20 minutes to complete and should correct any faulty registry files.
-
7. Check whether the Removable Storage Devices folder is gone from your desktop.

Since it is possible that the Removable Storage Devices folder is connected to incorrectly configured system settings or broken entries in the Windows registry, a DISM scan should fix the problem. You can easily perform one through Command Prompt.
Want to discover more about DSIM? Read our article and learn everything there’s to know about the DISM tool.
So these would be the recommended and handy solutions that should help you delete the Removable Storage Devices folder.
We skipped the rebooting step, which is sometimes helpful to remove temporary files, also, we didn’t recommend a fresh install of the OS, because it’s a more difficult job and probably unnecessary.
If you have problems removing other files, icons, or folders, you may want to take a look at our dedicated guide and learn how to easily solve the problem.
If you have any comments related to this topic, please use the dedicated section below.
Radu Tyrsina
Radu Tyrsina has been a Windows fan ever since he got his first PC, a Pentium III (a monster at that time).
For most of the kids of his age, the Internet was an amazing way to play and communicate with others, but he was deeply impressed by the flow of information and how easily you can find anything on the web.
Prior to founding Windows Report, this particular curiosity about digital content enabled him to grow a number of sites that helped hundreds of millions reach faster the answer they’re looking for.
Microsoft Windows 10 has a ghost folder that appears out of nowhere and then refuses to go back or deleted. This is the Removable Storage Devices folder on Desktop, which has the appearance of a system file folder. Most of the users are scared of tampering with it lest it would affect the functioning of the operating system. But one important fact that is not considered that all the important files required by the Windows 10 operating system already exists in the Windows folder. It is important to note that anything that is created afresh and especially on Desktop might not be of much relevance.
The Removable Storage Devices folder on Desktop was first reported in 2018. Microsoft has not provided an official statement on why this folder is created and what it is used for. The issue is still persistent, and even after countless Windows 10 updates that have been downloaded and installed on our computer, the problem hasn’t been resolved. This folder is generally empty and sometimes contains available devices and drives in your system, similar to My Computer icon.As the name suggests, it appears only after a user connects an external drive to the computer like a Flask disk, Pen Drive, or external Hard drive via USB.
Also Read: Best PC Cleanup Software
Different Methods On How To Delete The Removable Storage Devices Folder On Desktop In Windows 10?
Method 1. A Simple Refresh Can Fix Many Things
The Removable Storage Devices folder on Desktop is a temporary folder and can be removed by a simple fresh in most cases. All you have to do is to right-click on a space on your Desktop, and from the contextual menu, click on Refresh. Alternatively, you can press the F5 button on your keyboard while you are on the desktop wallpaper to refresh your Desktop. The Removable Storage Devices folder on Desktop will vanish where it came from.
However, as per the tech forums, there have been reports that this disappearance is temporarily, and the folder reappears after some time, and in other cases, it never vanished but remained on the Desktop. In such cases, you can try the next solution, which is a bit technical and more efficient.
Also Read: Overhaul Your Windows 10 Desktop With These Tricks!
Method 2.deployment Image Servicing And Management (Dism) Command
The DISM is an in-built utility tool present in Microsoft Windows 10 to scan and resolve specific issues with appropriate command lines. Follow these steps to resolve the Removable Storage Devices folder on Desktop:
Step 1. Type CMD in the search bar located on the taskbar.
Step 2. The search results locate Command Prompt App and click on Run as an administrator to launch the app in elevated mode.
Step 3. In the back and white window, type the following command, and hit the Enter key on the keyboard.
DISM /Online /Cleanup-Image /RestoreHealth
Step 4. This process initiated in Step 3 will take some time to complete and resolve general issues with system files on your computer.

Step 5. Restart your computer and check if the Removable Storage Devices folder on Desktop has been removed.
Also Read: Folders You Should Never Touch On Windows 10
Method 3: Run Antivirus, Antimalware, Or System Optimizer Tool

One of the reasons for unwanted files and folders being created or unintended activity in your system is due to a virus or malware. And this calls for a regular scan by an updated Antivirus or Antimalware to identify and eliminate potential threats to your system. You can use Windows Defender or any other Third-Party Antimalware to scan and delete the Removable Storage Devices folder on Desktop lest it was created by malicious software.
However, this is a temporary fix, and to keep your computer free of errors, threats, unwanted folders, and any other hassles you can think of, I recommend using a powerful System Optimizer Tool. This PC optimizer will not only act as an Antimalware but also clean junk files and boost your computer’s performance. I have been using Advanced System Optimizer for a couple of years now, and I can state that I do not require any other tool in my system to enjoy a hassle-free computing experience.
Also Read: 5 Simple Ways to Organize your Messy Windows Desktop
Bonus: How Beneficial Can Advanced System Optimizer Be To Your Computer?
Advanced System Optimizer is one of the most robust clean-up tools for Windows 10 that not only removes viruses and malware but also optimizes the system to run efficiently and enhances performances. Some of the features include:
Disk Cleaner & Optimizer: Removes junk, temporary and obsolete files.
Security and Privacy: Detects and removes malicious software and deletes browsing history, cookie, and cache.
Optimization software: Frees up RAM, optimizes game performance.
Driver Updater: Downloads and installs the latest drivers from various sources to keep your system updated.
Backup and Recovery: Facilitates backup and restore of the system and personal files on your system
Also Read: How to Move Default Data Folder to a Different Drive: Windows 10
Your Thoughts On How To Delete The Removable Storage Devices Folder On Desktop In Windows 10?
There are three methods to get rid of unwanted files and folder like the Removable Storage Devices Folder on Desktop. Although that folder might not consume much space of your hard drive as a necessary file in front of your eyes every time you use the computer, it can certainly be avoided. The optimization software is the easiest and most effective way to get rid of these issues and keep your system error-free.
For any queries or suggestions, please let us know in the comments section below. We would love to get back to you with a solution. We regularly post on tips and tricks, along with answers to common issues related to technology.
Suggested Reading:
How To Change A Desktop Background On A Windows Computer
How To Securely Hide Files And Folders In Windows 10 With Command Prompt
How to Password Protect a Folder in Windows 10 Without Using Third-Party Tools
Files & Folders Safe To Delete To Recover Space On Windows
Delete The Removable Storage Devices Folder On Desktop. In this article, you will read how to delete Removable Storage Devices folder from desktop. Many Windows users have reported the issue that the Removable Storage Devices folder on desktop has appeared out of nowhere.
This folder is created by the Windows bug which can be triggered due to the incorrect entries in the Windows Registry or incorrectly configured system settings. Read the article to know how you can delete the Removable Storage Devices folder from your desktop.
How To Delete The Removable Storage Devices Folder On Desktop?
If you open the Removable Storage Devices folder, you will find available devices and drives on the computer or the folder may even be empty.
If you want to delete it using the delete option, you will not be able to do so. This is because, it is created by a bug. This folder is useless and serves no purpose. You can remove it with some simple methods as mentioned below.
Method 1 – Restart The PC:
Restart your Pc. It will fix most minor bugs and errors. This error can also be fixed. After the restart, you will see that the folder has been automatically removed from the desktop. Restarting the system clears the system cache.
Method 2 – Refresh The Desktop:
You can get rid of this folder by refreshing the desktop. This method has removed this bug for many users. But, this is not a feasible solution, if it returns back again and again. For permanent solution, try the next method.
Method 3 – Run SFC And DISM Scan:
The corrupted system and registry files can also cause this error. If this is the case, the restarting and refreshing method will only remove the folder temporarily. Run the SFC and DISM scan for the permanent solution. To do so:
1.Type cmd in the Start menu.
2.Right-click on the Command Prompt option.
3.Select the Run as Administrator option to open an elevated Command Prompt.
4.Now, type sfc /scannow.
5.Press Enter to run the SFC scan.
6.It will take some time to complete , don’t close it.
7.After it finishes, restart your computer.
8.Then, open the elevated Command Prompt again.
9.Type the following command:
DISM /Online /Cleanup-Image /RestoreHealth, and press Enter.
10.This will run the DISM scan.
11.Wait for the DISM scan to finish.
12.Then restart the computer.
13.After this, you will be able to get rid of the Removable Storage Devices folder on desktop permanently.
Method 4 – Run Antivirus Scan:
If the above method does not work, then this error s likely because of any virus or malware. Try to run an antivirus scam to remove it. You can use Windows Defender to do the scan or you can use any 3rd party antivirus to do so. To run the Windows Defender Offline scan, follow the steps given below:
1.Type Windows Security in the Windows search bar.
2.Select the top result.
3.Click on the Virus & Threat Protection option.
4.Select the Scan options in the Current Threats section.
5.Scroll down and check the Microsoft Defender Offline scan.
6.Select the Scan now option.
7.The scan will get start.
8.It will take 15 to 20 minutes.
9.Wait for the scan to finish.
10.After the scan finishes, Windows will get start automatically.
11.After the restart, you will find the Removable Storage Devices folder removed from the desktop.