
О технологии RemoteFX от Майкрософт, которая повышает качество работы в режиме удалённого рабочего стола, известно давно. В интернете хватает материалов, демонстрирующих её эффективность. Но большинство оценок носят качественный характер: «вот играем в %game_name%, fps в норме», «вот запустили 3D софт, как будто локально работает! Скриншот здесь, видео там».
В данном исследовании мы разберёмся, как перейти от «попугаев» к конкретным метрикам, чтобы количественно оценить эффективность технологии и объективно сравнить её использование с обычным режимом RDP.
Содержание
-
Кратко о RemoteFX
-
Конфигурация тестовой среды
-
Сервер
-
Клиент
-
-
Выбор показателей для измерений
-
Методика тестирования
-
Тест #1: ввод текста
-
Тест #2: ввод текста + 3D BenchMark
-
Тест #3: ввод текста + просмотр локальных видеофайлов
-
Тест #4: ввод текста + просмотр youtube-ролика
-
-
Обработка данных и построение графиков
-
Анализ результатов и наиболее интересные графики
-
Задержки при обработке ввода от пользователя
-
Частота кадров
-
Общие сетевые метрики
-
Загрузка центрального процессора
-
Загрузка видеокарты
-
-
Выводы
-
Что дальше
-
Список источников
-
Приложения
-
Переопределение групп сбора данных: _1_task_define.cmd
-
Принудительная остановка записи данных: _1_task_breake.cmd
-
Конвертация двоичных данных в CSV: blg2csv.cmd
-
Нормализация заголовков CSV: blg2csv.ps1
-
Jupiter Notebook: импорт данных
-
Jupiter Notebook: отрисовка одной метрики на диаграмму
-
Jupiter Notebook: отрисовка всех метрик на одной диаграмме
-
Диаграмма со всеми графиками
-
Кратко о RemoteFX
Традиционный RDP работает так, чтобы как можно больше работы по отрисовке окна удалённого рабочего стола переложить на клиента: по сети передаются графические примитивы и инструкции, которые должна выполнить клиентская видеокарта. Такой подход, в случае показа видео или использования интерфейса Windows Aero, требует поддержки со стороны клиента. Иначе вместо Aero будет использована упрощённая схема, а обработанный CPU сервера видеопоток передан клиенту в виде растровой графики, производительность отрисовки при этом может оказаться просто неприемлемой. Поэтому приходилось выбирать: либо использовать традиционный RDP только в связке с достаточно производительным клиентским железом, либо отказываться от сложной графики.
При включении RemoteFX клиенту по сети по прежнему передаются растровые кадры. Но есть два существенных отличия от традиционного RDP. Во-первых, вся подготовка и обработка графики перекладывается на GPU сервера, это происходит намного быстрее и разгружает CPU. А во-вторых, используется сжатие кадра, которое выполняет кодек RemoteFX. Это существенно снижает объём передаваемых по сети данных, тем самым разгружая канал связи. Это существенно снижает требования к клиентскому железу, но сохраняет достаточный уровень отрисовки и отзывчивости удалённого рабочего стола.
Конфигурация тестовой среды
Сервер
-
2 vCPU Intel(R) Xeon(R) CPU E5-2696 v4 @ 2.20GHz
-
8 GB RAM
-
GPU NVIDIA GRID M60-1Qб, Dedicated Memory 929 MB, Shared Memory 4095 MB
-
гостевая ОС Windows Server 2019 Standart x64 1809 (Version 10.0.17763.1577), DirectX 12
-
network in/out rate limit 50 Mbps
Клиент
-
Intel(R) Core(TM) i5-7600K CPU @ 3.80GHz, 3801 МГц, ядер: 4, логических процессоров: 4
-
16 GB RAM
-
network in/out rate limit 100 Mbps
-
OS Windows 10 Pro 2004 (Version 10.0.19041.685), DirectX 12
-
настройки RDP-сеанса
-
1920 x 1080 (32 bit) (32Hz)
-
на вкладке «Взаимодействие» выбрано «Локальная сеть (10 Мбит/с и выше)»
-
Выбор показателей для измерений
Качество и производительность удалённого рабочего стола нужно оценить с точки зрения как пользователя, так и потребления облачных ресурсов. Будем собирать данные о частоте кадров отрисовки, задержках отклика на ввод данных, сетевом трафике и загрузке CPU/GPU/RAM. Метрики выбраны с учётом официальных рекомендаций по диагностике.
Замеры выполним с помощью стандартного средства Системный монитор. Для этого на каждый тест определим свой сборщик данных, который в течении двух минут будет каждую секунду фиксировать в двоичном blg-файле журнала показания счётчиков:
Показания
-
\Графика RemoteFX(*)\Качество кадра
-
\Графика RemoteFX(*)\Исходящих кадров в секунду
-
\Графика RemoteFX(*)\Входящих кадров в секунду
-
\Графика RemoteFX(*)\Среднее время кодирования
-
\Графика RemoteFX(*)\Коэффициент сжатия графических данных
-
\Графика RemoteFX(*)\Пропущено кадров в секунду — у сервера недостаточно ресурсов
-
\Графика RemoteFX(*)\Пропущено кадров в секунду — недостаточно сетевых ресурсов
-
\Графика RemoteFX(*)\Пропущено кадров в секунду — у клиента недостаточно ресурсов
-
\Задержка ввода данных пользователем на сеанс(Max)\Максимальная задержка ввода
-
\Сведения о процессоре(_Total)\% загруженности процессора
-
\NVIDIA GPU(*)\% Video Decoder Usage
-
\NVIDIA GPU(*)\% Video Encoder Usage
-
\NVIDIA GPU(*)\% GPU Memory Usage
-
\NVIDIA GPU(*)\% GPU Usage
-
\NVIDIA GPU(*)\% FB Usage
-
\Сеть RemoteFX(*)\Потери
-
\Сеть RemoteFX(*)\Общая скорость отправки
-
\Сеть RemoteFX(*)\Общая скорость приема
-
\Сеть RemoteFX(*)\Скорость отправки TCP-данных
-
\Сеть RemoteFX(*)\Скорость отправки UDP-данных
-
\Сеть RemoteFX(*)\Общая скорость приема
-
\Сеть RemoteFX(*)\Скорость получения TCP-данных
-
\Сеть RemoteFX(*)\Скорость получения UDP-данных
-
\Сеть RemoteFX(*)\Пропускная способность текущего TCP-подключения
-
\Сеть RemoteFX(*)\Пропускная способность текущего UDP-подключения
-
\Память\% использования выделенной памяти
-
\Память\Доступно байт

PS. По непонятной причине данные по оперативной памяти не сохранялись в журнал при выполнении задания группы сбора, хотя «вживую» Системный монитор нормально строил графики по обоим показателям. Сброс кэша счётчиков не помог.
Методика тестирования
Чтобы оценить эффективность использования выделенной видеокарты на облачным сервере, нужно провести две серии одинаковых тестов: до и после включения отрисовки удалённого рабочего стола на GPU.
В каждой серии выполним следующие тесты:
-
ввод текста
-
ввод текста + 3D BenchMark
-
ввод текста + просмотр локальных видеофайлов
-
ввод текста + просмотр youtube-ролика
Для оценки влияния теста на задержку обработки ввода от пользователя поверх основной программы открывается стандартный Блокнот и зажимается произвольная клавиша. Окно редактора на протяжении теста будет постоянной частью всех кадров, поэтому исказит результат в лучшую сторону. Чтобы снизить эффект, размер окна уменьшим до 122*156% 99% кадра будут меняться и визуально будет видно, что имитация активности пользователя работает.
Тест #1: ввод текста
В качестве тестов рекомендуется «использовать любые приложения, которые плотно работают с графикой (например, потоковое видео), приложения, использующие DirectX». Результаты первого теста, с точки зрения пользователя (частота кадров и задержка ввода), практически одинаковые. Поэтому строить графики и анализировать их нет особого смысла. Такой тест больше пригодится для диагностики RemoteFX.
Тест #2: ввод текста + 3D BenchMark
Выполнялся при помощи FurMark в полноэкранном режиме.
Тест #3: ввод текста + просмотр локальных видеофайлов
Локальные видеофайлы воспроизводились в Windows Media Player, равёрнутом на весь экран, без установки каких-либо дополнительных кодеков, по кругу в следущем порядке:
-
«Ants carrying dead spider»: 1920 x 1080, 10667 кбит/с, 19 секунд, 29.97 fps
-
«Flying Through Forest 1»: 1920 x 1088, 48072 кбит/с, 9 секунд, 25 fps
-
«Low Angle Of Pedestrians Walking In Busy Street, Daytime»: 4096 x 2160, 31721 кбит/с, 13 секунд, 25 fps
Единственным критерием отбора была динамичность ролика: видеоряд должен был как можно сильнее нагрузить кодек RemoteFX. Но ролик «Flying Through Forest 1» оказался в этом плане интересной находкой: выходной FPS заметно проседал, а входной от запуска к запуску был сильно выше или ниже среднего! Его влияние на различные метрики будет заметно на графиках, которые будут ниже.
Тест #4: ввод текста + просмотр youtube-ролика
В качестве youtube-теста был выбран чудесный ролик «Коста-Рика», который проигрывался в качестве 1080p60 в браузере Firefox, режим «киоск».
Обработка данных и построение графиков
Файлы журналов — blg — имеют двоичный формат: легко открываются в родной программе, графики всех счётчиков на одной шкале, можно выключать/включать/масштабировать/etc. Но чтобы работать с данными из нескольких файлов, нужно другое решение.
Сначала конвертируем двоичные файлы в csv (см. Приложение) с помощью стандартной утилиты reglog и очистим их заголовки (см. Приложение).
Затем в Jupiter-блокноте при помощи библиотек pandas и matplotlib прочитаем csv (см. Приложение, Jupiter Notebook: импорт) и построим графики (см. Приложение, Jupiter Notebook: одна метрика — одна диаграмма).
Анализ результатов и наиболее интересные графики
Задержки при обработке ввода от пользователя

До включения групповых политик сильнее всего на обработке ввода сказалось проигрывание локальных видеофайлов: в среднем 45 мс при рекомендованных 33 мс.
Включение отрисовки через GPU в групповых политиках стабилизировало этот показатель во всех сценариях.
Частота кадров

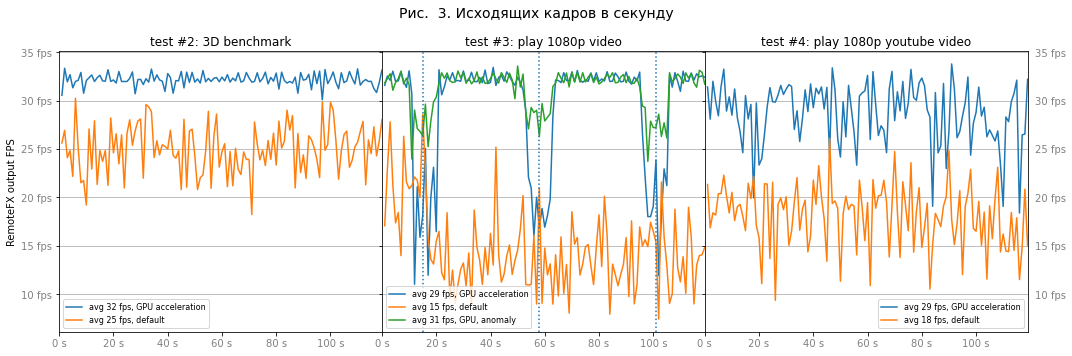
После включения GPU ускорения ситуация явно становится лучше, особенно в 3D тесте. Результаты двух других тестов хоть и демонстрируют улучшение, но недостаточно: провалы на графиках соответствуют визуальным «рывкам» при просмотре.
Воспроизведение «Flying Through Forest 1» (1920 x 1088, 48072 кбит/с, 9 секунд, 25 fps): от запуска к запуску на вход кодека RеmoteFX поступало либо повышенное либо пониженное количество кадров. Возможно, причина в перекодировке из формата QuickTime, «лишних» 8 пикселях ширины кадра или битрейте.
«Коста-Рика» также вызвал «проседание» FPS у RemoteFX: его проигрывание в браузере в 1080p60 ложилось на центральный процессор. Возможно, он просто не успевал перекодировать из 60fps и подготовить нужный кадр для RemoteFX.
Общие сетевые метрики

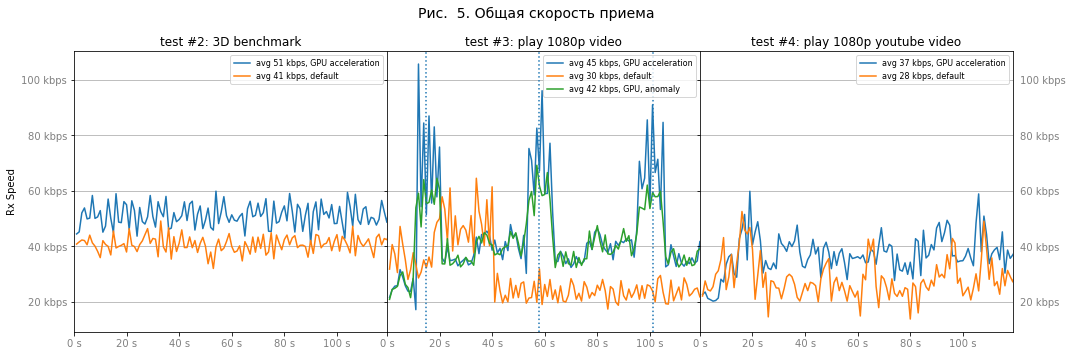
При включении GPU ускорения происходит рост сетевого трафика, который зависит от сценария теста.
Видно, что самым тяжёлым для кодека RemoteFX опять оказался тот же самый видеофайл, «Flying Through Forest 1». Первый запуск этого теста, когда наблюдается провал входящих кадров, также видим скачки трафика до 60 Мбит/с и потери до 30% — 40%.

Загрузка центрального процессора

Включение GPU ускорения практически вдвое разгружает центральный процессор, за исключением youtube-теста. И даже здесь удалось уйти от периодической 100% загрузки.
Загрузка видеокарты


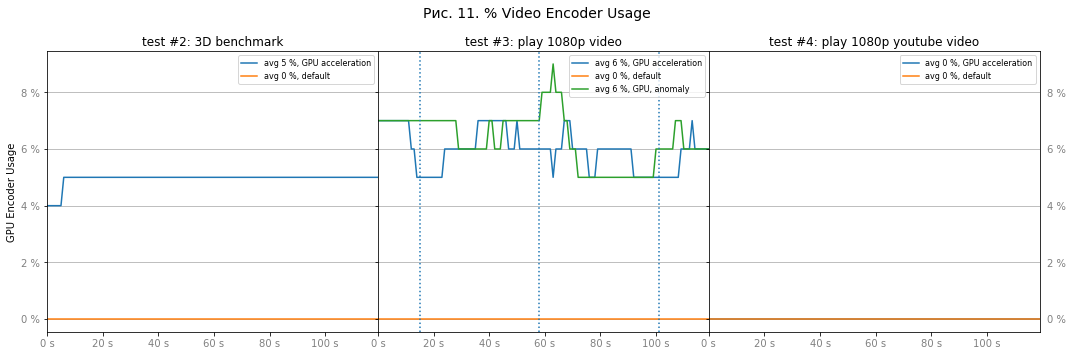
Возможно, разгадка странного поведения второго ролика кроется в графике 17: входящих для RemoteFX кадров было больше, когда видеокарта была больше загружена кодированием.
Выводы
В RDP протоколе частота кадров ограничена 30-ю кадрами в секунду. Со стороны сервера увеличить лимит FPS можно, но бессмысленно: на практике терминальная сессия перестала отрисовывать окно и реагировать на действия как раз при проигрывании «того самого» видеофайла :).
Итоги в цифрах:
-
Частота кадров стабилизируется почти на максимально возможном для протокола уровне: 29-30 FPS в среднем вместо 25 или даже 15 FPS
-
Отзывчивость удалённого рабочего стола также стабилизируется, при этом возрастая в несколько раз
-
Заметно, на 20-50 %, разгружается центральный процессор
-
Немного возрастает утилизация канала связи, на 3-6 Мбит/сек
-
Утилизация GPU составила до 20%
Результат действительно очень хороший: RemoteFX значительно увеличивает качество работы в терминальной сессии — плавность отрисовки окна и отклик на действия пользователя сравнимы с локальным режимом. Даже «тяжёлые» сценарии показывают в этом плане заметный прирост.
Тесты, конечно, носят искусственный характер: выбором способа нагрузки на кодек RemoteFX можно как «завалить» так и «подтянуть» его результаты. Возможно, более релевантным было бы проведение чего-то вроде «конфетти-теста», например, такого.
Что дальше
Так как на этом этапе тесты проводились для одной сессии и при включении лишь рекомендованных настроек, то далее имеет смысл протестировать производительность:
-
при одновременной работе нескольких пользователей
-
при включении в групповых политиках различных дополнительных настроек кодека
Список источников
Приложения
Переопределение групп сбора данных: _1_task_define.cmd
@echo off
setlocal EnableDelayedExpansion

@REM для сбора используются счётчики, перечисленные в _1_counters.cfg
@REM счётчики называются только на английском, на русском это просто описание
@REM
@REM запуск сбора данных:
@REM    при каждом входе на удалённый рабочий стол исправить _1_counters.cfg:
@REM    1)  посмотреть номер своей терминальной сессии консольной командой
@REM        query session
@REM
@REM    2)  вписать этот номер в _1_counters.cfg, например, RDP-Tcp 9
@REM
@REM    3)  перерегистрировать сброщик запуском данного файла
@REM
@REM    4)  замер производительности производится запуском _2_task_run_X.cmd и длится 2 минуты
@REM


@REM удаление старого сборщика данных
logman delete -n RemoteFX_1
logman delete -n RemoteFX_2
logman delete -n RemoteFX_3
logman delete -n RemoteFX_4
logman delete -n RemoteFX_5


for /F "usebackq delims= " %%a IN (`query session ^| find "Administrator"`) DO (
    set "x=%%a"
    set "x=!x:~9,10!"
    echo !x!

    type NUL>_1_counters.cfg
    echo ^\NVIDIA GPU^(^*^)^\%% Video Decoder Usage>>_1_counters.cfg
    echo ^\NVIDIA GPU^(^*^)^\%% Video Encoder Usage>>_1_counters.cfg
    echo ^\NVIDIA GPU^(^*^)^\%% GPU Memory Usage>>_1_counters.cfg
    echo ^\NVIDIA GPU^(^*^)^\%% GPU Usage>>_1_counters.cfg
    echo.>>_1_counters.cfg
    echo ^\Processor Information^(_Total^)^\%% Processor Time>>_1_counters.cfg
    echo.>>_1_counters.cfg
    echo ^\RemoteFX Network^(RDP-Tcp !x!^)^\Loss Rate>>_1_counters.cfg
    echo ^\RemoteFX Network^(RDP-Tcp !x!^)^\Current TCP Bandwidth>>_1_counters.cfg
    echo ^\RemoteFX Network^(RDP-Tcp !x!^)^\Current UDP Bandwidth>>_1_counters.cfg
    echo.>>_1_counters.cfg
    echo ^\RemoteFX Network^(RDP-Tcp !x!^)^\Total Sent Rate>>_1_counters.cfg
    echo ^\RemoteFX Network^(RDP-Tcp !x!^)^\TCP Sent Rate>>_1_counters.cfg
    echo ^\RemoteFX Network^(RDP-Tcp !x!^)^\UDP Sent Rate>>_1_counters.cfg
    echo.>>_1_counters.cfg
    echo ^\RemoteFX Network^(RDP-Tcp !x!^)^\Total Received Rate>>_1_counters.cfg
    echo ^\RemoteFX Network^(RDP-Tcp !x!^)^\TCP Received Rate>>_1_counters.cfg
    echo ^\RemoteFX Network^(RDP-Tcp !x!^)^\UDP Received Rate>>_1_counters.cfg
    echo.>>_1_counters.cfg
    echo ^\RemoteFX Graphics^(^*^)^\Output Frames/Second>>_1_counters.cfg
    echo ^\RemoteFX Graphics^(^*^)^\Input Frames/Second>>_1_counters.cfg
    echo.>>_1_counters.cfg
    echo ^\RemoteFX Graphics^(^*^)^\Frames Skipped/Second - Insufficient Server Resources>>_1_counters.cfg
    echo ^\RemoteFX Graphics^(^*^)^\Frames Skipped/Second - Insufficient Network Resources>>_1_counters.cfg
    echo ^\RemoteFX Graphics^(^*^)^\Frames Skipped/Second - Insufficient Client Resources>>_1_counters.cfg
    echo ^\RemoteFX Graphics^(^*^)^\Frame Quality>>_1_counters.cfg
    echo ^\RemoteFX Graphics^(^*^)^\Average Encoding Time>>_1_counters.cfg
    echo ^\User Input Delay per Session^(Max^)^\Max Input Delay>>_1_counters.cfg

    echo.>>_1_counters.cfg
    echo ^\RemoteFX Graphics^(^*^)^\Graphics Compression ratio>>_1_counters.cfg
    echo ^\NVIDIA GPU^(^*^)^\%% FB Usage>>_1_counters.cfg

    @REM счётчик памяти не работает, сброс кэша счётчиков также не помог
    @REM    https://docs.microsoft.com/ru-ru/troubleshoot/windows-server/performance/manually-rebuild-performance-counters
    echo ^\Memory^\%% Committed Bytes In Use>>_1_counters.cfg
    echo ^\Memory^\Available Bytes>>_1_counters.cfg
)

@REM и регистрация нового сборщика
logman create counter -n RemoteFX_1 -f bin -max 10 -si 00:00:01 -rf 00:02:00 --v -o "%~dp0logs\test #1 void GPO X" -cf "%~dp0_1_counters.cfg"
logman create counter -n RemoteFX_2 -f bin -max 10 -si 00:00:01 -rf 00:02:00 --v -o "%~dp0logs\test #2 3D GPO X" -cf "%~dp0_1_counters.cfg"
logman create counter -n RemoteFX_3 -f bin -max 10 -si 00:00:01 -rf 00:02:00 --v -o "%~dp0logs\test #3 wmp GPO X" -cf "%~dp0_1_counters.cfg"
logman create counter -n RemoteFX_4 -f bin -max 10 -si 00:00:01 -rf 00:02:00 --v -o "%~dp0logs\test #4 youtube GPO X" -cf "%~dp0_1_counters.cfg"
logman create counter -n RemoteFX_5 -f bin -max 10 -si 00:00:01 -rf 00:02:00 --v -o "%~dp0logs\test #5 webGL GPO X" -cf "%~dp0_1_counters.cfg"


@REM pause
@REM exit
Принудительная остановка записи данных: _1_task_breake.cmd
@REM запускаем сбор данных
logman stop RemoteFX_1
logman stop RemoteFX_2
logman stop RemoteFX_3
logman stop RemoteFX_4
logman stop RemoteFX_5
Конвертация двоичных данных в CSV: blg2csv.cmd
@echo off

@REM смена кодировки нужна для powershell-скрипта "%~dpn0.ps1"
chcp 65001

@REM работаем в текущей папке скрипта
cd "%~dp0logs"


@REM включаем расширения для переопределения переменных в цикле
setlocal EnableDelayedExpansion

@REM цикл по двоичным файлам мониторинга
FOR /F "usebackq delims=." %%a IN (`dir *.blg /b`) DO (
    set "blg=%%a.blg"
    set "csv=%%a.csv"

    @REM convert binary to csv
    relog "!blg!" -f csv -o "!csv!" -y
)

@REM имена cmd и powershell скриптов должны совпадать
start "%~dpn0.ps1" /WAIT /B pwsh.exe -Command "& {%~dpn0.ps1 -en:$False}"

@REM справка reglog - утилиты работы с журналами производительности
@REM https://docs.microsoft.com/ru-ru/windows-server/administration/windows-commands/relog
Нормализация заголовков CSV: blg2csv.ps1
Заголовки столбцов содержат различные уникальные данные (id терминальной сессии или оборудования), которые будут несовпадать из-за применения групповых политик и выхода-входа на терминальный сервер. Приводим к единому виду с помощью PowerShell-скрипта:
[CmdletBinding()]
param (
    [switch] $en       = $False  # substitute ru alias of counters by real en name
)

$WorkDir = $MyInvocation.MyCommand.Definition | Split-Path -Parent

$LogsDir = Join-Path -Path $WorkDir -ChildPath 'logs'

$EncodeFrom = [System.Text.Encoding]::GetEncoding(1251)
$EncodeTo = New-Object System.Text.UTF8Encoding $False

$names = @(
    New-Object psobject -Property @{ 'ru' = 'Задержка ввода данных пользователем на сеанс(Max)\Максимальная задержка ввода' ; 'en' = 'User Input Delay per Session\Max Input Delay'}
    New-Object psobject -Property @{ 'ru' = 'Графика RemoteFX\Входящих кадров в секунду' ; 'en' = 'RemoteFX Graphics\Input Frames/Second'}
    New-Object psobject -Property @{ 'ru' = 'Графика RemoteFX\Исходящих кадров в секунду' ; 'en' = 'RemoteFX Graphics\Output Frames/Second'}
    New-Object psobject -Property @{ 'ru' = 'Графика RemoteFX\Среднее время кодирования' ; 'en' = 'RemoteFX Graphics\Average Encoding Time'}
    New-Object psobject -Property @{ 'ru' = 'Графика RemoteFX\Качество кадра' ; 'en' = 'RemoteFX Graphics\Frame Quality'}
    New-Object psobject -Property @{ 'ru' = 'Графика RemoteFX\Коэффициент сжатия графических данных' ; 'en' = 'RemoteFX Graphics\Graphics Compression ratio'}

    New-Object psobject -Property @{ 'ru' = 'Сеть RemoteFX\Общая скорость отправки' ; 'en' = 'RemoteFX Network\Total Sent Rate'}
    New-Object psobject -Property @{ 'ru' = 'Сеть RemoteFX\Общая скорость приема' ; 'en' = 'RemoteFX Network\Total Received Rate'}
    New-Object psobject -Property @{ 'ru' = 'Сеть RemoteFX\Потери' ; 'en' = 'RemoteFX Network\Loss Rate'}

    New-Object psobject -Property @{ 'ru' = 'Графика RemoteFX\Пропущено кадров в секунду — недостаточно сетевых ресурсов' ; 'en' = 'RemoteFX Graphics\Frames Skipped/Second - Insufficient Network Resources'}
    New-Object psobject -Property @{ 'ru' = 'Графика RemoteFX\Пропущено кадров в секунду — у сервера недостаточно ресурсов' ; 'en' = 'RemoteFX Graphics\Frames Skipped/Second - Insufficient Server Resources'}
    New-Object psobject -Property @{ 'ru' = 'Графика RemoteFX\Пропущено кадров в секунду — у клиента недостаточно ресурсов' ; 'en' = 'RemoteFX Graphics\Frames Skipped/Second - Insufficient Client Resources'}

    New-Object psobject -Property @{ 'ru' = 'Сведения о процессоре(_Total)\% загруженности процессора' ; 'en' = 'Processor Information(_Total)\% Processor Time'}
    New-Object psobject -Property @{ 'ru' = 'NVIDIA GPU\% GPU Usage' ; 'en' = 'NVIDIA GPU\% GPU Usage'}
    New-Object psobject -Property @{ 'ru' = 'NVIDIA GPU\% GPU Memory Usage' ; 'en' = 'NVIDIA GPU\% GPU Memory Usage'}
    New-Object psobject -Property @{ 'ru' = 'NVIDIA GPU\% Video Decoder Usage' ; 'en' = 'NVIDIA GPU\% Video Decoder Usage'}
    New-Object psobject -Property @{ 'ru' = 'NVIDIA GPU\% Video Encoder Usage' ; 'en' = 'NVIDIA GPU\% Video Encoder Usage'}
    New-Object psobject -Property @{ 'ru' = 'NVIDIA GPU\% FB Usage' ; 'en' = 'NVIDIA GPU\% FB Usage'}

    New-Object psobject -Property @{ 'ru' = 'Сеть RemoteFX\Пропускная способность текущего UDP-подключения' ; 'en' = 'RemoteFX Network\Current UDP Bandwidth'}
    New-Object psobject -Property @{ 'ru' = 'Сеть RemoteFX\Пропускная способность текущего TCP-подключения' ; 'en' = 'RemoteFX Network\Current TCP Bandwidth'}

    New-Object psobject -Property @{ 'ru' = 'Сеть RemoteFX\Скорость отправки UDP-данных' ; 'en' = 'RemoteFX Network\UDP Sent Rate'}
    New-Object psobject -Property @{ 'ru' = 'Сеть RemoteFX\Скорость получения UDP-данных' ; 'en' = 'RemoteFX Network\UDP Received Rate'}
    New-Object psobject -Property @{ 'ru' = 'Сеть RemoteFX\Скорость отправки TCP-данных' ; 'en' = 'RemoteFX Network\TCP Sent Rate'}
    New-Object psobject -Property @{ 'ru' = 'Сеть RemoteFX\Скорость получения TCP-данных' ; 'en' = 'RemoteFX Network\TCP Received Rate'}
)

$Heads = @()
foreach ($f in Get-ChildItem -Path $LogsDir -File -Filter '*.csv')
{
    $FileContent = $f | Get-Content -Encoding $EncodeFrom

    $HeadOrig = $FileContent[0]


    # приводим заголовки к единому виду, убираем ненужное
    # "\\TESTGPU\NVIDIA GPU(#0 GRID M60-1Q (id=1, NVAPI ID=513))\% GPU Memory Usage"
    if ($HeadOrig -match '.*(?<hostname>\\\\[a-zA-Z0-9]*\\).*')
    {
        $HeadOrig = $HeadOrig.Replace($Matches['hostname'], '')
    }

    if ($HeadOrig -match '.*NVIDIA GPU(?<gpu>\(#[A-Z0-9 ]*-[A-Z0-9]* \(id=[0-9,]* NVAPI ID=[0-9]*\)\))')
    {
        $HeadOrig = $HeadOrig.Replace($Matches['gpu'], '')
    }

    # "\\TESTGPU\Графика RemoteFX(RDP-Tcp 55)\Входящих кадров в секунду"
    if ($HeadOrig -match '.*(?<session>\(RDP-Tcp[ 0-9]*\)).*')
    {
        $HeadOrig = $HeadOrig.Replace($Matches['session'], '')
    }

    # "(PDH-CSV 4.0) (Russia TZ 2 Standard Time)(-180)"
    if ($HeadOrig -match '.*(?<time>\(.*\) \(.*Time\)\([0-9 +-]*\))')
    {
        $HeadOrig = $HeadOrig.Replace($Matches['time'], 'Time')
    }

    if ($en)
    {
        $HeadOrig = ($HeadOrig -split '","') -replace '"', ''

        foreach ($h in $HeadOrig)
        {
            if ($h -notin $names.ru) { continue }

            $n = $names | Where-Object {$_.ru -eq $h}

            $HeadOrig[($HeadOrig.IndexOf($h))] = $n.en  # $h = $n.en не работает
        }

        $HeadOrig = '"{0}"' -f ($HeadOrig -join '","')
    }


    $FileContent[0] = $HeadOrig  # перезапись заголовка

    $FileContent | Out-File -Encoding $EncodeTo -FilePath $f.FullName

    $Heads += $f.Name + $HeadOrig  # сохранение заголовка
}

# вывод заголовков столбцов в отдельный файл для доп. контроля порядка, названий и т.д.
$Heads | Out-File -Encoding $EncodeTo -FilePath (Join-Path -Path $LogsDir -ChildPath 'heads.txt')
Jupiter Notebook: импорт данных
import pandas as pd
import matplotlib.pyplot as plt
from matplotlib.ticker import EngFormatter  # для вывода форматированных единиц измерения
plt.rcParams['figure.max_open_warning'] = 30  # порог предупреждения при одновременном построении нескольких рисунков
%matplotlib inline

# импорт данных csv-файлов
t21 = pd.read_csv('./logs/test #2 3D GPO 1.csv', na_values=' ')
t20 = pd.read_csv('./logs/test #2 3D GPO 0.csv', na_values=' ')  # , encoding='cp1251')

t31 = pd.read_csv('./logs/test #3 wmp GPO 1.csv', na_values=' ')
t30 = pd.read_csv('./logs/test #3 wmp GPO 0.csv', na_values=' ')
t31_prev = pd.read_csv('./logs/test #3 wmp GPO 1 anomaly.csv', na_values=' ')

t41 = pd.read_csv('./logs/test #4 youtube GPO 1.csv', na_values=' ')
t40 = pd.read_csv('./logs/test #4 youtube GPO 0.csv', na_values=' ')

# слияние результатов каждого теста: сначала рекомендованные GPO, потом default GPO
t2 = pd.concat([t21, t20],           join='inner', axis=1)
t3 = pd.concat([t31, t30, t31_prev], join='inner', axis=1)
t4 = pd.concat([t41, t40],           join='inner', axis=1)

# разные наборы для итерации и рисования в цикле
dataframes = [t2, t3, t4]
ax_titles = ['test #2: 3D benchmark', 'test #3: play 1080p video', 'test #4: play 1080p youtube video']
legend = ['GPU acceleration', 'default', 'GPU, anomaly']
img_sx, img_sy = 15, 5  # размеры одного ряда графиков
fgs = [  # макет графиков  # yunit ед. изм., ylabel метка Y-оси, ydata колонка из датафрейма
    {'yunit': 'ms',     'ylabel': 'Input Delay',            'ydata': 'Задержка ввода данных пользователем на сеанс(Max)\Максимальная задержка ввода'},
    {'yunit': 'fps',    'ylabel': 'RemoteFX input FPS',     'ydata': 'Графика RemoteFX\Входящих кадров в секунду'},
    {'yunit': 'fps',    'ylabel': 'RemoteFX output FPS',    'ydata': 'Графика RemoteFX\Исходящих кадров в секунду'},

    {'yunit': 'bps',    'ylabel': 'Tx Speed',               'ydata': 'Сеть RemoteFX\Общая скорость отправки'},
    {'yunit': 'bps',    'ylabel': 'Rx Speed',               'ydata': 'Сеть RemoteFX\Общая скорость приема'},
    {'yunit': '%',      'ylabel': 'Tx / Rx Loss',           'ydata': 'Сеть RemoteFX\Потери'},

    {'yunit': '%',      'ylabel': 'CPU Usage',              'ydata': 'Сведения о процессоре(_Total)\% загруженности процессора'},

    {'yunit': '%',      'ylabel': 'GPU Usage',              'ydata': 'NVIDIA GPU\% GPU Usage'},
    {'yunit': '%',      'ylabel': 'GPU Memory Usage',       'ydata': 'NVIDIA GPU\% GPU Memory Usage'},
    {'yunit': '%',      'ylabel': 'GPU Decoder Usage',      'ydata': 'NVIDIA GPU\% Video Decoder Usage'},
    {'yunit': '%',      'ylabel': 'GPU Encoder Usage',      'ydata': 'NVIDIA GPU\% Video Encoder Usage'},

    {'yunit': 'ms',     'ylabel': 'Encoding Time',          'ydata': 'Графика RemoteFX\Среднее время кодирования'},
    {'yunit': '%',      'ylabel': 'Frame Quality',          'ydata': 'Графика RemoteFX\Качество кадра'},
    {'yunit': '%',      'ylabel': 'Compression: enc byte / in byte', 'ydata': 'Графика RemoteFX\Коэффициент сжатия графических данных'},

    {'yunit': 'fps',    'ylabel': 'FPS Loss by network',    'ydata': 'Графика RemoteFX\Пропущено кадров в секунду — недостаточно сетевых ресурсов'},
    {'yunit': 'fps',    'ylabel': 'FPS Loss by server',     'ydata': 'Графика RemoteFX\Пропущено кадров в секунду — у сервера недостаточно ресурсов'},
    {'yunit': 'fps',    'ylabel': 'FPS Loss by client',     'ydata': 'Графика RemoteFX\Пропущено кадров в секунду — у клиента недостаточно ресурсов'},

    {'yunit': '%',      'ylabel': 'GPU Framebufer Usage',   'ydata': 'NVIDIA GPU\% FB Usage'},

    {'yunit': 'bps',    'ylabel': 'Tx Speed UDP',           'ydata': 'Сеть RemoteFX\Скорость отправки UDP-данных'},
    {'yunit': 'bps',    'ylabel': 'Rx Speed UDP',           'ydata': 'Сеть RemoteFX\Скорость получения UDP-данных'},
    {'yscale': 1000,    'yunit': 'bps', 'ylabel': 'Bandwidth UDP', 'ydata': 'Сеть RemoteFX\Пропускная способность текущего UDP-подключения'},

    {'yunit': 'bps',    'ylabel': 'Tx Speed TCP',           'ydata': 'Сеть RemoteFX\Скорость отправки TCP-данных'},
    {'yunit': 'bps',    'ylabel': 'Rx Speed TCP',           'ydata': 'Сеть RemoteFX\Скорость получения TCP-данных'},
    {'yscale': 1000,    'yunit': 'bps', 'ylabel': 'Bandwidth TCP', 'ydata': 'Сеть RemoteFX\Пропускная способность текущего TCP-подключения'},
]
Jupiter Notebook: отрисовка одной метрики на диаграмму
for i in range(len(fgs)):  # сколько метрик, столько рисунков (рядов диаграмм)
    fig, axs = plt.subplots(1, 3, figsize=(img_sx, img_sy), sharex='col', sharey='row', gridspec_kw=dict(hspace=0, wspace=0, ))  # width_ratios=[1, 1, 1]

    fig_name = fgs[i]['ydata'].split('\\')[1]
    fig.suptitle(f'Рис. {i + 1:>2}. {fig_name}', fontsize=14)  #, color='grey')  # имя рисунка
    fig.patch.set_facecolor('white')  # фон рисунка белый вместо прозрачного

    axs[0].set(ylabel=fgs[i]['ylabel'])  # подпись Y-оси только на первых (левых) графиках из трёх
    axs[2].yaxis.set_tick_params(labelleft=False, labelright=True, which='major')  # дублируем значения справа

    for ax, d, title in zip(axs, dataframes, ax_titles):  # на каждый тест своя диаграмма
        ax.plot(d.index.values, d[fgs[i]['ydata']] * (fgs[i].get('yscale', 1)))  # строим график
        ax.set_title(title)  #, color='grey')  # заголовок диаграммы

        ax.xaxis.set_tick_params(which='major', labelcolor='grey')  # подписи к X-шкале
        ax.xaxis.set_major_formatter(EngFormatter(unit='s'))  # по X секунды

        ax.yaxis.set_tick_params(which='major', labelcolor='grey')  # подписи Y-шкале
        ax.yaxis.set_major_formatter(EngFormatter(unit=fgs[i]['yunit']))  # по Y у каждого графика своя ед. изм.

        # расчёт средних и вывод в легенду диаграммы "на лету"
        avg = [EngFormatter(places=0).format_eng(avg * (fgs[i].get('yscale', 1))) for avg in d[fgs[i]['ydata']].mean()]
        lgn = [f'avg {m}{fgs[i]["yunit"]}, {l}' for l, m in zip(legend, avg)]
        ax.legend(lgn, fontsize=8)  # отображение легенды графика

        ax.grid(axis='y')  # горизонтальная сетка
        ax.set_xlim(0,119)  # метка "120" засоряла график

        if ax == axs[1]:  # выделяем аномалии на средней диаграмме
            ax.axvline(x=15, linestyle=":", color='C0')
            ax.axvline(x=58, linestyle=":", color='C0')
            ax.axvline(x=101, linestyle=":", color='C0')

        fig.tight_layout()  # (pad=0.4, w_pad=1.5, h_pad=30.0)
Jupiter Notebook: отрисовка всех метрик на одной диаграмме
Общая ось X на все графики: метрики тестов располагаются строго друг под другом — удобно сопоставлять разные метрики между собой.
# один рисунок  # plt.style.available  # plt.style.use('seaborn-whitegrid')
fig, axs = plt.subplots(len(fgs), 3, figsize=(img_sx, img_sy * len(fgs)), sharex='col', sharey='row', gridspec_kw=dict(hspace=0.2, wspace=0))
fig.patch.set_facecolor('white')  # фон рисунка белый вместо прозрачного

# заголовки только вверху
[ax.set_title(title) for ax, title in zip(axs[0], ax_titles)]  # ax.set_title(title, color='grey')

for i in range(len(fgs)):
    axs[i,0].set(ylabel=fgs[i]['ylabel'])
    fig_name = fgs[i]['ydata'].split('\\')[1]
    axs[i,1].set(xlabel=f'Рис. {i + 1:>02}. {fig_name}')
    # axs[i,1].xaxis.label.set_color('grey')

    axs[i,2].yaxis.set_tick_params(labelleft=False, labelright=True, which='major')

    for ax, d, title in zip(axs[i], dataframes, ax_titles):
        ax.plot(d.index.values, d[fgs[i]['ydata']] * (fgs[i].get('yscale', 1)))

        ax.xaxis.set_tick_params(which='major', labelcolor='grey')  # подписи к X-шкале
        ax.xaxis.set_major_formatter(EngFormatter(unit='s'))  # по X секунды

        ax.yaxis.set_tick_params(which='major', labelcolor='grey')  # подписи Y-шкале
        ax.yaxis.set_major_formatter(EngFormatter(unit=fgs[i]['yunit']))  # по Y у каждого графика своя ед. изм.

        # расчёт средних и изменение легенды диаграммы "на лету"
        avg = [EngFormatter(places=0).format_eng(avg * (fgs[i].get('yscale', 1))) for avg in d[fgs[i]['ydata']].mean()]
        lgn = [f'avg {m}{fgs[i]["yunit"]}, {l}' for l, m in zip(legend, avg)]
        ax.legend(lgn, fontsize=8)  # отображение легенды графика

        ax.grid(axis='y')  # горизонтальная сетка
        ax.set_xlim(0,119)  # метка "120" засоряла график

        if ax == axs[i,1]:  # выделяем аномалии на средней диаграмме
            ax.axvline(x=15, linestyle="--", color='C0')
            ax.axvline(x=58, linestyle="--", color='C0')
            ax.axvline(x=101, linestyle="--", color='C0')
Диаграмма со всеми графиками

Продолжение истории будет на следующей неделе. Спасибо за внимание!
Что ещё интересного есть в блоге Cloud4Y
→ Частые ошибки в настройках Nginx, из-за которых веб-сервер становится уязвимым
→ Пароль как крестраж: ещё один способ защитить свои учётные данные
→ Тим Бернерс-Ли предлагает хранить персональные данные в подах
→ Подготовка шаблона vApp тестовой среды VMware vCenter + ESXi
→ Создание группы доступности AlwaysON на основе кластера Failover
Подписывайтесь на наш Telegram-канал, чтобы не пропустить очередную статью. Пишем не чаще двух раз в неделю и только по делу.
What is RemoteFX?
RemoteFX is new age Remote Desktop Protocol and enables the GPU (GPU card) virtualization which means sharing a physical graphics adaptor among the multiple virtual machines The virtual machines can offload rendering of graphics information from the processor to the dedicated graphics processing unit ( GPU card) attached to the host. This feature reduces Virtual machine ’s load on physical processors and improves the graphical stability.
After the Bitcoin Boom, RemoteFX again has come into picture. I have spent time to dig down the internet and collect information about this amazing technology. So, if you are looking for the same, you are at the right place. I have consolidated everything that you should know about RemoteFX to begin with, here in this article.
Use of the Remote Desktop Protocol(RDP) is not new and evolved as a great tool for remote desktop connectivity for Windows operating systems. Users want to use their work stations from diverse devices, through networks. The RDP has resolved their issues with its rich features like complete 32-bit color support, audio redirection and that too bidirectional, RDS Print, support for real multi-color monitor and Aero glass monitoring.
Then, what went wrong? Why we need RemoteFX at the first place?
To experience a great usability, complete Aero Glass features, and graphics, RDP depends on the resource and network capabilities of the client. That means, if the VM gets connected from a basic client, the user will not get the Aero Glass experience at all. Also, multimedia rendering experience is not smoother with RDP.
Here comes the RemoteFX technology. It empowers the user to experience a smoother pseudo-local desktop experience with a support of full graphics, and consistent multimedia including 3D videos, irrespective of the capabilities and power of the client used.
What is RemoteFX?
We can define RemoteFX as an enhancement of Microsoft Remote Desktop Services(RDS). This technology enables users to work on a remote environment on Windows Aero Desktop with a richer experience of graphics rendering.
That means they can watch full-motion videos, Silverlight Animations, and running 3D applications on their session based virtual machines through network connections. Users can experience all these things, while accessing their applications remotely over the network with a constancy and performance of a real desktop machine.
RemoteFX is not a standalone technology or product from Microsoft. RemoteFX is a combination of three RDP technologies that are meant for Hyper-V 2008 R2 SP1 enabled servers with Windows 7 Service Pack 1 client on virtual machines, which runs VDI environments. This Hyper V server operating system is free.
It is a very good platform to implement VDI environments. Unlike the Enterprise editions, you do not need a virtual guest right on the server. All you need is a virtualized environment. This is the reason, RemoteFX has become a buzzword after it is being used for mining bitcoins rigorously, though it is an age-old technology that exists from 2010.
What does RemoteFX do?
RemoteFX is a combination of the goodness of RDS solutions for virtualization. It is made up of some session based virtualization and some other complex codes, which was introduced with Windows Server 2008.
We can use RemoteFX, as a tool for session-based virtualizations, virtual desktop infrastructure and/or a combination of these two. Here are some uses of this smart technology –
• We as system users, have become tech-savvy and mobile-oriented. To get along with the demand for remote system accesses, we can use RemoteFX along with RDS as a platform to provide the users a multisession and cost-effective solution for their daily work.
• RemoteFX provides the fidelity of real desktop in a local like environment through VDI. The remote applications have their own taskbar. We can move them across the monitors. We also can resize to the virtual environment. It allows the users to work in a secure and reliable remote environment through the experience of real customization.
• One of the three technologies of RemoteFX empowers the server to virtualize the GPU (graphics processing unit). This GPU then appears on the virtual machines running on the Hyper V Server. Windows 7 has some updated integration services that allow it to see this full-featured GPU and let the users use it without any need of additional software.
So, basically, RemoteFX is a set of RP protocols to give VM users a high quality, user experience through graphics virtualization and advanced coding. Using this flexible technology, users can experience seamless remote work through virtual desktops. This allows the use of Windows Aero Environment, run 3D applications through a performance close to native desktops.
Who will be using Microsoft RemoteFX and why?
RemoteFX provides a very consistent, high-end graphics with a higher constancy which works well regardless of the resources that clients use. With RemoteFX, you’ll have the ability to experience remote desktop with complete features which enable the redirection of high-end graphics to the remote VMs. Therefore, RemoteFX usage is going to leap is future.
Here are some of its features and usage –
Use of RemoteFX in Cryptocurrency
Graphics processing unit is a very important thing in the case where high -graphics are in demand. Technology that RemoteFX is based on, furnishes it with the ability to virtualize the Graphics Processing units or GPUs in the server. Then the GPU becomes available on the VM that is running on the server (Hyper V).
This virtualization of the entire GPU provides an awesome graphical experience to the VM users. High configuration servers and GPUs are essential for Cryptocurrency. Bitcoin mining has an essential use of GPU as it requires high graphical environment.
After the Bitcoin boom, GPUs are getting used through VMs over the LANs and WANs for mining. RemoteFX provides a seamless graphical experience to the VM clients irrespective of their powers and capabilities.
It offers real-time video rendering, a 3D application running, and other multimedia too. This is one of the reasons Bitcoin mining and cryptocurrency has started using the RemoteFX vigorously now. Another Reason for using RemoteFX in Cryptocurrency is that Hyper V server is free and now you can use it in a multipoint environment as well.
Gaming
High-quality GPU virtualization, multimedia redirection, new improved features for seamless virtualizations through WANs, high level enhanced USB redirections, and 3D applications running -these have made RemoteFX the first choice for the gaming industry. High-end game developers and testers use RemoteFX for shared resources of high-end servers through VMs.
Artificial Intelligence and RemoteFX
Though this is in a very initial or experimental stage, RemoteFX can essentially be used for gamification of businesses or anything. The potential of this technology in this field is still unleashed though.
Knowledge industry
People who work in knowledge-based industries and use various applications will now be able to use RemoteFX.
Applications such as Silverlight and Flash-based applications, USB devices that are used on VMs, VM based MS Office applications, Rich Media applications, Line-of-Business applications and many more – all these can be used on the virtual environments through RemoteFX.
The server administrators
Administrators who manage many standalone servers, server groups, VMs clients, or Host Server Remote Sessions can use RemoteFX. This will reduce the cost of high-end servers through creation of virtualized systems.
What to consider?
RemoteFX provides a rich and outstanding 3D experience in a remote environment. To get the 100% benefit of it, there are some technical considerations you need to keep a check on.
Hardware requirements for remote desktop Virtualization Host server
● RemoteFX supporting servers need high performance. Hence, the processor in the server that runs RemoteFX must be supporting L2 SLAT (Second Level Address Translation) for high-end performance.
● You need to have DitectX9.0 and DirectX1.0 supporting GPUs for graphical rendering during virtualization. Therefore, on the RemoteFX servers, at least one of such GPU is required. If more than one GPU is needed, they should be identical.
● If you require scalability in RemoteFX servers, you must install RemoteFX encoder in the RemoteFX server. It is optional though.
● Hyper-V hardware requirements are among the most essential requirements for RemoteFX to be up and running.
● For Live Migration option, the GPU of the source and destination servers must be identical.
Hardware requirements for Remote Desktop session Host server
RD Session host server that supports Streaming SMID Extensions 2 (SSE2) only can be used for RemoteFX on RD Session Host Server. If you need more scalability on your RemoteFX server, you may install RemoteFX encoder. This is an optional requirement.
How RemoteFX works?
Before we talk about the installation, let’s first understand, how RemoteFX functions.
The vGPU in the Microsoft RemoteFX enables the servers to virtualize the GPUs in the server. These virtualized GPUs then become available to the virtual machines that are running on the Hyper V Server.
Then the screen outputs, which are highly compressed bitmaps, are sent to the client. These screen outputs can include server side rendering of multimedia, Aero effects, other medias, applications, adobe flash based applications and Microsoft Silverlight based applications.
Rendering of all these things are actually performed in the Hyper V server within the Virtual Machines, and compressed images go to the client. In the client, the RemoteFX decoder decodes these images.
Then the ‘Intelligent Screen Capture’ functionality adjusts these outputs according to the capability of the client machine and the client side network. Thus, capabilities of the client don’t matter anymore to provide a high end graphical rendering through RemoteFX.
Once a client virtual machine is added to the RemoteFX, it will show as a VM has a GPU in real and graphics memory will be allocated too, based on the configuration of the RemoteFX VM.
What functionalities does it provide?
RemoteFX provides a never before graphical experience with a fidelity of native machines along with the following functionalities.
GPU Virtualization
Multiple virtual desktops share a single GPU on a Hyper V server is shared. This happens, when RemoteFX exposes a WDDM Driver, which is a virtual graphics device to the virtual desktop.
Intelligent screen capture
Earlier network capability differences between host and the client used to take troll on the graphical experience on a remote desktop. Intelligent Screen capture understands these differences. It is used to check changes in screen contents between the frames and transmit the bits which are changed for encoding.
Host side rendering
Host Side rendering provides the rendering on the host servers instead of the client servers. Also, it enables the host to send highly compressed bitmap images to the endpoint systems, which provides the experience of high quality graphical image rendering and performance like a native system.
RemoteFX Encoder
RemoteFX encoder is used for the scalability and high performance of the RemoteFX servers.
RemoteFX USB redirection
USB redirection provides the flexibility of redirection of many devices to the Remote Desktop Virtualization host server at the USB level. Through this, no physical device is required on the client side and any device can be connected to the USB.
Remote Decoder
It decodes the highly compressed bitmaps that are sent to the client from the virtual desktops.
Where do I get and who is providing RemoteFX Cloud Servers?
Microsoft Azure
Microsoft Azure Provides the efficiency and flexibility to run your Windows Server, Hyper-V server on Azure cloud spaces. It also enables you to install and run RemoteFX on the Azure Reserved VM Instances. These highly efficient servers and instances are self-managed.
Medha Hosting
Medha Hosting provides one of the best solutions to all your Virtualization needs and server supports. You can get Microsoft Server Support, physical as well as RemoteFX Cloud Servers, and technical consultation along with 24*7 support environment. Medha Hosting provides fully managed services. That means you can leave everything from Server setup to installation of RemoteFX to them and concentrate on your business well through the RemoteFX benefits.
You can check here our cheap dedicated server hosting services.
Amazon AWS
Amazon clouds enables you to deploy, manage and scale the Windows Servers efficiently and easily. You can install and setup RDP and RemoteFX on the Windows Servers on Amazon AWS. It provides secure, scalable, self-managed services for Microsoft Windows Server and Remote Desktop Protocols.
How to install RemoteFX?
We have read enough about RemoteFX till now. Let’s dive into the real thing. We need to follow the below steps to install RemoteFX on the intended servers.
Prerequisites to consider
Installation of RemoteFX and prepare it to work for you, needs some preparation. H.ere are those.
Software requirements
First you have to checkout which Windows Server version is suitable for you which supports RemoteFX services.
The minimum requirement for installing RemoteFX is Windows Server 2008 R2 SP1. You may use any of the versions like Standard, Enterprise or Datacenter, but you have to do the full installation for these servers. You may use Hyper V Server 2008 R2 SP1.
Running a full installation only will enable you to use Server Core for installing VDI environments. Other than that, you may use Windows Server 2012 R2, Windows Server 2016 Hyper V for the upgraded features.
Here is the list of supported GPU accelerations on VMs provided by Microsoft.
Image Source: https://docs.microsoft.com/en-us/windows-server/remote/remote-desktop-services/rds-supported-config
Hardware requirements
Well, the hardware requirements are very crucial for any type of VDI environment, including the RemoteFX.
● To virtualize a graphics processing unit on a server and make the GPU work like a real server side graphical rendering on the VM machine, you need a Graphics Processing Unit. Hence, the first requirement for installing RemoteFX is to get a GPU in the Windows 2008 R2 SP1 server or the Hyper V Server.
● The GPU you will use in the Server must support Direct X9.0c and DirectX10.0.
● GPU should be having a dedicated memory for high graphical rendering.
● Memory requirements depend on certain factors. One of them is your requirement of Virtual Machines to configure.
● You must use Identical GPUs must be used if you require more than one GPU in the Hyper V server.
Getting ready with the infrastructure
There are some requirements for RemoteFX vGPU which we need to take care of and that from the planning stage itself.
Host system requirements
For the full featured advanced RemoteFX GPU settings, you need the following.
● Windows 10 or Windows Server 2016(You may use older versions as well according to the compatibility shown in the table above.
● GPU that is compatible with DirectX 11.0 along with WDDM 1.2 compatible driver.
● Remote Desktop Virtualization Host Role enabled Windows Server which enables Hyper V Role.
● Second Level Address Translation supported CPU along with physical server.
Guest Virtual Machine requirements
The guest machine should be able to run a Windows Server, like Windows Server 2008 R2, Windows Server 2012 R2 or Windows Server 2016 OR a Windows Enterprise version client like Windows 7 SP1, Windows 8.1 or Windows 10.
Installation procedure
To install RemoteFX, here are some steps we need to follow.
Scenario
Suppose we are enabling RemoteFX on a Windows Server 2012 R2 environment. So, the process will be like the following –
● Install the Windows Server 2012 R2 first or make sure it is installed already
● You need to verify that the CPU supports SLAT using Systeminfo
● Install a display driver which supports WDDM 1.2 and DirectX 11 at least
● Use DxDiag to verify DirectX 11
● Windows SKU running inside the virtual machine must be Windows 8 Enterprise at least.
● Add the Hyper V Role to the Server
● Add the RDS or Remote Desktop Services
● Install and configure RemoteFX on the top of it.
So let’s follow it step by step to install and enable RemoteFX.
Here, we’ll see how to set up and configure RemoteFX on Windows Server 2012 R2 with a Hyper V host. For RemoteFX vGPU, we assume we are having a DirectX11.0 compatible graphics adapter in the VMs we are going to use.
Install Hyper-V Role
To install Hyper V Role on a server we can either use the Power Shell method or we can use the graphical Server Manager wizard.
Using PowerShell
First launch the PowerShell from the taskbar icon.
● On the PowerShell terminal, type “Get-WindowsFeature”. You’ll get the list of the features you can install.
● Now type ‘Install-WindowsFeature Hyper-v –IncludeManagementTools’
● After it is installed and the cursor is back, Restart the Windows.
Using Server Manager
Open the Server Manager First and then follow the below steps.
● Click on “Add roles and features”. Below screen will appear.
● Click Next and you get the following screen.
● Select “Select Role-based or Feature-based installation and click on Next.
● Select the server from the Server Pool option and click on Next.
● On this screen click on Add Features and the following screen will appear.
● Select Hyper-V and click Next.
● On this screen click on next unless you want to add additional features.
• Click on Next.
• If you want to add external interfaces, you may select LAN. We click on Next.
• Click on Next. These settings can be changed later as well. So, we are just skipping the screen leaving it as it is.
• We need to modify the default locations to the destination as we require on our system. Then click on Next.
• Next, a warning screen appears. On this, we need to click on Yes to restart server automatically later without appearing of any additional notification later.
• Save and Close everything before you start the installation of Hyper-V. By clicking on Install, you just enable the system to start the installation of Hyper-V Role.
• Now, you need to click on Close after the Hyper V server is installed. Now, it is ready to get configured.
Configure Hyper V Role
Once the Hyper V is installed on Windows Server, you can readily start configuring it. You need to select the local server which you want to add the role into first.
Then, use the Add Roles and Features wizard to add the role to the server. You’ll sell a screen like below with the Hyper-V status as “Installed”.
Now follow the steps of the wizard as required to finish up adding the Hyper-V Role configuration.
After adding the Hyper-V Role, The Hyper-V Manager will be available after you add the Role.
Install Remote Desktop Services (RDS)
To make the RemoteFX up and running, you need to install Remote Desktop Virtualization Host(RDVH) and make it up and running on the machine, which Hyper-V server is installed upon.
A Remote Desktop Licensing Server should be available on the network, so that RDVH gets the confirmation about Remote Desktop Access Licenses from the Remote Desktop Licensing Server.
To install the RDS, you need to log on to the Domain Controller and open the Server Manager. Then right click on the “All Servers Node” and select the target server by – right click on All Servers Node, then click on Manage and finally click on Add Servers.
Next, you need to click on “Add Roles & Features”.
Click on Next.
Click on Remote Desktop Services Configuration and click on Next.
Now we need to select the deployment options. It is safer to use the Standard Deployment for a standard installation.
Click on Next and then click on the session based desktop deployment. Click on Next.
Click on the server your intent and then click next.
After specifying the RD session host, you need to restart the server to complete the installation.
Click on Deploy.
Installation of Remote Desktop license
To Install the Remote Desktop License, you need to follow these steps.
• First, start the Remote Desktop Licensing Manager. Then you need to connect to the machine where the RDLM server is running on.
• Now, go to the Server Nodes Context Menu-> Open Properties menu. Check that the connection method is set as Automatic Connection. You need to enter the required information like Name, Company Name, country etc. for licensing purpose.
• After selecting the option Install Licenses which is there in the server node’s context menu.
• On the Install Licenses wizard, you need to select the licensing program you require. Click on Next.
• In the next step, you need to enter the license information that you have purchased.
• Now the Wizard will install the RDS license program to complete the licenses. You can check the installation status in Remote Desktop Licensing Manager.
Configure Remote Desktop Services (RDS)
After the installation of RDS host and RDS License, RD Licensing Diagnoser becomes available like this.
- Open the Diagnoser and RD licensing server gets located via Group policies. In our case, it is a local group policy. Open the gedit.msc, file and navigate to the Licensing directory. The path will be something like this.
2. Now open the ‘Use the specified Remote Desktop license servers’ window to set up the policy.
3. Next step is to open the Remote Desktop licensing mode window. Specify the licensing policy for each device after enabling the policy setting by clicking on Enable.
4. After setting the policy RD Diagnoser looks like this.
Install and configure RemoteFX
1. Once the installation of Hyper V Role and Remote Desktop Virtualization Host Role is done, you need to open the Hyper V Manager interface.
2. In the Hyper V Settings, you need to select the physical GPU support
3. Navigate to Virtual Machine settings.
4. Select Add Hardware to add the RemoteFX 3D Graphics adapter to the VMs which are essentially Windows 8 Enterprise edition or Windows Server 7 enterprise
5. Now select RemoteFX 3D Video Adapter in the Windows 8 RemoteFX settings screen and click on Add.
6. Now it is time to add a maximum number of monitors and resolution which will be used by the RD Clients connected to the virtual machine. Navigate to the properties of the RemoteFX 3D video adapter.
7. Click on OK to save the changes.
8. Now verify that the Microsoft RemoteFX Graphics Device -WDDM is being recognized as a display adapter during the connection request to the Remote Desktop Client by checking the device manager
This completes the installation and configuration of the RemoteFX vGPU.
Testing RemoteFX functionality
To enable the RemoteFX compression, we need to follow the below steps.
1. First, you need to log on to the RDSH-SRV as a member user of the local administrator group.
2. Now click on Start, click on Run type gedit.msc and click OK.
3. Now navigate to the directory ConfigurationAdministrative TemplatesWindows ComponentsRemote Desktop ServicesRemote Desktop Session HostRemote Session Environment.
4. Then double click on the Configure RemoteFX option, click on Enabled and click OK.
5. After a Reboot, RemoteFX is ready for a test.
6. Open the Event Log and check on ‘Enable Analytics and Debug’ log option.
7. Navigate to the Remote Desktop Session Manager through Application and ServicesLogsMicrosoftWindowsRemoteDesktopServices-RemoteDesktopSession Manager.
From the Event ID shown in the Session Manager, we can decide RemoteFX is working or not.
I. If the Session ID shows 1000, it means the system is connected to the Remote Desktop session using the RemoteFX for the RD Session host.
II. Event ID 1001 will be shown if the RemoteFX hardware compression is not getting used for RD Session host.
Optimize for best performance
To optimize the visual experience and performance, the experience index for RemoteFX can be configured by using these policy settings.
●Navigate to Computer “Computer ConfigurationPoliciesAdministrative TemplatesWindows ComponentsRemote Desktop ServicesRemote Desktop Session HostRemote Session Environment”.
● Now Enable the option Optimize Visual Experience when using RemoteFX.
● Now, in the Screen Capture Rate (Frames Per Second) box, click on the ‘Highest Best Quality Option’.
● Click OK.
● Now, check the Enabled option and click on OK button.
● Reboot the RDSH server.
The settings for best visual experience will be applied.
RemoteFX vastly improves the user’s visual experience during a remote desktop session (RDP). RemoteFX lets users enjoy high-quality media support, audio-synchronization, graphics, and RemoteFX USB redirection.
Contents:
- What is RemoteFX?
- Microsoft RemoteFX features
- RemoteFX vGPU
What is RemoteFX?

RemoteFX is not a standalone product from Microsoft. Rather, it describes a set of RDP technologies — most prominently graphics virtualization and the use of advanced codes — which have been added since Windows Server 2008 R2 Service Pack 1; these technologies are based on the IP that Microsoft acquired and continued to develop since acquiring Calista Technologies.
With Microsoft RemoteFX, users will be able to work remotely in a Windows Aero desktop environment, watch full-motion video, enjoy Silverlight animations, and run 3D applications – all with the fidelity of a local-like performance when connecting over the LAN. Their desktops are actually hosted in the data center as part of a virtual desktop infrastructure (VDI) or a session virtualization environment (formerly known as Terminal Services).
With RemoteFX, these users will be able to access their workspace via a standard RDP connection from a broad range of client devices – rich PCs, thin clients and very simple, low-cost devices.
Microsoft RemoteFX features
Released in 2011 as part of Service Pack 1 (SP1) for Windows Server 2008 R2, and Windows, Microsoft RemoteFX delivers graphics hardware support to Hyper-V virtual machines (VMs).
RemoteFX vGPU was one of many innovations that RemoteFX protocol brought to the table. By permitting VMs to “tap” physical graphic processing units (GPUs) and present them as virtualized graphic processing units, RemoteFX vGPU enables hardware acceleration in virtual machines (RDP sessions).
Other Remote Desktop RemoteFX features include:
USB Redirection. Users can access and enjoy full control over peripheral USB devices in remote desktop sessions.
RemoteFX Callista Codec. Users have access to high-fidelity text and video media during remote desktop sessions.
Windows Multimedia Redirection (WMP) is another exciting option that allows multimedia content opened in Windows Media Player to redirect to a remote desktop session.
Redirect USB devices to remote desktop
14-day free trial
Redirected to a client machine via MMR, users could enjoy supported media types streamed on their Local Area Network (LAN). The following list outlines missing features that users should be aware of:
- Lack of support for Non-WMP content (like Flash and QuickTime formats).
- All MMR data must be decoded and rendered on the client machine. Based on the client’s specifications, users experienced limited streaming quality as a result.
- Bandwidth usage is reliant upon the original video’s bit rate. Videos with high bit rates require fast and reliable connections (which isn’t always convenient).
- Users with high-latency networks and low bandwidth suffered terrible streaming experiences. Users would see frame-skipping, low frame rate, unstable streaming quality, and data loss.
Massive enhancements were introduced to the RemoteFX features thanks to the release of Windows 8, and Windows Server 2021. New features were also developed like RemoteFX Adaptive Graphics, RemoteFX Multi-Touch, RemoteFX Media Redirection AP, and RemoteFX for WAN.
With the release of Windows 10 Enterprise and Windows Server 2016, the RemoteFX Windows 10 version had multiple new improvements, e.g. MMR was replaced by Microsoft RemoteFX Media Streaming, as MMR still failed to support all video format types.
Adversely, RemoteFX Media Streaming melded broad video format support and H.264 codec into one, establishing host-side redirection and rendering capabilities.
RemoteFX 3D Video Adapter (vGPU) support
In Windows Server 2012, and subsequent releases (RemoteFX in Windows 10), RemoteFX was designed with more default features that made it simpler and easier to use.
The host machine’s Hyper-V server needs a “non-server core setup” that excludes any media codecs before connecting RemoteFX with a vGPU (virtual graphical processing unit).
No additional configuration is necessary to enable RemoteFX Media Streaming (or any other RDP service).
Note! There’s an existing vulnerability (CVE-2020-1036) that hackers might take advantage of to remotely execute code. They can run that code on a host machine using specially designed programs on a virtual machine (VM) with RemoteFX GPU and then strike video drivers on a Hyper-V host.
In this scenario, a verified user on a guest OS cannot have their input correctly authenticated by a host server. However, Microsoft claims that this is an architectural problem and does not offer a patch to address the said vulnerability.
Because of these security issues, Microsoft eventually made automatic updates to eliminate and disable RemoteFX in all Windows versions:
• Microsoft disabled RemoteFX vGPU for all Windows versions on July 14, 2020.
• Microsoft removed RemoteFX vGPU on April 13, 2021.
Other RemoteFX requirements are:
- DirectX 11.0-compatible GPU alongside a WDDM 1.2-compatible driver (for those using Windows Server 2008 R2 Service Pack 1: server(s) need no less than one DirectX 9.0c and 10.0 compatible graphics card).
- A CPU that supporting Second-Level Address Translation (SLAT).
- Installed VM instances that run on (and are created with) Hyper-V.
- Host computers with non-domain Controllers.
- Enabled RemoteFX vGPU support for the below listed operating systems:
- ○ Windows 7 SP1
- ○ Windows 8.1
- ○ Windows 10 1703 or newer
- ○ Windows Server 2016 (in single-session deployment only)
Even though GPUs with OpenGL/OpenCL is supported and provide full-functionality, it is strongly advised to only use graphics cards designed to work within a professional workstation.
Windows Enterprise editions are the only versions able to support a RemoteFX virtual graphics adapter.
A useful feature that was introduced not too long ago for Windows 10 has now been disabled. The RemoteFX vGPU feature lets the users of Virtual Machines (VMs) running Windows Server 2008 R2, Server 2012, Server 2016, and Windows 10 running on Hyper-V use the physical Graphics Processing Unit (GPU) of the host machine to render its graphic output.
As of the most recent update by Microsoft for Windows 10, KB4571757, Microsoft has decided to discontinue this feature due to a critical vulnerability discovered in Remote Code Execution.
Let’s look into the details of the feature, why it was discontinued, and whether or not we can find a way for it to still work.
Table of Contents
What is RemoteFX vGPU?
The VMs running on Hyper-V can use the physical GPU on the host computer to run their tasks concerning video rendering and image processing, using the RemoteFX vGPU feature. This allows users to take the load off of their CPU and run heavy image processing on their VMs using the shared GPU.
With this feature, a dedicated GPU for each VM is not required and simultaneously provides enhanced scalability and usability of the GPU, as well as the VMs. Head on to Microsoft’s web page to learn more about the feature.
Why did Microsoft remove RemoteFX vGPU feature?
Although the RemoteFX vGPU feature is old as it was introduced in Windows 7, it is now being exploited by hackers to execute remote commands on the host machine. This feature is not capable of authenticating the input of a valid user on the VM. A hacker can exploit this vulnerability to run modified applications on the VM to exploit the drivers of the host GPU and gain access. Once they have access to the host machine, they are able to execute remote commands and scripts.
Although Microsoft addresses such vulnerabilities through their regular updates, they were unable to do so as the flaw is architectural.
Microsoft started removing this feature for different versions of the OS back in July 2020. However, the Windows 10 cumulative update for September 2020 disabled the feature in all editions of Windows 10 version 2004.
Microsoft states that users will still be able to re-enable the feature until February 2021 through special commands, but should start working on alternative methods which will be discussed further down the article. Here is a notification by Microsoft on disabling RemoteFX vGPU.
How to enable RemoteFX vGPU on Hyper-V running on Windows 10
Although Microsoft has greyed out the feature to enable RemoteFX vGPU through Hyper-V on Windows 10, it can still be enabled through a command using PowerShell. Moreover, the Group Policy Settings are still there within the guest Operating Systems (VMs) which can be used to enable the feature on the VM just as before.

- First, turn on the VM you wish to configure this feature on and open the Group Policy Editor by typing in gpedit.msc in Run.
- In the Group Policy Editor, navigate to the following from the left pane:
- Computer Configuration -> Administrative Templates -> Windows Components -> Remote Desktop Services -> Remote Desktop Session Host -> Remote Session Environment -> RemoteFX for Windows Server
- In the right pane, double-click on Configure RemoteFX.
- In the Configure RemoteFX properties window, select Enabled, and then click Apply and Ok.
- Now open the Command Prompt and type in gpupdate /force to update the Group Policies.

- Download and install the recommended GPU driver according to your physical GPU. Here is a detailed review of GPUs and how to manage them.
- Now shut down the VM and navigate back to the hosting computer running Hyper-V.
- Since the RemoteFX 3D Video Adapter option is greyed out in the settings of the VM, we shall enable it through PowerShell. Run PowerShell with Administrative Rights. Here is a complete guide on how to always run PowerShell in Administrative Mode.
- Enter the following command while replacing (name) with the name of your virtual machine:
Add-VMRemoteFX3dVideoAdapter -VMName (name)
- Now open the VM Settings through the Hyper-V control panel and you will find the RemoteFX ED Video Adapter under the Processor tab. Click on it and then make the configurations according to your needs.


You can now start and connect to the virtual machine and it will now use the host machine’s GPU to process its workload. You may also configure multiple VMs to run on a shared physical GPU.
Alternative for RemoteFX vGPU
Microsoft is permanently planning on removing the feature by February 2021. However, they have not left their users stranded. Microsoft has also proposed an alternative solution to directly mount the physical GPU on the PCIe port to a VM through the Discrete Device Assignment (DDA).
This method has three phases which need to be completed in order to provide a VM with a dedicated GPU:
- Configure the VM for DDA
- Dismount the GPU from the host computer
- Assign the GPU to the VM
Configure the VM for DDA
On the host computer, run the following commands one after the other to configure its settings. Replace (name) with the name of the VM:
Set-VM -Name (name) -AutomaticStopAction TurnOffSet-VM -GuestControlledCacheTypes $true -VMName (name)Set-VM -LowMemoryMappedIoSpace 3Gb -VMName (name)Set-VM -HighMemoryMappedIoSpace 33280Mb -VMName (name)
Dismount the GPU from the host computer
Firstly, you need to disable the GPU on the PCIe port, and then dismount it. But before that, you are going to need the port’s physical address. This can be determined by performing the following:
- Head to the Device Manager by typing in devmgmt.msc in Run.
- Now expand Display Adapters and right-click on the GPU. Select Properties from the Context Menu.

- Go to the Details tab and select Location Paths from the drop-down menu under Property.
- Note that the entry starts with “PCIROOT” as this will be required when dismounting the GPU from the host device.

Now perform the following to dismount the device:
- Head to the Properties window of the GPU from the Device Manager.
- Go to the Driver tab and then click on Disable device.
Now that the device has been disabled, you need to dismount it.
Enter the following command in Command Prompt:Dismount-VMHostAssignableDevice -force -LocationPath $(LocationPath)
Replace (LocationPath) with the PCIe path you had noted earlier.
Once done, you may proceed to the next phase.
Assign the GPU to the VM
Now all you need to do is program Hyper-V to let the specified VM use the physical GPU. This can be done by running the command below in Command Prompt:Add-VMAssignableDevice -LocationPath $locationPath -VMName (name)
Replace (name) with the name of the VM.
You may now start the guest operating system and see that the video adapter it is now using will be the physical one on your host computer.
If at any time you wish to return the GPU back to the host device, simply run the following two commands in the same order, one after the other, in the Command Prompt while replacing (name) with the name of the VM:Remove-VMAssignableDevice -LocationPath $locationPath -VMName VMName<br>Mount-VMHostAssignableDevice -LocationPath $locationPath
Closing words
The RemoteFX vGPU hasn’t been around much for the version 2004. However, people liked the idea of it. Seeing it go might not be as troublesome as anticipated unless you put in the cost factor.
Although Microsoft has given an alternative for using designated GPUs for each virtual machine, it would not be ideal to place as many GPUs on the motherboard of the host computer as the virtual machines. The costs would be too high, and power consumption would not be ideal.
Microsoft needs to find a workaround for the issue as the solution provided is not feasible for most users.
Installing video acceleration and a graphics card on a physical computer for better performance and image quality is a common task. But what do you do when you need to run applications for video rendering or 3D modeling on a VM and need hardware video acceleration and a graphics card?
When it comes to VMs, hardware resources are shared between virtual machines for flexible and rational resource usage. If a VM is running heavy applications, it can consume more CPU and memory resources than other VMs that are idle or running less resource-intensive operations. In addition, VMs use only basic video functionality to display data by default. In a Microsoft Hyper-V environment, you can use Hyper-V RemoteFX to allow VMs to share the resources of a video card and 3D acceleration.
Read this blog post to learn about Hyper-V RemoteFX and how to configure RemoteFX on Windows machines.
What Is RemoteFX
RemoteFX is a feature that allows Hyper-V virtual machines to share a physical GPU (graphics processing unit). The resources of a video card are shared among multiple VMs. This is the optimal scenario for high-burst workloads when the dedicated resources of a video card are not required at all times. Hyper-V RemoteFX can be used to deploy a VDI (virtual desktop infrastructure). A RemoteFX GPU is a virtual device attached to a virtual machine that shares the resources of a physical video card installed on a Hyper-V host (shares the GPU and video memory).
RemoteFX was introduced in Windows 7 and has been available in Windows 8, Windows 10, Windows Server 2008 R2 SP1, Windows Server 2012, and Windows Server 2016. This feature is not present in Hyper-V Manager in the latest version of Windows Server 2019 – you cannot enable Hyper-V RemoteFX in the graphical user interface (GUI). Using RemoteFX decreases CPU (central processing unit) load and increases scalability in a virtual environment. You don’t need to attach a dedicated GPU for each VM when using Hyper-V RemoteFX because virtual machines can dynamically share the GPU for the workload.
Video rendering, processing heavy images, working with CAD applications, and 3D modeling are some of the cases when you may need 3D acceleration and a RemoteFX GPU in a VM. A modern GPU is better adapted for parallel processing than the CPU, handles more threats simultaneously, and has more processing cores. The number of monitors and used resolutions depends on the video memory and the GPU performance of a video card. Use Remote Desktop, not VMConnect (Virtual Machine Connection), to connect to VMs using RemoteFX.
The advantage of RemoteFX is that it can be used on desktop and server Windows versions. While buying a supported video card that is compatible with server hardware may not be easy, most desktop computers that usually run client Windows operating systems have PCI Express graphics adapters installed.
End of Support
There is a vulnerability (CVE-2020-1036) that can be used by cybercriminals for remote code execution. Hackers can execute remote code on a host machine by using specially crafted applications on a VM with RemoteFX GPU to attack video drivers on a Hyper-V host. A host server cannot properly validate input from an authenticated user on a guest OS in this case. Microsoft doesn’t provide a patch to fix this vulnerability and says that this is an architectural issue. Due to these security concerns, Microsoft decided to disable and remove RemoteFX from all Windows versions using automatic updates:
- RemoteFX vGPU was disabled on July 14, 2020, for all Windows versions.
- RemoteFX vGPU was removed on April 13, 2021.
RemoteFX works on Windows 10 version 1803 and earlier Windows versions (can be configured in a few clicks in the GUI of Hyper-V Manager). After the KB4571756 update (a cumulative update released in September 2020), this feature is disabled in the GUI. As a result, Windows 10 RemoteFX configuration is not available in the GUI of the Hyper-V Manager in Windows 10, version 1809, because the feature was disabled. Until the updates in April 2021, RemoteFX GPU had to be enabled in PowerShell with special commands.
RemoteFX Requirements
- A supported Windows version on a Hyper-V host (Windows 7 Ultimate/Enterprise, Windows 8 Ultimate/Enterprise, Windows 10; Windows Server 2008 R2 SP1, Windows Server 2012, Windows Server 2016, Windows Server 2019). Updates removing Hyper-V RemoteFX must not be installed.
- A GPU must be compatible with DirectX 11 on a host machine (DirectX 10 can be used on Windows Server 2008 and Windows 7 installed on a physical machine). If multiple video cards are installed on the Hyper-V host, they must be identical. DirectX 11 is available on Windows 8.1 and newer Windows versions on guest VMs.
- A CPU must support SLAT (Second Level Address Translation). The name of this feature is Extended Page Tables (EPT) for Intel processors and Nested Page Tables (NPT) for AMD processors.
- Supported guest operating systems are Windows 7 SP1, Windows 8 and 8.1, Windows 10 1703 or later, Windows Server 2008 R2, Windows Server 2012, Windows Server 2016 (in a single-session deployment only).
Prepare the physical machine that is the Hyper-V host. Make sure that you have installed graphics drivers for a graphics adapter on the Hyper-V host. It is recommended that you install the latest stable version of drivers provided by your GPU vendor (for example, NVIDIA or AMD).
Prepare a virtual machine that is running a supported version of Windows to use Hyper-V RemoteFX. In my example, the name of the VM is Windows-VM, and the name of the Hyper-V host is Hyper-V-prim.
Installing the needed features
Install the Remote Desktop Virtualization Host service on the Hyper-V host.
Open Server Manager, and click Manage > Add Roles and Features.
The Add Roles and Features Wizard opens.
Installation Type. Select Role-based or feature-based installation. Hit Next at each step of the wizard to continue.

Server Selection. Select a server from the server pool. Make sure that your Hyper-V host is selected.

Server Roles. Select Remote Desktop Services in the list of roles. If the Hyper-V role is not installed, select and install the Hyper-V role.

Features. Skip this step.
Remote Desktop Services. Read the explanation, and go to the next step.
Role Services. Select Remote Desktop Virtualization Host. You can read the description in the right pane.

Reboot the Hyper-V host when the installation of the role is finished.
Configuring Hyper-V Settings
Open Hyper-V Manager by running virtmgmt in the command line or using the Windows GUI. Then open Hyper-V Settings.
In the navigation pane of the Hyper-V Settings window, click Physical GPUs. In the drop-down menu, select your video card, and then select the Use this GPU with RemoteFX checkbox.

If you cannot select this checkbox, then your video adapter cannot be used for RemoteFX, or RemoteFX is disabled.
Stop the virtual machine.
Open Hyper-V Manager, select your VM, right-click the VM, and open VM Settings.
In the VM Settings window, click Add Hardware in the left pane (the navigation pane). In the right pane, you see a list of devices that you can add to a virtual machine. The workflow is similar for Generation 1 and Generation 2 VMs.
If a RemoteFX 3D Video Adapter is active (a black font is used), select this adapter and click Add. This option is active in Windows versions until July 14, 2020, updates are installed.
If your Windows was updated, the RemoteFX 3D Video Adapter option is inactive (a grey font is used), and you cannot add this adapter in the GUI of Hyper-V Manager. At the same time, the Physical GPUs option is no longer displayed in Hyper-V Settings.

You can fix this in PowerShell.
Run the command in PowerShell on the Hyper-V host to add a RemoteFX 3D video adapter to a VM:
Add-VMRemoteFx3dVideoAdapter -VMName your_VM_name
If the command is executed successfully, a warning message is displayed.
WARNING: We no longer support the RemoteFX 3D video adapter. If you are still using this adapter, you may become vulnerable to security risks.
If you see the error: Add-VMRemoteFx3dVideoAdapter: To enable this device, use Server Manager to install the Remote Desktop Virtualization Host role service
The Remote Desktop Virtualization service is not installed on the Hyper-V host. See Installing the needed features earlier in this post.
Enabling Windows 10 RemoteFX after installing updates
As I mentioned earlier, if the Windows updates of July 14, 2020, are installed, Microsoft RemoteFX is disabled. If you have VMs configured to use RemoteFX, they won’t start. The following Windows 10 RemoteFX error for Windows 10 with the July 14, 2020, update is displayed when trying to start a VM:
An error occurred while attempting to start the selected virtual machine(s):
‘VM-name’ failed to start.
Synthetic 3D Display Controller (Instance ID xxxxxxxx-xxxx-xxxx-xxxx-xxxxxxxxxxxx): Failed to Power on with Error ‘Insufficient system resources exist to complete the requested service.’.
The virtual machine cannot be started because all the RemoteFX-capable GPUs are disabled in Hyper-V Manager. You must enable at least one GPU.
Another variant of the error:
The virtual machine cannot be started because the server has insufficient GPU resources.
You can fix this in PowerShell. This method is applicable for Windows 10 and the appropriate Windows Server versions. Use commands in PowerShell to fix this error and enable RemoteFX. Run this command to check information about the video adapter on the Hyper-V host:
Get-VMRemoteFXPhysicalVideoAdapter
Find this string:
Enabled: False
It means that RemoteFX is disabled. Change this value to True.

Copy the name of the video card (in my example, NVIDIA GeForce GTX 1060).
Run the command:
Enable-VMRemoteFXPhysicalVideoAdapter -Name "video_card_name"
Enter your graphic card name.
Try to start your VM using RemoteFX again. The VM should start now.
Note also these PowerShell cmdlets to manage a RemoteFX 3D video adapter:
Set-VMRemoteFx3dVideoAdapter
Get-VMRemoteFXPhysicalVideoAdapter
After adding a RemoteFX 3D video adapter to a VM, this adapter should be visible in the list of VM hardware with options to set resolution, the number of monitors, and dedicated video memory.
If you don’t see these options in the GUI of Hyper-V Manager, use additional parameters when adding a RemoteFX video adapter to a VM in PowerShell, for example:
Set-VMRemoteFx3dVideoAdapter -VMName Windows-VM -MaximumResolution 1024x768 -VRAMSizeBytes 536870912
If Microsoft RemoteFX was configured successfully, in the guest Windows that is running on the VM, you see a Microsoft RemoteFX Graphics Device – WDDM device in the Display Adapters section of Device Manager. This RemoteFX 3D video adapter is a virtual device that shares the resources of the physical video card installed on the physical Hyper-V host by using RemoteFX.
Troubleshooting
Sometimes additional errors may occur. Let me explain a common error when a user cannot connect to a running VM using Remote desktop RemoteFX.
Symptoms:
- Video remoting was disconnected and the appropriate message is displayed.
- RDP failed to connect: Your Remote Desktop session has been ended, possibly for one of the following reasons.
If this error occurred on your VM, edit a group policy in the guest Windows on the VM.
Click Start > Run > gpedit.msc to open the Group Policy Editor for a local machine.
In the left pane of the Group Policy Editor window, navigate to
Computer Configuration > Administrative Templates > Windows Components > Remote Desktop Services > Remote Desktop Session Host > Remote Session Environment > RemoteFX for Windows Server. Double-click Configure RemoteFX in the right pane of the window.
A window with Configure RemoteFX properties opens. Select Enabled, and hit OK to save settings.
Double-click Use WDDM graphics display driver for Remote Desktop Connections (available for Windows 10 version 1903 and newer Windows versions).
In the window that opens, select Disabled, and hit OK.
Update configuration of group policies to apply new settings with the command:
gpupdate /force
Reboot your virtual machine. Try to connect to your VM using the Enhanced Session Mode.
How to Prevent Disabling RemoteFX on a Hyper-V host
After the Windows update released in April 2021 is installed, VMs using a RemoteFX 3D video adapter fail to start. You can disable automatic updates on Windows computers at your own risk to continue using RemoteFX. Note that security patches are not installed automatically on Windows machines if Windows updates are disabled. Unpatched vulnerabilities are a threat for your computers, which are then at risk of getting infected with ransomware, viruses, and other malware.
You can download Windows updates (patches) manually from the Microsoft site and install them. Learn which Window updates are intended to remove RemoteFX and don’t install them. Consider deploying WSUS (Windows Server Update Services) in your organization and deselect the updates that you don’t need.
Don’t forget to back up your Windows servers and Hyper-V virtual machines. In case of a disaster or ransomware attack, having a backup allows you to recover your data, restore workloads, and resume operations in a short time. Use NAKIVO Backup & Replication to back up your physical and virtual machines.
Alternatives to Hyper-V RemoteFX
Microsoft recommends that customers use DDA instead of using RemoteFX after April 2021.
DDA (Discrete Device Assignment) is a feature that allows you to attach a device (in my case, a PCI Express device) directly to a VM. In the case of a graphics card, the card should be disconnected from the host machine and connected to a VM. Only one VM can use a video card with DDA at any given time.
A video driver for a GPU must be installed on the guest OS of a VM, not on a host machine. In this case, features such as DirectX 12 and CUDA (Compute Unified Device Architecture) are available on a VM (CUDA is not available on a VM when using RemoteFX). When using Direct Device Assignment, VM migration between Hyper-V hosts is not possible.
Consider using VMware alternatives for servers and desktops running VMs. Use Virtual Shared Graphics Acceleration (vSGA) and Virtual Shared Pass-Through Graphics Acceleration in VMware vSphere to share GPU with multiple VMs. Use compatible video cards that support GPU virtualization and have the appropriate hardware features:
- nVidia GRID vGPU
- AMD Multiuser GPU
You can enable accelerated 3D graphics for a VM in VMware Workstation if you use a desktop machine rather than a server.
Conclusion
Hyper-V RemoteFX is a useful feature that allows VMs to share hardware resources of a physical video adapter installed on a Hyper-V host and use 3D acceleration for applications on virtual machines. To configure RemoteFX on a virtual machine, install the Remote Desktop Virtualization Host service on the Hyper-V host, edit general Hyper-V settings to select the GPU that must be used for video acceleration, and add a RemoteFX 3D video adapter in the virtual hardware options of the VM. Unfortunately, Hyper-V RemoteFX is deprecated by Microsoft, and using RemoteFX is possible only until you install Windows updates of April 2021.