Как настроить Terminal Services RemoteApp (удаленные приложения) в Windows 7 Корпоративная? После моей заметки “Как сделать из Windows 7 терминальный сервер?” – это сделать проще простого. Нужно добавить пару ключей в реестр и создать файл для подключения.
1. Правим реестр. Запускаем regedit.exe. И идем в ветку:
HKLM\Software\Microsoft\WindowsNT\CurrentVersion\TerminalServer\TSAppAllowList
В разделе TSAppAllowList создаем новый подраздел Applications. Далее создаем подразделы для программ, которые должны будут запускаться в качестве RemoteApp. Для каждой программы свой подраздел. Для проверки создадим подраздел с названием Notepad. Переходим в него и создаем два строковых параметра Name и Path. Для параметра Name задаем значение notepad.exe, а для Path – путь к папке где лежит приложение, в нашем случае – C:\Windows. (Путь должен быть к папке на компьютере, который будет выступать в роли терминального сервера с Windows 7).

Добавляем приложения следующим образов. В разделе Applications создаем дополнительные разделы для каждой программы. И в этих разделах создаем два строковых параметра Name и Path.

На последок изменим еще один параметр. Переходим в раздел TSAppAllowList. И выставим значение 1 для параметра fDisableAllowList.

С реестром закончили.
2. Создадим файл для подключения к удаленному рабочему столу
Запускаем утилиту Подключением к удаленному рабочему столу через меню Пуск –> Стандартные, либо Win+R, вводим mstsc, Enter.
В открывшемся окне вводим имя ПК, либо IP адрес компьютера с Windows 7 TS RemoteApp. Жмем Сохранить как… И сохраняем в любом месте.
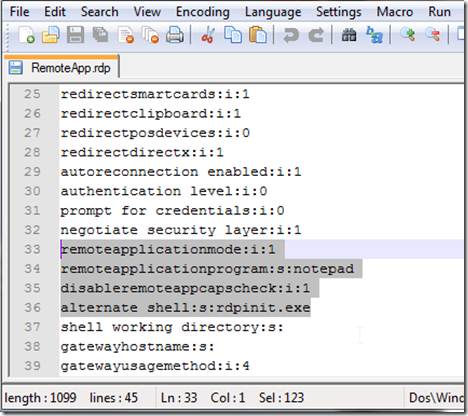
Откроем полученный файл в Notepad++
В файле меняем значение параметра remoteapplicationmode:i:0 на remoteapplicationmode:i:1. После добавим 3 строчки:
remoteapplicationprogram:s:notepad
disableremoteappcapscheck:i:1
alternate shell:s:rdpinit.exe

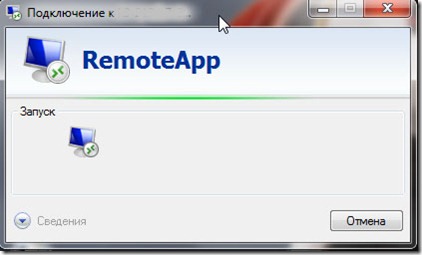
Сохраняем файл RemoteApp.rdp и запускаем.

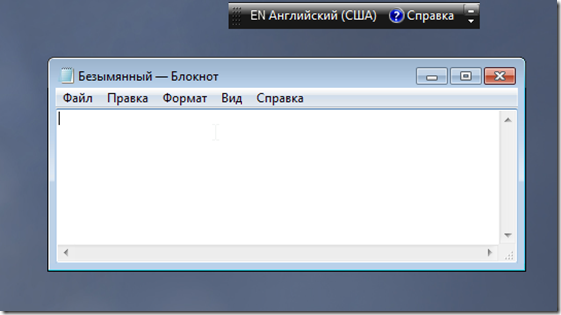
При подключении спросит логин и пароль. Нужно чтобы учетная запись входила в группу Пользователи удаленного рабочего стола. Либо надо быть локальным админом, либо доменным. Если все условия соблюдены, то через пару секунд откроется Notepad.

Пробовал разные программы и даже некоторые игры – работает. Вот только как это применить на практике, я пока не придумал.
01.11.2011 — Метод работает только в Windows 7 SP1 Корпоративная (может еще в Windows 7 Максимальная — не проверял). В Windows 7 SP1 x32 Профессиональная не работает.
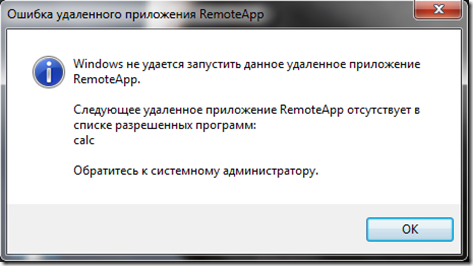
З.Ы. Если при подключении выскакивает сообщение: “Следующее удаленное приложение RemoteApp отсутствует в списке разрешенных программ”, то нужно проверить параметр реестра fDisableAllowList, что у него значение 1.

Перед выполнением пунктов этой статьи надо убедится, что заменен файл termsrv.dll, как описано в статье “Как сделать из Windows 7 терминальный сервер?”. Проверить подключение по RDP к этому компьютеру.
Applies ToWindows 7 Service Pack 1 Windows 7 Enterprise Windows 7 Home Basic Windows 7 Home Premium Windows 7 Professional Windows 7 Starter Windows 7 Ultimate
Введение
В данной статье рассматривается обновление для возможности подключения к удаленным рабочим столам и приложениям RemoteApp в Windows 7. Это обновление обеспечивает поддержку для определенных функций Windows Server 2012 R2 в Windows 7.
Дополнительные сведения
Сведения об обновлении
Это обновление устанавливается при установке 2830477 обновления из центра обновления Windows. Это обновление можно загрузить на странице загрузки обновления 2830477. Для получения дополнительных сведений щелкните следующий номер статьи базы знаний Майкрософт:
2830477 обновление для возможности подключения к удаленным рабочим столам и приложениям RemoteApp в WindowsПримечание. Рекомендуется отменить подписку на все рабочие области, перед удалением обновления. Это предотвращает следующие проблемы.
Известные проблемы
ImportantТщательно выполните действия, описанные в этом разделе. При неправильном изменении реестра могут возникнуть серьезные проблемы. До изменения его резервную копию для восстановления реестра в случае возникновения проблем.
Проблема 1
Рассмотрим следующий сценарий:
-
Это обновление на компьютере и затем Подпишитесь на рабочую область.
-
Удалить обновление с компьютера.
-
Попробуйте отказаться от рабочей области.
В этом случае операция завершается с ошибкой, и рабочую область остается зарегистрированных.
Эта проблема возникает потому, что Windows 7 не удается удалить разделы реестра, созданные с помощью данного обновления.
Чтобы обойти эту проблему, выполните следующие действия.
-
Нажмите кнопку Пуск, в поле Начать поиск введите regedit.exe и нажмите клавишу ВВОД, чтобы запустить редактор реестра.
-
Перейдите по следующему адресу:HKEY_CURRENT_USER\SOFTWARE\Microsoft\Workspaces\Feeds
-
Найти перевод необходимо удалить раздел реестра, в котором значение URL-адреса соответствует URL-адрес рабочей области.
-
Удалите разделы реестра, которые необходимо найти.
Например можно удалить раздел реестра, с помощью следующей команды:reg delete HKCU\SOFTWARE\Microsoft\Workspaces\Feeds\{A6851E3B-B228-4EEA-A01E-8D3968CDA34F}
Проблема 2
Рассмотрим следующий сценарий:
-
Это обновление на компьютере и затем Подпишитесь на рабочую область.
-
Удалить обновление с компьютера.
В этом случае иногда появляется одно из следующих сообщений об ошибке программы RunDLL:
Ошибка в записи tsworkspaceMissing: WorkspaceStateNotify2
Ошибка в записи tsworkspaceMissing: TaskUpdateWorkspaces2
Эта проблема возникает, поскольку обновления создает новые задания для поддержания вашей подписки в актуальном состоянии. Задание новой функции, которая больше не существует, после удаления обновления.
Чтобы обойти эту проблему, выполните следующие действия.
-
Нажмите кнопку Пуск, выберите Все программы, Стандартныеи щелкните Планировщик заданий.
-
Откройте Планировщик заданий (локальный)Библиотека планировщика заданий и перейдите в следующее расположение:Microsoft\Windows\RemoteApp и Update\ подключения к рабочему столу
-
Откройте папку, которая представляет имя пользователя.
-
Удалите следующие задачи:
-
Обновление подключений
-
Отчет о состоянии обновления
Примечание. Чтобы удалить задание, щелкните правой кнопкой мыши задачу и выберите команду Удалить.
-
Предварительные условия
Это исправление необходимо использовать Пакет обновления 1 (SP1) для Windows 7. Дополнительные сведения о получении пакета обновления Windows 7 или Windows Server 2008 R2 щелкните следующий номер статьи базы знаний Майкрософт:
976932 сведения о Пакет обновления 1 для Windows 7 и Windows Server 2008 R2
Дополнительные сведения
Для получения дополнительных сведений о терминологии обновлений программного обеспечения щелкните следующий номер статьи базы знаний Майкрософт:
Описание 824684 Стандартные термины, используемые при описании обновлений программных продуктов Майкрософт
Нужна дополнительная помощь?
Нужны дополнительные параметры?
Изучите преимущества подписки, просмотрите учебные курсы, узнайте, как защитить свое устройство и т. д.
четверг, 27 июня 2013 г.
Включение функционала RemoteApp в Windows 7
Добавляем в реестр:
[HKEY_LOCAL_MACHINE\SOFTWARE\Microsoft\Windows NT\CurrentVersion\Terminal Server\TSAppAllowList]
"fDisabledAllowList"=dword:00000001
Добавляем в стандартный rdp файл:
remoteapplicationmode:i:1
remoteapplicationprogram:s:"c:\windows\calc.exe"
disableremoteappcapscheck:i:1
alternate shell:s:rdpinit.exe
И наслаждаемся.
Подсмотрено у belnetmon
Автор:
Unknown
на
08:40
Комментариев нет:
Отправить комментарий
Следующее
Предыдущее
Главная страница
Подписаться на:
Комментарии к сообщению (Atom)
UPDATE 10 May 2010 : I finally discovered where the Remote Desktop team documented this process last December and thought it might be useful; blogs.msdn.com/rds/archive/2010/03/08/remoteapp-for-hyper-v-vdi-deployment.aspx
UDPATE 20 February 2010 : Sorry for how long the final solution took to discover, but thanks to Aaron Parker’s blog entry at http://blog.stealthpuppy.com we now have the final missing pieces that allow remote applications to be hosted within a standard Windows XP SP3 virtual machine.
UPDATE 5 July 2011 : Kim Knight has now written a GUI tool for configuring remote apps which makes the process a lot easier and less error prone, http://sites.google.com/site/kimknight/remoteapptool. (Note: new URL as of 9 Sep 2011)
I have just tested the settings from Aaron on a Windows XP SP3 image running under VirtualBox 3.1.2 which previously failed with the dreaded ‘The remote computer does not support RemoteApp ..’. As soon as the two extra settings were added to the RDP file (see steps c and d below), I could run Notepad via RemoteApp quite happily. I’ll be doing more research into this and will update some of the screen shots in this post, but I thought I’d post this update as soon as possible to help people right away.
What is RemoteApp?
This is used within the XP Mode within Windows 7 to provide seamless application integration where applications running under Windows XP appear as application windows floating over the Windows 7 desktop.
RemoteApp is only the remote display technology which enables this to occur. It should be noted that XP Mode also includes logic to integrate start menu items and saving of documents and files which are not covered by RemoteApp alone.
Why would you want RemoteApp?
For all those people using XP Mode to run a nicely sandboxed IE6 for testing purposes, you can now achieve exactly the same result without having to install Virtual PC. This is important if you are already running virtual machines in another platform, such as VirtualBox or VMWare Workstation (or Player) as running Virtual PC XP Mode has a habit of causing your other virtual machines to crash with very little warning.
Also, unlike XP Mode, seamless mode in VirtualBox or ‘unity’ mode in VMWare Workstation, you can use this on a non local virtual machine. So you could happily have a network server with IE6 instances pooled for all developers. With VirtualBox and VMWare Workstation this also means we can use an application on 64-bit or multi CPU installations which XP Mode does not support.
Step 1 — Configuring the guest virtual machine to allow RemoteApp access
For Windows Vista and Windows XP you will need to install updates on the guest to enable RemoteApp (see below). Windows 7 requires now such updates.
This example uses a completely clean version of Windows 7 Ultimate RTM 64-bit, dual CPU, running under VirtualBox 3.1. We are going to enable Notepad to be run as a RemoteApp. The connecting client is Windows 7 Ultimate RC 64-bit, dual CPU.
This solution involved directly editing the registry, and this is not the ideal way of enabling RemoteApp, and I have omitted numerous registry keys which would be required by XP Mode (see resources for full registry value list). This is a minimal bootstrap to enable RemoteApp until the virtualisation and remote desktop teams provide suitable tools and fully document the process.
1. Enable remote desktop connections on the guest.
2. Run regedit (registry editor) and locate the key TsAppAllowList
a) New Key, Applications.
b) Under Applications, create New Key, 1234567 (the key name is not important, we just need any key for next two steps)
c) In the new key, Create New -> String Value, Name. Set value to Notepad
d) Also in the new key, Create New -> String Value, Path. Set to c:\windows\system32\Notepad.exe
3. Navigate back to the TsAppAllowList branch
a) Edit fDisableAllowList value, and set to 1
Step 2 – Creating the RDP file to access the RemoteApp
Now the guest operating system has a RemoteApp created we need to use a Remote Desktop Connection to access that application.
1. Run remote desktop connection, setup your desired settings as you would in a normal connection
2.. Save the settings to an RDP file.
3) Use Notepad to open the RDP file to edit the configuration file,
a) Modify the setting; remoteapplicationmode:i:0 to remoteapplicationmode:i:1
b) Add the setting; remoteapplicationprogram:s:Notepad
c) Add the setting; disableremoteappcapscheck:i:1
d) Add the setting; alternate shell:s:rdpinit.exe
e) Save the RDP file
(20th February 2010 — thanks again to Aaron Parker’s blog for steps c and d)
4. You can now use the RemoteApp by double clicking on the RDP to open with Remote Desktop Connection,
a) Click on Connect when you see the security warning
b) And after a short start to initiate the remote desktop session you will be running notepad floating over your VM
Setting a Timeout for RDP connections
When using RemoteApp one of the issues you may find is that when you exit the application that does not close the Remote session on the guest machine. This is clear on a desktop operating system as you will receive warning messages about users already being logged into the system.
Clearly this is less than ideal, so I decided to find out how to ensure that closing the application caused the user to logout in a very short time period. This is configured on the guest operating system.
1. Windows key, Edit Group Policy.
2. Computer Configuration -> Administrative Templates -> Windows Components -> Remote Desktop Session Host -> Session Time Limits
3.Double click ‘Set time limit for disconnected sessions’, change to Enabled, set to 1 Minute.
Final thought
Similar to VirtualBox seamless mode, you will not be able to move the floating guest application window between monitors, unless you save the RDP to use all monitors available. Either set this option prior to saving the RDP file, or edit the RDP setting multimon:i:1.
Summary
As the keen eyed may have spotted, my laptop is still running the Release Candidate of Windows 7 as I have been too busy recently to upgrade to the RTM version. However, over Christmas I will be upgrading the laptop to RTM and I’m glad I did, because I RemoteApp means there will be absolutely no need to install Virtual PC and XP Mode when I can just run IE6 under VMWare or VirtualBox instead.
Patches for Windows XP and Vista
To enable Windows XP SP3 or Vista SP1 (or higher) to host remote applications you will need to install one of the following patches.
Update for Windows® XP SP3 to enable RemoteApp™ (KB961742)
http://www.microsoft.com/downloads/details.aspx?FamilyID=2f376f53-83cf-4e5b-9515-2cb70662a81b&displaylang=en
Update for Windows® Vista SP1 or above to enable RemoteApp™, (KB961741)
http://www.microsoft.com/downloads/details.aspx?familyid=097B7478-3150-4D0D-A85A-6451F32C459C&displaylang=en
Resources
The original article which started all this, from Ben Armstrong, Virtualization Program Manager at Microsoft ‘Virtual PC Guy’s blog’, http://blogs.msdn.com/virtual_pc_guy/archive/2009/12/17/remoteapp-hyper-v-windows-xp-vista.aspx
.. which led to Remote Desktop Services (Terminal Services) Team Blog that revealed it’s all an RDP 7.0 thing, and not Hyper-V is just an enabling technology, http://blogs.msdn.com/rds/archive/2009/12/15/remoteapp-for-hyper-v.aspx
… as Aaron Parker suggested by including a VirtualBox example on his stealthpuppy blog, http://blog.stealthpuppy.com/virtualisation/remoteapp-for-hyper-v-hyper-what
20th February 2010 update … and it was Aaron Parker’s blog post here that revealed the final missing settings in the RDP file that allowed me to finally run a RemoteApp from within a Windows XP SP3 virtual machine.
Once I knew the TsAllowAppList registry key was involved I Bing later I found the very useful XP Mode analysis of this key at the C# Snippets blog, http://c-sharp-snippets.blogspot.com/2009/09/creating-shortcut-to-application-inside.html
And for RDP configuration file editing, I found an excellent clue in Paul Monaghan’s article here, http://support.yourofficeanywhere.co.uk/Customer/KBArticle.aspx?articleid=82
… which helped me guess that changing the remoteapplicationmode:i:0 value to 1 would help, and if you Bing remoteapplicationmode:i:1 then the careless folk at financelogix.com have kindly published their RDP file with the application name key within it, which gave me the last piece of the jigsaw.
Finally the ‘Set time limit for disconnected sessions’, example may be for Windows XP but gave enough information for Windows 7, http://howtonetworking.com/casestudy/tstimelimit1.htm
-
Share This Post:
Print | posted on Friday, December 18, 2009 12:53 AM
Provide feedback
Saved searches
Use saved searches to filter your results more quickly
Sign up
Appearance settings
