
User Account Control (UAC) или контроль учетных записей – это функция безопасности Windows включенная по умолчанию и предназначенная для предотвращения нежелательных изменений в ОС. Если программа пытается выполнить действие, требующее прав администратора (например, установить программу, изменить настройки ОС, ветки реестра или системные файлы), UAC уведомляет об этом и запрашивает подтверждения этих действий у администратора. Тем самым снижается риск несанкционированных изменений и выполнения вредоносного кода с правами администратора.
В этой статье мы рассмотрим, как управлять настройками контроля учетных записей в Windows
Содержание:
- Настройки контроля учётных записей (UAC) в Windows
- Управление параметрами User Account Control через GPO
- Ползунок User Account Control и соответствие параметров реестра (GPO)
- Как полностью отключить UAC в Windows через GPO?
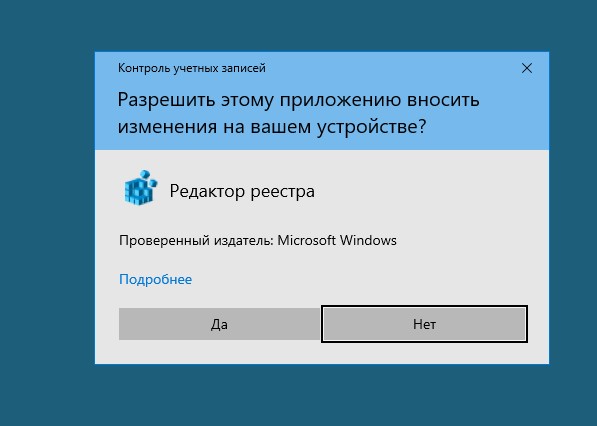
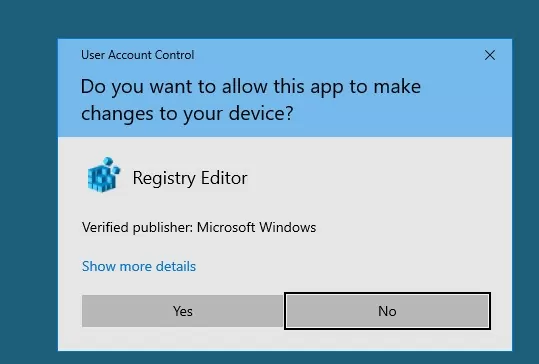
Как выглядит окно UAC? Например, при попытке повышения привилегий процесса в сессии пользователя с правами локального администратора, появляется окно подтверждения UAC:
Контроль учетных записей
Разрешить этому приложению вносить изменения на вашем устройстве?
User Account Control
Do you want to allow this app to make changes to your device?
Настройки контроля учётных записей (UAC) в Windows
Для управления настройками UAC в панели управления Windows доступен специальный апплет Change User Account Control settings, который можно запустить из классической панели управления или с помощью команды
UserAccountControlSettings.exe
.
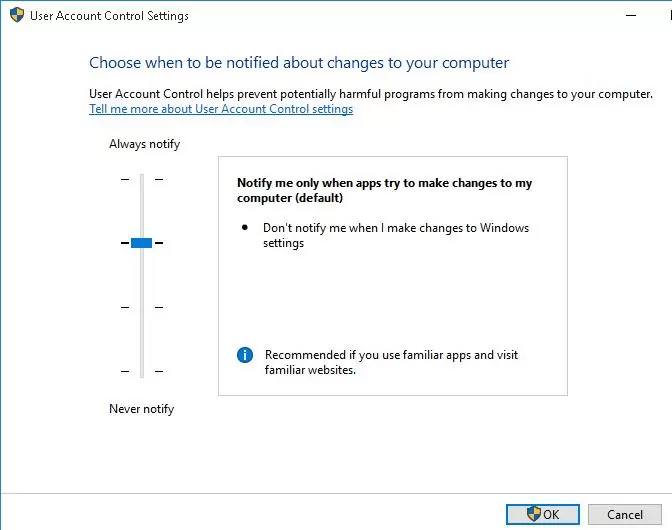
С помощью ползунка можно выбрать уровень контроля учетных записей на компьютере. Доступно 4 уровня:
- Уровень 4 — Always notify — Всегда уведомлять (максимальный уровень защиты UAC);
- Уровень 3 — Notify only when programs try to make changes to my computer (default) – Уведомить только когда программа пытается внести изменения в мой компьютер (используется в Windows по умолчанию);
- Уровень 2 — Notify only when programs try to make changes to my computer (do not dim my desktop) – то же что и предыдущий уровень, но без переключения на Secure Desktop с блокировкой рабочего стола;
- Уровень 1 — Never notify – Никогда не уведомлять
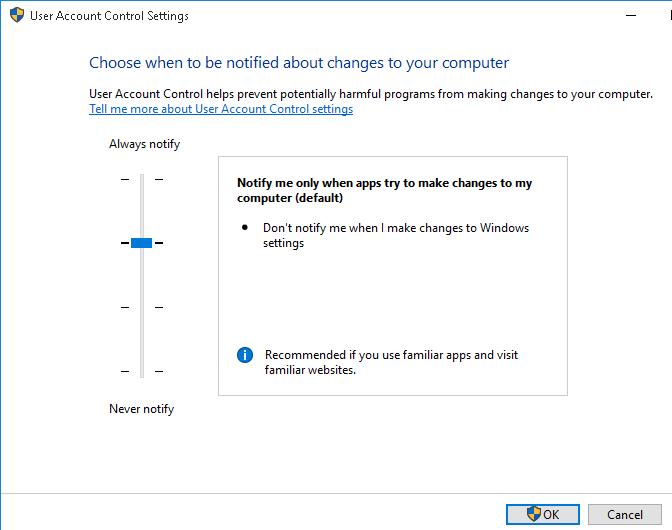
Обратите внимание, что перевод ползунка в нижнее положение Никогда не уведомлять, не отключает UAC полностью. Этот режим включает автоматическое подтверждения запросов на повышение прав, инициированных администратором, без отображения окна с запросом UAC. В сессиях пользователей запросы повышения прав автоматически откланяются.
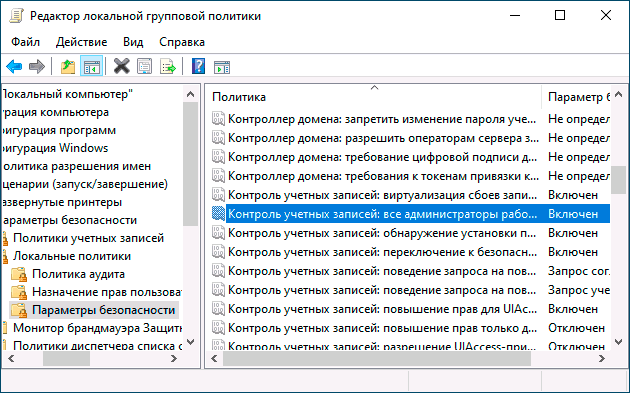
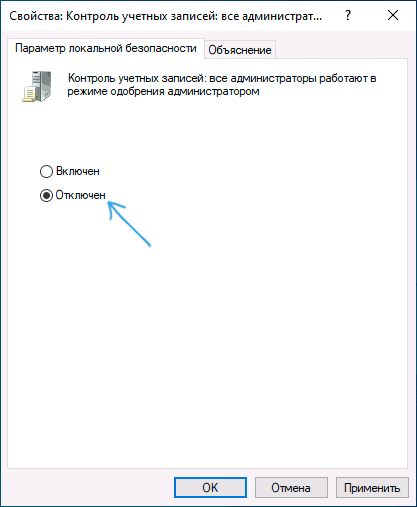
Чтобы полностью отключить UAC, нужно отключить параметр локальной политики Контроль учетных записей: все администраторы работают в режиме одобрения администратором (User Account Control: Run all administrators in Admin Approval Mode). Об этом ниже.
Управление параметрами User Account Control через GPO
Возможно управление параметрами контроля учетных записей UAC в Windows через групповые политики. Имена политик, относящихся к UAC, начинаются с User Account Control (Контроль учетных записей) и находятся в разделе редактора GPO Computer Configuration -> Policies -> Windows Settings -> Security Settings -> Local Policies -> Security Options (Конфигурация компьютера –> Конфигурация Windows –> Параметры безопасности –> Локальные политики).
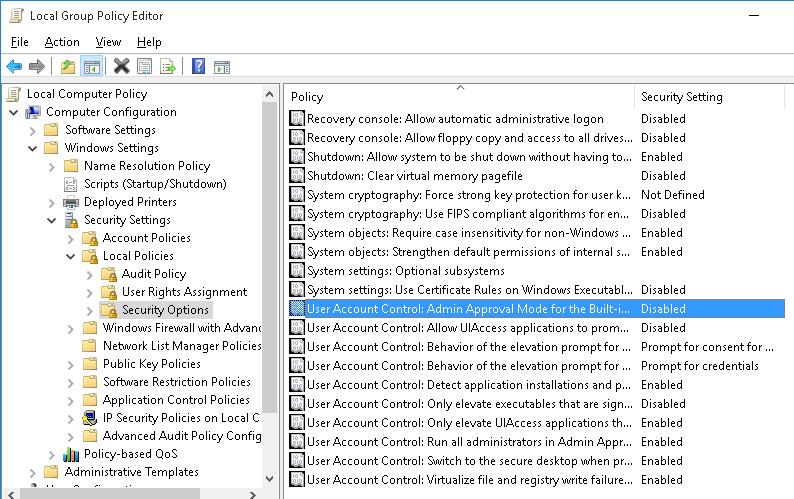
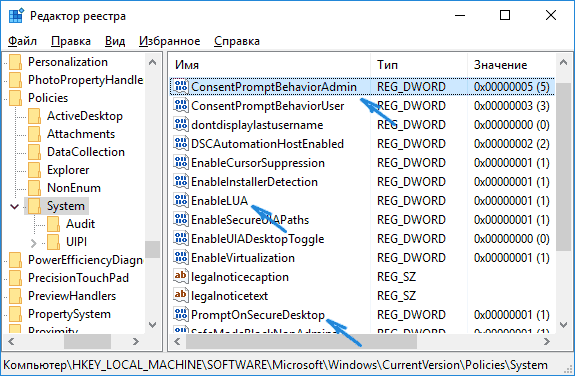
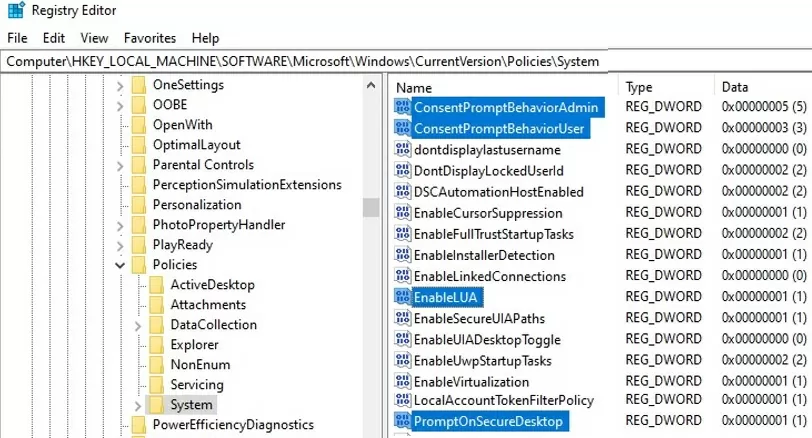
Доступно 12 параметров GPO. В следующей таблице представлен список политик UAC, и соответствующие им параметры реестра (ветка HKLM\SOFTWARE\Microsoft\Windows\CurrentVersion\Policies\System) и возможные значения (в том числе значения по-умолчанию).
| Имя политики | Ключ реестра | Значения | |
| User Account Control: Admin Approval Mode for the Built-in Administrator account | Контроль учетных записей: использование режима одобрения администратором для встроенной учетной записи администратора |
FilterAdministratorToken
|
0 (Default) = Disabled 1 = Enabled |
| User Account Control: Allow UIAccess applications to prompt for elevation without using the secure desktop | Контроль учетных записей: разрешать UIAccess-приложениям запрашивать повышение прав, не используя безопасный рабочий стол |
EnableUIADesktopToggle
|
0 (Default) = Disabled 1 = Enabled |
| User Account Control: Behavior of the elevation prompt for administrators in Admin Approval Mode | Контроль учетных записей: поведение запроса на повышение прав для администраторов в режиме одобрения администратором |
ConsentPromptBehaviorAdmin
|
0 = Elevate without prompting 1 = Prompt for credentials on the secure desktop 2 = Prompt for consent on the secure desktop 3 = Prompt for credentials |
| User Account Control: Behavior of the elevation prompt for standard users | Контроль учетных записей: поведение запроса на повышение прав для обычных пользователей |
ConsentPromptBehaviorUser
|
0 = Automatically deny elevation requests 1 = Prompt for credentials on the secure desktop3 (Default) = Prompt for credentials |
| User Account Control: Detect application installations and prompt for elevation | Контроль учетных записей: обнаружение установки приложений и запрос на повышение прав |
EnableInstallerDetection
|
1 = Enabled 0 = Disabled (default) |
| User Account Control: Only elevate executables that are signed and validated | Контроль учетных записей: повышение прав только для подписанных и проверенных исполняемых файлов |
ValidateAdminCodeSignatures
|
0 (Default) = Disabled 1 = Enabled |
| User Account Control: Only elevate UIAccess applications that are installed in secure locations | Контроль учетных записей: повышать права только для UIAccess-приложений, установленных в безопасном местоположении |
EnableSecureUIAPaths
|
0 = Disabled 1 (Default) = Enabled |
| User Account Control: Run all administrators in Admin Approval Mode | Контроль учетных записей: включение режима одобрения администратором |
EnableLUA
|
0 = Disabled 1 (Default) = Enabled |
| User Account Control: Switch to the secure desktop when prompting for elevation | Контроль учетных записей: переключение к безопасному рабочему столу при выполнении запроса на повышение прав |
PromptOnSecureDesktop
|
0 = Disabled 1 (Default) = Enabled |
| User Account Control: Virtualize file and registry write failures to per-user locations | Контроль учетных записей: при сбоях записи в файл или реестр виртуализация в размещение пользователя | EnableVirtualization | 0 = Disabled 1 (Default) = Enabled |
| User Account Control: Behavior of the elevation prompt for administrators running with Administrator Protection | опции появилbсь в Windows 11 в конце 2024 для управления новой функцией Local Administrator Protection
|
||
| User Account Control: Configure type of Admin Approval Mode |
Ползунок User Account Control и соответствие параметров реестра (GPO)
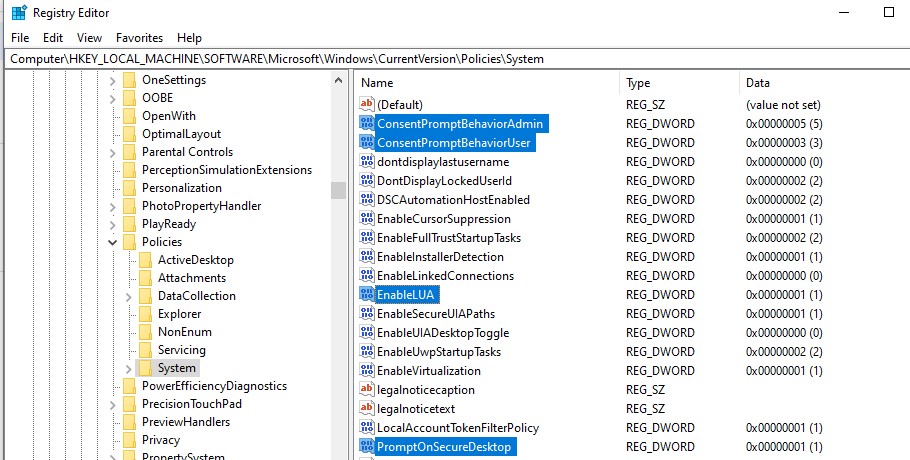
Когда вы меняете уровень защиты UAC с помощью ползунка в панели управления, Windows изменяет значения следующих параметров реестра.
| Уровень ползунка UAC |
PromptOnSecureDesktop
|
EnableLUA
|
ConsentPromptBehaviorAdmin
|
| 4 — Всегда уведомлять | 1 | 1 | 2 |
| 3 — Уведомлять при попытках приложений изменить параметры | 1 | 1 | 5 |
| 2- Уведомлять без затемнения экрана | 0 | 1 | 5 |
| 1 — Отключить UAC и не уведомлять | 0 | 1 | 0 |
Таким образом, если вы хотите через GPO задать параметры UAC, соответствующие уровню ползунка вам достаточно настроить 3 параметра политик (указаны выше).
Например, для UAC уровень 3 (Notify only when programs try to make changes to my computer) нужно внедрить такие параметры в реестр:
Windows Registry Editor Version 5.00
[HKEY_LOCAL_MACHINE\SOFTWARE\Microsoft\Windows\CurrentVersion\Policies\System]
"PromptOnSecureDesktop"=dword:00000001
"EnableLUA"=dword:00000001
"ConsentPromptBehaviorAdmin"=dword:00000005
"ConsentPromptBehaviorUser"=dword:00000003
"EnableInstallerDetection"=dword:00000001
"EnableVirtualization"=dword:00000001
"ValidateAdminCodeSignatures"=dword:00000000
"FilterAdministratorToken"=dword:00000000
Значения параметров ConsentPromptBehaviorUser, EnableInstallerDetection, EnableVirtualization, ValidateAdminCodeSignatures и FilterAdministratorToken будут одинаковыми для всех уровней.
Как полностью отключить UAC в Windows через GPO?
Рассмотрим, как через групповые политики отключить контроль учетных записей в Windows.
На отдельном компьютере можно использовать редактор локальный групповой политики
gpedit.msc
. Если нужно применить политику на множестве компьютерлв в домене, нужно использовать консоль Group Policy Management Console —
gpmc.msc
(рассмотрим этот вариант).
- В консоли управления доменными GPO щелкните по OU с компьютерами, на которых вы хотите отключить UAC и создайте новую политику
- Отредактируйте политику и перейдите в разделComputer Configuration -> Policies -> Windows Settings -> Security Settings -> Local Policies -> Security Options;
- Для полного отключения UAC установите следующие значения параметров:
- User Account Control: Behavior of the elevation prompt for administrators in Admin Approval Mode =
Elevate without prompting
;
- User Account Control: Detect application installations and prompt for elevation =
Disabled
; - User Account Control: Run all administrators in Admin Approval Mode =
Disabled
; - User Account Control: Only elevate UIAccess applications that are installed in secure locations =
Disabled
.

- Чтобы обновить настройки групповых политик на компьютерах и отключить UAC, нужно перезагрузить их.
Также можно точечно отключать UAC только для некоторых пользователей/компьютеров через реестр, а настройки распространить через Group Policy Preferences.
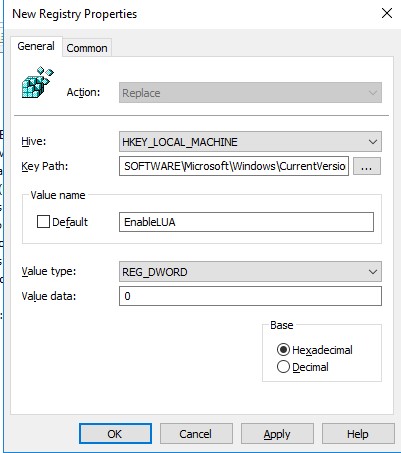
Создайте новый параметр реестра в ветке GPO Computer Configuration -> Preferences -> Windows Settings -> Registry со следующими настройками:
- Action: Replace
- Hive: HKEY_LOCAL_MACHINE
- Key Path: SOFTWARE\Microsoft\Windows\CurrentVersion\Policies\System
- Value name: EnableLUA
- Value type: REG_DWORD
- Value data: 0
Затем перейдите на вкладку Common и включите опции:
- Remove this item when it is no longer applied
- Item-Level targeting
Нажмите на кнопку Targeting и укажите компьютеры, или доменные группы, на которые должна применяться политика отключения UAC.
Вы можете изменить значение любого параметра из редактора реестра или из командной строки. Например, чтобы отключить UAC на компьютере (потребуется перезагрузка) можно выполнить команду:
reg.exe ADD HKLM\SOFTWARE\Microsoft\Windows\CurrentVersion\Policies\System /v EnableLUA /t REG_DWORD /d 0 /f.
Или аналогичная команда на PowerShell:
New-ItemProperty -Path HKLM:Software\Microsoft\Windows\CurrentVersion\policies\system -Name EnableLUA -PropertyType DWord -Value 0 -Force
- UAC can be disabled from the Control Panel, Windows Registry, Group Policy, Command Prompt, and Windows PowerShell.
- Disable UAC from Command Prompt: reg.exe ADD HKLM\SOFTWARE\Microsoft\Windows\CurrentVersion\Policies\System /v EnableLUA /t REG_DWORD /d 0 /f
- Disable UAC from Control Panel by going to Control Panel >> User Accounts >> User Accounts >> Change User Account Control settings >> Drag slider to “Never Notify”
The Windows operating system is vulnerable to outside threats and unauthorized access, which is why it includes a User Account Control (UAC) feature.
Even if you are not aware of what UAC is, you must certainly have come across it if you are a Windows user. Ever seen that annoying confirmation dialog box that asks for administrative permission when you’re installing an app, running a setup, or uninstalling anything? That is the UAC prompt.
If it is getting too annoying for you and want to disable the UAC prompt, this article lists all the methods to do so on Windows 11. But before we show you how to do it, let us learn what it is, and whether it should be turned off or not.
Table of Contents
What is User Account Control (UAC)
 1")
The UAC is a Windows security feature that prevents the unauthorized execution of apps and processes with administrative privileges and also prevents malicious software from running on your computer.
When an app or a program is making changes to your computer, a popup emerges asking for user consent, as in the image above.
In simpler words, it is just an extra precautionary measure by Windows to ensure that no task is run without the user’s consent, and thus, you are prompted with a dialog box for confirmation.
Is it Safe to Disable UAC?
Now that we know the role of UAC, disabling UAC is not the smart choice. Although most tasks performed by the end user, like installing or uninstalling an app, are done with complete consciousness, a UAC prompt gives a second chance to the user to reconsider their action.
Not only that but any malicious action performed by software or piece of code could also be blocked by the UAC. Additionally, any occurrences happening in the background would be highlighted and brought to the user’s attention with the help of the UAC prompt.
Therefore, we recommend that you do not disable the UAC, and only do it when it is necessary. After that, you can re-enable it.
UAC Security Levels
If you read ahead, you will find that the UAC has different security levels. each of those security levels defines how the UAC will work, when the end user will be prompted with a UAC, and when the prompt will not be generated.
Here are the details of the 4 security levels of UAC:
-
Always notify
A UAC prompt will appear when an app or a program tries to make changes to your system. It will also notify you when you try to change Windows settings. Additionally, it freezes background tasks until the user responds.
-
Notify me only when apps try to make changes to my computer
This is the default Windows UAC level and only notifies you when an app tries to install or make changes to your PC. It also freezes background tasks until you respond.
-
Notify me only when apps try to make changes to my computer (do not dim my desktop)
This option will display the UAC prompt but it does not freeze the background tasks, nor does it dim the desktop.
-
Never notify
Selecting this option completely disables the UAC. No prompts will pop up.
Let us now continue to see the different methods to disable UAC when needed.
Disable UAC on Windows
Disable UAC from Control Panel
The following steps allow you to disable the UAC from the Control Panel:
-
Press Windows Key + R to open the Run Command box.
-
Type in “Control” and press Enter to open the Control Panel.
-
Click “User Accounts.”
 2")
Open User Account settings in Control Panel -
Click “User Accounts” again.
Click “User Accounts” again -
Click “Change User Account Control settings.”
Change UAC settings from Control Panel -
Drag the slider on the left to the bottom and click Ok.
 5")
Disable UAC from the Control Panel -
[Conditional] If UAC was already enabled, you will be prompted with a UAC. Click Yes.
 2")
 3")
 4")
 5")
UAC will now be disabled.
If you want to re-enable it again, simply return the slider inside the “Change User Account Control settings” page to its original UAC security level.
 6")
Disable UAC from Group Policy Editor
To disable the UAC prompts from the Group Policy editor, use these steps:
-
Press Windows Key + R to open the Run Command box.
-
Type in “gpedit.msc” and press Enter to open the Group Policy Editor.
-
Navigate to the following path from the left side of the Group Policy Editor:
Local Computer Policy > Computer Configuration > Windows Settings > Security Settings > Local Policies > Security Options
-
Double-click the policy “User Account Control: Run all administrators in Admin Approval Mode” in the right pane.
 7")
Open UAC Group Policy -
Select “Disabled” and then click Apply and Ok.
Disable UAC from Group Policy Editor -
Now press Windows Key + R again and type in “CMD“, then press CTRL + Shift + Enter to open the Command Prompt with elevated rights.
-
Execute the following command to implement the changes in the Group Policy Editor:
GPUpdate /Force 9")
Apply Group Policy changes
 7")
 8")
 9")
UAC will now be disabled.
However, if you want to enable it again, return to the “User Account Control: Run all administrators in Admin Approval Mode” Group Policy and enable it.
Disable UAC from Registry Editor
You can also disable the UAC from the Windows Registry Editor. Here is how:
Note: Misconfiguration of critical values in the system’s registry could be fatal for your operating system. Therefore, we insist that you create a system restore point or a complete system image backup before proceeding forward with the process.
You can also use our top selection of disk imaging and backup software so you never lose your data or operating system again.
-
Press Windows Key + R to open the Run Command box.
-
Type in “regedit” and press Enter to open the Registry editor.
-
Navigate to the following path from the left pane:
Computer\HKEY_LOCAL_MACHINE\SOFTWARE\Microsoft\Windows\CurrentVersion\Policies\System
-
Double-click the DWORD “EnableLUA.”
 10")
Open the EnableLUA DWORD in Windows Registry -
Change the Value Data to 0 and click Ok.
Disable UAC from Windows Registry -
Restart the computer.
 10")
 11")
Once the computer restarts, you will notice that the UAC has been disabled.
To re-enable it, return to the System key using the Registry Editor, double-click the DWORD “EnableLUA,” and set its Value Data to 1.
Disable UAC from Command Prompt
If you are a fan of the Command Line Interface (CLI), then you can also disable UAC directly from the Command Prompt with a single command. Here are the steps to follow:
-
Press Windows Key + R to open the Run Command box.
-
Type in “CMD” and then press CTRL + Shift + Enter to open the Command Prompt with elevated rights.
-
Run the following command:
reg.exe ADD HKLM\SOFTWARE\Microsoft\Windows\CurrentVersion\Policies\System /v EnableLUA /t REG_DWORD /d 0 /f 12")
Disable UAC from Command Prompt -
Now restart the computer.
 12")
The steps above will make changes to the EnableLUA DWORD in the Windows Registry and disable UAC.
To re-enable UAC, run the following command in an elevated Command Prompt:
reg.exe ADD HKLM\SOFTWARE\Microsoft\Windows\CurrentVersion\Policies\System /v EnableLUA /t REG_DWORD /d 1 /fDisable UAC from Windows PowerShell
Similar to the Command Prompt, you can also disable UAC from PowerShell. Here is how:
-
Press Windows Key + R to open the Run Command box.
-
Type in “PowerShell” and then press CTRL + Shift + Enter to open PowerShell with elevated rights.
-
Run the following command:
Set-ItemProperty -Path REGISTRY::HKEY_LOCAL_MACHINE\Software\Microsoft\Windows\CurrentVersion\Policies\System -Name ConsentPromptBehaviorAdmin -Value 0 13")
Disable UAC from PowerShell -
Now restart the computer.
 13")
UAC will now be disabled when the computer restarts.
If you want to re-enable UAC, use this command in PowerShell:
Set-ItemProperty -Path REGISTRY::HKEY_LOCAL_MACHINE\Software\Microsoft\Windows\CurrentVersion\Policies\System -Name ConsentPromptBehaviorAdmin -Value 1These are all the methods you can disable (or enable) UAC on a Windows computer. Let us now show you how to do the same on a remote computer that is on the same network.
Disable UAC Remotely
You can disable the User Account Control on a remote computer as well using the Command Prompt. This method can be used by sysadmins to get the task done without having to leave their computer.
To disable UAC on a remote PC, we must use PsTools by SysInternals – which is a suite of command-line tools for the Windows operating system. Using the PsExec utility inside this suite, you can remote access the Command Prompt of the target PC and then run any command.
Use the following steps to disable UAC on a remote computer:
-
Start by downloading and extracting PsTools.
 14")
Extract PsTools -
Launch an elevated Command Prompt and use the
CDcmdlet to change the directory to the extracted folder:CD [PathToExtractedPsTools] 15")
Change directory to extracted PsTools folder -
Now use the following command syntax to connect to the remote computer:
PsExec -i \\[RemoteComputerName] -u [Username] -p [Password] cmdReplace [RemoteComputerName] with the name of the PC you want to connect to, [Username] with the account name, and [Password] with the account password. Make sure that the account you are logging in with has administrative rights.
Connect to remote PC using PsExec You will now be connected to the remote PC.
-
Now, use the following command to disable UAC on the remote PC:
reg.exe ADD HKLM\SOFTWARE\Microsoft\Windows\CurrentVersion\Policies\System /v EnableLUA /t REG_DWORD /d 0 /f
Disable UAC on the remote computer -
Now run the following command to restart the remote PC:
Shutdown /r
Restart the remote computer
 14")
 15")
 16")
 17")
 18")
When the remote computer restarts, UAC will be turned off.
To re-enable it, you will need to use the PsExec tool again. Connect to the remote computer again using the command given above, and then use this command to re-enable UAC:
reg.exe ADD HKLM\SOFTWARE\Microsoft\Windows\CurrentVersion\Policies\System /v EnableLUA /t REG_DWORD /d 1 /fNote that these are the exact same commands to disable or enable UAC on your local computer. This is because PsExec has launched a Command prompt instance on the remote computer and any commands running after establishing the connection will be on the remote PC.
Final Verdict
As mentioned earlier, it is not entirely safe to disable User Account Control. However, there are certain moments when it is absolutely necessary. That being said, we always recommend that you re-enable UAC when you no longer need it disabled.
This article lists multiple methods of disabling UAC on the local computer as well as on a remote computer on the same network.
Контроль учетных записей или UAC в Windows 10 уведомляет вас при запуске программ или выполнении действий, которые требуют права администратора на компьютере (что обычно означает, что программа или действие приведет к изменению системных настроек или файлов). Сделано это с целью защитить вас от потенциально опасных действий и запуска ПО, которое может нанести вред компьютеру.
По умолчанию UAC включен и требует подтверждения для любых действий, могущих оказать влияние на операционную систему, однако вы можете отключить UAC или настроить его уведомления удобным для себя способом. В конце инструкции также имеется видео, где показаны оба способа отключения контроля учетных записей Windows 10. Также вы можете отключить запрос контроля учетных записей для отдельной программы.
Отключение UAC в Панели управления
Первый способ — использовать соответствующий пункт в панели управления Windows 10 для изменения настроек контроля учетных записей. Прежде чем приступить, учитывайте, что для отключения UAC вам требуется наличие прав администратора. Если их нет, но вы хотите установить или запустить программу, может сработать способ из инструкции Как установить программу без прав администратора.
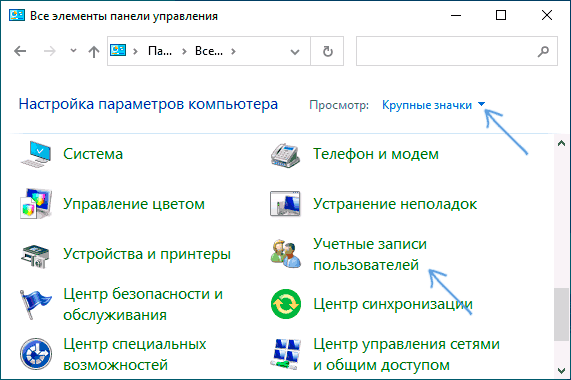
- Откройте панель управления, для этого можно использовать поиск в панели задач или нажать клавиши Win+R, ввести control и нажать Enter. А можно сразу перейти к 4-му шагу, нажав Win+R и введя UserAccountControlSettings
- В панели управления вверху справа в поле «Просмотр» вместо «Категории» установите «Значки», а затем откройте пункт «Учетные записи пользователей».

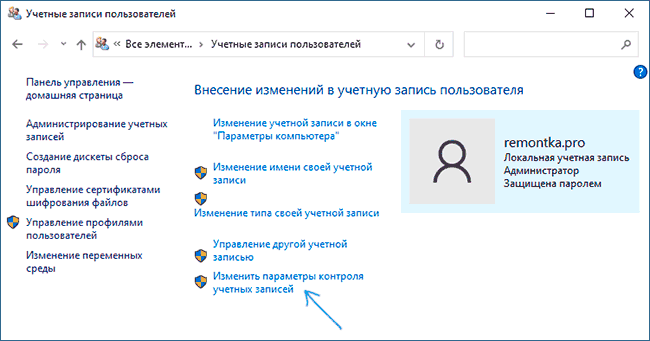
- В следующем окне нажмите «Изменить параметры контроля учетных записей».

- Далее вы можете вручную задать параметры UAC или отключить контроль учетных записей Windows 10, достаточно выбрать один из вариантов настроек работы UAC, каждый из которых пояснён далее.

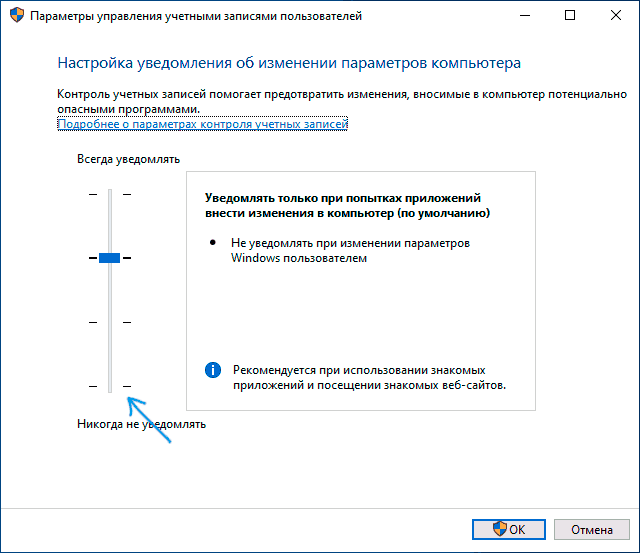
Возможные варианты настроек контроля учетных записей в панели управления от верхнего к нижнему:
- Всегда уведомлять, когда приложения пытаются установить программное обеспечение или при изменении параметров компьютера — самый безопасный вариант, при любом своем действии, которое может что-то изменить, а также при действиях сторонних программ вы будете получать уведомление об этом. Обычные пользователи (не администраторы) должны будут ввести пароль для подтверждения действия.
- Уведомлять только при попытках приложений внести изменения в компьютер — этот параметр установлен в Windows 10 по умолчанию. Он означает, что контролируются только действия программ, но не действия пользователя.
- Уведомлять только при попытках приложений внести изменения в компьютер (не затемнять рабочий стол). Отличие от предыдущего пункта в том, что рабочий стол не затемняется и не блокируется, что в некоторых случаях (вирусы, трояны) может быть угрозой безопасности.
- Не уведомлять меня — UAC отключен и не уведомляет о каких-либо изменениях в параметрах компьютера, инициированных вами или программами.
Если вы решили отключить контроль учетных записей Windows 10, что является совсем не безопасной практикой, в дальнейшем следует быть очень внимательным, поскольку все программы будут иметь к системе тот же доступ, что и вы, в то время как контроль учетных записей не сообщит, если какая-то из них может повлиять на работу системы. Иными словами, если причина отключения UAC только в том, что он «мешает», я настойчиво рекомендую включить его обратно.
Редакторе реестра
Отключение UAC и выбор любого из четырех вариантов работы контроля учетных записей Windows 10 возможен и с помощью редактора реестра (чтобы запустить его нажмите Win+R на клавиатуре и введите regedit).
Параметры работы UAC определяются тремя ключами реестра, находящимися в разделе
HKEY_LOCAL_MACHINE\SOFTWARE\Microsoft\Windows\CurrentVersion\Policies\System
Перейдите в этот раздел и найдите следующие параметры DWORD в правой части окна: PromptOnSecureDesktop, EnableLUA, ConsentPromptBehaviorAdmin. Для полного отключения контроля учетных записей достаточно изменить значение параметра EnableLUA на 0 (ноль), закрыть редактор реестра и перезагрузить компьютер.
Однако, когда вы меняете параметры UAC в панели управления, сама Windows 10 оперирует тремя параметрами одновременно и делает это несколько иначе (хотя предыдущий метод проще и быстрее). Далее привожу значения каждого из ключей PromptOnSecureDesktop, EnableLUA, ConsentPromptBehaviorAdmin в том порядке, как они указаны для разных вариантов оповещений контроля учетных записей.
- Всегда уведомлять — 1, 1, 2 соответственно.
- Уведомлять при попытках приложений изменить параметры (значения по умолчанию) — 1, 1, 5.
- Уведомлять без затемнения экрана — 0, 1, 5.
- Отключить UAC и не уведомлять — 0, 1, 0.
Командная строка
Быстрый способ полностью отключить контроль учетных записей — использовать командную строку, для этого:
- Запустите командную строку от имени администратора, в Windows 10 для этого можно начать вводить «Командная строка» в поиск на панели задач, а когда найдется нужный результат — либо нажать по нему правой кнопкой мыши и выбрать нужный пункт меню, либо выбрать «Запуск от имени администратора» в панели справа.
- Введите команду (нажав Enter после ввода)
reg ADD HKLM\SOFTWARE\Microsoft\Windows\CurrentVersion\Policies\System /v EnableLUA /t REG_DWORD /d 0 /f
- Закройте командную строку и перезапустите компьютер или ноутбук.
По своей сути этот метод является вариантом способа с редактором реестра, который описан выше: просто нужный параметр изменяется с помощью указанной команды.
Редактор локальной групповой политики
Этот метод подойдёт для Windows 10 Pro и Enterprise, где присутствует редактор локальной групповой политики. Шаги будут следующими:
- Нажмите клавиши Win+R на клавиатуре, введите gpedit.msc и нажмите Enter.
- В редакторе перейдите к разделу «Конфигурация компьютера» — «Конфигурация Windows» — «Параметры Безопасности» — «Локальные политики» — «Параметры безопасности».
- В правой панели найдите параметр «Контроль учетных записей: все администраторы работают в режиме одобрения администратором» и дважды нажмите по нему.

- Установите параметр в значение «Отключен» и нажмите «Ок».

Перезагрузка компьютера обычно не требуется.
В завершение еще раз напомню: я не рекомендую отключать контроль учетных записей ни в Windows 10 ни в других версиях ОС, если только вы абсолютно точно не знаете, для чего вам это нужно, а также являетесь достаточно опытным пользователем.
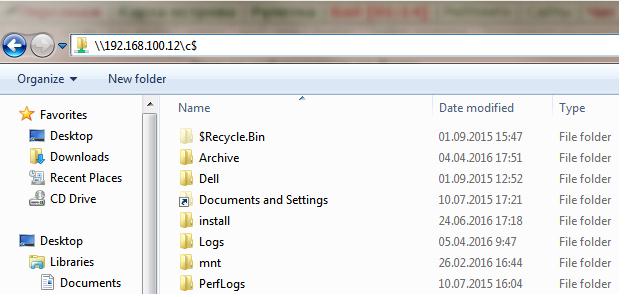
Столкнулся с тем, что не удается удаленно подключиться к дефолтным административным шарам (которые с долларом) на компьютере с Windows 10 под пользователем, входящим в группу локальных администраторов. Причем под учетной записью встроенного локального администратора (по умолчанию она отключена) такой доступ работает.
Немного подробнее как выглядит проблема. Пытаюсь с удаленного компьютера обратится к встроенным административным ресурсам компьютера Windows 10, состоящего в рабочей группе (при отключенном фаерволе) таким образом:
- \\win10_pc\C$
- \\win10_pc\D$
- \\win10_pc\IPC$
- \\win10_pc\Admin$
В окно авторизации ввожу имя и пароль учетной записи, состоящей в группе локальных администраторов Windows 10, на что появляется ошибка доступа (Access is denied). При этом доступ к общим сетевым каталогам и принтерам на Windows 10 работает нормально. Доступ под встроенной учетной записью administrator к административным ресурсам при этом тоже работает. Если же этот компьютер включить в домен Active Directory, то под доменными аккаунтами с правами администратора доступ к админским шарам также не блокируется.
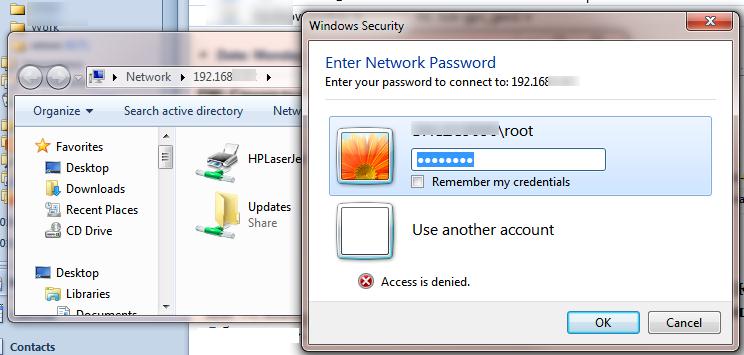
Дело в еще одном аспекте политики безопасности, появившемся в UAC – так называемом Remote UAC (контроль учетных записей для удаленных подключений), который фильтрует токены доступа локальных записей и аккаунтов Microsoft, блокируя удаленный административный доступ таким учеткам. При доступе под доменным аккаунтом такое ограничение не налагается.
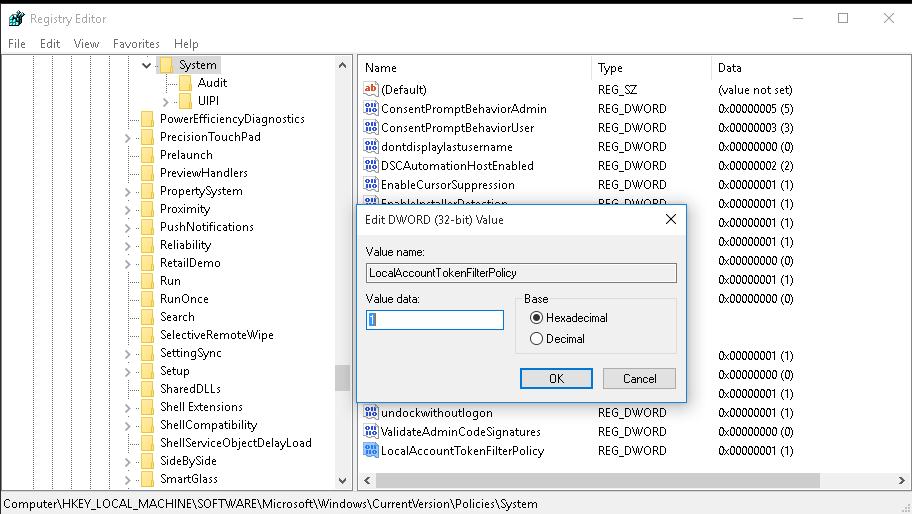
Отключить Remote UAC можно путем создания в системном реестре параметра LocalAccountTokenFilterPolicy
Совет. Эта операция несколько снижает уровень безопасности системы.
- Откройте редактор реестра (regedit.exe)
- Перейдите в ветку реестра HKEY_LOCAL_MACHINE\SOFTWARE\Microsoft\Windows\CurrentVersion\Policies\System
- Создайте новый параметр типа DWORD (32-bit) с именем LocalAccountTokenFilterPolicy
- Установите значение параметра LocalAccountTokenFilterPolicy равным 1

- Для применения изменений потребуется перезагрузить компьютер
Примечание. Создать указанный ключ можно всего одной командой
reg add "HKLM\SOFTWARE\Microsoft\Windows\CurrentVersion\Policies\System" /v "LocalAccountTokenFilterPolicy" /t REG_DWORD /d 1 /f
После загрузки попробуйте удаленно открыть каталог административный каталог C$ на Windows 10 компьютере. Авторизуйтесь под учетною записью, входящей в группу локальных администраторов. Должно открыться окно проводника с содержимым диска C:\.
Примечание. Станет доступен и другой функционал удаленного управления Windows 10, в том числе теперь можно удаленно подключиться к компьютеру с помощью оснастки Computer Management (Управления компьютером).
Итак, мы разобрались как с помощью параметра LocalAccountTokenFilterPolicy разрешить удаленный доступ к скрытым админ-ресурсам для всех локальных администраторов компьютера Windows. Данная инструкция применима также к Windows 8.x, 7 и Vista.
Источник: https://winitpro.ru/index.php/2016/07/06/kak-vklyuchit-udalennyj-dostup-k-administrativnym-sharam-v-windows-10/
Как исправить ошибку 0x80004005 в Windows 10
При обращении к сетевому ресурсу по имени \\server выходила ошибка 0x80004005, имя разрешается, то есть определяется ip-адрес, хост пингуется, нет доступа к компьютерам ниже Windows 10. Решение было достаточно простым, но до этого перебрал несколько других вариантов, не помогло. Этот способ помог.
Если не заходит из Windows 10 на шару под Windows XP или под Windows Server 2003 решение такое:
Включить протокол SMB 1.0, который не установлен (по умолчанию) в Windows 10.
Открываем панель «Программы и компоненты»
В открывшемся окне жмём на «Включение или отключение компонентов Windows»
Там ставим галочки на пунктах «Клиент SMB 1.0/CIFS» и «Сервер SMB 1.0/CIFS»
Windows 7
[HKEY_LOCAL_MACHINE\SOFTWARE\Microsoft\Windows\CurrentVersion\Policies\System]
«LocalAccountTokenFilterPolicy»=dword:00000001
User Account Control (UAC) is a default Windows security feature designed to prevent unwanted changes to the operating system. When a program tries to perform an action that requires administrator privileges, such as installing software or changing system settings, registry, or system files, UAC alerts the administrator and asks for confirmation. This reduces the risk of unauthorized changes and the execution of malicious code with administrator privileges.
In this article, we’ll look at how to manage UAC settings on a single computer, or multiple computers in a domain using Group Policies.
Contents:
- Configure User Account Control (UAC) Levels in Windows
- Managing UAC Settings via Group Policy
- User Account Control Slider Levels and GPO/Registry Settings
- How to Disable UAC with Group Policy
What does the UAC prompt look like? For example, if you attempt to elevate process privileges in a local administrator session, a UAC confirmation prompt appears:
User Account Control
Do you want to allow this app to make changes to your device?
Configure User Account Control (UAC) Levels in Windows
To manage UAC settings in Windows, a special applet is available in the Control Panel, which can be launched from the classic Control Panel or with the UserAccountControlSettings.exe command.
Use the slider to change the User Account Control protection level on a computer. There are 4 predefined UAC levels available:
- Level 4 — Always notify — the highest UAC protection level;
- Level 3 — Notify only when programs try to make changes to my computer (default) – default protection level (used by default);
- Level 2 — Notify only when programs try to make changes to my computer (do not dim my desktop) – almost the same as the previous level, but without switching to Secure Desktop with desktop locking;
- Level 1 — Never notify – UAC is disabled.
Note that moving the slider to the bottom Never notify (Level 1) position doesn’t completely disable UAC. This mode only enables automatic confirmation of administrator elevation requests without displaying the UAC prompt. Elevation requests are automatically denied in non-admin user sessions.
To disable UAC completely, you must disable the local group policy option User Account Control: Run all administrators in Admin Approval Mode. See below for details.
Managing UAC Settings via Group Policy
It is possible to manage UAC settings in Windows through Group Policy. The names of the UAC-related Group Policy options begin with User Account Control and can be found in this GPO editor section Computer Configuration -> Policies -> Windows Settings -> Security Settings -> Local Policies -> Security Options.

The following table contains a list of UAC policies, their possible values (including defaults), and the corresponding registry parameters (located under the HKLM\SOFTWARE\Microsoft\Windows\CurrentVersion\Policies\System registry key).
| Policy Name | Registry Parameter | Values |
| User Account Control: Admin Approval Mode for the Built-in Administrator account | FilterAdministratorToken |
0 (Default) = Disabled 1 = Enabled |
| User Account Control: Allow UIAccess applications to prompt for elevation without using the secure desktop | EnableUIADesktopToggle |
0 (Default) = Disabled 1 = Enabled |
| User Account Control: Behavior of the elevation prompt for administrators in Admin Approval Mode | ConsentPromptBehaviorAdmin |
0 = Elevate without prompting 1 = Prompt for credentials on the secure desktop 2 = Prompt for consent on the secure desktop 3 = Prompt for credentials 4 = Prompt for consent 5 (Default) = Prompt for consent for non-Windows binaries |
| User Account Control: Behavior of the elevation prompt for standard users | ConsentPromptBehaviorUser |
0 = Automatically deny elevation requests 1 = Prompt for credentials on the secure desktop 3 (Default) = Prompt for credentials |
| User Account Control: Detect application installations and prompt for elevation | EnableInstallerDetection |
1 = Enabled (default for Workgroup) 0 = Disabled (default for domain-joined Windows device) |
| User Account Control: Only elevate executables that are signed and validated | ValidateAdminCodeSignatures |
0 (Default) = Disabled 1 = Enabled |
| User Account Control: Only elevate UIAccess applications that are installed in secure locations | EnableSecureUIAPaths |
0 = Disabled 1 (Default) = Enabled |
| User Account Control: Run all administrators in Admin Approval Mode | EnableLUA |
0 = Disabled 1 (Default) = Enabled |
| User Account Control: Switch to the secure desktop when prompting for elevation | PromptOnSecureDesktop |
0 = Disabled 1 (Default) = Enabled |
| User Account Control: Virtualize file and registry write failures to per-user locations | EnableVirtualization |
0 = Disabled 1 (Default) = Enabled |
| User Account Control: Behavior of the elevation prompt for administrators running with Administrator Protection | These options were introduced in Windows 11 in late 2024 to control the new Local Administrator Protection feature. | |
| User Account Control: Configure type of Admin Approval Mode |
User Account Control Slider Levels and GPO/Registry Settings
When you change the UAC protection level by using the slider in the Control Panel, Windows changes the values of the following registry entries.
| UAC Slider Level | PromptOnSecureDesktop |
EnableLUA |
ConsentPromptBehaviorAdmin |
| Level 4 – Always Notify | 1 | 1 | 2 |
| Level 3 – Notify only when programs try to make changes to my computer (default) | 1 | 1 | 5 |
| Level 2 – Notify only when programs try to make changes to my computer (do not dim my desktop): | 0 | 1 | 5 |
| Level 1 – Never Notify | 0 | 1 | 0 |
Therefore, if you want to use the GPO to configure UAC settings that correspond to the specific slider level, you only need to configure 3 policy parameters (described above).
For example, apply the following registry parameters to set UAC level 3:
Windows Registry Editor Version 5.00
[HKEY_LOCAL_MACHINE\SOFTWARE\Microsoft\Windows\CurrentVersion\Policies\System]
"PromptOnSecureDesktop"=dword:00000001
"EnableLUA"=dword:00000001
"ConsentPromptBehaviorAdmin"=dword:00000005
"ConsentPromptBehaviorUser"=dword:00000003
"EnableInstallerDetection"=dword:00000001
"EnableVirtualization"=dword:00000001
"ValidateAdminCodeSignatures"=dword:00000000
"FilterAdministratorToken"=dword:00000000
The values of the ConsentPromptBehaviorUser, EnableInstallerDetection, EnableVirtualization, ValidateAdminCodeSignatures, and FilterAdministratorToken parameters are the same for all levels.
There is another registry parameter in this key, LocalAccountTokenFilterPolicy, often referred to as Remote UAC. This parameter restricts remote connections to default admin shares under local user accounts with administrator privileges.
How to Disable UAC with Group Policy
Let’s look at how to completely disable User Account Control (UAC) in Windows through Group Policy.
On a standalone computer, use the Local Group Policy Editor gpedit.msc. If you need to deploy the Group Policy settings to multiple domain computers, use the Group Policy Management Console – gpmc.msc (let’s consider this option).
- In the Group Policy Management snap-in, click the OU containing computers where you want to disable UAC and create a new GPO
- Edit the policy and go to the section Computer Configuration -> Policies -> Windows Settings -> Security Settings -> Local Policies -> Security Options;
- To completely disable UAC, set the following parameter values:
- User Account Control: Behavior of the elevation prompt for administrators in Admin Approval Mode =
Elevate without prompting; - User Account Control: Detect application installations and prompt for elevation =
Disabled; - User Account Control: Run all administrators in Admin Approval Mode =
Disabled; - User Account Control: Only elevate UIAccess applications that are installed in secure locations =
Disabled.
- User Account Control: Behavior of the elevation prompt for administrators in Admin Approval Mode =
- Reboot the target computers to update Group Policy settings and disable UAC. After the reboot, UAC will switch to “Never notify” mode.

You can also disable UAC for some users/computers via the registry and deploy the settings through Group Policy Preferences.
In the GPO editor, go to Computer Configuration -> Preferences -> Windows Settings -> Registry and create a new registry parameter with the following settings
- Action: Replace
- Hive: HKEY_LOCAL_MACHINE
- Key Path: SOFTWARE\Microsoft\Windows\CurrentVersion\Policies\System
- Value name: EnableLUA
- Value type: REG_DWORD
- Value data: 0
Then go to the Common tab and enable the options:
- Remove this item when it is no longer applied
- Item-Level targeting
Click the Targeting button and specify the computers or domain security groups to which you want to apply the UAC disable policy.
You can change the value of any parameter using the Registry Editor GUI or from the command prompt. For example, to disable UAC on a computer (a reboot is required), run the command:
reg.exe ADD HKLM\SOFTWARE\Microsoft\Windows\CurrentVersion\Policies\System /v EnableLUA /t REG_DWORD /d 0 /f.
Or a similar PowerShell command:
New-ItemProperty -Path HKLM:Software\Microsoft\Windows\CurrentVersion\policies\system -Name EnableLUA -PropertyType DWord -Value 0 -Force