
Вы можете использовать встроенный OpenSSH сервер в Windows для проброса портов через SSH-туннель (SSH туннелирования). Перенаправление портов в SSH позволяет туннелировать (пробрасывать) порты приложений с локального компьютера на удаленный сервер и наоборот. Проброс портов через SSH туннель широко используется в среде Linux/Unix, а теперь вы можете воспользоваться этим возможностями и в Windows. В этом примере мы покажем, как пробросить RDP подключение через OpenSSH на хосте Windows Server.
Содержание:
- Для чего нужны SSH-туннели?
- Защищенный доступ к RDP через SSH туннель (local TCP forwarding)
- SSH туннель в Windows с помощью Putty
- Переброс удаленного порта на локальную машину (Remote TCP forwarding)
Для чего нужны SSH-туннели?
SSH-туннель обеспечивает защищенное шифрованный TCP соединение локальных хостом и удалённым сервером SSH. SSH Port Forwarding позволяет туннелировать поверх SSH подключение к локальному порту на локальном компьютере к любому TCP порту на удаленном сервере (или наоборот)
Порт форвардинг в SSH-туннелях применяются для:
- Обхода межсетевых экранов;
- Открытия бэкдоров в частные сети;
- Организации простых VPN/прокси сценариев для безопасного удаленного подключения;
- Защиты трафика устаревших приложений (протоколов), которые передают данные в открытом тексте (без шифрования).
Вы можете перенаправить в SSH туннель только TCP трафик/порт (UDP и ICMP протоколы не поддерживаются).
Проброс портов через SSH туннель можно использовать в сценариях, когда нужно подключиться к удаленному компьютеру, который защищен межсетевым экраном. Например, у вас имеется сервер c Windows, на котором наружу открыт только SSH порт (TCP 22). Все остальные порты блокируются аппаратным межсетевым экраном или Windows Defender Firewall Windows. Ваша задача подключиться к рабочему столу этого Windows сервера с помощью клиента RDP. Казалось бы, невозможная задача, т.к. порт RDP 3389 блокируется брандмауэром. Однако вы можете получить доступ к любому открытому порты на удаленном хосте через SSH-тунель.
Чаще всего используются следующие сценарии проброса через SSH:
- Local TCP forwarding — проброс локального порта на удаленный сервер;
- Remote TCP forwarding — проброс удаленного порта на локальный компьютер;
- Двойной SSH туннель – позволяет соединить между собой через SSH сервер компьютеры без выделенных белых IP адресов или находящиеся за NAT (если не подходит решение с OpenVPN)
Защищенный доступ к RDP через SSH туннель (local TCP forwarding)
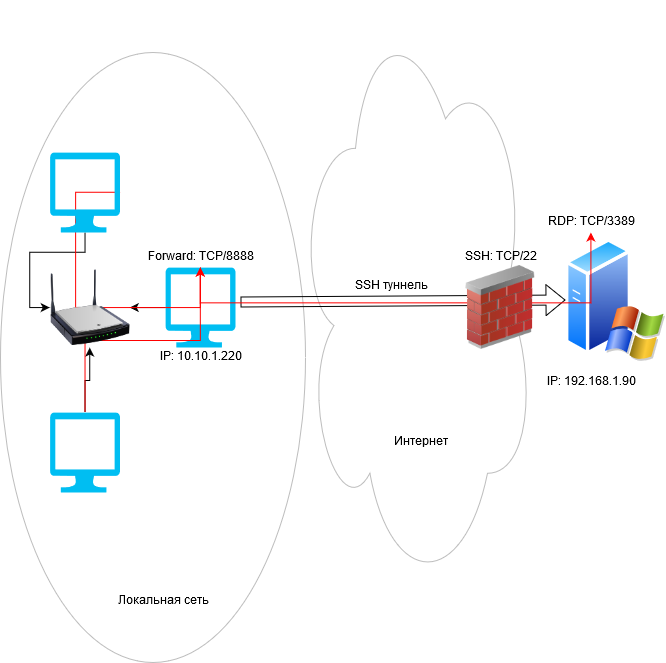
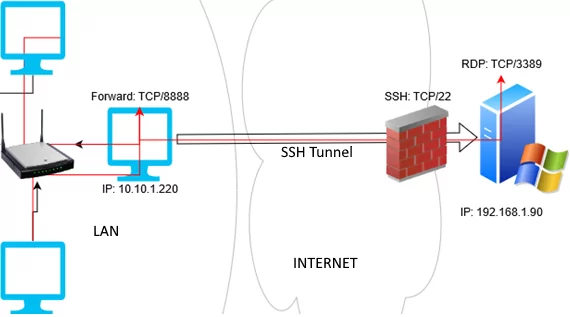
В этом режиме вы создаете на своем компьютере локальный TCP порт, подключения к которому перенаправляются через SSH туннель на указанный порт удаленного сервера. В этом примере мы создадим локальный порт 8888, при подключении к которому выполняется перенаправление на RDP порт 3389 на удаленном компьютере. Общая схема подключения выглядит так:
Для проброса портов нам потребуется SSH клиент. Можно использовать сторонний клиент (например, Putty), но я буду использовать встроенный SSH клиент в Windows. Чтобы установить клиенте OpenSSH, выполните в консоли PowerShell команду:
Get-WindowsCapability -Online | ? Name -like 'OpenSSH.Client*'
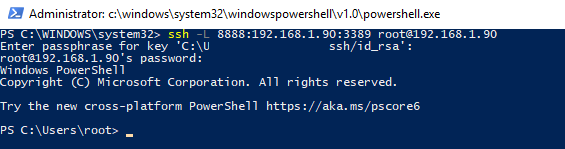
Чтобы создать SSH туннель с удаленным компьютером 192.168.1.90, выполните команду:
ssh -L 8888:192.168.1.90:3389 [email protected]
В этом примере используется формат
LOCAL_PORT:DESTINATION:DESTINATION_PORT
и
USER@DEST_SERVER_IP
(имя пользователя и адрес удаленного SSH сервера)
Чтобы SSH туннель работал в фоновом режиме, нужно добавит параметр –f.
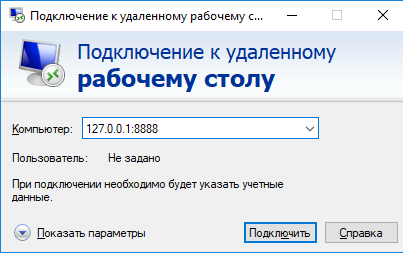
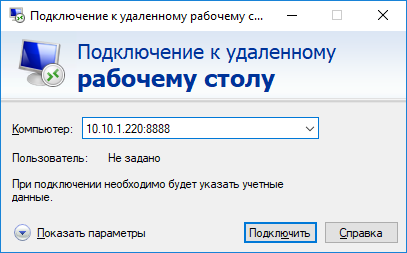
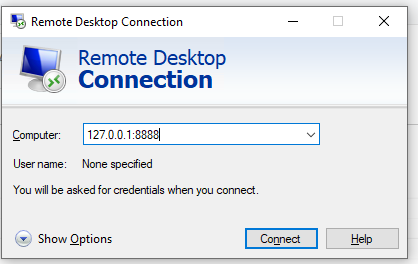
Теперь, чтобы подключится к удаленному компьютеру по RDP через SSH туннель, вам запустить RDP-клиент (mstsc.exe) и подключиться на локальный порт 8888 своего компьютера:
127.0.0.1:8888
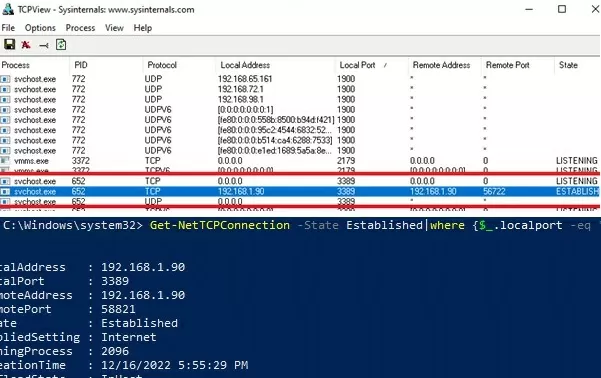
Выполните аутентификацию на удаленном компьютере и можете спокойно работать в RDP-сессии. С помощью команды Get-NetTCPConnection или утилиты TCPView вы можете убедиться, что RDP подключение установлено локально (RDP подключение инициировано запущенным локально SSH сервером):
Get-NetTCPConnection -State Established|where {$_.localport -eq "3389"}|fl
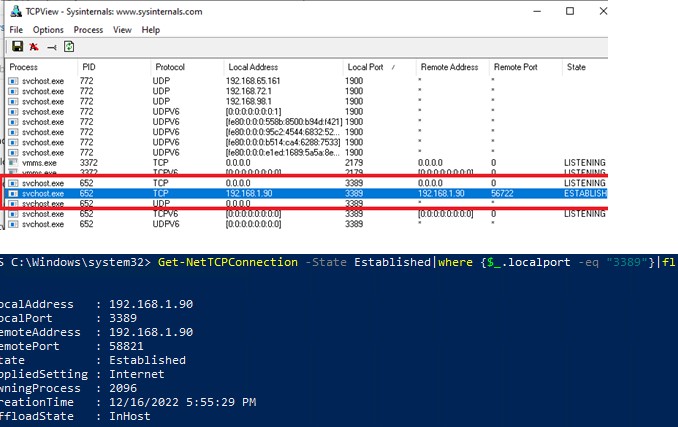
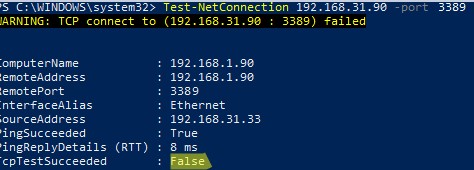
При этом порт TCP/3389 на сервере не доступен с удаленного компьютера. Вы можете проверить доступность порта с помощью командлета Test-NetConnection:
Test-NetConnection 192.168.1.90 -port 3389
TcpTestSucceeded : False
Обратите внимание, что если вы перенаправляете таким образом незашифрованный трафик приложения, то по сети он передается в зашифрованном виде. Трафик шифруется на одном конце SSH соединения и расшифровывается на другом.
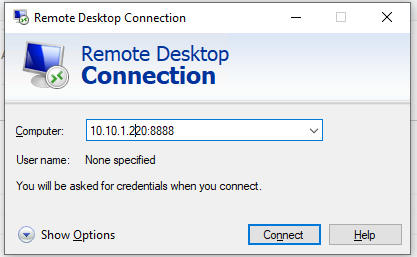
Другие компьютеры в вашей локальной сети смогут одновременно подключиться к удаленному RDP серверу Windows, даже если у них полностью заблокирован прямой доступ к удаленному серверу (как по SSH, так и по RDP). Для этого, они должны подключиться RDP клиентом к порту 8888 на компьютере, на котором создан SSH туннель:
mstsc.exe /v 10.10.1.220:8888
Защита RDP подключения с помощью SSH туннеля может быть хорошей альтернативой VPN для доступа к публичным Windows хостам в Интернете. В этом случае вам не нужно открывать прямой доступ к порту RDP/3389 из Интернета к хосту Windows. Достаточно открыть только порт SSH/22, что защитит вас от атак подбора пароля по RDP и эксплуатации 0-day RDP уязвимостей.
Для автоматического ввода пароля для подключения к SSH можно использовать утилиту sshpass. Ее можно запустить через подсистему WSL2 для Windows.
Установите sshpass в Ubuntu WSL:
$ sudo apt-get -y install ssphass
Запустите клиент Remote Desktop Connection (mstsc.exe) и сохраните в Windows RDP файл с настройками подключения:
Computer : localhost:8888
User name : remoteusername
Для автоматического подключения к удаленном RDP хосту с сохранённым паролем SSH, используйте такой bat файл:
start /min wsl sshpass -p "password" ssh -L 8888:192.168.31.90:3389 [email protected]
powershell sleep 5
start mstsc C:\rdp\localhost-33389.rdp
Или (предпочтительно) настройте SSH аутентификацию по ключам.
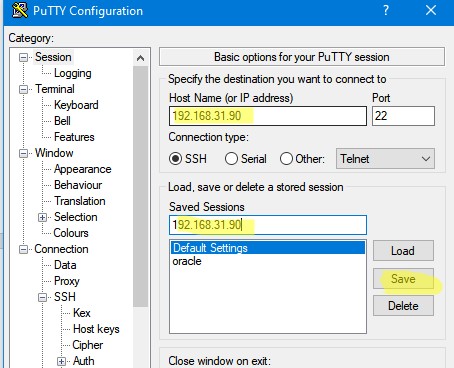
SSH туннель в Windows с помощью Putty
Рассмотрим, как настроить SSH туннель в Windows с помощью популярного SSH клиента Putty.
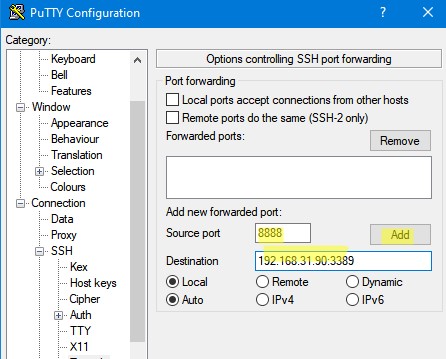
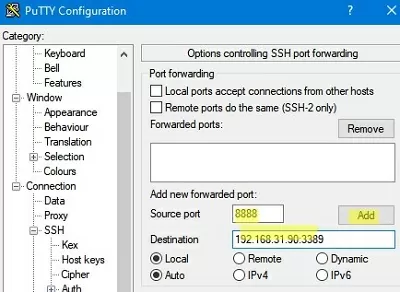
- Запустите PuTTY и перейдите в раздел Connection -> SSH -> Tunnels;
- В поле Source port укажите локального порта (в нашем примере это 8888);
- Укажите IP адрес сервера SSH и порт на удаленном хосте, на который нужно выполнить переадресацию:
192.168.31.90:3389 - Выберите Local в качестве Destination и нажмите Add;

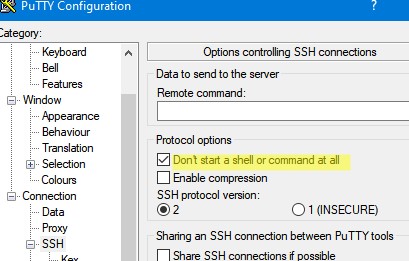
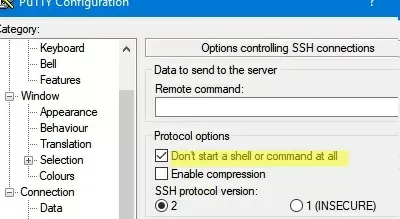
- Чтобы не открывать shell удаленного хоста при подключении через туннель, включите опцию Don’t start a shell or command at all в разделе SSH;

- Вернитесь на вкладку Session, укажите имя или IP адрес удаленного SSH хоста и порт подключения (по умолчанию порт 22). Чтобы сохранить настройки подключения, укажите имя сессии в поле Saved Session и нажмите Save;

- Теперь вы можете запустить сохраненный SSH туннель в Putty прямо и панели задач Windows.
Переброс удаленного порта на локальную машину (Remote TCP forwarding)
Есть еще один вариант применения SSH туннеля – remote TCP forwarding. Через SSH туннель вы можете открыть доступ удаленному серверу к локальному порту на вашем компьютере или порту на другом компьютере в вашей локальной сети. Например, вы хотите, чтобы внешний сервер (192.168.1.90) получил доступ к вашему Интранет сайту (не опубликованному в Интернете). Для создания обратного туннеля, используйте такую команду:
ssh -R 8080:internalwebsever:80 [email protected]
Теперь, чтобы на удаленном SSH сервер получить доступ к веб серверу internalwebsever достаточно в браузере набрать адрес
http://localhost:8080
.
С помощью SSH туннелей вы можете строить целые цепочки для форвардинга портов. Включить или отключить SSH туннелирование можно в конфигурационном файле OpenSSH (sshd_config) с помощью директив:
AllowStreamLocalForwarding yes
AllowTcpForwarding remote
PermitTunnel no
Данные опции неприменимы для текущей версии OpenSSH в Windows.
You can use the built-in OpenSSH server on Windows to forward ports through an SSH tunnel (SSH tunneling). Port forwarding in SSH allows you to tunnel (forward) application ports from your local computer to a remote server and vice versa. Port forwarding over an SSH tunnel is widely used in Linux/Unix environments, and now you can take advantage of this feature in Windows as well. In this example, we will show how to tunnel an RDP connection traffic over OpenSSH on a Windows Server host.
Contents:
- Securing RDP with the SSH Tunnel (Local TCP Forwarding)
- How to Create SSH Tunnel on Windows with Putty?
- Remote TCP Forwarding (Reverse SSH) to a Local Computer
What is an SSH Tunneling?
An SSH tunnel provides a secure, encrypted TCP connection between a local host and a remote SSH server. SSH Port Forwarding allows you to tunnel a connection from a local port on your local machine to any TCP port on a remote server (or vice versa) over SSH.
Port forwarding in SSH tunnels is used for:
- Bypass firewalls;
- Opening backdoors to private networks;
- VPN scenarios replacements for secure remote connection;
- Protect traffic of legacy applications (protocols) that transmit data in clear text (without encryption).
You can only forward TCP traffic/port to the SSH tunnel (UDP and ICMP protocols are not supported).
SSH tunneling is mostly used in scenarios when you need to connect to a remote computer behind the firewall. For example, you have a Windows Server with only SSH port open (TCP 22). All other ports are blocked by a hardware firewall or Windows Defender Firewall. Your task is to connect to the Windows Server using the RDP client. It would seem an impossible task because the Remote Desktop port 3389 is blocked by the firewall. However, you can access any ports on a remote host through an SSH tunnel.
Here are the typical usage scenarios of SSH tunneling:
- Local TCP forwarding is a local port forwarding to a remote server;
- Remote TCP forwarding is a remote port forwarding to a local computer;
- Double SSH tunnel – allows connecting computers without allocated pubic IP addresses or behind NAT/firewall through an SSH server (if OpenVPN server solution is not applicable).
Securing RDP with the SSH Tunnel (Local TCP Forwarding)
In this mode, you create a local TCP port on your computer. All connections to this port will be forwarded to the specified port on a remote server via the SSH tunnel. In this example, we will create a local port 8888, and the connection to it will be redirected to RDP port 3389 on a remote Windows host. The general connection diagram looks like this:
We need an SSH client for port forwarding. You can use a third-party client (like Putty), but I will use the built-in SSH client on Windows. Run the following command in the PowerShell console to install the OpenSSH client on Windows 10/11 or Windows Server 2022/2019:
Get-WindowsCapability -Online | ? Name -like 'OpenSSH.Client*'
To create an SSH tunnel with a remote host 192.168.1.90, run the command:
ssh -L 8888:192.168.1.90:3389 [email protected]
The following connection string is used in this example: LOCAL_PORT:DESTINATION_IP:DESTINATION_PORT and USER@DESTINATION_IP (the username and address of the remote SSH server)
To make the SSH tunnel run in the background, add the –f parameter.
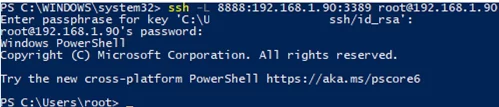
To connect to a Remote Desktop via the SSH tunnel, you need to connect to the local port 8888 of your computer using the RDP client (mstsc.exe):
127.0.0.1:8888
Login to the remote computer and work safely in the RDP session. You can use the Get-NetTCPConnection cmdlet or the TCPView tool to make sure that the RDP connection has been established locally (the RDP connection was initiated by the SSH server running locally):
Get-NetTCPConnection -State Established|where {$_.localport -eq "3389"}|fl
You can check that the TCP/3389 port on the server is not directly accessible from your computer. You can check the availability of a port using the Test-NetConnection cmdlet:
Test-NetConnection 192.168.1.90 -port 3389
TcpTestSucceeded : False
Other computers of your local network can also use this tunnel to simultaneously connect to an RDP server even if the direct connection is not allowed (both via SSH and RDP). To do it, they must use the RDP client to connect to port 8888 on your computer (with the SSH tunnel created):
mstsc.exe /v 10.10.1.220:8888
Securing an RDP connection with an SSH tunnel can be a good VPN alternative for accessing public Windows hosts. In this case, you don’t need to directly open the RDP/3389 port on the Windows host. It is enough to open only the SSH/22 port, which will protect you from RDP brute force attacks and the exploitation of 0-day RDP vulnerabilities.
You can use the sshpass tool to provide password automation for SSH login. You can run this tool through the WSL2 subsystem for Windows.
Install the sshpass in Ubuntu WSL:
$ sudo apt-get -y install ssphass
Run the Remote Desktop Connection client (mstsc.exe) and save the connection settings to the localhost-3389.rdp file:
Computer: localhost:8888
User name: remoteusername
To automatically connect to a remote RDP host with a saved SSH password, use the following bat file:
start /min wsl sshpass -p "password" ssh -L 8888:192.168.31.90:3389 [email protected]
 powershell sleep 5
 start mstsc C:\script\localhost-3389.rdp
Or (preferably) set up SSH key authentication.
How to Create SSH Tunnel on Windows with Putty?
Let’s look at how to create an SSH tunnel on Windows using the popular SSH client Putty.
- Run PuTTY and navigate to Connection -> SSH -> Tunnels;
- Specify the local port number in the Source port (in our example, it is 8888);
- Specify the IP address of the SSH server and the port on the remote host to forward the connection:
192.168.31.90:3389 - Select Local destination and click Add;

- To avoid opening a remote host shell when connecting through a tunnel, enable the Don’t start a shell or command at all option in the SSH section;

- Return to the Session tab, specify the name or IP address of the remote SSH host and the connection port number (22 by default). Specify the session name in the Saved Session field and click Save;
- Now you can start the saved SSH tunnel in Putty directly from the Windows 10 taskbar.
Remote TCP Forwarding (Reverse SSH) to a Local Computer
There is another SSH tunnel use case — remote TCP forwarding. You can allow a remote server to access a local port on your computer or a port on another computer on your local network through an SSH tunnel. For example, you want an external server (192.168.1.90) to access your Intranet site (not published on the Internet). To create a reverse tunnel, use the following command:
ssh -R 8080:internalwww:80 [email protected]
Now, to access the internal website from a remote SSH server, just type the address http://localhost:8080 in the browser.
On all Windows versions, you can create the port forwarding rules using the netsh interface portproxy command.
With SSH tunnels, you can create port forwarding chains. You can enable or disable SSH tunneling in the OpenSSH configuration file (sshd_config) using the following directives:
AllowStreamLocalForwarding yes
AllowTcpForwarding remote
PermitTunnel no
These configuration directives aren’t available in the current version of OpenSSH for Windows.
In recent days, users rely on remote desktop for various purposes especially to interact with a workplace computer from home or where they are. Basically, when you make a connection to your PC by using this feature, all you need is to straight away access the host computer. Oppositely while connecting to your system from outside network, you will have to enable related access. And for all this to happen, setting up Remote Desktop Port Forwarding on home network becomes compulsory.
Remote Desktop Port Forwarding mainly maps the port of your router’s IP to the port and IP of the Windows 10 desktop you want to interact with. Once you set Port Forwarding properly, it lets you carry out whatever you want to do remotely on the computer as same as you are using the PC.
Remote Desktop Port Forwarding
Here is How to Set up Remote Desktop Port Forwarding Windows 10 –
There are thousands of points to which a computer, a process, or an application connects, and these are known as port. Mainly, they are in control of Windows RDP service 3389, therefore, you will have to set the default port as 3389 for using the feature securely. Let’s see how to configure it –
1] Configure RDP through Windows Firewall
When you want to make RDP accessible within LAN, you need to “allow the port through Windows Firewall”. Here’s how –
- Press Win and I together to open Windows Settings app.
- Click on Update & Security.
- Select Windows Security from the left sidebar.
- Move to right-pane and click on Firewall & network protection.
- Click the link Allow an app through firewall present in the right-hand listing of when Windows Security shows up.
- A window from Control Panel will prompt, click Change settings button.
- Doing so will give you the ability to allow apps to communicate through Windows Firewall.
- Scroll down to reach Remote Desktop.
- If you want to allow Remote Desktop on the local network only, make sure the checkbox assigned for Private is ticked.
- Similarly, you can allow RDP for the public network by clicking on the checkbox of Public option. However, it’s not safe.
- Thereafter, click OK button to save the changes.
Important – If you don’t get Remote Desktop in the list, click on Allow another app button from the bottom and navigate to the following directory to add the same –
C:\Windows\System32\mstsc.exe
2] Set up Remote Desktop Port Forwarding through Router
If you want to use RDP over the internet, the Remote Desktop Port Forwarding is requisite through the main router. Here is how to proceed –
Check IP address of the computer
First of all, you need to find out the IP address of the computer you’re forwarding the port to. For that –
- Click on the search icon located in the taskbar.
- Type in cmd.exe and hit Enter key.
- In the black panel, insert
ipconfig / alland to execute the command-line, press Enter. - Look for IP Address label and note down the number.
Log into your home internet router
To enter into the router’s web-accessible control panel, all you need to do is open a web browser and surf IP address of router. In most cases, the address is 192.168.1.1 but it may differ depending on which manufacture’s router you are using. To be sure about the IP address, you can check the user manual that comes with the packaging.
You can also get the router’s IP address using Command Prompt. To do so –
- Press Win+R to bring run Dialog box.
- Type cmd in the command box and click OK button.
- Put
ipconfig / allafter blinking cursor and hit Enter. - Look for the Default Gateway IP address and note it down.
After getting the router’s IP, insert it into the address bar of a web browser, and press Enter key. Thereafter, provide credentials to log in to the dedicated control panel.
Modify the router settings
- Enter the control panel of the router, locate either of Applications and Games, Port Forwarding, or NAT (Network Address Translation), and click on it. The name of this section can vary depending on the router.
- In the text entry boxes, put IP address and port numbers.
Note – Set the forwarding port to 3389 and the IP address of your local PC.
- Save the settings and restart the router.
1] How to Disable, Enable Remote Desktop From Windows 10 Settings App
2] How to Connect to PC Using RDP / Remote Desktop Preview on Windows 10
3] Windows 10 – How to Establish Remote Desktop Connection
4] How to View Remote Desktop on Network and Capture Screenshots
5] How to access Remote Desktop with Ammyy Admin
Methods list:
1] Configure RDP through Windows Firewall
2] Set up Remote Desktop Port Forwarding through Router
That’s all!!
Проброс портов — одна из часто встречающихся задач для системного администратора. Обычно для её решения используют службы маршрутизации и удалённого доступа (RRAS), но в некоторых случаях это избыточно. В таких ситуациях на помощь приходит встроенная служба Portproxy, управляемая через командную строку утилитой Netsh.
Portproxy позволяет перенаправлять пакеты с IPv4 и IPv6 портов на любые адреса в любых комбинациях, однако работает только с протоколом TCP. Несмотря на это, функциональности Portproxy достаточно для большинства задач.
Приобрести оригинальные ключи активации Windows всегда можно у нас в каталоге от 1099 ₽
Основные команды Portproxy
1) Добавление правила
Команда для перенаправления пакетов с одного адреса и порта на другой:
netsh interface portproxy add v4tov4 listenaddress=XXX.XXX.XXX.XXX listenport=NNN connectaddress=YYY.YYY.YYY.YYY connectport=NNN
Параметры:
— listenaddress: локальный адрес, на котором принимаются соединения.
— listenport: локальный порт для входящих соединений.
— connectaddress: адрес назначения, на который перенаправляются соединения.
— connectport: порт назначения, на который перенаправляются соединения.
2) Изменение правила
Для изменения существующего правила используйте:
netsh interface portproxy set v4tov4 listenaddress=XXX.XXX.XXX.XXX listenport=NNN connectaddress=YYY.YYY.YYY.YYY connectport=NNN
3) Удаление правила
Для удаления перенаправления выполните:
netsh interface portproxy delete v4tov4 listenaddress=XXX.XXX.XXX.XXX listenport=NNN
4) Просмотр существующих правил
Для отображения всех правил перенаправления:
netsh interface portproxy show all
5) Сброс всех правил
Чтобы удалить все правила:
netsh interface portproxy reset
Практический пример
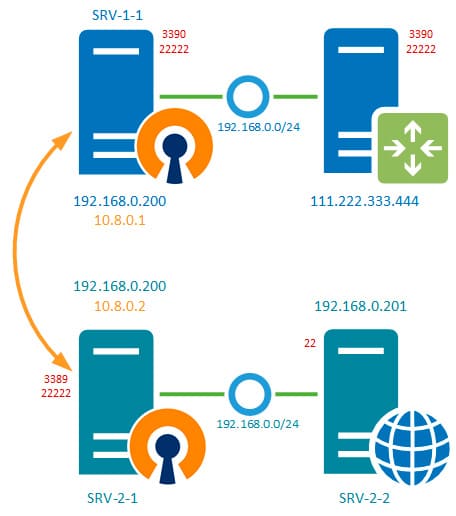
Есть две аффилированные организации с разным профилем деятельности. Первая организация имеет качественный доступ в интернет, вторая находится в сельской местности, где выделенный IP недоступен. Требуется обеспечить доступ к RDP и SSH серверам второй компании через ресурсы первой.
Исходные данные:
— Первая организация: сервер SRV-1-1, IP — 192.168.0.200.
— Вторая организация: сервера SRV-2-1 (RDP, порт 3389) и SRV-2-2 (SSH, порт 22).
— VPN-туннель соединяет серверы обеих организаций, доступ осуществляется через VPN-адреса (10.8.0.0).
Решение:
1) Настройка перенаправления RDP:
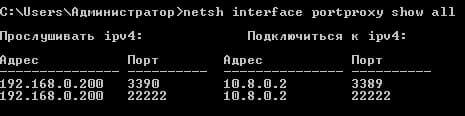
На сервере SRV-1-1 создаём правило для перенаправления внешнего порта 3390 на порт 3389 сервера SRV-2-1:
netsh interface portproxy add v4tov4 listenport=3390 listenaddress=192.168.0.200 connectport=3389 connectaddress=10.8.0.2
2) Настройка перенаправления SSH:
Создаём правило для перенаправления внешнего порта 22222 на порт 22 сервера SRV-2-2:
netsh interface portproxy add v4tov4 listenport=22222 listenaddress=192.168.0.200 connectport=22222 connectaddress=10.8.0.2
3) Дополнительная настройка на SRV-2-1:
Чтобы пакеты, попадающие на порт 22222, перенаправлялись на SSH сервер SRV-2-2, на SRV-2-1 создаём правило:
netsh interface portproxy add v4tov4 listenport=22222 listenaddress=10.8.0.2 connectport=22 connectaddress=192.168.0.201
Теперь RDP и SSH сервера второй компании доступны через порты 3390 и 22222, проброшенные через SRV-1-1. При этом:
— Внешние порты первой компании используются только для внешнего доступа.
— Сети организаций остаются изолированными.
Использование Portproxy позволяет реализовать сложные схемы перенаправления трафика без настройки маршрутизации и дополнительных инструментов. Это решение подходит для задач любой сложности, сохраняя простоту и эффективность.
Лицензионный ключ активации Windows от
Port forwarding is a technique used to direct network traffic from one network port to another. In Windows, the NETSH (Network Shell) command-line tool can be used to set up port forwarding. This article provides a detailed guide for system administrators on how to configure port forwarding using NETSH, a task essential for various network management and troubleshooting scenarios.
Understanding Port Forwarding
Port forwarding allows external devices to pass through a firewall to a specific device or service within a private local area network (LAN). This is particularly useful when hosting public services like web servers or FTP servers on a private network.
Prerequisites
- Administrator Privileges: You must have administrator rights on the Windows machine.
- Familiarity with NETSH: Basic understanding of the NETSH command is beneficial.
- Network Configuration: Know the specific ports and addresses that need to be forwarded.
Step-by-Step Guide to Configure Port Forwarding
Step 1: Open an Elevated Command Prompt
Right-click on the Start menu, select “Command Prompt (Admin)” or “Windows PowerShell (Admin)” to launch an elevated command prompt.
Step 2: Adding a Port Forwarding Rule
To forward a local port to a remote server port, use the following syntax:
netsh interface portproxy add v4tov4 listenport=[LocalPort] listenaddress=[LocalAddress] connectport=[RemotePort] connectaddress=[RemoteIPAddress]For example, to forward local port 8888 to remote server port 80 at IP address 64.57.102.36, use:
netsh interface portproxy add v4tov4 listenport=8888 listenaddress=0.0.0.0 connectport=80 connectaddress=64.57.102.36Step 3: Verifying the Configuration
Check if the TCP port is listening correctly:
netstat -an | findstr /I [LocalPort]Replace [LocalPort] with the port number, like 8888.
Step 4: Configuring the Firewall (Optional)
To allow incoming connections on the forwarded port, add a firewall rule:
netsh advfirewall firewall add rule name="Allow TCP Port [LocalPort]" dir=in action=allow protocol=TCP localport=[LocalPort]Replace [LocalPort] with the appropriate port number.
Step 5: Testing the Port Forwarding
Use a web browser or a network tool to connect to the local port and verify that the traffic is correctly forwarded to the remote address.
Advanced Configuration and Use Cases
- Port Forwarding for Multiple Ports: Repeat the port forwarding rule addition for each port that requires forwarding.
- IPv6 Support: If handling IPv6 addresses, adjust the command to support
v6tov4orv6tov6as required. - Use Case – Remote Administration: Forward specific ports to manage remote servers or devices from a central location.
- Use Case – Hosting Services: Forward ports to host services like web servers or gaming servers on a private network.
- Load Balancing and Redundancy: Set up port forwarding to distribute traffic among multiple servers for load balancing and redundancy.
- Security Considerations: Be cautious with port forwarding as it can expose internal network resources to the public internet. Always use in combination with robust security measures.
Removing Port Forwarding Configuration
To remove a specific port forwarding rule:
netsh interface portproxy delete v4tov4 listenport=[LocalPort] listenaddress=[LocalAddress]To clear all port forwarding configurations:
netsh interface portproxy resetTroubleshooting Common Issues
- Firewall Blocking: Ensure the Windows Firewall or any third-party firewall isn’t blocking the forwarded ports.
- Correct IP Addresses and Ports: Double-check the IP addresses and port numbers used in the commands.
- Command Syntax: Ensure the NETSH command is typed correctly, with appropriate parameters.
Conclusion
Configuring port forwarding using NETSH in Windows is a powerful technique for network traffic management. It is essential for system administrators to understand and utilize this tool for various network configurations and troubleshooting tasks. By following this guide, you can effectively set up port forwarding to meet specific network requirements, ensuring efficient and secure network operations.