
The Remote Desktop feature in Windows 11 operating system helps you to connect with differential device. You can use Remote Desktop on your Windows, Android, or iOS device to connect to a Windows PC from afar. If the Remote Desktop not working in Windows 11/10, this article will help you to fix it.
Remote Desktop not working is common issue under which client can’t connect to a remote computer. Additionally you don’t get error messages or any other symptoms that would hint to identify the root cause to fix the issue.
In this case, you can use below solutions that usually helps.
Page Contents
Fix 1: Check status of RDP protocol
Registry Disclaimer: It is recommended to create a System Restore point first, if you’re not familiar with registry manipulation.
1. Run regedit command to open Registry Editor.
2. Click File > Connect Network Registry.
3. Next, type name of the remote computer and select Check Names, and then select OK.
4. In left pane of Registry Editor window, navigate to:
HKEY_LOCAL_MACHINE\SYSTEM\CurrentControlSet\Control\Terminal Server

5. Make sure fDenyTSConnections DWORD is set to 0. If not, change its Value from 1 to 0, in order to enable RDP.
6. Repeat step 5 at this registry location as well:
HKEY_LOCAL_MACHINE\SOFTWARE\Policies\Microsoft\Windows NT\Terminal Services
Fix 2: Ensure GPO is not blocking RDP
1. Open administrative Command Prompt.
2. Execute this command:
gpresult /H c:\gpresult.html
3. Now open C:\gpresult.html file.
4. Locate Allow users to connect remotely by using Remote Desktop Services policy at Computer Configuration > Administrative Templates > Windows Components > Remote Desktop Services > Remote Desktop Session Host > Connections.
5. If the policy configuration is set to Disabled, check Winning GPO. Remove the blocking GPO to fix issue with RDP.
Fix 3: Check RDP services
In order to use Remote Desktop, the following two services must be running at the client machine and also at the remote computer. If either of these systems do not have these services running, you won’t be able to use Remote Desktop properly:
- Remote Desktop Services (TermService)
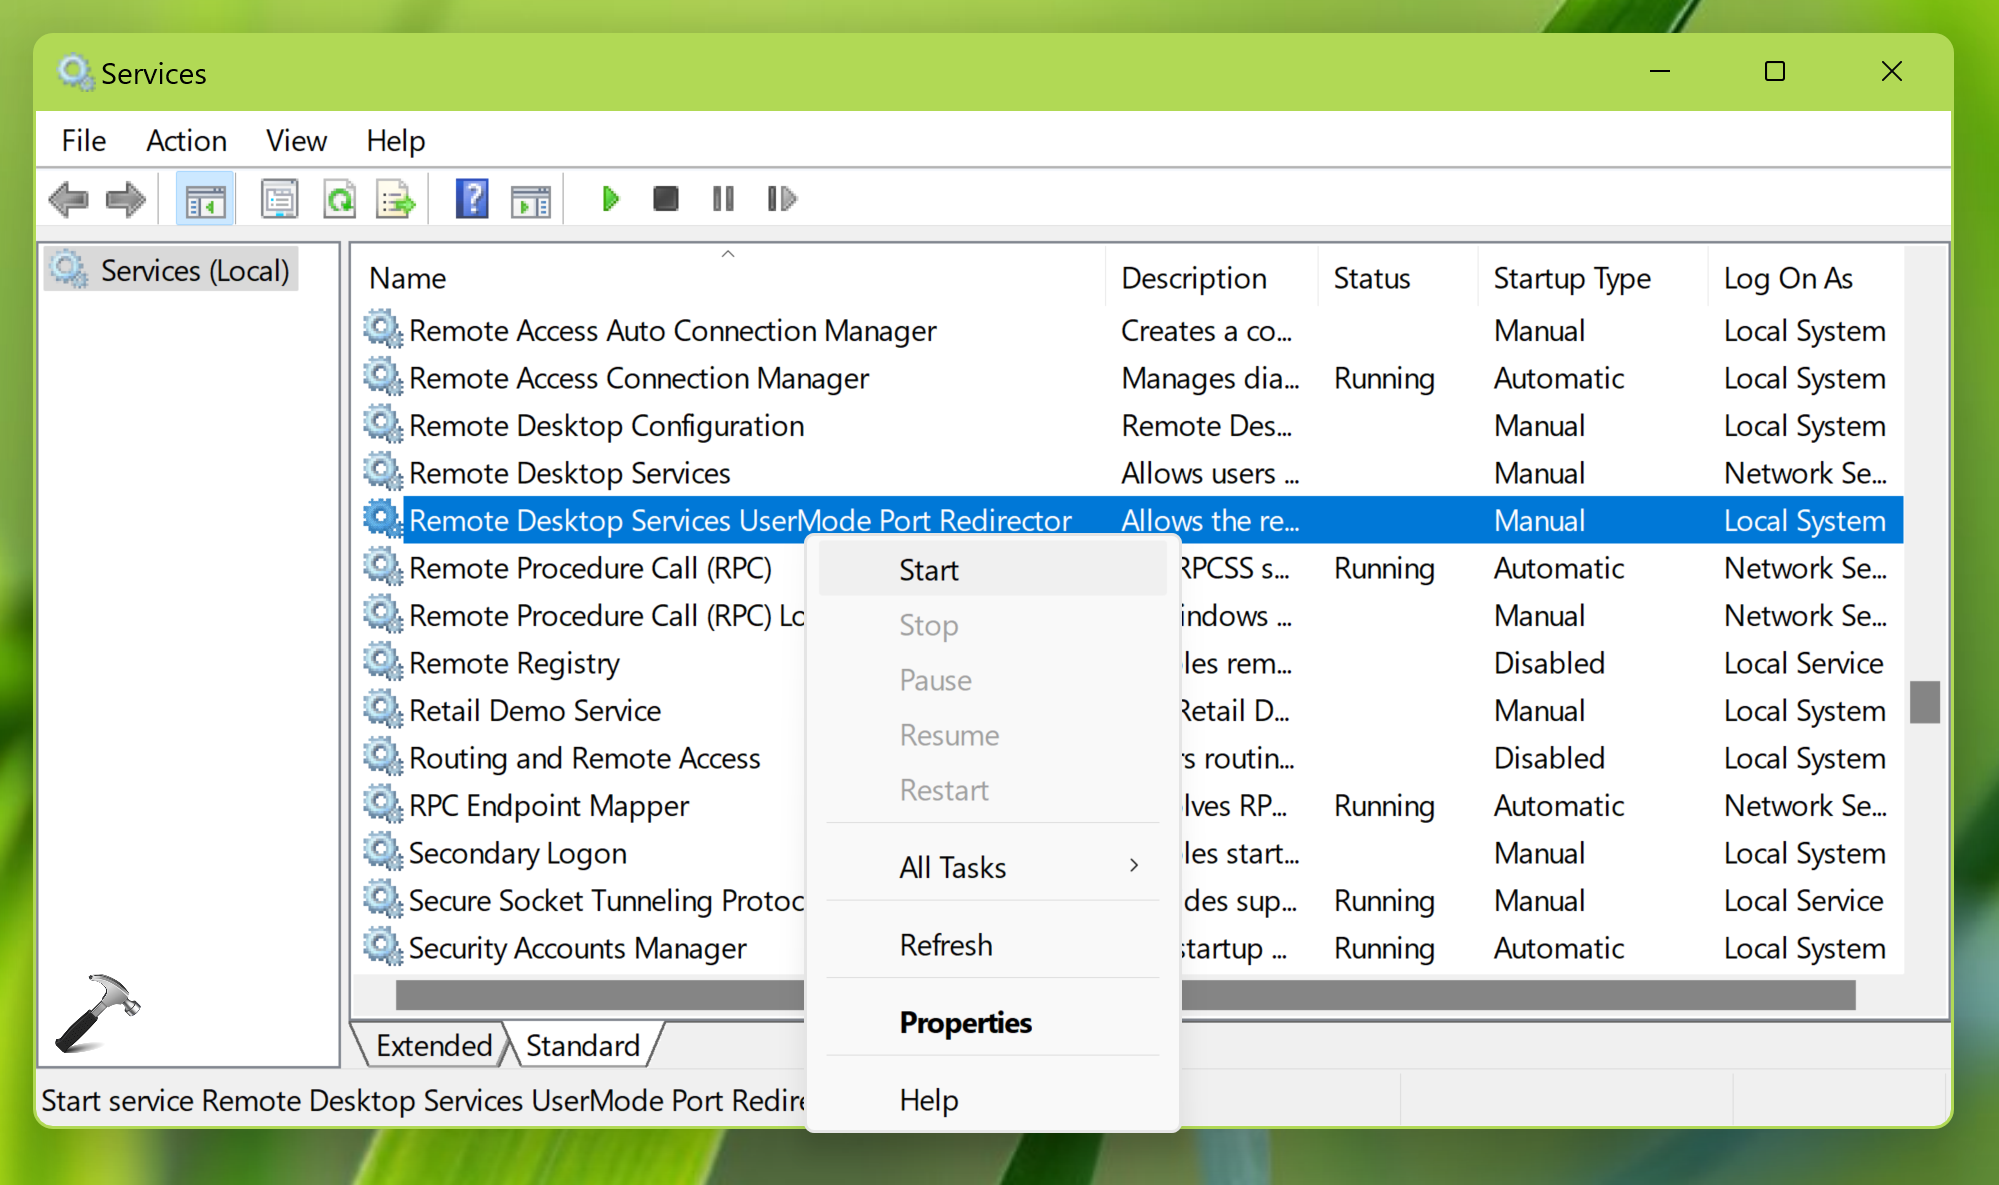
- Remote Desktop Services UserMode Port Redirector (UmRdpService)
Open Services snap-in by running services.msc command. Locate either of above two mentioned services, right click on it, select Start. Repeat same for other service.
Hope something helps!
RELATED ARTICLES
Readers help support Windows Report. We may get a commission if you buy through our links.
Read our disclosure page to find out how can you help Windows Report sustain the editorial team. Read more
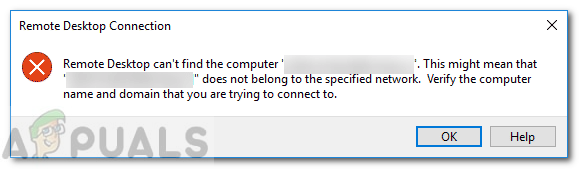
Remote Desktop is a powerful tool that enables you to access a computer from a remote location. However, sometimes you may encounter an error message stating that Remote Desktop can’t find the computer, which can be frustrating.
Why can’t Remote Desktop find the computer?
There could be various reasons why you are not able to connect to your computer remotely; some of the common ones are mentioned below:
- No Entry in the Hosts File – This error may occur if the system hosts’ files have no entry to your RDP server. Try adding it manually to fix the issue.
- Network connectivity issues – The weak internet connection could be why you cannot establish a connection with a remote PC. Try troubleshooting your network.
- DNS is not configured – If the DNS is not configured for the system, you might see this error. Configure DNS and try to access the remote device.
- Remote Desktop Connections Credentials cache – The credentials cache of RDP connections could also be the reason for the issue. Clear them to fix the problem.
Now that you know the reasons for the issue, let us move to the solutions.
How do I fix the Remote Desktop can’t find the computer error?
Before engaging in advanced troubleshooting steps, you should consider performing the following checks:
- Try restarting your computer and the router.
- Ensure no Windows update is pending.
- Check internet connectivity.
- Verify the host computer name.
If none of the above fixes worked for you, jump right into the detailed solutions to eliminate the error.
1. Allow the remote connections to the computer
- Press Windows + R to open the Run dialog box.
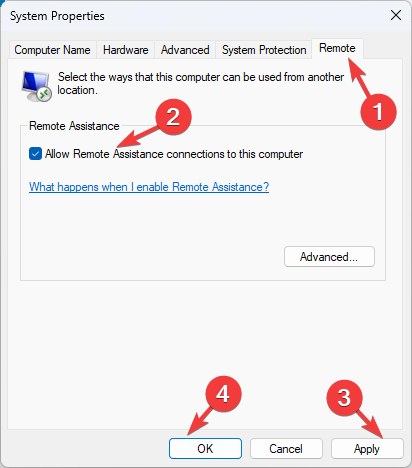
- Type sysdm.cpl and click OK to open System Properties.
- Go to the Remote tab, under Remote Assistance, and select Allow Remote Assistance connections to this computer.

- Click Apply and OK.
2. Verify that Remote access is enabled
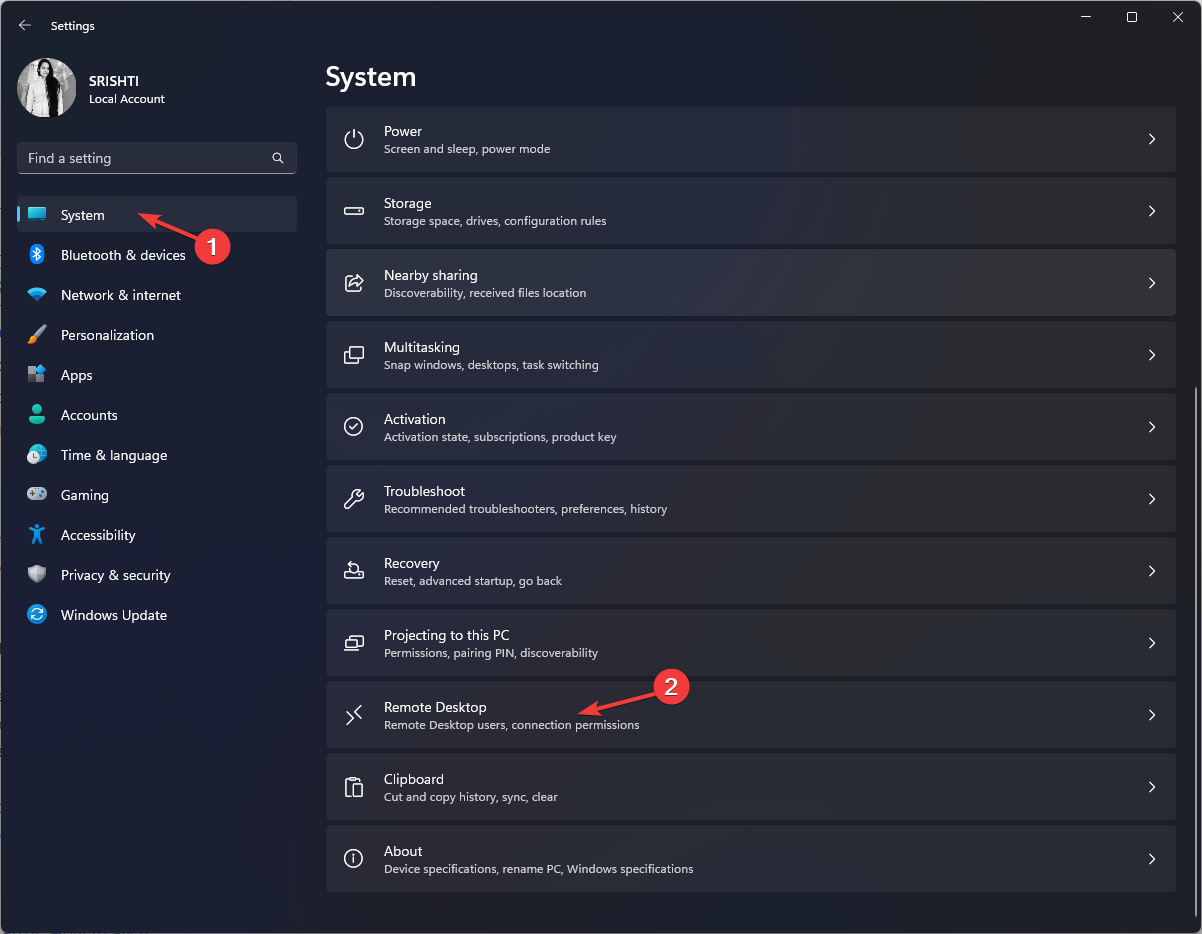
- Press Windows + I to open the Settings app.
- Go to System, then click Remote Desktop.

- Locate Remote Desktop and toggle on the switch to enable it.

- Click Confirm to save the changes.

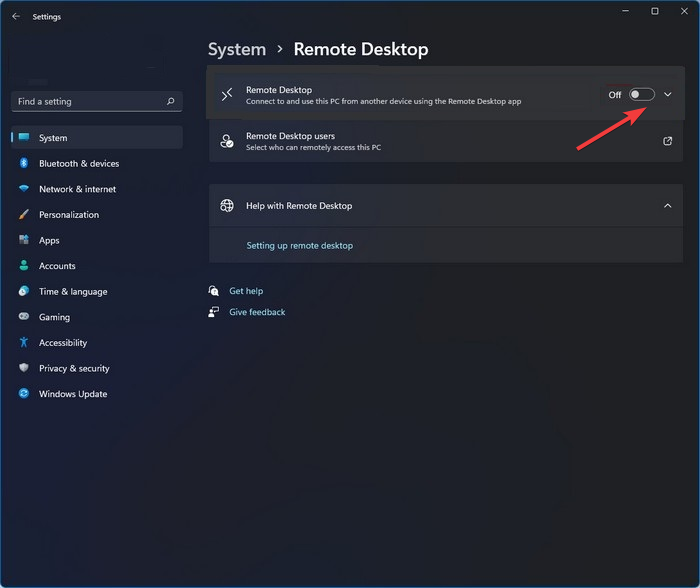
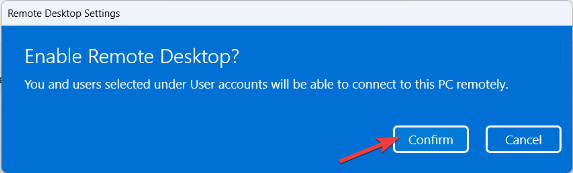
Now check if you can access the remote computer.
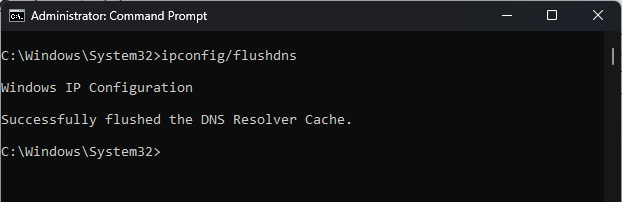
3. Flush the DNS
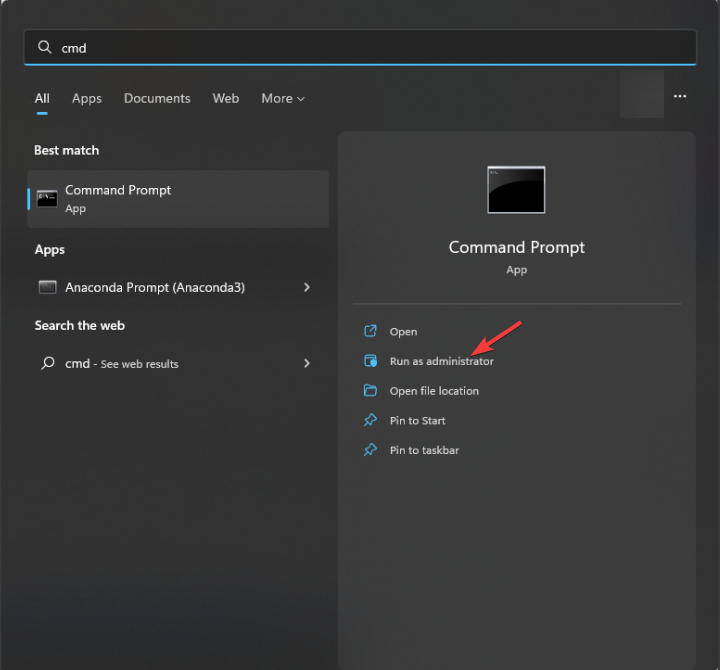
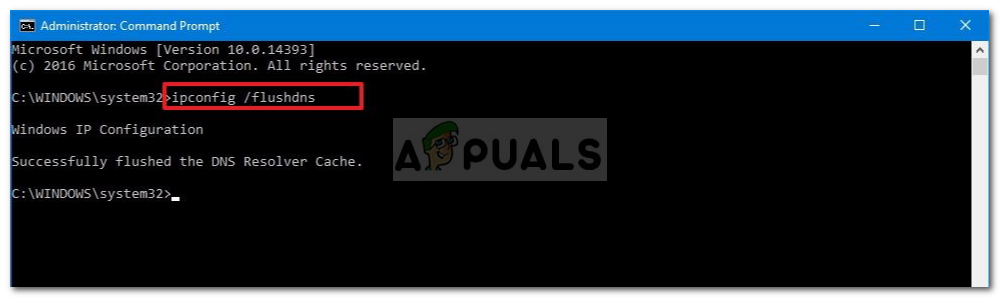
- Press the Windows key, type cmd, and click Run as administrator.

- Copy and paste the following command to flush DNS and hit Enter:
ipconfig/flushdns
- Close the Command Prompt and restart your computer.

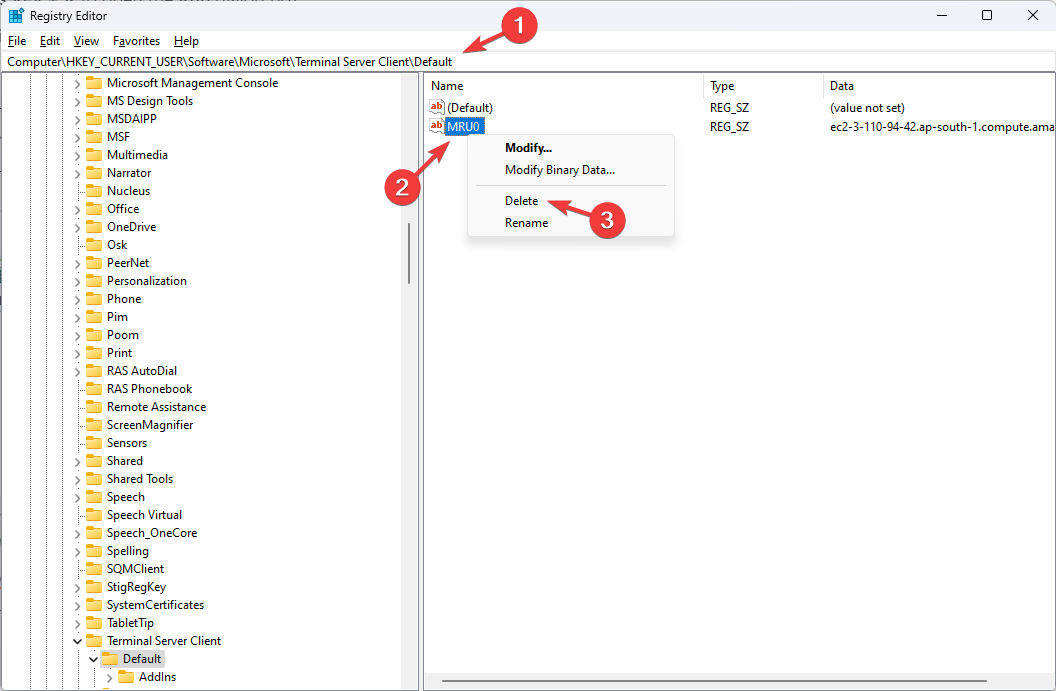
4. Delete the RDP connections history
- Press Windows + R to open the Run dialog box.
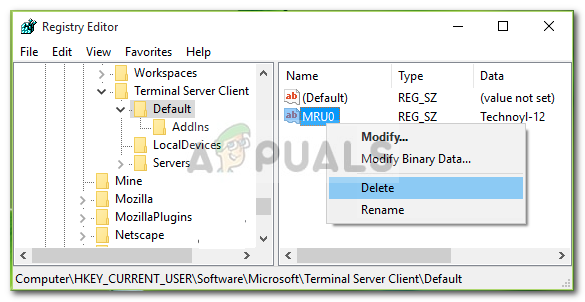
- Type regedit and click OK to open the Registry Editor.
- Navigate to this path:
Computer\HKEY_CURRENT_USER\Software\Microsoft\Terminal Server Client\Default - Select MRU0, right-click it, and select Delete to remove all the entries.

- Close Registry Editor and reboot your PC.
- Microsoft wants Windows 10 users to upgrade to Windows 11 or Copilot + PCs
- Windows 11 KB5055627 update makes File Explorer more fluid
- A few keyboard settings are moving from Control Panel to Settings app in Windows 11
- Details of Windows 11 25H2 spotted in the wild; likely to be a smaller update
- Deleting ‘inetpub’ folder lets hackers permanently stop Windows updates, Microsoft warns
5. Add Hostname to the Host file
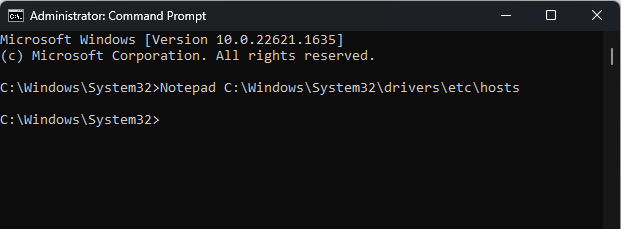
- Press the Windows key, type cmd, and click Run as administrator.

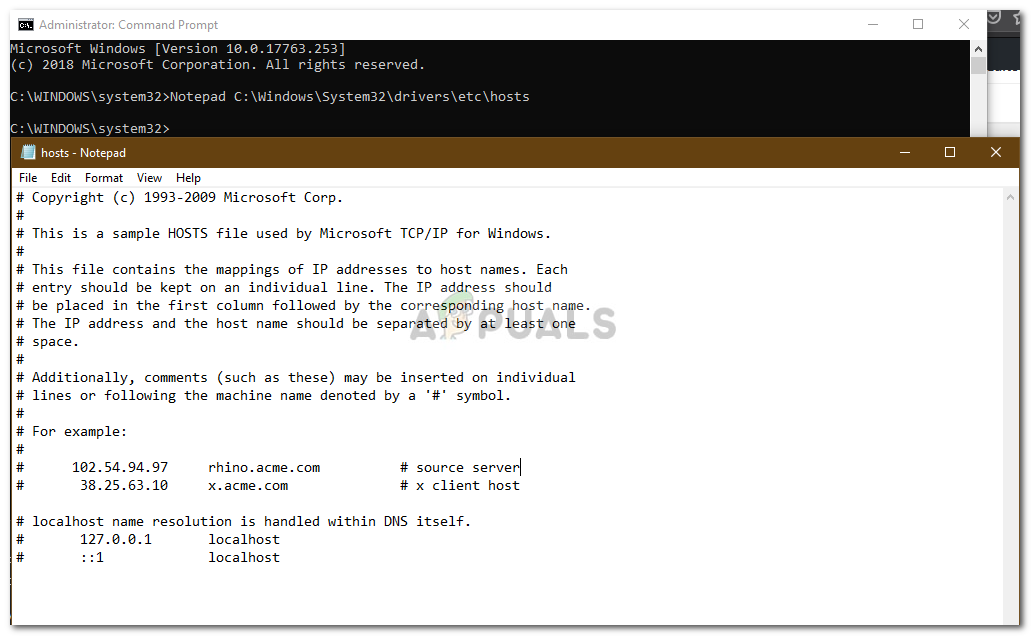
- Copy & paste the following command to open the hosts’ file in a notepad, and hit Enter:
Notepad C:\Windows\System32\drivers\etc\hosts
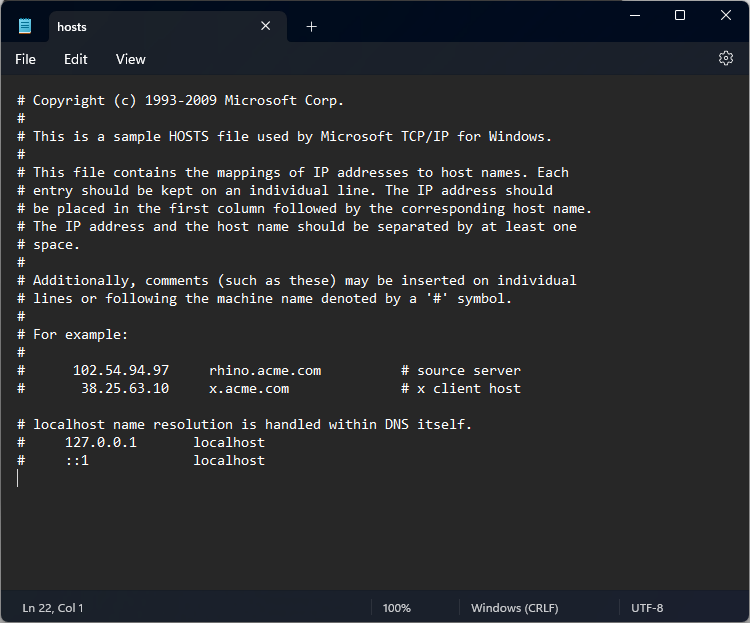
- You will have to add a string in the following format:
127.0.0.1 [hostname of the server]
- Press Ctrl + S to save the changes. Close Notepad, and then Command Prompt.
6. Allow Remote connection through the firewall
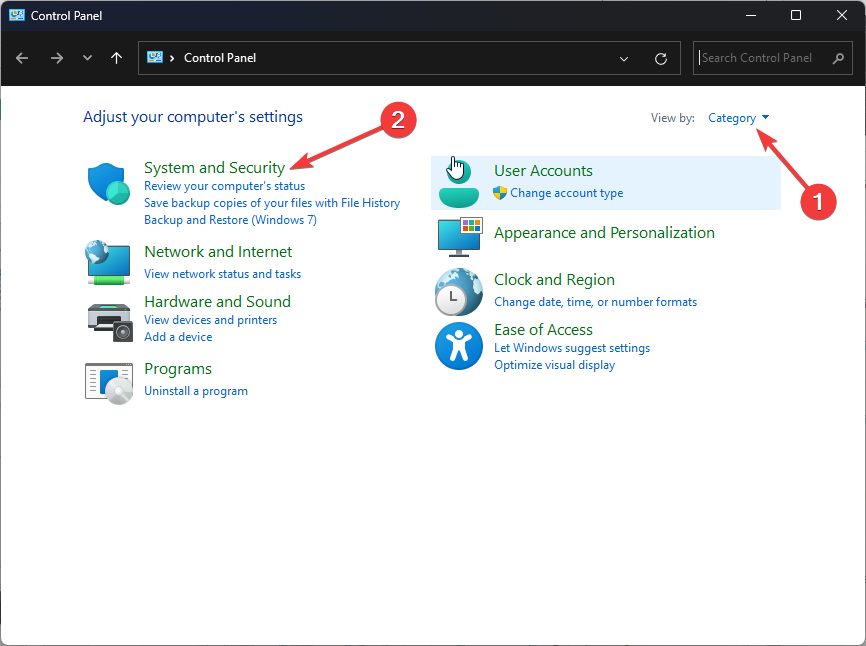
- Press the Windows key, type control panel, and click Open.

- Select View by as Category and click System & Security.

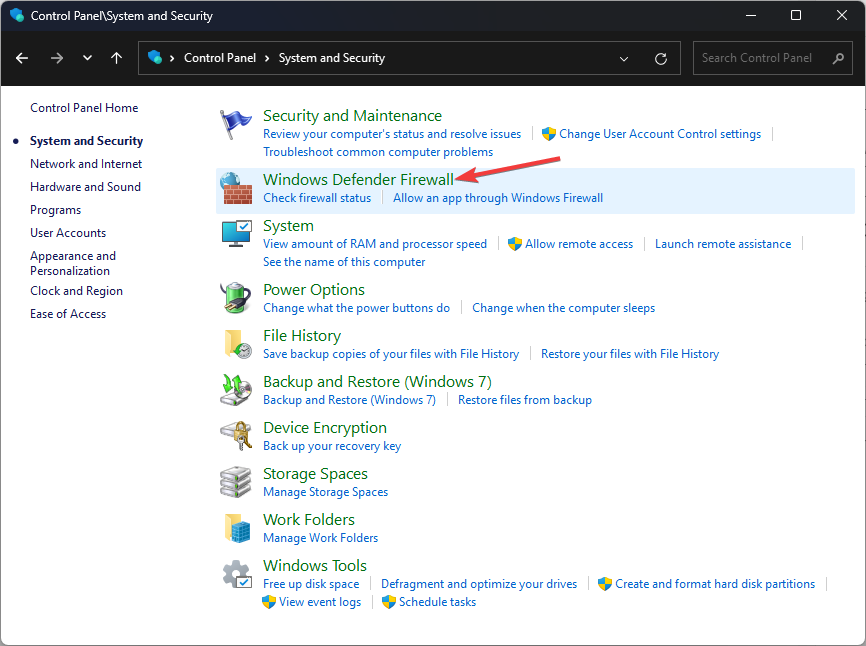
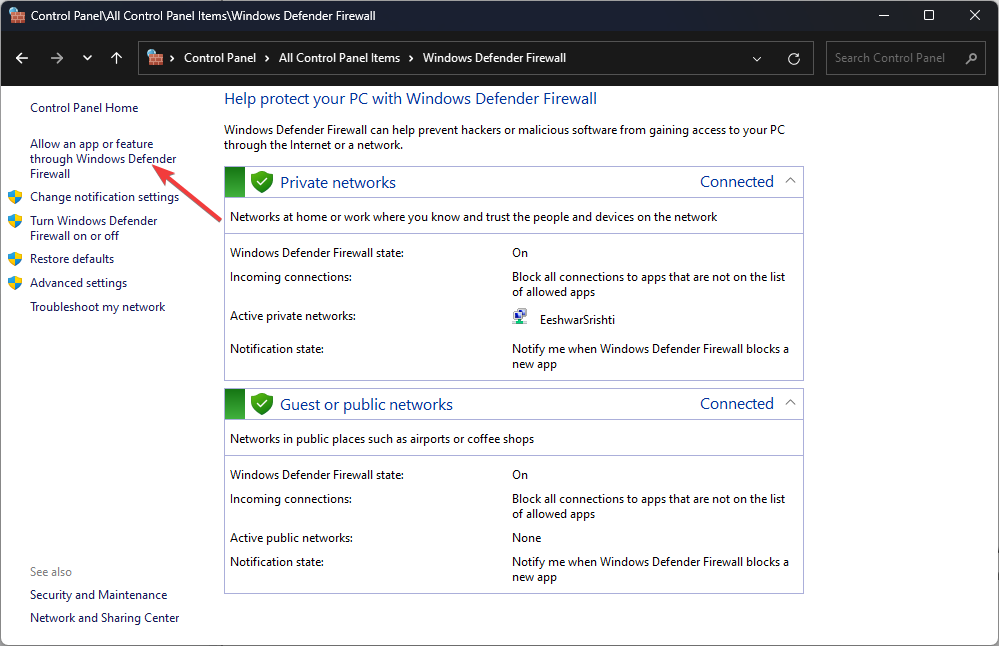
- Click Windows Defender Firewall.
- Now click Allow an app or feature through Windows Defender Firewall.

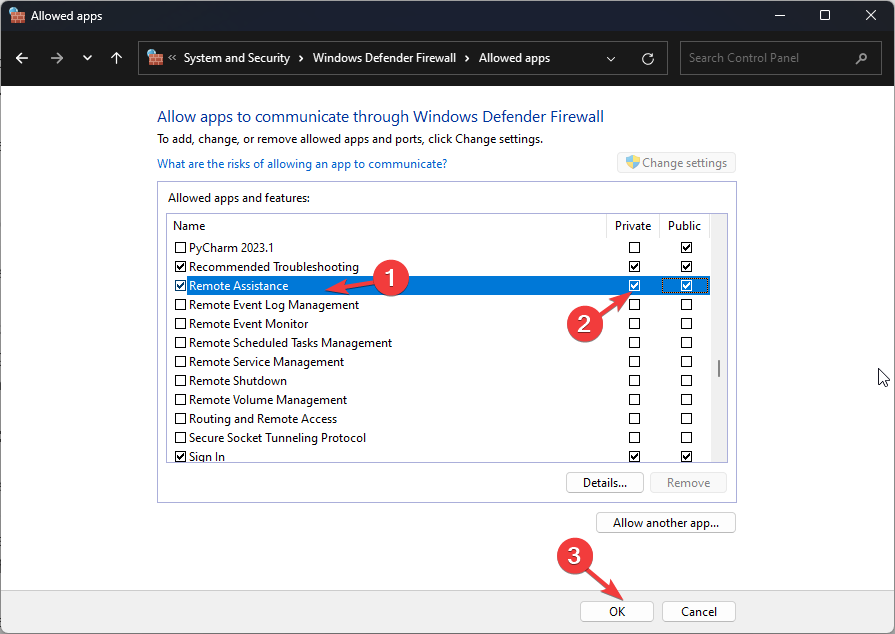
- Click Change settings.

- Locate Remote Assistance and Remote Desktop, select them, and make sure the Private & Public option for both is selected.

- Click OK to close the window.


7. Change the Port number
- Press Windows + R to open the Run window.
- Type regedit and click OK to open the Registry Editor.
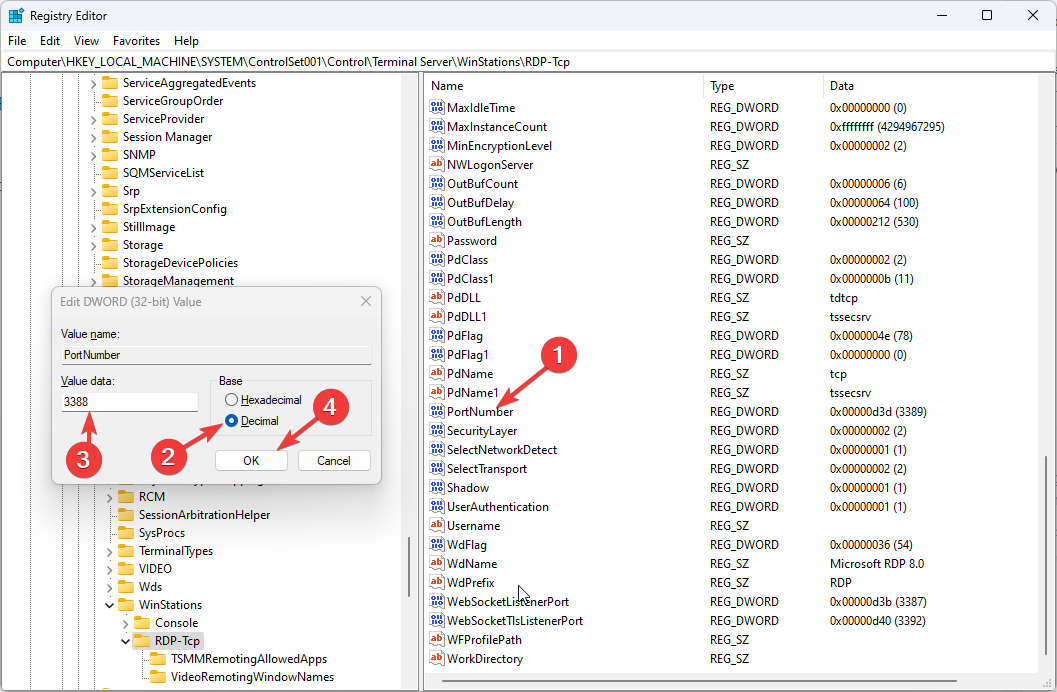
- Navigate to this path:
Computer\HKEY_LOCAL_MACHINE\SYSTEM\ControlSet001\Control\Terminal Server\WinStations\RDP-Tcp - Locate and double-click PortNumber.

- Change the Base to Decimal and the Value data from 3389 to 3388.
- Click OK and reboot your computer.
8. Enable the Remote Desktop Services
- Press the Windows + R to open the Run dialog box.
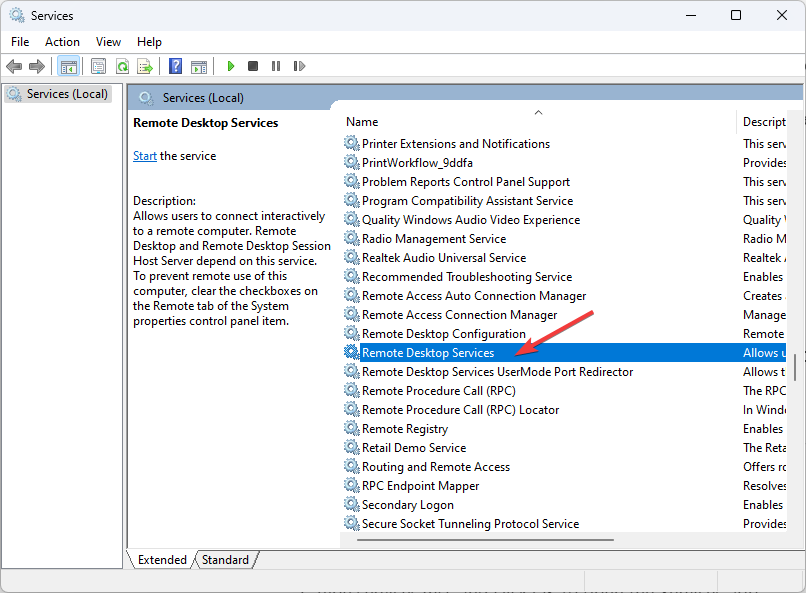
- Type services.msc and click OK to open the Services app.
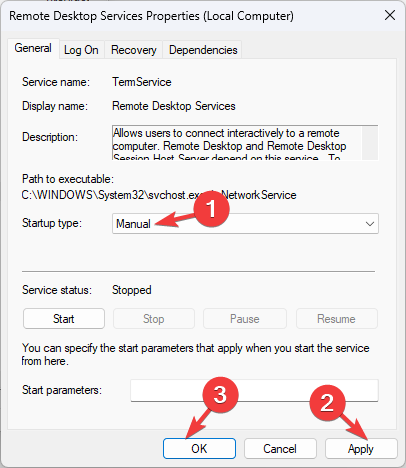
- Locate and double-click Remote Desktop Services to open Properties.

- Select Startup type as Manual and click Apply, then OK.

- Restart your PC to confirm the changes.
So, these are methods you can use to get rid of the Remote Desktop can’t find the computer error. If you have any questions or suggestions, please let us know in the comments section below.
Srishti Sisodia
Windows Software Expert
Srishti Sisodia is an electronics engineer and writer with a passion for technology. She has extensive experience exploring the latest technological advancements and sharing her insights through informative blogs.
Her diverse interests bring a unique perspective to her work, and she approaches everything with commitment, enthusiasm, and a willingness to learn. That’s why she’s part of Windows Report’s Reviewers team, always willing to share the real-life experience with any software or hardware product. She’s also specialized in Azure, cloud computing, and AI.
Working from home is becoming more common and often involves connecting to a computer remotely. However, many people who are doing it for the first time encounter various problems and errors. The most common one is the “remote desktop can’t find the computer” error.
Why is this happening and how can you solve it?
The Remote Desktop (RDP) feature that comes with Windows 10 is what allows us to connect to another Windows computer from a remote location. All you need is the device’s username and password. As long as you have a solid connection, you can connect to any computer no matter where in the world it’s located.

Unfortunately, there are certain things that can prevent you from connecting via remote desktop. In this article, we’re going to explore the most common problems that prevent you from setting a remote connection and how to solve them.
Common Reasons Why Remote Desktop Can’t Find the Computer
Before you start applying any of our solutions, you should be aware of the most common causes and try to identify which one is the culprit. Some of them are extremely easy to solve without any tech know-how.
1. Bad Internet Connection
Make sure your internet connection is set up properly.
2. Windows Updates
In some cases, a Windows update can prevent the Remote Desktop from working as it should. This is due to corrupt files. Finding the specific update that conflicts with RDP can be challenging and you’ll have to manually look for the cause. You might be dealing with a Windows update error.
3. Antivirus Blocks RDP
If you’re using a third-party antivirus in addition to Windows Defender, it might be blocking the remote desktop connection. However, Windows Defender can also cause the “remote desktop can’t connect to the remote computer” error if it’s not properly configured.
The easiest way to find out if the antivirus is to blame is to disable it. If RDP starts working as a result, then you’ve found the issue.
4. Remote Machine Is Turned Off or Disconnected
It could be as simple as your remote machine being turned off. Make sure the remote computer is turned on and available on the network. Additionally, remote access has to be enabled as well.
5. Wrong Credentials
Make sure you have the correct hostname. A simple typo can prevent you from connecting to the remote computer.
If you can’t identify the cause behind the “remote desktop can’t find the computer” error, start applying the solutions below step-by-step.
1. Configure Your Firewall
If you disabled your antivirus and that solved the error, you need to configure it to stop blocking RDP. You shouldn’t leave your computer unprotected. For the sake of this guide, we’re going to assume you’re using Windows Defender that comes with every Windows 10 system. However, you can easily adapt the following steps to any other antivirus. The essentials are the same.
Start by accessing the Windows Defender Firewall. You can find it in the Control Panel or you can simply type “Windows Defender” in the search box.

On the left side of the screen, choose “Allow an app or feature through Windows Defender Firewall.” You will see a list of applications and ports that are allowed or blocked to pass through the firewall.

To change the settings you first need to click on the “Change settings” button in the top right corner. Then scroll down to find Remote Assistance and Remote Desktop. Click on both Private and Public checkboxes to allow these apps to go through the firewall.
If the firewall was the problem, you should be able to connect to the remote computer. Otherwise, try applying one of the fixes below.
2. Enable RDP Services
You won’t be able to connect to a remote machine if any of the remote desktop services are disabled. Make sure the following services are enabled on both machines:
- Remote Desktop Services (TermService)
- Remote Desktop Services UserMode Port Redirector (UmRdpService)
To check, press CTRL + ALT + DELETE to launch the Task Manager. Click on Services and scroll until you find the two services.

They should be running by default, but if they’re not, you can restore them through the command prompt. Open the command prompt and type the following command for Remote Desktop Services:
sc config TeamService start = demand
If the Remote Desktop Services UserMode Port Redirector is not running, then type the following command:
sc config UmRdpService start = demand
Remember that these services have to be running on both computers.
3. Clear DNS Cache
If the “Remote desktop can’t find the computer” error persists, you should flush the DNS cache. Open the command prompt and type the following line in the console:
ipconfig /flushdns
Press Enter and try connecting to the remote computer. If the error appears, try the next solution.
4. Reset Credentials
When you connect to a remote machine, the credentials you used in the past might be automatically applied. This can cause issues if they’re no longer valid or matching with the desktop you’re trying to connect to.
Open the Remote Desktop Connection app, and insert the correct IP address of the computer you’re trying to connect to. Alternatively, you can manage your credentials from the User Accounts panel that you can find in the Control Panel. Make the necessary changes, double-check, and save.

5. Clear the Connections History Using the Windows Registry
Sometimes, the Remote Desktop Connections cache is what’s causing the error. Try clearing the connections history from the Windows Registry.
Open the Registry Editor by typing “registry editor” in the search box and launching the app. Alternatively, you can use the “Run” dialog window and type “regedit.”

Go to the Terminal Server Client folder and delete any MRU entries you find. If you’re having difficulties finding the folder, go to Edit, select Find, and type “Terminal Server Client” in the search box.

In this case, there are no MRU entries to delete. If there are any, you will see them in the right panel. To remove them, right-click on them and select the Delete option.
6. Check the RDP Port
While you’re inside the Registry Editor, you should check the listener port that the RDP uses. By default, port 3389 is used. However, if another application is using the same port, you’ll get the “remote desktop can’t find the computer” error.
Open the Registry Editor and go to the RDP-Tcp directory. You can use the Find function inside the Edit tab to save time looking for it.

Search for PortNumber and check the number of the listener port as seen in the image above. As mentioned, 3389 should be the default. Let’s change it to 3388 instead, to see if we can connect to the remote machine using a different port.
To modify the port number, right-click on PortNumber and choose Modify. This opens the editing window.
By default, you will probably see “d3d” in the data field. That’s just hexadecimal for port number 3389. To change that number, switch to decimal by ticking the Decimal option. Then type 3388 in the value data field. Now try connecting to the remote computer.
7. Check the Network Properties
The Remote Desktop application sometimes doesn’t like public networks and blocks them for safety reasons. Check your network settings and make sure to set the profile to private.
Open the Settings application and go to Network & Internet. Click on Status and select Properties in the right panel.

Under Network Profile, choose Private.

Try to connect to the remote computer once again.
Connecting with Remote Desktop
We hope that one of these solutions worked for you. The “Remote desktop can’t find the computer” error is quite common because so many issues can cause it. The best thing to do is go one solution at a time until you find the one that works. Let us know which fix worked for you in the comments below.
Related Posts
- How to Fix a “This file does not have an app associated with it” Error on Windows
- How to Fix an Update Error 0x800705b4 on Windows
- How to Resolve “A JavaScript error occured in the main process” Error on Windows
- How to Fix the Network Discovery Is Turned Off Error on Windows
- How to Change Folder Icons in Windows
The error message ‘Remote Desktop can’t find the computer’ pops up when your Remote Desktop connection fails. This can be due to a number of reasons including your DNS cache or the system hosts file etc. Often it is assumed that the error message is emerging because the system is not able to resolve the specified hostname due to some issue with the DNS, however, it is not necessarily the case every time. There are other factors as well due to which you are not able to resolve the hostname.
In some cases, the issue is simply because you have mistakenly entered the hostname incorrectly. You can also, sometimes, get over the issue by simply using the IP address instead of the hostname. However, in case it doesn’t work out, then you are in for a ride. In such a case, you can try to use the solutions given down below to isolate the issue.
What causes the ‘Remote Desktop Can’t Find the Computer’ Error Message on Windows 10?
Well, the error message appears because your system is not able to resolve the specified hostname which can be due to one of the following factors —
- DNS Cache: In most of the cases, your DNS cache is responsible for the system not being able to reach the hostname. In such a case, you will just have to flush it.
- No Entry in the Hosts File: The error message can also appear if your system’s hosts file has no entry of your RDP server. In such a situation, you will have to manually add it.
- Remote Desktop Connections Credentials Cache: The issue also seems to be caused by the credentials cache of the Remote Desktop Connections. To isolate it, you will have to clear the credentials cache.
Now, getting towards the possible resolutions for the issue, you can circumvent it by implementing the following solutions.
Solution 1: Flush DNS
If you are caught in the midst of the said error message then the first thing you need to do is to flush your DNS cache. In most of the cases, this will fix your issue. Here’s how to do it:
- Press Windows Key + X and select Command Prompt (Admin) from the list to open an elevated command prompt.
- Once the command prompt loads up, type in the following command and then hit Enter:
ipconfig /flushdns

Flushing DNS - Close the command prompt.
- Check if it isolates the issue.
Solution 2: Clear RDP Connections History
In some cases, the issue can also be caused by the credentials cache of the Remote Desktop Connections. In such a case, you will have to clear the RDP connections history. This can be done using the Windows Registry. Here’s how to do it:
- Press Windows Key + R to open the Run dialog box.
- Type in ‘regedit’ and then hit Enter.
- Now, navigate to the following directory:
HKEY_CURRENT_USER\Software\Microsoft\Terminal Server Client\Default
- On the right-hand side, delete all the MRU entries and then restart your system.

Deleting MRU Entries - See if it fixes the issue.
Solution 3: Adding the Hostname to the Hosts File
If the above solutions do not work out for you, then the hosts file on your system is missing your RDP server entry. In such a case, you will have to manually put it in and then see if it fixes the issue. To do this, follow the given instructions:
- Press Windows Key + X and then select Command Prompt (Admin) from the list to open an elevated command prompt.
- In the command prompt, type in the following and then hit Enter:
Notepad C:\Windows\System32\drivers\etc\hosts
- This will open up the hosts file in a notepad.

Hosts File - You will have to add a string in the following format:
- 127.0.0.1 [hostname of the server]
- Press Ctrl + S to save the notepad file.
- Close the notepad file and then close the command prompt.
- See if it isolates the issue.
Kevin Arrows
Kevin Arrows is a highly experienced and knowledgeable technology specialist with over a decade of industry experience. He holds a Microsoft Certified Technology Specialist (MCTS) certification and has a deep passion for staying up-to-date on the latest tech developments. Kevin has written extensively on a wide range of tech-related topics, showcasing his expertise and knowledge in areas such as software development, cybersecurity, and cloud computing. His contributions to the tech field have been widely recognized and respected by his peers, and he is highly regarded for his ability to explain complex technical concepts in a clear and concise manner.
Уровень сложностиПростой
Время на прочтение8 мин
Количество просмотров67K

Для доступа удалённому Windows-серверу из Windows-системы большинство администраторов используют протокол удалённого рабочего стола (Remote Desktop Protocol — RDP). Есть, конечно, и существенная доля тех, кто оперирует более обширным перечнем вариантов подключения — Microsoft Remote Assistance, VNC, Radmin и много чего ещё, но мы поговорим про RDP. Вернее, не о самом RDP, а о проблемах, которые могут возникнуть при подключении к удалённому серверу при помощи этого протокола.
Для многих, вероятно, не составляет труда решить внезапно возникшее затруднение, когда почему-то не получается подключиться к виртуалке, вдобавок практически каждый, не сходя с места, подкинет пару-тройку советов, где и что следует глянуть, чтобы исправить проблему. И всё же, вдруг кто-то чего-то не знает. На этот случай под катом несколько способов выхода из ситуации — по большей части самых простых.
▍ Немного теории
RDP — сетевой протокол разработки корпорации Microsoft, позволяющий управлять удалённым компьютером или виртуальной машиной. Протокол был разработан для поддержки множества различных типов сетевых топологий, таких как ISDN, POTS, IPX, NetBIOS, TCP/IP. Текущая версия работает только по протоколу TCP/IP. Передача данных через стек RDP производится в рамках семиуровневых стандартов модели OSI. Данные из службы или приложения передаются вниз по стекам протоколов, где они разбиваются на секции, направляются в канал, шифруются, оформляются, упаковываются в сетевой протокол и, наконец, отправляются в адрес клиента. Возвращаемые данные обрабатываются так же, только в обратном порядке. Пакет лишается своего адреса, после чего разворачивается, расшифровывается и передаётся приложению.
Протокол использует архитектуру клиент-сервер, когда клиент инициирует подключение, а сервер отвечает на полученный запрос. Чтобы начать сеанс RDP, клиент посылает на удалённый узел запрос на подключение, включающий в себя данные, необходимые для входа в систему — учётную запись пользователя, разрешение и глубину цветопередачи экрана удалённого рабочего стола, параметры использования клавиатуры, звука и тому подобное. После чего сервер проверяет корректность учётных данных подключающегося пользователя и устанавливает соединение с клиентом.
В установленном соединении RDP использует сочетание методов сжатия, кэширования и кодирования для оптимизации передачи обновлений экрана, ввода с помощью мыши и клавиатуры и других данных.
Для подключения к удалённому рабочему столу из Windows-системы используется специальный клиент, запуск которого осуществляется при помощи комбинации клавиш Win и R, где необходимо ввести mstsc.

По умолчанию RDP использует на удалённой машине порт 3389. Для того, чтобы успешно установить соединение, этот порт должен быть открыт и доступен через брандмауэры и конфигурацию сетевой безопасности. При этом следует отметить, что номер порта может быть изменён администратором для приведения настроек конфигурации RDP в соответствие со своими конкретными потребностями.
▍ Недостаточность прав пользователя
Для многих очевидно, что пользователь, под именем которого производится подключение к удалённому рабочему столу, должен обладать определёнными полномочиями. В самом простейшем случае локальная учётная запись должна входить либо в группу Administrators, либо, если данной учётке не нужны администраторские привилегии, в группу Remote Desktop Users. Если же пользователь не обладает достаточными правами, ошибка при подключении выглядит следующим образом:

Решением в данном случае является добавление учётной записи дополнительных полномочий путём помещения её в соответствующую группу, либо потребуется настройка групповых политик, если вы используете Active Directory.
▍ Проверка порта RDP
Именно с возможным изменением номера порта связан первый из рассматриваемых рецептов восстановления неработающего подключения к удалённому рабочему столу. Если номер порта на удалённом сервере не совпадает с номером порта на локальной машине, клиент mstsc выдаёт ошибку, как на скриншоте ниже.

Чтобы проверить и при несоответствии изменить номер порта на удалённом сервере, придётся подключиться к нему либо при помощи консоли, либо с использованием какого-либо другого протокола — здесь вам в помощь VNC, Radmin или что-либо подобное. На серверах RUVDS для подобных ситуаций предусмотрен специальный аварийный режим работы, который по сути является аналогом консольного подключения. Для того, чтобы получить возможность управлять виртуальной машиной в данном режиме, достаточно кликнуть на изображение его экрана в списке серверов.

Получив доступ к удалённой машине, необходимо запустить редактор реестра. Для этого в строке поиска набираем regedit. В результате чего система найдёт соответствующее приложение.

Хорошим тоном в таких ситуациях является создание резервной копии на случай, если внесённые изменения приведут к каким-либо неожиданным последствиям. Системный реестр — серьёзная вещь, поэтому подобный подход здесь особенно важен. Чтобы создать бэкап в редакторе реестра, переходим в File, затем Export. После чего указываем место на диске, куда нужно сохранить файл резервной копии, в разделе Export range отмечаем сохранение всего реестра целиком и нажимаем Save.

Если что-то пойдёт не так, восстановить реестр из копии можно будет также в редакторе через File → Import.
Теперь к главному. В редакторе реестра через Edit → Find запускаем поиск ветки rdp-tcp.

В ветке RDP-Tcp ищем параметр PortNumber, открываем его, указываем отображение в десятичном формате и, если значением параметра является не 3389, меняем его и нажимаем ОК.

Теперь для применения внесённых изменений необходимо перезапустить службы удалённых рабочих столов. Чтобы это сделать, в строке поиска вводим services и выбираем приложение, в котором перечислены службы, работающие в фоновом режиме.

Здесь находим службу Remote Desktop Services и кликаем на Restart.

Кроме того, следует иметь в виду, что порт, предназначенный для подключения по RDP, должен быть открыт в брандмауэре удалённого сервера. Правила, применяемые для RDP, называются Remote Desktop — User Mode. Проверяем их тоже на всякий случай.

Если попытки подключиться по RDP всё ещё заканчиваются ничем, следует в числе прочего проверить статус протокола. Для этого также необходимо войти в удалённую систему через консоль или протокол, отличный от RDP, после чего запустить редактор реестра. Здесь проверяем параметр fDenyTSConnections, который находится в ветке HKEY_LOCAL_MACHINE\SYSTEM\CurrentControlSet\Control\Terminal Server. Значением параметра может быть 0 или 1. Первое значение означает, что протокол работает, второе указывает на то, что он отключён. Естественно, устанавливаем значение параметра в 0 и снова пытаемся подключиться к серверу по RDP.

Для проверки статуса протокола удалённого рабочего стола можно использовать командную оболочку PowerShell. В поисковой строке набираем powershell и запускаем найденное приложение от имени администратора.

В командной строке выполняем команду Get-Service TermService и смотрим, что вывод показывает в колонке Status.

Здесь же проверяем, слушается ли порт 3389 на стороне сервера. Оптимально, если порт присутствует в списке и в столбце Status имеет значение Listen. Проверку состояния порта производим командой:
Get-NetTCPConnection -State Listen | Where-Object LocalPort -EQ 3389

Помимо этого, PowerShell позволяет проверить наличие в брандмауэре правила, разрешающего входящие RDP-подключения. Команда для такой проверки выглядит следующим образом:
Get-NetFirewallPortFilter | Where-Object LocalPort -EQ 3389 | Get-NetFirewallRule
О том, что доступ к порту разрешён, свидетельствует значение True в поле Enabled и значение Allow в поле Action.

Проверить состояние порта RDP можно также и из монитора ресурсов, для запуска которого после нажатия Win R вводим resmon.exe, либо в Control Panel переходим Administrative Tools → Resource Monitor. Активность на порту доступна для мониторинга в разделе TCP Connections вкладки Network.

▍ Проверка настроек файрвола в личном кабинете
В личном кабинете RUVDS присутствует штатный межсетевой экран, при помощи которого можно легко настроить параметры доступа к виртуальным серверам. Основой конфигурации данного файрвола является набор разрешающих и запрещающих правил, создаваемых владельцем виртуалок. Для доступа к настройкам межсетевого экрана переходим в личный кабинет и в настройках сервера переключаемся на вкладку Сеть, где кликаем на Настроить файрвол для публичных адресов. Чтобы получить доступ к изменению конфигурации межсетевого экрана, необходимо корректно набрать пароль от личного кабинета.

В открывшемся окне обратите внимание на список правил файрвола. Здесь нас в первую очередь должны интересовать правила, касающиеся рассматриваемого протокола. Если ранее вы уже прописывали правила, позволяющие или запрещающие подключаться к порту RDP из какой-то определённой сети или с какого-либо IP-адреса, то, вероятно, невозможность подключения к виртуальной машине заключена именно в этом. Убедитесь, что IP-адрес, с которого вы пытаетесь соединиться с вашим VPS, является валидным с точки зрения текущего набора правил.

Желание обезопасить сервер путём ограничения доступа к нему не лишено здравого смысла, но всё же требует определённой степени аккуратности. Здесь важно не заблокировать доступ самому себе.
▍ Проверка локальной рабочей станции
Корнем проблем, препятствующих бесперебойному подключению по RDP, может служить компьютер, с которого такое подключение производится. В некоторых случаях помогает очистка истории RDP-подключений. Сделать это можно в редакторе реестра на локальной машине. А именно, открываем редактор, для чего используем комбинацию клавиш Win и R, где вводим regedit.exe и переходим на ветку HKEY_CURRENT_USER\Software\Microsoft\Terminal Server Client. Там разворачиваем ветку Default и выделяем все параметры с именами MRU0-MRU9, потом нажимаем правую кнопку мыши и кликаем на Удалить.

Там же можно очистить всю историю RDP-подключений вместе с сохранёнными адресами и именами пользователей. Для этого необходимо удалить содержимое ветки Servers. Поскольку выделять все вложенные ветки внутри Servers не совсем сподручно, удобнее будет удалить данную ветку целиком и после этого создать новую с таким же названием.

После таких манипуляций с реестром перезагружаем локальный компьютер и пробуем подключиться к удалённой машине.
В некоторых случаях может помочь изменение настроек подключения в клиенте mstsc. Для этого запускаем его, нажимаем стрелочку Показать параметры и переходим во вкладку Взаимодействие. Здесь устанавливаем или убираем галочку в строке Восстановить подключение при разрыве (действие зависит от того, в каком состоянии находится данный чекбокс).

Затем снова пробуем при помощи кнопки Подключить.
▍ Заключение
При любых сложностях в подключении к удалённой машине следует помнить, что доступ к виртуальному серверу RUVDS возможен через аварийный режим. Данный режим хотя и имеет ограничения по времени использования, всё же позволяет решить проблему на стороне удалённого сервера. В то же время, как мы уже смогли убедиться, причина невозможности подключения может заключаться в рабочей станции, с которой производится подключение.
Не всегда неудачная попытка подключения по RDP заканчивается выводом какой-либо ошибки. Для пользователя, который подключается к удалённой системе, это может выглядеть как «бесконечный коннект». В такой ситуации полезно убедиться, что на виртуальном сервере установлено достаточное количество оперативной памяти, которое позволяет службе RDP работать в штатном режиме. К примеру, на удалённой системе может быть запущено чрезмерное количество торговых ботов, и под такой нагрузкой у сервера нет возможности поддерживать полноценную работу RDP.
Также никто не отменял самый популярный метод решения всех неурядиц — перезагрузку машины. Не исключено, что сервер банально «завис». Перезапустить его можно в личном кабинете при помощи соответствующей кнопки под изображением экрана виртуалки.
Если решить проблему всё же не удаётся, всегда можно инициировать переустановку операционной системы на виртуальном сервере, если на нём нет важной информации или такие данные предварительно сохранены. Ну, и естественно, можно обратиться к специалистам технической поддержки.
Скидки, итоги розыгрышей и новости о спутнике RUVDS — в нашем Telegram-канале ?
