
Эта большая инструкция посвящена особенностям установки, настройки и эксплуатации фермы терминальных серверов на базе роли Remote Desktop Services (RDS) в Windows Server. Статья поможет вам развернуть службы удаленных столов на Windows Server 2022, 2019 и 2016 в домене Active Directory.
Содержание:
- Компоненты Remote Desktop Services в Windows Server 2022/2016/2016/2012R2
- Создаем новую конфигурацию Remote Desktop Services в Windows Server
- Создаем коллекции Remote Desktop Services в Windows Server
- Публикация RemoteApp в Remote Desktop Services
- Настройка фермы Remote Desktop services с помощью PowerShell
Компоненты Remote Desktop Services в Windows Server 2022/2016/2016/2012R2
В состав роли RDS в Windows Server входя следующие компоненты:
- Remote Desktop Session Host (RDSH) – узлы сеансов RDS. Основные рабочие лошадки фермы RDS, на которых работают приложения пользователей;
- Remote Desktop Connection Broker (RDCB) – посредник RDS подключений. Используется для управления фермой RDS, распределения нагрузки, обеспечивает переподключение пользователей к своим сеансам, хранит коллекции RDS и опубликованные приложения RemoteApps;
- Remote Desktop Gateway (RDGW) – обеспечивает безопасный доступ к сервисам RDS из Интернета;
- RD Web Access (RDWA) – веб интерфейс для доступа к рабочим столам, программам RemoteApp;
- Remote Desktop Licensing (RD Licensing) — служба лицензирования, управляет RDS лицензиями (CAL) пользователей.
В нашем небольшом стенде будут всего три сервера со следующим распределением ролей
-
msk-rds1.winitpro.ru
— RDSH -
msk-rds2.winitpro.ru
– RDSH -
msk-rdsman.winitpro.ru
– RDSH, RDWA, RDCB, RD License
Предварительные требования, которые нужно выполнить перед созданием RDS фермы:
- Установите одинаковую версию Windows Server на все сервера, настроить их, и добавить в один домен AD;
- Откройте консоль ADUC (
dsa.msc
) и переместите все хосты с ролью RDSH в одну OU в AD. Так будет удобнее применять единые настройки через GPO; - Создайте в домене группу для RDSH серверов (например,
msk-rdsh
) и добавьте в нее все хосты; - Если вы хотите использовать диски User Profile Disk (UPD) для хранения профилей пользователей RDS (или перемещаемые профили), нужно создать на файловом сервере сетевой каталог, в котором они будут хранится (желательно расположить этот каталог на отказоустойчивом файловом кластере Windows Server). Предоставьте права Full Control на этот сетевой каталог для группы
msk-rdsh
.
Создаем новую конфигурацию Remote Desktop Services в Windows Server
Рассмотрим, как создать и настроить RDS конфигурацию с помощью графического интерфейса Server Manager.
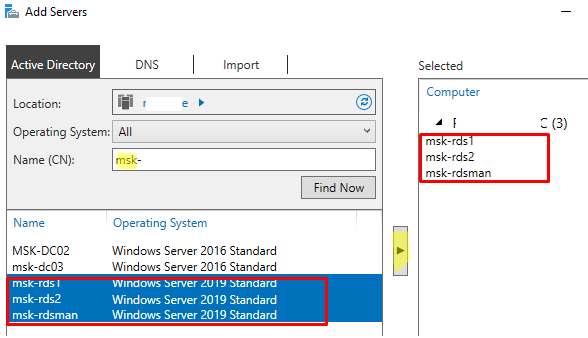
Откройте Server Manager и добавьте все планируемые RDS сервера в консоль. Щелкните All Server -> Add servers.
Теперь в меню Server Manager выберите Add Roles and Features -> Remote Desktop Services installation -> Standard deployment –> Session-based deployment.
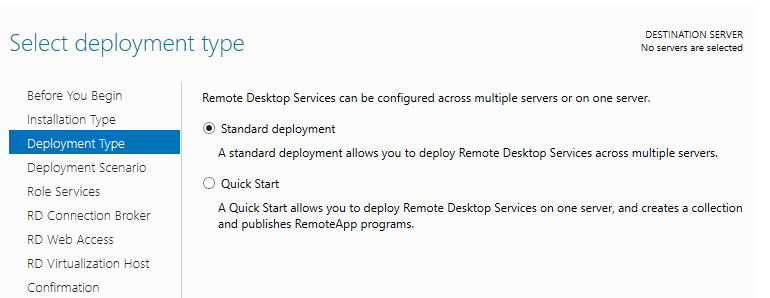
Режим Quick Start используется для развертывания всех компонентов RDS на одном сервере. В RDS ферме минимум может быть один сервер, который совмещает все роли RDS (RD Session Host, RD Web Access и RD Connection broker). Но такая конфигурация не обеспечивает отказоустойчивость и балансировку нагрузки в службах удаленных рабочей столов Windows Server.
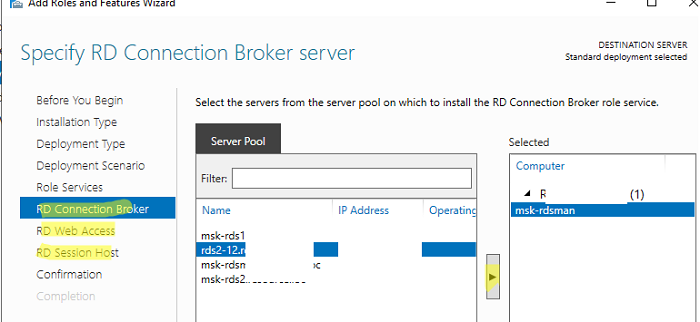
Далее нужно указать, как вы хотите распределить роли RDS по вашим серверам. В мастере построения фермы RDS нужно выбрать сервера для соответствующих ролей. В моем случае я хочу построить такую конфигурацию:
- RD Connection Broker –
msk-rdsman - RD Web Access —
msk-rdsman - RD Session hosts —
msk-rdsman, msk-rds1, msk-rds2
Вы можете распределить RDS роли по серверам в любой другой конфигурации.
Поставьте галку Restart destination server automatically if required и нажмите кнопку Deploy. Дождитесь установки ролей RDS на всех серверах.
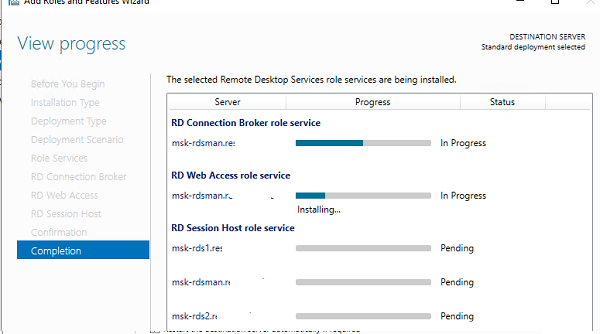
Итак, ваша ферма RDS создана.
Следующий этап установка и настройка сервера лицензирования RDS. Вы можете установить роль RD Licensing на один из серверов в вашей ферме или использовать существующий в домене сервер лицензирования RDS. Подробная инструкция по установке, настройке и активации роли RD Licensing доступа по ссылке.
Для управления вашим развертыванием RDS нужно перейти в раздел Server Manager -> Remote Desktop Services. На вкладке Overview показана текущая конфигурация RDS фермы.
Чтобы изменить настройки RDS фермы выберите Tasks -> Edit Deployment Properties в разделе Deployment Overview.
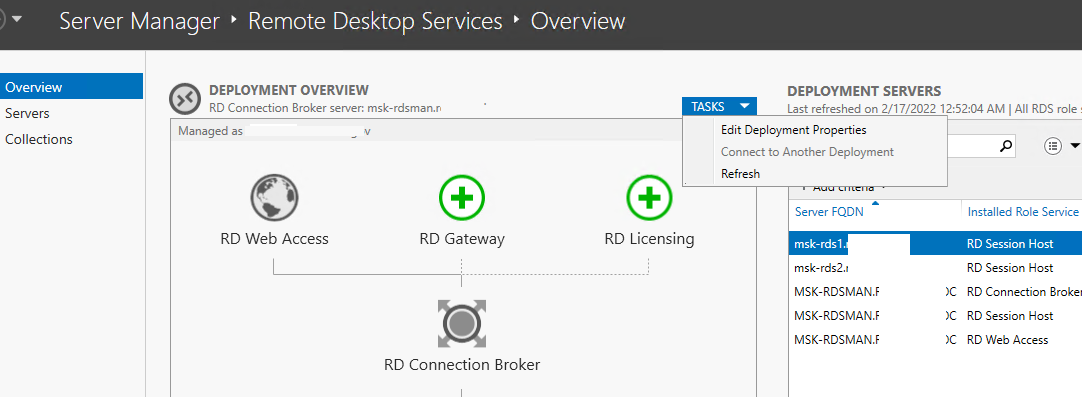
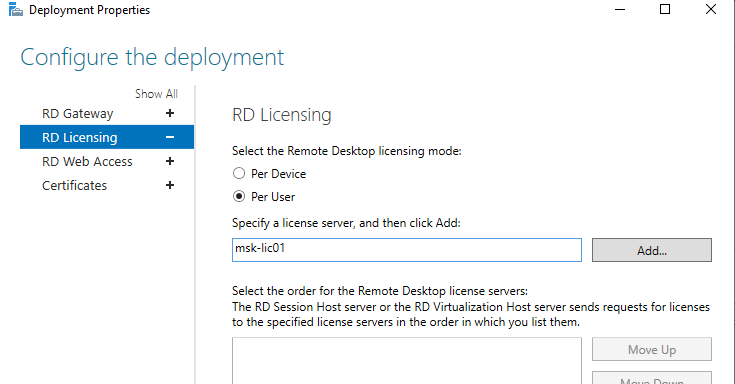
Здесь можно изменить:
- Параметры RD Gateway;
- Адрес сервер сервера лицензирования и тип пользовательских лицензий RDS CAL (per user/per device);
- Посмотреть URL адреса RD Web Access;
- Добавить SSL сертификаты для служб RDS (в инструкции мы пропустим этот пункт).
Для построения отказоустойчивой фермы Remote Desktop Services нужно обеспечить высокую доступность роли RD Connection Broker. Это достигается за счет запуска нескольких экземпляров RDCB (Active/Active) на разных серверах с общей базой данных SQL, в которой хранится конфигурация брокера подключений. Для обеспечения высокой доступности SQL базы RDCB ее можно размесить в группе высокой доступности SQL Server Always On. Ранее мы публиковали подробный гайд по настройке RDS Connection Broker с высокой доступностью.
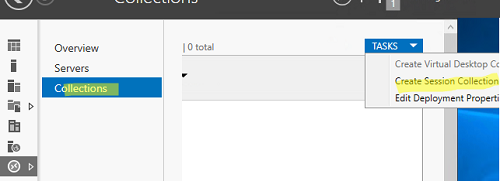
Создаем коллекции Remote Desktop Services в Windows Server
Следующий этап настройки – создание коллекций сеансов RDS. Коллекции Remote Desktop позволяют разделить хосты в ферме RDSH на отдельные группы или создать разный набор настроек и доступных приложений Remote App для разных групп пользователей.
Перейдите в раздел Collections, выберите Edit -> Create Session Collection.
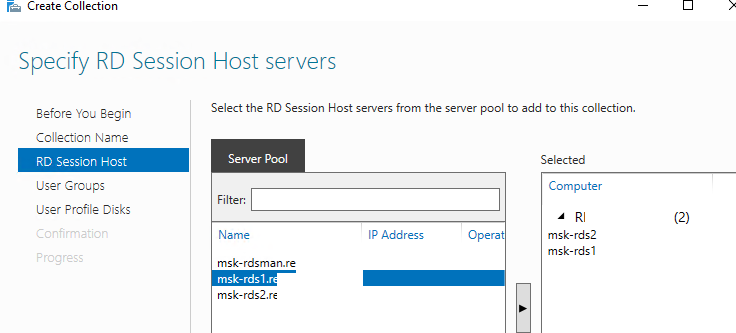
Здесь нужно задать:
- Имя коллекции RDS:
rds-Msk-Managers - Выберите какие хосты RDSH будут обслуживать пользователей коллекции (один RDSH хост может находиться в одной коллекций; не рекомендуется объединять в одну коллекцию сервера с разными версиями Windows Server);

- На вкладке User Groups указываются группы пользователей, которым разрешено подключаться к коллекции. Уберите из групп Domain users и добавьте вашу группу (msk-Managers);
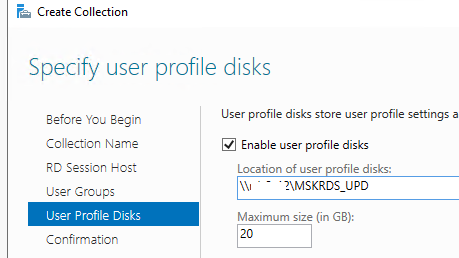
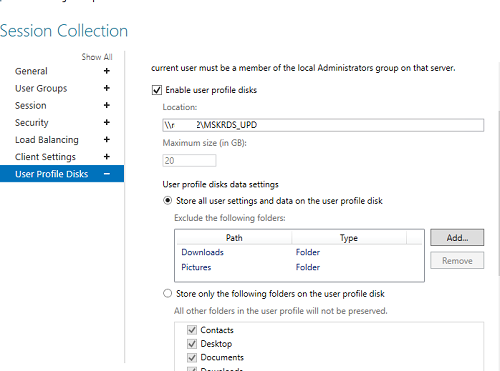
- На вкладке User Profile Disk нужно указать, хотите ли вы использовать формат UPD для хранения профилей пользователей (Enable user profile disks). В поле Location of user profile disks укажите UNC путь к сетевому каталогу(например,
\\msk-fs01\mskrds_upd
), в котором будут хранится профили пользователей в форматер UPD виртуальных дисков (в этом случае при входе на любой сервер коллекции RDS, пользователь будет всегда загружать свой профиль) и максимальный размер диска (20 Гб по умолчанию);
- Нажмите Create чтобы создать новую RDS коллекцию;
- Убедитесь, что в указанном каталоге создался UPD файл с шаблоном профиля пользователя UVHD-template.vhdx.
Чтобы задать параметры коллекции RDS, выберите ее и нажмите Tasks -> Edit Properties.
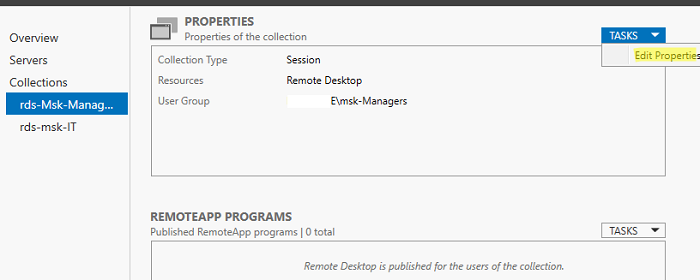
Здесь можно изменить базовые параметры коллекции (имя, описание, группы доступа) и ряд других важных настроек.
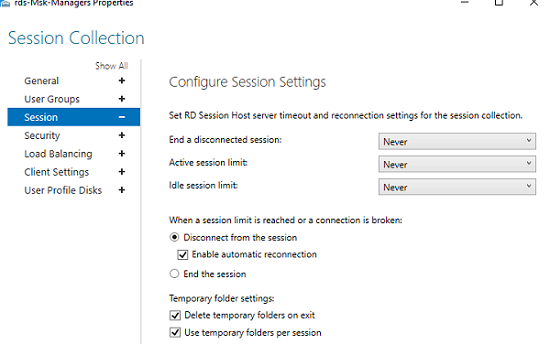
В разделе Session можно задать параметры переподключения/ автоматического отключения простаивающих RDP сессий (подробнее рассматривалось в статье Настройка таймаутов для RDP сессий).
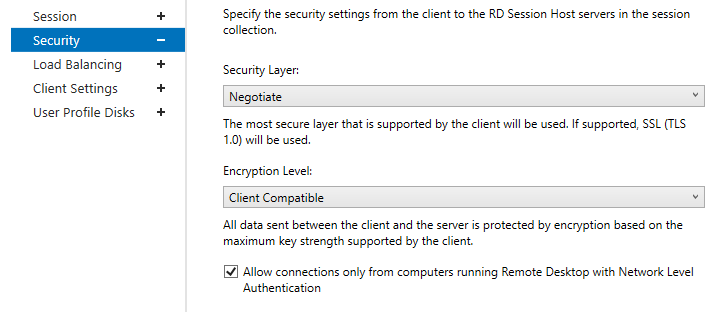
На вкладке Security можно выбрать настройки безопасности (Negotiate, RDP Security level или SSL/TLS) и шифрования (Low, High, Client compatible или FIPS compliant) для сессий RDP. Здесь также можно включить/отключить Network Level Authentication для RDP.
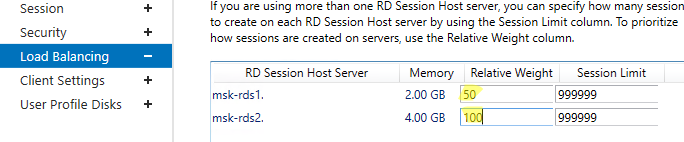
В секции Load Balancing можно изменить веса (
Relative Weight
) RDSH хостов в вашей ферме. Если характеристики серверов (RAM, CPU) в коллекции сильно отличаются, нужно задать меньший вес для менее производительных серверов. В этом случае RDCB будет распределять сессии пользователей по серверам в зависимости от их веса.
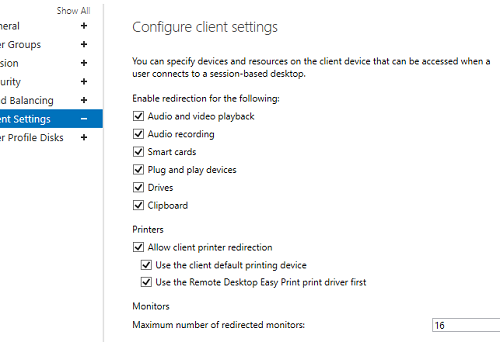
На вкладке Client Settings можно указать, какие устройства пользователям разрешено пробрасывать в RDP сессию. Например, вы можете разрешить/запретить пробрасывать с локального компьютера пользователя в RDS сеанс принтера, сетевые диски, аудио устройства, буфер обмена.
В разделе User Profile Disks можно более тонко настроить параметры UPD профилей пользователей. Можно исключить из синхронизации определенные папки или файлы. Это позволит уменьшить размер профиля UPD в сетевом каталоге и увеличить скорость загрузки профиля (не забывайте, что он загружается по сети из сетевой папки при входе пользователя).
Настройка и эксплуатация UPD обычно гораздо проще, чем использование перемещаемых профилей или folder redirection. Один UPD профиль не может использоваться в разных коллекциях RDS.
Для уменьшения размера UPD диска пользователя можно использовать стандартный PowerShell командлет
Resize-VHD
, используемый для изменения размеров виртуальных VHDX дисков Hyper-V.
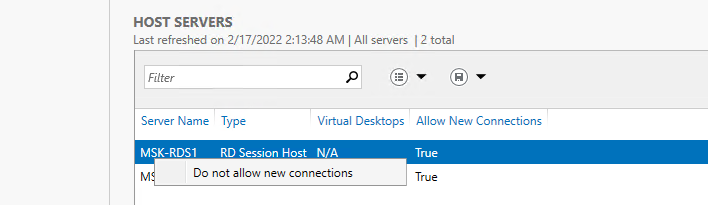
В секции HOST SERVERS коллекции RDS можно перевести любой сервер фермы в режим обслуживания RDSH (Drain Mode). Для этого щелкните по нему и выберите Do not allow new connection. В результате Connection Broker не будет отправлять новые подключения пользователей на этот сервер. В таком режиме вы можете спокойно установить обновления Windows или обновлять на сервере приложения, не затрагивая пользователей.
Здесь же можно добавить/удалить RDS Host из коллекции.
Если RDSH хост вышел из строя и не доступен, его можно корректно удалить из фермы Remote Desktop Services по этой инструкции.
Публикация RemoteApp в Remote Desktop Services
RemoteApps – это опубликованные для пользователей приложения на RDS серверах. Благодаря RemoteApp можно использовать приложения, установленные на терминальном RDSH сервере так, как будто оно запущено непосредственно на компьютере пользователя. Пользователь не видит всего рабочего стола Windows Server RDS и работает только с теми программами, которые опубликовал для него администратор. На компьютере пользователя будет отображаться только окно запущенной на RDS программы.
Если вы не создаете RemoteApp, пользователи будут работать непосредственно на собственных рабочих столах на Windows Server. Поэтому не забудьте скопировать все необходимые пользователю ярлыки приложений в папку C:\Users\Public\Desktop. Файлы из этой папки будут отображаться на рабочем столе всех пользователей. Если вы устанавливаете на RDSH пакет MS Office 365, обратите внимание что Office нужно разворачивать в режиме SharedComputerLicensing.
RemoteApp приложения создаются в настройках коллекций RDS. Выберите пункт Tasks -> Publish RemoteApp Programs в секции REMOTEAPP PROGRAMS.
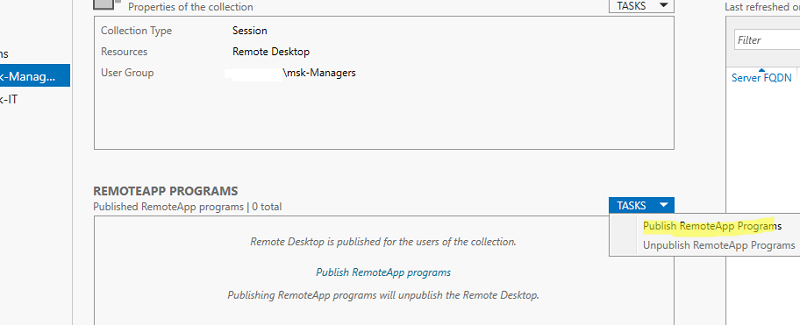
Windows отобразит все приложения, установленные на текущем сервере. Можете выбрать одно из них. Если вашего приложения нет в списке, но оно установлено на других хостах RDS, нажмите кнопку Add и укажите полный путь к исполняемому файлу приложения (exe, bat, cmd и т.д.).
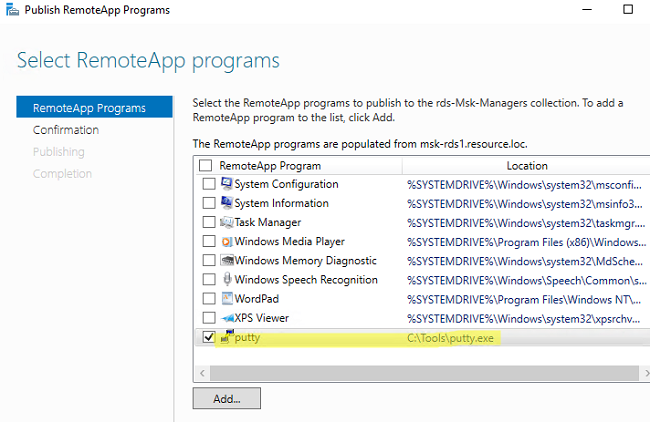
Опубликуйте приложение RemoteApp.
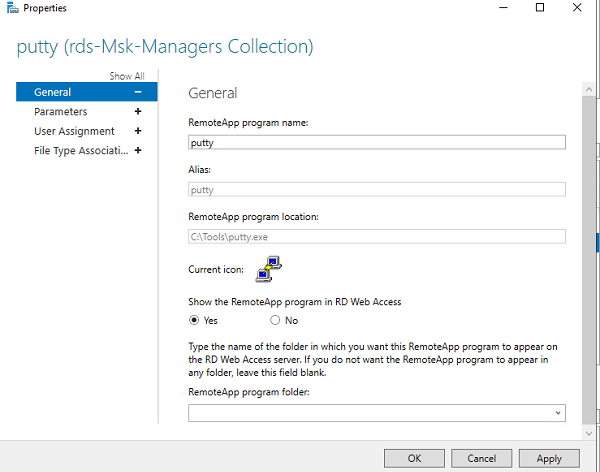
Затем в настройках RemoteApp можно указать дополнительные параметры приложения.
- Нужно ли показывать опубликованное RemoteApp приложение в веб интерфейсе RD Web Access;
- Задать параметры запуска (аргументы) приложения (Command-line Parameters -> Always use the following command-line parameters);
- На вкладке User Assignment можно дополнительно ограничить каким группам пользователей разрешено запускать приложение.
Если вы хотите изменить иконку опубликованного RemoteApp, нужно открыть следующую папку на сервере с ролью RDS Connection Broker:
C:\Windows\RemotePackages\CPubFarms\rds-Msk-Managers\CPubRemoteApps
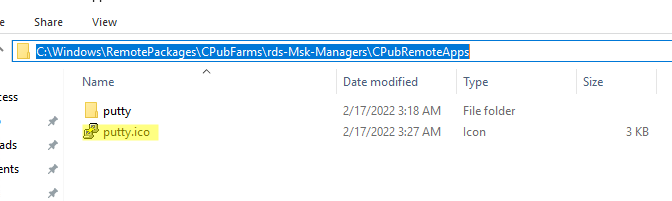
Замените иконку приложения другим ico файлом.
Теперь пользователь может запустить RemoteApp приложение из RD Web Access (
https://msk-rdsman.wintpro.ru/RDWeb
) или с помощью специального RDP файла.
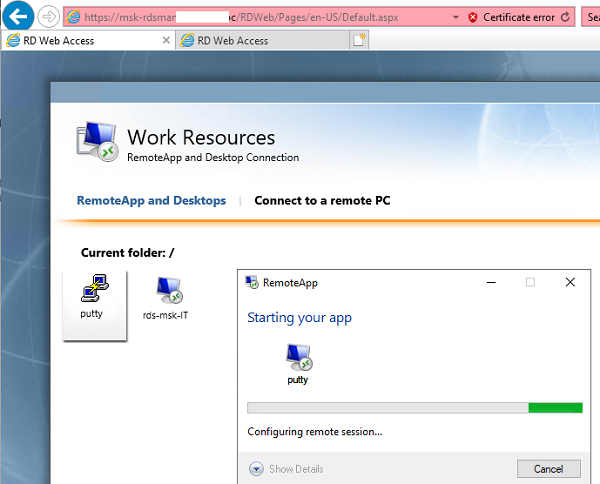
Для запуска опубликованного приложения RemoteApp, нужно добавить в RDP файл такие строки:
remoteapplicationmode:i:1
remoteapplicationname:s:putty
remoteapplicationprogram:s:"C:\Tools\putty.exe"
disableremoteappcapscheck:i:1
alternate shell:s:rdpinit.exe
Несколько полезных мелочей для удобной эксплуатации фермы RDS:
- Для роли RDWeb можно настроить поддержку HTML5, это позволит пользователям подключаться к RDS серверам из любого браузера и ОС даже без клиента RDP;
- На веб сервере RD Web Access можно опубликовать ссылку на смену истекшего пароля пользователя (по умолчанию при включенном NLA вы не сможете аутентифицироваться на RDSH с истекшим паролем пользователя Active Directory);
- Инструкция для пользователей по смене пароля в RDP сессии;
- Администратор может использовать теневые подключения RD Session Shadow для подключения/просмотра рабочего стола сеанса пользователя на сервере RDS;
- Чтобы быстро найти, на каких RDS серверах есть сессии определенного пользователя, можно использовать PowerShell:
Import-Module RemoteDesktop
Get-RDUserSession -ConnectionBroker msk-rdsman.winitpro.ru | where {$_.UserName -eq "a.ivanov"} | Select HostServer - Вы можете использовать PowerShell скрипты для просмотра и анализа логов RDP подключений пользователей к серверам RDS;
- Для дополнительной защиты можно настроить двухфакторную аутентификацию (2FA) пользователей на RDS серверах Windows с помощью сторонних средств.
Настройка фермы Remote Desktop services с помощью PowerShell
Если вы четко представляете себе концепцию RDS фермы, вы можете быстро разворачивать RDS конфигурацию с помощью PowerShell.
Следующие PowerShell команды для создания RDS фермы лучше запускать с другого на другом сервера, т.к. управляемые RDS хосты придется перезагружать.
Задайте имена серверов в вашей ферме RDS. В этом примере я установлю роли RDCB и RDS Licensing на отдельный сервер (в дальнейшем рекомендуется настроить отказоустойчивую конфигурацию RDCB).
$RDSH1 = "msk-rds1.winitpro.ru"
$RDSH2 = "msk-rds2.winitpro.ru"
$RDSCB = "msk-rdcb.winitpro.ru"
$RDSGW = "msk-rdsgw.winitpro.ru"
Import-Module RemoteDesktop
Установите RDS роли на сервера:
Add-WindowsFeature –ComputerName $RDSH1, $RDSH2 -Name RDS-RD-Server –IncludeManagementTools
Add-WindowsFeature –ComputerName $RDSCB -Name RDS-Connection-Broker -IncludeManagementTools
Add-WindowsFeature –ComputerName $RDSGW -Name RDS-Web-Access, RDS-Gateway –IncludeManagementTools
Перезагрузите все хосты:
Restart-Computer -ComputerName $RDSH1,$RDSH2,$RDSCB,$RDSGW
Создайте новый инстанс RDSessionDeployment:
New-RDSessionDeployment -ConnectionBroker $RDSCB -SessionHost $RDSH1,$RDSH2 –Verbose
Добавить в ферму сервера RDWA и RDGW:
Add-RDServer -Server $RDSGW -Role RDS-WEB-ACCESS -ConnectionBroker $RDSCB
Add-RDServer -Server $RDSGW -Role RDS-GATEWAY -ConnectionBroker $RDSCB -GatewayExternalFqdn "rds.winitpro.ru"
Текущее распределение RDS ролей по серверам фермы можно вывести так:
Get-RDServer -ConnectionBroker $RDSGW
Установка роли лицензирования RDS:
Add-WindowsFeature –ComputerName $RDSCB -Name RDS-Licensing, RDS-Licensing-UI
Задайте режим лицензирования PerUser:
Invoke-Command -ComputerName $RDSCB -ScriptBlock {Set-RDLicenseConfiguration -Mode PerUser -LicenseServer $RDSCB -ConnectionBroker $RDSCB}
Add-RDServer -Server $RDSCB -Role RDS-LICENSING -ConnectionBroker $RDSCB
Добавить сервер лицензирования в доменную группу с помощью Add-ADGroupMember:
Add-ADGroupMember "Terminal Server License Servers" -Members "msk-rdcb$"
Если у вас есть сертификат для RDS можно его добавить в конфигурацию фермы (можно использовать бесплатный SSL сертификат Let’s Encrypt для вашего RDS хоста):
Path = "C:\ps\RDSCert.pfx"
$Password = ConvertTo-SecureString -String "CertPAssddr0w11-" -AsPlainText -Force
Set-RDCertificate -Role RDGateway -ImportPath $Path -Password $Password -ConnectionBroker $RDSCB -Force
Set-RDCertificate -Role RDWebAccess -ImportPath $Path -Password $Password -ConnectionBroker $RDSCB -Force
Set-RDCertificate -Role RDPublishing -ImportPath $Path -Password $Password -ConnectionBroker $RDSCB -Force
Set-RDCertificate -Role RDRedirector -ImportPath $Path -Password $Password -ConnectionBroker $RDSCB -Force
Информацию об установленных SSL сертификатах можно получить так:
Get-RDCertificate
Теперь можно создать коллекции RDS:
$CollectionName = "DEVdept"
New-RDSessionCollection –CollectionName $CollectionName –SessionHost $RDSH1,$RDSH2 –ConnectionBroker $RDSCB –CollectionDescription “Develovers”
Разрешить доступ к RDS серверам для групп:
$UserGroup =@("WINITPRO\msk-developers","WINITPRO\msk_devops")
Set-RDSessionCollectionConfiguration -CollectionName $CollectionName -UserGroup $UserGroup
Опубликовать приложение RemoteAPP:
New-RDRemoteapp -Alias GoogleChrome -DisplayName GoogleChrome -FilePath "C:\Program Files (x86)\Google\Chrome\Application\chrome.exe" -ShowInWebAccess 1 -CollectionName $CollectionName -ConnectionBroker $RDSCB
В статье мы рассмотрели, как установить и настроить ферму Remote Desktop Services на базе Windows Server 2019/2022 с помощью графического интерфейса Server Manager и с помощью PowerShell. За рамками статьи осталось более подробное описание ролей RD Web Access и RD Gateway. Мы рассмотрим настройку этих ролей отдельно в следующих статьях.
,
This article contains step by step instructions on how to install and configure the Remote Desktop Services on a Windows Server 2016 or 2012. In Windows Server 2016 & 2012 the Terminal Services role has been replaced by the Remote Desktop Session Host (RDSH) role service and is part of Remote Desktop Services (RDS). A Remote Desktop Session Host (RDSH) server, provides to remote users the ability to access the applications on the RDS host server and the company resources from anywhere by using an RDP client.
In this tutorial you ‘ll learn how to setup and configure a Windows Server 2016 or 2012 as a Remote Desktop Session Host (Terminal) server, in order to provide remote desktop sessions, based on the number of Remote Desktop Services client access licenses (RDS CALs) installed on the RDSH server.
How to Setup and Configure a Windows Server 2016/2012 as a Remote Desktop Session Host Server (Terminal Server).
Notes:
1. The mentioned steps below, can be applied either on a Domain Controller or in a standalone server 2016/2012.
2. If the Terminal services are installed on a server that will act as a Domain Controller also, then first install the Active Directory Domain Service (AD DS) role service and promote the Server to a Domain Controller, before installing the Remote Desktop Session Host (RDSH) role service (Terminal Service).
3. Keep in mind that the below configuration does provide access to RemoteApp programs or the RDWeb site, because the Remote Desktop Connection Broker role service will not be installed.
Step 1. Install Remote Desktop Services on Server 2016/2012.
Step 2. Activate the Remote Desktop License Server.
Step 3. Install Licenses on the Remote Desktop License Server.
Step 4. Configure RD Session Host role to use the local Remote Desktop Licensing server & Set the Remote Desktop licensing mode.
Step 5. Add RD Clients (Users) to the Remote Desktop Users Group.
Step 6. Allow the log on through remote desktop Services.
Step 1. Install Remote Desktop Licensing and Remote Desktop Session Host role services.
1. Open ‘Server Manager’ and click on Add Roles and Features.

2. At the first screen of ‘Add Roles and Features wizard’ leave the Role-based or feature-based installation option and click Next.
 Server 2016/2012")
3. At the next screen, leave the default option «Select server from the server pool» and click Next.

4. Select the Remote Desktop Services and click Next.

5. Leave the default settings and click Next at Features and Remote Desktop Services screens.
6. At Role Services screen, select the Remote Desktop Licensing role service and then click Add Features.

7. Then select the Remote Desktop Session Host role service and click Add Features again.

8. When done, click Next to continue.

9. Finally click Install to install the Remote Desktop Services: Remote Desktop Licensing and Remote Desktop Session Host.

10. When the installation is completed close the ‘Add Roles and Features Wizard’ and restart your server.

Step 2. Activate the Remote Desktop License Server.
1. Simultaneously press the Windows + R keys to open run command box.
2. Type licmgr.exe and press Enter to open the RD Licensing Manager *
* Note: Alternately, you can launch the RD Licensing Manager, from Control Panel –> Administrative Tools –> Remote Desktop Services –> Remote Desktop Licensing Manager.

3. At the right pane, right click on the server name and select Activate Server.

4. Click Next at the Welcome screen and then click Next again at Connection method options.

5. At ‘Company Information’ window, fill the required fields and click Next twice to activate your License Server.

6. When the activation is completed, leave checked the ‘Start Install Licenses Wizard’ checkbox and click Next.

7. Continue to next step.
Step 3. Install Licenses on the Remote Desktop License Server.
1. At ‘Welcome to the install licenses wizard’, click Next

2. On the License Program page, select the appropriate program through which you purchased your RDS CALs, and then click Next.

3. According the License Program you selected on the previous page, type either the license code or the agreement number provided when you purchased your RDS CALs and then click Next.
4. On the Product Version and License Type page, select the appropriate product version, license type, and the quantity of the RDS CALs based on your RDS CAL purchase agreement, and then click Next.
5. When the RDS CALs installed on the server, click Finish. *
TIP: If you cannot activate the RDS Server automatically, then try to activate it using the Web Browser or via Telephone. To do that:
a. Right-click on the Server’s name and select Properties.
b. Change the Connection Method to Web Browser or to Telephone. When done, click OK.
c. Finally, right click on the server name, select Activate Server and follow the onscreen instructions to completed the activation.
Step 4. Configure RD Session Host role to use the local Remote Desktop Licensing server & Set the Remote Desktop licensing mode.
1. Open Group Policy Editor. To do that:
1. Simultaneously press the Windows + R keys to open run command box.
2. Type gpedit.msc and press Enter.
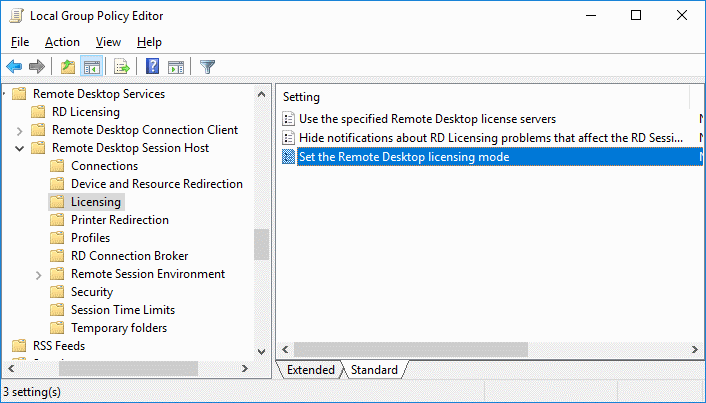
2. In Group Policy Editor navigate to:
- Computer Configuration\Administrative Templates\Windows Components\Remote Desktop Services\Remote Desktop Session Host\ Licensing
3. At the right pane, double click at Use the specified Remote License Servers.

4. Click Enabled, and then at ‘License server to use‘ field, type the RDS license server name and click OK.

5. Then open the Set the Remote Desktop licensing mode setting.

6. Click Enabled and then specify the licensing mode (Per User or Per Device) for the RDS host server and then click OK again.

7. Close Group Policy Editor.
8. Verify the RD Licensing configuration, by going to: Windows Control Panel –> Administrative Tools –> Remote Desktop Services –> RD Licensing Diagnoser.

Step 5. Add RD Clients (Users) to the Remote Desktop Users Group.
1. Open Server Manager.
2. From Tools menu, select Active Directory Users and Computers. *
* Note: If the RD Session Host Service is not installed on the Domain Controller, use the ‘Local Users and Groups’ snap-in or the ‘Remote’ tab in the ‘System Properties’ on the RDS host server, to add the remote desktop users.

3. Double click at your domain on the left and then select Builtin.
4. Open Remote Desktop Users on the right pane.

5. At Members tab, click Add.
6. Type the name(s) of the users that you want to give Remote access to the RDS Server and click OK.

7. After selecting the remote desktop users, click OK again to close the window.
8. Continue to step-6 below.
Step 6. Allow the log on through remote desktop Services.
1. Open the Local Group Policy Editor. To do that:
1. Simultaneously press the Windows + R keys to open run command box.
2. Type gpedit.msc and press Enter.
2. In Group Policy Editor navigate to: Computer Configuration > Windows Settings > Security Settings > Local Policies > User Rights Assignment.
3. At the right Pane: double click at Allow log on through Remote Desktop Services.

4. Click Add User or Group.
5. Click Object Types, check all the available objects (Users, Groups, & Built-in security principals) and then click OK.

6. Type remote desktop users and then click OK.

7. Finally click OK again and close Group Policy Editor.
8. Now you ‘re ready to connect to the Remote Desktop Session Host Server 2016/2012 from any Remote desktop client.
That’s it! Let me know if this guide has helped you by leaving your comment about your experience. Please like and share this guide to help others.
If this article was useful for you, please consider supporting us by making a donation. Even $1 can a make a huge difference for us in our effort to continue to help others while keeping this site free:
- Author
- Recent Posts
Konstantinos is the founder and administrator of Wintips.org. Since 1995 he works and provides IT support as a computer and network expert to individuals and large companies. He is specialized in solving problems related to Windows or other Microsoft products (Windows Server, Office, Microsoft 365, etc.).
Remote Desktop Services (RDS) is a powerful feature in Windows Server 2016 that allows users to remotely connect to a server and access desktops or applications. It enables organizations to provide a secure and efficient remote access solution for their employees or clients. In this tutorial, we will go through the steps to configure Remote Desktop Services on Windows Server 2016.
Step 1: Install the Remote Desktop Services Role
To begin, log in to your Windows Server 2016 machine with administrative privileges. Open the Server Manager by clicking on the Windows icon in the bottom-left corner and selecting «Server Manager» from the menu. Once the Server Manager opens, click on «Add roles and features» from the dashboard.
Step 2: Select Installation Type
In the «Add Roles and Features Wizard» window, select «Role-based or feature-based installation» and click «Next.«
Step 3: Select Destination Server
Choose the server on which you want to install the Remote Desktop Services role and click «Next.«
Step 4: Select Role
From the «Server Roles» list, locate «Remote Desktop Services» and select it. A pop-up window will appear, asking if you want to add additional features. Click «Add Features» and then click «Next.«
Step 5: Select Role Services
In the «Role Services» section, you can choose the specific services you want to install. Select the appropriate options based on your requirements and click «Next.«
Step 6: Configure Deployment Type
You have two deployment types to choose from: «Standard deployment» or «Quick Start.» For this tutorial, we will select «Standard deployment» to configure all necessary roles on a single server. Click «Next.«
Step 7: Configure RD Licensing Mode
In this step, you will need to choose the Remote Desktop Licensing mode. Depending on your needs, select either «Per User» or «Per Device» licensing mode. Once selected, click «Next.«
Step 8: Configure RD Connection Broker
In the «RD Connection Broker» section, choose the appropriate deployment option based on your environment. Click «Next» to proceed.
Step 9: Configure RD Web Access
If you want to provide users with web-based access to remote desktops and applications, select «RD Web Access» and click «Next.«
Step 10: Configure RD Gateway
If you need to allow external users to access remote desktops and applications securely, select «RD Gateway» and click «Next.«
Step 11: Review and Confirm
Review the summary of your configuration selections and click «Install» to start the installation process.
Congratulations! You have successfully configured Remote Desktop Services on Windows Server 2016. This will allow you to provide remote access to desktops and applications securely.
| Pros | Cons |
|---|---|
| 1. Provides secure remote access solution for users. | 1. Requires proper configuration and management to ensure security. |
| 2. Allows users to access desktops and applications from anywhere. | 2. Requires appropriate licensing for Remote Desktop Services. |
| 3. Can be customized to fit specific organizational needs. | 3. May require additional hardware resources to support remote sessions. |
Video Tutorial: How do I enable Remote Desktop Services?
To configure Remote Desktop Services in Windows Server 2016, follow these steps:
1. Install the Remote Desktop Services role:
– Open Server Manager on the Windows Server 2016 machine.
– Click on «Add Roles and Features.«
– Follow the wizard to install the Remote Desktop Services role.
2. Configure Remote Desktop Licensing:
– Open the Remote Desktop Licensing Manager.
– Right-click on the server name and select «Install License.«
– Follow the wizard to install the Remote Desktop Services Client Access License (CAL).
3. Configure Remote Desktop Session Host:
– Open the Remote Desktop Session Host Configuration.
– Right-click on «RDP-Tcp» and select «Properties.«
– Set the desired settings for the session configuration, such as licensing, encryption, and security.
4. Configure Remote Desktop Connection Broker:
– Open the Remote Desktop Connection Broker Configuration.
– Follow the wizard to set up the Connection Broker, including configuring the RD Connection Broker role service.
5. Configure Remote Desktop Web Access:
– Open Server Manager.
– Click on «Add roles and features.«
– Follow the wizard to add the Remote Desktop Web Access role.
– Configure the desired settings for Remote Desktop Web Access.
6. Configure Remote Desktop Gateway (optional):
– Open the Remote Desktop Gateway Manager.
– Follow the wizard to set up the Remote Desktop Gateway, including configuring network and user/group access policies.
7. Configure Remote Desktop Services Licenses (optional):
– Open the Remote Desktop Licensing Manager.
– Right-click on the server name and select «Activate Server.«
– Follow the wizard to activate the Remote Desktop Services licenses.
8. Configure Remote Desktop Gateway (RDG) Capabilities (optional):
– Open the Remote Desktop Gateway Manager.
– Under the RD Gateway Server Properties, configure the desired settings like security, resource authorization policies (RAP), and connection authorization policies (CAP).
Remember to secure your Remote Desktop Services deployment by implementing appropriate security measures, such as strong passwords, firewalls, network isolation, and regular updates to protect against vulnerabilities.
How to enable Remote Desktop on Windows Server 2016 Remotely?
Enabling Remote Desktop on Windows Server 2016 remotely involves several steps. Follow these instructions to accomplish this task:
1. Ensure that you have administrative access privileges to the Windows Server 2016 machine you wish to enable Remote Desktop on remotely.
2. Open the «Server Manager» application on your local machine. This can be done by clicking on the Start button, searching for «Server Manager,» and selecting it from the search results.
3. On the left-hand side of the Server Manager window, select «Remote Desktop Services» from the tools menu.
4. Click on the option «Add other servers to manage» and enter the IP address or hostname of the Windows Server 2016 machine you want to enable Remote Desktop on remotely.
5. Once the remote server is added to the server pool, go back to the main Server Manager window, and click on «Local Server» on the left-hand side.
6. In the «Properties» section, you will see an option for «Remote Desktop.» By default, it will be set to «Not Enabled.» Click on «Not Enabled» next to «Remote Desktop» to open the System Properties window.
7. In the System Properties window, select the «Remote» tab.
8. Under the «Remote Desktop» section, select one of the options depending on your requirements:
– «Don’t allow remote connections to this computer«: Select this if you want to disable Remote Desktop on the server.
– «Allow remote connections to this computer«: Select this if you want to enable Remote Desktop and allow connections only from computers running Remote Desktop with Network Level Authentication.
– «Allow remote connections to this computer» (Advanced): Select this if you want to enable Remote Desktop and allow connections from computers running any version of Remote Desktop.
9. After selecting the desired option, click on «Apply» and then «OK.«
10. You should now have successfully enabled Remote Desktop on the Windows Server 2016 machine remotely.
Note: Always make sure to have proper security measures in place when enabling Remote Desktop, such as strong passwords and firewall configurations, to protect your server from unauthorized access.
How to launch Remote Desktop Session Host configuration from the server?
To launch the Remote Desktop Session Host configuration from the server, follow these steps:
1. Log in to the server using an administrator account.
2. Click on the «Start» button, typically located on the bottom-left corner of the screen.
3. In the Start menu, search for «Remote Desktop Session Host Configuration» and click on the application when it appears in the search results.
4. The Remote Desktop Session Host Configuration window will open, providing access to various configuration options.
5. Within the configuration window, you can modify settings related to sessions, licensing, security, and more.
6. Make the desired changes to the configuration as needed. It’s recommended to consult relevant documentation or seek guidance from your IT department if you’re unsure about specific settings.
7. Once you’ve made the necessary changes, click on the «Apply» or «OK» button to save your configuration modifications.
8. Depending on the changes made, you may need to restart the Remote Desktop Session Host service for the modifications to take effect. Keep this in mind if required and plan for minimal disruption if necessary.
Remember that the exact steps may vary slightly depending on the server operating system version you are using. It’s always a good practice to refer to the official documentation provided by the server’s manufacturer for accurate and up-to-date instructions.
How to open Remote Desktop Session Host configuration in Windows Server 2016?
To open the Remote Desktop Session Host configuration in Windows Server 2016, follow these steps:
1. Launch the Start Menu by clicking on the Windows icon located at the bottom left corner of the screen.
2. Locate and click on the «Windows Administrative Tools» folder to expand it.
3. Within the «Windows Administrative Tools» folder, you should find the «Remote Desktop Services» folder. Click on it to expand further.
4. Inside the «Remote Desktop Services» folder, you should find the «Remote Desktop Session Host Configuration» application. Click on it to launch the configuration console.
Alternatively, you can also access the Remote Desktop Session Host configuration using the Run command. Here’s how:
1. Press the «Windows» key and the «R» key together to open the Run dialog box.
2. Type «tsconfig.msc» in the Run dialog box and press «Enter» or click on «OK.«
This will open the Remote Desktop Session Host configuration console where you can configure various settings related to remote desktop sessions on your Windows Server 2016.
Please note that the steps mentioned above are specific to Windows Server 2016 and may differ slightly in other Windows Server versions.
How to setup Remote Desktop Services on Windows Server?
Setting up Remote Desktop Services on Windows Server involves the following steps:
1. Install the Remote Desktop Services Role: Open Server Manager and select «Add Roles and Features.» Choose «Remote Desktop Services Installation» and click Next. Select «Standard Deployment» and proceed to install the necessary role services.
2. Configure Remote Desktop Session Host: In Server Manager, navigate to Remote Desktop Services and expand the server name. Select «Collections» and click «QuickSessionCollection» or create a new collection. Configure the session collection properties, including licensing mode, user groups, and Session ID.
3. Install Remote Desktop Licensing: In Server Manager, go to Remote Desktop Services and select «RD Licensing.» Follow the prompts to install the Remote Desktop Licensing role service. Activate the license server and install the appropriate Remote Desktop Client Access Licenses (CALs) based on your organization’s needs.
4. Configure Remote Desktop Gateway (optional): If you want to provide remote access over the internet, configure the Remote Desktop Gateway. In Server Manager, expand Remote Desktop Services, right-click on the RD Gateway server, and select «Properties.» Configure the necessary settings, including SSL certificate, user authorization, and resource access policies.
5. Configure Remote Desktop Web Access (optional): To allow users to access Remote Desktop Services through a web browser, configure the Remote Desktop Web Access. In Server Manager, expand the Remote Desktop Services node, right-click on the RD Web Access server, and select «Internet Information Services (IIS) Manager.» Configure the desired web access settings, including branding, authentication, and application publishing.
6. Configure Remote Desktop Connection Broker (optional): If you have multiple servers hosting session collections, you can configure the Remote Desktop Connection Broker for load balancing and user session management. Open Server Manager, expand the Remote Desktop Services node, right-click on the RD Connection Broker server, and select «Properties.» Configure the necessary settings, such as DNS round-robin, load balancing, and high availability.
7. Enable Remote Desktop access on Windows Firewall: On the Windows Server hosting Remote Desktop Services, open Windows Firewall and ensure that the necessary inbound rules for Remote Desktop are enabled. This includes rules for Remote Desktop (TCP-In) and Remote Desktop – User Mode (TCP-In).
8. Configure user accounts and permissions: Create user accounts or groups that you want to grant access to Remote Desktop Services. Ensure these accounts have appropriate permissions, such as being members of the Remote Desktop Users group or granted individual access permissions through Group Policy.
9. Test Remote Desktop Services: Validate the setup by connecting to the Remote Desktop Services from a client computer. Use the Remote Desktop Connection client and enter the server’s IP address or domain name, and the appropriate credentials.
Remember, these steps provide a broad overview of the process. It is crucial to refer to official Microsoft documentation and guidelines for detailed instructions and best practices when setting up Remote Desktop Services on Windows Server.
- Заметки
- Windows
01.08.2019
Добавление ролей и компонентов
Установка самой оси Microsoft Windows Server 2016 в рамках данной статьи рассматриваться не будет, только отдельно сама установка терминального сервера.
На будущем терминальном сервере открываем диспетчер сервера через Панель управления (Win + R Control) — Администрирование — Диспетчер серверов (Server Manager)
или через команду «Выполнить» (Win + R ServerManager). После чего переходим по вкладке Локальный сервер (Local Server)
Открываем мастер добавления ролей и компонентов, жмём далее, в типе установки отмечаем радиокнопкой пункт Установка ролей или компонентов (Role-based or feature-based installation),
выбираем сервер, жмём далее, чекбоксом отмечаем Службы удаленных рабочих столов. В службах ролей отмечаем для установки две службы: Лицензирование удаленных рабочих столов (Remote Desktop Licensing) и Узел сеансов удаленных рабочих столов (Remote Desktop Session Host),
жмём далее и потом установить. Дожидаемся конца установки и перезагружаем сервер, если это не было сделано автоматически по завершению установки.
Активация лицензии удалённых рабочих столов
Средства — Remote Desktop Services — Диспетчер лицензирования удаленных рабочих столов (RD Licensing Manager).
Раскрываем древо, правой кнопкой по нашему серверу вызываем выпадающее меню и выбираем пункт активировать сервер.
В мастер активации сервера вначале заполняем сведения об организации, а после устанавливаем саму лицензию. При выборе программы лицензии указываем Другое соглашение,
и указываем ключи активации купленной лицензии 6565792 (или любой другой. Для тестового сервера нагуглите за 2 минуты:»номер соглашения windows server 2016«. Ключ 6565792 — также является результатом выдачи поисковика google).
Выбираем версию продукта Windows Server 2016и тип лицензии Клиентская лицензия служб удаленных рабочих столов (на пользователя). Готово!
Но Средство диагностики лицензирования удаленных рабочих столов сообщает нам, что сервер лицензирования не включён. Чтож, поправим это дело через политики. Вызываем
командное меню «Выполнить» Win + R gpedit.msc. Переходим: Конфигурация компьютера (Computer Configuration) — Административные шаблоны (Administrative Templates) — Компоненты Windows (Windows Components) — Службы удаленных рабочих столов (Remote Desktop Services) — Узел сеансов удаленных рабочих столов (Remote Desktop Session Host) — Лицензирование (Licensing).
Тут поправим Использовать указанные серверы лицензирования удаленных рабочих столов (Use the specified Remote Desktop license servers) и Задать режим лицензирования удаленных рабочих столов (Set the Remote licensing mode).
Обновляем сведения в оснастке Средство диагностики лицинзирования удаленных рабочих столов (Win + R lsdiag.msc). Теперь всё ок!
Изменение стандартного порта подключения
Стандартный порт для RDP подключения: 3389
Открываем реестр (Win + R regedit), переходим по ветке:
HKEY_LOCAL_MACHINE\System\CurrentControlSet\Control\Terminal Server\WinStations\RDP-Tcp
Находим ключ PortNumber, меняем систему исчисления на Десятичную и задаем необходимый номер порта.
Так же это можно сделать через командную строу:
reg add "HKLM\System\CurrentControlSet\Control\Terminal Server\WinStations\RDP-Tcp" /v PortNumber /t REG_DWORD /d НОВЫЙ_НОМЕР_ПОРТА /f
А чтобы вы потом смогли подключиться по новому порту, то вам в фаервол нужно прописать правило
netsh advfirewall firewall add rule name="RDP PORT НОВЫЙ_НОМЕР_ПОРТА" dir=in action=allow protocol=TCP localport=НОВЫЙ_НОМЕР_ПОРТА
И перезапустить службу
net stop TermService && net start TermService
Возможные проблемы
Подключение было запрещено
Скорее всего вы при попытке подключиться увидите сообщение:»Подключение было запрещено, так как учетная запись пользователя не имеет прав для удаленного входа в систему«,
а всё из-за того, что 1 — терминальный сервер не настроен в домене на разрешение подключения к нему определённых пользователей; 2 — вы не добавили в группу Пользователи удаленного рабочего стола ни одного пользователя.
Возможно вам будет полезна статья о том как из Windows 10 сделать Терминальный сервер.
CredSSP
Ещё можете столкнуться с такой вот ошибкой: An authentication error has occurred. The function is not supported. This could be due to CredSSP encryption oracle remediation.
О ней я писал ранее в статье:»Ошибка RDP подключения: CredSSP encryption oracle remediation. Как исправить?».
А возникновение этой ошибки связано с тем, что на терминальном Windows сервере, на который идёт подключение, не установлены последние обновления безопасности (CredSSP обновления для CVE-2018-0886). После обновления система по умолчанию запрещает подключаться к удалённым серверам по RDP со старой версией протокола CredSSP.
Отсутствуют доступные серверы лицензирования удаленных рабочих столов
После настройки сервера всё шло хорошо, но только 120 дней. Потом случилось следущее:
Удаленный сеанс отключен, поскольку отсутствуют доступные серверы лицензирования удаленных рабочих столов.
Обратитесь к администратору сервера
А это означает что у вас установлен ключ льготного периода (grace period licensing), который необходимо удалить. Для этого вам нужно залогиниться на сервер локально.
Где удалять ключ льготного периода? В реестре под именем L$RTMTIMEBOMB. Идём по ветке реестра:
HKEY_LOCAL_MACHINE\SYSTEM\CurrentControlSet\Control\Terminal Server\RCM\GracePeriod
Но не тут то было! У вас недостаточно прав, но и это нас не остановит. Жмём правой кнопкой мыши и меняем владельца на ветку реестра и даём полные права самому себе, после чего спокойно удаляем эту гадость).
Если не поможет, то советую переустановить роли и компоненты.
Автору на кофе ☕ или просто поднять мотивацию писать больше статей для вас 😉 !
Отдельное спасибо всем, кто отправляет донатики 😀! Очень приятно и неожиданно. Благодаря вам сайт может и в дальнейшем обходиться без рекламных баннеров.

You may be perplexed at how to configure Remote Desktop on a Microsoft Windows 2016 Server since the Remote Desktop Host Configuration tool is missing from the OS.
You can still configure RDP settings, but you’ll have to use Group Policy to do so. Just use these steps:
Note: For instructions on how to activate Remote Desktop Services license server, visit Microsoft’s page about the subject.
- Launch “gpedit.msc“.
- Navigate to “Computer Configuration” > “Administrative Templates” > “Windows Components” > “Remote Desktop Services” > “Remote Desktop Session Host“.
Here you can find group policy settings to set Licensing, Security, Connections, etc. You’ll notice these are the same settings you would find in the old Remote Desktop Host Configuration tool like “Limit number of connections”, “Set time limit for disconnected sessions” , and setting the licensing mode.
You don’t need to utilize Active Directory in your environment to use these settings on the server either.
Author Mitch Bartlett
Through my career that spans over 20 years I have become an expert in Microsoft Systems Administration, Android, and macOS. I started this site as a technical guide for myself and it has grown into what I hope is a useful knowledgebase for everyone.