
| Previous | Table of Contents | Next |
| Configuring BitLocker Drive Encryption on Windows Server 2008 R2 | Adding New GPT and MBR Disks to Windows Server 2008 R2 Systems |
<google>BUY_WINSERV_2008R2</google>
Windows Server 2008 R2 is, as the name suggests, a server operating system. In the real world this means that systems running Windows Server 2008 R2 will most likely be located in large rack systems in a server room. As such, it is highly unlikely that system administrators are going to want to have to physically visit each of these servers to perform routine administrative tasks such as system configuration and monitoring. A far preferable scenario involves these administrators remotely logging into the servers from their own desktop systems to perform administrative tasks. Fortunately Windows Server 2008 R2 provides precisely this functionality through Remote Desktop and the remote administration features of the Server Manager. In this chapter we will look at the steps necessary to remotely administer Windows Server 2008 R2 systems using each of these approaches.
Contents
Contents
|
||
Remote Administration Using Server Manager
The Windows Server 2008 R2 Server Manager tool provides the ability to perform some administrative tasks on a remote server. Unfortunately, the administrative tasks that can be performed using this approach are quite restrictive and, as such, the following activities are disabled:
- Addition or removal of roles
- Addition or removal of features
- Modification of Windows Update settings
- Modification of network configuration
- Modification of domain settings
- Alteration of computer name
- Configuration of Internet Explorer security settings
- Execution of Security configuration wizard
- Management of Remote Desktop configuration settings
- System Properties configuration
In order to enable remote administration using the Server Manager, remote administration must first be enabled on the remote server. This can be achieved by launching Server Manager on the remote server and selecting the Configure Server Manager Remote Management link located in the Server Summary section. Within the resulting dialog, ensure that the option to Enable remote management of this server from other computers check box is selected before clicking on the OK button:
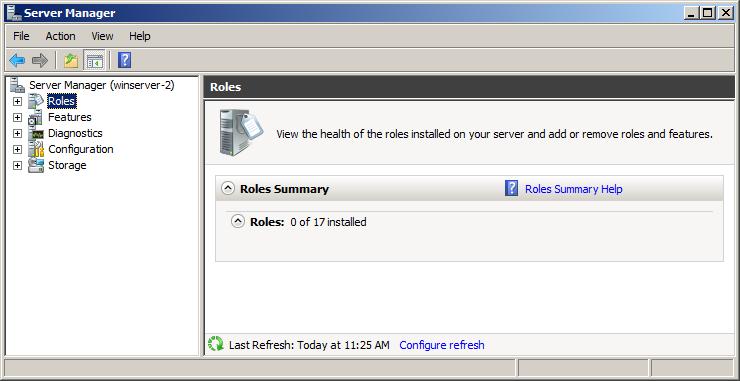
Once remote administration using Server Manager has been enabled, launch Server Manager on another computer located on the same domain or workgroup as the remote server, launch Server Manager and select the Action -> Connect to Another Computer menu option. Within the resulting dialog box, enter the name of the remote server to which you wish to connect and click on the OK button. A progress dialog will be displayed as the connection to the remote server is established. After a short delay the name of the current computer in the left hand pane of the Server Manager will change from the local computer to the remote server. Once the connection has been established, all the information displayed by Server Manager relates to the remote system. As you explore the various options you will begin to notice that a number of options are missing. For example, in the following figure there are no options listed to add or remove roles from the remote server:
In order to perform a wider range of remote administrative tasks than those provided by the Server Manager, it is necessary to use Remote Desktop access.
What is Remote Desktop?
Remote Desktop allows the graphical interface of a remote Windows system to be displayed over a network onto a local system. In addition, keyboard and mouse events on the local system are transmitted to the remote system enabling the local user to perform tasks on the remote system as if they were physically sitting at the remote system. Conversely, resources (such as printers and disk drives) on the local system can be made available to the remote system for the duration of the connection. This remote control can be established in a number of ways, including over wide area networks (WAN), local area networks (LAN) or over the internet.
In the case of Windows Server 2008 R2, this service is provided by Remote Desktop Services (known as Terminal Services in previous versions of Windows Server) running on the remote system and the Remote Desktop Connection (RDC) client on the local system.
Remote Desktop Services run in two different modes, Administration and Virtual Session. Remote Desktop for Administration provides full administration functionality to the remote administrator (including access to the console session and visibility of notification messages). Remote Desktop for Administration is the equivalent to working directly at the remote system’s console. In virtual session mode the user is subject to some limitations such as the ability to install applications and view console notification messages.
Windows Server 2008 R2 imposes some administrator logon restrictions. Specifically, a maximum of two administrators may be logged on at any one time, either two logged on remotely, or one local and one remote administrator. This assumes, however, that different accounts are being used to log on. In other words, the same user may not log on locally and remotely simultaneously.
Enabling Remote Desktop Administration on the Remote Server
As mentioned previously, remote desktop functionality on the server is provided by Remote Desktop Services. It is important to note, however, that Remote Desktop Services do not have to be explicitly enabled on the server in order to support Remote Desktop Administration. In fact, all that needs to be done is to enable Remote Desktop Administration. This is configured by opening the Control Panel from the Start menu and selecting the System and Security icon followed by the System icon. In the section in the top left hand corner of the System page select Remote settings to display the following properties window:
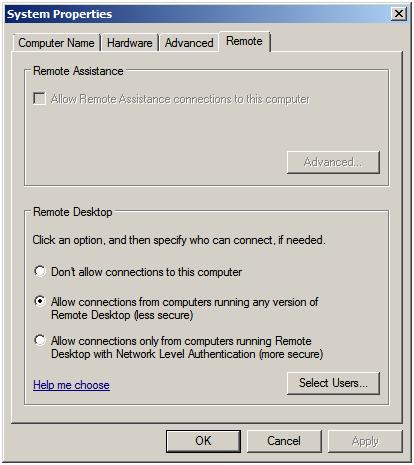
The Remote properties dialog provides a number of options. The default setting is to disallow remote connections to the computer system. The second option allows remote desktop connections from any version of the Remote Desktop client. The third, and most secure option, will only allow connections from Remote Desktop clients with Network Level Authentication support. This typically will only allow access to systems providing secure network authentication such as Windows Vista, Windows 7 and Windows Server 2008.
If the Windows Firewall is active, the act of enabling Remote Desktop administration also results in the creation of a firewall exception allowing Remote Desktop Protocol (RDP) traffic to pass through on TCP port 3389. This default port can be changed by changing this setting in the Registry key:
HKEY_LOCAL_MACHINE\System\CurrentControlSet\Control\TerminalServer\WinStations\RDP-tcp\PortNumber.
The easiest way to locate this registry key value is to execute regedit from the Run window or a command prompt, select Edit — > Find and enter RDP-tcp. In the resulting list, scroll down until you reach the PortNumber entry and double click on it to change the current value.
Controlling Remote Desktop Access
<google>WIN28BOX</google>
The default configuration for Remote Desktop is to allow all members of the Administration group to connect remotely. Active Directory also contains a Remote Desktop Users group to which users may be added to provide Remote Desktop access privileges. To provide users with remote desktop access, open the Control Panel -> System and Security -> System -> Remote settings panel and click on the Select Users button to invoke the Remote Desktop Users dialog illustrated in the following figure:
Note that users with administrative privileges do not need to be added to this list; by default they already have Remote Desktop access. To add additional users click on the Add… button to display the Select Users dialog. Enter the name of the user in the text box entitled Enter object names to select and click on Check names to list names that match the name entered. Select the appropriate name from the list. The following example shows user Bill on server winserver-2:

Click on OK to apply the change. The new user will now appear in the list of users with Remote Desktop access on the Remote Users screen. Click OK to close this screen and click on Apply in the System Settings screen. The specified user will now have remote desktop access to the system.
Starting the Remote Desktop Client
With the appropriate configuration tasks completed on the remote system the next step is to launch the Remote Desktop Client on the local system. The client can be run in either administration mode which provides full integration with the console of the remote server, or virtual session mode which provides some administrative privileges but does not provide console access or allow applications to be installed.
To invoke the Remote Desktop Client in virtual session mode either select Start -> All Programs -> Accessories -> Remote Desktop Connection or enter the following in the Run dialog or at a command prompt:
mstsc
To start the Remote Desktop Client in administrator mode run the following command:
mstsc /admin
In either case the following initial screen will appear requesting details of computer to which the client is to connect:

This can either be an IP address or a computer name. If previous connections have been established the User name field will be populated with the user name used in the preceding session. If you need to log in as a different user this option will be provided on the next screen which appears after the Connect button is pressed:
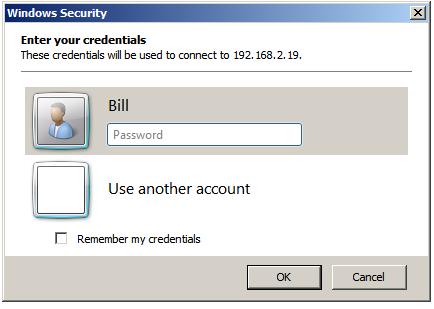
In this screen enter the password for the selected user (note that remote desktop access is only available for user accounts which are password protected). If a user other than the one displayed is required, simply click on the Use another account link and enter the necessary details. Click on OK to establish the connection. After a short delay the remote desktop will appear on the local computer screen.
Remote Desktop Client Configuration Options
The Options>> button displayed on the initial screen of the Remote Desktop Client provides six tabs, each containing a range of configuration options:
- General — Allows login credentials to be configured and session information to be saved.
- Display — Configures the resolution and color settings to be used when displaying the remote desktop on the local system.
- Local Resources — Specifies which local resources (sound, disk drives, printers etc) are to be made accessible to the remote system during the Remote Desktop session. This page also provides options to control the situations under which special key combinations such as Ctrl-Alt-Del are interpreted by the local or remote systems.
- Programs — Allows specified programs to be automatically invoked each time a remote sessions is established.
- Experience — Controls which desktop features are enabled or disabled for the Remote Desktop session. For example, over a slow dial-up connection it is unwise to have the desktop background displayed and font smoothing enabled. Either select the connection type and speed to see recommended settings, or use Custom to configure your own settings. This particular screen also provides the option to have the connection automatically re-established in the event that a session is dropped.
- Advanced — Enables and disables remote server verification. This ensures that the remote server to which you are connected is indeed the server you wanted. Also available are TS Gateway settings. By default the Remote Desktop Client is configured to automatically detect TS Gateway settings.
Remote Session Tracking
With Remote Desktop access implemented it is often useful to find out at times who is logged into a system. This can be achieved using the quser command-line tool. To obtain details of logged in users on a local system simply run quser at a command prompt or in a Run dialog:
C:Users\Administrator> quser
 USERNAME              SESSIONNAME        ID  STATE   IDLE TIME  LOGON TIME
 administrator                             1  Disc         3:18  7/11/2008 12:36 PM
 bill                  rdp-tcp#0           2  Active          .  7/14/2008 9:11 AM
 nas                   console             3  Active      none   7/11/2008 12:58 PM
To obtain information for a remote system simply run quser with the /server:<hostname> command-line option. For example:
C:\Users\Administrator> quser /server:winserver-2
 USERNAME              SESSIONNAME        ID  STATE   IDLE TIME  LOGON TIME
 administrator                             1  Disc         3:22  7/11/2008 12:36 PM
 bill                  rdp-tcp#0           2  Active          .  7/14/2008 9:11 AM
 nas                   console             3  Active      none   7/11/2008 12:58 PM
Logging out from a Remote Desktop Session
When the Remote Desktop Client is exited by pressing the ‘X’ on the control panel the remote session continues to run on the server even though no client is connected. Next time the user connects the desktop session will appear exactly as it was left before.
To end the session select Start in the remote desktop session, click on the right arrow button in the bottom right hand corner of the menu and select Log Off. This will close down the remote desktop session and close the remote desktop client.
Running Multiple Remote Desktops
Multiple concurrent remote desktops can be run and managed within a single window using the MMC Remote Desktops snap-in. This may either be snapped into the MMC or launched from the command-line or a Run dialog by typing:
tsmmc.msc
Once launched, right click on the Remote desktops item in the tree in the left hand panel and select Add a new connection from the menu. Once selected the Add New Connection dialog will appear as follows:
In this dialog enter the IP address or computer name of the remote system together with the User name and the name to be assigned to this connection (this is essentially the name by which this connection will be listed and administered inside the Remote Desktops snap-in). For an administrative session (as opposed to a virtual session) set the Connect with /admin box. Click OK to add the session to the snap-in. Once added, the session will appear in the left hand panel under Remote Desktops. Repeat these steps to add connections to any additional remote systems required.
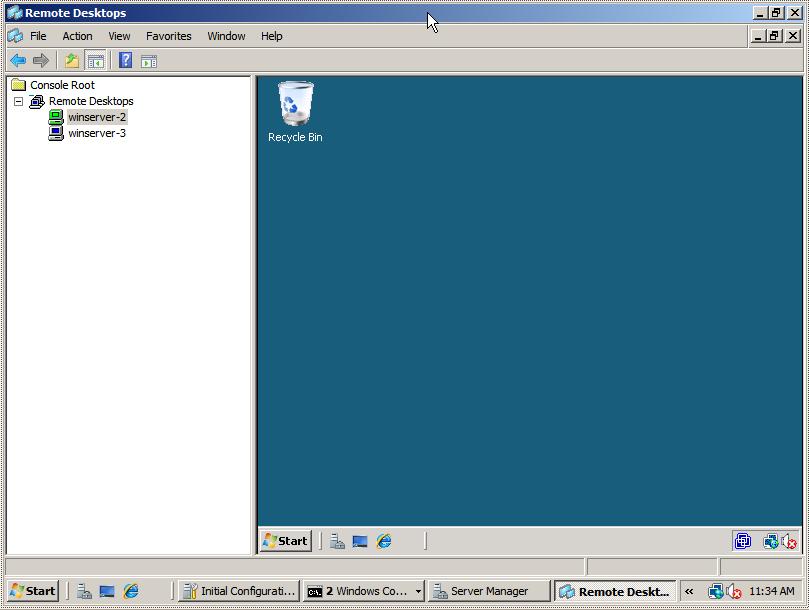
To establish a remote desktop connection, right click on the name of the session from the left hand panel and select Connect from the menu. The remote session will appear in the window. To start another session simply right click on the session name and once again select Connect. To switch between sessions simply click on the name of the session in the left hand panel and the corresponding desktop will be displayed. The following figure illustrates two sessions running in Remote Desktops:
To change configuration options for each session right click on the desired session in the left hand panel and select Properties. This panel has a number of tabs which enable credentials, screen size and program start properties to be defined.
<google>BUY_WINSERV_2008R2_BOTTOM</google>
First published on TechNet on Dec 30, 2008
[Today’s post comes to us courtesy of Wayne McIntyre]
Microsoft Windows Server 2008 is the first server product where the Windows firewall is enabled by default. This is definitely a plus from a security standpoint however by default it does not allow remote administration. If you attempt to remotely connect to the Event Viewer of one of your additional 2008 servers you will see the following error.
On the main SBS server we enable remote administration out of the box, however, if you want to be able to remotely administer any additional Windows 2008 servers in your environment you will have to enable the remote administration firewall policy inbound rule. You can either do this locally or if you have multiple servers you may want to implement a group policy to configure the firewall for your 2008 servers. To do this locally, follow these steps:
- Open the Windows Firewall with Advanced Security snap in from Administrative Tools.
- Select inbound rules and enable the following 3 rules.
- Remote Administration (NP-in)
- Remote Administration (RPC)
- Remote Administration (RPC-EPMAP)
Enabling this policy will enable remote administration for all services, but you can also get more granular and just enable remote administration for specific components as well.
Additional Resources:
http://technet.microsoft.com/en-us/network/bb545423.aspx
When managing your domain networking services, it is very common to install administrative tools on your domain member computers rather than interactively logging into the target system.
For example, this is especially true when managing Active Directory services. There really is no reason why you would log on to a domain controller to simply create or modify a user account. The same holds true for the management of DHCP, DNS, and other related services.
Generally, you would install the Administrative tools on your workstation. However, there may be a scenario where you would need to install these tools on a member server. In the workstation type operating systems, you would need to download either Adminpak or RSAT (Remote Server Administration Tools) depending on which operating system you are running.
Each specific version of these tools are designed for a specific target operating system. For instance, if you are running Vista, you would not be able to install Adminpak designed for Windows XP, or RSAT designed for Windows 7. You would need to download the correct version of RSAT for Vista.
When it comes to Windows Server 2008 R2, the tools do not require any downloads. They simply need to be enabled within Server Manager. The first step is to launch Server Manager, which should be located in your Administrative Tools in the Start Menu.
Once you launch Server Manager, Click on Features.
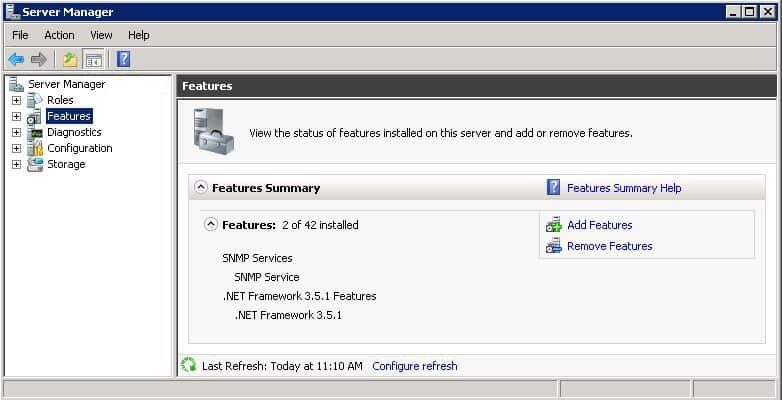
Click on Add Features. Scroll down until you reach Remote Server Administration Tools. Expand the appropriate category and enable the features needed to manage the remote systems.
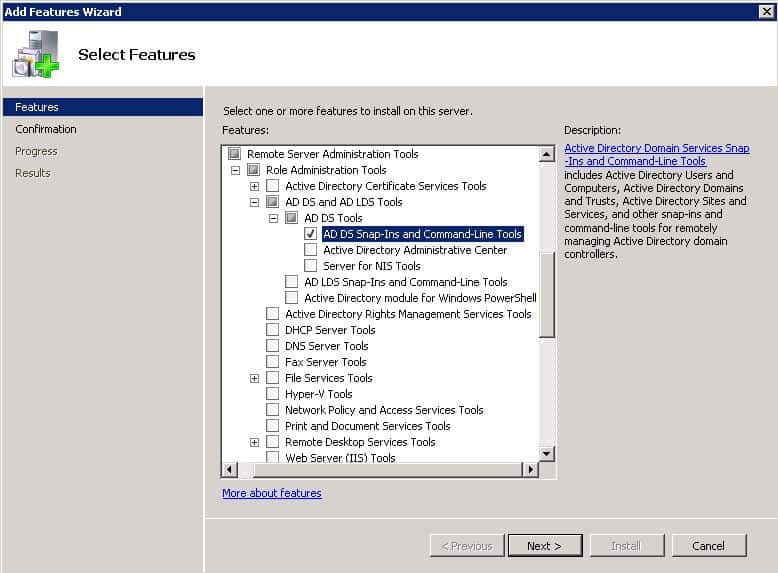
Click Next and finish the installation process. Once it has been completed, the installed tools will now show up in your Administrative Tools folder on the Start Menu.
Автор статьи Ro8
Привет друзья! В данной статье мы выполним удаленное управление операционной системой Windows Server 200 R2 установленной в режиме Server Core используя Windows PowerShell 2.0.
У нас есть две машины, одна с предустановленной Windows Server 2008 R2 (Server Core), другая с Windows 7
Удаленное управление машиной с Windows Server 2008 R2 будем выполнять при помощи службы удаленного управления Windows (WinRM). Данная служба применяет протокол WS-Management для удаленного управления. WS-Management представляет собой стандартный протокол веб-служб для удаленного управления программным обеспечением и оборудованием. Служба WinRM прослушивает сеть на наличие запросов WS-Management и обрабатывает их.
Для запуска службы WinRM на машине с Windows Server 2008 R2 применим утилиту Core Configurator
Переходим по ссылке https://coreconfig.codeplex.comи скачиваем ее

Скачанный образ с утилитой Core Configurator
На компьютере с Windows 7 смонтируем скачанный образ в виртуальный привод (в нашем случае под буквой F). Также к компьютеру подключен флеш-накопитель

Содержимое смонтированного образа Core Configurator. Копируем все файлы со смонтированного образа на наш флеш-накопитель

Скопированные файлы утилиты Core Configurator на флеш-накопителе

Переходим на машину с Windows Server 2008 R2, подключаем к ней флеш-накопитель с файлами утилиты Core Configurator
Выполняем команды dir c:, dir d:, dir e: и так далее и определяем букву нашего флеш-накопителя. В нашем случае флеш-накопитель определился под буквой E:
На флеш-накопителе присутствует папка CoreConfig, в которую были скопированы файлы утилиты Core Configurator

Переходим на флеш-накопитель

Далее переходим в папку coreconfig введя команду cd coreconfig

Для просмотра содержимого папки coreconfig выполним команду dir /b. В данной папке присутствует файл Start_Coreconfig.wsf

Выполняем команду Start_Coreconfig.wsf

После выполнения команды Start_Coreconfig.wsf откроется главное окно утилиты Core Configurator

В главном окне выбираем Computer settings

Выбираем WinRM

Как видим, служба WinRM на машине с Windows Server 2008 R2 не запущена
Запускаем службу WinRM поставив переключатель в положение Enable WinRM и нажав кнопку Apply
Как видим, теперь служба WinRM запустилась
Проверим выполнение службы WinRM используя Windows PowerShell
Запускаем Windows PowerShell выполнив команду PowerShell
Проверить состояние службы WinRM можно выполнив команду get-service winrm

Как видим, служба WinRM выполняется

Переходим на машину с Windows 7 и запускаем на ней Windows PowerShell
Для подключения к удаленной машине с Windows Server 2008 R2 и выполнения на ней нужных нам действий выполняем команду:
invoke-command -computername Server01 -Credential exityrwed\Administrator -ScriptBlock {……..}
где Server01 — это имя машины, к которой производится подключение
exityrwed — домен в состав которого входит машина
Administrator — пользователь, от имени которого производится подключение
{……} — в данных скобках прописываем команду, которую хотим выполнить на удаленной машине
К примеру мы хотим получить список процессов на удаленной машине Windows Server 2008 R2
Для этого выполняем команду invoke-command -computername Server01 -Credential exityrwed\Administrator -ScriptBlock {get-process}

Указываем пароль пользователя и нажимаем ОК

Как видим, мы подключились к машине с Windows Server 2008 R2 (имя машины Server01) и нам отобразился список процессов на данной машине

Также можно создать сессию с удаленной машиной. Выполняется это командой Enter-PSSession Server01
где Server01 — это имя машины, с которой устанавливается соединение
Вводим команду Enter-PSSession Server01и выполняем ее

Как видим, мы подключились к удаленной машине Server01, и теперь можем выполнять на ней любые действия

К примеру перейдем в корень диска C: выполнив команду set-location / и посмотрим его содержимое, введя команду get-childitem

Или к примеру определим политику выполнения сценариев PowerShell на удаленной машине Server01 выполнив команду get-executionpolicy
(подробнее о политиках выполнения сценариев в статье «Сценарии в Windows PowerShell» ) http://remontcompa.ru/851-scenarii-v-windows-powershell-20.html

Для закрытия сессии с удаленной машиной вводим команду exit

Произведено закрытие сессии с удаленной машиной Server01

Windows 7 / Getting Started
Windows 2008’s built-in feature set allows it to be easily managed remotely. This
capability eases administration time, expenses, and energy by allowing administrators to
manage systems from remote locations rather than having to be physically at the system.
Remote Server Administration Tools
The Remote Server Administration Tools include a number of tools to manage Windows
2008 remotely. This set of tools replaced the Adminpack.msi set of tools that shipped with
previous versions of Windows.
There are different tools for the roles (see Table 20.5) and for the features.
TABLE-5 Remote Server Administration Tools for Roles
| Tool | Description |
|---|---|
| Active Directory Certificate Services Tools | Active Directory Certificate Services Tools includes the Certification Authority, Certificate Templates, Enterprise PKI, and Online Responder Management snap-ins. |
| Active Directory Domain Services (AD DS) Tools | Active Directory Domain Services Tools includes Active Directory Users and Computers, Active Directory Domains and Trusts, Active Directory Sites and Services, and other snap-ins and command-line tools for remotely managing Active Directory Domain Services. |
| Active Directory Lightweight Directory Services (AD LDS) Tools | Active Directory Lightweight Directory Services Tools includes Active Directory Sites and Services, ADSI Edit, Schema Manager, and other snap-ins and command-line tools for managing Active Directory Lightweight Directory Services. |
| Active Directory Rights Management Services (AD RMS) Tools | Active Directory Rights Management Services (AD RMS) Tools includes the Active Directory Rights Management Services (AD RMS) snap-in. |
| DHCP Server Tools | DHCP Server Tools includes the DHCP snap-in. |
| DNS Server Tools | DNS Server Tools includes the DNS Manager snapin and dnscmd.exe command-line tool. |
| Fax Server Tools | Fax Server Tools includes the Fax Service Manager snap-in. |
| File Services Tools | File Services Tools include the following: Distributed File System Tools includes the DFS Management snap-in, and the dfsradmin.exe, dfscmd.exe, dfsdiag.exe, and dfsutil.exe command-line tools. File Server Resource Manager Tools includes the File Server Resource Manager snap-in, and the filescrn.exe and storrept.exe command-line tools. Services for Network File System Tools includes the Network File System snap-in, and the nfsadmin.exe, showmount.exe, and rpcinfo.exe command-line tools. |
| Network Policy and Access Services Tools | Network Policy and Access Services Tools includes the Routing and Remote Access and Health Registration Authority snap-ins. |
| Print Services Tools | Print Services Tools includes the Print Management snap-in. |
| Terminal Services Tools | Terminal Services Tools includes the TS RemoteApp Manager, TS Gateway Manager, and TS Licensing Manager snap-ins. |
| Universal Description, Discovery, and Integration (UDDI) Services Tools | UDDI Services Tools includes the UDDI Services snap-in. |
| Web Server (IIS) Tools | Web Server (IIS) Tools includes the Internet Information Services (IIS) 6.0 Manager and IIS Manager snap-ins. |
| Windows Deployment Services Tools | Windows Deployment Services Tools includes the Windows Deployment Services snap-in, wdsutil.exe command-line tool, and Remote Install extension for the Active Directory Users and Computers snap-in. |
TABLE-6 Remote Server Administration Tools for Features
| Tool | Description |
|---|---|
| BitLocker Drive Encryption Tools | BitLocker Drive Encryption Tools includes the manage-bde.wsf script. |
| BITS Server Extensions Tools | BITS Server Extensions Tools includes the Internet Information Services (IIS) 6.0 Manager and IIS Manager snap-ins. |
| Failover Clustering Tools | Failover Clustering Tools includes the Failover Cluster Manager snap-in and the cluster.exe command-line tool. |
| Network Load Balancing Tools | Network Load Balancing Tools includes the Network Load Balancing Manager snap-in and the nlb.exe and wlbs.exe command-line tools. |
| SMTP Server Tools | SMTP Server Tools includes the Internet Information Services (IIS) 6.0 Manager snap-in. |
| WINS Server Tools | Windows Internet Naming Service (WINS) Server Tools includes the WINS snap-in. |
The tools are installed as a feature. You can install all the tools or only the specific ones that
you need. To install the Remote Server Administration Tools, execute the following steps:
- Launch Server Manager.
- Select the Features folder.
- Click the Add Features link.
- Locate the Remote Server Administration Tools feature.
- Select the desired tools (more than one can be selected).
- Click Next to accept the selected tools.
- Click Install to install the selected tools.
- Click Close to exit the wizard.
- Close the Server Manager window.
After the tools are installed, you can manage remote computers by selecting the Connect
to Another Computer command from the Action menu.
Windows Remote Management
Windows Remote Management (WinRM) allows an administrator to run command lines
remotely on a target server. When WinRM is used to execute the command remotely, the
command executes on the target server and the output of the command is piped to the
local server. This allows administrators to see the output of those commands.
The commands run securely, as the WinRM requires authentication and also encrypts the
network traffic in both directions.
WinRM is both a service and a command-line interface for remote and local management
of servers. The service implements the WS-Management protocol on Windows 2008. WSManagement
is a standard web services protocol for management of software and hardware remotely.
In Windows 2008, the WinRM service establishes a Listener on the HTTP and HTTPS ports.
It can coexist with Internet Information Services (IIS) and share the ports, but uses the
/wsman URL to avoid conflicts. The IIS role does not have to be installed for this to work.
The WinRM service must be configured to allow remote management of the target server
and the Windows Firewall must be configured to allow Windows Remote Management
traffic inbound. The WinRM service can be configured through GPO or via the WinRM
command line. To have the WinRM service listen on port 80 for all IP addresses on the
server and to configure the Windows Firewall, execute the following commands on the target server:
- Select Start, Run.
- Enter the command winrm quickconfig.
- Click OK to run the command.
- Read the output from WinRM. Answer y to the prompt that asks, «Make These Changes [y/n]?»
Now the target server is ready to accept commands. For example, suppose an administrator
is logged on to a server dc1.companyabc.com and needs to remotely execute a
command on branch office server dc3.companyabc.com. These steps assume that WinRM
has been configured and the firewall rule has been enabled. Use the following steps to
remotely execute the command:
- Open a command prompt on DC1.
- Enter the command winrs -r:http://dc3.companyabc.com ipconfig /all.
The output of the command will be shown on the local server (DC1), in this case the IP
configuration of the target server (DC3).
This is particularly useful when executing a command or a set of commands on numerous
servers. Rather than having to log on to an RDP session on each server and execute
the command, the command can be remotely executed in a batch file against all the target servers.
PowerShell
The powerful new command-line shell is now integrated into Windows 2008. PowerShell
is an administrator-focused shell and scripting language that has a consistent syntax that
makes it easy to use. It operates on a cmdlet paradigm, which is, in effect, mini commandline
tools. The syntax for the cmdlets is the same as for the PowerShell scripting language,
reducing the learning curve of the administrator.
PowerShell can run its own scripts and cmdlets, as well as legacy scripts such as VBScript
(.vbs), batch files (.bat), and Perl scripts (.perl). The shell can even run Windows-based
command-line tools. Many of Microsoft’s new applications, such as Microsoft Exchange
2007 and System Center Operations Manager 2007, are integrated with PowerShell and
add a host of cmdlets to help automate administration.