

У пользователей MacOS периодически возникает необходимость оперировать приложениями, запущенными на удалённых рабочих станциях или серверах, работающих на Windows. В качестве удалённого рабочего места, при решения подобного рода задач, сейчас довольно часто используются виртуальные выделенные сервера (VPS). Стандартным приложением для связывания MacOS и Windows в последние годы стал Microsoft Remote Desktop. И, к счастью, установка и работа в Microsoft Remote Desktop на MacOS довольно просты. Итак, далее о том, как подключиться по RDP из-под MacOS к виртуальной рабочей станции или серверу.
Загрузка Microsoft Remote Desktop
Как и все современные Mac-приложения, Microsoft Remote Desktop доступен для скачивания через Mac App Store. Поэтому, найдет иконку App Store на вашем рабочем столе и щелкните по ней чтобы открыть.
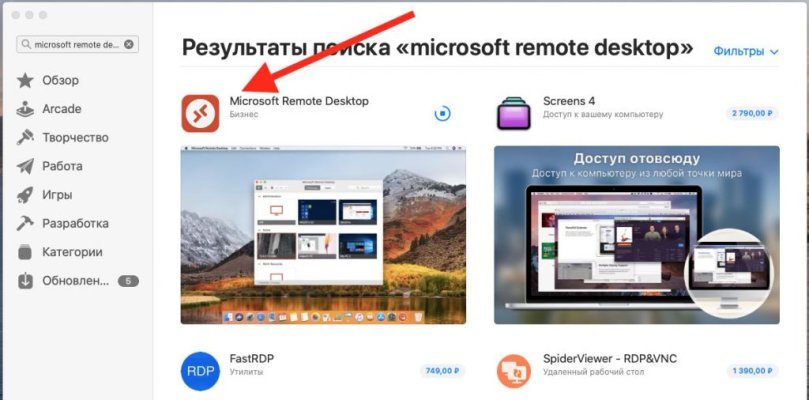
В поисковой строке Mac App Store наберите “Microsoft Remote Desktop”. Среди найденных компонентов найдите оранжевую иконку с изображением компьютера. Скорее всего, она будет первая в открывшемся списке приложений. Чтобы загрузка началась, нажмите на кнопку Get синего цвета. Поскольку Microsoft Remote Desktop является бесплатным приложением, возле его значка не будет указана стоимость. Как только вы нажмёте на Get, кнопка изменит свой цвет на зелёный, и будет содержать надпись Install app. Нажмите на кнопку ещё раз.

Теперь, после завершения загрузки, App Store можно закрыть. Чтобы открыть только что скачанную программу, запустите значок Launchpad, находящийся в Dock. Далее, нажмите на иконку Microsoft Remote Desktop и приложение запустится. В случае, если вы не можете найти значок искомого приложения, попробуйте пролистать влево. Вероятно, Launchpad имеет несколько страниц из-за большого количества имеющихся приложений.
Есть ещё один способ найти загруженное приложение. Им является использование поисковой компоненты Spotlight. Вы можете запустить её нажав на значок с изображением глаза в правом верхнем углу рабочего стола. Также, можно запустить поисковик с клавиатуры, нажав комбинацию клавиш Command + Пробел. В открытом окне Spotlight наберите “Microsoft Remote Desktop” и нажмите Enter.
Когда вы запустите приложение в первый раз, скорее всего, при его запуске откроется всплывающее окно, которое сообщит вам о том, что нового появилось в установленной версии Microsoft Remote Desktop. Вы можете спокойно закрыть это окно и продолжить свою работу.
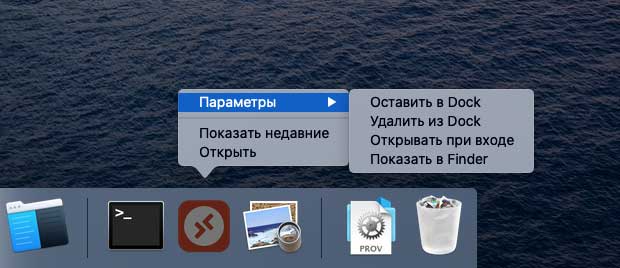
Чтобы получить быстрый доступ к приложению в будущем, вы можете поместить его в свой Dock. Чтобы это сделать, на иконке приложения нажмите правую кнопку мыши, выберите Options (Параметры), затем нажмите Keep in Dock (Оставить в Dock).
Параметры RDP подключения
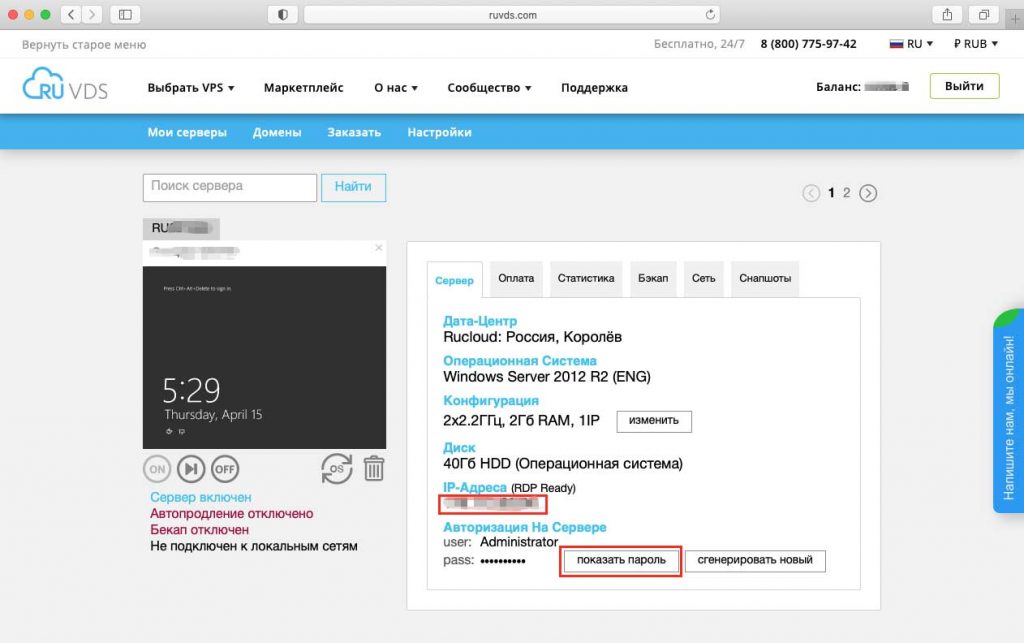
Для доступа к вашей удалённой машине вам понадобится её IP-адрес. Чтобы узнать его, в браузере перейдите на сайт RUVDS и авторизуйтесь на нём при помощи своей учётной записи. IP-адрес будет указан в разделе Мои серверы. В этом же окне вы можете увидеть учётные данные, необходимые для авторизации на удалённом сервере. Имя пользователя доступно для просмотра в строке user, а для того, чтобы увидеть пароль, нажмите кнопку Показать пароль.
Подключение к удалённому рабочему столу
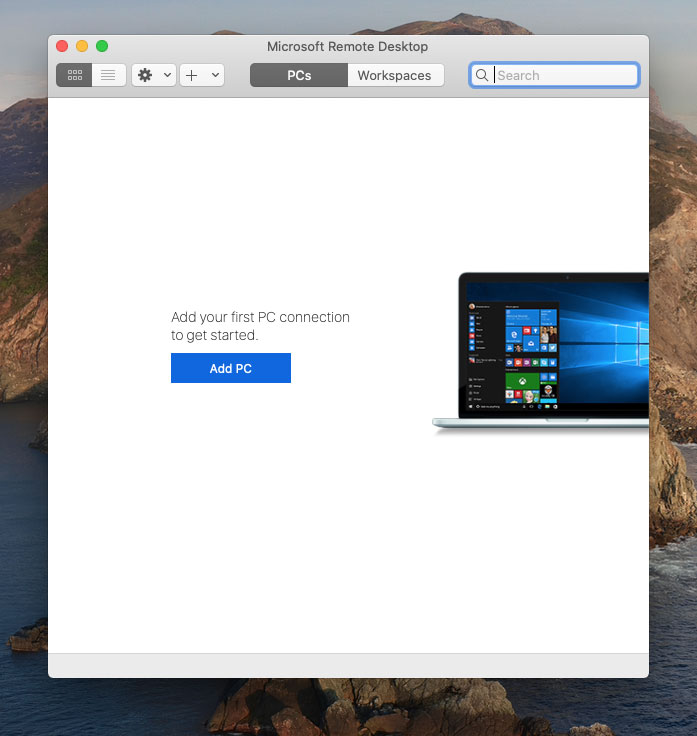
Теперь, когда открыт доступ к машине, работающей на Windows, и вы знаете её IP-адрес и учётные данные для подключения, можно перейти на ваш Mac. На нём запустите Microsoft Remote Desktop и в левом верхнем углу окна найдите и нажмите кнопку New.
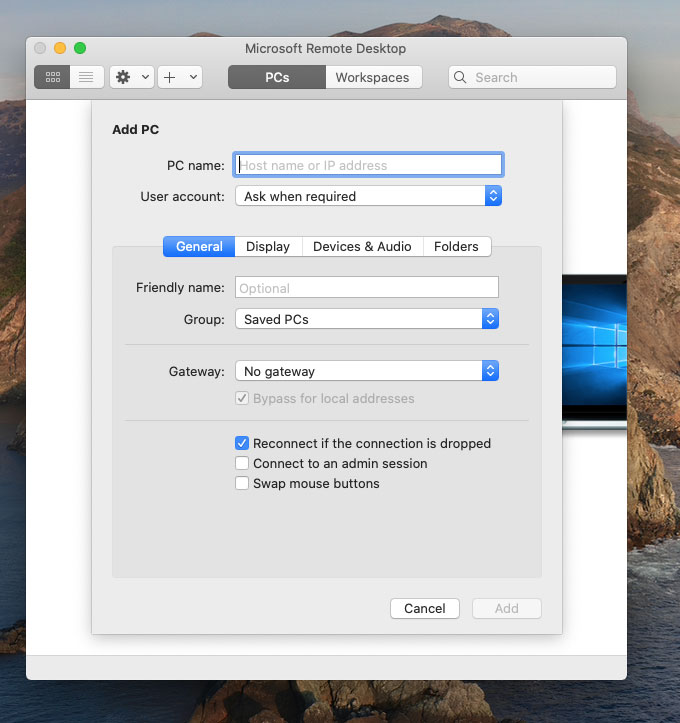
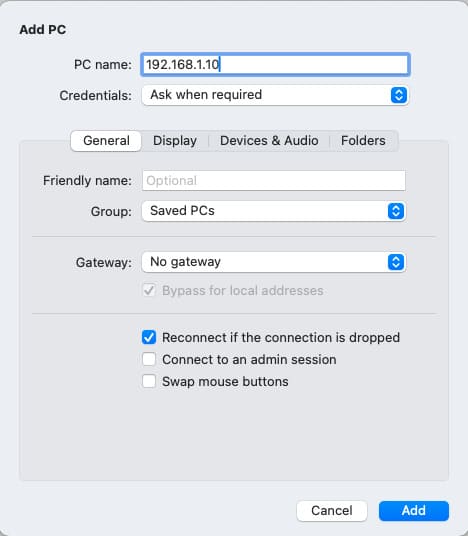
В открывшемся окне заполните:
PC Name– IP-адрес вашей удалённой машины (см. раздел Параметры RDP подключения).User account– Если оставить по умолчаниюAsk when required, то логин и пароль будут спрашиваться при подключении. Если выбратьAdd User Account, то можно сразу ввести учетный данные для входа на сервер. Эти данные вы можете найти в личном кабинете RUVDS (см. раздел Параметры RDP подключения).Friendly name. Это просто произвольное название, например,Сервер Windows 2012.
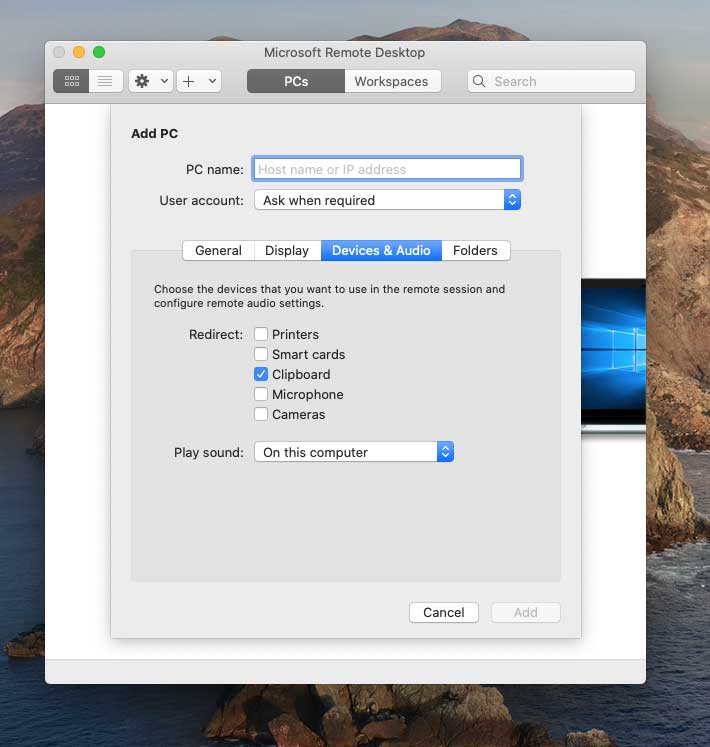
На вкладке Devices & Audio можно настроить периферийное оборудование на удалённом компьютере. Например, в выпадающем меню Play sound вы можете, выбрать какое из действий будет сопровождаться проигрыванием звуков.
Опция Printers поможет вам сделать доступными локальные принтеры при удалённом подключении.
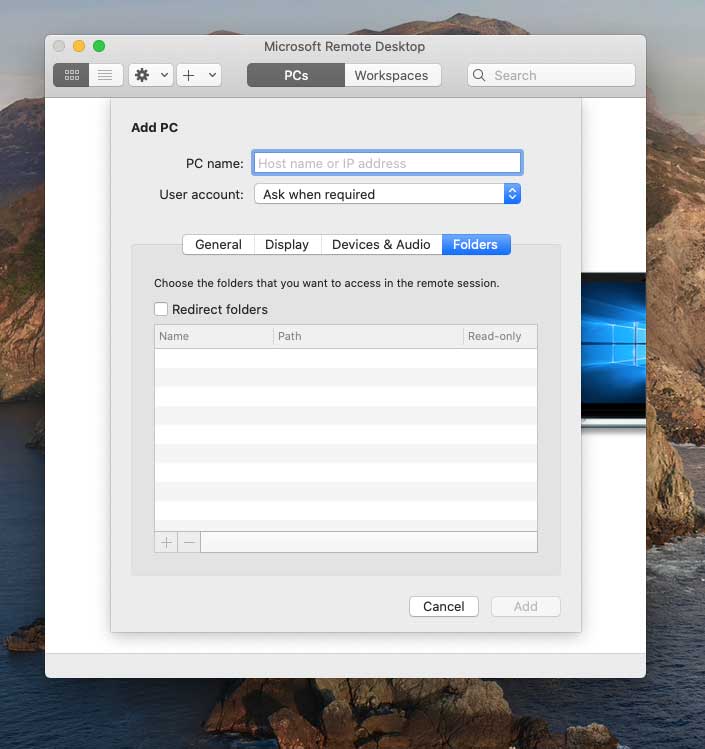
Крайняя правая закладка окна – это Folders. В ней вы можете выбрать локальный каталог для того, чтобы он был доступен из удалённой сессии. Нажмите кнопку +, выберите имя папки и введите путь до неё.
Когда вы закончите настройку подключения к удалённому рабочему столу, нажмите кнопку Add в правом нижнем углу окна. Тем самым, вы сохраните новое подключение. Чтобы начать сессию этого подключения, просто щёлкните на нём двойным щелчком мыши.
Если вам понадобится отредактировать, дублировать, экспортировать или удалить данное удалённое подключение, используйте клик правой кнопкой на имени подключения, чтобы получить доступ к этим опциям.
В этой статье мы покажем, как подключиться к удалённому компьютеру с Windows, используя MacBook и приложение Windows App (ранее известное как Microsoft Remote Desktop). Также рассмотрим настройку общего доступа к папкам для обмена файлами между устройствами.
Приобрести оригинальные ключи активации Windows Server RDS можно у нас в каталоге от 3440 ₽
Шаг 1: Установка Windows App
Убедитесь что вы вошли в учетную запись на вашем Mac, для того что бы скачивать приложения из AppStore

1) Откройте App Store на вашем MacBook.
2) В поиске введите Windows App (ранее известное как Microsoft Remote Desktop).
3) Установите приложение. Оно бесплатное и отлично работает для удалённого управления компьютерами с Windows.
4) После установки нажмите Open, чтобы запустить приложение.

Шаг 2: Настройка подключения
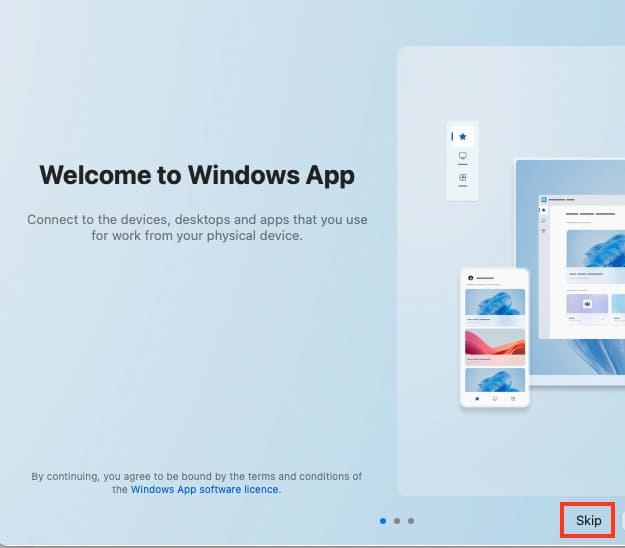
После того как откроете приложение, нажмите Not Now и пропустите обучающее окно.
У вас откроется пустое окно приложения.
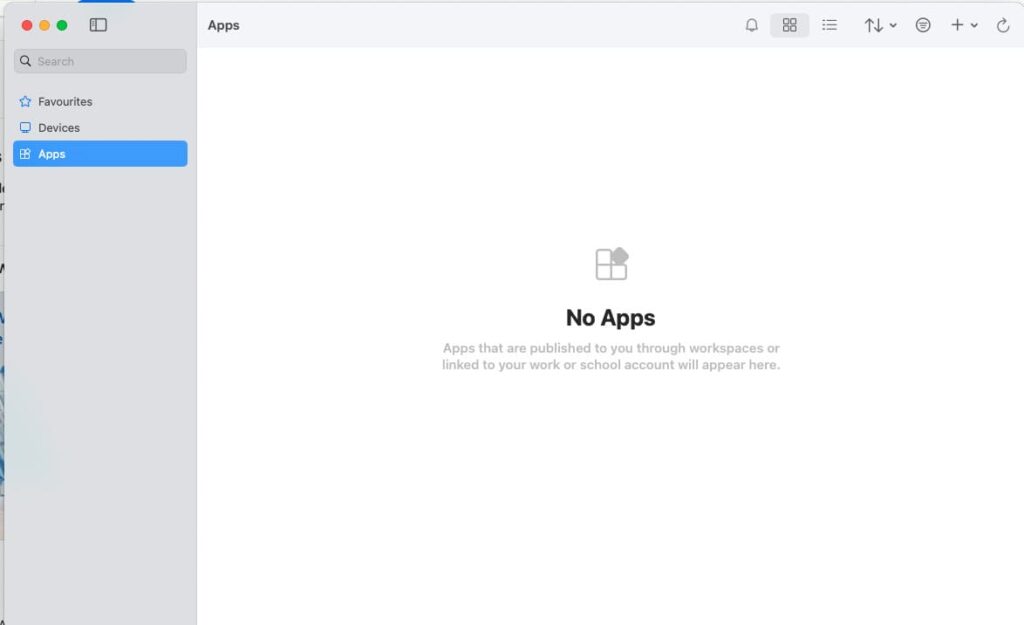
1) Нажмите на + в правом углу — Далее Добавить компьютер (Add PC) в главном окне приложения.
2) В поле PC Name введите IP-адрес удалённого компьютера с Windows.
3) Нажмите Добавить (Add).
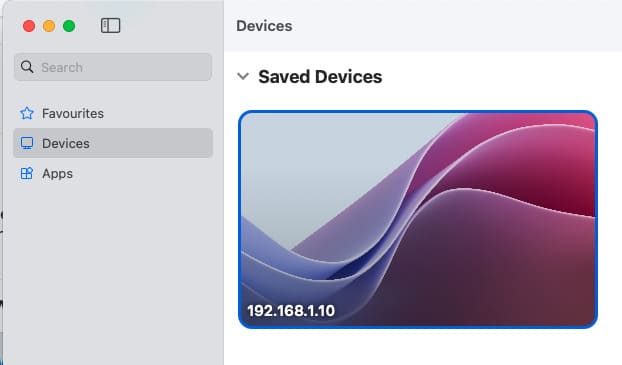
4) Дважды щёлкните на добавленный компьютер, чтобы подключиться.
При подключении введите логин и пароль пользователя Windows. Если появится предупреждение о сертификате, просто подтвердите подключение.

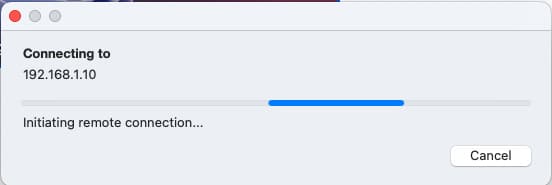
5) После этого, вы подключитесь к рабочему столу вашего ПК с rdp.

Шаг 3: Настройка общего доступа к папкам
Для обмена файлами между MacBook и удалённым компьютером выполните следующие действия:
1) Закройте текущую сессию подключения.
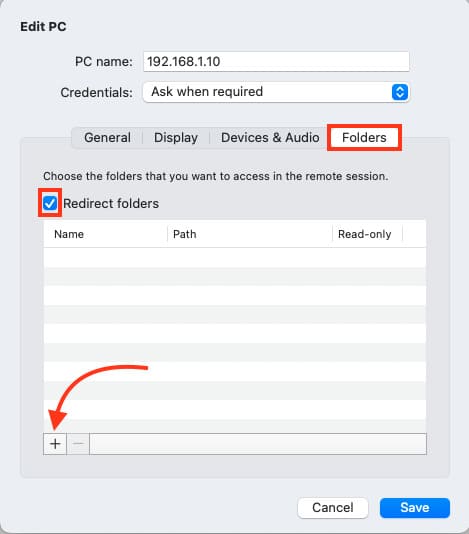
2) В приложении Windows App выберите ранее добавленный компьютер и нажмите Изменить (Edit).
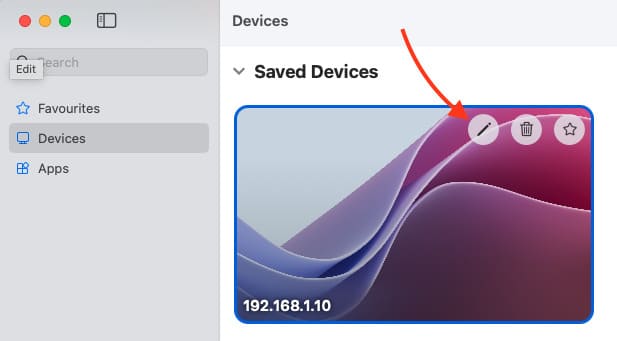
3) Перейдите в раздел Папки (Folders).
4) Нажмите +, чтобы добавить папку для общего доступа. Например, создайте на рабочем столе папку с именем Shared.
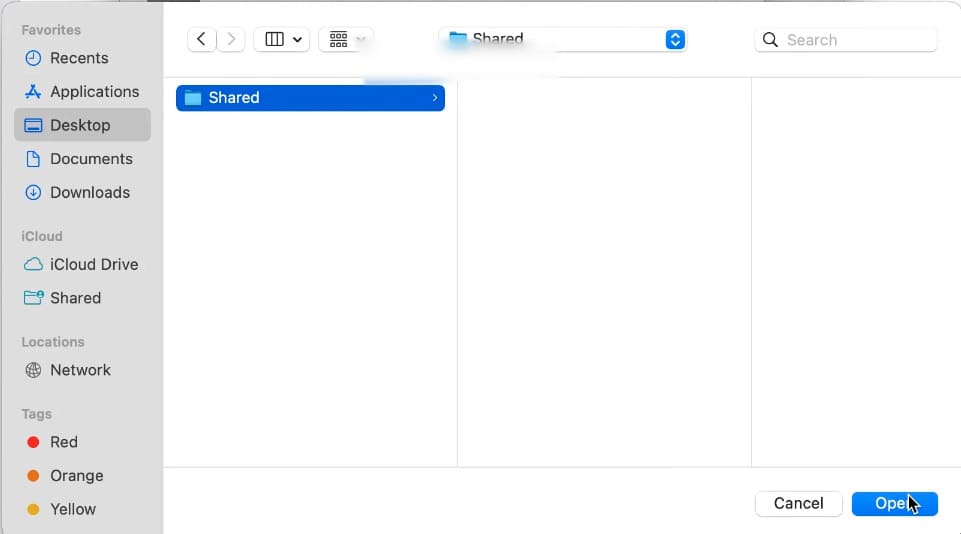
5) Выберите созданную папку и нажмите Open.
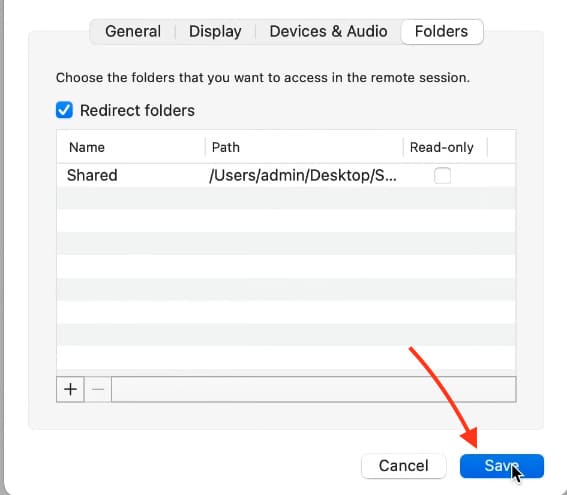
6) Сохраните изменения, нажав Save.
Шаг 4: Обмен файлами
1) Подключитесь заново к удалённому компьютеру.
2) Откройте проводник Windows и перейдите в раздел Этот компьютер.
3) Вы увидите папку Shared, связанную с вашим MacBook.
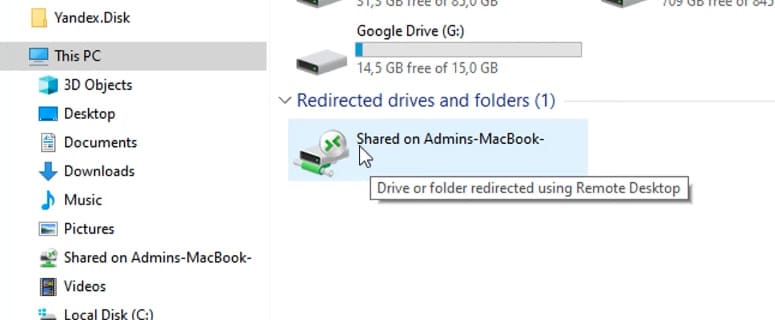
4) Перетащите нужный файл в эту папку для передачи на MacBook или наоборот.
Файлы будут копироваться быстро, если устройства находятся в одной сети.
С помощью Windows App вы можете легко управлять удалённым компьютером с Windows и настроить обмен файлами между устройствами. Этот метод прост в настройке и экономит время при работе с разными операционными системами.
Лицензионный ключ активации Microsoft Office для Mac от
Microsoft Remote Desktop (также известный как Remote Desktop Services или RDS) – технология, разработанная компанией Microsoft, которая позволяет пользователям подключаться к удаленному компьютеру или серверу с помощью удаленного рабочего стола.
С использованием Microsoft Remote Desktop можно удаленно управлять компьютером или сервером, работать в приложениях и доступ к файлам на удаленном устройстве. Технология Microsoft Remote Desktop может быть полезна во множестве случаев, включая удаленную поддержку, удаленный доступ к рабочему месту, удаленное обучение.
В macOS функция удаленного рабочего стола для Windows может быть полезной в нескольких сценариях. Например, если у вас есть компьютер или сервер на базе Windows, к которому вы хотите получить доступ из своего устройства Mac, то удаленный рабочий стол позволит вам делать это. Вы сможете управлять удаленным компьютером, как будто находитесь прямо перед ним, выполнять задачи, запускать программы.
Это может быть удобно для поддержки других пользователей, если вы администратор или технический специалист. Для этого в macOS можно использовать встроенное приложение «Подключение к удаленному рабочему столу», которое позволяет устанавливать соединение с удаленными компьютерами Windows.
Microsoft Remote Desktop для macOS можно скачать бесплатно из Mac App Store. Вот шаги для загрузки и установки приложения:
- Откройте Mac App Store на вашем устройстве. Вы можете найти этот магазин в папке «Программы» или воспользоваться функцией поиска Spotlight, чтобы найти его.
- Введите «Microsoft Remote Desktop» в поле поиска, расположенное в верхней части окна Mac App Store.
- Найдите приложение с логотипом «Microsoft Remote Desktop» и нажмите на кнопку «Get» (Получить), а затем «Install» (Установить). Вам может потребоваться ввести пароль вашей учетной записи Apple ID для подтверждения установки.
- Ожидайте, пока загрузится и установится Microsoft Remote Desktop на ваш Mac. После завершения установки приложение будет доступно в папке «Программы» и в Launchpad вашего Mac.
Теперь вы можете использовать Microsoft Remote Desktop для подключения к удаленным компьютерам или серверам с помощью macOS.
В macOS (Mac OS X) удаленный рабочий стол не включен по умолчанию, но если вы хотите убедиться, что он отключен, выполните следующие шаги:
Откройте «Настройки системы»: нажмите на значок «Яблока» в верхнем левом углу экрана и выберите «Настройки системы».
Выберите «Общий доступ»: в окне «Настройки системы» найдите и выберите «Общий доступ».
Проверьте настройки удаленного управления: в разделе «Общий доступ» убедитесь, что все опции для удаленного управления (Remote
Management, Remote Login, Remote Apple Events и т.д.) отключены.
Отключите необходимые опции: если какие-то из опций удаленного управления включены, снимите флажки напротив них.
Закройте «Настройки системы»: после того как вы проверили и отключили необходимые опции, закройте «Настройки системы».
Теперь удаленный рабочий стол должен быть успешно отключен на вашем устройстве Mac с операционной системой macOS.
Параметры RDP (Remote Desktop Protocol) подключения определяют настройки и конфигурацию для подключения к удаленному компьютеру или серверу.
Ниже приведены основные параметры RDP, которые могут быть настроены при установке соединения:
- Имя удаленного компьютера или IP-адрес: адрес удаленного компьютера или сервера, к которому происходит подключение.
- Имя пользователя: учетная запись пользователя, которую вы будете использовать для входа на удаленный компьютер или сервер.
- Пароль: пароль, связанный с указанной учетной записью пользователя. Необходим для аутентификации и проверки подлинности.
- Домен: если удаленный компьютер или сервер находятся в домене, вы можете указать имя домена для аутентификации пользователя вместо локальной учетной записи.
- Разрешение экрана: определяет разрешение и размер экрана удаленного компьютера или сервера, которое будет отображаться на локальном компьютере или устройстве.
- Звук: определяет, перенаправляется ли звук с удаленного компьютера или сервера на локальное устройство
- Устройства: позволяет выбрать, перенаправлять ли устройства, такие как принтеры, диски или порты.
В окне с параметрами для подключения вы можете увидеть учётные данные, необходимые для авторизации на удалённом сервере. Имя пользователя доступно для просмотра в строке user, а для того, чтобы увидеть пароль, нажмите кнопку Показать пароль.
Установите Microsoft Remote Desktop из Mac App Store. После установки откройте Microsoft Remote Desktop. Нажмите на «+» в левом нижнем углу окна, чтобы добавить новое подключение. Введите имя удаленного компьютера или IP-адрес, к которому вы хотите подключиться.
В разделе «General» укажите имя пользователя, пароль и, при необходимости, домен для аутентификации. Опционально, в разделе «Display» вы можете настроить разрешение экрана и другие параметры отображения.
Щелкните на «Add», чтобы сохранить настройки подключения. Тем самым, вы сохраните новое подключение. Чтобы начать сессию этого подключения, просто щёлкните на нём двойным щелчком мыши.
Выберите подключение из списка и нажмите на кнопку «Start» (Запуск), чтобы установить соединение. Введите пароль вашей учетной записи Mac, если вам будет предложено это сделать. После успешного подключения вы сможете видеть и управлять удаленным рабочим столом.
Remote Desktop is an essential tool for accessing a Windows PC from a Mac, providing flexibility for work and personal use. This guide will walk you through the step-by-step process of setting up and using How to Remote Desktop from Mac to Windows. Whether you need to access files, run applications, or provide remote support, this tutorial will help you achieve a seamless connection.
Why Use Remote Desktop?
Remote Desktop enables you to:
- Access a Windows PC from anywhere.
- Work on projects from different devices.
- Provide technical support to Windows users.
- Run Windows-only applications from a Mac.
Prerequisites
Before starting, ensure you have the following:
- A Windows PC with Remote Desktop enabled.
- A Mac with Microsoft Remote Desktop installed.
- The IP address or hostname of the Windows Personal Computer.
- Login credentials for the Windows PC.
Step-1: Enable Remote Desktop on Windows
Windows 10 and 11
- Open Settings: Press on the Start menu & select Settings.
- Go to System: Navigate to System > Remote Desktop.
- Enable Remote Desktop: Toggle the switch to enable Remote Desktop.
- Confirm Network Level Authentication: Ensure that “Require computers to use Network Level Authentication” is checked for added security.
Windows 7 and 8
- Open Control Panel: Click on the Start menu & select Control Panel.
- System & Security: Navigate to System & Security > System.
- Remote Settings: Press on Remote Settings in the left-hand menu.
- Allow Remote Connections: Select “Allow remote connections to this computer” and check the box for Network Level Authentication.
Step-2: Find Your Windows PC’s IP Address
- Open Command Prompt: Press Win + R, type cmd, and press Enter.
- Type ipconfig: In the Command Prompt, type ipconfig and press Enter.
- Note the IPv4 Address: Locate the IPv4 address under your active network connection.
Step-3: Download and Install Microsoft Remote Desktop on Mac
- Open the App Store: Launch the App Store on your Mac.
- Search for Microsoft Remote Desktop: Use the search bar to find Microsoft Remote Desktop.
- Download and Install: Click on the Get button to download and install the application.
Step-4: Set Up Microsoft Remote Desktop on Mac
- Launch Microsoft Remote Desktop: Open the Microsoft Remote Desktop application from your Applications folder.
- Add a PC: Click on the Add PC button or the + icon.
- Enter PC Name: In the PC name field, enter the IP address or hostname of your Windows PC.
- Add User Account: Press on Add User Account to save your login credentials for easier access in the future.
- Configure Settings: You can adjust additional settings such as display resolution and device redirection if needed.
Step-5: Connect to Your Windows PC
- Select the PC: In the Microsoft Remote Desktop app, click on the PC you just added.
- Initiate Connection: Click on Start to initiate the connection.
- Authenticate: Enter your Windows login credentials if prompted.
- Access Your Windows PC: Once authenticated, you will have full access to your Windows desktop from your Mac.
Troubleshooting Tips
- Ensure Both Devices Are Online: Both your Mac and Windows PC must be connected to the internet.
- Verify IP Address: Double-check the IP address of your Windows PC.
- Firewall Settings: Ensure that the Windows firewall is not blocking Remote Desktop connections.
- Network Configuration: Both devices should be on the same network for easier connectivity, especially in a home network setup.
- Update Software: Ensure that both the macOS and Microsoft Remote Desktop applications are up to date.
Security Considerations
- Use Strong Passwords: Ensure your Windows account has a strong, unique password.
- Enable Two-Factor Authentication: If possible, enable two-factor authentication on your Windows PC.
- Keep Software Updated: Regularly update both your Mac and Windows PC to protect against security vulnerabilities.
Conclusion
Using Remote Desktop from a Mac to Windows is a powerful way to enhance productivity and flexibility. By following this comprehensive guide, you can easily set up and connect to a Windows PC from your Mac, ensuring smooth and efficient remote access. Remember to keep your devices secure and updated to enjoy a hassle-free remote desktop experience.
By optimizing your workflow with Remote Desktop, you can seamlessly bridge the gap between macOS and Windows, making it easier to manage tasks, support others, and access critical resources from anywhere.
If you run a business with multiple employees, some of your workers will inevitably use Apple computers at home and Windows computers at work, necessitating a remote desktop connection. Remote desktop technology enables you to control one computer from another remotely, and is becoming increasingly commonplace.
It’s possible to remote desktop from Mac to Windows simply, and via some of the best remote desktop software available. We compiled this guide on how to remote desktop from Mac to Windows below, as well as other guides outlining how to use remote desktop on Mac, and how to use remote desktop on Windows 10.
To prepare your Windows PC for a remote desktop connection, log in and navigate to the Start menu. In the Start menu, search for Control Panel. Navigate to the System and Security tab, and click «Allow Remote Access» under the System heading.

Use this menu to configure your Windows PC’s remote desktop settings
(Image credit: Microsoft)
In the resultant pop-up window, click the Remote tab. Near the bottom, under the Remote Desktop heading, you will see a radio button labelled «Allow remote connections to this computer». Click it to enable a second radio button, which will ask if you want to allow remote connections only from computers running remote desktop with Network Level Authentication (NLA).
We recommend that you activate this button. NLA provides a second layer of security when you connect to your Windows PC from your Mac. This security layer makes it harder for hackers to take control of your computer through a malicious remote desktop connection. Learn more about how strong authentication protects against ransomware to see why such security is so important.
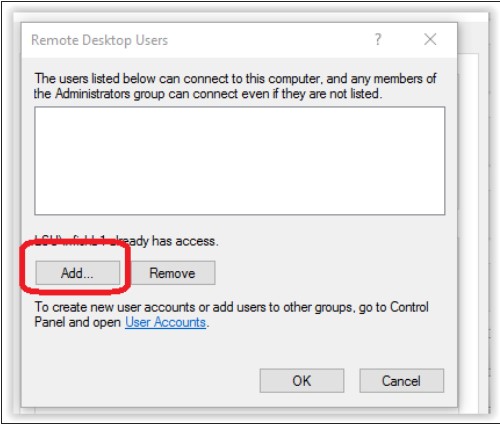
You can also set your remote access to be available only to specific users if you want to. By default, anyone with an administrator-level account can access your PC remotely. If you’re going to change this, click the «Select Users» button in the bottom right corner of the Remote tab.
Give remote desktop access to specific users here
(Image credit: Microsoft)
You should now see a pop-up window and an «Add» button. Click it to open a list of all the user accounts on this PC and add whomever you wish. Hit «OK» to exit when you are satisfied with the user permissions.
Sign up today and you will receive a free copy of our Future Focus 2025 report — the leading guidance on AI, cybersecurity and other IT challenges as per 700+ senior executives
Once you are happy with your remote desktop configuration, head over to your Mac to begin your remote desktop connection setup.
Initial setup
Step 1: Pick a remote desktop program that works on Mac and Windows
You will need a program that is compatible with both Mac and Windows, as you will need to run it on both computers to establish a connection.
We recommend Zoho Assist, since it’s compatible with both Windows and Mac. It has a free version for individuals and small businesses, and a paid version for companies that want to scale up, making it suitable for everyone. It also offers both attended and unattended access.
Alternatively, if you are on a budget, have a look at our list of the best free remote desktop software.
Step 2: Sign up to and download Zoho Assist
On your Mac, navigate to Zoho’s home page—just Zoho, not Zoho Assist—then click «Free Sign Up» in the top right corner.
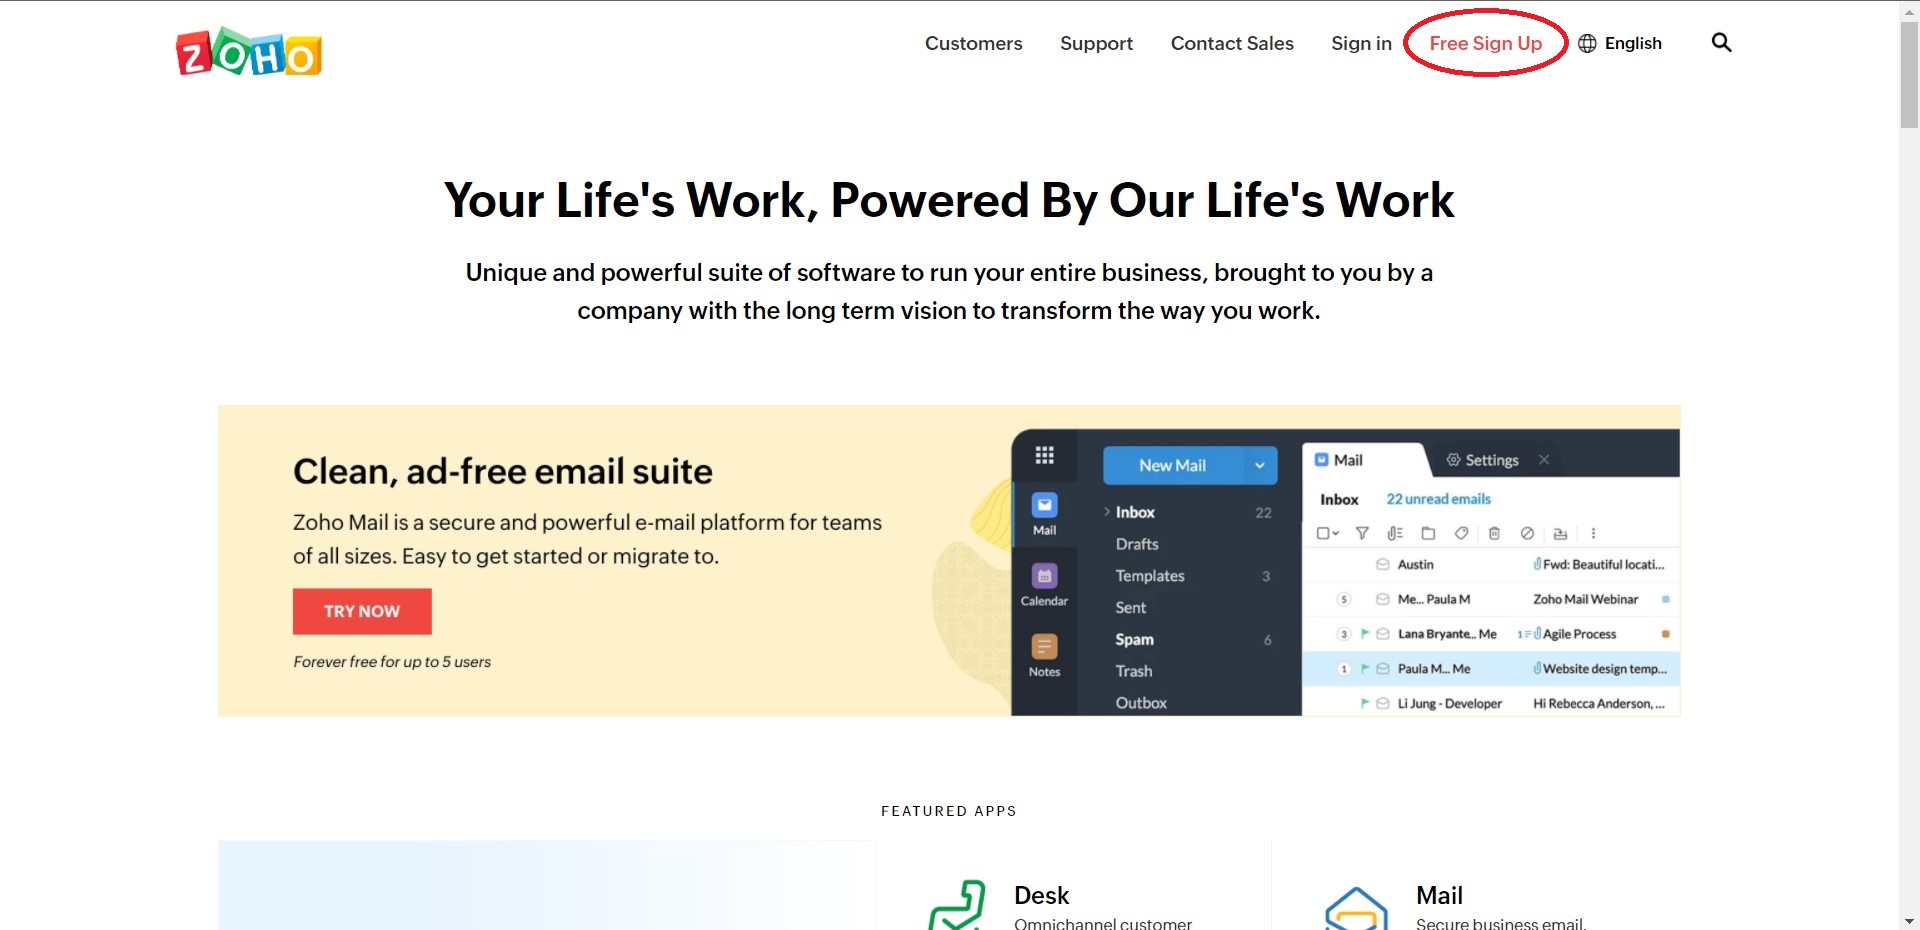
Navigate to Zoho.com and create an account
(Image credit: Zoho)
In the next window, you can either create an account from scratch with an email and password, or use your existing login credentials from Google, LinkedIn, or Microsoft Office 365. On the next screen, select your country/region.
Once you’ve created your account, Zoho will automatically take you to a page of its most popular applications, with Zoho Assist featured prominently on the list. Click on it to proceed.
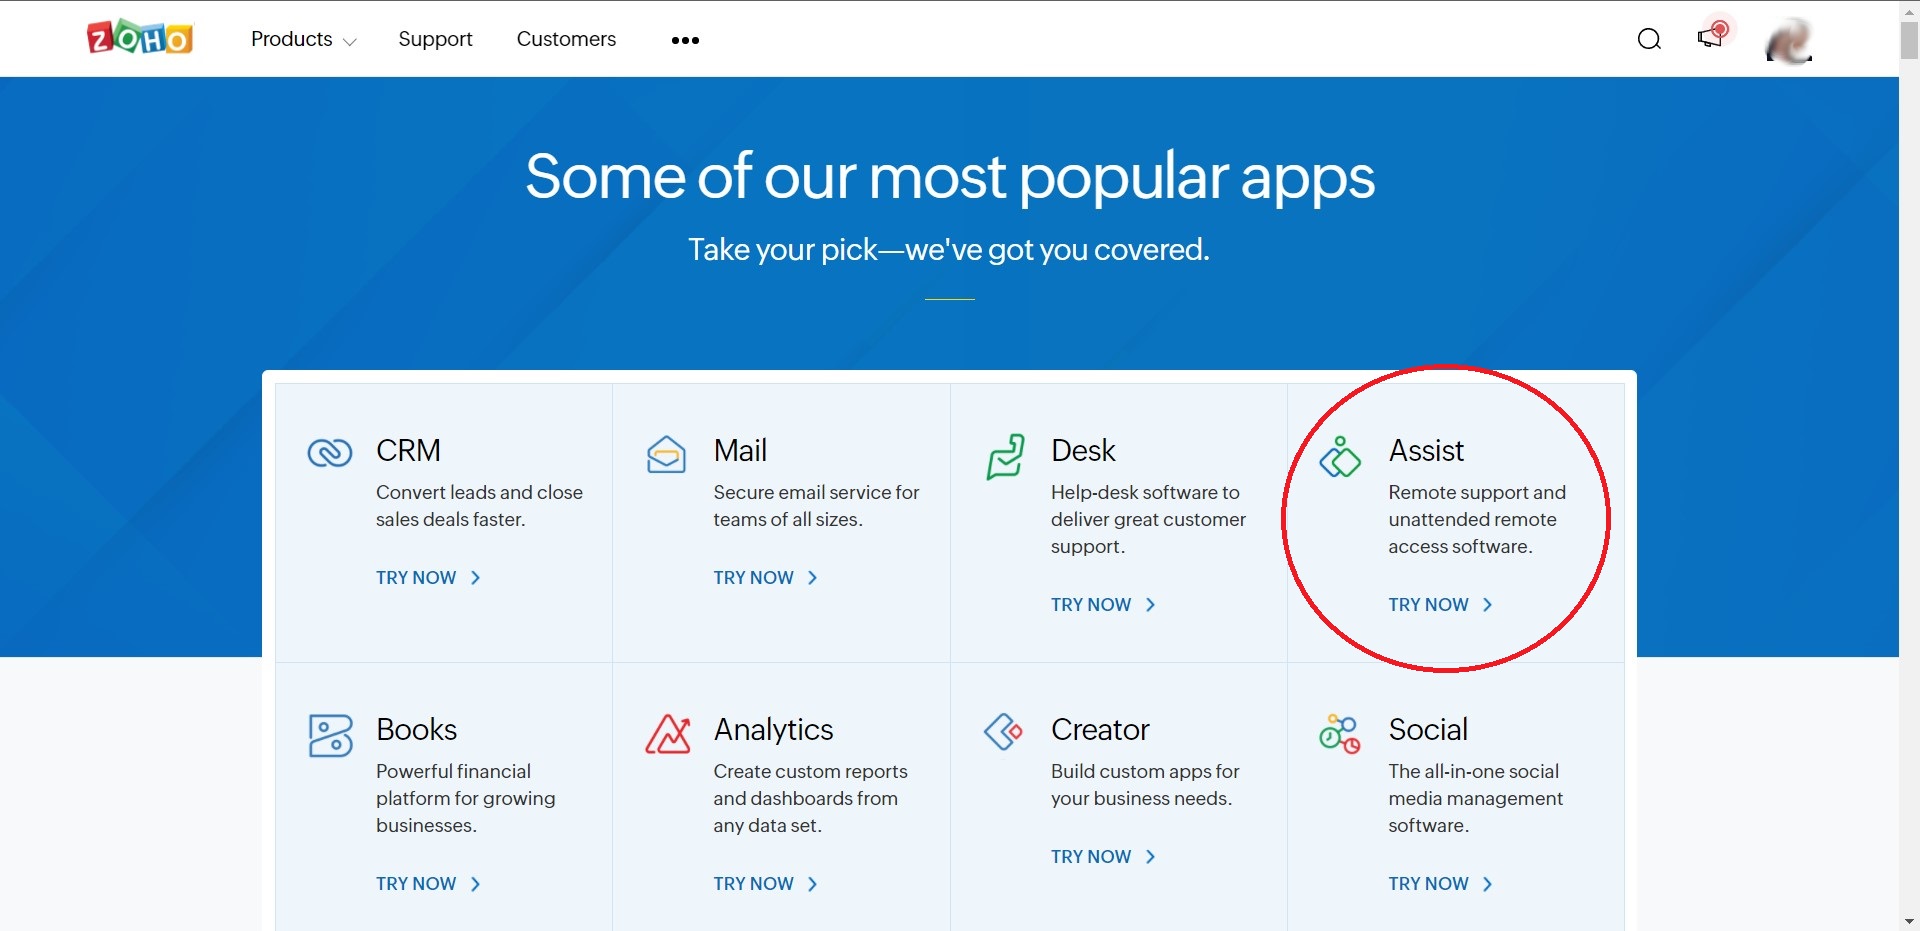
Choose Zoho Assist from the product selection screen
(Image credit: Zoho)
Step 3: Set up Zoho Assist on your Mac
On the next screen, hit the red button in the middle that says «Access Zoho Assist». Next, click «Start 15-day trial to begin». Do not worry about losing your Zoho account after 15 days. It will automatically revert to the free version at the end of the trial period, unless you purchase a paid plan before that happens.
You have now linked Zoho Assist to your Zoho account. You should see a screen that looks something like this:
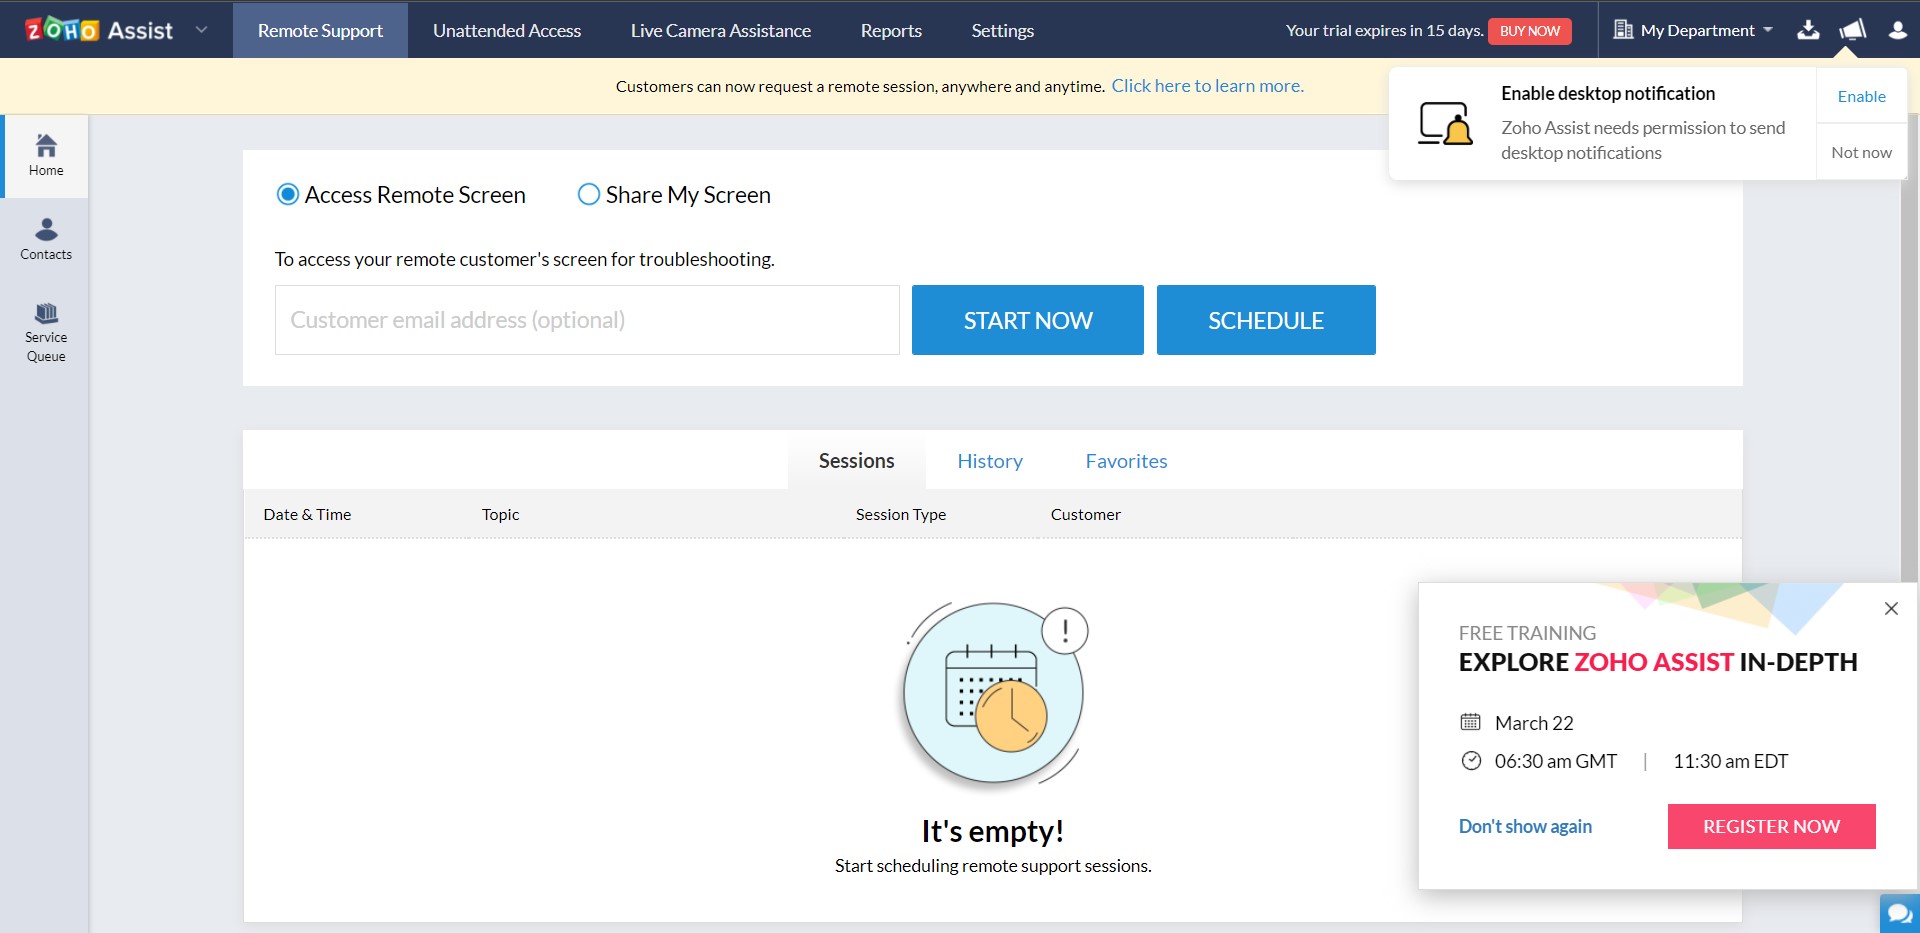
Check out the free training session, and don’t forget to enable notifications
(Image credit: Zoho)
Feel free to book a free training session if you or your team want to learn more about the program. In the meantime, the next step is to set up either attended or unattended access.
There are two kinds of remote desktop access: attended and unattended. Both can be used to set up a remote desktop connection in a pinch, but attended access is specifically designed for tech support, screen sharing during presentations, and other tasks where another person actively uses the computer while you are connected.
Unattended access is the opposite. It enables you to access your Windows PC from your Mac at any time—even when the PC is off, in some cases. Before setting up your Zoho account, consider what kind of access makes the most sense for you.
To proceed with setting up unattended access, keep reading. Otherwise, skip ahead to the instructions for attended access.
Unattended access
Step 1: Choose your preferred setup method
With unattended access, you will be able to connect to your PC at any time by logging into your Mac and enabling a remote connection. Your PC needs to be on and connected to the internet for this to work. However, you can get around this using the Wake-on-LAN feature—more on that later.
There are three ways to set up unattended access: sharing a deployment link, downloading the installer, or bulk deployment. Skip to the appropriate sub-step for instructions on each type of setup.
Step 2 (optional): Use deployment link or download the installer
To use the deployment link, either copy the link to your clipboard and manually send it to a user on your PC, or hit «Share» to email it to a user on your PC. You can also email it to yourself and walk over to your PC to set it up. In any case, you or whoever is using your PC should click the link. You will see a screen that looks like this:
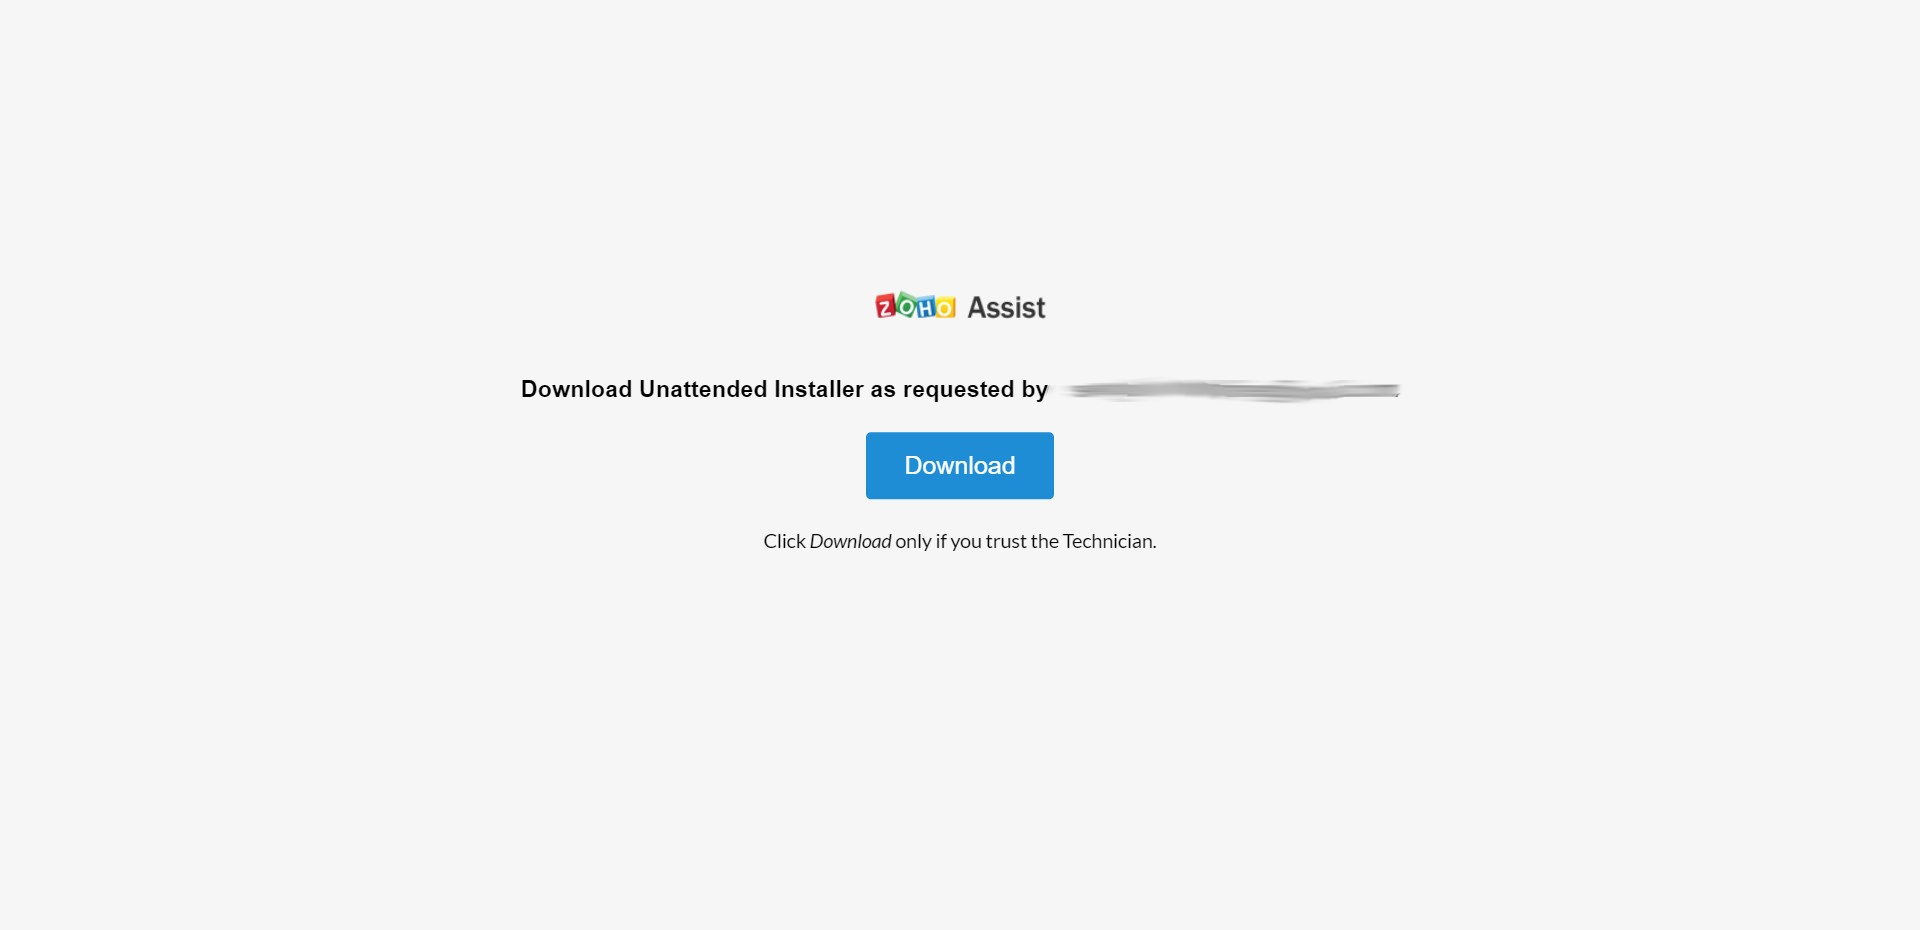
Use this link to connect your PC for future unattended access
(Image credit: Zoho)
Click «Download», then tick the box indicating that you are aware you are setting up the PC for unattended access. Accept the license agreement and hit «Install». Once the installation process is complete, you will see a pop-up message indicating that your computer has been configured successfully for unattended access.
Open your PC and navigate to Zoho’s website, then log in as you did on the Mac. Navigate to the «Unattended Access» tab and download the installer. Run the installer and tick the box indicating you are aware that you are setting up your PC for unattended access. Accept the license agreement, and click the «Install» button. You will receive a pop-up message saying that your PC is configured for unattended access once the installation process is complete.
Installation via link is fine if you have one or just a handful of PCs. If your organisation has tens or hundreds of PCs, you will need a more efficient way to install unattended access via Zoho Assist to all of them at once. Contact an IT professional if you would like to go with this option, as it requires a certain amount of technical know-how.
Step 3 (optional): Set up bulk deployment
If you know what you are doing, there are three ways to set up bulk deployment: using a distributor, Group Policy Object (GPO) deployment, or Zoho’s native tool. Click on the appropriate option in the «Unattended Access» tab under «Bulk Deployment» to begin, and read Zoho’s instructions if you or your team get stuck.
Once you have set up unattended access to your PC using a method of your choice, go back to your Mac. Log back into Zoho and click the «Unattended Access» tab. Close the deployment window, and you should see your PC on the list of devices.
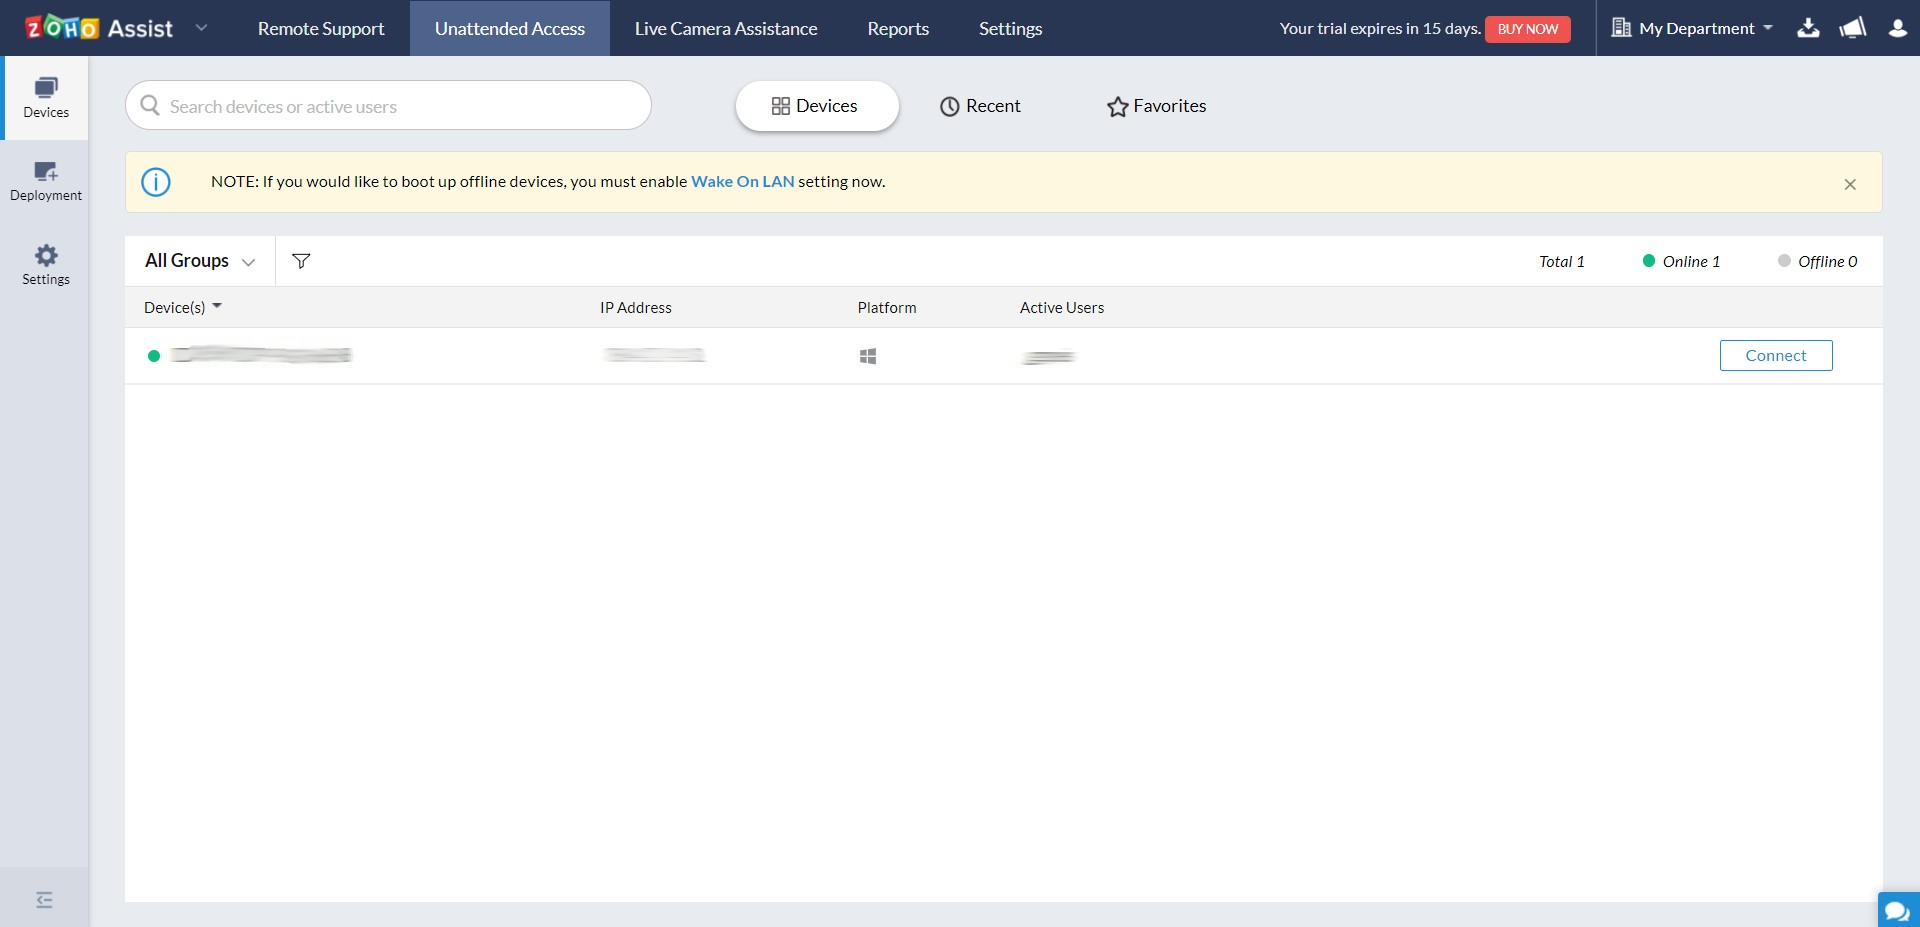
Once you see your PC on this list, you are pretty much good to go. Just hit «Connect»
(Image credit: Zoho)
If it is powered on and connected to the internet, you will see your PC on the list of online devices, with a green dot indicating that it is available for a remote desktop connection. Click «Connect» to begin your remote session. You will now have complete remote control of your Windows PC from your Mac.
Step 4 (optional): Enable Wake-on-LAN in BIOS
With Wake-on-LAN, you can remotely power on your PC from your Mac, enabling you to start a remote desktop session even if your PC is off. To begin, make sure that your PC is powered on, connected to the internet, and has a green online status next to it on the «Devices» tab.
Navigate to the Settings tab on the left and click «Wake-on-LAN». Tick the «Enable Wake-on-LAN» checkbox to enable this feature.
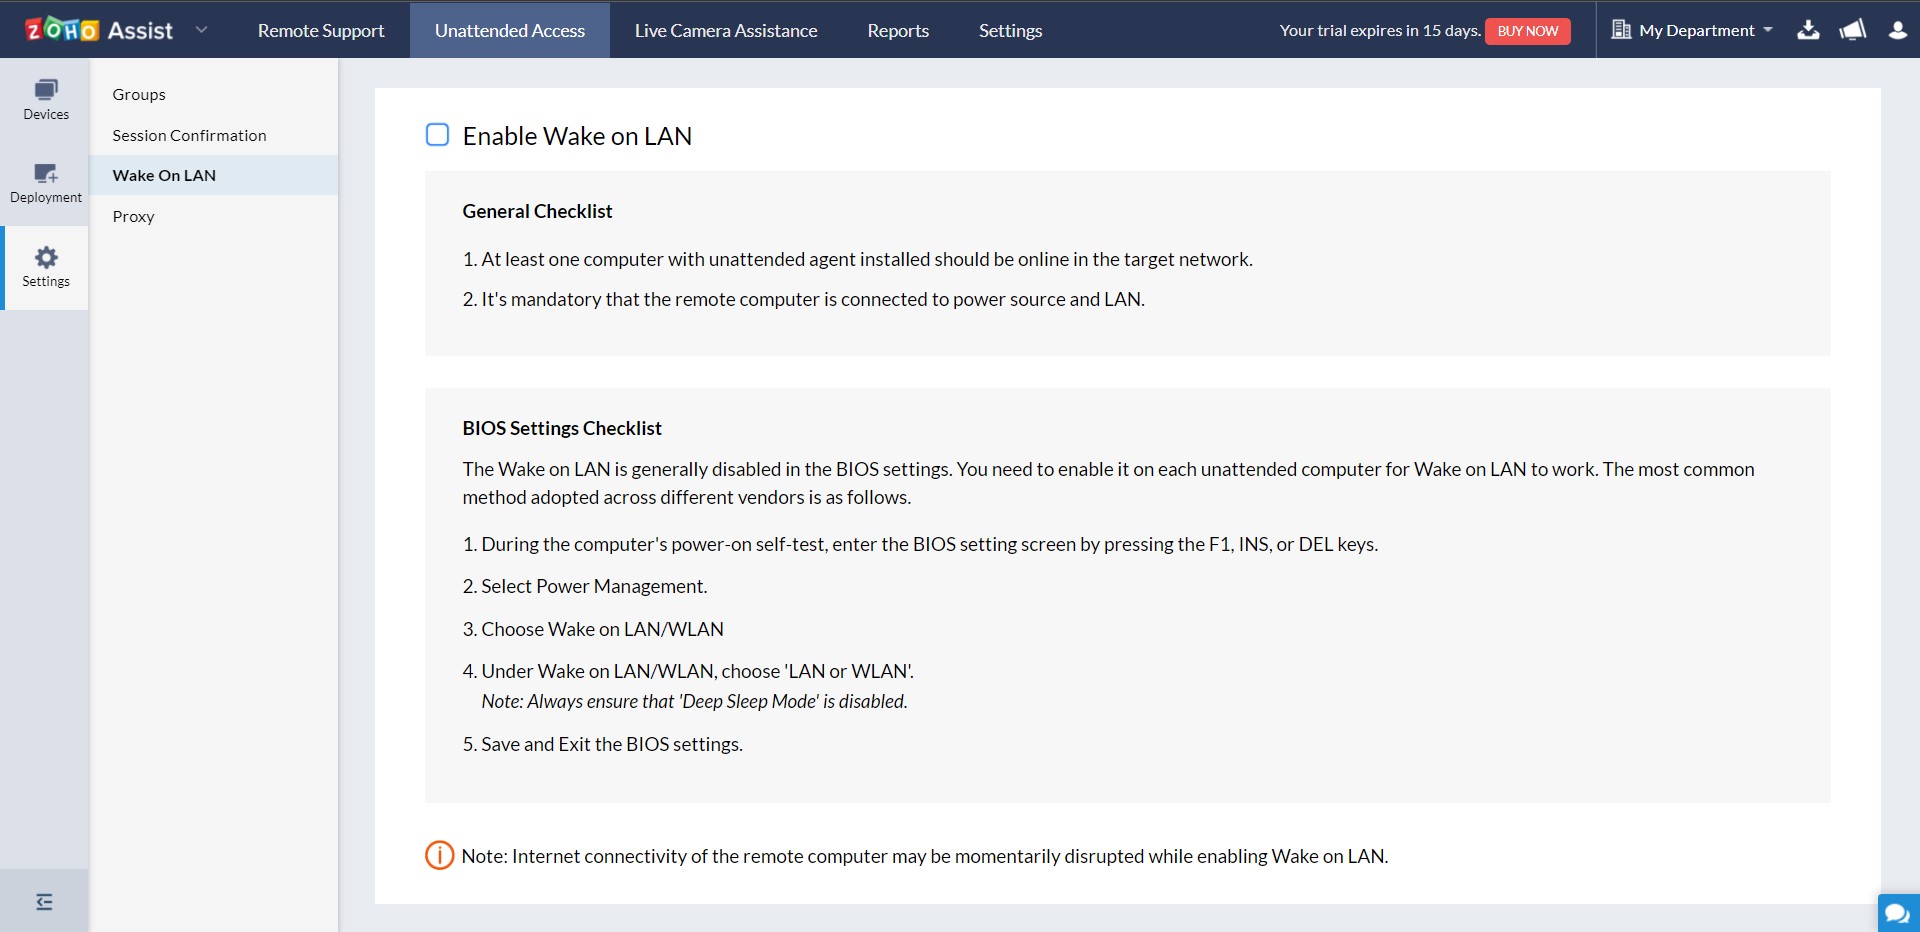
Enable Wake-on-LAN to power on your PC remotely
(Image credit: Zoho)
Some PCs have Wake-on-LAN disabled in the BIOS by default, in which case they will not work with Wake-on-LAN even after you enable it in Zoho. To fix this, navigate to Settings on your PC and click «Update & Security». Click «Recovery», then click the «Restart Now» button under «Advanced Startup». Your PC will restart and open a menu of special options.
Navigate to Troubleshoot > Advanced options > UEFI Firmware Settings. Your PC will restart again and open the BIOS settings screen. Navigate to Power Management > Wake on LAN/WLAN in the BIOS settings. Choose LAN or WLAN, then click «Save and Exit».
Your PC will restart again, and Wake-on-LAN should now be enabled.
Attended access
Step 1: Setup and connect
Attended access is much quicker to set up than unattended access, but only works while there is someone actively using your PC. To enable it, log in to Zoho Assist on your Mac, and click the «Remote Support» tab.
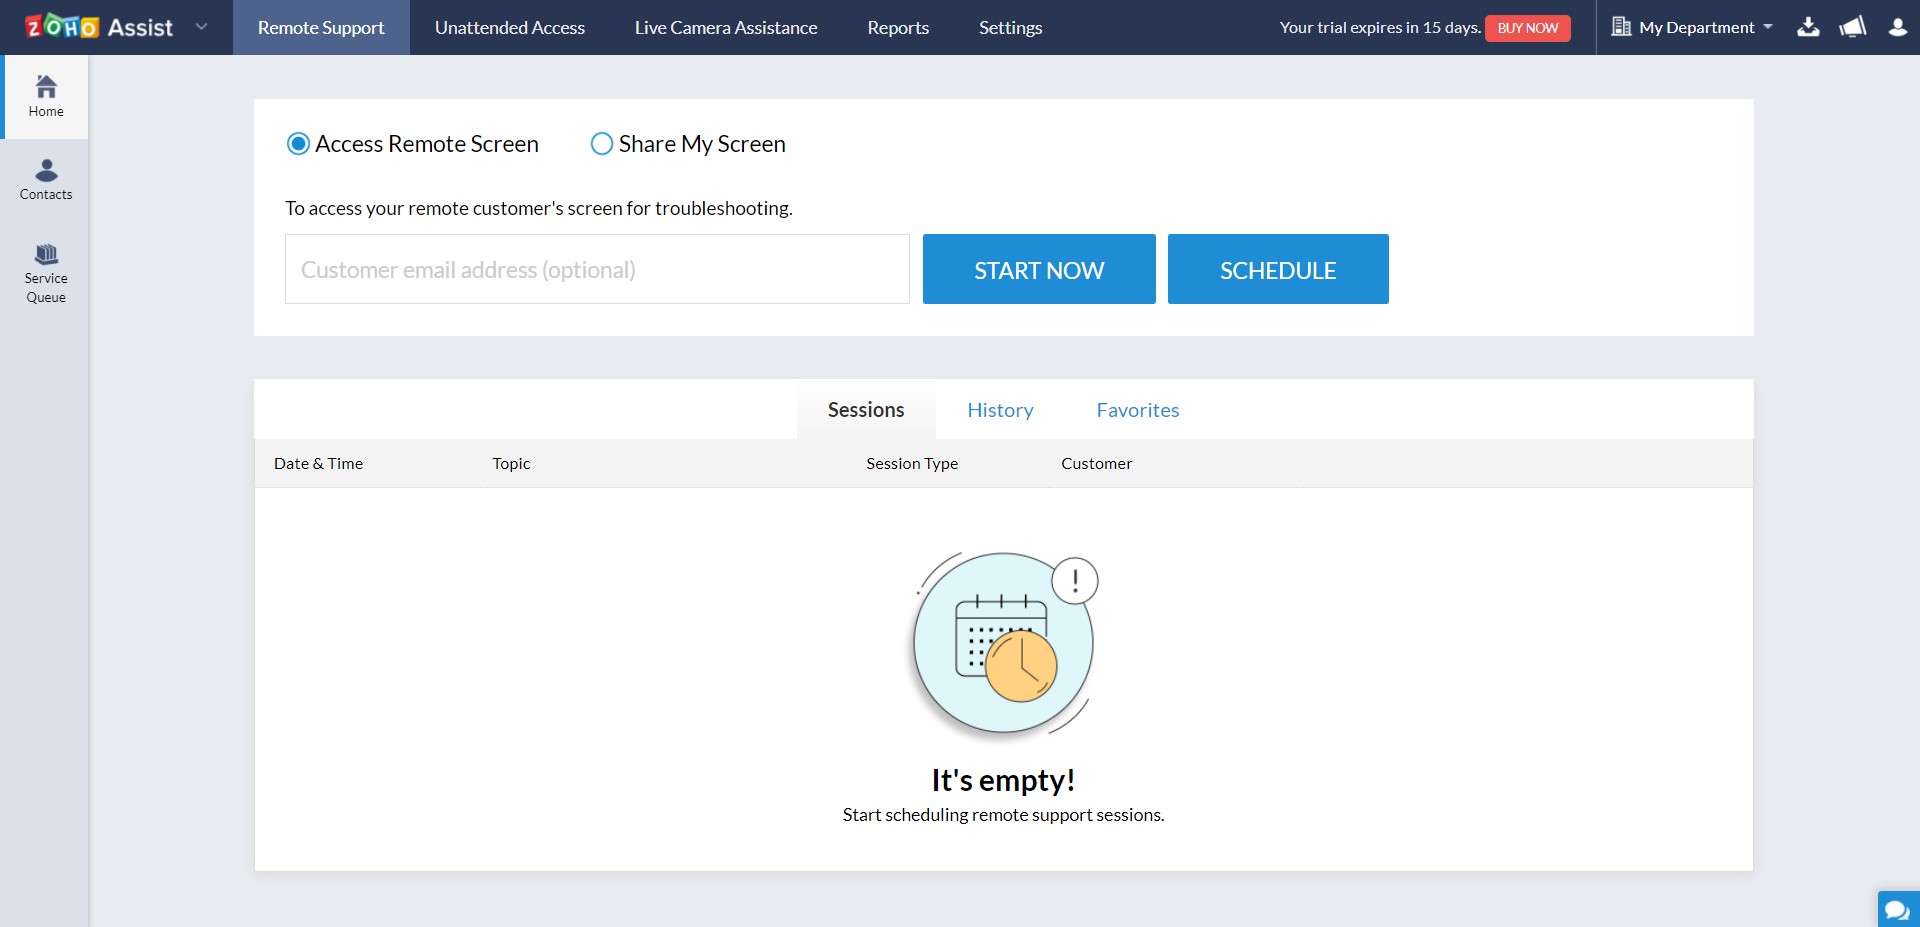
Use attended access for tech support, coaching sessions, screen sharing for presentations, and other collaborative activities
(Image credit: Zoho)
Make sure that the «Access Remote Screen» radio button is selected before proceeding. Type the email of the PC user into the customer email address field and click «Start Now». The PC user should receive an email inviting them to join a remote desktop session.
Once they click «Join Session», they will see another screen prompting them to download a .exe file. After downloading the file and hitting «Join» yet again, you will be able to access their PC remotely from your Mac.
Remote desktop from Mac to Windows: Summary
You now know two methods to connect a Mac to a Windows PC using a remote desktop. While we used Zoho Assist, many other remote desktop programs are also compatible across multiple platforms, including TeamViewer, RemotePC, and Splashtop Business.
Further reading on remote desktops
If you’re interested in finding out more about remote desktop technology and platforms, we’ve got a wide range of content available for your reference. Learn more about protocols such as RDP, XRDP or VNC and what TeamViewer offers; find out how to use Microsoft Remote Desktop and how to use remote desktop on Windows 10.
If you need walkthroughs for setting up remote access via Microsoft or Apple OSs, see how to use remote desktop on Mac, how to set up Chrome Remote Desktop; and how to remote desktop from Mac to Windows.
Finally, if you’re a Linux user, find out how to remote desktop into Ubuntu via the best remote desktop for Linux.