
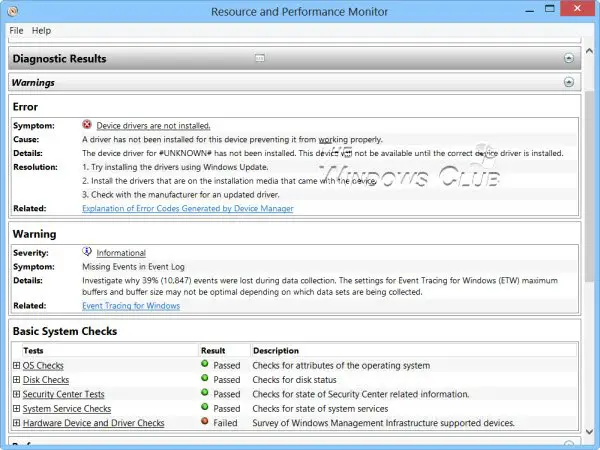
Download Windows Speedup Tool to fix errors and make PC run faster
Rather than downloading third-party tools for diagnosing and fixing your Windows 10 PC problems, it’s best to use built-in programs when available. Windows Reliability Monitor in Windows 11/10 is one such built-in tool that can be used for checking system errors, warnings, informational events, and other critical events that can help you fix problems in Windows.

The tool is special in the way that the events which are normally noticeable by users can be picked up by the program and provided in the form of a graphical layout, pinpointing when an issue occurred and for how long it has been occurring. The graph goes down whenever the computer experiences a problem, like software not working or a driver crashing, unexpectedly.
Reliability Monitor presents the data in the form of a line chart that provides a system stability overview with detailed information about individual events that may affect the system’s overall stability. By combining what Reliability Monitor logs, and the Events Logs and is detailed in problem reports you are further along in finding out what is causing Windows problems.
Reliability Monitor provides a system stability overview and trend analysis with detailed information about individual events that may affect the system’s overall stability, such as software installations, operating system updates, and hardware failures. It begins collecting data at the time of system installation.
Under ‘Settings’ search option type reliability to open the Reliability Monitor. Alternatively, you may open the Run box, type the following and hit Enter:
perfmon /rel
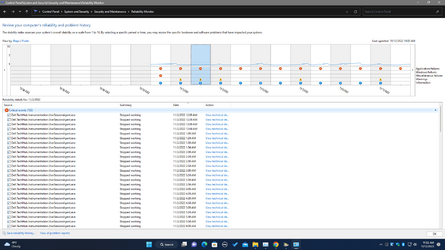
Click any event on the graph to view its details. The stability index assesses a system’s stability on a scale from 1 to 10. By selecting a specific period in time, you may review the specific hardware and software problems affecting your system.
Via the Control Panel, you can also click Performance Information and Tools and click Advanced Tools in the left-hand green pane; you can open the Reliability Monitor. This new feature gives your computer a reliability score out of 10. This figure goes down whenever your computer experiences a problem, such as a piece of software not working or a driver crash. This helps you identify what causes your computer problems for any particular event. Do also note the System Stability Index that it computes for your machine, in the top RHS corner. It takes into account Software UnInstall Issues, Application Failures, Hardware Failures, Windows Failures & Miscellaneous Failures.
By default, the program displays the days of the current month and issues show up each day. Issues displayed by Reliability Monitor are classified or categorized into the following categories:
- Application failures
- Windows failures
- Miscellaneous failures
- Warnings
- Information
If you want, you can easily switch views from ‘Days’ to ‘Weeks’ by clicking on the link highlighted in Blue. If not, choose the desired day on your Reliability Monitor. This action will provide details pertaining to that issue of the day. You can easily find the underlying cause and correct the problem then. To check the technical details of the problem, click ‘View technical details’ link under the ‘Actions’ column of the corresponding problem.
On clicking the link, a ‘Problem Details’ window pops up on your computer screen, displaying the date and time of the related problem along with a technical description of it. This information may reveal the error code that might come in handy while looking for a software or app in question. You can then search this site or the Internet for a potential solution.
Generate Reliability Monitor System Health Reports
To generate Reliability Monitor System Health Reports, open Run, type perfmon /report and hit Enter. In a minute or so, a PC health report will be generated which will give you a lot of information. You can read more details here. In case you do not see any reports, make sure that you have enabled Data Collection for Reliability Monitor
Here are shortcuts you can use via Run:
- perfmon /rel : Runs Reliability Monitor
- perfmon /report : Generates System Health Report
- permon /sys : Runs a Standalone Performance Monitor
Read: Enable, Disable Data Collection for Reliability Monitor.
If for some reason you find that your Windows Reliability Monitor is not working, you may try to reset it and see if it helps.
PS: How to use the Performance Monitor and the Resource Monitor may also interest you.
Anand Khanse is the Admin of TheWindowsClub.com, a 10-year Microsoft MVP (2006-16) & a Windows Insider MVP (2016-2022). Please read the entire post & the comments first, create a System Restore Point before making any changes to your system & be careful about any 3rd-party offers while installing freeware.
Reader Interactions
Когда с вашей Windows 10, 8.1 или Windows 7 начинают происходить необъяснимые вещи, один из самых полезных инструментов, для того чтобы выяснить, в чем же дело — монитор стабильности системы, спрятанный в виде ссылки внутри Центра поддержки Windows (который также почти никто не использует). Об использовании данной утилиты Windows мало где написано и, на мой взгляд, очень зря. Также может быть полезным: Встроенные системные утилиты Windows, о которых мало кто знает.
Монитор стабильности системы ведет учет изменений и сбоев на компьютере и предоставляет этот обзор в удобном графическом виде — дает возможность увидеть, какое приложение и когда вызвало ошибку или зависло, отследить появление синего экрана смерти Windows, а также увидеть, связано ли это с очередным обновлением Windows или установкой очередной программы — учет этих событий также ведется. Иначе говоря, инструмент этот очень полезен и может пригодиться любому — как начинающему, так и опытному пользователю. Найти монитор стабильности можно во всех последних версиях Windows.
Еще инструкции на тему инструментов администрирования Windows для начинающих
- Администрирование Windows для начинающих
- Редактор реестра
- Редактор локальной групповой политики
- Работа со службами Windows
- Управление дисками
- Диспетчер задач
- Просмотр событий
- Планировщик заданий
- Монитор стабильности системы (эта статья)
- Монитор ресурсов
- Брандмауэр Windows в режиме повышенной безопасности
Запуск монитора стабильности системы Windows
Предположим, что ваш компьютер ни с того ни с сего стал зависать, выдавать различного рода ошибки или делать что-то еще, неприятно сказывающееся на работе, а вы при этом не уверены в чем может быть причина. Все что нужно, чтобы ее выяснить — открыть монитор стабильности и проверить, что же такого случилось, какая программа или обновление были установлены, после чего начались сбои. Вы можете отследить сбои в течение каждого дня и часа с тем, чтобы узнать, когда именно они начались и после какого события с тем, чтобы исправить это.

Для того, чтобы запустить монитор стабильности системы, зайдите в панель управления Windows, откройте «Центр поддержки» или «Центр безопасности и обслуживания», раскройте пункт «Обслуживание» и нажмите ссылку «Показать журнал стабильности системы» (или «Показать журнал стабильности работы» в ранних версиях Windows).
Есть и другие способы запуска монитора стабильности системы:
- Использовать поиск на панели задач Windows 10 или в меню Пуск Windows 7 — просто начните набирать слово «стабильность».

- Нажать клавиши Win+R на клавиатуре, ввести perfmon /rel в окно «Выполнить» и нажать Enter.

Есть и другие методы запуска, но думаю представленных 3-х вариантов должно хватить для большинства пользователей.
Использование монитора стабильности
Главное окно монитора стабильности системы представляет собой график, который может отображать информацию по дням или неделям. В нем можно видеть все сбои в течение отдельных дней, при нажатии на них можно узнать, что именно произошло и чем это было вызвано. Таким образом, этот график и всю сопутствующую информацию бывает удобно использовать, для того, чтобы исправить ошибки на своем или чужом компьютере.

Линия графика отражает представление Microsoft о стабильности вашей системы по шкале от 1 до 10. При верхнем значении в 10 баллов система стабильна и к этому стоит стремиться. Вверху — скриншот монитора стабильности с моего ноутбука, который служит для экспериментов и где я не особо забочусь о работоспособности системы. Внизу — с основного рабочего компьютера.

В графике присутствуют следующие пункты:
- Сбои приложений — появляются, например, если какая-то программа самопроизвольно закрылась, зависла или вы сняли задачу с такого ПО в диспетчере задач, будет зарегистрирована ошибка типа «Остановка работы».
- Сбои Windows — сообщения о сбоях операционной системы, синих экранах смерти, ошибках при различных событиях и задачах, установке обновлений.
- Прочие сбои — другие типы ошибок, обычно связанные с неправильно работой оборудования.
- Предупреждения — сообщения, которые не влияют непосредственно на работу системы, например, об ошибке установки какого-то драйвера или программы.
- Сведения (информационные события) — информация о важных системных событиях, например, об установке обновлений. К примеру, если в один из дней внезапно начались сбои Windows, стоит приглядеться, что есть в информационных событиях в этот и предыдущий день.
Для каждого события можно нажать по ссылке «Показать технические подробности» и посмотреть подробную информацию о произошедшем сбое:

Также вы можете посмотреть полный список возникавших проблем в виде таблицы, нажав по пункту «Посмотреть все отчеты о проблемах» внизу окна монитора стабильности системы. Там же вы можете очистить отчеты о проблемах, а в главном окне — экспортировать данные из монитора стабильности в виде XML-файла для того, чтобы передать кому-либо на анализ.

Повторю то, что писал в начале статьи: монитор стабильности может быть полезен для того, чтобы разобраться, а что именно происходит с вашим компьютером или ноутбуком, если вы уже наблюдаете какие-то сбои, но не можете понять их природу. Если же просто заглянуть в эту утилиту, то с большой вероятностью вы увидите баллы ниже 10, некоторое количество сбоев, но это совершенно не обязательно говорит о том, что с Windows есть проблемы, сбои будут возникать всякий раз, когда:
- Вы неправильно выключите компьютер или ноутбук.
- Какая-то программа или игра «вылетит», зависнет, просто не запустится или будет неправильно работать.
- А иногда и вовсе без видимых причин: порой бывает похоже что в рамках штатной работы программ, служб или при установке обновлений могут все равно записываться сбои.
Таким образом, если вы уверены, что с системой всё в порядке, а в мониторе стабильности видны проблемы, на них стоит взглянуть и проанализировать, но они не обязательно говорят о том, что с Windows есть какие-то проблемы.

This tutorial will show you how to view reliability history for your Windows 11 device.
The Reliability Monitor provides a system stability overview and details about events that impact reliability. It calculates the Stability Index shown in the System Stability Chart.
Reliability Monitor maintains up to a year of history for system stability and reliability events. The System Stability Chart displays a rolling graph organized by date.
The top half of the System Stability Chart displays a graph of the Stability Index. In the lower half of the chart, five rows track Reliability Events that either contribute to the stability measurement for the system or provide related information about software installation and removal. When one or more Reliability Events of each type are detected, an icon appears in the column for that date.
- For Software Installs and Uninstalls, an Information icon indicates a successful event of that type occurred, or a Warning icon indicates a failure of that type occurred.
- For all other Reliability Event types, an Error icon indicates a failure of that type occurred.
If more than 30 days of data are available, you can use the scroll bar at the bottom of the System Stability Chart to find dates outside the visible range.
Based on data collected, each date in the System Stability Chart includes a graph point showing that day’s System Stability Index rating. The System Stability Index is a number from 1 (least stable) to 10 (most stable) and is a weighted measurement derived from the number of specified failures seen over a rolling historical period. Reliability Events in the System Stability Report describe the specific failures. For more information about interpreting the System Stability report, see Use Reliability Monitor to Troubleshoot.
- Recent failures are weighted more heavily than past failures, allowing an improvement over time to be reflected in an ascending System Stability Index once a reliability issue has been resolved.
- Days when the system is powered off or in a sleep state are not used when calculating the System Stability Index.
- If there is not enough data to calculate a steady System Stability Index, the graphed line will be dotted. When enough data has been recorded to generate a steady System Stability Index, the graphed line will be solid.
- If there are any significant changes to the system time, an Information icon will appear on the graph for each day on which the system time was adjusted.
References:

Here’s How:
1 Open the Control Panel (icons view), and click/tap on the Security and Maintenance icon.
2 Expand open Maintenance, and click/tap on the View reliability history link to open Reliability Monitor (perfmon /rel). (see screenshot below)

3 Reliability Monitor will now start generating the report. (see screenshot below)

7 After a short moment, you will see the reliability and problem history for your Windows device. (see screenshots below)
8 You can select how to View by (ex: «Days» or «Weeks») the history line graph.
9 You can click/tap on the back and forward arrow buttons to scroll through the history line graph.
10 You can click/tap on View all problem reports at the bottom to see them all at once instead of on the line graph.
11 You can click/tap on a problem in the timeline to its details at the bottom.
12 You can click/tap View technical details for a problem source to see more details about it.
13 You can click/tap on Save reliability history at the bottom to save the reliability history as an .xml file to a location you select.


That’s it,
Shawn Brink
Last edited:
-
-
#2
The linked microsoft docs article
says ‘Applies To: Windows Server 2008, Windows Vista’ (and nothing else)
I checked it on a W10 and a W11 machine, and as far as I can tell, everything is as this tutorial says. Just a curious remark.
-
- OS
- Windows 10 Pro
-
-
#3
Hello @Haydon,
I couldn’t find updated reference material from Microsoft other than those back from Vista. It still applies, but it would be nice for newer info applying specifically for W11.
-
- OS
- Windows 11 Pro for Workstations
- Computer type
- PC/Desktop
- Manufacturer/Model
- Custom self build
- CPU
- Intel i7-8700K 5 GHz
- Motherboard
- ASUS ROG Maximus XI Formula Z390
- Memory
- 64 GB (4x16GB) G.SKILL TridentZ RGB DDR4 3600 MHz (F4-3600C18D-32GTZR)
- Graphics Card(s)
- ASUS ROG-STRIX-GTX1080TI-O11G-GAMING (11GB GDDR5X)
- Sound Card
- Integrated Digital Audio (S/PDIF)
- Monitor(s) Displays
- 2 x Samsung Odyssey G75 27″
- Screen Resolution
- 2560×1440
- Hard Drives
- 1TB Samsung 990 PRO M.2,
4TB Samsung 990 PRO M.2,
8TB WD MyCloudEX2Ultra NAS
- PSU
- Seasonic Prime Titanium 850W
- Case
- Thermaltake Core P3 wall mounted
- Cooling
- Corsair Hydro H115i
- Keyboard
- Logitech wireless K800
- Mouse
- Logitech MX Master 3
- Internet Speed
- 1 Gbps Download and 35 Mbps Upload
- Browser
- Google Chrome
- Antivirus
- Microsoft Defender and Malwarebytes Premium
- Other Info
- Logitech Z625 speaker system,
Logitech BRIO 4K Pro webcam,
HP Color LaserJet Pro MFP M477fdn,
CyberPower CP1500PFCLCD
Galaxy S23 Plus phone
-
- Operating System
- Windows 11 Pro
- Computer type
- Laptop
- Manufacturer/Model
- Surface Laptop 7 Copilot+ PC
- CPU
- Snapdragon X Elite (12 core) 3.42 GHz
- Memory
- 16 GB LPDDR5x-7467 MHz
- Monitor(s) Displays
- 15″ HDR
- Screen Resolution
- 2496 x 1664
- Hard Drives
- 1 TB SSD
- Internet Speed
- Wi-Fi 7 and Bluetooth 5.4
- Browser
- Chrome and Edge
- Antivirus
- Windows Defender
-
-
#4
Yeah, thanks! I take this opportunity to say that your tutorials drive me to learn things out of curiosity which is different from learning things out of concern that they might go wrong
-
- OS
- Windows 10 Pro
-
-
#5
@Brink
My reliability reporting is turned off in Maintenance (see screen attached) I may have disabled this in W10 and migrated to W11, services is on Auto, I don’t remember how I disabled this. How to turn it on again?
Thanks
Hello Frank,
It looks like it’s most likely from using option 1 or 2 below to turn it off, but you can use the same to turn it back on if so.
-
- OS
- Windows 11 Pro for Workstations
- Computer type
- PC/Desktop
- Manufacturer/Model
- Custom self build
- CPU
- Intel i7-8700K 5 GHz
- Motherboard
- ASUS ROG Maximus XI Formula Z390
- Memory
- 64 GB (4x16GB) G.SKILL TridentZ RGB DDR4 3600 MHz (F4-3600C18D-32GTZR)
- Graphics Card(s)
- ASUS ROG-STRIX-GTX1080TI-O11G-GAMING (11GB GDDR5X)
- Sound Card
- Integrated Digital Audio (S/PDIF)
- Monitor(s) Displays
- 2 x Samsung Odyssey G75 27″
- Screen Resolution
- 2560×1440
- Hard Drives
- 1TB Samsung 990 PRO M.2,
4TB Samsung 990 PRO M.2,
8TB WD MyCloudEX2Ultra NAS
- PSU
- Seasonic Prime Titanium 850W
- Case
- Thermaltake Core P3 wall mounted
- Cooling
- Corsair Hydro H115i
- Keyboard
- Logitech wireless K800
- Mouse
- Logitech MX Master 3
- Internet Speed
- 1 Gbps Download and 35 Mbps Upload
- Browser
- Google Chrome
- Antivirus
- Microsoft Defender and Malwarebytes Premium
- Other Info
- Logitech Z625 speaker system,
Logitech BRIO 4K Pro webcam,
HP Color LaserJet Pro MFP M477fdn,
CyberPower CP1500PFCLCD
Galaxy S23 Plus phone
-
- Operating System
- Windows 11 Pro
- Computer type
- Laptop
- Manufacturer/Model
- Surface Laptop 7 Copilot+ PC
- CPU
- Snapdragon X Elite (12 core) 3.42 GHz
- Memory
- 16 GB LPDDR5x-7467 MHz
- Monitor(s) Displays
- 15″ HDR
- Screen Resolution
- 2496 x 1664
- Hard Drives
- 1 TB SSD
- Internet Speed
- Wi-Fi 7 and Bluetooth 5.4
- Browser
- Chrome and Edge
- Antivirus
- Windows Defender
-
-
#6
Hello Frank,
It looks like it’s most likely from using option 1 or 2 below to turn it off, but you can use the same to turn it back on if so.
Thanks Shawn, I remembered I created a disabled key a long time ago, now deleted
-
- OS
- Windows 11 Home 24H2 build: 26100.3915
- Computer type
- Laptop
- Manufacturer/Model
- Acer Predator PHN16-71-50JG
- CPU
- Intel i5-13500HX 2500 Mhz, 14 cores, 20 l. processors
- Motherboard
- RPL, Compass RTX, V1.18
- Memory
- 16 GB DDR5-4800MT/s in Dual Channel mode
- Graphics Card(s)
- Intel UHD + NVIDIA GeForce RTX 4050
- Sound Card
- RealTek + Intel Smart Sound and Nvidia HD Audio
- Monitor(s) Displays
- IPS 16″, AR16:10,
- Screen Resolution
- 1920x1200x165Hz
- Hard Drives
- SK Hynix 512GB PCIe NVMe Gen4x4 M.2 2280 SSD
- PSU
- Power adapter Delta 230W, 4-cell 90 Wh Li-Ion battery
- Case
- Polycarbonate with a metal panel lid
- Cooling
- 2 fans
- Keyboard
- US RGB white keys
- Mouse
- Precision Trackpad
- Internet Speed
- 15 Mb/s
- Browser
- Edge
- Antivirus
- Windows Defender
- Other Info
- BIOS: Insyde Software 5.44.1.18 dated: 21/8/2024
Wi-Fi 6 AX 1650i, Gigabit Ethernet, Network (RJ-45) port
-
- Operating System
- Windows 11 Home 24H2 build 26100.3915
- Computer type
- Laptop
- Manufacturer/Model
- Asus Vivobook K3502Z S15 15″ OLED
- CPU
- Intel 12th Gen. i7 12700H, 14 cores, 2.3 GHz (24M Cache, up to 4.7 GHz, 6P+8E cores)
- Motherboard
- Alder Lake-H, 1700-4700 MHz clock rate
- Memory
- 8GB LPDDR4 on board + 8GB LPDDR4 3200 MHz in Dual Channel.
- Graphics card(s)
- Intel Iris Xe supports up to 4096 x 2304 @ 120Hz
- Sound Card
- Harman Kardon — DTS
- Monitor(s) Displays
- OLED 15.6inch 2.8K (2880 x 1620)
- Screen Resolution
- 16:9 aspect ratio 0.2ms response time 120Hz refresh rate, 550nits
- Hard Drives
- 512GB M.2 NVMe Gen4 PCIe 4.0 SSD, Micron_2450_MTFDKBA512TFK
- PSU
- 90-Watt USB charger (Thunderbolt4)
- Case
- Metal lid, plastic case
- Cooling
- 1 fan
- Mouse
- Precision Trackpad
- Keyboard
- With adjustable backlight
- Internet Speed
- ISP provides 15 mb/s WIFI LTE (4G), laptop WIFI 6 adapter.
- Browser
- Edge
- Antivirus
- Windows Defender
- Other Info
- BIOS American Megatrends International, LLC. 10.1.2.312, 13/03/2024. Network adapter: Intel Wi-Fi 6E AX211 160 MHz
-
-
#7
@Brink thank you so much for this guide. Is there any way to easily export all data directly from the Reliability Monitor? All I know to do is go though each instance and view technical details—copy data to clipboard for each instance. Attached is a screenshot showing over 110 critical error instances in one day. So going one by one would be more painful and tedious than a clean reinstall or image recovery.
Any way to export ALL events and details to save for debugging?
I have saved reliability history, but it only shows a tree xml view of events, and not the data included in the «technical details» of the logs.
-

Screenshot (3).png
80.2 KB
· Views: 102
-
- OS
- Windows 11 Home, Version 22H2 Build 22621.819
- Computer type
- PC/Desktop
- Manufacturer/Model
- Dell XPS 8950
- CPU
- Intel(R) Core(TM) i7-12700, 2100 Mhz
- Motherboard
- Dell BaseBoard Product 0R6PCT
- Memory
- 16GB DDR5, 1x16GB, at 4400MHz;
- Graphics Card(s)
- AMD Radeon RX 6700XT
- Sound Card
- Realtek Audio (Integrated is my guess)
- Monitor(s) Displays
- Samsung 23″ LS24F352FFHNXZA Old HDMI
- Screen Resolution
- 1920×1080 60Hz
- Hard Drives
- Kioxia KBG50ZNS256G 256 GB,
Raid w/
ST1000DM010-2EP102
1.0 TB Spinning Non SSD
- PSU
- 750 W
- Case
- «750W Night Sky Bezel Chassis»
- Cooling
- Basis Fan, not upgraded to Increased Air or Water Cooling
- Keyboard
- Dell Wireless
- Mouse
- Logitech M310 Wireless USB w/ dongle
- Internet Speed
- ATT Fiber 300Mb
- Browser
- Prefer Chrome, but use Edge. I’m open to suggestions on this.
- Antivirus
- Windows Defender
- Other Info
- Killer E3100G 2.5 Gigabit Ethernet Controller
Killer(R) Wi-Fi 6E AX1675x 160MHz Wireless Network Adapter (210NGW)
w/ bluetoothBios 1.7 Dell — w/errors of not started in past event log.
-
-
#8
Hello @ddbbmm190010,
I’m not aware of a way to export all history at once either so far.
-
- OS
- Windows 11 Pro for Workstations
- Computer type
- PC/Desktop
- Manufacturer/Model
- Custom self build
- CPU
- Intel i7-8700K 5 GHz
- Motherboard
- ASUS ROG Maximus XI Formula Z390
- Memory
- 64 GB (4x16GB) G.SKILL TridentZ RGB DDR4 3600 MHz (F4-3600C18D-32GTZR)
- Graphics Card(s)
- ASUS ROG-STRIX-GTX1080TI-O11G-GAMING (11GB GDDR5X)
- Sound Card
- Integrated Digital Audio (S/PDIF)
- Monitor(s) Displays
- 2 x Samsung Odyssey G75 27″
- Screen Resolution
- 2560×1440
- Hard Drives
- 1TB Samsung 990 PRO M.2,
4TB Samsung 990 PRO M.2,
8TB WD MyCloudEX2Ultra NAS
- PSU
- Seasonic Prime Titanium 850W
- Case
- Thermaltake Core P3 wall mounted
- Cooling
- Corsair Hydro H115i
- Keyboard
- Logitech wireless K800
- Mouse
- Logitech MX Master 3
- Internet Speed
- 1 Gbps Download and 35 Mbps Upload
- Browser
- Google Chrome
- Antivirus
- Microsoft Defender and Malwarebytes Premium
- Other Info
- Logitech Z625 speaker system,
Logitech BRIO 4K Pro webcam,
HP Color LaserJet Pro MFP M477fdn,
CyberPower CP1500PFCLCD
Galaxy S23 Plus phone
-
- Operating System
- Windows 11 Pro
- Computer type
- Laptop
- Manufacturer/Model
- Surface Laptop 7 Copilot+ PC
- CPU
- Snapdragon X Elite (12 core) 3.42 GHz
- Memory
- 16 GB LPDDR5x-7467 MHz
- Monitor(s) Displays
- 15″ HDR
- Screen Resolution
- 2496 x 1664
- Hard Drives
- 1 TB SSD
- Internet Speed
- Wi-Fi 7 and Bluetooth 5.4
- Browser
- Chrome and Edge
- Antivirus
- Windows Defender
-
-
#9
Hello, thank you for this tutorial @Brink
I am running Windows 11 Home 23H2 on my HP laptop
Is there a way to reset the Reliability Monitor?
Thank you
-
- OS
- Windows 11 Home
- Computer type
- Laptop
- Manufacturer/Model
- HP Envy 17
- CPU
- Intel Core i7 1260P
- Motherboard
- Intel Integrated SoC
- Memory
- 32 GB
- Graphics Card(s)
- Intel Iris Xᵉ Graphics
- Sound Card
- Realtek Audio
- Monitor(s) Displays
- 17″ 4K UHD IPS
- Screen Resolution
- 3840 x 2160
- Hard Drives
- 1 TB PCIe NVMe
- Internet Speed
- 1 Gbit / 100 Mbps
- Browser
- MS Edge
-
-
#10
-
- OS
- Windows 11
- Computer type
- Laptop
- Manufacturer/Model
- HP / Spectre x360 Convertible 13
- CPU
- i5-8250U
- Motherboard
- 83B9 56.50
- Memory
- 8GB
- Graphics Card(s)
- Intel(R) UHD Graphics 620
- Sound Card
- Realtek High Definition Audio(SST)
- Screen Resolution
- 1920 x 1080
- Hard Drives
- Toshiba 256GB SSD
- Internet Speed
- 500Mbps
- Browser
- Firefox, Edge
- Antivirus
- Windows Defender
-
-
#11
I use the batch file from here,
Download the zip file and extract it to the desktop. Right click the batch file and select ‘run as administrator’.
You should see it working,


-
- OS
- Win 11 Home & Pro
- Computer type
- Laptop
- Manufacturer/Model
- ASUS Vivobook
- CPU
- AMD Ryzen™ 7 7730U
- Motherboard
- M1605YA
- Memory
- 15.0GB Dual-Channel DDR4 @ 1596MHz (22-22-22-52)
- Graphics Card(s)
- 512MB ATI AMD Radeon Graphics (ASUStek Computer Inc)
- Monitor(s) Displays
- Generic PnP Monitor (1920×1200@60Hz) — P1 PLUS (1920×1080@59Hz)
- Screen Resolution
- 1920 X 1200
- Hard Drives
- 953GB Western Digital WD
- PSU
- 45 Watts
- Mouse
- Lenovo Bluetooth.
- Internet Speed
- 500 Mbps
- Browser
- Edge
- Antivirus
- Defender
-
- Operating System
- Windows 11
- Computer type
- Laptop
- Manufacturer/Model
- ACER NITRO
- CPU
- AMD Ryzen 7 5800H / 3.2 GHz
- Motherboard
- CZ Scala_CAS (FP6)
- Memory
- 32 GB DDR4 SDRAM 3200 MHz
- Graphics card(s)
- NVIDIA GeForce RTX 3060 6 GB GDDR6 SDRAM
- Sound Card
- Realtek Audio. NVIDIA High Definition Audio
- Monitor(s) Displays
- 15.6″ LED backlight 1920 x 1080 (Full HD) 144 Hz
- Screen Resolution
- 1920 x 1080 (Full HD)
- Hard Drives
- Samsung 970 Evo Plus 2TB NVMe M.2
- PSU
- 180 Watt, 19.5 V
- Mouse
- Lenovo Bluetooth
- Internet Speed
- 500 Mbps
- Browser
- Edge
- Antivirus
- Defender
-
-
#12
Any way to export ALL events and details to save for debugging?
The reliability monitor data is similar to event viewer data.
The V2 log collector will create a text file of each system and application events with only a 30 day look back
BSOD — Posting Instructions
BSOD — Posting Instructions This will show you how to help provide needed information about your system and dump files. It will not contain any personal or sensitive information about you or your data. To get better help with your Windows BSOD issue, please read these instructions and follow…
www.elevenforum.com
The events can then be scanned using: edit > select all > edit > find >
Alternatively the event viewer can be scanned:
Chkdsk: Read Chkdsk Log in Event Viewer in Windows 10
Click tab to sort.
-
- OS
- Windows 10
- Computer type
- Laptop
- Manufacturer/Model
- HP
- CPU
- Intel(R) Core(TM) i7-4800MQ CPU @ 2.70GHz
- Motherboard
- Product : 190A Version : KBC Version 94.56
- Memory
- 16 GB Total: Manufacturer : Samsung MemoryType : DDR3 FormFactor : SODIMM Capacity : 8GB Speed : 1600
- Graphics Card(s)
- NVIDIA Quadro K3100M; Intel(R) HD Graphics 4600
- Sound Card
- IDT High Definition Audio CODEC; PNP Device ID HDAUDIO\FUNC_01&VEN_111D&DEV_76E0
- Hard Drives
- Model Hitachi HTS727575A9E364
- Antivirus
- Microsoft Defender
- Other Info
- Mobile Workstation
-
-
#13
Hello, thank you for this tutorial @Brink
I am running Windows 11 Home 23H2 on my HP laptop
Is there a way to reset the Reliability Monitor?
Thank you
Hello Joanne,
There sure is. You can also use the method in the tutorial below.
-
- OS
- Windows 11 Pro for Workstations
- Computer type
- PC/Desktop
- Manufacturer/Model
- Custom self build
- CPU
- Intel i7-8700K 5 GHz
- Motherboard
- ASUS ROG Maximus XI Formula Z390
- Memory
- 64 GB (4x16GB) G.SKILL TridentZ RGB DDR4 3600 MHz (F4-3600C18D-32GTZR)
- Graphics Card(s)
- ASUS ROG-STRIX-GTX1080TI-O11G-GAMING (11GB GDDR5X)
- Sound Card
- Integrated Digital Audio (S/PDIF)
- Monitor(s) Displays
- 2 x Samsung Odyssey G75 27″
- Screen Resolution
- 2560×1440
- Hard Drives
- 1TB Samsung 990 PRO M.2,
4TB Samsung 990 PRO M.2,
8TB WD MyCloudEX2Ultra NAS
- PSU
- Seasonic Prime Titanium 850W
- Case
- Thermaltake Core P3 wall mounted
- Cooling
- Corsair Hydro H115i
- Keyboard
- Logitech wireless K800
- Mouse
- Logitech MX Master 3
- Internet Speed
- 1 Gbps Download and 35 Mbps Upload
- Browser
- Google Chrome
- Antivirus
- Microsoft Defender and Malwarebytes Premium
- Other Info
- Logitech Z625 speaker system,
Logitech BRIO 4K Pro webcam,
HP Color LaserJet Pro MFP M477fdn,
CyberPower CP1500PFCLCD
Galaxy S23 Plus phone
-
- Operating System
- Windows 11 Pro
- Computer type
- Laptop
- Manufacturer/Model
- Surface Laptop 7 Copilot+ PC
- CPU
- Snapdragon X Elite (12 core) 3.42 GHz
- Memory
- 16 GB LPDDR5x-7467 MHz
- Monitor(s) Displays
- 15″ HDR
- Screen Resolution
- 2496 x 1664
- Hard Drives
- 1 TB SSD
- Internet Speed
- Wi-Fi 7 and Bluetooth 5.4
- Browser
- Chrome and Edge
- Antivirus
- Windows Defender
-
-
#14
Hello Joanne,
There sure is. You can also use the method in the tutorial below.
I did search for Elevenforum tut for it, never thought about Ten forums
-
- OS
- Win 11 Home & Pro
- Computer type
- Laptop
- Manufacturer/Model
- ASUS Vivobook
- CPU
- AMD Ryzen™ 7 7730U
- Motherboard
- M1605YA
- Memory
- 15.0GB Dual-Channel DDR4 @ 1596MHz (22-22-22-52)
- Graphics Card(s)
- 512MB ATI AMD Radeon Graphics (ASUStek Computer Inc)
- Monitor(s) Displays
- Generic PnP Monitor (1920×1200@60Hz) — P1 PLUS (1920×1080@59Hz)
- Screen Resolution
- 1920 X 1200
- Hard Drives
- 953GB Western Digital WD
- PSU
- 45 Watts
- Mouse
- Lenovo Bluetooth.
- Internet Speed
- 500 Mbps
- Browser
- Edge
- Antivirus
- Defender
-
- Operating System
- Windows 11
- Computer type
- Laptop
- Manufacturer/Model
- ACER NITRO
- CPU
- AMD Ryzen 7 5800H / 3.2 GHz
- Motherboard
- CZ Scala_CAS (FP6)
- Memory
- 32 GB DDR4 SDRAM 3200 MHz
- Graphics card(s)
- NVIDIA GeForce RTX 3060 6 GB GDDR6 SDRAM
- Sound Card
- Realtek Audio. NVIDIA High Definition Audio
- Monitor(s) Displays
- 15.6″ LED backlight 1920 x 1080 (Full HD) 144 Hz
- Screen Resolution
- 1920 x 1080 (Full HD)
- Hard Drives
- Samsung 970 Evo Plus 2TB NVMe M.2
- PSU
- 180 Watt, 19.5 V
- Mouse
- Lenovo Bluetooth
- Internet Speed
- 500 Mbps
- Browser
- Edge
- Antivirus
- Defender
-
-
#15
I am attempting work out why my MS Access has suddenly stopped responding when I attempt to open a report. Event viewer states «The program MSACCESS.EXE version 16.0.18623.20178 stopped interacting with Windows and was closed. To see if more information about the problem is available, check the problem history in the Security and Maintenance control panel.«
I cannot see any «problem history» under the Security and Maintenance entry of the control panel. However, there IS a View Reliability History. But clicking on that just brings up the same message — sending me around in circles? Am I missing something?
-
- OS
- Windows 11
- Computer type
- PC/Desktop
- Manufacturer/Model
- Dell
- CPU
- i9-12900K, 3200 MHz, 16 Cores
- Memory
- 32GB
-
-
#16
I am attempting work out why my MS Access has suddenly stopped responding when I attempt to open a report. Event viewer states «The program MSACCESS.EXE version 16.0.18623.20178 stopped interacting with Windows and was closed. To see if more information about the problem is available, check the problem history in the Security and Maintenance control panel.«
I cannot see any «problem history» under the Security and Maintenance entry of the control panel. However, there IS a View Reliability History. But clicking on that just brings up the same message — sending me around in circles? Am I missing something?
Hello,
You could try reinstalling Access to try and repair its installation, and hopefully fix it.
-
- OS
- Windows 11 Pro for Workstations
- Computer type
- PC/Desktop
- Manufacturer/Model
- Custom self build
- CPU
- Intel i7-8700K 5 GHz
- Motherboard
- ASUS ROG Maximus XI Formula Z390
- Memory
- 64 GB (4x16GB) G.SKILL TridentZ RGB DDR4 3600 MHz (F4-3600C18D-32GTZR)
- Graphics Card(s)
- ASUS ROG-STRIX-GTX1080TI-O11G-GAMING (11GB GDDR5X)
- Sound Card
- Integrated Digital Audio (S/PDIF)
- Monitor(s) Displays
- 2 x Samsung Odyssey G75 27″
- Screen Resolution
- 2560×1440
- Hard Drives
- 1TB Samsung 990 PRO M.2,
4TB Samsung 990 PRO M.2,
8TB WD MyCloudEX2Ultra NAS
- PSU
- Seasonic Prime Titanium 850W
- Case
- Thermaltake Core P3 wall mounted
- Cooling
- Corsair Hydro H115i
- Keyboard
- Logitech wireless K800
- Mouse
- Logitech MX Master 3
- Internet Speed
- 1 Gbps Download and 35 Mbps Upload
- Browser
- Google Chrome
- Antivirus
- Microsoft Defender and Malwarebytes Premium
- Other Info
- Logitech Z625 speaker system,
Logitech BRIO 4K Pro webcam,
HP Color LaserJet Pro MFP M477fdn,
CyberPower CP1500PFCLCD
Galaxy S23 Plus phone
-
- Operating System
- Windows 11 Pro
- Computer type
- Laptop
- Manufacturer/Model
- Surface Laptop 7 Copilot+ PC
- CPU
- Snapdragon X Elite (12 core) 3.42 GHz
- Memory
- 16 GB LPDDR5x-7467 MHz
- Monitor(s) Displays
- 15″ HDR
- Screen Resolution
- 2496 x 1664
- Hard Drives
- 1 TB SSD
- Internet Speed
- Wi-Fi 7 and Bluetooth 5.4
- Browser
- Chrome and Edge
- Antivirus
- Windows Defender
-
-
#17
Thanks. I seem to have managed to fix it (possibly by running the quick fix?). However, the question still remains as to why the reliability history seems to point to itself.
-
- OS
- Windows 11
- Computer type
- PC/Desktop
- Manufacturer/Model
- Dell
- CPU
- i9-12900K, 3200 MHz, 16 Cores
- Memory
- 32GB
-
-
#18
Thanks. I seem to have managed to fix it (possibly by running the quick fix?). However, the question still remains as to why the reliability history seems to point to itself.
No telling. Possibly a bug.
-
- OS
- Windows 11 Pro for Workstations
- Computer type
- PC/Desktop
- Manufacturer/Model
- Custom self build
- CPU
- Intel i7-8700K 5 GHz
- Motherboard
- ASUS ROG Maximus XI Formula Z390
- Memory
- 64 GB (4x16GB) G.SKILL TridentZ RGB DDR4 3600 MHz (F4-3600C18D-32GTZR)
- Graphics Card(s)
- ASUS ROG-STRIX-GTX1080TI-O11G-GAMING (11GB GDDR5X)
- Sound Card
- Integrated Digital Audio (S/PDIF)
- Monitor(s) Displays
- 2 x Samsung Odyssey G75 27″
- Screen Resolution
- 2560×1440
- Hard Drives
- 1TB Samsung 990 PRO M.2,
4TB Samsung 990 PRO M.2,
8TB WD MyCloudEX2Ultra NAS
- PSU
- Seasonic Prime Titanium 850W
- Case
- Thermaltake Core P3 wall mounted
- Cooling
- Corsair Hydro H115i
- Keyboard
- Logitech wireless K800
- Mouse
- Logitech MX Master 3
- Internet Speed
- 1 Gbps Download and 35 Mbps Upload
- Browser
- Google Chrome
- Antivirus
- Microsoft Defender and Malwarebytes Premium
- Other Info
- Logitech Z625 speaker system,
Logitech BRIO 4K Pro webcam,
HP Color LaserJet Pro MFP M477fdn,
CyberPower CP1500PFCLCD
Galaxy S23 Plus phone
-
- Operating System
- Windows 11 Pro
- Computer type
- Laptop
- Manufacturer/Model
- Surface Laptop 7 Copilot+ PC
- CPU
- Snapdragon X Elite (12 core) 3.42 GHz
- Memory
- 16 GB LPDDR5x-7467 MHz
- Monitor(s) Displays
- 15″ HDR
- Screen Resolution
- 2496 x 1664
- Hard Drives
- 1 TB SSD
- Internet Speed
- Wi-Fi 7 and Bluetooth 5.4
- Browser
- Chrome and Edge
- Antivirus
- Windows Defender
Understanding Windows Event Viewer, Reliability Monitor, and Task Scheduler
Windows 11 is packed with tools to help users monitor, troubleshoot, and automate tasks effectively. Among these, Event Viewer, Reliability Monitor, and Task Scheduler stand out for their utility. Here’s a breakdown of their features and how to use them:
1. Event Viewer: Your System’s Black Box Recorder
Event Viewer logs everything happening in your system, from app launches to hardware errors. It’s an invaluable tool for diagnosing problems.
Key Features:
- Logs Events: Tracks system activities like app launches, errors, and warnings.
- Categories of Logs:
- Application Events: Issues reported by apps.
- System Events: Problems detected by Windows components.
- Security Events: Tracks login attempts and permission changes.
- Custom Views: Helps focus on critical issues like Administrative Events.
How to Use:
- Accessing Event Viewer: Right-click the Start button and choose Event Viewer.
- Filter Logs: Expand Custom Views > Administrative Events for actionable insights.
- Check Event Details: Double-click an event for in-depth info or use tools like MyEventLog to decode Event IDs.
2. Reliability Monitor: A System Stability Tracker
Reliability Monitor offers a user-friendly overview of system reliability over time, focusing on crashes, software updates, and hardware issues.
Key Features:
- Graphical Representation: Displays stability ratings on a scale of 1–10.
- Event Correlation: Shows which events might have led to system instability.
- Detailed Logs: Access technical details and problem reports.
How to Use:
- Launch Reliability Monitor: Search for View Reliability History in the taskbar search.
- Analyze the Graph: Check for dips in the stability rating and corresponding events.
- Access Details: Click problem reports for technical insights, helping diagnose recurring issues.
3. Task Scheduler: Automate Routine Tasks
Task Scheduler enables users to automate tasks, whether launching applications, running scripts, or performing system maintenance.
Key Features:
- Triggers and Actions: Schedule tasks based on time, events, or specific conditions.
- Predefined Tasks: Windows apps like Microsoft Edge and OneDrive often rely on scheduled tasks.
- Advanced Triggers: Integrate with Event Viewer for event-based automation.
How to Use:
- Open Task Scheduler: Search for Task Scheduler in the taskbar search.
- Explore Tasks: Navigate to Task Scheduler Library > Microsoft > Windows for predefined tasks.
- View Task Properties: Double-click a task to understand its triggers and conditions.
- Create a Task: Use the app’s wizard to automate processes based on your needs.
Pro Tips:
- Use Reliability Monitor alongside Event Viewer to identify and resolve recurring problems.
- Regularly check Task Scheduler to monitor or disable unnecessary background tasks.
- Tools like Autoruns can complement these features for managing startup and scheduled programs.
By leveraging these tools, you can maintain your Windows 11 system’s health, streamline tasks, and troubleshoot issues with ease. Whether you’re an IT professional or a curious user, these utilities offer unmatched insights and capabilities.
how-to
Jun 13, 20249 mins
ComputersSmall and Medium BusinessWindows
Built right into Windows 10 and 11, this old-school tool helps diagnose crashes, hangs, and other issues.
The built-in Windows Reliability Monitor remains an oft-overlooked troubleshooting gem. It’s actually a specialized part of Windows’ general-purpose Performance Monitor tool (perfmon.exe). While more limited in scope and capability, Reliability Monitor (a.k.a. ReliMon) is much, much easier to use.
Reliability Monitor zeroes in on and tracks a limited set of errors and changes on Windows 10 and 11 desktops (and earlier versions going back to Windows Vista), offering immediate diagnostic information to administrators and power users trying to puzzle their way through crashes, failures, hiccups, and more.
Launch Reliability Monitor
There are many ways to get to Reliability Monitor in Windows 10 and 11. At the Windows search box, if you type reli you’ll usually see an entry that reads View reliability history pop up on the Start menu in response. Click that to open the Reliability Monitor application window.
You can also click Start > Settings, then type reli into that search box for the same menu option, shown in Figure 1.
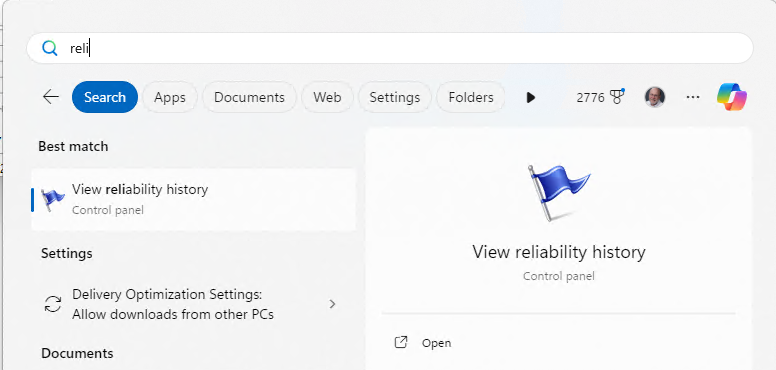
Figure 1: Type “reli” into the Start menu, and you’ll see “View reliability history” to the right.
Ed Tittel / IDG
To navigate to this item in the Control Panel hierarchy, follow this sequence of selections: Start > Control Panel > Security and Maintenance > View reliability history (under the Maintenance heading). Yet another method of launching ReliMon is to press Win key + R to open the Run box, then type in perfmon /rel. That same command works from any Windows command-line interface.
However you invoke Reliability Monitor, you’ll find it has useful things to tell you. Figure 2 shows the main ReliMon screen tracking the reliability of my Windows 11 production PC from May 9 through May 28. It shows a near-optimal stability index of 10 at the left-hand side, errors (denoted by a red circle with a white X) on May 14 and 18, and a climb back to a “perfect 10” at the right.
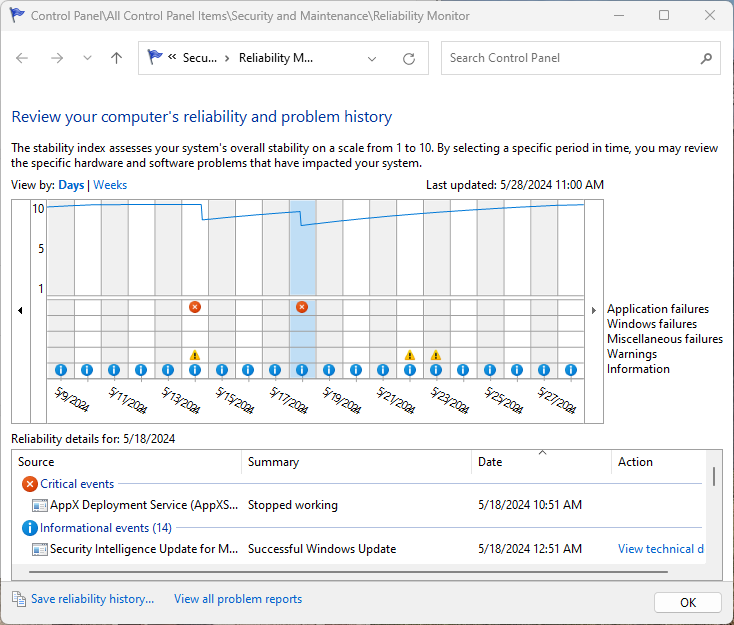
Figure 2: The main ReliMon window, which traces reliability on a scale of 1 (bottom) to 10 (top) from May 9 through May 28. Note the error markers on May 14 and 18.
Ed Tittel / IDG
Look to the right of the timeline, which labels the rows in the table underneath the stability graph. They read:
- Application failures: Provides timestamps and additional info about application or app crashes, hangs, and other issues, of which “stopped working” is most typical.
- Windows failures: Indicates Windows OS or hardware errors that cause crashes, hangs, BSODs, and other issues. You can see a “Windows hardware error” in Figure 3 below (turns out to be graphics driver related).
- Miscellaneous failures: Failures or crashes that fall outside the realm of apps, applications and the OS — usually something bus or peripheral related. In addition, a “shut down unexpectedly” or “not properly shut down” item is recorded when Windows 10 or 11 hangs and you cycle power to restart the OS. This also counts as a miscellaneous failure.
- Warnings: Warnings and Information items both usually relate to updates applied to the current host, through Windows Update, the Microsoft Store, and so forth. Warnings usually document failed or incomplete updates.
- Information: Related to updates from various sources successfully applied to the current host.
Next up is a somewhat more error-prone PC, a Lenovo ThinkPad X380 Yoga, to demonstrate what such a sequence looks like in ReliMon (see Figure 3). You’ll see Windows errors occurring on five days in a 10-day stretch, from May 16 through May 25. Except for the hardware error shown on May 23, the rest of the errors come from the built-in Windows facilities and applications that include the AppX Distribution Service, Teams, Phone Link, and so forth.
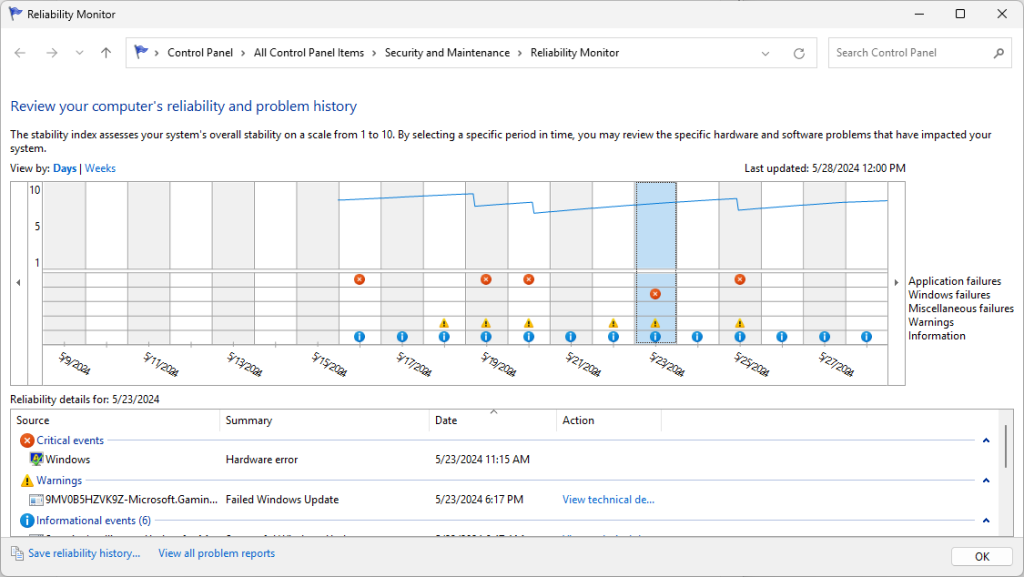
Figure 3: The highlighted item (May 23) shows a Windows hardware error; other errors occurred on May 16, 19, 20, and 25. Ouch!
Ed Tittel / IDG
What Reliability Monitor can tell you about critical errors
By clicking on a specific day in the timeline (shown as a vertical blue bar for May 23 in Figure 3), you can see events reported for that day in a list below the timeline. Double-click any item in the list to pop up a detail pane with more information.
After clicking May 23 in Figure 3, I double-clicked the entry labeled “Windows” with a summary that reads “Hardware error,” which brought up the Problem Details screen shown in Figure 4.
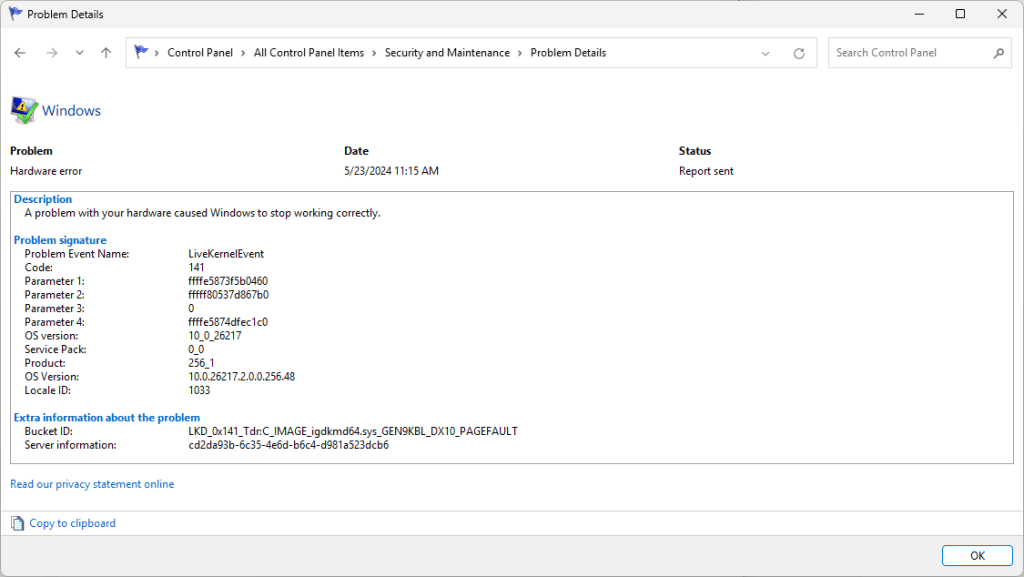
Figure 4: For this somewhat generic “Hardware error,” the most useful info appears in the Bucket ID line. More often, the Problem Event Name and Code fields lead directly to good info.
Ed Tittel / IDG
The bucket ID from which the error originates (shown under “Extra information about the problem” in Figure 4) includes the string igkdmd64.sys. A quick Google search confirms this is the Windows driver for Intel Graphics Kernel Mode (acronym: igkd). Thus, it’s pretty obvious that the Intel graphics module on the Lenovo ThinkPad X380 Yoga experienced a hiccup in the built-in Intel UHD Graphics 620 on its i7-8650U CPU. You can usually find fair-to-good guidance on problem information by visiting answers.microsoft.com and searching on problem event names, bucket IDs, and so forth.
What kinds of problems can ReliMon diagnose?
Knowing the source of failures can help you take action to prevent them. For example, certain critical events show APPCRASH as the Problem Event Name. This signals that some Windows app or application has experienced a failure sufficient to make it shut itself down. Such events are typically internal to an app, often requiring a fix from its developer. Thus, if I see a Microsoft Store app that I seldom or never use throwing crashes, I’ll uninstall that app so it won’t crash any more. This keeps the Reliability Index up at no functional cost (since I don’t use the app anyway).
The same approach works for update checkers of many kinds. (I prefer to update manually, or to use an update tool such as the Microsoft Winget package manager in PowerShell or at a Command Prompt.) As it turns out, Reliability Monitor is a great tool for catching and stopping updaters that one may have tried but failed to block through the Startup tab in Task Manager. I’ve used it to detect updaters for the Intel Driver & Support Assistant, CCleaner, MiniTool Partition Wizard, anti-malware packages, Office plug-ins, Java, and lots of other stuff. In many such cases, I decided to remove them (by uninstalling them or renaming their .exe files) because (a) I didn’t need or use them and (b) I wanted to remove a source of Windows errors.
Recently, I also found myself facing a “black screen with cursor” on a Lenovo ThinkPad P16. By using two keyboard sequences (Win key + Ctrl + Shift + B to restart the graphics driver, then Ctrl + Alt + Del to access the Windows “master control menu”), I regained control of the PC. A quick trip into Reliability Monitor showed me an error with this telltale string in the bucket ID information: “CreateBlackScreenLiveDump.” That’s a clear indication that something went wrong with the graphics driver, as was the system’s recovery after I entered the “reset graphics” key combo. I ended up reverting to the previous NVIDIA graphics driver to fix the problem.
Where ReliMon is less helpful
Sometimes, you’ll find that error sources are either applications you need or want to run, or they originate from OS components and executables. Uninstalling such things is not an option, and may not only be unproductive but render the OS inoperable. When that kind of thing pops up — and it often does — all you can do is report the issue via the Microsoft Feedback Hub, include the Reliability Monitor detail as an attachment, and hope that Microsoft gets around to fixing whatever’s broken sooner rather than later.
Here’s an example of such stuff from across my dozen or so Windows 11 PCs and VMs from the last 30 days (all show “Stopped working” or “Stopped responding and was closed” in the summary field in ReliMon):
- AppX Deployment Service
- Intel System Usage Report
- Microsoft Phone Link
- Microsoft Teams Updater
- Windows Biometric Service
- Windows Camera Frame Server
- Windows Explorer
Nearly every item (except the one labeled “Intel…”) is an OS element that is required to keep Windows working. Thus, getting rid of them is not an option. Reporting them via Feedback Hub is the only responsible thing to do.
I hope I’ve shown that Reliability Monitor can be a useful and informative member of any Windows professional’s troubleshooting toolkit, both for Windows 10 and Windows 11. I check in on it no less than monthly on the machines that I manage, even when nobody’s complaining about something odd, slow, or broken. And when such complaints do come in, it’s one of the first tools I check to try to figure out and fix what’s causing trouble. I recommend you do likewise.
This article was originally published in October 2020 and most recently updated in June 2024.
SUBSCRIBE TO OUR NEWSLETTER
From our editors straight to your inbox
Get started by entering your email address below.