
Я уже более 3‑х лет использую программу “Volumouse” на всех своих компьютерах и регулирую громкость колесиком мышки с зажатием ее левой кнопки. Иной способ мне доставляет дискомфорт — это удобнее чем использование специальных мультимедиа-кнопок на клавиатуре, ведь мышь всегда в руке, а к кнопкам на клавиатуре или кнопкам в интерфейсах программ нужно «тянуться».
«Volumouse» — маленькая программа, которая позволяет удобно и легко регулировать громкость на Windows-компьютере — просто покрутив колесико мышки. Не смотря на малый размер самой программы и занимаемой ею оперативной памяти, все очень гибко настраивается.
По-умолчанию интерфейс на английском языке, но если вам нужен русский, то скопируйте файл volumouse_lng.ini в папку с установленной программой.
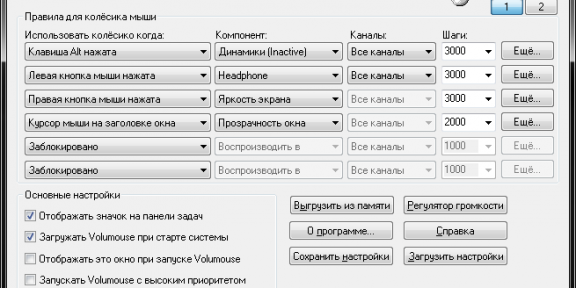
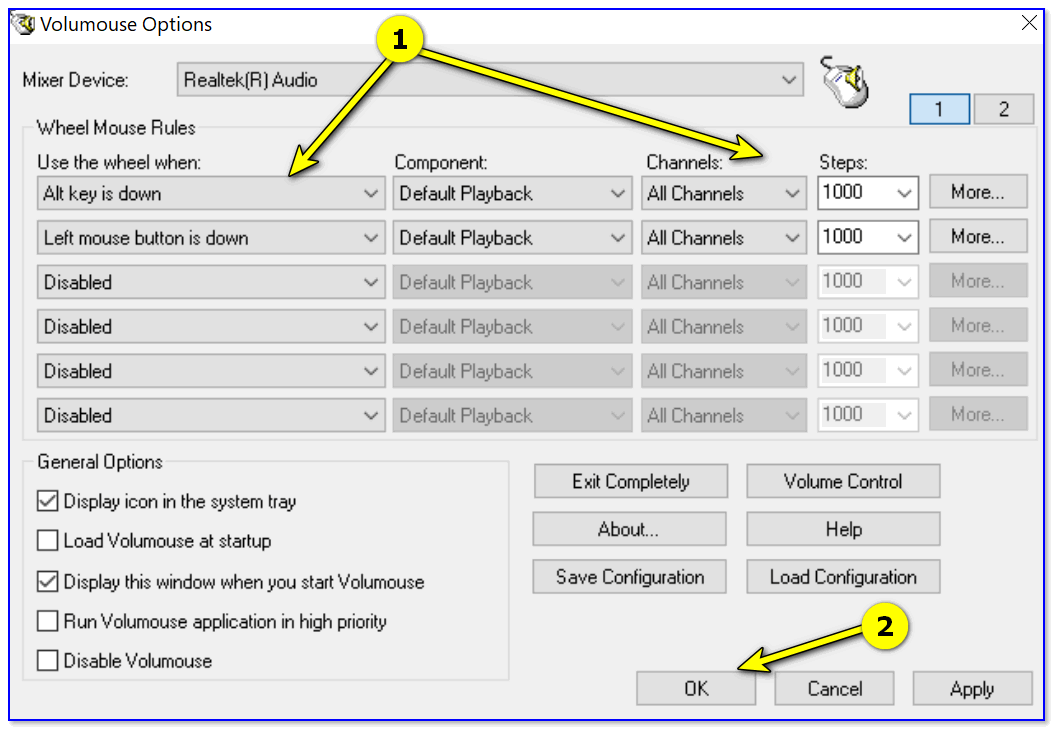
Возможно установить до 12 различных правил, которые определяют как и когда будет использовано колесико мышки для регулировки громкости. По-умолчанию включено 2 правила: когда нажата кнопка Alt и когда нажата левая кнопка мышки. Вы можете легко настроить правила под себя.
Описание базовых правил регулировки громкости
Каждое правило содержит 4 базовых поля:
- “Использовать колесико когда:” — условие, при котором работает правило. Например, если вы выберите “Клавиша Shift нажата”, правило будет работать, только когда нажата кнопка “Shift”. Вы так же можете выключить правило, выбрав “Заблокировано” в этом поле.
- “Компонент:” Определяет каким звуковым компонентом (наушники, колонки, микрофон и т.д.) управляет правило. “Общая громкость системы” — компонент, который включен по-умолчанию и используется наиболее часто.
- “Каналы:” По-умолчанию включена и наиболее часто используется опция “Все каналы”. Это означает, что громкость обоих каналов (например, левого и правого) изменяется одинаково. Но если у вас возникнет нужда регулировать каналы по отдельности, вы легко можете это сделать. Также доступна опция выключения/включения канала целиком.
- “Шаги:” — количество шагов, согласно с которым будет регулироваться громкость за одно движение колесика мышки. Т.е. если вы увеличите это значение, то громкость будет регулироваться быстрее. Я поставил себе это значение — “3000”.
Кроме того, доступны дополнительные настройки — нажмите кнопку “Еще…” у соответствующего правила.
Дополнительные настройки правил
“Включать правило после” — можно указать, после какого количества вращений колесика мышки включать правило.
“Влево/вправо баланс” — позволяет контролировать баланс левого и правого канала. Например, если вы хотите что бы левый канал был всегда на 50% тише чем правый, установите значение правого “1.0”, левого — “0.5”
Экранный Индикатор
Программа позволяет отображать экранный индикатор при изменении уровня громкости. Вы можете настроить его в дополнительных настройках для каждого правила.
“Тип:” Можно установить вертикальное, горизонтальное отображение индикатора, или выключить его вообще.
“Размер:” Можно установить размер в пикселях
“Задержка:” Количество миллисекунд после регулировки громкости, когда будет показан индикатор.
“Позиция:” Горизонтальная и вертикальная позиция индикатора. По-умолчанию он отображается около курсора мыши.
“Прозрачность:” Позволяет настроить прозрачность индикатора
Регулировка прозрачности окон и яркости экрана
Для того, что бы воспользоваться этой функцией, создайте новое правило с компонентом «Прозрачность окна» или «Яркость экрана». Например, можно сделать так что бы при зажатии правой кнопки мыши колесиком менялась прозрачность окна над которым расположен курсор или яркость.
Конечно, большинству все эти навороченные функции не нужны – но базовая функция «регулировка громкости колесиком мышки» будет удобна всем людям.
Последняя версия Vloumouse всегда доступна по прямой ссылке с сайта разработчика.
CCleaner 6.35.11488
CCleaner — популярное приложение для оптимизации ПК, чистки реестра и удаления различного…
MSI Afterburner 4.6.5
MSI Afterburner — настоящая находка для истинного оверклокера, с помощью которой можно…
Process Hacker 2.39.124
Process Hacker — мощное приложение для полного контроля над задачами, процессами и службами, с…
Mem Reduct 3.5
Mem Reduct — небольшая портативная утилита, которая позволяет высвободить до 25% используемой…
CCleaner Portable 6.35.11488
CCleaner Portable — портативная (переносная, не требующая инсталляции на компьютер) версия утилиты CCleaner для чистки системного мусора…
| All Utilities |
| Password Tools |
| System Tools |
| Browser Tools |
| Programmer Tools |
| Network Tools |
| Outlook/Office |
| 64-bit Download |
| Panel |
| Forensics |
| Pre-Release Tools |
| Articles |
DescriptionVolumouse provides you a quick and easy way to control the sound volume on your system — simply by rolling the wheel of your wheel mouse. 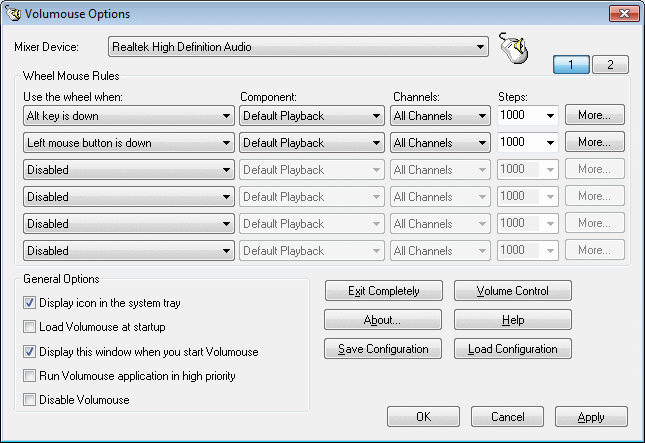
System Requirements
Known Issues
Additional Plugins
Versions History
Upgrading Volumouse from previous versionsIf you have a previous version of Volumouse,
Installing/Removing VolumouseThere are 2 methods to install Volumouse on your system:
Using VolumouseWhen you run Volumouse, the main options window is displayed, in order to allow you to configure Volumouse according to your needs. Wheel Mouse RulesEach rule contains 4 basic fields:
there are also more advanced options for each rule, you can configure them by clicking the ‘More…’ button of the desired rule. More Rule Options
On-Screen IndicatorStarting from version 1.10, Volumouse allows you display an indicator on the screen when you use the wheel for adjusting the volume.
Non-Sound ComponentsVolumouse was originally created for controlling the sound volume with the mouse wheel.
Using the mouse wheel when specific application is in focusStarting from version 1.70 of Volumouse, there are 2 new conditions that allows you the define the wheel behaviour for every application, Creating plugins for VolumouseIf you’re a C++ programmer, and you want to add new components to Volumouse, and respond with your own code Other Options
Translating Volumouse to other languagesIn order to translate Volumouse to other language, follow the instructions below:
LicenseThis utility is released as freeware. DisclaimerThe software is provided «AS IS» without any warranty, either expressed or implied, FeedbackIf you have any problem, suggestion, comment, or you found a bug in my utility,
Download Volumouse 32-bit for manual installation (volumouse.zip)
Download self-install executable for automatic installation of Volumouse 32-bit (volumouse_setup.exe) Download Volumouse x64 for manual installation (volumouse.zip) Volumouse is also available in other languages. In order to change the language of
|
Доброго времени!
В последнее время всё чаще стали «проскальзывать» ко мне вопросы относительно регулировки звука в Windows 10 (вероятнее всего, есть какое-то обновление или версия ОС, у которой явно есть проблема этого плана…).
Вообще, надо сказать, что стандартный регулятор громкости в Windows — выполнен крайне неудачно: чтобы отрегулировать громкость нужно открыть еще 2-3 вкладки 👀 (это тем более осознаешь, когда начинаешь пользоваться альтернативным ПО).
Собственно, несколько альтернативных регуляторов и хотел предложить в этой заметке. Они не только упростят взаимодействие с настройкой громкости динамиков/наушников, но и позволят настроить «горячие» клавиши для быстрого убавления/прибавления громкости. 👌
*
📌 По теме!
Значок громкости не реагирует или вообще пропал… Что делать — https://ocomp.info/propal-znachok-gromkosti.html
*
Как можно легко регулировать уровень громкости
Из вышесказанного уже, наверное, стало понятно, что нам понадобятся спец. утилиты. Первая, на которой хочу остановиться — Volume 2.
📌 Volume 2
Сайт: https://volume-2.ru.softonic.com/
Это альтернативный регулятор громкости (кстати, название этой утилиты это подчеркивает). После ее установки — у вас в трее появится еще один «значок динамика», который позволит вам быстро настраивать все аудио-параметры.
Разумеется, у Volume 2 есть и свой альтернативный регулятор громкости (который не зависит от стандартного, встроенного в Windows). См. скриншот ниже. 👇
Альтернативный регулятор громкости
Кстати, не могу также не отметить, что Volume 2 позволяет двумя кликами мышки изменить устройство воспроизведения по умолчанию, включить/выключить микрофоны, колонки, наушники и пр. Пример ниже.
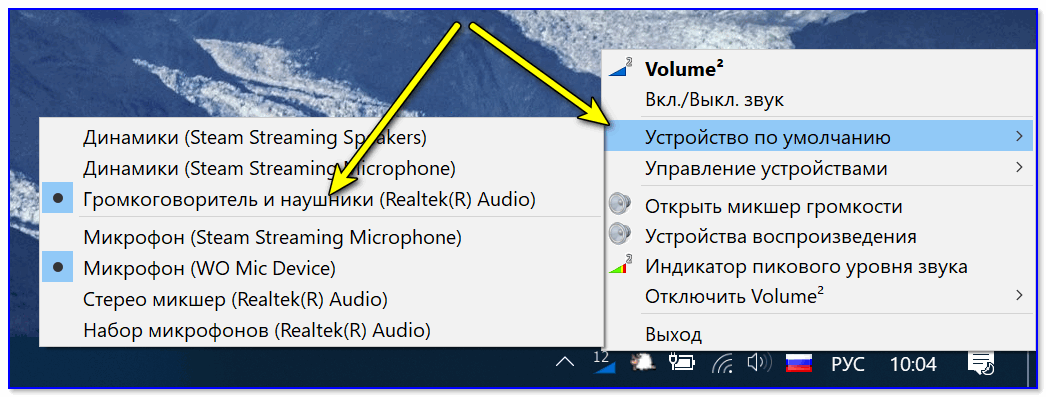
Устройство по умолчанию
Что касается настройки «горячих» клавиш: в параметрах утилиты есть спец. одноименный раздел, в котором можно задать нужные сочетания клавиш. В своем примере ниже для:
- увеличения громкости — я задал кнопки ALT + колесико мыши вверх;
- уменьшения громкости — ALT + колесико мыши вниз.
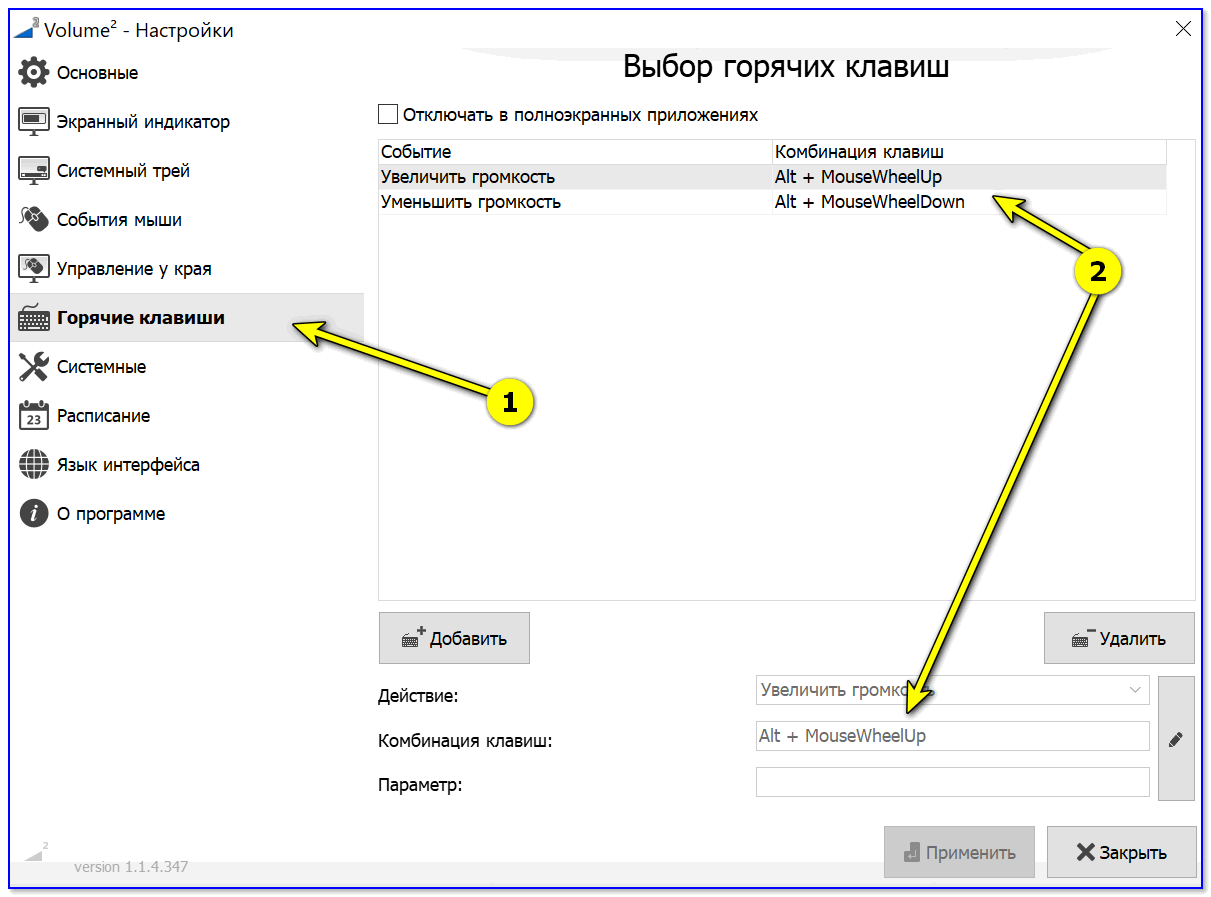
Выбор горячих клавиш для регулировки звука
📌 Важно!
Стоит отметить, что программа Volume 2 позволяет на «горячие» клавиши посадить очень много полезных действий:
- настраивать яркость экрана;
- выключать монитор;
- регулировать уровень громкости звука на не активном (альтернативном) устройстве;
- менять каналы;
- отправить ПК в сон, гибернацию или выключить его.
В общем и целом, приложение очень удобно и экономит время (тем более актуально, если есть проблемы со стандартной регулировкой (не всегда же переустанавливать Windows…)).
*
👉 Есть еще одна крайне простая утилита для регулировки громкости при помощи мышки (с альтернативным регулятором) — Volumouse (ссылка на офиц. сайт разработчика).
Несмотря на «старомодный» дизайн (и год выхода 2004) — утилита хорошо функционирует во всех современных ОС Windows 8/10/11.
Всё, что вам нужно сделать — это загрузить утилиту, запустить ее и можете сразу же зажать ALT + покрутить колёсико мыши — громкость изменится! На экране при этом появится небольшой регулятор громкости. См. пример ниже. 👇
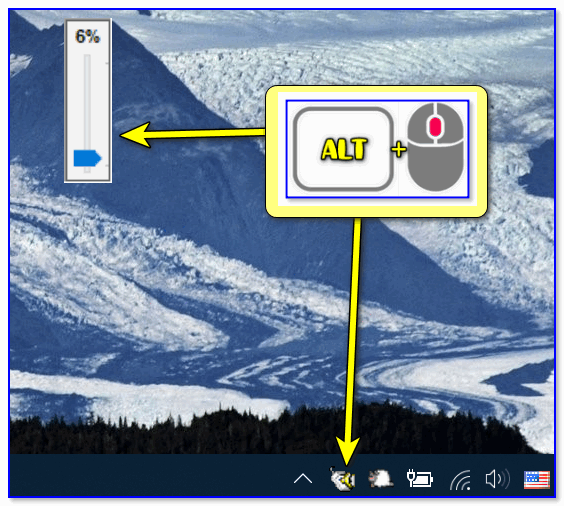
ALT + колесико мыши
Настройки программы минимальны: можно выбрать «горячие» клавиши, указать шаг регулировки, задать устройство воспроизведения по умолчанию и пр.
Утилита Volumouse
Думаю, что пары предложенных регуляторов будет более, чем достаточно. На всякий случай привожу чуть ниже пару ссылок на типовые проблемы со звуком.
📌 В помощь!
1) Что делать, если на компьютере нет звука
2) Тихий звук на компьютере — способы увеличения громкости
*
Дополнения по теме приветствуются!
Удачи!
👋
Первая публикация: 12.02.2020
Корректировка: 12.02.2022
5.07.2018 — 21:00
1
885+
размер текста
Наверняка вы сталкивались с ситуацией, когда необходимо быстро уменьшить громкость на компьютере или вообще ее выключить. Конечно же, для этой цели можно воспользоваться стандартными инструментами операционной системы или, скажем, прикрутить звук на колонках, но это не всегда бывает удобно. Рассмотрим небольшую программу, которая может назначить настройки изменения звука на комбинации клавиш и вращение колесика мышки.
Загрузка и установка Volumouse
С функцией регулировки громкости отлично справится программа Volumouse. Загрузить ее можно с сайта разработчика. Приложение доступно как в виде инсталлятора, так и в портативной версии. Мы рекомендуем использовать портативные приложения, так как они оставляют меньше следов в операционной системе.
Итак, загружаем файл, соответствующий разрядности вашей версии Windows, и распаковываем его в папку на жестком диске (разработчик называет портативную версию «for manual installation»). Дополнительно на этой же странице скачиваем файл русификации и распаковываем его в ту же папку. Установка закончена.
Регулировка громкости с Volumouse
Работает Volumouse очень просто. Перемещаем курсор мыши на открытое приложение, которое в данный момент воспроизводит звук, например на вкладку браузера. Далее нажимаем «Alt» и крутим колесико мышки для регулировки уровня громкости.

Дополнительные возможности Volumouse
Главное окно программы дает доступ к дополнительным функциям:
Вместо послесловия
Рассмотренная нами небольшая бесплатная программа Volumouse позволяет легко и просто настроить изменение уровня громкости с помощью горячих клавиш и колесика мыши. Как показывает практика, данная функция весьма удобная и практичная. А как вы регулируете уровень громкости на своем компьютере?