
Provide feedback
Saved searches
Use saved searches to filter your results more quickly
Sign up
Appearance settings
Защитник Windows (или Windows Defender) — встроенный в последние версии ОС антивирус от Microsoft — Windows 10 и 8 (8.1). Он работает по умолчанию, пока вы не установите какой-либо сторонний антивирус (а при установке, современные антивирусы отключают Защитник Windows. Правда, с недавних пор — не все) и обеспечивает, пусть не идеальную, но защиту от вирусов и вредоносных программ (хотя последние тесты говорят о том, что он стал сильно лучше, чем был). См. также: Как включить защитник Windows 10 (если он пишет, что это приложение отключено групповой политикой).
В этой инструкции — пошаговое описание того, как отключить Защитник Windows 10 и Windows 8.1, несколькими способами, а также о том, как включить его обратно при необходимости. Это может потребоваться в некоторых случаях, когда встроенный антивирус не дает установить программу или игру, считая их вредоносными, а возможно и в других ситуациях. Сначала описан способ отключения в последних версиях Windows 10 — 21H1, 2004, 1909, 1903, 1809 и 1803, а затем — в предыдущих версиях Windows 10, 8.1 и 8. Также в конце руководства приведены альтернативные способы выключения (не системными средствами). Примечание: возможно, более разумным будет добавить файл или папку в исключения защитника Windows 10. Также может быть полезным: Лучший бесплатный антивирус.
- Временное отключение Защитника Windows 10 в параметрах
- Как отключить Защитник Windows 10 в редакторе локальной групповой политики
- Отключение Защитника Windows 10 в редакторе реестра
- Отключение службы «Антивирусная программа Защитника Windows»
- Видео инструкция
- Программы, позволяющие отключить встроенный антивирус
- Как отключить Защитник в предыдущих версиях Windows 10 и 8.1
- Отключение защитника с помощью PowerShell (временное)
Как отключить Защитник Windows 10
В последних версиях Windows 10 отключение Защитника Windows несколько изменилось по сравнению с предыдущими версиями. Как и раньше, отключение возможно с использованием параметров (но в данном случае встроенный антивирус отключается лишь временно), либо с помощью редактора локальной групповой политики (только для Windows 10 Pro и Enterprise) или редактора реестра.
Временное отключение встроенного антивируса Windows 10 с помощью настройки параметров
Если вам не требуется полное отключение защитника, а необходимо лишь временно отключить его для установки какой-либо программы, вы можете сделать это следующем способом:
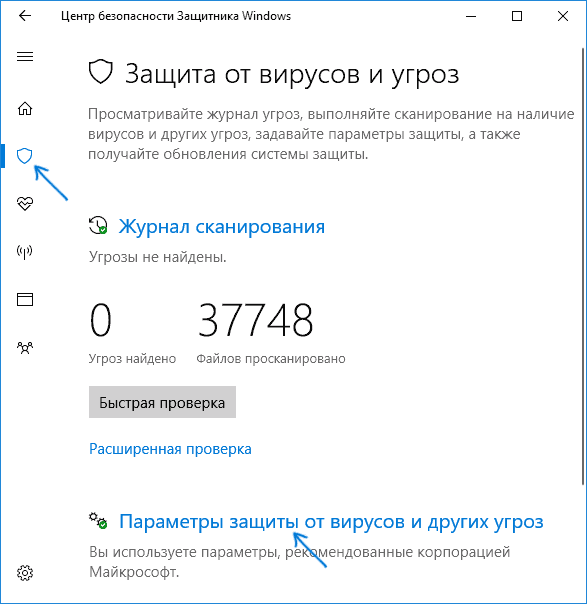
- Зайдите в «Центр безопасности Защитника Windows». Это можно сделать, дважды нажав мышью по значку защитника в области уведомлений справа внизу и выбрав «Открыть», либо в Параметры — Обновления и безопасность — Защитник Windows — Кнопка «Открыть Центр безопасности защитника Windows».
- В центре безопасности выберите страницу настройки защитника Windows — пункт «Защита от вирусов и угроз» (иконка с изображением щита), а затем нажмите «Управление настройками» в разделе «Параметры защиты от вирусов и других угроз».

- Отключите «Защита в режиме реального времени» и «Облачная защита».


При этом защитник Windows будет отключен лишь на некоторое время и в дальнейшем система снова задействует его. Также не забывайте о возможности добавления программы в исключения защитника. Если же требуется отключить его полностью, для этого потребуется использовать следующие способы.
Примечание: при использовании далее описанных способов, возможность настройки работы защитника Windows в параметрах станет неактивной (до тех пор, пока вы не вернете измененные в редакторе значения на значения по умолчанию).
Отключение Защитника Windows 10 в редакторе локальной групповой политики
Данный способ подойдет только для редакций Windows 10 Профессиональная и Корпоративная, если у вас Домашняя — в следующем разделе инструкции приведен способ с использованием редактора реестра.
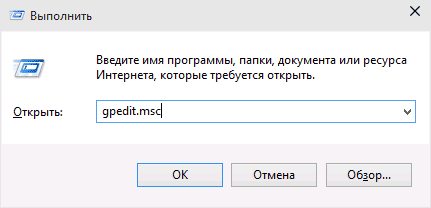
- Нажмите клавиши Win+R на клавиатуре и введите gpedit.msc
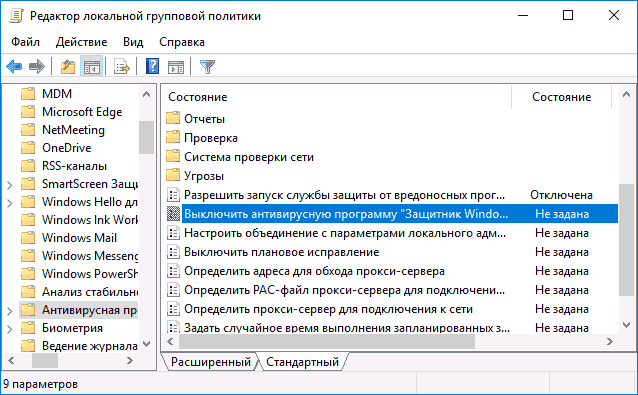
- В открывшемся редакторе локальной групповой политики перейдите к разделу «Конфигурация компьютера» — «Административные шаблоны» — «Компоненты Windows» — «Антивирусная программа Защитник Windows».

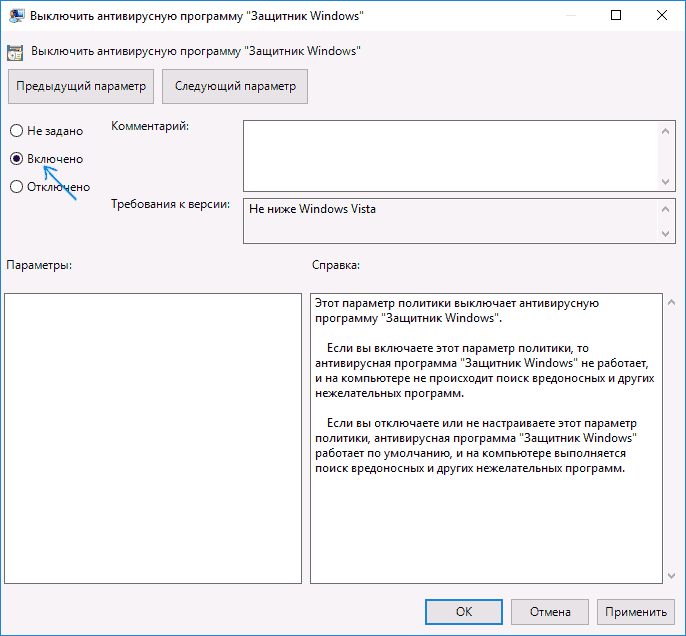
- Дважды нажмите по параметру «Выключить антивирусную программу Защитник Windows» и выберите «Включено» (именно так — «Включено» отключит антивирус).

- Аналогичным образом отключите параметры «Разрешить запуск службы защиты от вредоносных программ» и «Разрешить постоянную работу службы защиты от вредоносных программ» (установить «Отключено»).
- Зайдите в подраздел «Защита в режиме реального времени», дважды кликните по параметру «Выключить защиту в реальном времени» и установите «Включено».
- Дополнительно отключите параметр «Проверять все загруженные файлы и вложения» (здесь следует установить «Отключено»).
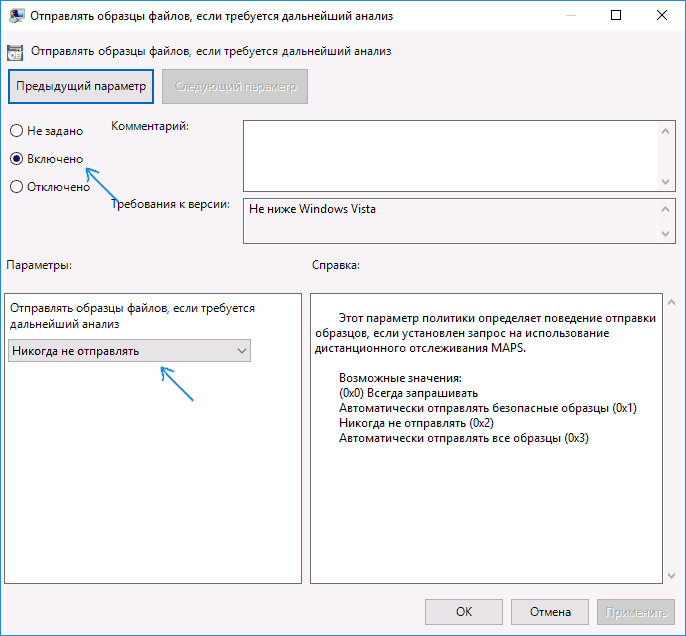
- В подразделе «MAPS» отключите все параметры, кроме «Отправлять образцы файлов».
- Для параметра «Отправлять образцы файлов, если требуется дальнейший анализ» установите «Включено», а внизу слева (в том же окне настройки политики) задайте «Никогда не отправлять».
Однако, в последних версиях Windows 10 этого недостаточно, дополнительно требуется отключить службу защитника Windows, причем сделать это просто в службах не получится. О том, как именно она отключается — в соответствующем разделе сразу после следующего способа.
Как полностью отключить защитник Windows 10 с помощью редактора реестра
Параметры, настраиваемые в редакторе локальной групповой политики можно задать и в редакторе реестра, тем самым отключив встроенный антивирус. Очень важное примечание: последняя версия Windows 10 не позволяет изменять указанные параметры реестра до тех пор, пока вы не отключите Защитник Windows 10 в параметрах, как это было описано в первом разделе инструкции. При этом обязательно требуется отключить и пункт Защита от подделки в том же разделе параметров.
Порядок действий будет следующим (примечание: при отсутствии каких-то из указанных разделов, вы можете их создать, нажав правой кнопкой мыши по «папке», находящейся на уровень выше и выбрав нужный пункт в контекстном меню):
- Нажмите клавиши Win+R, введите regedit и нажмите Enter.
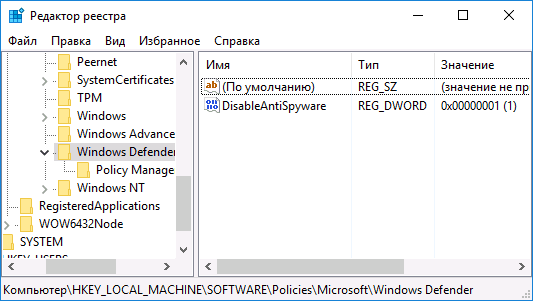
- В редакторе реестра перейдите к разделу
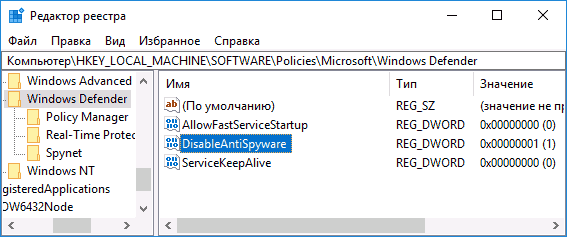
HKEY_LOCAL_MACHINE\SOFTWARE\Policies\Microsoft\Windows Defender
- В правой части редактора реестра нажмите правой кнопкой мыши, выберите «Создать» — «Параметр DWORD 32 бита» (даже если у вас 64-бит система) и задайте имя параметра DisableAntiSpyware

- После создания параметра дважды нажмите по нему и задайте значение 1.
- Там же создайте параметры AllowFastServiceStartup и ServiceKeepAlive — их значение должно быть 0 (ноль, задается по умолчанию).
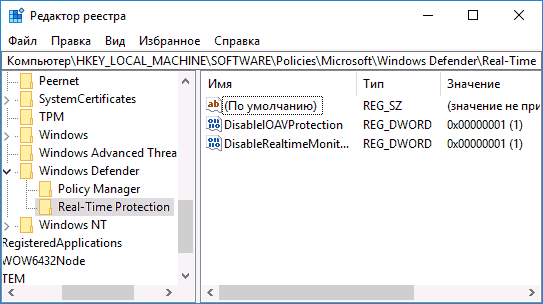
- В разделе Windows Defender выберите подраздел Real-Time Protection (или создайте его), а в нем создайте параметры с именами DisableIOAVProtection и DisableRealtimeMonitoring

- Дважды кликните по каждому из этих параметров и задайте значение 1.
- В разделе Windows Defender создайте подраздел Spynet, в нем создайте параметры DWORD32 с именами DisableBlockAtFirstSeen (значение 1), LocalSettingOverrideSpynetReporting (значение 0), SubmitSamplesConsent (значение 2). Это действие отключает проверку в облаке и блокировку неизвестных программ.

С этим закончили, но не торопитесь закрывать редактор реестра: для полного отключения защитника нужно также отключить соответствующую ему службу.
Отключение службы Антивирусная программа Защитника Windows
В завершение требуется отключить службу антивирусной программы защитника Windows, причем сделать это в services.msc не получится. Отключение возможно следующим методом:
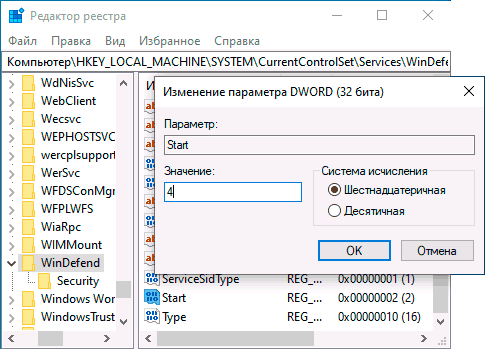
- Перезапустите Windows 10 в безопасном режиме, зайдите в редактор реестра (клавиши Win+R, ввести regedit) и перейдите к разделу
HKEY_LOCAL_MACHINE\SYSTEM\CurrentControlSet\Services\WinDefend
- Дважды кликните мышью по параметру Start в правой панели редактора реестра и задайте для него значение 4.

- Примените настройки, закройте редактор реестра и перезагрузите компьютер в обычном режиме.
Примечание: в последних версиях Windows 10 параметр Start в этих случаях меняется на 3 автоматически, но служба сама не запускается (при желании, однако, вы можете удалить в безопасном режиме весь раздел реестра WinDefend и тогда запуск службы станет невозможным даже вручную, но настоятельно рекомендую сначала экспортировать этот раздел для быстрого возврата, либо создать точку восстановления системы). Также может иметь смысл тем же способом (изменив параметр Start на 4) отключить службу wscsvc (Центр обеспечения безопасности) и Sense, соответствующие разделы реестра находятся в том же расположении.
Готово, теперь Защитник Windows 10 не будет работать.
Дополнительно: в последних обновлениях Windows 10 значок защитника Windows по умолчанию отображается в области уведомлений панели задач. Вы можете отключить её, зайдя в диспетчер задач (через правый клик по кнопке Пуск), включив подробный вид и выключив на вкладке «Автозагрузка» пункт Windows Defender Notification icon.
При следующей перезагрузке иконка отображаться не будет (тем не менее, защитник продолжит работать, если его не отключить описываемыми способами). Чтобы избавиться от уведомления о том, что отключена защита от вирусов, используйте инструкцию: Защита от вирусов и угроз — как отключить уведомление.
Как отключить защитник Windows 10 — видео инструкция
Ввиду того, что описываемое действие в Windows 10 не такое уж и элементарное, предлагаю также к просмотру видео, в котором показано два способа отключения защитника Windows 10.
Отключение защитника Windows 10 с помощью бесплатных программ
Есть множество бесплатных программ, позволяющих, помимо прочего, отключить защитник Windows 10, среди них можно отметить очень простую бесплатную утилиту Defender Control, а также следующие:
- Winaero Tweker — бесплатная программа для настройки параметров Windows 10. Отключение Защитника доступно в разделе Windows Defender. О возможностях программы и где её скачать: Настройка и оптимизация Windows 10 в Winaero Tweaker.

- O&O ShutUp 10 — еще одна бесплатная утилита для настройки поведения ОС, где доступна такая опция.

- Утилита Dism++
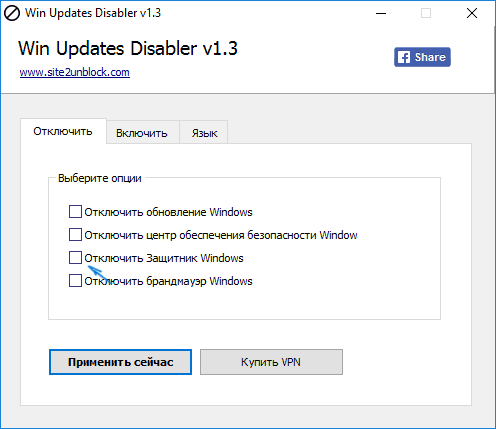
- Win Updates Disabler. Программа создавалась для отключения автоматических обновлений Windows 10, но может отключить (и, что важно — включить обратно) и другие функции, включая защитник и брандмауэр. Официальный сайт программы вы можете увидеть на скриншоте ниже.


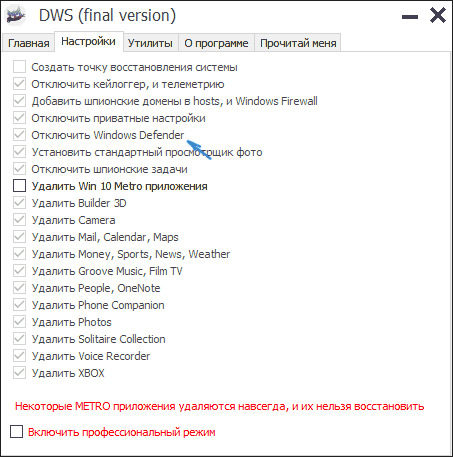
Еще один вариант — использование утилиты Destroy Windows 10 Spying или DWS, основная цель которой — отключение функций слежения в ОС, но, в настройках программы, если вкючить расширенный режим, вы можете также отключить и Защитник Windows (впрочем, он отключается в этой программе и по умолчанию).
Отключение защитника Windows 10 предыдущих версий и Windows 8.1
Необходимые действия, чтобы выключить Защитник Windows будут отличаться в двух последних версиях операционной системы от Microsoft. В общем случае, достаточно начать с выполнения следующих шагов в обеих ОС (но для Windows 10 процедура полного отключения защитника несколько сложнее, далее будет описано подробно).
Зайдите в панель управления: самым простым и быстрым способом для этого будет правый клик по кнопке «Пуск» и выбор соответствующего пункта меню.
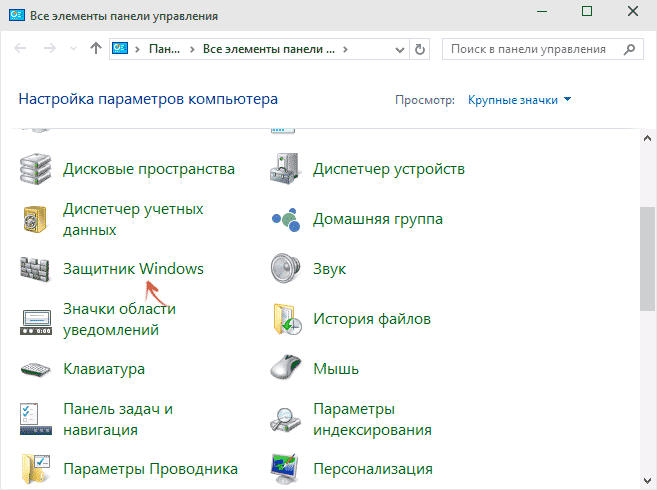
В панели управления, переключенной в вид «Значки» (в пункте «Просмотр» справа вверху), выберите «Защитник Windows».
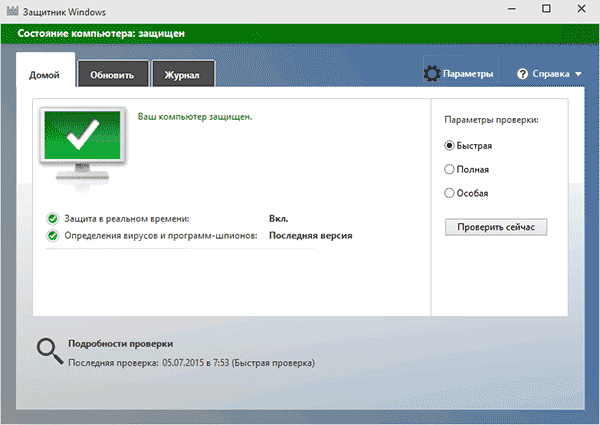
Запустится главное окно Защитника Windows (если вы увидите сообщение о том, что «Приложение отключено и не ведет наблюдение за компьютером», то, вероятнее всего, у вас просто установлен другой антивирус). В зависимости от того, какая версия ОС у вас установлена, выполните следующие шаги.
Windows 10
Стандартный способ (который не вполне работоспособен) отключения защитника Windows 10 выглядит таким образом:
- Зайдите в «Пуск» — «Параметры» (иконка с шестеренкой) — «Обновление и безопасность» — «Защитник Windows»
- Отключите пункт «Защита в реальном времени».

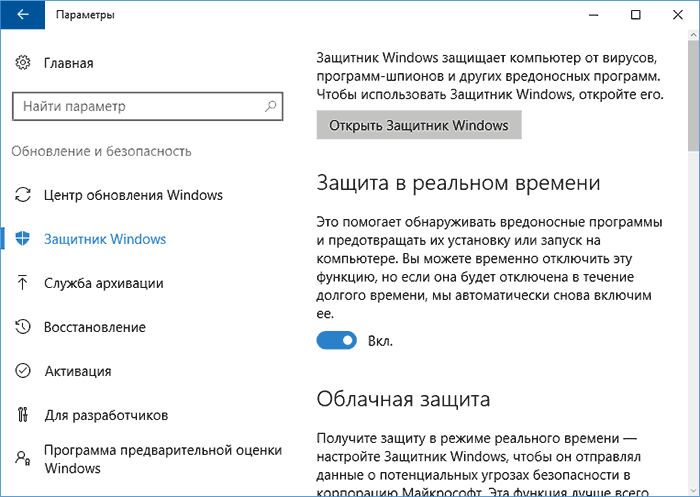
В результате защита будет отключена, но только на некоторое время: примерно через 15 минут она включится снова.
Если же такой вариант нам не подходит, то есть способы и полностью и навсегда отключить Защитник Windows 10 двумя способами — используя редактор локальной групповой политики или редактор реестра. Способ с редактором локальной групповой политики не подходит для Windows 10 Домашняя.
Для отключения с помощью редактора локальной групповой политики:
- Нажмите клавиши Win+R и введите gpedit.msc в окно «Выполнить».

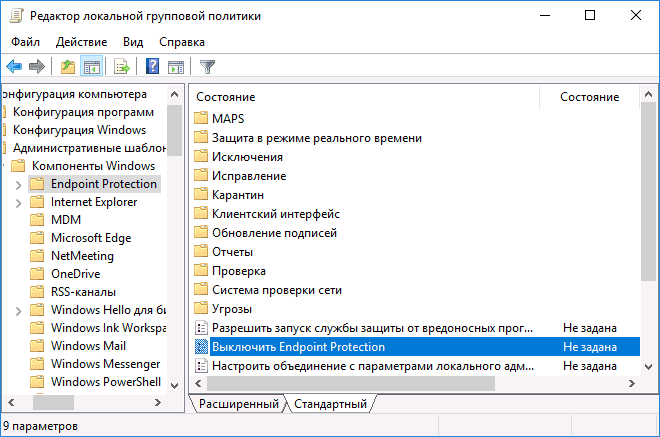
- Зайдите в Конфигурация компьютера — Административные шаблоны — Компоненты Windows — Антивирусная программа Защитник Windows (в версиях Windows 10 до 1703 — Endpoint Protection).

- В правой части редактора локальной групповой политики дважды кликните по пункту Выключить антивирусную программу защитник Windows (ранее — Выключить Endpoint Protection).
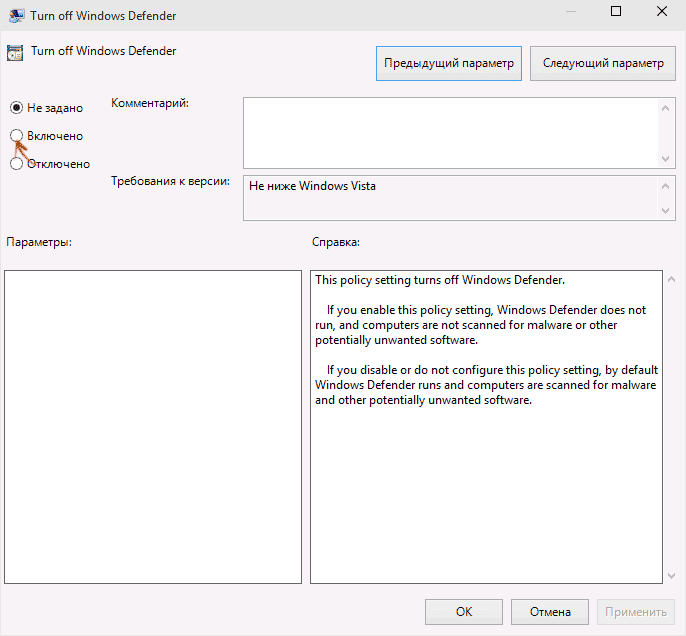
- Установите «Включено» для этого параметра, если требуется отключить защитник, нажмите «Ок» и выйдите из редактора (на скриншоте ниже параметр называется Turn off Windows Defender, таково его название было в ранних версиях Windows 10. Сейчас — Выключить антивирусную программу или выключить Endpoint Protection).
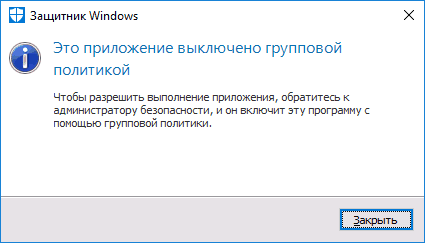
В результате служба защитника Windows 10 будет остановлена (т.е. он будет полностью отключен) и при попытке запуска защитника Windows 10 вы увидите сообщение об этом.
Также вы можете выполнить то же самое действия с помощью редактора реестра:
- Зайдите в редактор реестра (клавиши Win+R, ввести regedit)
- Перейдите к разделу реестра
HKEY_LOCAL_MACHINE\SOFTWARE\Policies\Microsoft\Windows Defender
- Создайте параметр DWORD с именем DisableAntiSpyware (если он отсутствует в данном разделе).
- Установите для данного параметра значение 0, чтобы защитник Windows был включен или 1, если его требуется отключить.

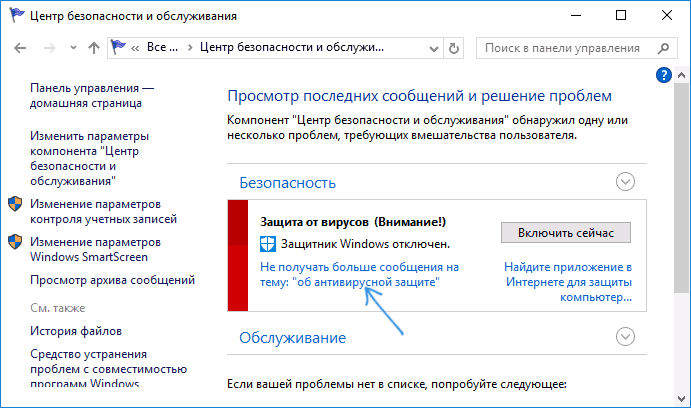
Готово, теперь, если встроенный антивирус от Microsoft вас и потревожит, то только уведомлениями о том, что он отключен. При этом, до первой перезагрузки компьютера, в области уведомлений панели задач вы будете видеть иконку защитника (после перезагрузки она исчезнет). Также появится уведомление о том, что защита от вирусов отключена. Чтобы убрать эти уведомления, кликните по нему, после чего в следующем окне нажмите «Не получать больше уведомлений об антивирусной защите»
Если отключения встроенного антивируса не произошло, далее есть описание способов отключить защитник Windows 10 с помощью бесплатных программ для этих целей.
Windows 8.1
Отключение Защитника Windows 8.1 куда проще, чем в предыдущем варианте. Все, что вам требуется — это:
- Зайдите в Панель управления — Защитник Windows.
- Откройте вкладку «Параметры», а затем пункт «Администратор».

- Снимите отметку «Включить приложение»
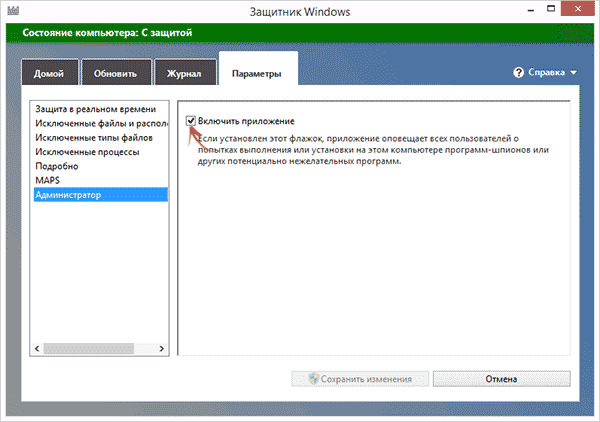
В результате вы увидите уведомление о том, что приложение отключено и не ведет наблюдение за компьютером — то, что нам и требовалось.
Отключение защитника Windows с помощью командной строки или PowerShell
Еще один способ отключить защитник Windows 10 (правда не навсегда, а только временно — также, как и при использовании параметров) — использование команды PowerShell. Windows PowerShell следует запустить от имени администратора, что можно сделать, используя поиск в панели задач, а затем — контекстное меню по правому клику мышью.
В окне PowerShell введите команду
Set-MpPreference -DisableRealtimeMonitoring $true
Сразу после ее выполнения защита в реальном времени будет отключена.
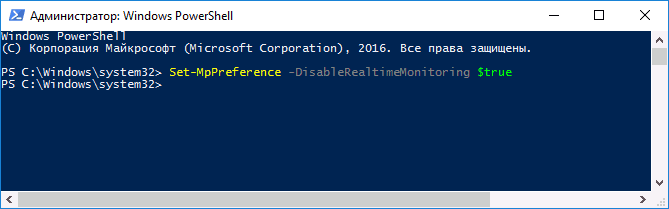
Чтобы использовать эту же команду в командной строке (также запущенной от имени администратора), просто введите powershell и пробел перед текстом команды.
Отключение уведомления «Включение защиты от вирусов»
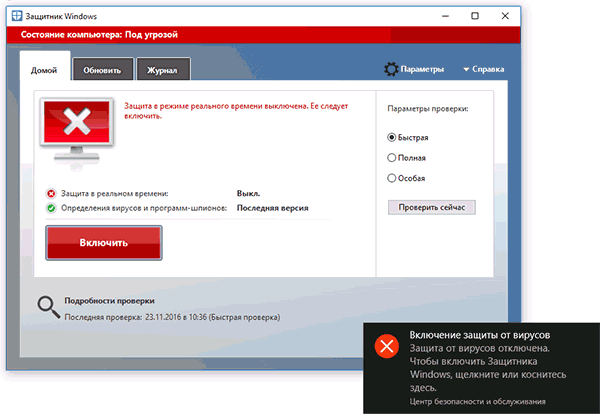
Если после действий по отключению защитника Windows 10 постоянно появляется уведомление «Включение защиты от вирусов. Защита от вирусов отключена», то для того чтобы убрать это уведомление, вы можете выполнить следующие шаги:
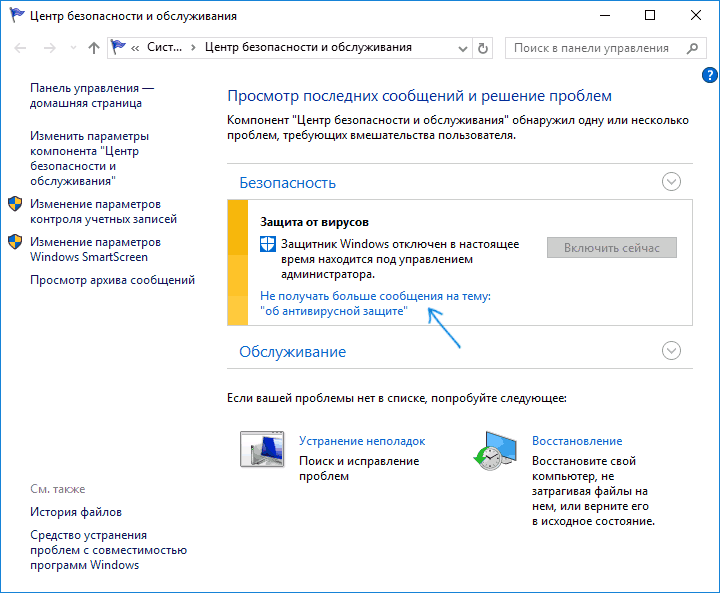
- С помощью поиска на панели задач зайдите в «Центр безопасности и обслуживания» (или найдите этот пункт в панели управления).
- В разделе «Безопасность» нажмите «Не получать больше сообщений на тему об антивирусной защите».

Готово, в дальнейшем вы не должны будете увидеть сообщений о том, что защитник Windows отключен.
Защитник Windows пишет Приложение отключено (как включить)
Обновление: подготовил обновленную и более полную инструкцию на эту тему: Как включить защитник Windows 10. Однако, если у вас установлена Windows 8 или 8.1, используйте шаги, описанные далее.
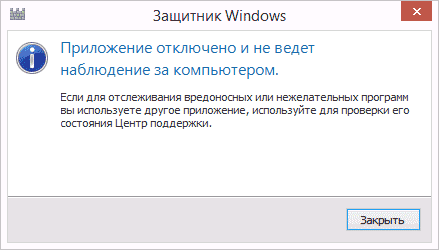
Если при входе в панель управления и выборе пункта «Защитник Windows», вы видите сообщение о том, что приложение отключено и не ведет наблюдение за компьютером, это может говорить о двух вещах:
- Защитник Windows отключен потому, что на вашем компьютере установлен другой антивирус. В этом случае ничего делать не стоит — после удаления сторонней антивирусной программы он включится автоматически.
- Вы сами выключили защитник Windows или он был отключен по какой-либо причине, тут вы можете его включить.
В Windows 10 для включения защитника Windows вы можете просто кликнуть по соответствующему сообщению в области уведомлений — все остальное система сделает за вас. За исключением того случая, когда вы использовали редактор локальной групповой политики или редактор реестра (в этом случае, следует проделать обратную операцию по включению защитника).
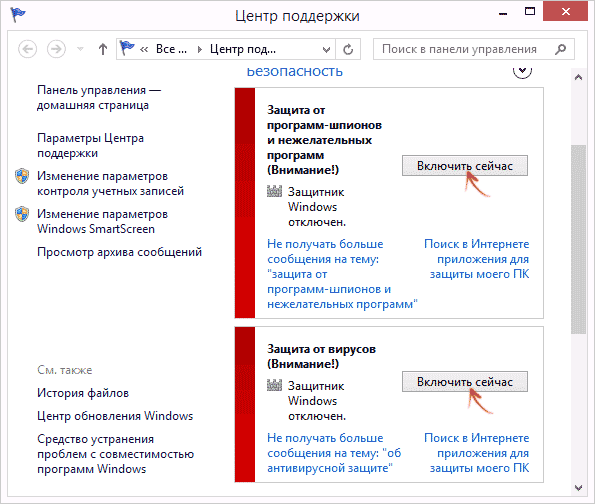
Для того, чтобы включить защитник Windows 8.1, зайдите в Центр поддержки (правый клик по «флажку» в области уведомлений). Вероятнее всего, вы увидите два сообщения: о том, что выключено защита от программ-шпионов и нежелательных программ и выключена защита от вирусов. Достаточно нажать «Включить сейчас», чтобы Защитник Windows снова запустился.
Многие программы для диагностики автомобилей боятся антивирусные программы, поэтому при установке лучше отключать и потом добавлять папку с установленной программой в исключения.

Данный способ поможет навсегда отключить внутренний защитник Windows 10 (но на всякий случай в в раздаче есть и файл для обратного включения внутреннего защитника Windows 10).
Для этого надо скачать файл, какой именно вам нужен. Запустить на вашем компьютере и когда вы зайдете в настройки защитника, то увидите «Нет активного поставщика антивирусной программы. Устройство уязвимо»

Кто боится запускать файлы, можете сами создать его, открываете блокнот вставляете текст который ниже и сохраняется с форматом .reg.
Отключение.
Windows Registry Editor Version 5.00
[HKEY_LOCAL_MACHINE\SOFTWARE\Policies\Microsoft\Windows Defender]
«DisableAntiSpyware»=dword:00000001
«AllowFastServiceStartup»=dword:00000000
«ServiceKeepAlive»=dword:00000000
[HKEY_LOCAL_MACHINE\SOFTWARE\Policies\Microsoft\Windows Defender\Real-Time Protection]
«DisableIOAVProtection»=dword:00000001
«DisableRealtimeMonitoring»=dword:00000001
[HKEY_LOCAL_MACHINE\SOFTWARE\Policies\Microsoft\Windows Defender\Spynet]
«DisableBlockAtFirstSeen»=dword:00000001
«LocalSettingOverrideSpynetReporting»=dword:00000000
«SubmitSamplesConsent»=dword:00000002
Включение.
Windows Registry Editor Version 5.00
[HKEY_LOCAL_MACHINE\SOFTWARE\Policies\Microsoft\Windows Defender]
«DisableAntiSpyware»=-
«AllowFastServiceStartup»=-
«ServiceKeepAlive»=-
[HKEY_LOCAL_MACHINE\SOFTWARE\Policies\Microsoft\Windows Defender\Real-Time Protection]
«DisableIOAVProtection»=-
«DisableRealtimeMonitoring»=-
[HKEY_LOCAL_MACHINE\SOFTWARE\Policies\Microsoft\Windows Defender\Spynet]
«DisableBlockAtFirstSeen»=-
«LocalSettingOverrideSpynetReporting»=-
«SubmitSamplesConsent»=-
-
Windows Support Forums
-
AntiVirus, Firewalls and System Security
You should upgrade or use an alternative browser.
Disable Windows Defender Completely.
-
Thread starter
Thread starterLance1
-
Start date
Start date
- Local time
- 4:23 AM
- Posts
- 893
- OS
- Windows 11 Pro 23H2
-
-
#1
[HKEY_LOCAL_MACHINE\SOFTWARE\Policies\Microsoft\Windows Defender]
«DisableAntiSpyware»=dword:00000001
«DisableRealtimeMonitoring»=dword:00000001
«DisableAntiVirus»=dword:00000001
«DisableSpecialRunningModes»=dword:00000001
«DisableRoutinelyTakingAction»=dword:00000001
«ServiceKeepAlive»=dword:00000000
[HKEY_LOCAL_MACHINE\SOFTWARE\Policies\Microsoft\Windows Defender\Real-Time Protection]
«DisableBehaviorMonitoring»=dword:00000001
«DisableOnAccessProtection»=dword:00000001
«DisableScanOnRealtimeEnable»=dword:00000001
«DisableRealtimeMonitoring»=dword:00000001
[HKEY_LOCAL_MACHINE\SOFTWARE\Policies\Microsoft\Windows Defender\Signature Updates]
«ForceUpdateFromMU»=dword:00000000
[HKEY_LOCAL_MACHINE\SOFTWARE\Policies\Microsoft\Windows Defender\Spynet]
«DisableBlockAtFirstSeen»=dword:00000001
My Computers
-
- OS
- Windows 11 Pro 23H2
- Computer type
- PC/Desktop
- Manufacturer/Model
- Custom Build By Lance1
- CPU
- Intel 12th Gen Intel Core i5-12600KF, 3686 MHz
- Motherboard
- GIGABYTE Z790 AORUS ELITE AX LGA 1700 Intel Z790 ATX
- Memory
- CORSAIR Vengeance 32GB (2 x 16GB) 288-Pin PC RAM DDR5 6400 (PC5 51200) Dual-Channel
- Graphics Card(s)
- GIGABYTE GeForce RTX 4060, 3x Fans, 8GB GDDR6 OC
- Sound Card
- AMD High Definition
- Monitor(s) Displays
- Samsung 32″ 60Hz 4ms Curved PLS LED
- Screen Resolution
- 1920 X 1080
- Hard Drives
- WD Blue NVME M.2 1T Boot Drive
WD Blue SSD 1T
WD Blue NVME M.2 2T
- PSU
- EVGA SuperNOVA 850 GT, 80 Plus Gold 850W, Fully Modular,
- Case
- Fractal Design Pop XL Air RGB Black TG ATX High-Airflow Clear Tempered Glass Window Full Tower
- Cooling
- Noctua NH-D15 chromax black, Dual Tower CPU Cooler with Dual NF-A15 PWM 140mm Fans (Black)
- Keyboard
- Devistator 3
- Mouse
- Inphic PM6 Pro
- Internet Speed
- Telus Fiber Optic: Download 332.7 Mbps / Upload 331.5 Mbps
- Browser
- Vivaldi (64bit)
- Antivirus
- Windows Defender
-
- Operating System
- Window 11 Pro
- Computer type
- Laptop
- Manufacturer/Model
- DELL Inspiron N7110
- CPU
- Intel(R) Core(TM) i3-2310M CPU @ 2.10GHz
- Motherboard
- Dell Inc. 0YH79Y
- Memory
- 4 GB DDR3
- Graphics card(s)
- Intel(R) HD Graphics 3000
- Sound Card
- High Definition Audio
- Monitor(s) Displays
- 17.3 Inch Display
- Screen Resolution
- 1600 X 900
- Hard Drives
- Samsung SSD 860 EVO 500GB
- Internet Speed
- Fiber Optic: Download 332.7 Mbps / Upload 331.5 Mbps
- Browser
- Vivaldi 64 bit
- Antivirus
- Windows Defender
- Other Info
- YA! This the old backup. In case things go south. It’ll give me access to everything I need.
-
-
#2
If you don’t like or want Defender on your system and you want it Completely Gone, there is a way BUT! You have to add to the registry. Values and Keys and a lot of them. I disabled Defender and installed another AV for testing. Never liked Defender. To give you an idea of how in-depth this is I’ll past the Values and Keys from Britec. Defender is so embedded into the Windows system that the average user will have no idea how to remove it. So My Post! Would you go this far? Or would you settle for what Microsoft says you need…[HKEY_LOCAL_MACHINE\SOFTWARE\Policies\Microsoft\Windows Defender]
«DisableAntiSpyware»=dword:00000001
«DisableRealtimeMonitoring»=dword:00000001
«DisableAntiVirus»=dword:00000001
«DisableSpecialRunningModes»=dword:00000001
«DisableRoutinelyTakingAction»=dword:00000001
«ServiceKeepAlive»=dword:00000000[HKEY_LOCAL_MACHINE\SOFTWARE\Policies\Microsoft\Windows Defender\Real-Time Protection]
«DisableBehaviorMonitoring»=dword:00000001
«DisableOnAccessProtection»=dword:00000001
«DisableScanOnRealtimeEnable»=dword:00000001
«DisableRealtimeMonitoring»=dword:00000001[HKEY_LOCAL_MACHINE\SOFTWARE\Policies\Microsoft\Windows Defender\Signature Updates]
«ForceUpdateFromMU»=dword:00000000[HKEY_LOCAL_MACHINE\SOFTWARE\Policies\Microsoft\Windows Defender\Spynet]
«DisableBlockAtFirstSeen»=dword:00000001
What about these few extra’s?
[HKEY_LOCAL_MACHINE\SOFTWARE\Policies\Microsoft\Windows Defender\Policy Manager]
[HKEY_LOCAL_MACHINE\SOFTWARE\Policies\Microsoft\Windows Defender\SmartScreen]
«ConfigureAppInstallControlEnabled»=dword:00000000
«ConfigureAppInstallControl»=»Anywhere»
[HKEY_LOCAL_MACHINE\SOFTWARE\Policies\Microsoft\Windows Defender\Spynet]
«SpyNetReporting»=dword:00000000
«SubmitSamplesConsent»=dword:00000002
My Computer
-
- OS
- Windows 11 Pro
- Computer type
- PC/Desktop
- Manufacturer/Model
- Custom Build
- CPU
- Intel Core i9 12900KF
- Motherboard
- ASUS ROG Maximus Z690 Hero
- Memory
- Corsair 64GB DDR5 Vengeance C40 5200Mhz
- Graphics Card(s)
- ASUS GeForce RTX 3090 ROG Strix OC 24GB
- Sound Card
- OnBoard
- Monitor(s) Displays
- Acer Predator XB323UGP 32″ QHD G-SYNC-C 144Hz 1MS IPS LED
- Screen Resolution
- 2560 x 1440
- Hard Drives
- 1x Samsung 980 Pro Series Gen4 250GB M.2 NVMe
1x Samsung 980 Pro Series Gen4 500GB M.2 NVMe
2x Samsung 980 Pro Series Gen4 2TB M.2 NVMe
- PSU
- Corsair AX1200i 1200W 80PLUS Titanium Modular
- Case
- Corsair 4000D Black Case w/ Tempered Glass Side Panel
- Cooling
- Noctua NH-U12A Chromax Black CPU Cooler, 4x Noctua 120mm Fans
- Keyboard
- Logitech MK545
- Mouse
- Logitech MX Master 3
- Internet Speed
- Fixed Wireless 150mbps/75mbps
- Browser
- Firefox
- Antivirus
- Kaspersky
- Other Info
- Thrustmaster TS-PC RACER
Fanatec CSL Elite Pedals with the Load Cell Kit
Yamaha Amp with Bose Speakers
- Local time
- 2:23 PM
- Posts
- 4,292
- OS
- Windows 11
-
-
#3
My Computer
-
- OS
- Windows 11
- Computer type
- PC/Desktop
- Manufacturer/Model
- HP Pavilion
- CPU
- AMD Ryzen 7 5700G
- Motherboard
- Erica6
- Memory
- Micron Technology DDR4-3200 16GB
- Graphics Card(s)
- NVIDIA GeForce RTX 3060
- Sound Card
- Realtek ALC671
- Monitor(s) Displays
- Samsung SyncMaster U28E590
- Screen Resolution
- 3840 x 2160
- Hard Drives
- SAMSUNG MZVLQ1T0HALB-000H1
- Local time
- 5:23 AM
- Posts
- 655
- OS
- Linux Mint
-
-
#4
My Computer
-
- OS
- Linux Mint
- Computer type
- Laptop
- Manufacturer/Model
- System76 Lemur Pro
- Local time
- 1:23 PM
- Posts
- 212
- OS
- Windows 11
-
-
#5
My Computer
-
- OS
- Windows 11
- Computer type
- PC/Desktop
- Manufacturer/Model
- —
- CPU
- 4770k
- Motherboard
- Asus Maximus Formula VI
- Memory
- 16 gb Kingston
- Graphics Card(s)
- 2070 super
- Local time
- 2:23 PM
- Posts
- 4,292
- OS
- Windows 11
-
-
#7
My Computer
-
- OS
- Windows 11
- Computer type
- PC/Desktop
- Manufacturer/Model
- HP Pavilion
- CPU
- AMD Ryzen 7 5700G
- Motherboard
- Erica6
- Memory
- Micron Technology DDR4-3200 16GB
- Graphics Card(s)
- NVIDIA GeForce RTX 3060
- Sound Card
- Realtek ALC671
- Monitor(s) Displays
- Samsung SyncMaster U28E590
- Screen Resolution
- 3840 x 2160
- Hard Drives
- SAMSUNG MZVLQ1T0HALB-000H1
- Local time
- 1:23 PM
- Posts
- 212
- OS
- Windows 11
-
-
#8
Have you tried Panda, WiseVector, 360 TSE or Adaware?I know your voice now, beware.
Panda yes 2 other no
My Computer
-
- OS
- Windows 11
- Computer type
- PC/Desktop
- Manufacturer/Model
- —
- CPU
- 4770k
- Motherboard
- Asus Maximus Formula VI
- Memory
- 16 gb Kingston
- Graphics Card(s)
- 2070 super
- Local time
- 11:23 AM
- Posts
- 4,991
- Location
-
Hafnarfjörður IS
- OS
- Windows XP,7,10,11 Linux Arch Linux
-
-
#9
Up to individuals so that’s their choice — but WD is so good now and integrated with OS to use minimal resources I’m not sure what the problem is here or why the OP doesn’t want it.
To me disabling WD seems a bit like saying I want a top of the range BMW but only want a Pinto engine in it.
Cheers
jimbo
My Computer
-
- OS
- Windows XP,7,10,11 Linux Arch Linux
- Computer type
- PC/Desktop
- CPU
- 2 X Intel i7
- Local time
- 9:23 PM
- Posts
- 270
- OS
- Windows 11 Pro
-
-
#10
My Computer
-
- OS
- Windows 11 Pro
- Computer type
- PC/Desktop
- Manufacturer/Model
- Custom
- CPU
- Ryzen 7 5800X3D
- Motherboard
- Asus TUF Gaming X570-Pro WiFi II
- Memory
- 64GB
- Graphics Card(s)
- AMD Radeon RX 6800 XT
- Sound Card
- Realtek ALC897 @ AMD K19.2
- Monitor(s) Displays
- AOC U34G2G4R3 [34″ LCD]
- Screen Resolution
- 3440×1440
- Hard Drives
- NVMe Samsung SSD 970 x 2
Samsung SSD 860 EVO 1TB
4TB ST4000DM004-2CV104
- PSU
- 750W Coolermaster V Series V750 80 Plus Gold
- Case
- Phanteks Enthoo Pro 2 D-RGB Tempered Glass Full Tower Black
- Internet Speed
- 250Mbps
- Browser
- Firefox / Chrome / Edge / Vivaldi
- Antivirus
- Bitdefender Total Security
- Local time
- 3:23 PM
- Posts
- 254
- Location
-
Dubai
- OS
- Windows 11 Education
-
-
#11
If you don’t like or want Defender on your system and you want it Completely Gone, there is a way BUT! You have to add to the registry. Values and Keys and a lot of them. I disabled Defender and installed another AV for testing. Never liked Defender. To give you an idea of how in-depth this is I’ll past the Values and Keys from Britec. Defender is so embedded into the Windows system that the average user will have no idea how to remove it. So My Post! Would you go this far? Or would you settle for what Microsoft says you need…[HKEY_LOCAL_MACHINE\SOFTWARE\Policies\Microsoft\Windows Defender]
«DisableAntiSpyware»=dword:00000001
«DisableRealtimeMonitoring»=dword:00000001
«DisableAntiVirus»=dword:00000001
«DisableSpecialRunningModes»=dword:00000001
«DisableRoutinelyTakingAction»=dword:00000001
«ServiceKeepAlive»=dword:00000000[HKEY_LOCAL_MACHINE\SOFTWARE\Policies\Microsoft\Windows Defender\Real-Time Protection]
«DisableBehaviorMonitoring»=dword:00000001
«DisableOnAccessProtection»=dword:00000001
«DisableScanOnRealtimeEnable»=dword:00000001
«DisableRealtimeMonitoring»=dword:00000001[HKEY_LOCAL_MACHINE\SOFTWARE\Policies\Microsoft\Windows Defender\Signature Updates]
«ForceUpdateFromMU»=dword:00000000[HKEY_LOCAL_MACHINE\SOFTWARE\Policies\Microsoft\Windows Defender\Spynet]
«DisableBlockAtFirstSeen»=dword:00000001
No need for all this. One simple batch file gets rid of Windows Defender completely from its roots. Running it again would restore it.
Download ToggleDefender
## Toggle Defender, AveYo 2022.01.15
## changed: comment personal configuration tweaks
sp ‘HKCU:\Volatile Environment’ ‘ToggleDefender’ @’
if ($(sc.exe qc windefend) -like ‘*TOGGLE*’) {$TOGGLE=7;$KEEP=6;$A=’Enable’;$S=’OFF’}else{$TOGGLE=6;$KEEP=7;$A=’Disable’;$S=’ON’}
## Comment to hide dialog prompt with Yes, No, Cancel (6,7,2)
if ($env:1 -ne 6 -and $env:1 -ne 7) {
$choice=(new-object -ComObject Wscript.Shell).Popup($A + ‘ Windows Defender?’, 0, ‘Defender is: ‘ + $S, 0x1033)
if ($choice -eq 2) {break} elseif ($choice -eq 6) {$env:1=$TOGGLE} else {$env:1=$KEEP}
}
## Without the dialog prompt above will toggle automatically
if ($env:1 -ne 6 -and $env:1 -ne 7) { $env:1=$TOGGLE }
## Cascade elevation
$u=0;$w=whoami /groups;if($w-like’*1-5-32-544*’){$u=1};if($w-like’*1-16-12288*’){$u=2};if($w-like’*1-16-16384*’){$u=3}
## Comment to not hide per-user toggle notifications
$notif=’HKCU:\SOFTWARE\Microsoft\Windows\CurrentVersion\Notifications\Settings\Windows.SystemToast.SecurityAndMaintenance’
ni $notif -ea 0|out-null; ri $notif.replace(‘Settings’,’Current’) -Recurse -Force -ea 0
sp $notif Enabled 0 -Type Dword -Force -ea 0; if ($TOGGLE -eq 7) {rp $notif Enabled -Force -ea 0}
## Comment to not relaunch systray icon
$L=»$envrogramFiles\Windows Defender\MSASCuiL.exe»; if (!(test-path $L)) {$L=’SecurityHealthSystray’}
if ($u -eq 2) {start $L -win 1}
## Reload from volatile registry as needed
$script=’-win 1 -nop -c & {$AveYo=’+»‘`r`r»+’ A LIMITED ACCOUNT PROTECTS YOU FROM UAC EXPLOITS ‘+»`r`r'»+’;$env:1=’+$env:1
$script+=’;$k=@();$k+=gp Registry::HKEY_Users\S-1-5-21*\Volatile* ToggleDefender -ea 0;iex($k[0].ToggleDefender)}’
$cmd=’powershell ‘+$script; $env:__COMPAT_LAYER=’Installer’
## 0: limited-user: must runas / 1: admin-user non-elevated: must runas [built-in lame uac bpass removed]
if ($u -lt 2) {
start powershell -args $script -verb runas -win 1; break
}
## 2: admin-user elevated: get ti/system via runasti lean and mean snippet [$window hide:0x0E080600 show:0x0E080610]
if ($u -eq 2) {
$A=[AppDomain]::CurrentDomain.»DefineDynami`cAssembly»(1,1).»DefineDynami`cModule»(1);$D=@();0..5|%{$D+=$A.»Defin`eType»(‘A’+$_,
1179913,[ValueType])} ;4,5|%{$D+=$D[$_].»MakeByR`efType»()} ;$I=[Int32];$J=»Int`Ptr»;$P=$I.module.GetType(«System.$J»); $F=@(0)
$F+=($P,$I,$P),($I,$I,$I,$I,$P,$D[1]),($I,$P,$P,$P,$I,$I,$I,$I,$I,$I,$I,$I,[Int16],[Int16],$P,$P,$P,$P),($D[3],$P),($P,$P,$I,$I)
$S=[String]; $9=$D[0].»DefinePInvok`eMethod»(‘CreateProcess’,»kernel`32″,8214,1,$I,@($S,$S,$I,$I,$I,$I,$I,$S,$D[6],$D[7]),1,4)
1..5|%{$k=$_;$n=1;$F[$_]|%{$9=$D[$k].»DefineFie`ld»(‘f’+$n++,$_,6)}};$T=@();0..5|%{$T+=$D[$_].»CreateT`ype»();$Z=[uintptr]::size
nv (‘T’+$_)([Activator]::CreateInstance($T[$_]))}; $H=$I.module.GetType(«System.Runtime.Interop`Services.Mar`shal»);
$WP=$H.»GetMeth`od»(«Write$J»,[type[]]($J,$J)); $HG=$H.»GetMeth`od»(«AllocHG`lobal»,[type[]]’int32′); $v=$HG.invoke($null,$Z)
‘TrustedInstaller’,’lsass’|%{if(!$pn){net1 start $_ 2>&1 >$null;$pn=[Diagnostics.Process]::GetProcessesByName($_)[0];}}
$WP.invoke($null,@($v,$pn.Handle)); $SZ=$H.»GetMeth`od»(«SizeOf»,[type[]]’type’); $T1.f1=131072; $T1.f2=$Z; $T1.f3=$v; $T2.f1=1
$T2.f2=1;$T2.f3=1;$T2.f4=1;$T2.f6=$T1;$T3.f1=$SZ.invoke($null,$T[4]);$T4.f1=$T3;$T4.f2=$HG.invoke($null,$SZ.invoke($null,$T[2]))
$H.»GetMeth`od»(«StructureTo`Ptr»,[type[]]($D[2],$J,’boolean’)).invoke($null,@(($T2-as $D[2]),$T4.f2,$false));$window=0x0E080600
$9=$T[0].»GetMeth`od»(‘CreateProcess’).Invoke($null,@($null,$cmd,0,0,0,$window,0,$null,($T4-as $D[4]),($T5-as $D[5]))); break
}
## Cleanup
rp Registry::HKEY_Users\S-1-5-21*\Volatile* ToggleDefender -ea 0
## Create registry paths
$wdp=’HKLM:\SOFTWARE\Policies\Microsoft\Windows Defender’
‘ Security Center\Notifications’,’\UX Configuration’,’\MpEngine’,’\Spynet’,’\Real-Time Protection’ |% {ni ($wdp+$_)-ea 0|out-null}
## Toggle Defender
if ($env:1 -eq 7) {
## enable notifications
rp ‘HKLM:\SOFTWARE\Policies\Microsoft\Windows Defender Security Center\Notifications’ DisableNotifications -Force -ea 0
rp ‘HKLM:\SOFTWARE\Policies\Microsoft\Windows Defender\UX Configuration’ Notification_Suppress -Force -ea 0
rp ‘HKLM:\SOFTWARE\Policies\Microsoft\Windows Defender\UX Configuration’ UILockdown -Force -ea 0
rp ‘HKLM:\SOFTWARE\Microsoft\Windows Defender Security Center\Notifications’ DisableNotifications -Force -ea 0
rp ‘HKLM:\SOFTWARE\Microsoft\Windows Defender\UX Configuration’ Notification_Suppress -Force -ea 0
rp ‘HKLM:\SOFTWARE\Microsoft\Windows Defender\UX Configuration’ UILockdown -Force -ea 0
## enable shell smartscreen and set to warn
rp ‘HKLM:\SOFTWARE\Policies\Microsoft\Windows\System’ EnableSmartScreen -Force -ea 0
sp ‘HKLM:\SOFTWARE\Policies\Microsoft\Windows\System’ ShellSmartScreenLevel ‘Warn’ -Force -ea 0
## enable store smartscreen and set to warn
gp Registry::HKEY_Users\S-1-5-21*\SOFTWARE\Microsoft\Windows\CurrentVersion\AppHost -ea 0 |% {
sp $_.PSPath ‘EnableWebContentEvaluation’ 1 -Type Dword -Force -ea 0
sp $_.PSPath ‘PreventOverride’ 0 -Type Dword -Force -ea 0
}
## enable chredge smartscreen + pua
gp Registry::HKEY_Users\S-1-5-21*\SOFTWARE\Microsoft\Edge\SmartScreenEnabled -ea 0 |% {
sp $_.PSPath ‘(Default)’ 1 -Type Dword -Force -ea 0
}
gp Registry::HKEY_Users\S-1-5-21*\SOFTWARE\Microsoft\Edge\SmartScreenPuaEnabled -ea 0 |% {
sp $_.PSPath ‘(Default)’ 1 -Type Dword -Force -ea 0
}
## enable legacy edge smartscreen
ri ‘HKLM:\SOFTWARE\Policies\Microsoft\MicrosoftEdge\PhishingFilter’ -Force -ea 0
## enable av
rp ‘HKLM:\SOFTWARE\Policies\Microsoft\Windows Defender\Real-Time Protection’ DisableRealtimeMonitoring -Force -ea 0
rp ‘HKLM:\SOFTWARE\Policies\Microsoft\Windows Defender’ DisableAntiSpyware -Force -ea 0
rp ‘HKLM:\SOFTWARE\Microsoft\Windows Defender’ DisableAntiSpyware -Force -ea 0
sc.exe config windefend depend= RpcSs
net1 start windefend
kill -Force -Name MpCmdRun -ea 0
start ($envrogramFiles+’\Windows Defender\MpCmdRun.exe’) -Arg ‘-EnableService’ -win 1
} else {
## disable notifications
sp ‘HKLM:\SOFTWARE\Policies\Microsoft\Windows Defender Security Center\Notifications’ DisableNotifications 1 -Type Dword -ea 0
sp ‘HKLM:\SOFTWARE\Policies\Microsoft\Windows Defender\UX Configuration’ Notification_Suppress 1 -Type Dword -Force -ea 0
sp ‘HKLM:\SOFTWARE\Policies\Microsoft\Windows Defender\UX Configuration’ UILockdown 0 -Type Dword -Force -ea 0
sp ‘HKLM:\SOFTWARE\Microsoft\Windows Defender Security Center\Notifications’ DisableNotifications 1 -Type Dword -ea 0
sp ‘HKLM:\SOFTWARE\Microsoft\Windows Defender\UX Configuration’ Notification_Suppress 1 -Type Dword -Force -ea 0
sp ‘HKLM:\SOFTWARE\Microsoft\Windows Defender\UX Configuration’ UILockdown 0 -Type Dword -Force -ea 0
## disable shell smartscreen and set to warn
sp ‘HKLM:\SOFTWARE\Policies\Microsoft\Windows\System’ EnableSmartScreen 0 -Type Dword -Force -ea 0
sp ‘HKLM:\SOFTWARE\Policies\Microsoft\Windows\System’ ShellSmartScreenLevel ‘Warn’ -Force -ea 0
## disable store smartscreen and set to warn
gp Registry::HKEY_Users\S-1-5-21*\SOFTWARE\Microsoft\Windows\CurrentVersion\AppHost -ea 0 |% {
sp $_.PSPath ‘EnableWebContentEvaluation’ 0 -Type Dword -Force -ea 0
sp $_.PSPath ‘PreventOverride’ 0 -Type Dword -Force -ea 0
}
## disable chredge smartscreen + pua
gp Registry::HKEY_Users\S-1-5-21*\SOFTWARE\Microsoft\Edge\SmartScreenEnabled -ea 0 |% {
sp $_.PSPath ‘(Default)’ 0 -Type Dword -Force -ea 0
}
gp Registry::HKEY_Users\S-1-5-21*\SOFTWARE\Microsoft\Edge\SmartScreenPuaEnabled -ea 0 |% {
sp $_.PSPath ‘(Default)’ 0 -Type Dword -Force -ea 0
}
## disable legacy edge smartscreen
sp ‘HKLM:\SOFTWARE\Policies\Microsoft\MicrosoftEdge\PhishingFilter’ EnabledV9 0 -Type Dword -Force -ea 0
## disable av
sp ‘HKLM:\SOFTWARE\Policies\Microsoft\Windows Defender\Real-Time Protection’ DisableRealtimeMonitoring 1 -Type Dword -Force
sp ‘HKLM:\SOFTWARE\Policies\Microsoft\Windows Defender’ DisableAntiSpyware 1 -Type Dword -Force -ea 0
sp ‘HKLM:\SOFTWARE\Microsoft\Windows Defender’ DisableAntiSpyware 1 -Type Dword -Force -ea 0
net1 stop windefend
sc.exe config windefend depend= RpcSs-TOGGLE
kill -Name MpCmdRun -Force -ea 0
start ($envrogramFiles+’\Windows Defender\MpCmdRun.exe’) -Arg ‘-DisableService’ -win 1
del ($envrogramData+’\Microsoft\Windows Defender\Scans\mpenginedb.db’) -Force -ea 0 ## Commented = keep scan history
del ($envrogramData+’\Microsoft\Windows Defender\Scans\History\Service’) -Recurse -Force -ea 0
}
## PERSONAL CONFIGURATION TWEAK — COMMENT OR UNCOMMENT ENTRIES TO TWEAK OR REVERT
#sp $wdp DisableRoutinelyTakingAction 1 -Type Dword -Force -ea 0 ## Auto Actions off
#rp $wdp DisableRoutinelyTakingAction -Force -ea 0 ## Auto Actions ON [default]
#sp ($wdp+’\MpEngine’) MpCloudBlockLevel 2 -Type Dword -Force -ea 0 ## Cloud blocking level HIGH
#rp ($wdp+’\MpEngine’) MpCloudBlockLevel -Force -ea 0 ## Cloud blocking level low [default]
#sp ($wdp+’\Spynet’) SpyNetReporting 2 -Type Dword -Force -ea 0 ## Cloud protection ADVANCED
#rp ($wdp+’\Spynet’) SpyNetReporting -Force -ea 0 ## Cloud protection basic [default]
#sp ($wdp+’\Spynet’) SubmitSamplesConsent 0 -Type Dword -Force -ea 0 ## Sample Submission ALWAYS-PROMPT
#rp ($wdp+’\Spynet’) SubmitSamplesConsent -Force -ea 0 ## Sample Submission automatic [default]
#sp ($wdp+’\Real-Time Protection’) RealtimeScanDirection 1 -Type Dword -Force -ea 0 ## Scan incoming file only
#rp ($wdp+’\Real-Time Protection’) RealtimeScanDirection -Force -ea 0 ## Scan INCOMING, OUTGOING file [default]
#sp $wdp PUAProtection 1 -Type Dword -Force -ea 0 ## Potential Unwanted Apps on [policy]
#rp $wdp PUAProtection -Force -ea 0 ## Potential Unwanted Apps off [default]
#sp ‘HKLM:\SOFTWARE\Microsoft\Windows Defender’ PUAProtection 1 -Type Dword -Force -ea 0 ## Potential Unwanted Apps ON [user]
#rp ‘HKLM:\SOFTWARE\Microsoft\Windows Defender’ PUAProtection -Force -ea 0 ## Potential Unwanted Apps off [default]
$env:1=$null
# done!
‘@ -Force -ea 0; $k=@();$k+=gp Registry::HKEY_Users\S-1-5-21*\Volatile* ToggleDefender -ea 0;iex($k[0].ToggleDefender)
#-_-# hybrid script, can be pasted directly into powershell console
My Computers
-
- OS
- Windows 11 Education
- Computer type
- Laptop
- Manufacturer/Model
- Razer Blade 16
- CPU
- AMD Ryzen AI 9 HX 370
- Motherboard
- Razer
- Memory
- 64 GB LPDDR5X 8000 MHz RAM
- Graphics Card(s)
- GeForce RTX 5090 24 GB GDDR7 VRAM
- Sound Card
- Six Speaker System THX Spatial Audio
- Monitor(s) Displays
- AOC Q27G3XMN 27″ QHD Mini LED Monitor
- Screen Resolution
- QHD (2560×1440)
- Hard Drives
- WD_BLACK SN850X 4TB+8TB SSD
- PSU
- 280W AC Power Adapter
- Cooling
- Noctua NT-H2 + Fujipoly Extreme Thermal Pads + Razer Laptop Cooling Pad
- Keyboard
- Razer BlackWidow V4 X
- Mouse
- Razer Basilisk V3 X HyperSpeed
- Internet Speed
- 1 GBPS Down / 330 MBPS Up
- Browser
- Google Chrome
- Antivirus
- McAfee AntiVirus
-
- Operating System
- Windows 11 Pro
- Computer type
- Laptop
- Manufacturer/Model
- Dell XPS 15 9500
- CPU
- Intel i7-10875H
- Memory
- Kingston FURY Impact 64 GB 3200 MHz DDR4 RAM
- Graphics card(s)
- nVIDIA GeForce GTX 1650 Ti Max-Q w/ 4 GB GDDR6
- Sound Card
- Realtek
- Monitor(s) Displays
- 15.6 UHD+ Touch, InfinityEdge, 500-nits, Anti-Reflecitve
- Screen Resolution
- 3840 x 2400
- Hard Drives
- Samsung 990 PRO 2TB + 4TB SSDs
- PSU
- Dell 130W Laptop Charger USB C Type C AC Adapter
- Cooling
- Noctua NT-H2 Thermal Paste on CPU + GPU
- Mouse
- Logitech MX Anywhere 3
- Internet Speed
- 1 GBPS Down / 350 MBPS Up
- Browser
- Google Chrome
- Antivirus
- Avast Free Antivirus
- Local time
- 4:23 AM
- Posts
- 382
- OS
- Windows 11
-
-
#12
My Computer
-
- OS
- Windows 11
- Computer type
- Laptop
- Manufacturer/Model
- Lenovo
- Graphics Card(s)
- NVIDA 1650 Ti
- Monitor(s) Displays
- Lenovo C32q-20
- Local time
- 4:23 AM
- Posts
- 382
- OS
- Windows 11
-
-
#13
No need for all this. One simple batch file gets rid of Windows Defender completely from its roots. Running it again would restore it.Download ToggleDefender
That batch feel needs updating. It’s been reported early in the new year it stopped working after a Windows (11) update. That’s why in March Defender Control was updated to 2.1.
My Computer
-
- OS
- Windows 11
- Computer type
- Laptop
- Manufacturer/Model
- Lenovo
- Graphics Card(s)
- NVIDA 1650 Ti
- Monitor(s) Displays
- Lenovo C32q-20
- Local time
- 4:23 AM
- Posts
- 893
- OS
- Windows 11 Pro 23H2
-
-
#14
My Computers
-
- OS
- Windows 11 Pro 23H2
- Computer type
- PC/Desktop
- Manufacturer/Model
- Custom Build By Lance1
- CPU
- Intel 12th Gen Intel Core i5-12600KF, 3686 MHz
- Motherboard
- GIGABYTE Z790 AORUS ELITE AX LGA 1700 Intel Z790 ATX
- Memory
- CORSAIR Vengeance 32GB (2 x 16GB) 288-Pin PC RAM DDR5 6400 (PC5 51200) Dual-Channel
- Graphics Card(s)
- GIGABYTE GeForce RTX 4060, 3x Fans, 8GB GDDR6 OC
- Sound Card
- AMD High Definition
- Monitor(s) Displays
- Samsung 32″ 60Hz 4ms Curved PLS LED
- Screen Resolution
- 1920 X 1080
- Hard Drives
- WD Blue NVME M.2 1T Boot Drive
WD Blue SSD 1T
WD Blue NVME M.2 2T
- PSU
- EVGA SuperNOVA 850 GT, 80 Plus Gold 850W, Fully Modular,
- Case
- Fractal Design Pop XL Air RGB Black TG ATX High-Airflow Clear Tempered Glass Window Full Tower
- Cooling
- Noctua NH-D15 chromax black, Dual Tower CPU Cooler with Dual NF-A15 PWM 140mm Fans (Black)
- Keyboard
- Devistator 3
- Mouse
- Inphic PM6 Pro
- Internet Speed
- Telus Fiber Optic: Download 332.7 Mbps / Upload 331.5 Mbps
- Browser
- Vivaldi (64bit)
- Antivirus
- Windows Defender
-
- Operating System
- Window 11 Pro
- Computer type
- Laptop
- Manufacturer/Model
- DELL Inspiron N7110
- CPU
- Intel(R) Core(TM) i3-2310M CPU @ 2.10GHz
- Motherboard
- Dell Inc. 0YH79Y
- Memory
- 4 GB DDR3
- Graphics card(s)
- Intel(R) HD Graphics 3000
- Sound Card
- High Definition Audio
- Monitor(s) Displays
- 17.3 Inch Display
- Screen Resolution
- 1600 X 900
- Hard Drives
- Samsung SSD 860 EVO 500GB
- Internet Speed
- Fiber Optic: Download 332.7 Mbps / Upload 331.5 Mbps
- Browser
- Vivaldi 64 bit
- Antivirus
- Windows Defender
- Other Info
- YA! This the old backup. In case things go south. It’ll give me access to everything I need.
- Local time
- 11:23 AM
- Posts
- 4,991
- Location
-
Hafnarfjörður IS
- OS
- Windows XP,7,10,11 Linux Arch Linux
-
-
#15
It’s not without it’s bugs, but the only way to disable Defender (100%) completely is installing and running Defender Control.
That site has so many «Entrapment links» before you get to the real file download and it doesn’t work anyway.
I’ve found absolutely no way to stop this wretched thing appearing on clean installs of W11 on latest builds whether using local account or not. You can even at first boot see there’s a problem with WD as the store isn’t even shown on the taskbar which it normally is when booting a new systyem ist time.

Update installs work OK — just clean installs whether using ISO’s from UUPDUMP or the ms site.
I’ve given up with W11 new installs on this computer for the moment — it fails whether as a VM or a real machine, whether on real HDD’s or vhdx files. None of the 10 zillion fixes on google work nor scannow or other commands to fix system files.
If this nonsense is going to happen when bog standard users finally do a mass switch — I wouldn’t like to be I.T admin !!!!
Cheers
jimbo
My Computer
-
- OS
- Windows XP,7,10,11 Linux Arch Linux
- Computer type
- PC/Desktop
- CPU
- 2 X Intel i7
- Local time
- 12:23 PM
- Posts
- 7,326
- OS
- Windows 11 Pro + Win11 Canary VM.
-
-
#16
I have Defender full enabled on my laptop with nvme drives and it idles at 1% cpu and very occasionally blips to a few % when it does a background scan after an update.
In the end running without an AV package is just dumb (It’s like peole saying I have never had an accident, so I never wear a seatbelt).
People can try and justify to the end of time why they feel they are more knowledgeable than hackers but in the end it is bullcrap. There is always some toerag out to get you — why make it easy?
I would not let any user attach a pc to my network if they have disabled all AVs.
My Computer
-
- OS
- Windows 11 Pro + Win11 Canary VM.
- Computer type
- Laptop
- Manufacturer/Model
- ASUS Zenbook 14
- CPU
- I9 13th gen i9-13900H 2.60 GHZ
- Motherboard
- Yep, Laptop has one.
- Memory
- 16 GB soldered
- Graphics Card(s)
- Integrated Intel Iris XE
- Sound Card
- Realtek built in
- Monitor(s) Displays
- laptop OLED screen
- Screen Resolution
- 2880×1800 touchscreen
- Hard Drives
- 1 TB NVME SSD (only weakness is only one slot)
- PSU
- Internal + 65W thunderbolt USB4 charger
- Case
- Yep, got one
- Cooling
- Stella Artois (UK pint cans — 568 ml) — extra cost.
- Keyboard
- Built in UK keybd
- Mouse
- Bluetooth , wireless dongled, wired
- Internet Speed
- 900 mbs (ethernet), wifi 6 typical 350-450 mb/s both up and down
- Browser
- Edge
- Antivirus
- Defender
- Other Info
- TPM 2.0, 2xUSB4 thunderbolt, 1xUsb3 (usb a), 1xUsb-c, hdmi out, 3.5 mm audio out/in combo, ASUS backlit trackpad (inc. switchable number pad)
Macrium Reflect Home V8
Office 365 Family (6 users each 1TB onedrive space)
Hyper-V (a vm runs almost as fast as my older laptop)
- Local time
- 11:23 AM
- Posts
- 4,991
- Location
-
Hafnarfjörður IS
- OS
- Windows XP,7,10,11 Linux Arch Linux
-
-
#17
The issue is not so much disabling defender — that is easy i.e. install another AV package. When people go out of their way to ask about deleting Defender, they never say why. It always seems to be gamers in pursuit of a tiny fps increase.I have Defender full enabled on my laptop with nvme drives and it idles at 1% cpu and very occasionally blips to a few % when it does a background scan after an update.
In the end running without an AV package is just dumb (It’s like peole saying I have never had an accident, so I never wear a seatbelt).
People can try and justify to the end of time why they feel they are more knowledgeable than hackers but in the end it is bullcrap. There is always some toerag out to get you — why make it easy?
I would not let any user attach a pc to my network if they have disabled all AVs.
The problem here is that I can’t get into the application to run anything on it at all — even a scan for malware !!!!!!!!
When it’s working WD is excellent — but an OS where the security package fails to open so you can’t even scan or change some settings is just plain useless.
I’m not sure why this app is such a problem —using 100% legal software and this is just after a clean install from an official W11 iso.
Cheers
jimbo
My Computer
-
- OS
- Windows XP,7,10,11 Linux Arch Linux
- Computer type
- PC/Desktop
- CPU
- 2 X Intel i7
- Local time
- 1:23 PM
- Posts
- 8
- OS
- Windows 11 26100 24H2 Pro & Opensuse Tumbleweed
-
-
#18
@cls
@echo off
>nul chcp 437
setlocal enabledelayedexpansion
title Group Policy Addins
>nul 2>&1 where powershell || (
echo.
echo Missing Critical files [powershell.exe]
echo.
pause
exit /b
)
rem == Destroy Defender Called from End OF Script
whoami|>nul findstr /i /c:»nt authority\system» && (
echo.
call :RunAtSystemLevel
timeout 6
exit
)
rem Credit ..
rem Bau For Run As TI Script
rem freddie-o, geepnozeex, St1ckys For Defender Script
cd /d «%~dp0»
:::: Run as administrator, AveYo: ps\vbs version
1>nul 2>nul fltmc || (
set «_=call «%~f0″ %*» & powershell -nop -c start cmd -args’/d/x/r’,$env:_ -verb runas || (
>»%temp%\Elevate.vbs» echo CreateObject^(«Shell.Application»^).ShellExecute «%~dpf0», «%*» , «», «runas», 1
>nul «%temp%\Elevate.vbs» & del /q «%temp%\Elevate.vbs» )
exit)
echo.
set Policies=HKEY_LOCAL_MACHINE\SOFTWARE\Policies
set Key=»HKEY_LOCAL_MACHINE\SOFTWARE\Microsoft\Windows NT\CurrentVersion\SystemRestore»
>nul 2>&1 REG ADD !Key! /f /v DisableSR /t REG_DWORD /d 1
>nul 2>&1 REG ADD !Key! /f /v DisableConfig /t REG_DWORD /d 1
set Key=»%Policies%\Microsoft\Windows NT\SystemRestore»
>nul 2>&1 REG ADD !Key! /f /v DisableSR /t REG_DWORD /d 1
>nul 2>&1 REG ADD !Key! /f /v DisableConfig /t REG_DWORD /d 1
echo == Disable Malicious Software Reporting Tool
set Key=»%Policies%\Microsoft\MRT»
>nul 2>&1 REG ADD !Key! /f /v DontReportInfectionInformation /t REG_DWORD /d «1»
>nul 2>&1 REG ADD !Key! /f /v DontOfferThroughWUAU /t REG_DWORD /d «1»
echo == Disable Windows Defender Security Center Notifications
>nul 2>&1 REG ADD «%Policies%\Microsoft\Windows Defender Security Center\Notifications» /f /v DisableNotifications /t REG_DWORD /d «1»
>nul 2>&1 REG ADD «%Policies%\Microsoft\Windows Defender Security Center\Notifications» /f /v DisableEnhancedNotifications /t REG_DWORD /d «1»
echo == Hide Windows Security Systray
>nul 2>&1 REG ADD «%Policies%\Microsoft\Windows Defender Security Center\Systray» /f /v HideSystray /t REG_DWORD /d «1»
echo == Turn off Windows Defender
>nul 2>&1 REG ADD «%Policies%\Microsoft\Windows Defender» /f /v DisableAntiSpyware /t REG_DWORD /d «1»
echo == Disable smartscreen
>nul 2>&1 REG ADD «%Policies%\Microsoft\Windows\System» /f /v EnableSmartScreen /t REG_DWORD /d «0»
>nul 2>&1 REG ADD «%Policies%\Microsoft\Windows Defender\SmartScreen» /f /v ConfigureAppInstallControlEnabled /t REG_DWORD /d «0»
>nul 2>&1 REG ADD «%Policies%\Microsoft\Windows Defender\SmartScreen» /f /v ConfigureAppInstallControl /t REG_SZ /d «Anywhere»
>nul 2>&1 REG ADD «%Policies%\Microsoft\Internet Explorer\PhishingFilter» /f /v Enabled /t REG_DWORD /d «0»
>nul 2>&1 REG ADD «%Policies%\Microsoft\Internet Explorer\PhishingFilter» /f /v EnabledV8 /t REG_DWORD /d «0»
>nul 2>&1 REG ADD «%Policies%\Microsoft\Internet Explorer\PhishingFilter» /f /v EnabledV9 /t REG_DWORD /d «0»
>nul 2>&1 REG ADD «%Policies%\Microsoft\Windows\CurrentVersion\Internet Settings\Lockdown_Zones\3» /f /v 2301 /t REG_DWORD /d «3»
>nul 2>&1 REG ADD «HKEY_LOCAL_MACHINE\SOFTWARE\Microsoft\PolicyManager\default\Browser\AllowSmartScreen» /f /v value /t REG_DWORD /d «0»
>nul 2>&1 REG ADD «HKEY_LOCAL_MACHINE\SOFTWARE\Microsoft\Windows\CurrentVersion\Explorer» /f /v SmartScreenEnabled /t REG_SZ /d «Off»
echo == Disable smartscreen for store and apps
>nul 2>&1 REG ADD «HKEY_CURRENT_USER\SOFTWARE\Microsoft\Windows\CurrentVersion\AppHost» /f /v EnableWebContentEvaluation /t REG_DWORD /d «0»
>nul 2>&1 REG ADD «HKEY_CURRENT_USER\SOFTWARE\Microsoft\Windows\CurrentVersion\AppHost» /f /v PreventOverride /t REG_DWORD /d «0»
>nul 2>&1 REG ADD «HKEY_CURRENT_USER\SOFTWARE\Microsoft\Windows Security Health\State» /f /v AppAndBrowser_StoreAppsSmartScreenOff /t REG_DWORD /d «0»
echo == Disable smartscreen for microsoft edge
>nul 2>&1 REG ADD «HKEY_CURRENT_USER\SOFTWARE\Microsoft\Edge» /f /v SmartScreenEnabled /t REG_DWORD /d «0»
>nul 2>&1 REG ADD «HKEY_CURRENT_USER\SOFTWARE\Microsoft\Edge» /f /v SmartScreenPuaEnabled /t REG_DWORD /d «0»
>nul 2>&1 REG ADD «HKEY_CURRENT_USER\SOFTWARE\Microsoft\Windows Security Health\State» /f /v AppAndBrowser_EdgeSmartScreenOff /t REG_DWORD /d «0»
call :RunAsTI «%~dpf0»
timeout 10
exit
:RunAtSystemLevel
:RunAtSystemLevel
:RunAtSystemLevel
echo == Delete Windows Defender Services
for %%A IN (WinDefend, WdBoot, WdFilter, Sense, WdNisDrv, WdNisSvc) do (
>nul 2>&1 sc config %%A start=disabled
>nul 2>&1 sc stop %%A
>nul 2>&1 reg delete «HKEY_LOCAL_MACHINE\SYSTEM\ControlSet001\Services\%%A» /f
)
echo == Close Windows Defender Application
for %%A IN (SecurityHealthService.exe, SecurityHealthSystray.exe, smartscreen.exe, MpCmdRun.exe) do >nul 2>&1 taskkill /im %%A
echo == Delete Windows Defender scheduled tasks
>nul 2>&1 reg delete «HKEY_LOCAL_MACHINE\SOFTWARE\Microsoft\Windows NT\CurrentVersion\Schedule\TaskCache\Tree\Microsoft\Windows\Windows Defender» /f
echo == Disable Malicious Software Reporting Tool
>nul 2>&1 reg delete «HKEY_LOCAL_MACHINE\SOFTWARE\Microsoft\Windows NT\CurrentVersion\Image File Execution Options\MRT.exe» /f
echo == Remove Defender Components
call :export cson > «%temp%\Windows.10.Defender_Uninstall.ps1»
>nul 2>&1 powershell -noprofile -executionpolicy bypass -file «%temp%\Windows.10.Defender_Uninstall.ps1»
echo == Remove Temper Protection
set Key=»HKEY_LOCAL_MACHINE\SOFTWARE\Microsoft\Windows Defender\Features»
>nul 2>&1 call :reg_own !key! «» S-1-5-114 «» Allow FullControl
>nul 2>&1 call :reg_own !key! «» S-1-5-32-544 «» Allow FullControl
>nul 2>&1 REG ADD !Key! /f /v DisableAntiSpyware /t REG_DWORD /d 1
>nul 2>&1 REG ADD !Key! /f /v TamperProtection /t REG_DWORD /d 0
echo == Remove Windows Defender Folder
>nul 2>&1 call estryFolder «%ProgramFiles%\Windows Defender»
>nul 2>&1 call estryFolder «%ProgramFiles(x86)%\Windows Defender»
>nul 2>&1 call estryFolder «%ALLUSERSPROFILE%\Windows Defender»
>nul 2>&1 call estryFolder «%ProgramFiles%\Windows Defender Advanced Threat Protection»
>nul 2>&1 call estryFolder «%ProgramFiles(x86)%\Windows Defender Advanced Threat Protection»
>nul 2>&1 call estryFolder «%ALLUSERSPROFILE%\Microsoft\Windows Defender Advanced Threat Protection»
goto :eof
estryFolder
set targetFolder=%*
if exist %targetFolder% (
rd /s /q %targetFolder%
if exist %targetFolder% (
for /f «tokens=*» %%g in (‘dir /b/s /a-d %targetFolder%’) do move /y «%%g» «%temp%»
rd /s /q %targetFolder%
)
)
goto :eof
:export
rem AveYo’s :export text attachments snippet
setlocal enabledelayedexpansion || Prints all text between lines starting with :NAME:[ and :NAME:] — A pure batch snippet by AveYo
set [=&for /f «delims=:» %%s in (‘findstr/nbrc:»:%~1:\[» /c:»:%~1:\]» «%~f0″‘) do if defined [ (set/a ]=%%s-3) else set/a [=%%s-1
<«%~fs0» ((for /l %%i in (0 1 %[%) do set /p =)&for /l %%i in (%[% 1 %]%) do (set txt=&set /p txt=&echo(!txt!)) &endlocal &exit/b
:cson:[
#—————————————————————
# Windows.10.Defender_Uninstall.ps1
# IMPORTANT: Run as Administrator or for the better as TrustedInstaller
# Stuff/Windows.10.Defender_Uninstall.ps1 at main · St1ckys/Stuff
#—————————————————————
Set-ItemProperty -Path «REGISTRY::HKEY_LOCAL_MACHINE\SOFTWARE\Microsoft\Windows\CurrentVersion\Component Based Servicing\Packages\*Windows-Defender*» -Name Visibility -Value «1»
Remove-Item -Path «REGISTRY::HKEY_LOCAL_MACHINE\SOFTWARE\Microsoft\Windows\CurrentVersion\Component Based Servicing\Packages\*Windows-Defender*» -Include *Owner* -Recurse -Force | Out-Null
Get-ChildItem -Path «REGISTRY::HKEY_LOCAL_MACHINE\SOFTWARE\Microsoft\Windows\CurrentVersion\Component Based Servicing\Packages\*Windows-Defender*» -Name | ForEach-Object {dism /online /remove-package /PackageName:$_ /NoRestart}
:cson:]
#:RunAsTI: #1 snippet to run as TI/System, with /high priority, /priv ownership, explorer and HKCU load
set ^ #=& set «0=%~f0″& set 1=%*& powershell -nop -c iex(([io.file]::ReadAllText($env:0)-split’:RunAsTI\:.*’)[1])& exit/b
$_CAN_PASTE_DIRECTLY_IN_POWERSHELL=’^,^’; function RunAsTI ($cmd) { $id=’RunAsTI’; $sid=((whoami /user)-split’ ‘)[-1]; $code=@’
$ti=(whoami /groups)-like»*1-16-16384*»; $DM=[AppDomain]::CurrentDomain.»DefineDynamicAss`embly»(1,1).»DefineDynamicMod`ule»(1)
$D=@(); 0..5|% {$D+=$DM.»DefineT`ype»(«M$_»,1179913,[ValueType])}; $I=[int32];$P=$I.module.gettype(«System.Int`Ptr»); $U=[uintptr]
$D+=$U; 4..6|% {$D+=$D[$_].»MakeB`yRefType»()};$M=$I.module.gettype(«System.Runtime.Interop`Services.Mar`shal»);$Z=[uintptr]::size
$S=[string]; $F=»kernel»,»advapi»,»advapi»,($S,$S,$I,$I,$I,$I,$I,$S,$D[7],$D[8]),($U,$S,$I,$I,$D[9]),($U,$S,$I,$I,[byte[]],$I)
0..2|% {$9=$D[0].»DefinePInvokeMeth`od»((«CreateProcess»,»RegOpenKeyEx»,»RegSetValueEx»)[$_],$F[$_]+’32’,8214,1,$S,$F[$_+3],1,4)}
$DF=0,($P,$I,$P),($I,$I,$I,$I,$P,$D[1]),($I,$S,$S,$S,$I,$I,$I,$I,$I,$I,$I,$I,[int16],[int16],$P,$P,$P,$P),($D[3],$P),($P,$P,$I,$I)
1..5|% {$k=$_;$n=1;$AveYo=1; $DF[$_]|% {$9=$D[$k].»DefineFie`ld»(‘f’+$n++,$_,6)}}; $T=@(); 0..5|% {$T+=$D[$_].»CreateT`ype»()}
0..5|% {nv «A$_» ([Activator]::CreateInstance($T[$_])) -force}; function F ($1,$2) {$T[0].»GetMeth`od»($1).invoke(0,$2)};
if (!$ti) { $g=0; «TrustedInstaller»,»lsass»|% {if (!$g) {net1 start $_ 2>&1 >$null; $g=@(get-process -name $_ -ea 0|% {$_})[0]}}
function M($1,$2,$3){$M.»GetMeth`od»($1,[type[]]$2).invoke(0,$3)}; $H=@(); $Z,(4*$Z+16)|% {$H+=M «AllocHG`lobal» $I $_};
M «WriteInt`Ptr» ($P,$P) ($H[0],$g.Handle); $A1.f1=131072;$A1.f2=$Z;$A1.f3=$H[0];$A2.f1=1;$A2.f2=1;$A2.f3=1;$A2.f4=1;$A2.f6=$A1
$A3.f1=10*$Z+32;$A4.f1=$A3;$A4.f2=$H[1]; M «StructureTo`Ptr» ($D[2],$P,[boolean]) (($A2 -as $D[2]),$A4.f2,$false); $w=0x0E080600
$out=@($null,»powershell -win 1 -nop -c iex `$env:A»,0,0,0,$w,0,$null,($A4 -as $T[4]),($A5 -as $T[5])); F «CreateProcess» $out
} else { $env:A=»; $PRIV=[uri].module.gettype(«System.Diagnostics.Process»).»GetMeth`ods»(42) |? {$_.Name -eq «SetPrivilege»}
«SeSecurityPrivilege»,»SeTakeOwnershipPrivilege»,»SeBackupPrivilege»,»SeRestorePrivilege» |% {$PRIV.Invoke(0, @(«$_»,2))}
$HKU=[uintptr][uint32]2147483651; $LNK=$HKU; $reg=@($HKU,»S-1-5-18″,8,2,($LNK -as $D[9])); F «RegOpenKeyEx» $reg; $LNK=$reg[4]
function SYM($1,$2){$b=[Text.Encoding]::Unicode.GetBytes(«\Registry\User\$1″);@($2,»SymbolicLinkValue»,0,6,[byte[]]$b,$b.Length)}
F «RegSetValueEx» (SYM $(($key-split’\\’)[1]) $LNK); $EXP=»HKLM:\Software\Classes\AppID\{CDCBCFCA-3CDC-436f-A4E2-0E02075250C2}»
$r=»explorer»; if (!$cmd) {$cmd=’C:\’}; $dir=test-path -lit ((($cmd -split ‘^(«[^»]+»)|^([^\s]+)’) -ne»)[0].trim(‘»‘)) -type 1
if (!$dir) {$r=»start `»$id`» /high /w»}; sp $EXP RunAs » -force; start cmd -args («/q/x/d/r title $id && $r»,$cmd) -wait -win 1
do {sleep 7} while ((gwmi win32_process -filter ‘name=»explorer.exe»‘|? {$_.getownersid().sid -eq «S-1-5-18»}))
F «RegSetValueEx» (SYM «.Default» $LNK); sp $EXP RunAs «Interactive User» -force } # lean and mean snippet by AveYo, 2018-2021
‘@; $key=»Registry::HKEY_USERS\$sid\Volatile Environment»; $a1=»`$id=’$id’;`$key=’$key’;»;$a2=»`$cmd=’$($cmd-replace»‘»,»»»)’;`n»
sp $key $id $($a1,$a2,$code) -type 7 -force; $arg=»$a1 `$env:A=(gi `$key).getvalue(`$id)-join»;rp `$key `$id -force; iex `$env:A»
$_PRESS_ENTER=’^,^’; start powershell -args «-win 1 -nop -c $arg» -verb runas }; <#,#> RunAsTI $env:1; #:RunAsTI:
:reg_own #key [optional] all user owner access permission : call :reg_own «HKCU\My» «» S-1-5-32-544 «» Allow FullControl
powershell -nop -c $A=’%~1′,’%~2′,’%~3′,’%~4′,’%~5′,’%~6′;iex(([io.file]::ReadAllText(‘%~f0′)-split’:Own1\:.*’)[1])&exit/b:Own1:
$D1=[uri].module.gettype(‘System.Diagnostics.Process’).»GetM`ethods»(42) |where {$_.Name -eq ‘SetPrivilege’} #`:no-ev-warn
‘SeSecurityPrivilege’,’SeTakeOwnershipPrivilege’,’SeBackupPrivilege’,’SeRestorePrivilege’|foreach {$D1.Invoke($null, @(«$_»,2))}
$path=$A[0]; $rk=$path-split’\\’,2; $HK=gi -lit Registry::$($rk[0]) -fo; $s=$A[1]; $sps=[Security.Principal.SecurityIdentifier]
$u=($A[2],’S-1-5-32-544′)[!$A[2]];$o=($A[3],$u)[!$A[3]];$w=$u,$o |% {new-object $sps($_)}; $old=!$A[3];$own=!$old; $y=$s-eq’all’
$rar=new-object Security.AccessControl.RegistryAccessRule( $w[0], ($A[5],’FullControl’)[!$A[5]], 1, 0, ($A[4],’Allow’)[!$A[4]] )
$x=$s-eq’none’;function Own1($k){$t=$HK.OpenSubKey($k,2,’TakeOwnership’);if($t){0,4|%{try{$o=$t.GetAccessControl($_)}catch{$old=0}
};if($old){$own=1;$w[1]=$o.GetOwner($sps)};$o.SetOwner($w[0]);$t.SetAccessControl($o); $c=$HK.OpenSubKey($k,2,’ChangePermissions’)
$p=$c.GetAccessControl(2);if($y){$p.SetAccessRuleProtection(1,1)};$p.ResetAccessRule($rar);if($x){$p.RemoveAccessRuleAll($rar)}
$c.SetAccessControl($p);if($own){$o.SetOwner($w[1]);$t.SetAccessControl($o)};if($s){$subkeys=$HK.OpenSubKey($k).GetSubKeyNames()
foreach($n in $subkeys){Own1 «$k\$n»}}}};Own1 $rk[1];if($env:VO){get-acl Registry::$path|fl} #:Own1: lean & mean snippet by AveYo
::-_-::
My Computer
-
- OS
- Windows 11 26100 24H2 Pro & Opensuse Tumbleweed
- Computer type
- PC/Desktop
- Manufacturer/Model
- ASRock
- CPU
- Intel Core Ultra 7 265K
- Motherboard
- Asrock Z890 Pro-A
- Memory
- 64GB
- Graphics Card(s)
- AMD RX7600XT
- Sound Card
- Realtek
- Monitor(s) Displays
- Samsung SyncMaster LCD 32″
- Screen Resolution
- 1920×1080
- Hard Drives
- Samsung SSD 990 PRO 1TB
Samsung SSD 980 PRO 1TB
WD BLACK SSD SN770 1TB
ADATA SSD SX8200PNP 1TB
ST1000DM010-2EP102 1TB
WDC WD10EZEX-08WN4A0 1TB
TOSHIBA HDWD130 3TB
- PSU
- Corsair RM1000e
- Case
- LC Power Gaming
- Cooling
- Deep Cool Zero Dark Zoria AK620
- Keyboard
- Logi
- Mouse
- Logi
- Internet Speed
- 1000/500
- Antivirus
- Kaspersky Standard
- Local time
- 11:23 AM
- Posts
- 4,991
- Location
-
Hafnarfjörður IS
- OS
- Windows XP,7,10,11 Linux Arch Linux
-
-
#19
Disable Temper Protection in defender and use this save as remove defnder.cmd@cls
@echo off
>nul chcp 437
setlocal enabledelayedexpansion
title Group Policy Addins>nul 2>&1 where powershell || (
echo.
echo Missing Critical files [powershell.exe]
echo.
pause
exit /b
)rem == Destroy Defender Called from End OF Script
whoami|>nul findstr /i /c:»nt authority\system» && (
echo.
call :RunAtSystemLevel
timeout 6
exit
)rem Credit ..
rem Bau For Run As TI Script
rem freddie-o, geepnozeex, St1ckys For Defender Scriptcd /d «%~dp0»
:::: Run as administrator, AveYo: ps\vbs version
1>nul 2>nul fltmc || (
set «_=call «%~f0″ %*» & powershell -nop -c start cmd -args’/d/x/r’,$env:_ -verb runas || (
>»%temp%\Elevate.vbs» echo CreateObject^(«Shell.Application»^).ShellExecute «%~dpf0», «%*» , «», «runas», 1
>nul «%temp%\Elevate.vbs» & del /q «%temp%\Elevate.vbs» )
exit)echo.
set Policies=HKEY_LOCAL_MACHINE\SOFTWARE\Policiesset Key=»HKEY_LOCAL_MACHINE\SOFTWARE\Microsoft\Windows NT\CurrentVersion\SystemRestore»
>nul 2>&1 REG ADD !Key! /f /v DisableSR /t REG_DWORD /d 1
>nul 2>&1 REG ADD !Key! /f /v DisableConfig /t REG_DWORD /d 1set Key=»%Policies%\Microsoft\Windows NT\SystemRestore»
>nul 2>&1 REG ADD !Key! /f /v DisableSR /t REG_DWORD /d 1
>nul 2>&1 REG ADD !Key! /f /v DisableConfig /t REG_DWORD /d 1echo == Disable Malicious Software Reporting Tool
set Key=»%Policies%\Microsoft\MRT»
>nul 2>&1 REG ADD !Key! /f /v DontReportInfectionInformation /t REG_DWORD /d «1»
>nul 2>&1 REG ADD !Key! /f /v DontOfferThroughWUAU /t REG_DWORD /d «1»echo == Disable Windows Defender Security Center Notifications
>nul 2>&1 REG ADD «%Policies%\Microsoft\Windows Defender Security Center\Notifications» /f /v DisableNotifications /t REG_DWORD /d «1»
>nul 2>&1 REG ADD «%Policies%\Microsoft\Windows Defender Security Center\Notifications» /f /v DisableEnhancedNotifications /t REG_DWORD /d «1»echo == Hide Windows Security Systray
>nul 2>&1 REG ADD «%Policies%\Microsoft\Windows Defender Security Center\Systray» /f /v HideSystray /t REG_DWORD /d «1»echo == Turn off Windows Defender
>nul 2>&1 REG ADD «%Policies%\Microsoft\Windows Defender» /f /v DisableAntiSpyware /t REG_DWORD /d «1»echo == Disable smartscreen
>nul 2>&1 REG ADD «%Policies%\Microsoft\Windows\System» /f /v EnableSmartScreen /t REG_DWORD /d «0»
>nul 2>&1 REG ADD «%Policies%\Microsoft\Windows Defender\SmartScreen» /f /v ConfigureAppInstallControlEnabled /t REG_DWORD /d «0»
>nul 2>&1 REG ADD «%Policies%\Microsoft\Windows Defender\SmartScreen» /f /v ConfigureAppInstallControl /t REG_SZ /d «Anywhere»
>nul 2>&1 REG ADD «%Policies%\Microsoft\Internet Explorer\PhishingFilter» /f /v Enabled /t REG_DWORD /d «0»
>nul 2>&1 REG ADD «%Policies%\Microsoft\Internet Explorer\PhishingFilter» /f /v EnabledV8 /t REG_DWORD /d «0»
>nul 2>&1 REG ADD «%Policies%\Microsoft\Internet Explorer\PhishingFilter» /f /v EnabledV9 /t REG_DWORD /d «0»
>nul 2>&1 REG ADD «%Policies%\Microsoft\Windows\CurrentVersion\Internet Settings\Lockdown_Zones\3» /f /v 2301 /t REG_DWORD /d «3»
>nul 2>&1 REG ADD «HKEY_LOCAL_MACHINE\SOFTWARE\Microsoft\PolicyManager\default\Browser\AllowSmartScreen» /f /v value /t REG_DWORD /d «0»
>nul 2>&1 REG ADD «HKEY_LOCAL_MACHINE\SOFTWARE\Microsoft\Windows\CurrentVersion\Explorer» /f /v SmartScreenEnabled /t REG_SZ /d «Off»echo == Disable smartscreen for store and apps
>nul 2>&1 REG ADD «HKEY_CURRENT_USER\SOFTWARE\Microsoft\Windows\CurrentVersion\AppHost» /f /v EnableWebContentEvaluation /t REG_DWORD /d «0»
>nul 2>&1 REG ADD «HKEY_CURRENT_USER\SOFTWARE\Microsoft\Windows\CurrentVersion\AppHost» /f /v PreventOverride /t REG_DWORD /d «0»
>nul 2>&1 REG ADD «HKEY_CURRENT_USER\SOFTWARE\Microsoft\Windows Security Health\State» /f /v AppAndBrowser_StoreAppsSmartScreenOff /t REG_DWORD /d «0»echo == Disable smartscreen for microsoft edge
>nul 2>&1 REG ADD «HKEY_CURRENT_USER\SOFTWARE\Microsoft\Edge» /f /v SmartScreenEnabled /t REG_DWORD /d «0»
>nul 2>&1 REG ADD «HKEY_CURRENT_USER\SOFTWARE\Microsoft\Edge» /f /v SmartScreenPuaEnabled /t REG_DWORD /d «0»
>nul 2>&1 REG ADD «HKEY_CURRENT_USER\SOFTWARE\Microsoft\Windows Security Health\State» /f /v AppAndBrowser_EdgeSmartScreenOff /t REG_DWORD /d «0»call :RunAsTI «%~dpf0»
timeout 10
exit:RunAtSystemLevel
:RunAtSystemLevel
:RunAtSystemLevelecho == Delete Windows Defender Services
for %%A IN (WinDefend, WdBoot, WdFilter, Sense, WdNisDrv, WdNisSvc) do (
>nul 2>&1 sc config %%A start=disabled
>nul 2>&1 sc stop %%A
>nul 2>&1 reg delete «HKEY_LOCAL_MACHINE\SYSTEM\ControlSet001\Services\%%A» /f
)echo == Close Windows Defender Application
for %%A IN (SecurityHealthService.exe, SecurityHealthSystray.exe, smartscreen.exe, MpCmdRun.exe) do >nul 2>&1 taskkill /im %%Aecho == Delete Windows Defender scheduled tasks
>nul 2>&1 reg delete «HKEY_LOCAL_MACHINE\SOFTWARE\Microsoft\Windows NT\CurrentVersion\Schedule\TaskCache\Tree\Microsoft\Windows\Windows Defender» /fecho == Disable Malicious Software Reporting Tool
>nul 2>&1 reg delete «HKEY_LOCAL_MACHINE\SOFTWARE\Microsoft\Windows NT\CurrentVersion\Image File Execution Options\MRT.exe» /fecho == Remove Defender Components
call :export cson > «%temp%\Windows.10.Defender_Uninstall.ps1»
>nul 2>&1 powershell -noprofile -executionpolicy bypass -file «%temp%\Windows.10.Defender_Uninstall.ps1»echo == Remove Temper Protection
set Key=»HKEY_LOCAL_MACHINE\SOFTWARE\Microsoft\Windows Defender\Features»
>nul 2>&1 call :reg_own !key! «» S-1-5-114 «» Allow FullControl
>nul 2>&1 call :reg_own !key! «» S-1-5-32-544 «» Allow FullControl
>nul 2>&1 REG ADD !Key! /f /v DisableAntiSpyware /t REG_DWORD /d 1
>nul 2>&1 REG ADD !Key! /f /v TamperProtection /t REG_DWORD /d 0echo == Remove Windows Defender Folder
>nul 2>&1 call estryFolder «%ProgramFiles%\Windows Defender»
>nul 2>&1 call estryFolder «%ProgramFiles(x86)%\Windows Defender»
>nul 2>&1 call estryFolder «%ALLUSERSPROFILE%\Windows Defender»
>nul 2>&1 call estryFolder «%ProgramFiles%\Windows Defender Advanced Threat Protection»
>nul 2>&1 call estryFolder «%ProgramFiles(x86)%\Windows Defender Advanced Threat Protection»
>nul 2>&1 call estryFolder «%ALLUSERSPROFILE%\Microsoft\Windows Defender Advanced Threat Protection»goto :eof
estryFolder
set targetFolder=%*
if exist %targetFolder% (
rd /s /q %targetFolder%
if exist %targetFolder% (
for /f «tokens=*» %%g in (‘dir /b/s /a-d %targetFolder%’) do move /y «%%g» «%temp%»
rd /s /q %targetFolder%
)
)
goto :eof:export
rem AveYo’s :export text attachments snippet
setlocal enabledelayedexpansion || Prints all text between lines starting with :NAME:[ and :NAME:] — A pure batch snippet by AveYo
set [=&for /f «delims=:» %%s in (‘findstr/nbrc:»:%~1:\[» /c:»:%~1:\]» «%~f0″‘) do if defined [ (set/a ]=%%s-3) else set/a [=%%s-1
<«%~fs0» ((for /l %%i in (0 1 %[%) do set /p =)&for /l %%i in (%[% 1 %]%) do (set txt=&set /p txt=&echo(!txt!)) &endlocal &exit/b:cson:[
#—————————————————————
# Windows.10.Defender_Uninstall.ps1
# IMPORTANT: Run as Administrator or for the better as TrustedInstaller
# Stuff/Windows.10.Defender_Uninstall.ps1 at main · St1ckys/Stuff
#—————————————————————Set-ItemProperty -Path «REGISTRY::HKEY_LOCAL_MACHINE\SOFTWARE\Microsoft\Windows\CurrentVersion\Component Based Servicing\Packages\*Windows-Defender*» -Name Visibility -Value «1»
Remove-Item -Path «REGISTRY::HKEY_LOCAL_MACHINE\SOFTWARE\Microsoft\Windows\CurrentVersion\Component Based Servicing\Packages\*Windows-Defender*» -Include *Owner* -Recurse -Force | Out-Null
Get-ChildItem -Path «REGISTRY::HKEY_LOCAL_MACHINE\SOFTWARE\Microsoft\Windows\CurrentVersion\Component Based Servicing\Packages\*Windows-Defender*» -Name | ForEach-Object {dism /online /remove-package /PackageName:$_ /NoRestart}:cson:]
#:RunAsTI: #1 snippet to run as TI/System, with /high priority, /priv ownership, explorer and HKCU load
set ^ #=& set «0=%~f0″& set 1=%*& powershell -nop -c iex(([io.file]::ReadAllText($env:0)-split’:RunAsTI\:.*’)[1])& exit/b
$_CAN_PASTE_DIRECTLY_IN_POWERSHELL=’^,^’; function RunAsTI ($cmd) { $id=’RunAsTI’; $sid=((whoami /user)-split’ ‘)[-1]; $code=@’
$ti=(whoami /groups)-like»*1-16-16384*»; $DM=[AppDomain]::CurrentDomain.»DefineDynamicAss`embly»(1,1).»DefineDynamicMod`ule»(1)
$D=@(); 0..5|% {$D+=$DM.»DefineT`ype»(«M$_»,1179913,[ValueType])}; $I=[int32];$P=$I.module.gettype(«System.Int`Ptr»); $U=[uintptr]
$D+=$U; 4..6|% {$D+=$D[$_].»MakeB`yRefType»()};$M=$I.module.gettype(«System.Runtime.Interop`Services.Mar`shal»);$Z=[uintptr]::size
$S=[string]; $F=»kernel»,»advapi»,»advapi»,($S,$S,$I,$I,$I,$I,$I,$S,$D[7],$D[8]),($U,$S,$I,$I,$D[9]),($U,$S,$I,$I,[byte[]],$I)
0..2|% {$9=$D[0].»DefinePInvokeMeth`od»((«CreateProcess»,»RegOpenKeyEx»,»RegSetValueEx»)[$_],$F[$_]+’32’,8214,1,$S,$F[$_+3],1,4)}
$DF=0,($P,$I,$P),($I,$I,$I,$I,$P,$D[1]),($I,$S,$S,$S,$I,$I,$I,$I,$I,$I,$I,$I,[int16],[int16],$P,$P,$P,$P),($D[3],$P),($P,$P,$I,$I)
1..5|% {$k=$_;$n=1;$AveYo=1; $DF[$_]|% {$9=$D[$k].»DefineFie`ld»(‘f’+$n++,$_,6)}}; $T=@(); 0..5|% {$T+=$D[$_].»CreateT`ype»()}
0..5|% {nv «A$_» ([Activator]::CreateInstance($T[$_])) -force}; function F ($1,$2) {$T[0].»GetMeth`od»($1).invoke(0,$2)};
if (!$ti) { $g=0; «TrustedInstaller»,»lsass»|% {if (!$g) {net1 start $_ 2>&1 >$null; $g=@(get-process -name $_ -ea 0|% {$_})[0]}}
function M($1,$2,$3){$M.»GetMeth`od»($1,[type[]]$2).invoke(0,$3)}; $H=@(); $Z,(4*$Z+16)|% {$H+=M «AllocHG`lobal» $I $_};
M «WriteInt`Ptr» ($P,$P) ($H[0],$g.Handle); $A1.f1=131072;$A1.f2=$Z;$A1.f3=$H[0];$A2.f1=1;$A2.f2=1;$A2.f3=1;$A2.f4=1;$A2.f6=$A1
$A3.f1=10*$Z+32;$A4.f1=$A3;$A4.f2=$H[1]; M «StructureTo`Ptr» ($D[2],$P,[boolean]) (($A2 -as $D[2]),$A4.f2,$false); $w=0x0E080600
$out=@($null,»powershell -win 1 -nop -c iex `$env:A»,0,0,0,$w,0,$null,($A4 -as $T[4]),($A5 -as $T[5])); F «CreateProcess» $out
} else { $env:A=»; $PRIV=[uri].module.gettype(«System.Diagnostics.Process»).»GetMeth`ods»(42) |? {$_.Name -eq «SetPrivilege»}
«SeSecurityPrivilege»,»SeTakeOwnershipPrivilege»,»SeBackupPrivilege»,»SeRestorePrivilege» |% {$PRIV.Invoke(0, @(«$_»,2))}
$HKU=[uintptr][uint32]2147483651; $LNK=$HKU; $reg=@($HKU,»S-1-5-18″,8,2,($LNK -as $D[9])); F «RegOpenKeyEx» $reg; $LNK=$reg[4]
function SYM($1,$2){$b=[Text.Encoding]::Unicode.GetBytes(«\Registry\User\$1″);@($2,»SymbolicLinkValue»,0,6,[byte[]]$b,$b.Length)}
F «RegSetValueEx» (SYM $(($key-split’\\’)[1]) $LNK); $EXP=»HKLM:\Software\Classes\AppID\{CDCBCFCA-3CDC-436f-A4E2-0E02075250C2}»
$r=»explorer»; if (!$cmd) {$cmd=’C:\’}; $dir=test-path -lit ((($cmd -split ‘^(«[^»]+»)|^([^\s]+)’) -ne»)[0].trim(‘»‘)) -type 1
if (!$dir) {$r=»start `»$id`» /high /w»}; sp $EXP RunAs » -force; start cmd -args («/q/x/d/r title $id && $r»,$cmd) -wait -win 1
do {sleep 7} while ((gwmi win32_process -filter ‘name=»explorer.exe»‘|? {$_.getownersid().sid -eq «S-1-5-18»}))
F «RegSetValueEx» (SYM «.Default» $LNK); sp $EXP RunAs «Interactive User» -force } # lean and mean snippet by AveYo, 2018-2021
‘@; $key=»Registry::HKEY_USERS\$sid\Volatile Environment»; $a1=»`$id=’$id’;`$key=’$key’;»;$a2=»`$cmd=’$($cmd-replace»‘»,»»»)’;`n»
sp $key $id $($a1,$a2,$code) -type 7 -force; $arg=»$a1 `$env:A=(gi `$key).getvalue(`$id)-join»;rp `$key `$id -force; iex `$env:A»
$_PRESS_ENTER=’^,^’; start powershell -args «-win 1 -nop -c $arg» -verb runas }; <#,#> RunAsTI $env:1; #:RunAsTI::reg_own #key [optional] all user owner access permission : call :reg_own «HKCU\My» «» S-1-5-32-544 «» Allow FullControl
powershell -nop -c $A=’%~1′,’%~2′,’%~3′,’%~4′,’%~5′,’%~6′;iex(([io.file]::ReadAllText(‘%~f0′)-split’:Own1\:.*’)[1])&exit/b:Own1:
$D1=[uri].module.gettype(‘System.Diagnostics.Process’).»GetM`ethods»(42) |where {$_.Name -eq ‘SetPrivilege’} #`:no-ev-warn
‘SeSecurityPrivilege’,’SeTakeOwnershipPrivilege’,’SeBackupPrivilege’,’SeRestorePrivilege’|foreach {$D1.Invoke($null, @(«$_»,2))}
$path=$A[0]; $rk=$path-split’\\’,2; $HK=gi -lit Registry::$($rk[0]) -fo; $s=$A[1]; $sps=[Security.Principal.SecurityIdentifier]
$u=($A[2],’S-1-5-32-544′)[!$A[2]];$o=($A[3],$u)[!$A[3]];$w=$u,$o |% {new-object $sps($_)}; $old=!$A[3];$own=!$old; $y=$s-eq’all’
$rar=new-object Security.AccessControl.RegistryAccessRule( $w[0], ($A[5],’FullControl’)[!$A[5]], 1, 0, ($A[4],’Allow’)[!$A[4]] )
$x=$s-eq’none’;function Own1($k){$t=$HK.OpenSubKey($k,2,’TakeOwnership’);if($t){0,4|%{try{$o=$t.GetAccessControl($_)}catch{$old=0}
};if($old){$own=1;$w[1]=$o.GetOwner($sps)};$o.SetOwner($w[0]);$t.SetAccessControl($o); $c=$HK.OpenSubKey($k,2,’ChangePermissions’)
$p=$c.GetAccessControl(2);if($y){$p.SetAccessRuleProtection(1,1)};$p.ResetAccessRule($rar);if($x){$p.RemoveAccessRuleAll($rar)}
$c.SetAccessControl($p);if($own){$o.SetOwner($w[1]);$t.SetAccessControl($o)};if($s){$subkeys=$HK.OpenSubKey($k).GetSubKeyNames()
foreach($n in $subkeys){Own1 «$k\$n»}}}};Own1 $rk[1];if($env:VO){get-acl Registry::$path|fl} #:Own1: lean & mean snippet by AveYo
::-_-::
There’s some mis-understanding here — I DON’T WANT WD to be gone, I just want it to WORK — don’t people understand SIMPLE PLAIN ENGLISH here any more.
This is the problem : WD won’t open and says it needs another app !!! Surely people can understand what I posted. !!! It’s not in 12th century Faroese or pre historic Sanscrit —surely.
Please @Master —tell me EXACTLY how I can turn off WD tamper protection if I can’t get into WD in the first place !!!!!.
You might have all the skills on the planet in coding / obscure reg hacks or whatever —but please look at what the original problem actually consists of before providing answers.
Not wanting to be nasty — there’s enough of that around at the moment anyway — but I suggest a lot of failing problems that beset the world in general currently is that people are trying to give answers out before they’ve even understood the problem. Help is always appreciated but it needs to address the actual problem.
Cheers
jimbo
My Computer
-
- OS
- Windows XP,7,10,11 Linux Arch Linux
- Computer type
- PC/Desktop
- CPU
- 2 X Intel i7
- Local time
- 1:23 PM
- Posts
- 8
- OS
- Windows 11 26100 24H2 Pro & Opensuse Tumbleweed
-
-
#20
Disable Windows Defender Completely.
My Computer
-
- OS
- Windows 11 26100 24H2 Pro & Opensuse Tumbleweed
- Computer type
- PC/Desktop
- Manufacturer/Model
- ASRock
- CPU
- Intel Core Ultra 7 265K
- Motherboard
- Asrock Z890 Pro-A
- Memory
- 64GB
- Graphics Card(s)
- AMD RX7600XT
- Sound Card
- Realtek
- Monitor(s) Displays
- Samsung SyncMaster LCD 32″
- Screen Resolution
- 1920×1080
- Hard Drives
- Samsung SSD 990 PRO 1TB
Samsung SSD 980 PRO 1TB
WD BLACK SSD SN770 1TB
ADATA SSD SX8200PNP 1TB
ST1000DM010-2EP102 1TB
WDC WD10EZEX-08WN4A0 1TB
TOSHIBA HDWD130 3TB
- PSU
- Corsair RM1000e
- Case
- LC Power Gaming
- Cooling
- Deep Cool Zero Dark Zoria AK620
- Keyboard
- Logi
- Mouse
- Logi
- Internet Speed
- 1000/500
- Antivirus
- Kaspersky Standard
Similar threads
-
Windows Support Forums
-
AntiVirus, Firewalls and System Security
How to Enable or Disable Windows Defender in Windows 10 (Microsoft Defender)
Microsoft Defender, also known as Windows Defender, is the default antivirus app shipped with Windows 10. Earlier versions of Windows like Windows 8.1, Windows 8, Windows 7 and Vista also had it but it was less efficient previously as it only scanned spyware and adware. In Windows 8 and Windows 10, Defender is based on the Microsoft Security Essentials app which offers better protection by adding full blown protection against all kinds of malware.
However, despite Microsoft’s claims that it offers full protection, studies have found that third party antivirus apps still offer better protection. If you prefer to use a third party anti malware app, or have any other reason for that, you may want to disable Windows Defender.
This post will show you how to disable Microsoft Windows Defender in Windows 10.
Windows 10 allows to only temporary disable Windows Defender with a special option in Windows Security. After some period of time, it will be re-enabled automatically. We’ll look at various ways to disable the app, including both temporary and permanent disabling.
- Disable the Tamper Protection feature. Otherwise you won’t be able to permanently disable the app.
- Download the following ZIP archive: Download ZIP archive.
- Unblock the file.
- Extract its contents to any folder. You can place the files directly to the Desktop.
- Double click on the
Disable Windows Defender in Windows 10.regfile to merge it.
- Restart Windows 10.
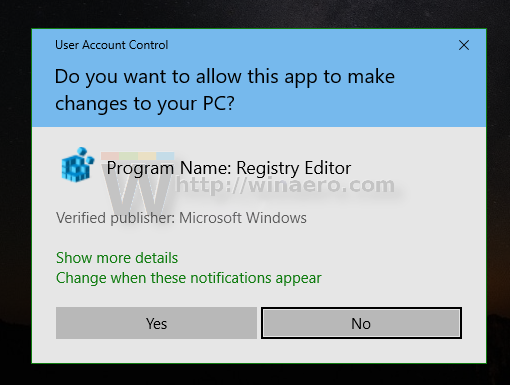
You are done.
The ZIP archive contains the undo file, called Restore Windows Defender in Windows 10.reg. Use it to re-enable Defender later, and restart the OS after applying it.
How it works
The above registry files will modify the following Registry keys and values.
Under the key HKEY_LOCAL_MACHINE\SOFTWARE\Policies\Microsoft\Windows Defender, they will set the following 32-bit DWORD values. Note: Even if you are running 64-bit Windows you must still create a 32-bit DWORD value."DisableAntiSpyware"=dword:00000001"DisableRealtimeMonitoring"=dword:00000001
Additionally, the Registry files contain the following values for the real-time protection options
[HKEY_LOCAL_MACHINE\SOFTWARE\Policies\Microsoft\Windows Defender\Real-Time Protection]
"DisableBehaviorMonitoring"=dword:00000001
"DisableOnAccessProtection"=dword:00000001
"DisableScanOnRealtimeEnable"=dword:00000001
Why to disable Tamper Protection
Tamper Protection is a setting from Microsoft Defender Antivirus, available in the Windows Security app, which when on, provides additional protections against changes to key security features, including limiting changes which are not made directly through the Windows Security app. This will prevent you from applying the above Registry tweak.
If you are not happy with Registry editing, you can use Winaero Tweaker.
Disable Microsoft Defender with Winaero Tweaker
- Download Winaero Tweaker.
- On the left, navigate to Windows Defender > Disable Windows Defender.
- The app is able to detect is the Tamper Protection is active, so you will be prompted to disable it first. By clicking the Open Defender Settings button you will open the Windows Security app. Disable the Tamper Protection there.

- Finally, turn on (check) the option named Disable Windows Defender.

- Restart Windows 10.
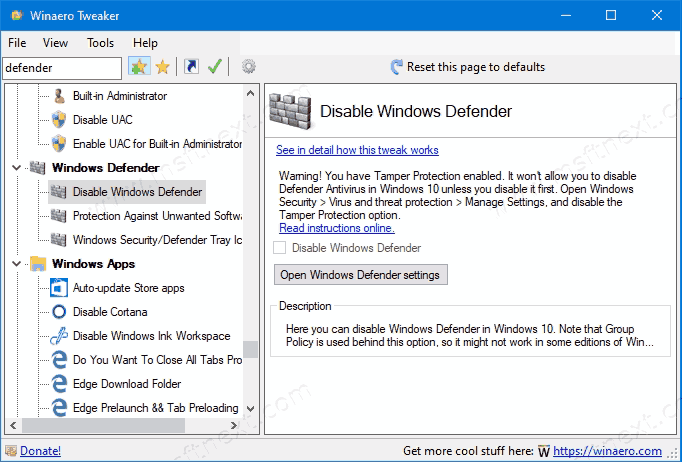
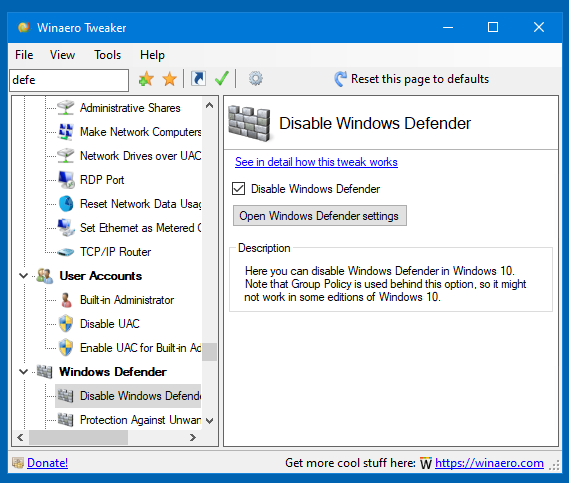
You can learn more about Winaero Tweaker here.
Using Winaero Tweaker, you can keep Defender disabled until you uncheck the option «Disable Windows Defender». This is a time saving option.
Finally, you can disable Microsoft Defender in its settings. However, this won’t stay for long. Windows 10 will quickly re-enable it.
Temporarily Enable or Disable Microsoft Windows Defender
- Open the Windows Security app. You can launch Windows Security from the Start menu or with a special shortcut. Tip: The Start menu supports alphabet navigation.

- In the user interface of the app, click on the icon Virus & Threat protection.

- On the next page, click on the Manage settings link under the Virus and threat protection settings section.
- On the next page, toggle the Real-time protection option to Off. This will temporarily disable Windows Defender in Windows 10.
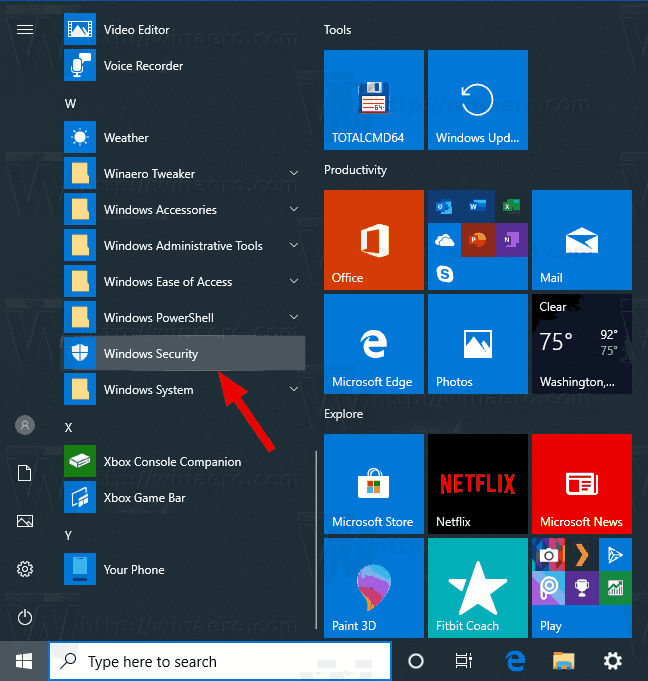

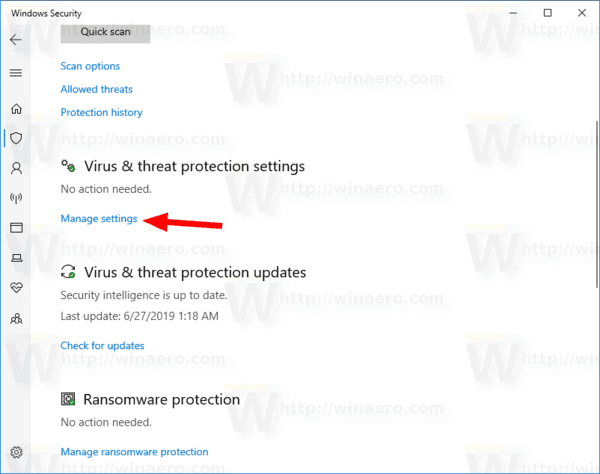
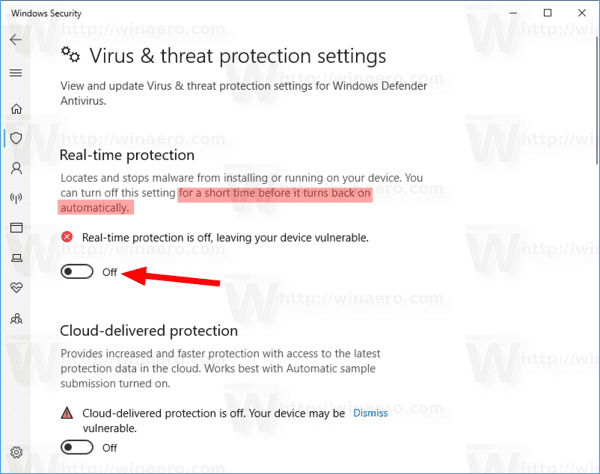
That’s it. Please leave a comment about which method you tried and which worked for you. Thanks in advance.
Support us
Winaero greatly relies on your support. You can help the site keep bringing you interesting and useful content and software by using these options:
If you like this article, please share it using the buttons below. It won’t take a lot from you, but it will help us grow. Thanks for your support!