
Microsoft Defender Antivirus (Защитник) — это встроенный антивирус в Windows 10/11 и Windows Server, который включен и настроен по умолчанию. В этой статье мы рассмотрим, как полностью отключить Защитник в Windows 11 или временно (приостановить).
В Windows 11 и 10 при установке стороннего антивируса, встроенный стандартный Защитника Microsoft должен отключаться. В некоторых случаях это не происходит автоматически и вам может потребоваться ручное отключение Microsoft Defender.
Содержание:
- Временная приостановка защиты Microsoft Defender в Windows 11 и 10
- Как полностью отключить Защитник Defender в Windows 11 и 10?
Временная приостановка защиты Microsoft Defender в Windows 11 и 10
В некоторых случаях вам может понадобится временно отключить защиту Microsoft Defender, не затрагивая важные системные службы. Например, запуск или установка какой-то системной программы или утилиты блокируется Microsoft Defender. Чтобы запустить такое приложение, нужно остановить защиту Windows Defender в реальном времени.
- Перейдите в следующий раздел настроек Windows 11: Settings -> Privacy and Security -> Windows Security -> Open Windows Security (или выполните команду быстрого доступа к настройкам
ms-settings:windowsdefender
);Если приложение службы безопасности Microsoft Defender не запускается, его можно восстановить (под капотом находится UWP приложение
Microsoft.SecHealthUI
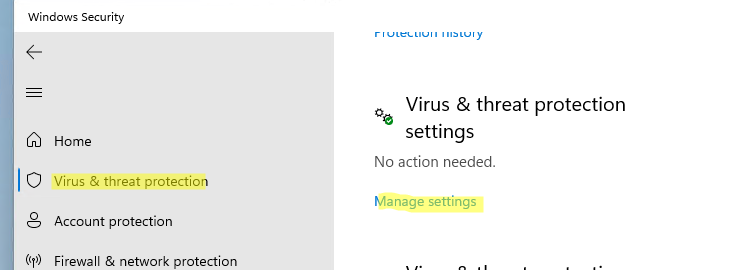
). - Откройте раздел Virus and threat protection, и нажмите на кнопку Manage Settings в разделе Virus and Threat protection settings;

- Переведите переключатель Real-time protection в положение Off;
- Подтвердите приостановку антивирусной защиты в окно с подтверждением повышения привилегий UAC.
Чтобы восстановить защиту компьютера Windows Defender, нужно включить переключатель. Также защита в реальном времени Microsoft Defender будет включена автоматически после перезагрузки компьютера.
Ранее мы рассматривали, как управлять настройками антивируса Windows Defender с помощью PowerShell. В статье была рассмотрена PowerShell команда для отключения защиты в реальном времени:
Set-MpPreference -DisableRealtimeMonitoring $true
Однако это команда не отрабатывает, как вы ожидаете в Windows 11 и последних билдах Windows 10. Дело в том, что в Windows 10, начиная с билда 1903, по умолчанию включена новая фича Defender, которая называется Microsoft Defender Tamper Protection (Защита от подделок).
Tamper protection обеспечивает дополнительную защиту основных элементов безопасности Microsoft Defender. В частности, она блокирует несанкционированное изменение настроек антивируса, приостановку защиты в реальном времени, отключение облачной защиты. Это означает, что при включенной Защите от подделок вы не сможете отключить Real Time Protection в Microsoft Defender с помощью PowerShell.
Отключить Tamper Protection можно только вручную из графической панели управления Windows Security.
Перейдите в раздел настроек Virus and threat protection settings, промотайте список компонентов и измените переключатель параметра Tamper Protection на Off.

После отключение Tamper Protection вы сможете отключить защиту в реальном времени указанной выше командой PowerShell.
Как полностью отключить Защитник Defender в Windows 11 и 10?
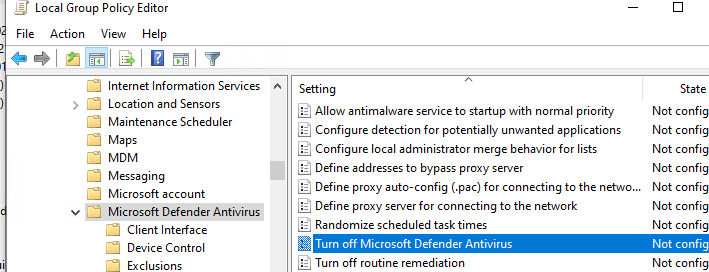
В ранних билдах Windows 10 и в Windows Server 2016 можно было полностью отключить Windows Defender через параметр групповой политики Turn off Windows Defender Antivirus в разделе Computer Configurations -> Administrative Template -> Windows Component -> Windows Defender Antivirus редактора локальных групповых политик gpedit.msc. Или ключом реестра DisableAntiSpyware в HKEY_LOCAL_MACHINE\SOFTWARE\Policies\Microsoft\Windows Defender, соответствующий этому параметру GPO:
New-ItemProperty -Path “HKLM:\SOFTWARE\Policies\Microsoft\Windows Defender” -Name DisableAntiSpyware -Value 1 -PropertyType DWORD -Force
Для отключение защиты в реальном времени использовалась политика Turn on behavior monitoring или параметр реестра DisableBehaviorMonitoring =1 в указанной выше ветке реестра.
Во всех билдах, начиная с Windows 10 1903, и в Windows 11 эти параметры GPO и ключи реестра нельзя использоваться для отключения Microsoft Defender, так как его настройки защищены новой опцией Tamper Protections (рассмотрена выше). Методы, используемые ранее для отключения Microsoft Defender Antivirus, не работают в Windows 11.
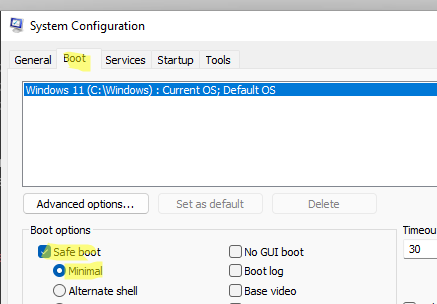
Для полного отключения компонентов Windows Defender нужно загрузить ваш компьютер в безопасном режиме. Для этого:
- Запустите утилиту
msconfig
; - Перейдите на вкладку Boot;
- Выберите опцию Safe boot -> Minimal в разделе настройки параметров загрузки;
- Нажмите OK и перезагрузите компьютер;
- Ваш компьютер загрузится в безопасном режиме;
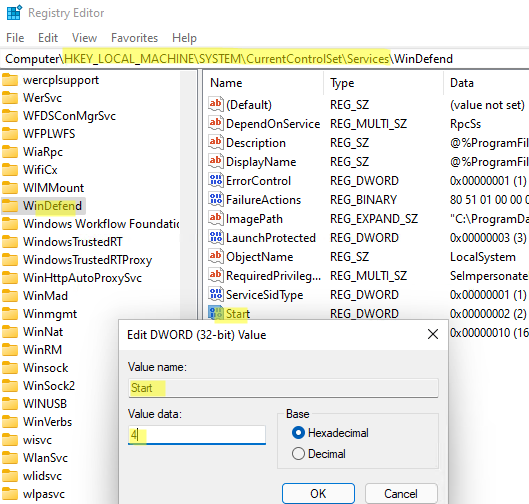
- Теперь нужно открыть редактор реестра (
regedit.exe
), перейдти в ветку HKEY_LOCAL_MACHINE\SYSTEM\CurrentControlSet\Services и отключить запуск следующих служб:- Sense
- WdBoot
- WdFilter
- WdNisDrv
- WdNisSvc
- WinDefend
Для этого нужно изменить значение параметра Start на 4;
Измените параметр Start для всех указанных служб вручную или воспользуйтесь скриптом PowerShell:
$regpath='HKLM:\SYSTEM\CurrentControlSet\Services'
Set-ItemProperty -Path ($regpath+"\WinDefend") -Name Start -Value 4
Set-ItemProperty -Path ($regpath+"\Sense") -Name Start -Value 4
Set-ItemProperty -Path ($regpath+"\WdFilter") -Name Start -Value 4
Set-ItemProperty -Path ($regpath+"\WdNisDrv") -Name Start -Value 4
Set-ItemProperty -Path ($regpath+"\WdNisSvc”) -Name Start -Value 4
Чтобы включить Microsoft Defender в Windows, нужно установить следующие дефолтные значение параметра Start в ветке каждой службы:
- Sense — 3
- WdBoot — 0
- WdFilter — 0
- WdNisDrv — 3
- WdNisSvc — 3
- WinDefend — 2
- Запустите msconfig и отключите безопасный режим, перезагрузите компьютер в обычном режиме;
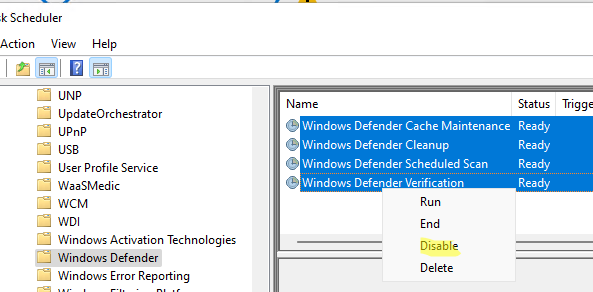
- Отключите все четыре задания в разделе Microsoft –> Windows –> Windows Defender Task Scheduler (
taskschd.msc
);
Get-ScheduledTask “Windows Defender Cache Maintenance” | Disable-ScheduledTask
Get-ScheduledTask “Windows Defender Cleanup” | Disable-ScheduledTask
Get-ScheduledTask “Windows Defender Scheduled Scan” | Disable-ScheduledTask
Get-ScheduledTask “Windows Defender Verification” | Disable-ScheduledTask
Можно отключить задания планировщика с помощью PowerShell:
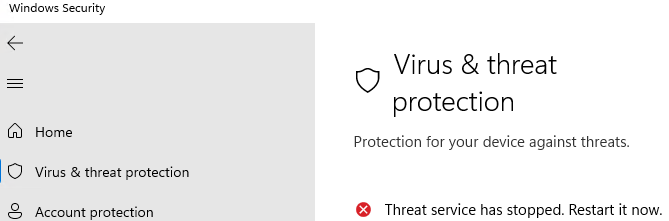
Запустите приложение Windows Security и убедитесь, что антивирус Microsoft Defender теперь отключен. Здесь должна появиться надпись Threat service has stopped. Restart it now (Служба работы с угрозами остановлена).
Итак, мы рассмотрели, как отключить защиту Microsoft Defender в Windows 10 и 11.
Даже полезные программы иногда мешают работе. Например, встроенный в операционную систему защитник периодически блокирует установку стороннего софта или замедляет устройство. В этот момент приходится выяснять, как отключить антивирус Windows. Убрать его возможно как на время, так и насовсем.
Зачем отключать
В Windows 10 и 11
В Windows 7
После отключения
Чек-лист
Зачем отключать
В Windows 10 и 11
В Windows 7
После отключения
Чек-лист

Разберемся, как отключить антивирус в разных версиях Windows. Выясним, зачем иногда требуется временная деактивация встроенной защиты, какие при этом возникают риски, и что обязательно нужно сделать после отключения.
Стоит ли отключать Windows Defender и когда это может понадобиться
Windows Defender запускается в фоновом режиме и, подобно другим антивирусам, защищает компьютер от вредоносных программ. Отключая защиту, вы оставляете компьютер уязвимым, однако иногда приходится пойти на риск.
Отключение может понадобиться в нескольких случаях.
-
При установке определенных программ или игр, которые ошибочно распознаются как угрозы.
-
Для тестирования программного обеспечения или системных настроек.
-
При переходе на сторонний антивирус — например, Kaspersky, Avast и другие.
-
Когда Defender потребляет слишком много ресурсов и тормозит работу операционной системы.
Помните: не стоит надолго оставлять компьютер совсем без защиты. Если выключили «Защитника Windows», будьте особенно осторожны при загрузке файлов и серфинге в интернете, чтобы не заразить систему вредоносным ПО.
Как отключить защиту Windows 10 и 11
Современные версии операционной системы позволяют временно деактивировать защитник. Также существуют методы его полного отключения. Пошагово разберем все варианты.
Через «Параметры»
1. Откройте «Параметры» с помощью сочетания клавиш Win + I, выберите «Конфиденциальность и защита», далее «Безопасность Windows».

2. Откройте раздел «Защита от вирусов и угроз», после чего переходите в настройки.


3. Перетащите ползунок защиты в режиме реального времени в положение «Выключено».

Алгоритм временно отключает защиту. Она включится автоматически после перезагрузки. Можно сразу активировать Defender. Для этого достаточно вернуть ползунок в положение «Включено».
Учтите, что уже запланированную проверку антивирус выполнит, но новые файлы не тронет до следующей диагностики.
Через реестр
Деактивировать программу насовсем получится через реестр. Схема тоже несложная.
1. Чтобы попасть в реестр, нажмите Win + R, введите команду regedit, затем задайте путь или пройдите его вручную: HKEY_LOCAL_MACHINE\SOFTWARE\Policies\Microsoft\Windows Defender.

2. Щелкните мышкой справа, чтобы создать параметр DWORD.

3. Дайте ему имя DisableAntiSpyware.
4. В графе «Значение» поставьте единицу. Отправьте компьютер на перезагрузку.

5. Чтобы вновь активировать защиту, поставьте нулевое значение или лишите параметр имени.
Важно. Этот способ работает только в старых версиях платформы безопасности, выпущенных до августа 2021 года.
Если у вас установлена платформа антивируса версии 4.18.2108.4 или новее (а это практически все системы на Windows 10 версии 1903+ и Windows 11), то параметр DisableAntiSpyware больше не действует. Его просто игнорирует система.
Это связано с тем, что Microsoft включила функцию Tamper Protection (защита от несанкционированных изменений). Она блокирует любые попытки отключить встроенную защиту через реестр или сторонние программы, чтобы злоумышленники не могли сделать это без ведома пользователя.
Чтобы проверить свою версию платформы безопасности, откройте «Центр безопасности Windows» → «Параметры» → «О программе». Найдите строку «Платформа антивируса».
Если версия 4.18.2108.4 и выше — способ с реестром работать не будет. Отключить Defender можно в настройках, как мы описывали выше, или при установке другого антивируса. Чтобы избежать конфликта ПО, встроенный защитник Windows отключится автоматически.

Через редактор групповой политики
Профессиональные и корпоративные версии Windows 10 и 11 оснащены редактором групповой политики. Он тоже позволяет избавиться от срабатывания защиты навсегда.
1. Зажмите Win + R, используйте команду gpedit.msc.
2. По папкам проделайте такой путь: «Конфигурация компьютера» → «Административные шаблоны» → «Компоненты Windows» → «Антивирусная программа».

3. Откройте параметр «Выключить антивирусную программу» и выберите опцию «Отключено».

4. В папке «Антивирусная программа» также есть раздел «Защита в режиме реального времени». Деактивируйте все элементы.
5. Антивирус отключится после перезагрузки. Включить его получится, если возвратить параметры в прежнее положение.
Как отключить защиту Windows 7
В «семерке» процесс немного другой, но выключить встроенный антивирус тоже несложно.
1. Откройте «Панель управления» и перейдите в блок «Защитник Windows».
2. Нажмите «Программы» → «Параметры» → «Администратор».
3. Снимите галочку с опции «Использовать эту программу» и сохраните изменения.
Что делать после отключения встроенного антивируса «Защитник Windows»
После выполнения задач, которым мешал Defender, не забывайте включать его снова. В процессе работы с отключенным защитником придерживайтесь мер безопасности.
-
Установите альтернативный антивирус или хотя бы блокировщик рекламы, если у вас его еще нет.
-
Ограничьте время работы без защиты — оставлять так ПК насовсем не стоит.
-
Не посещайте сомнительные сайты, не загружайте и не открывайте подозрительные файлы.
-
Пользуйтесь только проверенными сетями Wi-Fi.
-
Проведите полное сканирование системы, когда закончите и включите встроенный антивирус снова.
Если антивирус каждый раз ложно блокирует определенные программы или файлы, а отключать его не хочется, некоторые папки можно внести в исключения Defender. Но не злоупотребляйте этой функцией, добавляйте только проверенные объекты.
Чек-лист: как отключить антивирус Windows Defender
Выключать антивирус не рекомендуется, но если защита блокирует программы или затрудняет работу, это допустимо.
-
Снимите защиту в реальном времени. Вам нужны параметры «Безопасность Windows» → «Защита от вирусов» → «Управление настройками».
-
Для Windows 7 — снимите галочку «Использовать эту программу» в параметрах защитника.
-
Соблюдайте осторожность и не блокируйте антивирус надолго.
-
Установите альтернативную антивирусную программу.
-
После повторной активации защиты просканируйте систему на вирусы.
This method will work 100%, but as always, there are multiple ways to come to the same goal. I’ll describe all of them below. I keep it short and understandable even for beginners, keep in mind that all method require that you are admin or have admin rights on the OS level otherwise they will not work!
The old batch script from 2015 still works, except that Tamper Protection must be dealt with first.
Microsoft added this (and enabled it by default) in later Windows 10 Builds (1903+), so easily disabling WD with one single script is not anymore possible.
The protection was added because of malware protection reasons.
Dealing with Windows Defender’s Tamper protection
reg add "HKLM\Software\Microsoft\Windows Defender\Features" /v "TamperProtection" /t REG_DWORD /d "0" /f
This method ^^ does not work anymore. Someone wrote a complicated PoC to bypass all this, but I suggest using my method described below because it is 100% reliable.
Multiple methods to deal with Microsoft’s Tamper Protection
Via install_wim_tweak.exe (does not work in Windows 11)
You get the program here. You need to execute the command twice, once and then again after the reboot.
install_wim_tweak.exe /o /c "Windows-Defender" /r
Via third-party AV
Install 3rd party AV, disable Defender’s services, uninstall 3rd party AV.
Via Group Policy Editor
You need to manually disable it via GPO.
Via NSudo and other third-party tools
This is a last resort method and not really something you want to do under normal circumstances because those tool might trigger the AV, which means that the AV will block executing the processes — in this case — you must exclude them or add them to the whitelist first but WD will tell you.
We can take ownership of required files via NSudo or psexec, PowerRun, RunAsTI. They all do more or less the same in this context.
What I suggest
- Use GPO because it survives in-place upgrade.
- Alternative if you start a cmd terminal with TrustedInstaller privileges e.g. PowerRun OR RunAsTI, then execute the normal commands, the script disables windows defender as it should.
cd SCRIPT_PATH
Set-ExecutionPolicy Unrestricted -Scope CurrentUser
.\disable-windows-defender.ps1 (you can use official ones or create your own or use mine from 2015 which is still on the www)
After dealing with Tamper Protection, execute the below script.
Disabling Windows Defender, Tasks, and all the rest…
Make sure you run it with admin privileges.
ECHO OFF
reg delete "HKLM\Software\Microsoft\Windows\CurrentVersion\Explorer\StartupApproved\Run" /v "SecurityHealth" /f
reg delete "HKLM\Software\Microsoft\Windows\CurrentVersion\Run" /v "SecurityHealth" /f
reg delete "HKCR\*\shellex\ContextMenuHandlers\EPP" /f
reg delete "HKCR\Directory\shellex\ContextMenuHandlers\EPP" /f
reg delete "HKCR\Drive\shellex\ContextMenuHandlers\EPP" /f
reg delete "HKLM\Software\Policies\Microsoft\Windows Defender" /f
reg add "HKLM\Software\Policies\Microsoft\Windows Defender" /v "DisableAntiSpyware" /t REG_DWORD /d "1" /f
reg add "HKLM\Software\Policies\Microsoft\Windows Defender" /v "DisableAntiVirus" /t REG_DWORD /d "1" /f
reg add "HKLM\Software\Policies\Microsoft\Windows Defender\MpEngine" /v "MpEnablePus" /t REG_DWORD /d "0" /f
reg add "HKLM\Software\Policies\Microsoft\Windows Defender\Real-Time Protection" /v "DisableBehaviorMonitoring" /t REG_DWORD /d "1" /f
reg add "HKLM\Software\Policies\Microsoft\Windows Defender\Real-Time Protection" /v "DisableIOAVProtection" /t REG_DWORD /d "1" /f
reg add "HKLM\Software\Policies\Microsoft\Windows Defender\Real-Time Protection" /v "DisableOnAccessProtection" /t REG_DWORD /d "1" /f
reg add "HKLM\Software\Policies\Microsoft\Windows Defender\Real-Time Protection" /v "DisableRealtimeMonitoring" /t REG_DWORD /d "1" /f
reg add "HKLM\Software\Policies\Microsoft\Windows Defender\Real-Time Protection" /v "DisableRoutinelyTakingAction" /t REG_DWORD /d "1" /f
reg add "HKLM\Software\Policies\Microsoft\Windows Defender\Real-Time Protection" /v "DisableScanOnRealtimeEnable" /t REG_DWORD /d "1" /f
reg add "HKLM\Software\Policies\Microsoft\Windows Defender\Reporting" /v "DisableEnhancedNotifications" /t REG_DWORD /d "1" /f
reg add "HKLM\Software\Policies\Microsoft\Windows Defender\SpyNet" /v "DisableBlockAtFirstSeen" /t REG_DWORD /d "1" /f
reg add "HKLM\Software\Policies\Microsoft\Windows Defender\SpyNet" /v "SpynetReporting" /t REG_DWORD /d "0" /f
reg add "HKLM\Software\Policies\Microsoft\Windows Defender\SpyNet" /v "SubmitSamplesConsent" /t REG_DWORD /d "2" /f
reg add "HKLM\System\CurrentControlSet\Control\WMI\Autologger\DefenderApiLogger" /v "Start" /t REG_DWORD /d "0" /f
reg add "HKLM\System\CurrentControlSet\Control\WMI\Autologger\DefenderAuditLogger" /v "Start" /t REG_DWORD /d "0" /f
reg add "HKLM\System\CurrentControlSet\Services\WdFilter" /v "Start" /t REG_DWORD /d "4" /f
reg add "HKLM\System\CurrentControlSet\Services\WdNisDrv" /v "Start" /t REG_DWORD /d "4" /f
reg add "HKLM\System\CurrentControlSet\Services\WdNisSvc" /v "Start" /t REG_DWORD /d "4" /f
reg add "HKLM\System\CurrentControlSet\Services\WinDefend" /v "Start" /t REG_DWORD /d "4" /f
schtasks /Change /TN "Microsoft\Windows\ExploitGuard\ExploitGuard MDM policy Refresh" /Disable
schtasks /Change /TN "Microsoft\Windows\Windows Defender\Windows Defender Cache Maintenance" /Disable
schtasks /Change /TN "Microsoft\Windows\Windows Defender\Windows Defender Cleanup" /Disable
schtasks /Change /TN "Microsoft\Windows\Windows Defender\Windows Defender Scheduled Scan" /Disable
schtasks /Change /TN "Microsoft\Windows\Windows Defender\Windows Defender Verification" /Disable
PAUSE
#Tamper protection
#Windows
#Windows 10
#Windows 11
#Windows Defender
rem USE AT OWN RISK AS IS WITHOUT WARRANTY OF ANY KIND !!!!!
rem https://technet.microsoft.com/en-us/itpro/powershell/windows/defender/set-mppreference
rem To also disable Windows Defender Security Center include this
rem reg add «HKLM\System\CurrentControlSet\Services\SecurityHealthService» /v «Start» /t REG_DWORD /d «4» /f
rem 1 — Disable Real-time protection
reg delete «HKLM\Software\Policies\Microsoft\Windows Defender« /f
reg add «HKLM\Software\Policies\Microsoft\Windows Defender« /v «DisableAntiSpyware« /t REG_DWORD /d «1« /f
reg add «HKLM\Software\Policies\Microsoft\Windows Defender« /v «DisableAntiVirus« /t REG_DWORD /d «1« /f
reg add «HKLM\Software\Policies\Microsoft\Windows Defender\MpEngine« /v «MpEnablePus« /t REG_DWORD /d «0« /f
reg add «HKLM\Software\Policies\Microsoft\Windows Defender\Real-Time Protection« /v «DisableBehaviorMonitoring« /t REG_DWORD /d «1« /f
reg add «HKLM\Software\Policies\Microsoft\Windows Defender\Real-Time Protection« /v «DisableIOAVProtection« /t REG_DWORD /d «1« /f
reg add «HKLM\Software\Policies\Microsoft\Windows Defender\Real-Time Protection« /v «DisableOnAccessProtection« /t REG_DWORD /d «1« /f
reg add «HKLM\Software\Policies\Microsoft\Windows Defender\Real-Time Protection« /v «DisableRealtimeMonitoring« /t REG_DWORD /d «1« /f
reg add «HKLM\Software\Policies\Microsoft\Windows Defender\Real-Time Protection« /v «DisableScanOnRealtimeEnable« /t REG_DWORD /d «1« /f
reg add «HKLM\Software\Policies\Microsoft\Windows Defender\Reporting« /v «DisableEnhancedNotifications« /t REG_DWORD /d «1« /f
reg add «HKLM\Software\Policies\Microsoft\Windows Defender\SpyNet« /v «DisableBlockAtFirstSeen« /t REG_DWORD /d «1« /f
reg add «HKLM\Software\Policies\Microsoft\Windows Defender\SpyNet« /v «SpynetReporting« /t REG_DWORD /d «0« /f
reg add «HKLM\Software\Policies\Microsoft\Windows Defender\SpyNet« /v «SubmitSamplesConsent« /t REG_DWORD /d «0« /f
rem 0 — Disable Logging
reg add «HKLM\System\CurrentControlSet\Control\WMI\Autologger\DefenderApiLogger« /v «Start« /t REG_DWORD /d «0« /f
reg add «HKLM\System\CurrentControlSet\Control\WMI\Autologger\DefenderAuditLogger« /v «Start« /t REG_DWORD /d «0« /f
rem Disable WD Tasks
schtasks /Change /TN «Microsoft\Windows\ExploitGuard\ExploitGuard MDM policy Refresh« /Disable
schtasks /Change /TN «Microsoft\Windows\Windows Defender\Windows Defender Cache Maintenance« /Disable
schtasks /Change /TN «Microsoft\Windows\Windows Defender\Windows Defender Cleanup« /Disable
schtasks /Change /TN «Microsoft\Windows\Windows Defender\Windows Defender Scheduled Scan« /Disable
schtasks /Change /TN «Microsoft\Windows\Windows Defender\Windows Defender Verification« /Disable
rem Disable WD systray icon
reg delete «HKLM\Software\Microsoft\Windows\CurrentVersion\Explorer\StartupApproved\Run« /v «Windows Defender« /f
reg delete «HKCU\Software\Microsoft\Windows\CurrentVersion\Run« /v «Windows Defender« /f
reg delete «HKLM\Software\Microsoft\Windows\CurrentVersion\Run« /v «WindowsDefender« /f
rem Remove WD context menu
reg delete «HKCR\*\shellex\ContextMenuHandlers\EPP« /f
reg delete «HKCR\Directory\shellex\ContextMenuHandlers\EPP« /f
reg delete «HKCR\Drive\shellex\ContextMenuHandlers\EPP« /f
rem Disable WD services
reg add «HKLM\System\CurrentControlSet\Services\WdBoot« /v «Start« /t REG_DWORD /d «4« /f
reg add «HKLM\System\CurrentControlSet\Services\WdFilter« /v «Start« /t REG_DWORD /d «4« /f
reg add «HKLM\System\CurrentControlSet\Services\WdNisDrv« /v «Start« /t REG_DWORD /d «4« /f
reg add «HKLM\System\CurrentControlSet\Services\WdNisSvc« /v «Start« /t REG_DWORD /d «4« /f
reg add «HKLM\System\CurrentControlSet\Services\WinDefend« /v «Start« /t REG_DWORD /d «4« /f
reg add «HKLM\System\CurrentControlSet\Services\SecurityHealthService« /v «Start« /t REG_DWORD /d «4« /f
rem Run «Disable WD.bat» again to disable WD services
Quick Tips
- Disabling your antivirus leaves your computer vulnerable to malware, viruses, and other online threats.
- Access Windows Security settings and temporarily disable Real-time protection by switching off. This allows essential scans to run while pausing continuous monitoring.
- For more granular control, utilize the Group Policy Editor or Registry Editor. However, these methods can leave your system vulnerable—consider a third-party antivirus instead.
Method 1: Using Command Prompt
Step 1: Press the Windows key on your keyboard, type Command Prompt, and click Run as administrator.
Step 2: Type or copy the below command and press Enter.
REG ADD "hklm\software\policies\microsoft\windows defender" /v DisableAntiSpyware /t REG_DWORD /d 1 /f

Method 2: Using the Settings App
Step 1: Press the Windows key on your keyboard, type Settings, and click Open.
Step 2: Go to Privacy & security settings.
Step 3: In Privacy & security settings, under Security, click on Windows Security.

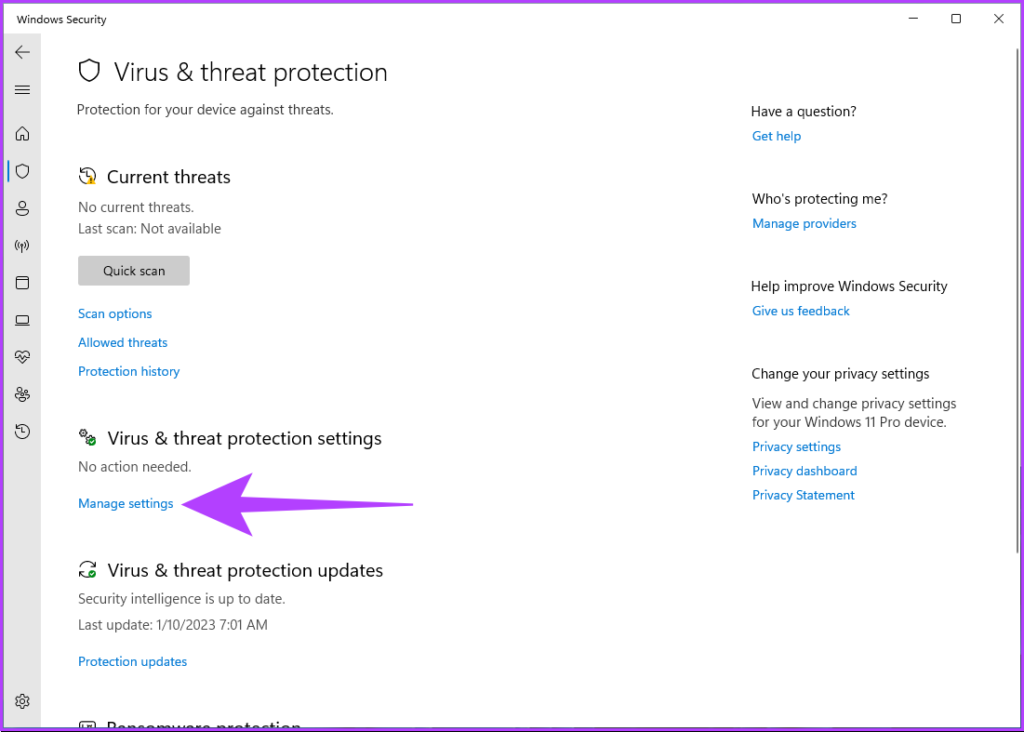
Step 4: Go to the Virus & threat protection option.
Step 5: Under the ‘Virus & threat protection settings’ section, click on Manage settings.
Step 6: Now, disable the Real-time protection toggle and other toggles on this page.
Note: If prompted, click Yes.

If you want Windows Defender to stay disabled, you must keep toggling off the settings every time Windows resets it. However, if you want to disable Windows Defender permanently, jump to the next method.
Method 3: Using Registry Editor
Before you proceed with the steps, you must disable Windows Defender Tamper Protection.
Step 1: Press the Windows key on your keyboard, type Settings, and click Open.
Step 2: Go to Privacy & security settings.
Step 3: In Privacy & security settings, under Security, click on Windows Security.
Step 4: Under Protection areas, select Virus & threat protection.

Step 5: Select Manage settings.

Step 6: Toggle off Tamper Protection.

Now, let’s go to Registry settings. Because we will be using Registry Editor, we strongly advise you to back up the Windows Registry and follow the steps below.
Step 7: Press the Windows key on your keyboard, type Registry Editor, and click Run as administrator.
In the prompt, select Yes.
Step 8: In the top address bar, enter the mentioned address and press Enter.
HKEY_LOCAL_MACHINE\SOFTWARE\Policies\Microsoft\Windos Defender

Step 9: Under the Windows Defender folder, right-click, select New, and choose DWORD (32-bit) Value.
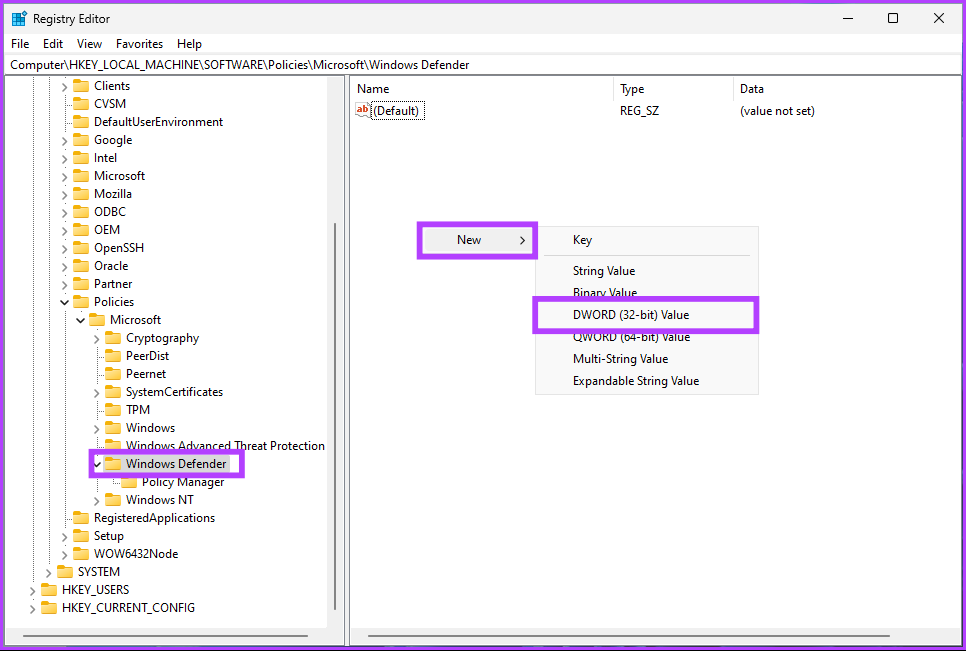
Step 10: Type DisableAntiSpyware in the name field.
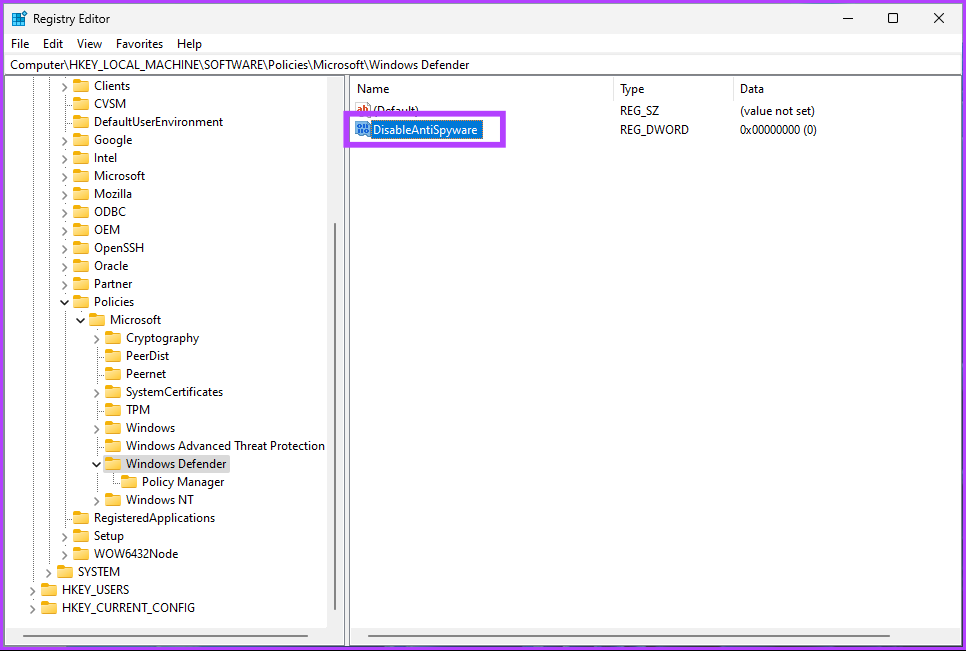
Step 11: Double-click the new value, type 1 in the Value Data field, and press OK.
Finally, reboot the system to implement the changes. When the system boots back and you try to load Windows Defender, you will see an error message saying, ‘This application is turned off by group policy.’
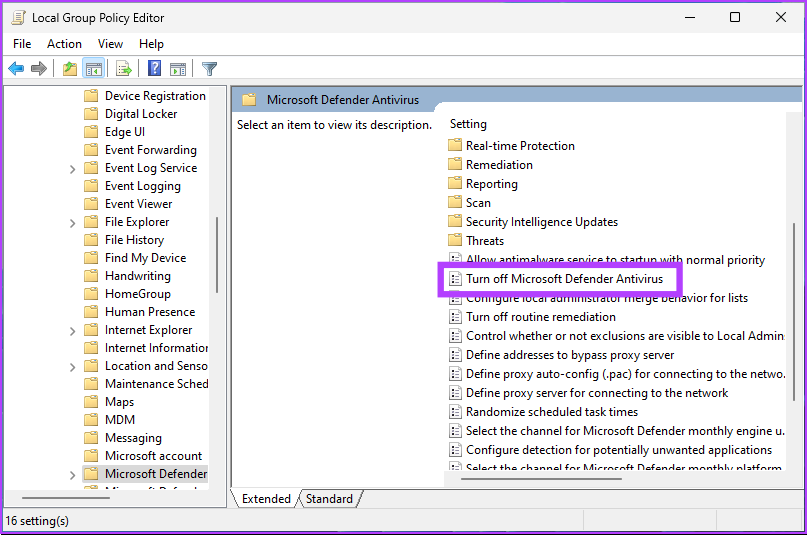
Method 4: Using Group Policy Editor
The Group Policy Editor is exclusive to Windows 11 Pro and Enterprise versions. If you are using Windows 11 Home Edition, you can skip this method.
Step 1: Press the Windows keys on your keyboard, type gpedit, and click Open.
Step 2: In the left pane, under Local Computer Policy, select Computer Configuration.

Step 3: In the right pane, double-click on Administrative Templates.
Step 4: Select Windows Components.
Step 5: Under Windows Components, select Microsoft Defender Antivirus.

Step 6: Under the Microsoft Defender Antivirus, locate and double-click on the Turn off Windows Defender Antivirus option on the right.
Step 7: In the new window, select Enabled. Finally, click on Apply > OK.
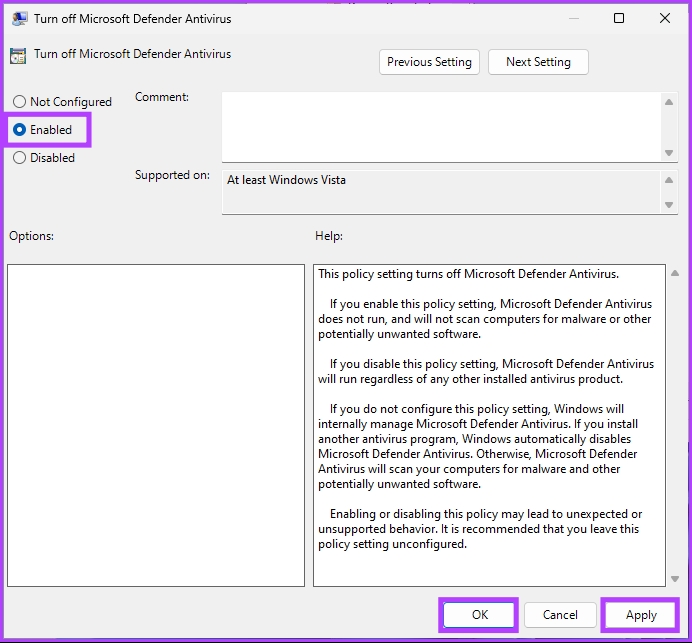
There you go. Now, all you need to do is restart Windows. And once it boots back up, Windows Defender would have been disabled. Whenever you try to open it, an error message will pop up.
If you want to roll back any time in the future, go under the Turn off Windows Defender policy > select Disabled > click Apply > OK.
Method 5: Using a Third-Party Antivirus
There are many antivirus programs for Windows. If you choose to use any, Windows Defender automatically gets disabled. This is, by far, the easiest way to disable Windows Defender.
Here’s how to check if the third-party antivirus is correctly installed. Follow the instructions below.
Step 1: Press the Windows key on your keyboard, type Settings, and click Open.
Step 2: Go to Privacy & security settings.
Step 3: In Privacy & security settings, under Security, click on Windows Security.
Step 4: Under Protection areas, select Virus & threat protection.
Step 5: Select Manage providers in the far right.

Under security providers, you will see that third-party antivirus is turned on. In contrast, Microsoft Defender is turned off.

You may see that the Windows Firewall is still active. It happens when the antivirus doesn’t have a firewall. If it does, Microsoft Defender’s firewall gets turned off automatically.
Was this helpful?
Thanks for your feedback!
The article above may contain affiliate links which help support Guiding Tech. The content remains unbiased and authentic and will never affect our editorial integrity.