-
Home
-
News
- [Fixed] REGISTRY_ERROR Blue Screen Of Death Windows 10
By Sarah |
Last Updated
A blue screen tends to occur on your computer when users try to start it or after they have installed new programs/updates on the device. Usually, a brief introduction to the error will be given. In some cases, the stop code will also be provided for user to get more information. In this page, I’ll talk about the blue screen error — REGISTRY_ERROR.
REGISTRY_ERROR Blue Screen
What is BSOD?
Blue screen appears now and then on users’ storage devices, mainly computer. You may be confronted with a blue-colored screen during computer restart or after you have made changes to the system. The blue screen of death (abbreviated as BSOD) refers to an unexpected shutdown of your PC. According to users’ feedback, the BSOD can be caused by a wide variety of different reasons. You could figure out what happens by looking at the error messages and descriptions. If not enough information is provided, you can search online for the stop code it gives.
Don’t worry! MiniTool Solution can help you get access to the internal hard drive without a system; it can also help you with some boot failures.
Windows 10 REGISTRY_ERROR
People reported they see REGISTRY_ERROR on a blue screen, and it is followed by the stop code 0x00000051 sometimes. Obviously, this registry error is occurred due to a registry problem found in your system.
Tip: According to Wikipedia, Windows Registry is a hierarchical database that stores low-level settings for the Microsoft Windows operating system and for applications that opt to use the registry.

The exact error message may be:
Your PC ran into a problem and needs to restart. We’re just collecting some error info, and then we’ll restart for you (*% complete).
If you’d like to know more, you can search online later for this error: REGISTRY_ERROR.
What about the registry error BSOD error you meet?
- If you only see the Windows 10 REGISTRY_ERROR once, it’s not a big deal.
- However, if you run into the blue screen registry error each time you leave your PC for over 4 minutes or use the Security and Maintenance feature, it’s a serious issue.
How to Fix Registry Error
This part mainly focuses on fixing registry error Windows 10.
Solution 1: disable System Maintenance.
If you see the Windows 10 registry error every time when you try to launch maintenance, please follow the steps below to fix the error.
- Open Windows search.
- Type Run into the textbox and press Enter.
- Type regedit and hit Enter/click OK to open Windows Registry Editor.
- Click Yes if you see a User Account Control window.
- Copy & paste this to the address bar: Computer\HKEY_LOCAL_MACHINE\SOFTWARE\Microsoft\Windows NT\CurrentVersion\Schedule\Maintenance. Then, press Enter.
- Look for the MaintenanceDisabled in the right pane.
- Select this DWORD value. However, you need to create this key if you can’t find it.
- Right click on the blank area and choose New > DWORD (32-bit) Value.
- Name it as MaintenanceDisabled and hit Enter.
- Double click on this key and change the value data from 0 to 1.
- Click on the OK button and close Registry Editor to reboot your PC.
Solution 2: disable the .NET Framework tasks triggered when your PC is idle.
- Open Windows search.
- Type task scheduler and hit Enter.
- Expand Task Scheduler Library in the left pane.
- Then, expand Microsoft and Windows in order.
- Select .NET Framework.
- Right click on a task which says When computer is idle under Triggers.
- Choose Disable.
- Repeat step 6 & 7 to disable another task in the list. (This can be skipped if there’s only one such task.)

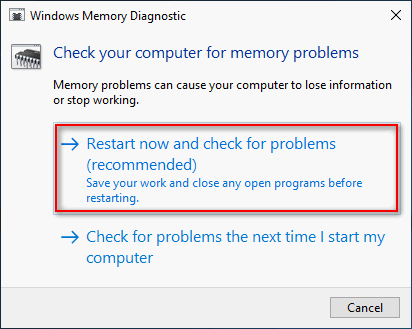
Solution 3: Run Windows Memory Diagnostic.
- Type diagnostic into Windows search & choose Windows Memory Diagnostic.
- Click Restart now and check for problems (recommended).
- Wait for the action to finish and restart your computer.
Solution 4: reset Windows 10.
- Open Settings by pressing Windows + I.
- Choose Update & Security.
- Select Recovery in the left pane.
- Click on the Get started button under Reset this PC.
- Choose from Keep my files and Remove everything (please backup files before this).
- Click Next and then Reset.
How to recover files after factory reset computer?
Other methods that can be used to solve registry error:
- Run antivirus software.
- Run SFC/CHKDSK/DISM. (What if DISM failed?)
- Update Windows 10 to the latest version.
- Repair Windows 10 with installation media. (Top Windows 10 boot repair tools.)
About The Author
Position: Columnist
Sarah has been working as an editor at MiniTool since she graduated from university. Sarah aims at helping users with their computer problems such as disk errors and data loss. She feels a sense of accomplishment to see that users get their issues fixed relying on her articles. Besides, she likes to make friends and listen to music after work.
As you know, you can encounter Blue Screen errors at any given point after your computer boots up and can just reboot it randomly which results in loss of unsaved work. One of these Blue Screen errors is the “REGISTRY_ERROR”. This kind of Stop error has a bug check value of 0x00000051 which indicates your computer’s registry has encountered a severe error. There could be a number of causes for this error but at the time of writing, it is quite difficult to narrow them down to one component. If you face this kind of Blue Screen error, worry not as this post will guide you in fixing it.
As mentioned, this error indicates that there is something wrong with the registry, particularly an I/O error while it tried to read one of its files. This may be caused by hardware issues or file system corruption. It could also be due to failure in a refresh operation which is only used by the security system and only when resource limits are encountered. To fix the Registry_Error Blue Screen, you can try to use the CHKDSK utility or the System File Checker, or the DISM tool or run the Blue Screen troubleshooter. You may also try to reset your computer or repair Windows by using installation media.
Option 1 – Run the Check Disk utility
The first thing you can do to fix the REGISTRY_ERROR Blue Screen error is to run the Check Disk utility. How? Follow these steps:
- In the Windows Search box, type “command prompt” and from the search results, right-click on Command Prompt and select “Run as administrator”.
- After opening Command Prompt, type this command and tap Enter: chkdsk <Drive Letter>: /f /r /x /b
- The command you entered will start to check for errors and fix them automatically. Else, it will throw an error message saying, “Chkdsk cannot run because the volume is in use by another process. Would you like the schedule this volume to be checked the next time the system restarts? (Y/N)”.
- Tap the Y key to schedule Disk Check the next time your computer restarts.
Option 2 – Run the Blue Screen Troubleshooter
The Blue Screen troubleshooter is a built-in tool in Windows 10 that helps users in fixing BSOD errors like REGISTRY_ERROR. It can be found in the Settings Troubleshooters page. To use it, refer to these steps:
- Tap the Win + I keys to open the Settings panel.
- Then go to Update & Security > Troubleshoot.
- From there, look for the option called “Blue Screen” on your right-hand side and then click the “Run the troubleshooter” button to run the Blue Screen Troubleshooter and then follow the next on-screen options. Note that you might have to boot your PC into Safe Mode.
Option 3 – Run System File Checker
- Open Command Prompt with admin privileges.
- After that, execute this command: sfc /scannow
- Once the scan is completed, restart your computer and then check if the REGISTRY_ERROR is now fixed.
Option 4 – Run the DISM tool
You can try running the Deployment Imaging and Servicing Management or DISM tool to fix the REGISTRY_ERROR Blue Screen error. Using this built-in tool, you have various options such as the “/ScanHealth”, “/CheckHealth”, and “/RestoreHealth”.
- Open the Command Prompt with admin privileges.
- Then type in the following commands and make sure to hit Enter right after you type each one of them:
- Dism /Online /Cleanup-Image /CheckHealth
- Dism /Online /Cleanup-Image /ScanHealth
- exe /Online /Cleanup-image /Restorehealth
- Do not close the window if the process takes a while as it will probably take a few minutes to finish. Once it’s done, restart your computer.
Option 5 – Reset your computer
- Tap the Win key or click on the Start button located in the Taskbar.
- Then click on the Power button at the bottom right portion of the screen.
- Next, press and hold the Shift key on your keyboard and then click on Restart. This will restart your Pc into the Advanced Startup options.
Note: Once you have access to the Advanced Startup options, you have to go to the setting which allows you to Reset your Windows 10 PC. All you have to do is select Troubleshoot > Reset this PC to reach the following screen
Afterward, select either the “Keep my files” option and then proceed to the next on-screen instructions that follow to reset your Windows 10 computer without losing your files.
Option 6 – Try to perform repair install by creating a Windows 10 installation media
- Click this link and then click the Download Tool Now button.
- Next, click the “Use the tool to create installation media (USB flash drive, DVD, or ISO file)…” option and follow the next given instructions on the screen.
- Now select the ISO file option in step 5.
- After that, you should now have an ISO file.
- Next, go to the location where you’ve downloaded the ISO file.
- Then right-click on the Windows 10 ISO file and select the Open with option and then select File Explorer.
- Now click on “setup.exe” and follow the next instructions that appear on the screen. When asked, you have to select either Nothing (clean install) or Keep personal files only option. Take note that you must not select the “Keep personal files, apps, and Windows settings”.
Do You Need Help with Your Device?
Our Team of Experts May Help
Troubleshoot.Tech Experts are There for You!
GET HELP
Troubleshoot.Tech experts work with all versions of Microsoft Windows including Windows 11, with Android, Mac, and more.
Share this article:
You might also like
Browsing your files on a computer seamlessly is made possible by the File Explorer in Windows 10 as it provides users with a great sense of customization for both listing and performing operations on a file. You have the option to arrange the folders and files being browsed by their name, type, date, size, and so on. Moreover, files that share a common attribute can be also be grouped accordingly using the grouping feature. However, there are times when instead of helping, it causes some problems for some users. This is why in this post, you will be guided on how you can disable the File Grouping feature in the File Explorer in Windows 10.
There are two methods you need to consider in disabling the File Grouping feature in Windows 10. First, you can disable it for only one folder or you can disable it for all the folders on your computer. For more details, follow the instructions given below.
Option 1 – Disable File Grouping in only one folder
This first option is relatively straightforward and simple which will work if you only want to disable File Grouping in one folder.
- First, open File Explorer, and go to the folder you want to disable File Grouping.
- Next, right-click anywhere on that folder.
- And then select Group by > None. This will disable File Grouping for only that particular folder.
Option 2 – Disable File Grouping in all the folders
If you wish to disable File Grouping in all the folders on your computer, then you need to follow this option. If you have already tried the first one, then continue with the given steps below.
- Tap the Alt + V key combination.
- Then tap the Alt + Y keys and then tap Alt + O keys.
- After that, navigate to the View tab, and under the Folder views section, select Apply to Folders.
- Now click on the Apply and OK buttons to save the changes made. This will disable File Grouping in all the folders listed in the File Explorer.
Read More
BSOD or Blue Screen of Death errors are one of the most common errors you can encounter on your Windows PC. One of these BSOD errors is the “ACPI_BIOS_ERROR”. If you suddenly get this error, it means that there is some problem in booting the operating system from your hard drive or Windows was not properly installed on your PC. In addition, this error could also mean that there is something wrong with the CMOS battery located in the motherboard.
Unlike other BSOD errors, the workaround for this error is a bit different as these workarounds require a bit more expertise in updating the BIOS as well as setting the correct boot configuration. If you know are capable enough in troubleshooting the problem, refer to the instructions laid out below to fix the BSOD “ACPI_BIOS_ERROR”.
Option 1 – Try to remove the SSD and update the BIOS
The first thing you have to do is to check the primary storage devices on your PC. If you have just installed a new hard drive or SSD recently on your computer, then it’s most likely the cause of the BSOD error. Moreover, you should also ensure that your BIOS is up-to-date to the latest available build.
- Remove the SSD/HDD and inject a different HDD that was already preinstalled in your Windows PC.
- After that, update the BIOS to the latest available build. After updating it, insert the old SSD/HDD and then try to boot your PC again. The problem should be fixed now. If not, refer to the next given option.
Option 2 – Try to check the CMOS battery and reset the CMOS module
As mentioned earlier, the CMOS battery might also be the one that’s causing the problem. It is a physical component of the motherboard and is a memory chip that contains all the settings configuration on your computer and is also powered by a battery. So if your battery loses power, the CMOS will be reset and as a result, all the configurations will be gone as well. It is also possible that the CMOS module is not properly working and every time things are saved, they are properly written due to the battery. That’s why you have to consider changing the CMOS battery and see if it fixes the problem. In addition, you also have to make sure that you completely reset the CMOS module and then try booting your PC again.
Option 3 – Try to check the BIOS settings
If the BIOS settings are incorrect, chances are that’s the reason why you’re getting the “ACPI_BIOS_ERROR” BSOD error. Every BIOS has different settings which you can make use of to enhance your computer experience. So make sure that your BIOS is up-to-date and that the settings are in accordance with your requirement.
Another thing you can try is to disable the Legacy USB and the Legacy BIOS in the BIOS settings if you are trying to install a 64 bit Windows version. Make sure that you also enable AHCI before plugging in the installation drive on your PC. Moreover, ensure that your PC is using IDE or Integrated Drive Electronics mode instead of SATA or Serial Advanced Technology Attachment. Aside from that, try to check the extracted setup if it is in NTFS format, if it is, you should extract the ISO in FAT32 and use it to install Windows.
Option 4 – Try to reset the ACPI Compliant Control Method
ACPI or Advanced Configuration and Power Interface provide an open standard that operating systems can use to detect hardware, perform power management, as well as monitor the status of your device and provide information for other processes. Chances are, there are some misconfigurations with this module on your PC that lead to believing that there is no battery present. That’s why you need to reset it and see if it fixes the BSOD error or not.
- Boot your PC into Safe Mode.
- Tap the Win + R keys to open the Run dialog box.
- Type in “devmgmt.msc” in the field and tap Enter to open the Device Manager.
- After opening the Device Manager, go to the “Batteries” section and click it to expand it and then right-click on the “Microsoft ACPI-Complaint Control Method Battery” option and click on Uninstall.
- After you disable the module, click on any empty space and then click the “Scan for hardware changes” option.
- Then check if you can now boot your PC normally and without the BSOD error.
Read More
QuickLook app is one of the best options to preview files without opening them in Windows 10. It works similar to the Quick Look feature of macOS. This Microsoft Store app has some really interesting features. It lets you preview images, documents, and media files. Also, just a hotkey is needed to preview the content of a file. There is no interface for the app. Only a preview window is visible.
You can also expand the preview window to full size. Apart from that, it lets you keep the preview window on top of the other opened applications. For image files, it also provides the EXIF data.
After installing this app, just select some file that you want to preview, and press the Spacebar key. That’s it! The preview window will open immediately to view the file content.
If you would like to read more helpful articles and tips about various software and hardware visit errortools.com daily.
Read More
Error 550 — What is it?
Error 550 is an SMTP (Simple Mail Transfer Protocol) outgoing server error code.
It usually occurs when you try to send emails through your Outlook account and the email message encounters a relay error. The email returns back without being delivered with a 550 error message.
The error message is prompted as either of the following:
«550 Requested action not taken: mailbox unavailable»
«550 5 2 1 mail from refused spam site»
In other words, the error code 550 means that your SMTP server was not able to deliver the sent email to the user.
Solution
Error Causes
There are multiple reasons for this error message including:
- The email address was typed incorrectly
- Incorrect SMTP Server settings
- ISP placing restrictions for outgoing mails on the email server
- System infected by virus or malware
Further Information and Manual Repair
Regardless of what the reason may be for the error 550 code occurrence, it is advisable to repair and fix the issue quickly to avoid inconvenience.
You may not be able to send emails from your Outlook account if the error continues. This can cause great hassle in corresponding with others timely and may create a big communication gap.
Here are some quick and efficient ways to resolve this issue on your system:
Solution 1:
There is no need to panic when you encounter error 550. Sometimes the error message may occur because you inserted the wrong/ incorrect email address of the recipient.
In such a case, cross-check the recipient’s email address to verify if it is correct. If not, insert the correct address and try sending the email again.
Solution 2:
If the error still persists, try other methods to resolve it. Sometimes error 550 can also occur due to incorrect SMTP settings.
Fix it to resolve the error. This can be done by opening your Outlook settings Tools and Accounts option. Now go to view/change the email account for the email account you are having problems with.
After that check, the SMTP server is set to mail.yourdomain.com. Then click more settings and then click the outgoing server tab. See if the ‘My server requires authentication for the outgoing server’ is checked. If not, then check on it. Then simply save to confirm changes. Now try emailing again.
Hopefully, this will resolve the issue.
Solution 3:
Another reason for the error occurrence can be ISP blockage.
When the junk email volumes increase, network administrators (the people who are responsible for managing ISP servers) place restrictions on SMTP email servers to prevent spam on their network. If this is the reason, contact your ISP administrator to resolve the issue.
Solution 4:
Malware and viral infection can also be the cause for error 550. To remove all kinds of viruses including Trojans and spyware and fix the issue right away without compromising on the speed of your PC it is advisable to download Restoro.
This is a highly functional and advanced PC Fixer embedded with multiple utilities like a powerful antivirus and a system optimizer.
It scans your entire PC in seconds, detects and removes all kinds of viruses. Simultaneously, the system optimizer feature ensures the speed of your PC does not slow down during the scanning and virus removal process.
This feature boosts your PC speed significantly.
It is user-friendly and has easy navigations making it quite simple for even those users who are not technically sound to work around it and operate it with ease. It is compatible with all Windows versions.
Click here to download Restoro and resolve the error 550 messages today!
Read More
There are some new generation motherboards for laptops and PCs that bring in support for both the Unified Extensible Firmware Interface or UEFI as well as the Basic Input Output System or BIOS. The main advantage of UEFI over the traditional BIOS is the fact that UEFI supports a hard drive that has a capacity of more than 2 terabytes. However, the disadvantage of UEFI is that it only supports the x64 Windows operating system versions and that the hard drive is supposed to use the GPT structure. So if your PC is compatible with and supports UEFI and you want to change from Legacy to UEFI, then you’ve come to the right place as this post will guide you on how you can exactly do that without having to reinstall it.
There are two ways to change Legacy to UEFI. You can convert MBR to GPT using either the built-in utilities in Windows or using the Recovery Environment. Before you proceed, make sure that your computer fulfills the following prerequisites:
- Your PC’s motherboard should support both Legacy and UEFI.
- Your PC should be running at least the 1703 Windows 10 version or newer on an MBR partition.
Once you’ve made sure that your computer covers the aforementioned prerequisites, refer to the given options below.
Option 1 – Convert MBR to GPT via Windows built-in utilities
- In the Windows Search box, type “command prompt” and from the search results that appear, right-click on Command Prompt and select the “Run as administrator” option.
- After that, execute this command: exe /convert /allowfullOS
- Now, wait until the process is completed since you can track its process on your screen.
- Once it’s done, go to Settings > Update & Security > Advanced Startup options and from there, click on Restart Now. This will restart your computer and give you advanced options.
- Next, select Troubleshoot > Advanced Options where you will see further options including System Restore, Startup Repair, Go back to the previous version, Command Prompt, System Image Recovery, and UEFI Firmware Settings.
- Now select the UEFI Firmware Settings. This will take you to the BIOS. Boot Mode is typically available under Boot > Boot Configuration. Once you’re there, set it to UEFI and then save the changes you’ve made. After that, your computer will restart.
Option 2 – Convert MBR to GPT via the Recovery Environment
- When the message appears on your screen while running Windows Setup, you need to tap the Shift + F10 keys to open Command Prompt.
- Make sure to run Command Prompt as admin and then execute this command: exe /convert
- After that, wait until the process is completed. When it’s done, you have to go to the BIOS just like in the first given option above.
- As mentioned, you can usually find the Boot Mode under Boot > Boot Configuration. Once you’re there, set it to UEFI.
- Now save the changes made and exit as your computer will restart.
Read More
What Is STOP 0x00000014 Error?
0x00000014 error is actually an error that is always displayed on a STOP message.
It is also known as Blue Screen of Death, abbreviated as BSOD. When this error occurs, the message that is displayed to the user either says ‘STOP: 0x00000014’ or states ‘CREATE_DELETE_LOCK_NOT_LOCKED’. It is crucial to fix this error to ensure your program is functioning appropriately. If this error message is not rectified, you might be opened to other error messages, such as error code 0x000000d1.
Solution
Error Causes
As far as the causes of STOP 0x00000014 error are concerned, this error usually occurs when a device driver or hardware problem occurs. This error may also occur if users attempt to run some specific application or update or modify an existing application. When a 0x00000014 error occurs, the operating system restarts to disable the PC from performing any further.
Without taking into consideration the causes of its occurrence, it is crucial to make sure that the 0x00000014 error is fixed as soon as possible to eliminate any undesired inconvenience in the future.
Further Information and Manual Repair
A lot of times when an operating system tries to recover from the STOP 0x00000014 error, the user is prompted that Windows has recovered from an unexpected shutdown.
However, if Windows fails to recover on its own, manual repair has to be performed.
While there are several ways this error can be fixed, some of the most effective and efficient ways of troubleshooting the 0x00000014 error are listed below as follows.
- Restart your computer. Often simply restarting the computer can help eliminate the problem.
- If restarting the system doesn’t help, find if you have recently modified or altered any hardware or driver. It is possible that the 0x00000014 error has been caused by the recent modification. Undo the changes and find out if the error occurs again. If it doesn’t, it is highly likely the issue has been resolved.
However, if the error persists, some solutions that may work are outlined below.
- Start your system using the Last Known Good Configuration. This will undo any changes in the driver and recent registry.
- Another solution is to manually perform System Restore. This will also return the system back to its former state.
- Another idea that my work is to use roll back the device driver. When the driver will return to its previous version, the problem will easily be resolved.
To keep the 0x00000014 error from occurring in the future, it is advised to unplug any newly installed hardware or reinstall any deleted software.
If you’re not tech-savvy and wish to get this error code rectified in a jiffy, download a powerful automated tool and perform a computer scan.
Read More
As you know, the Start Menu in Windows 10 is quite a stable experience. However, there are times when it can encounter some issues as well like getting corrupted. If your computer is going through the same problem, you’ve come to the right place as this post will guide you on how you can fix the “Tile Data is corrupt” error.
This kind of problem is actually quite common among a lot of Windows 10 users. This kind of problem prevents the Start Menu from working properly and no amount of clicking the keyboard keys or mouse will resolve the issue. Fixing it is important since the Start Menu is required for the operating system to function properly and even though there are several ways to get around in using the Start Menu, it can get quite problematic. Even if you manage to open the Start Menu, the ability to click on apps to open them is out of the question and you need to fix the problem.
Worry not for the potential fixes provided in this post are not hard to follow. You can try to run the Start Menu troubleshooter or run the DISM tool. You could also reset the folder for Tile Database or re-register the Windows 10 Start Menu. For more details, refer to each one of the options provided below.
Option 1 – Try running the Start Menu troubleshooter
The first and basic thing you can do to fix the problem is to run the Start Menu troubleshooter as it can help you fix the problem automatically. Since this is not a built-in troubleshooter, you can download it from the official website of Microsoft. After you download it, run it and wait until it’s done identifying the problem and automatically fixing it.
Option 2 – Try running the DISM tool
You can run the DISM tool as well to help fix the “Tile Database is corrupt” error. Using this built-in tool, you have various options such as the “/ScanHealth”, “/CheckHealth”, and “/RestoreHealth”.
- Open the Command Prompt with admin privileges.
- Then type in the following commands and make sure to hit Enter right after you type each one of them:
- Dism /Online /Cleanup-Image /CheckHealth
- Dism /Online /Cleanup-Image /ScanHealth
- Dism(.)exe /Online /Cleanup-image /Restorehealth
- Do not close the window if the process takes a while as it will probably take a few minutes to finish.
- Once it’s done, check if it was able to fix the corrupted Start Menu or not.
Option 3 – Try to reset the Tile Database folder
- First, you need to restart your computer and log into another user account where the Start Menu works.
- Next, navigate to this folder location, C:/Users/<userX>/AppData/Local/Tile/DataLayer.
- From there, copy the “TdlData.xml” file and save it to another drive.
- Once done, restart your computer and log into the user account where the Start Menu is corrupted.
- After that, navigate to this folder location, C:/Users/<userY>/AppData/Local/Tile/DataLayer.
- Now paste the TdlData.xml file you copied earlier and navigate to this location, %LocalAppData%MicrosoftWindowsShell.
- Afterward, copy the DefaultLayouts.xml file from the user account that’s working fine to the user account where the Start Menu is corrupted.
Option 4 – Try to re-register the Windows 10 Start Menu
- Tap the Win + X and select the “Windows PowerShell (Admin” option from the menu.
- After opening PowerShell, execute this command: Get-AppXPackage -AllUsers |Foreach{Add-AppxPackage -DisableDevelopmentMode -Register «$($_.InstallLocation)AppXManifest.xml»}
- Wait until the command is executed and then see if it fixed the problem with the Start Menu or not.
Read More
Stop 0x0000000A — What is it?
Stop 0x000000A is a type of blue screen of death error associated with Windows XP. It occurs either during or after the installation of Windows XP. In other cases, the stop 0x000000A error may occur when the device driver uses an incorrect memory address, causing an IRQ conflict.
The Stop 0x000000A error message means that a process or a driver attempted to access a memory section without permission. The stop error message is displayed in the following format:
Stop: 0x0000000A (parameter1, parameter2, parameter3, parameter4)
IRQL_NOT_LESS_OR_EQUAL
*** Address x has base at x — filename
Solution
Error Causes
The stop 0x000000A error is triggered due to multiple reasons. These include:
- Faulty hardware
- The poor device driver installation
- Incompatible device driver
- Viruses and malware attack
- Disk fragmentation
Blue screen of death errors like the stop 0x000000A error code is critical. These errors may pose serious PC threats. When this error occurs the computer screen turns blue, the program running on the system stops and if the error is not fixed in time it may also result in a system crash and failure.
Further Information and Manual Repair
To resolve the Stop 0x000000A error on your PC, here are some solutions that you can try:
1. Roll Back Drivers
To do this, click on the start button and go to the control panel. Then double click the system icon and locate the ‘System Properties’ window. After that click on the ‘hardware’ tab and then click the ‘Device Manager’ button. Here locate the device that you recently updated which could be causing the IRQ conflict.
Now double click the device recently updated and click the driver tab. Then click on the ‘Roll Back Driver’ button. Wait for the process to finish and then simply reboot your system.
2. Specify the Hardware Abstraction Layer (HAL)
Another method to resolve the Stop 0x000000A error on your system is to specify the hardware abstraction layer (HAL). This can be done during Windows XP installation startup. Simply press the F5 button on your keyboard while the “Setup is inspecting your computer’s hardware configuration’.
When prompted, make sure that you specify the correct computer type and HAL (the Hardware Abstraction Layer). Most computers use a single processor, if your computer also has a single processor then simply select ‘Standard PC HAL’ computer type from the menu. Now reboot your PC and then reinstall the Windows XP operating system.
If the error is still not resolved then try turning off features in CMOS settings
3. Turn off Features in CMOS Settings
Turn off all the following features in the CMOS settings:
- All caching, including L2, BIOS, internal/external, and write back caching on disk controllers
- Plug and Play
- All shadowing
- Any BIOS-based virus protection feature
After turning off these features, try reinstalling Windows XP again. If this works, then that’s great! However, if it doesn’t, then try method 4; maybe the cause of the stop 0x000000A is associated with incompatible drivers.
4. Install Windows XP compatible Drivers
Sometimes device driver compatibility can also shoot up the stop 0x000000A error message.
First, remove the drivers that are incompatible with Windows XP. Now obtain and install new Windows XP compatible drivers. To do this, go to the start menu and the control panel. Now double click on Add or Remove Programs icon. Select the drivers that are incompatible with Windows XP and click on the remove button.
After that restart PC and install Windows XP, compatible drivers, for the hardware devices on your system.
5. Scan for Viruses and Repair the Registry
If all the methods discussed above do not resolve the stop 0x000000A error on your PC, then it means either your computer is affected by an infection virus or the problem is associated with the registry like disk fragmentation and invalid entries.
To scan for both viruses and registry issues simultaneously in seconds, it is advisable to download Restoro.
Restoro is an advanced and multi-functional PC repair tool integrated with powerful utilities including a registry cleaner, antivirus, and a system optimizer. It also scans for Active X controls and class ID errors.
The registry cleaning utility scans your entire PC for all possible registry issues triggering different error codes including the stop 0x000000A error. It wipes out all the unnecessary files cluttering and damaging the registry including cookies, temporary files, junk files, and invalid entries.
It repairs the fragmented disk and the registry thereby resolving the stop 0x000000A error on your system.
The privacy error utility functions like an antivirus. It detects all kinds of malicious software on your system including malware, adware, spyware, and viruses. These are removed immediately thus making your PC error-free.
Restoro is safe, efficient, and user-friendly. It is compatible with all Windows versions including XP. It has a sophisticated interface and a neat layout which makes it quite easy to operate and workaround.
Click here to download Restoro and repair your PC and resolve the stop 0x000000A error code now!
Read More
Error Code 0xc00000fd — What is it?
In its most basic essence, Error Code 0xc00000fd appears when a program can not be initiated. It can occur when a file or program is corrupted, incompatible with the current version of the operating system, or out of date.
This error code occurs primarily in Windows but is also present in previous editions of the operating system. The symptoms of this error and the resolution methods for each of these systems are essentially resolved in the same way.
Common symptoms include:
- Failure of programs to open properly, even if they were able to be opened in the past
- The appearance of an error message stating that the application couldn’t be started correctly
There are several different things that Windows 10 users can do to try to fix the appearance of Error Code 0xc00000fd on their machine. Some of these methods are fairly simple for the average user, while others may require advanced knowledge and comfort with diving into the deeper tools and settings of the Windows operating system. If you have difficulty in implementing the methods below, contact a qualified Windows repair technician to assist you in the resolution of the error code.
Solution
Error Causes
Error Code 0xc00000fd can arise when program files are not recognized properly by the operating system, when the operating system is no longer compatible with the program being run, when files are missing or corrupted, or when the program has been changed in a substantial way. Each of these causes requires a different method of resolution.
Further Information and Manual Repair
Several methods can be used to attempt to resolve Error Code 0xc00000fd on your computer. Basic users can use some of these methods, while others require familiarity with advanced tools and options in Windows. If you have trouble implementing the steps below, contact a qualified professional to assist you.
Here are the top ways to deal with Error Code 0xc00000fd on your machine:
Method One: Check for Updates using the Windows Update Tool
In some cases, compatibility issues can be resolved through updates and patches available directly from Microsoft via the Windows Update tool. This is most likely the case if you have not kept up with regular updates on your machine over time.
In your settings, open up the Windows Update tool and run a scan to see if there are any required updates available for your programs or for the operating system itself. If there are updates, install them, then reboot your computer to make sure that all updates are able to be fully applied to your operating system.
Attempt to open the program that caused the error after you are finished to see if this method addressed the problem fully or if an additional method needs to be used.
Method Two: Roll Back to an Earlier Version of the Updates
Sometimes, an update can cause a compatibility issue. If you have previously been able to open the program in question without any problems, but have recently installed an update on your computer, that update may have been the source of the problem. If this is the case, roll your system back to an earlier stage of updates to see if that fixes the problem. If so, you may need to wait to reinstall the updates until Microsoft corrects the issue.
Method Three: Run Scans on Your Registry, Antivirus Software, Drivers, and Update Troubleshooters
If there truly is a corrupted or missing file within the program that you are trying to run, you can open up several tools to scan for the file that may be causing the trouble and attempt to fix it.
Run the following tools to try to fix the problems:
- Windows Registry Repair Tool (this particular tool may take some time to complete)
- Windows Update Troubleshooting Wizard
- Windows Drivers Updates
- Antivirus software or Microsoft Security Essentials
After running each of these tools, restart your computer to allow any necessary changes to be applied to your system.
If the above methods do not fix error Code 0xc00000fd on your particular device or if you do not have the confidence and knowledge to implement these steps on your own, get in touch with a Windows repair professional who can help you to resolve the problem.
Method 4: Use An Automated Tool
If you wish to always have at your disposal a utility tool to fix these Windows 10 and other related issues when they do arise, download and install a powerful automated tool.
Read More
What is Error 0xe06d7363?
Error 0xe06d7363 is displayed when a process or an operation is not launched, or completed by an application.
This error can prevent the user from performing some operations. It might close the application unconditionally. Sometimes a ‘GetLastError()’, a ‘GetExceptionCode()’, or a ‘GetExceptionInformation()’ is displayed with this error.
Error Causes
Error 0xe06d7363 can occur for a number of reasons. Damaged, corrupted, or missing files in the registry database are the main reasons why the error might occur. Another reason is when the system files are not configured correctly, thus they corrupt system files in applications. They can also affect the hardware devices.
All code-generated exceptions in the Microsoft Visual C + + compiler will contain this error. As this error is compiler-generated, the code will not be listed in Win32 API header files. This code is a cryptic device, with ‘e’ for exception while the final 3 bytes represent ‘msc’ ASCII values.
Further Information and Manual Repair
To resolve this error, you will have to debug an application. While using Microsoft Visual Studio, you can stop the program when the error 0xe06d7363 occurs. To start debugging, follow these steps:
- Start debugging application
- From Debug menu, click on Exceptions
- In the Exceptions window, select error 0xe06d7363
- In Action, Change to Stop always from Stop if not handled
Another fix for this issue is reverting back to an earlier copy or the last update of the same Windows. Error 0xe06d7363 can occur is when you try running a client application using Microsoft.SqlServer.Types.dll component on your computer that has Microsoft SQL Server 2008 Server Pack 2 installed. With the error, the following text can be seen:
“unable to load DLL ‘SqlServerSpatial.dll’ Exception from HRESULT 0xe06d7363″.
A Cumulative Update 7 was initially released for SQL Server 2008 Service Pack 2 in order to fix this issue. Since the builds are cumulative, every new fix released contains hotfixes and all security fixes which were also included in the previous SQL Server 2008 fix release. This error can be found in all Microsoft products that are listed in the Applies to Category.
Microsoft SQL Server 2008 hotfixes are created to resolve errors like 0xe06d7363 on specific SQL Server service packs. This error is by design and has commonly occurred in the previous versions of Windows before Windows 7.
Congratulations, you have just fixed Error 0xe06d7363 in Windows 10 all by yourself. If you would like to read more helpful articles and tips about various software and hardware visit errortools.com daily.
Now that’s how you fix Error 0xe06d7363 in Windows 10 on a computer. On the other hand, if your computer is going through some system-related issues that have to get fixed, there is a one-click solution known as Restoro you could check out to resolve them. This program is a useful tool that could repair corrupted registries and optimize your PC’s overall performance. Aside from that, it also cleans out your computer for any junk or corrupted files that help you eliminate any unwanted files from your system. This is basically a solution that’s within your grasp with just a click. It’s easy to use as it is user-friendly. For a complete set of instructions in downloading and using it, refer to the steps below
Perform a full system scan using Restoro. To do so, follow the instructions below.
-
-
- Download and install Restoro from the official site.
- Once the installation process is completed, run Restoro to perform a full system scan.

- After the scan is completed click the “Start Repair” button.
-


Read More
Copyright © 2023, ErrorTools. All Rights Reserved
Trademark: Microsoft Windows logos are registered trademarks of Microsoft. Disclaimer: ErrorTools.com is not affiliated with Microsoft, nor claims direct affiliation.
The information on this page is provided for information purposes only.
BSOD REGISTRY ERROR появляется вследствие проблем с чтением файла, на который ссылается реестр. Windows 10, 11 просто не в состоянии воспроизвести системный файл, необходимый ей для выполнения какой-либо задачи. Синий экран с этим кодом очень часто появляется не сразу, может возникать только в моменты простой или после определенного действия. Практически всегда нужно время и некоторые закономерности в этом отношении заметить легко. Вот все, что нам известно о BSOD с кодом REGISTRY_ERROR.
Причины ошибки
Синий экран смерти появляется либо по причине повреждения системного реестра, либо из-за неисправности некоторых файлов. Преимущественно речь идет о системных файлах. К примеру, очень часто это касается файла ntkrnlpa.exe, но далеко не всегда.
Как исправить BSOD?
Самое лучшее решение по совместительству и самое сложное. Для его реализации нужны дампы памяти, логи системы. К сожалению, научиться анализировать их достаточно сложно, здесь нужно профессиональная помощь. Однако нередко в сообщении с BSOD также указан проблемный файл, что может существенно облегчить работу. Возможно, это файл ntkrnlpa.exe. Если известен проблемный файл, рекомендуем сделать следующее:
- Загрузить систему в безопасном режиме.
- Найти проблемный файл и скопировать его на рабочий стол, а затем удалить. Возможно, для этого придется получить полномочия на управление (Свойства – Безопасность).
- Перезагрузить систему в обычном режиме. В процессе загрузки может появиться окно со сканированием системы, но его может и не быть.
Windows 10 умеет находить недостающие файлы и автоматически их восстанавливать. Это лучший вариант получить 100% рабочий, исправный и безопасный файл. Есть и негативная сторона вопроса – если удалить слишком важный элемент, система может не запуститься. В таком случае рекомендуем запустить восстановление Windows через установочный диск или флешку.
Еще один путь – просканировать системные файлы, есть высокая вероятность, что проблемный элемент будет найден и автоматически исправлен. В этом поможет серия команд DISM.exe /Online /Cleanup-image /Scanhealth, DISM.exe /Online /Cleanup-image /Restorehealth и sfc /scannow.
Не стоит исключать и вероятность того, что проблема в реестре. Можем попробовать запустить его восстановление через любую программу, специализирующуюся на подобном. Одна из самых популярных – CCleaner.
Без персональных данных системы нам весьма сложно сделать вывод, какой именно файл стал причиной BSOD REGISTRY ERROR. Однако ваш пользовательский опыт очень поможет нам и другим читателям. Просьба написать, на какие именно файлы ругается ваша Windows, удалось ли их исправить в автоматическом режиме.
Table of contents
- What Is the Blue Screen Registry Error 0x00000051?
- How to Resolve the Error 0x00000051 in Windows
- Fix 1: Test Automatic Maintenance
- Fix 2: Update your system
- Fix 3: Run a Windows Memory Diagnostic test
- Fix 4: Update all device drivers on your PC
- Fix 5: Scan your system for malware
- Fix 6: Return to a previous restore point
- Fix 7: Reinstall Windows
- How to Get Rid of the REGISTRY_ERROR Blue Screen Error (0x00000051): Solved
If you’ve ever encountered a blue screen, especially those that come up when you try to start your system, you can identify with the gnashing of teeth many users have been subjected to.
Luckily, for every blue screen of death, there is a solution lurking somewhere on the Internet that can revive the PC and get rid of the error, and the REGISTRY_ERROR BSOD (0x00000051) error isn’t an exception. In this guide, we have gathered all the available working solutions for all the frustrated users out there.
What Is the Blue Screen Registry Error 0x00000051?
The blue screen error code 0x00000051 typically informs the user of an issue with the computer’s operating system or damage to the hard disk boot register, configuration manager, and other issues that prevent the system from starting up. It is a generic error code that incorporates a wide array of bugs, including but not limited to the following:
- Errors in the registry
- Damaged or outdated device drivers
- Damaged system components (RAM and HDD being the most common)
- Malware
- Corrupt OS
Also read: How to Fix “Windows 10 Won’t Boot” Problem Easily
How to Resolve the Error 0x00000051 in Windows
Below is a list of possible solutions for the REGISTRY_ERROR blue screen error (0x00000051) in Windows 10 and earlier versions. At least one of them has worked for someone, and it will work for you too if you meticulously follow the instructions. We recommend you try the fixes in the order they are presented. So, let’s get ready to resolve this stop code registry error.
Fix 1: Test Automatic Maintenance
Automatic Maintenance is Microsoft’s housecleaning setting on Windows that performs periodic maintenance on a computer at a specific time each day. It isn’t a unique activity by itself but rather a collection of automated tasks that are scheduled to run when your computer isn’t in active use.
When you get frequent BSOD registry errors, sometimes they are related to this program not working correctly, leading to the accumulation of minor bugs that affect your PC.
Each day at 02:00 am, Automatic Maintenance swings into action and starts running various tasks and scans to help optimize your PC and ensure that any errors or causes of errors that have developed during your previous day of use don’t have the chance to take root and cause potentially fatal damage down the line.
Note that your system has to be on and not in active use for scheduled maintenance to take place. If you happen to be using the computer or the system is off, then the maintenance will be postponed to the next scheduled hour. However, you can adjust the maintenance schedule to take place at a more conducive time.
Automatic Maintenance updates your applications and operating system, scans your PC for viruses and other security threats, performs disk defragmentation on your storage, deletes some junk files, and performs a plethora of other activities that cumulatively ensure your PC never gets bogged down by bugs. If the program has somehow been disabled, then frequent errors like REGISTRY_ERROR (0x00000051) become inevitable.
PRO TIP
If your PC is frequently running into errors or has slowed down a lot, consider using a PC optimizing program like Auslogics BoostSpeed.
This handy tool will run a scan of your PC, easily detect any performance issues you may be experiencing and help you speed up your system in just a few clicks!
So, the first solution you can try (other than performing a simple reboot) is to try running Automatic Maintenance immediately. Obviously, this only works if you can gain access to the Windows desktop area.
Fortunately, there is a minor class of errors that don’t permanently lock you out from using your computer. Once you’ve regained temporary access to your PC, quickly do the following to solve the error before it reoccurs:
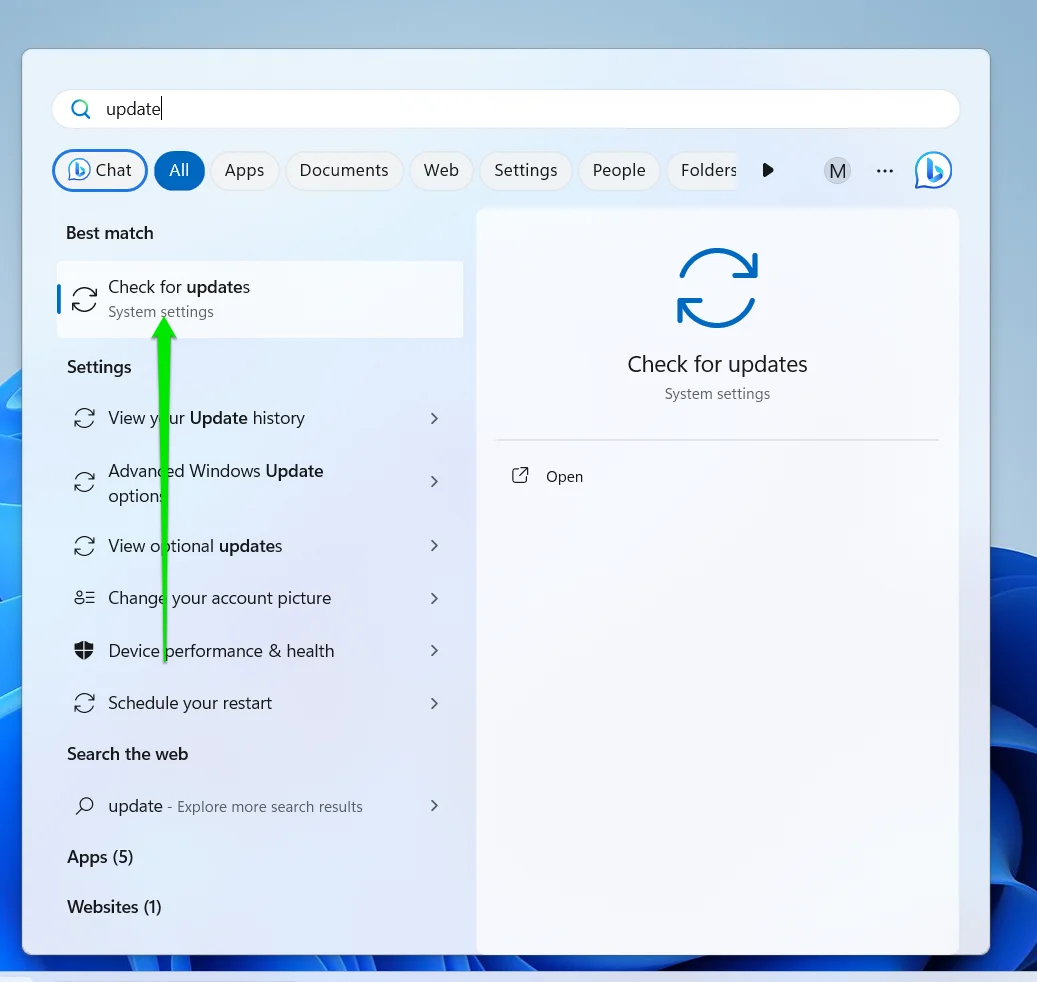
- Type “control panel” in the search area and click the program when it appears in the results.
- Select System and Security.
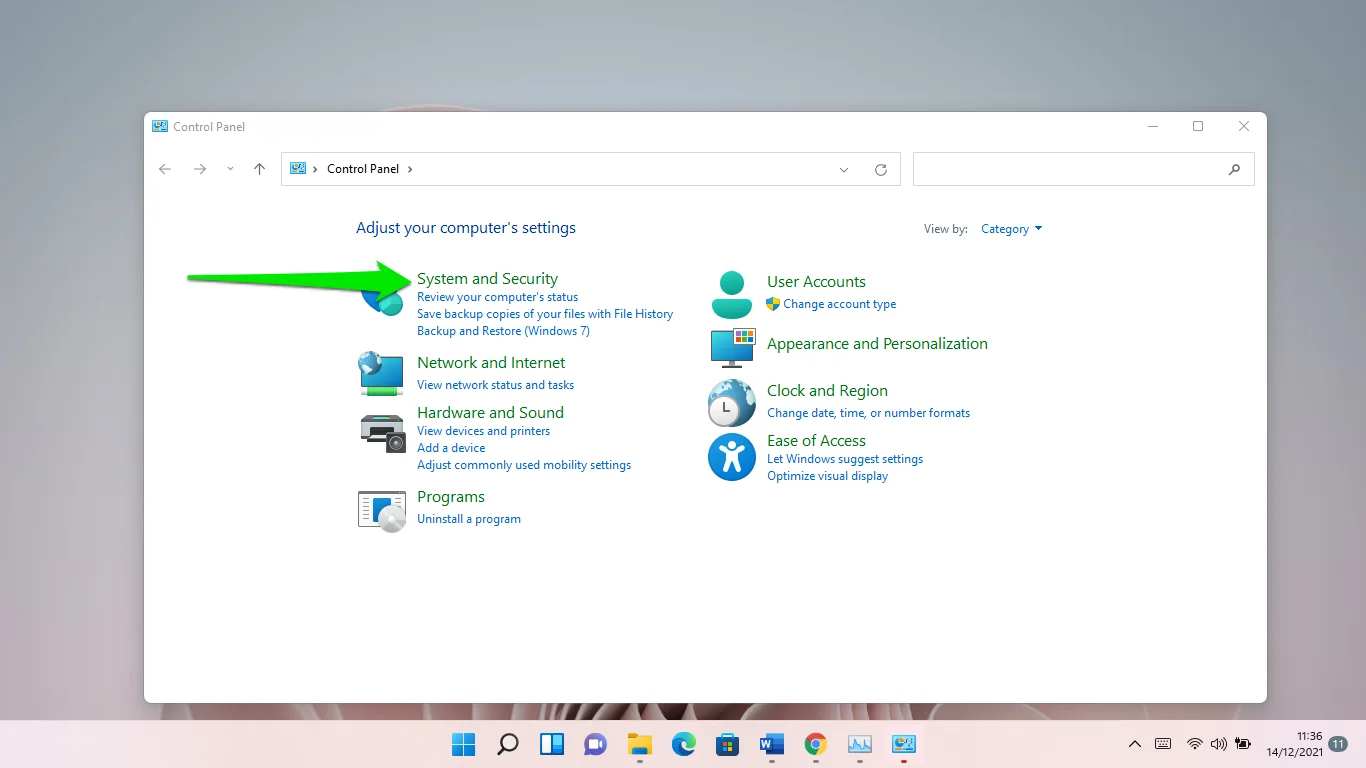
- Select Security and Maintenance.
- Expand the Maintenance section.
- Under Automatic Maintenance, click Start maintenance.
- What happens at this point determines what you should do next. Should Automatic Maintenance start without problems when you click Start maintenance, then there’s nothing wrong here and you don’t need to do anything else. However, if it displays the REGISTRY_ERROR error message and doesn’t start, then you have to disable it.
- To do this, press
Windows key + Xto bring up the Windows Power menu. - Select Run from the menu.
- Type
regeditinto the Run search box and press Enter to launch Registry Editor.
Warning!
At this point, you should be careful about what you’re doing since making the wrong changes to the registry by mistake can have catastrophic consequences on your PC.
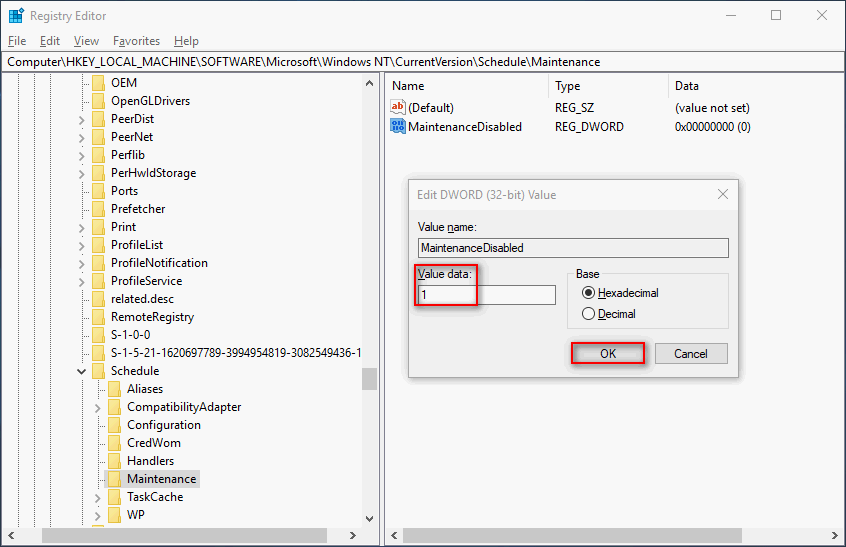
- Navigate to the path below. You may copy and paste it into the search bar at the top of the Registry Editor:
HKEY_LOCAL_MACHINE\SOFTWARE\Microsoft\Windows NT\CurrentVersion\Schedule\Maintenance
- Examine the registry items in the right windowpane under the Maintenance registry key. If you don’t see the Maintenance Disabled DWORD, create it.
- Place the cursor anywhere within the right window pane. Right-click the space and select New >DWORD (32-bit) Value.
- Rename your created DWORD to Maintenance Disabled, then click OK.
- Open the Maintenance Disabled DWORD, input the numeral 1 in the Value data field, and click OK to save your modification.
- Reboot your system.
Upon restart, the BSOD REGISTRY_ERROR should become a thing of the past.
Also read: How to Fix Disk Errors in Windows 10 Using Windows Commands?
Fix 2: Update your system
Sometimes, certain bugs that are discovered in Windows computers are rectified by Microsoft through a security update. Other updates bring improvement to the error detection and combat system within the OS, all of which make your PC less likely to become unable on account of the BSOD REGISTRY_ERROR and related issues.
So, it is always important to check whether you have the latest iteration of Windows installed and if not, to quickly perform an update that will bring your PC’s performance and stability to an optimum level.
To check if your machine is up-to-date, navigate to Control Panel > Update and Security > Windows Update > Check for updates.
Should an update be available, download it and reboot your system after the installation.
Fix 3: Run a Windows Memory Diagnostic test
The BSOD REGISTRY_ERROR can be due to your RAM not working properly; hence, your computer is unable utilize it optimally when performing operations. If you continue using faulty RAM without being aware of that fact, problems will eventually surface, and they might render your machine unusable. Therefore, it is better to perform periodic checks on your RAM to ensure that it is in good working condition.
Windows Memory Diagnostic is a tool developed by Microsoft for just this purpose. Although the company has discontinued the shipment of the program along with other system recovery options in versions of Windows after Windows 7, you can still download the program from a third-party website. It works great for discovering possible RAM issues.
After downloading Windows Memory Diagnostic, run the setup and save the CD image to your desktop. Burn the image to a CD or DVD. The program only starts from a bootable drive. This makes it a great tool to use when your machine is stuck on a BSOD and you cannot access your system. You just have to boot into the disc containing Windows Memory Diagnostic.
Once the program starts running, allow it to do its thing. It will conduct an infinite number of tests until you stop it or your machine turns off.
Observe if any errors are displayed. If WMD identifies errors, even minor ones, it is recommended that you discard the RAM and get a new one. Once you’ve installed the new RAM on your machine—and provided the fault solely lies with the bad RAM—the BSOD REGISTRY_ERROR will stop appearing.
Related: Memory Management BSOD Error on Windows 10
Fix 4: Update all device drivers on your PC
The numerous components that make up your PC use device drivers to communicate with the installed operating system. Sometimes, it just so happens that the OS has been updated while the device drivers remain old versions that might not be able to work well with the OS anymore.
Other times, they become corrupted and incapable of communicating with Windows.
On rare occasions, they go missing, which causes a total breakdown in communication between the device and the overall machine.
All these possible issues can and do cause frustrating issues like the BSOD REGISTRY_ERROR on Windows. Hence, it is best to nip all that in the bud before you run into more serious problems along the way.
And when you do get a non-fatal BSOD, you should endeavor to update all the drivers on your system as fast as possible. You might think a certain hardware driver might be the culprit and want to update just that one, but updating everything insures you against regret if you’re mistaken. Moreover, it also replaces other problematic drivers that will eventually bring more annoyances later.
The main things to be updated on your Windows 10 PC (though by no means the only ones) are your graphics card, sound card, and network card, respectively. We will show you how to update all three of them and the rest. You can either update your device drivers manually or do it automatically with the aid of a software application developed for that purpose. You can also let Windows update your drivers for you via Device Manager.
Update drivers manually
Generally speaking, device manufacturers always want the hardware they produce to work on newer computers and later versions of operating systems. Hence, they release updated versions of hardware drivers for these devices, which are available for download on their websites.
As long as you know what you are looking for, you can proceed to the manufacturer’s website to download the latest hardware drivers for the devices on your computer. You will need to ensure that the name and model of your hardware corresponds to the driver you have downloaded. Moreover, you must make sure that the driver you downloaded is the right one for your operating system.
It sounds like a lot of work, especially if you’re updating multiple device drivers developed by different manufacturers. This is compounded by the fact that some of these OEMs are hard to track down online and the drivers you are looking for might be tucked away in some obscure corner of their website. Even so, as long as you have the will and put in the effort, you will most likely get what you need in the end.
Once you’ve downloaded everything on your computer, just click a driver file and let the installer guide you through the installation. You might have to extract the driver file from an archive first before you can proceed with the installation. Repeat the process for each downloaded driver file.
Update drivers automatically
The previous method explained above sounds like a lot of fun, doesn’t it? It seems like an awful lot of time spent chasing files that are no larger than a few megabytes at best. If you don’t want to expend all your energy on what might turn out to be a wild goose chase, you can automatically bring your drivers up-to-date with Auslogics Driver Updater.
PRO TIP
Auslogics Driver Updater is a safe, fast, and intuitive tool that updates all drivers on your PC in one click to prevent device conflicts and ensure smooth hardware operation. It will give you a report on outdated or missing drivers it detects and let you quickly update them to the latest manufacturer-recommended versions.
Here is how to use Auslogics Driver Updater:
- Download and install the software.
- Launch Auslogics Driver Updater and connect your PC to the Internet.
- Click the green “Start scan” button, and Driver Updater will search your system for faulty, missing, and outdated drivers.
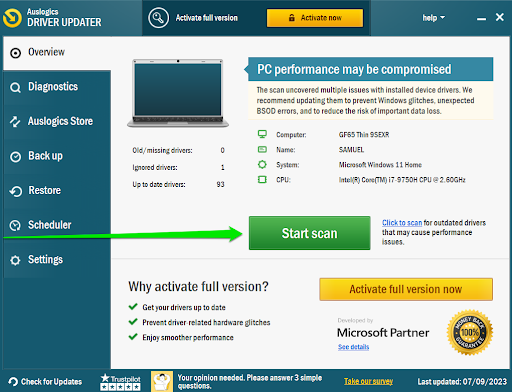
- A list of drivers that require updates will be shown by category. Click “Expand list” to view them all.
If you like what you’ve seen, you can upgrade to the full version. It will scan your devices and update them all with a single click to ensure smoother performance.
Update with Device Manager
You can as well bring all your drivers up-to-date through Windows Device Manager. You need to launch the program, find hardware, and let Windows search for the latest drivers for it. Though this method works fairly well, it isn’t guaranteed to be successful since Windows is sometimes unable to find the required driver. Additionally, it is a semi-manual method that takes up a lot of time and effort. Should you really wish to use this method to update all your device drivers, here’s how to do so:
- Press
Windows key + Xto bring up the Windows Power menu. - Select Device Manager from the menu.
- Expand a device category (Monitors, Network adapters, etc).
- Right-click on any device.
- Select Update driver.
- Wait for Windows to find, download, and install the latest version of the driver.
As you must have guessed, you’ll have to repeat these steps for every device listed in Device Manager. In summary, your best bet is to use Auslogics Driver Updater to download them automatically with one click.
Also read: [EASY GUIDE] How to Update Device Drivers on a Windows 10 PC?
Fix 5: Scan your system for malware
Malware is the greatest enemy of computers. Many users can attest to the danger posed by viruses, trojans, and their cousins in the extended family of dangerous code that wreak untold havoc on systems with negligible or no security protection. When malware takes root on a Windows computer, it might damage crucial system files, leading to a frustrating cycle of sudden shutdowns and reboots, blue screens of death, and even total annihilation of the computer.
If you’ve been having battles with BSODs like 0x00000051 and related errors, you might want to perform a deep, thorough scan of your system, leaving no nook upended and no cranny unchecked. Sure, you can go ahead and perform a deep scan with Windows Defender or another antivirus software.
PRO TIP
For a really thorough and rigorous systemwide examination of your computer files and programs, we recommend Auslogics Anti-Malware It has a deep scan option that checks your entire system and can reveal malware lurking in obscure corners you don’t even realize exist in your machine.
Once you’ve finished the deep scan and deleted all the discovered malware, reboot your system and enjoy the satisfaction of a bug-free machine.
Fix 6: Return to a previous restore point
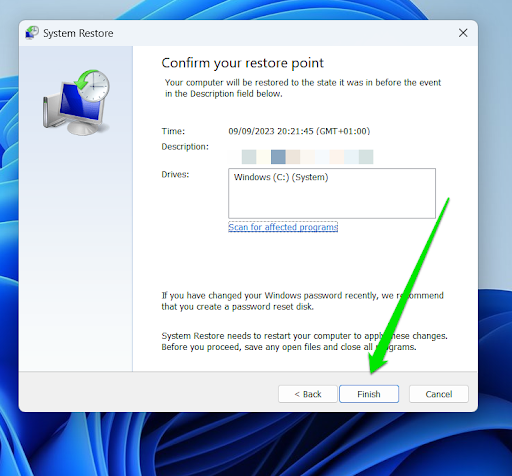
Microsoft created the idea of restore points for scenarios like this when a blue screen error prevents you from logging in. As long as you already have this feature enabled and created at least one recent restore point, you can revert to that earlier copy of your machine and see if that gets rid of the BSOD REGISTRY_ERROR.
Also read: System Restore Not Working in Windows 10
We assume you’re unable to even get to the Windows login screen. You don’t have to worry; you can still perform a system restore from Windows Recovery Environment. If the restore point is stored on your computer’s hard drive, you can use that as long as the BSOD issue isn’t caused by dead or non-communicative machine storage. Also, if you have a backup restore point on an installation disk or flash drive, you can use those, too.
- Turn off your PC by holding the power button until the screen turns black.
- Turn your system on. If a boot failure occurs, Windows will automatically run the Recovery Environment.
- In the Choose an option screen, select Troubleshoot.
- Go to Advanced options > System Restore.