Registry error blue screen windows

  • Home
  • News
  • [Fixed] REGISTRY_ERROR Blue Screen Of Death Windows 10

By Sarah |
Last Updated

A blue screen tends to occur on your computer when users try to start it or after they have installed new programs/updates on the device. Usually, a brief introduction to the error will be given. In some cases, the stop code will also be provided for user to get more information. In this page, I’ll talk about the blue screen error — REGISTRY_ERROR.

REGISTRY_ERROR Blue Screen

What is BSOD?

Blue screen appears now and then on users’ storage devices, mainly computer. You may be confronted with a blue-colored screen during computer restart or after you have made changes to the system. The blue screen of death (abbreviated as BSOD) refers to an unexpected shutdown of your PC. According to users’ feedback, the BSOD can be caused by a wide variety of different reasons. You could figure out what happens by looking at the error messages and descriptions. If not enough information is provided, you can search online for the stop code it gives.

Don’t worry! MiniTool Solution can help you get access to the internal hard drive without a system; it can also help you with some boot failures.

Windows 10 REGISTRY_ERROR

People reported they see REGISTRY_ERROR on a blue screen, and it is followed by the stop code 0x00000051 sometimes. Obviously, this registry error is occurred due to a registry problem found in your system.

Tip: According to Wikipedia, Windows Registry is a hierarchical database that stores low-level settings for the Microsoft Windows operating system and for applications that opt to use the registry.

registry error

The exact error message may be:

Your PC ran into a problem and needs to restart. We’re just collecting some error info, and then we’ll restart for you (*% complete).

If you’d like to know more, you can search online later for this error: REGISTRY_ERROR.

What about the registry error BSOD error you meet?

  • If you only see the Windows 10 REGISTRY_ERROR once, it’s not a big deal.
  • However, if you run into the blue screen registry error each time you leave your PC for over 4 minutes or use the Security and Maintenance feature, it’s a serious issue.

How to Fix Registry Error

This part mainly focuses on fixing registry error Windows 10.

Solution 1: disable System Maintenance.

If you see the Windows 10 registry error every time when you try to launch maintenance, please follow the steps below to fix the error.

  1. Open Windows search.
  2. Type Run into the textbox and press Enter.
  3. Type regedit and hit Enter/click OK to open Windows Registry Editor.
  4. Click Yes if you see a User Account Control window.
  5. Copy & paste this to the address bar: Computer\HKEY_LOCAL_MACHINE\SOFTWARE\Microsoft\Windows NT\CurrentVersion\Schedule\Maintenance. Then, press Enter.
  6. Look for the MaintenanceDisabled in the right pane.
  7. Select this DWORD value. However, you need to create this key if you can’t find it.
  8. Right click on the blank area and choose New > DWORD (32-bit) Value.
  9. Name it as MaintenanceDisabled and hit Enter.
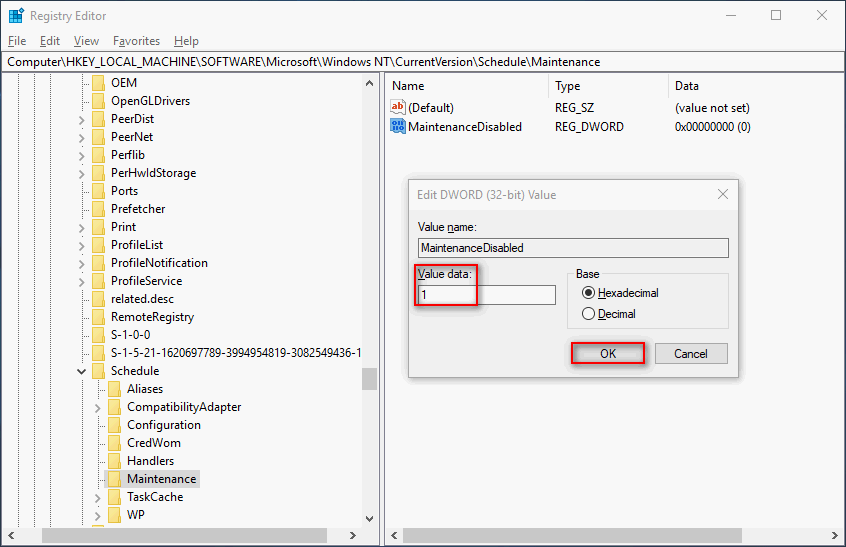
  10. Double click on this key and change the value data from 0 to 1.
  11. Click on the OK button and close Registry Editor to reboot your PC.

MaintenanceDisabled

Solution 2: disable the .NET Framework tasks triggered when your PC is idle.

  1. Open Windows search.
  2. Type task scheduler and hit Enter.
  3. Expand Task Scheduler Library in the left pane.
  4. Then, expand Microsoft and Windows in order.
  5. Select .NET Framework.
  6. Right click on a task which says When computer is idle under Triggers.
  7. Choose Disable.
  8. Repeat step 6 & 7 to disable another task in the list. (This can be skipped if there’s only one such task.)

Disable

Solution 3: Run Windows Memory Diagnostic.

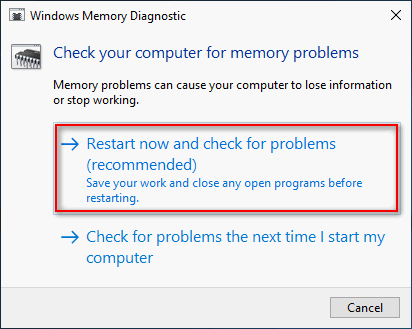
  1. Type diagnostic into Windows search & choose Windows Memory Diagnostic.
  2. Click Restart now and check for problems (recommended).
  3. Wait for the action to finish and restart your computer.

check for problems

Solution 4: reset Windows 10.

  1. Open Settings by pressing Windows + I.
  2. Choose Update & Security.
  3. Select Recovery in the left pane.
  4. Click on the Get started button under Reset this PC.
  5. Choose from Keep my files and Remove everything (please backup files before this).
  6. Click Next and then Reset.

How to recover files after factory reset computer?

Other methods that can be used to solve registry error:

  • Run antivirus software.
  • Run SFC/CHKDSK/DISM. (What if DISM failed?)
  • Update Windows 10 to the latest version.
  • Repair Windows 10 with installation media. (Top Windows 10 boot repair tools.)

About The Author

Position: Columnist

Sarah has been working as an editor at MiniTool since she graduated from university. Sarah aims at helping users with their computer problems such as disk errors and data loss. She feels a sense of accomplishment to see that users get their issues fixed relying on her articles. Besides, she likes to make friends and listen to music after work.

Ошибка 0x00000051 с синим экраном в Windows 7 – это очень неприятная проблема для обладателей этой операционной системы, так как она напрямую связана с файлами реестра, из-за чего имеется великая вероятность того, что запустить Виндовс в обычном режиме вы попросту не сможете. Давайте же более детально разберемся с природой появления синего экрана с кодом 0x00000051 и научимся её исправлять.

Причины появления ошибки

Как уже было сказано ранее, код ошибки 0x00000051 напрямую связан с реестром Windows (об этом также говорит надпись рядом REGISTRY_ERROR).

0x00000051-windows-7-sinij-ekran

Ошибки реестра, приводящие к такой проблеме, чаще всего возникают при попытке считать один из файлов реестра, когда имеются на ПК аппаратные или системные проблемы считывания файлов.

Исправление ошибки

Чтобы решить эту задачу, нужно немного изменить некоторые данные в реестре:

  1. Перезагрузите компьютер и во время его повторного запуска быстро жмите кнопку F8 на клавиатуре, пока не увидите такое окно:
    0x00000051-windows-7-sinij-ekran

  2. Выберите «Безопасный режим» и дождитесь полной загрузки системы в этом режиме.
  3. Когда Windows 7 загрузится, через меню «Пуск» найдите и запустите приложение regedit.exe.
    0x00000051-windows-7-sinij-ekran

  4. В окне редактора реестра перейдите по такому пути: HKEY_LOCAL_MACHINE\SYSTEM\Select.
  5. В правой части окна вы можете увидеть ключи реестра. Значения некоторых из них нужно изменить:
    0x00000051-windows-7-sinij-ekran

    • замените значение ключа LastKnownGood на 3;
    • замените значение ключа Failed на 2.

    Если вы не знаете, как изменить эти параметры, то для этого достаточно дважды кликнуть по конкретному ключу, после чего откроется небольшое окошко, в котором вы и сможете изменить данные.

    0x00000051-windows-7-sinij-ekran

  6. Когда всё будет готово – перезагрузите компьютер, вернув обычный режим загрузки операционной системы.

После того как вы всё это проделаете, а Windows 7 будет запущена – вы увидите уведомление о том, что ветка реестра была восстановлена. Закрывайте это сообщение и можете дальше спокойно работать с компьютером, не опасаясь, что ошибка 0x00000051 с синим экраном снова появится в вашей Виндовс 7.

Table of contents

  • What Is the Blue Screen Registry Error 0x00000051?
  • How to Resolve the Error 0x00000051 in Windows
    • Fix 1: Test Automatic Maintenance
    • Fix 2: Update your system
    • Fix 3: Run a Windows Memory Diagnostic test
    • Fix 4: Update all device drivers on your PC
    • Fix 5: Scan your system for malware
    • Fix 6: Return to a previous restore point
    • Fix 7: Reinstall Windows
  • How to Get Rid of the REGISTRY_ERROR Blue Screen Error (0x00000051): Solved

If you’ve ever encountered a blue screen, especially those that come up when you try to start your system, you can identify with the gnashing of teeth many users have been subjected to.

Luckily, for every blue screen of death, there is a solution lurking somewhere on the Internet that can revive the PC and get rid of the error, and the REGISTRY_ERROR BSOD (0x00000051) error isn’t an exception. In this guide, we have gathered all the available working solutions for all the frustrated users out there.

What Is the Blue Screen Registry Error 0x00000051?

The blue screen error code 0x00000051 typically informs the user of an issue with the computer’s operating system or damage to the hard disk boot register, configuration manager, and other issues that prevent the system from starting up. It is a generic error code that incorporates a wide array of bugs, including but not limited to the following:

  • Errors in the registry
  • Damaged or outdated device drivers
  • Damaged system components (RAM and HDD being the most common)
  • Malware
  • Corrupt OS

Also read: How to Fix “Windows 10 Won’t Boot” Problem Easily


How to Resolve the Error 0x00000051 in Windows

Below is a list of possible solutions for the REGISTRY_ERROR blue screen error (0x00000051) in Windows 10 and earlier versions. At least one of them has worked for someone, and it will work for you too if you meticulously follow the instructions. We recommend you try the fixes in the order they are presented. So, let’s get ready to resolve this stop code registry error.

Fix 1: Test Automatic Maintenance

Automatic Maintenance is Microsoft’s housecleaning setting on Windows that performs periodic maintenance on a computer at a specific time each day. It isn’t a unique activity by itself but rather a collection of automated tasks that are scheduled to run when your computer isn’t in active use.

When you get frequent BSOD registry errors, sometimes they are related to this program not working correctly, leading to the accumulation of minor bugs that affect your PC.

Each day at 02:00 am, Automatic Maintenance swings into action and starts running various tasks and scans to help optimize your PC and ensure that any errors or causes of errors that have developed during your previous day of use don’t have the chance to take root and cause potentially fatal damage down the line.

Note that your system has to be on and not in active use for scheduled maintenance to take place. If you happen to be using the computer or the system is off, then the maintenance will be postponed to the next scheduled hour. However, you can adjust the maintenance schedule to take place at a more conducive time.

Automatic Maintenance updates your applications and operating system, scans your PC for viruses and other security threats, performs disk defragmentation on your storage, deletes some junk files, and performs a plethora of other activities that cumulatively ensure your PC never gets bogged down by bugs. If the program has somehow been disabled, then frequent errors like REGISTRY_ERROR (0x00000051) become inevitable.

PRO TIP

If your PC is frequently running into errors or has slowed down a lot, consider using a PC optimizing program like Auslogics BoostSpeed.

This handy tool will run a scan of your PC, easily detect any performance issues you may be experiencing and help you speed up your system in just a few clicks!

So, the first solution you can try (other than performing a simple reboot) is to try running Automatic Maintenance immediately. Obviously, this only works if you can gain access to the Windows desktop area.

Fortunately, there is a minor class of errors that don’t permanently lock you out from using your computer. Once you’ve regained temporary access to your PC, quickly do the following to solve the error before it reoccurs:

  • Type “control panel” in the search area and click the program when it appears in the results.
  • Select System and Security.

Click on System and Security after the Control Panel opens

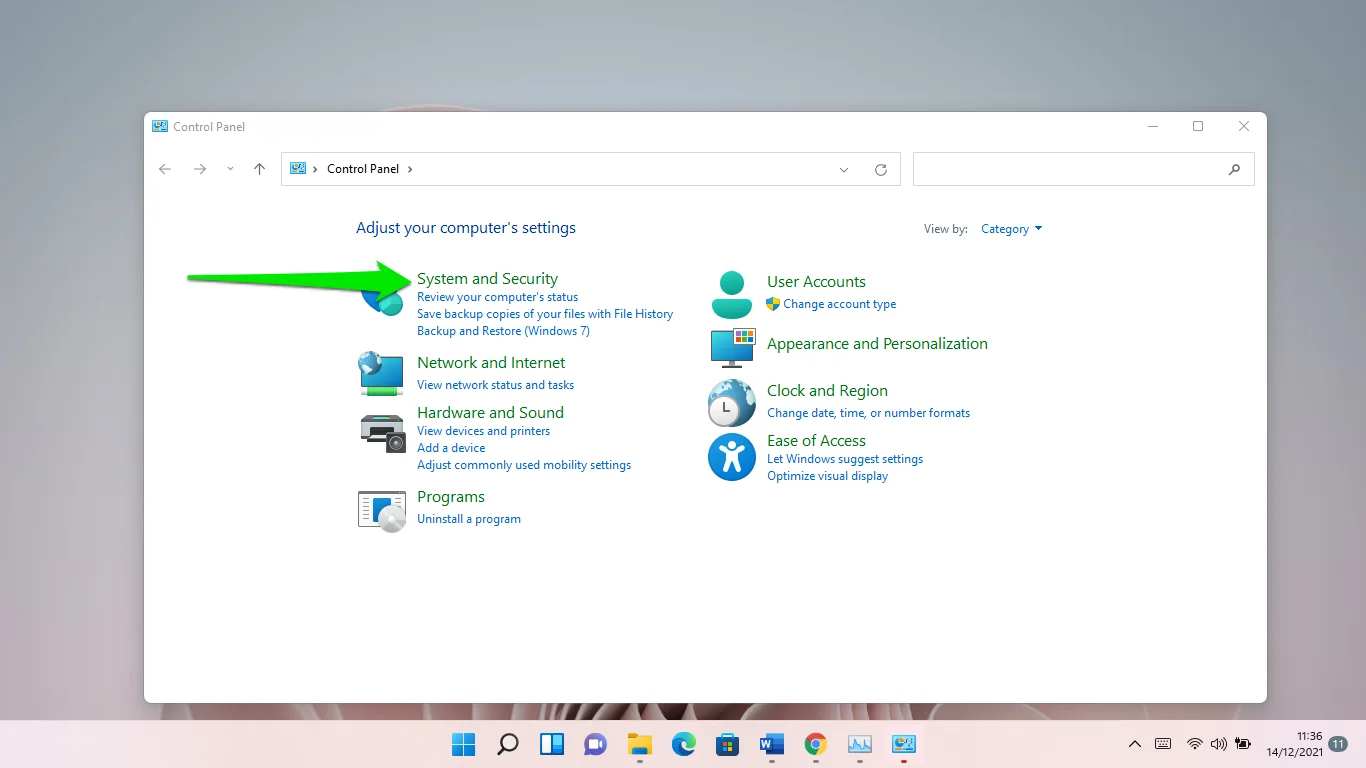
  • Select Security and Maintenance.

Select <em>Security and Maintenance</em>» src=»https://www.auslogics.com/en/articles/wp-content/uploads/2023/11/Security-and-Maintenance-Windows-10-1.png»></p>
<div class= Картинка с сайта: www.auslogics.com

  • Expand the Maintenance section.
  • Under Automatic Maintenance, click Start maintenance.

Under <em>Automatic Maintenance</em><strong>, </strong>click <em>Start maintenance</em>» src=»https://www.auslogics.com/en/articles/wp-content/uploads/2024/05/Screenshot-2024-05-27-201830.png»></p>
<div class= Картинка с сайта: www.auslogics.com

  • What happens at this point determines what you should do next. Should Automatic Maintenance start without problems when you click Start maintenance, then there’s nothing wrong here and you don’t need to do anything else. However, if it displays the REGISTRY_ERROR error message and doesn’t start, then you have to disable it.
  • To do this, press Windows key + X to bring up the Windows Power menu.
  • Select Run from the menu.
  • Type regedit into the Run search box and press Enter to launch Registry Editor.

Warning!

At this point, you should be careful about what you’re doing since making the wrong changes to the registry by mistake can have catastrophic consequences on your PC.

  • Navigate to the path below. You may copy and paste it into the search bar at the top of the Registry Editor:
HKEY_LOCAL_MACHINE\SOFTWARE\Microsoft\Windows NT\CurrentVersion\Schedule\Maintenance
  • Examine the registry items in the right windowpane under the Maintenance registry key. If you don’t see the Maintenance Disabled DWORD, create it.
    • Place the cursor anywhere within the right window pane. Right-click the space and select New >DWORD (32-bit) Value.
    • Rename your created DWORD to Maintenance Disabled, then click OK.
  • Open the Maintenance Disabled DWORD, input the numeral 1 in the Value data field, and click OK to save your modification.
  • Reboot your system.

Upon restart, the BSOD REGISTRY_ERROR should become a thing of the past.


Also read: How to Fix Disk Errors in Windows 10 Using Windows Commands?


Fix 2: Update your system

Sometimes, certain bugs that are discovered in Windows computers are rectified by Microsoft through a security update. Other updates bring improvement to the error detection and combat system within the OS, all of which make your PC less likely to become unable on account of the BSOD REGISTRY_ERROR and related issues.

So, it is always important to check whether you have the latest iteration of Windows installed and if not, to quickly perform an update that will bring your PC’s performance and stability to an optimum level.

To check if your machine is up-to-date, navigate to Control Panel > Update and Security > Windows Update > Check for updates.

Click Check for updates

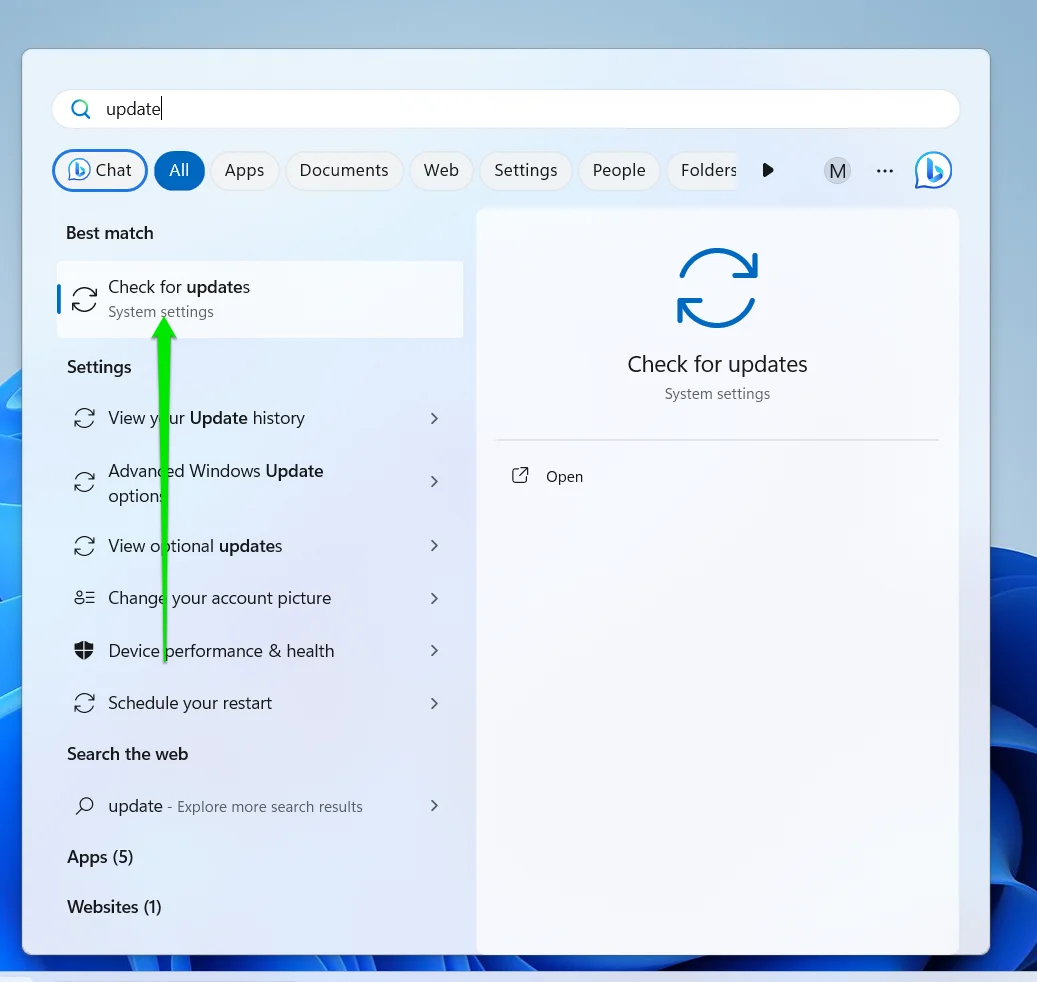
Should an update be available, download it and reboot your system after the installation.

Fix 3: Run a Windows Memory Diagnostic test

The BSOD REGISTRY_ERROR can be due to your RAM not working properly; hence, your computer is unable utilize it optimally when performing operations. If you continue using faulty RAM without being aware of that fact, problems will eventually surface, and they might render your machine unusable. Therefore, it is better to perform periodic checks on your RAM to ensure that it is in good working condition.

Windows Memory Diagnostic is a tool developed by Microsoft for just this purpose. Although the company has discontinued the shipment of the program along with other system recovery options in versions of Windows after Windows 7, you can still download the program from a third-party website. It works great for discovering possible RAM issues.

After downloading Windows Memory Diagnostic, run the setup and save the CD image to your desktop. Burn the image to a CD or DVD. The program only starts from a bootable drive. This makes it a great tool to use when your machine is stuck on a BSOD and you cannot access your system. You just have to boot into the disc containing Windows Memory Diagnostic.

Once the program starts running, allow it to do its thing. It will conduct an infinite number of tests until you stop it or your machine turns off.

Observe if any errors are displayed. If WMD identifies errors, even minor ones, it is recommended that you discard the RAM and get a new one. Once you’ve installed the new RAM on your machine—and provided the fault solely lies with the bad RAM—the BSOD REGISTRY_ERROR will stop appearing.


Related: Memory Management BSOD Error on Windows 10 


Fix 4: Update all device drivers on your PC

The numerous components that make up your PC use device drivers to communicate with the installed operating system. Sometimes, it just so happens that the OS has been updated while the device drivers remain old versions that might not be able to work well with the OS anymore.

Other times, they become corrupted and incapable of communicating with Windows.

On rare occasions, they go missing, which causes a total breakdown in communication between the device and the overall machine.

All these possible issues can and do cause frustrating issues like the BSOD REGISTRY_ERROR on Windows. Hence, it is best to nip all that in the bud before you run into more serious problems along the way.

And when you do get a non-fatal BSOD, you should endeavor to update all the drivers on your system as fast as possible. You might think a certain hardware driver might be the culprit and want to update just that one, but updating everything insures you against regret if you’re mistaken. Moreover, it also replaces other problematic drivers that will eventually bring more annoyances later.

The main things to be updated on your Windows 10 PC (though by no means the only ones) are your graphics card, sound card, and network card, respectively. We will show you how to update all three of them and the rest. You can either update your device drivers manually or do it automatically with the aid of a software application developed for that purpose. You can also let Windows update your drivers for you via Device Manager.

Update drivers manually

Generally speaking, device manufacturers always want the hardware they produce to work on newer computers and later versions of operating systems. Hence, they release updated versions of hardware drivers for these devices, which are available for download on their websites.

As long as you know what you are looking for, you can proceed to the manufacturer’s website to download the latest hardware drivers for the devices on your computer. You will need to ensure that the name and model of your hardware corresponds to the driver you have downloaded. Moreover, you must make sure that the driver you downloaded is the right one for your operating system.

It sounds like a lot of work, especially if you’re updating multiple device drivers developed by different manufacturers. This is compounded by the fact that some of these OEMs are hard to track down online and the drivers you are looking for might be tucked away in some obscure corner of their website. Even so, as long as you have the will and put in the effort, you will most likely get what you need in the end.

Once you’ve downloaded everything on your computer, just click a driver file and let the installer guide you through the installation. You might have to extract the driver file from an archive first before you can proceed with the installation. Repeat the process for each downloaded driver file.

Update drivers automatically

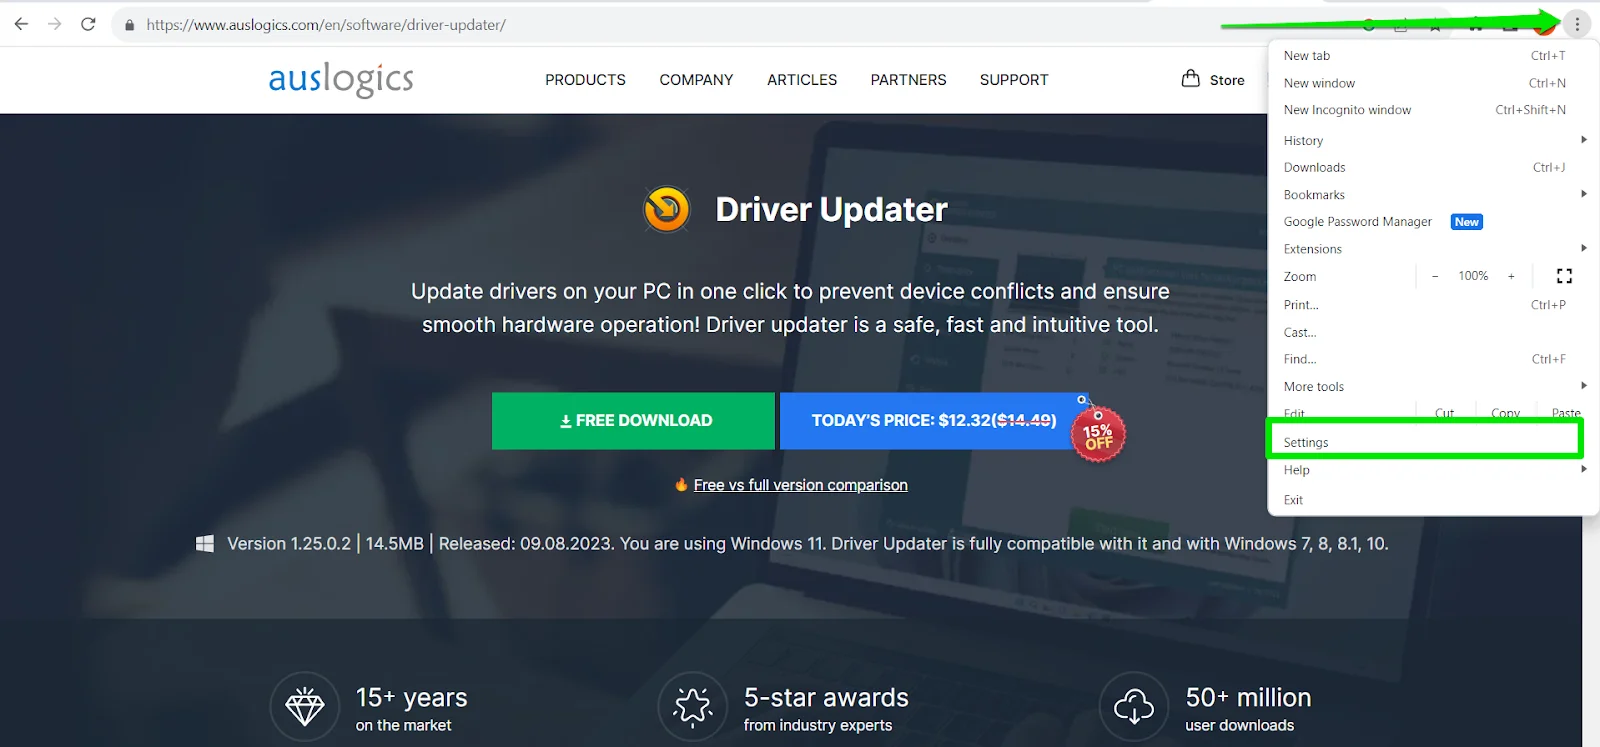
The previous method explained above sounds like a lot of fun, doesn’t it? It seems like an awful lot of time spent chasing files that are no larger than a few megabytes at best. If you don’t want to expend all your energy on what might turn out to be a wild goose chase, you can automatically bring your drivers up-to-date with Auslogics Driver Updater.

PRO TIP

Auslogics Driver Updater is a safe, fast, and intuitive tool that updates all drivers on your PC in one click to prevent device conflicts and ensure smooth hardware operation. It will give you a report on outdated or missing drivers it detects and let you quickly update them to the latest manufacturer-recommended versions.

Here is how to use Auslogics Driver Updater:

  • Download and install the software.

Download and install Auslogics Driver Updater

  • Launch Auslogics Driver Updater and connect your PC to the Internet.
  • Click the green “Start scan” button, and Driver Updater will search your system for faulty, missing, and outdated drivers.

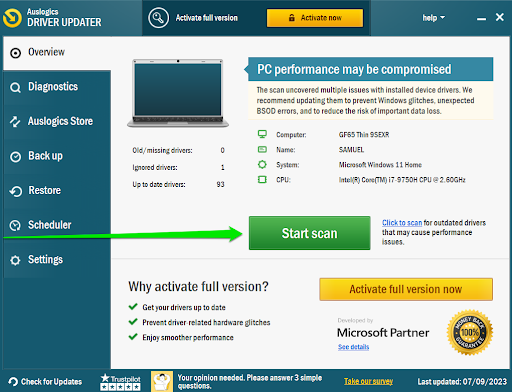
  • A list of drivers that require updates will be shown by category. Click “Expand list” to view them all.

If you like what you’ve seen, you can upgrade to the full version. It will scan your devices and update them all with a single click to ensure smoother performance.

Update with Device Manager

You can as well bring all your drivers up-to-date through Windows Device Manager. You need to launch the program, find hardware, and let Windows search for the latest drivers for it. Though this method works fairly well, it isn’t guaranteed to be successful since Windows is sometimes unable to find the required driver. Additionally, it is a semi-manual method that takes up a lot of time and effort. Should you really wish to use this method to update all your device drivers, here’s how to do so:

  • Press Windows key + X to bring up the Windows Power menu.
  • Select Device Manager from the menu.
  • Expand a device category (Monitors, Network adapters, etc).
  • Right-click on any device.
  • Select Update driver.
  • Wait for Windows to find, download, and install the latest version of the driver.

As you must have guessed, you’ll have to repeat these steps for every device listed in Device Manager. In summary, your best bet is to use Auslogics Driver Updater to download them automatically with one click.


Also read: [EASY GUIDE] How to Update Device Drivers on a Windows 10 PC?


Fix 5: Scan your system for malware

Malware is the greatest enemy of computers. Many users can attest to the danger posed by viruses, trojans, and their cousins in the extended family of dangerous code that wreak untold havoc on systems with negligible or no security protection. When malware takes root on a Windows computer, it might damage crucial system files, leading to a frustrating cycle of sudden shutdowns and reboots, blue screens of death, and even total annihilation of the computer.

If you’ve been having battles with BSODs like 0x00000051 and related errors, you might want to perform a deep, thorough scan of your system, leaving no nook upended and no cranny unchecked. Sure, you can go ahead and perform a deep scan with Windows Defender or another antivirus software.

PRO TIP

For a really thorough and rigorous systemwide examination of your computer files and programs, we recommend Auslogics Anti-Malware It has a deep scan option that checks your entire system and can reveal malware lurking in obscure corners you don’t even realize exist in your machine.

Once you’ve finished the deep scan and deleted all the discovered malware, reboot your system and enjoy the satisfaction of a bug-free machine.

Fix 6: Return to a previous restore point

Microsoft created the idea of restore points for scenarios like this when a blue screen error prevents you from logging in. As long as you already have this feature enabled and created at least one recent restore point, you can revert to that earlier copy of your machine and see if that gets rid of the BSOD REGISTRY_ERROR.


Also read: System Restore Not Working in Windows 10


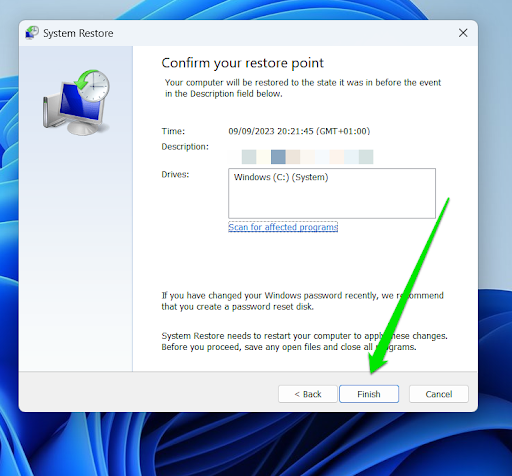
We assume you’re unable to even get to the Windows login screen. You don’t have to worry; you can still perform a system restore from Windows Recovery Environment. If the restore point is stored on your computer’s hard drive, you can use that as long as the BSOD issue isn’t caused by dead or non-communicative machine storage. Also, if you have a backup restore point on an installation disk or flash drive, you can use those, too.

  • Turn off your PC by holding the power button until the screen turns black.
  • Turn your system on. If a boot failure occurs, Windows will automatically run the Recovery Environment.
  • In the Choose an option screen, select Troubleshoot.
  • Go to Advanced options > System Restore.

Go to <em>Advanced options > System Restore</em>» src=»https://www.auslogics.com/en/articles/wp-content/uploads/2024/03/Advanced-options-system-restore-1.png»></p>
<div class= Картинка с сайта: www.auslogics.com

  • In the next screen, enter your administrator account username. Then enter your password in the subsequent screen.
  • Click Next in the System Restore screen.
  • Choose a restore point and click Next.
  • In the “Confirm your restore point” window, click Finish.

  • Click Yes in the confirmation pop-up dialog.
  • Once System Restore has run its course, click Restore on the notification dialog to reboot your PC.

If you’re trying to restore from a bootable drive, do this instead:

  • Insert the bootable drive and power off your computer.
  • Turn it on and it should boot to the drive.
  • Enter your preferences on the Setup screen and click Next.
  • Click Repair your computer at the bottom left.
  • In the Choose an option screen, select Troubleshoot.
  • Go to Advanced options > System Restore.
  • In the next screen, enter your administrator account username. Then enter your password in the subsequent screen.
  • Click Next in the System Restore screen.
  • Choose a restore point and click Next.
  • In the “Confirm your restore point” windows, click Finish.
  • Click Yes in the confirmation pop-up dialog.
  • Once System Restore has run its course, click Restore on the notification dialog to reboot your PC.

After the system restore, recently installed drivers and apps that caused the BSOD error would have been removed and your machine should have returned to an earlier, error-free state.


Also read: Ultimate Windows Recovery Guide: How to Restore Your Windows System


Fix 7: Reinstall Windows

This is the final card you can play if the REGISTRY_ERROR blue screen error (0x00000051) just refuses to go away despite trying all the solutions above. You can install a fresh copy of Windows from a bootable media you have created through the Media Creation Tool on Microsoft’s website.

If you’re not on Windows 10, this is also a chance for you to upgrade to the latest OS that offers better stability, performance, and error detection and prevention than its predecessors.


Further reading: How to Speed up Windows 10


How to Get Rid of the REGISTRY_ERROR Blue Screen Error (0x00000051): Solved

Dealing with a blue screen of death, especially the REGISTRY_ERROR (0x00000051), can be frustrating. Thankfully, solutions exist. From running Automatic Maintenance and updating your system to checking your RAM and updating drivers, these methods target common causes of the error. If these steps don’t work, try restoring your system to a previous point or reinstalling Windows for a fresh start. With these strategies, you can resolve the error and get your PC back to optimal performance.

As you know, you can encounter Blue Screen errors at any given point after your computer boots up and can just reboot it randomly which results in loss of unsaved work. One of these Blue Screen errors is the “REGISTRY_ERROR”. This kind of Stop error has a bug check value of 0x00000051 which indicates your computer’s registry has encountered a severe error. There could be a number of causes for this error but at the time of writing, it is quite difficult to narrow them down to one component. If you face this kind of Blue Screen error, worry not as this post will guide you in fixing it.

As mentioned, this error indicates that there is something wrong with the registry, particularly an I/O error while it tried to read one of its files. This may be caused by hardware issues or file system corruption. It could also be due to failure in a refresh operation which is only used by the security system and only when resource limits are encountered. To fix the Registry_Error Blue Screen, you can try to use the CHKDSK utility or the System File Checker, or the DISM tool or run the Blue Screen troubleshooter. You may also try to reset your computer or repair Windows by using installation media.

Option 1 – Run the Check Disk utility

The first thing you can do to fix the REGISTRY_ERROR Blue Screen error is to run the Check Disk utility. How? Follow these steps:

  • In the Windows Search box, type “command prompt” and from the search results, right-click on Command Prompt and select “Run as administrator”.
  • After opening Command Prompt, type this command and tap Enter: chkdsk <Drive Letter>: /f /r /x /b
  • The command you entered will start to check for errors and fix them automatically. Else, it will throw an error message saying, “Chkdsk cannot run because the volume is in use by another process. Would you like the schedule this volume to be checked the next time the system restarts? (Y/N)”.
  • Tap the Y key to schedule Disk Check the next time your computer restarts.

Option 2 – Run the Blue Screen Troubleshooter

The Blue Screen troubleshooter is a built-in tool in Windows 10 that helps users in fixing BSOD errors like REGISTRY_ERROR. It can be found in the Settings Troubleshooters page. To use it, refer to these steps:

  • Tap the Win + I keys to open the Settings panel.
  • Then go to Update & Security > Troubleshoot.
  • From there, look for the option called “Blue Screen” on your right-hand side and then click the “Run the troubleshooter” button to run the Blue Screen Troubleshooter and then follow the next on-screen options. Note that you might have to boot your PC into Safe Mode.

Option 3 – Run System File Checker

  • Open Command Prompt with admin privileges.
  • After that, execute this command: sfc /scannow
  • Once the scan is completed, restart your computer and then check if the REGISTRY_ERROR is now fixed.

Option 4 – Run the DISM tool

You can try running the Deployment Imaging and Servicing Management or DISM tool to fix the REGISTRY_ERROR Blue Screen error. Using this built-in tool, you have various options such as the “/ScanHealth”, “/CheckHealth”, and “/RestoreHealth”.

  • Open the Command Prompt with admin privileges.
  • Then type in the following commands and make sure to hit Enter right after you type each one of them:
    • Dism /Online /Cleanup-Image /CheckHealth
    • Dism /Online /Cleanup-Image /ScanHealth
    • exe /Online /Cleanup-image /Restorehealth
  • Do not close the window if the process takes a while as it will probably take a few minutes to finish. Once it’s done, restart your computer.

Option 5 – Reset your computer

  • Tap the Win key or click on the Start button located in the Taskbar.
  • Then click on the Power button at the bottom right portion of the screen.
  • Next, press and hold the Shift key on your keyboard and then click on Restart. This will restart your Pc into the Advanced Startup options.

Note: Once you have access to the Advanced Startup options, you have to go to the setting which allows you to Reset your Windows 10 PC. All you have to do is select Troubleshoot > Reset this PC to reach the following screen

Afterward, select either the “Keep my files” option and then proceed to the next on-screen instructions that follow to reset your Windows 10 computer without losing your files.

Option 6 – Try to perform repair install by creating a Windows 10 installation media

  • Click this link and then click the Download Tool Now button.
  • Next, click the “Use the tool to create installation media (USB flash drive, DVD, or ISO file)…” option and follow the next given instructions on the screen.
  • Now select the ISO file option in step 5.
  • After that, you should now have an ISO file.
  • Next, go to the location where you’ve downloaded the ISO file.
  • Then right-click on the Windows 10 ISO file and select the Open with option and then select File Explorer.
  • Now click on “setup.exe” and follow the next instructions that appear on the screen. When asked, you have to select either Nothing (clean install) or Keep personal files only option. Take note that you must not select the “Keep personal files, apps, and Windows settings”.

Do You Need Help with Your Device?

Our Team of Experts May Help

Troubleshoot.Tech Experts are There for You!

GET HELP

Troubleshoot.Tech experts work with all versions of Microsoft Windows including Windows 11, with Android, Mac, and more.

Share this article:

You might also like

Hello everyone and welcome to another tutorial on errortools.com, Windows itself when it is installed has a general idea about certain file types and how to open them, for example, image files would be opened with application photos, web links with the edge, etc. So when we double click on the known file type, Windows will start the default application for that type and open the file in it. But what if we do not want to open files in applications Microsoft thinks we should? What if we want to open the website in firefox or images in photoshop, or whatever.

Luckily we can easily change which application Windows uses for which file type.

Click on ⊞ WINDOWS to open the start menu and choose settings.

Windows 10 Star menu with marked settings icon

On the settings screen, choose Apps.

Windows settings apps section marked

When the Apps screen opens on the left click on Default apps.

Windows settings default apps marked

On right, you will get a list of Windows default applications for certain types of files. Click on any application you would like to change and choose from the drop-down list a new one. Click on it and you are done.

Read More

High Dynamic Range or HDR is a technique that’s used to create lifelike videos which have improved and better dynamic range, especially when it comes to details. And as you know, Windows 10 supports the steaming of HDR videos as long as the display supports it and it comes with the option to enable the HDR Playback for Windows 10 Video Streaming apps. However, before you can get the best viewing experience, you need to calibrate the display further for HDR video on your Windows 10 PC.

Take note that even when you have the HDR Playback feature enabled on your computer, you still need a display that supports it. To make sure that your display supports this feature, you can use the DirectX Diagnostic Tool to have the display correctly wired and have the latest WDDM 2.4 drivers installed as well as set the other settings properly.

Once you’ve made sure that your computer’s display really supports HDR and you’ve already enabled the HDR Playback feature, now it’s time for you to calibrate. Remember that when you calibrate the display, you should make an external monitor your primary display if you are using it for HDR and then adjust the settings to your liking. And if you are calibrating for primary display, you need to disconnect all other displays.

Follow the given steps below to calibrate the display of your PC.

  • Step 1: You need to open the Video Playback first. To do so, navigate to Settings > Apps > Video Playback.
  • Step 2: Under the Video Playback settings, uncheck the “Don’t increase display brightness when watching HDR video on battery” checkbox or plug in your PC.
  • Step 3: Next, click the “Change calibration settings for HDR video on my built-in display” link located on the right side.
  • Step 4: After that, click on the Play button located on the left side to play the video. Then move the sliders to the left or right so you can start to calibrate. Once you see that the quality of the image is to your preference, stop.

Note: Just a tip when calibrating – you just have to find the right balance between the details in the darker parts of a scene. For instance, you have Mountains in the background and buildings in the front – you need to drag the slider to the right to add more details to the snow on the mountain or drag the slider to the left to add more details to the buildings. After that, you can pause the video and exit the full-screen mode. Keep in mind that the quality of HDR depends on you as it is a personal choice. Some users might like a brighter shade while other ones want the darker shade so it really depends on your taste. If you are not satisfied with how your HDR turned out, you can just try calibrating the display again. Simply go back to the default HDR video calibration and click or tap the Reset calibration button.

Another thing to remember. First, you can only see HDR content on the full screen and if you’re using a laptop, you need to make sure to watch videos when plugged in and check that the battery settings won’t’ lower the brightness.

Read More

PuzzleGamesDaily is a Browser extension developed by Mindspark. This extension monitors user activity such as website visits, clicked links and other web-related tasks that It later uses to display targeted ads.

When installed it changed the default home page, search engine and new tab page to MyWay.com, and while browsing the internet with this extension active you will see additional pop-up ads, injected (unwanted) ads, and sponsored links during your browsing sessions.

From the Terms of Use: You hereby acknowledge and agree that by using an MS Product you may be exposed to Content that may be offensive, indecent or objectionable in your community […]
MS Products are exposed to various security issues, and should be regarded as insecure. By accepting this Agreement, you acknowledge and accept that the MS Products and any information you download or offer to share by means of an MS Product, may be exposed to unauthorized access, interception, corruption, damage, or misuse, and should be regarded as insecure. You accept all responsibility for such security risks and any damage resulting therefrom.

This extension has been marked as a Browser Hijacker by several anti-virus scanners and has been flagged for optional removal. It is not considered malicious but many users wish to remove it due to the above reasons.

About Browser Hijackers

Browser hijacking is regarded as the internet’s constant danger that targets internet browsers. It’s a type of malware program that directs the web browser requests to some other suspicious internet sites. Browser hijacker malware is created for many different reasons. Often, it will force users to particular sites which are aiming to boost their advertising campaign income. Many people believe that these websites are legitimate and harmless but that is not true. Nearly every browser hijacker pose an existent threat to your online safety and it’s vital to categorize them under privacy risks. Browser hijackers could also permit other destructive programs without your knowledge to further damage your computer.

Major signs that your internet browser has been hijacked

There are many signs that indicate your web browser is highjacked: the browser’s home-page is modified; bookmark and new tab are likewise modified; the main web browser settings is modified and unwanted or insecure sites is put into the trusted sites listing; you are getting browser toolbars you have never found before; you observe numerous ads show up on your web browsers or display screen; your browser has instability problems or displays frequent errors; Inability to navigate to certain sites, especially anti-malware and also other computer security software webpages.

So how exactly does a browser hijacker infect a computer?

Browser hijackers attack computers through malicious e-mail attachments, downloaded infected documents or by checking out infected sites. They can be included with toolbars, BHO, add-ons, plugins, or browser extensions. Browser hijackers sneak to your computer in addition to free software application downloads that you unwittingly install along with the original. An example of some infamous browser hijacker includes Babylon, Anyprotect, Conduit, SweetPage, DefaultTab, RocketTab, and Delta Search, but the names are regularly changing.

Browser hijackers could record user keystrokes to gather potentially important information leading to privacy concerns, cause instability on systems, significantly disrupt the user experience, and eventually slow down the computer to a stage where it will become unusable.

Removal

Some hijackers can be easily removed by uninstalling the free software they were included with or by deleting any extension you’ve recently added to your PC. Yet, certain hijackers are far more difficult to discover or get rid of since it could get itself associated with certain crucial computer files that enable it to operate as a necessary operating system process. Inexperienced PC users shouldn’t ever attempt for the manual form of removal, since it needs detailed computer knowledge to carry out fixes on the system registry and HOSTS file.

Anti-malware application is very effective with regards to catching and removing browser hijackers that regular anti-virus software has overlooked. Among the best tools for fixing browser hijacker malware is SafeBytes Anti-Malware. It assists you eliminate any pre-existing malicious software on your system and provides you real-time monitoring and protection from new threats.[/section][/vc_column_text][/vc_column][/vc_row][vc_row][vc_column][vc_column_text][section header=»How One Can Eliminate Malware that is Blocking Websites or Preventing Downloads»]Malware could cause several different types of damage to PCs, networks, and data. Some malware sits in between your computer and the net connection and blocks some or all websites that you would like to visit. It might also prevent you from adding anything on your computer, particularly anti-malware applications. If you’re reading this article, you may have infected by malware that prevents you from downloading a computer security program such as Safebytes Antimalware on your PC. Refer to the instructions below to eliminate malware through alternative ways.

Install the antivirus in Safe Mode

The Windows OS has a special mode known as “Safe Mode” in which just the minimum required programs and services are loaded. If the malicious software is set to load automatically when PC boots, switching into this mode could prevent it from doing so. To enter into Safe Mode or Safe Mode with Networking, press F8 while the PC is starting up or run MSCONFIG and look for the “Safe Boot” options under the “Boot” tab. After you restart into Safe Mode with Networking, you may download, install, as well as update anti-malware program from there. After installation, run the malware scanner to remove most standard infections.

Switch to a different web browser

Certain malware may target vulnerabilities of a particular web browser that block the downloading process. If you are not able to download the security program using Internet Explorer, it means virus could be targeting IE’s vulnerabilities. Here, you need to switch over to another web browser like Chrome or Firefox to download Safebytes Anti-malware software.

Create a portable antivirus for eliminating viruses
Another option is to store and run an antivirus program entirely from a Flash drive. To run anti-malware using a flash drive, follow these simple steps:
1) On a clean computer, install Safebytes Anti-Malware.
2) Mount the pen-drive onto the same computer.
3) Double-click the Setup icon of the antivirus software package to run the Installation Wizard.
4) Pick thumb drive as the place when the wizard asks you exactly where you wish to install the application. Follow the on-screen instructions to complete the installation process.
5) Now, transfer the thumb drive to the infected PC.
6) Double-click the anti-malware program EXE file on the USB flash drive.
7) Simply click “Scan Now” to run a complete scan on the infected computer for viruses.

A Look at the Best AntiMalware Program

If you’re looking to install anti-malware software for your computer, there are plenty of tools on the market to consider nonetheless, you cannot trust blindly anyone, regardless of whether it is a free or paid program. Some of them are great, some are decent, and some will destroy your computer themselves! When looking for an anti-malware program, purchase one that offers dependable, efficient, and complete protection against all known viruses and malware. When considering the trustworthy software programs, Safebytes Anti-Malware is certainly the highly recommended one.

SafeBytes is a powerful, real-time antivirus application that is designed to assist the average computer end user in safeguarding their PC from malicious threats. Using its cutting-edge technology, this software can help you eliminate several types of malware which includes computer viruses, trojans, PUPs, worms, ransomware, adware and browser hijackers.

SafeBytes anti-malware takes PC protection to a totally new level with its advanced features. Here are some of the good ones:

Active Protection: SafeBytes provides real-time active monitoring and protection against all of known viruses and malware. They are extremely efficient in screening and removing numerous threats because they’re continuously improved with latest updates and alerts.

Best AntiMalware Protection: Using a critically acclaimed malware engine, SafeBytes offers multilayered protection that is intended to catch and eliminate threats that are hidden deep in your computer’s operating-system.

Fast Multi-threaded Scanning: SafeBytes’s virus scan engine is among the quickest and most efficient in the industry. Its targeted scanning vastly increases the catch rate for viruses that is embedded in various computer files.

Website Filtering: Safebytes assigns all sites a unique safety ranking that helps you to get an idea of whether the website you’re about to visit is safe to view or known to be a phishing site.

Lightweight Tool: SafeBytes gives complete protection from online threats at a fraction of the CPU load because of its enhanced detection engine and algorithms.

24/7 Online Support: Support service is available for 24 x 7 x 365 days via email and chat to answer your concerns.

To sum it up, SafeBytes Anti-Malware is pretty great for securing your computer against all kinds of malware threats. There is no doubt that your computer system will be protected in real-time once you put this tool to use. You will get the very best all-around protection for the money you spend on SafeBytes Anti-Malware subscription, there is no doubt about it.

Technical Details and Manual Removal (Advanced Users)

If you would like to perform the removal of PuzzleGamesDaily manually rather than utilizing an automated software tool, you can follow these measures: Go to the Windows Control Panel, click the “Add or Remove Programs” and there, select the offending program to uninstall. In case of suspicious versions of browser plugins, you can actually remove it via your web browser’s extension manager. You may even want to reset your web browser settings, and also clear your browser cache and cookies.

To make sure of complete removal, find the following registry entries on your computer and remove it or reset the values appropriately. However, this can be a difficult task and only computer professionals can carry out safely. Furthermore, certain malware is capable of replicating or preventing removal. It is advisable that you carry out the removal process in Safe Mode.

Files:
%Documents and Settings%\%UserName%\Application Data\%random%
%AllUsersProfile%\Application Data\.dll

Registry:
HKCU\Software\Microsoft\Windows\CurrentVersion\Run\KB8456137 = %LocalAppData%\KB8456137\KB8456137.exe
HKEY_CLASSES_ROOT\CLSID\28949824-6737-0594-0930-223283753445\InProcServer32 (Default) = \.dll

Read More

Visual Studio code

Visual studio code is a code editor available for Windows, Linux, and macOS. It is a completely free tool offering you to code in any language without the need to switch to another editor.

Visual Studio Code is part of Microsoft Visual Studio which is a complete integrated development environment (IDE). Take notice that Visual studio itself has more advanced tools for developing and testing, it has 24/7 support, training, and Azure for WEB apps.

Visual Studio Code is an editor lacking in some advanced features Visual Studio offers.

Visual Studio code Price and royalty

As mentioned Visual Studio code is completely free licensed under the MIT license agreement giving you the tool free to use and sell your product.

How it supports Linux, Windows, and macOS, all you need it to go to its official page https://code.visualstudio.com/, download it and start using it.

How this is free project backside is that there is no official support, you will have to rely on various articles and community in order to get needed information or problem solution.

Features

Syntax highlighting has become standard and norm for any editor but besides this function VS code offers us also IntelliSense option which goes a step further with code completion, code hinting, and parameter info.

This means that VS code is aware of many things going on inside your code and will offer you as you type a menu with options for autocomplete along with variables referenced, function names, etc.

VS code offers extensions inside its extensions marketplace where you can add extensions in order to implement new languages, add debuggers, change the layout, etc. This is one of the great features it allows you to easily switch from one project to another, one language to another not leaving your code editor.

Working with version control systems like Git is easy with VS Code. You’ll be able to stage files and make commits, then push and pull changes to your remote code repository of choice, right from the editor.

Conclusion about Visual Studio code

Visual Studio Code is one of if not the most flexible and extensible code editors currently on the market that I have ever tried and used. IT has become my code editor of choice simply for reasons that there is really not much it cannot do and it is constantly updated and taken care of.

You can really tune it to look and feels how you want with extensions and you really cannot beat the free price tag.

I would highly recommend this editor for daily use especially since its biggest competitors like Atom and sublime text have not seen many updates lately.

Read More

TelevisionFanatic is a potentially unwanted browser hijacking extension developed by Mindspark Interactive Network. It is marketed to enjoy one-click access to local TV listings, watch recently-aired episodes of your favorite shows and viral web videos, plus TV news and show recaps. However, all of these services require registration and sensitive personal data, that is later sold/forwarded to serve ads.

Upon installation, this extension adds registry entries that allow it to run each time the computer is started. It also changed your default search engine to MyWebSearch and hijacks your default new tab behavior opening MyWebSearch instead. These search results display unwanted ads, and clutter pages with sponsored links that negatively affect your browsing experience. Multiple anti-virus scanners have detected TelevisionFanatic as a browser hijacker, and therefore it is flagged for optional removal.

About Browser Hijackers

Browser hijacking is amongst the web’s constant problems that target browsers. It’s a kind of malware program that alters your web browser’s configuration settings and redirects you to sites or pages that you had no intention of visiting. Browser hijackers could do a variety of things on your PC. It redirects you to the sponsored internet sites and injects ads on the web browser that helps its creator generate income. While it might appear naive, all browser hijackers are damaging and thus always regarded as security risks. Some browser hijackers are designed to make certain modifications beyond the browsers, like altering entries on the computer registry and letting other types of malware further damage your PC.

Browser hijacking signs and symptoms

When your browser is hijacked, the following could happen:
1. home-page is changed
2. new bookmarks pointing to porn sites have been added to your favorite pages
3. the default online search engine and/or the default browser settings are modified
4. you see unwanted new toolbars added
5. you may see many pop-up ads on your computer screen
6. your internet browser starts running slowly or displays frequent glitches
7. you are blocked to access those sites of antivirus solution providers.

Exactly how browser hijacker finds its way to your computer

Browser hijackers may use drive-by downloads or file-sharing websites or an e-mail attachment to reach a targeted PC. Many internet browser hijackings come from add-on software, i.e., browser helper objects (BHO), toolbars, or plug-ins added to web browsers to provide the extra features. Browser hijackers sneak into your pc in addition to free software application downloads that you unwittingly install alongside the original. Common examples of browser hijackers include Conduit, CoolWebSearch, Coupon Server, OneWebSearch, RocketTab, Snap.do, Delta Search, and Searchult.com.

Browser hijackers can record user keystrokes to collect potentially important information leading to privacy concerns, cause instability on systems, severely disrupt user’s browsing experience, and finally slow down the system to a stage where it will become unusable.

Removing browser hijackers

Some hijackers can be removed by uninstalling the freeware they came with or by deleting any extension you’ve recently added to your browser. However, most hijackers are hard to get rid of manually. Irrespective of how much you try to remove it, it might return over and over again. And there is no denying the very fact that manual repairs and removal can certainly be a difficult job for an inexperienced PC user. Besides, there are various risks connected with tinkering around with the system registry files.

What To Do When You Cannot Download Safebytes Anti-Malware?

Viruses can cause plenty of damage to your personal computer. Some malware sits in between your computer and your internet connection and blocks a few or all sites that you would like to visit. It might also block you from the installation of anything on your system, particularly antivirus applications. So what you should do if malicious software prevents you from downloading or installing Anti-Malware? There are some steps you can take to get around this issue.

Make use of Safe Mode to fix the issue

In Safe Mode, you may modify Windows settings, uninstall or install some software, and remove hard-to-delete viruses. In the event the malware is obstructing internet connection and affecting the computer, launching it in Safe Mode allows you to download anti-malware and run a diagnostic scan whilst limiting potential damage. To start the computer into Safe Mode, hit the “F8” key on the keyboard right before the Windows boot screen comes up; Or right after normal Windows boot up, run MSCONFIG, check the Safe Boot under Boot tab, and click Apply. Once you are in safe mode, you can attempt to download and install your anti-malware program without the hindrance of malicious software. Following installation, run the malware scanner to eliminate standard infections.

Switch over to an alternate web browser

Malicious program code could exploit vulnerabilities on a specific web browser and block access to all antivirus software websites. If you suspect that your Internet Explorer has been hijacked by malware or otherwise compromised by online hackers, the most effective thing to do would be to switch to an alternate web browser such as Firefox, Chrome, or Safari to download your favorite computer security program – Safebytes Anti-Malware.

Run anti-malware from your USB drive

Here’s another solution which is utilizing a portable USB anti-virus software that can check your system for malware without the need for installation. To run anti-virus using a thumb drive, follow these simple steps:
1) Download Safebytes Anti-Malware or Windows Defender Offline onto a clean PC.
2) Plug the USB drive into the clean PC.
3) Double-click the Setup icon of the antivirus software to run the Installation Wizard.
4) Select the drive letter of the flash drive as the location when the wizard asks you where you want to install the antivirus. Do as instructed on the screen to finish off the installation process.
5) Disconnect the flash drive. Now you can utilize this portable anti-virus on the infected computer system.
6) Double-click the anti-malware software EXE file on the pen drive.
7) Press the “Scan” button to run a full system scan and remove malware automatically.

A Look at the Best Anti-Malware Program

Do you want to download the best anti-malware program for your laptop or computer? There are many applications in the market that comes in free and paid versions for Microsoft Windows computers. A few of them are good and some are scamware applications that pretend as genuine anti-malware software waiting around to wreak havoc on your PC. You need to select one that is dependable, practical, and has a strong reputation for its malware source protection. One of the highly recommended software programs is SafeBytes Anti-Malware. SafeBytes carries a superb reputation for top-quality service, and customers seem to be happy with it.

SafeBytes anti-malware is a trustworthy tool that not only secures your computer completely but is also very user-friendly for people of all skill levels. With its outstanding protection system, this software will automatically detect and get rid of the majority of the security threats, which include adware, viruses, browser hijackers, ransomware, PUPs, and trojans.

SafeBytes anti-malware provides a plethora of enhanced features which sets it aside from all others. Let’s check out some of them below:

Anti-Malware Protection: Safebytes is built on the best virus engine within the industry. These engines will identify and remove threats even during the early stages of a malware outbreak.

Real-time Active Protection: Malware programs looking to get into the computer are discovered and stopped as and when detected by the SafeBytes active protection shields. This utility will continuously monitor your PC for suspicious activity and updates itself regularly to keep abreast of the constantly changing threat situation.

Internet Security: SafeBytes gives an instant safety rating on the pages you are about to visit, automatically blocking dangerous sites and ensuring that you are certain of your safety while browsing the web.

High-Speed Malware Scanning Engine: SafeBytes Anti-Malware has got a multi-thread scan algorithm that works up to 5 times faster than any other antivirus software.

Minimal CPU and Memory Usage: SafeBytes is well-known for its low influence on processing power and great detection rate of numerous threats. It works quietly and efficiently in the background so you’re free to use your computer or laptop at full power all of the time.

24/7 Guidance: SafeBytes provides you with 24/7 technical support, automatic maintenance, and updates for the best user experience.

Technical Details and Manual Removal (Advanced Users)

If you wish to manually remove TelevisionFanatic without the use of an automated tool, it may be possible to do so by removing the program from the Windows Add/Remove Programs menu, or in cases of browser extensions, going to the browsers AddOn/Extension manager and removing it. You will likely also want to reset your browser.

To ensure the complete removal, manually check your hard drive and registry for all of the following and remove or reset the values accordingly. Please note that this is for advanced users only and may be difficult, with incorrect file removal causing additional PC errors. In addition, some malware is capable of replicating or preventing deletion. Doing this in Safe Mode is advised.

The following files, folders, and registry entries are created or modified by TelevisionFanatic

Files:
%APPDATA%TelevisionFanatic
%PROGRAMFILES%TelevisionFanatic
%PROGRAMFILES%TelevisionFanaticEI
%PROGRAMFILES%TelevisionFanaticEITelevisionFanaticauxstb.dll
%PROGRAMFILES%TelevisionFanaticEITelevisionFanaticbar.dll
%PROGRAMFILES%TelevisionFanaticEITelevisionFanaticbarsvc.exe
%PROGRAMFILES%TelevisionFanaticEITelevisionFanaticbprtct.dll
%PROGRAMFILES%TelevisionFanaticEITelevisionFanaticbrmon.exe
%PROGRAMFILES%TelevisionFanaticEITelevisionFanaticbrstub.dll
%PROGRAMFILES%TelevisionFanaticEITelevisionFanaticdatact.dll
%PROGRAMFILES%TelevisionFanaticEITelevisionFanaticdlghk.dll
%PROGRAMFILES%TelevisionFanaticEITelevisionFanaticdyn.dll
%PROGRAMFILES%TelevisionFanaticEITelevisionFanaticfeedmg.dll
%PROGRAMFILES%TelevisionFanaticEITelevisionFanatichighin.exe
%PROGRAMFILES%TelevisionFanaticEITelevisionFanatichkstub.dll
%PROGRAMFILES%TelevisionFanaticEITelevisionFanatichtmlmu.dll
%PROGRAMFILES%TelevisionFanaticEITelevisionFanatichttpct.dll
%PROGRAMFILES%TelevisionFanaticEITelevisionFanaticidle.dll
%PROGRAMFILES%TelevisionFanaticEITelevisionFanaticieovr.dll
%PROGRAMFILES%TelevisionFanaticEITelevisionFanaticimpipe.exe
%PROGRAMFILES%TelevisionFanaticEITelevisionFanaticmedint.exe
%PROGRAMFILES%TelevisionFanaticEITelevisionFanaticmlbtn.dll
%PROGRAMFILES%TelevisionFanaticEITelevisionFanaticmsg.dll
%PROGRAMFILES%TelevisionFanaticEITelevisionFanaticPlugin.dll
%PROGRAMFILES%TelevisionFanaticEITelevisionFanaticradio.dll
%PROGRAMFILES%TelevisionFanaticEITelevisionFanaticregfft.dll
%PROGRAMFILES%TelevisionFanaticEITelevisionFanaticreghk.dll
%PROGRAMFILES%TelevisionFanaticEITelevisionFanaticregiet.dll
%PROGRAMFILES%TelevisionFanaticEITelevisionFanaticscript.dll
%PROGRAMFILES%TelevisionFanaticEITelevisionFanaticskin.dll
%PROGRAMFILES%TelevisionFanaticEITelevisionFanaticsknlcr.dll
%PROGRAMFILES%TelevisionFanaticEITelevisionFanaticskplay.exe
%PROGRAMFILES%TelevisionFanaticEITelevisionFanaticSrcAs.dll
%PROGRAMFILES%TelevisionFanaticEITelevisionFanaticSrchMn.exe
%PROGRAMFILES%TelevisionFanaticEITelevisionFanatictpinst.dll
%PROGRAMFILES%TelevisionFanaticEITelevisionFanaticuabtn.dll
%PROGRAMFILES%TelevisionFanaticEITelevisionFanaticAppIntegrator64.exe
%PROGRAMFILES%TelevisionFanaticEITelevisionFanaticAppIntegratorStub64.dll
%PROGRAMFILES%TelevisionFanaticEITelevisionFanaticBOOTSTRAP.JS
%PROGRAMFILES%TelevisionFanaticEITelevisionFanaticffxtbr.jar
%PROGRAMFILES%TelevisionFanaticEITelevisionFanaticCHROME.MANIFEST
%PROGRAMFILES%TelevisionFanaticEITelevisionFanaticCREXT.DLL
%PROGRAMFILES%TelevisionFanaticEITelevisionFanaticCrExtP64.exe
%PROGRAMFILES%TelevisionFanaticEITelevisionFanaticDPNMNGR.DLL
%PROGRAMFILES%TelevisionFanaticEITelevisionFanaticEXEMANAGER.DLL
%PROGRAMFILES%TelevisionFanaticEITelevisionFanaticHpg64.dll
%PROGRAMFILES%TelevisionFanaticEITelevisionFanaticINSTALL.RDF
%PROGRAMFILES%TelevisionFanaticEITelevisionFanaticinstallKeys.js
%PROGRAMFILES%TelevisionFanaticEITelevisionFanaticLOGO.BMP
%PROGRAMFILES%TelevisionFanaticEITelevisionFanaticNP64Stub.dll
%PROGRAMFILES%TelevisionFanaticEITelevisionFanaticT8EXTEX.DLL
%PROGRAMFILES%TelevisionFanaticEITelevisionFanaticT8EXTPEX.DLL
%PROGRAMFILES%TelevisionFanaticEITelevisionFanaticT8HTML.DLL
%PROGRAMFILES%TelevisionFanaticEITelevisionFanaticT8RES.DLL
%PROGRAMFILES%TelevisionFanaticEITelevisionFanaticT8TICKER.DLL
%PROGRAMFILES%TelevisionFanaticEITelevisionFanaticVERIFY.DLL
%PROGRAMFILES%TelevisionFanaticEITelevisionFanaticEIPlug.dll
%PROGRAMFILES%TelevisionFanaticEITelevisionFanaticEZSETP.dll
%PROGRAMFILES%TelevisionFanaticEITelevisionFanaticNP64EISb.dll
%PROGRAMFILES%TelevisionFanaticEITelevisionFanatic%APPDATA%TelevisionFanatic
%PROGRAMFILES%TelevisionFanatic
%PROGRAMFILES%TelevisionFanaticEI
%PROGRAMFILES%TelevisionFanaticEITelevisionFanaticauxstb.dll
%PROGRAMFILES%TelevisionFanaticEITelevisionFanaticbar.dll
%PROGRAMFILES%TelevisionFanaticEITelevisionFanaticbarsvc.exe
%PROGRAMFILES%TelevisionFanaticEITelevisionFanaticbprtct.dll
%PROGRAMFILES%TelevisionFanaticEITelevisionFanaticbrmon.exe
%PROGRAMFILES%TelevisionFanaticEITelevisionFanaticbrstub.dll
%PROGRAMFILES%TelevisionFanaticEITelevisionFanaticdatact.dll
%PROGRAMFILES%TelevisionFanaticEITelevisionFanaticdlghk.dll
%PROGRAMFILES%TelevisionFanaticEITelevisionFanaticdyn.dll
%PROGRAMFILES%TelevisionFanaticEITelevisionFanaticfeedmg.dll
%PROGRAMFILES%TelevisionFanaticEITelevisionFanatichighin.exe
%PROGRAMFILES%TelevisionFanaticEITelevisionFanatichkstub.dll
%PROGRAMFILES%TelevisionFanaticEITelevisionFanatichtmlmu.dll
%PROGRAMFILES%TelevisionFanaticEITelevisionFanatichttpct.dll
%PROGRAMFILES%TelevisionFanaticEITelevisionFanaticidle.dll
%PROGRAMFILES%TelevisionFanaticEITelevisionFanaticieovr.dll
%PROGRAMFILES%TelevisionFanaticEITelevisionFanaticimpipe.exe
%PROGRAMFILES%TelevisionFanaticEITelevisionFanaticmedint.exe
%PROGRAMFILES%TelevisionFanaticEITelevisionFanaticmlbtn.dll
%PROGRAMFILES%TelevisionFanaticEITelevisionFanaticmsg.dll
%PROGRAMFILES%TelevisionFanaticEITelevisionFanaticPlugin.dll
%PROGRAMFILES%TelevisionFanaticEITelevisionFanaticradio.dll
%PROGRAMFILES%TelevisionFanaticEITelevisionFanaticregfft.dll
%PROGRAMFILES%TelevisionFanaticEITelevisionFanaticreghk.dll
%PROGRAMFILES%TelevisionFanaticEITelevisionFanaticregiet.dll
%PROGRAMFILES%TelevisionFanaticEITelevisionFanaticscript.dll
%PROGRAMFILES%TelevisionFanaticEITelevisionFanaticskin.dll
%PROGRAMFILES%TelevisionFanaticEITelevisionFanaticsknlcr.dll
%PROGRAMFILES%TelevisionFanaticEITelevisionFanaticskplay.exe
%PROGRAMFILES%TelevisionFanaticEITelevisionFanaticSrcAs.dll
%PROGRAMFILES%TelevisionFanaticEITelevisionFanaticSrchMn.exe
%PROGRAMFILES%TelevisionFanaticEITelevisionFanatictpinst.dll
%PROGRAMFILES%TelevisionFanaticEITelevisionFanaticuabtn.dll
%PROGRAMFILES%TelevisionFanaticEITelevisionFanaticAppIntegrator64.exe
%PROGRAMFILES%TelevisionFanaticEITelevisionFanaticAppIntegratorStub64.dll
%PROGRAMFILES%TelevisionFanaticEITelevisionFanaticBOOTSTRAP.JS
%PROGRAMFILES%TelevisionFanaticEITelevisionFanaticffxtbr.jar
%PROGRAMFILES%TelevisionFanaticEITelevisionFanaticCHROME.MANIFEST
%PROGRAMFILES%TelevisionFanaticEITelevisionFanaticCREXT.DLL
%PROGRAMFILES%TelevisionFanaticEITelevisionFanaticCrExtP64.exe
%PROGRAMFILES%TelevisionFanaticEITelevisionFanaticDPNMNGR.DLL
%PROGRAMFILES%TelevisionFanaticEITelevisionFanaticEXEMANAGER.DLL
%PROGRAMFILES%TelevisionFanaticEITelevisionFanaticHpg64.dll
%PROGRAMFILES%TelevisionFanaticEITelevisionFanaticINSTALL.RDF
%PROGRAMFILES%TelevisionFanaticEITelevisionFanaticinstallKeys.js
%PROGRAMFILES%TelevisionFanaticEITelevisionFanaticLOGO.BMP
%PROGRAMFILES%TelevisionFanaticEITelevisionFanaticNP64Stub.dll
%PROGRAMFILES%TelevisionFanaticEITelevisionFanaticT8EXTEX.DLL
%PROGRAMFILES%TelevisionFanaticEITelevisionFanaticT8EXTPEX.DLL
%PROGRAMFILES%TelevisionFanaticEITelevisionFanaticT8HTML.DLL
%PROGRAMFILES%TelevisionFanaticEITelevisionFanaticT8RES.DLL
%PROGRAMFILES%TelevisionFanaticEITelevisionFanaticT8TICKER.DLL
%PROGRAMFILES%TelevisionFanaticEITelevisionFanaticVERIFY.DLL
%PROGRAMFILES%TelevisionFanaticEITelevisionFanaticEIPlug.dll
%PROGRAMFILES%TelevisionFanaticEITelevisionFanaticEZSETP.dll
%PROGRAMFILES%TelevisionFanaticEITelevisionFanaticNP64EISb.dll
%PROGRAMFILES%TelevisionFanaticEITelevisionFanatic%#MANIFEST#%18369B.exe
%PROGRAMFILES%TelevisionFanaticauxstb.dll
%PROGRAMFILES%TelevisionFanaticbar.dll
%PROGRAMFILES%TelevisionFanaticbarsvc.exe
%PROGRAMFILES%TelevisionFanaticbprtct.dll
%PROGRAMFILES%TelevisionFanaticbrmon.exe
%PROGRAMFILES%TelevisionFanaticbrstub.dll
%PROGRAMFILES%TelevisionFanaticdatact.dll
%PROGRAMFILES%TelevisionFanaticdlghk.dll
%PROGRAMFILES%TelevisionFanaticdyn.dll
%PROGRAMFILES%TelevisionFanaticfeedmg.dll
%PROGRAMFILES%TelevisionFanatichighin.exe
%PROGRAMFILES%TelevisionFanatichkstub.dll
%PROGRAMFILES%TelevisionFanatichtmlmu.dll
%PROGRAMFILES%TelevisionFanatichttpct.dll
%PROGRAMFILES%TelevisionFanaticidle.dll
%PROGRAMFILES%TelevisionFanaticieovr.dll
%PROGRAMFILES%TelevisionFanaticimpipe.exe
%PROGRAMFILES%TelevisionFanaticmedint.exe
%PROGRAMFILES%TelevisionFanaticmlbtn.dll
%PROGRAMFILES%TelevisionFanaticmsg.dll
%PROGRAMFILES%TelevisionFanaticPlugin.dll
%PROGRAMFILES%TelevisionFanaticradio.dll
%PROGRAMFILES%TelevisionFanaticregfft.dll
%PROGRAMFILES%TelevisionFanaticreghk.dll
%PROGRAMFILES%TelevisionFanaticregiet.dll
%PROGRAMFILES%TelevisionFanaticscript.dll
%PROGRAMFILES%TelevisionFanaticskin.dll
%PROGRAMFILES%TelevisionFanaticsknlcr.dll
%PROGRAMFILES%TelevisionFanaticskplay.exe
%PROGRAMFILES%TelevisionFanaticSrcAs.dll
%PROGRAMFILES%TelevisionFanaticSrchMn.exe
%PROGRAMFILES%TelevisionFanatictpinst.dll
%PROGRAMFILES%TelevisionFanaticuabtn.dll
%PROGRAMFILES%TelevisionFanaticAppIntegrator64.exe
%PROGRAMFILES%TelevisionFanaticAppIntegratorStub64.dll
%PROGRAMFILES%TelevisionFanaticBOOTSTRAP.JS
%PROGRAMFILES%TelevisionFanaticffxtbr.jar
%PROGRAMFILES%TelevisionFanaticCHROME.MANIFEST
%PROGRAMFILES%TelevisionFanaticCREXT.DLL
%PROGRAMFILES%TelevisionFanaticCrExtP64.exe
%PROGRAMFILES%TelevisionFanaticDPNMNGR.DLL
%PROGRAMFILES%TelevisionFanaticEXEMANAGER.DLL
%PROGRAMFILES%TelevisionFanaticHpg64.dll
%PROGRAMFILES%TelevisionFanaticINSTALL.RDF
%PROGRAMFILES%TelevisionFanaticinstallKeys.js
%PROGRAMFILES%TelevisionFanaticLOGO.BMP
%PROGRAMFILES%TelevisionFanaticNP64Stub.dll
%PROGRAMFILES%TelevisionFanaticT8EXTEX.DLL
%PROGRAMFILES%TelevisionFanaticT8EXTPEX.DLL
%PROGRAMFILES%TelevisionFanaticT8HTML.DLL
%PROGRAMFILES%TelevisionFanaticT8RES.DLL
%PROGRAMFILES%TelevisionFanaticT8TICKER.DLL
%PROGRAMFILES%TelevisionFanaticVERIFY.DLL
%PROGRAMFILES%TelevisionFanaticEIPlug.dll
%PROGRAMFILES%TelevisionFanaticEZSETP.dll
%PROGRAMFILES%TelevisionFanaticNP64EISb.dll
%PROGRAMFILES%TelevisionFanatic%#MANIFEST#%18369B.exe
%APPDATA%TelevisionFanaticauxstb.dll
%APPDATA%TelevisionFanaticbar.dll
%APPDATA%TelevisionFanaticbarsvc.exe
%APPDATA%TelevisionFanaticbprtct.dll
%APPDATA%TelevisionFanaticbrmon.exe
%APPDATA%TelevisionFanaticbrstub.dll
%APPDATA%TelevisionFanaticdatact.dll
%APPDATA%TelevisionFanaticdlghk.dll
%APPDATA%TelevisionFanaticdyn.dll
%APPDATA%TelevisionFanaticfeedmg.dll
%APPDATA%TelevisionFanatichighin.exe
%APPDATA%TelevisionFanatichkstub.dll
%APPDATA%TelevisionFanatichtmlmu.dll
%APPDATA%TelevisionFanatichttpct.dll
%APPDATA%TelevisionFanaticidle.dll
%APPDATA%TelevisionFanaticieovr.dll
%APPDATA%TelevisionFanaticimpipe.exe
%APPDATA%TelevisionFanaticmedint.exe
%APPDATA%TelevisionFanaticmlbtn.dll
%APPDATA%TelevisionFanaticmsg.dll
%APPDATA%TelevisionFanaticPlugin.dll
%APPDATA%TelevisionFanaticradio.dll
%APPDATA%TelevisionFanaticregfft.dll
%APPDATA%TelevisionFanaticreghk.dll
%APPDATA%TelevisionFanaticregiet.dll
%APPDATA%TelevisionFanaticscript.dll
%APPDATA%TelevisionFanaticskin.dll
%APPDATA%TelevisionFanaticsknlcr.dll
%APPDATA%TelevisionFanaticskplay.exe
%APPDATA%TelevisionFanaticSrcAs.dll
%APPDATA%TelevisionFanaticSrchMn.exe
%APPDATA%TelevisionFanatictpinst.dll
%APPDATA%TelevisionFanaticuabtn.dll
%APPDATA%TelevisionFanaticAppIntegrator64.exe
%APPDATA%TelevisionFanaticAppIntegratorStub64.dll
%APPDATA%TelevisionFanaticBOOTSTRAP.JS
%APPDATA%TelevisionFanaticffxtbr.jar
%APPDATA%TelevisionFanaticCHROME.MANIFEST
%APPDATA%TelevisionFanaticCREXT.DLL
%APPDATA%TelevisionFanaticCrExtP64.exe
%APPDATA%TelevisionFanaticDPNMNGR.DLL
%APPDATA%TelevisionFanaticEXEMANAGER.DLL
%APPDATA%TelevisionFanaticHpg64.dll
%APPDATA%TelevisionFanaticINSTALL.RDF
%APPDATA%TelevisionFanaticinstallKeys.js
%APPDATA%TelevisionFanaticLOGO.BMP
%APPDATA%TelevisionFanaticNP64Stub.dll
%APPDATA%TelevisionFanaticT8EXTEX.DLL
%APPDATA%TelevisionFanaticT8EXTPEX.DLL
%APPDATA%TelevisionFanaticT8HTML.DLL
%APPDATA%TelevisionFanaticT8RES.DLL
%APPDATA%TelevisionFanaticT8TICKER.DLL
%APPDATA%TelevisionFanaticVERIFY.DLL
%APPDATA%TelevisionFanaticEIPlug.dll
%APPDATA%TelevisionFanaticEZSETP.dll
%APPDATA%TelevisionFanaticNP64EISb.dll
%APPDATA%TelevisionFanatic%#MANIFEST#%18369B.exe

Registry:
Key HKLMSOFTWARETelevisionFanatic
Key HKLMSOFTWAREMicrosoftWindowsCurrentVersionUninstallTelevisionFanaticbar Uninstall Internet Explorer
Key HKLMSOFTWAREMicrosoftWindowsCurrentVersionUninstallTelevisionFanaticbar Uninstall Firefox
Key HKLMSOFTWAREMicrosoftWindowsCurrentVersionExplorerBrowser Helper Objectscb41fc95-f1b3-4797-8bb6-1012ff62abba
Key HKLMSOFTWAREMicrosoftWindowsCurrentVersionExplorerBrowser Helper Objects5d79f641-c168-40df-a32f-bacea7509e75
Key HKLMSOFTWAREClassesTelevisionFanatic.XMLSessionPlugin.1CLSID
Key HKLMSOFTWAREClassesTelevisionFanatic.XMLSessionPlugin.1
Key HKLMSOFTWAREClassesTelevisionFanatic.XMLSessionPluginCurVer
Key HKLMSOFTWAREClassesTelevisionFanatic.XMLSessionPluginCLSID
Key HKLMSOFTWAREClassesTelevisionFanatic.XMLSessionPlugin
Key HKLMSOFTWAREClassesTelevisionFanatic.UrlAlertButton.1CLSID
Key HKLMSOFTWAREClassesTelevisionFanatic.UrlAlertButton.1
Key HKLMSOFTWAREClassesTelevisionFanatic.UrlAlertButtonCurVer
Key HKLMSOFTWAREClassesTelevisionFanatic.UrlAlertButtonCLSID
Key HKLMSOFTWAREClassesTelevisionFanatic.UrlAlertButton
Key HKLMSOFTWAREClassesTelevisionFanatic.ToolbarProtector.1CLSID
Key HKLMSOFTWAREClassesTelevisionFanatic.ToolbarProtector.1
Key HKLMSOFTWAREClassesTelevisionFanatic.ToolbarProtectorCurVer
Key HKLMSOFTWAREClassesTelevisionFanatic.ToolbarProtectorCLSID
Key HKLMSOFTWAREClassesTelevisionFanatic.ToolbarProtector
Key HKLMSOFTWAREClassesTelevisionFanatic.ThirdPartyInstaller.1CLSID
Key HKLMSOFTWAREClassesTelevisionFanatic.ThirdPartyInstaller.1
Key HKLMSOFTWAREClassesTelevisionFanatic.ThirdPartyInstallerCurVer
Key HKLMSOFTWAREClassesTelevisionFanatic.ThirdPartyInstallerCLSID
Key HKLMSOFTWAREClassesTelevisionFanatic.ThirdPartyInstaller
Key HKLMSOFTWAREClassesTelevisionFanatic.SkinLauncherSettings.1CLSID
Key HKLMSOFTWAREClassesTelevisionFanatic.SkinLauncherSettings.1
Key HKLMSOFTWAREClassesTelevisionFanatic.SkinLauncherSettingsCurVer
Key HKLMSOFTWAREClassesTelevisionFanatic.SkinLauncherSettingsCLSID
Key HKLMSOFTWAREClassesTelevisionFanatic.SkinLauncherSettings
Key HKLMSOFTWAREClassesTelevisionFanatic.SkinLauncher.1CLSID
Key HKLMSOFTWAREClassesTelevisionFanatic.SkinLauncher.1
Key HKLMSOFTWAREClassesTelevisionFanatic.SkinLauncherCurVer
Key HKLMSOFTWAREClassesTelevisionFanatic.SkinLauncherCLSID
Key HKLMSOFTWAREClassesTelevisionFanatic.SkinLauncher
Key HKLMSOFTWAREClassesTelevisionFanatic.SettingsPlugin.1CLSID
Key HKLMSOFTWAREClassesTelevisionFanatic.SettingsPlugin.1
Key HKLMSOFTWAREClassesTelevisionFanatic.SettingsPluginCurVer
Key HKLMSOFTWAREClassesTelevisionFanatic.SettingsPluginCLSID
Key HKLMSOFTWAREClassesTelevisionFanatic.SettingsPlugin
Key HKLMSOFTWAREClassesTelevisionFanatic.ScriptButton.1CLSID
Key HKLMSOFTWAREClassesTelevisionFanatic.ScriptButton.1
Key HKLMSOFTWAREClassesTelevisionFanatic.ScriptButtonCurVer
Key HKLMSOFTWAREClassesTelevisionFanatic.ScriptButtonCLSID
Key HKLMSOFTWAREClassesTelevisionFanatic.ScriptButton
Key HKLMSOFTWAREClassesTelevisionFanatic.RadioSettings.1CLSID
Key HKLMSOFTWAREClassesTelevisionFanatic.RadioSettings.1
Key HKLMSOFTWAREClassesTelevisionFanatic.RadioSettingsCurVer
Key HKLMSOFTWAREClassesTelevisionFanatic.RadioSettingsCLSID
Key HKLMSOFTWAREClassesTelevisionFanatic.RadioSettings
Key HKLMSOFTWAREClassesTelevisionFanatic.Radio.1CLSID
Key HKLMSOFTWAREClassesTelevisionFanatic.Radio.1
Key HKLMSOFTWAREClassesTelevisionFanatic.RadioCurVer
Key HKLMSOFTWAREClassesTelevisionFanatic.RadioCLSID
Key HKLMSOFTWAREClassesTelevisionFanatic.Radio
Key HKLMSOFTWAREClassesTelevisionFanatic.PseudoTransparentPlugin.1CLSID
Key HKLMSOFTWAREClassesTelevisionFanatic.PseudoTransparentPlugin.1
Key HKLMSOFTWAREClassesTelevisionFanatic.PseudoTransparentPluginCurVer
Key HKLMSOFTWAREClassesTelevisionFanatic.PseudoTransparentPluginCLSID
Key HKLMSOFTWAREClassesTelevisionFanatic.PseudoTransparentPlugin
Key HKLMSOFTWAREClassesTelevisionFanatic.MultipleButton.1CLSID
Key HKLMSOFTWAREClassesTelevisionFanatic.MultipleButton.1
Key HKLMSOFTWAREClassesTelevisionFanatic.MultipleButtonCurVer
Key HKLMSOFTWAREClassesTelevisionFanatic.MultipleButtonCLSID
Key HKLMSOFTWAREClassesTelevisionFanatic.MultipleButton
Key HKLMSOFTWAREClassesTelevisionFanatic.HTMLPanel.1CLSID
Key HKLMSOFTWAREClassesTelevisionFanatic.HTMLPanel.1
Key HKLMSOFTWAREClassesTelevisionFanatic.HTMLPanelCurVer
Key HKLMSOFTWAREClassesTelevisionFanatic.HTMLPanelCLSID
Key HKLMSOFTWAREClassesTelevisionFanatic.HTMLPanel
Key HKLMSOFTWAREClassesTelevisionFanatic.HTMLMenu.1CLSID
Key HKLMSOFTWAREClassesTelevisionFanatic.HTMLMenu.1
Key HKLMSOFTWAREClassesTelevisionFanatic.HTMLMenuCurVer
Key HKLMSOFTWAREClassesTelevisionFanatic.HTMLMenuCLSID
Key HKLMSOFTWAREClassesTelevisionFanatic.HTMLMenu
Key HKLMSOFTWAREClassesTelevisionFanatic.FeedManager.1CLSID
Key HKLMSOFTWAREClassesTelevisionFanatic.FeedManager.1
Key HKLMSOFTWAREClassesTelevisionFanatic.FeedManagerCurVer
Key HKLMSOFTWAREClassesTelevisionFanatic.FeedManagerCLSID
Key HKLMSOFTWAREClassesTelevisionFanatic.FeedManager
Key HKLMSOFTWAREClassesTelevisionFanatic.DynamicBarButton.1CLSID
Key HKLMSOFTWAREClassesTelevisionFanatic.DynamicBarButton.1
Key HKLMSOFTWAREClassesTelevisionFanatic.DynamicBarButtonCurVer
Key HKLMSOFTWAREClassesTelevisionFanatic.DynamicBarButtonCLSID
Key HKLMSOFTWAREClassesTelevisionFanatic.DynamicBarButton18369B.exe
%PROGRAMFILES%TelevisionFanaticauxstb.dll
%PROGRAMFILES%TelevisionFanaticbar.dll
%PROGRAMFILES%TelevisionFanaticbarsvc.exe
%PROGRAMFILES%TelevisionFanaticbprtct.dll
%PROGRAMFILES%TelevisionFanaticbrmon.exe
%PROGRAMFILES%TelevisionFanaticbrstub.dll
%PROGRAMFILES%TelevisionFanaticdatact.dll
%PROGRAMFILES%TelevisionFanaticdlghk.dll
%PROGRAMFILES%TelevisionFanaticdyn.dll
%PROGRAMFILES%TelevisionFanaticfeedmg.dll
%PROGRAMFILES%TelevisionFanatichighin.exe
%PROGRAMFILES%TelevisionFanatichkstub.dll
%PROGRAMFILES%TelevisionFanatichtmlmu.dll
%PROGRAMFILES%TelevisionFanatichttpct.dll
%PROGRAMFILES%TelevisionFanaticidle.dll
%PROGRAMFILES%TelevisionFanaticieovr.dll
%PROGRAMFILES%TelevisionFanaticimpipe.exe
%PROGRAMFILES%TelevisionFanaticmedint.exe
%PROGRAMFILES%TelevisionFanaticmlbtn.dll
%PROGRAMFILES%TelevisionFanaticmsg.dll
%PROGRAMFILES%TelevisionFanaticPlugin.dll
%PROGRAMFILES%TelevisionFanaticradio.dll
%PROGRAMFILES%TelevisionFanaticregfft.dll
%PROGRAMFILES%TelevisionFanaticreghk.dll
%PROGRAMFILES%TelevisionFanaticregiet.dll
%PROGRAMFILES%TelevisionFanaticscript.dll
%PROGRAMFILES%TelevisionFanaticskin.dll
%PROGRAMFILES%TelevisionFanaticsknlcr.dll
%PROGRAMFILES%TelevisionFanaticskplay.exe
%PROGRAMFILES%TelevisionFanaticSrcAs.dll
%PROGRAMFILES%TelevisionFanaticSrchMn.exe
%PROGRAMFILES%TelevisionFanatictpinst.dll
%PROGRAMFILES%TelevisionFanaticuabtn.dll
%PROGRAMFILES%TelevisionFanaticAppIntegrator64.exe
%PROGRAMFILES%TelevisionFanaticAppIntegratorStub64.dll
%PROGRAMFILES%TelevisionFanaticBOOTSTRAP.JS
%PROGRAMFILES%TelevisionFanaticffxtbr.jar
%PROGRAMFILES%TelevisionFanaticCHROME.MANIFEST
%PROGRAMFILES%TelevisionFanaticCREXT.DLL
%PROGRAMFILES%TelevisionFanaticCrExtP64.exe
%PROGRAMFILES%TelevisionFanaticDPNMNGR.DLL
%PROGRAMFILES%TelevisionFanaticEXEMANAGER.DLL
%PROGRAMFILES%TelevisionFanaticHpg64.dll
%PROGRAMFILES%TelevisionFanaticINSTALL.RDF
%PROGRAMFILES%TelevisionFanaticinstallKeys.js
%PROGRAMFILES%TelevisionFanaticLOGO.BMP
%PROGRAMFILES%TelevisionFanaticNP64Stub.dll
%PROGRAMFILES%TelevisionFanaticT8EXTEX.DLL
%PROGRAMFILES%TelevisionFanaticT8EXTPEX.DLL
%PROGRAMFILES%TelevisionFanaticT8HTML.DLL
%PROGRAMFILES%TelevisionFanaticT8RES.DLL
%PROGRAMFILES%TelevisionFanaticT8TICKER.DLL
%PROGRAMFILES%TelevisionFanaticVERIFY.DLL
%PROGRAMFILES%TelevisionFanaticEIPlug.dll
%PROGRAMFILES%TelevisionFanaticEZSETP.dll
%PROGRAMFILES%TelevisionFanaticNP64EISb.dll
%PROGRAMFILES%TelevisionFanatic%APPDATA%TelevisionFanatic
%PROGRAMFILES%TelevisionFanatic
%PROGRAMFILES%TelevisionFanaticEI
%PROGRAMFILES%TelevisionFanaticEITelevisionFanaticauxstb.dll
%PROGRAMFILES%TelevisionFanaticEITelevisionFanaticbar.dll
%PROGRAMFILES%TelevisionFanaticEITelevisionFanaticbarsvc.exe
%PROGRAMFILES%TelevisionFanaticEITelevisionFanaticbprtct.dll
%PROGRAMFILES%TelevisionFanaticEITelevisionFanaticbrmon.exe
%PROGRAMFILES%TelevisionFanaticEITelevisionFanaticbrstub.dll
%PROGRAMFILES%TelevisionFanaticEITelevisionFanaticdatact.dll
%PROGRAMFILES%TelevisionFanaticEITelevisionFanaticdlghk.dll
%PROGRAMFILES%TelevisionFanaticEITelevisionFanaticdyn.dll
%PROGRAMFILES%TelevisionFanaticEITelevisionFanaticfeedmg.dll
%PROGRAMFILES%TelevisionFanaticEITelevisionFanatichighin.exe
%PROGRAMFILES%TelevisionFanaticEITelevisionFanatichkstub.dll
%PROGRAMFILES%TelevisionFanaticEITelevisionFanatichtmlmu.dll
%PROGRAMFILES%TelevisionFanaticEITelevisionFanatichttpct.dll
%PROGRAMFILES%TelevisionFanaticEITelevisionFanaticidle.dll
%PROGRAMFILES%TelevisionFanaticEITelevisionFanaticieovr.dll
%PROGRAMFILES%TelevisionFanaticEITelevisionFanaticimpipe.exe
%PROGRAMFILES%TelevisionFanaticEITelevisionFanaticmedint.exe
%PROGRAMFILES%TelevisionFanaticEITelevisionFanaticmlbtn.dll
%PROGRAMFILES%TelevisionFanaticEITelevisionFanaticmsg.dll
%PROGRAMFILES%TelevisionFanaticEITelevisionFanaticPlugin.dll
%PROGRAMFILES%TelevisionFanaticEITelevisionFanaticradio.dll
%PROGRAMFILES%TelevisionFanaticEITelevisionFanaticregfft.dll
%PROGRAMFILES%TelevisionFanaticEITelevisionFanaticreghk.dll
%PROGRAMFILES%TelevisionFanaticEITelevisionFanaticregiet.dll
%PROGRAMFILES%TelevisionFanaticEITelevisionFanaticscript.dll
%PROGRAMFILES%TelevisionFanaticEITelevisionFanaticskin.dll
%PROGRAMFILES%TelevisionFanaticEITelevisionFanaticsknlcr.dll
%PROGRAMFILES%TelevisionFanaticEITelevisionFanaticskplay.exe
%PROGRAMFILES%TelevisionFanaticEITelevisionFanaticSrcAs.dll
%PROGRAMFILES%TelevisionFanaticEITelevisionFanaticSrchMn.exe
%PROGRAMFILES%TelevisionFanaticEITelevisionFanatictpinst.dll
%PROGRAMFILES%TelevisionFanaticEITelevisionFanaticuabtn.dll
%PROGRAMFILES%TelevisionFanaticEITelevisionFanaticAppIntegrator64.exe
%PROGRAMFILES%TelevisionFanaticEITelevisionFanaticAppIntegratorStub64.dll
%PROGRAMFILES%TelevisionFanaticEITelevisionFanaticBOOTSTRAP.JS
%PROGRAMFILES%TelevisionFanaticEITelevisionFanaticffxtbr.jar
%PROGRAMFILES%TelevisionFanaticEITelevisionFanaticCHROME.MANIFEST
%PROGRAMFILES%TelevisionFanaticEITelevisionFanaticCREXT.DLL
%PROGRAMFILES%TelevisionFanaticEITelevisionFanaticCrExtP64.exe
%PROGRAMFILES%TelevisionFanaticEITelevisionFanaticDPNMNGR.DLL
%PROGRAMFILES%TelevisionFanaticEITelevisionFanaticEXEMANAGER.DLL
%PROGRAMFILES%TelevisionFanaticEITelevisionFanaticHpg64.dll
%PROGRAMFILES%TelevisionFanaticEITelevisionFanaticINSTALL.RDF
%PROGRAMFILES%TelevisionFanaticEITelevisionFanaticinstallKeys.js
%PROGRAMFILES%TelevisionFanaticEITelevisionFanaticLOGO.BMP
%PROGRAMFILES%TelevisionFanaticEITelevisionFanaticNP64Stub.dll
%PROGRAMFILES%TelevisionFanaticEITelevisionFanaticT8EXTEX.DLL
%PROGRAMFILES%TelevisionFanaticEITelevisionFanaticT8EXTPEX.DLL
%PROGRAMFILES%TelevisionFanaticEITelevisionFanaticT8HTML.DLL
%PROGRAMFILES%TelevisionFanaticEITelevisionFanaticT8RES.DLL
%PROGRAMFILES%TelevisionFanaticEITelevisionFanaticT8TICKER.DLL
%PROGRAMFILES%TelevisionFanaticEITelevisionFanaticVERIFY.DLL
%PROGRAMFILES%TelevisionFanaticEITelevisionFanaticEIPlug.dll
%PROGRAMFILES%TelevisionFanaticEITelevisionFanaticEZSETP.dll
%PROGRAMFILES%TelevisionFanaticEITelevisionFanaticNP64EISb.dll
%PROGRAMFILES%TelevisionFanaticEITelevisionFanatic%#MANIFEST#%18369B.exe
%PROGRAMFILES%TelevisionFanaticauxstb.dll
%PROGRAMFILES%TelevisionFanaticbar.dll
%PROGRAMFILES%TelevisionFanaticbarsvc.exe
%PROGRAMFILES%TelevisionFanaticbprtct.dll
%PROGRAMFILES%TelevisionFanaticbrmon.exe
%PROGRAMFILES%TelevisionFanaticbrstub.dll
%PROGRAMFILES%TelevisionFanaticdatact.dll
%PROGRAMFILES%TelevisionFanaticdlghk.dll
%PROGRAMFILES%TelevisionFanaticdyn.dll
%PROGRAMFILES%TelevisionFanaticfeedmg.dll
%PROGRAMFILES%TelevisionFanatichighin.exe
%PROGRAMFILES%TelevisionFanatichkstub.dll
%PROGRAMFILES%TelevisionFanatichtmlmu.dll
%PROGRAMFILES%TelevisionFanatichttpct.dll
%PROGRAMFILES%TelevisionFanaticidle.dll
%PROGRAMFILES%TelevisionFanaticieovr.dll
%PROGRAMFILES%TelevisionFanaticimpipe.exe
%PROGRAMFILES%TelevisionFanaticmedint.exe
%PROGRAMFILES%TelevisionFanaticmlbtn.dll
%PROGRAMFILES%TelevisionFanaticmsg.dll
%PROGRAMFILES%TelevisionFanaticPlugin.dll
%PROGRAMFILES%TelevisionFanaticradio.dll
%PROGRAMFILES%TelevisionFanaticregfft.dll
%PROGRAMFILES%TelevisionFanaticreghk.dll
%PROGRAMFILES%TelevisionFanaticregiet.dll
%PROGRAMFILES%TelevisionFanaticscript.dll
%PROGRAMFILES%TelevisionFanaticskin.dll
%PROGRAMFILES%TelevisionFanaticsknlcr.dll
%PROGRAMFILES%TelevisionFanaticskplay.exe
%PROGRAMFILES%TelevisionFanaticSrcAs.dll
%PROGRAMFILES%TelevisionFanaticSrchMn.exe
%PROGRAMFILES%TelevisionFanatictpinst.dll
%PROGRAMFILES%TelevisionFanaticuabtn.dll
%PROGRAMFILES%TelevisionFanaticAppIntegrator64.exe
%PROGRAMFILES%TelevisionFanaticAppIntegratorStub64.dll
%PROGRAMFILES%TelevisionFanaticBOOTSTRAP.JS
%PROGRAMFILES%TelevisionFanaticffxtbr.jar
%PROGRAMFILES%TelevisionFanaticCHROME.MANIFEST
%PROGRAMFILES%TelevisionFanaticCREXT.DLL
%PROGRAMFILES%TelevisionFanaticCrExtP64.exe
%PROGRAMFILES%TelevisionFanaticDPNMNGR.DLL
%PROGRAMFILES%TelevisionFanaticEXEMANAGER.DLL
%PROGRAMFILES%TelevisionFanaticHpg64.dll
%PROGRAMFILES%TelevisionFanaticINSTALL.RDF
%PROGRAMFILES%TelevisionFanaticinstallKeys.js
%PROGRAMFILES%TelevisionFanaticLOGO.BMP
%PROGRAMFILES%TelevisionFanaticNP64Stub.dll
%PROGRAMFILES%TelevisionFanaticT8EXTEX.DLL
%PROGRAMFILES%TelevisionFanaticT8EXTPEX.DLL
%PROGRAMFILES%TelevisionFanaticT8HTML.DLL
%PROGRAMFILES%TelevisionFanaticT8RES.DLL
%PROGRAMFILES%TelevisionFanaticT8TICKER.DLL
%PROGRAMFILES%TelevisionFanaticVERIFY.DLL
%PROGRAMFILES%TelevisionFanaticEIPlug.dll
%PROGRAMFILES%TelevisionFanaticEZSETP.dll
%PROGRAMFILES%TelevisionFanaticNP64EISb.dll
%PROGRAMFILES%TelevisionFanatic%#MANIFEST#%18369B.exe
%APPDATA%TelevisionFanaticauxstb.dll
%APPDATA%TelevisionFanaticbar.dll
%APPDATA%TelevisionFanaticbarsvc.exe
%APPDATA%TelevisionFanaticbprtct.dll
%APPDATA%TelevisionFanaticbrmon.exe
%APPDATA%TelevisionFanaticbrstub.dll
%APPDATA%TelevisionFanaticdatact.dll
%APPDATA%TelevisionFanaticdlghk.dll
%APPDATA%TelevisionFanaticdyn.dll
%APPDATA%TelevisionFanaticfeedmg.dll
%APPDATA%TelevisionFanatichighin.exe
%APPDATA%TelevisionFanatichkstub.dll
%APPDATA%TelevisionFanatichtmlmu.dll
%APPDATA%TelevisionFanatichttpct.dll
%APPDATA%TelevisionFanaticidle.dll
%APPDATA%TelevisionFanaticieovr.dll
%APPDATA%TelevisionFanaticimpipe.exe
%APPDATA%TelevisionFanaticmedint.exe
%APPDATA%TelevisionFanaticmlbtn.dll
%APPDATA%TelevisionFanaticmsg.dll
%APPDATA%TelevisionFanaticPlugin.dll
%APPDATA%TelevisionFanaticradio.dll
%APPDATA%TelevisionFanaticregfft.dll
%APPDATA%TelevisionFanaticreghk.dll
%APPDATA%TelevisionFanaticregiet.dll
%APPDATA%TelevisionFanaticscript.dll
%APPDATA%TelevisionFanaticskin.dll
%APPDATA%TelevisionFanaticsknlcr.dll
%APPDATA%TelevisionFanaticskplay.exe
%APPDATA%TelevisionFanaticSrcAs.dll
%APPDATA%TelevisionFanaticSrchMn.exe
%APPDATA%TelevisionFanatictpinst.dll
%APPDATA%TelevisionFanaticuabtn.dll
%APPDATA%TelevisionFanaticAppIntegrator64.exe
%APPDATA%TelevisionFanaticAppIntegratorStub64.dll
%APPDATA%TelevisionFanaticBOOTSTRAP.JS
%APPDATA%TelevisionFanaticffxtbr.jar
%APPDATA%TelevisionFanaticCHROME.MANIFEST
%APPDATA%TelevisionFanaticCREXT.DLL
%APPDATA%TelevisionFanaticCrExtP64.exe
%APPDATA%TelevisionFanaticDPNMNGR.DLL
%APPDATA%TelevisionFanaticEXEMANAGER.DLL
%APPDATA%TelevisionFanaticHpg64.dll
%APPDATA%TelevisionFanaticINSTALL.RDF
%APPDATA%TelevisionFanaticinstallKeys.js
%APPDATA%TelevisionFanaticLOGO.BMP
%APPDATA%TelevisionFanaticNP64Stub.dll
%APPDATA%TelevisionFanaticT8EXTEX.DLL
%APPDATA%TelevisionFanaticT8EXTPEX.DLL
%APPDATA%TelevisionFanaticT8HTML.DLL
%APPDATA%TelevisionFanaticT8RES.DLL
%APPDATA%TelevisionFanaticT8TICKER.DLL
%APPDATA%TelevisionFanaticVERIFY.DLL
%APPDATA%TelevisionFanaticEIPlug.dll
%APPDATA%TelevisionFanaticEZSETP.dll
%APPDATA%TelevisionFanaticNP64EISb.dll
%APPDATA%TelevisionFanatic%#MANIFEST#%18369B.exe

Key HKLMSOFTWARETelevisionFanatic
Key HKLMSOFTWAREMicrosoftWindowsCurrentVersionUninstallTelevisionFanaticbar Uninstall Internet Explorer
Key HKLMSOFTWAREMicrosoftWindowsCurrentVersionUninstallTelevisionFanaticbar Uninstall Firefox
Key HKLMSOFTWAREMicrosoftWindowsCurrentVersionExplorerBrowser Helper Objectscb41fc95-f1b3-4797-8bb6-1012ff62abba
Key HKLMSOFTWAREMicrosoftWindowsCurrentVersionExplorerBrowser Helper Objects5d79f641-c168-40df-a32f-bacea7509e75
Key HKLMSOFTWAREClassesTelevisionFanatic.XMLSessionPlugin.1CLSID
Key HKLMSOFTWAREClassesTelevisionFanatic.XMLSessionPlugin.1
Key HKLMSOFTWAREClassesTelevisionFanatic.XMLSessionPluginCurVer
Key HKLMSOFTWAREClassesTelevisionFanatic.XMLSessionPluginCLSID
Key HKLMSOFTWAREClassesTelevisionFanatic.XMLSessionPlugin
Key HKLMSOFTWAREClassesTelevisionFanatic.UrlAlertButton.1CLSID
Key HKLMSOFTWAREClassesTelevisionFanatic.UrlAlertButton.1
Key HKLMSOFTWAREClassesTelevisionFanatic.UrlAlertButtonCurVer
Key HKLMSOFTWAREClassesTelevisionFanatic.UrlAlertButtonCLSID
Key HKLMSOFTWAREClassesTelevisionFanatic.UrlAlertButton
Key HKLMSOFTWAREClassesTelevisionFanatic.ToolbarProtector.1CLSID
Key HKLMSOFTWAREClassesTelevisionFanatic.ToolbarProtector.1
Key HKLMSOFTWAREClassesTelevisionFanatic.ToolbarProtectorCurVer
Key HKLMSOFTWAREClassesTelevisionFanatic.ToolbarProtectorCLSID
Key HKLMSOFTWAREClassesTelevisionFanatic.ToolbarProtector
Key HKLMSOFTWAREClassesTelevisionFanatic.ThirdPartyInstaller.1CLSID
Key HKLMSOFTWAREClassesTelevisionFanatic.ThirdPartyInstaller.1
Key HKLMSOFTWAREClassesTelevisionFanatic.ThirdPartyInstallerCurVer
Key HKLMSOFTWAREClassesTelevisionFanatic.ThirdPartyInstallerCLSID
Key HKLMSOFTWAREClassesTelevisionFanatic.ThirdPartyInstaller
Key HKLMSOFTWAREClassesTelevisionFanatic.SkinLauncherSettings.1CLSID
Key HKLMSOFTWAREClassesTelevisionFanatic.SkinLauncherSettings.1
Key HKLMSOFTWAREClassesTelevisionFanatic.SkinLauncherSettingsCurVer
Key HKLMSOFTWAREClassesTelevisionFanatic.SkinLauncherSettingsCLSID
Key HKLMSOFTWAREClassesTelevisionFanatic.SkinLauncherSettings
Key HKLMSOFTWAREClassesTelevisionFanatic.SkinLauncher.1CLSID
Key HKLMSOFTWAREClassesTelevisionFanatic.SkinLauncher.1
Key HKLMSOFTWAREClassesTelevisionFanatic.SkinLauncherCurVer
Key HKLMSOFTWAREClassesTelevisionFanatic.SkinLauncherCLSID
Key HKLMSOFTWAREClassesTelevisionFanatic.SkinLauncher
Key HKLMSOFTWAREClassesTelevisionFanatic.SettingsPlugin.1CLSID
Key HKLMSOFTWAREClassesTelevisionFanatic.SettingsPlugin.1
Key HKLMSOFTWAREClassesTelevisionFanatic.SettingsPluginCurVer
Key HKLMSOFTWAREClassesTelevisionFanatic.SettingsPluginCLSID
Key HKLMSOFTWAREClassesTelevisionFanatic.SettingsPlugin
Key HKLMSOFTWAREClassesTelevisionFanatic.ScriptButton.1CLSID
Key HKLMSOFTWAREClassesTelevisionFanatic.ScriptButton.1
Key HKLMSOFTWAREClassesTelevisionFanatic.ScriptButtonCurVer
Key HKLMSOFTWAREClassesTelevisionFanatic.ScriptButtonCLSID
Key HKLMSOFTWAREClassesTelevisionFanatic.ScriptButton
Key HKLMSOFTWAREClassesTelevisionFanatic.RadioSettings.1CLSID
Key HKLMSOFTWAREClassesTelevisionFanatic.RadioSettings.1
Key HKLMSOFTWAREClassesTelevisionFanatic.RadioSettingsCurVer
Key HKLMSOFTWAREClassesTelevisionFanatic.RadioSettingsCLSID
Key HKLMSOFTWAREClassesTelevisionFanatic.RadioSettings
Key HKLMSOFTWAREClassesTelevisionFanatic.Radio.1CLSID
Key HKLMSOFTWAREClassesTelevisionFanatic.Radio.1
Key HKLMSOFTWAREClassesTelevisionFanatic.RadioCurVer
Key HKLMSOFTWAREClassesTelevisionFanatic.RadioCLSID
Key HKLMSOFTWAREClassesTelevisionFanatic.Radio
Key HKLMSOFTWAREClassesTelevisionFanatic.PseudoTransparentPlugin.1CLSID
Key HKLMSOFTWAREClassesTelevisionFanatic.PseudoTransparentPlugin.1
Key HKLMSOFTWAREClassesTelevisionFanatic.PseudoTransparentPluginCurVer
Key HKLMSOFTWAREClassesTelevisionFanatic.PseudoTransparentPluginCLSID
Key HKLMSOFTWAREClassesTelevisionFanatic.PseudoTransparentPlugin
Key HKLMSOFTWAREClassesTelevisionFanatic.MultipleButton.1CLSID
Key HKLMSOFTWAREClassesTelevisionFanatic.MultipleButton.1
Key HKLMSOFTWAREClassesTelevisionFanatic.MultipleButtonCurVer
Key HKLMSOFTWAREClassesTelevisionFanatic.MultipleButtonCLSID
Key HKLMSOFTWAREClassesTelevisionFanatic.MultipleButton
Key HKLMSOFTWAREClassesTelevisionFanatic.HTMLPanel.1CLSID
Key HKLMSOFTWAREClassesTelevisionFanatic.HTMLPanel.1
Key HKLMSOFTWAREClassesTelevisionFanatic.HTMLPanelCurVer
Key HKLMSOFTWAREClassesTelevisionFanatic.HTMLPanelCLSID
Key HKLMSOFTWAREClassesTelevisionFanatic.HTMLPanel
Key HKLMSOFTWAREClassesTelevisionFanatic.HTMLMenu.1CLSID
Key HKLMSOFTWAREClassesTelevisionFanatic.HTMLMenu.1
Key HKLMSOFTWAREClassesTelevisionFanatic.HTMLMenuCurVer
Key HKLMSOFTWAREClassesTelevisionFanatic.HTMLMenuCLSID
Key HKLMSOFTWAREClassesTelevisionFanatic.HTMLMenu
Key HKLMSOFTWAREClassesTelevisionFanatic.FeedManager.1CLSID
Key HKLMSOFTWAREClassesTelevisionFanatic.FeedManager.1
Key HKLMSOFTWAREClassesTelevisionFanatic.FeedManagerCurVer
Key HKLMSOFTWAREClassesTelevisionFanatic.FeedManagerCLSID
Key HKLMSOFTWAREClassesTelevisionFanatic.FeedManager
Key HKLMSOFTWAREClassesTelevisionFanatic.DynamicBarButton.1CLSID
Key HKLMSOFTWAREClassesTelevisionFanatic.DynamicBarButton.1
Key HKLMSOFTWAREClassesTelevisionFanatic.DynamicBarButtonCurVer
Key HKLMSOFTWAREClassesTelevisionFanatic.DynamicBarButtonCLSID
Key HKLMSOFTWAREClassesTelevisionFanatic.DynamicBarButton18369B.exe
%APPDATA%TelevisionFanaticauxstb.dll
%APPDATA%TelevisionFanaticbar.dll
%APPDATA%TelevisionFanaticbarsvc.exe
%APPDATA%TelevisionFanaticbprtct.dll
%APPDATA%TelevisionFanaticbrmon.exe
%APPDATA%TelevisionFanaticbrstub.dll
%APPDATA%TelevisionFanaticdatact.dll
%APPDATA%TelevisionFanaticdlghk.dll
%APPDATA%TelevisionFanaticdyn.dll
%APPDATA%TelevisionFanaticfeedmg.dll
%APPDATA%TelevisionFanatichighin.exe
%APPDATA%TelevisionFanatichkstub.dll
%APPDATA%TelevisionFanatichtmlmu.dll
%APPDATA%TelevisionFanatichttpct.dll
%APPDATA%TelevisionFanaticidle.dll
%APPDATA%TelevisionFanaticieovr.dll
%APPDATA%TelevisionFanaticimpipe.exe
%APPDATA%TelevisionFanaticmedint.exe
%APPDATA%TelevisionFanaticmlbtn.dll
%APPDATA%TelevisionFanaticmsg.dll
%APPDATA%TelevisionFanaticPlugin.dll
%APPDATA%TelevisionFanaticradio.dll
%APPDATA%TelevisionFanaticregfft.dll
%APPDATA%TelevisionFanaticreghk.dll
%APPDATA%TelevisionFanaticregiet.dll
%APPDATA%TelevisionFanaticscript.dll
%APPDATA%TelevisionFanaticskin.dll
%APPDATA%TelevisionFanaticsknlcr.dll
%APPDATA%TelevisionFanaticskplay.exe
%APPDATA%TelevisionFanaticSrcAs.dll
%APPDATA%TelevisionFanaticSrchMn.exe
%APPDATA%TelevisionFanatictpinst.dll
%APPDATA%TelevisionFanaticuabtn.dll
%APPDATA%TelevisionFanaticAppIntegrator64.exe
%APPDATA%TelevisionFanaticAppIntegratorStub64.dll
%APPDATA%TelevisionFanaticBOOTSTRAP.JS
%APPDATA%TelevisionFanaticffxtbr.jar
%APPDATA%TelevisionFanaticCHROME.MANIFEST
%APPDATA%TelevisionFanaticCREXT.DLL
%APPDATA%TelevisionFanaticCrExtP64.exe
%APPDATA%TelevisionFanaticDPNMNGR.DLL
%APPDATA%TelevisionFanaticEXEMANAGER.DLL
%APPDATA%TelevisionFanaticHpg64.dll
%APPDATA%TelevisionFanaticINSTALL.RDF
%APPDATA%TelevisionFanaticinstallKeys.js
%APPDATA%TelevisionFanaticLOGO.BMP
%APPDATA%TelevisionFanaticNP64Stub.dll
%APPDATA%TelevisionFanaticT8EXTEX.DLL
%APPDATA%TelevisionFanaticT8EXTPEX.DLL
%APPDATA%TelevisionFanaticT8HTML.DLL
%APPDATA%TelevisionFanaticT8RES.DLL
%APPDATA%TelevisionFanaticT8TICKER.DLL
%APPDATA%TelevisionFanaticVERIFY.DLL
%APPDATA%TelevisionFanaticEIPlug.dll
%APPDATA%TelevisionFanaticEZSETP.dll
%APPDATA%TelevisionFanaticNP64EISb.dll
%APPDATA%TelevisionFanatic%APPDATA%TelevisionFanatic
%PROGRAMFILES%TelevisionFanatic
%PROGRAMFILES%TelevisionFanaticEI
%PROGRAMFILES%TelevisionFanaticEITelevisionFanaticauxstb.dll
%PROGRAMFILES%TelevisionFanaticEITelevisionFanaticbar.dll
%PROGRAMFILES%TelevisionFanaticEITelevisionFanaticbarsvc.exe
%PROGRAMFILES%TelevisionFanaticEITelevisionFanaticbprtct.dll
%PROGRAMFILES%TelevisionFanaticEITelevisionFanaticbrmon.exe
%PROGRAMFILES%TelevisionFanaticEITelevisionFanaticbrstub.dll
%PROGRAMFILES%TelevisionFanaticEITelevisionFanaticdatact.dll
%PROGRAMFILES%TelevisionFanaticEITelevisionFanaticdlghk.dll
%PROGRAMFILES%TelevisionFanaticEITelevisionFanaticdyn.dll
%PROGRAMFILES%TelevisionFanaticEITelevisionFanaticfeedmg.dll
%PROGRAMFILES%TelevisionFanaticEITelevisionFanatichighin.exe
%PROGRAMFILES%TelevisionFanaticEITelevisionFanatichkstub.dll
%PROGRAMFILES%TelevisionFanaticEITelevisionFanatichtmlmu.dll
%PROGRAMFILES%TelevisionFanaticEITelevisionFanatichttpct.dll
%PROGRAMFILES%TelevisionFanaticEITelevisionFanaticidle.dll
%PROGRAMFILES%TelevisionFanaticEITelevisionFanaticieovr.dll
%PROGRAMFILES%TelevisionFanaticEITelevisionFanaticimpipe.exe
%PROGRAMFILES%TelevisionFanaticEITelevisionFanaticmedint.exe
%PROGRAMFILES%TelevisionFanaticEITelevisionFanaticmlbtn.dll
%PROGRAMFILES%TelevisionFanaticEITelevisionFanaticmsg.dll
%PROGRAMFILES%TelevisionFanaticEITelevisionFanaticPlugin.dll
%PROGRAMFILES%TelevisionFanaticEITelevisionFanaticradio.dll
%PROGRAMFILES%TelevisionFanaticEITelevisionFanaticregfft.dll
%PROGRAMFILES%TelevisionFanaticEITelevisionFanaticreghk.dll
%PROGRAMFILES%TelevisionFanaticEITelevisionFanaticregiet.dll
%PROGRAMFILES%TelevisionFanaticEITelevisionFanaticscript.dll
%PROGRAMFILES%TelevisionFanaticEITelevisionFanaticskin.dll
%PROGRAMFILES%TelevisionFanaticEITelevisionFanaticsknlcr.dll
%PROGRAMFILES%TelevisionFanaticEITelevisionFanaticskplay.exe
%PROGRAMFILES%TelevisionFanaticEITelevisionFanaticSrcAs.dll
%PROGRAMFILES%TelevisionFanaticEITelevisionFanaticSrchMn.exe
%PROGRAMFILES%TelevisionFanaticEITelevisionFanatictpinst.dll
%PROGRAMFILES%TelevisionFanaticEITelevisionFanaticuabtn.dll
%PROGRAMFILES%TelevisionFanaticEITelevisionFanaticAppIntegrator64.exe
%PROGRAMFILES%TelevisionFanaticEITelevisionFanaticAppIntegratorStub64.dll
%PROGRAMFILES%TelevisionFanaticEITelevisionFanaticBOOTSTRAP.JS
%PROGRAMFILES%TelevisionFanaticEITelevisionFanaticffxtbr.jar
%PROGRAMFILES%TelevisionFanaticEITelevisionFanaticCHROME.MANIFEST
%PROGRAMFILES%TelevisionFanaticEITelevisionFanaticCREXT.DLL
%PROGRAMFILES%TelevisionFanaticEITelevisionFanaticCrExtP64.exe
%PROGRAMFILES%TelevisionFanaticEITelevisionFanaticDPNMNGR.DLL
%PROGRAMFILES%TelevisionFanaticEITelevisionFanaticEXEMANAGER.DLL
%PROGRAMFILES%TelevisionFanaticEITelevisionFanaticHpg64.dll
%PROGRAMFILES%TelevisionFanaticEITelevisionFanaticINSTALL.RDF
%PROGRAMFILES%TelevisionFanaticEITelevisionFanaticinstallKeys.js
%PROGRAMFILES%TelevisionFanaticEITelevisionFanaticLOGO.BMP
%PROGRAMFILES%TelevisionFanaticEITelevisionFanaticNP64Stub.dll
%PROGRAMFILES%TelevisionFanaticEITelevisionFanaticT8EXTEX.DLL
%PROGRAMFILES%TelevisionFanaticEITelevisionFanaticT8EXTPEX.DLL
%PROGRAMFILES%TelevisionFanaticEITelevisionFanaticT8HTML.DLL
%PROGRAMFILES%TelevisionFanaticEITelevisionFanaticT8RES.DLL
%PROGRAMFILES%TelevisionFanaticEITelevisionFanaticT8TICKER.DLL
%PROGRAMFILES%TelevisionFanaticEITelevisionFanaticVERIFY.DLL
%PROGRAMFILES%TelevisionFanaticEITelevisionFanaticEIPlug.dll
%PROGRAMFILES%TelevisionFanaticEITelevisionFanaticEZSETP.dll
%PROGRAMFILES%TelevisionFanaticEITelevisionFanaticNP64EISb.dll
%PROGRAMFILES%TelevisionFanaticEITelevisionFanatic%#MANIFEST#%18369B.exe
%PROGRAMFILES%TelevisionFanaticauxstb.dll
%PROGRAMFILES%TelevisionFanaticbar.dll
%PROGRAMFILES%TelevisionFanaticbarsvc.exe
%PROGRAMFILES%TelevisionFanaticbprtct.dll
%PROGRAMFILES%TelevisionFanaticbrmon.exe
%PROGRAMFILES%TelevisionFanaticbrstub.dll
%PROGRAMFILES%TelevisionFanaticdatact.dll
%PROGRAMFILES%TelevisionFanaticdlghk.dll
%PROGRAMFILES%TelevisionFanaticdyn.dll
%PROGRAMFILES%TelevisionFanaticfeedmg.dll
%PROGRAMFILES%TelevisionFanatichighin.exe
%PROGRAMFILES%TelevisionFanatichkstub.dll
%PROGRAMFILES%TelevisionFanatichtmlmu.dll
%PROGRAMFILES%TelevisionFanatichttpct.dll
%PROGRAMFILES%TelevisionFanaticidle.dll
%PROGRAMFILES%TelevisionFanaticieovr.dll
%PROGRAMFILES%TelevisionFanaticimpipe.exe
%PROGRAMFILES%TelevisionFanaticmedint.exe
%PROGRAMFILES%TelevisionFanaticmlbtn.dll
%PROGRAMFILES%TelevisionFanaticmsg.dll
%PROGRAMFILES%TelevisionFanaticPlugin.dll
%PROGRAMFILES%TelevisionFanaticradio.dll
%PROGRAMFILES%TelevisionFanaticregfft.dll
%PROGRAMFILES%TelevisionFanaticreghk.dll
%PROGRAMFILES%TelevisionFanaticregiet.dll
%PROGRAMFILES%TelevisionFanaticscript.dll
%PROGRAMFILES%TelevisionFanaticskin.dll
%PROGRAMFILES%TelevisionFanaticsknlcr.dll
%PROGRAMFILES%TelevisionFanaticskplay.exe
%PROGRAMFILES%TelevisionFanaticSrcAs.dll
%PROGRAMFILES%TelevisionFanaticSrchMn.exe
%PROGRAMFILES%TelevisionFanatictpinst.dll
%PROGRAMFILES%TelevisionFanaticuabtn.dll
%PROGRAMFILES%TelevisionFanaticAppIntegrator64.exe
%PROGRAMFILES%TelevisionFanaticAppIntegratorStub64.dll
%PROGRAMFILES%TelevisionFanaticBOOTSTRAP.JS
%PROGRAMFILES%TelevisionFanaticffxtbr.jar
%PROGRAMFILES%TelevisionFanaticCHROME.MANIFEST
%PROGRAMFILES%TelevisionFanaticCREXT.DLL
%PROGRAMFILES%TelevisionFanaticCrExtP64.exe
%PROGRAMFILES%TelevisionFanaticDPNMNGR.DLL
%PROGRAMFILES%TelevisionFanaticEXEMANAGER.DLL
%PROGRAMFILES%TelevisionFanaticHpg64.dll
%PROGRAMFILES%TelevisionFanaticINSTALL.RDF
%PROGRAMFILES%TelevisionFanaticinstallKeys.js
%PROGRAMFILES%TelevisionFanaticLOGO.BMP
%PROGRAMFILES%TelevisionFanaticNP64Stub.dll
%PROGRAMFILES%TelevisionFanaticT8EXTEX.DLL
%PROGRAMFILES%TelevisionFanaticT8EXTPEX.DLL
%PROGRAMFILES%TelevisionFanaticT8HTML.DLL
%PROGRAMFILES%TelevisionFanaticT8RES.DLL
%PROGRAMFILES%TelevisionFanaticT8TICKER.DLL
%PROGRAMFILES%TelevisionFanaticVERIFY.DLL
%PROGRAMFILES%TelevisionFanaticEIPlug.dll
%PROGRAMFILES%TelevisionFanaticEZSETP.dll
%PROGRAMFILES%TelevisionFanaticNP64EISb.dll
%PROGRAMFILES%TelevisionFanatic%#MANIFEST#%18369B.exe
%APPDATA%TelevisionFanaticauxstb.dll
%APPDATA%TelevisionFanaticbar.dll
%APPDATA%TelevisionFanaticbarsvc.exe
%APPDATA%TelevisionFanaticbprtct.dll
%APPDATA%TelevisionFanaticbrmon.exe
%APPDATA%TelevisionFanaticbrstub.dll
%APPDATA%TelevisionFanaticdatact.dll
%APPDATA%TelevisionFanaticdlghk.dll
%APPDATA%TelevisionFanaticdyn.dll
%APPDATA%TelevisionFanaticfeedmg.dll
%APPDATA%TelevisionFanatichighin.exe
%APPDATA%TelevisionFanatichkstub.dll
%APPDATA%TelevisionFanatichtmlmu.dll
%APPDATA%TelevisionFanatichttpct.dll
%APPDATA%TelevisionFanaticidle.dll
%APPDATA%TelevisionFanaticieovr.dll
%APPDATA%TelevisionFanaticimpipe.exe
%APPDATA%TelevisionFanaticmedint.exe
%APPDATA%TelevisionFanaticmlbtn.dll
%APPDATA%TelevisionFanaticmsg.dll
%APPDATA%TelevisionFanaticPlugin.dll
%APPDATA%TelevisionFanaticradio.dll
%APPDATA%TelevisionFanaticregfft.dll
%APPDATA%TelevisionFanaticreghk.dll
%APPDATA%TelevisionFanaticregiet.dll
%APPDATA%TelevisionFanaticscript.dll
%APPDATA%TelevisionFanaticskin.dll
%APPDATA%TelevisionFanaticsknlcr.dll
%APPDATA%TelevisionFanaticskplay.exe
%APPDATA%TelevisionFanaticSrcAs.dll
%APPDATA%TelevisionFanaticSrchMn.exe
%APPDATA%TelevisionFanatictpinst.dll
%APPDATA%TelevisionFanaticuabtn.dll
%APPDATA%TelevisionFanaticAppIntegrator64.exe
%APPDATA%TelevisionFanaticAppIntegratorStub64.dll
%APPDATA%TelevisionFanaticBOOTSTRAP.JS
%APPDATA%TelevisionFanaticffxtbr.jar
%APPDATA%TelevisionFanaticCHROME.MANIFEST
%APPDATA%TelevisionFanaticCREXT.DLL
%APPDATA%TelevisionFanaticCrExtP64.exe
%APPDATA%TelevisionFanaticDPNMNGR.DLL
%APPDATA%TelevisionFanaticEXEMANAGER.DLL
%APPDATA%TelevisionFanaticHpg64.dll
%APPDATA%TelevisionFanaticINSTALL.RDF
%APPDATA%TelevisionFanaticinstallKeys.js
%APPDATA%TelevisionFanaticLOGO.BMP
%APPDATA%TelevisionFanaticNP64Stub.dll
%APPDATA%TelevisionFanaticT8EXTEX.DLL
%APPDATA%TelevisionFanaticT8EXTPEX.DLL
%APPDATA%TelevisionFanaticT8HTML.DLL
%APPDATA%TelevisionFanaticT8RES.DLL
%APPDATA%TelevisionFanaticT8TICKER.DLL
%APPDATA%TelevisionFanaticVERIFY.DLL
%APPDATA%TelevisionFanaticEIPlug.dll
%APPDATA%TelevisionFanaticEZSETP.dll
%APPDATA%TelevisionFanaticNP64EISb.dll
%APPDATA%TelevisionFanatic%#MANIFEST#%18369B.exe

Key HKLMSOFTWARETelevisionFanatic
Key HKLMSOFTWAREMicrosoftWindowsCurrentVersionUninstallTelevisionFanaticbar Uninstall Internet Explorer
Key HKLMSOFTWAREMicrosoftWindowsCurrentVersionUninstallTelevisionFanaticbar Uninstall Firefox
Key HKLMSOFTWAREMicrosoftWindowsCurrentVersionExplorerBrowser Helper Objectscb41fc95-f1b3-4797-8bb6-1012ff62abba
Key HKLMSOFTWAREMicrosoftWindowsCurrentVersionExplorerBrowser Helper Objects5d79f641-c168-40df-a32f-bacea7509e75
Key HKLMSOFTWAREClassesTelevisionFanatic.XMLSessionPlugin.1CLSID
Key HKLMSOFTWAREClassesTelevisionFanatic.XMLSessionPlugin.1
Key HKLMSOFTWAREClassesTelevisionFanatic.XMLSessionPluginCurVer
Key HKLMSOFTWAREClassesTelevisionFanatic.XMLSessionPluginCLSID
Key HKLMSOFTWAREClassesTelevisionFanatic.XMLSessionPlugin
Key HKLMSOFTWAREClassesTelevisionFanatic.UrlAlertButton.1CLSID
Key HKLMSOFTWAREClassesTelevisionFanatic.UrlAlertButton.1
Key HKLMSOFTWAREClassesTelevisionFanatic.UrlAlertButtonCurVer
Key HKLMSOFTWAREClassesTelevisionFanatic.UrlAlertButtonCLSID
Key HKLMSOFTWAREClassesTelevisionFanatic.UrlAlertButton
Key HKLMSOFTWAREClassesTelevisionFanatic.ToolbarProtector.1CLSID
Key HKLMSOFTWAREClassesTelevisionFanatic.ToolbarProtector.1
Key HKLMSOFTWAREClassesTelevisionFanatic.ToolbarProtectorCurVer
Key HKLMSOFTWAREClassesTelevisionFanatic.ToolbarProtectorCLSID
Key HKLMSOFTWAREClassesTelevisionFanatic.ToolbarProtector
Key HKLMSOFTWAREClassesTelevisionFanatic.ThirdPartyInstaller.1CLSID
Key HKLMSOFTWAREClassesTelevisionFanatic.ThirdPartyInstaller.1
Key HKLMSOFTWAREClassesTelevisionFanatic.ThirdPartyInstallerCurVer
Key HKLMSOFTWAREClassesTelevisionFanatic.ThirdPartyInstallerCLSID
Key HKLMSOFTWAREClassesTelevisionFanatic.ThirdPartyInstaller
Key HKLMSOFTWAREClassesTelevisionFanatic.SkinLauncherSettings.1CLSID
Key HKLMSOFTWAREClassesTelevisionFanatic.SkinLauncherSettings.1
Key HKLMSOFTWAREClassesTelevisionFanatic.SkinLauncherSettingsCurVer
Key HKLMSOFTWAREClassesTelevisionFanatic.SkinLauncherSettingsCLSID
Key HKLMSOFTWAREClassesTelevisionFanatic.SkinLauncherSettings
Key HKLMSOFTWAREClassesTelevisionFanatic.SkinLauncher.1CLSID
Key HKLMSOFTWAREClassesTelevisionFanatic.SkinLauncher.1
Key HKLMSOFTWAREClassesTelevisionFanatic.SkinLauncherCurVer
Key HKLMSOFTWAREClassesTelevisionFanatic.SkinLauncherCLSID
Key HKLMSOFTWAREClassesTelevisionFanatic.SkinLauncher
Key HKLMSOFTWAREClassesTelevisionFanatic.SettingsPlugin.1CLSID
Key HKLMSOFTWAREClassesTelevisionFanatic.SettingsPlugin.1
Key HKLMSOFTWAREClassesTelevisionFanatic.SettingsPluginCurVer
Key HKLMSOFTWAREClassesTelevisionFanatic.SettingsPluginCLSID
Key HKLMSOFTWAREClassesTelevisionFanatic.SettingsPlugin
Key HKLMSOFTWAREClassesTelevisionFanatic.ScriptButton.1CLSID
Key HKLMSOFTWAREClassesTelevisionFanatic.ScriptButton.1
Key HKLMSOFTWAREClassesTelevisionFanatic.ScriptButtonCurVer
Key HKLMSOFTWAREClassesTelevisionFanatic.ScriptButtonCLSID
Key HKLMSOFTWAREClassesTelevisionFanatic.ScriptButton
Key HKLMSOFTWAREClassesTelevisionFanatic.RadioSettings.1CLSID
Key HKLMSOFTWAREClassesTelevisionFanatic.RadioSettings.1
Key HKLMSOFTWAREClassesTelevisionFanatic.RadioSettingsCurVer
Key HKLMSOFTWAREClassesTelevisionFanatic.RadioSettingsCLSID
Key HKLMSOFTWAREClassesTelevisionFanatic.RadioSettings
Key HKLMSOFTWAREClassesTelevisionFanatic.Radio.1CLSID
Key HKLMSOFTWAREClassesTelevisionFanatic.Radio.1
Key HKLMSOFTWAREClassesTelevisionFanatic.RadioCurVer
Key HKLMSOFTWAREClassesTelevisionFanatic.RadioCLSID
Key HKLMSOFTWAREClassesTelevisionFanatic.Radio
Key HKLMSOFTWAREClassesTelevisionFanatic.PseudoTransparentPlugin.1CLSID
Key HKLMSOFTWAREClassesTelevisionFanatic.PseudoTransparentPlugin.1
Key HKLMSOFTWAREClassesTelevisionFanatic.PseudoTransparentPluginCurVer
Key HKLMSOFTWAREClassesTelevisionFanatic.PseudoTransparentPluginCLSID
Key HKLMSOFTWAREClassesTelevisionFanatic.PseudoTransparentPlugin
Key HKLMSOFTWAREClassesTelevisionFanatic.MultipleButton.1CLSID
Key HKLMSOFTWAREClassesTelevisionFanatic.MultipleButton.1
Key HKLMSOFTWAREClassesTelevisionFanatic.MultipleButtonCurVer
Key HKLMSOFTWAREClassesTelevisionFanatic.MultipleButtonCLSID
Key HKLMSOFTWAREClassesTelevisionFanatic.MultipleButton
Key HKLMSOFTWAREClassesTelevisionFanatic.HTMLPanel.1CLSID
Key HKLMSOFTWAREClassesTelevisionFanatic.HTMLPanel.1
Key HKLMSOFTWAREClassesTelevisionFanatic.HTMLPanelCurVer
Key HKLMSOFTWAREClassesTelevisionFanatic.HTMLPanelCLSID
Key HKLMSOFTWAREClassesTelevisionFanatic.HTMLPanel
Key HKLMSOFTWAREClassesTelevisionFanatic.HTMLMenu.1CLSID
Key HKLMSOFTWAREClassesTelevisionFanatic.HTMLMenu.1
Key HKLMSOFTWAREClassesTelevisionFanatic.HTMLMenuCurVer
Key HKLMSOFTWAREClassesTelevisionFanatic.HTMLMenuCLSID
Key HKLMSOFTWAREClassesTelevisionFanatic.HTMLMenu
Key HKLMSOFTWAREClassesTelevisionFanatic.FeedManager.1CLSID
Key HKLMSOFTWAREClassesTelevisionFanatic.FeedManager.1
Key HKLMSOFTWAREClassesTelevisionFanatic.FeedManagerCurVer
Key HKLMSOFTWAREClassesTelevisionFanatic.FeedManagerCLSID
Key HKLMSOFTWAREClassesTelevisionFanatic.FeedManager
Key HKLMSOFTWAREClassesTelevisionFanatic.DynamicBarButton.1CLSID
Key HKLMSOFTWAREClassesTelevisionFanatic.DynamicBarButton.1
Key HKLMSOFTWAREClassesTelevisionFanatic.DynamicBarButtonCurVer
Key HKLMSOFTWAREClassesTelevisionFanatic.DynamicBarButtonCLSID
Key HKLMSOFTWAREClassesTelevisionFanatic.DynamicBarButton18369B.exe

Key HKLMSOFTWARETelevisionFanatic
Key HKLMSOFTWAREMicrosoftWindowsCurrentVersionUninstallTelevisionFanaticbar Uninstall Internet Explorer
Key HKLMSOFTWAREMicrosoftWindowsCurrentVersionUninstallTelevisionFanaticbar Uninstall Firefox
Key HKLMSOFTWAREMicrosoftWindowsCurrentVersionExplorerBrowser Helper Objectscb41fc95-f1b3-4797-8bb6-1012ff62abba
Key HKLMSOFTWAREMicrosoftWindowsCurrentVersionExplorerBrowser Helper Objects5d79f641-c168-40df-a32f-bacea7509e75
Key HKLMSOFTWAREClassesTelevisionFanatic.XMLSessionPlugin.1CLSID
Key HKLMSOFTWAREClassesTelevisionFanatic.XMLSessionPlugin.1
Key HKLMSOFTWAREClassesTelevisionFanatic.XMLSessionPluginCurVer
Key HKLMSOFTWAREClassesTelevisionFanatic.XMLSessionPluginCLSID
Key HKLMSOFTWAREClassesTelevisionFanatic.XMLSessionPlugin
Key HKLMSOFTWAREClassesTelevisionFanatic.UrlAlertButton.1CLSID
Key HKLMSOFTWAREClassesTelevisionFanatic.UrlAlertButton.1
Key HKLMSOFTWAREClassesTelevisionFanatic.UrlAlertButtonCurVer
Key HKLMSOFTWAREClassesTelevisionFanatic.UrlAlertButtonCLSID
Key HKLMSOFTWAREClassesTelevisionFanatic.UrlAlertButton
Key HKLMSOFTWAREClassesTelevisionFanatic.ToolbarProtector.1CLSID
Key HKLMSOFTWAREClassesTelevisionFanatic.ToolbarProtector.1
Key HKLMSOFTWAREClassesTelevisionFanatic.ToolbarProtectorCurVer
Key HKLMSOFTWAREClassesTelevisionFanatic.ToolbarProtectorCLSID
Key HKLMSOFTWAREClassesTelevisionFanatic.ToolbarProtector
Key HKLMSOFTWAREClassesTelevisionFanatic.ThirdPartyInstaller.1CLSID
Key HKLMSOFTWAREClassesTelevisionFanatic.ThirdPartyInstaller.1
Key HKLMSOFTWAREClassesTelevisionFanatic.ThirdPartyInstallerCurVer
Key HKLMSOFTWAREClassesTelevisionFanatic.ThirdPartyInstallerCLSID
Key HKLMSOFTWAREClassesTelevisionFanatic.ThirdPartyInstaller
Key HKLMSOFTWAREClassesTelevisionFanatic.SkinLauncherSettings.1CLSID
Key HKLMSOFTWAREClassesTelevisionFanatic.SkinLauncherSettings.1
Key HKLMSOFTWAREClassesTelevisionFanatic.SkinLauncherSettingsCurVer
Key HKLMSOFTWAREClassesTelevisionFanatic.SkinLauncherSettingsCLSID
Key HKLMSOFTWAREClassesTelevisionFanatic.SkinLauncherSettings
Key HKLMSOFTWAREClassesTelevisionFanatic.SkinLauncher.1CLSID
Key HKLMSOFTWAREClassesTelevisionFanatic.SkinLauncher.1
Key HKLMSOFTWAREClassesTelevisionFanatic.SkinLauncherCurVer
Key HKLMSOFTWAREClassesTelevisionFanatic.SkinLauncherCLSID
Key HKLMSOFTWAREClassesTelevisionFanatic.SkinLauncher
Key HKLMSOFTWAREClassesTelevisionFanatic.SettingsPlugin.1CLSID
Key HKLMSOFTWAREClassesTelevisionFanatic.SettingsPlugin.1
Key HKLMSOFTWAREClassesTelevisionFanatic.SettingsPluginCurVer
Key HKLMSOFTWAREClassesTelevisionFanatic.SettingsPluginCLSID
Key HKLMSOFTWAREClassesTelevisionFanatic.SettingsPlugin
Key HKLMSOFTWAREClassesTelevisionFanatic.ScriptButton.1CLSID
Key HKLMSOFTWAREClassesTelevisionFanatic.ScriptButton.1
Key HKLMSOFTWAREClassesTelevisionFanatic.ScriptButtonCurVer
Key HKLMSOFTWAREClassesTelevisionFanatic.ScriptButtonCLSID
Key HKLMSOFTWAREClassesTelevisionFanatic.ScriptButton
Key HKLMSOFTWAREClassesTelevisionFanatic.RadioSettings.1CLSID
Key HKLMSOFTWAREClassesTelevisionFanatic.RadioSettings.1
Key HKLMSOFTWAREClassesTelevisionFanatic.RadioSettingsCurVer
Key HKLMSOFTWAREClassesTelevisionFanatic.RadioSettingsCLSID
Key HKLMSOFTWAREClassesTelevisionFanatic.RadioSettings
Key HKLMSOFTWAREClassesTelevisionFanatic.Radio.1CLSID
Key HKLMSOFTWAREClassesTelevisionFanatic.Radio.1
Key HKLMSOFTWAREClassesTelevisionFanatic.RadioCurVer
Key HKLMSOFTWAREClassesTelevisionFanatic.RadioCLSID
Key HKLMSOFTWAREClassesTelevisionFanatic.Radio
Key HKLMSOFTWAREClassesTelevisionFanatic.PseudoTransparentPlugin.1CLSID
Key HKLMSOFTWAREClassesTelevisionFanatic.PseudoTransparentPlugin.1
Key HKLMSOFTWAREClassesTelevisionFanatic.PseudoTransparentPluginCurVer
Key HKLMSOFTWAREClassesTelevisionFanatic.PseudoTransparentPluginCLSID
Key HKLMSOFTWAREClassesTelevisionFanatic.PseudoTransparentPlugin
Key HKLMSOFTWAREClassesTelevisionFanatic.MultipleButton.1CLSID
Key HKLMSOFTWAREClassesTelevisionFanatic.MultipleButton.1
Key HKLMSOFTWAREClassesTelevisionFanatic.MultipleButtonCurVer
Key HKLMSOFTWAREClassesTelevisionFanatic.MultipleButtonCLSID
Key HKLMSOFTWAREClassesTelevisionFanatic.MultipleButton
Key HKLMSOFTWAREClassesTelevisionFanatic.HTMLPanel.1CLSID
Key HKLMSOFTWAREClassesTelevisionFanatic.HTMLPanel.1
Key HKLMSOFTWAREClassesTelevisionFanatic.HTMLPanelCurVer
Key HKLMSOFTWAREClassesTelevisionFanatic.HTMLPanelCLSID
Key HKLMSOFTWAREClassesTelevisionFanatic.HTMLPanel
Key HKLMSOFTWAREClassesTelevisionFanatic.HTMLMenu.1CLSID
Key HKLMSOFTWAREClassesTelevisionFanatic.HTMLMenu.1
Key HKLMSOFTWAREClassesTelevisionFanatic.HTMLMenuCurVer
Key HKLMSOFTWAREClassesTelevisionFanatic.HTMLMenuCLSID
Key HKLMSOFTWAREClassesTelevisionFanatic.HTMLMenu
Key HKLMSOFTWAREClassesTelevisionFanatic.FeedManager.1CLSID
Key HKLMSOFTWAREClassesTelevisionFanatic.FeedManager.1
Key HKLMSOFTWAREClassesTelevisionFanatic.FeedManagerCurVer
Key HKLMSOFTWAREClassesTelevisionFanatic.FeedManagerCLSID
Key HKLMSOFTWAREClassesTelevisionFanatic.FeedManager
Key HKLMSOFTWAREClassesTelevisionFanatic.DynamicBarButton.1CLSID
Key HKLMSOFTWAREClassesTelevisionFanatic.DynamicBarButton.1
Key HKLMSOFTWAREClassesTelevisionFanatic.DynamicBarButtonCurVer
Key HKLMSOFTWAREClassesTelevisionFanatic.DynamicBarButtonCLSID
Key HKLMSOFTWAREClassesTelevisionFanatic.DynamicBarButton

Read More

What is Error Code 1309?

Error code 1309 is an error code that occurs when installing either Microsoft Office 2003 or Microsoft Office Project 2003.

This error code may hamper your ability to run and use applications associated with Microsoft Office. To ensure installation is successful, it is first advisable to fix this error code. Error 1309 is displayed in any one of the two formats illustrated below.

When installing Microsoft Office Project 2003, the error message may pop up as:

Error 1309. Error reading from file:    pathfilename.cab. Verify that the file exists and that you can access it.

When installing Microsoft Office 2003, the error message may appear in the following format:
Fatal Error During Installation

Solution

Error Causes

Error code 1309 message may appear during Microsoft Office installation due to several reasons. These include:

  • Problems in the Oclncore.opc file. Project 2003 uses this version of the file for program installation.
  • Lack of adequate use permission
  • The requested file was not found
  • Setup registry entries are modified in an unacceptable manner

To avoid inconvenience and access Microsoft Office 2003 or Microsoft Office Project 2003, it is recommended to fix the error immediately.

Further Information and Manual Repair

To resolve this error you don’t need to be a technical whiz. Here are some of the best, easiest, and proven do-it-yourself methods to resolve error 1309 on your computer screen instantly.

Method 1 — Change CacheLevel Settings

If the problem is related to Oclncore.opc file then try changing CacheLevel settings.

Follow these steps to work around this method.

  1. First, locate the PRJPRO*.XML file in the FILESSETUP folder of the Project 2003 installation source and then open this file in the Notepad.
  2. Also, make sure that you do not open the file as read-only and make sure that a checkmark is not displayed next to Word Wrap on the Format menu.
  3. The next step is to search the file for the following text string: OCLNCORE.OPC_1033.
  4. Now on the line where this string is located, change the CacheLevel=’1’ setting to the following CacheLevel=’3’ save the file back to the original location, and then quit Notepad.

After the changes are activated, try installing the software again on your system. If it installs successfully, then this means error 1309 is resolved. If the error still persists then try other given methods.

Method 2 — Configure security settings to get full permission

When the cause of error 1309 on your PC is related to lack of adequate permission issues, then configure security settings to resolve.

To do this, simply locate the folder on your installation drive.

Then right-click the folder and click Properties. On the Security tab, click edit and now make sure your user name is added to the list.

Grant required security permissions and then click OK to save changes.

After this, try installing Microsoft Office 2003 again on your system.

Method 3 — Copy the requested file from another source

If the error 1309 pops up because the requested file was not found, then try this method. Simply copy the file specified in the error to the destination directory.

For example, if the error shows data1.cab was not found, then copy this file from another source and paste it into the directory specified in the error description.

Method 4- Remove bad registry entries

Bad registry entries are responsible for registry setup modification. If this is the reason for error code 1309, then download Restoro.

This is a user-friendly PC Repair Tool embedded with a powerful registry cleaner. It scans and removes all bad and invalid entries accumulated in the registry. It cleans and repairs the registry resuming it back to its normal function.

Click here to download Restoro and repair error 1309 today.

Read More

If you are trying to upgrade your computer but encounter the Windows Update Error 0x800F081F – 0x20003 instead, then read on as this post will guide you in fixing this Windows Update error. This kind of error is commonly encountered when upgrading your copy of Windows 10 and is caused by errors with various developer-related settings that are being enabled in the system.

When you encounter Windows Update Error 0x800F081F – 0x20003, you will see either of these error messages:

“We couldn’t install Windows 10. The installation failed in the SAFE_OS phase with an error during INSTALL_UPDATES operation: Error 0x800F081F”

 “The installation failed in the Safe_OS phase with an error during apply_image operation: Error: 0x800f081f – 0x20003”

To fix this kind of Windows Update error, you need not use external programs but you can try to disable the Developer Mode, run the Windows Update troubleshooter or restart all the Windows Update-related services and components. For more details, refer to the options provided below.

Option 1 – Try to disable Developer Mode

You might have to disable Developer Mode to fix the Windows Update Error 0x800F081F – 0x20003. How? Refer to these steps:

  • Tap the Win + I keys on your keyboard to open the Settings app.
  • Next, go to Update & Security > For Developers.
  • From there, select the toggle for Sideload apps or Microsoft Store apps located on the right-side panel.
  • If you get any prompt, just click on Yes.
  • After that, navigate to Apps > Apps & features and then click on Optional features on the right-side panel.
  • Then scroll down to locate the Windows Developer Mode entry and select it and click on Uninstall.
  • Once you’re done uninstalling the Windows Developer Mode component, close the Settings app and restart your computer to apply the changes made.

Option 2 – Try to run the Windows Update Troubleshooter

You should also try to run the built-in Windows Update troubleshooter as it could help you resolve the Windows Update Error 0x800F081F – 0x20003. To run it, go to Settings and then select Troubleshoot from the options. From there, click on Windows Update and then click the “Run the troubleshooter” button. After that, follow the next on-screen instructions and you should be good to go.

Option 3 – Try restarting various Windows Update-related services and components

  • Tap the Win + X key combination and select Command Prompt (Admin) to open Command Prompt with admin privileges.
  • After opening Command Prompt, copy and paste each one of the commands listed below one by one and tap Enter right after you enter each command.
    • net stop wuauserv
    • net stop bits
    • net stop appidsvc
    • ren %systemroot%SoftwareDistribution SoftwareDistribution.bak
    • ren %systemroot%system32catroot2 catroot2.bak
  • Once you’ve entered all the commands given above, they will stop all the Windows Update services that are running on your computer as well as clear the SoftwareDistribution folder, and reset the Catroot2 folder. Now you have to start all these Windows Update services you’ve just stopped by executing the following commands:
    • net start wuauserv
    • net start bits
    • net start appidsvc
    • net start cryptsvc
  • After that, restart your computer and try to run the setup again, and see if the error is now fixed.

Read More

Logon.scr Application Error — What is it?

To understand Logon.scr application error, it is first important to understand the function of logon.scr. Logon.scr is an important file that is located in the Windows\System32 folder. It guarantees Windows systems stability.

Logon.scr application error occurs when logon.scr file gets corrupt. It is a common system error that can happen in most Windows platforms. It usually pops up during system start-ups and when trying to launch certain programs.

Some of the common systems of this error code include: system halt, freeze, no application icons are visible on the desktop, random blue screen of death and system performance decreases dramatically.

Solution

Error Causes

Two of the most common causes of logon.scr application error is:

  • Corrupted and damaged logon.scr file
  • Viral infection

It is advisable to fix this error code immediately because it leads to serious damages. It is fatal and can result in a system crash; therefore resolve it right away.

Further Information and Manual Repair

To resolve this issue on your computer you don’t have to spend hundreds of dollars to hire a professional for the job. The good news is that it can be repaired easily and does not require any technical expertise.

Here are some of the most effective and easy DIY methods to resolve the error on your screens.

Method 1 — Replace the Damaged and the Corrupted Logon.scr File

Whether the file gets corrupted or is accidentally deleted, the best way to fix the issue is to download the Logon.scr file again from a reliable website and install in the following location C:\Windows\System32.

Alternatively you can also get the file copy form another proper functioning computer by using flash drive if you don’t have an internet connection to download the logon.scr file online.

Method 2 — Restore Points by Applying System Restore of Windows

Another way to resolve this is to restore points to bring back your system to the previous state before the error occurred. To do this, simply click the start button and type ‘System Restore’.

Now click System Restore in the result and click next. Select the restore point in the list and click the next button to proceed. To activate changes reboot your PC.

Method 3 — Scan and Remove Viruses

If Logon.scr application error still persists, then it could be due to viruses. To resolve, install a powerful anti-virus. Scan your entire PC and remove viruses.

Method 4 — Repair the Registry

Corrupt and damaged Logon.scr file also triggers issues with the registry. DLL files and other important files like Logon.scr application files may get damage due to too many bad and invalid registry entries.

Registry stores all the activities performed on the PC including unnecessary files like junk files and cookies. If these are not removed timely, these files accumulate and corrupt important files. Therefore, to fix the error it is advisable to clean and repair the registry.

The best way to go about is to download Restoro. This is a user-friendly and multi-functional PC Fixer deployed with a registry cleaner. It scans for all registry errors and removes all the invalid entries. It cleans the registry and repairs the damaged files thereby resolving the issue in seconds.

Click here to download Restoro and resolve the Logon.scr application error now!

Read More

QuickLook app is one of the best options to preview files without opening them in Windows 10. It works similar to the Quick Look feature of macOS. This Microsoft Store app has some really interesting features. It lets you preview images, documents, and media files. Also, just a hotkey is needed to preview the content of a file. There is no interface for the app. Only a preview window is visible.

You can also expand the preview window to full size. Apart from that, it lets you keep the preview window on top of the other opened applications. For image files, it also provides the EXIF data.

After installing this app, just select some file that you want to preview, and press the Spacebar key. That’s it! The preview window will open immediately to view the file content.

If you would like to read more helpful articles and tips about various software and hardware visit errortools.com daily.

Read More

Copyright © 2023, ErrorTools. All Rights Reserved
Trademark: Microsoft Windows logos are registered trademarks of Microsoft. Disclaimer: ErrorTools.com is not affiliated with Microsoft, nor claims direct affiliation.
The information on this page is provided for information purposes only.

BSOD REGISTRY ERROR появляется вследствие проблем с чтением файла, на который ссылается реестр. Windows 10, 11 просто не в состоянии воспроизвести системный файл, необходимый ей для выполнения какой-либо задачи. Синий экран с этим кодом очень часто появляется не сразу, может возникать только в моменты простой или после определенного действия. Практически всегда нужно время и некоторые закономерности в этом отношении заметить легко. Вот все, что нам известно о BSOD с кодом REGISTRY_ERROR.

Причины ошибки

Синий экран смерти появляется либо по причине повреждения системного реестра, либо из-за неисправности некоторых файлов. Преимущественно речь идет о системных файлах. К примеру, очень часто это касается файла ntkrnlpa.exe, но далеко не всегда.

Как исправить BSOD?

Самое лучшее решение по совместительству и самое сложное. Для его реализации нужны дампы памяти, логи системы. К сожалению, научиться анализировать их достаточно сложно, здесь нужно профессиональная помощь. Однако нередко в сообщении с BSOD также указан проблемный файл, что может существенно облегчить работу. Возможно, это файл ntkrnlpa.exe. Если известен проблемный файл, рекомендуем сделать следующее:

  1. Загрузить систему в безопасном режиме.
  2. Найти проблемный файл и скопировать его на рабочий стол, а затем удалить. Возможно, для этого придется получить полномочия на управление (Свойства – Безопасность).
  3. Перезагрузить систему в обычном режиме. В процессе загрузки может появиться окно со сканированием системы, но его может и не быть.

Windows 10 умеет находить недостающие файлы и автоматически их восстанавливать. Это лучший вариант получить 100% рабочий, исправный и безопасный файл. Есть и негативная сторона вопроса – если удалить слишком важный элемент, система может не запуститься. В таком случае рекомендуем запустить восстановление Windows через установочный диск или флешку.

Еще один путь – просканировать системные файлы, есть высокая вероятность, что проблемный элемент будет найден и автоматически исправлен. В этом поможет серия команд DISM.exe /Online /Cleanup-image /Scanhealth, DISM.exe /Online /Cleanup-image /Restorehealth и sfc /scannow.

Не стоит исключать и вероятность того, что проблема в реестре. Можем попробовать запустить его восстановление через любую программу, специализирующуюся на подобном. Одна из самых популярных – CCleaner.

Без персональных данных системы нам весьма сложно сделать вывод, какой именно файл стал причиной BSOD REGISTRY ERROR. Однако ваш пользовательский опыт очень поможет нам и другим читателям. Просьба написать, на какие именно файлы ругается ваша Windows, удалось ли их исправить в автоматическом режиме.

Понравилась статья? Поделить с друзьями:
0 0 голоса
Рейтинг статьи
Подписаться
Уведомить о
guest

0 комментариев
Старые
Новые Популярные
Межтекстовые Отзывы
Посмотреть все комментарии
  • Самая легкая windows 10 для слабых компьютеров 32 бит активированная
  • Почему не отображается дисковод в моем компьютере windows 10 на компьютере
  • Песочница для windows 10 что это
  • Windows password default administrator password
  • Как найти сетевую папку на windows 10