
This article will serve as an informative guide and give you a clear understanding of how to perform silent or interactive installs and uninstalls of the Microsoft Remote Desktop (Microsoft Store App) using the Powershell App Deployment Toolkit. The PowerShell App Deployment Toolkit can be used to replace your WiseScript, VBScript and Batch wrapper scripts with one versatile, re-usable and extensible tool. This tool is an absolute must for Microsoft Endpoint Manager Configuration Manager (MEMCM) / (SCCM) Administrators or anyone who is responsible for packaging and deploying software.
How to Install the Microsoft Remote Desktop (Microsoft Store App) Using the PowerShell App Deployment Toolkit
- Download the Powershell App Deployment Toolkit 3.8.4:
- https://github.com/PSAppDeployToolkit/PSAppDeployToolkit/releases/download/3.8.4/PSAppDeployToolkit_v3.8.4.zip
- Download the zip file to a folder created at (C:\Downloads)
- Open Windows PowerShell by Right-Clicking on Windows PowerShell and selecting Run as Administrator
- Enter the following command to remove the Zone.Identifier:
Unblock-File -Path C:\Downloads\PSAppDeployToolkit_v3.8.4.zip
- Enter the following command to extract the contents of the zip file:
Expand-Archive -Path C:\Downloads\PSAppDeployToolkit_v3.8.4.zip -DestinationPath C:\Downloads\PADT
- Enter the following commands to copy the AppDeployToolkit & Files folder to “C:\Downloads\MSRemoteDesktopApp“:
Copy-Item -Path "C:\Downloads\PADT\Toolkit\AppDeployToolkit" -Destination "C:\Downloads\MSRemoteDesktopApp\AppDeployToolkit" -RecurseCopy-Item -Path "C:\Downloads\PADT\Toolkit\Files" -Destination "C:\Downloads\MSRemoteDesktopApp\Files"
You should now see the AppDeploymentToolkit folder with files & the empty Files folder at “C:\Downloads\MSRemoteDesktopApp”
Next we’ll want to download the Microsoft Remote Desktop (Microsoft Store App) & dependency files using PowerShell.
- Copy the PowerShell script below to “C:\Downloads” & name it Get_Store_Downloads.ps1
- Script Reference: https://flexxible.com/automating-msix-packaging-with-powershell/
#Requires -version 3
<#
.SYNOPSIS
Get links to Microsoft Store downloads and optionally download packages
.DESCRIPTION
Downloaded packages can be installed via Add-AppxPackage -Path
.PARAMETER packageFamilyName
A list of package family names to download
.PARAMETER name
A regular expression which will select the family package names for existing AppX package names that match
.PARAMETER packageTypeFilter
The types of package to download
.PARAMETER downloadFolder
The folder to download non-excluded files to. Will be created if does not exist. If not specified, files will not be downloaded
.PARAMETER ring
The release ring to download
.PARAMETER proxy
Proxy server to use
.PARAMETER excludeExtensions
List of file extensions to not download
.PARAMETER excluderegex
If download Links match this regular expression they will not be downloaded
.PARAMETER language
The language for downloading files
.PARAMETER force
Overwrite files which already exist
.PARAMETER all
Interrogate all local AppX packages rather than just those available to the user running the script (requires elevation). Use with -name
.EXAMPLE
Powershell.exe -ExecutionPolicy ByPass "&" '.\Get_Store_Downloads.ps1' -packageFamilyName Microsoft.RemoteDesktop_8wekyb3d8bbwe -downloadFolder C:\Downloads\MSRemoteDesktopApp\Files -excludeRegex 'arm' -force
Downloads the resources from the Microsoft Store for the Microsoft Remote Desktop App, excluding files for arm and arm64 architecture and save the files to C:\Downloads\MSRemoteDesktopApp\Files
.NOTES
Modification History:
2022/03/18 @guyrleech Initial public release
2022/03/29 modified by Jason Bergner
#>
<#
Copyright © 2022 Guy Leech
Permission is hereby granted, free of charge, to any person obtaining a copy of this software and associated documentation files (the “Software”), to deal in the Software without restriction,
including without limitation the rights to use, copy, modify, merge, publish, distribute, sublicense, and/or sell copies of the Software, and to permit persons to whom the Software is furnished to do so, subject to the following conditions:
The above copyright notice and this permission notice shall be included in all copies or substantial portions of the Software.
THE SOFTWARE IS PROVIDED “AS IS”, WITHOUT WARRANTY OF ANY KIND, EXPRESS OR IMPLIED, INCLUDING BUT NOT LIMITED TO THE WARRANTIES OF MERCHANTABILITY, FITNESS FOR A PARTICULAR PURPOSE AND NONINFRINGEMENT.
IN NO EVENT SHALL THE AUTHORS OR COPYRIGHT HOLDERS BE LIABLE FOR ANY CLAIM, DAMAGES OR OTHER LIABILITY, WHETHER IN AN ACTION OF CONTRACT, TORT OR OTHERWISE, ARISING FROM, OUT OF OR IN CONNECTION WITH THE SOFTWARE OR THE USE OR OTHER DEALINGS IN THE SOFTWARE.
#>
[CmdletBinding()]
Param
(
[Parameter(Mandatory=$true,ParameterSetName='Family')]
[string[]]$packageFamilyName ,
[Parameter(Mandatory=$true,ParameterSetName='Name')]
[string]$name ,
[Parameter(Mandatory=$false,ParameterSetName='Name')]
[string]$packageTypeFilter = 'All' ,
[string]$downloadFolder ,
[ValidateSet('Slow','Retail','Fast,','RP')]
[string]$ring = 'retail' ,
[string]$proxy ,
[string[]]$excludeExtensions = ('','blockmap','eappx','eappxbundle') ,
[string]$excludeRegex ,
[string]$language = 'en-US' ,
[switch]$force ,
[Parameter(Mandatory=$false,ParameterSetName='Name')]
[switch]$all
)
[hashtable]$proxyParameters = @{}
if( ! [string]::IsNullOrEmpty( $proxy ) )
{
$proxyServer = New-Object -TypeName 'System.Net.WebProxy'
$proxyServer.Address = [uri]$proxy
$proxyServer.UseDefaultCredentials = $true
[System.Net.WebRequest]::DefaultWebProxy = $proxyServer
$proxyParameters.Add( 'Proxy' , $proxy )
$proxyParameters.Add( 'ProxyUseDefaultCredentials' , $true )
Write-Verbose "Proxy set to $proxy"
}
##https://stackoverflow.com/questions/41897114/unexpected-error-occurred-running-a-simple-unauthorized-rest-query?rq=1
Add-Type -TypeDefinition @'
public class SSLHandler
{
public static System.Net.Security.RemoteCertificateValidationCallback GetSSLHandler()
{
return new System.Net.Security.RemoteCertificateValidationCallback((sender, certificate, chain, policyErrors) => { return true; });
}
}
'@
[System.Net.ServicePointManager]::ServerCertificateValidationCallback = [SSLHandler]::GetSSLHandler()
[Net.ServicePointManager]::SecurityProtocol = [Net.ServicePointManager]::SecurityProtocol -bor [System.Net.SecurityProtocolType]::Tls12
if( $PSCmdlet.ParameterSetName -eq 'Name' )
{
Import-Module -Name AppX -Verbose:$false
[array]$packages = @( Get-AppxPackage -AllUsers:$all -PackageTypeFilter $PackageTypeFilter | Where-Object PackageFamilyName -Match $name )
if( $null -eq $packages -or $packages.Count -eq 0 )
{
Throw "No existing AppX packages found matching $name"
}
$packageFamilyName = $packages | Select-Object -ExpandProperty PackageFamilyName -Unique
}
Write-Verbose -Message "Got $($packageFamilyName.Count) packages"
$webclient = $null
if( -Not [string]::IsNullOrEmpty( $downloadFolder ) )
{
if( -Not ( Test-Path -Path $downloadFolder -ErrorAction SilentlyContinue ) )
{
$null = New-Item -Path $downloadFolder -Force -ItemType Directory -ErrorAction Stop
}
if( -Not ( $webClient = New-Object -TypeName System.Net.WebClient ) )
{
Throw "Failed to create a System.Net.WebClient object"
}
}
[int]$count = 0
ForEach( $package in $packageFamilyName )
{
$count++
[string]$requestBody = "type=PackageFamilyName&url=$package&ring=$ring&lang=$language"
$response = $null
$session = $null
$response = Invoke-WebRequest -URI 'https://store.rg-adguard.net/api/GetFiles' -body $requestBody -Method Post -ContentType 'application/x-www-form-urlencoded' -SessionVariable session @proxyParameters
if( $response -and $response.PSObject.Properties[ 'links' ] -and $response.Links.Count -gt 0 )
{
##Write-Verbose -Message "$count / $($packageFamilyName.Count) : Got $($response.Links.Count) links for $requestBody"
ForEach( $link in ($response.Links | Where-Object href -match '^https?://' ))
{
[string]$extension = [System.IO.Path]::GetExtension( $link.innerText ) -replace '^\.'
if( $extension -in $excludeExtensions )
{
Write-Verbose -Message "Ignoring `"$($link.innerText)`" as extension $extension in exclude list"
}
elseif( -Not [string]::IsNullOrEmpty( $excludeRegex ) -and $link.innerText -match $excludeRegex )
{
Write-Verbose -Message "Ignoring `"$($link.innerText)`" as matches $excludeRegex"
}
else
{
$result = [pscustomobject]@{
'PackageFamilyName' = $package
'File' = $link.innertext
'Link' = $link.href
}
if( -Not [string]::IsNullOrEmpty( $downloadFolder ) )
{
[string]$destinationFile = Join-Path -Path $downloadFolder -ChildPath $link.InnerText
if( ( Test-Path -Path $destinationFile -ErrorAction SilentlyContinue) -and -Not $force )
{
Write-Warning -Message "Not downloading to `"$destinationFile`" as already exists - use -force to overwrite"
}
else
{
try
{
$webclient.DownloadFile( ( $link.href -replace '&' , '&' ) , $destinationFile )
if( $properties = Get-ItemProperty -Path $destinationFile )
{
Add-Member -InputObject $result -NotePropertyMembers @{
'Download' = $properties.FullName
'Size (KB)' = [math]::Round( $properties.Length / 1KB , 1 )
}
}
else
{
Write-Warning -Message "Unable to get file properties for $destinationFile"
}
}
catch
{
Write-Warning -Message "Problem downloading $($link.href) - $_"
}
}
}
$result
}
}
}
else
{
## <img src="../img/stop.png">The server returned an empty list.<br>Either you have not entered the link correctly, or this service does not support generation for this product.</p><script type="text/javascript">
Write-Warning -Message "No data or links returned for $requestBody - $($response.Content -split "`n`r?" , 2 -replace '\<[^\>]+\>' | Select-Object -First 1)"
}
}
- Add the following registry key to suppress the “To Allow this website to provide information personalized for you, will you allow it to put a small file (cookie) on your computer?” popup message
REG ADD "HKCU\SOFTWARE\Microsoft\Windows\CurrentVersion\Internet Settings\Zones\3" /t REG_DWORD /v 1A10 /f /d 0
- Open Windows PowerShell by Right-Clicking on Windows PowerShell and selecting Run as Administrator
- Change the directory to “C:\Downloads”
- PS C:\Downloads>
- Enter the following command to download the installation files:
Powershell.exe -ExecutionPolicy ByPass "&" '.\Get_Store_Downloads.ps1' -packageFamilyName Microsoft.RemoteDesktop_8wekyb3d8bbwe -downloadFolder C:\Downloads\MSRemoteDesktopApp\Files -excludeRegex 'arm' -force
- After the download completes, you should see .appx & .appxbundle files inside the “C:\Downloads\MSRemoteDesktopApp\Files” directory
- Copy the PowerShell script below to “C:\Downloads\MSRemoteDesktopApp“ & name it Deploy-MSRemoteDesktopApp.ps1
<#
.SYNOPSIS
This script performs the installation or uninstallation of the Microsoft Remote Desktop Microsoft Store App.
# LICENSE #
PowerShell App Deployment Toolkit - Provides a set of functions to perform common application deployment tasks on Windows.
Copyright (C) 2017 - Sean Lillis, Dan Cunningham, Muhammad Mashwani, Aman Motazedian.
This program is free software: you can redistribute it and/or modify it under the terms of the GNU Lesser General Public License as published by the Free Software Foundation, either version 3 of the License, or any later version. This program is distributed in the hope that it will be useful, but WITHOUT ANY WARRANTY; without even the implied warranty of MERCHANTABILITY or FITNESS FOR A PARTICULAR PURPOSE. See the GNU General Public License for more details.
You should have received a copy of the GNU Lesser General Public License along with this program. If not, see <http://www.gnu.org/licenses/>.
.DESCRIPTION
The script is provided as a template to perform an install or uninstall of an application(s).
The script either performs an "Install" deployment type or an "Uninstall" deployment type.
The install deployment type is broken down into 3 main sections/phases: Pre-Install, Install, and Post-Install.
The script dot-sources the AppDeployToolkitMain.ps1 script which contains the logic and functions required to install or uninstall an application.
.PARAMETER DeploymentType
The type of deployment to perform. Default is: Install.
.PARAMETER DeployMode
Specifies whether the installation should be run in Interactive, Silent, or NonInteractive mode. Default is: Interactive. Options: Interactive = Shows dialogs, Silent = No dialogs, NonInteractive = Very silent, i.e. no blocking apps. NonInteractive mode is automatically set if it is detected that the process is not user interactive.
.PARAMETER AllowRebootPassThru
Allows the 3010 return code (requires restart) to be passed back to the parent process (e.g. SCCM) if detected from an installation. If 3010 is passed back to SCCM, a reboot prompt will be triggered.
.PARAMETER TerminalServerMode
Changes to "user install mode" and back to "user execute mode" for installing/uninstalling applications for Remote Destkop Session Hosts/Citrix servers.
.PARAMETER DisableLogging
Disables logging to file for the script. Default is: $false.
.EXAMPLE
PowerShell.exe .\Deploy-MSRemoteDesktopApp.ps1 -DeploymentType "Install" -DeployMode "NonInteractive"
.EXAMPLE
PowerShell.exe .\Deploy-MSRemoteDesktopApp.ps1 -DeploymentType "Install" -DeployMode "Silent"
.EXAMPLE
PowerShell.exe .\Deploy-MSRemoteDesktopApp.ps1 -DeploymentType "Install" -DeployMode "Interactive"
.EXAMPLE
PowerShell.exe .\Deploy-MSRemoteDesktopApp.ps1 -DeploymentType "Uninstall" -DeployMode "NonInteractive"
.EXAMPLE
PowerShell.exe .\Deploy-MSRemoteDesktopApp.ps1 -DeploymentType "Uninstall" -DeployMode "Silent"
.EXAMPLE
PowerShell.exe .\Deploy-MSRemoteDesktopApp.ps1 -DeploymentType "Uninstall" -DeployMode "Interactive"
.NOTES
Toolkit Exit Code Ranges:
60000 - 68999: Reserved for built-in exit codes in Deploy-Application.ps1, Deploy-Application.exe, and AppDeployToolkitMain.ps1
69000 - 69999: Recommended for user customized exit codes in Deploy-Application.ps1
70000 - 79999: Recommended for user customized exit codes in AppDeployToolkitExtensions.ps1
.LINK
http://psappdeploytoolkit.com
#>
[CmdletBinding()]
Param (
[Parameter(Mandatory=$false)]
[ValidateSet('Install','Uninstall','Repair')]
[string]$DeploymentType = 'Install',
[Parameter(Mandatory=$false)]
[ValidateSet('Interactive','Silent','NonInteractive')]
[string]$DeployMode = 'Interactive',
[Parameter(Mandatory=$false)]
[switch]$AllowRebootPassThru = $false,
[Parameter(Mandatory=$false)]
[switch]$TerminalServerMode = $false,
[Parameter(Mandatory=$false)]
[switch]$DisableLogging = $false
)
Try {
## Set the script execution policy for this process
Try { Set-ExecutionPolicy -ExecutionPolicy 'ByPass' -Scope 'Process' -Force -ErrorAction 'Stop' } Catch {}
##*===============================================
##* VARIABLE DECLARATION
##*===============================================
## Variables: Application
[string]$appVendor = ''
[string]$appName = 'Microsoft Remote Desktop Microsoft Store App'
[string]$appVersion = ''
[string]$appArch = ''
[string]$appLang = ''
[string]$appRevision = ''
[string]$appScriptVersion = '1.0.0'
[string]$appScriptDate = 'XX/XX/20XX'
[string]$appScriptAuthor = 'Jason Bergner'
##*===============================================
## Variables: Install Titles (Only set here to override defaults set by the toolkit)
[string]$installName = ''
[string]$installTitle = 'Microsoft Remote Desktop Microsoft Store App'
##* Do not modify section below
#region DoNotModify
## Variables: Exit Code
[int32]$mainExitCode = 0
## Variables: Script
[string]$deployAppScriptFriendlyName = 'Deploy Application'
[version]$deployAppScriptVersion = [version]'3.8.4'
[string]$deployAppScriptDate = '26/01/2021'
[hashtable]$deployAppScriptParameters = $psBoundParameters
## Variables: Environment
If (Test-Path -LiteralPath 'variable:HostInvocation') { $InvocationInfo = $HostInvocation } Else { $InvocationInfo = $MyInvocation }
[string]$scriptDirectory = Split-Path -Path $InvocationInfo.MyCommand.Definition -Parent
## Dot source the required App Deploy Toolkit Functions
Try {
[string]$moduleAppDeployToolkitMain = "$scriptDirectory\AppDeployToolkit\AppDeployToolkitMain.ps1"
If (-not (Test-Path -LiteralPath $moduleAppDeployToolkitMain -PathType 'Leaf')) { Throw "Module does not exist at the specified location [$moduleAppDeployToolkitMain]." }
If ($DisableLogging) { . $moduleAppDeployToolkitMain -DisableLogging } Else { . $moduleAppDeployToolkitMain }
}
Catch {
If ($mainExitCode -eq 0){ [int32]$mainExitCode = 60008 }
Write-Error -Message "Module [$moduleAppDeployToolkitMain] failed to load: `n$($_.Exception.Message)`n `n$($_.InvocationInfo.PositionMessage)" -ErrorAction 'Continue'
## Exit the script, returning the exit code to SCCM
If (Test-Path -LiteralPath 'variable:HostInvocation') { $script:ExitCode = $mainExitCode; Exit } Else { Exit $mainExitCode }
}
#endregion
##* Do not modify section above
##*===============================================
##* END VARIABLE DECLARATION
##*===============================================
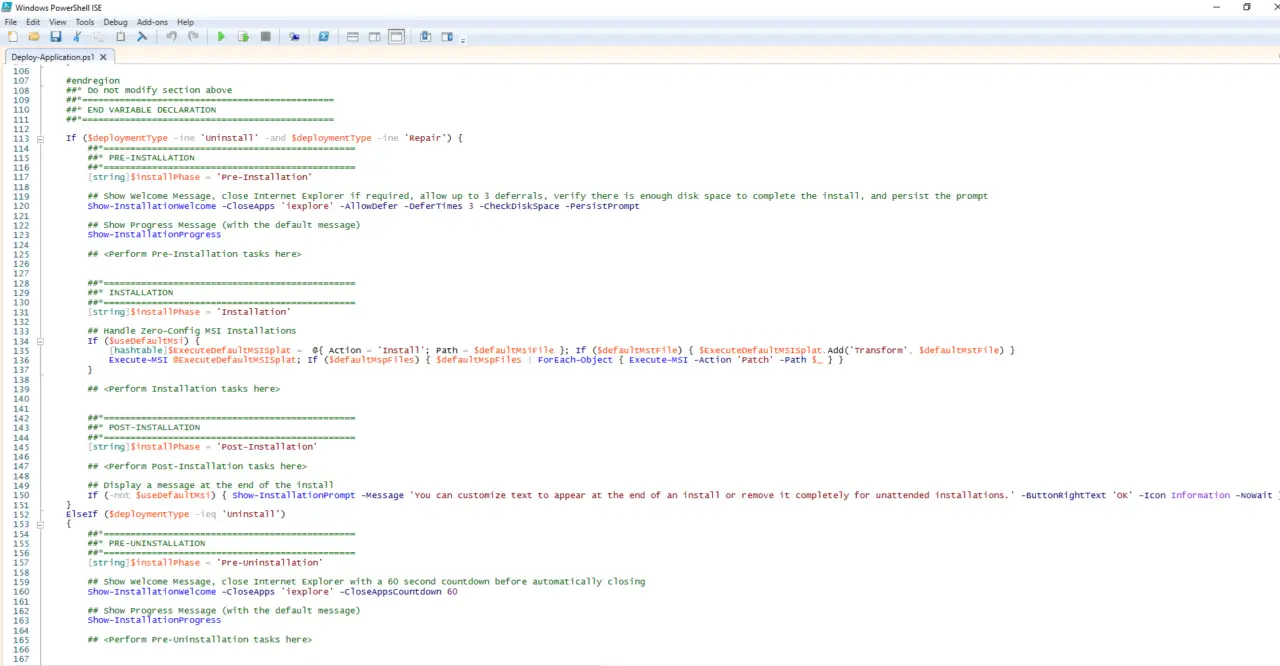
If ($deploymentType -ine 'Uninstall' -and $deploymentType -ine 'Repair') {
##*===============================================
##* PRE-INSTALLATION
##*===============================================
[string]$installPhase = 'Pre-Installation'
## Show Welcome Message, Close Microsoft Remote Desktop With a 60 Second Countdown Before Automatically Closing
Show-InstallationWelcome -CloseApps 'RdClient.Windows' -CloseAppsCountdown 60
## Show Progress Message (with the default message)
Show-InstallationProgress
## Remove Any Existing Versions of the Microsoft Remote Desktop Microsoft Store App
$AppPackageNames = @(
"Microsoft.RemoteDesktop"
)
foreach ($AppName in $AppPackageNames) {
Execute-ProcessAsUser -Path "$PSHOME\powershell.exe" -Parameters "-WindowStyle Hidden Get-AppxPackage -Name $AppName | Remove-AppxPackage" -Wait
#Execute-ProcessAsUser -Path "$PSHOME\powershell.exe" -Parameters "-WindowStyle Hidden Get-AppxPackage -AllUsers -Name $AppName | Remove-AppxPackage -AllUsers" -Wait
Execute-ProcessAsUser -Path "$PSHOME\powershell.exe" -Parameters "-WindowStyle Hidden Get-AppXProvisionedPackage -Online | Where-Object DisplayName -eq $AppName | Remove-AppxProvisionedPackage -Online" -Wait
#Execute-ProcessAsUser -Path "$PSHOME\powershell.exe" -Parameters "-WindowStyle Hidden Get-AppXProvisionedPackage -Online | Where-Object DisplayName -eq $AppName | Remove-AppxProvisionedPackage -AllUsers -Online" -Wait
}
##*===============================================
##* INSTALLATION
##*===============================================
[string]$installPhase = 'Installation'
## Install Microsoft Remote Desktop Microsoft Store App Dependencies
$DependencyPath = Get-ChildItem "$dirFiles" -Include *.appx -File -Recurse -ErrorAction SilentlyContinue
ForEach ($Dependency in $DependencyPath) {
Show-InstallationProgress "Installing the Microsoft Remote Desktop Microsoft Store App Dependencies. This may take some time. Please wait..."
Execute-ProcessAsUser -Path "$PSHOME\powershell.exe" -Parameters "-WindowStyle Hidden Add-AppxPackage ""$Dependency""" -Wait
}
## Install Microsoft Remote Desktop Microsoft Store App
$AppPath = Get-ChildItem "$dirFiles" -Include *.appxbundle -File -Recurse -ErrorAction SilentlyContinue
ForEach ($App in $AppPath) {
Show-InstallationProgress "Installing the Microsoft Remote Desktop Microsoft Store App. This may take some time. Please wait..."
Execute-ProcessAsUser -Path "$PSHOME\powershell.exe" -Parameters "-WindowStyle Hidden Add-AppxPackage ""$App""" -Wait
}
##*===============================================
##* POST-INSTALLATION
##*===============================================
[string]$installPhase = 'Post-Installation'
}
ElseIf ($deploymentType -ieq 'Uninstall')
{
##*===============================================
##* PRE-UNINSTALLATION
##*===============================================
[string]$installPhase = 'Pre-Uninstallation'
## Show Welcome Message, Close Microsoft Remote Desktop With a 60 Second Countdown Before Automatically Closing
Show-InstallationWelcome -CloseApps 'RdClient.Windows' -CloseAppsCountdown 60
## Show Progress Message (With a Message to Indicate the Application is Being Uninstalled)
Show-InstallationProgress -StatusMessage "Uninstalling the $installTitle. Please Wait..."
##*===============================================
##* UNINSTALLATION
##*===============================================
[string]$installPhase = 'Uninstallation'
## Uninstall Any Existing Versions of the Microsoft Remote Desktop Microsoft Store App
$AppPackageNames = @(
"Microsoft.RemoteDesktop"
)
foreach ($AppName in $AppPackageNames) {
#Execute-ProcessAsUser -Path "$PSHOME\powershell.exe" -Parameters "-WindowStyle Hidden Get-AppxPackage -Name $AppName | Remove-AppxPackage" -Wait
Execute-ProcessAsUser -Path "$PSHOME\powershell.exe" -Parameters "-WindowStyle Hidden Get-AppxPackage -AllUsers -Name $AppName | Remove-AppxPackage -AllUsers" -Wait
#Execute-ProcessAsUser -Path "$PSHOME\powershell.exe" -Parameters "-WindowStyle Hidden Get-AppXProvisionedPackage -Online | Where-Object DisplayName -eq $AppName | Remove-AppxProvisionedPackage -Online" -Wait
Execute-ProcessAsUser -Path "$PSHOME\powershell.exe" -Parameters "-WindowStyle Hidden Get-AppXProvisionedPackage -Online | Where-Object DisplayName -eq $AppName | Remove-AppxProvisionedPackage -AllUsers -Online" -Wait
}
## Add Registry Keys to Prevent Windows Apps from Reinstalling
Write-Log -Message "Adding Registry Keys to Prevent Windows Apps from Reinstalling."
[scriptblock]$HKCURegistrySettings = {
Set-RegistryKey -Key 'HKCU\Software\Microsoft\Windows\CurrentVersion\ContentDeliveryManager' -Name 'ContentDeliveryAllowed' -Value 0 -Type DWord -SID $UserProfile.SID
Set-RegistryKey -Key 'HKCU\Software\Microsoft\Windows\CurrentVersion\ContentDeliveryManager' -Name 'FeatureManagementEnabled' -Value 0 -Type DWord -SID $UserProfile.SID
Set-RegistryKey -Key 'HKCU\Software\Microsoft\Windows\CurrentVersion\ContentDeliveryManager' -Name 'OemPreInstalledAppsEnabled' -Value 0 -Type DWord -SID $UserProfile.SID
Set-RegistryKey -Key 'HKCU\Software\Microsoft\Windows\CurrentVersion\ContentDeliveryManager' -Name 'PreInstalledAppsEnabled' -Value 0 -Type DWord -SID $UserProfile.SID
Set-RegistryKey -Key 'HKCU\Software\Microsoft\Windows\CurrentVersion\ContentDeliveryManager' -Name 'PreInstalledAppsEverEnabled' -Value 0 -Type DWord -SID $UserProfile.SID
Set-RegistryKey -Key 'HKCU\Software\Microsoft\Windows\CurrentVersion\ContentDeliveryManager' -Name 'SilentInstalledAppsEnabled' -Value 0 -Type DWord -SID $UserProfile.SID
Set-RegistryKey -Key 'HKCU\Software\Microsoft\Windows\CurrentVersion\ContentDeliveryManager' -Name 'SubscribedContent-314559Enabled' -Value 0 -Type DWord -SID $UserProfile.SID
Set-RegistryKey -Key 'HKCU\Software\Microsoft\Windows\CurrentVersion\ContentDeliveryManager' -Name 'SubscribedContent-338387Enabled' -Value 0 -Type DWord -SID $UserProfile.SID
Set-RegistryKey -Key 'HKCU\Software\Microsoft\Windows\CurrentVersion\ContentDeliveryManager' -Name 'SubscribedContent-338388Enabled' -Value 0 -Type DWord -SID $UserProfile.SID
Set-RegistryKey -Key 'HKCU\Software\Microsoft\Windows\CurrentVersion\ContentDeliveryManager' -Name 'SubscribedContent-338389Enabled' -Value 0 -Type DWord -SID $UserProfile.SID
Set-RegistryKey -Key 'HKCU\Software\Microsoft\Windows\CurrentVersion\ContentDeliveryManager' -Name 'SubscribedContent-338393Enabled' -Value 0 -Type DWord -SID $UserProfile.SID
Set-RegistryKey -Key 'HKCU\Software\Microsoft\Windows\CurrentVersion\ContentDeliveryManager' -Name 'SubscribedContentEnabled' -Value 0 -Type DWord -SID $UserProfile.SID
Set-RegistryKey -Key 'HKCU\Software\Microsoft\Windows\CurrentVersion\ContentDeliveryManager' -Name 'SystemPaneSuggestionsEnabled' -Value 0 -Type DWord -SID $UserProfile.SID
}
Invoke-HKCURegistrySettingsForAllUsers -RegistrySettings $HKCURegistrySettings -ErrorAction SilentlyContinue
## Add Registry Key to Disable Auto-Updating of Microsoft Store Apps
Write-Log -Message "Adding Registry Key to Disable Auto-Updating of Microsoft Store Apps."
Set-RegistryKey -Key 'HKLM\SOFTWARE\Policies\Microsoft\WindowsStore' -Name 'AutoDownload' -Value 2 -Type DWord
# Add Registry Key to Prevent Suggested Applications from Returning
Write-Log -Message "Adding Registry Key to Prevent Suggested Applications from Returning."
Set-RegistryKey -Key 'HKLM\SOFTWARE\Policies\Microsoft\Windows\CloudContent' -Name 'DisableWindowsConsumerFeatures' -Value 1 -Type DWord
##*===============================================
##* POST-UNINSTALLATION
##*===============================================
[string]$installPhase = 'Post-Uninstallation'
}
ElseIf ($deploymentType -ieq 'Repair')
{
##*===============================================
##* PRE-REPAIR
##*===============================================
[string]$installPhase = 'Pre-Repair'
##*===============================================
##* REPAIR
##*===============================================
[string]$installPhase = 'Repair'
##*===============================================
##* POST-REPAIR
##*===============================================
[string]$installPhase = 'Post-Repair'
}
##*===============================================
##* END SCRIPT BODY
##*===============================================
## Call the Exit-Script function to perform final cleanup operations
Exit-Script -ExitCode $mainExitCode
}
Catch {
[int32]$mainExitCode = 60001
[string]$mainErrorMessage = "$(Resolve-Error)"
Write-Log -Message $mainErrorMessage -Severity 3 -Source $deployAppScriptFriendlyName
Show-DialogBox -Text $mainErrorMessage -Icon 'Stop'
Exit-Script -ExitCode $mainExitCode
}
Ok, all the hard work is done and now you can install or uninstall the Microsoft Remote Desktop (Microsoft Store App) using one single PowerShell script. Simply change the DeploymentType parameter to install or uninstall. Logging functionality is built-in automatically and you can view the log files under “C:\Windows\Logs\Software”.
Microsoft Remote Desktop (Microsoft Store App) NonInteractive Install (PowerShell)
NonInteractive means Very Silent, i.e. no blocking apps. This is automatically set if it is detected that the process is not running in the user session and it is not possible for anyone to provide input using a mouse or keyboard.
- Open Windows PowerShell by Right-Clicking on Windows PowerShell and selecting Run as Administrator
- Change the directory to “C:\Downloads\MSRemoteDesktopApp”
- PS C:\Downloads\MSRemoteDesktopApp>
- Enter the following command:
Powershell.exe -ExecutionPolicy Bypass .\Deploy-MSRemoteDesktopApp.ps1 -DeploymentType "Install" -DeployMode "NonInteractive"
Microsoft Remote Desktop (Microsoft Store App) Silent Install (PowerShell)
Silent means no dialogs (progress and balloon tip notifications are suppressed).
- Open Windows PowerShell by Right-Clicking on Windows PowerShell and selecting Run as Administrator
- Change the directory to “C:\Downloads\MSRemoteDesktopApp“
- PS C:\Downloads\MSRemoteDesktopApp>
- Enter the following command:
Powershell.exe -ExecutionPolicy Bypass .\Deploy-MSRemoteDesktopApp.ps1 -DeploymentType "Install" -DeployMode "Silent"
Microsoft Remote Desktop (Microsoft Store App) Interactive Install (PowerShell)
Interactive means the install will show dialogs including progress and balloon tip notifications.
- Open Windows PowerShell by Right-Clicking on Windows PowerShell and selecting Run as Administrator
- Change the directory to “C:\Downloads\MSRemoteDesktopApp“
- PS C:\Downloads\MSRemoteDesktopApp>
- Enter the following command:
Powershell.exe -ExecutionPolicy Bypass .\Deploy-MSRemoteDesktopApp.ps1 -DeploymentType "Install" -DeployMode "Interactive"
How to Uninstall the Microsoft Remote Desktop (Microsoft Store App) Using the PowerShell App Deployment Toolkit
Microsoft Remote Desktop (Microsoft Store App) NonInteractive Uninstall (PowerShell)
NonInteractive means Very Silent, i.e. no blocking apps. This is automatically set if it is detected that the process is not running in the user session and it is not possible for anyone to provide input using a mouse or keyboard.
- Open Windows PowerShell by Right-Clicking on Windows PowerShell and selecting Run as Administrator
- Change the directory to “C:\Downloads\MSRemoteDesktopApp“
- PS C:\Downloads\MSRemoteDesktopApp>
- Enter the following command:
Powershell.exe -ExecutionPolicy Bypass .\Deploy-MSRemoteDesktopApp.ps1 -DeploymentType "Uninstall" -DeployMode "NonInteractive"
Microsoft Remote Desktop (Microsoft Store App) Silent Uninstall (PowerShell)
Silent means no dialogs (progress and balloon tip notifications are suppressed).
- Open Windows PowerShell by Right-Clicking on Windows PowerShell and selecting Run as Administrator
- Change the directory to “C:\Downloads\MSRemoteDesktopApp“
- PS C:\Downloads\MSRemoteDesktopApp>
- Enter the following command:
Powershell.exe -ExecutionPolicy Bypass .\Deploy-MSRemoteDesktopApp.ps1 -DeploymentType "Uninstall" -DeployMode "Silent"
Microsoft Remote Desktop (Microsoft Store App) Interactive Uninstall (PowerShell)
Interactive means the install will show dialogs including progress and balloon tip notifications.
- Open Windows PowerShell by Right-Clicking on Windows PowerShell and selecting Run as Administrator
- Change the directory to “C:\Downloads\MSRemoteDesktopApp“
- PS C:\Downloads\MSRemoteDesktopApp>
- Enter the following command:
Powershell.exe -ExecutionPolicy Bypass .\Deploy-MSRemoteDesktopApp.ps1 -DeploymentType "Uninstall" -DeployMode "Interactive"
Always make sure to test everything in a development environment prior to implementing anything into production. The information in this article is provided “As Is” without warranty of any kind.
Provide feedback
Saved searches
Use saved searches to filter your results more quickly
Sign up
Appearance settings
-
-
#1
Build 2023.12.9552 64 Bit Home licence.
Can’t find the Content Delivery Manager option in Components — System Apps as per the attached image. What have I missed ?
-
ntlite_components_sys_apps.jpg
1 MB
-
-
#2
Content Delivery Manager is under System Apps, unless it’s already been removed.
-
-
#3
Check your install.esd/wim (with 7-Zip Manager or something), it should be listed under \Windows\SystemApps\Microsoft.Windows.ContentDeliveryManager_xxxxxxxx where it normally would be. Previously edited image?
-
-
#4
Yep, must have been a previously edited image — all good & thanks
Since the Windows 10 Anniversary Update people have been complaining about various apps popping up in their start menu.Windows 10 comes with “Content Delivery Manager’ the evil which install apps without even prompting us
Reports about various Apps emerging on User Start Menu have been reported, all because of Content Delivery Manager which is turned ON by default and there is no OFF option in the settings (great going Microsoft)
Drawback of Leaving Content Delivery Manager Turned On
Anything running without my consent is a bad thing , but let see some other dangers in Microsoft 10 Content Delivery Manager
- Content Delivery Manager consumes your bandwidth because it frequently checks with network for any new pushed App or update of an older pushed App
- Content Delivery Manager consumes your processor as there is running process which would download and ‘silently’ install an App in the background
- Chances of being hacked by messed up app sent through Microsoft Content Delivery Manager
- Consume disk space without our consent
Above mentioned aspects are the major ones, the biggest and obvious is “A process running on background without our consent”
Lets go ahead and stop Windows 10 from installing unwanted apps without our consent
Disabling Content Delivery Manager on Windows 10
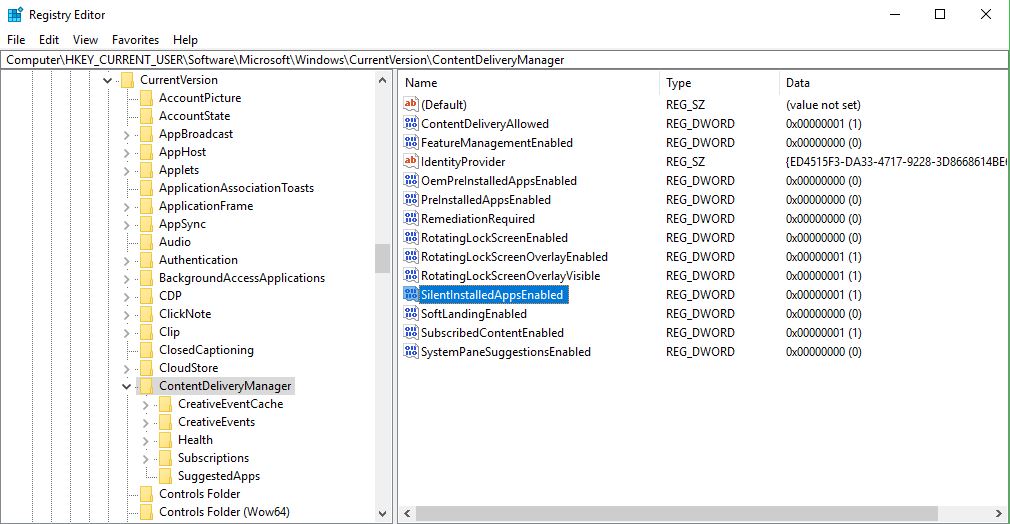
- Open the Registry Editor. The simplest way to do so is to open Start, type ‘regedit’ and press Enter.
Registry Editor in Windows 10 - Once, Registry Editor is open navigate to:
HKEY_CURRENT_USER\SOFTWARE\Microsoft\Windows\CurrentVersion\ContentDeliveryManager

RegEdit -Silent Installed Apps Enabled for Content Delivery Manager - Double click on “SilentInstalledAppsEnabled” set the “Value Data” as 0 (if its already 0, you are good to go)
Edit Value Data to 0 for disabling CDM - Hit “Ok” and close Registry Editor
- Restart your machine to be welcomed to Windows 10 with no CDM running in the background
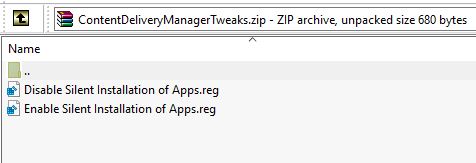
Auto Disable Content Delivery Manager on Windows 10 Script
The above steps are very simple but if you are lazy and just need a double click script to do so, just download and run this <1KB RegEdit Tweak file.If Fix 1 doesn’t work try the Fix 2 (by Will Dormann )
Fix 1 : Disable Windows 10 CDM
Fix 2 : Disable Windows 10 Foistware
Microsoft should stop bundling such Packages onto Windows ,until they do that we need to fix things our self.
Updated : 6 January 2018
-
Since SystemApps\Microsoft.Windows.ContentDeliveryManager_cw5n1h2txyewy can’t be removed anymore (or it can, but updates or sfc repairs just bring it back), I’ve been looking for other methods to disable the obnoxious ads pushing by Microsoft in Windows 10. The «Let’s make Windows even better..» full screen nag window is one of the worst of them, and apparently the registry settings below are not enough to disable it.
I’m currently testing this: I cleared all content under the key HKCU\SOFTWARE\Microsoft\Windows\CurrentVersion\ContentDeliveryManager, except for the settings below, and then took ownership of the key and set permissions to Everyone:read. No ‘subscription’ entries are written under the key anymore, and so far the only downside has been a little bit longer (a second or two) login time.
[HKEY_CURRENT_USER\Software\Microsoft\Windows\CurrentVersion\ContentDeliveryManager]
«SilentInstalledAppsEnabled»=dword:00000000[HKEY_CURRENT_USER\SOFTWARE\Microsoft\Windows\CurrentVersion\ContentDeliveryManager]
«SystemPaneSuggestionsEnabled»=dword:00000000[HKEY_CURRENT_USER\SOFTWARE\Microsoft\Windows\CurrentVersion\Explorer\Advanced]
«ShowSyncProviderNotifications»=dword:00000000[HKEY_CURRENT_USER\SOFTWARE\Microsoft\Windows\CurrentVersion\ContentDeliveryManager]
«SoftLandingEnabled»=dword:00000000[HKEY_CURRENT_USER\SOFTWARE\Microsoft\Windows\CurrentVersion\ContentDeliveryManager]
«RotatingLockScreenEnabled»=dword:00000000[HKEY_CURRENT_USER\SOFTWARE\Microsoft\Windows\CurrentVersion\ContentDeliveryManager]
«RotatingLockScreenOverlayEnabled»=dword:00000000[HKEY_CURRENT_USER\SOFTWARE\Microsoft\Windows\CurrentVersion\ContentDeliveryManager]
«SubscribedContent-310093Enabled»=dword:00000000[HKEY_CURRENT_USER\Software\Microsoft\Windows\CurrentVersion\UserProfileEngagement]
«ScoobeSystemSettingEnabled»=dword:00000000 -
Stop hovering to collapse…
Click to collapse…
Hover to expand…
Click to expand…
-
One thing missing from the above script vs. your keys is handling «Get Even More Out of Windows in Windows 10» (ScoobeSystemSettingEnabled).
Not sure if still needed on top of the script, I will have to first test it myself, but looks worth adding.
Stop hovering to collapse…
Click to collapse…
Hover to expand…
Click to expand…
-
Looks like the nag screen on login comes back if I delete the key ContentDeliveryManager\Context\CloudExperienceHostIntent. ScoobeSystemSettingEnabled and SubscribedContent-nnnnnnEnabled have no effect like I feared. It puts a REG_BINARY timestamp to IntroIneligible and IntroSkipped subkeys, most likely to see when it’s time to nag again.
Damn it Microsoft.. I wish you had at least one sane person in power (like Linux has Torvalds) and interested in Windows instead of the cloud and your wallet
-
I use non-LTSC Enterprise and never see any ads at all. Just throwing that out there.
-
Being on this forum you would think everybody is on LTS / Enterprise / Edu train, but we’re just a drop in an ocean (a 900+ million devices one).
Most people have Home preinstalled on their PCs, and very few Pro and above. I mostly use Education at home for a good reason, but that’s irrelevant.I see MS are fiddling with the 20xx setup some more — who knows what other annoyance they are backing in.
Definitely worth investigating some more for those that have no choice in the matter (which is most people).
Stop hovering to collapse…
Click to collapse…
Hover to expand…
Click to expand…
-
I’m on Pro because of the free upgrade option some time ago. If Enterprise stays activated without a hassle like searching a working activation server, I might think about it. AFAIK Pro can be converted to Enterprise these days, but in any case I have to take a full backup before.
And also: I know that you can use Enterprise and Education indefinitely with the watermark, but I don’t like it. Especially if the watermark shows during full screen gaming?
-
No watermark on my legit Education license (I do IT work for couple schools).
If you are a student, teacher or involved in education in some other capacity, you are eligible for a free license. But your school must be registered with Microsoft before.
If not, there is always kms / hwid / mak / leaked keys activation.
Stop hovering to collapse…
Click to collapse…
Hover to expand…
Click to expand…
-
Stop hovering to collapse…
Click to collapse…
Hover to expand…
Click to expand…
-
Stop hovering to collapse…
Click to collapse…
Hover to expand…
Click to expand…
-
Stop hovering to collapse…
Click to collapse…
Hover to expand…
Click to expand…
-
Stop hovering to collapse…
Click to collapse…
Hover to expand…
Click to expand…
-
I must have clicked something without realizing — I’ve never seen even one ad on Windows ever.
I have regular Windows 10 Pro x64 set to log on to local account automatically. I have Open Shell, and I use Firefox with DuckDuckGo as homepage (and uBlock Origin). I press the power button, computer fires up and I use it — with no ads.
Weird eh ?