
После установки Windows Server на VDS нередко встречается, что интерфейс системы использует английский как основной язык, а русификация полностью отсутствует. Хоть английский и является неким стандартом в IT-сообществе, не всегда удобно использовать систему на иностранном языке. Для таких случаев в Windows предусмотрен специальный раздел, позволяющий загрузить и установить родной язык.
В сегодняшней статье мы поговорим о том, как можно добавить русский язык в Windows Server версий 2008, 2012, 2016 и 2019.
Алгоритм перевода системы на русский язык может немного различаться в зависимости от года выпуска WS: для версии 2008 потребуется загрузить дополнительный языковой пакет, в 2012-2019 перевод выполняется через системные настройки. Давайте детально рассмотрим, как выполнить русификацию интерфейса в каждой версии.
Как включить русский язык в Windows Server 2008
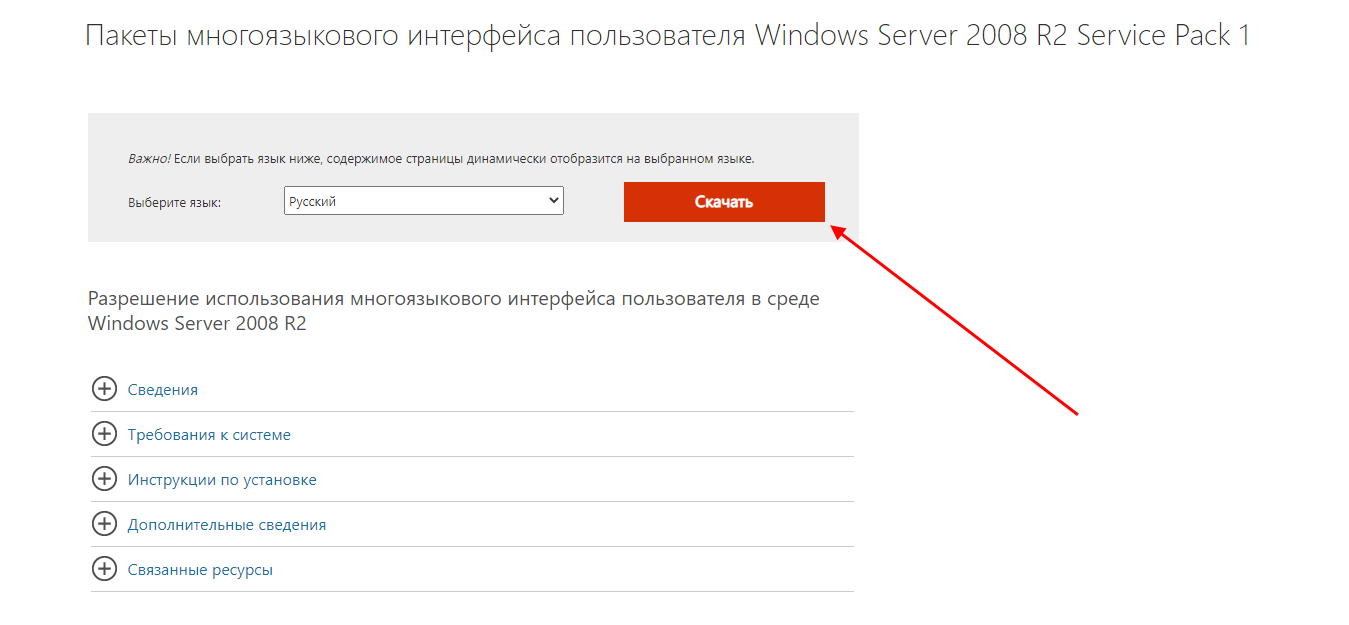
- Первым делом подключаемся к серверу одним из удобных способов и запускаем любой доступный браузер. В нем переходим на официальную страницу Microsoft и пролистываем вниз до заголовка «Пакеты многоязыкового интерфейса пользователя Windows Server 2008 R2 Service Pack 1». Выбираем нужный язык интерфейса и скачиваем его.

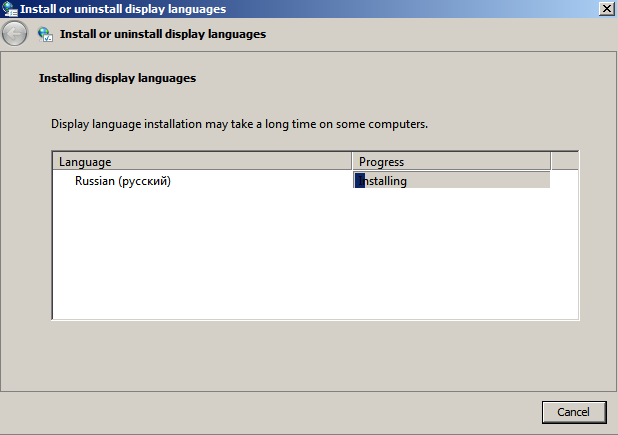
- Ожидаем, пока скачается файл для установки языкового пакета, запускаем его и следуем указаниям. В результате увидим следующее окно установки:
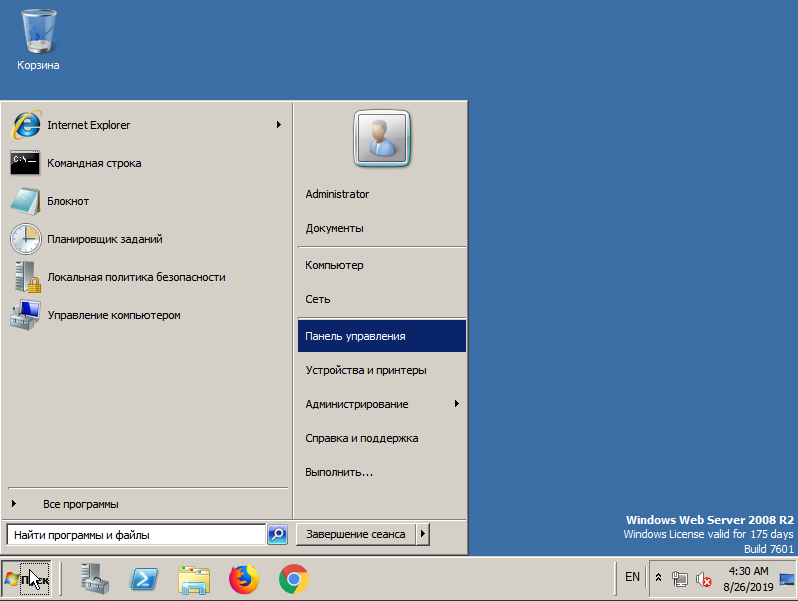
- После успешной установки новый язык будет добавлен в систему. Остается его активировать. Для этого переходим через меню «Пуск» в «Control panel» – там перемещаемся в «Region and Language», открываем вкладку «Keyboard and Languages» и в блоке «Choose a display language» выбираем «Русский».
- Перезагружаемся и проверяем активацию нового языкового пакета – весь интерфейс должен быть переведен на русский язык.
На этом русификация Windows Server 2008 завершена.
Комьюнити теперь в Телеграм
Подпишитесь и будьте в курсе последних IT-новостей
Подписаться
Русифицируем Windows Server 2012-2016
Обычно в системах данного выпуска установлен только английский языковой пакет. Чтобы установить новый язык, необходимо изменить несколько системных параметров. Посмотрим, как это можно сделать:
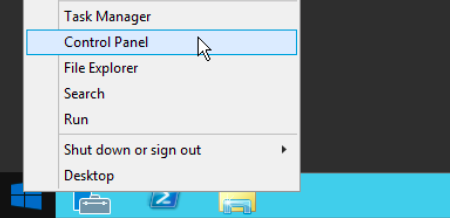
- Подключаемся к серверу через RDP, VNC или личный кабинет хостинг-провайдера. Заходим в ОС и открываем панель управления – сделать это можно через меню «Пуск».
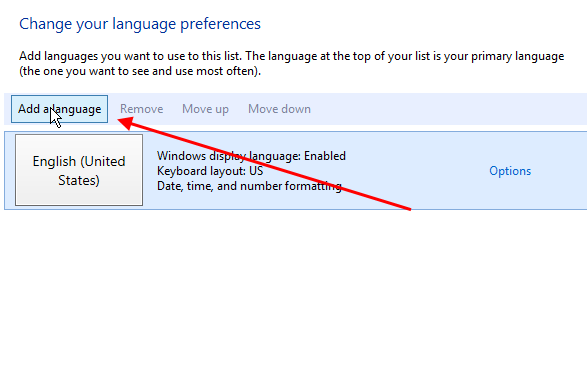
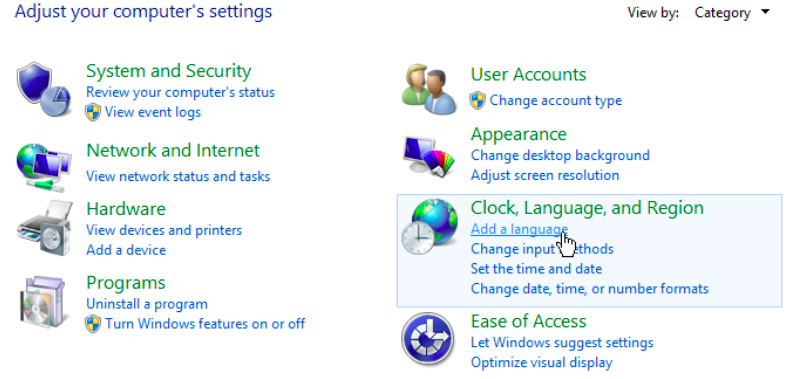
- Находим блок «Clock, Language, and Region» и кликаем по кнопке «Add a language».
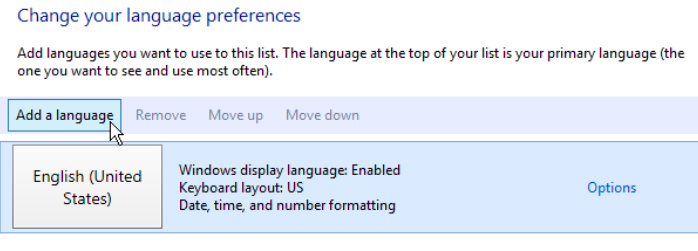
- В отобразившемся окне мы увидим только английский язык. Если же у вас уже установлен русский пакет, то можете сразу переходить к пункту «5». В противном случае нажимаем «Add a language».
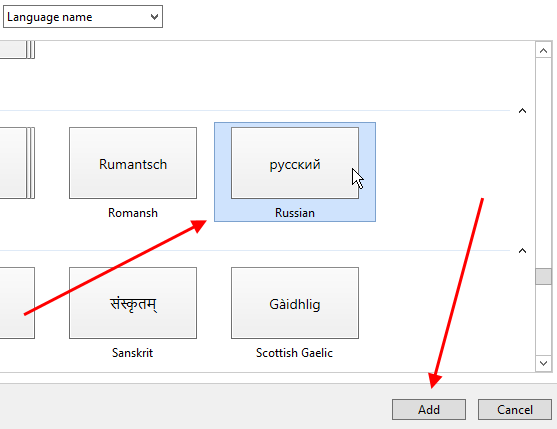
- Выбираем нужный пакет и жмем в нижней части окна на кнопку «Add».
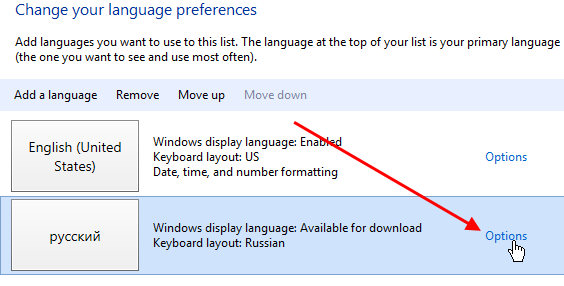
- Мы добавили русский пакет в Windows, далее потребуется его установить – для этого первым делом перейдем в дополнительные настройки языка.
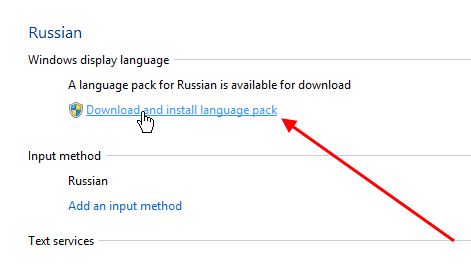
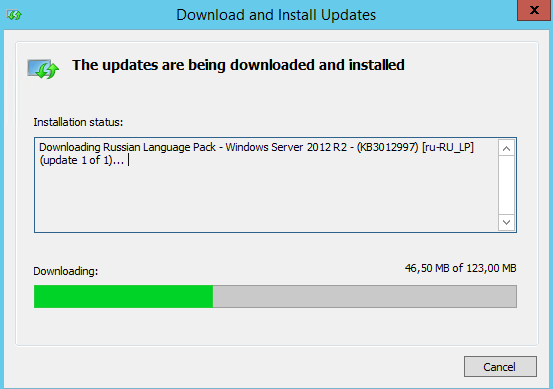
- Выбираем «Download and install language pack».
- Ждем, пока завершится установка.
- Осталось назначить русский язык по умолчанию – сделать это можно в разделе «Option». Нажимаем в нем по кнопке «Make this primary language».
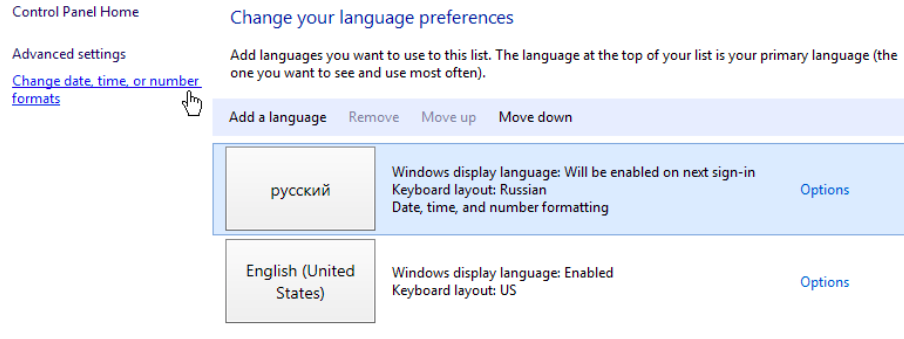
- Но это еще не все, необходимо изменить региональные настройки. Возвращаемся в панель управления и в блоке «Clock, Language, and Region» выбираем «Change date, time, or number formats».
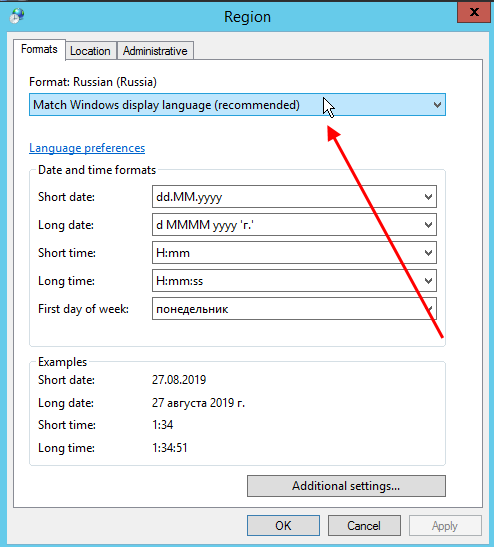
- В отобразившемся окне заходим во вкладку «Formats» и указываем русский язык.
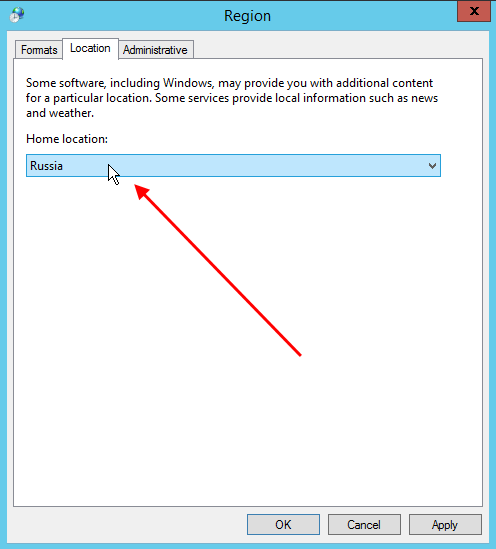
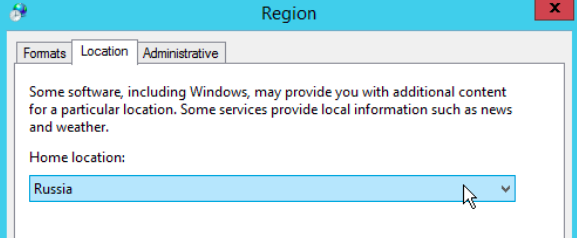
- Переходим в «Location» и ставим «Russia».
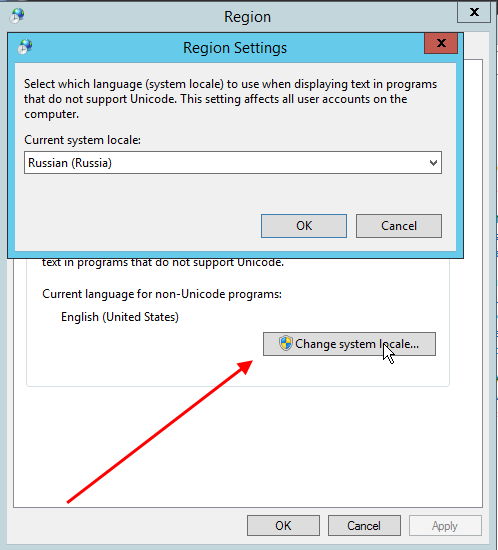
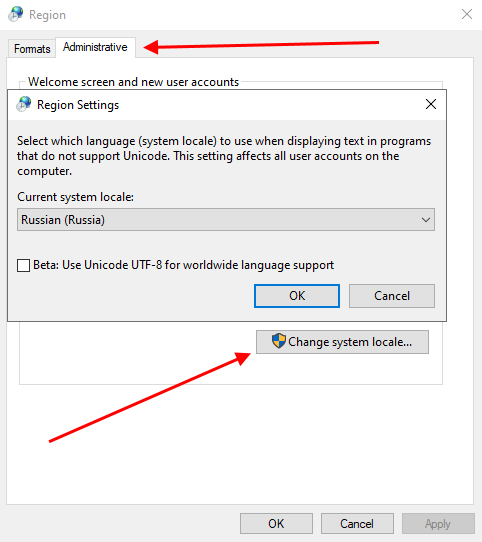
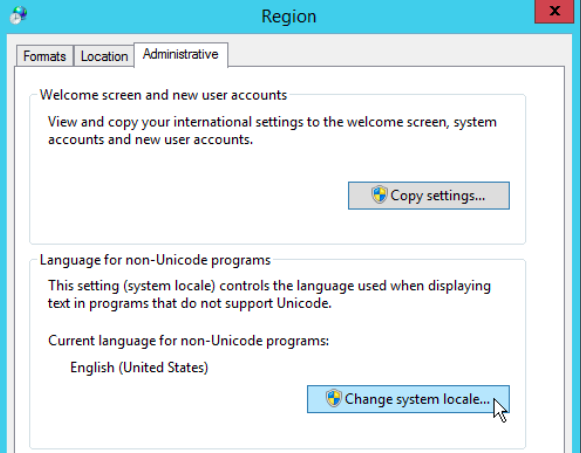
- В разделе «Administrative» кликаем по кнопке «Change system locale…» и также устанавливаем русский язык.
- В завершение нажимаем на «OK» в главном окне и перезагружаемся.
- Готово! Теперь интерфейс Windows Server 2012-2016 полностью переведен.
Таким образом можно добавить и установить новый языковой пакет в Windows Server 2012 и 2016 года.
Настраиваем язык в Windows Server 2019
Русификация системы 2019 года выполняется через настройки системы:
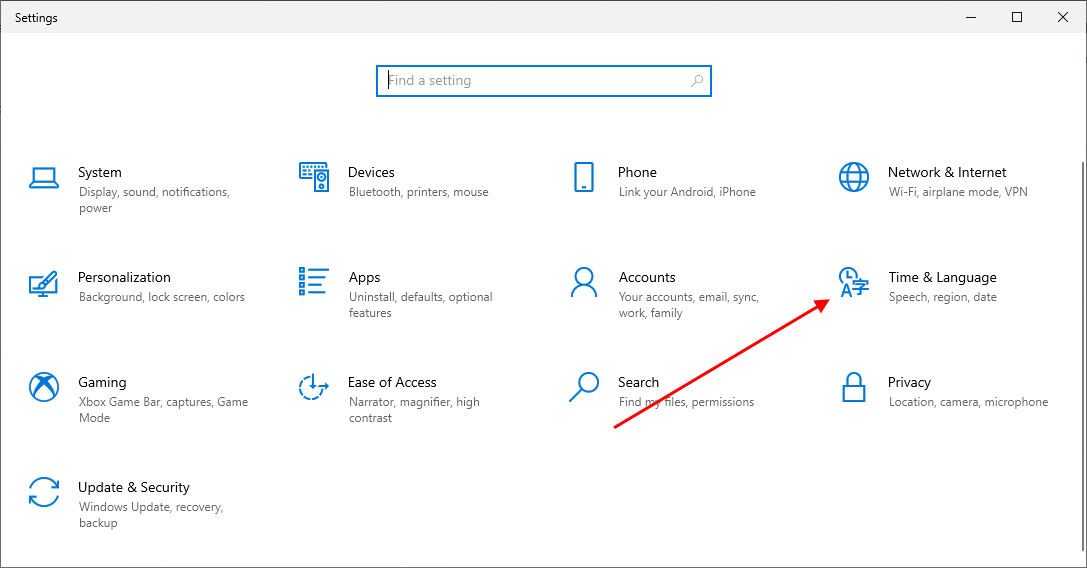
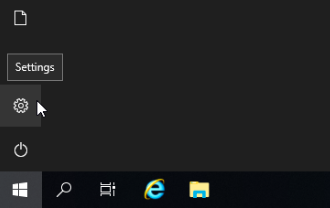
- Подключаемся к серверу удобным способом и переходим в меню «Пуск». После кликаем по кнопке в виде шестеренки.
- В отобразившемся окне переходим в раздел «Time & Language».
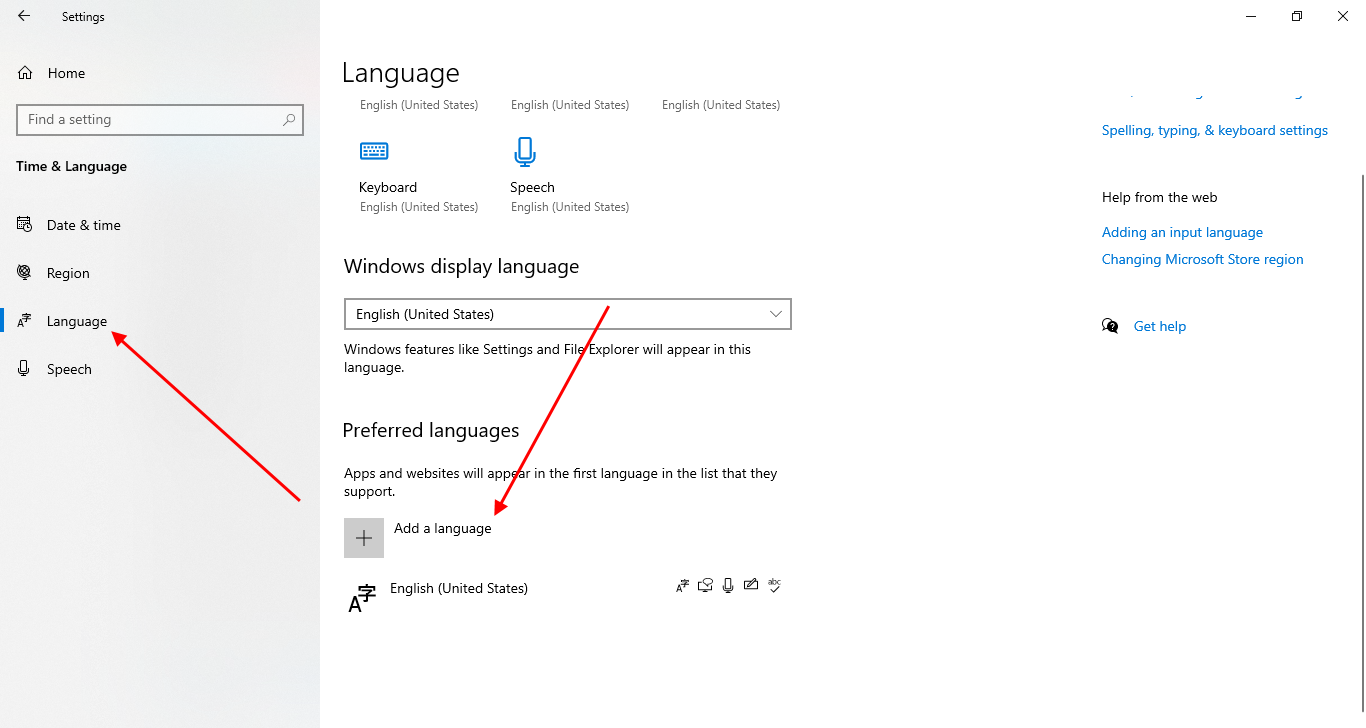
- Перемещаемся в подраздел «Language» и выбираем «Add a language».
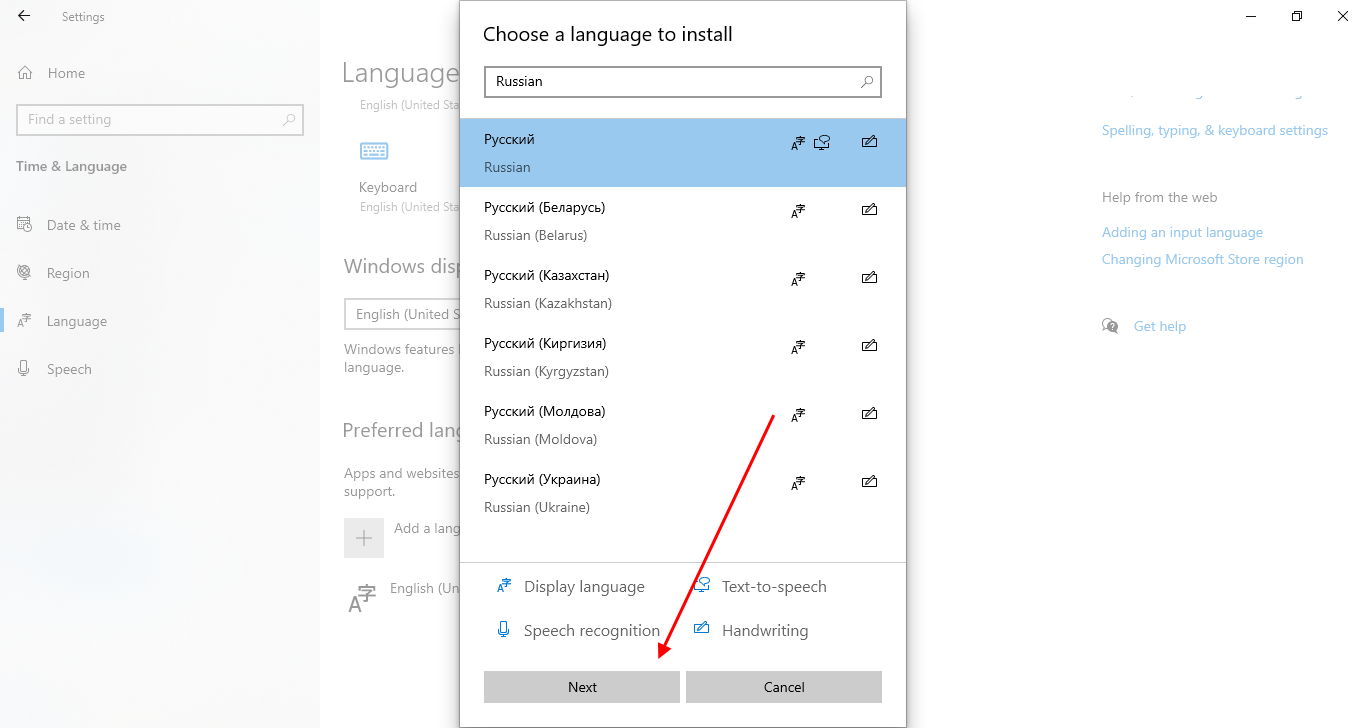
- Находим нужный язык, выбираем его и жмем на кнопку «Next».
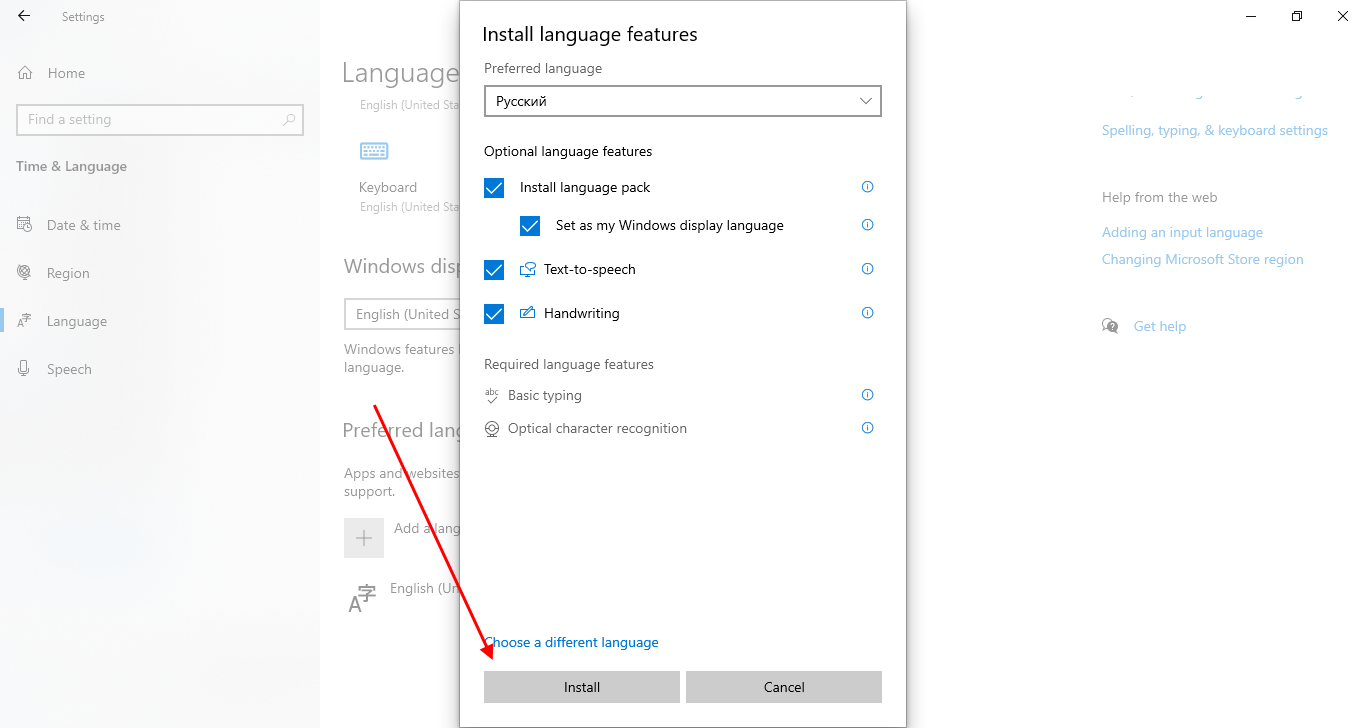
- Отмечаем все пункты и жмем «Install».
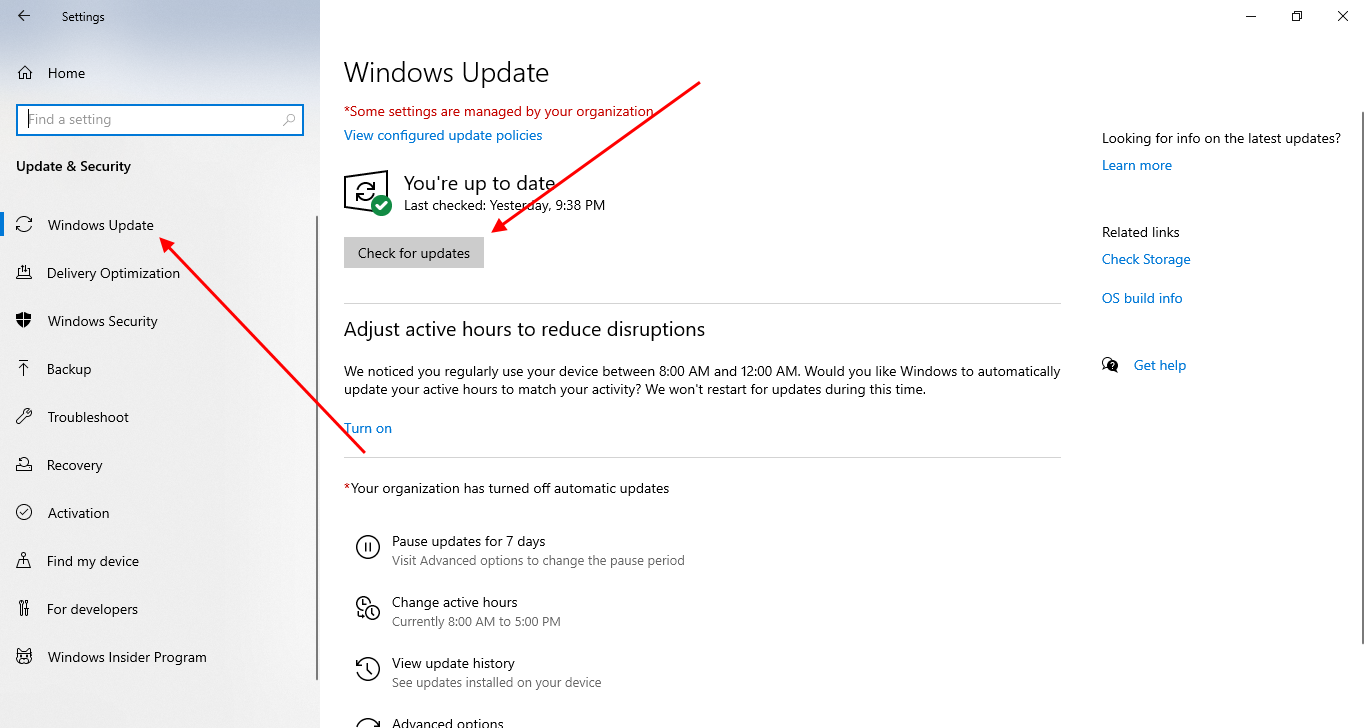
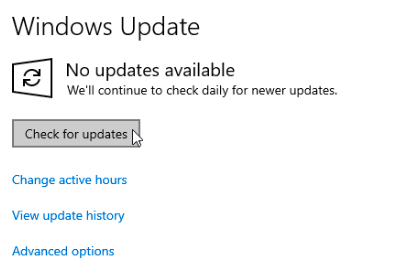
- После этого будет запущена автоматическая установка нового языка. В случае возникновения ошибки 0x00F0950 потребуется открыть раздел «Windows Update» и установить недостающие обновления. Сначала проверяем наличие новых обновлений с помощью кнопки «Check for updates», затем обновляемся.
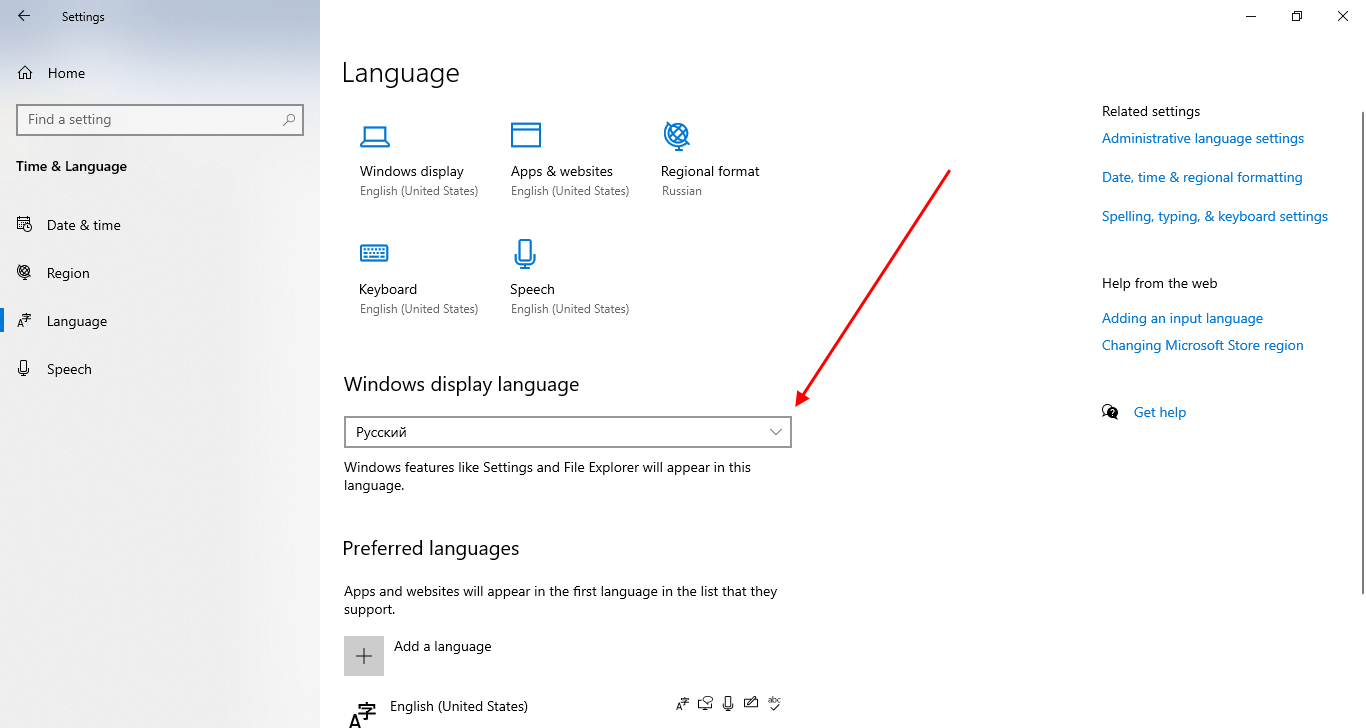
- Пробуем повторно установить русский язык, если в первый раз не получилось. Далее в блоке «Windows display language» выбираем «Русский».
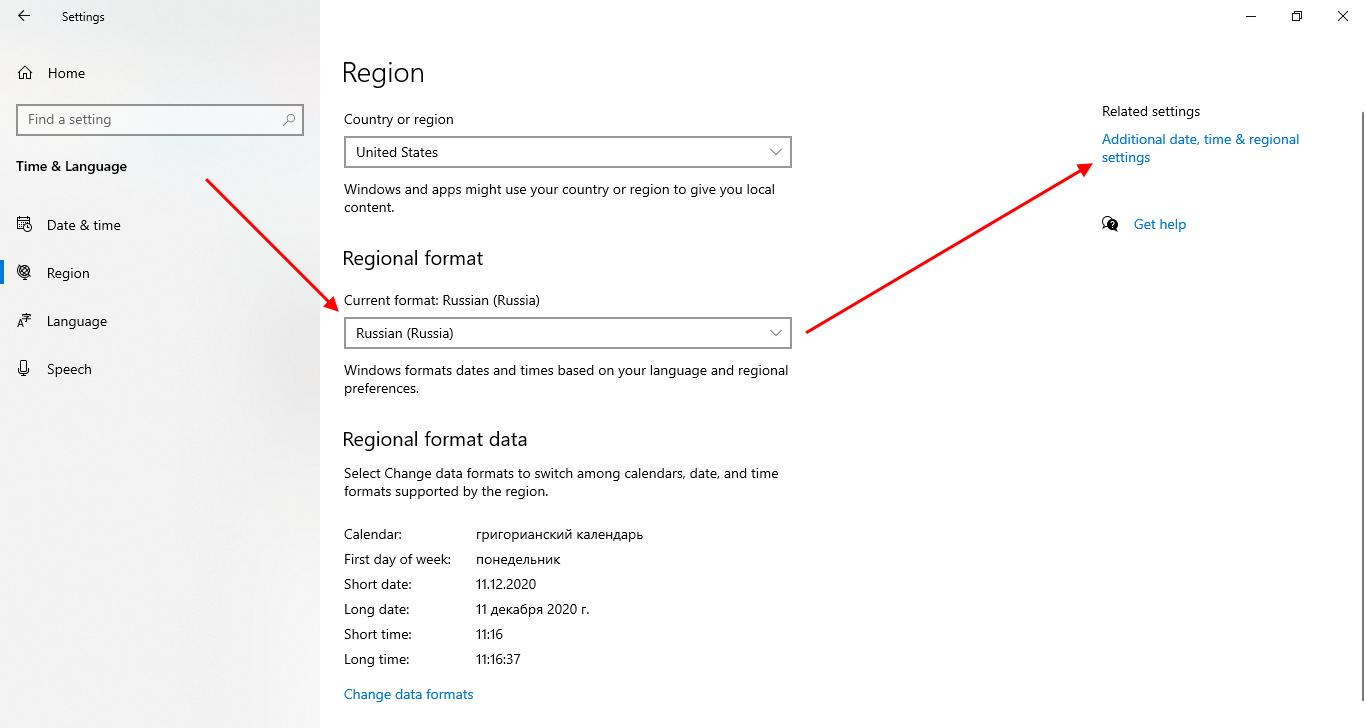
- Также в разделе «Region» установим необходимый язык и зайдем в другое место – «Additional date, time & regional settings».
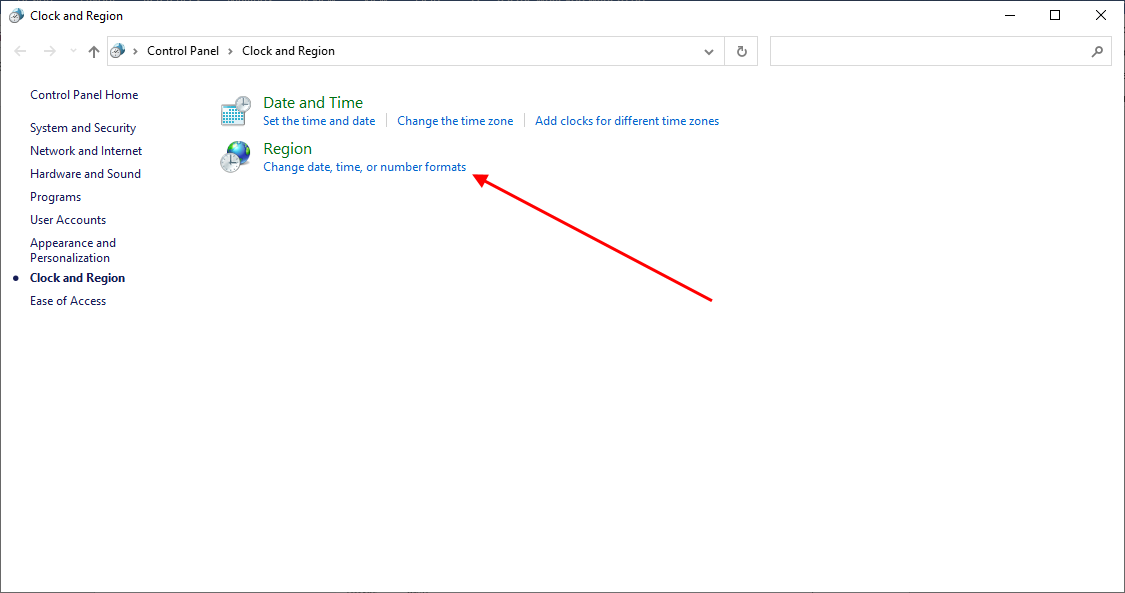
- Откроем настройки региона.
- Переходим в подраздел «Administrative» и кликаем по кнопке «Change system locale…». Выбираем русский язык и сохраняем изменения.
После этого потребуется перезагрузить сервер, чтобы все изменения вступили в силу.
Надеюсь, что у вас не возникло проблем с русификацией Windows Server. Спасибо за внимание!
Skip to content
— Загружаемся с DVD
— Выбираем региональные настройки. Формат даты и времени лучше выбрать — Russian. Любые из этих настроек можно будет поменять после установки ОС.

— Запускаем установку

— Вводим ключ. Можно взять по ссылке (см.ниже). Эти ключи подойдут только для установки, для активации — нет. Если у вас Volume License (VL) тогда этого шага не будет (но потом все равно придется активировать ОС).
Automatic Virtual Machine Activation — http://technet.microsoft.com/en-us/library/dn303421.aspx
Edition
AVMA key
Datacenter
Y4TGP-NPTV9-HTC2H-7MGQ3-DV4TW
Standard
DBGBW-NPF86-BJVTX-K3WKJ-MTB6V
Essentials
K2XGM-NMBT3-2R6Q8-WF2FK-P36R2

— Выбираем редакцию ОС. Standart и Datacenter отличаются количеством виртуальных машин, которые могут быть созданы в ОС и политикой лицензирования таких машин. Для Oracle — Standart вполне подойдет.

— Принимаем лицензионное соглашение

— Выбираем установку (НЕ обновление уже установленной ОС).

— Создаем разделы на диске. В данном примере всего один раздел.

— Предупреждение о том, что Windows создаст еще один раздел для своих системных файлов.

— Выбираем на какой раздел устанавливать ОС.

— Задаем пароль для пользователя Administrator.

После копирования файлов система готова к работе.
Рассказываем, как поменять язык на русский в Windows Server 2012/2016 и 2019.
Введение
На серверах с операционной системой Windows по умолчанию установлен английский язык. При необходимости вы можете изменить язык на русский.
Для Windows Server 2012/2016
1. Подключитесь к серверу по RDP. Если не знаете, как это сделать, поможет наша статья в базе знаний.
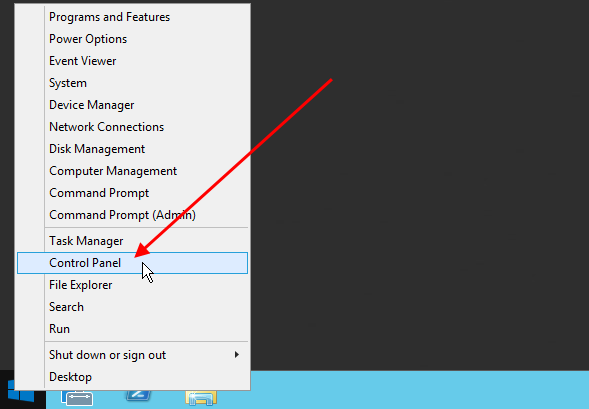
2. Нажмите правой кнопкой мыши на Пуск и перейдите в Control panel.
3. В блоке Clock, Language, and Region нажмите Add a language.
4. В открывшемся окне нажмите Add a language.
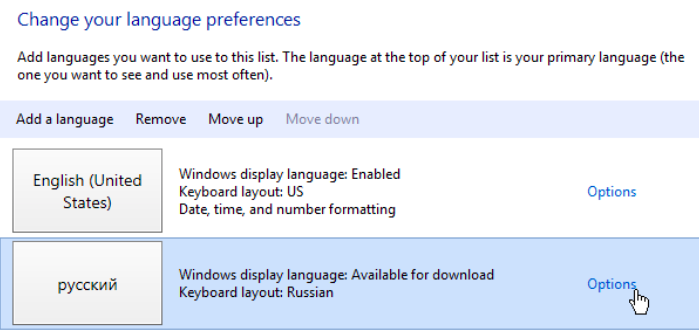
5. В появившемся списке выберите Russian (русский) и нажмите Add.

6. Русский язык появится в списке доступных. Нажмите Options напротив русского языка, чтобы его установить.
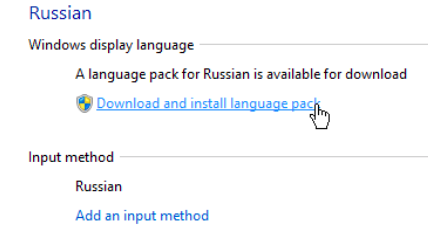
7. Нажмите Download and install language pack. Начнется установка языкового пакета.
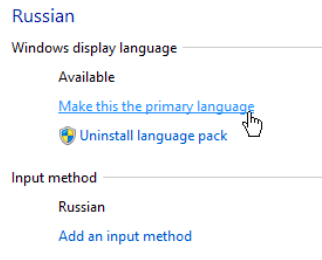
8. После того как установка завершится, снова нажмите Options напротив русского языка. Затем нажмите Make this the primary language — русский язык станет языком по умолчанию.
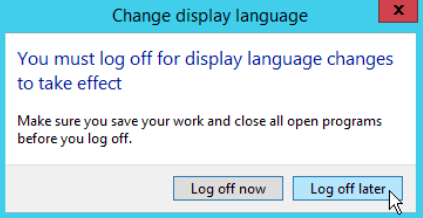
9. При появлении диалогового окна нажмите кнопку Log off later, чтобы перезагрузить систему позже.
10. Измените региональные настройки. Для этого нажмите Change date, time, or number formats.
11. В открывшемся окне откройте вкладку Location, в списке Home location выберите Russia.
12. Откройте вкладку Administrative, нажмите Change system locale… В появившемся списке выберите Russian (Russia) и нажмите OK.
13. В открывшемся диалоговом окне нажмите Restart now, чтобы перезагрузить систему.

Для Windows Server 2019
1. Подключитесь к серверу по RDP. Если не знаете, как это сделать, поможет наша статья в базе знаний.
2. Нажмите Пуск, затем нажмите Settings (значок шестеренки).
3. В открывшемся окне нажмите Update & Security.

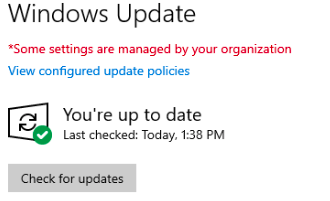
4. Нажмите кнопку Check for updates, чтобы установить обновления системы.
5. После того как установка обновлений завершится, проверьте, что появилась надпись You’re up to date. Если она не появилась, повторите установку обновлений.
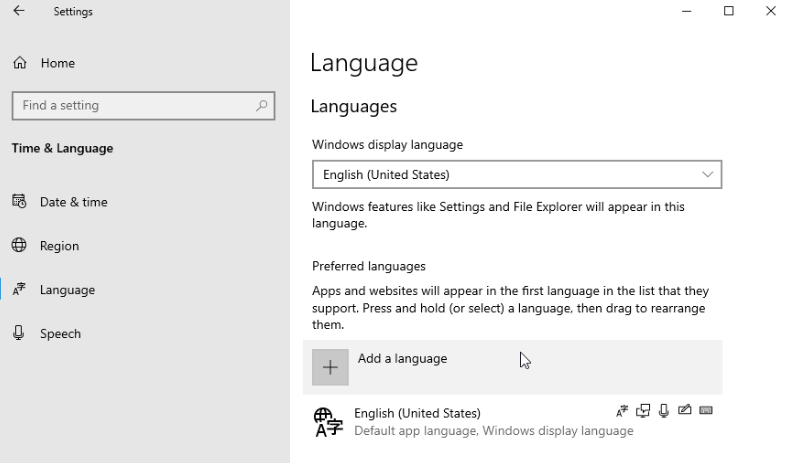
6. Снова перейдите в Settings и нажмите Time & Language.

7. Откройте вкладку Language и нажмите Add a language.
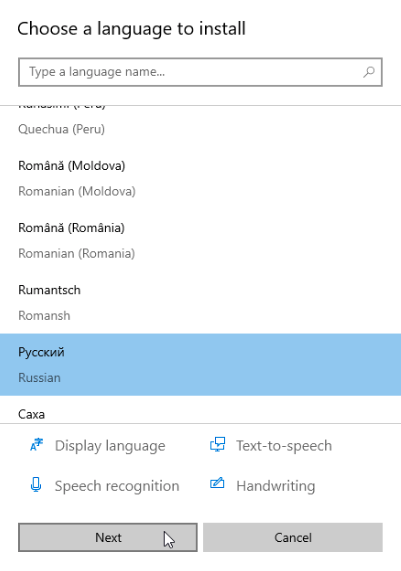
8. Выберите в списке Русский (Russian) и нажмите Next.
9. Проверьте, что в открывшемся окне отмечен чекбокс Install language pack and set as my Windows display language, и нажмите Install. Начнется установка языкового пакета. Если такого пункта нет, устраните ошибку по инструкции от Windows и продолжите далее.
10. После того как установка завершится, в списке Windows display language выберите Русский.
11. Откройте вкладку Region. В списке Country or region выберите Russia, в списке Current format выберите Russian (Russia).
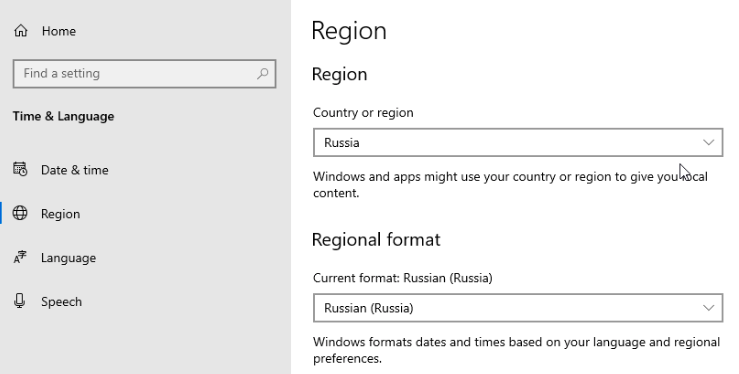
12. Нажмите Additional date, time & regional settings.
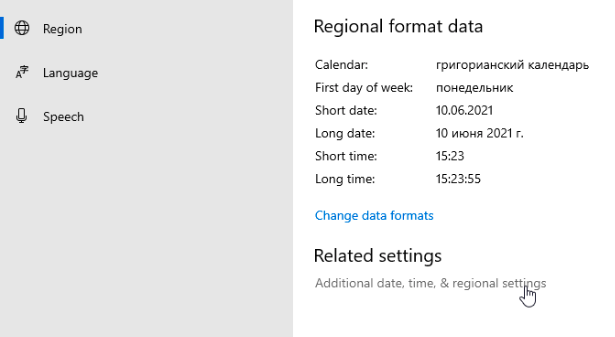
13. В открывшемся окне нажмите Region.
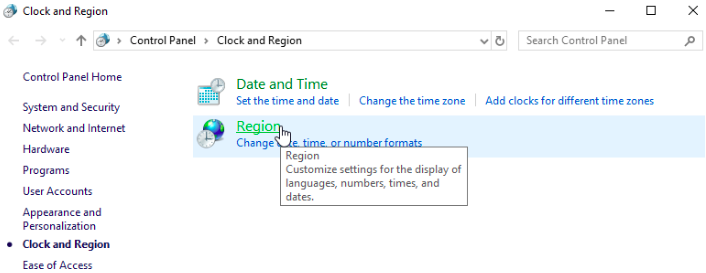
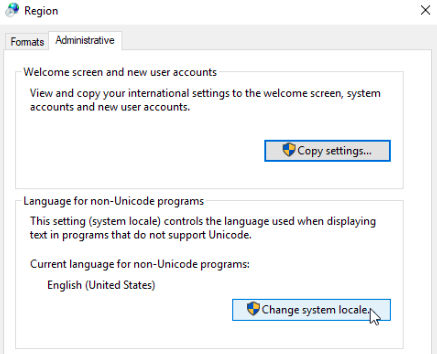
14. Откройте вкладку Administrative и нажмите Change system locale… В появившемся списке выберите Russian (Russia) и нажмите OK.
15. В открывшемся диалоговом окне нажмите Restart now, чтобы перезагрузить систему.
Заключение
В этой инструкции мы рассмотрели, как поменять язык на русский в Windows Server 2012/2016 и 2019.
Configuring Regional Settings and Windows locales with Group Policy is about managing user location settings such as region, currency and time. A locale is a unique combination of language, country/region, and code page. Part of these settings are user-specific, others are system-specific (local machine) and thus apply to all logged-on users.
Table of Contents
-
- Introduction
- Quick list of the main registry values mentioned in this article
- Configuring regional settings using Group Policy
- Configuring the 24/12 hour clock and AM/PM using Group Policy
- Configure the clock using a Regional Settings Group Policy Preference
- Configure the clock using a Group Policy Preference registry item
- Configuring the (home) location setting using Group Policy
- Configuring the code page (separate article)
Introduction
This article applies to all operating systems starting from Windows Server 2008/Windows 7 all the way up to the latest versions and builds (currently Windows 10 version 1809 and Windows Server 2019)!
I know, I know, this topic is a bit of a “golden oldie”, but still very relevant today. In my lab environment, I recently found myself struggling with this old topic again. Once again I faced the problem of incorrect regional settings, incorrect time format, incorrect code page and incorrect time zone. And mind you, my lab environment exists of Windows 2016 servers only (OK, I have one 2012 R2 server). Having solved such issues before, I knew I could configure all settings centrally using Group Policy. This blog post is for all of you fellow administrators out there who struggle with the same issues.
I am sure that you are familiar with the Regional Settings Control Panel item. Before you continue with the various sections below, I would like to remind you of the fact that the tabs Formats and Location contain user-specific settings and that settings on the tab Administrative are system-specific.
These system-specific settings concern the international settings for the welcome screen and system accounts as well as the local system’s code page for programs that do not support Unicode. For detailed information how to configure the code page please see the article Configuring the time zone and code page with Group Policy on this website.
The rest of this article deals with the user-specific settings (= the first two tabs) only.
One last thing. All configurations described in this article are stored in the Windows registry. If you are unsure of the exact value of a setting, for example concerning country codes, I recommend you to first configure the setting using the graphical interface. You than go to the registry and read the configured value, which you can than use in your script or Group Policy setting.
Quick list of the main registry values mentioned in this article
In case you are not in the mood for any blabla, I have listed all relevant registry keys and values in this section. If you know your way around Group Policy Preferences, you do not need to read further. Here it goes.
Regional settings:
Registry key: HKEY_CURRENT_USER\Control Panel\International
Registry value: multiple values in the aforementioned key
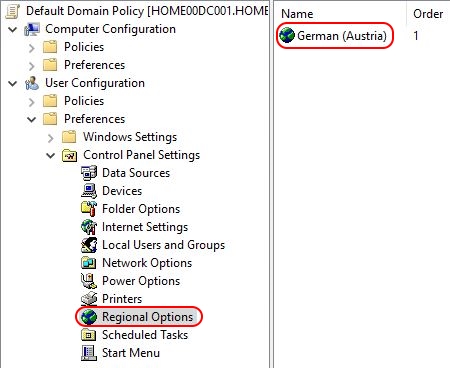
You can configure Regional Settings with the Regional Settings Group Policy Preference (User Configuration \ Preferences \ Control Panel Settings \ Regional Options).
24/12 hour clock and AM/PM time settings:
Registry key: HKEY_CURRENT_USER\Control Panel\International
Registry value: sShortTime (REG_SZ)
You can configure the time settings with the Regional Settings Group Policy Preference or with a Group Policy Preference registry item.
(Home) location:
Registry key: HKEY_CURRENT_USER\Control Panel\International\Geo
Registry value: Nation (REG_SZ)
You can configure the (home) location with a Group Policy Preference registry item.
Configuring regional settings using Group Policy
This section deals with the settings configured on the first tab, Formats, of the Regional Settings Control Panel item.
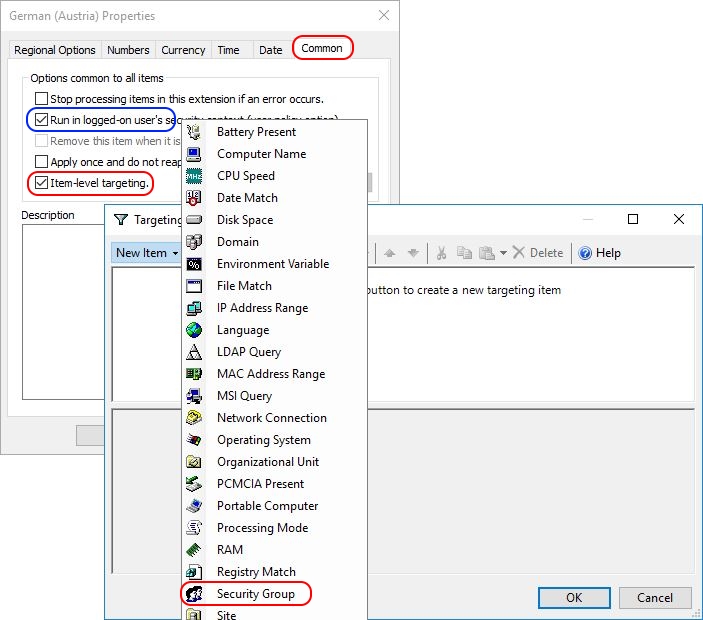
Ever since the introduction of Group Policy Preferences with Item-Level Targeting (first introduced with Windows Server 2008), managing regional settings has been a breeze. Open your Group Policy Management Console (GPMC.msc) and navigate to User Configuration \ Preferences \ Control Panel Settings \ Regional Options. With a right-mouse click on Regional Options select New.
Now you can configure your settings the same way as on a local Regional Settings pane.

Note: please be aware that this policy item requires you to first enable underlined settings by pressing the F5 or F6 key before you can modify and save them! See the Microsoft article Enable and Disable Settings in a Preference Item for more information.
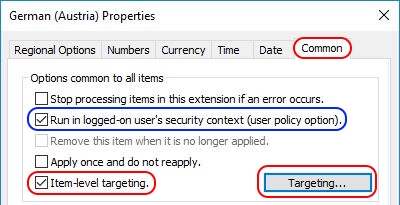
I recommend to execute this policy in the user’s security context (tick the Run in logged-on […] box on the Common tab).
In case you require multiple Regional Settings configurations within the same Group Policy, use an Item-Level Targeting filter.

One way to distinguish users is to filter based on Active Directory security group membership, for example:
- German (Austria): filtered on the Active Directory Group usrsAustria
- French (France): filtered on the Active Directory Group usrsFrance
- English (United States): filtered on the Active Directory Group usrsEnglish
In the end, all regional settings are configured in the registry in the HKEY_CURRENT_USER hive. The regional settings consist of multiple values. You find all settings in the following registry key:
Control Panel\International
Configuring the 24/12 hour clock and AM/PM using Group Policy
It may happen that after configuring the regional settings for a user, the time in the system tray is not shown in the correct format. You can correct the time format on the Time tab in the Regional Settings Group Policy Preference (see also the previous paragraph) or directly in the registry (using either a script or a Group Policy Preference).
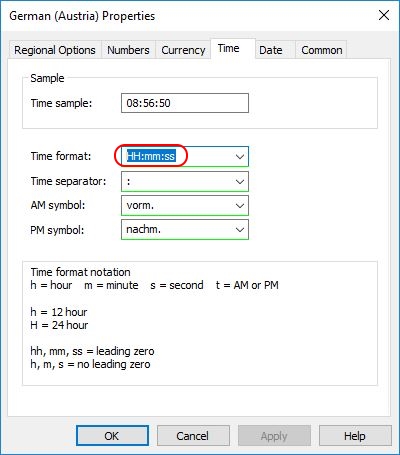
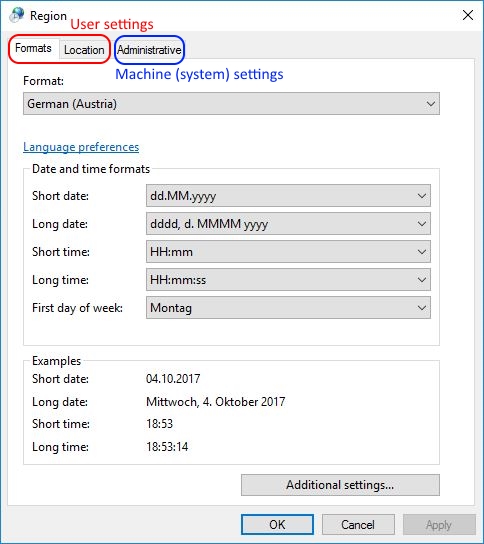
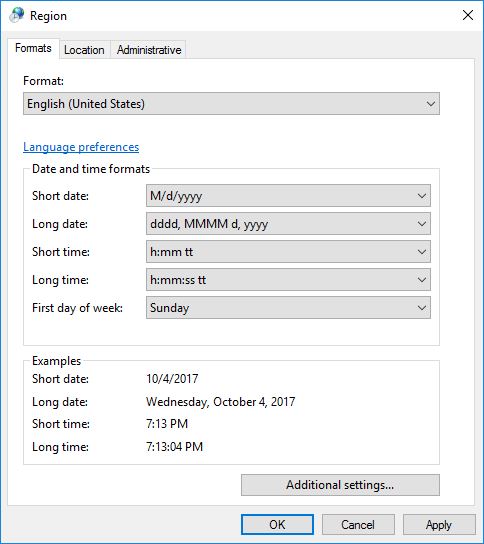
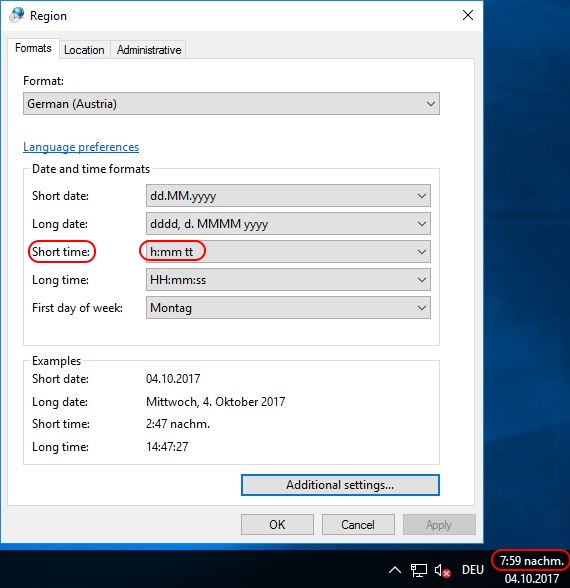
Please take a look at the screenshot below. The regional settings have been modified from English (United States) to German (Austria). In most countries in Europe, a 24-hour clock is used without AM / PM at the end. In the example below, the time is not displayed as it should be. In our example, a 12-hour clock is displayed as well as AM / PM (nachm. stands for PM in German). What the clock should display is a 24-hour time notation without AM / PM at the end.
The short time value determines how the time in the system tray is displayed; a 24 or 12-hour clock (with or without leading zeros) and with or without AM / PM. This value is written in the registry in the HKEY_CURRENT_USER hive. The exact registry key and value are:
Control Panel\International -> sShortTime (REG_SZ)
The following possible values exist:
- h:mm = 12-hour clock without leading zeros and without AM / PM
- hh:mm = 12-hour clock with leading zeros and without AM / PM
- h:mm tt = 12-hour clock without leading zeros and with AM / PM
- hh:mm tt = 12-hour clock with leading zeros and with AM / PM
- H:mm = 24-hour clock without leading zeros and without AM / PM
- HH:mm = 24-hour clock with leading zeros and without AM / PM
- H:mm tt = 24-hour clock without leading zeros and with AM / PM
- HH:mm tt = 24-hour clock with leading zeros and with AM / PM
A capital H sets the clock to a 24-hour format; a small h sets the clock to a 12-hour format. A double hh or HH adds a leading zero (when the hour is one digit only). If tt is present at the end than AM / PM is displayed. Also, note the space between the clock settings and the tt value.
Here are some examples:
- h:mm = 7:30 or 10:42
- hh:mm = 07:30 or 10:42
- h:mm tt = 7:30 AM or 10:42 PM
- hh:mm tt = 07:30 AM or 10:42 PM
- H:mm = 7:30 or 23:42
- HH:mm = 07:30 or 23:42
- H:mm tt = 7:30 AM or 23:42 PM
- HH:mm tt = 07:30 AM or 23:42 PM
The last two examples in the previous list will not be used much in practice: a 24-hour clock with AM / PM at the end. The drop down menu in the Regional Settings does not allow you configure this, but you can configure this on the Time tab of the Regional Settings Group Policy Preference and by directly configuring the registry (using a Group Policy Preference registry item for example). Adding the prefix AM / PM to a 24-hour clock notation looks a bit weird, but it is technically possible:
Now we have all the information we need to set the correct time configuration for all users. There are two easy ways how to accomplish this:
- Configure the clock using a Regional Settings Group Policy Preference
- Configure the clock using a Group Policy Preference registry item
Configure the clock using a Regional Settings Group Policy Preference
Please read the section Configuring regional settings using Group Policy in this article to understand how to configure the user’s regional settings. After you have configured at least one regional setting configuration, modify this configuration and go to the Time tab.
On this tab you can modify the time format to anything you want. Before you can modify anything, first make sure to press the F5 button to turn all the red lines to green lines. Green lines indicate that anything you change will be saved after clicking the Apply or OK button. At the bottom of the tab a detailed description of the various configuration options is provided. In the example below I changed the format HH:mm:ss to h:mm:ss tt, changing the clock from a 24-hour to a 12-hour clock and adding AM / PM.

Configure the clock using a Group Policy Preference registry item
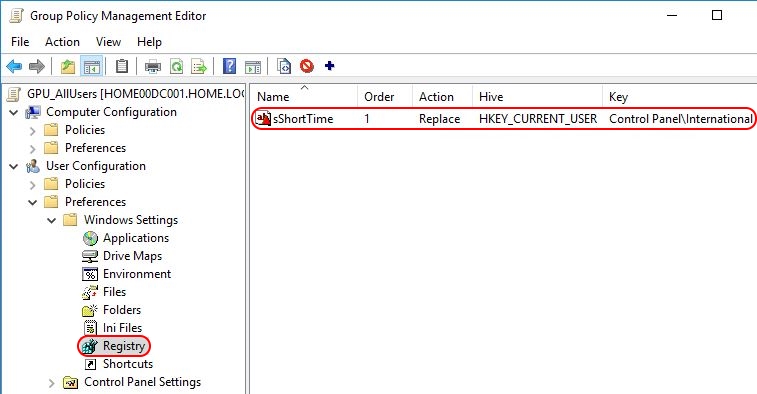
Open your Group Policy Management Console (GPMC.msc) and navigate to User Configuration \ Preferences \ Windows Settings \ Registry. With a right-mouse click on Registry select New \ Registry Item. Configure the registry item as follows:
- Action: replace
- Hive: HKEY_CURRENT_USER
- Key path: Control Panel\International
- Value name: sShortTime
- Value data: <your value>, e.g. HH:mm
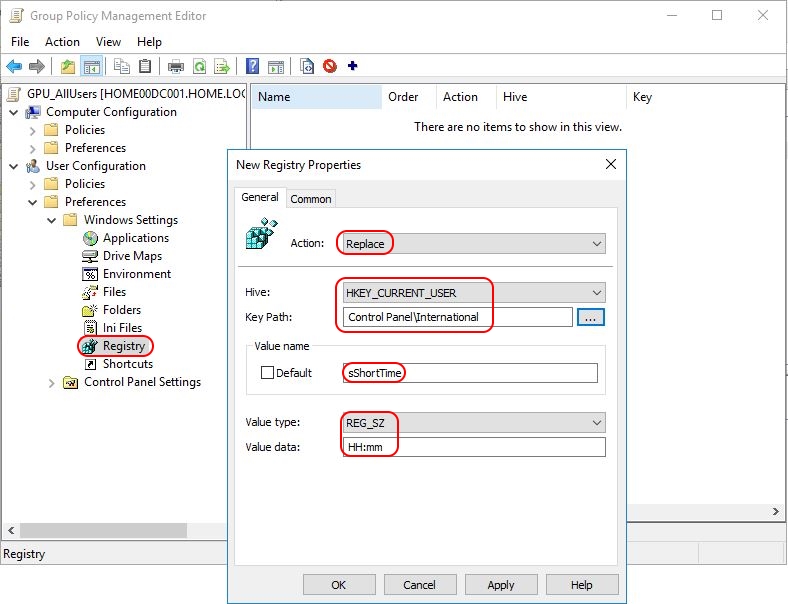
I recommend to execute this policy in the user’s security context (tick the Run in logged-on […] box on the Common tab).
In case you require multiple locations for a variety of scenarios within the same Group Policy, use an Item-Level Targeting filter. This is explained in the section Configuring regional settings using Group Policy.
The registry item is now created and will be deployed to all users to whom the particular Group Policy applies.
It is possible to rename the registry item afterwards:
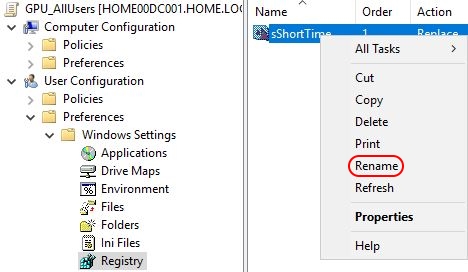
Just remember that modifying the item resets it to its original name (=the value name) and you will have to rename it again.
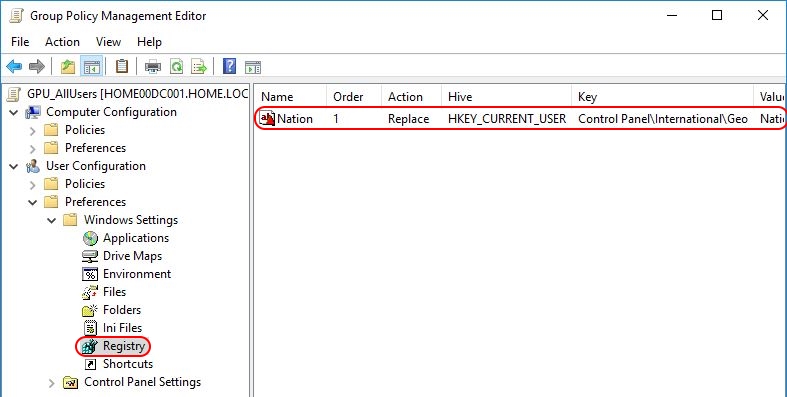
Configuring the (home) location setting using Group Policy
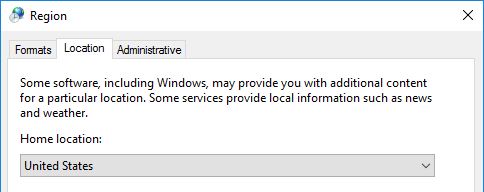
This section deals with the Home Location setting configured on the second tab, Location, of the Regional Settings Control Panel item.
The location cannot be changed using the Regional Settings Group Policy Preference. Instead, a Group Policy Preference registry item needs to be used.
The location is stored in the Windows registry in the HKEY_CURRENT_USER hive. The exact registry key and value are:
Control Panel\International\Geo -> Nation (REG_SZ)
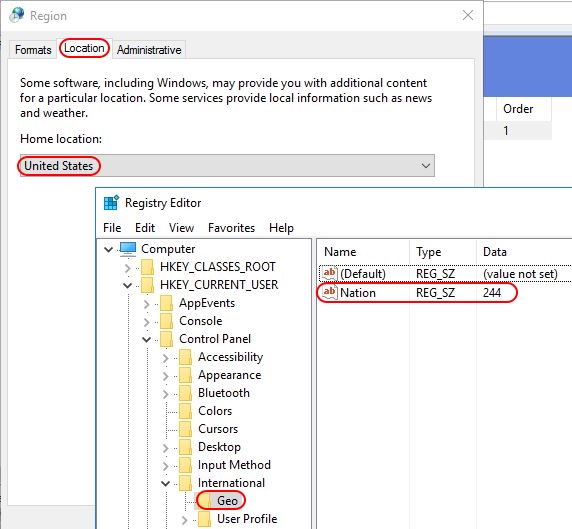
To determine the country ID, change the location manually on the second tab of the Control Panel item Regional Settings and than check the aforementioned registry value. For example, when I select Austria as my location, the value Nation is set to 14. Before it was 244, which is the country ID for the United States.
Now we have all the information we need to set the correct location for all users. The easiest way to accomplish this is by using a Group Policy Preference.
Open your Group Policy Management Console (GPMC.msc) and navigate to User Configuration \ Preferences \ Windows Settings \ Registry. With a right-mouse click on Registry select New \ Registry Item. Configure the registry item as follows:
- Action: replace
- Hive: HKEY_CURRENT_USER
- Key path: Control Panel\International\Geo
- Value name: Nation
- Value data: <your value>, e.g. 14

I recommend to execute this policy in the user’s security context (tick the Run in logged-on […] box on the Common tab).
In case you require multiple locations for a variety of scenarios within the same Group Policy, use an Item-Level Targeting filter. This is explained in the section Configuring regional settings using Group Policy.
The registry item is now created and will be deployed to all users to whom the particular Group Policy applies.
It is possible to rename the registry item afterwards:
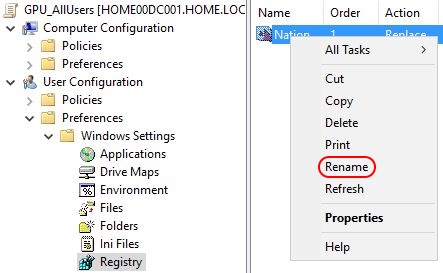
Just remember that modifying the item resets it to its original name (=the value name) and you will have to rename it again.
I hope this article was of some help to you.
Dennis Span works as a Lead Account Technology Strategist at Cloud Software Group in Vienna, Austria. He holds multiple Citrix certifications (CCE-V). Dennis has been a Citrix Technology Advocate (CTA) since 2017 (+ one year as Citrix Technology Professional, CTP). Besides his interest in virtualization technologies and blogging, he loves spending time with his family as well as snowboarding, playing basketball and rowing. He is fluent in Dutch, English, German and Slovak and speaks some Spanish.
В стандартном образе операционной системы Windows Server 2012, по умолчанию установлен английский язык. Хотя английский язык это некий стандарт в IT, но не всегда удобно и практично для некоторых пользователей использовать операционную систему на иностранном языке.
В таком случае в ОС Winows Server предусмотрена возможность загрузки и установки необходимого языка. В этой статье мы рассмотрим как можно будет установить другой язык на Вашу ОС Windows Server 2012.
И так, чтобы установить другой язык на наш виртуальный сервер, кликнем правой клавишей на меню Start и выберем Control Panel
В появившемся окне Control Panel выбираем Add a language и переходим к настройке локализации.
В окне добавления локализации, можем наблюдать что на данном сервере уже установлен английский язык. Чтобы добавить необходимый нам язык/локализацию, щелкаем Add a language.
В следующем окне, выбираем нужную нам локализацию нашей ОС.
После чего дожидаемся окончания установки пакета.
При успешной установки локали можем наблюдать данное сообщение.
Теперь необходимо применить установленный язык ко всему интерфейсу операционной системы. Для этого, в этом же окне, на нужном нам языке, нажимаем Options
Находимо надпись Make this the primary language и щелкаем по ней. После чего нажимаем Save
Теперь для применения изменений необходимо перезайти или перезагрузить ОС. Жмем Log off later, это мы сделаем позже.
Переходим в Advanced settings
В Override for Windows display language и Override for default input method, выставляем установленный нами новый язык, и сохраняем настройки Save.
Теперь необходимо сменить региональные стандарты. Чтобы это сделать, переходим снова в панель управления Control Panel. И жмем на Change date, time, or numbers formats
На вкладке Formats устанавливаем нужный язык.
Во вкладке Location также выбираем нужную нам страну.
На вкладке Administrative, жмем Change system locale и выпадающем меню выбираем туже страну локализации.
Нажимаем Ok, и Restart Now перезапустим сервер для применения изменений.
ВАЖНО!!!
Если у Вас на сервер запущены важные программы, рекомендовано завершить их работу.
Так же все эти действия можно сделать через PowerShell. Откройте консоль PowerShell и вставьте данную команду:
Set-Culture ru-RU; Set-WinSystemLocale -SystemLocale ru-RU; Set-WinUILanguageOverride -Language ru-RU; $list = Get-WinUserLanguageList; $list.Add("ru-RU"); Set-WinUserLanguageList $list -Force; Set-WinHomeLocation -GeoId 203; После перезапуска ОС Вы сможете насладиться работой Windows на родном Вам языке.