
I have not worked with multi-language Windows for a while, which seems to have changed a lot compared to Windows 10, I am happy that I found Peter Klapwijk’s blog post and his script . If you are still using the XML, maybe it’s time to try out the PowerShell LanguagePackManagement in Windows 11.
Inspired by Peter’s post, I did some tests some tests my own and would like to write down some of my findings.
New module
There are some useful commands in the module, just remember some of them are Alias, and they do the same things.
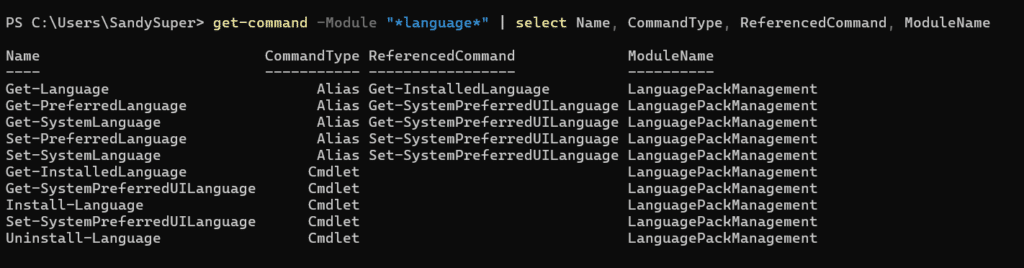
Other International commands can be found in this documentation: https://learn.microsoft.com/en-us/powershell/module/international/?view=windowsserver2022-ps
Language and Regional Settings
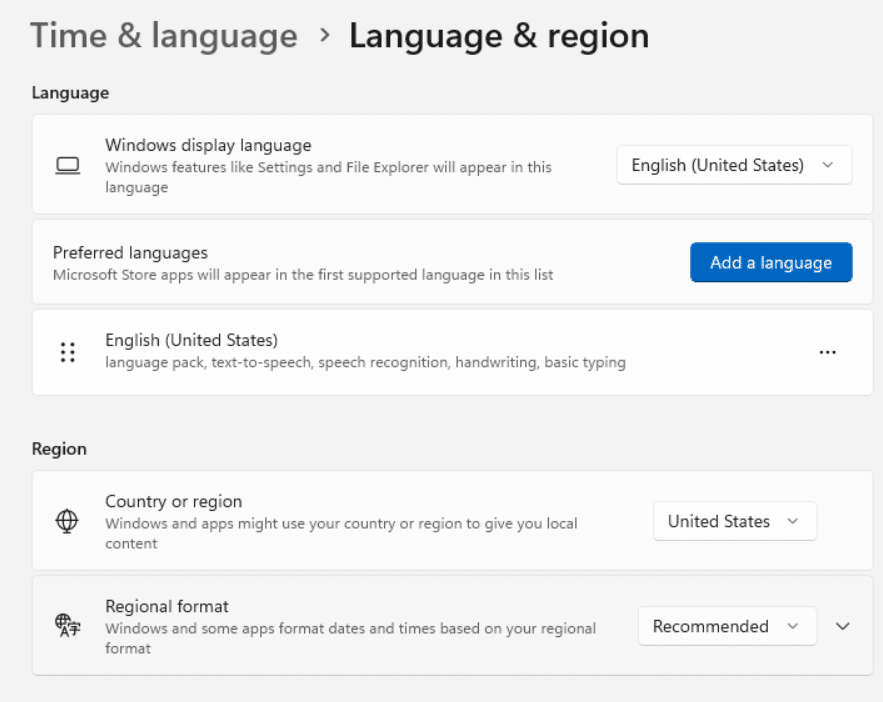
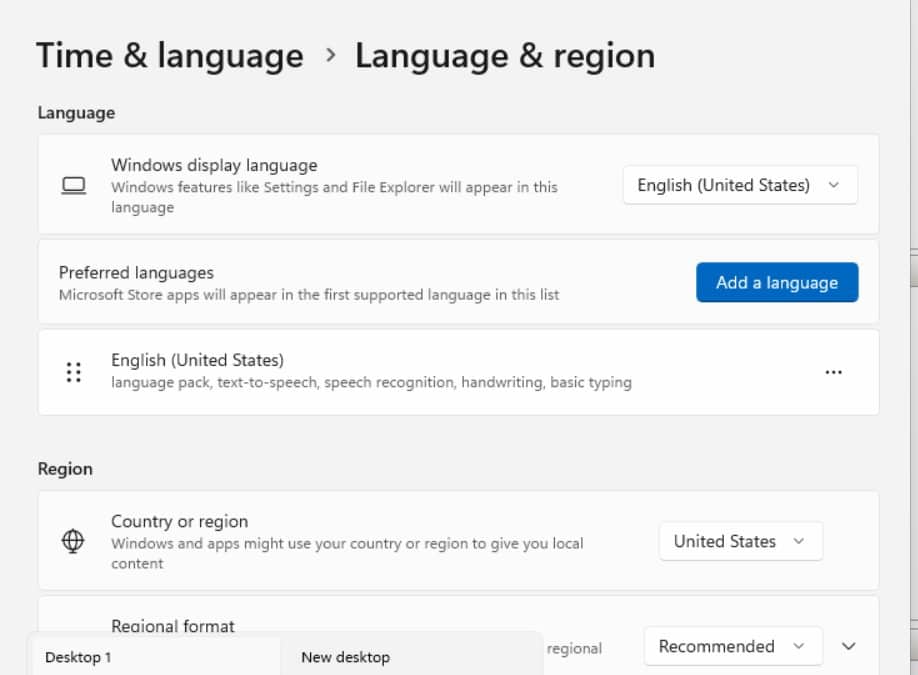
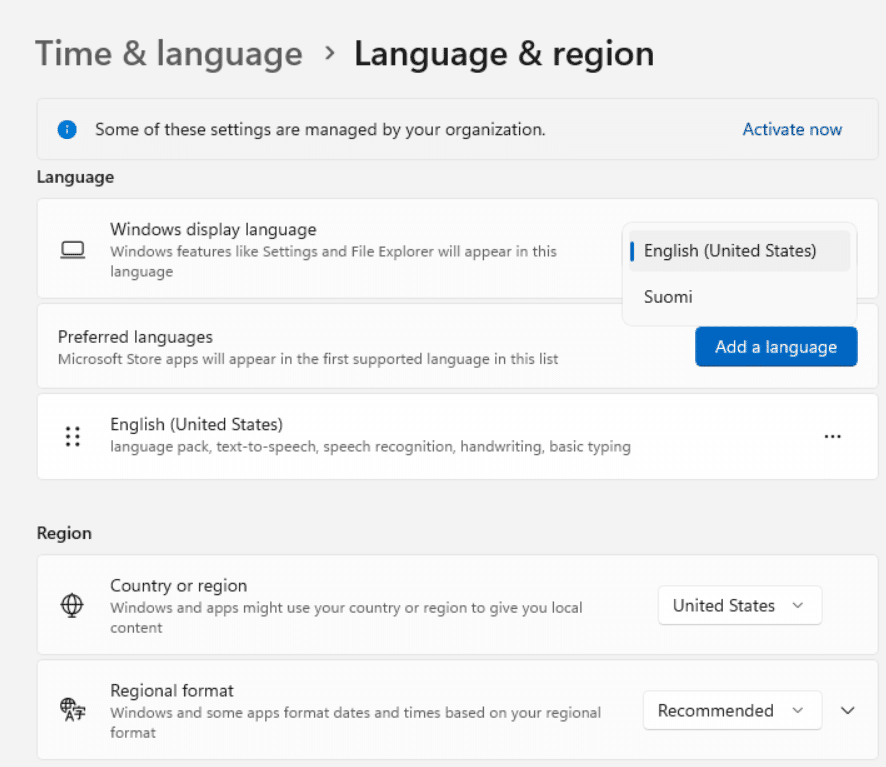
There are four settings in the “Language & Region” UI:
- Windows display language. This language will be used in File Explorer and Settings
- Preferred languages. Microsoft Store apps will appear in the first supported language in the list. Example Company Portal will use the first language in the list. Also input keyboard
- Country or region. Windows and Apps might use this information to get local content
- Regional format. Windows and apps might use this for time, and currency based on regional format.
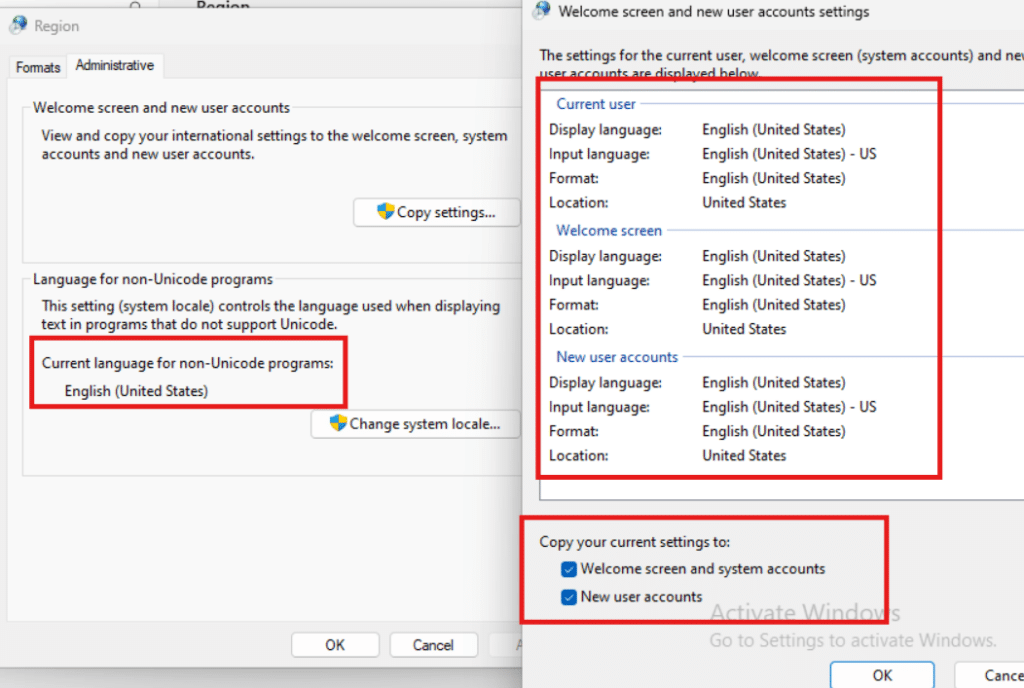
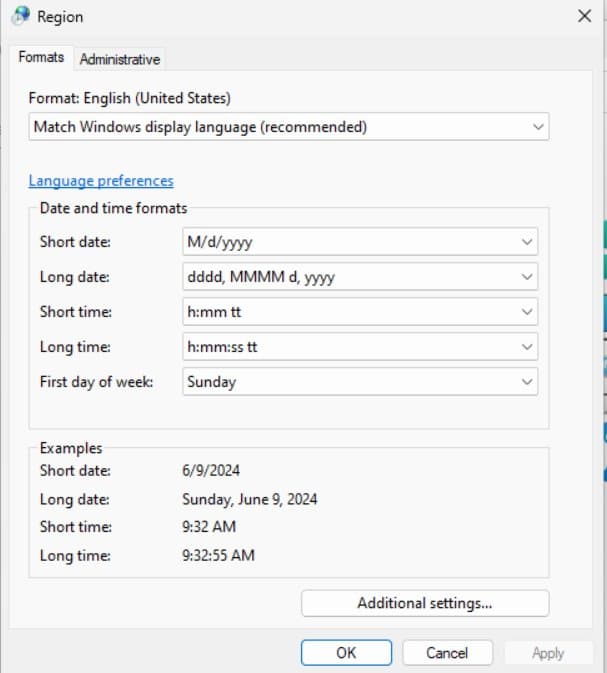
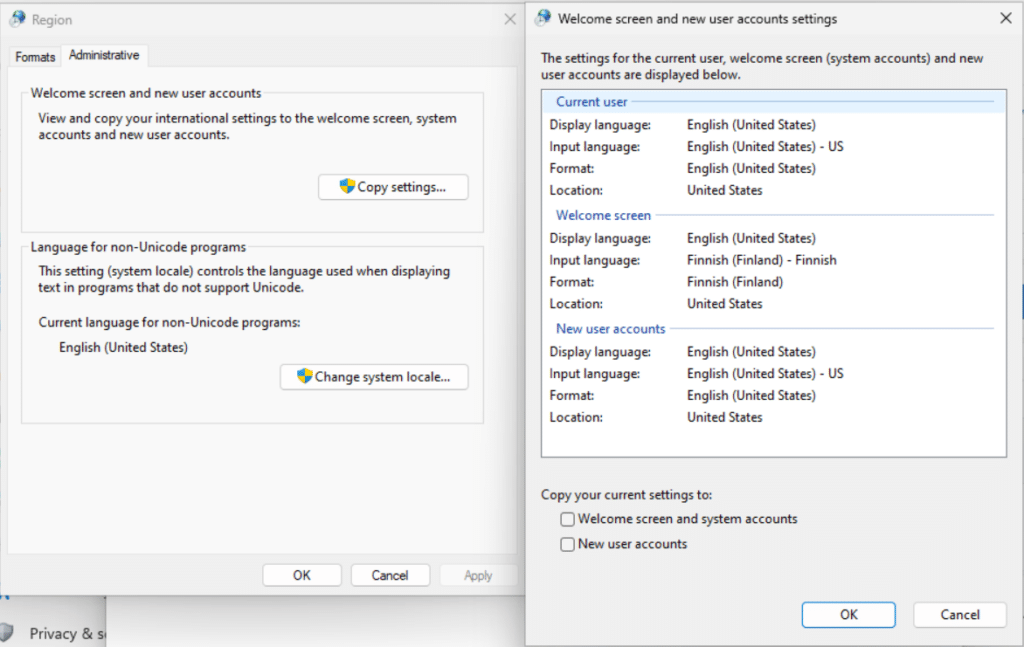
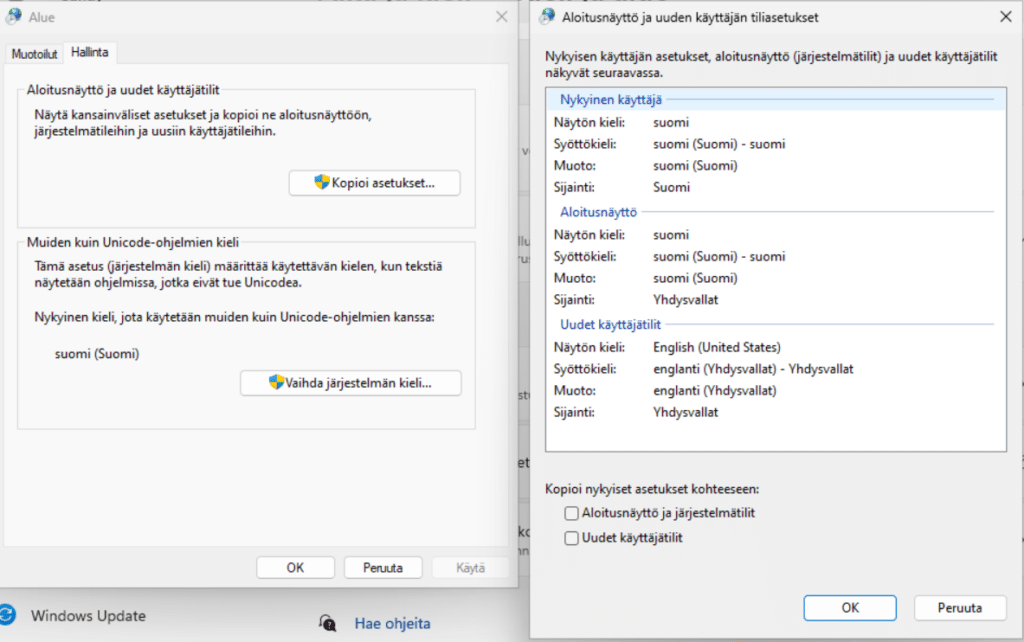
What else? The Region Administrative settings.
- non-Unicode program. Some old or bad applications don’t support Unicode, it might need to change the language to help show the correct characters.
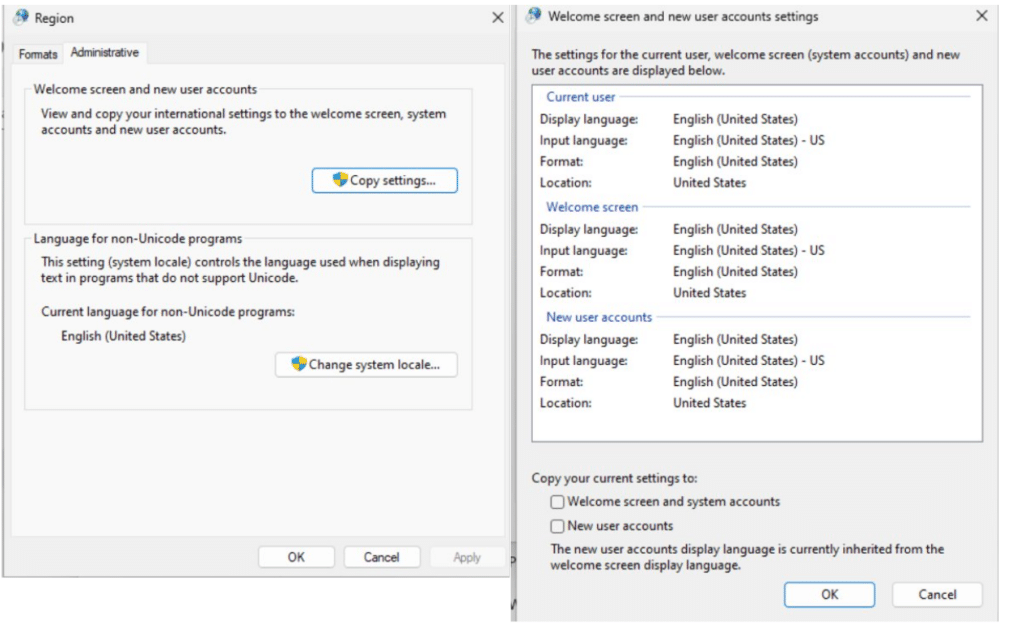
- Welcome screen and new user account settings. This allows us to copy the current user’s international language settings to the Welcome screen and system accounts, and/or New user accounts.
When we want to change the whole OS, for example “installing updates”, “restarting computer”, “Welcome”, “Getting ready”, or File Explorer, start menu, all of these settings are needed to be changed.
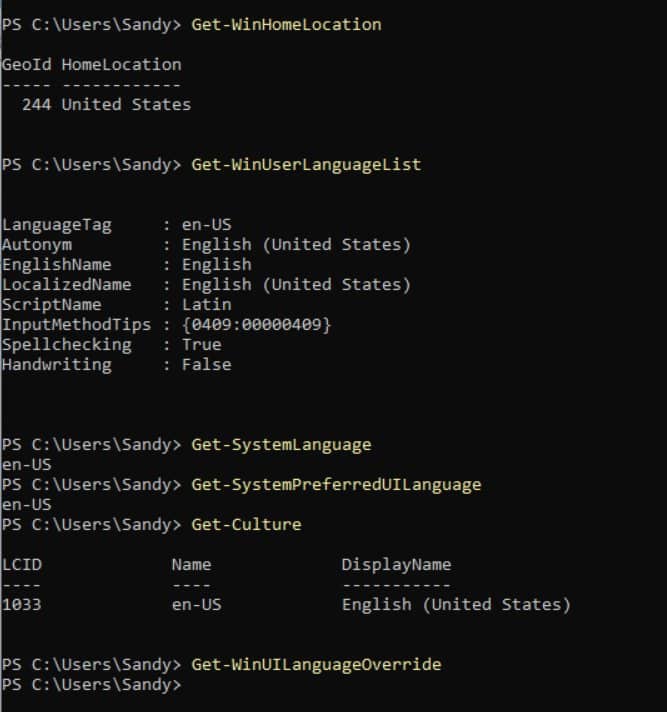
Before we changed anything
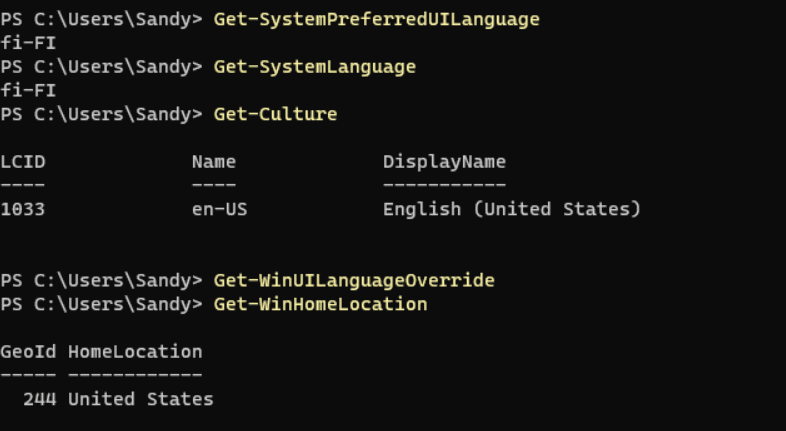
Before we change anything, just use some PowerShell command to show the current settings.
So let’s change to Finnish
Install Finnish language
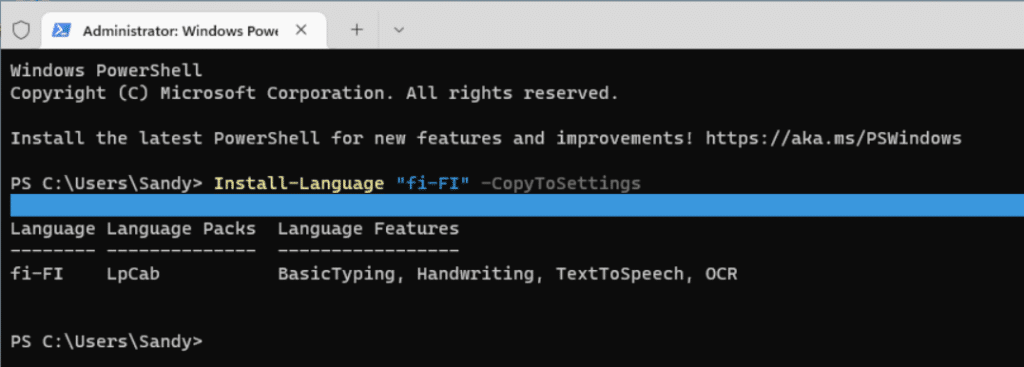
We can use Install-Language -Language “fi-FI” -CopyToSettings or without -CopyToSettings for installing the Finnish language, the language tag can be found in the link Language tag can be found here: https://learn.microsoft.com/en-us/windows-hardware/manufacture/desktop/available-language-packs-for-windows?view=windows-11#language-packs
Note: Install-language command needs to be run as admin
Question: Difference between using CopyToSettings or without?
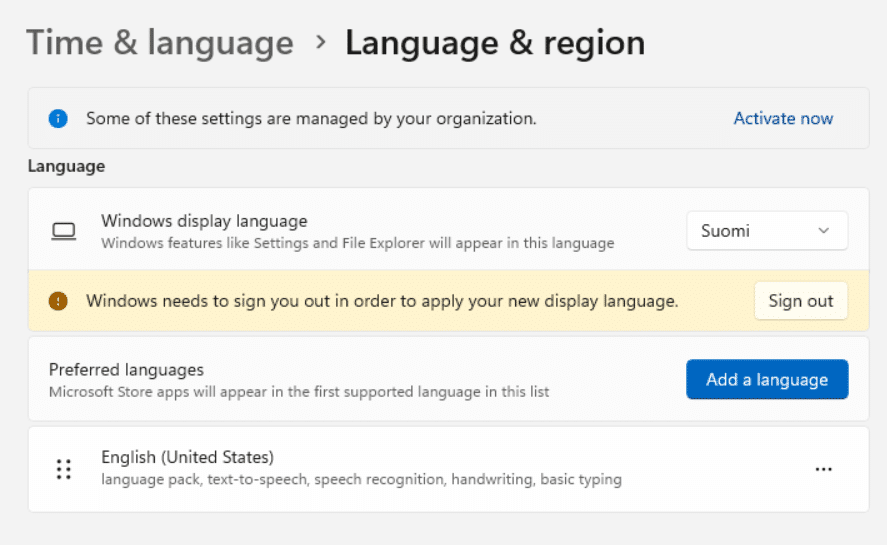
In my example here, I use CopyToSettings, before I run this command, I have everything in English, as the screenshots showed above. Let’s see again after I have run the command and before I restart the machine.
After I restarted the machine
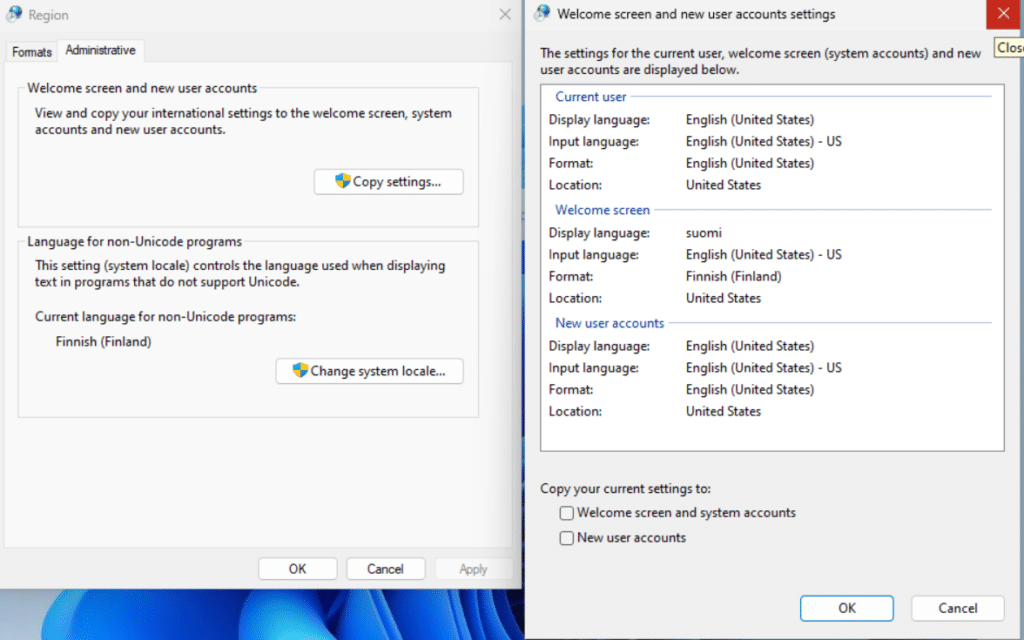
Results:
- Install-Langauge did install our desired language
- Users can now change “Windows display language” to the language we just installed.
- The additional language we just installed isn’t added to the preferred language list
- Welcome screen (and system) Display Language and region format are changed. CopyToSettings parameter has changed these settings
- Non-Unicode language support is changed. CopyToSettings parameter has changed these settings
- Current user’s settings aren’t changed.
- New users’ settings aren’t changed
Change Windows display language
We can use Set-WinUILangaugeOverride -Language “fi-FI” to change Windows display language to Finnish.

Adding additional preferred languages
Normally when we want to change Windows display language, we first choose “Add a language” in the Preferred languages, and then the language will show up last in the list. Then when we choose this language from the “Windows display language” list, we will see this language will become the first of the preferred language list.
But since we install the language by using the PowerShell command that runs as admin, we don’t see the language show up in the user’s preferred languages, we only see it shown in the “Windows display language” list. By running the command Set-WinUILangaugeOverride, it only sets the Windows display language and doesn’t add the language to the preferred language list for this user, so we are missing the input locale for this language. That’s why we need another set of commands to add the input locale.
Preferred language input locales can be found here: https://learn.microsoft.com/en-us/windows-hardware/manufacture/desktop/default-input-locales-for-windows-language-packs?view=windows-11#input-locales
$OldList = Get-WinUserLanguageList
$UserLanguageList = New-WinUserLanguageList -Language "fi-FI"
$UserLanguageList += $OldList
Set-WinUserLanguageList -LanguageList $UserLanguageList -Force

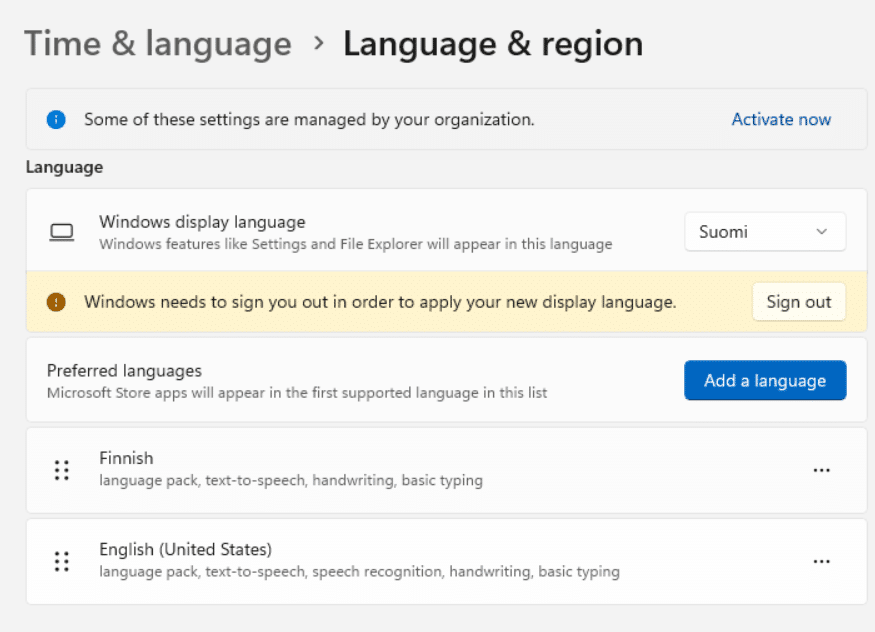
After signing out and login again, Windows display language has now changed.
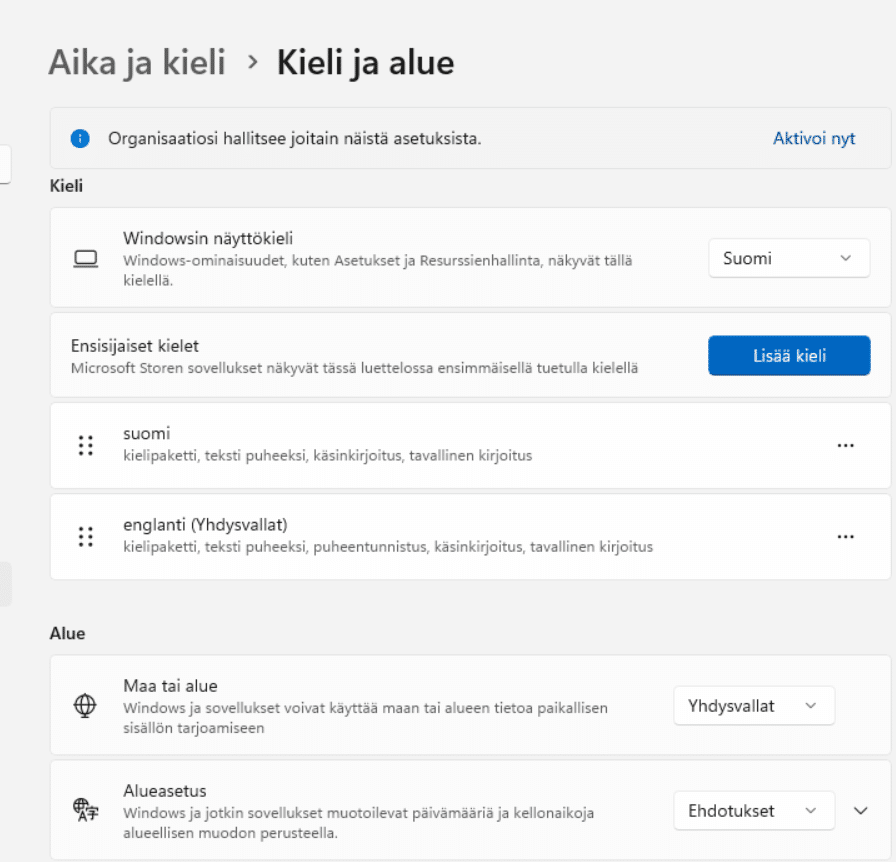
Change Region and Region format
We can use Set-WinHomeLocation -GeoId “77” command to change “Country or region” to “Finland”, and use Set-Culture -CultureInfo “fi-FI” command to change the regional format to Finland.
GeoID can be found here: https://learn.microsoft.com/en-us/windows/win32/intl/table-of-geographical-locations

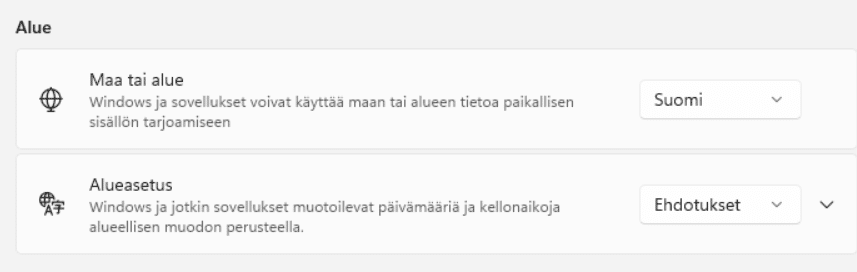
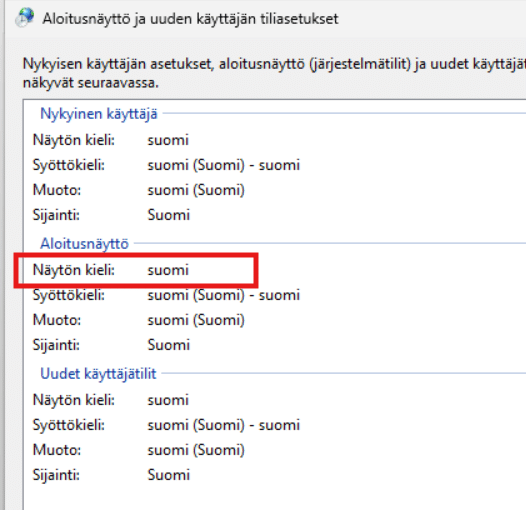
After we have made all the changes above, what do the regional administrative settings look like? Current user’s settings are all changed to Finnish (Suomi), The Welcome screen is 80% changed, and new users’ settings are untouched.
Copy the current user setting
One last step, we copy the current user’s international settings to the Welcome screen and system, and new users.
Copy-UserInternationalSettingsToSystem -WelcomeScreen $True -NewUser $True
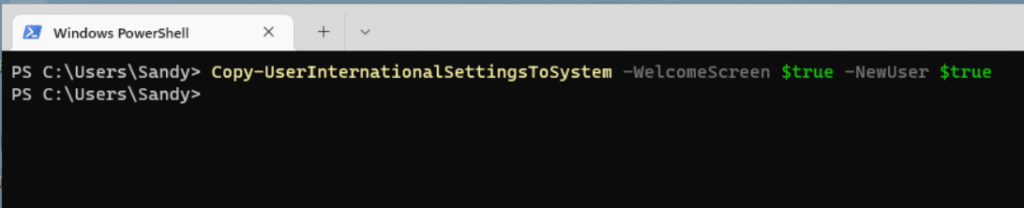
Restart the machine, and we see the changes are applied.
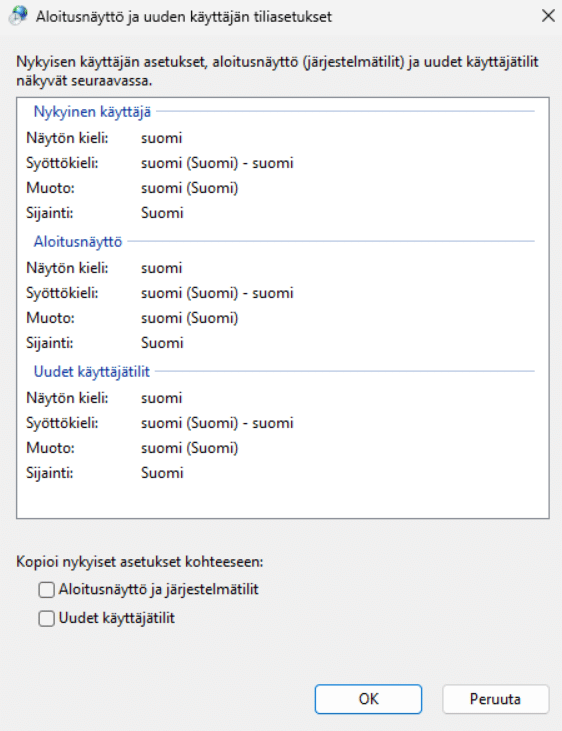
Now you have successfully added a new language pack to your Windows 11 and changed everything to that language. One more thing, the Company portal will use the first language in the preferred language list. It will change its language in time (maybe not immediately).
What else do you need to know?
Wipe the device
Remember this? System language (Welcome screen display language). If I wipe the machine from Microsoft Intune or reset the machine locally, the default OS language is Finnish, and language packs will be still in the machine even if you wipe/reset the device.
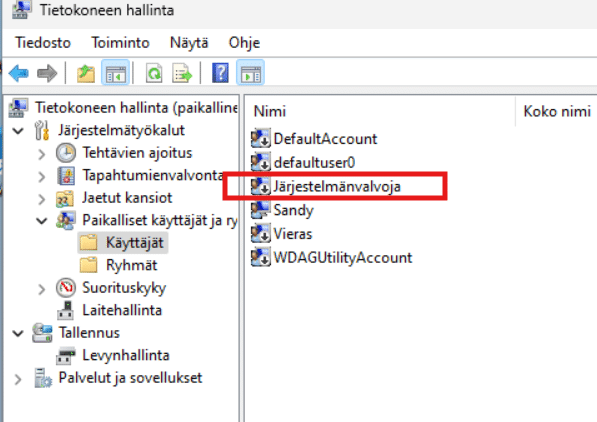
If you have Autopilot profile Langauge (Region) set to “Operating system default”, the whole OS will be Finnish, so your local Administrator account will show as “Järjestelmänvalvoja“, not English “Administrator”. If you have some scripts or Intune User account control policy using the name “Administrator”, you will have some issues. It means, if you are handling a multi-language environment, you need to always consider using SID as much as possible, not the name.

If you have Autopilot profile Language (Region) set to “User select”, the user will see this language selection in OOBE, and the default selected language is the “System Language” we had before we wiped the device.


Another option is, in the Autopilot profile, to use Language (Region) to English. Then use script or IntuneWin32App to change the region, language, input, and timezone as you desire later.
With or without CopyToSettings?
The Install-Language command has CopyToSettings parameter, it is optional. So if you want to change the Non-Unicode language settings, you need to use this CopyToSettings parameter. If you don’t want to change Non-Unicode language setting, then don’t use the CopyToSetting parameter.
Change System Language
Change System language can use Set-SystemPreferredUILanguage, it changes the Welcome screen display language and system language. Now if you look at my script, you might notice I didn’t use this command at all. Why? Because I used the Set-WinUILangaugeOverride to set the current user’s Windows Display language, then I used Copy-UserInternationalSettingsToSystem -WelcomeScreen $True to copy the current user’s Windows display language to the Welcome screen and System. In my test, regardless I run the Set-SystemPreferredUILanguage before or after I run Copy-UserInternationalSettingsToSystem -WelcomeScreen $True without restarting the computer in between, the Copy-UserInternationalSettingsToSystem -WelcomeScreen $True always wins. Now remember, it is without restarting between these two commands, if I would run first Copy-UserInternationalSettingsToSystem -WelcomeScreen $True, then restart the machine, then run again Set-SystemPreferredUILanguage, then restart the machine, you will see the Set-SystemPreferredUILanguage language would apply.
Autopilot and ESP
Now finally we talk about Autopilot and ESP. Change MUI requires the machine to restart, it doesn’t matter if you do this in PowerShell or from Window UI itself. Can you change these settings and apply the settings without a restart? No, simply just no.
So what do we do in Autopilot?
- Modify the script and add some of your detection methods. Remember to leave the exit code as 3010
- Pack the script as Intune Win32App
- Use the Install command to make sure it runs the script in 64bit:
%windir%\SysNative\WindowsPowerShell\v1.0\powershell.exe -ExecutionPolicy Bypass -file Invoke-ChangeDefaultLanguage.ps1 - Chose 3010 Soft reboot
- Assign this package to device group, not user group. When assigning the app to the device group, this app will be installed during device setup, and make sure to use the Enrollment Status page (ESP) to track this app. Intune triggered reboot is supported during device setup, and not supported in User state Account setup.
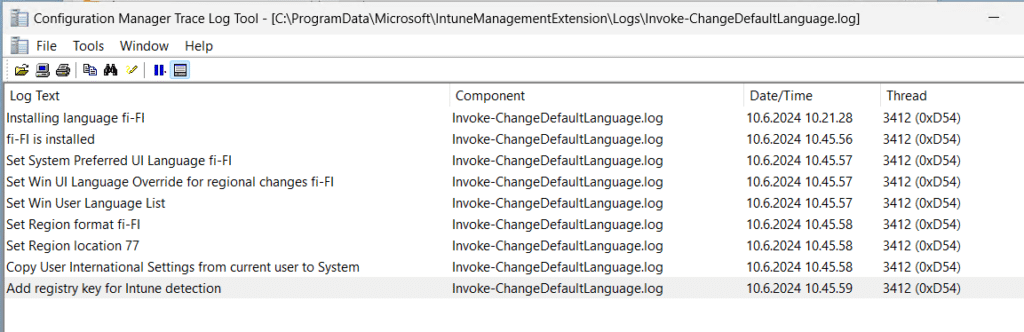
You will see the language changed during the ESP state, and you might see it change between two different languages during the whole process, but it will eventually apply the language you have configured in your script.
Note, The Install-Language takes a long time to download and install the language pack and feature package, I sometimes had to wait almost 20 minutes until it finished installation.
A short video of my User-Driven Autopilot in fast mode.
What about those devices are already installed and has existing user?
If the device is already provisioned/Enrolled, the whole OOBE provisioning state is already gone. So running the script in System context will not change existing users’ profile language settings. Which means you will need two scripts. One for installing language and copying the settings to system and new users, same as the one that we use during Autopilot. Then use another script run as user context, and change whatever you need to change for the user.
Since the user is already using the machine, and the user might have preferred input locale, I would consider not enforcing the newly installed language as the first of the preferred language, but set it as the last of the list. Please modify the script as you see fit for user context.
Enterprise State Roaming
Just a side note here, if you are using the Enterprise State Roaming feature and sync language settings, you might see some languages added back to the preferred language list.
Finally
Finally, you can find the script in my Github Gist here. Hope you enjoy this post!
Views: 18,615

Do you want to change the regional settings in Windows 10 and 11?
You can easily change a regional setting in Windows 10 and 11. Select any location where you live now after changing the regional setting, you see changes in date, time, and location. Your computer shows those apps’ exact locations.
Click Here: 3 Ways to Create a Folder in Windows 10 and 11.
I am telling you how to change a regional setting in Windows 10 and 11.
Let’s go!
Step 1 Left-click on “Windows start (button)”
Step 2 Open “Setting”
Step 3 Click on “Time & Language” in the settings list

Step 4 Click on “Region (text)” in the sidebar of Time & Language

Step 5 Click on “Country or region” and select any location where you live now.

Step 6 Drag the mouse down and see all the information about the calendar, time, and date
Step 7 Change your data format in a regional setting
In conclusion, knowing how to change a regional setting in Windows 10 and 11 is crucial for optimizing your user experience and ensuring that your system reflects your preferred language, time zone, and other regional preferences. The process may seem daunting at first, but with the step-by-step guide provided in this blog, you’ll find it easy and straightforward.
We hope this article helped to change a regional setting in Windows 10 and 11. It is a simple process that can be completed in just a few clicks.
How has changing your regional settings in the past impacted your usage of Windows, and what specific benefits did you notice after making the adjustments? Share your experiences and insights in the comments below, and let’s learn from each other!
If you enjoyed this post, please subscribe to our YouTube channel. You may also find us on Twitter, Pinterest, Instagram, and Facebook.
How do I change my region on Windows 11?
To change the region on Windows 11, go to Settings > Time & Language > Region, select your desired region, and click “Restart now” to apply the changes.
How do I change my default regional format?
To change the default regional format on Windows 11, go to Settings > Time & Language > Region, and choose your preferred format from the drop-down menu.
Where is the region and language settings in Windows 11?
Find the region and language settings in Windows 11 by going to Settings > Time & Language.
How to change regional settings for all users on a computer?
To change the regional settings for all users on Windows 11, access Settings > Accounts > Family & other users > Set up assigned access, and follow the instructions to apply the changes.

Download Windows Speedup Tool to fix errors and make PC run faster
Windows 11 offers many languages so you can work in the language you prefer to read and write. You can also change your region, time, and date to suit your needs. Here are some easy steps on how to change these settings to suit your needs.
Time & Language Settings in Windows 11
The settings to change language, region, time, and date on Windows 11 are a bit different from what they were in Windows 10. Let’s see each of them in detail.
When Windows 11 is installed, you have the option of choosing the language to use as the default. However, if you made a mistake or used a device that already had a language set, you can adjust the language settings of your device by following the steps below:
- To get it started, open Windows 11 Settings first. In order to do this, simply right-click on Start and select Settings.
- Click on the Time & Language option on the left side of the screen.
- From the right, choose Language & Region.
- In the Language section, Windows displays the language that you are currently using.

- To change the language, click the Add a language option next to the Preferred languages option.

- Now select the required language and click Next.
- Check the box labeled Set as my Windows display language on the next pop-up screen.
- Now click on the Install button to proceed.
- When your preferred language is downloaded and installed on your computer, sign out of Windows to apply the new display language.
How to Change Region on Windows 11
The region setting in Windows 11 allows you to customize your experience so that relevant content is displayed based on where you are. If you need to change the setting, follow these steps:
- Press the Windows key + I keyboard shortcut to open the Settings app.
- From the left side, select Time & Language.
- Go to the right pane and scroll down to Language & Region.

- Under the Region section, click on the drop-down menu next to the Country or region option to select your country or location. Doing so makes Windows and apps display content specific to your location.

- Now expand the Regional format option, and then click the Change formats button.

- Here you can change the date, the day of the week, the short and long dates, the short and long times, and the calendar. It will help Windows and apps to format date and time based on your regional format.
How to Change Time and Date on Windows 11
You don’t need to reinstall Windows 11 if you are using a computer with incorrect language settings. All you need to do is adjust a few settings.
- Through the Settings app
- Through the Windows Taskbar
Here are the details of each:
Through the Settings app
- To get it started, open the Start menu, type Settings, and press Enter. This will launch the Windows Settings.
- From the list of options on the left, click on Time & Language.
- After that, click on Date & time on the right.

- On the next screen, you will then need to turn the Set time automatically off.
- Now click the Change button next to the Set the date and time manually option.
- When you click Change, a new window appears that allows you to change the time and date.
- You will then need to set the appropriate date and time on your computer and then hit Change to confirm.
- You are done. Now your Windows 11 PC is up to date.
- Now you can turn back on the Set Time Automatically switch if you want Windows to get the time automatically.
- There is also an option to set the time zone for your region here. To do so, turn on the toggle next to the Set time zone automatically option.
- Next, scroll down to the Additional Settings section and click on the Sync Now button. In this way, Windows 11’s time and date are synced with Microsoft Network Time Protocol servers.
Through the Windows Taskbar
Here’s one more way to change the date and time on your Windows 11 PC. To do so, follow the instructions below.
- Go to the right-hand side of your System tray and right-click on Clock.
- On the pop-up menu, select the Adjust date and time option.
- Now follow the same steps discussed above to adjust the time and date in Windows 11.
Read: How to change Date and Time formats in Windows 11
Why do we need to change Language, Region, Time and Date
You may need to change the date and time, or region for one of the following reasons:
- You may need to change the language, time and date if you have bought a computer from another country.
- These settings may also need to be changed if you are traveling and want to use the local time settings of your destination.
- You changed your region and now find it difficult to read text, which is not in your native language.
Digvijay is a Windows enthusiast who likes to write about the Windows OS and software in specific, and technology in general. When he is not working, he would either surf the web or dives into learning tech skills.
On Windows 10, users can select multiple languages that will be used to customize the appearance of Windows and 3rd party apps, as well as to set default region and time preferences. Here’s how to do it.
How to change your Windows 10 language?
1) To change your language, first, go to the Start menu, then select the gear icon to open your computer’s Settings.
2) In the window that opens, click Time & language, then select Regional & Language:
3) Go to the column Languages then click Add a language.
4) A list will appear with the languages available on Windows 10. Click on the language you would like to add and it will be added to the set languages on your PC. To set a newly added language as default, click on the desired language in your computer’s list of languages and select Set as default. Users can also set keyboard options or remove a preferred language from the list by selecting Options or Remove, respectively.
N.B. Users can switch between input languages by pressing the Alt and Shift keys simultaneously.
How to change your Windows 10 region settings?
To change your Region, go to the Start menu, select the gear icon to open your Settings, click Time & language, and then select Regional & Language. In the first drop-down, select your preferred country to set your region. The change will be applied automatically.
(Image credit: Future)
Windows 10 will guide you through configuring your preferred language during the initial setup, but if you didn’t select the correct option or use a device already configured with a different language, you don’t have to struggle when your requirements are different, nor do you have to reinstall the operating system.
If you have to change the device’s default language settings, you can do this using the Settings app without reinstalling Windows 10.
In this how-to guide, I will walk you through the steps to change the system’s default language on Windows 10.
How to change default system language on Windows 10
If the incorrect language is configured on Windows 10, you can adjust the system settings to configure the correct language without reinstallation.
Disable language sync
On Windows 10, when using a Microsoft account, some of your preferences (including language) will sync across the device. If you only plan to change the settings on the computer, you should turn off the option to sync your language settings to prevent changing the same settings on other devices.
To disable language preference sync on Windows 10, use these steps:
- Open Settings.
- Click on Accounts.
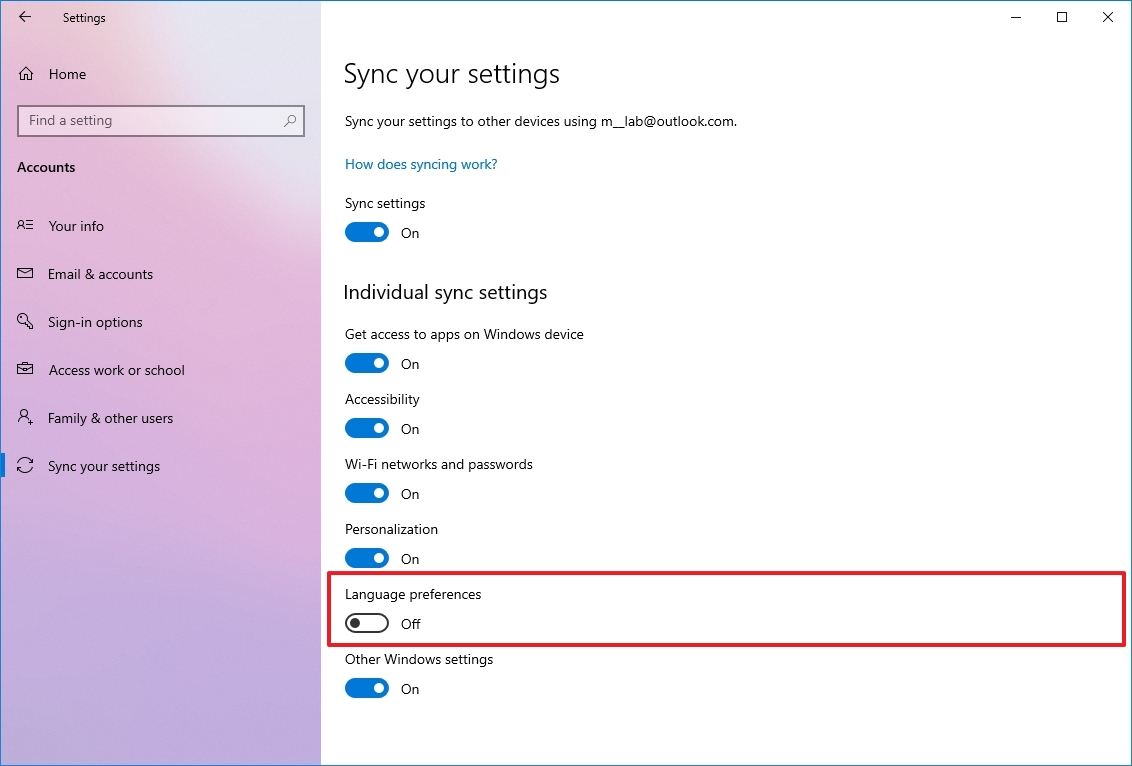
- Click on Sync your settings.
- Under the «Individual sync settings» section, turn off the Language preferences toggle switch.
Once you complete the steps, you can change the language settings without affecting the other devices connected with the same Microsoft account.
All the latest news, reviews, and guides for Windows and Xbox diehards.
Change system language settings
To change the system default language, close your apps, and use these steps:
- Open Settings.
- Click on Time & Language.
- Click on Language.
- Under the «Preferred languages» section, click the «Add a language» button.
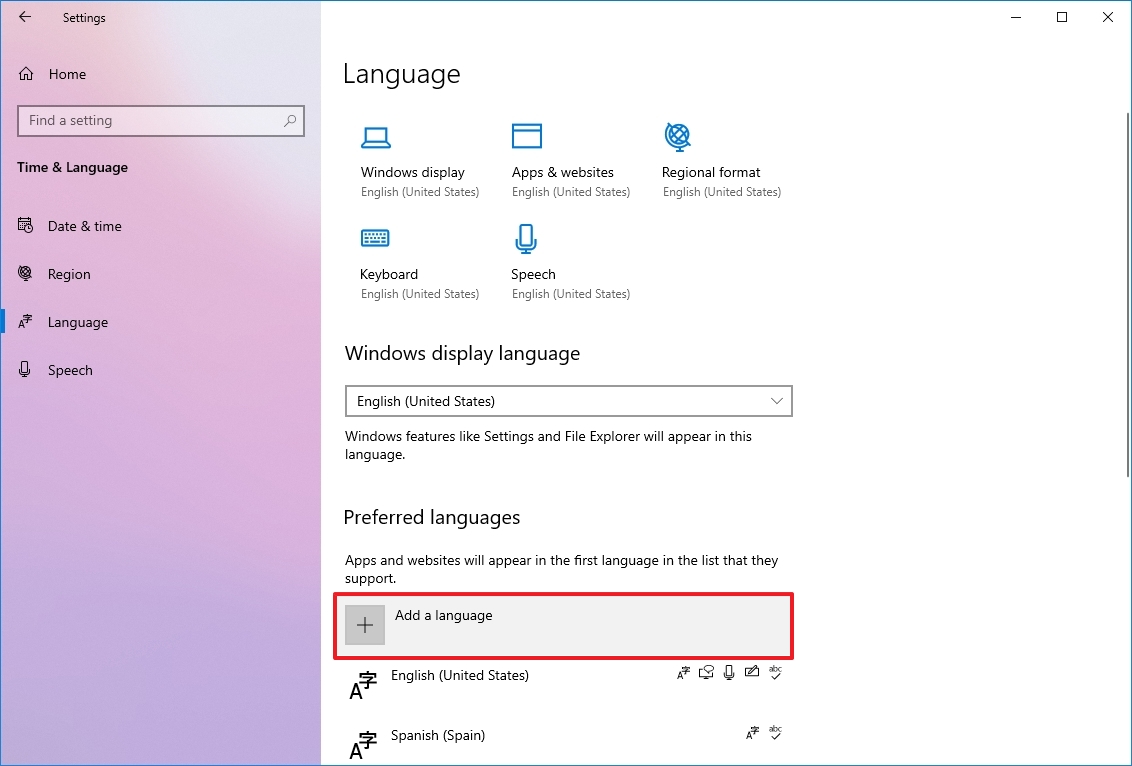
- Search for the correct setting using the language or country name.
- Select the package from the result.
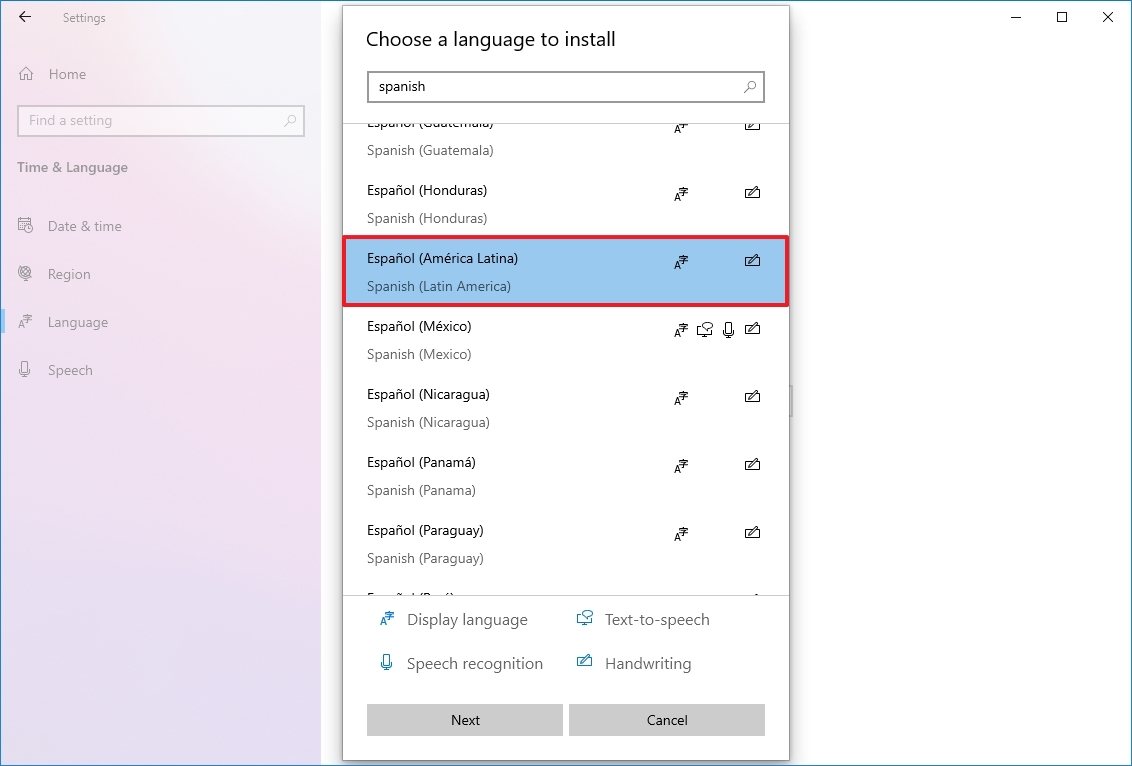
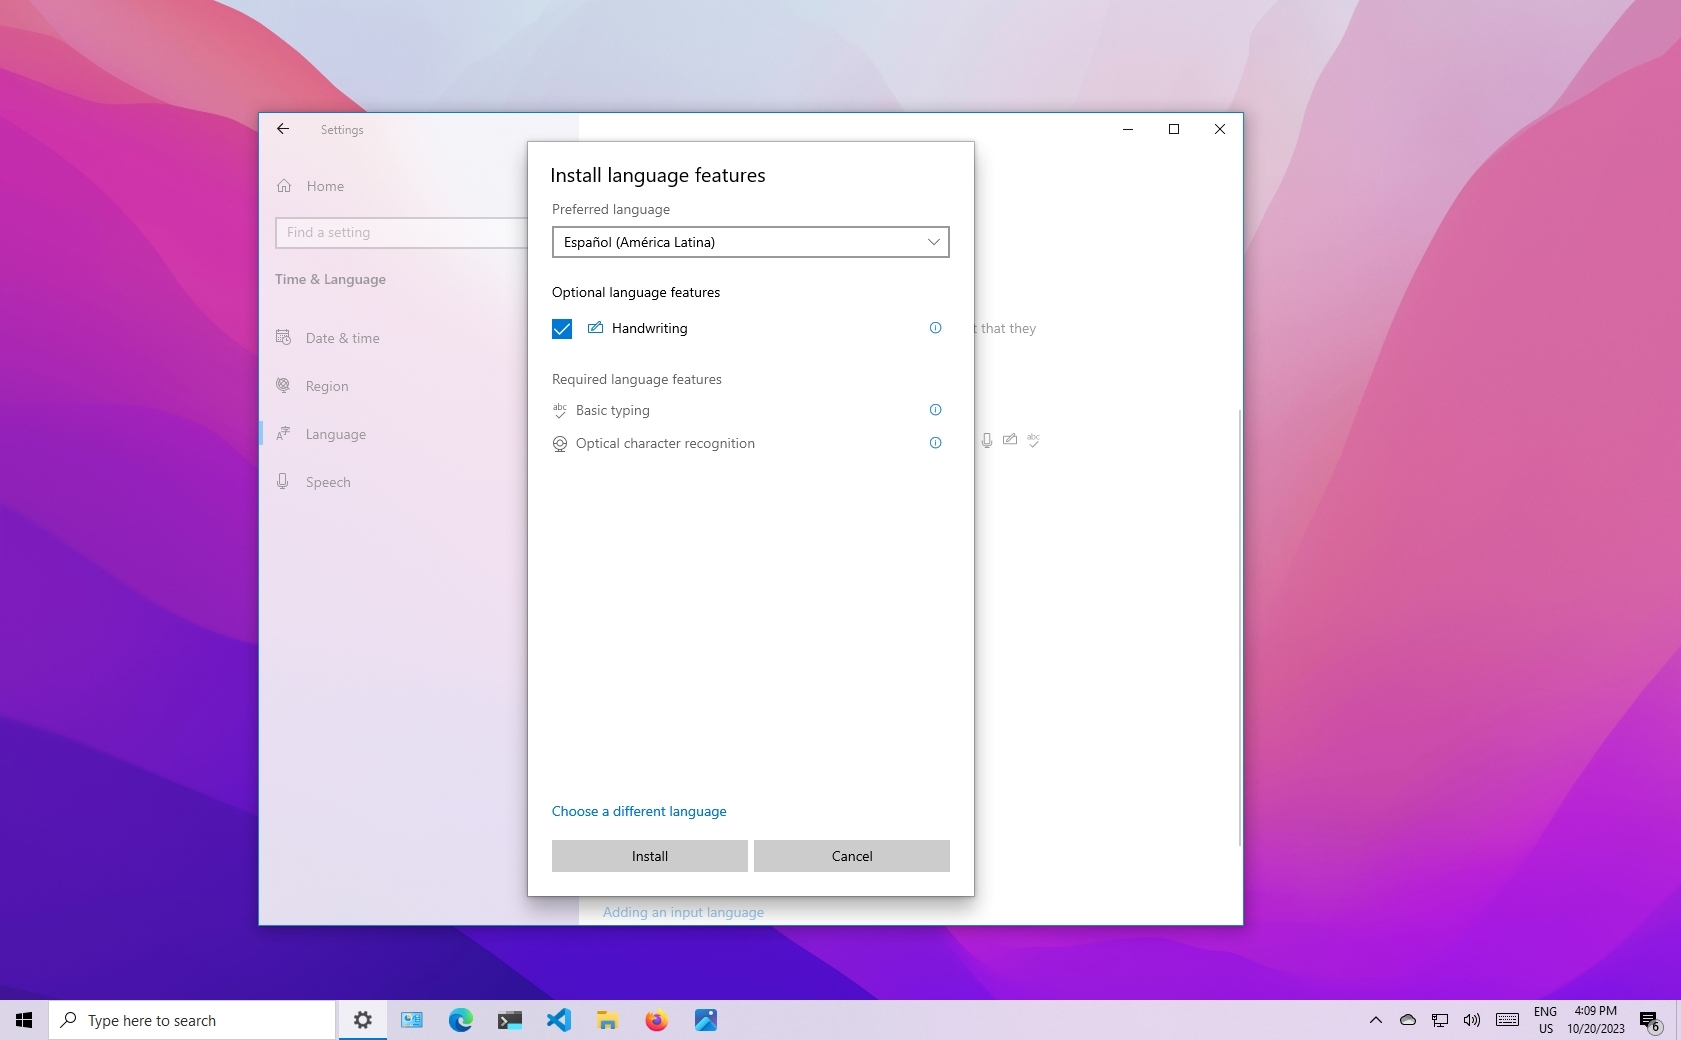
- Click the Next button.
- Check the «Install language pack» option.
- Check the «Set as my Windows display language» option.
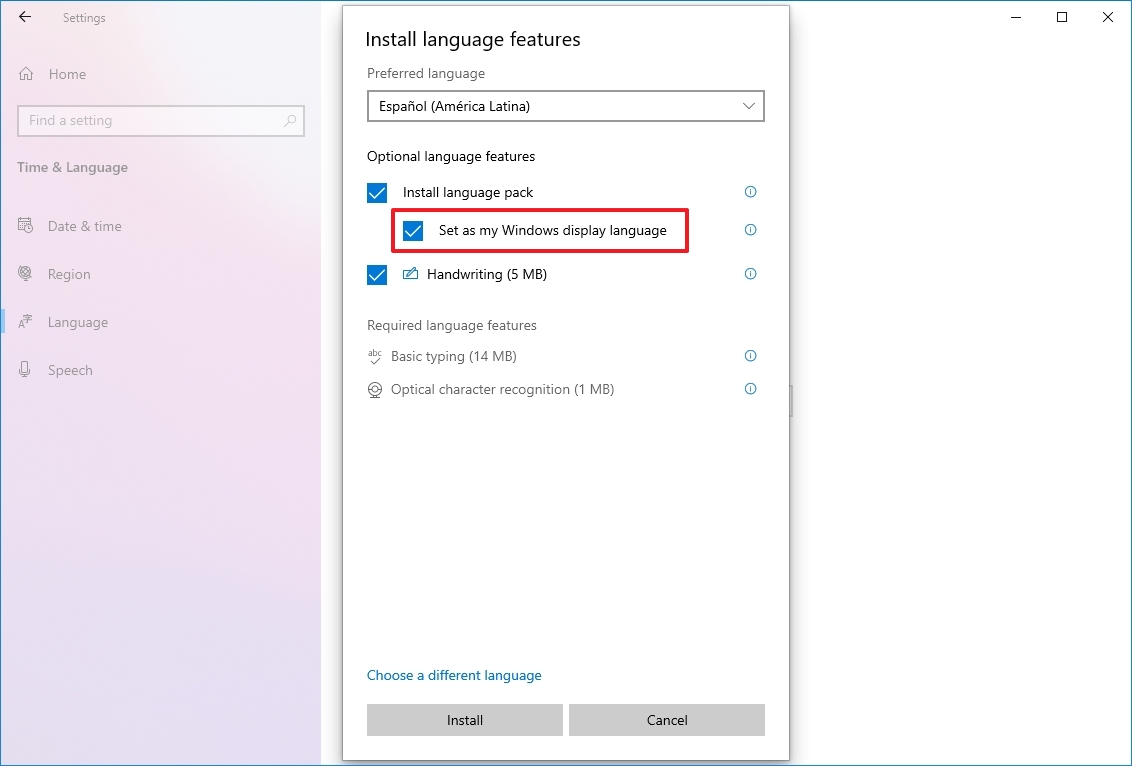
- Check the additional features as needed — for example, «Text-to-speech» and «Handwriting.»
- Click the Install button.
- Click the «Yes, sign out now» button.
- Sign back into the account.
After you complete the steps, the Windows 10 language will change across the experience, including the Sign-in screen, Settings app, File Explorer, Desktop, apps, browser, and websites you visit.
Change system region settings
You will also have to change the region settings if you need to adjust the language settings because you are in a different region.
To change the local region settings, use these steps:
- Open Settings.
- Click on Time & Language.
- Click on Region.
- Under the «Region» section, select the current location with the «Country or region» drop-down menu (if applicable).
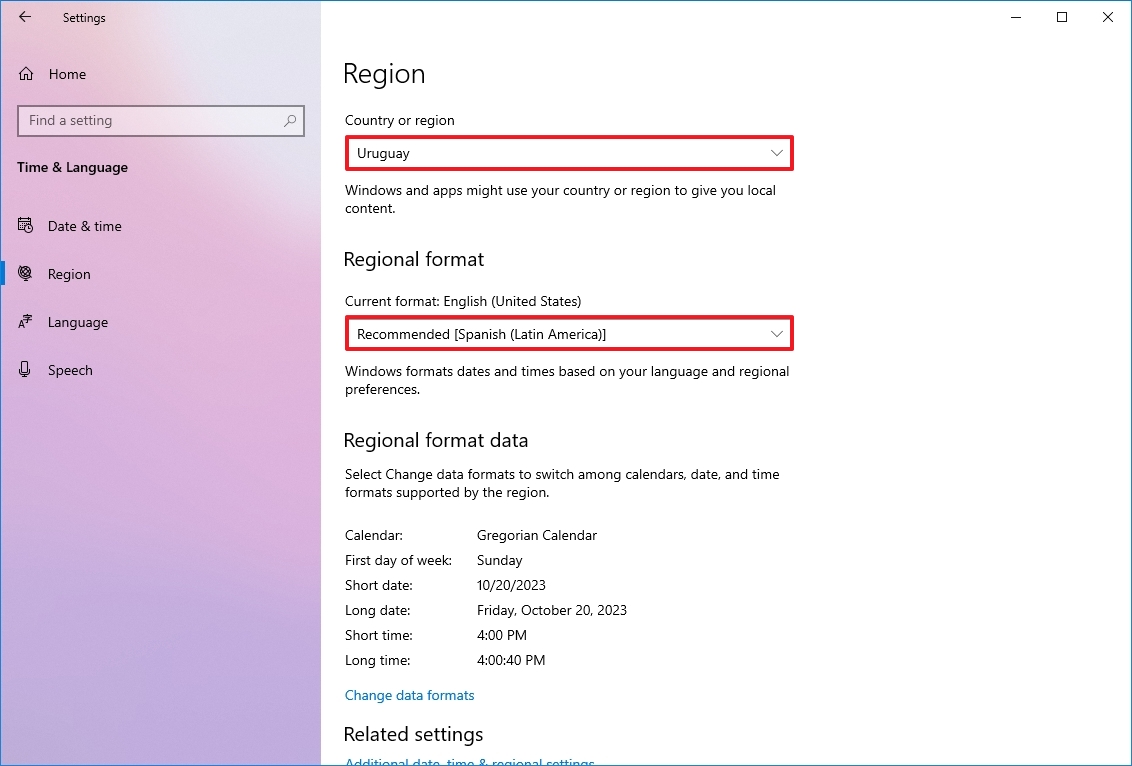
- Under the «Regional format» section, select the formats for the region’s date and time with the «Current format» drop-down menu (if applicable).
- Click on Language.
- Under the «Related settings» section, click the «Administrative language settings» option.
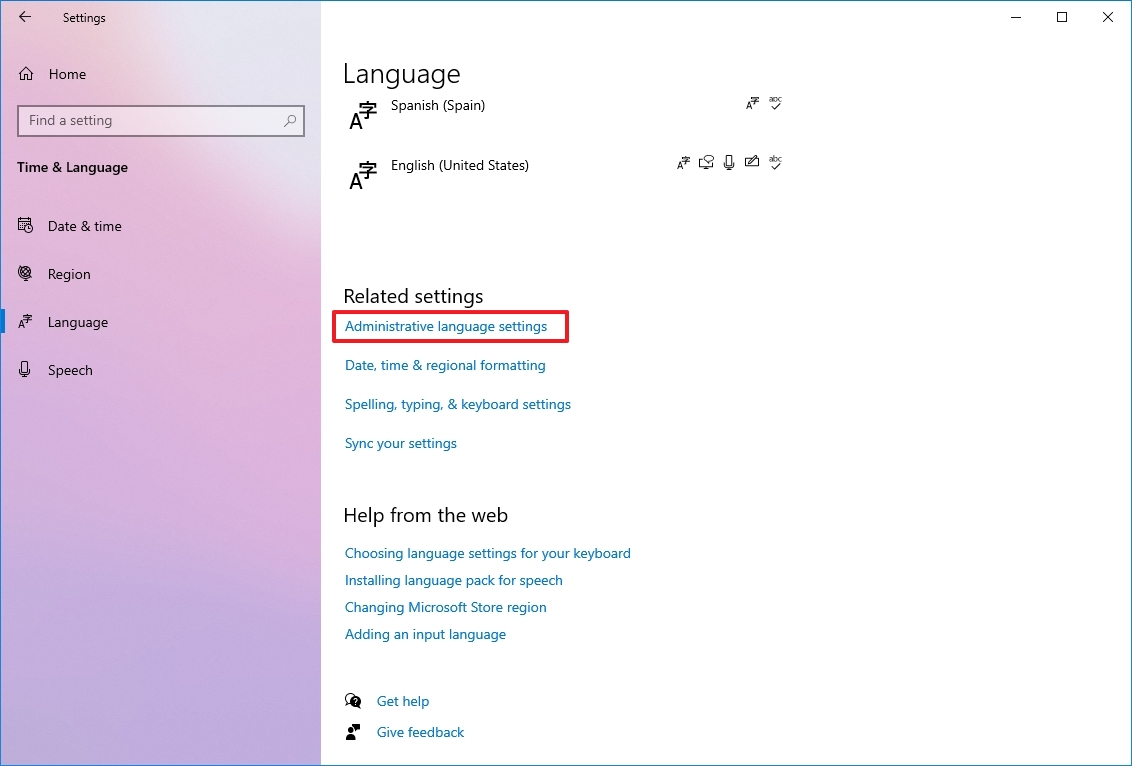
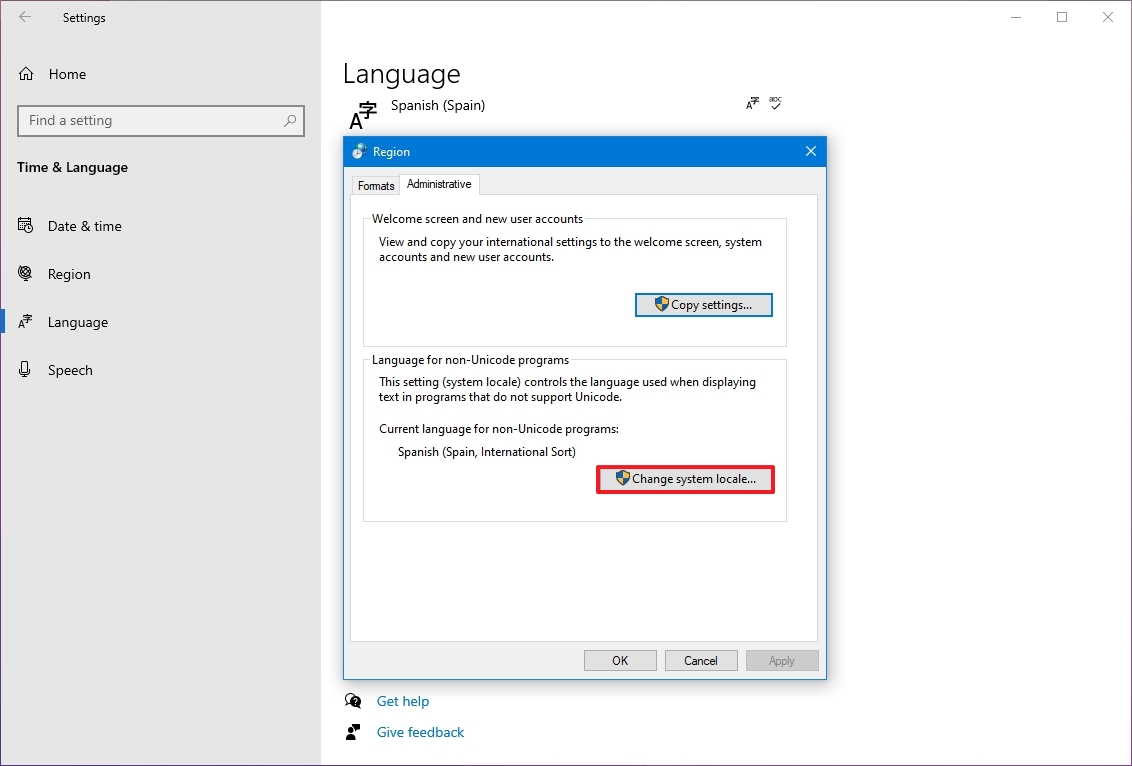
- Click the Administrative tab.
- Under the «Language for non-Unicode programs» section, click the «Change system locale» button.
- Select the new system locale language with the «Current system locale» drop-down menu.
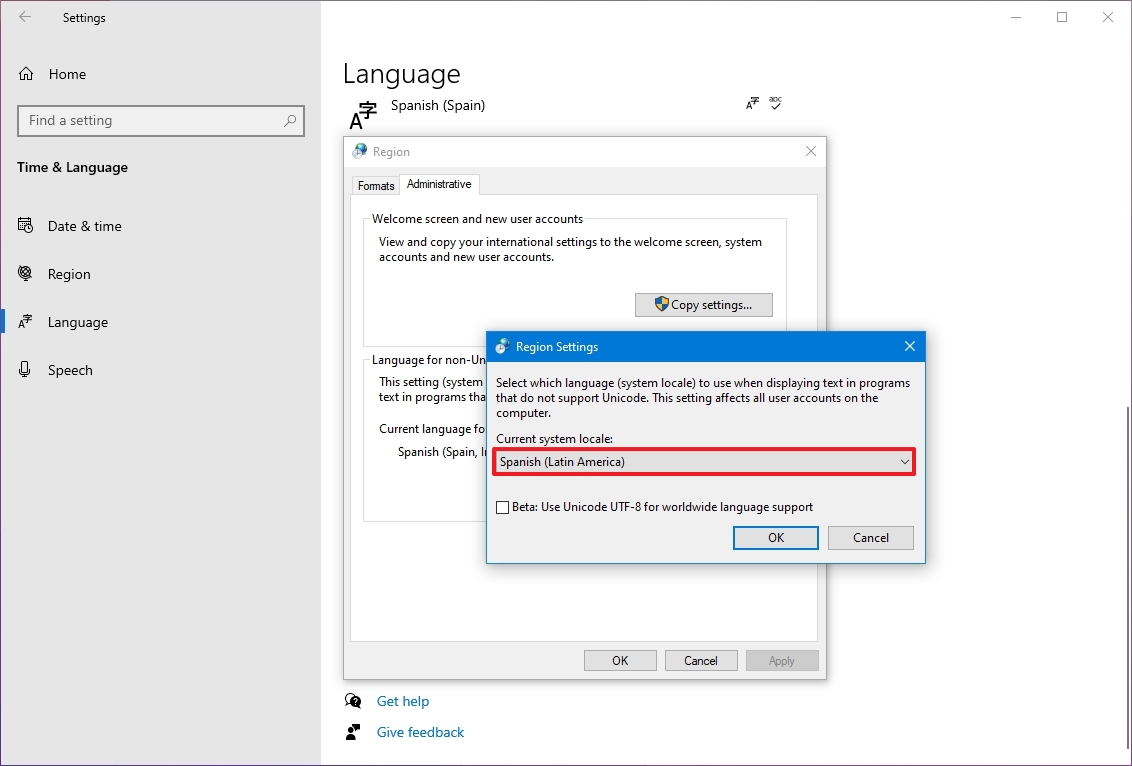
- Click the OK button.
- Click the Copy settings button in the «Administrative» tab.
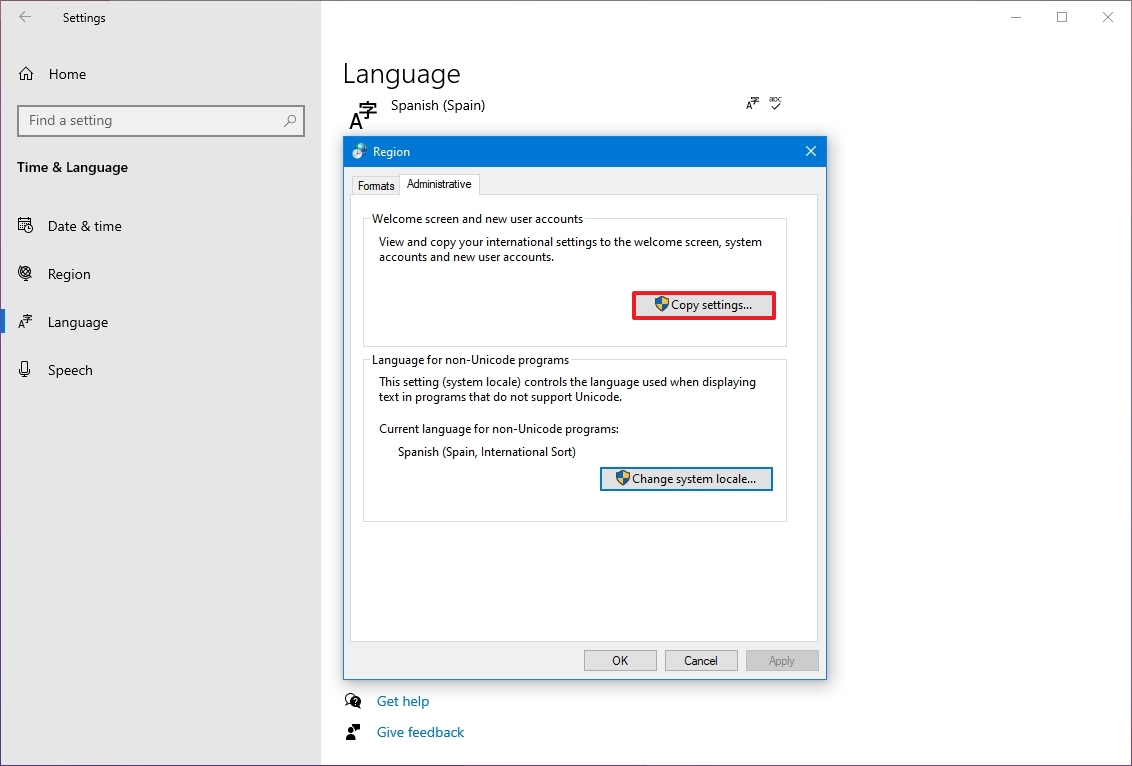
- Under the «Copy your current settings to» section, check the «Welcome screen and system accounts» and «New user accounts» options.
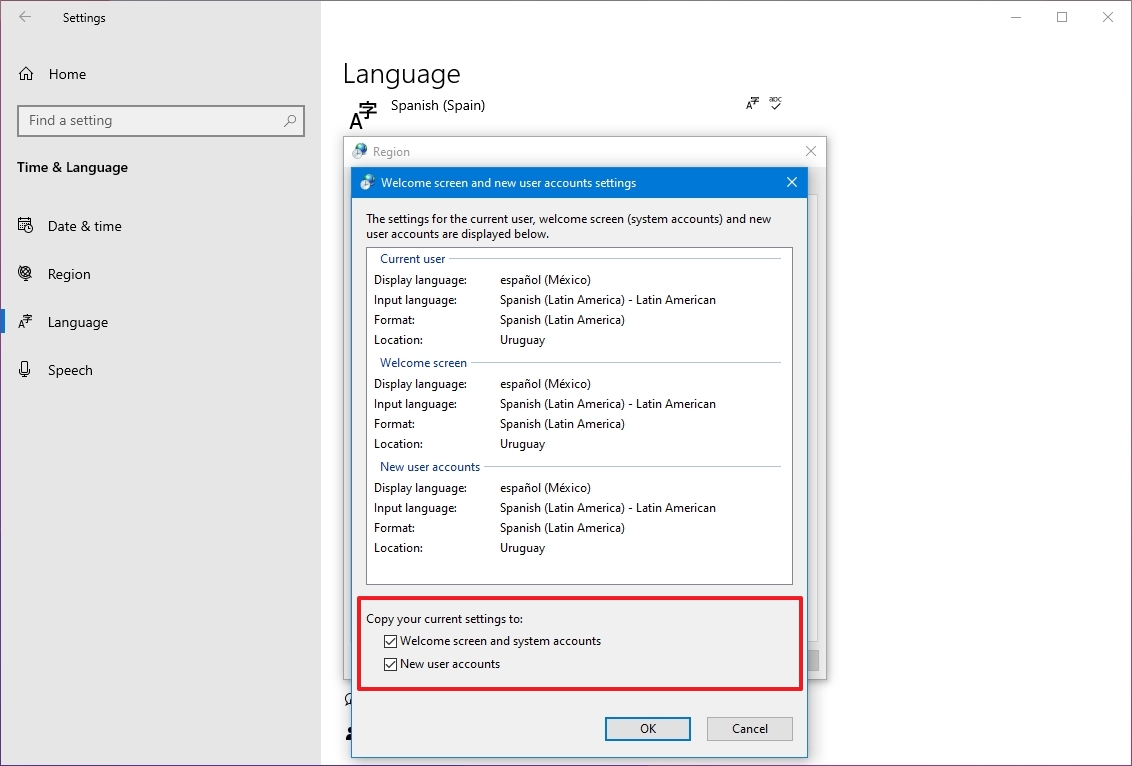
- Click the OK button.
- Click the OK button again.
- Click the Restart now button.
Once you complete the steps, the settings will apply, and the computer will use the correct region settings.
You rarely have to change or add other languages on Windows 10. However, changing these settings may come in handy in organizations working with people who need to use different preferences. It’s also a helpful feature to match the locale settings if you relocate to another region or when buying a new laptop that ships from a different country.
The only caveat with changing the region settings is that it will also change the settings for the Microsoft Store, which may block access to certain apps and services, depending on the location. In the same way, you can change the region settings to access an application from the Microsoft Store that is only available in a specific region.
More resources
For more helpful articles, coverage, and answers to common questions about Windows 10 and Windows 11, visit the following resources:
- Windows 11 on Windows Central — All you need to know
- Windows 10 on Windows Central — All you need to know
Mauro Huculak has been a Windows How-To Expert contributor for WindowsCentral.com for nearly a decade and has over 15 years of experience writing comprehensive guides. He also has an IT background and has achieved different professional certifications from Microsoft, Cisco, VMware, and CompTIA. He has been recognized as a Microsoft MVP for many years.