
В ходе экспериментов с различными настройками мыши: в части кликов, DPI, чувствительности и ускорения, указателей можно прийти к тому, что захочется вернуть всё в изначальное состояние.
В этой инструкции подробно о том, как сбросить все настройки мыши на параметры по умолчанию в последних версиях Windows.
Редактор реестра
Основные параметры мыши, такие как скорость движения указателя и двойного клика и другие хранятся в реестре Windows 11/10 и предыдущих версий системы. Это позволяет изменить их прямо там:
- Нажмите клавиши Win+R на клавиатуре (либо нажмите правой кнопкой мыши по кнопке «Пуск» и выберите пункт «Выполнить»), введите regedit и нажмите Enter
- Перейдите к разделу реестра
HKEY_CURRENT_USER\Control Panel\Mouse
- Измените значения параметров в реестре на значения по умолчанию: дважды нажмите по соответствующему параметру и введите нужно значение (список значений основных параметров по умолчанию приведён ниже, также их можно увидеть на скриншоте).

- Закройте редактор реестра. Перезагрузка компьютера обычно не требуется.

В результате настройки управления мышью будут такими, как при первом её подключении, за исключением случаев, когда дополнительные настройки устанавливаются фирменным ПО.
Список значений параметров мыши в реестре по умолчанию:
- ActiveWindowsTracking: 0
- Beep: No
- DoubleClickHeight: 4
- ExtendedSounds: No
- MouseHoverHeight: 4
- MouseHoverTime: 100
- MouseHoverWidth: 4
- MouseSensitivity: 20
- MouseSpeed: 1
- MouseThreshold1: 6
- MouseThreshold2: 10
- MouseTrails: 0
- SnapToDefaultButton: 0
- SwapMouseButtons: 0
Параметры указателя
Если вы настраивали указатели (курсоры) мыши вручную или с помощью сторонних программ и результат вас не устраивает, сбросить их можно следующим способом:
- Нажмите клавиши Win+R на клавиатуре, введите control mouse и нажмите Enter.
- Перейдите на вкладку «Указатели» и либо используйте кнопку «По умолчанию» для каждого указателя, который нужно изменить, либо выберите одну из стандартных системных схем указателей мыши.

- Нажмите кнопку «Применить».

В результате настройки указателей будут сброшены и вернутся к системным значениям по умолчанию.
Фирменное ПО мыши

Для настроек многих современных и не совсем стандартных мышей используются фирменные программы от производителя, например:
- Logitech G Hub для игровых мышей Logitech, или Logitech Options и Logi Options+ для «обычных» мышек
- Razer Synapse
- SteelSeries Engine
- Corsair iCUE
- Центр управления мышью и клавиатурой для устройств Microsoft
При этом фирменное ПО может настраивать те или иные параметры мыши не в стандартных разделах реестра или вовсе записывать их «в саму мышь». Как правило, в этом случае сброс настроек может присутствовать в соответствующей утилите производителя:
Поищите такую опцию в настройках и не исключено, что она найдётся и в вашем случае.
С учётом того, что основные параметры мыши хранятся в реестре, его восстановление с помощью точек восстановления на дату, когда поведение мыши вас устраивало, может помочь. Нажмите клавиши Win+R на клавиатуре, введите rstrui.exe и следуйте указаниям мастера восстановления системы:
Ещё одна возможность — удаление мыши вместе с драйвером, а для Bluetooth-мыши — разрыв сопряжения. Для удаления мыши:
- Откройте диспетчер устройств через меню Win+X
- Удалите ненужную мышь или мыши, используя контекстное меню.

- Используйте меню «Действие» — «Обновить конфигурацию оборудования», либо просто перезагрузите компьютер, чтобы сделать это с помощью клавиатуры можно нажать клавиши Win+R, ввести команду
shutdown -r -t
и нажать Enter.
- Для Bluetooth мыши вы можете «Удалить устройство» в Параметрах Windows 11 и 10, а затем повторно выполнить сопряжение.


На близкую тему, возможно, будет интересным: Как настроить чувствительность мыши в Windows, Как отключить ускорение мыши.
There are many ways to change mouse speed in Windows 11 or Windows 10, and we’ll be focusing on three of them today. One involves using the modern Windows settings UI, one the familiar legacy control panel, and the other is regedit. No matter which method you choose, you’ll notice that there are a total of 20 speeds for your mouse pointer, with 1 being the slowest and 20 the fastest.You should be aware, however, that it’s always preferable to change the DPI on your mouse before you change mouse speed in Windows settings. For reasons we won’t get into here, your cursor will be more accurate if you leave the Windows sensitivity at 6 or 11 and adjust the DPI in your mouse software or via its physical buttons to reach the desired behavior.
How to Check Mouse DPI
You can do a mouse DPI test with this web-based dpi checker here. With this tool you can measure the real DPI of your mouse, and calculate the sensor accuracy. It can also be used to find out what your DPI actually is if you don’t have a setting for it in your mouse driver.
Many mice, especially cheaper ones, unfortunately, don’t come with DPI control. If you’re in a more restricted enterprise environment, your IT admin may also prevent you from installing third-party software such as mouse drivers. If this is the case, changing Windows 10 mouse sensitivity via its built-in tools is your only choice.
How to Adjust Mouse Sensitivity via Settings in Windows 11
This method uses the modern user interface of Windows 10 settings, which is straightforward and ideal for quick adjustments.
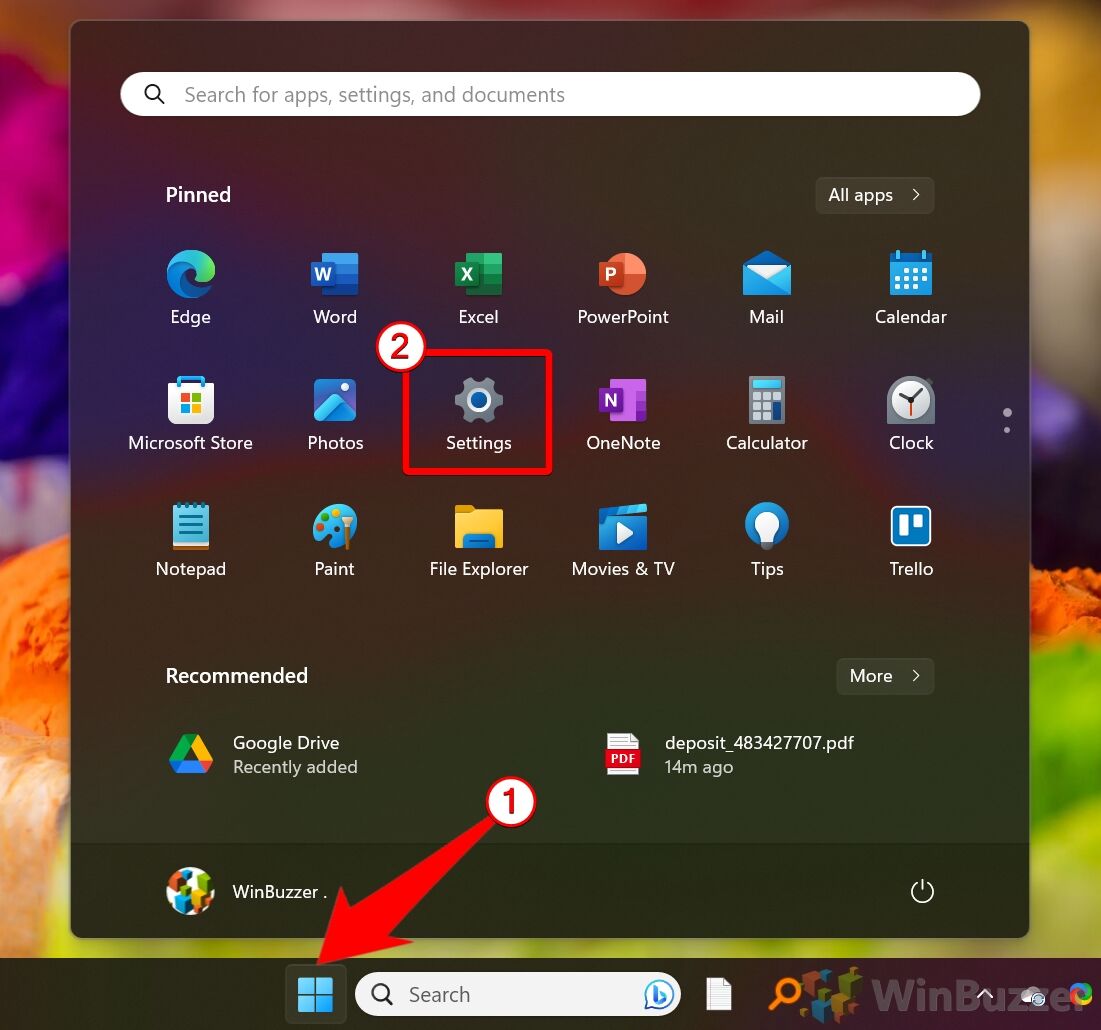
- Open Settings
Press the “Start” button, then click the settings cog. Alternatively, you can press “Windows + I” on your keyboard to open settings directly.

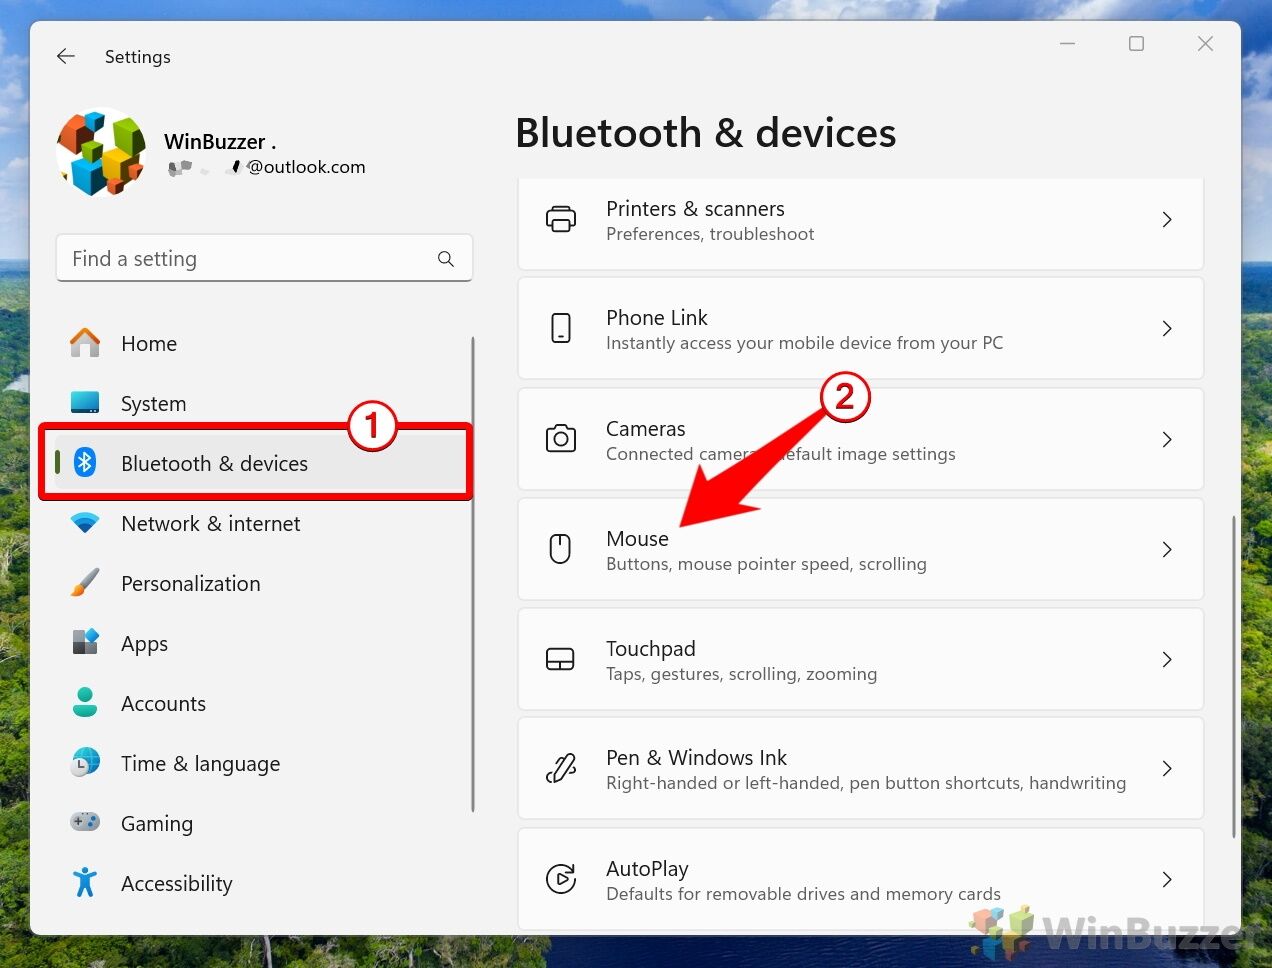
- Switch to “Bluetooth and Devices” and select “Mouse”

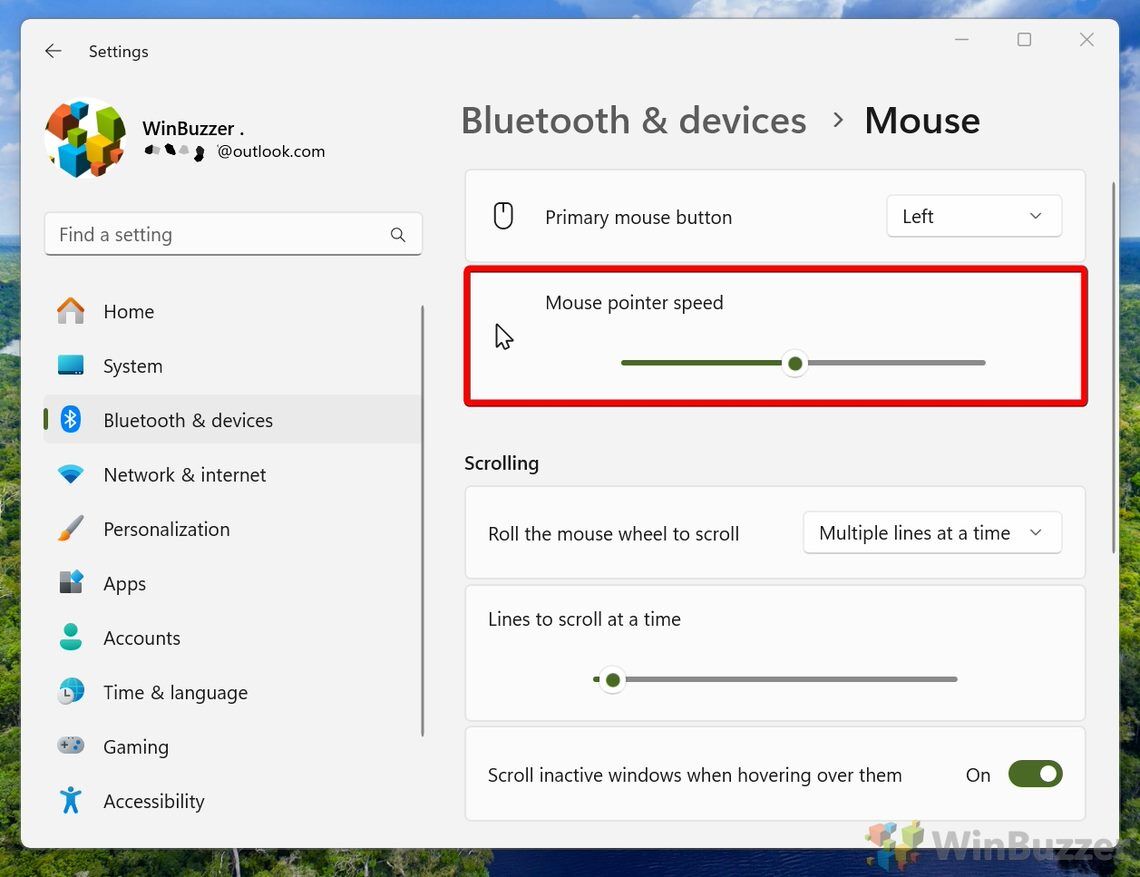
- Adjust Mouse Pointer Speed
In the main pane, you’ll see a slider for “Mouse Pointer Speed“. Dragging this to the left will slow your cursor down, and dragging it to the right will speed it up. The changes will take effect immediately.

How to Adjust Mouse Sensitivity via Settings in Windows 10
This method uses the modern user interface of Windows 10 settings, which is straightforward and ideal for quick adjustments.
- Open Settings
Press the “Start” button, then click the settings cog located above the power button. Alternatively, you can press “Windows + I” on your keyboard to open settings directly.

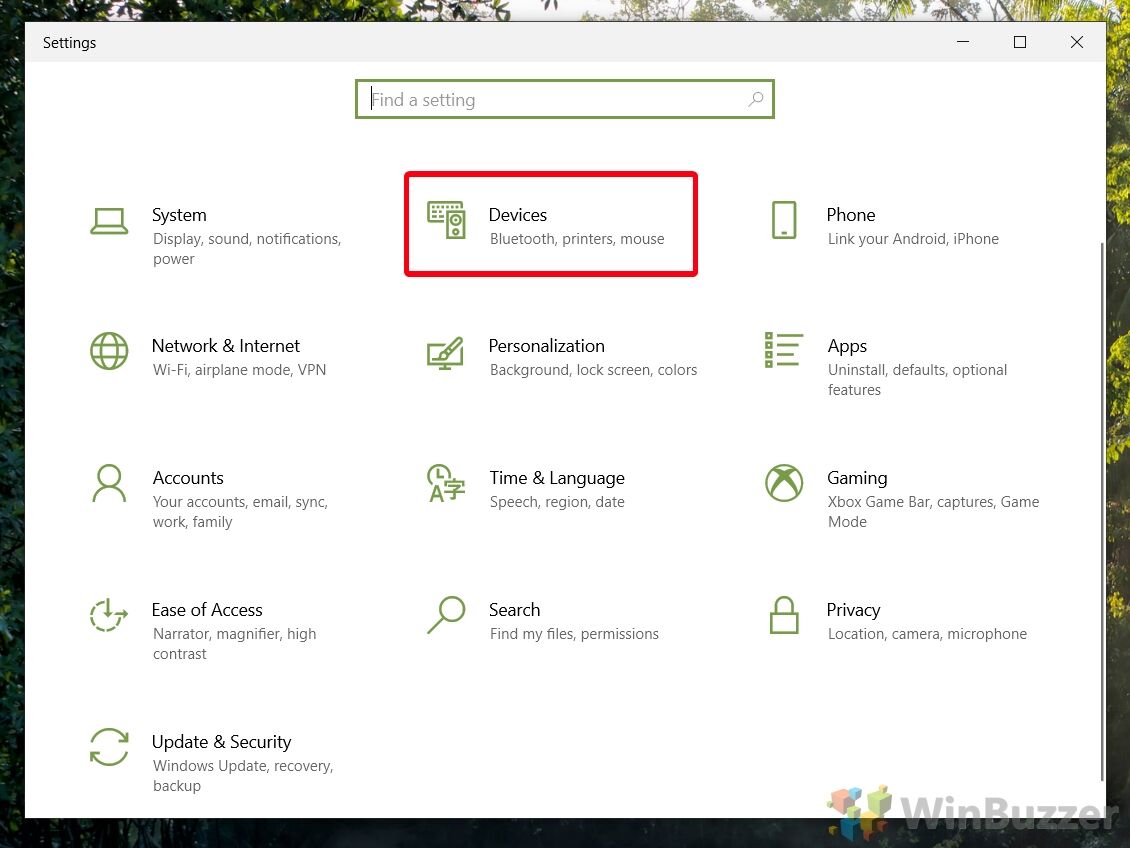
- Click on “Devices”

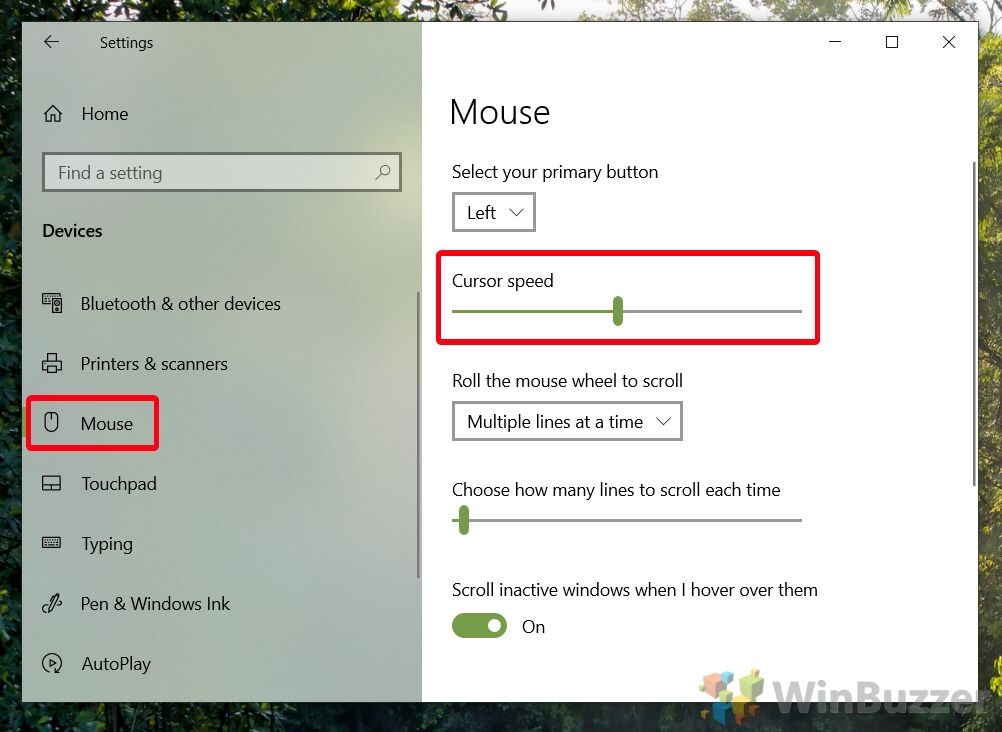
- Choose “Mouse” in the sidebar and change your mouse speed
In the main pane, you’ll see a slider with “Cursor speed” above it. Dragging this to the left will slow your cursor down, and dragging it to the right will speed it up. The changes will take effect immediately.


How to Change Mouse Speed via Control Panel in Windows 11 and Windows 10
For users who prefer a more traditional interface, the Control Panel offers a familiar environment to adjust mouse sensitivity.
- Open Control Panel
Click the “Start” menu and type “Control Panel,” then select the top result to open the Control Panel.

- Click “Hardware and Sound”

- Look for the “Devices and Printers” section and press “Mouse”

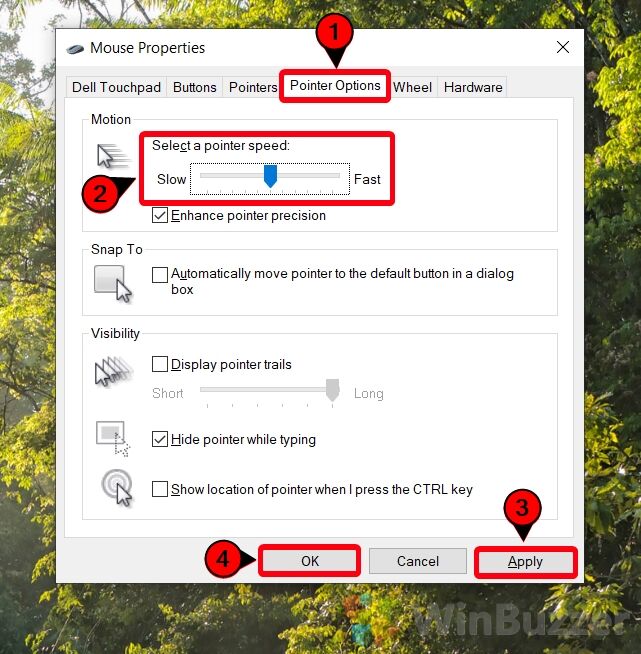
- Open the “Pointer Options” tab and adjust the mouse pointer speed slider
The further to the right, the faster your cursor will get. Once you’re at a speed you’re happy with, you can click “Apply” followed by “OK“.


How to Change Mouse Sensitivity via Regedit (Registry Editor)
This method is advanced and should be used if other options do not retain settings after updates or restarts. Ensure you back up your registry before proceeding.
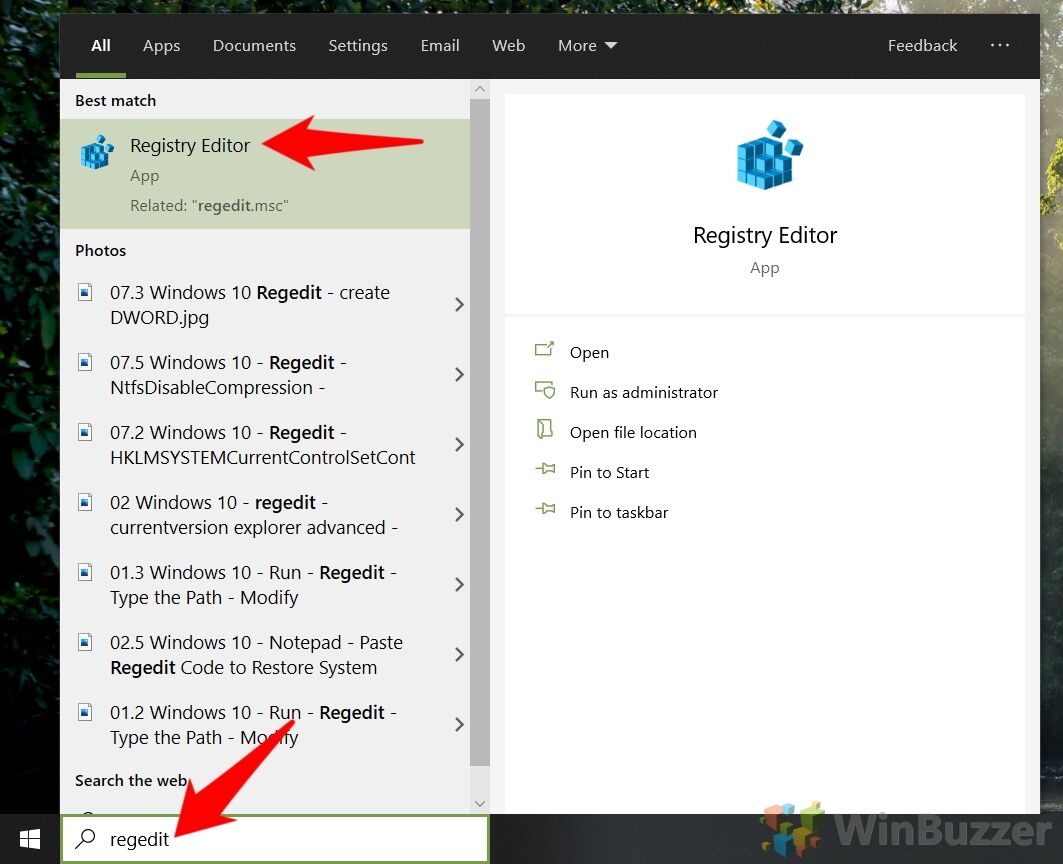
- Open Registry Editor
Press “Start,” type “regedit,” and click the top result to open the Registry Editor.

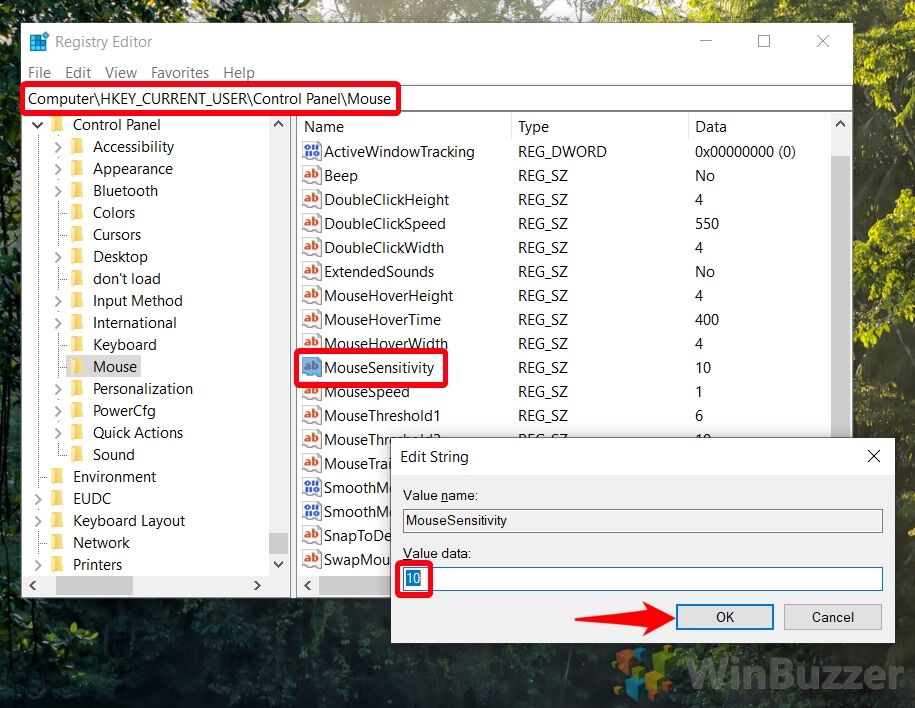
- Navigate to the Mouse key and Adjust your “Mouse Sensitivity” value data
In your Registry Editor top bar, pasteComputer\HKEY_CURRENT_USER\Control Panel\Mouse. Scroll down the main pane until you find the “MouseSensitivity” entry and double-click it. In the “Value data” field, enter a number, with 1 representing the lowest speed, and 20 the highest. Press “OK” when you’re done and test the changes. If you need to change Windows mouse sensitivity again at any point, you can come back here and adjust the value.

Related: How to Change Your Mouse Cursor Size or Use a Custom Cursor in Windows 11 / Windows 10
The Windows 11 / Windows 10 cursor is more or less iconic at this point, but it’s not without its flaws. Quite often, it can be too small on high-resolution displays or fit poorly with your system theme. In such instances, you can change your cursor to a custom one or change your cursor size in Windows 11 / Windows 10 settings.

Related: How to Reverse Scrolling Direction for Mouse or Touchpad in Windows 11 / Windows 10
Your touchpad or mouse scroll direction is something that quickly becomes muscle memory. As a result, using Windows with mouse settings, you’re not used to can seriously hamper your productivity and cause frustration. In such cases, it’s necessary to know how to reverse the scrolling direction in Windows 11 / Windows 10.
FAQ – Frequently Asked Questions About Mouse Sensitivity and Mouse Speed in Windows
Can I adjust mouse sensitivity for specific applications or games in Windows 11/10?
Unfortunately, Windows 11/10 does not provide a direct option to set mouse sensitivity for specific applications or games. However, you can look into the settings of each individual game or application, as most include their own sensitivity settings. For applications that don’t offer this, you can consider using third-party software that creates profiles for different applications, which automatically adjusts settings according to the active window.
How does changing mouse sensitivity affect gaming?
Changing mouse sensitivity in gaming can significantly affect your gameplay experience. Higher sensitivity allows for faster cursor movement, thus speeding up your reaction time, which is ideal for fast-paced games like FPS or action games. On the other hand, lower sensitivity might aid with precision, making it suitable for strategic games or scenarios requiring careful aiming.
Is it possible to adjust mouse sensitivity through third-party software?
Yes, you can use third-party software to adjust mouse sensitivity more finely than Windows settings allow. Companies like Logitech, Corsair, and Razer provide their own software that not only allows for sensitivity adjustment but also for creating multiple profiles, macro settings, and even lighting options if supported by the mouse. These software solutions often provide more granular control over DPI settings and profiles can be switched automatically based on the application being used.
Does Windows 11/10 support mouse acceleration, and how can it be adjusted or turned off?
Windows 11/10 does include support for mouse acceleration, which can be modified or disabled according to your preference. This setting is found in the Control Panel under Mouse Properties > Pointer Options. Disabling the “”Enhance pointer precision”” option will turn off mouse acceleration, which can lead to more consistent mouse movements, often preferred by gamers for better accuracy.
Can I save different sensitivity settings for my mouse to quickly switch between them?
Directly within Windows 11/10, the OS does not support multiple sensitivity profiles for mice. However, if you have a gaming mouse with dedicated software (like Logitech G Hub or Razer Synapse), you can create and save multiple profiles with different sensitivity settings. These profiles can also automatically switch depending on the app in focus, which is very useful if you frequently switch between tasks that benefit from different sensitivity settings.
What’s the quickest way to adjust mouse sensitivity in Windows 11/10 without going through settings?
If your mouse is equipped with a DPI button, pressing it cycles through predefined sensitivity settings, providing a very quick way to adjust sensitivity. These DPI settings are typically preset in the mouse software and can be customized to your preferences, providing a quick adjustment method without needing to navigate through system settings.
How do I change the scrolling speed of my mouse in Windows 11/10?
To adjust the scrolling speed in Windows 11/10, go to Settings > Devices > Mouse. Here you will find an option named “”Choose how many lines to scroll each time””, which allows you to increase or decrease the number of lines scrolled with each movement of the mouse wheel. Adjust this to tailor your scrolling speed to your preferred comfort level.
What is the recommended mouse sensitivity for general use versus gaming?
The recommended sensitivity might vary based on personal preference and the specific tasks you perform. For general desktop use, moderate sensitivity is typically preferred as it offers a good balance between speed and control. For gaming, the ideal sensitivity can vary widely: low sensitivity is often recommended for shooter games for better aiming accuracy, while higher sensitivity might be better for quick movements in action-packed games.
Can adjusting mouse sensitivity help with wrist pain or discomfort?
Yes, optimizing mouse sensitivity can potentially reduce wrist strain. Higher sensitivity means less physical movement is necessary to move the cursor across the screen, which can decrease the strain on your wrist. If you experience discomfort, experiment with higher sensitivities or consider an ergonomic mouse designed to minimize wrist strain.
How do I know what mouse sensitivity setting is right for me?
Determining the ideal mouse sensitivity involves trial and error. Start with a sensitivity level that allows you to move the cursor across the screen with a single, comfortable wrist movement. From there, adjust higher or lower based on your ability to precisely control the cursor. It’s important to consider the screen size and resolution as well; higher resolution displays might require higher sensitivity settings.
Can mouse sensitivity be adjusted on all types of mice?
Yes, mouse sensitivity adjustments can be made on any type of mouse through Windows settings, regardless of whether it’s a basic office mouse, a high-end gaming mouse, or an ergonomic mouse. Additional adjustment features might be available depending on the mouse’s software capabilities.
How can I adjust touchpad sensitivity in Windows 11/10?
To adjust the sensitivity of your touchpad on a Windows 11/10 device, navigate to Settings > Devices > Touchpad. In this menu, you’ll find an option called “Change the touchpad sensitivity,” which allows you to select levels from Low Sensitivity to Most Sensitive. Choosing the right sensitivity can help improve your control and reduce accidental touch inputs.
How do I reset my mouse sensitivity to its default setting in Windows 11/10?
To restore your mouse sensitivity to its default settings in Windows 11/10, go to Settings > Devices > Mouse and adjust the cursor speed slider back to the default position, generally in the middle of the slider. This will reset your sensitivity to the standard setting, which is suitable for typical use cases.
Is it necessary to restart my computer after changing the mouse sensitivity?
No, when you change the mouse sensitivity settings in Windows 11/10, the effects are applied immediately. There is no need to restart your computer for the changes to take effect, making it easy and convenient to find the perfect sensitivity settings.
How can I adjust mouse sensitivity if my mouse does not have a DPI button?
If your mouse lacks a DPI button, you can adjust its sensitivity using the Windows Settings app or the Control Panel. In Windows Settings, go under Devices > Mouse and adjust the cursor speed slider, or in Control Panel, under Hardware and Sound > Devices and Printers > Mouse settings, adjust sensitivity through the Pointer Options tab. These settings can help you refine your mouse’s performance to better suit your needs.
Last Updated on November 7, 2024 8:38 pm CET
A Pointer or mouse cursor is a symbol or graphical image on the PC display representing the movement of the pointing device such as a mouse or touchpad. Basically, the mouse pointer allows users to navigate Windows with a mouse or touchpad easily. Now the pointer is essential for every PC users, and it also has some customization options such as shape, size or colour.

With the introduction of Windows 10, you can easily change the Pointer Scheme using Settings. If you don’t want to use the predefined Pointer scheme, you could use your own preferred pointer. So without wasting any time let’s see How to Change Mouse Pointer in Windows 10 with the help of below-listed troubleshooting guide.
Table of Contents
Make sure to create a restore point just in case something goes wrong.
Method 1: Change Mouse Pointer Size and colour using Windows 10 Settings
Note: Settings app has only basic customization for the mouse pointer.
1. Press Windows Key + I to open Settings then click on Ease of Access.

2. From the left-hand menu, click on Mouse.
3. Now, on the right-hand side window, select the appropriate Pointer size, which has three attributes: standard, large, and extra-large.

4. Next, below Pointer size, you will see Pointer colour. Choose the appropriate Pointer colour, which also has these three attributes: white, black, and high contrast.
5. Reboot your PC to save changes.
Method 2: Change Mouse Pointers via Mouse Properties
1. Press Windows Key + S to open search then type control and click on Control Panel.
2. Next, click on Hardware and Sound & then click Mouse under Devices and Printers.

3. Under Mouse Properties window switch to Pointers tab.
4. Now, under Scheme drop-down, select any one of the installed cursor themes.

5. Under the Pointer tab, you will find Customize, using which you can customize individual cursors.
6. So select the desired cursor from the list, for example, “Normal Select” and then click Browse.

7. Choose the cursor according to your preferences from the list and then click Open.

Note: You can choose an animated cursor (*.ani file) or a static cursor image (*.cur file).
8. Once you are done with the changes, you could save this cursor scheme for future use. Just click the Save As button below Scheme drop-down.
9. Name the scheme something like custom_cursor (just an example you can name the scheme anything) and click OK.

10. Click Apply, followed by OK.
11. Reboot your PC to save changes, and you have successfully learned How to change Mouse Pointer in Windows 10.
12. If you need to reset it to default in the future, open Mouse Properties then click Use Default below the customize settings.
Method 3: Install third-party Mouse Pointers
1. Download Mouse Pointers from a safe & trusted source, as they can be a malicious download.
2. Extract the downloaded pointer files to C:\Windows\Pointers or C:\Windows\Cursors.

Note: The pointer file will be either an animated cursor file (*.ani file) or a static cursor image file (*.cur file).
3. From the above method, follow the steps from 1 to 3 to open Mouse Properties.
4. Now in the Pointers tab, select the Normal Select under Customize, then click Browse.
5. Select your custom pointer from the list and click Open.
6. Click Apply, followed by OK.
7. Reboot your PC to save changes.
Method 4: Change Mouse Pointers via Registry
1. Press Windows Key + R then type regedit and hit Enter to open Registry Editor.
2. Navigate to the following registry key:
HKEY_CURRENT_USER\Control Panel\Cursors
3. To select a Pointer Scheme, make sure you select Cursors then in the right window pane double click on (Default) string.

4. Now change the value in the Value data field according to the name of the pointer schemes in the below-listed table:
leave blank for None
Magnified
Windows Black (extra large)
Windows Black (large)
Windows Black
Windows Default (extra large)
Windows Default (large)
Windows Default
Windows Inverted (extra large)
Windows Inverted (large)
Windows Inverted
Windows Standard (extra large)
Windows Standard (large)
5. Type any name according to the Pointer scheme you want to set and click OK.

6. To customize individual pointers, modify the following string values:
Arrow - pointer for Normal Select
Help - pointer for Help Select
AppStarting - pointer for Working in Background
Wait - pointer for Busy
Crosshair - pointer for Precision Select
IBeam - pointer for Text Select
NWPen - pointer for Handwriting
No - pointer for Unavailable
SizeNS - pointer for Vertical Resize
SizeWE - pointer for Horizontal Resize
SizeNWSE - pointer for Diagonal Resize 1
SizeNESW - pointer for Diagonal Resize 2
SizeAll - pointer for Move
UpArrow - pointer for Alternate Select
Hand - pointer for Link Select
7. Double-click on any of the above expandable string then type in the full path of the .ani or .cur file you want to use for the pointer and click OK.

8. Close Registry Editor and reboot your PC.
Recommended:
- How to Switch to tablet mode in Windows 10
- Fix Searchindexer.exe High CPU Usage
- How to Disable Data Logging on Windows 10
- How to Enable AHCI Mode in Windows 10
That’s it you have successfully learned How to change Mouse Pointer in Windows 10 but if you still have any questions regarding this post then feel free to ask them in the comment’s section.
If you buy a new mouse, you might be surprised by how quick it is. A higher DPI (dots per inch) rating for your mouse means greater accuracy in picking up the smallest of movements. This isn’t always ideal, and you may prefer to lower the sensitivity on your mouse by reducing the mouse speed.
Thankfully, it’s easy to change your mouse speed in Windows 10. You can use the built-in Windows settings for your mouse to do this, or you can use a third-party solution. Your mouse may even include an easy-access sensitivity button to switch between settings. To change your mouse speed, here’s what you’ll need to do.

If you want to tweak your mouse speed and overall mouse sensitivity, the best place to start is in your Windows 10 settings area. Windows allows you to change various settings that can impact on how you use your mouse or trackpad, including the ability to change button actions, line scrolling speeds, and cursor speeds.
- To change any of the built-in Windows 10 mouse settings, you’ll need to access your Windows 10 settings area. To do this, right-click the Windows Start menu and click Settings.
- In the Windows Settings menu, click the Devices option to enter that menu.

- Click Mouse in the left-hand menu to access some of the more basic mouse settings. From here, you can change your mouse scroll speeds and line length, as well as change some basic mouse button actions.

- For more advanced mouse settings, click the Additional Mouse Options option under the Related settings section on the right (or at the bottom if the window is too small).
- Under the Buttons tab of the Mouse Properties window, you can change the double-click speed. This is the speed you’ll need to be able to perform a double clicking action for Windows to register it. To change this, move the slider towards the left to slow the speed down, or right to speed it up.

- You can change the action speed of your mouse cursor under the Pointer Options tab. Move the slider under the Select a pointer speed section to do this, moving it left to slow it down, or right to speed your cursor up. If you find that your pointer isn’t as precise, click to enable the Enhance pointer precision checkbox.

- Once you’re happy with the changes you’ve made, click OK to save and close the window. Any changes you’ve made will be applied automatically and can be quickly tweaked or reversed, if needed.

Using The Windows Registry Editor To Change Mouse Sensitivity
If you’re comfortable tweaking with the Windows Registry, then you can use the Windows Registry Editor to change some of your mouse sensitivity settings instead. This could allow you to make more precise changes to your mouse speed compared to using the Windows 10 settings menu.
- To do this, press Ctrl+R on your keyboard to open the Run dialog box. Type regedit into the box, then click OK to open it.
- Using the registry navigation menu on the left, head to KEY_CURRENT_USERControl PanelMouse to view the registry entries for your mouse settings.
- You’ll see various registry entries for your mouse settings, but one of the most important is the MouseSensitivity entry. Double-click the entry to change the value to any figure up to 20.

- You can also tweak how precise your cursor movements are using the MouseSpeed, MouseThreshold1 and MouseThreshold2 entries. Your mouse movements will double when the value for MouseSpeed equals or is greater than the value for MouseThreshold1, and quadruples for MouseThreshold2. The values reflect distance travelled by pixels.

- These entries have a default value of 0, but you can see their default values by enabling the Enhance pointer precision checkbox first (Windows Settings > Devices > Mouse > Additional Mouse Options). If you want to set it to maximum, set MouseSpeed to 2, and set the value of MouseThreshold1 and MouseThreshold2 to 0.

- Once you’re done, close the Windows Registry Editor. Any changes you make should be applied automatically, but you may need to restart to see some of the changes take effect.
Using a Third-Party Mouse Settings App
While cheaper mice and keyboard combos are typically supplied without software, more advanced gaming mice will often come with manufacturer settings apps that allow you to tweak and change how they operate. They can also help to unlock additional features, supported by your mouse but not by Windows directly.
If your mouse comes with a DPI settings button (as many gaming mice do), you’ll need to install the settings software from the manufacturer to allow you to set up the different sensitivity profiles that the button supports. Popular gaming manufacturers, including Logitech and Razer, offer this feature.

One example of software that you can use to control your mouse settings is Logitech Gaming Software, designed to support Logitech-branded gaming equipment, including mice and keyboard. Installing this software will allow you to control various settings for your mouse, including the speeds.
In the first instance, check the website for your mouse manufacturer to see if this is something that is offered for your mouse model. If it isn’t, you may find that software that isn’t specifically designed for your mouse will work for some features, but this isn’t guaranteed.
Making Changes In Windows 10
Once you know how to change your mouse speed in Windows 10, you can start to look at other tweaks you can make to your settings. You may wish to change your keyboard language to help your language skills improve, or tweak your display settings to improve your Windows 10 display quality.
If you make too many changes, don’t worry, as you can reset and restore Windows to default settings pretty quickly. Be sure to back up your important files before you do this to make sure you don’t lose anything essential, however. If you’re tired of slowdowns, you could always start building a new custom PC to start afresh.
Related Posts
- How to Fix a “This file does not have an app associated with it” Error on Windows
- How to Fix an Update Error 0x800705b4 on Windows
- How to Resolve “A JavaScript error occured in the main process” Error on Windows
- How to Fix the Network Discovery Is Turned Off Error on Windows
- How to Change Folder Icons in Windows
Provide feedback
Saved searches
Use saved searches to filter your results more quickly
Sign up
Appearance settings