Исправляем синий экран смерти REFERENCE_BY_POINTER в Windows 10
Сообщение REFERENCE_BY_POINTER, отображаемое на синем экране смерти, имеет не совсем понятную природу происхождения. Как сообщается техподдержкой Microsoft, одноразовое появление BSOD с такой ошибкой не является причиной для тревоги. Может быть, Windows просто обновляла драйвера в фоновом режиме и что-то пошло не так. Если же это не одиночное срабатывание, придется попробовать несколько разных способов. Все известные варианты описаны ниже.
Причины ошибки BSOD REFERENCE_BY_POINTER
Очевидно, что определить истинную причину ошибки Reference By Pointer Windows 10 без минидампов вашей системы, мы не сможем. И все же анализ информации от других пользователей дает основание выделить несколько основных первоисточников сбоя.
Что может вызывать Reference By Pointer:
- случайный сбой во время инсталляции обновления;
- устаревшие, поврежденные драйверы и системные файлы;
- ошибки жесткого диска или оперативной памяти;
- некорректно установленное или проблемное обновление Windows 10.
Самое простое решение, которое нередко срабатывает при различных BSOD – «Устранение неполадок синего экрана», которые окрестили «смертью» Windows. В «десятке» есть автоматический инструмент поиска проблем и их исправления. Будет логично им воспользоваться.
Подробная инструкция:
- Открываем «Панель управления», ее можно найти через Пуск.
- Ищем и нажимаем на элемент «Устранение неполадок».
- Выбираем «Просмотр всех категорий».
- В конце списка нажимаем на пункт «Синий экран» и следуем советам мастера.

Хоть шансы на исправление и неплохие, данный инструмент – далеко не панацея. Следующие ручные действия тоже имеют высокую вероятность решения проблемы.
1. Сканировать ОЗУ на наличие ошибок
Если BSOD Reference By Pointer в Windows 10 появляется каждый раз при запуске системы, мы склонны думать на какие-то ошибки в оперативной памяти. Именно они очень быстро проявляются. Крайне редко бывает, что сбой может появляться при загрузке определенного процента или объема ОЗУ, но это тоже указывает на ошибки оперативной памяти. Мы предлагаем запустить средство диагностики ОЗУ.
Как это сделать:
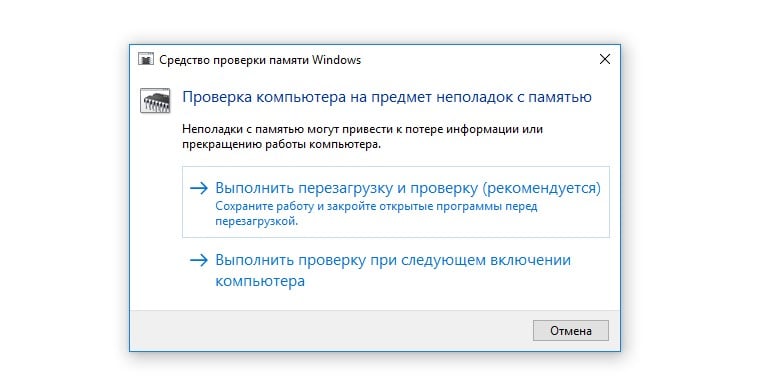
- Открываем Пуск и вводим в поиск mdsched, выбираем единственный найденный элемент.
- Жмем на первый вариант «Выполнить перезагрузку и проверку».
- Ожидаем результата процедуры. Возможно, найденные проблемы будут исправлены автоматически.
2. Проверить жесткий диск на ошибки
Инструмент сканирования жесткого диска на наличие ошибок часто выручает. Даже если он не сможет в автоматическом режиме помочь, по крайней мере даст понимание о природе проблемы и укажет, в каком направлении искать дальше. Нужно всего лишь вставить в командную строку chkdsk /f C:, только у нее должны быть привилегии администратора. Буква C в команде – обозначение диска, куда установлена Windows, у вас она может отличаться.
3. Запустить Диспетчер проверки драйверов в безопасном режиме
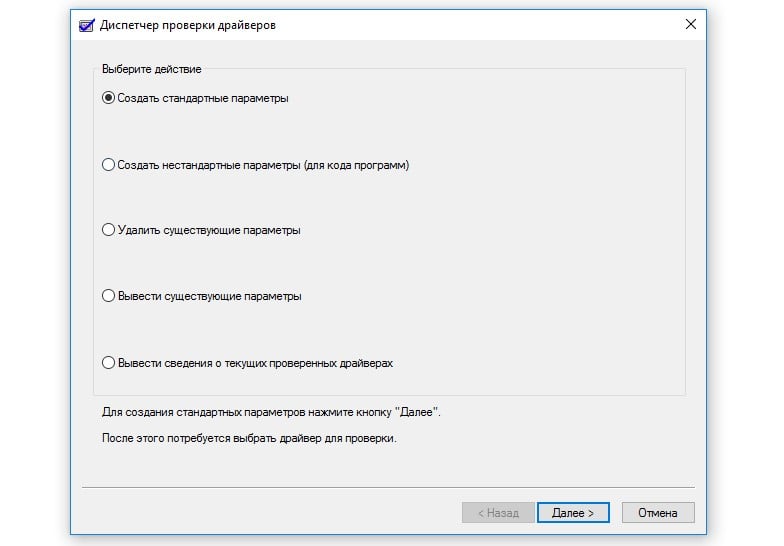
В Windows 10 всех версий есть утилита «Диспетчер проверки драйверов», которая самостоятельно сканирует установленные драйвера и их состояние. Может отобразить поврежденное ПО, которое нужно переустановить, обновить или откатить в зависимости от причины проблемы. Запустить инструмент можно с помощью запроса verifier в строку поиска. Перед запуском нужно установить следующие параметры: «Создать стандартные параметры» и «Далее» — «Автоматически выбирать неподписанные драйверы» и снова «Далее». Если это не поможет, стоит снова запустить инструмент и выбрать «Автоматически выбирать драйверы для прошлых версий Windows».
4. Откатить или обновить драйвера видеокарты
Если в результате предыдущего действия удалось найти проблемное ПО, с ним нужно поработать дополнительно. Также следует посмотреть драйверы вручную, возможно, система не обнаружила проблем автоматически, но они есть. Хороший вариант – просмотреть список всех обновленных за последнее время драйверов и сопоставить их со временем первого появления BSOD. Скорее всего одно из последних апдейтов ПО и стало причиной синего экрана с сообщением Reference By Pointer. Информацию о всех обновленных драйверов поможет отобразить DriverView. Дальше все просто – скачать официальное обновление для драйвера.
На практике чаще всего проблему вызывает именно ПО видеокарты. Стоит попробовать загрузить самую новую версию с официального сайта производителя и установить. Если процедура не сработает, можем порекомендовать откатить драйвера.
Для этого нужно:
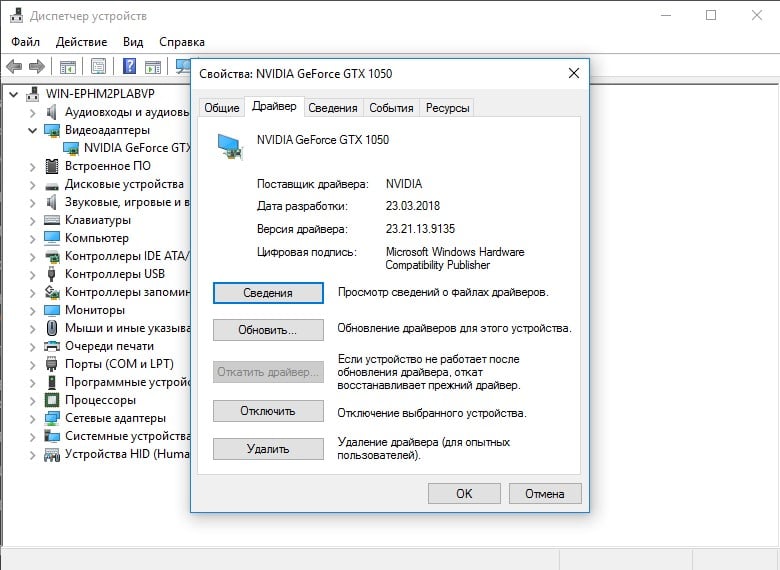
- Переходим в «Диспетчер устройств» (из меню, которое появляется после нажатия сочетания Win + X).
- В разделе «Видеоадаптеры» двойным кликом жмем на видеокарту.
- Идем во вкладку «Драйверы» и выбираем «Откатить драйвер».
- Следуем пошаговым подсказкам мастера.
5. Удалить проблемное обновление Windows
Замечена тенденция, что синий экран смерти Reference By Pointer начинает массово появляться после некоторых обновлений. Самый простой способ решения сбоя – удалить проблемное обновление.
Как это сделать:
- Сочетанием клавиш Win + I открываем «Параметры» и переходим в «Обновление и безопасность».
- На первой вкладке жмем на «Журнал обновлений» и смотрим на последние патчи, которые вышли незадолго до появления BSOD.
- Нажимаем правой кнопкой мыши по Пуску и выбираем «Программы и компоненты».
- Из меню слева жмем на вариант «Просмотр установленных обновлений».
- Жмем ПКМ на версии обновлений, на которые есть подозрения (их установка совпала с появлением BSOD) и выбираем «Удалить».

Нужно отметить, что некоторые программы могут вызывать синий экран смерти REFERENCE_BY_POINTER. Почему-то они неправильно работают в системе и после удаления работоспособность Windows 10 восстанавливается. Сегодня подобное поведение замечено за TrueCrypt, VeraCrypt, Daemon Tools, Any Video Converter, nProtect GameGuard. Если есть любое ПО из списка, его лучше удалить и установить аналог. Пока это все, что мы можем написать о BSOD REFERENCE_BY_POINTER.
The “Reference by Pointer” Blue Screen of Death (BSOD) error in Windows is indicated by the stop code 0x00000018. This error occurs when a driver or system component references a memory address using an already freed or invalid pointer. It also happens when faulty drivers, corrupted system files, or hardware issues occur. Let us put our troubleshooting hats on and fix this issue.
What Causes Blue Screen Reference By Pointer BSOD Error
Faulty or outdated drivers: A driver may be attempting to access already released memory.
Corrupted system files: Essential Windows files might be damaged or missing.
Hardware issues: Problems with RAM or other hardware components can trigger this error.
Malware Issues: Malware-infected PCs often face a blue screen reference by a pointer stop code of 0x00000018.
How To Fix Reference by Pointer BSOD Error On Windows 10/11
Fix 1: Run A Malware Scan
Malware infection is a significant factor behind all major and minor issues on your Windows PC, including the “Reference By Pointer BSOD” error. To clean the infection from a PC using Windows Security on Windows 11, follow these steps:
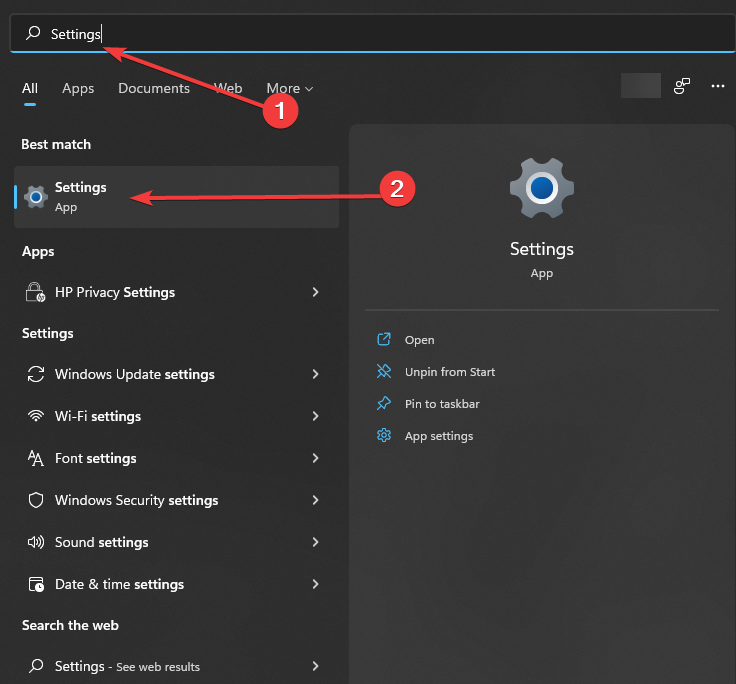
Step 1: Click on the Start menu, select Settings (gear icon), or press the Win key + I.
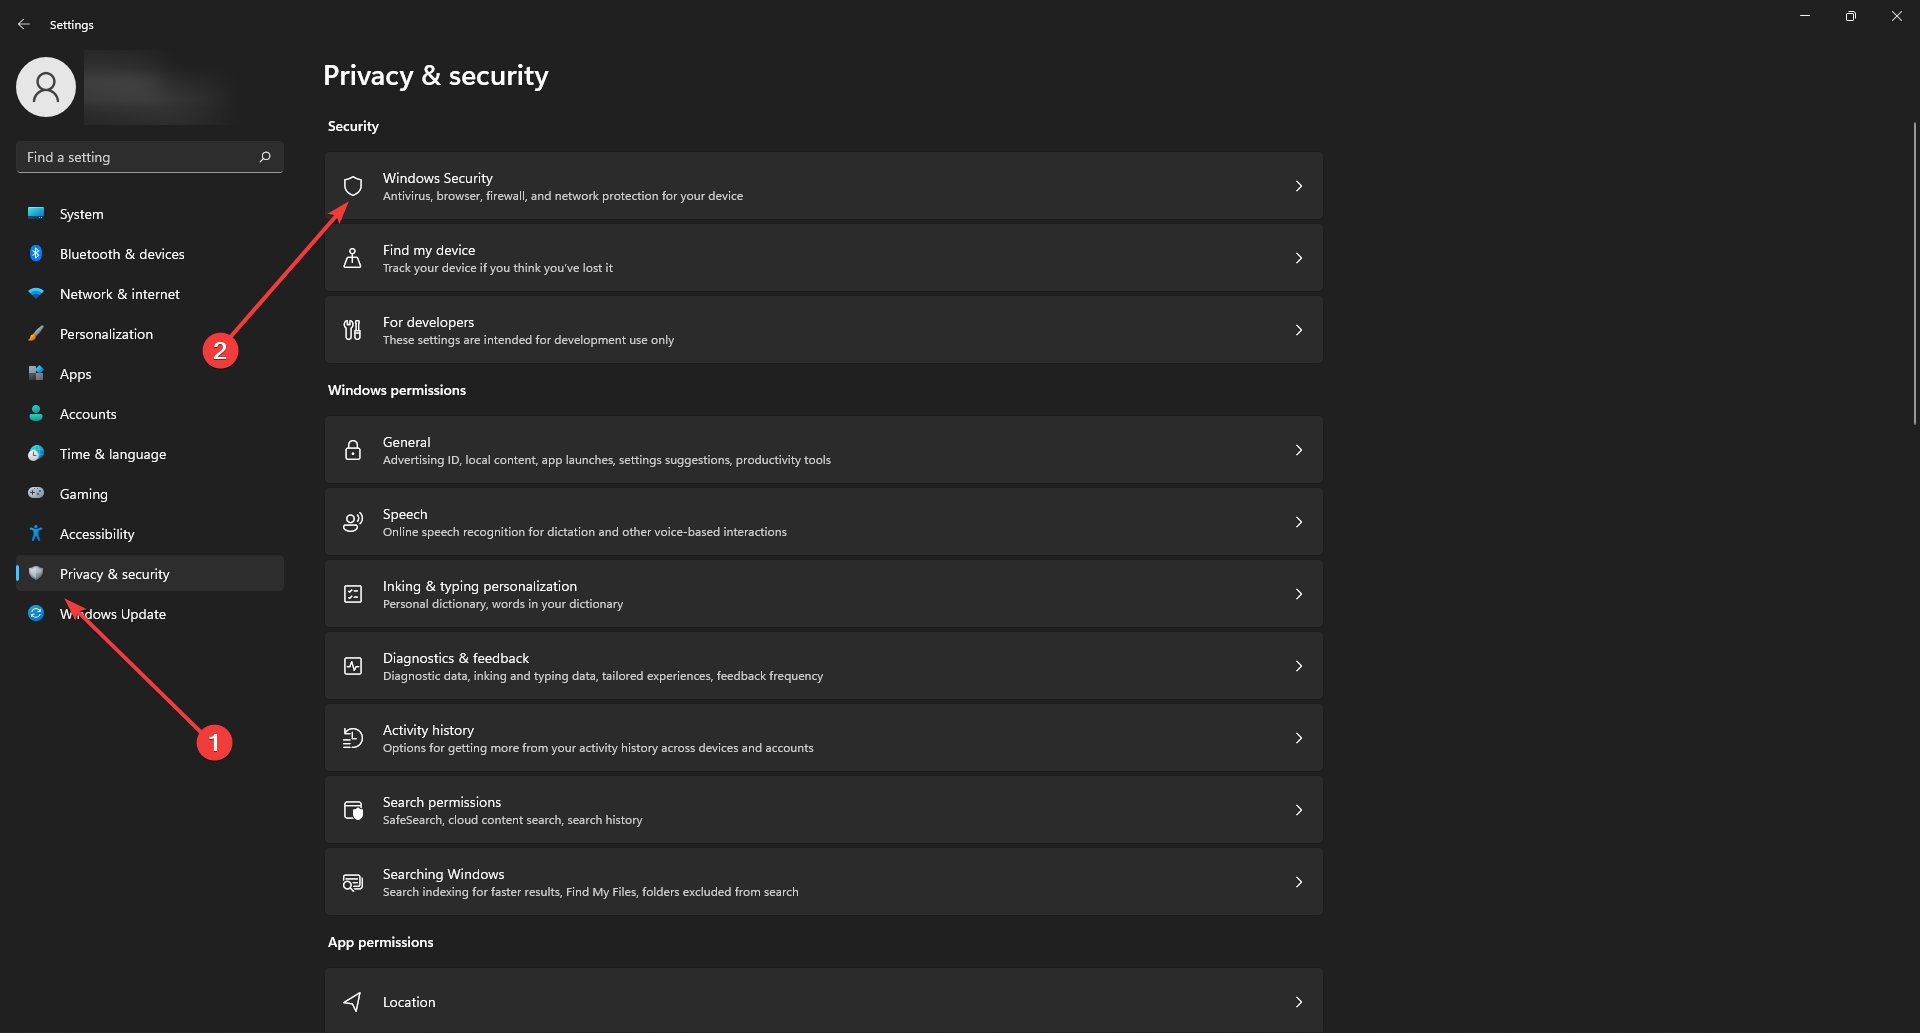
Step 2: Go to Privacy & security on the left sidebar.
Step 3: Click on Windows Security and click on Virus & Threat Protection.

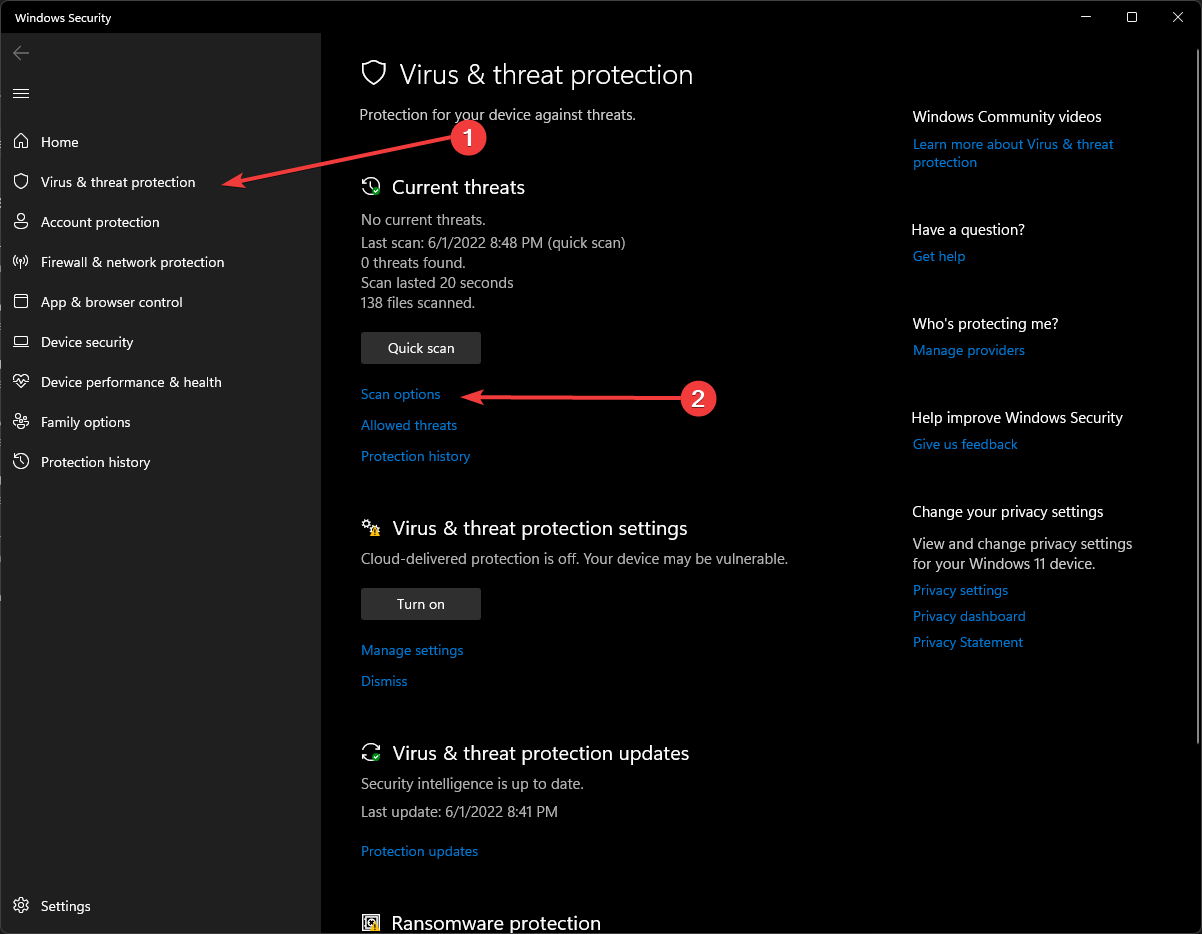
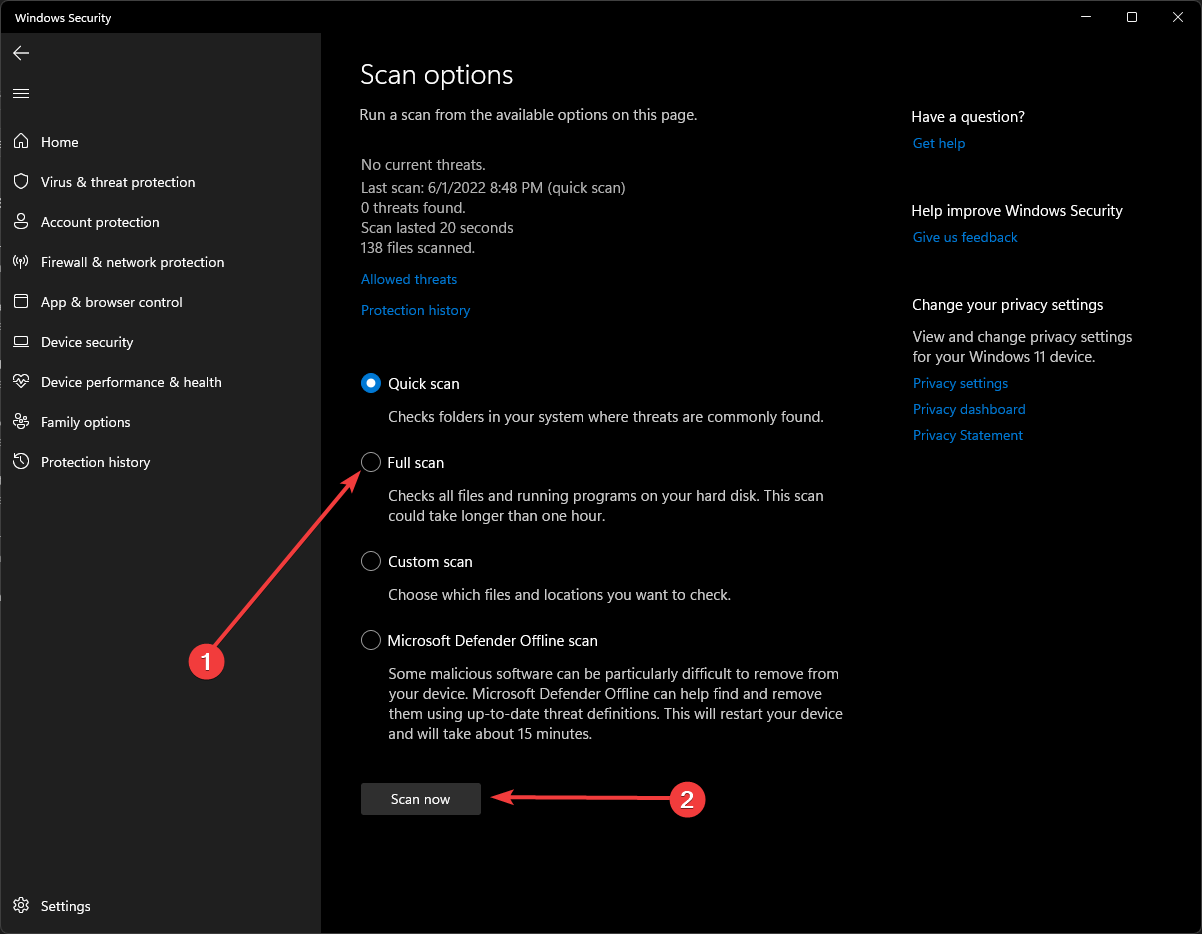
Step 4: To run a more thorough scan, click on Scan options and select Full Scan.
Step 5: Follow any prompts to complete the scan. If malware is detected, Windows Security will provide options to quarantine or remove the threats.
Step 6: After the scan, review the results and take the necessary actions to address any detected threats.
Fix 2: Disable Your Antivirus (Temporarily)
If no viruses or malware are detected, the next step is temporarily disabling third-party and built-in security applications. There might be a chance that your antivirus program might be interfering with your computer’s normal operation.

If the “Reference By Pointer BSOD Error” disappears after disabling your antivirus, you may need to consider using a different, reliable antivirus program.
Editor’s Recommendation—If you are looking for a third-party antivirus, we recommend T9 Antivirus. It is a real-time malware detector that detects viruses, malware, trojans, etc., as soon as they try to infiltrate your system.
Fix 3: Windows Update
The next step to fix the Reference By Pointer Error On Windows 10/11 is to ensure your Windows is fully updated. Here is what you need to do:
Step 1: Press the Win key and type “Check For Updates”.
Step 2: Click on the relevant result under best match, and the Windows Settings box will open.
Step 3: Next, click the Check For Updates button and wait for the updates to download and install on your PC.

Step 4: Reboot your PC.
Fix 4: Clean Boot Windows
In addition to antivirus software, other third-party programs or services may also cause the “Reference by Pointer” BSOD. Consider any recently installed or enabled programs or services related to the error. If unsure, perform a clean boot to identify the problematic software. Here’s how to do it:
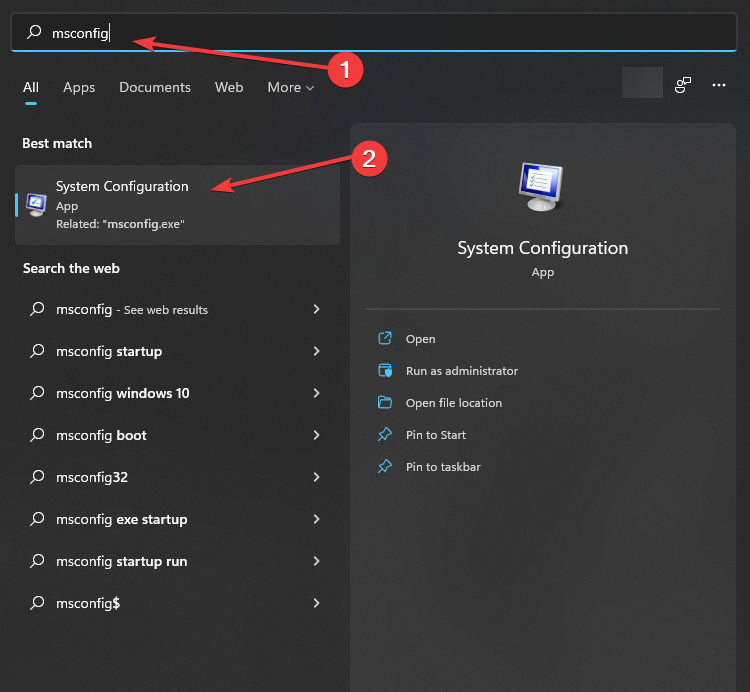
Step 1: Press Win + R and type “msconfig” followed by the Enter key.
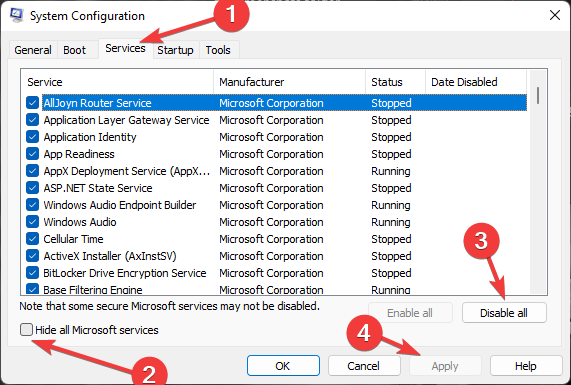
Step 2: The System Configuration box will now open. Click on the Services tab and check the box before Hide all Microsoft services.

Step 3: Click the Disable All button to turn off all the third-party services.
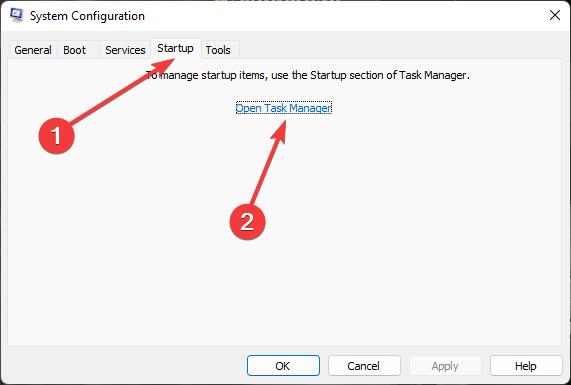
Step 4: Next, click on the Startup tab and click the “Open Task Manager” link.

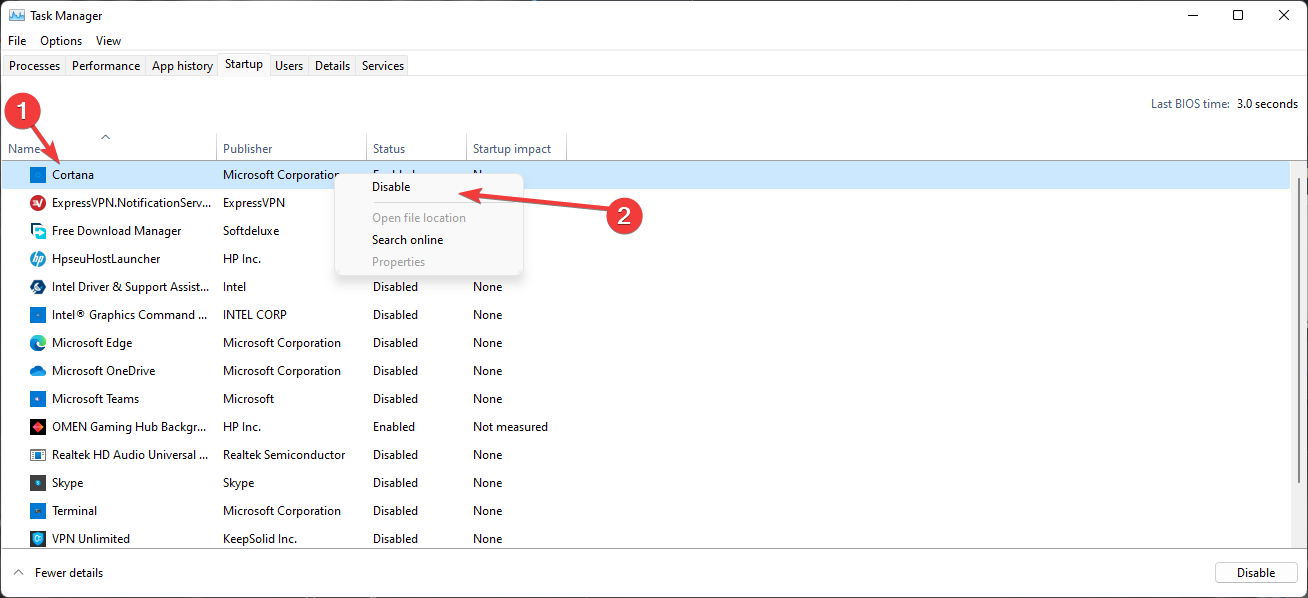
Step 5: The Task Manager window will now open, displaying all the apps that boot up when you reboot your PC.

Step 6: Right-click on all apps and choose Disable. This will disable all the apps from being loaded at startup or boot.
Step 7: Click on Apply and then on OK,
Step 8: Reboot your PC and check if the “Reference By Pointer Stop Code 0x00000018” error is fixed.
If this resolves the issue, you may need to re-enable applications and services one at a time to identify the problematic one. Once found, you should either keep it disabled or remove it.
Fix 5: Update Graphics Driver
Graphics drivers enable communication between your graphics card and the operating system. Updating these drivers is essential because outdated, missing, or corrupted drivers can cause BSOD errors.
Step 1: Go to the official website of your device’s manufacturer (e.g., Dell, HP, Lenovo).
Step 2: Find the support, drivers, or downloads section on the website.
Step 3: Enter your device’s model or serial number to locate the appropriate drivers and updates for your hardware.
Step 4: Download your device’s latest drivers, firmware, or BIOS updates.
Step 5: Double-click the downloaded file to begin the installation process and follow the on-screen instructions.
Step 6: Restart your computer after the installation to ensure all changes are applied.
Fix 6: Utilize The System File Checker Tool
Blue Screen of Death errors like “Reference by Pointer” can occur if certain system files are corrupted, damaged, or missing. You can repair these files by replacing them with cached copies using the System File Checker (SFC) utility. To use this built-in tool, follow these steps:
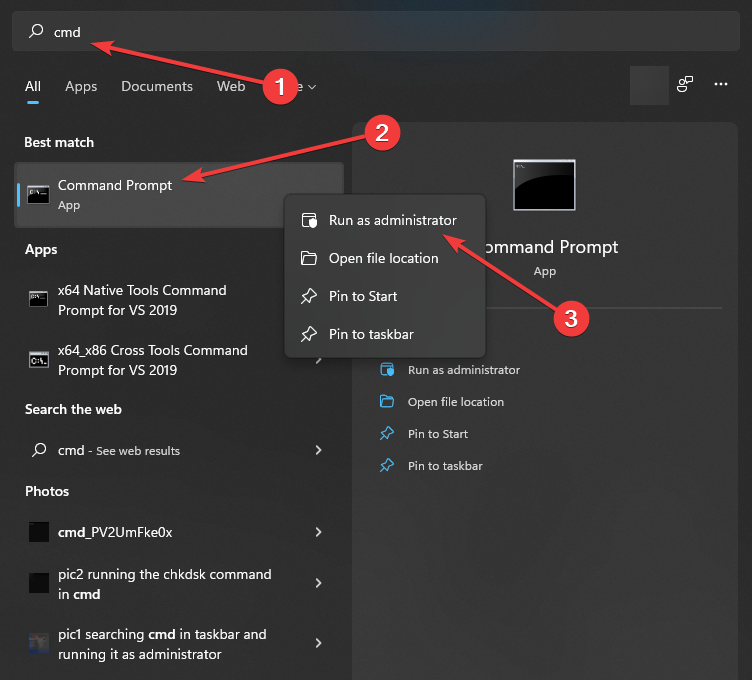
Step 1: Press Win + S to open the search box, type “cmd,” right-click on “Command Prompt” from the search results, and select “Run as administrator.”
Step 2: If the prompt box for administrative privileges appears, click “Yes” to proceed.
Step 3: In the Command Prompt window, type “sfc /scannow” and press the Enter key.
The tool will scan your system files, automatically detecting and repairing any issues. Wait for the scan to complete, then restart your computer to see if the issue is resolved.
Fix 7: Activate Deployment Image Servicing And Management Utility
Sometimes, the “Reference by Pointer” BSOD error may appear after updating to Windows 10. If the SFC scan doesn’t resolve the issue, it’s possible that your Windows image files were corrupted during the update. To address this, you should run the DISM command, which can effectively repair damaged image files.
Step 1: Press Windows + S, type cmd, right-click Command Prompt, and select Run as administrator.
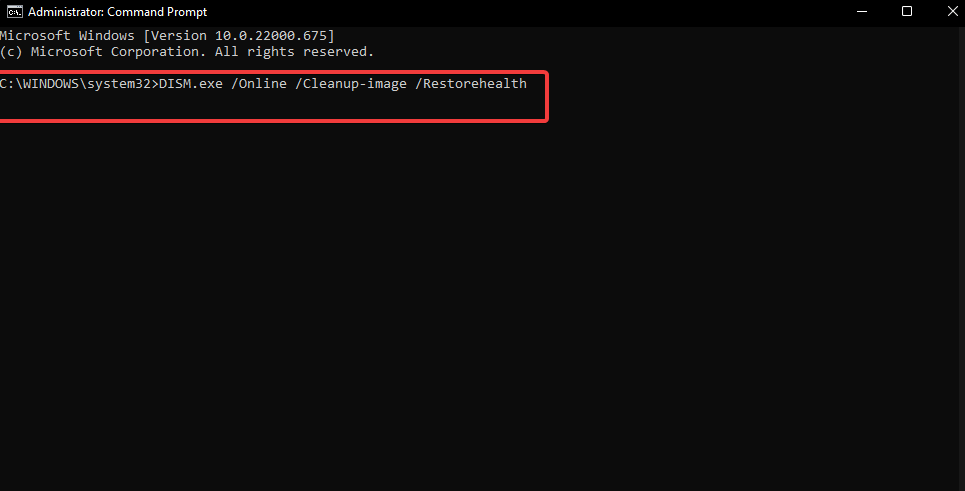
Step 2: In the Command Prompt window, type the following command and press Enter
DISM /Online /Cleanup-Image /RestoreHealth
Step 3: Allow the process to complete and reboot your PC.
Fix 8: Check for Overheating Issues
Overheating can also be a potential cause of the error. If your CPU temperature exceeds a certain threshold, it may cause your computer to crash. It’s advisable to check your PC’s temperature if you encounter this problem. Here is what you need to do:
Step 1: Press Ctrl + Shift + Esc to open the Task Manager.
Step 2: In the Task Manager window, click on the Performance tab.

Step 3: Next, click on the GPU sub-tab to find the temperature here.
Note : The normal CPU temperature should be around 30℃ to 40℃ in normal cases and not exceed 70℃ under heavy load.
If your computer is overheating, cleaning the dust may help resolve the issue. Disconnect the power supply, open the computer case, and use compressed air to clean the internal components.
Read – A Study on How CPU Stress Affects Windows Computer Performance
Fix 9: Inspect Your Hardware
Many Blue Screen of Death errors are related to hardware issues. If you encounter this stop code error, it’s important to check your hardware.
If you recently installed new hardware before the error occurred, try removing it. If the error disappears after removing the new hardware, consider replacing it with the original component or a new one, or contact the manufacturer for assistance.
Fix 10: Reinstall Windows And Recover Data
If nothing else works, you have to Reinstall Windows. The major concern here is recovering the data, which you can do by using the Advanced Disk Recovery tool after formatting and reinstalling Windows.
Steps To Reinstall Windows
Step 1: Download the Windows 11 installation media from the Microsoft website.
Note: Windows 10 users, click on this link.

Step 2: Create a bootable USB drive using the Media Creation Tool.
Step 3: Insert the bootable USB drive into your PC.
Step 4: Restart your PC and enter the BIOS/UEFI settings (usually by pressing F2, F12, Del, or Esc during startup).
Step 5: Set the USB drive as the primary boot device and save the changes to exit the BIOS/UEFI.
Note : Your PC should boot from the USB drive and start the Windows 11 installation process.
Step 6: Follow the on-screen instructions to install Windows 11.
Step 7: Select Custom Installation when prompted, and choose the partition where you want to install Windows.
Note: This will erase the current Windows installation and perform a clean install.
Step 8: Follow the setup prompts to configure Windows 11 after installation.
Steps To Recover Data After Format And Reinstallation
Step 1: Download and Install Advanced Disk Recovery using the download button below.
Step 2: Launch the software and choose the areas to be scanned.

Step 3: Click on the Start Scan Now Button.

Step 4: Choose the Deep scan option to recover files from the deepest sectors of your hard drive and click on Scan Now.
Step 5: A list of files that can be recovered will be displayed. Click on the check box next to the files you wish to recover and click on the Recover button.

Step 6: You will have to specify the location where you wish to save these recovered files and click on OK.
Step 7: Wait for some time, and you will have recovered all your important data.
Are You Able To Fix Reference By Pointer Error On Windows 10/11?
We hope you have fixed the Reference By Pointer Error on Windows 10/11 with the abovementioned steps. In the comments section below, please share your views on why this error occurred and how you fixed the issue and saved your data.
References –
https://www.partitionwizard.com/disk-recovery/reference-by-pointer-bsod.html
https://learn.microsoft.com/en-us/answers/questions/674157/bsod-reference-by-pointer-dont-know-what-driver-is
https://www.reddit.com/r/techsupport/comments/pspsvt/reference_by_pointer_bsod/
Every error has its own cause and you can carry out several solutions to get rid of it. Reference by Pointer Error is a Blue Screen issue with bug check value 0x00000018 that hits the computer screen, making it difficult for the users to operate the system.
Advanced users can easily interpret both the code and value and in this case, it indicates that the reference count of an object is illegal for the current state of the object. Loaded with a few reasons, this issue is not difficult to handle and in this article, we will describe all the possible and effective workarounds to solve the BSOD.
Reference by Pointer Error BSOD Windows 10 Solutions
Here is how to Fix Reference by Pointer Error BSOD Windows 10 –
1] Update Outdated Graphics Drivers
Users who frequently experience Reference by Pointer Error notices that the presence of outdated graphics drivers was the major reason behind the issue. So, once you install the latest version, the problem will most possibly go away. However, AMD users are quite specific with this as they are able to resolve this trouble by updating the AMD graphics card. But even if you don’t have AMD graphics, there is nothing to worry as you can still update the one you are using by these steps –
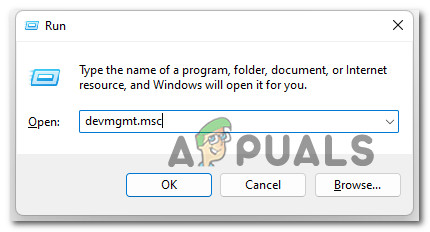
- Use a combination of “Win + I” hotkeys to quickly open Run dialog box. Once it appears, insert the command ‘devmgmt.msc‘ and click OK.
- In the Device Manager console, locate and expand Display adapters.
- Do a right-click on the drivers one after another and select the Update driver option.
- Choose Search automatically for drivers from the wizard that shows up in each.
- Wait for the system to download and install the same. If it requires a reboot for a complete installation, do it.
2] Use the System File Checker Tool
Any broken, faulty, or missing system files often create BSOD issues on the system including Reference by Pointer Error. Problem in these files because of common reasons as changes in Windows Registry, installation of 3rd party software, or replaced certain system files. These consequences cause high chances for the PC to get affected by such BSOD errors. So, the best possible way is to restore those corrupted files from the cached copy in the Windows folder. You can simply carry out this procedure using System File Checker, the built-in utility, through the guidelines mentioned below –
- Get access to the taskbar search (Win+S) and insert the command cmd. Once Command Prompt appears in the results list, do a right-click on it and select Run as administrator option.
- Upon the prompt of UAC, click the Yes button to proceed further.
- When the black window appears on the screen, input the below command and hit Enter to initiate the scan.
sfc /scannow
- Let the tool start and detect problematic areas and then repair them automatically.
- Subsequent to completion, the utility will display you the scan status and for effective results, perform a system reboot.
3] Get Rid of Problematic Applications
Under certain conditions, some installed programs create conflict with the system which may lead to Reference by Pointer Error. To deal with this, you need to perform a clean boot that would start the device with a minimal set of services and apps. Issue does not occur again indicates that the specific applications is faulty and prevents the PC Startup. To deploy this workaround, let us follow the steps –
- Do a right-click on the Start icon and select Run. Insert the command msconfig in the text field and click OK.
- This would immediately open System Configuration on the PC screen. Here, choose Selective Startup and moving ahead uncheck the option namely Load startup items.
- Now, switch to the Services tab and tick mark the box Hide all Microsoft services. Click the Disable all button.
- Shift to the Startup tab and click Open Task Manager.
- Perform a right-click on the items listed and select the Disable button.
- Again head back to the System Configuration window and click on Apply and OK buttons respectively.
After the computer restarts, see if it is working in a stable condition without throwing any error codes. If there are no BSODs, it means that the issue was due to one of the installed applications. You need to find out the problematic program and to do that simply carry out the above steps and one by one enable the services until you locate the one that was creating a mess.
Once you know which app was creating the issue, simply remove it and see if this makes the PC stable.
4] Check for updates to solve Reference by Pointer Error
Outdated operating system definitely gets prone to several issues. Keeping Windows 10 up to date with the latest drivers, patches, builds is very important as they contain fixes for various bugs and problems. So, if your system is not running the latest version, it is your job to update and maintain it. Here is how to do it –
- Press Win + I key to directly and quickly open Windows Settings program.
- Once into the app, click Update & security.
- Click Check for updates button on the right pane.
- Wait for the system to list down all the available updates for you. Click the Download button visible there to grab and install them.
- If the update requires a reboot, carry it out to make the changes effective right away.
5] Conduct Malware Scan
Malware or virus attacks are always been the culprit behind several issues and Reference by Pointer Error is no exceptional. So, it is always advisable to do a threat scan and see if there is any malicious activity taking place in the system or not. Windows Security app, the built-in protection tool helps you detect and take necessary action against them. Let us see how to bring this utility into use in order to make things normal –
- Click the shield icon on the system tray to quickly access Windows Security.
- Go to the Virus & threat protection area.
- Select Scan options link on the right pane.
- Choose Full scan on the consequent page and at the bottom hit on Scan now. This would immediately initiate the detection process.
- If any threats are found, the app will display you the same. Take instant action and remove the malware from the system.
- For effective results, it is better to restart the computer.
6] Temporarily Disable 3rd party Antivirus
Windows carries drawback to engage into conflict with the 3rd party antivirus tool. BSOD Reference by Pointer Error may be the outcomes of such situations. Therefore, in case, you are using any such program, the immediate action is to disable it for a certain time. Even after disabling it if the issue continues to show, then uninstall it.
- Find the 3rd party antivirus icon on the system tray. Do a right-click on it and choose Disable option.
- Now, see if you are still getting the BSOD or not. If the error does not appear again, it means that the antivirus is the culprit and thus you need to uninstall it.
- To do so, perform a right-click on Start and select Apps and features from the list.
- Locate and select the antimalware program you are using. Click Uninstall.
- Follow the instructions of the app that comes into view to remove it completely from the system.
7] Run DISM Tool to fix Reference by Pointer Error
Many users have reported in the forums that they are receiving Reference by Pointer Error BSOD after updating their PCs to Windows 10. Same situation may also happen with you, so there is a chance of Windows image files of being corrupted. In these circumstances, you need to run the DISM tool to repair the faulty image file very efficiently. Let us see how to deploy this built-in utility –
- Open Run dialog. Type in cmd on the text box and press Ctrl + Shift + Enter keys altogether to directly Open Command Prompt as Admin From Run Dialog.
- Click the Yes button if the UAC prompts up for further permission.
- On the black window, insert the below-given command and hit Enter.
DISM.exe /Online /Cleanup-image /Restorehealth
- The entire process to detect faulty Windows image files may take a long to finish. Once it gets over, Restart Windows 10 PC and see for the error.
Hopefully, with the above set of workarounds, you will be able to overcome Reference by Pointer Error BSOD in Windows 10. Though there are other reasons that could affect the PC like similar functioning of two apps, low disk space, RAM issues, and more. However, if you resolve the problem by any other means, then kindly write to us about them.
Methods:
1] Update Outdated Graphics Drivers
2] Use the System File Checker Tool
3] Get Rid of Problematic Applications
4] Check for updates
5] Conduct Malware Scan
6] Temporarily Disable 3rd party Antivirus
7] Run DISM Tool
That’s all!!
A BSOD, or blue screen of death, can occur for a variety of reasons, including hardware failure, and you’ve come to the right place if you’re seeking a fix to the reference by pointer BSOD issue.
Although this crash error is unusual, there are a few simple fixes that may solve your problem quickly. We’ve compiled a list of 10 DIY methods to fix BSOD caused by reference by pointer error.
What causes reference by pointer BSOD?
A reference by pointer BSOD error indicates a problem with your system files or device drivers. The most typical cause is hardware driver errors, including errors in graphics cards and other components like network devices.
Other problems, such as faulty system files or even failed hardware, might cause the error.
How can I fix to Reference by Pointer BSOD?
1. Run a full scan
If your system is affected by a virus or bad sectors, it may face the ‘reference_by_pointer’ problem. Therefore, it’s recommended to run a complete scan on your PC.
Follow these steps to perform a comprehensive system scan:
- Search for Settings in the search box of Windows taskbar and select the first application.
- Select the Update & Security tab and choose Windows Security.
- Choose Virus & threat protection and select Scan options.
- In the new window, check the Full scan option, and click on Scan now
2. Disable antivirus for a short time
Sometimes an existing or a newly installed antivirus program can disrupt a computer’s normal functioning, and throw errors like reference_by_pointer. To prevent the antivirus from interfering with your Windows operations, try disabling it temporarily. Here’s what to do:
- Search for Windows Security in the Start menu, and select the Virus & threat protection tab.
- Under Virus & threat protection settings, select Manage settings.

- Switch Real-time protection to Off.
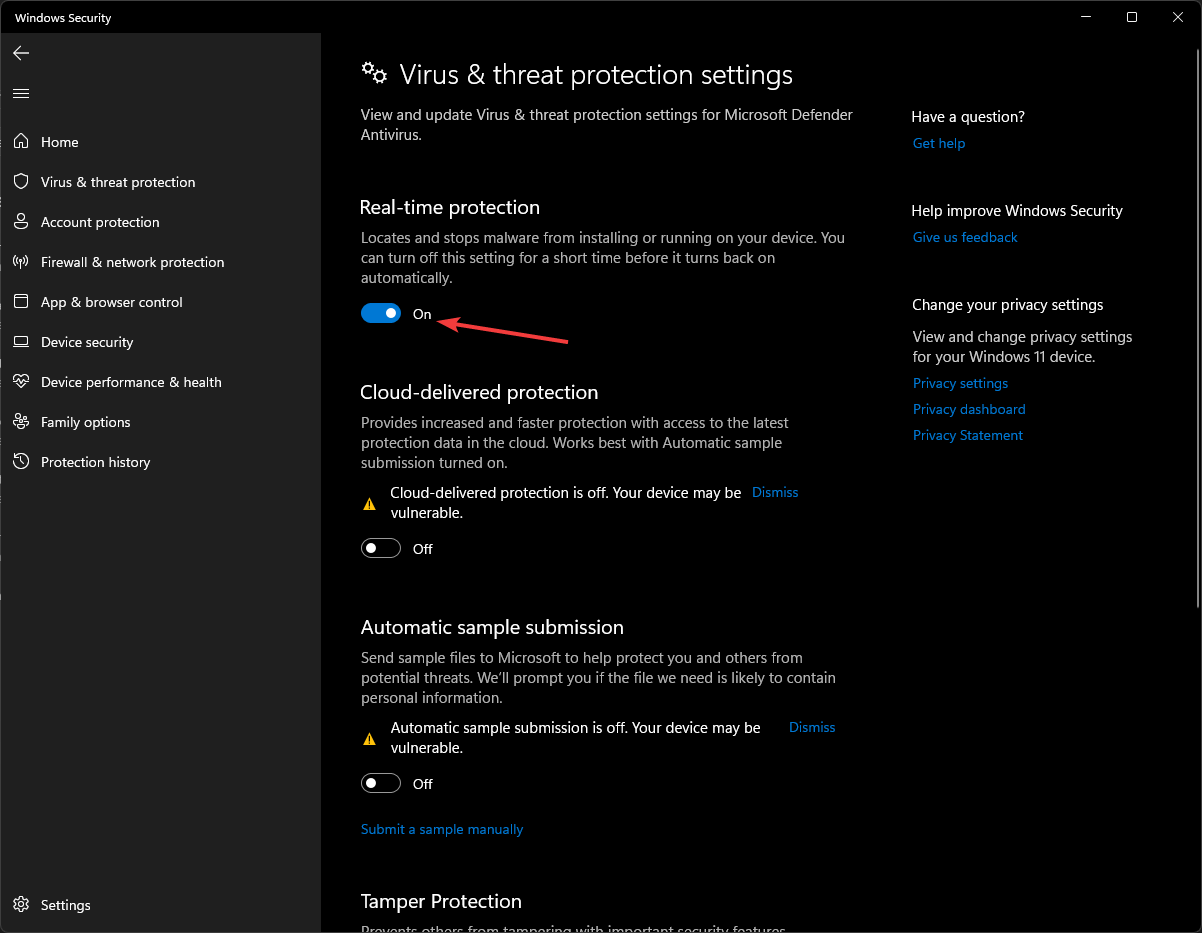
If the REFERENCE BY POINTER problem disappears after this step, you may have a problematic antivirus on your hands. Try updating or replacing it with a bug-free antivirus solution.
3. Verify System files using SFC
The above issue might result from corruption in one or more system files. To be sure, you can run a System File Scan (SFC) to scan and restore corrupt system files. Follow these steps to do so:
- Search cmd in the taskbar and right-click on Command Prompt. Select Run as administrator.
- Type the command and press Enter.
sfc /scannow
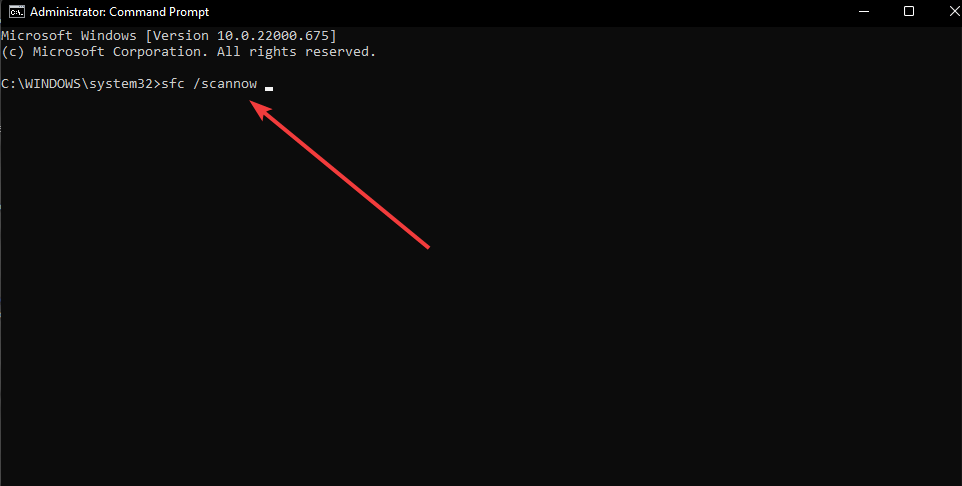
Your computer will now search for any damaged files and attempt to fix them if it finds any. The SFC scan will check the health of the files and repair corrupted files if any. This may take some time, depending on the level of corruption.
4. Run DISM command
The reference_by_pointer BSOD error may or may not be fixed by running the SFC scan if the corruption is severe.
This indicates a deeper issue with the Windows image or a system component. Here, you can run the DISM command to restore the health of your hard disk and eliminate the error. Follow the below steps:
- Run the command prompt as administrator again and type in DISM.exe /Online /Cleanup-image /Restorehealth.
5. Clean boot your computer
Other third-party apps or services, in addition to antivirus software, may cause this reference_by_pointer BSOD. You can perform a clean boot to locate the troublesome application.
- In the search box on the taskbar, type msconfig and select System Configuration from the results.
- On the Services tab of System Configuration, select Hide all Microsoft services. Then select Disable all and click Apply.
- On the Startup tab of System Configuration, select Open Task Manager.
- Under Startup in Task Manager, for each startup item, right-click the item, and then select Disable.
- Restart your computer.
6. Check if your PC is overheating
Overheating of the PC may also cause various BSoD errors. When the PC is idle, the temperature should be between 150 and 160 degrees Fahrenheit (65 to 70 degrees Celsius).
When playing games or running complex applications, the temperature can quickly rise to roughly 175 degrees Fahrenheit (80 degrees Celsius). Here’s how to check the temperature of your PC.
- Download and install Core Temp.
- Run the application and see if your CPU temperatures are high or not.
7. Update the graphics driver
A common reason for reference_by_pointer error is an outdated graphics driver on your PC. Follow these steps to update the Graphics driver.
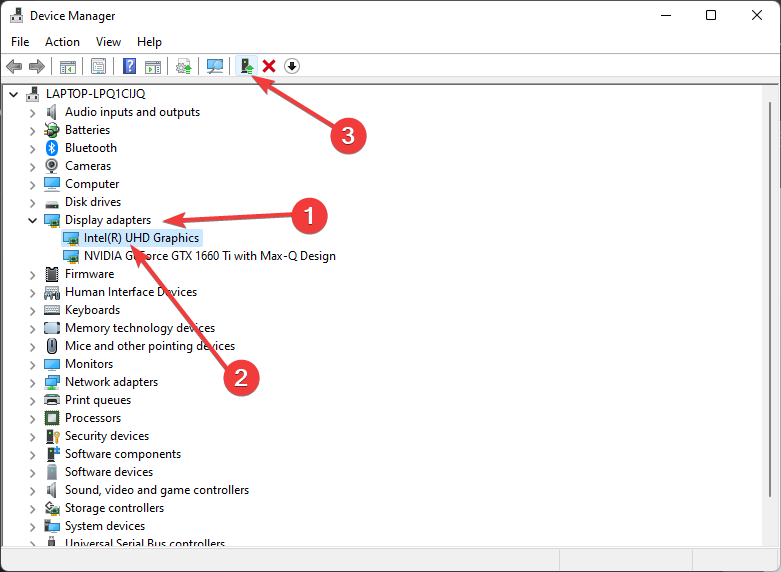
- In the search box on the taskbar, type device manager, then select Device Manager.
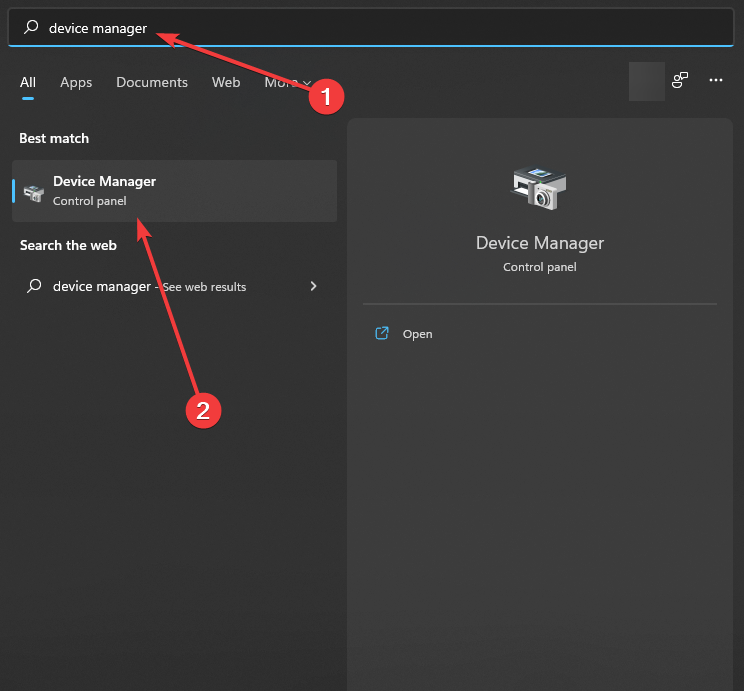
- In the new window, select Display adapters. In the drop-down menu, select your primary graphics card, and then choose the update driver icon on the top bar.
Windows will look for the most recent driver software for your device on your computer and the Internet.
You can also manually download and install the latest driver software from the official website of your graphics card manufacturer.
Check out this article if you’re looking for a way to fix Nvidia graphics card problems.
8. Update your Windows
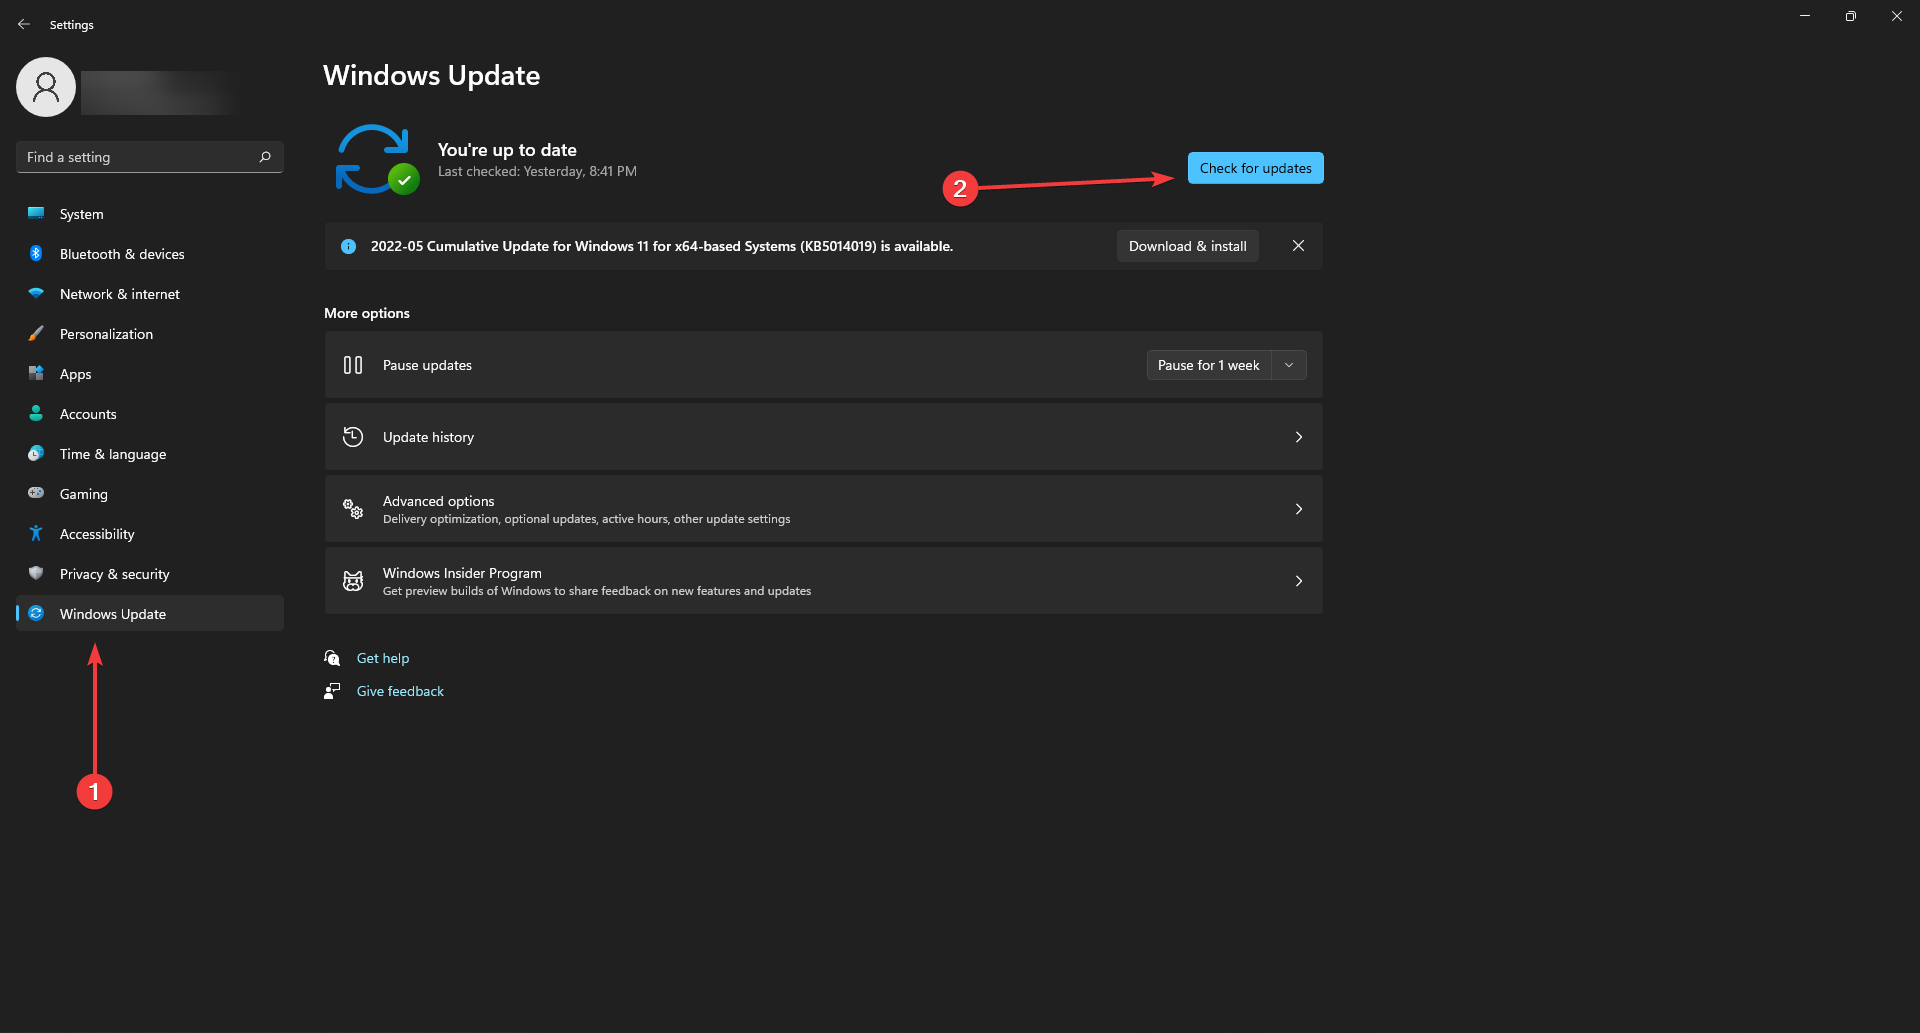
- Search setting in the taskbar and select the first app.
- Select the Windows Update tab on the left and then click on Check for updates.
9. Check the hardware
- Take the laptop or PC to a technician and ask them to troubleshoot your system.
- If any faulty hardware parts are detected, ask the technician to replace the damaged part.
10. Use Data Recovery Software
If all the above methods to fix the reference by pointer error fail, it’s time to download an efficient data recovery software. Stellar Data Recovery is a great software to retrieve any type of files, images, and folders from a BSoD-affected computer.
To recover data from a bootable PC:
Simply download the software from the official website and follow the 3-step process- Select, Scan & Recover.
To recover data from an unbootable PC: Click here to recover data from an Unbootable system
If your PC is not booting because of the blue screen reference by pointer issue and you need to extract your files, then this application is a great tool indeed.
You can also use Stellar Data Recovery Professional to recover files before attempting to reinstall Windows because this process will remove all the files from your PC or Laptop.
Does overheating cause a blue screen with stop code reference by pointer?
An overheating device can cause a system crash and a blue screen of death with the reference_by_pointer error code.
To avoid this problem, make sure your computer has proper cooling systems and the thermal paste of your CPU or GPU has not dried completely.
Conclusion
A blue screen of death happens when your system restarts or shuts down unexpectedly. This means that one of the main processes of your Windows has been terminated by an unknown cause.
Following the methods above, you’ll hopefully be able to fix the reference by pointer BSOD with ease.
Was this article helpful?
YES4
NO
The Reference_By_Pointer error on Windows is one of the harder types of BSOD (Blue Screen of Death) to diagnose and fix. This issue was widespread on Windows 10 and we are starting to see new user reports of it occurring on Windows 11 too.

Even with the fact that this problem is hard to diagnose, there are a couple of common culprits that you should prioritize when you’re troubleshooting for this particular issue:
- Corrupted Storage sectors – Two of the most common causes that are most likely responsible for this kind of issue are either a storage drive that is beginning to fail or a different kind of storage inconsistencies. If the damage to your drive is minimal, you might be able to alleviate the problem temporarily by doing a CHKDSK scan via the Recovery menu.
- Corrupted data inside the Temp and Prefetch folder – If you are able to boot up your computer and you’re only seeing this type of BSOD during certain actions, you might be lucky enough to see this problem occurring due to some kind of corrupted data that’s currently stored inside the Temp or Prefetch folder. Clearing the contents of this folder should fix the issue in your case.
- System File Corruption – System file corruption can also be responsible for this particular issue. If the issue is superficial, you might be able to fix it by running SFC and DISM scans via the recovery menu. But if you’re dealing with a type of problem that is rooted inside the Kernel data, you will likely need to do a clean install or repair install to fix the system file corruption.
- Outdated Motherboard drivers – If you are typically experiencing this type of issue when your PC has to perform resource-intensive tasks, chances are your current rig is forced to function with outdated motherboard firmware. On laptops, this type of system crash occurs because your motherboard is not configured to provide the correct voltage to your internals. To fix this issue, you’ll need to install the latest available drivers for your motherboard.
- Outdated / Incompatible NIC drivers – This might look like an unlikely culprit, but the Network Interface Card driver (NIC) is a confirmed culprit for this type of BSOD. Fortunately, fixing this particular scenario is as simple as updating your NIC driver to the latest version available.
- 3rd party Antivirus Interference – Norton and a couple of other 3rd party antivirus suites are sometimes blamed for this BSOD. Most likely, the critical system crash occurs because a kernel file is blocked due to a false positive by the active AV. To test out this type of interference, you’ll need to temporarily disable or uninstall the 3rd party antivirus and see if the BSOD stops occurring.
- Different 3rd party Interference – Besides potentially-interfering Antivirus Suites, there are also other program categories known for causing this issue. System Optimizers and generally any type of overlay software are known to cause this type of BSOD. The best way if identify this type of issue is to perform a clean boot procedure.
- Different configuration (for VMs) – If you’re experiencing this issue when booting up a Virtual machine (VM), and you recently made some adjustments to your system configuration, you might be able to resolve this issue quickly by forcing the virtual OS to restart with the last good configuration.
- Corrupted Hyper-V integration services (for VMs) – If you’re a virtual machine through Hyper-V, another potential culprit (if you get this BSOD inside a virtual machine) are the Hyper-V integration services. In this case, you can fix the issue by updating every Hyper-V service via Device Manager (inside your Virtual Machine).
Now that we went over every potential cause that might be responsible for this problem on both Windows 10 and Windows 11, let’s go over several fixes that other affected users have successfully used to fix the Reference_By_Pointer error:
1. Perform a CHKDSK scan from the Recovery menu
Before you move on to more comprehensive repair strategies, you should start this troubleshooting guide by making sure that you’re not encountering the Reference_By_Pointer BSOD due to a failing drive.
Fortunately for you, if the damage is superficial and the drive is only beginning to fail, you might avoid the need to purchase a new drive by deploying a CHKDSK scan and seeing if the Check Disk Utility is able to identify any failing sectors and replace them with unused equivalents.
But since you might not be able to boot reliably (or at all) due to the Reference_By_Pointer BSOD, we recommend triggering a CHKDSK scan via the Advanced Recovery menu on Windows 11 and Windows 10:
Note: The screens you’ll see will vary a little if you’re on Windows 10, but the steps are generally the same for both operating systems.
- Press the Windows key to open up the Start button.
- Next, click on the power icon and hold the Shift key while clicking on Restart.
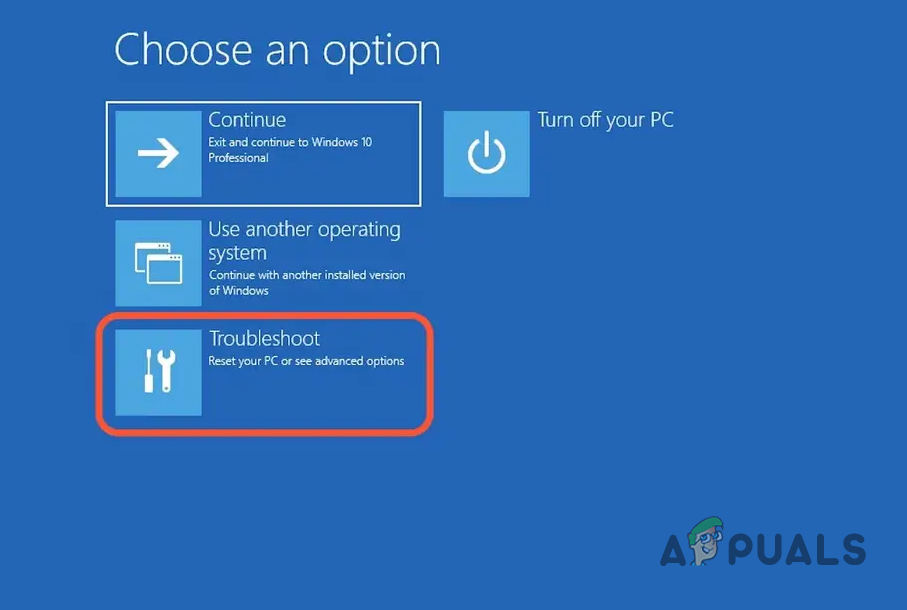
Note: This will force Windows to restart directly into the Advanced Recovery menu. - Once your PC boots into the Advanced Recovery menu, click on Troubleshoot from the available options.

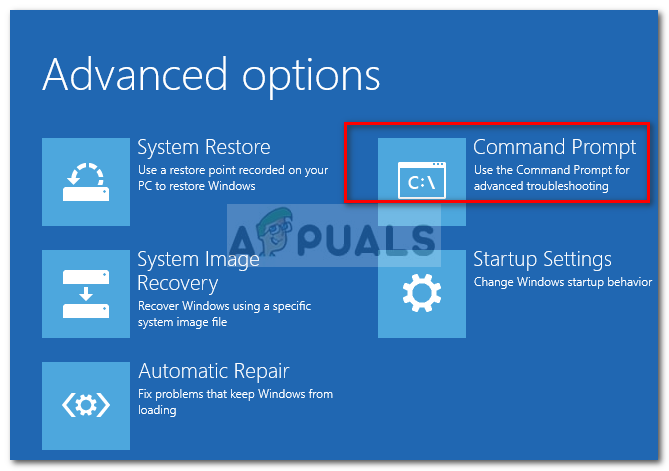
Open the Troubleshoot tab - Inside the Troubleshoot tab, click on Command Prompt.

Open up the Command Prompt menu Note: While in the recovery menu, CMD will open with admin access, so there’s no need for any special instructions.
- Inside the elevated Command Prompt, type the following command to deploy a CHKDSK scan:
chkdsk /r /v C:
Note: Change C to the appropriate letter if your operating system is installed on a different location.
- Wait until the operation is complete, then reboot your PC and see if the problem is now fixed.
If you’re still dealing with the same Reference_By_Pointer BSOD even after running this utility, move down to the next potential fix below.
2. Clear Temp and PreFetch folder (if applicable)
If you’re experiencing this issue sporadically and you are able to boot normally, you should turn your attention towards the two directories that are used by Windows to store temporary files – TEMP and Prefetch.
Deleting the contents of these directories (not the directories themselves) is completely safe and won’t cause an underlying issue with your system.
All you’re essentially doing is forcing your system to let go of any temp files that are currently in use by the various Windows components active during every boot.
However, you will likely not be allowed to delete these folders unless you boot in Safe Mode.
Follow the instructions below to clear the Temp and preFetch folders from Windows 10 or Windows 11 and see if that fixes the Reference_By_Pointer BSOD:
- First things first, follow this guide to boot in Safe Mode.
- Once your PC boots in Safe mode, press Windows key + R to open up a Run dialog box.
- Inside the newly appeared dialog box, type ‘%TEMP%‘ and press Enter to open up the Temp folder of your Windows installation.

Open up the Temp folder - Once you’re inside the Temp folder, press Ctrl + A to select everything inside, then press the Delete key and confirm by clicking Yes to delete the contents of the Temp folder.

Delete the contents of the Temp folder - Once the contents of the Temp folder have been cleared, press Windows key + R once again.
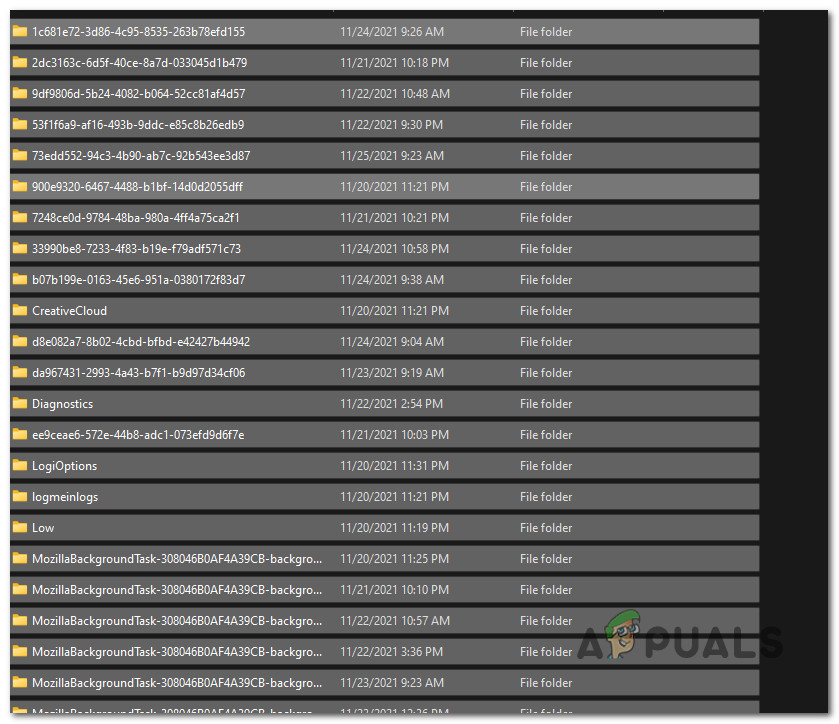
- Inside the new dialog box, type ‘prefetch’ and press Ctrl + Shift + Enter to open up the Prefetch folder with admin access.
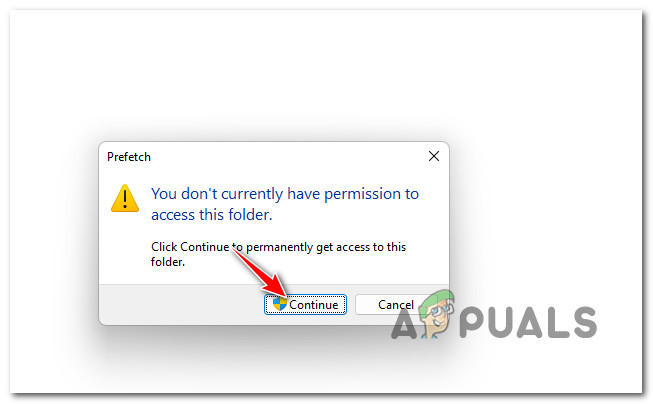
Open up the Prefetch folder - Before you’ll be able to view the contents of the Prefetch folder, you’ll need to click on Continue, then accept the UAC (User Account Control) prompt.

Accepting the admin access - Once you finally receive access to the Prefetch folder, press Ctrl + A once again, then press the Delete key and confirm to delete the contents of the folder.
- Now that the contents of both the Prefetch and Temp folders have been cleared, reboot your PC to exit safe mode, then utilize your PC normally and see if the same BSOD returns.


If you’re still experiencing critical reference_by_pointer crashes even after you cleared both of these folders (or you’re unable to boot), move down to the next potential fix below.
3. Deploy SFC and DISM Scans via Recovery Menu
If none of the methods above have proven to be effective in your case as you’re still experiencing the same Reference_by_Pointer BSOD constantly, you should start considering a type of system file corruption that’s causing this type of issue.
If you haven’t tried this already, you should proceed by deploying SFC and DISM scans in order and see if this allows you to fix the critical system crash that is currently affecting your system.
Note: Keep in mind that due to the fact that you might not be able to boot or you run the risk of the Reference_by_Pointer crash occurring while you’re in the middle of the scan, we recommend that you do this via the Advanced Recovery menu.
Follow the instructions below for step-by-step instructions on how to do this:
- Press the Windows key to open up the Start menu.
- Next, click on the power icon, then keep the Shift key pressed while clicking on Restart.

Restart while the Shift key is pressed - Wait until your PC restarts directly into the Advanced Recovery menu.
- From the Advanced Recovery menu, click on Troubleshoot from the context menu that just appeared.
Accessing the Troubleshoot menu - From the multitude of options available inside the Troubleshooting tab, click on Command Prompt to open a CMD window with admin access.
Open up the Command Prompt - Once you’re inside the elevated CMD prompt, type the following command and press Enter to deploy an SFC (System File Checker) scan:
sfc /scannow
Note: This type of scan will replace every corrupted file it finds with healthy files stored locally (on the OS partition). Don’t interrupt this operation after you started because you run the risk of creating additional logical errors.
- Once the SFC scan is complete, type the following command and press Enter to deploy a DISM (Deployment Image Servicing and Deployment) scan (regardless of the outcome):
DISM /Online /Cleanup-Image /RestoreHealth
Note: DISM uses a sub-component of Windows Update to download healthy files that will replace corrupted equivalents. If you don’t have access to the Internet, skip the DISM scan altogether.
- Once both of the scans are complete, reboot your PC and see if the problem is fixed once the next startup is complete.


If you’re still dealing with the same type of Blue Screen of death (Reference by Pointer) even after deploying DISM and SFC scans, move down to the next potential fix below.
4. Update all motherboard drivers
As it turns out, you can also expect to deal with this issue in those situations where you’re using an outdated motherboard driver that is not designed to work with your operating system.
Several affected users have confirmed that they managed to fix this problem by updating their motherboard drivers to the latest version available.
Note: Most scenarios where you’ll see this particular problem is when the user recently upgraded to Windows 11 from Windows 10 and the old motherboard driver was simply migrated instead of being updated for the new operating system.
Here’s what you need to do to update all motherboard drivers on your Windows computer:
- Before you can install the appropriate driver, you need to know your motherboard model. This will allow you to ensure that you’re downloading and installing the appropriate drivers.
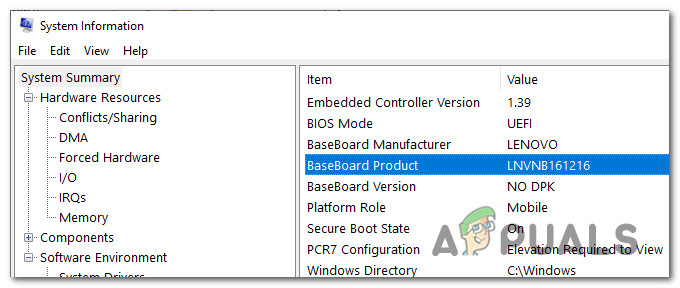
Note: If you already know your motherboard model, skip these first steps and move directly to step 4. - Press Windows key + R to open up a Run dialog box, then type ‘msinfo32’ inside the text box and press Enter to open up the System Information screen.
Open up the msinfo32 utility - Once you’re finally inside the System Information screen, click on System Summary from the menu on the left, then move over to the right-hand side of the screen and check your motherboard model under BaseBoard Product.

Checking the motherboard model Note: Additionally, you can use a 3rd party tool like Speccy to find out your motherboard model.
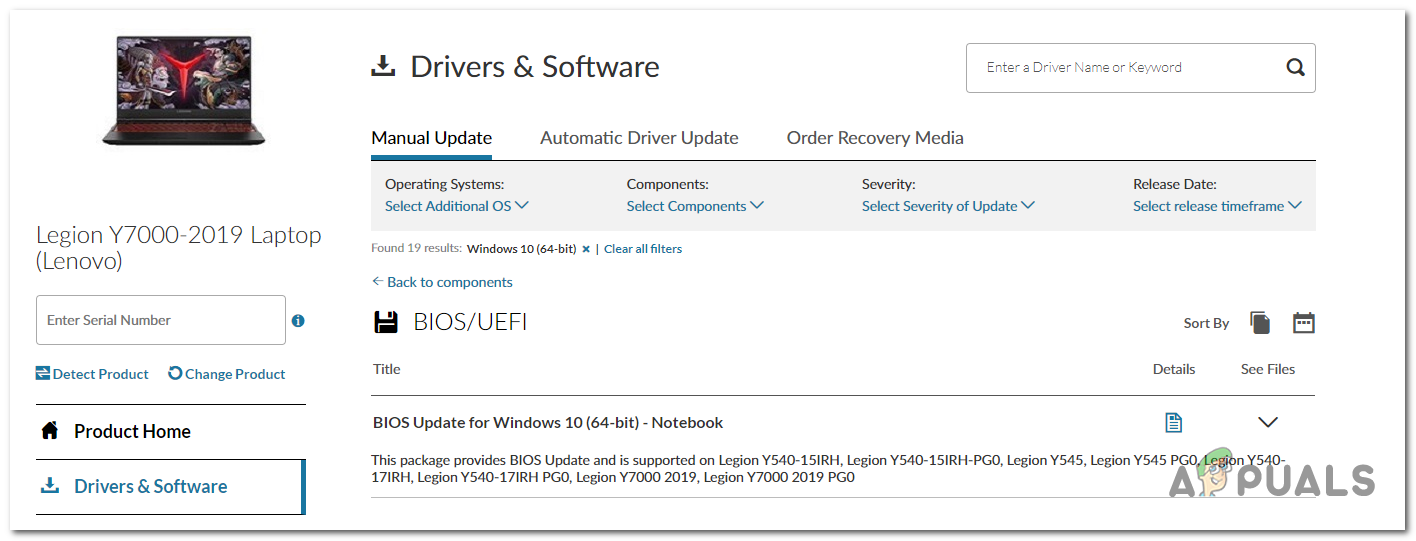
- Once you manage to discover your motherboard model, visit the official download page of your motherboard manufacturer and download the latest version of the motherboard driver.

Downloading the latest motherboard driver - Once the latest driver is downloaded locally, double-click on the installer and follow the on-screen prompts to complete the installation of the motherboard driver.
- At the end of this procedure, reboot your PC and see if the problem is fixed once the next startup is complete.

In case you’re still experiencing BSOD crashes with the same reference_by_pointer error after installing the latest motherboard driver (or you already had the latest version), move down to the next potential fix below.
5. Disable or Uninstall 3rd party antivirus (if applicable)
If you’re using a 3rd party antivirus suite, you should not discard it from the basket of potential culprits that might be causing this type of BSOD on Windows 10 or Windows 11.
According to some affected users, you might experience the Reference by Pointer BSOD crash because your antivirus ends up blocking a kernel process due to a false positive – most of the occurrences that we’ve managed to identify were related to Norton Antivirus.
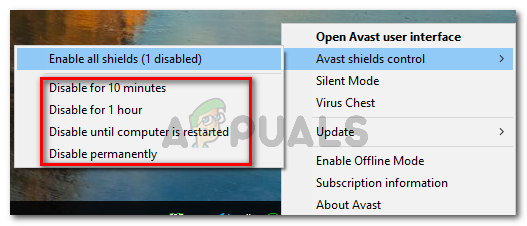
To test if your antivirus is actually causing this type of issue, you should start by disabling the real protection of your antivirus or firewall and utilize your PC normally to see if the crashes stop. Of course, the instructions for doing this will vary from AV to AV, but in most cases, you can do this directly by right-clicking the taskbar icon.
If the BSOD crashes are no longer occurring while you disable the real-time protection of your antivirus (or you’re using a firewall), follow the instructions below to uninstall the interfering security suite and see if the crashes stop completely:
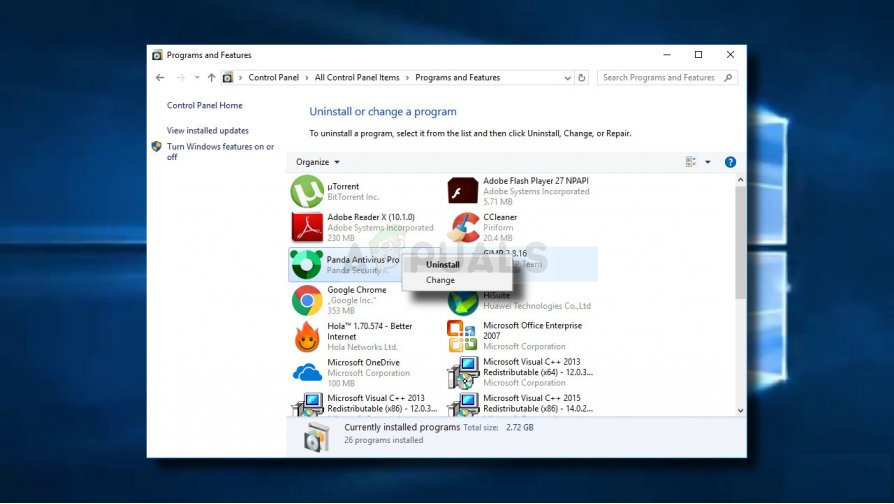
- Open up a Run dialog box by pressing Windows key + R. Next, type ‘appwiz.cpl’ and press Enter to open up the Programs and Features menu.
Open up the Programs and Features menu - If you are prompted by the User Account Control, click Yes to grant admin access.
- Once you’re inside the Programs and Features menu, scroll down through the list of installed applications and locate your 3rd party security suite. Once you see it, right-click on it and choose Uninstall from the context menu.

Uninstall antivirus - Follow the on-screen prompts to complete the uninstallation of the AV tool, then reboot your PC.
Note: If you want to make sure you’re not leaving behind any remnant files, follow this guide to clear any files left behind by the antivirus. - Utilize your PC normally and check if the problem is now fixed.

If the reference by pointer BSOD returns even after you uninstalled your antivirus suite, move down to the next potential fix below.
6. Update NIC Driver
This might not seem like a likely culprit, but the Network Interface Card (NIC) driver is often singled out for causing this problem (on both Windows 10 and Windows 11) by tech-savvy users that investigate the crash dumps.
The majority of user reports that we looked into we’re Windows 11 upgrades coming over from Windows 11. So we assume that this issue is mostly caused by a Windows 10 driver that is being migrated to Windows 11 without being updated for the new operating system.
Fortunately, if you’re dealing with the same kind of issue, you can probably fix the BSOD by using Device Manager to update the Network Interface Card driver.
Follow the instructions below for a quick guide on doing this:
- Press Windows key + R to open up a Run dialog box. Next, type ‘devmgmt.msc’ and press Ctrl + Shift + Enter to open up Device Manager with admin access.

Open up the Device Manager menu Note: When you’re prompted by the User Account Control window, click Yes to grant admin access.
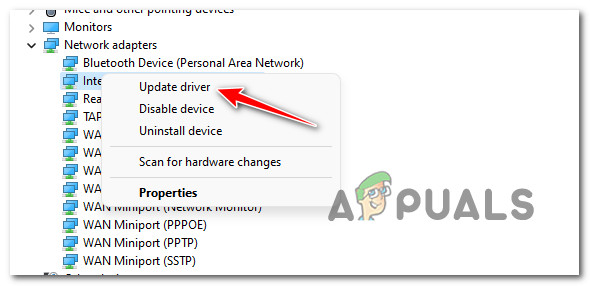
- Next, scroll down through the various device categories and expand the Network Adapters drop-down menu.
- Right-click on the NIC device and choose Update Driver Software from the context menu.

Update the Driver - At the confirmation prompt, confirm the operation, then wait to see if a new driver version is found.
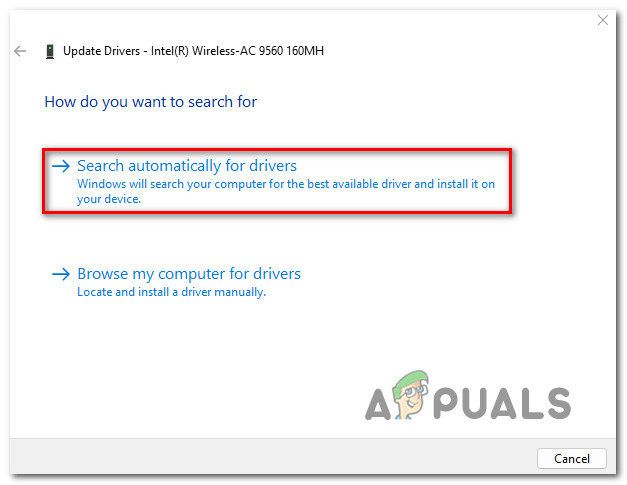
- At the next prompt, click on Search automatically for drivers from the new menu that just appeared.

Search for an updated NIC driver - If a new version of the driver is identified, follow the remaining instructions to complete the installation of the new NIC driver version.

In case the same BSOD is still occurring even after you updated the NIC driver, move down to the next potential fix below.
7. Perform a clean boot
Keep in mind that interfering Antivirus suites are not the only 3rd party programs that might ultimately be responsible for the apparition of the reference_by_pointer BSOD.
Looking at some user reports, we’ve discovered system optimizing tools and even optical burning software as potential culprits that might contribute to this critical system crash.
But since there are a lot of potential culprits that might be responsible for this problem, the best course of action would be to go for a clean boot procedure – this will force your Windows to boot up without any type of 3rd party interference (only required startup services and processes will be permitted to run).

If the problem no longer occurs while you run your PC in a clean boot state, it’s clear that a 3rd party item is causing the critical system crash (reference-by-pointer BSOD).
Here’s how to start your Windows PC in a clean boot state and figure out which culprit is responsible for this issue.
8. Clean install or Repair install your Windows installation
If none of the methods featured above have proven to be effective in your case, it’s almost clear that you’re dealing with some type of software or hardware issue that you won’t be able to fix conventionally.
If it’s a hardware issue, you’ll have to take your PC to a qualified technician to inspect each component and figure out if any component is actually causing this critical crash.
However, if you’re actually dealing with a software issue (corrupted Windows files) a clean install or repair install procedure should get the issue fixed.
A clean install is the easier procedure out of the bunch, since enforcing it won’t require any prerequisites. But the major downside is that you will lose any personal data stored on the OS drive if you don’t make a backup in advance.
On the other hand, if your operating system partition holds important system data that you simply can’t afford to lose, a repair install is the way to go in your case.
In case this problem is only occurring inside your Virtual machine, we have put together two additional methods (check below) that will treat this particular BSOD in these scenarios.
9. Boot with last good configuration (for VMs)
If you’re experiencing this Reference by Pointer Blue Screen of Death inside a virtual machine, chances are you recently adjusted the old configuration of your VM. Doing this might cause your Virtual machine to become unstable and crash with this particular BSOD at every attempted startup.
Fortunately, other users that found themselves in a similar situation have confirmed that they were finally able to boot up their VM normally by forcing the Windows installation to boot with the ‘Last Known Good Configuration”
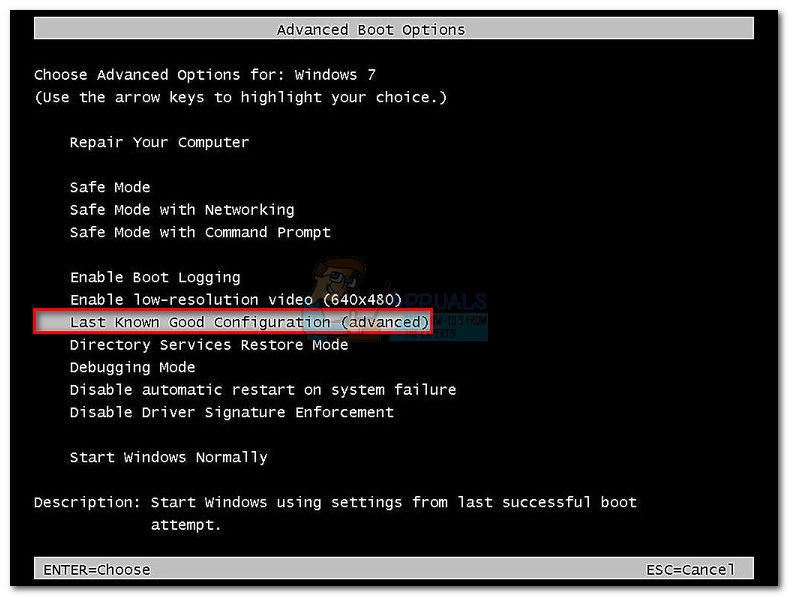
Note: This method should appear automatically after several botched startup attempts.
If forcing your virtual machine to boot up with the old configuration results in the same error, move down to the final potential fix below.
10. Reinstall all Hyper-V devices via Device Manager (for VMs)
Although you might be tempted to think that the involved services are actually identical on a VM installation as on the host machine. But that’s not actually the case. In a VM machine, HyperV services are much more present and considered a key pillar for system stability.
Other affected users that we’re also dealing with this problem (particular network administrators) have fixed the issue on affected virtual machines by uninstalling the following hyper V services and restarting the host machine so that they get reinstalled:
- Microsoft Hyper-V Data Exchange
- Microsoft Hyper-V Guest Shutdown
- Microsoft Hyper-V Heartbeat
- Microsoft Hyper-V Remote Desktop Control Channel
- Microsoft Hyper-V Time Synchronization
- Microsoft Hyper-V Volume Shadow Copy
You can disable all the services mentioned above via the System devices tab of Device Management.
Follow the instructions below for specific instructions on how to do this:
- Press Windows key + R to open up a Run dialog box. Next, type ‘devmgmt.msc’ and press Enter to open up Device Manager. When you’re prompted by the User Control Window, click Yes to grant admin access.
Open Up Device Management - Once you’re inside Device Manager, scroll down through the list of services and expand the System Devices drop-down menu.
- From the insides of the System devices menu, right-click on every Hyper-V service mentioned below and choose Uninstall device from the context menu that just appeared:
Microsoft Hyper-V Data Exchange

Microsoft Hyper-V Guest Shutdown

Microsoft Hyper-V Heartbeat

Microsoft Hyper-V Remote Desktop Control Channel

Microsoft Hyper-V Time Synchronization

Microsoft Hyper-V Volume Shadow Copy
Uninstall Hyper-V services that are potentially corrupted - Once every Hyper-V service has been uninstalled, reboot your VM and see if the problem is now fixed.