
Contents
What is redsnow jailbreak?
Redsnow is one of the most popular tool to jailbreak iOS 6 running devices. It is available for both Mac and Windows operating system and was consistently being updated by the developers team for a very long time. Redsn0w is not only used to Jailbreak iPhone but it has many other awesome features as well which we will discuss throughout this article. To jailbreak iOS 12 – iOS 14, Read this: Jailbreak iOS 12, iOS 13, iOS 14.
Redsnow History:
The first version of the redsn0w was released in 2008 by the iPhone-Dev Team. At that time it was named as QuickPWN but later it was changed to Redsn0w. Since then many versions of the tool are released to support different iOS versions. It is a un-tethered Jailbreak. But for iPhone 4 running iOS version greater than iOS 5.1.1 it provides tethered jailbreak.
Redsnow Compatible Devices:
Redsn0w is compatible with the following iDevices running these iOS versions:
- iPhone 3GS: iOS 3 to iOS 6.
- iPhone 4: iOS 3.1.3 to iOS 6.1.3
- iPhone 4S: iOS 5 to iOS 5.1.1
- iPad 1, iPad 2, iPod touch Devices.
Redsn0w can be downloaded using the following direct download links from their official site.
- RedSn0w 0.9.15b3 for Mac. Download
- RedSn0w 0.9.15b3 for Windows. Download
How to use RedSn0w to Jailbreak iPhone?
To jailbreak iOS 6 – iOS 6.1.3, you can use redsnow. With the help of following steps you can jailbreak your iDevice.
- Download Redsn0w from above link.
- Download compatible iOS firmware for your device.
- Open Redsn0w and click on Select IPSW, and choose the firmware file which you downloaded recently.
- Connect your iPhone to PC and click on Jailbreak, select “Install Cydia Option”.
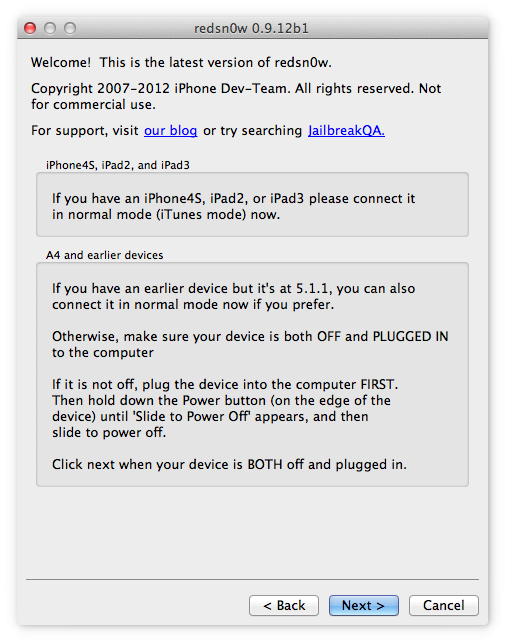
- Put your iOS device into DFU mode by following the on screen steps.
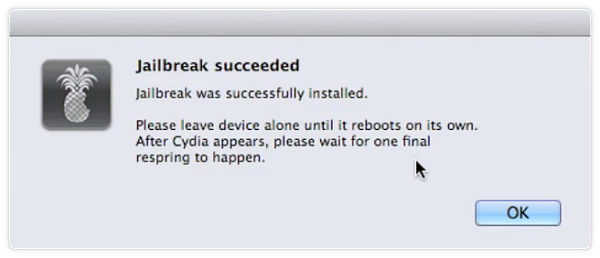
- It will take a few minutes and your Phone will be jailbreak successfully.
You can find Cydia icon on your home screen which indicates that the device is jailbroken successfully.
Other Features:
Just Boot:
if you have tethered jailbreak on your iPhone, then you have to boot your iPhone every time using this option whenever you restart your iPhone.
Pwned DFU:
You have to put your iPhone in Pwned DFU mode if you are going to install custom firmware. Because this mode is a bit different from Normal DFU mode and fixes many errors which you can face during custom firmware installation.
Recovery Fix:
When your device stucks in recovery loop then you can use recovery fix option to get it back into normal mode.
SHSH Blobs:
With the help of Redsn0w you can save, verify or submit SHSH Blobs of your iPhone. SHSH blobs are used to downgrade your iOS device to a lower iOS version.
Custom IPSW:
If you are going to unlock your iPhone using ultrasn0w then use this option to preserve your baseband while building custom IPSW.
PROS
- Redsnow is the best option to jailbreak, downgrade or install custom iOS firmware in your older devices.
- If you are going to unlock your iPhone 3GS using ultrasnow, then you must jailbreak using redsn0w to preserve your baseband.
Cons
- Redsn0w is limited upto iOS 6 version only. and can not be use to jailbreak newer versions.
- iOS devices upto iPhone 4S are supported only. New devices are not supported.
- The developers are not releasing newer updates anymore.
Hope this article helped you in jailbreaking your iPhone running iOS 6. If you still faced any issue then you can comment down and we will try our best to reply with the working solution.
What is tethered jailbreak?
it is a type of jailbreak where your device needs to be re-jailbroken or boot using the same software that was used to jailbreak, every time you restart or reboot your iPhone.
What is untethered jailbreak?
In un-tethered jailbreak you don’t need to re-jailbreak or boot your device on every restart. It boots normally on every restart.
What is Ultrasn0w?
Ultrasn0w is a tweak released by iPhone-Dev team which lets you unlock your iPhone 3GS running iOS 6.
What is the latest version of Redsn0w?
The latest version of the Redsn0w is Redsn0w 0 9 15 b 3. Available for both windows and mac.
Is redsnow available for mac?
Yes! all versions of the redsnow are available for mac operating system.
Is redsnow available for windows?
Yes! all versions of the redsnow are available for the windows operating system.
You may also like
These are instructions on how to jailbreak your iPhone using a custom restore ipsw and RedSn0w for Windows.
**At this time you cannot generate a custom restore ipsw using Windows. You will have to download one or get it from a Mac friend. You may find it easier to use one of the simple jailbreak options like Limera1n or Greenpois0n.
Step One
Create a folder on your desktop called Pwnage
Download RedSn0w from here and place it in the Pwnage folder. Likewise, download the latest 4.1 firmware for your device from here.
Extract the redsn0w zip that you just downloaded into the same folder.
")
Step Two
Launch the redsn0w application from the redsn0w folder we extracted earlier.
")
Step Three
Once RedSn0w opens click the Browse button
")
Step Four
Select the 4.1 firmware ipsw we placed in the Pwnage folder on our desktop then click Open.
")
Step Five
Once the firmware has been verified click the Next button to continue.
")
Step Six
RedSn0w will now prepare the jailbreak data
")
Step Seven
From this window you can select the jailbreak options you would like. Choose to put your iPhone in DFU mode.
Step Eight
Please plug your iPhone into the computer and make sure its OFF then click the Next button
")
Step Nine
RedSn0w will now guide you through the steps to get into DFU mode. You can find more help with DFU mode here
")
Hold down both the Home button and the Power button for 10 seconds.
")
Release the Power button and continue holding the Home button until RedSn0w detects the device.
")
Step Ten
RedSn0w will now exploit your device with limera1n.
")
Step Eleven
Your device will now be in pwned DFU mode.
")
Step Twelve
Launch iTunes and select your device from the list on the left. To make iTunes restore to a custom ipsw, hold down Shift and click the Restore button. This will bring up window letting you select the custom ipsw for restore.
")
What is RedSn0w?
RedSn0w is a jailbreak tool developed by the Dev-Team. Originally called QuickPWN, this jailbreak tool was quickly renamed, and has now become a household name for most jailbreakers. Unlike PwnageTool, RedSn0w works for both Mac and Windows, and is considered to be one of the most reliable jailbreaks by the whole community.
Latest Versions
The latest version of RedSn0w is 0.9.15b3
The latest untethered jailbreak using RedSn0w is iOS 5.1.1
The latest tethered jailbreak using RedSn0w is iOS 6.0.1
The latest beta jailbreak using RedSn0w is iOS 6.1 beta 4
Essentials
- What Device and iOS Version Can RedSn0w Be Used With?
- When Not to Use RedSn0w
- Download RedSn0w
- Tethered vs Untethered
Basic RedSn0w Tutorials
- How to Put Your Device into DFU Mode
- How to Jailbreak A4 devices and below running iOS 5.1.1
- How to Jailbreak almost any device (including A5) running iOS 5.1.1
- Tethered Booting With RedSn0w
Advanced RedSn0w Tutorials
- Preserving Baseband With RedSn0w
- Using Pwned DFU Mode
- How to Use the Recovery Fix
- How to enter DFU mode with a broken Home button
- How to jailbreak iOS 6
- How to jailbreak iOS 6.0.1
- How to jailbreak iOS 6.1 beta
Managing SHSH Blobs With RedSn0w
- Fetch SHSH Blobs With RedSn0w
- Verify SHSH Blobs With RedSn0w
- Submit SHSH Blobs With RedSn0w
- Query SHSH Blobs With RedSn0w
- Stitch SHSH Blobs With RedSn0w
Advanced RedSn0w User Preferences
- ECIDs
- Boot args
- Boot logo
- Backup
- Restoring SAM unlock Activation Tickets
- Downgrading
What Device and iOS Version Can RedSn0w Be Used With?
To date, RedSn0w can be used to jailbreak the following iOS devices:
- iPhone 5: none
- iPhone 4S: iOS 5.1.1, iOS 5.0.1, iOS 5.0
- iPhone 4: iOS 6.0.1, , iOS 6, iOS 5.1.1, iOS 5.1, iOS 5.0.1, iOS 5, 4.3.5, 4.3.4, 4.3.3, 4.3.2, 4.3.1, 4.3, 4.2.6, 4.2.1, 4.1, 4.0.2, 4.0.1, 4.0, 3.1.3
- iPhone 3GS: iOS 6.0.1, iOS 6, iOS 5.1.1, iOS 5.1, iOS 5.0.1, iOS 5, 4.3.5, 4.3.4, 4.3.3, 4.3.2, 4.3.1, 4.3, 4.2.6, 4.2.1, 4.1, 4.0.2, 4.0.1, 4.0, 3.1.3
- iPhone 3G: 4.2.1, 4.1, 4.0.2, 4.0.1, 4.0, 3.1.3
- iPad 3: iOS 5.1.1
- iPad 2: iOS 5.1.1, iOS 5.0.1
- iPad 1: iOS 6, iOS 5.1.1, iOS 5.1, iOS 5.0.1, iOS 5, 4.3.5, 4.3.4, 4.3.3, 4.3.2, 4.3.1, 4.3, 4.2.1, 3.2.2
- iPod Touch 4G: iOS 6.0.1, iOS 6, iOS 5.1.1, iOS 5.1, iOS 5.0.1, iOS 5, 4.3.5, 4.3.4, 4.3.3, 4.3.2, 4.3.1, 4.3, 4.2.1, 4.1, 4.0.2, 4.0.1, 4.0, 3.1.3
- iPod Touch 3G: iOS 5.1.1, iOS 5.1, iOS 5.0.1, iOS 5, 4.3.5, 4.3.4, 4.3.3, 4.3.2, 4.3.1, 4.3, 4.2.1, 4.1, 4.0.2, 4.0.1, 4.0, 3.1.3
- iPod Touch 2G: 4.3.4, 4.2.1, 4.1, 4.0.2, 4.0.1, 4.0, 3.1.3
This list will be updated as new versions of RedSn0w are released.
When Not to Use RedSn0w
Because RedSn0w used to require you to update your device to a newer version of iOS in order to jailbreak it, we used to strongly suggest that those of you who unlock the iPhone stay away from RedSn0w, as it might cause you to lose your ability to unlock.
That’s no longer the case. If you rely on an unlock for your iPhone and still want to run and jailbreak the latest iOS version available, you can use RedSn0w, PwnageTool or Sn0wBreeze. All three tools will allow you to update to a newer firmware and jailbreak it while preserving your baseband, which is the key to your unlock.
Download RedSn0w
RedSn0w is a very light utility that can be downloaded in just a few seconds. As mentioned above, RedSn0w will work with both Mac and Windows.
You can download RedSn0w from our downloads section. You will see that there are several versions available there, but we suggest you always use the latest version available. RedSn0w usually is compatible with older iPhone firmwares, so even if you want to jailbreak iOS 4.3.2 for example, you might still want to download the newer version of RedSn0w.
Tethered vs Untethered
RedSn0w has the ability to perform both tethered and untethered jailbreaks depending on the device and the firmware version the device is running. An untethered jailbreak is the most desirable because it allows you to reboot your device at will without needing to perform a tethered boot with the aid of a computer.
A tethered jailbreak, on the other hand, means that if you’re out and about and your device reboots, it will be unusable until you can perform a tethered boot with the aid of a computer. The chances of this happening are slim, but it is a definite annoyance if it happens to occur while you’re away from your computer. Some strides have been made to lessen the impact of tethered jailbreaks by using a so-called semitethered boot. The semitether, is a package that allows you to reboot the device and maintain limited functionality for phone calls and such until you can get back to your computer to perform the tethered boot.
For more information on the different types of jailbreaks, see the following video explanation:
How to Put Your Device into DFU Mode
Learning how to reliably place your iDevice into DFU mode is a step that you must learn if you want to be an effective jailbreaker.
DFU mode stands for Device Firmware Upgrade mode and differs from the restore mode with the iTunes logo that you may be used to. DFU mode differs from recovery mode because it does not load the boot loader, hence you will see a solid black screen instead of the more friendly “connect to iTunes logo”. Getting into DFU mode is super easy, but it does require some practice. We generally recommend putting your device into DFU mode prior to even starting any jailbreaking actions, because it just makes the process more seamless.
To place your device into DFU mode, do the following:
Step 1: Connect your device to your computer
Step 2: Hold the Home + Power buttons on your device simultaneously for 10 seconds.
Step 3: Release the Power button without releasing the home button. Continue holding Home for another 10 seconds.
Step 4: Release Home, and your screen should stay completely black. If so, chances are you successfully entered into DFU mode.
Notes: If iTunes is configured to do so, iTunes will open and report that: “iTunes has detected an iPhone in recovery mode. You must restore this iPhone before it can be used with iTunes.” If your screen is black and iTunes reports this message, this is a surefire indicator that you are successfully in DFU mode.
To kick your device out of DFU mode, simply hold Home + Power for 10 seconds and release. The Apple logo should then appear.
For more help with DFU mode, see the following video explanation:
How to Jailbreak A4 and below (no A5) device With RedSn0w
Jailbreaking your iDevice with RedSn0w is extremely simple as long as you follow the directions. Every time a new firmware is confirmed to be jailbreakable, we will post a new video that shows you how. The latest jailbreakable firmware is iOS 5.1.1. Please see the video below that shows how to jailbreak this firmware with RedSn0w using DFU traditional method. This method works with A4 devices and below only. For this reason, it is preferable if you use the non-DFU method below, unless you meet special circumstances outlined here.
How to Jailbreak an A4 and below + A5 Device With RedSn0w
With the release of RedSn0w 0.9.12b1, you can now jailbreak A5 devices on iOS 5.1.1 (iPad 2, iPhone 4S, iPad 3) using the Rocky Racoon exploit. This jailbreak was previously not incorporated into RedSn0w; instead you had to rely on the standalone Absinthe tool, or the Rocky Racoon untethered jailbreak tweak from Cydia. With the latest version of RedSn0w, it is now possible to untether jailbreak A5 devices running iOS 5.1.1. This method also works with A4 devices and below running iOS 5.1.1. This is the preferred method to use when jailbreaking with RedSn0w.
Tethered Booting With RedSn0w
Tether Booting is the action of booting an iDevice that has been jailbroken using a tethered jailbreak. Unlike untethered jailbreaks, tethered jailbreaks require a tethered boot anytime you wish to reboot the device. Please see the video below for a tutorial that shows how to perform a tethered boot with RedSn0w.
Preserving Baseband With RedSn0w
Preserving your baseband is useful if your current baseband is unlockable, and you want to keep that baseband but still upgrade your firmware to the latest version. Newer versions of RedSn0w are now capable of preserving your baseband, which was once a feature that was exclusive to the Dev Team’s PwnageTool jailbreak tool. Please see the video below that shows how to preserve your baseband with RedSn0w.
Using Pwned DFU Mode
Pwned DFU mode is almost the same as normal DFU mode with a slight twist. Unlike regular DFU mode, Pwned DFU mode allows you to use iTunes to restore your iDevice with custom firmware (IPSW) created by Preserving your Baseband with RedSn0w.

Please refer to our Preserving Baseband With RedSn0w video for additional insight into Pwned DFU mode. Pwned DFU is also needed when following our downgrade tutorial referenced in our How to Use the Recovery Fix section below. You only need to use this mode when you have created and are restoring your iDevice using custom firmware. In every other circumstance, normal DFU mode should suffice.
How to Use the Recovery Fix
The RedSn0w recovery fix option is instrumental for those moments when you receive recovery errors when performing restores in iTunes. It’s especially useful when attempting to downgrade firmware that is no longer being signed by Apple.
Here is an example of the error that you may receive in iTunes that the Recovery Fix can remedy:
")
The following video showcases how to use the Recovery Fix option when downgrading iOS 5 back to iOS 4.
How to enter DFU mode with a broken Home button
Starting with RedSn0w 0.9.14b2, you can now restore your device and force it into DFU mode using the DFU IPSW option in the Extras > Even more > options.
By pointing to a stock firmware file, you can create a firmware that will place your device into DFU mode after a restore with iTunes. Please view our full written tutorial, and the video walkthrough below for more info.
The official public version of RedSn0w supporting iOS 6 was released, and with it comes Cydia support as well. You no longer need to install Cydia manually, as we explain in our full tutorial.
How to jailbreak iOS 6.0.1
You can now jailbreak ioS 6.0.1 using RedSn0w using our jailbreak tutorial found here. Also, check our video walkthrough below for a step-by-step visual tutorial.
How to jailbreak iOS 6.1 beta
If you’re a developer using the iOS 6.1 beta, it is possible to jailbreak iOS 6.1 beta using the latest version of RedSn0w. In order to do so, you must select the iOS 6.0 public IPSW as we explain in our tutorial here. Be sure to watch our video below as well.
Managing SHSH Blobs With RedSn0w
Fetch:
Submits your SHSH blobs to Cydia. Requires DFU mode.
Verify:
A method to verify what SHSH blobs are available. Requires DFU mode.
Submit:
Submits blobs residing on your Mac or PC directly to Cydia for caching. No DFU mode required
Query:
Queries the Cydia server about all blobs for a device. Uses the ECID to accomplish this, no DFU mode required.
Stitch:
Stitching is a feature that allows you to create an all encompassing IPSW firmware file that can always be used regardless of whether or not Apple is still signing that particular firmware. Stitching combines both the firmware file with the SHSH blob for that device to allow you to downgrade at anytime. This is a highly recommended procedure to do every time a new Firmware version is released. It will ensure that you can always easily go back to a previous firmware with minimum steps. Please see the following video tutorial to learn more about stitching. Note: Stitching is not yet compatible with iPhones.
Advanced RedSn0w User Preferences
ECIDs:
This will list all of the ECIDs for all devices used by RedSn0w.
Boot args:
Boot arguments give you the ability to execute advanced commands while running RedSn0w. These are generally reserved for the accompanying boot-ipt4g command line tool, but can be executed in GUI mode as well. Please refer to boot-ipt4g.command for valid boot args.
Boot logo:
Allows you to designate a specific boot logo to replace the standard “Pwnapple” boot logo. Should be PNG format.
Backup:
Starting with RedSn0w 0.9.10b8, you can now back up arbitrary files. The purpose of this was initially intended to backup activation tickets for the SAM unlock procedure. The SAM unlock no longer works, but if you were able to generate an activation ticket with SAM before Apple fixed the issue with their activation server, it’s a good idea to use RedSn0w’s new backup feature to save off your activation ticket.
By doing this, you will be able to restore your activation ticket, and unlock your iPhone to work with that SIM, even if you’ve restored your iPhone.
You can also use the Backup option to backup any other files you have stored on your device. All you need to do is input the specific path that you want to backup. Your device will need afc2 installed to use this, but that generally comes prepackaged with most jailbreaks, including RedSn0w.
Restore:
Starting with RedSn0w 0.9.12b1, you can now easily restore SAM unlock activation tickets. RedSn0w gives you the option to restore an indivudual plist file that you backed up manually, or restore a full Lockdown.zip file that you created using the backup feature above.
See our full SAM unlock activation ticket restore tutorial for more details.
Downgrade:
Starting with RedSn0w 0.9.11b1, you can downgrade to iOS 5.0.1 from higher firmware on an A5 device (iPad 2 or iPhone 4S only). This downgrade option only works when you have SHSH blobs saved for iOS 5.0.1 either locally or on Cydia.
The ability to downgrade is something that can be fixed with a future firmware upgrade by Apple, but for some reason they decided not to fix it with iOS 5.1.1. For that reason you are able to downgrade iOS 5.1 and iOS 5.1.1 to iOS 5.0.1 if you have your SHSH blobs saved for 5.0.1.
Please see our video walkthrough, and tutorial on downgrading with RedSn0w for a step-by-step guide on the entire downgrade process. We also have a dedicated Windows tutorial for downgrading with RedSn0w.
Redsn0w is a jailbreaking tool for iOS 5 firmware.
Use the links below to download the Redsn0w jailbreak app.
Download for Mac OSX
Download for Windows
How to Install Redsn0w Jailbreak:
- Using your Mac or Windows PC, download Redsn0w from the links above
- Connect your iPhone to your computer
- Open Redsn0w and click on the Jailbreak button as shown here.

- Wait while Redsn0w is jailbreaking your device, and your device reboots.
- Unlock your device, and the Cydia app will be on your home screen. ( See video )
How to Install Redsn0w in DFU Mode:
Note: Apple’s A4 devices like the iPhone 4 or earlier can only use the Redsn0w app in DFU mode.
- Using your Mac or Windows PC, download the Redsn0w jailbreak app from the links above.
- Connect your iOS device to your computer and launch Redsn0w
- Click on the Jailbreak button. You will see the information on compatible iOS devices.
- Click on Next, and you will see on-screen directions to place your device into DFU mode ( you may need to try a few times to be successful )
- Once your device is successfully in DFU mode, check the box beside Install Cydia and click on Next.
- Leave Redsn0w to work, and when the Slide to Unlock screen appears on your iPhone, unlock it.
- After the jailbreak is successful Cydia app should be on your home screen

Frequently Asked Questions:
- What is RedSn0w?
Redsn0w is a jailbreaking tool released by the iPhone Dev Team in 2008 when it was initially named QuickPWN. Redsn0w is an incredibly versatile and adaptable jailbreak tool that is available for Windows PC and Mac computers.
- Is Redsn0w Jailbreak Untethered?
Redsn0w has the ability to install both tethered and untethered jailbreaks. However, there is a limit on the untethered jailbreaks provided by Redsnow. Anyone using an iPhone 4 or earlier on iOS 5.1.1 or earlier can install an untethered jailbreak. Anything newer than that is limited to a tethered jailbreak.
- Is Redsn0w Jailbreak Safe?
Yes, the Redsn0w jailbreak is a very safe jailbreaking tool. It has been thoroughly tested by the iPhone Dev Team and released after it has completed all the stages of bug-testing and stability checks.
User Ratings:

Прошло уже больше недели с момента релиза прошивки 5.0, а мануала по её джейлбрейку мы пока так и не публиковали. И причина тут не столько в нашей тормознутости, сколько в несовершенстве инструментов для джейла. Как вы могли прочитать в нашей энциклопедии джейлбрейка, пока единственное более-менее универсальное средство для джейла — redsn0w 0.9.9 (ныне находящийся на стадии шестой бета-версии). Увы, пока эта версия redsn0w не умеет делать нормальный, непривязанный джейлбрейк большинства гаджетов (кроме iPhone 3GS со старым бутромом), а также грешит рядом глюков (например, возможны сбои в работе iBooks, Safari и Skype). Но время идёт, а других решений так и нет. Поэтому нам придётся рассказать вам о том, что есть.
В качестве предисловия ещё раз напомним, как обстоит дело с джейлбрейком iOS 5:
- только обладатели iPhone 3GS со старым бутромом могут сделать себе непривязанный джейлбрейк. Непривязанный (untethered) джейлбрейк означает, что операция джейлбрейка делается один раз и работает до следующей перепрошивки устройства. Увы, iPhone 3GS со старым бутом — большая редкость; они выпускались только с лета по 5 октября 2009 года, затем их сменили iPhone 3GS с усовершенствованной моделью загрузчика.
- владельцам iPhone 3GS с новым бутромом, iPhone 4, iPod touch 3G и 4G, а также iPad первого поколения придётся довольствоваться привязанным (tethered) джейлбрейком. Это означает, что джейлбрейк, Cydia и все программы, которые вы оттуда поставите, будут терять работоспособность после выключения или перезагрузки аппарата. Если вы не ставили из Сидии «тяжёлых» твиков, затрагивающих системные процессы, то ваш гаджет после перезагрузки будет в целом работоспособен, но Сидия не станет запускаться, Safari будет вылетать, Game Center — глючить и пр. Если же вы ставили «тяжёлые» твики (к их числу, кстати, относится и анлок ultrasn0w), то устройство вообще не сможет загрузиться самостоятельно, без подключения к компьютеру и запуска redsn0w. Думаем, понятно, что привязанный джейл куда менее удобен.
- обладатели iPad 2 и iPhone 4S пока в пролёте. Для них никакой джейлбрейк на iOS 5 невозможен.
Итак, популярнейшая утилита redsn0w относительно недавно пережила масштабное обновление. Версия 0.9.9 капитально отличается от предыдущей тем, что утилита теперь впитала в себя широкий круг дополнительных возможностей — например, она заменяет собой Pwnage Tool и sn0wbreeze, позволяя создавать кастомные прошивки, заменяет TinyUmbrella, т.к. умеет работать с хешами, заменяет даже утилиту iFaith, умея извлекать хеши SHSH прямо из прошивки на устройстве. Поменялись и принципы работы программы. Самое приятное изменение состоит в том, что теперь redsn0w не требует предварительной обработки файла прошивки. Да, никакие прошивки «подкладывать» больше не требуется, redsn0w уже содержит в себе все нужные файлы и кэши.
А теперь поговорим о том, как сделать джейлбрейк.
Вам понадобится гаджет с уже установленной прошивкой 5.0. Этот факт порождает множество проблем, связанных с перспективами отката прошивки и с анлоком:
- если у вас есть хеши SHSH от 4.3.3 или более ранних прошивок, то вы без проблем сможете откатиться обратно в случае проблем на iPhone 3GS/4, iPod touch 3G/4G и iPad первого поколения.
- для iPod touch 3G/4G и любых iPad (и первого, и второго поколения) БЕЗ 3G-модемов откат на 4.х.х тоже будет возможен без проблем при наличии хешей.
- если у вас iPhone 3GS/4, iPod touch 3G/4G, iPad первого поколения c прошивкой 4.3.3 или младше, но нет хешей, у вас есть возможность сохранить хеши через redsn0w. Если же вы прошьётесь, вы потеряете последнюю возможность их сохранить и откатиться обратно. На остальных гаджетах такой возможности уже нет.
- если у вас iPhone или iPad с 3G-модемом, то у вас возникнут проблемы при откате прошивки из-за того, что на iPhone 3GS и iPad 1 невозможно понизить модем в принципе, а на iPhone 4 и iPad 2 можно, но только пока соответствующие прошивки подписываются серверами Apple, но прошивки 4.x.x уже не подписываются. При восстановлении через iTunes вы получите ошибки 1013/1014/1015, и гаджет повиснет в режиме восстановления. Оживить его можно будет тоже через redsn0w, но только в том случае, если вы прошиваетесь на 4.3.3 или более раннюю версию, и только на iPhone 3GS/4 и iPad первого поколения. Ещё раз напоминаем, что все эти проблемы возникают только на гаджетах, имеющих модем!
- аналогичные предыдущему пункту проблемы возникают, если вы будете восстанавливаться на любом гаджете на iOS 4.3.4 или 4.3.5
- если у вас залоченный iPhone 4 c Gevey SIM (или с поддающимся анлоку модемом 01.59.00) либо iPhone 3GS с разлоченным модемом, ни в коем случае не прошивайтесь на официальную прошивку iOS 5! Вы повысите модем и сделаете анлок неработоспособным! Вам потребуется предварительно обработать прошивку в redsn0w.
- если у вас iPhone 3GS с модемом от айпада (06.15.00), вы в любом случае не сможете прошиться на официальную iOS 5.0, вам тоже потребуется пропатчить прошивку.
Как делается джейлбрейк
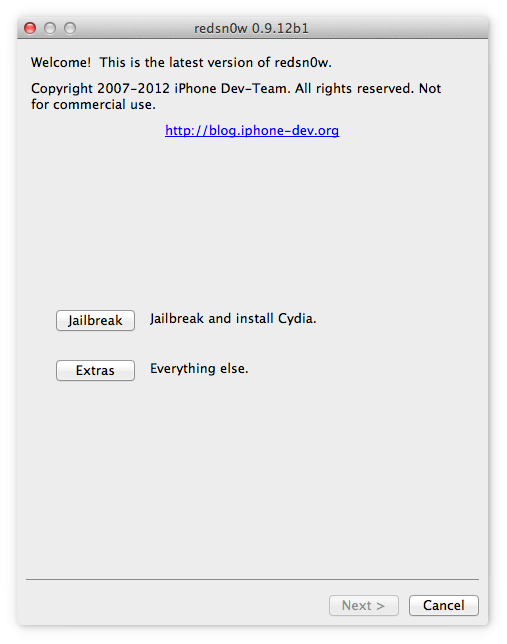
Если вас не волнует возможность отката на старые прошивки и у вас незалоченный гаджет, то для вас всё просто. Вы скачиваете актуальную версию redsn0w из наших Энциклопедий джейлбрейка для Windows или Mac OS X и запускаете её. Заодно подключите свой гаджет по кабелю к компьютеру. На стартовом экране redsn0w нажимаете Jailbreak. Затем выключаете свой гаджет (долго держите кнопку Power, пока не выползет слайдер) и нажимаете Next.

Затем от вас потребуются чудеса ловкости и быстрота реакции:
- на 3 секунды вы зажимаете кнопку Power
- затем, не отпуская Power, нажимаете Home и держите ровно 10 секунд
- затем, не отпуская Home, отпускаете Power и держите до тех пор, пока redsn0w не покажет следующий экран
К счастью, redsn0w снабжен наглядной инструкцией по данному процессу:

Следующий экран будет выглядеть так:

Состав галочек может меняться, но в любом случае опция «Install Cydia» должна быть помечена. После нажатия «Next» запустятся процедуры подготовки к джейлбрейку:

Потом гаджет перезагрузится, пройдут ещё несколько процессов, и на этом участие redsn0w в процессе джейлбрейка закончится. Вам остаётся дождаться, пока ваше устройство загрузится в нормальном режиме. До этого момента не отключайте его от компьютера. Вот и всё.
Как грузить гаджет в привязанном режиме
Как мы уже сказали, только обладатели iPhone 3GS смогут пользоваться непривязанным джейлом. Всем остальным для нормальной работы Cydia придётся каждый раз включать устройство в привязанном режиме. Сценарий действий в данном случае похожий: вы снова открываете redsn0w, но на стартовом экране нажимаете «Extras». Вы увидите широчайший ассортимент опций:

Вы нажимаете кнопку «Just boot» и вновь попадаете на экран, где вас просят выключить гаджет. Потом вы вновь должны будете проделать трюк с зажиманием кнопок на время. Через минуту-две ваше устройство загрузится в привязанном режиме, где и будет находиться до того, как вы его полностью выключите, перезагрузите либо оно вырубится самостоятельно из-за разрядившегося аккумулятора.
Как подготовить прошивку для залоченного iPhone?
На предыдущем скриншоте вы можете обнаружить также кнопку «Custom IPSW». Это именно то, что вам нужно в данном случае. redsn0w попросит вас указать путь к файлу прошивки (c расширением IPSW, все прошивки собраны в нашем Архиве версий iOS), потом обработает её и создаст копию с именем, начинающимся на NO_BB_. Из этой прошивки будет полностью вырезано обновление модема вашего iPhone или iPad.
Затем вам нужно будет снова запустить redsn0w, снова нажать на кнопку «Extras», а потом выбрать опцию «Pwned DFU». Потребуется выключение гаджета, акробатика с кнопками и несколько секунд томительного ожидания. После этого вы запускаете iTunes, переходите на страничку вашего гаджета и, зажав на клавиатуре Alt (если у вас Mac OS X) или Shift (если Windows), кликаете по кнопке «Восстановить». Затем вы указываете путь к пропатченной прошивке. Ни в коем случае не перепутайте пропатченную прошивку с официальной — имя файла должно начинаться с NO_BB!
Если в начале прошивания iTunes выдаст ошибку «This device isn’t eligible…», то вам сюда.
Как извлечь хеши из нынешней прошивки?
Снова redsn0w, снова экран с кнопками, появляющийся после нажатия на «Extras». На этот раз нужно нажать «SHSH Blobs». Вы попадёте в не менее масштабное меню:

В данном случае нас будет интересовать верхний пункт — опция «Fetch», которая вытянет хеши из установленной на гаджете прошивке даже в том случае, если эта прошивка не подписывается Apple. Как вы уже наверняка догадались, для этого снова придётся выключать гаджет, зажимать кнопки и ждать 
Вкратце расскажем о других опциях redsn0w 0.9.9:
- опция Recovery fix поможет вам в том случае, если устройство зависло в режиме восстановления и показывает шнурок с эмблемой iTunes. Учтите, что помочь делу можно только в том случае, если у вас iPhone 3GS, iPhone 4, iPod touch 3G или 4G, либо iPad первого поколения и только если вы восстанавливались на прошивку 4.3.3 или более раннюю версию. В остальных случаях опция не сработает.
- пункт Select IPSW позволяет вручную указать прошивку для процедуры джейлбрейка. Особого смысла в этом нет.
- пункт User Preferences открывает экран служебных настроек. Вряд ли вам потребуется что-либо здесь менять, однако вы сможете узнать здесь ECID ваших гаджетов — т.е. идентификаторы, по которым серверы Apple узнают, что это именно ваш гаджет, и производят подписывание прошивок для него.

- Verify в меню SHSH-хешей проверяет эти самые хеши на работоспособность и целостность
- Submit отправляет недостающие хеши с вашего гаджета на серверы Cydia
- Query спрашивает у серверов Cydia, какие хеши для вашего устройства там сохранены
- Stitch — опция, позволяющая «приклеить» хеши к файлу прошивки. Хеши в redsn0w бывают двух типов — полные (full) и частичные (partial). Если к прошивке приклеить полные, то прошиться на неё в iTunes можно будет, просто кликнув по кнопке «Восстановить» c зажатым Alt/Shift. Не потребуется ни правка hosts, ни какие-либо другие ухищрения. Если у вас есть только частичные хеши, то на прошивку, к которой они прикреплены, получится прошиться только через опцию «Pwned DFU» в redsn0w. Отдельно следует отметить, что для всех iPhone и iPad c 3G-модемами эта опция малоактуальна!
На сегодня это все премудрости. Как мы и предсказывали и, как вы, наверное, видите, год от года, от прошивки к прошивке джейлбрейк становится всё более замороченным, а откат с прошивки на прошивку — ещё труднее. Увы, Apple делает очень многое, чтобы максимально усложнить жизнь джейлбрейкерам.