
English | 简体中文
Redis Windows Version
With the powerful automated building capability of GitHub Actions, we can compile the latest version of Redis for Windows system in real-time.
The entire compilation process is completely transparent and open, with the compilation script located in the .github/workflows/ directory and the compilation logs available on the Actions page. In addition, we have added a hash calculation step when the compilation is completed, and the result is printed in the log. This is unmodifiable and recorded in the release page. You can verify the hash value of the downloaded file against the log and release page.
Our project is absolutely pure and without any hidden features, and can withstand the scrutiny of all experts. If you have any good ideas, please feel free to communicate with us.
We provide three operation modes:
- Run the start.bat script in the project to start directly with one click.
- Use the command line.
- Support running as a system service.
Command line startup:
cmd startup:
redis-server.exe redis.conf
powershell startup:
./redis-server.exe redis.conf
Service installation:
Can achieve automatic startup on boot. Please run it as an administrator and change RedisService.exe to the actual directory where it is stored.
sc.exe create Redis binpath=C:\Software\Redis\RedisService.exe start= auto
Start service
Out of Service
Uninstall service

Project Home: https://github.com/redis-windows/redis-windows
Acknowledgement:
Disclaimer
We suggest that you use it for local development and follow Redis official guidance to deploy it on Linux for production environment. This project doesn’t bear any responsibility for any losses caused by using it and is only for learning and exchange purposes.
The ServiceStack/redis-windows project contains the binary releases of MS Open Tech redis port of windows as well as a vagrant configuration for redis letting you run the native version of Redis in a Virtual Box VM.
Whilst it’s recommended to use Redis on Linux in production, it is often useful for developers on Windows platforms to have their own local version of redis running to develop with.
The 3 most popular ways of running redis on windows is to use the binary releases of Microsoft’s native port of redis, but as this is an unofficial port it always lags behind the latest official development of redis on Linux/OSX.
Thanks to Vagrant you can choose to run the latest linux version inside a Virtual Box Linux VM where you’ll be able to run the official native version of redis.
Or from Windows 10 you can install Bash on Ubuntu on Windows which will let you run the official version of Redis on Ubuntu on Windows  This is our preferred approach as it lets you run native Ubuntu binaries on Windows more efficiently than a VM of Linux.
Option 1) Install Redis on Ubuntu on Windows
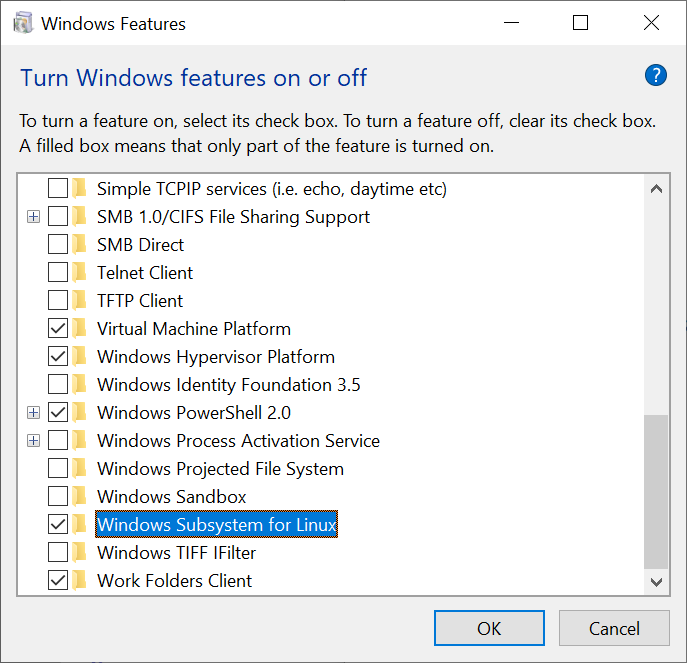
Install Windows Subsystem for Linux (WSL)
From Command Line:
From GUI:
- From Start, search for Turn Windows features on or off (type
turn) - Select Windows Subsystem for Linux
Once installed you can run bash on Ubuntu by typing bash from a Windows Command Prompt, then you can install recent stable versions of Redis from the official packages.redis.io APT repository with:
curl -fsSL https://packages.redis.io/gpg | sudo gpg --dearmor -o /usr/share/keyrings/redis-archive-keyring.gpg

echo "deb [signed-by=/usr/share/keyrings/redis-archive-keyring.gpg] https://packages.redis.io/deb $(lsb_release -cs) main" | sudo tee /etc/apt/sources.list.d/redis.list

sudo apt-get update
sudo apt-get install redis
After install, start the Redis server with:
sudo service redis-server start
Then test that it’s running with:
$ redis-cli
$ 127.0.0.1:6379> SET foo bar
OK
$ 127.0.0.1:6379> GET foo
"bar"
Install latest from source
To install the latest version of Redis we first need to install some prerequisites:
$ sudo apt-get update
$ sudo apt-get install make
$ sudo apt-get install gcc
Then follow the official installation guide
to download, build and install the latest stable version. NOTE: Installing
the binaries using make install will not work. You need to copy them manually
to /usr/bin (just like described in the guide, except that they use
/usr/local/bin — which is the problem).
You’ll then be able to launch redis with:
redis-server —daemonize yes
Which will run redis in the background freeing your shell so you can play with it using the redis client:
$ redis-cli
$ 127.0.0.1:6379> SET foo bar
OK
$ 127.0.0.1:6379> GET foo
"bar"
Which you can connect to from within bash or from your Windows desktop using the redis-cli native Windows binary from MSOpenTech.
Option 2) Running the latest version of Redis with Vagrant
-
Install Vagrant on Windows
-
Download the vagrant-redis.zip vagrant configuration
-
Extract
vagrant-redis.zipin any folder, e.g. inc:\vagrant-redis -
Launch the Virtual Box VM with
vagrant up
$ cd c:\vagrant-redis
$ vagrant up
This will launch a new Ubuntu VM instance inside Virtual Box that will automatically install and start the latest stable version of redis.
Option 3) Running Microsoft’s native port of Redis
These 64-bit binary releases are created by building the Microsoft’s native port of redis which have also been published on NuGet, but as it’s more convenient we provide a zip of the 64-bit binaries here.
MS Open Announcements
- MSOpenTech Redis on Windows 3.0 Release Notes
- MSOpenTech Redis on Windows 2.8 Release Notes
- MSOpenTech’s Redis on Windows
- Updates Released for Redis on Windows (2.8.4)
Current Version: 3.0.503 (June 28, 2016)
- Download the redis-latest.zip native 64bit Windows port of redis
-
Extract
redis64-latest.zipin any folder, e.g. inc:\redis -
Run the
redis-server.exeusing the local configuration
$ cd c:\redis
$ redis-server.exe redis.windows.conf
- Run
redis-cli.exeto connect to your redis instance
$ cd c:\redis
$ redis-cli.exe
- Start playing with redis

redis 127.0.0.1:6379> SET foo bar
OK
redis 127.0.0.1:6379> KEYS *
1) "foo"
redis 127.0.0.1:6379> GET foo
"bar"
redis 127.0.0.1:6379>
The MSOpenTech of Redis adds some useful extensions for better integration with Windows:
Running Redis as a Service
If you installed Redis using the MSI package, then Redis was already installed as a Windows service. Nothing further to do.
If you would like to change its settings, you can update the redis.windows-service.conf file and then restart the Redis
service (Run -> services.msc -> Redis -> Restart).
During installation of the MSI you can either use the installer’s user interface to update the port that Redis listens to and the firewall exception or run it silently without a UI. The following examples show how to install from the command line:
default install (port 6379 and firewall exception ON):
msiexec /i Redis-Windows-x64.msi
set port and turn OFF firewall exception:
msiexec /i Redis-Windows-x64.msi PORT=1234 ADD_FIREWALL_RULE=»»
set port and turn ON firewall exception:
msiexec /i Redis-Windows-x64.msi PORT=1234 ADD_FIREWALL_RULE =1
install with no user interface:
msiexec /quiet /i Redis-Windows-x64.msi
If you did not install Redis using the MSI package, then you still run Redis as a Windows service by following these instructions:
In order to better integrate with the Windows Services model, new command line arguments have been introduced to Redis.
These service arguments require an elevated user context in order to connect to the service control manager.
If these commands are invoked from a non-elevated context, Redis will attempt to create an elevated context in which to execute these commands.
This will cause a User Account Control dialog to be displayed by Windows and may require Administrative user credentials in order to proceed.
Installing the Service
--service-install
This must be the first argument on the redis-server command line. Arguments after this are passed in the order they occur to Redis when the service is launched.
The service will be configured as Autostart and will be launched as «NT AUTHORITY\NetworkService». Upon successful installation, a success message will be displayed and Redis will exit.
This command does not start the service.
For instance:
redis-server —service-install redis.windows.conf —loglevel verbose
Uninstalling the Service
--service-uninstall
This will remove the Redis service configuration information from the registry. Upon successful uninstallation, a success message will be displayed and Redis will exit.
This does command not to stop the service.
For instance:
redis-server —service-uninstall
Starting the Service
--service-start
This will start the Redis service. Upon successful startup, a success message will be displayed and Redis service will be started.
For instance:
redis-server —service-start
Stopping the Service
--service-stop
This will stop the Redis service. Upon successful termination, a success message will be displayed and Redis will exit.
For instance:
redis-server —service-stop
Naming the Service
--service-name name
This optional argument may be used with any of the preceding commands to set the name of the installed service. This argument should follow the service-install, service-start, service-stop or service-uninstall commands, and precede any arguments to be passed to Redis via the service-install command.
The following would install and start three separate instances of Redis as a service:
$ redis-server --service-install –service-name redisService1 –port 10001
$ redis-server --service-start –service-name redisService1
$ redis-server --service-install –service-name redisService2 –port 10002
$ redis-server --service-start –service-name redisService2
$ redis-server --service-install –service-name redisService3 –port 10003
$ redis-server --service-start –service-name redisService3
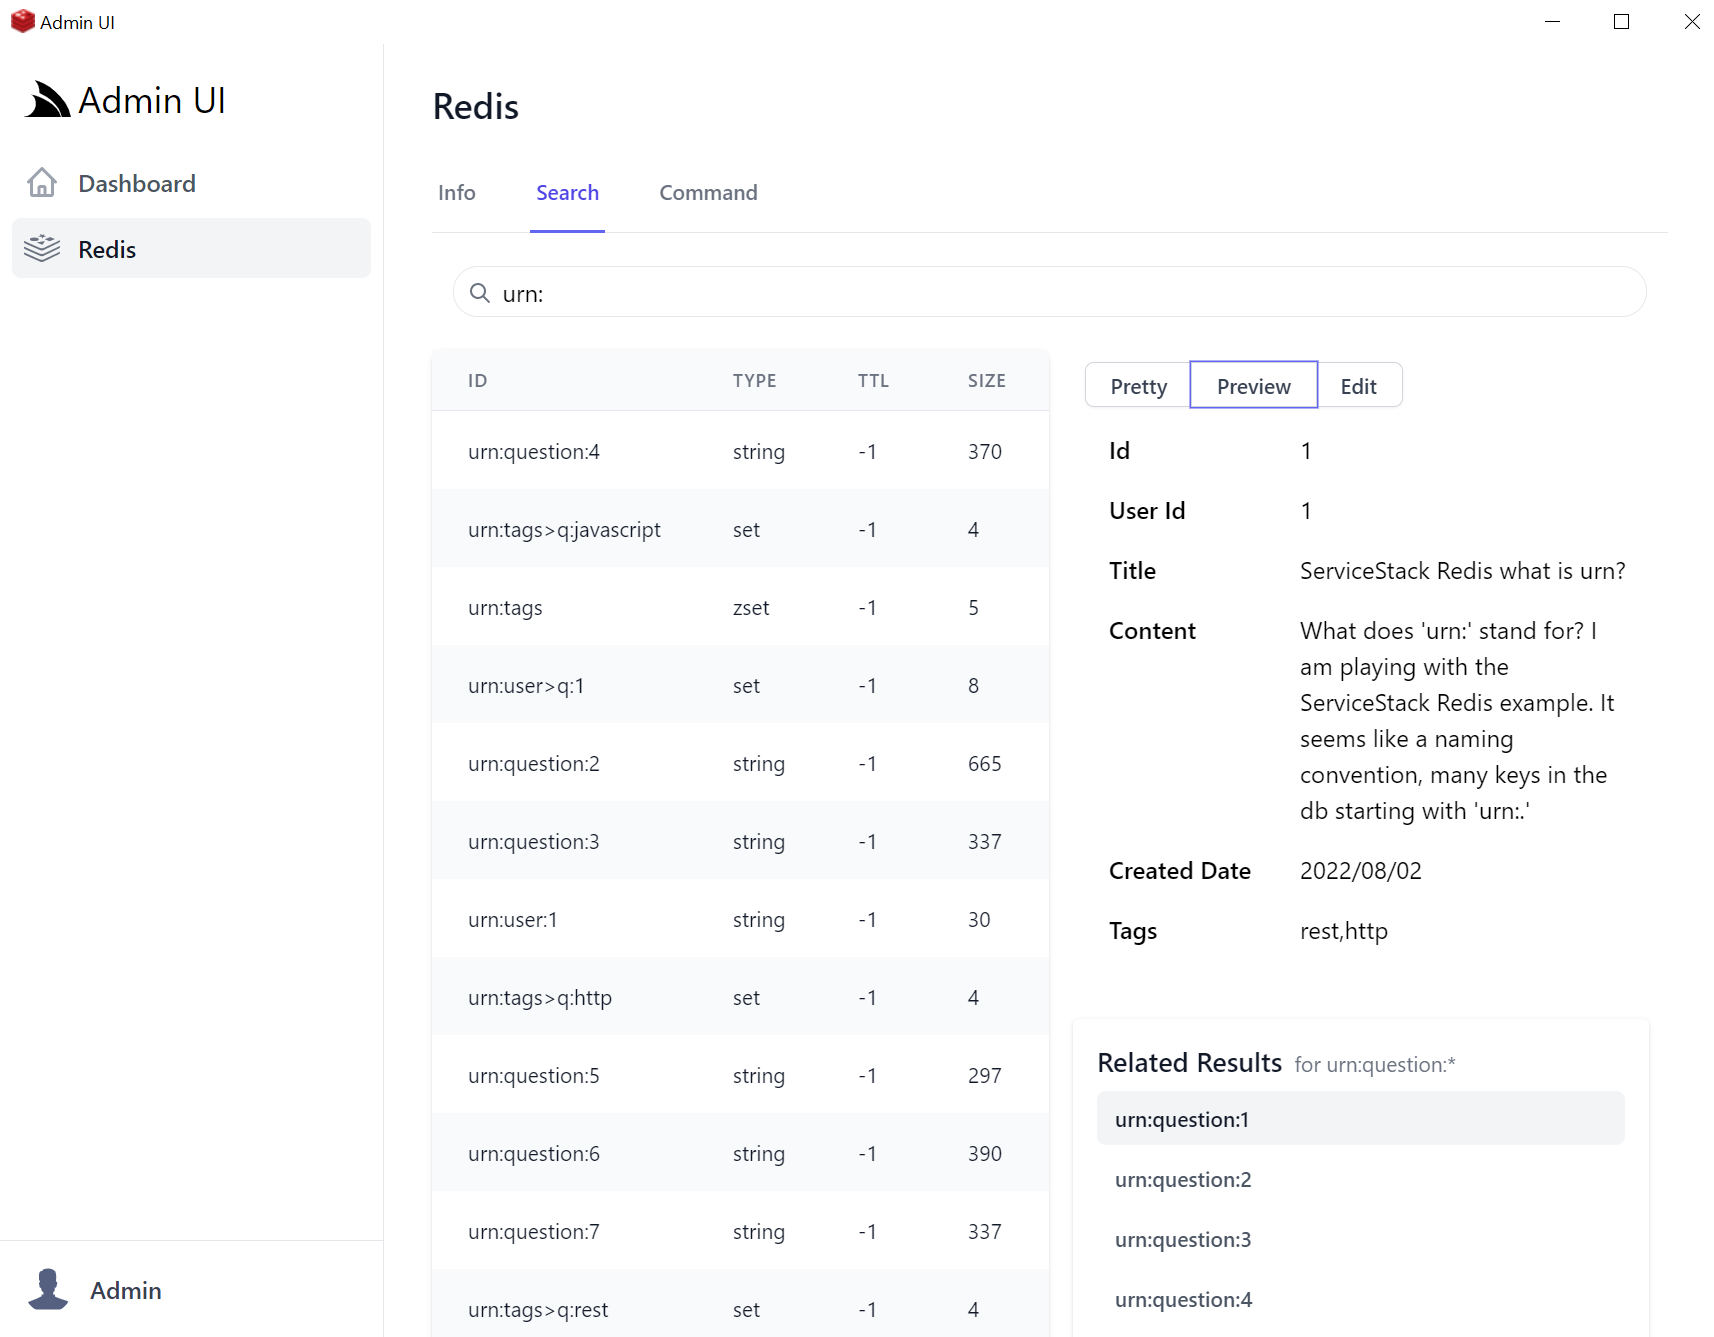
Redis Admin Desktop App
Redis Admin UI is a vuedesktop.com App that lets you manage your App’s configured Redis Server with a user-friendly UX for managing core Redis data types, simple search functionality to quickly find Redis values, quick navigation between related values, 1st class support for JSON values and a flexible CLI interface and command history to inspect all previously run redis commands for easy edits & reruns.
Video feature tour
Install
Launch as a stand-alone Desktop App by Installing .NET SDK and the
Windows Desktop App tool:
powershell iwr gist.cafe/install.ps1 -useb | iex
After install, open the Redis Admin Desktop from your browser at:
app://redis
Or from the command-line with:
Run headless on macOS, Linux and Windows
Non Windows OS can install the cross-platform x dotnet tool:
Then launch from Command Line with:
Where you can view it with your preferred browser at http://localhost:5000
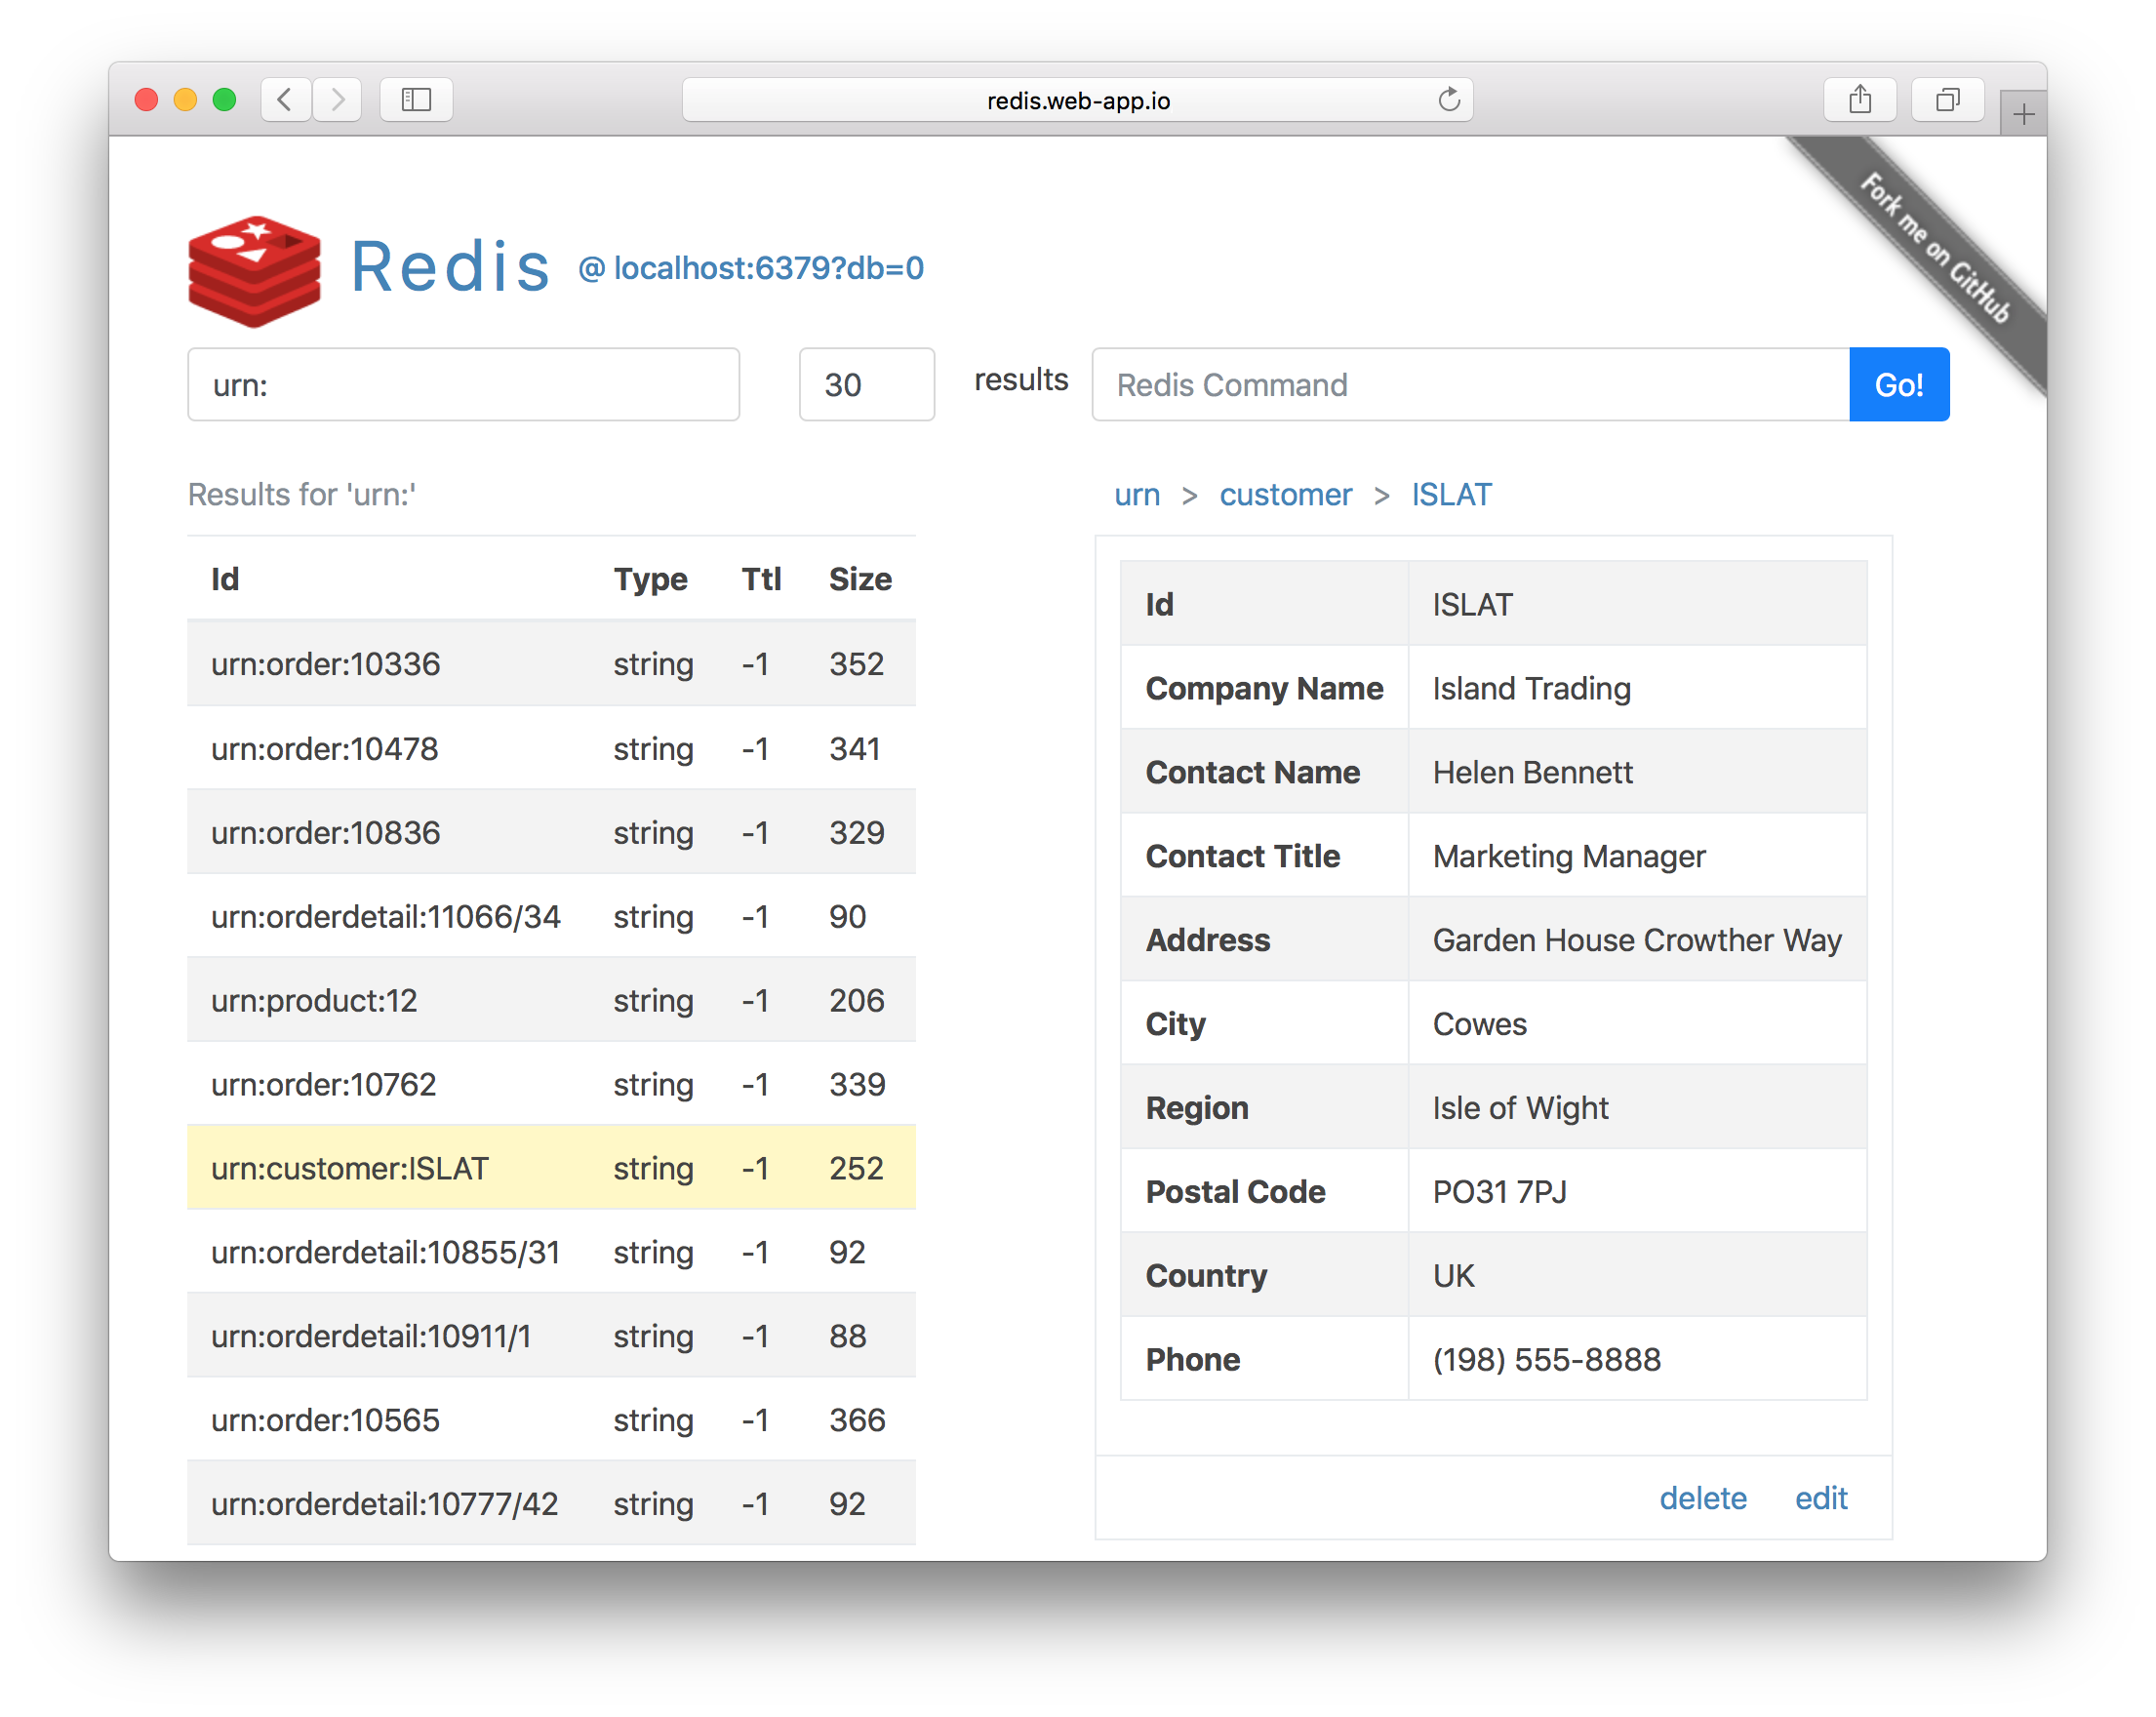
Redis Vue
Redis Vue is a simple, lightweight, versatile Redis Admin UI developed using Vue and ServiceStack Sharp Apps. It supports Redis’s core Strings, Lists, Sets, Sorted Sets and Hash data structures and custom Redis commands with its entire functionality contained in a single /index.html using the dynamic #Script language, making it easy to customize and further enhance.
After app install, open the Redis Vue Desktop App from your browser at:
app://redis-vue
Or from the command-line with:
Run headless on macOS, Linux and Windows
Non Windows OS can install the cross-platform x dotnet tool then launch from Command Line with:
Where you can view it with your preferred browser at http://localhost:5000
Configure Redis Sentinel Servers
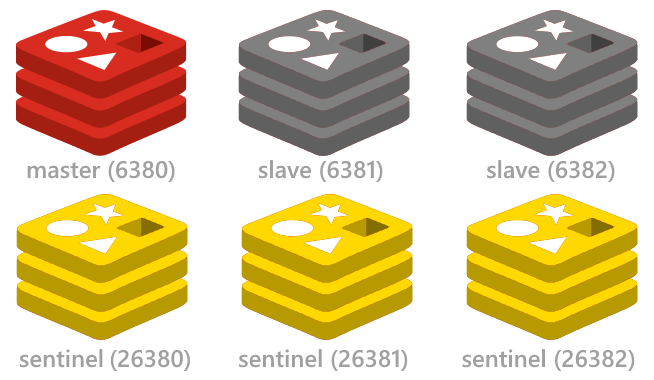
See the
redis config project for a quick way to setup up
the minimal
highly available Redis Sentinel configuration
including start/stop scripts for instantly running multiple redis instances on a single (or multiple)
Windows, OSX or Linux servers.
Redis uses a standard practice for its versioning:
major.minor.patchlevel.
An even minor marks a stable release, like 1.2, 2.0, 2.2, 2.4, 2.6, 2.8.Odd minors are used for unstable releases, for example 2.9.x releases are the unstable versions of what will be Redis 3.0 once stable.
| 2.8.13 | Stable | Redis 2.8 provides significant improvements like: Replication partial resynchronization, IPv6 support, config rewriting, keyspace changes notifications via Pub/Sub, and more. See the Release Notes for a full list of changes in this release. | Download |
| 3.0.0 | Beta-8 | This is the 8th beta of Redis 3.0.0. Redis 3.0 features support for Redis Cluster and important speed improvements under certain workloads. This is a developers preview and is not suitable for production environments. The next beta is scheduled for 1 September 2014. For the complete list of new features, please check the Release Notes. |
Download |
| 2.6.17 | Old | This is the newest Redis version replacing Redis 2.4. Redis 2.6 features support for Lua scripting, milliseconds precision expires, improved memory usage, unlimited number of clients, improved AOF generation, better performance, a number of new commands and features. For the complete list of new features, and the list of fixes contained in each 2.6 release, please check the Release Notes. |
Download |
| Unstable | Unstable | This is where all the development happens. Only for hard core hackers. | Clone |
| Win64 | Unofficial | The Redis project does not directly support Windows, however the Microsoft Open Tech group develops and maintains an Windows port targeting Win64. | Clone |
Other downloads are available on GitHub, Historical downloads are available on Google Code.
Scripts and other automatic downloads can easily access the tarball of the latest Redis stable version at http://download.redis.io/redis-stable.tar.gz. The source code of the latest stable release is always browsable here, use the file src/version.h in order to extract the version in an automatic way.
How to verify files for integrity
The Github repository redis-hashes contains a README file with SHA1 digets of released tarball archives.
Installation
Download, extract and compile Redis with:
$ wget http://download.redis.io/releases/redis-2.8.13.tar.gz
$ tar xzf redis-2.8.13.tar.gz
$ cd redis-2.8.13
$ make
The binaries that are now compiled are available in the src directory. Run Redis with:
$ src/redis-server
You can interact with Redis using the built-in client:
$ src/redis-cli
redis> set foo bar
OK
redis> get foo
"bar"
Are you new to Redis? Try our online, interactive tutorial.
Step 1: Download Redis for Windows
- Visit the Redis for Windows GitHub repository: https://github.com/microsoftarchive/redis
- Click on the «releases» tab and choose the latest release (or the version you wish to install).
- Download the zip file containing the binaries (for example,
Redis-x64-<version>.zip).
Step 2: Extract the Redis binaries
- Once the download is complete, extract the contents of the zip file to a folder of your choice. For example, you can extract it to
C:\Redis.
Step 3: Install Redis as a Windows service
- Open a command prompt (cmd) with administrative privileges.
- Navigate to the Redis folder you extracted earlier, for example:
cd C:\Redis. - To install Redis as a service, run the following command:
redis-server --service-install redis.windows-service.conf. This will use the configuration file provided with the binaries. - You should receive a message indicating that Redis has been successfully installed as a service.
Step 4: Start Redis service
- To start the Redis service, run the following command:
redis-server --service-start. - You should receive a message indicating that the Redis service has been started.
Step 5: Verify Redis installation
- In the command prompt, run the Redis CLI by typing
redis-cliand pressing Enter. - To check if Redis is running, type
pingand press Enter. If Redis is running, it will return «PONG». - You can also run other Redis commands to interact with the server, such as
SET key valueandGET key.
Managing Redis on Windows
- To stop the Redis service, run the following command:
redis-server --service-stop. - To uninstall the Redis service, run the following command:
redis-server --service-uninstall. - To configure Redis, edit the
redis.windows-service.conffile in the Redis folder. You can modify settings like memory limits, logging, and security options. After making changes, restart the Redis service to apply the new configuration.
For more information and advanced configuration options, consult the official Redis documentation: https://redis.io/documentation
#База знаний
-
0
Пошаговое руководство по работе с популярной NoSQL базой данных.
vlada_maestro / shutterstock

Преподаватель Skillbox. Пишет про Java, учит Go. Помнит рассвет PHP и как «грабить корованы».
Просто и быстро установить Redis в ОС Windows позволяет Chocolatey. Это менеджер пакетов в среде Windows, аналогичный apt-get в мире Linux. С его помощью можно устанавливать множество программ и обновлять их, не скачивая каждый раз дистрибутив с сайта.
Действуем по инструкции с официального сайта проекта Chocolatey.
- Windows 7+ / Windows Server 2003+;
- PowerShell v2+. Для установки с сайта требуется как минимум v3 (из-за требований TLS 1.2);
- .NET Framework 4+. Программа попытается установить .NET 4.0, если он не установлен. Минимальная необходимая версия для установки с этого веб-сайта — 4.5 (из-за требований TLS 1.2).
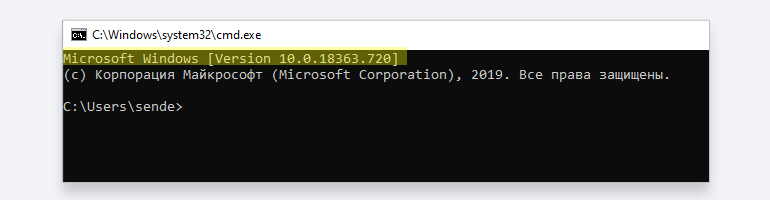
Запустите консоль запуска команд, нажав WIN + R, и введите команду cmd. Если вверху выведена версия Windows, как на скриншоте, этого достаточно.
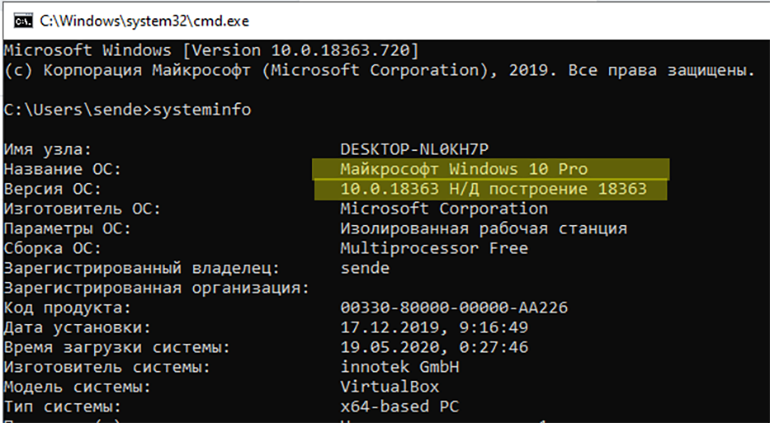
Если нет, введите команду systeminfo. В начале вывода должна появиться версия Windows.
Если у вас установлена версия 7 или выше — переходим к следующему шагу.
Для этого открываем PowerShell, вводим команду $PSVersionTable.PSVersion и получаем ответ:
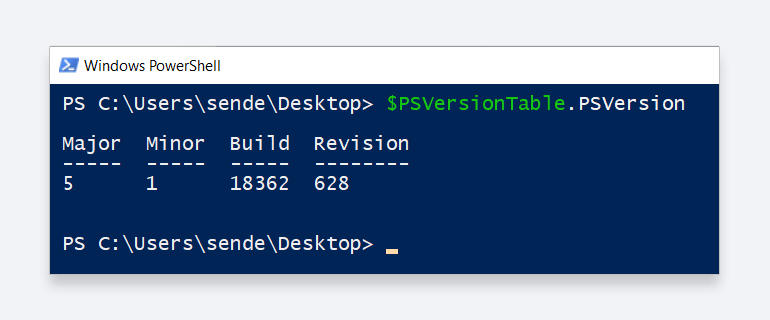
На нашем скриншоте версия PowerShell 5.1. Если у вас версия ниже 3, необходимо установить PowerShell версии 3 (или выше). Инструкция есть по этой ссылке.
Запускаем редактор реестра: нажимаем WIN + R и выполняем команду regedit.
Переходим в раздел
HKEY_LOCAL_MACHINE\SOFTWARE\Microsoft\NET Framework Setup\NDP и смотрим, какие папки там присутствуют:
Если нет такой ветки или отсутствует версия 4.0 и выше, то необходимо её установить. Подробная инструкция находится по этой ссылке.
После всех подготовительных действий устанавливаем Chocolatey. Это делается одной командой PowerShell.
Важно! До начала установки необходимо проверить, есть ли на это права. Если прав недостаточно, их нужно добавить.
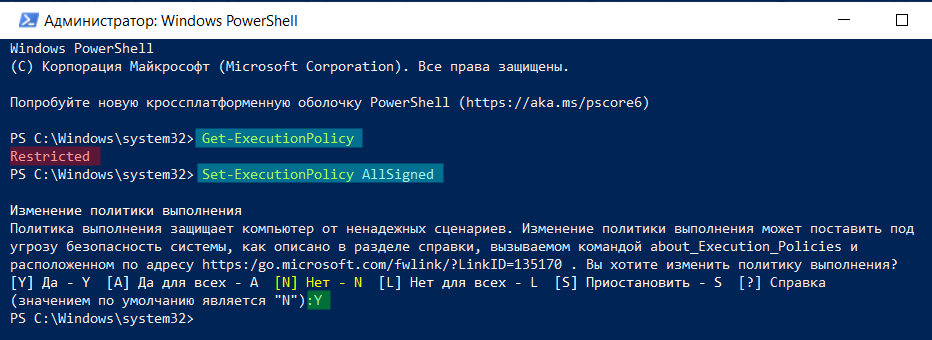
В PowerShell необходимо убедиться, что Get-ExecutionPolicy не является Restricted. Рекомендуется использовать Bypass для снятия ограничений или AllSigned для более безопасного использования.
Выполните команду Get-ExecutionPolicy. Если она вернёт Restricted, запустите Set-ExecutionPolicy AllSigned (рекомендуется) или Set-ExecutionPolicy Bypass -Scope Process.
После этого введите команду установки:
Set-ExecutionPolicy Bypass -Scope Process -Force; [System.Net.ServicePointManager]::SecurityProtocol = [System.Net.ServicePointManager]::SecurityProtocol -bor 3072; iex ((New-Object System.Net.WebClient).DownloadString('https://chocolatey.org/install.ps1'))
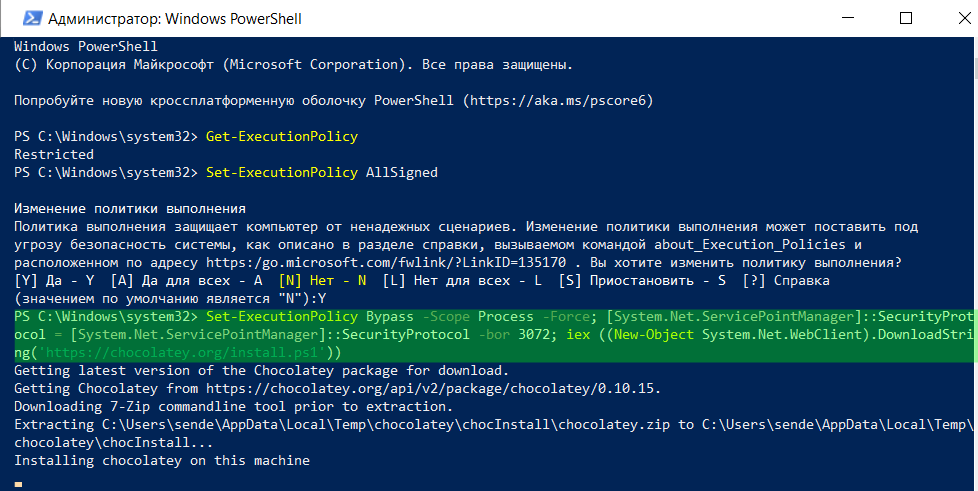
Если всё прошло успешно, получим:
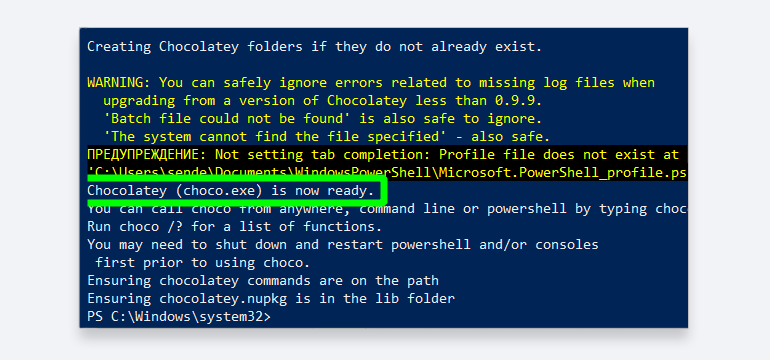
В этом случае можно переходить к установке пакетов приложений. В нашем случае это будет Redis.
Находим в поиске Chocolatey нужный пакет Redis, например, https://chocolatey.org/packages/redis-64/3.0.503 — и копируем (клавиши Ctrl-C) указанную на сайте ссылку для установки:
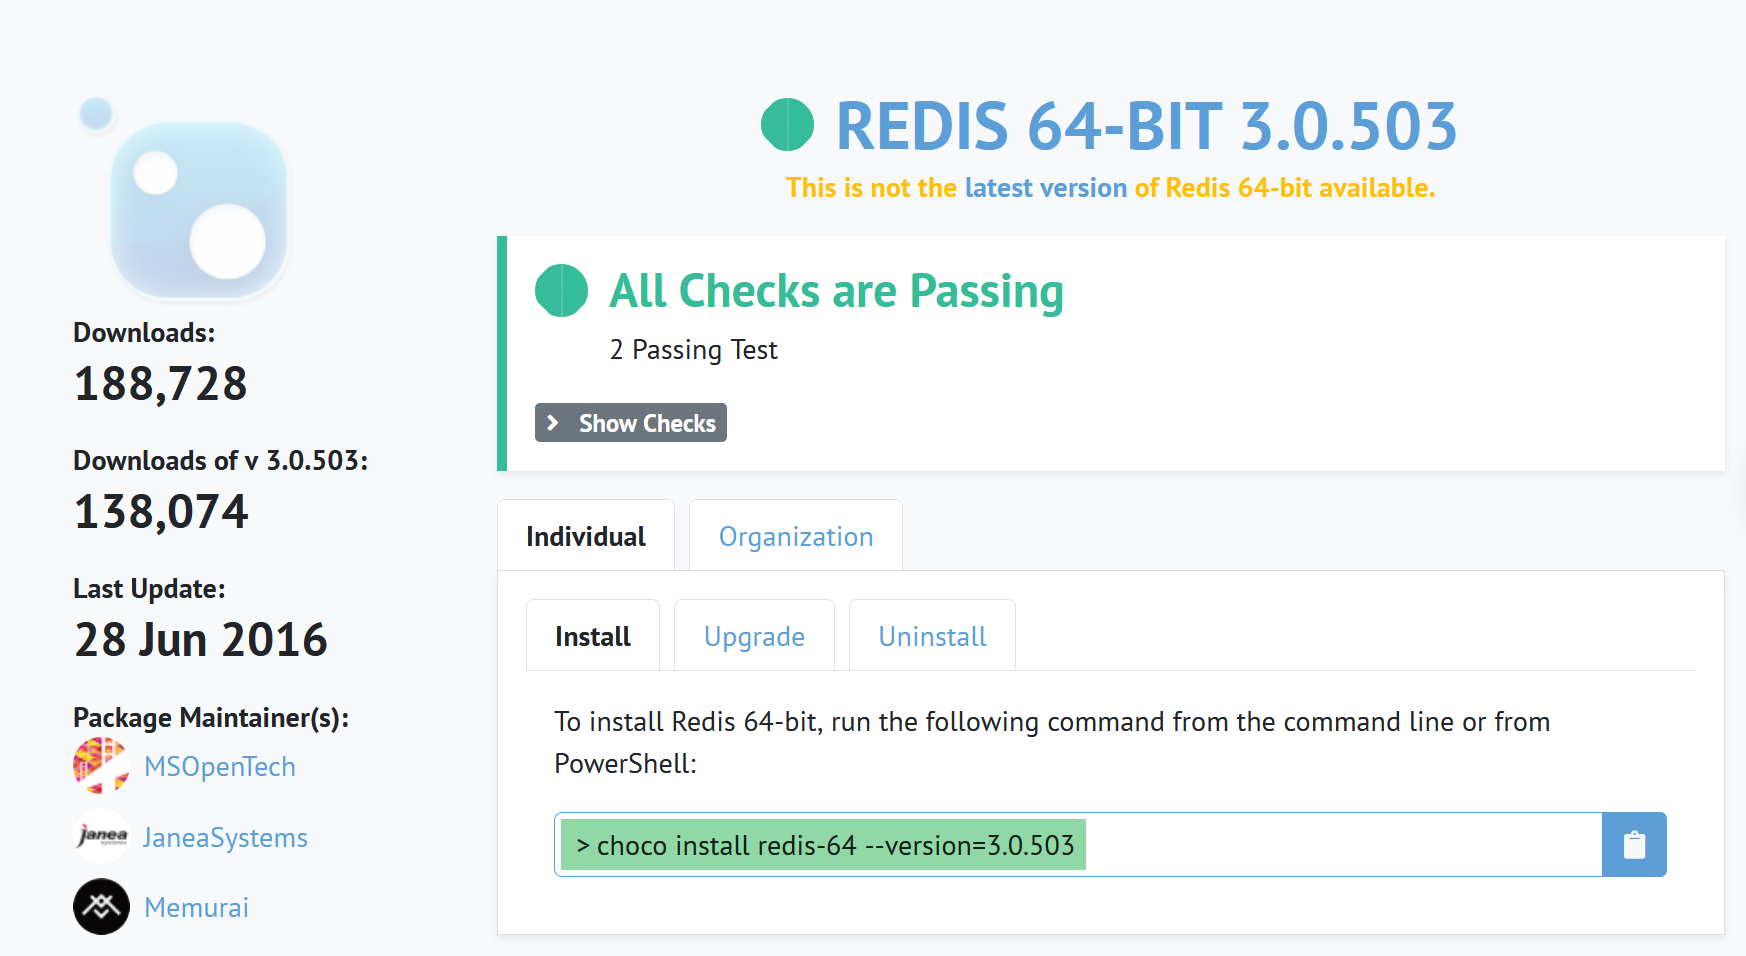
Примечание: после версии 3.0.503 текущий проект был переименован и больше не разрабатывался, однако для знакомства с Redis и её изучения подходит.
Затем вводим скопированную команду из буфера обмена (Ctrl-V) в консоль PowerShell:
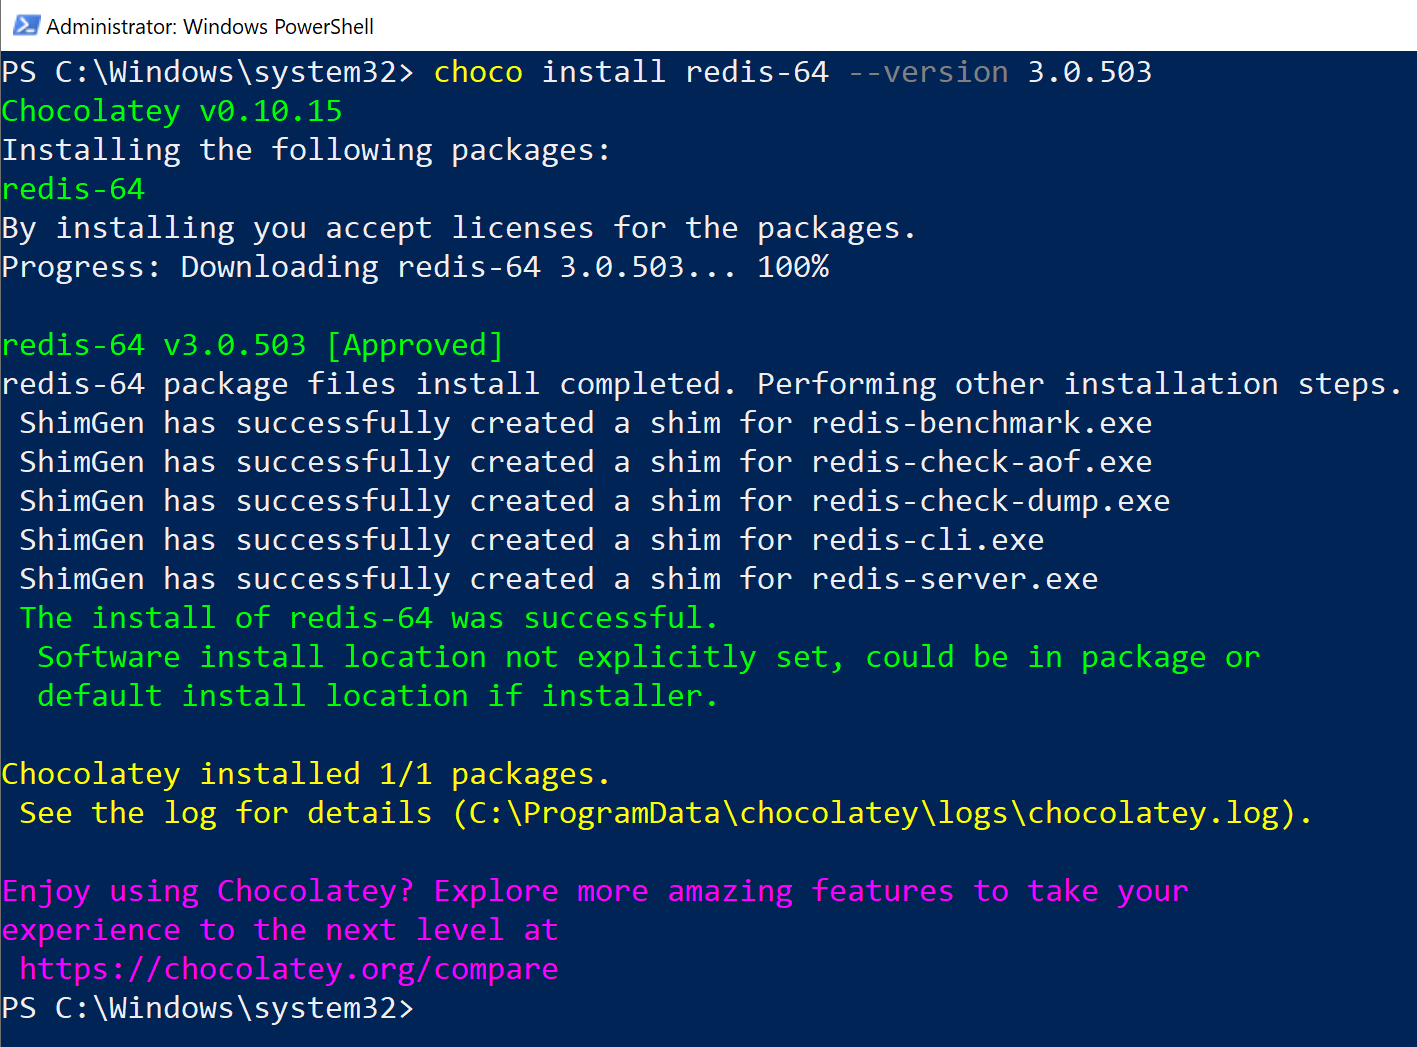
choco install redis-64 --version 3.0.503
Если установка прошла нормально, получаем:
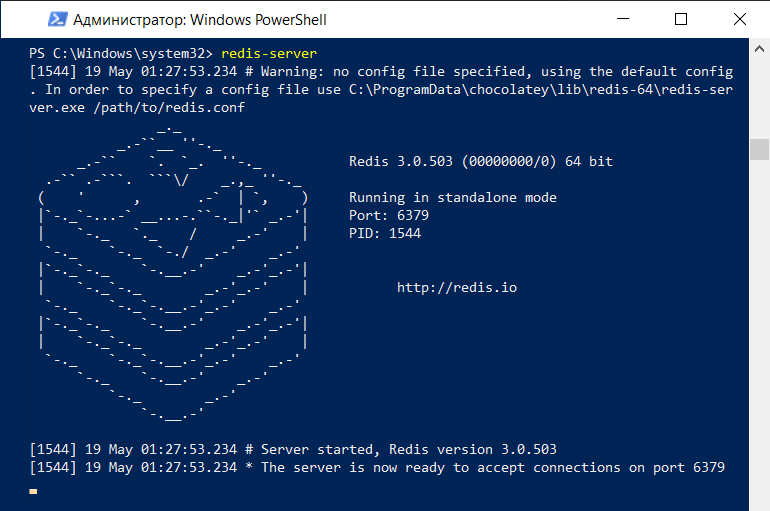
Теперь пробуем использовать Redis. Для этого запускаем сервер, выполнив команду:
Если у вас включён брандмауэр, разрешите в нём доступ к Redis. В консоли PowerShell должно появиться сообщение о том, что сервер Redis работает и принимает соединения.
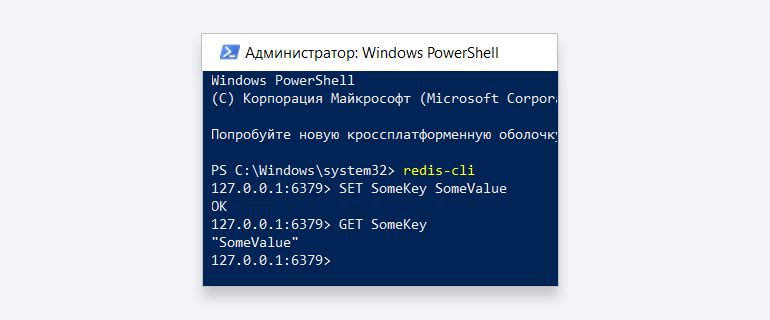
После этого откройте ещё одно окно Powershell, не закрывая окно с запущенным сервером. В новом выполните команду:
Теперь вы можете использовать redis в командной строке для работы с сервером Redis:
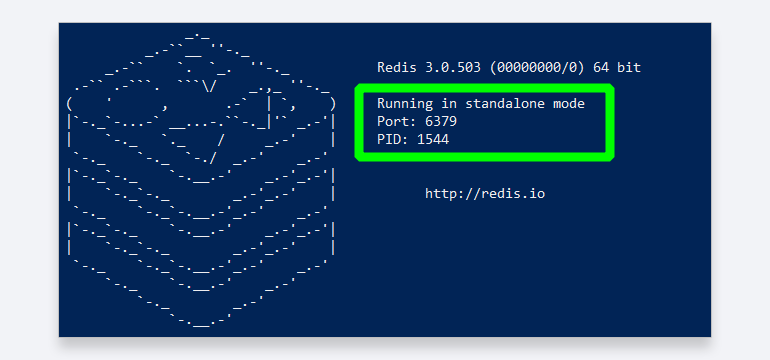
Для использования в коде программы и для связи с сервером вам может понадобиться номер порта для подключения. Его можно найти в окне запуска Redis:

Бесплатный курс по Python ➞
Мини-курс для новичков и для опытных кодеров. 4 крутых проекта в портфолио, живое общение со спикером. Кликните и узнайте, чему можно научиться на курсе.
Смотреть программу