Групповые политики являются одним из самых эффективных способов управления компьютерной сетью, построенной на базе Windows-сетей. Групповые политики используют для упрощения администрирования, предоставляя администраторам централизованное управление привилегиями, правами и возможностями как пользователей, так и компьютеров сети.
При помощи политики возможно:
- назначать сценарии пользователя и сценарии компьютера, запускающиеся в конкретно указанное время;
- определять политики параметров пароля учетных записей, блокировку пользователей;
- распространять программное обеспечение на компьютеры сети при помощи публикации или назначения;
- выполнять набор настроек безопасности для удаленных машин;
- ввести контроль над доступом к windows-компонентам, системным ресурсам, сетевым ресурсам, утилитам панели управления, рабочему столу и экрану;
- проводить настройку по распределению прав на доступ к файлам и папкам;
- настраивать перенаправление определенных папок из профиля пользователя.
Групповые политики возможно применять сразу на нескольких доменах, на отдельных доменах, на подгруппах в домене, на отдельных системах.
Политики, применяемые к отдельным системам, называются локальными групповыми политиками. Такие политики хранятся только на локальном компьютере. Остальные групповые политики соединены в объекты и хранятся в хранилище данных Active Directory.
Управление групповых политик имеется только в профессиональных и серверных версиях Windows.
Для каждой новой версии Windows вносились новые изменения в групповую политику. В некоторых случаях старые политики не применяются на новые версии Windows.
Обычно большинство политик прямо совместимы. Это означает, что, как правило, политики, предоставленные в Windows Server 2003, могут использоваться на Windows 7 и более поздних, а также на Windows Server 2008 и более поздних. Однако, политики для Windows 8/10 и Windows Server 2012/2016 обычно не применимы к более ранним версиям Windows. Для того, чтобы узнать какие версии поддерживает политика, можно открыть окно ее свойств – там посмотреть на поле Требование к версии или поддерживается. В нем указаны версии ОС, на которых эта политика будет работать:

Редактирование групповых политик
Консоль редактирования групповой политики входит в состав сервера, ее требуется установить в диспетчере сервера как дополнительный компонент управления групповыми политиками:

После этого в составе программ меню Администрирование появляется задача Управление групповыми политиками.
В оснастке Управление групповой политикой назначаются политики к подразделениям, а благодаря иерархической структуре можно визуально понять к какой группе относятся какая-либо политика:

Групповая политика изменяется в редакторе управления групповыми политиками – для этого требуется выбрать команду Изменить в меню Действия. Так же новую групповую политику можно создать либо «с нуля», для этого выбираем Объекты групповой политики выбираем команду Создать в меню Действие. Записываем новое имя объекта групповой политики после этого нажимаем ОК. Можно скопировать в нее параметры уже существующей политики в зависимости от требуемой задачи.

Чтобы применить созданную политику, требуется установить для нее связь с соответствующим объектом службы каталогов в оснастке Управление групповой политикой:

Примененную политику можно настроить по фильтру безопасности. Таким способом параметры данного объекта групповой политики возможно разделить только для заданных групп, пользователей и компьютеров, входящих в домен:

Рекомендации по применению политик
Главное заключается в том, чтобы не изменять политику по умолчанию. Потому как если в политике возникнет какая-либо серьезная ошибка, то возврат к начальному состоянию приведет к удалению не только последних настроек, но и всех других параметров. Поэтому для административных действий по управлению системой создавайте новые политики, тогда для изменения настроек вам потребуется только отключать/включать привязку политик к организационной структуре.
Обработка одной политики с наибольшим числом назначенных параметров, не отличается по времени от обработки нескольких политик, в каждой из которых назначается только часть этих параметров. Поэтому удобнее создавать несколько политик, чем включать все изменения в одну.
Не стоит удалять ранее созданные групповые политики – желательно просто отключить привязку их от объекта службы каталогов. Они могут потребоваться в дальнейшем для анализа в случае каких-либо проблем.
В рамках нашей услуги ИТ-обслуживание мы не только настраиваем групповые политики, но и берем на себя обслуживание всей ИТ-структуры клиента, включая все настройки, обновления ПО и поддержку в режиме 24/7.
Групповые политики Active Directory позволяют централизованно применять одинаковые настройки ко множеству компьютеров и/или пользователей домена и существенно упрощают управление конфигурацией в доменной среде. Консоль Group Policy Management Console (GPMC.msc) – это основной инструмент для управления групповыми политиками (Group Policy Object, GPO) в Active Directory.
Содержание:
- Установка консоли GPMC в Windows
- Управление групповыми политиками Active Directory с помощью консоли Group Policy Management
Установка консоли GPMC в Windows
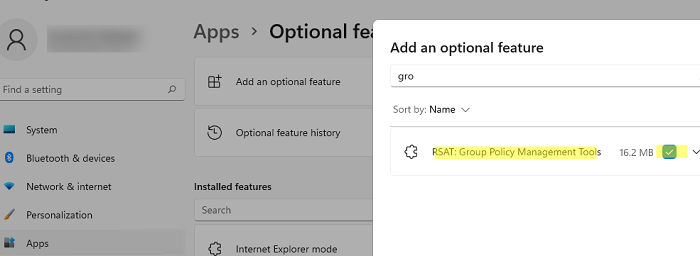
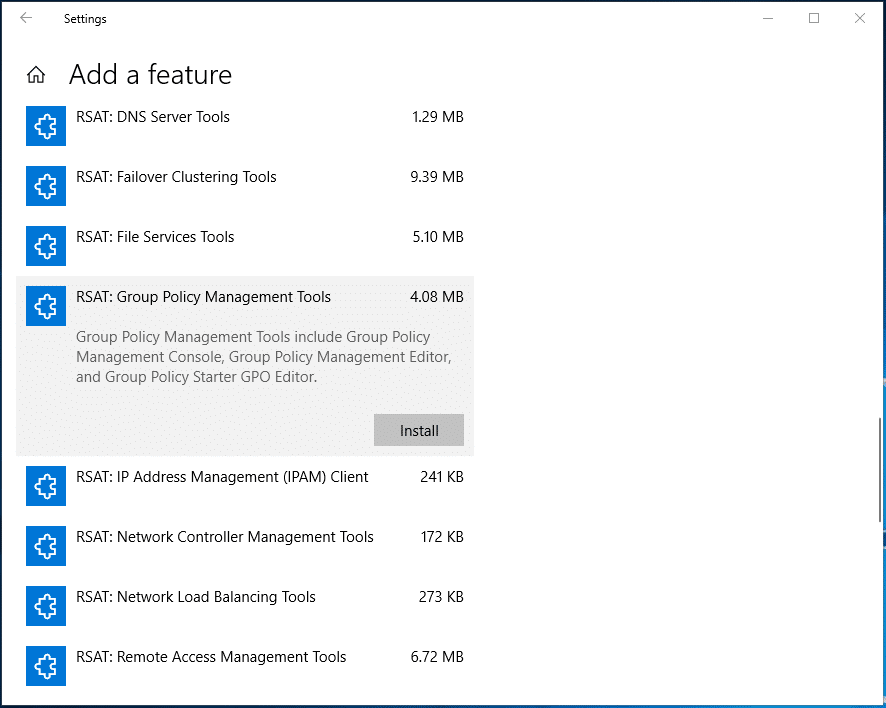
В Windows 10 и 11 консоль GPMC входит в состав RSAT, и вы можете установить ее через панель Settings. Перейдите Settings -> Apps -> Optional Features -> Add an optional feature -> выберите в списке RSAT: Group Policy Management Tools и нажмите Install.
Также вы можете установить консоль управления групповыми политиками в Windows 10 и 11 с помощью PowerShell:
Add-WindowsCapability -Online -Name Rsat.GroupPolicy.Management.Tools~~~~0.0.1.0
Или с помощью DISM:
DISM.exe /Online /add-capability /CapabilityName:Rsat.GroupPolicy.Management.Tools~~~~0.0.1.0
Обратите внимание, что в современных версиях Windows 10 и 11 для установки инструментов управления RSAT, ваш компьютер должен быть подключен к Интернету. Подробнее про установку инструментов администрирования (RSAT) в Windows описано в статье по ссылке.
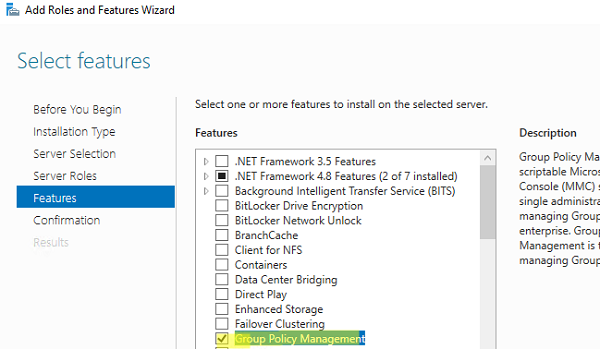
В Windows Server 2022/2019/2016/2012R2 вы можете установить консоль управления GPO через Server Manager: Add Roles and Features -> Features -> Group Policy Management.
Также можно установить консоль GPMC в Windows Server с помощью PowerShell командлета Install-WindowsFeature:
Install-WindowsFeature GPMC

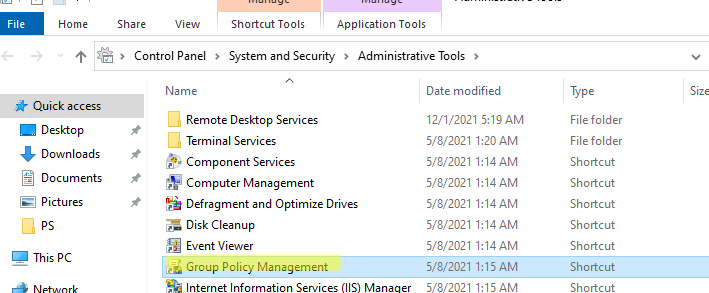
После установки, проверьте что ярлык Group Policy Management появится в разделе Administrative Tools в панели управления (Control Panel\System and Security\Administrative Tools). Ярлык ссылается на MMC оснастку
%SystemRoot%\system32\gpmc.msc
.
Управление групповыми политиками Active Directory с помощью консоли Group Policy Management
Консоль GPMC позволяет управлять групповыми политиками на уровне сайтов AD, доменов и организационными подразделениями (Organizational Unit).
Для запуска консоли выполните команду:
gpmc.msc
По умолчанию консоль подключается к контроллеру домена с FSMO ролью Primary Domain Controller Emulator (PDC). Вы можете подключиться к любому другому DC. Для этого щелкните правой кнопкой по имени домена и выберите Change Domain Controller (для комфортной работы рекомендуем подключиться к вашему Logon Server-у).
Разверните Forest -> Domain -> Ваш домен.
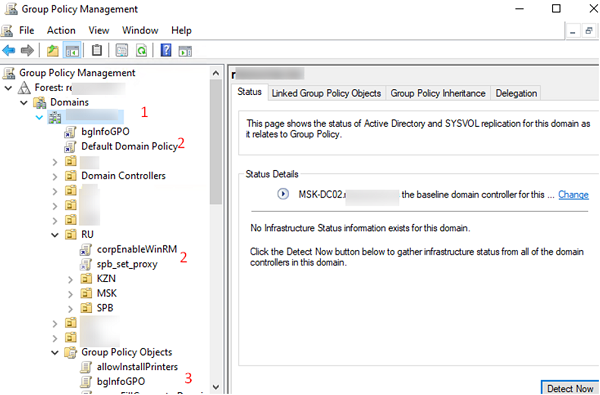
На этом скриншоте выделены:
- Имя домена, к которому подключена консоль;
- Групповые политики, которые назначены на различные OU (отображается вся структура OU, которую вы видите в консоли ADUC);
- Полный список политик (GPO) в текущем домене доступен в разделе Group Policy Objects.
Групповые политики Active Directory можно назначить на OU, сайт или весь домен. Чаще всего политики привязываются к OU с компьютерами или пользователями.
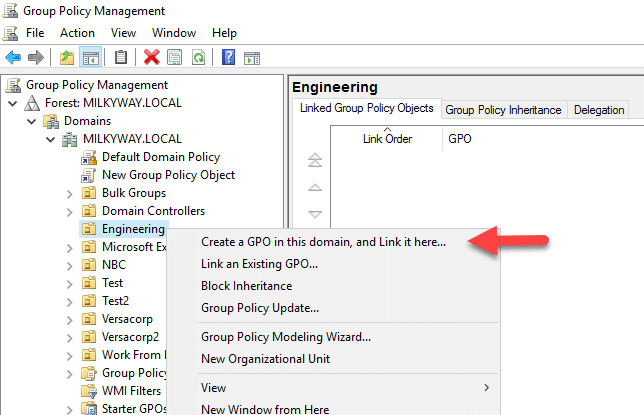
Чтобы создать новую GPO и сразу назначить ее на OU, щелкните по нужному контейнеру правой кнопкой и выберите Create a GPO in this domain, and Link it here.
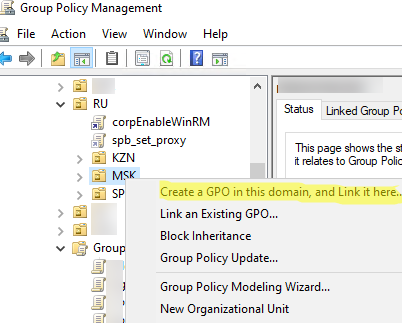
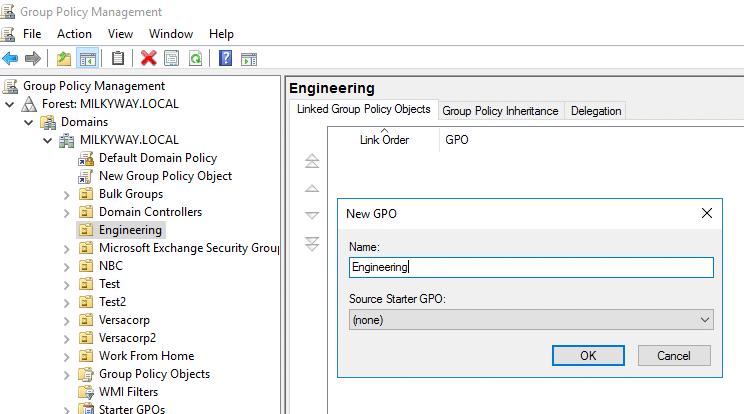
Задайте имя GPO:
В консоли GPMC вы увидите вашу новую GPO, которая сразу назначена на выбранный вами контейнер (OU).
GPO активна (
Link Enabled = True
), это значит что ее настройки будут применяться ко всем объектом в данном OU.
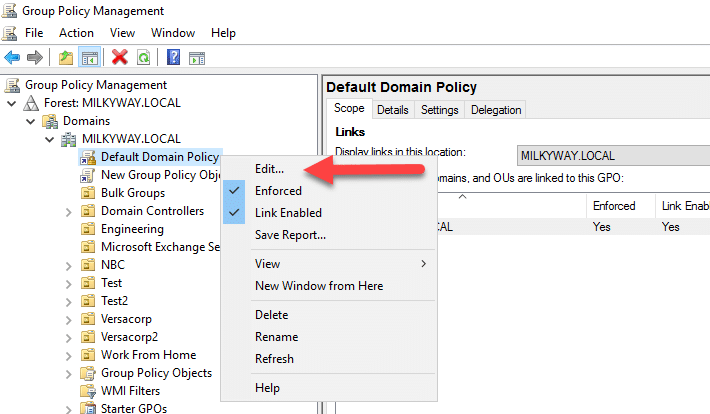
Чтобы изменить настройки GPO выберите Edit.
Для управления параметрами групповой политики на компьютере Windows используется консоль локального редактора GPO – gpedit.msc. Он позволяет настроить параметры Windows с помощью одной или множественных локальных политик (MLGPO).
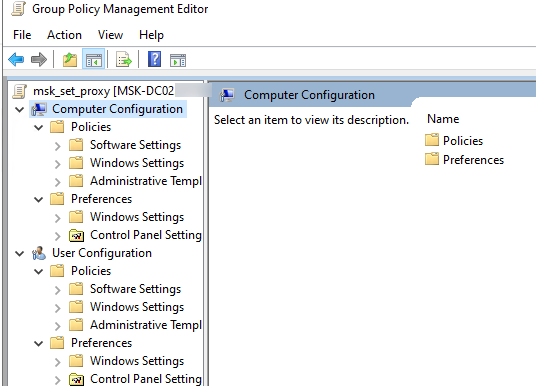
Перед вами откроется консоль редактора GPO, аналогичная локальному редактору GPO. Все настройки GPO разделены на две секции:
- Computer Configuration — здесь можно настроить параметров компьютера (Windows);
- User Сonfiguration – параметры, которые нужно применить для пользователей AD.
В каждой секции есть три подраздела:
- Software Settings – используется для установки и обновления программ через GPO;
- Windows Settings — здесь расположены основные параметры безопасности Windows: настройки политики паролей, блокировки аккаунтов, политики аудита, назначения прав пользователей и т.д;
- Administrative Templates – содержит параметры различных компонентов Windows. Здесь доступны как стандартные административные шаблоны Windows, так и дополнительно admx шаблоны, установленные администратором (например, admx шаблоны для управления программами Microsoft Office или шаблоны для Google Chrome). Рекомендуем использовать центральное хранилище административных шаблонов GPO для удобства управления.
Также здесь есть отдельный раздел Preferences. Здесь содержится дополнительный набор настроек Group Policy Preferences (GPP), которые вы можете задать для клиентских устройств через GPO.
Закройте редактор политики и вернитесь в консоль GPMC. Все настройки, которые вы изменили в GPO будут применены на клиентах при следующем цикле обновления настроек групповых политик.
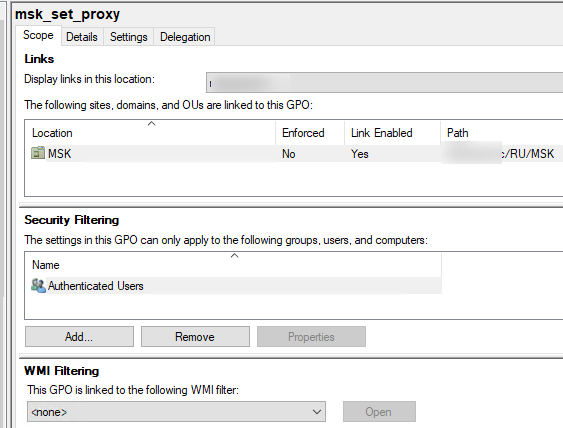
Выберите вашу GPO, чтобы вывести ее основные параметры. Здесь доступны 4 вкладки:
- Scope – здесь видно на какие OU назначена эта политики. В разделе Security Filtering можно настроить группы безопасности, для членов которых должна применяться политики (по умолчанию здесь задано Authenticated Users, это значит, что политика применяется ко всем объектам в OU). В параметре WMI filtering можно задать дополнительные правила фильтрации объектов для которых должна применяться GPO (см. WMI фильтры GPO);
- Details – содержится базовая информация о GPO (владелец, когда создана и изменена, версия, GUID);
- Settings – содержится отчет о всех настроенных параметрах GPO (отчет похож на результаты команды gpresult);
- Delegation – выводит текущие разрешения GPO, позволяет изменить их.
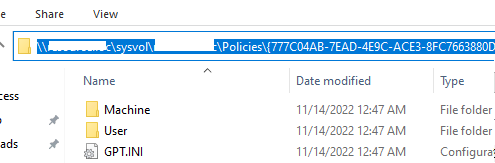
Active Directory хранит GPO хранятся в виде набора файлов и папок в каталоге SYSVOL, который реплицируется между DC. Вы можете найти каталог определенной GPO по ее GUID (на вкладке Details). Используйте следующий UNC путь:
\\winitpro.ru\sysvol\winitpro.ru\Policies\{GUID}
Если вы хотите, чтобы политика перестала действовать на клиенты в данном OU, можно либо удалить ссылку (
Delete
, при этом сама объект GPO не будет удален), либо временно отключить ее действие (
Link Enabled = False
).
Обратите внимание, что в домене уже есть две политики, которые действуют на все компьютеры и контроллеры домена соответственно:
- Default Domain Policy
- Default Domain Controller Policy
В большинстве случае не рекомендуется использовать эти GPO для настройки параметров клиентов. Лучше создать новые политики и назначить их на уровень всего домена или контейнера Domain Controllers.
Также консоль Group Policy Management позволяет:
- Импортировать/экспортировать, создавать резервные копии и восстанавливать GPO
- Создавать результирующие отчеты политик — Resultant Set of Policy (RSoP)
- Удаленно обновлять настройки GPO на компьютерах
- Подготавливать GPO к миграции между доменами
В отдельной статье “Почему не применяется групповая политика к компьютеру?” рассмотрены такие основные элементы групповых политик Active Directory как:
- Наследование в групповых полотках
- Область действия и порядок применения GPO (LSDOU)
- Приоритете и управление порядком применения политик
- Замыкание групповых политик (Loopback Processing mode)
- Фильтрация GPO
- Форсирование применения GPO
Рекомендуем внимательно ознакомиться с этой статьей для более эффективного использования возможностей групповых политик и понимания принципов их работы.
Салимжанов Р.Д
Part 4 Basic Configuration of Windows Server 2019 (Group Policies)
Salimzhanov R.D.
В последней части базовой настройки мы рассмотрим простейшую настройку групповой политики Windows.
Групповая политика Windows (Group Policy) — это механизм управления настройками операционной системы и приложений в среде Windows. Она позволяет администраторам централизованно управлять и конфигурировать системы, пользователи и группы в домене Active Directory.
Заходим в созданную нами папку в 3 части базовой настройки Active Directory:
Создадим правило:
После создания можем переходить к настройке:
Допустим, зададим фон рабочего стола для наших пользователей
Перед тем как выбирать картинку создадим общую папку, из которой будет взята картинка.
После чего, копируем путь к папке и запишем его в политику.
Точно также мы можем, к примеру, запретить доступ к панели управления и выхода из системы:
Проверим:
Можно посмотреть все парила:
При помощи групповых политик мы можем заниматься:
1. Централизованное управление: Позволяет администраторам управлять настройками множества компьютеров и пользователей из одного места.
2. Безопасность: Позволяет применять политики безопасности, такие как требования к паролям, настройки брандмауэра, права доступа и другие меры безопасности.
3. Конфигурация системы: Автоматическая настройка параметров операционной системы и приложений для пользователей и компьютеров.
4. Управление программами: Возможность установки, обновления или удаления программного обеспечения на всех компьютерах в сети.
5. Контроль доступа: Настройка прав доступа к ресурсам сети, таким как файлы, папки и принтеры.
6. Стандартизация: Обеспечивает единообразие настроек и конфигураций на всех устройствах в организации.
7. Упрощение администрирования: Уменьшает время и усилия, необходимые для управления IT-инфраструктурой.
Групповая политика является мощным инструментом для системных администраторов, позволяя эффективно управлять IT-ресурсами в организации.
1) Администратор групповая политика в управляемом домене доменных служб Microsoft Entra // [электронный ресурс]. URL: https://learn.microsoft.com/ru-ru/entra/identity/domain-services/manage-group-policy / (дата обращения 03.09.2024).
2) Помощник Админа // [канал]. URL: https://t.me/channel_adminwinru (дата обращения 01.09.2024).
3) Редактор локальной групповой политики Windows// [канал]. URL: https://remontka.pro/group-policy-editor-windows / (дата обращения 28.08.2024).
This Windows Server 2022 Tutorial covers how to Configure Group Policy on Windows Server 2022. Group Policy is a feature of the Microsoft Windows NT family of operating systems that controls the working environment of user accounts and computer accounts. It provides centralized management and configuration of operating systems, applications, and users’ settings in an Active Directory environment. A Group Policy Object (GPO) is a virtual collection of policy settings. A GPO has a unique name, such as a GUID, A GPO can represent policy settings in the file system and in the Active Directory. A GPO can be linked to one or more Active Directory containers, such as a site, domain, or organizational unit.
Windows Server Active Directory Domain Service (ADDS) is a directory service that stores information about all objects in the domain and makes this data available to network users and administrators. Active Directory Domain Service provides secure, structured, hierarchical data storage for objects and the admin can easily manage all objects. The Active Directory Domain Controller is a server that runs Active Directory Domain Service and domain controllers to give the network user access to permitted resources anywhere on the network through a single logon process.
In this tutorial, we are going to Prohibit access to the Control Panel for a particular Active Directory organization unit.
Demo environment
- Computer Name: server1.test.com
- Operating System: Windows Server 2022 Datacenter
- IP Address: 192.168.0.2
- Domain: test.com
- Current domain controller (DC): server1.test.com
- DNS Server IP address: 192.168.0.2
- Organizational unit: TEST_OU
- A user within Organizational unit (TEST_OU): test\user1
Related tutorial
- Install and configure ADDS on Windows Server 2022
Steps for Configuring Group Policy
- Configuring Central Store GPO
- Create and configure Starter GPOs
- Create a GPO and Link
- Check the result on a client machine
Configuring Central Store Group Policy Object
The group policy central store is a central location to store all the group policy template files. This eliminates the need for admins to load and open group policy template files on systems used to manage group policy.
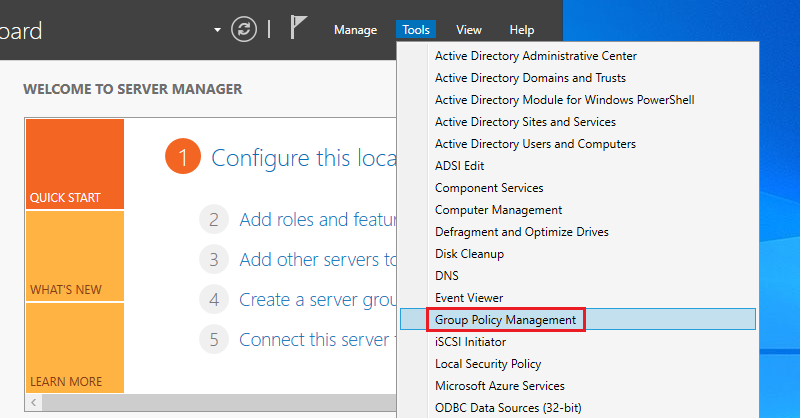
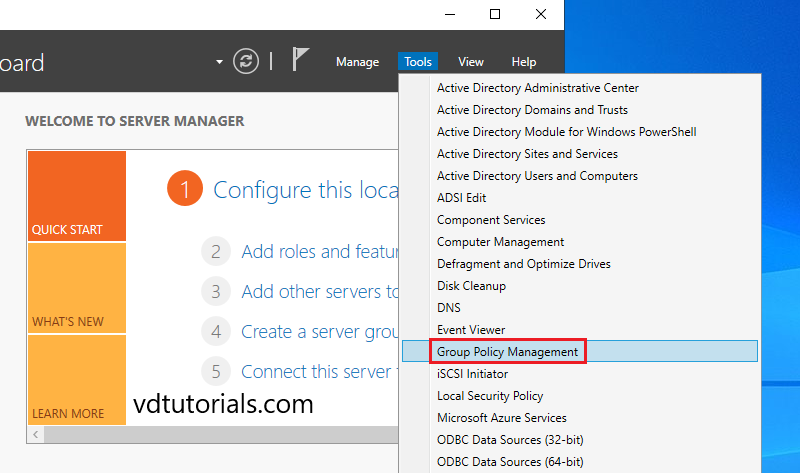
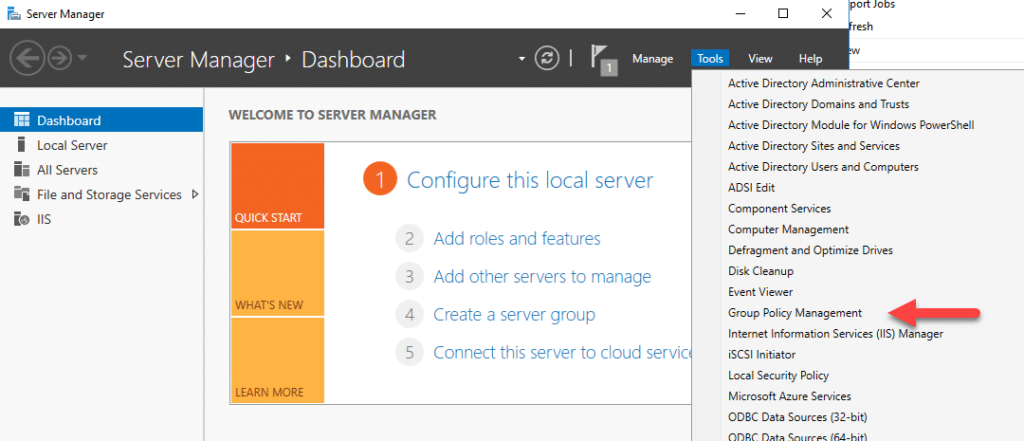
1. Open the Server Manager dashboard, click tools, and select Group Policy Management.
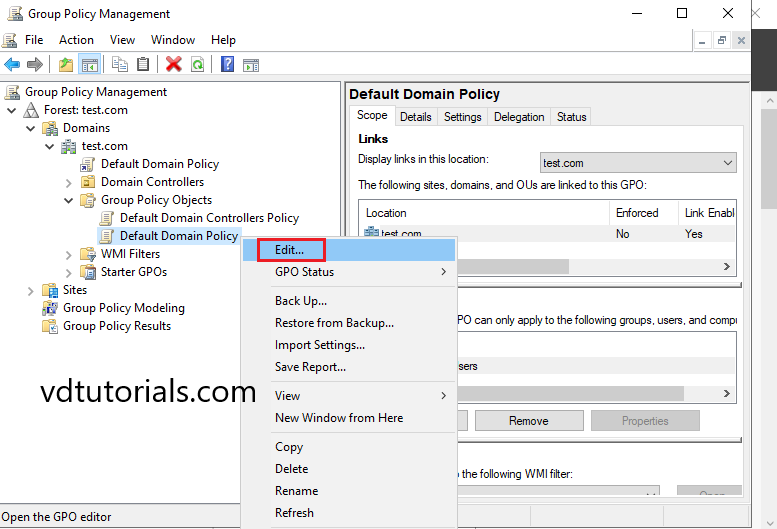
2. Right click on Default Domain Policy and select Edit.
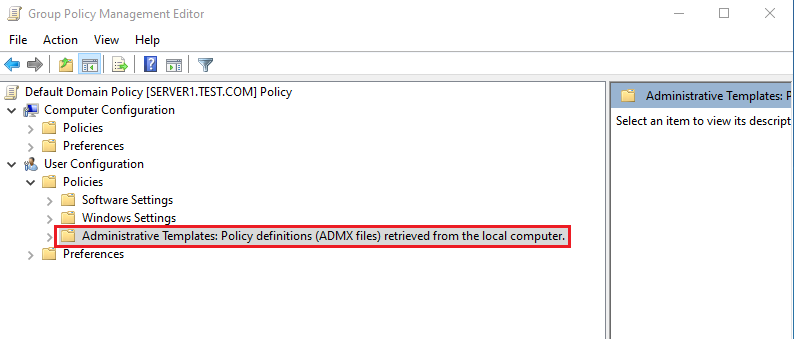
3. On the Group Policy Management Editor, double click User Configuration, expand Policies, and then click Administrative Templates, if you check on that, you will see a note saying Administrative Templates: Policy definitions (ADMX files) retrieved from the local computer.
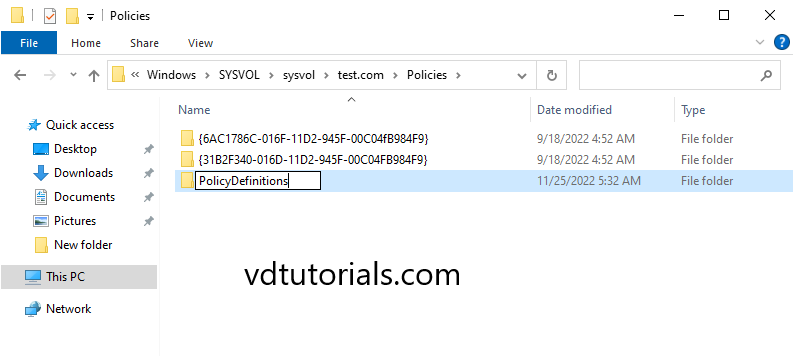
4. Access your Policies folder and create a new folder name PolicyDefinitions.
c:\windows\SYSVOL\sysvol\comsys.local
5. Access to your C:\windows\PolicyDefinitions folder, what you need to do here is to copy all .adml & .admx files.
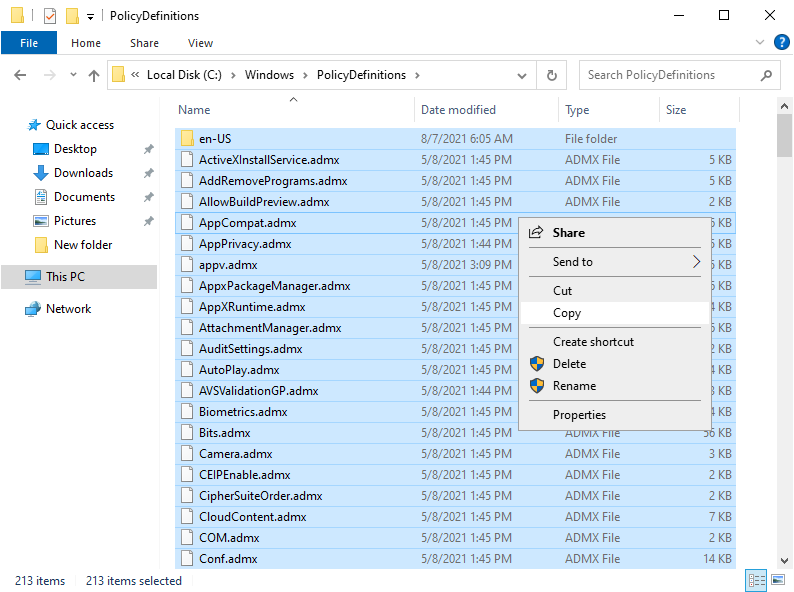
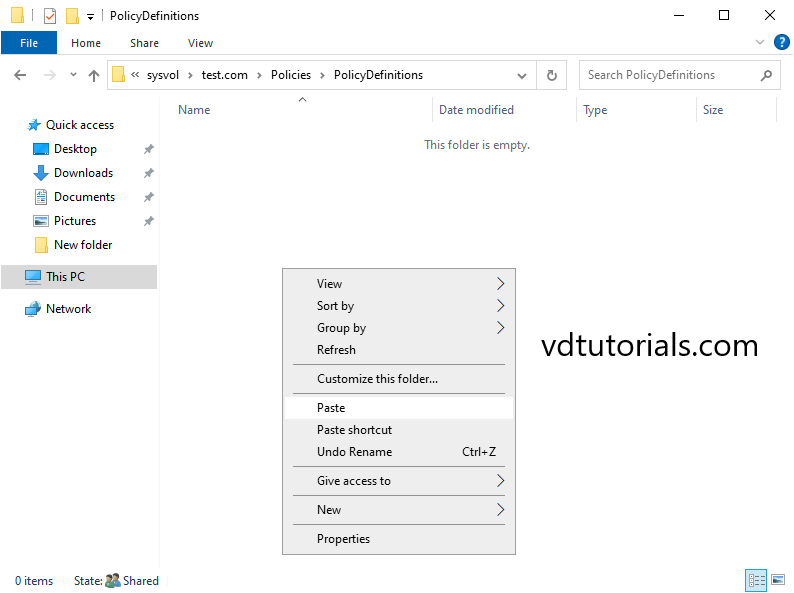
6. Then, paste the .adml & .admx files that you copied just now into c:\windows\SYSVOL\sysvol\comsys.local\PolicyDefinitions folder.
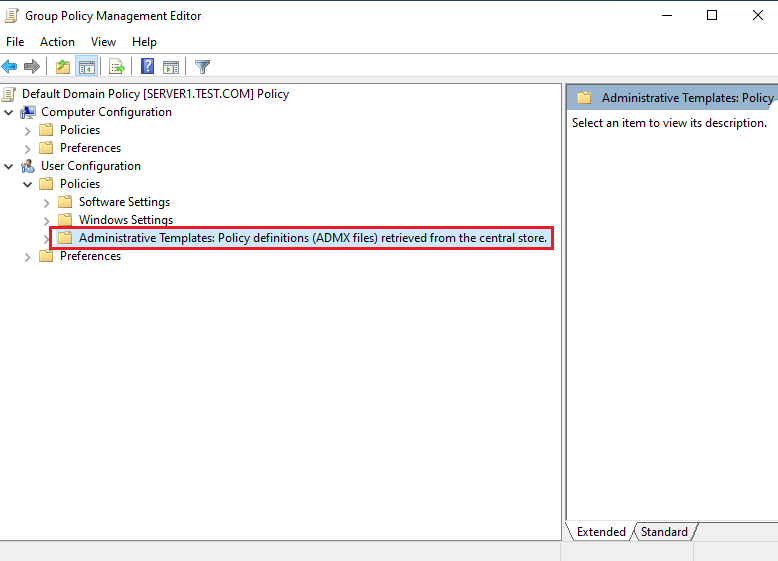
7. Open the Group Policy Management Editor interface, expand User Configuration> Polices, point your cursor to the Administrative Templates folder, and verify that it reads: Administrative Templates: Policy definitions (ADMX files) retrieved from the central store.
Create and configure Starter GPOs
Starter GPOs are templates for Group Policy settings. It enables an administrator to create and have a pre-configured group of settings that represent a baseline for any future policy to be created.
8. Open the Server Manager dashboard, click tools, and select Group Policy Management.
9. Create a new Starter GPO, right-click the Starter GPOs folder, and then click New.
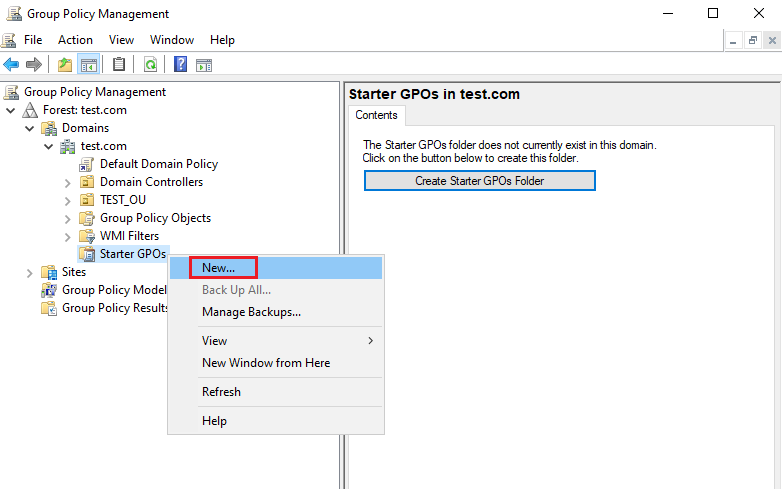
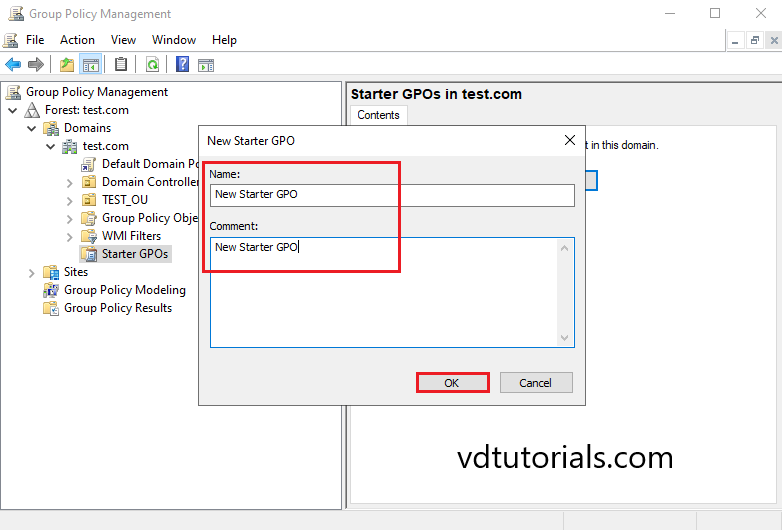
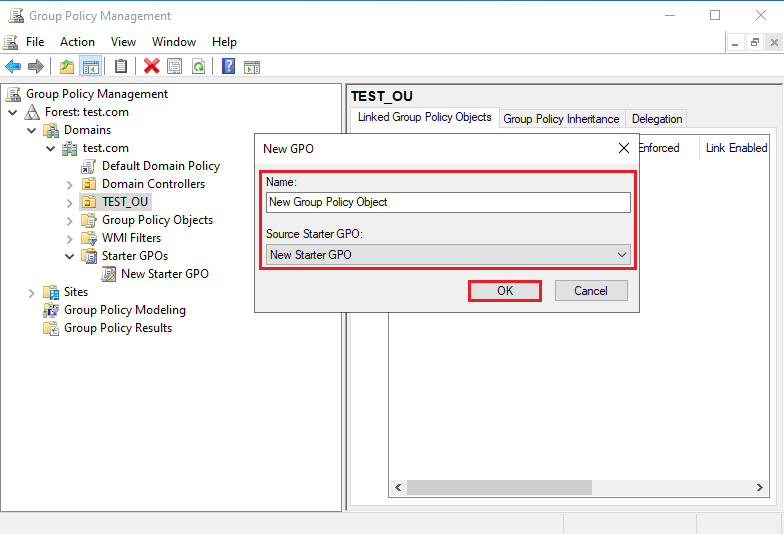
10. Enter Name and Comment for New Starter GPO and click OK.
- Name: New Starter GPO
- Comment: New Starter GPO
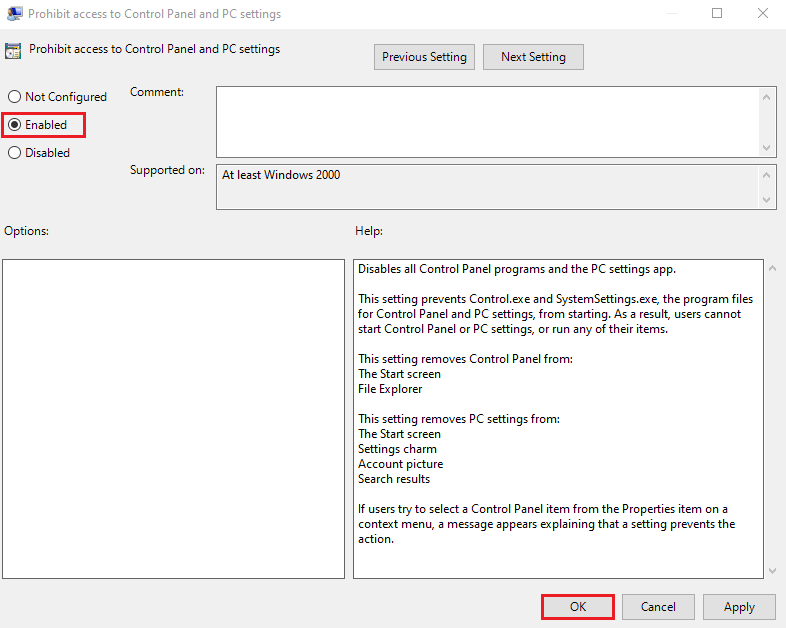
In this tutorial, we use Prohibit access to the Control Panel and PC settings policy for testing.
11. Right-click on New Starter GPO and Click Edit
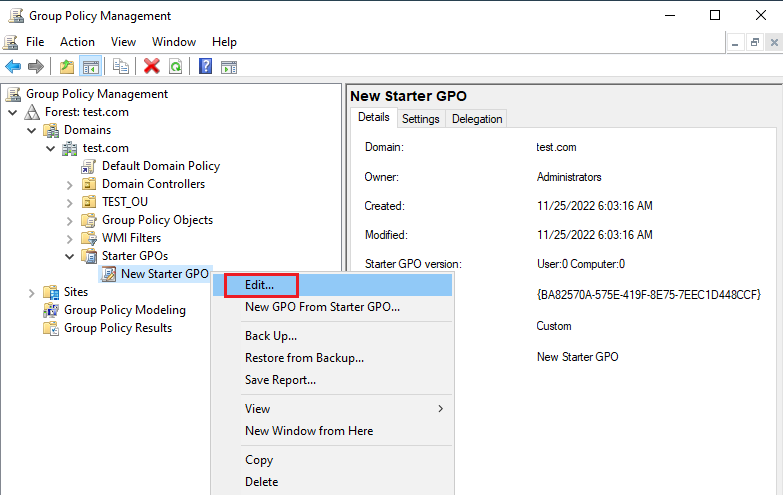
12. Open Group Policy Management Editor interface.
Expand User Configuration> Administrative Templates> Control Panel and open Prohibit access to Control Panel and PC settings.

13. In Prohibit access to Control Panel and PC settings window, select Enable and click OK.
Create a GPO and Link
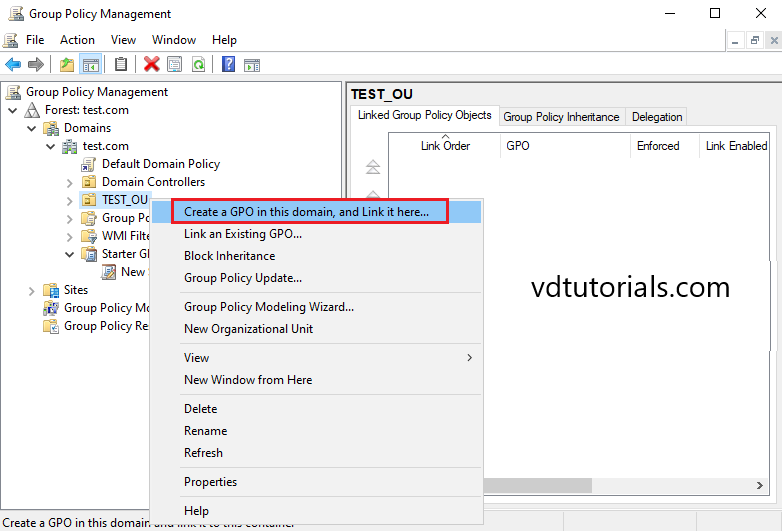
14. Open Group Policy Management, Right-click on OU and select Create a GPO in this domain and Link it here.
15. Enter Name, select Source Starter GPO, and click OK.
Check the result on a client machine
Client Demo environment
- Computer Name: server2.test.com
- Operating System: Windows Server 2022 Datacenter
- IP Address: 192.168.0.4
- Domain: test.com
- Organizational unit: TEST_OU
- A user within Organizational unit (TEST_OU): test\user1
16. Enter User Name and Password.

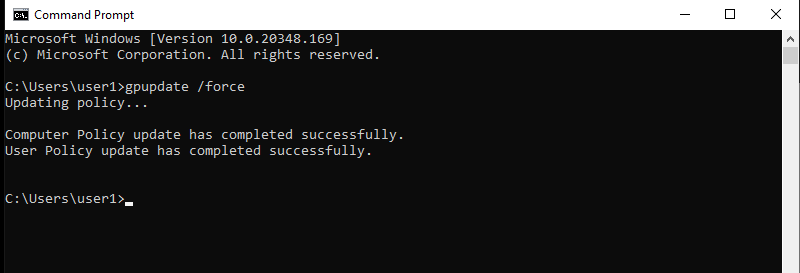
17. On the client, the machine waits for the policy to get updated automatically or manually updates the policy settings by running the command gpupdate /force in the command prompt.
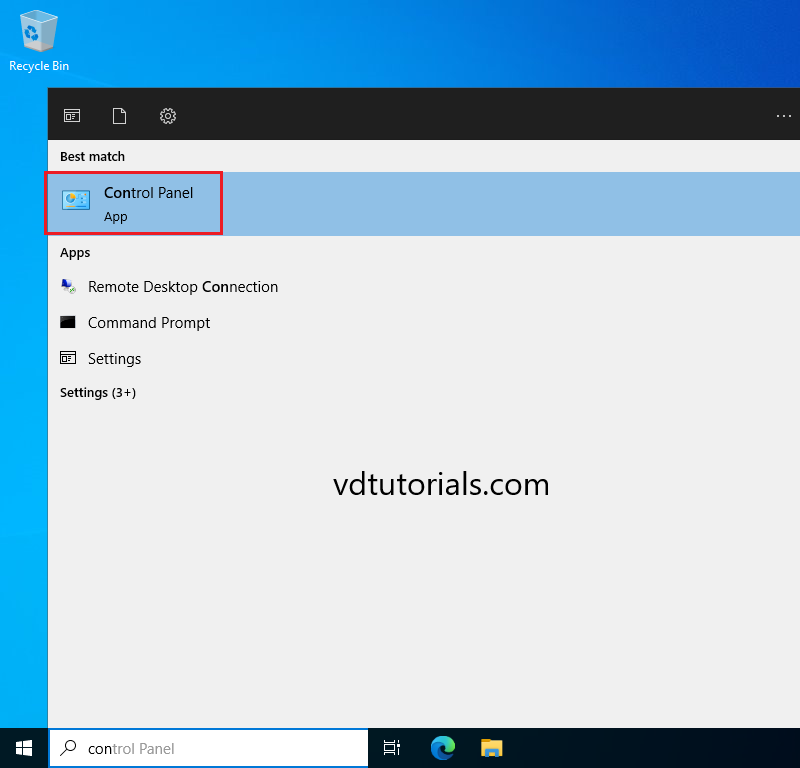
18. Once you successfully log on, try to open Control Panel.
19. A restriction warning box will appear, This operation has been cancelled due to restrictions in effect on this computer. Please contact your system administrator.
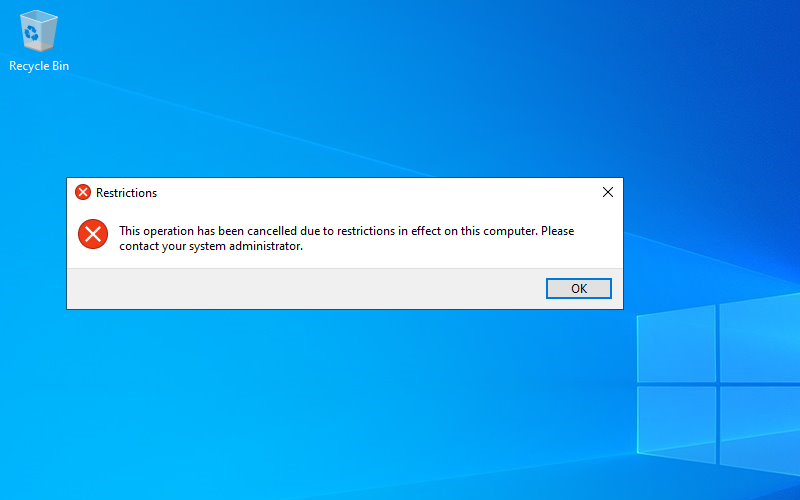
Introduction to Group Policy Management
Group Policy is a feature of Microsoft Windows operating systems that helps administrators manage and secure users and computers in Active Directory environments. Group Policy settings are grouped into Group Policy objects (GPOs) and applied to computer and user objects within the scope of the GPO.
For example, Group Policy objects can be used to manage:
- Configurations, such as desktop settings, startup scripts and logon/logoff scripts
- Security, including Active Directory (AD) password policies, account lockout policies and firewall settings
- Access to network resources like shared folders, printers and applications
- Software deployment, including installation of software on selected machines and scheduling of patches and updates.
This guide explains the key elements of Group Policy management.
Group Policy Management Tool
To manage GPOs, administrators use the Group Policy Management Console (GPMC). You can access this domain Group Policy editor from the Tools menu of Windows Server Manager.
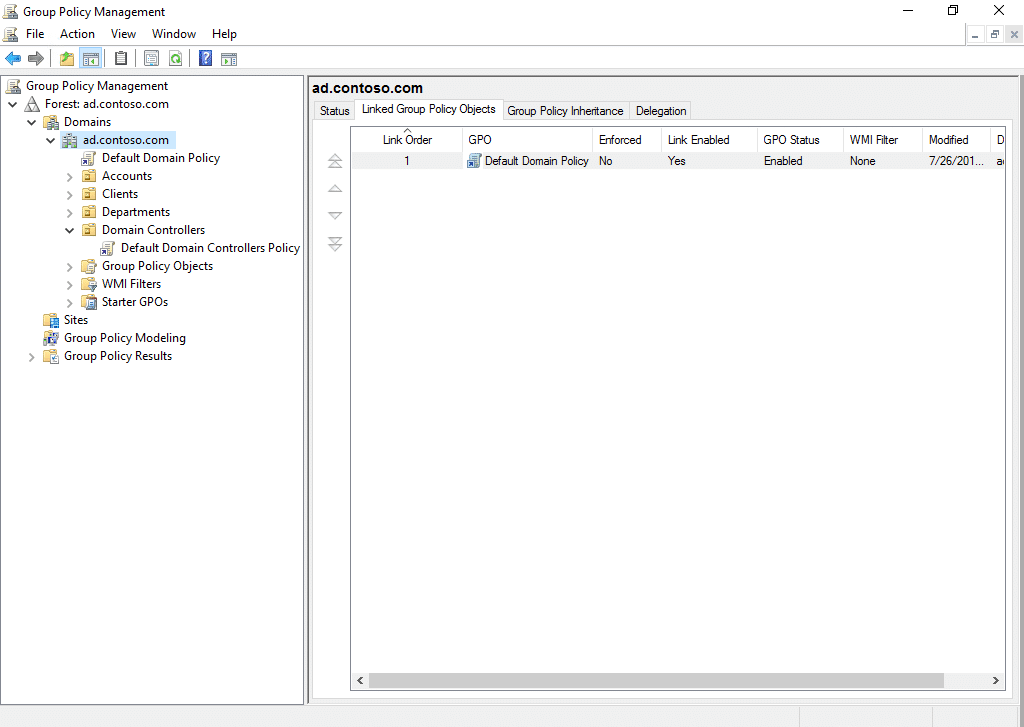
You can see all the GPOs in a domain by clicking the Group Policy Objects container in the left pane of the Group Policy Management Console. Below, you can see that the AD domain ad.contoso.com has just one GPO, Default Domain Policy:
The Group Policy Management Console includes a Group Policy Editor, as shown here:

Types of Group Policy Settings
The left panel of the screenshot below shows the types of settings in a GPO:
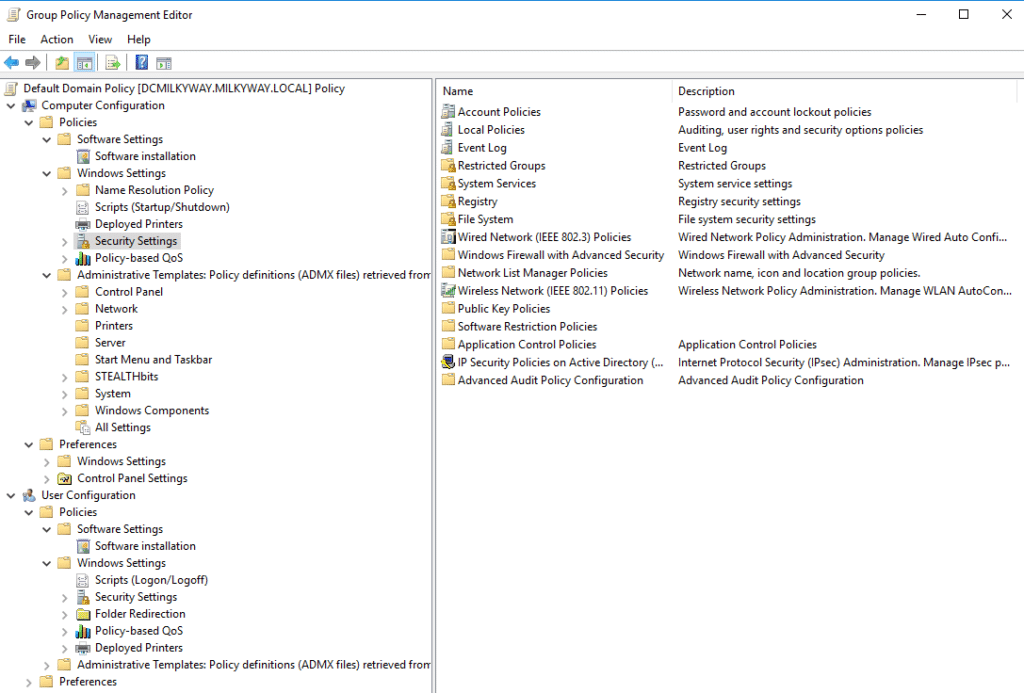
As you can see, there are two primary categories: Computer Configuration and User Configuration.
Each of these has Policies and Preferences, which you can expand to configure:
- Software Settings
- Windows Settings
- Administrative Templates
Policies vs Preferences
Policies and Preferences can both be used to manage settings for Active Directory computer and user objects. The primary difference is as follows:
- Policies cannot be changed by users. Accordingly, settings related to security and regulatory compliance should be made in policies. Examples include password policies, account lockout policies, firewall policies and software restriction policies.
- Preferences can be changed by users, so they should be used only for user experience and environment settings. For example, you might provide a standard set of mapped network drives, printers or desktop shortcuts, but establishing them via Preferences will allow users to adjust them to meet their own needs.
Installing the Group Policy Management Console on Windows Server
To install the Group Policy Management Console on Windows Server, take these steps:
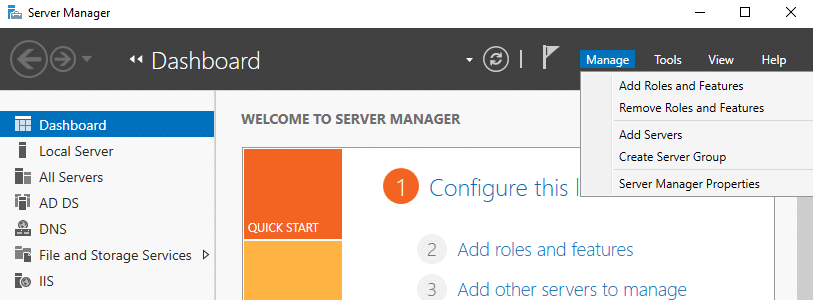
- Launch Server Manager by clicking on the Start menu and selecting Server Manager.
- In Server Manager, click Manage from the top menu, and then select Add Roles and Features.
- Choose Role-based or feature-based installation and click Next.

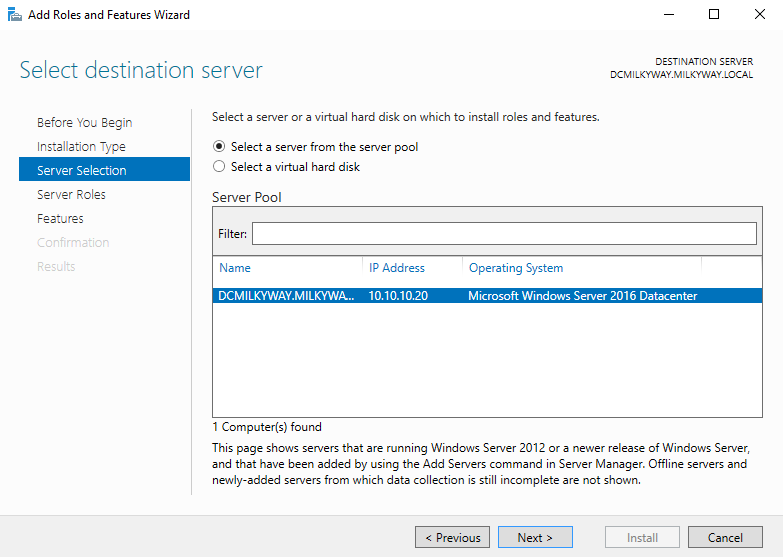
- Select the server where you want to install GPMC and click Next.
- On the “Select Server Roles” page click Next, since we are not adding a role.
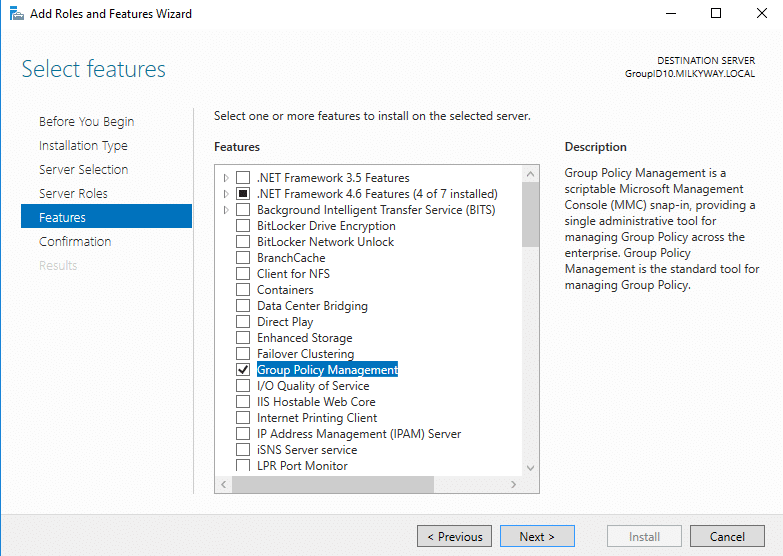
- Scroll down, find “Group Policy Management,” and check the box next to it.
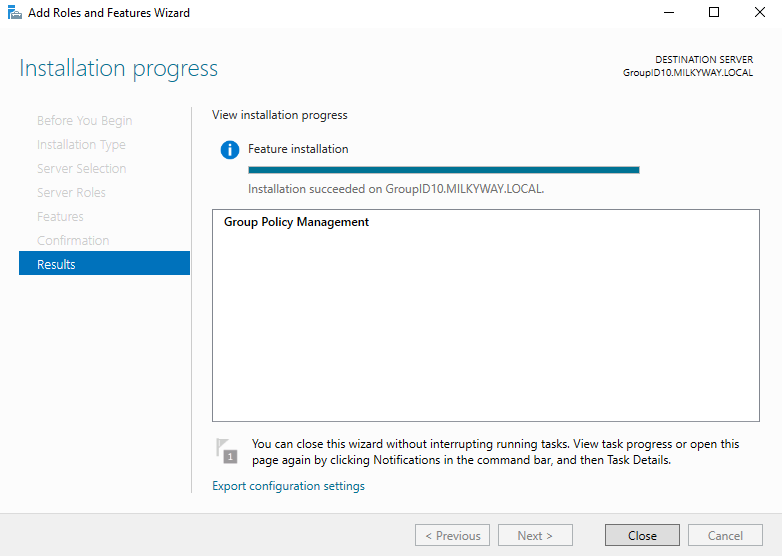
- Click “Next” any confirmation message once the installation is complete. Click “Close” to exit the wizard.
Installing the Group Policy Management Console on Windows
If you are using Windows 10 version 1809 or later, you can install GPMC using the Settings app:
- Open Settings by pressing WIN+I.
- Search for optional features.
- Click + Add a feature.
- Click RSAT: Group Policy Management Tools and then click Install.
If you are using an older version of Windows, you’ll need to download the correct version of RSAT from Microsoft’s website.
How to Create a GPO
To create a new Group Policy object:
- Open Server Manager, click Tools in the top-right corner and select Group Policy Management from the dropdown menu.
- In the Group Policy Management Console, expand the forest and domain where you want to link the GPO.
- Right-click on the OU, domain or site where you want to link the GPO and select the corresponding Create option, such as Create a GPO in this domain, and Link it here…
- Enter a descriptive name for the new GPO and click OK.
How to Edit a GPO
To edit Group Policy in the Group Policy Management Console, take the following steps:
- Expand the forest and domain to which the GPO belongs.
- Navigate to the OU, domain or site where the GPO is linked.
- Right-click on the GPO you want to edit and select Edit.
- In the Group Policy Management Editor, double-click the desired policy setting and modify it according to your requirements.
Computer settings are applied when Windows starts, and user settings are used when a user logs in. Group Policy background processing applies settings periodically if a GPO has been changed.
How to Link a GPO
To take effect, a GPO must be linked to at least one Active Directory container, such as an OU, domain or site. To link a GPO, take the following steps:
- In the Group Policy Management Console, expand the forest and domain where you want to link the GPO.
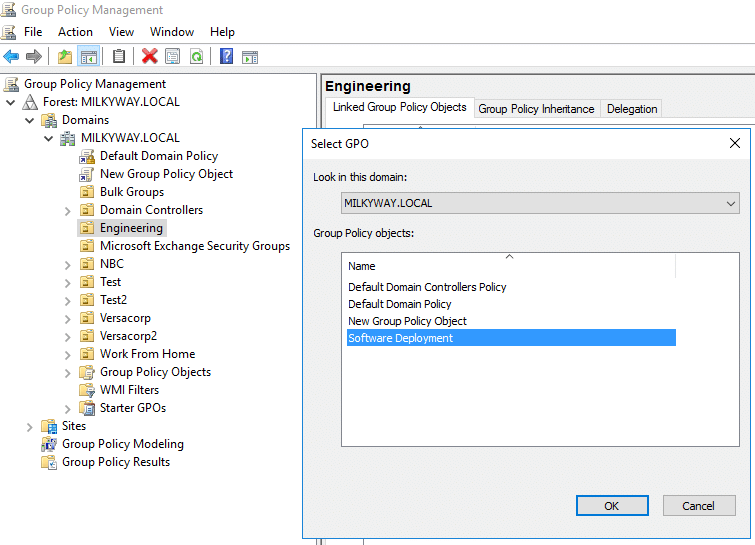
- Right-click the OU, domain or site where you want to link the GPO and select Link an Existing GPO.

- Choose the GPO you want to link from the list of available GPOs and click OK.
How to Enable or Disable a GPO Link
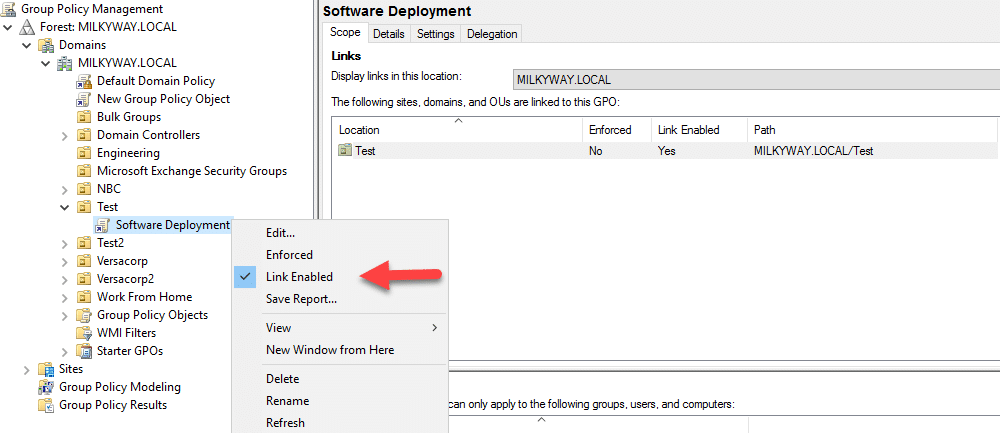
When a GPO link is disabled, its settings won’t apply to the objects in the linked container. Here’s how to enable or disable a GPO link:
- In the Group Policy Management Console, expand the Active Directory forest and domain to which the linked GPO belongs.
- Expand the container where the GPO is linked and right-click on the GPO.
- In the context menu, check Link Enabled to enable the link or uncheck it to disable the link.
How to Import GPO Settings
You can configure a GPO by importing settings from a backup GPO or template file. Here’s how it’s done:
- In the Group Policy Management Console, navigate to the OU, domain or site with the GPO to which you want to import settings.
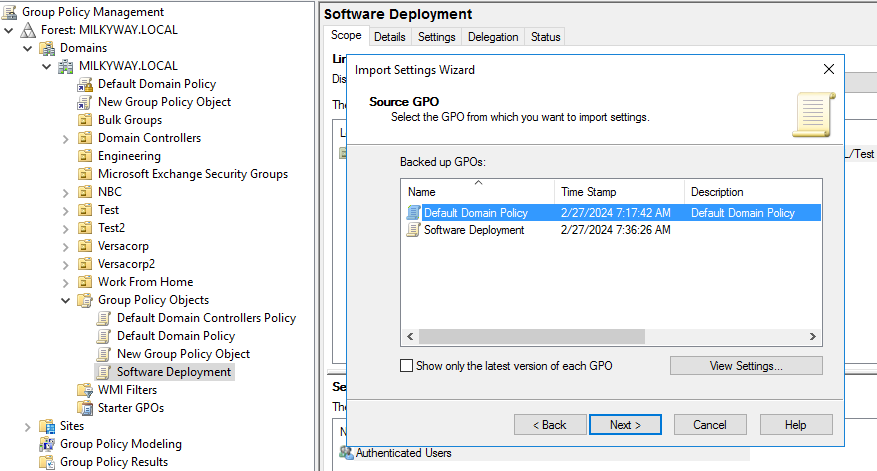
- Right-click on the destination GPO and select Import Settings…
- Choose the backup or template file (.admx or .adml) containing the desired GPO settings and click Open.
- Since backup locations can contain multiple GPOs, select the one from which you want to import settings.
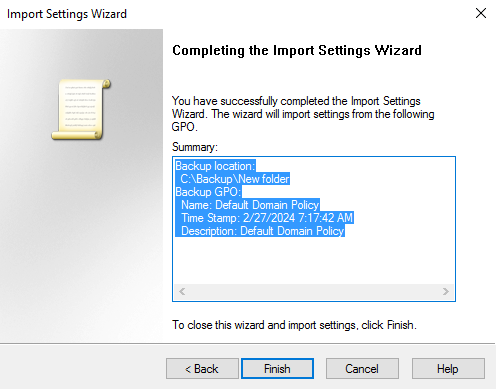
- Click Next twice, review the summary, and click Finish to complete the import process.
GPO Inheritance and Precedence
Group Policy inheritance and precedence determine how Group Policy objects are applied to objects.
Inheritance
Group Policy inheritance follows the hierarchical structure of AD domains and OUs. Domain-level policies apply to all objects (users, computers, groups) in the domain. OU-level policies apply to objects within a specific OU. Policies applied at a higher level in the hierarchy are inherited by child objects, so domain-level GPOs are inherited by all OUs in the domain, and a policy linked to an OU is inherited by all sub-OUs nested under that OU.
However, you can use the Block Inheritance setting on a site, domain or OU to stop GPOs linked to parent objects from being applied to child objects. Setting the Enforced flag on individual GPOs overrides the Block Inheritance setting.
To view the GPOs that an object inherits from parent objects, click on the object in GPMC and go to the Group Policy Inheritance tab.
Precedence
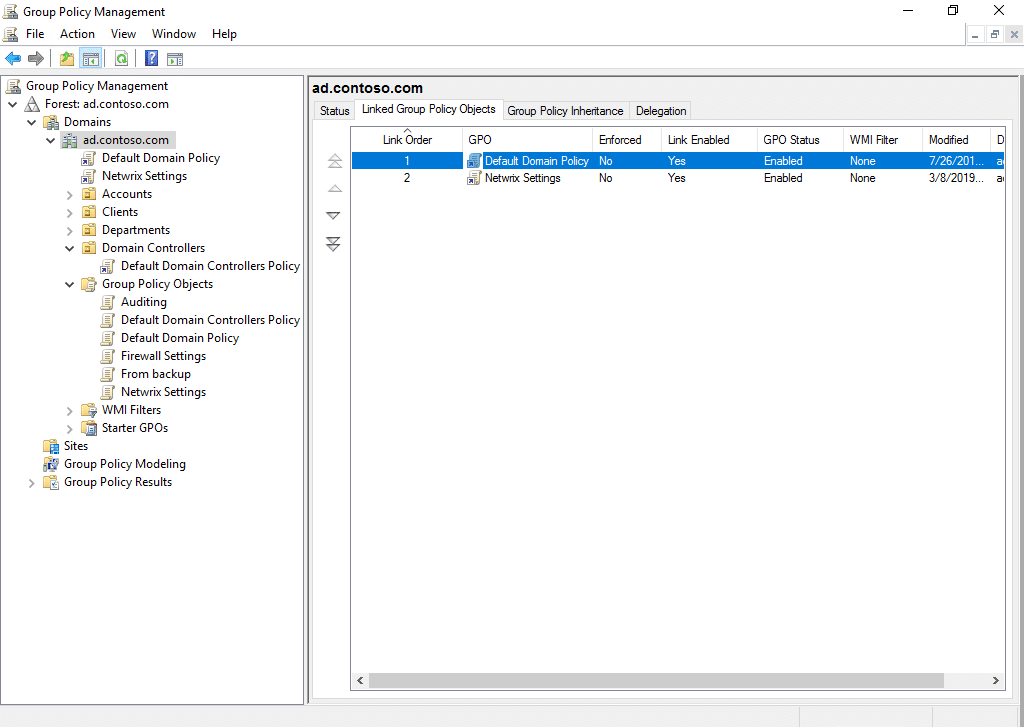
A given domain, site or OU can have multiple GPOs linked to it, and those policies could have conflicting settings. Group Policy precedence controls the order in which GPOs are applied and therefore which setting takes effect. The later a GPO is applied in the sequence, the higher its precedence.
The order in which policies are applied is as follows:
- Local Group Policy
- Site-level GPOs
- Domain-level GPOs
- OU-level GPOs
To view the GPOs linked to an object, click on the object in GPMC and go to the Linked Group Policy Objects tab. GPOs with a higher Link Order number take priority over those with a lower number. You can change the link order number by clicking on a GPO and using the arrows on the left to move it up or down.
Group Policy Extensibility
You can extend the functionality of Group Policy by integrating additional features, custom settings or third-party components. Here are several aspects of Group Policy extensibility:
- Administrative templates (.admx files) — Administrators can create custom templates to manage additional settings or configure custom policies.
- Custom Group Policy Preferences — You can create custom Preference items using XML files or scripts. These let you manage things like mapped drives, printers, registry settings, files and shortcuts on client computers.
- Group Policy client-side extensions (CSEs) — You can create custom CSEs to add extra settings, policies or management tasks.
- Group Policy filters and WMI filters — You can create filters to target Group Policy settings based on specific criteria, such as user or computer attributes.
- Third-party Group Policy tools — Third-party solutions provide additional management capabilities, reporting features, auditing tools and policy templates.
Backing Up GPOs
Create regular backups of your GPOs to ensure you have a recent copy in case of accidental or malicious deletion, corruption or misconfiguration. You should also back up GPOs after making significant changes or before performing maintenance tasks that could affect Group Policy settings.
Establish a centralized location for storing GPO backups to ensure easy access and management. Consider organizing backup files by domain, date or purpose to facilitate retrieval and recovery. Use descriptive naming conventions or metadata to identify backup versions and associated changes. Implement version control practices to track changes to GPOs over time, and maintain a history of backups.
Modeling Changes to Group Policy Settings
Group Policy Modeling is a GPMC feature that allows administrators to simulate how Group Policy settings would act for users and computers in an Active Directory environment. It provides a way to predict the outcome of applying specific Group Policy settings without implementing them.
Advanced Group Policy Management
Advanced Group Policy Management (AGPM) is a Microsoft Desktop Optimization Pack (MDOP) component that enhances the management, delegation, version control and auditing of Group Policy objects.
Unlike GPMC, AGPM is a client/server application. The server component stores GPOs and their histories offline. GPOs managed by AGPM are called controlled GPOs. Administrators can check them in and out, similar to how files or code are handled in GitHub or a document management system.
AGPM offers more control over GPOs than GPMC. Besides version control, you can assign roles like Reviewer, Editor and Approver to Group Policy administrators. This facilitates strict change control throughout the entire GPO lifecycle. AGPM auditing also provides deeper insight into changes in Group Policy.
How Netwrix Can Help
Netwrix Auditor extends traditional Group Policy management with enhanced visibility, auditing, change control and reporting functionalities that improve security, and compliance. For example, administrators get detailed insight into what was changed, who changed it and when the action occurred. From an intuitive interface, they can easily compare different versions of GPOs, identify specific changes and even roll back unwanted modifications.
This increased transparency empowers administrators to ensure that Group Policy settings align with organizational policies, security standards and regulatory requirements. By integrating Netwrix Auditor into their Group Policy management strategy, organizations can achieve a more secure, compliant and efficiently managed IT infrastructure.
Frequently Asked Questions
What is Active Directory Group Policy management?
Group Policy is a feature of Active Directory that enables administrators to control the configuration settings of users and computers. Group Policy management is the process of creating and maintaining Group Policy settings that enforce security, deploy software, manage desktop configurations and more.
How do you open the Group Policy Management Console?
To open the Active Directory Group Policy Management Console:
- Press Windows Key + R on your keyboard.
- In the Run dialog box that appears, type gpmc. msc and either press Enter or click OK.
How can I install the Group Policy Management Console?
To install GPMC on a Windows Server, take these steps:
- Launch Server Manager. You can usually find it in the taskbar, or you can locate it in the Start menu.
- In Server Manager, click Manage at the top-right corner and then select Add Roles and Features.
- On the “Before you begin” screen, click Next.
- On the “Select installation type” screen, choose Role-based or feature-based installation and then click Next.
- Select the server where you want to install the GPMC feature and click Next.
- On the “Select features” screen, check the box next to Group Policy Management. Click Next.
- Review your selections and click Install.
- Wait for the installation process to complete. Once you see a confirmation message, close Server Manager.
Which users are automatically granted permissions to perform Group Policy management tasks?
The Group Policy Creator Owners group is automatically created when an Active Directory forest is created. Members of the group can create, edit and manage Group Policy objects at the domain level. This group is typically used when administrators want to delegate control over Group Policy without granting full administrative privileges. By default, only the domain administrator is a member of this group.
IT consultant and author specializing in management and security technologies. Russell has more than 15 years of experience in IT, he has written a book on Windows security, and he coauthored a text for Microsoft’s Official Academic Course (MOAC) series.