
Dsdt Editor Windows Average ratng: 4,2/5 5980 reviews
DSDTSE is a simple editor aimed to help you solve your DSDT problems? And add common hacks to it.It will not do automatic patching, you have to manually add. Note: DSDT Editor is written in Java, so you will need to install Java in order to run it. 1.OS X should prompt you to install Java and automatically download and install it through Software Update. If it doesn’t, I suggest you visit and download the Java package appropriate for your version of OS X.
- Maciasl
- Dsdt Hackintosh
Maciasl
DSDT Editor 0.8 for Mac can be downloaded from our software library for free. This free software for Mac OS X is a product of dsdtparser. The most recent setup file that can be downloaded is 1.1 MB in size. DSDTEditorMac.zip is the default file name to indicate the DSDT Editor installer. DSDT Editor for Mac belongs to Developer Tools.
Our built-in antivirus scanned this Mac download and rated it as virus free. The following versions: 0.8 and 0.6 are the most frequently downloaded ones by the program users. The unique ID for this program’s bundle is dsdtparser.DSDTParserApp. The main editor windows allows the user to open a DSL file or extract the DSDT from IOReg.
It has some useful resources, like syntax highlighting, navigation tree and some options that came with the text editor component it uses, like regex matching, auto completion, jump to pair, etc. The patcher window parses a script-like language representing the patches. The user can preview the modifications before applying them. This “language” allows us to write dynamic patches that can be applied in various situations. More specific commands can be written as they become necessary.
Dsdt Hackintosh
You may want to check out more software for Mac, such as DSDT Auto-Patcher, Wave Editor or Tanbee Video Editor for Mac, which might be to DSDT Editor.
DSDTs are configuration files that tell Mac OS X how to use your Hackintosh’s motherboard, without the need for extra and drivers. A DSDT will make it a lot easier to enable sleep mode on your Hackintosh, and it will also fix any bootup problems related to your CPU. Bentley microstation download. The newest Gigabyte motherboards no longer require DSDT files. And older Gigabyte motherboards have DSDT files available in. However, if you own a non-Gigabyte motherboard, you usually have to make your own DSDT. Editing DSDTs is extremely complicated, but you can automate this editing process by applying a patch with DSDT Editor instead. LATEST UPDATE (March 7, 2014): DSDT Editor has largely been superseded by, a faster and more convenient app for patching DSDTs.
Check out instead! Requirements. Self-explanatory; this is a tool for editing DSDTs. You can make very advanced edits with DSDT Editor, but for this tutorial, we’ll just be using the ‘Patch’ function.
A Hackintosh with Mac OS X Snow Leopard or Lion installed: DSDT Editor is a Mac app, so you have to install Mac OS X on your Hackintosh beforehand. If your Hackintosh isn’t fully set up yet, you can boot Mac OS X with iBoot, Unibeast, or some other temporary solution for now.: A patch is a text file that contains the necessary DSDT edits for your motherboard. Patches are motherboard-specific; a patch for one motherboard model won’t work with any other motherboards. You can download (you need to register on olarila.com to view and download the patches).
In this tutorial, you will use DSDT Editor to extract an unedited DSDT straight from your Hackintosh’s motherboard. Then, you will create a new, edited DSDT with the patch file that you downloaded. In some ways, patching your own DSDT is more convenient than using a pre-edited DSDT from tonymacx86; unlike pre-edited DSDTs, patches will work with any of your motherboard. Open DSDT Editor, and go to File-‘Extract DSDT’ from the menu bar. This will create an unedited copy of your motherboard’s DSDT. If you get an error at this step, check /Extra in your main hard drive and make sure that there isn’t already a file called ‘DSDT.aml’ inside it. If so, delete that file, or move it somewhere else.
Once you’ve successfully extracted an unedited DSDT from your motherboard, go to the next step, where we edit the file by using a patch. Go to Patch-Open from the menu bar.
In the window that pops up, choose the patch that you downloaded from Olarila.
DSDT Patching is required only on the following motherboards.
- Sandy/Ivy Bridge motherboards which have applied UEFIPatch
- ASRock Haswell/Broadwell/Skylake/Kabylake (excluding HEDT (X99/LGA2011-3 and X299/LGA2066)) because these often come with broken DSDT for 4G decoding
- X79/LGA2011-0 systems which have applied UEFIPatch
Extend MMIOH limit to fix Above 4G Decoding - Systems without 4G decoding even in hidden settings, this fix will only work in Linux for them though (atleast with GPUs)
If you do not have a motherboard which requires DSDT patching you can skip to Flashing modified UEFI.
Before opening any issues about iASL errors make sure you have read the bottom of the page explaining how to fix them.
All warnings output by iASL are safe to ignore and will not cause any issues.
Please be aware of pad file issue when modifying DSDT on ASUS motherboards. This page contains information about doing the workaround.
Sandy/Ivy Bridge DSDT patch
If you’ve applied patch Replace 16GB MMIO region with complete use of physical address space (Ivy Bridge) and have problems booting Windows or get an error about insufficient resources you’ll need to patch the DSDT. You can both make Windows/Linux load a patched DSDT but we will be modifying it in the UEFI firmware.
Checking if patching is required
Make sure 4G decoding is enabled before doing the following. See Enabling hidden 4G decoding if you cannot find the option.
Windows
Open Device Manager, select View -> Resources by Type and expand Large Memory. If your Pci Bus range ends at FFFFFFFFF or above then DSDT modification isn’t required (UEFIPatch still is though). GPUs supporting Resizable BAR will only show under Large Memory after Resizable BAR is enabled.
Linux
Run sudo dmesg | grep "root bus resource". If then last one ends at fffffffff or above then DSDT modification isn’t required (UEFIPatch still is though).
☁  ~  sudo dmesg | grep "root bus resource"
[    0.161520] pci_bus 0000:00: root bus resource [bus 00-3e]
[    0.161522] pci_bus 0000:00: root bus resource [io  0x0000-0x0cf7 window]
[    0.161523] pci_bus 0000:00: root bus resource [io  0x0d00-0xffff window]
[    0.161525] pci_bus 0000:00: root bus resource [mem 0x000a0000-0x000effff window]
[    0.161526] pci_bus 0000:00: root bus resource [mem 0xdfa00000-0xfeafffff window]
[    0.161527] pci_bus 0000:00: root bus resource [mem 0x21e600000-0xfffffffff window]
DSDT Modification
-
Use UEFITool to extract body from the AmiBoardInfo (GUID
9F3A0016-AE55-4288-829D-D22FD344C34) module PE32 image section to AmiBoardInfo.efi (make sure extension is .efi when saving). Both NE and the old version will work. Make sure to use the modified BIOS image created in the previous step.
-
Download AmiBoardInfoTool. If you’re on Linux you will need to build it from source using CMake which also requires that you install the distorm3 development package.
-
Run
AmiBoardInfoTool -a AmiBoardInfo.efi -d DSDT.aml. This will extract the compiled DSDT from AmiBoardInfo to DSDT.aml -
Use
iasl DSDT.amlto decompile the DSDT to DSDT.dsl. You can download iasl for Windows from Intel or on Ubuntu fromacpica-tools. -
Rename DSDT.dsl to DSDTMod.dsl and open it in a text editor. Search for
CreateQWordFieldyou will find something like this (stock DSDT from my Gigabyte B75M-D3H F16d BIOS)

CreateQWordField (BUF0, \_SB.PCI0._Y0F._LEN, M2LN)  // _LEN: Length
CreateQWordField (BUF0, \_SB.PCI0._Y0F._MIN, M2MN)  // _MIN: Minimum Base Address
CreateQWordField (BUF0, \_SB.PCI0._Y0F._MAX, M2MX)  // _MAX: Maximum Base Address
M2LN = 0x0000000400000000
If ((TUUD >= 0x1000))
{
    M2MN = (TUUD << 0x14)
}
Else
{
    M2MN = 0x0000000100000000
}

M2MX = ((M2MN + M2LN) - One)
Change it to something like the following.
CreateQWordField (BUF0, \_SB.PCI0._Y0F._LEN, M2LN)  // _LEN: Length
CreateQWordField (BUF0, \_SB.PCI0._Y0F._MIN, M2MN)  // _MIN: Minimum Base Address
CreateQWordField (BUF0, \_SB.PCI0._Y0F._MAX, M2MX)  // _MAX: Maximum Base Address
// 36-bit / 64GB is highest supported by Sandy/Ivy Bridge
M2MX = 0xFFFFFFFFF

If ((TUUD >= 0x1000))
{
    M2MN = (TUUD << 0x14)
}
Else
{
    M2MN = 0x0000000100000000
}

M2LN = (M2MX - M2MN) + One
-
Compile the modified DSDT by running
iasl DSDTMod.dsl. If iasl reports any errors you will have to manually fix them. -
Create a new modified AmiBoardInfo using
AmiBoardInfoTool -a AmiBoardInfo.efi -d DSDTMod.aml -o AmiBoardInfoMod.efi. If you get the errorERROR: PE32 has .ROM but not DYNAMIC_BASE set -> Unpatchable atm..you’ll need to remove unneeded code from the DSDTMod.dsl so that its compiled size is smaller than the original. See bottom of this page for more information about fixing this. -
Use UEFITool (non NE) to replace body on AmiBoardInfo module PE32 image section with our new AmiBoardInfoMod.efi

Make sure to check for pad file issue and use the workaround if needed, see Pad file issue workaround. You can get the .ffs (for use in MMTool) of your modified AmiBoardInfo by using UEFITool Extract as-is on the DXE Driver after replacing the PE32 on a temporary copy of your BIOS.
- Save the modified BIOS
Continue to Flashing modified UEFI
DSDT broken 4G Decoding fix (Haswell and up) / Linux no 4G Decoding fix
If you’re unable to boot Windows or have non functioning GPU with 4G Decoding on then this modification will be required. Usually this issue is on ASRock boards.
This can also allow rebar on Linux for BIOS with missing 4G decoding (often Haswell) and may also work on Windows for compute GPUs. You can even override DSDT without any BIOS modification on Linux, just make sure to use DSDT from /sys/firmware/acpi/tables/DSDT as a base if you’re using this method. This method may also require pci=realloc in Linux kernel command line if it doesn’t work. On Linux NVIDIA GPUs will additionally require NVreg_EnableResizableBar=1 to make the driver resize them, Intel and AMD do it by default.
Checking if patching is required
Make sure 4G decoding is enabled before doing the following. See Enabling hidden 4G decoding if you cannot find the option. If Windows crashes/freezes on boot logo with 4G Decoding enabled then patching is required
Windows
Open Device Manager and select View -> Resources by Type. If you have Large Memory then this isn’t needed. Only the Pci Bus Large memory needs to show, GPUs supporting Resizable BAR will only show under Large Memory after Resizable BAR is enabled.
Linux
Run sudo dmesg | grep "root bus resource" and see if the last root bus resource is larger than 0xffffffff, if so then this isn’t needed.
Extracting DSDT (Haswell/Broadwell)
-
Use UEFITool to extract body from the AmiBoardInfo (GUID
9F3A0016-AE55-4288-829D-D22FD344C34) module PE32 image section to AmiBoardInfo.efi (make sure extension is .efi when saving). Both NE and the old version will work. Make sure to use the modified BIOS image created in the previous step. If your module is called AmiBoardInfo2 then use the other DSDT modifying method for Skylake+ not this
-
Download AmiBoardInfoTool. If you’re on Linux you will need to build it from source using CMake which also requires that you install the distorm3 development package.
-
Run
AmiBoardInfoTool -a AmiBoardInfo.efi -d DSDT.aml. This will extract the compiled DSDT from AmiBoardInfo to DSDT.aml
Extracting DSDT (Skylake and up)
-
Use UEFITool NE to extract body from raw section of the DsdtAsl (GUID
C118F50D-391D-45F4-B3D3-11BC931AA56D, search for it) module to DSDT.aml (make sure extension is .aml when saving). Make sure to use the modified BIOS image created in the previous step -
Use
iasl DSDT.amlto decompile the DSDT to DSDT.dsl. You can download iasl for Windows from ACPICA or on Ubuntu fromacpica-tools.
- Rename DSDT.dsl to DSDTMod.dsl and open it in a text editor. Search for
DWordMemoryand you should find multiple entries like this
DWordMemory (ResourceProducer, PosDecode, MinFixed, MaxFixed, Cacheable, ReadWrite,
    0x00000000,         // Granularity
    0x000EC000,         // Range Minimum
    0x000EFFFF,         // Range Maximum
    0x00000000,         // Translation Offset
    0x00004000,         // Length
    ,, _Y0C, AddressRangeMemory, TypeStatic)
DWordMemory (ResourceProducer, PosDecode, MinFixed, MaxFixed, Cacheable, ReadWrite,
    0x00000000,         // Granularity
    0x000F0000,         // Range Minimum
    0x000FFFFF,         // Range Maximum
    0x00000000,         // Translation Offset
    0x00010000,         // Length
    ,, _Y0D, AddressRangeMemory, TypeStatic)
DWordMemory (ResourceProducer, PosDecode, MinFixed, MaxFixed, Cacheable, ReadWrite,
    0x00000000,         // Granularity
    0x00000000,         // Range Minimum
    0xFEAFFFFF,         // Range Maximum
    0x00000000,         // Translation Offset
    0xFEB00000,         // Length
    ,, _Y0E, AddressRangeMemory, TypeStatic)
After the last one add the following
QWordMemory (ResourceProducer, PosDecode, MinFixed, MaxFixed, Cacheable, ReadWrite,
    0x0000000000000000, // Granularity
    0x0000000000010000, // Range Minimum
    0x000000000001FFFF, // Range Maximum
    0x0000000000000000, // Translation Offset
    0x0000000000010000, // Length
    ,, _YAF, AddressRangeMemory, TypeStatic)
Next search for M1LN and you should find something like this
If ((PM0H == One))
{
    CreateBitField (BUF0, \_SB.PCI0._Y0D._RW, F0RW)  // _RW_: Read-Write Status
    F0RW = Zero
}

CreateDWordField (BUF0, \_SB.PCI0._Y0E._MIN, M1MN)  // _MIN: Minimum Base Address
CreateDWordField (BUF0, \_SB.PCI0._Y0E._MAX, M1MX)  // _MAX: Maximum Base Address
CreateDWordField (BUF0, \_SB.PCI0._Y0E._LEN, M1LN)  // _LEN: Length
M1MN = (TLUD << 0x14)
M1LN = ((M1MX - M1MN) + One)
Add the following below it
CreateQWordField (BUF0, \_SB.PCI0._YAF._LEN, M2LN)  // _LEN: Length
CreateQWordField (BUF0, \_SB.PCI0._YAF._MIN, M2MN)  // _MIN: Minimum Base Address
CreateQWordField (BUF0, \_SB.PCI0._YAF._MAX, M2MX)  // _MAX: Maximum Base Address

// 39-bit for Haswell and up
M2MX = 0x8000000000 - One
If ((TUUD >= 0x1000))
{
    M2MN = (TUUD << 0x14)
}
Else
{
    M2MN = 0x100000000
}

M2LN = ((M2MX - M2MN) + One)
- Compile the modified DSDT by running
iasl DSDTMod.dsl. If iasl reports any errors you will have to manually fix them.
Replacing DSDT with modified (Haswell/Broadwell)
-
Create a new modified AmiBoardInfo using
AmiBoardInfoTool -a AmiBoardInfo.efi -d DSDTMod.aml -o AmiBoardInfoMod.efi. If you get the errorERROR: PE32 has .ROM but not DYNAMIC_BASE set -> Unpatchable atm..you’ll need to remove unneeded code from the DSDTMod.dsl so that its compiled size is smaller than the original. -
Use UEFITool (non NE) to replace body on AmiBoardInfo module PE32 image section with our new AmiBoardInfoMod.efi
Replacing DSDT with modified (Skylake and up)
-
Using UEFITool NE find the File GUID of DsdtAsl, in this case it is C118F50D-391D-45F4-B3D3-11BC931AA56D
-
Search for that GUID in UEFITool (non NE) and replace body on the Raw section with DSDTMod.aml

Make sure to check for pad file issue and use the workaround if needed, see Pad file issue workaround. You can get the .ffs (for use in MMTool) of your modified AmiBoardInfo or DsdtAsl by using UEFITool Extract as-is on the DXE Driver after replacing the PE32 on a temporary copy of your BIOS.
- Save the modified BIOS
Continue to Flashing modified UEFI
X79 DSDT Patch
⚠ Please make sure you use MMTool 4.50.0.23 to replace the AmiBoardInfo module when doing this on X79, there have been reports of newer MMTool versions and UEFITool causing high voltages when using overclocking
Only use this patch if you have applied UEFIPatch Extend MMIOH limit to fix Above 4G Decoding.
Follow the regular Sandy/Ivy Bridge guide for extracting/recompiling the DSDT. These are the changes that need to be made to the DSDT instead.
- Search for
If ((MALH || MALL)), there will most likely be two results. - Replace the contents of the If statement for each result, it should look something like the following.
Make sure that CRS1 and _Y05 is instead the identifier that was there before, for example it can be CRS2 and _Y0B instead. For the second If statement that you replace make sure to use M3 instead of M2 or you will get error Name already exists in scope
If ((MALH || MALL))
{
	CreateQWordField (CRS1, \_SB.PCI0._Y05._LEN, M2LN)  // _LEN: Length
	CreateQWordField (CRS1, \_SB.PCI0._Y05._MIN, M2MN)  // _MIN: Minimum Base Address
	CreateQWordField (CRS1, \_SB.PCI0._Y05._MAX, M2MX)  // _MAX: Maximum Base Address
	// MMIOH range 56 - 64 TB
	M2MX = 0x00003FFFFFFFFFFF
	M2MN = 0x0000380000000000
	M2LN = (M2MX - M2MN) + One
}
Common DSDT errors and fixes
Most DSDT compilation errors can be solved easily but I’ve added these common ones here.
_HID suffix must be all hex digits (GH)
Replace ABCDEFGH with ABCDEFFF in the line it says.
Invalid object type for reserved name ^ (_CRS: found Integer, Buffer required)
Replace Return (Zero) with Return (ToBuffer(Zero))
syntax error, unexpected ‘}’
Go to the line it mentions and remove the previous lines containing Arg
Non-hex letters must be upper case ^
Change letters in string of the line mentioned to uppercase
Min/Max/Length/Gran are all zero, but no resource tag
Remove the IO (Decode16 variable mentioned.
_HID prefix must be all uppercase or decimal digits
Change _HID prefix to uppercase and remove X, eg Name (_HID, "Xpnp0c14") to Name (_HID, "PNP0C14").
_UID inside processor declaration must be an integer (found a string)
You will need to use regex to fix this, find Name\s+\(_UID,\s*\"PCI\d\-CP(.*)\"\) and replace with Name \(_UID, 0x0$1\). For example in Notepad++.

Invalid object type for reserved name (_PLD: found Integer
Again this uses regex, find (Name\s*\(_PLD,\s*)Package(\s\([^\)].*\)[^\)]*) and replace with $1Package() { Buffer$2}.
Length is larger than Min/Max window
Calculate the correct Length by subtracting Minimum from Maximum and adding one, in the following example the correct Length value would be 0xFDE00000 instead of incorrect 0xFDFC0000 which is causing the error. Replace it with the correct value.
DWordMemory (ResourceProducer, PosDecode, MinFixed, MaxFixed, Cacheable, ReadWrite,
	0x00000000,         // Granularity
	0x02000000,         // Range Minimum
	0xFFDFFFFF,         // Range Maximum
	0x00000000,         // Translation Offset
	0xFDFC0000,         // Length
	,, _Y04, AddressRangeMemory, TypeStatic)
Invalid object type for reserved name ^ (_PLD: found Buffer, Package required)
See https://github.com/acpica/acpica/issues/122#issuecomment-604045199
AmiBoardInfoTool says ERROR: PE32 has .ROM but not DYNAMIC_BASE set -> Unpatchable atm..
Remove unneeded ACPI _OSI entries to reduce DSDT size. Thanks lyzzz on win-raid for figuring this out.
If DSDT still isn’t small enough you can try
- Remove all
ADBGlines - Remove device
BAT0/BAT1/BAT2 - Remove device
DOCK - Remove device
LID0 - Remove
SLICstring if you don’t use SLI
-
- 19 Июл 2014
-
- 1
-
- 0
-
- 0
-
- 30
-
-
Гусев
-
-
#1
Испробовал все что угодно,прочитал кучу материала,но так и не смог написать dsdt.может кто нибудь помочь,если не сложно.
Исходники взял с windows https://yadi.sk/d/E5CjJgSJWt5Ze
-
-
#2
На tonymacx86 есть дсдтхи для всех поддерживаемых матплат
-
-
#3
ДСДТ необходимо снимать с целевого копма и его править-фиксить. Это самый правильный способ.
-
-
#4
У тебя не всё так плачевно.
Прилагаю ДСДТ без ошибок и варнингов, на Control Method should be made Serialized не обращай внимания. Это не нужно трогать. Теперь он компилится. Дальше нужно добавлять правки и фиксы. опираясь на своё железо.
Вложения
-
1 2014-07-22 at 17.38.04.jpg
190,8 KB
· Просмотры: 5
-
dsdt.dsl.zip
dsdt.dsl.zip
27,9 KB
· Просмотры: 0
-
1 2014-07-22 at 17.46.33.jpg
220,1 KB
· Просмотры: 4
Последнее редактирование:
ar-T
Active Member
-
- 22 Авг 2013
-
- 162
-
- 52
-
- 28
-
-
USSR
-
-
#6
Как для новичка, то сойдёт.
А вообще всё это лучше сделать руками. Понимание приходит во время процесса.
Для редактирования ДСДТ (отладка и комппиляция) я рекомендую MACiasl. Free программа, на сурс форже лежит.
-
-
#7
Отпишись о результате?. Работает дсдт?
hello oldnapalm,
i’m having problem with DSDTEditor. I have sony vaio vpceb36fg laptop & i’m trying to install snow leopard 10.6.3 Retail DVD on it but i’m getting errors. I tried with iboot,iboot legacy, Empire_EFI, LegacyEmpire_EFI, Darwin Boot tools, & at last not least chameleon manually on the disk.
I Tried it with my internal dvd rom AD-7700h & now my DVD writer is not working & now i restore the dvd’s iso( made earliar )on a pendrive with my vmware8 machine &still i got errors.Then i read abt DSDT & I came here to this form via tonycraposx86.com .
I got a working DSDT of vpceb34en from http://www.osx86.net. it nearly match my system spec like cpu ,chipset, dvd,gpu ati, and screen 15.5 but i have a full HD Display, & ram,hdd & gpu are different.I tried with it but no luck.
Now i found a patch of vpcea16fg.i didn’t find find patch for my bios DSDT which i exracted with DSDT editor. so the spec of the vpcea16fg are closely matches to my system even os except the cpu i have i& the display. i tried this patch on my DSDT & go to the installation process still there was no luck. then i tried this vpcea16fg patch to the working DSDT of vpceb34en & still no luck with this time also.
I tried the two editors DSDTSE & the DSDTeditior & patch the DSDT.dsl i’m getting error like «error object not found » with no name of the error. i’m attaching the extraced with all the dwnd files plz help……
the errors im getting with the DSDT are:-
ATI VGA Controller [1002:68c1] : : PCI Root(0*0)/Pci(0*1,0*0)/Pci(0*0,0*0)
old Pci Command — 7
boot display -0
dumpingPci config space. 256 bytes
wrong BIOS signature : 0000
not going to use bios image file
found bios image
adding binimage to card 68c1 from legacy space with size ee00
Lan controller [11ab:4381] : : PciRoot(0*0)/Pci(0*1C,0*2)/Pci(0*0,0*0)
setting up lan keys
loaded HFS+ file :[Extra/smbios.Plist] 468bytes from 4253970.
Patche DMI Table.
Loaded HFS+ : [Extra/DSDT.aml] 43071 bytes from 4253790.
Patched ACPI Version 2DSDT
Starting Darwin iso.
all that..
& with iBOOT legacy the errors are:-
Using PciRoot-UID Value : 0
frame buffer @0*e0000000 MMIO @0*f0020000 I/O port @0*0000D000 ROM Addr @0*f000000
Ati card Posted,reading VBIOS from legacy space
memmory allocation error ! Addr=0*deadbeef, size=0*0, file=ati.c, Line=739
This is a non recoverable error ! System Halted ! ! !
that’all
One Thing My bios is aptio setup utility 1.28.1119 copyright AMERICAN MEGATRENDS Inc.
i can access only my date , time, virtualization ,c3/c6, security & boot devices from my bios. I read abt that this bios is efi enabled then why can’t i boot direct from the dvd or usb disk. i have spalshtop browser in my laptop which starts without os start or preboot without os. Is there any supervisor mode in the bios which stops me to access.How can i access full functions of this BIOS??
MY Hardware specs are:
Product : sony vaio vpceb36fg
Bios : sony bios ( aptio setup utility 1.28.1119 copyright AMERICAN MEGATRENDS Inc.)
cpu : intel core i3-370M processor 2.40 GHz
chipst : HM55
Ram : 4 GB DDR3
GPU : 1 GB DDR3 ATI Radeon HD 5650
DVD : sony optiarc ad-7700h
HDD : 500 GB Toshiba MK5065GSX
Display : Full HD (1920*1080)
wireless : Atheros AR9285 Wireless Network Adapter
lan : Marvell Yukon 88E8059 PCI-E Gigabit Ethernet Controller
sound : ATI HDMI Audio & Realtek High Definition Audio
i’ m attching the files with system information via cpu-z
Thank’s in advance.
sony vaio vpceb36fg.zip
So to start, we’ll need to get a copy of your DSDT from your firmware. The easiest way is grabbing the DSDT.aml SSDTTime dumped for us earlier but here are some other options:
# From Windows
-
SSDTTime (opens new window)
- Supports both Windows and Linux for DSDT dumping
8. Dump DSDT - Automatically dump the system DSDT
-
acpidump.exe (opens new window)
- In command prompt run
path/to/acpidump.exe -b -n DSDT -z, this will dump your DSDT as a .dat file. Rename this to DSDT.aml
- In command prompt run
-
Do note that all ACPI patches from clover/OpenCore will be applied to the DSDT with the above 2 methods
# From Linux
- SSDTTime (opens new window)
- Supports both Windows and Linux for DSDT dumping
4. Dump DSDT - Automatically dump the system DSDT
- Do note that all ACPI patches from clover/OpenCore will be applied to the DSDT with the above method
# From Clover
For those with Clover installed previously, this is a simple way to get your ACPI tables:
- F4 in Clover Boot menu
- DSDT can be found in
EFI/CLOVER/ACPI/origin, the folder must exist before dumping
- DSDT can be found in
# From OpenCore
With OpenCore, we have 2 options:
- SysReport Quirk
- UEFI Shell
# SysReport Quirk
With OpenCore 0.5.9, we have a new quirk called SysReport which will actually dump your DSDT automatically when hitting the boot screen. The main issues are:
- You already need a bootable OpenCore USB to get this dump
- This also requires a DEBUG version of 0.5.9
For the latter, you just need to replace the following files with DEBUG version (opens new window):
- EFI/BOOT/
BOOTx64.efi
- EFI/OC/Bootstrap/
Bootstrap.efi
- EFI/OC/Drivers/
OpenRuntime.efi
- EFI/OC/
OpenCore.efi
For the former, you can actually skip the ACPI section, return to the OpenCore guide (opens new window) and finish making the USB. Once booted to the picker, you can shut off the PC and check your USB:
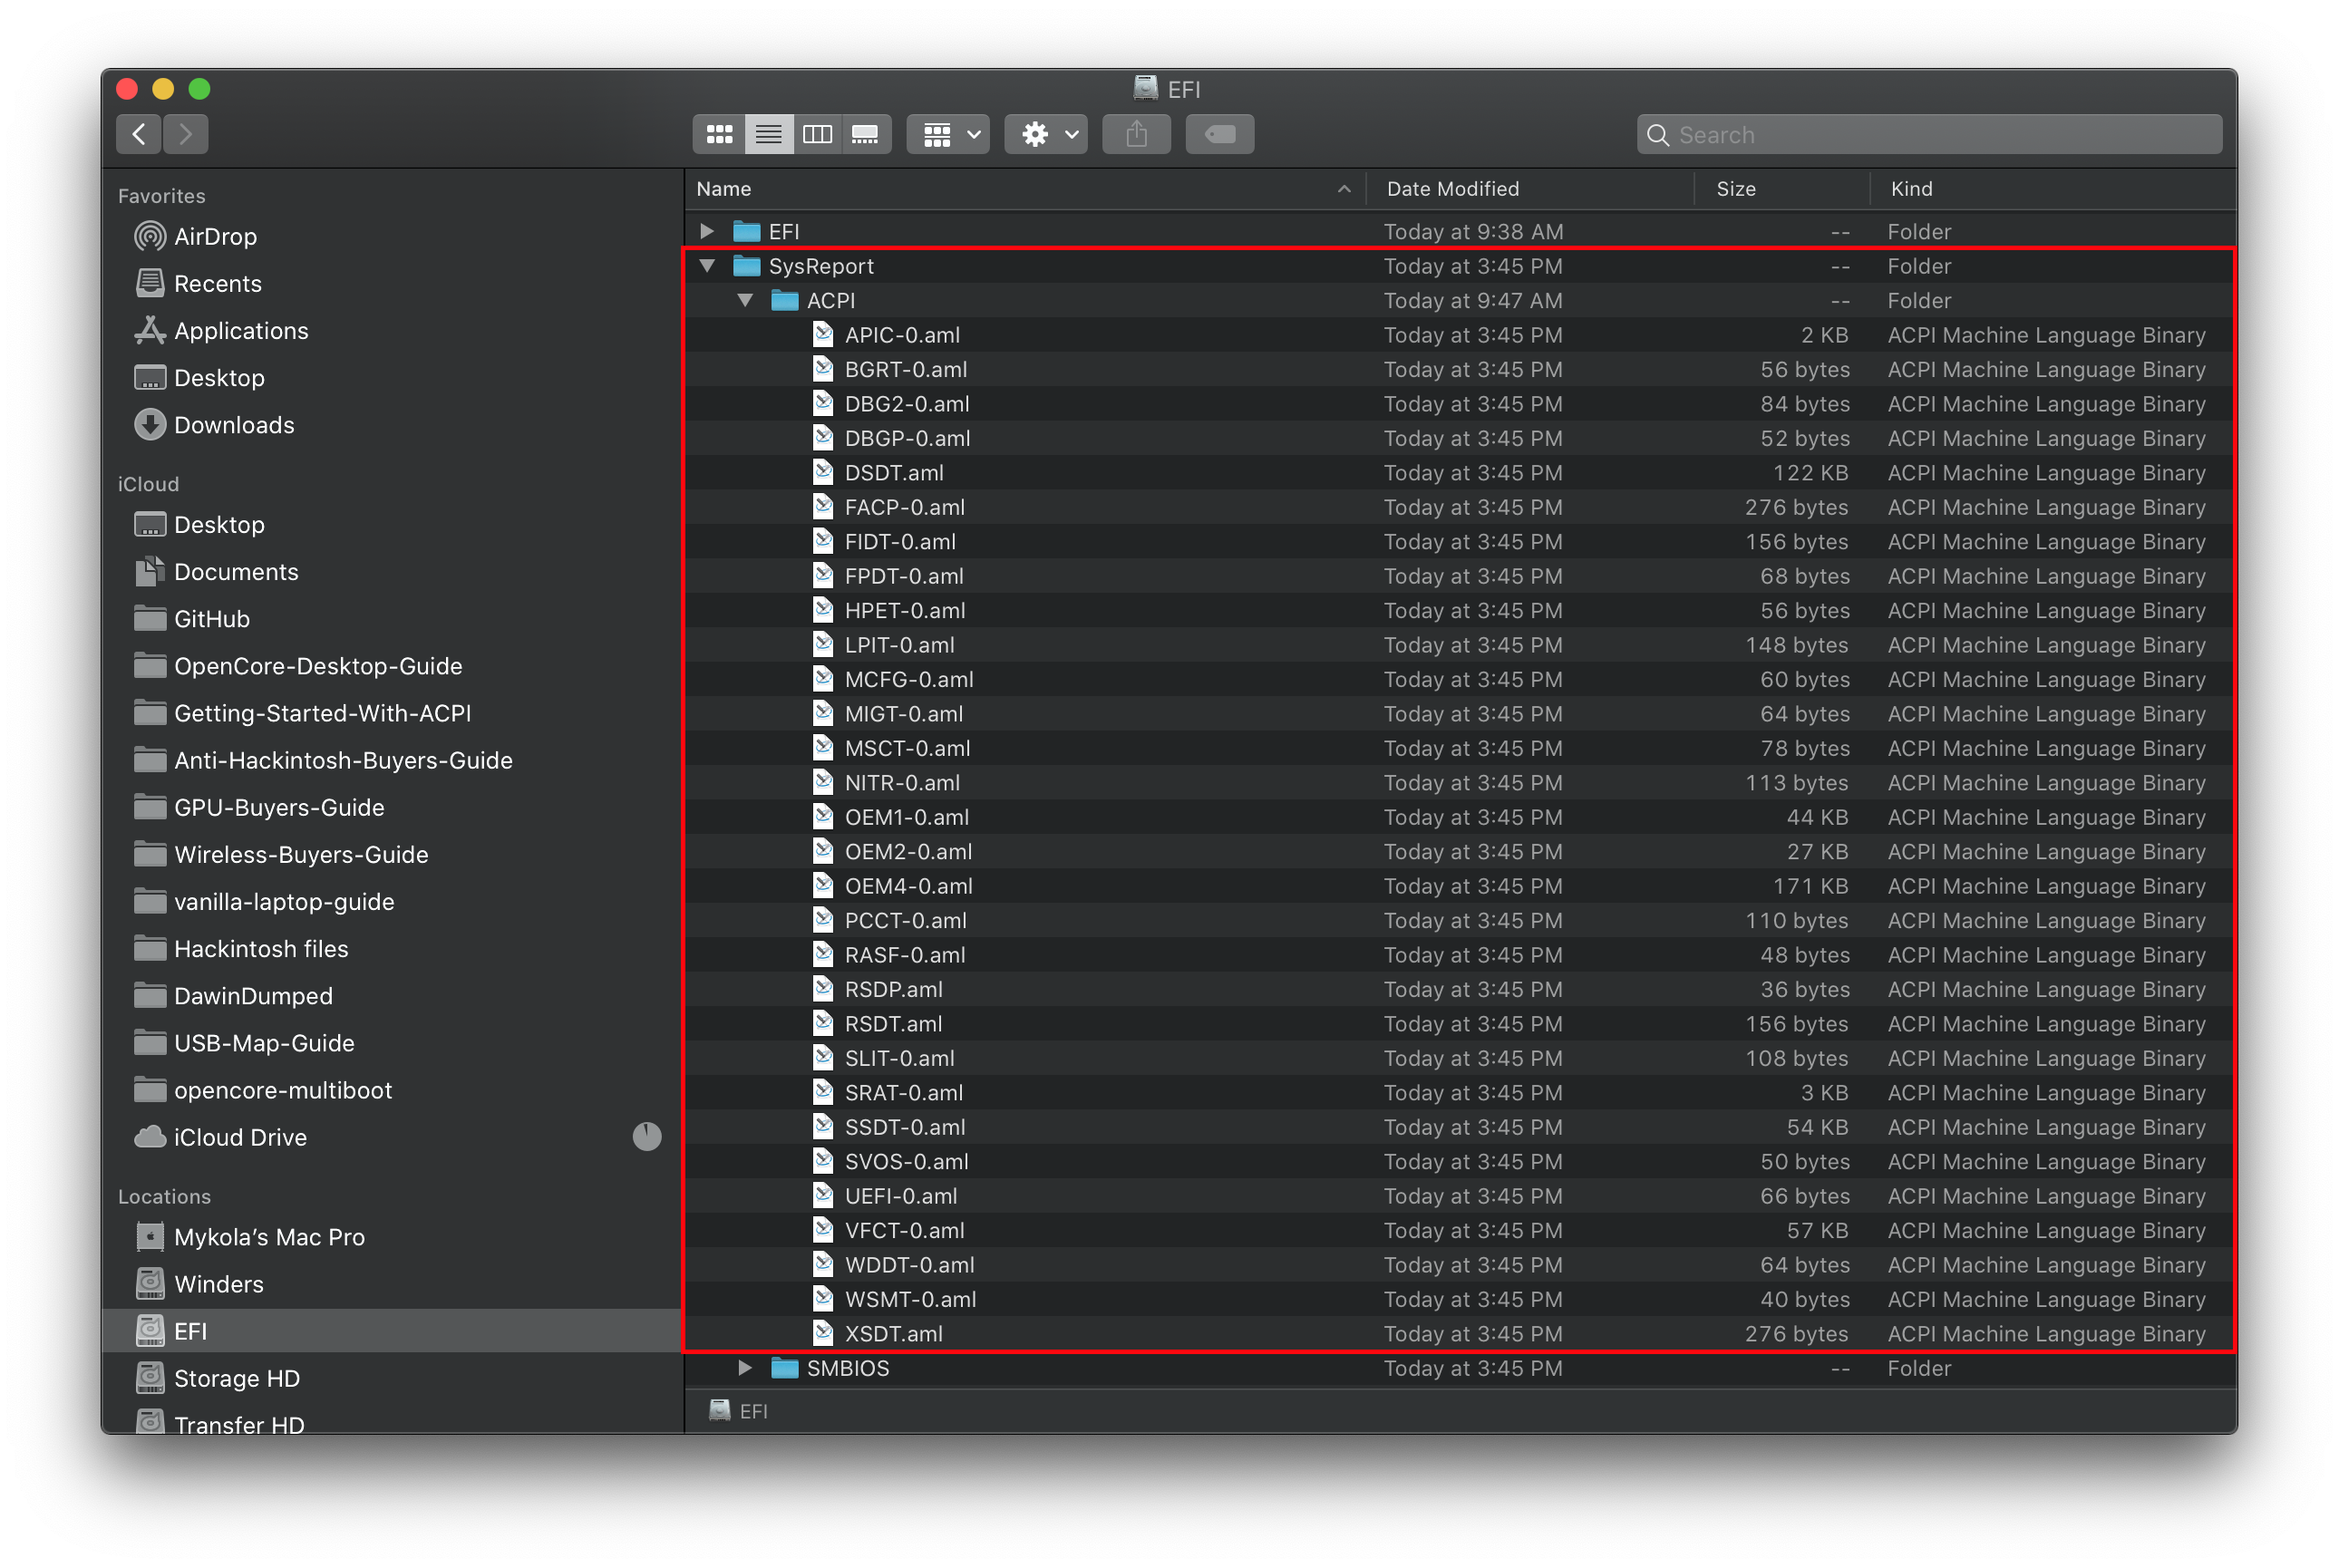
And voila! You have a DSDT! Now you can continue on with making SSDTs
# UEFI Shell
For this, we’ll want to grab acpidump.efi (opens new window) and add this to EFI/OC/Tools and in your config under Misc -> Tools with the argument: -b -n DSDT -z and select this option in OpenCore’s picker.
If OpenCore is having issues running acpidump.efi from the boot picker, you can call it from the shell with OpenShell (opens new window)(reminder to add to both EFI/OC/Tools and in your config under Misc -> Tools ):
Once done, you should find your DSDT in the EFI/OC/Tools folder with a .dat extension. Rename this DSDT.dat file to DSDT.aml to help us down the line
Last Updated: 8/11/2024, 2:46:04 AM