
Overview of How to Boot From USB on Windows 11:
| ⚙️Complex Level | Low, Beginners |
| ⏱️Duration | 5-10 minutes |
| 💻Applies to | Boot from USB on Windows 11/10/8/8.1/7 |
| ✏️Stages |
Stage 1. Format USB as FAT32 Stage 2. Create Bootable USB Stage 3. Boot From USB on Windows 11 |
| 🔨Tools | USB, Windows PC, EaseUS Partition Master |
Before we go to the tutorial, you need to prepare a reliable USB and a formatting tool — EaseUS Partition Master. This tool stands out during our tests. The reason why we recommend it is that it has a clear interface and is easy to use, making it friendly to beginners.
- ✅Prepare a USB — Buy a certificated USB with enough capacity.
- ✅Download the reliable format tool — EaseUS Partition Master by clicking the blue button in advance. (This tool allows you to format a USB larger than 32 GB to FAT32, while Windows built-in tools don’t.)
Now, let’s start learning how to boot from a USB on Windows 11. In this article, we divide the whole process into three stages. First, make your USB well-prepared for the bootable USB.
1️⃣Stage 1. Format USB as FAT32
Creating a bootable USB drive has specific file system format requirements; the USB flash drive must be set to FAT32 format first. However, Disk Management and CMD can’t format a USB larger than 32 GB to FAT32. You need to turn to a third-party format tool. Our tests verify that EaseUS Partition Master Free is a stable formatting utility. It can format 64/128/256 GB USB to FAT32. Download this tool and follow the guide below to try it.
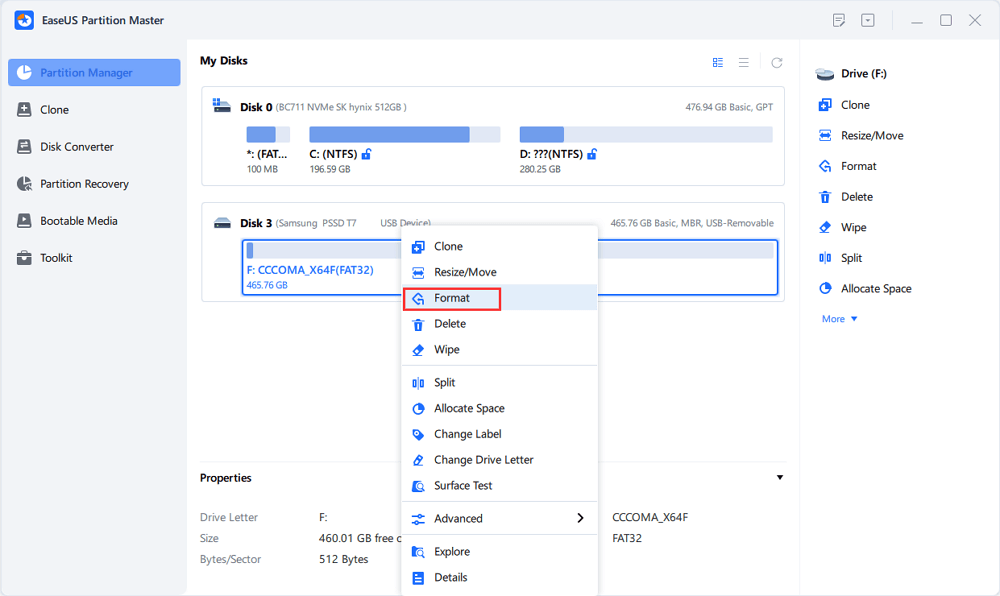
Step 1. Launch EaseUS Partition Master, right-click the partition on your external hard drive/USB/SD card which you want to format and choose the «Format» option.
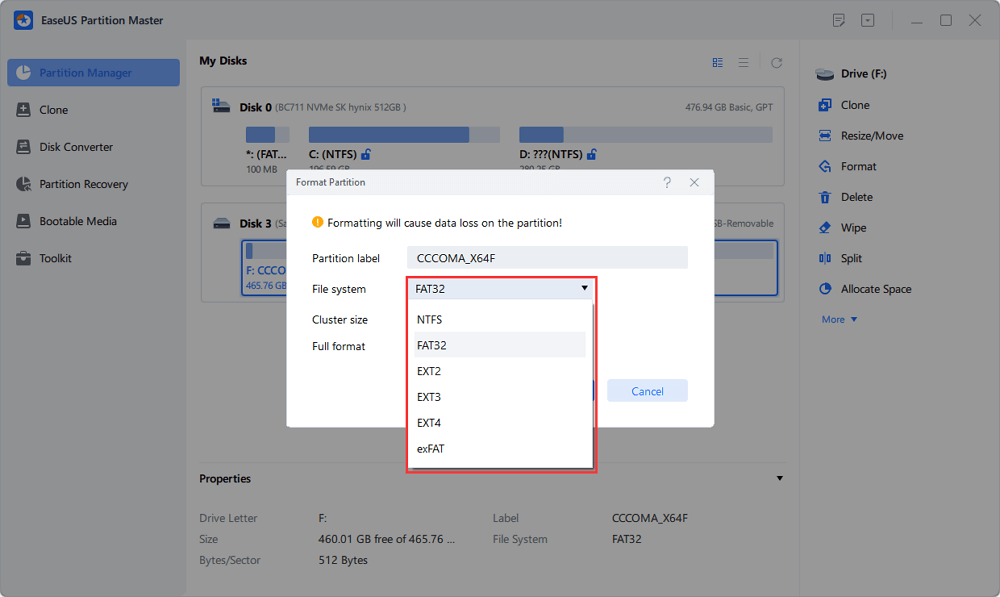
Step 2. Assign a new partition label, file system (NTFS/FAT32/EXT2/EXT3/EXT4/exFAT), and cluster size to the selected partition, then click «OK».
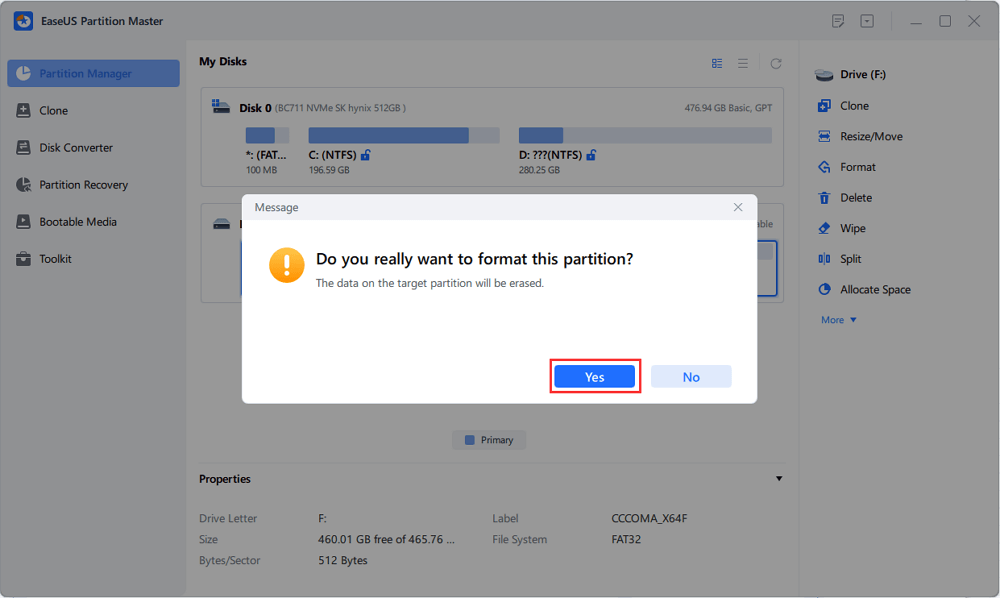
Step 3. In the Warning window, click «Yes» to continue.
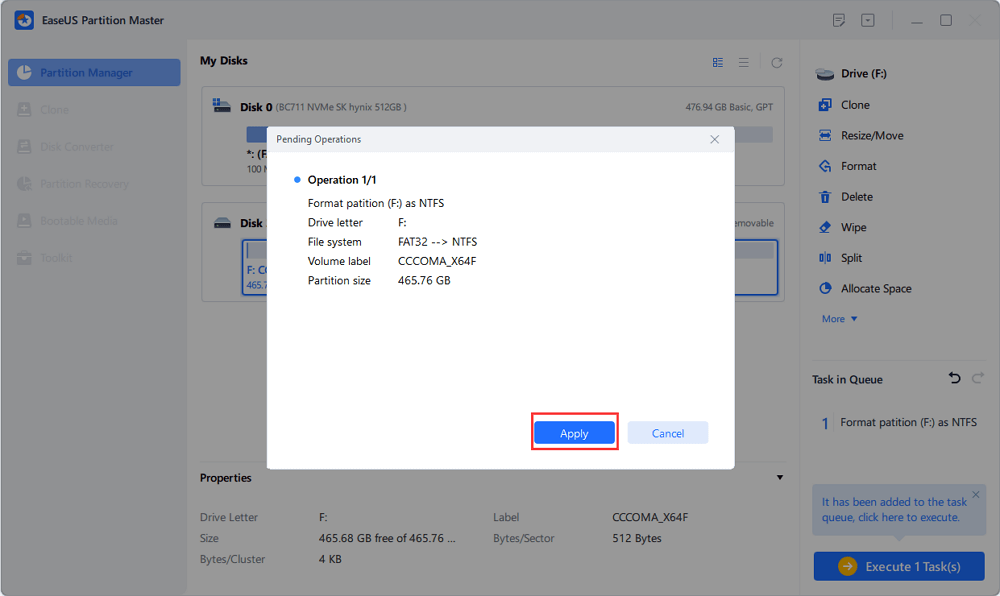
Step 4. Click the «Execute 1 Task(s)» button in the top-left corner to review the changes, then click «Apply» to start formatting your external hard drive/USB/SD card.
FAT32 is the best USB format to boot Windows 11; now, let’s go to Stage 2 and learn how to create a bootable USB.
2️⃣Stage 2. Create a Bootable USB
Creating a bootable USB can be complicated if you are not a pro; we need to choose trustworthy third-party software. To create a bootable USB, you can turn to EaseUS OS2GO. The following link can help you learn how to use it to create a bootable USB.
🔎Read this article to get more information: How to Create a Bootable USB on Windows 10
3️⃣Stage 3. How to Boot From USB on Windows 11 — 2 Cases
When you need to boot from USB on Windows 11, you may encounter two main situations. One situation is that your computer is working fine, and you can access the startup disk settings from the Windows Settings app portal. The other is when your computer goes wrong and crashes and doesn’t work properly, at which point you need to access the boot menu and boot your computer from USB in the BIOS. Now, let’s learn about each method.
Case 1. PC Can Start Properly — From Settings
Windows Settings can help you start from a USB; follow the given tutorial below to boot Windows 11 from USB while your computer still runs smoothly.
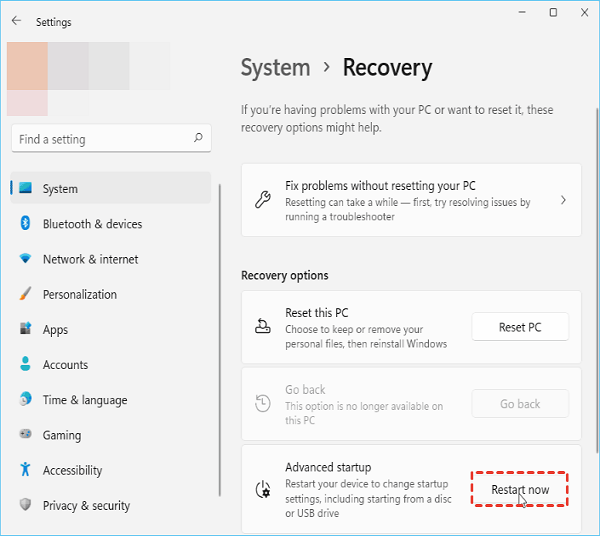
Step 1. Insert the bootable USB drive into your Windows 11 computer. Press Windows + I to open Settings, and select the «System» > «Recovery» option.
Step 2. Click the Restart Now button to the right of Advanced Startup. In the popup window, Windows 11 will let you know that it’s going to restart your device and that you’d better save your work until then.
Step 3. Afterward, your PC will restart and load into the recovery environment. Under the Choose an option window, select the Use a device option.
Step 4. Your PC will list the bootable devices your computer can use, including the USB drive you connected to your PC earlier. Click and select it.
Finally, your computer can reboot and boot from the USB drive you set up.
Case 2. PC Fails to Start — From Boot Menu
When your computer doesn’t boot, you need to access BIOS to boot Windows 11 from USB. Attach the USB flash drive to the PC where you want to clean install Windows 11. Then, restart your PC while pressing the Shift key to boot into the Windows Recovery Environment (WinRE). Select to boot from the USB drive in the Windows Recovery Environment.
Here’s the step by step guide:
Step 1. Connect the bootable USB drive to the correct USB port. Then, press the Power button to boot your laptop/PC. When it starts loading, keep tapping the appropriate Boot Menu key, such as ESC, F2, F8, or F10 (The key can vary depending on the motherboard’s manufacturer and model) to enter the BIOS setup.
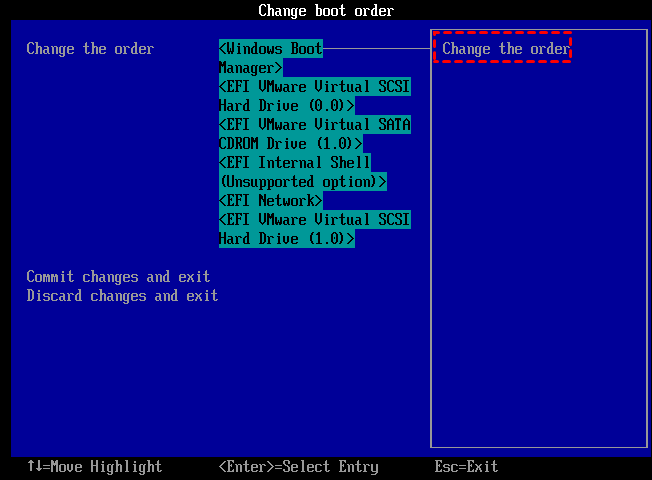
Step 2. In the boot menu, look for the Boot order option and move the bootable USB drive that you want to boot from to the top of the list.
Step 3. When you confirm your changes/settings, press the F10 key to save and exit. Upon exiting, your PC will automatically boot from the USB flash drive.
Conclusion
If you want to start Windows 11/10 from a USB flash drive but don’t know how to do it, then you can refer to the method in this tutorial to solve this problem easily. First, prepare a qualified USB flash drive and format it into FAT32; create a bootable USB; finally, change the boot order and set the bootable USB as the boot drive. Then, you can boot Windows 11 from the USB. It’s worth mentioning that you’ll need to access the BIOS to boot from USB if the computer isn’t working properly.
Click these buttons and share this detailed tutorial to help others in need.
How to Boot From USB on Windows 11 FAQs
There are many situations where you may wish to use a USB to boot Windows 11 on your computer, perhaps to boot a new Windows system, for troubleshooting, or to enjoy the same configuration on multiple PCs. Here are some more related questions and answers. Read on.
1. Why is Windows 11 not booting from USB?
Not all USB drives can be considered bootable USB devices. Regular USB drives are not bootable by default. So the reasons why Windows 11 cannot boot from USB are as follows:
- USB drive is not a bootable device
- Bootable USB drive not showing up in BIOS
- USB drive is too old
- USB drive is damaged by mistake
- USB drive format does not support
- Wrong boot order
2. How to boot Windows 11 from USB in BIOS?
Attach the USB flash drive to the PC on which you want to clean install Windows 11. Then, restart the PC while holding the Shift key to boot into the Windows Recovery Environment (WinRE). Choose to boot from the USB drive once in the Windows Recovery Environment.
3. When do we need to boot from a USB on Windows 11?
The reasons for booting the system from USB are as follows:
- Boot the new Windows system. Boot the new system on a USB stick to prevent it from affecting the version you are running.
- To troubleshoot. The second reason is that your computer operating system does not start properly, shows a blue screen on Windows 11, or keeps crashing due to viruses, malware, etc. At this point, you need a bootable USB disk to boot your computer properly.
- Booting the new computer from the USB boot disk with the old system will allow you to enjoy the same computer configuration.
Download Windows Speedup Tool to fix errors and make PC run faster
By default, your Windows 11 or Windows 10 PC is set to boot from the first connected internal hard drive. If you want to boot from a USB drive or an external drive, you need to change the boot order. In this post, we will walk you through the steps on how to boot from USB Drive within Windows 11/10.

Normally, if you are unable to boot into Windows and cannot access your files, you can create a bootable drive and use the media to boot and repair your OS installation.
Perhaps, not widely known by PC users, there is an option to boot from a USB drive within a running Windows OS installation. If Fast Boot is enabled in UEFI/BIOS, you may not be able to boot from a USB flash drive unless you boot from the USB within Windows; otherwise, you will have to temporarily disable Fast Boot or Ultra Fast Boot to be able to boot from a USB drive.
To Boot from USB Drive within Windows 11/10, do the following:
- Plug in a bootable USB drive to a USB port on your PC.
- Boot to Advanced Startup Options via Settings app.
- After the computer restarts, click/tap on the Use a device option.
- On the next screen, click/tap on the USB drive that you want to boot from.
The computer will now restart and boot from the selected USB drive.
That’s it!
Can Windows boot from a USB-connected drive?
If you have a bootable USB drive, you can boot your Windows 10 computer from the USB drive. The easiest way to boot from USB is to open the Advanced Startup Options by pressing and holding the Shift key when you choose the Restart option in the Start menu.
How do I get USB to show in boot menu?
You can enable the Quiet Boot option in the Main Menu. Under the Advanced menu, ensure that the Legacy USB Support option is enabled. Do the following:
- Restart the system into the BIOS.
- Ensure the Boot Mode is set to EFI (or UEFI). This is found in the Boot Options menu.
- Make sure that the USB Boot Priority is enabled.
- Save the changes and exit.
How do I boot my PC from a USB drive?
To boot from USB drive on Windows 11/10, follow these steps:
- Press the Power button for your computer.
- During the initial startup screen, press ESC, F1, F2, F8 or F10.
- When you choose to enter BIOS Setup, the setup utility page will appear.
- Using the arrow keys on your keyboard, select the BOOT tab.
- Move USB to be first in the boot sequence.
Is bootable USB safe?
The short answer: Yes. It is safe to run an operating system from a USB flash drive. But keep in mind that if you do decide to install Windows to a USB drive, a Flash Drive(UFD) drive, ESATA drive or store Windows Native Boot VHD on USB/UFD drive, Microsoft will not support this scenario.
Anand Khanse is the Admin of TheWindowsClub.com, a 10-year Microsoft MVP (2006-16) & a Windows Insider MVP (2016-2022). Please read the entire post & the comments first, create a System Restore Point before making any changes to your system & be careful about any 3rd-party offers while installing freeware.
Reader Interactions
При установке Windows с флешки возникает необходимость выставить загрузку с USB накопителя, для чего требуется настроить BIOS таким образом, чтобы компьютер загружался с нужного носителя. В этой статье речь пойдет, о том как поставить загрузку с флешки в БИОС или UEFI на компьютере или ноутбуке.
В статье приведены примеры для различных вариантов интерфейса БИОС/UEFI и даны решения для наиболее часто встречающихся проблем, с которыми можно столкнуться при изменении порядка загрузки. В конце также описано, что делать, если вы не можете зайти в БИОС или ПО UEFI на современных ПК и ноутбуках.
- Использование Boot Menu
- Вход в БИОС
- Изменение порядка загрузки в БИОС и UEFI для загрузки с USB
- Загрузка с флешки в старых версиях БИОС
- Загрузка с USB без входа в БИОС
- Что делать, если не получается открыть БИОС или Boot Menu
- Видео инструкция
Использование Boot Menu для загрузки с флешки
В большинстве случаев, поставить загрузку с флешки в БИОС требуется для какой-то однократной задачи: установки Windows, проверки компьютера на вирусы или восстановления системы с помощью LiveCD, сброса пароля Windows. Во всех этих случаях не обязательно изменять настройки БИОС или UEFI, достаточно вызвать Boot Menu (меню загрузки) при включении компьютера и один раз выбрать флешку как устройство загрузки.
Например, при установке Windows, вы нажимаете нужную клавишу для открытия Boot Menu, выбираете подключенный USB накопитель с дистрибутивом системы, начинаете установку — настройка, копирование файлов и прочее и, после того, как произойдет первая перезагрузка, компьютер сам загрузится, но уже с жесткого диска и продолжит процесс установки в штатном режиме.
Очень подробно о входе в данное меню на ноутбуках и компьютерах различных марок я написал в статье Как зайти в Boot Menu (там же есть видео инструкция). Обратите внимание, что флешка в Boot Menu может и не отображаться. Почему это происходит подробно в статье Что делать, если БИОС/UEFI не видит загрузочную флешку в Boot Menu.
Как попасть в BIOS для выбора вариантов загрузки
В разных случаях для того, чтобы попасть в утилиту настройки БИОС нужно выполнить, по сути, одно и то же действия: сразу после включения компьютера, при появлении первого черного экрана с информацией об установленной памяти или же логотипом производителя компьютера или материнской платы, нажать нужную кнопку на клавиатуре — наиболее распространенные варианты — это Delete и F2. Если при завершении работы уже установленной системы и включении компьютера вы не успеваете открыть БИОС, используйте не «завершение работы», а пункт «Перезагрузка» и сразу при потемнении экрана начните многократно нажимать по нужной клавише.

Обычно, эта информация имеется внизу или, в старых БИОС — вверху среди текста начального экрана: «Press Del to enter Setup», «Press F2 for Settings» и аналогичная.

По нажатию нужной кнопки в нужный момент (чем раньше, тем лучше — это нужно сделать до начала загрузки операционной системы) Вы попадете в меню настроек — BIOS Setup Utility (название может быть другим, но суть одна — это интерфейс настроек БИОС/UEFI). Внешний вид этого меню может отличаться, рассмотрим несколько наиболее распространенных вариантов.
Изменение порядка загрузки в UEFI BIOS для загрузки с USB
На современных материнских платах интерфейс БИОС, а если точнее — ПО UEFI как правило, чаще является графическим на ПК, но текстовым на ноутбуках. Во всех случаях разобраться с тем, как именно поставить загрузку с флешки обычно бывает не сложно. Далее будут приведены некоторые примеры и по аналогии, вероятнее всего, вы сможете успешно изменить порядок загрузки и на вашей системе.
Как правило, для того, чтобы поставить загрузку с флешки, нам требуется выполнить следующие шаги (описываю применительно к изображению выше, что является одним из наиболее распространенных вариантов, а далее приведу и другие реализации изменения порядка загрузки):
- Перейти в раздел Boot в БИОС/UEFI. Это можно сделать либо с помощью стрелок на клавиатуре (вправо), либо в некоторых случаях — с помощью мыши. Иногда параметры загрузки можно настроить прямо на главном экране БИОС.
- В зависимости от конкретного БИОС вы увидите либо список устройств загрузки (дисков, подключенных к компьютеру), либо несколько пунктов Boot Option с номерами.
- В первом случае требуется поместить вашу флешку на первое место: для этого выбираем её и с помощью клавиши F5 двигаем вверх (Fn+F5 на некоторых ноутбуках). Во втором случае выбираем Boot Option 1, нажимаем Enter и выбираем в списке загрузочную флешку.
- Сохраняем настройки: это можно сделать на вкладке Exit, либо, чаще всего — нажатием по клавише F10 с подтверждением Save Settings and Exit Setup.
Самая распространенная проблема при указании устройства загрузки в современных БИОС/UEFI — отсутствие загрузочной флешки в списке устройств загрузки. Чаще всего такое происходит, если тип загрузки, установленный в БИОС (на скриншоте выше — UEFI в разделе OS Type) и тип загрузки, поддерживаемый флешкой, не совпадают. Например, если для приведенного выше изображения использовать флешку под режим Legacy, выбрать её в качестве первого устройства загрузки не получилось бы. Подробнее о проблеме и методах её исправления в упоминавшейся ранее статье о том, почему БИОС не видит загрузочную флешку.
Выше был приведён пример одного из наиболее типичных вариантов БИОС (UEFI) на сегодня, но возможны и другие реализации.
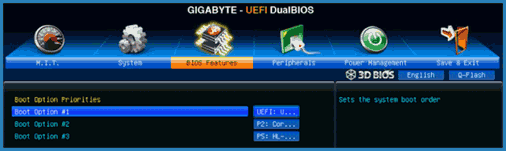
- Например, на некоторых материнских платах Gigabyte вы увидите список подключенных устройств в пункте Boot Sequence на первом экране и достаточно будет перетащить вашу флешку на первое место мышью.
- Другой вариант реализации, тоже на Gigabyte: вкладка Boot отсутствует, необходимо зайти в BIOS Features, а затем перейти в Boot Option Priorities.

- Интересен подход на фирменных материнских платах Intel: здесь порядок загрузки можно настроить прямо на главном экране, отдельно для режима Legacy и режима UEFI (с помощью мыши), а в Adavnced Options получить более подробное представление о доступных устройствах загрузки для каждого из режимов.

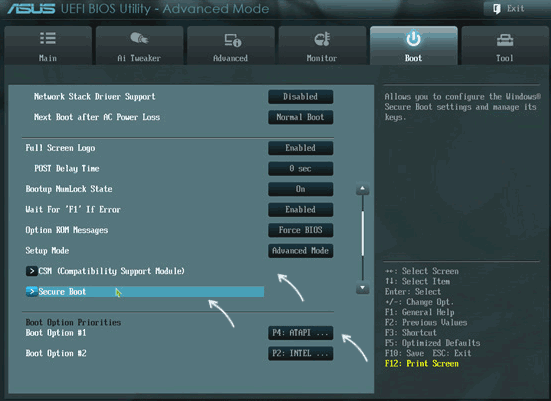
- Далее — относительно простой пример установки USB флешки в качестве первого устройства загрузки на Asus. Обратите внимание, что здесь для того, чтобы включить поддержку Legacy загрузки требуется задействовать опцию CSM (Compatibility Support Mode) на той же вкладке Boot.

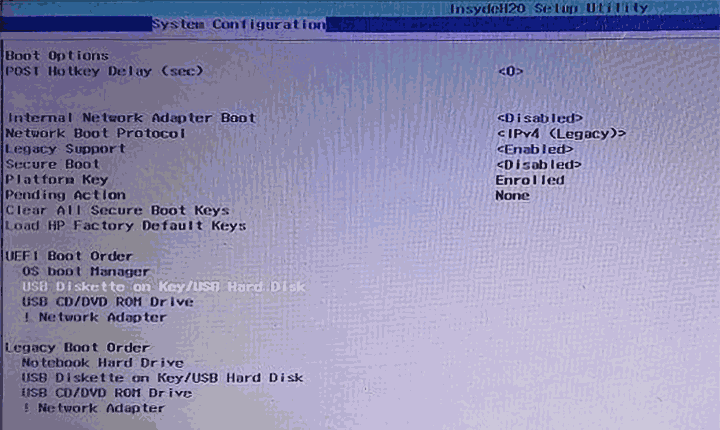
- Ниже — пример того, как сделать загрузку с флешки на ноутбуке HP. Здесь в БИОС необходимо зайти в System Configuration, а уже там в Boot Options, где можно найти (для некоторых моделей) отдельный список устройств загрузки для UEFI и Legacy режима. Флешку устанавливаем на первое место с помощью клавиш F5/F6 для нужного режима загрузки.


Если ничего похожего у себя в БИОС вы не находите, внимательно изучите различные разделы БИОС/UEFI, такие как BIOS Features, System Configuration, Advanced Configuration и попробуйте найти что-то связанное с Boot в этих разделах.
Настройка загрузки с флешки в старых версиях БИОС
На старых материнских платах и ноутбуках бывают некоторые особенности изменения порядка загрузки, особенно когда пользователю требуется настроить загрузку с USB накопителя. Рассмотрим несколько примеров.
AMI BIOS
Не только в AMI BIOS, но и в некоторых других вариантах БИОС тех же лет вы можете не обнаружить флешки для выбора в качестве устройства загрузки, а имеющиеся пункты, наподобие USB-HDD могут не работать. Решение для такой ситуации имеется.
Учтите, что для того, чтобы проделать все описываемые действия, флешка должна быть подключена к компьютеру заранее, до входа в БИОС. Для того, чтобы установить загрузку с флешки в AMI BIOS:
- В меню сверху, нажимая клавишу «вправо», выберите пункт «Boot» (Загрузка), но не переходим в Boot Device Priority.

- После этого выбираем пункт «Hard Disk Drives» (Жесткие диски) и в появившемся меню, нажимаем Enter на «1st Drive» (Первый диск). Если такого пункта нет, посмотрите, имеется ли раздел Integrated Peripherals в БИОС — иногда порядок жестких дисков (отдельно от порядка загрузки) можно настроить там.
- В списке выбираем название флешки, она будет видна именно в списке жестких дисков — на второй картинке, например, это — Kingmax USB 2.0 Flash Disk. Нажимаем Enter, затем — Esc.

- Далее выберите «Boot device priority» (Приоритет загрузочных устройств).
- Выберите пункт «First boot device» (Перовое устройство загрузки), нажмите Enter.
- Укажите флешку в качестве первого устройства загрузки, она будет присутствовать здесь как обычный жесткий диск.


По завершении нажимаем Esc, в меню сверху с пункта Boot (Загрузка) передвигаемся до пункта Exit (Выход) и выбираем «Save changes and exit» (Сохранить изменения и выйти) или «Exit saving changes» — на запрос о том, уверены ли Вы в том, что хотите сохранить сделанные изменения, нужно будет выбрать Yes или набрать с клавиатуры «Y», затем нажать Enter. После этого компьютер перезагрузится и начнет использовать для загрузки выбранную вами флешку, диск или другое устройство.
Загрузка с флешки в БИОС AWARD или Phoenix

Для того, чтобы выбрать устройство для загрузки в Award BIOS, в главном меню настроек выберите «Advanced BIOS Features» (расширенные настройки биос), после чего с выбранным пунктом First Boot Device (Первое устройство загрузки) нажимаем Enter.

Появится список устройств, с которых можно произвести загрузку — HDD-0, HDD-1 и т.д., CD-ROM, USB-HDD и другие. Для загрузки с флешки необходимо установить USB-HDD или USB-Flash. Для загрузки с компакт диска DVD или CD — CD-ROM. После этого выходим на один уровень вверх, нажатием Esc, и выбираем пункт меню «Save & Exit Setup» (Сохранить и выйти). Если способ с USB-HDD не сработал, попробуйте использовать подход, показанный в предыдущем способе, но ищите порядок жестких дисков в разделе Integrated Peripherals.
Настройка загрузки с внешнего носителя в старых версиях H2O BIOS

Для загрузки с флешки в InsydeH20 BIOS, который встречается на многих ноутбуках, в главном меню с помощью клавиши «вправо» необходимо дойти до пункта «Boot» (Загрузка). Установить пункт External Device Boot (Загрузка с внешнего устройства) в положение Enabled (Включено). Ниже, в разделе Boot Priority (Приоритет загрузки), с помощью клавиш F5 и F6 установить External Device на первую позицию. Если необходимо осуществить загрузку с DVD или CD, выбираем Internal Optic Disc Drive (Внутренний оптический накопитель).
После этого перейдите к пункту Exit в меню сверху и выберите «Save and Exit Setup» (Сохранить настройки и выйти). Компьютер перезагрузится с нужного носителя.
Загрузка с USB без входа в БИОС (только для Windows 11, 10 и Windows 8.1 с UEFI)
Если на вашем компьютере установлена одна из последних версий Windows, а материнская плата с ПО UEFI, то вы можете выполнить загрузку с флешки даже не входя в параметры BIOS. Способ работает не на любой системе (рассматриваемый далее пункт может отсутствовать даже на UEFI системах), а загрузочный накопитель должен быть подключен на момент выполнения действий.
Для того, чтобы выполнить перезагрузку этим методом, удерживая Shift нажмите по пункту «Перезагрузка» в меню выключения в меню Пуск либо на экране блокировки. Второй метод: зайдите в параметры — изменение параметров компьютера (через панель справа в Windows 8 и 8.1), затем откройте «Обновление и восстановление» — «Восстановление» и нажмите кнопку «Перезагрузить» в пункте «Особые варианты загрузки».
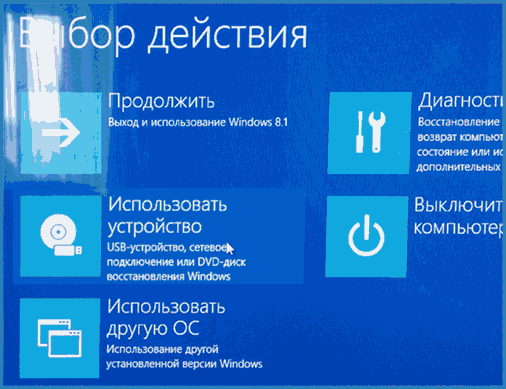
На появившемся экране «Выбор действия» выберите «Использовать устройство. USB-устройство, сетевое подключение или DVD-диск».
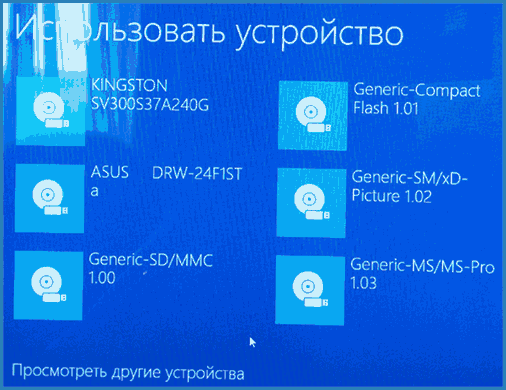
На следующем экране вы увидите список устройств, с которых можно загрузиться, среди которых должна быть и ваша флешка. Если вдруг ее нет — нажмите «Просмотреть другие устройства». После выбора, компьютер перезагрузится с указанного вами USB накопителя.
Что делать, если не получается зайти в БИОС, чтобы поставить загрузку с флешки
В связи с тем, что современные операционные системы используют технологии быстрой загрузки, может оказаться, что у вас попросту не получается зайти в БИОС, чтобы каким-то образом изменить настройки и загрузиться с нужного устройства. В этом случае я могу предложить два решения.
Первое — зайти в ПО UEFI (БИОС) с помощью особых вариантов загрузки Windows 10 (см. Как зайти в БИОС или UEFI Windows 10) или Windows 8 и 8.1. Как это сделать я подробно описал здесь: Как зайти в БИОС в Windows 8.1 и 8
Второе — попробовать отключить быструю загрузку Windows, после чего зайти в БИОС обычным способом, с помощью клавиши Del или F2. Для отключения быстрой загрузки, зайдите в панель управления — электропитание. В списке слева выберите пункт «Действия кнопок питания».

И в следующем окне уберите пункт «Включить быстрый запуск» — это должно помочь в использовании клавиш после включения компьютера. Подробнее: Как отключить быстрый запуск Windows 10.
Видео инструкция
Насколько могу судить, описал все типичные и наиболее распространенные варианты: один из них должен обязательно помочь, при условии, что сам загрузочный накопитель в порядке. Если вдруг что-то не получается — жду в комментариях.
There are many situations in which you might want to boot your computer using a USB flash drive. Maybe because you need to install Windows on your PC or maybe because you want to try the latest version of your favorite Linux distribution. Whatever reasons you might have, here are three different ways to use a bootable USB flash drive to start your computer:
NOTE: If you want to boot from USB in order to install Windows 10 or Windows 11, you’ll first need to create the Windows installation drive. If you’d like guidance on that, check these tutorials: Windows 10 Media Creation Tool: Create a setup USB stick or ISO or Windows 11 Media Creation Tool: Create a setup USB stick or ISO.
1. How to boot from a USB drive using Windows 10’s Settings (without BIOS or UEFI)
Start by plugging in the bootable USB flash drive to a USB port on your computer. Then, open the Settings app and head to Update & Security.
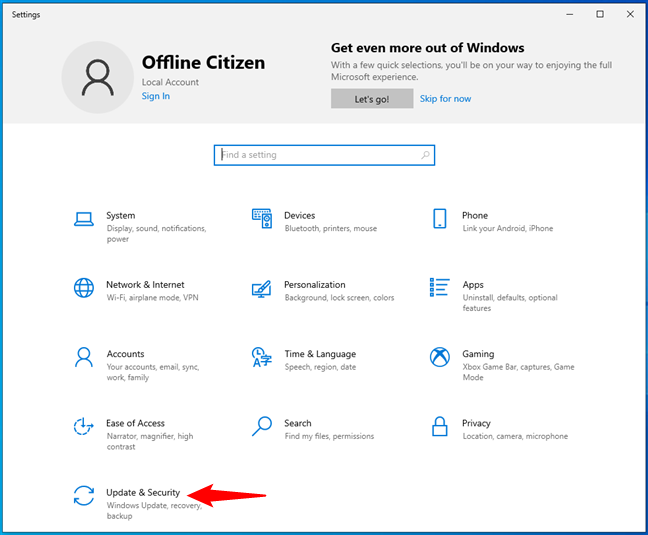
Update & Security settings in Windows 10
Select Recovery on the left, and then scroll on the right side of the window until you find the Advanced startup section. In it, click or tap the Restart now button.
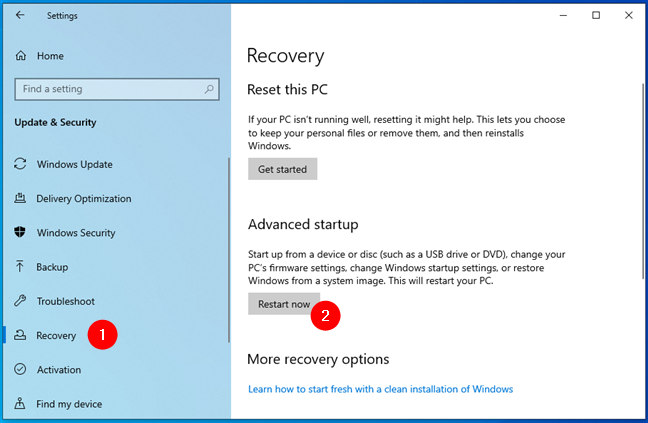
Advanced startup recovery options in Windows 10
Windows 10 restarts and then shows a screen where you can Choose an option. Click or tap on Use a device.
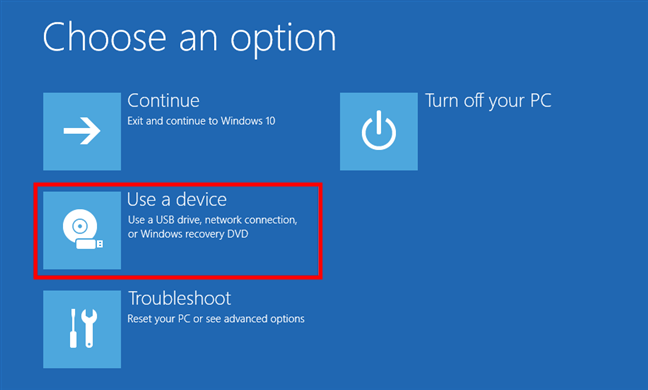
Choosing to use a device to start the PC
Next, you should see a list of devices your computer can boot from, including the USB flash drive that you plugged in. Click or tap on it.

Selecting the USB flash drive from which the PC should boot
Your computer then restarts and boots from the USB flash drive you chose.
TIP: If you want a faster way of accessing the Windows recovery environment, from where you can boot from a USB drive, creating a shortcut or knowing the command for that might come in handy. Here’s a guide that explains everything: Shortcuts for the UEFI BIOS & Windows 10’s Recovery Environment.
2. How to boot from a USB drive using Windows 11’s Settings (without BIOS or UEFI)
First, connect the bootable USB flash drive to a USB port on your Windows 11 computer. Then, open Settings (Windows + I), ensure that System is selected on the left sidebar, and click or tap on Recovery on the right panel.

Access the Recovery settings in Windows 11
Also on the right side of the window, locate the Advanced startup option. It briefly explains that you can “Restart your device to change startup settings, including starting from a disc or USB drive.” Press the Restart now button on the right.
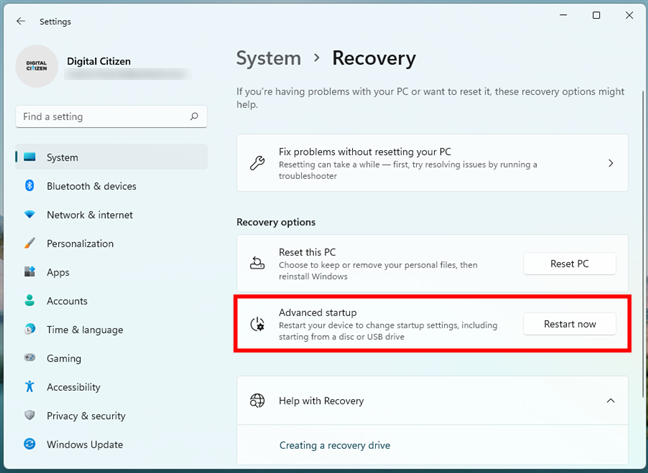
Advanced startup in Windows 11
Next, Windows 11 will let you know that it will restart your device, so you’d better save your work before that. After doing so, click or tap the Restart now button from the dialog.
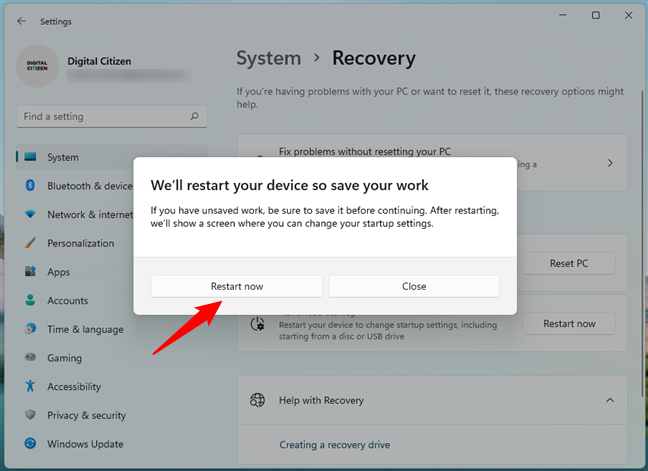
Windows 11 notifies you that it will restart your device
Your PC will then reboot, and Windows 11 will load its recovery environment. In it, select the Use a device option.
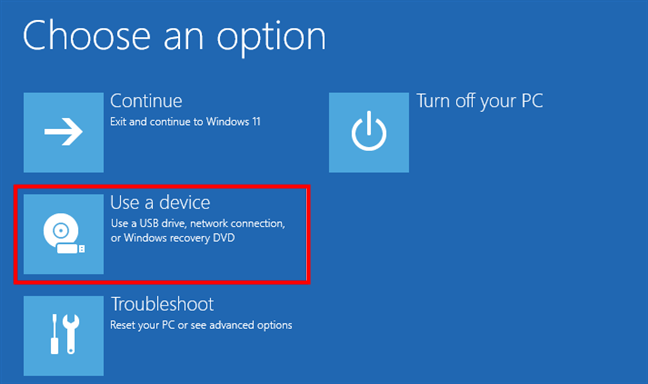
The Use a device option in Windows 11’s recovery environment
Next, you’ll see the list of bootable devices your computer can use. That includes the USB drive you’ve plugged in, so click or tap on it.
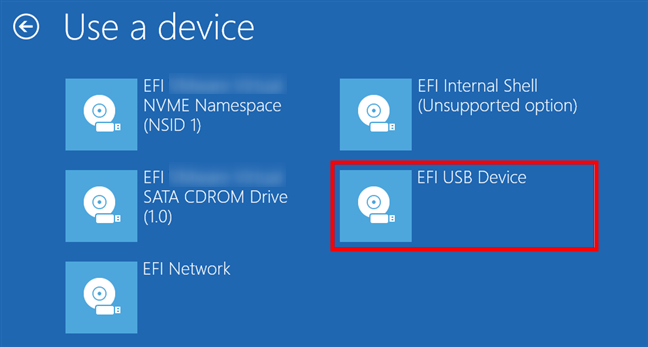
Choose to boot Windows 11 from the USB drive
Finally, your computer restarts and then boots from the USB drive you’ve chosen earlier.
3. How to boot from a USB drive using the UEFI/BIOS Boot Menu
If you are lucky, then all that you must do to boot from a USB flash drive, regardless of the operating system installed on your PC, is choose the USB flash drive from the Boot Menu of your UEFI or BIOS. Make sure that your USB flash drive is bootable, and then plug it into any USB port on your computer.
Next, power on your computer (or restart it if it is on). Immediately after powering it on, when the BIOS/UEFI screen appears, access the Boot Menu by pressing the right key(s) for it. Most PC manufacturers use the F8, F9, F10, or F11 keys for that, and many computers show the Boot Menu key(s) right after you power them on. However, if you cannot identify the right one, check the documentation for your computer’s motherboard or device manufacturer. The Boot Menu access key(s) should be mentioned in their user manuals.
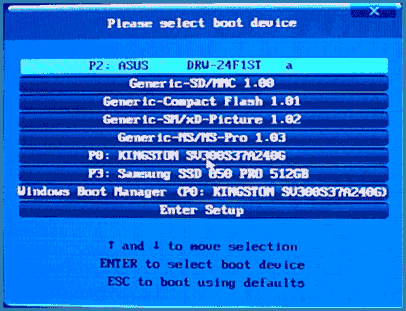
Once the Boot Menu appears on the screen, use it to select the USB flash drive from which you want to boot and press Enter on your keyboard. Note that the USB flash drive can bear different names depending on what the PC or motherboard manufacturer wanted. Some list it as Removable Device, some as USB-HDD, and so on.
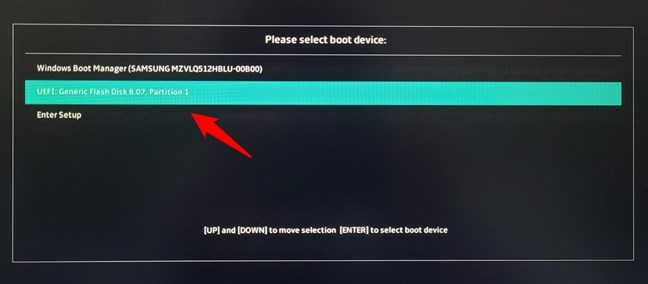
Selecting to boot from a USB flash drive in the Boot Menu
Once you’ve pressed Enter, the computer should boot from the USB flash drive.
4. How to boot from a USB drive by modifying the UEFI/BIOS settings
Start by accessing your BIOS/UEFI. You should be able to do that by pressing the right key (combination) immediately after you power on your PC. Although the manufacturer of your PC or motherboard can assign any key for this action, commonly used keys include Delete, F1, F2, F10, and F12. If none of these works, you can find the right key to press in the manual of your PC or motherboard.
If your PC has UEFI (a newer type of BIOS), it may boot so fast that you do not have time to press any key to access it. In such a situation, follow the steps from these guides, depending on what version of Windows you have:
- How to enter BIOS in Windows 10
- How to enter the UEFI/BIOS from Windows 11 (7 ways)
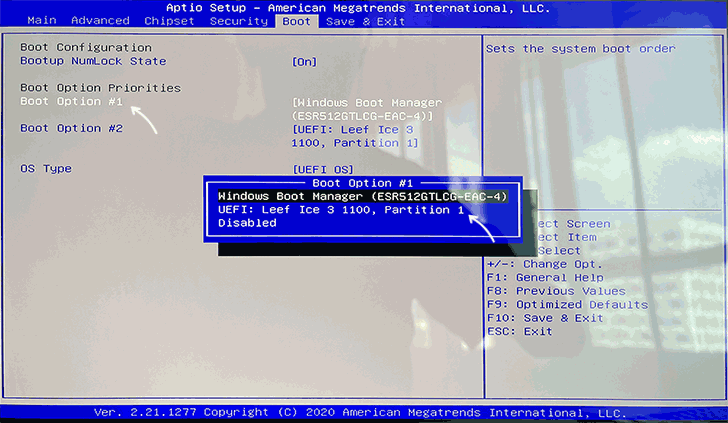
Once you’ve entered the BIOS/UEFI, browse through its configuration options until you find a page called Boot or similar. There, you should see the boot order used by your computer. In this list, you must choose the USB flash drive to be the first device used for booting. Remember that the USB option can be named differently on your PC: check for Removable Devices, USB-HDD, or similar names. Moving the USB flash drive to the top of the boot list is usually done using the keyboard keys +, -, F5, or F6. Your BIOS/UEFI should display some helpful information about this topic.
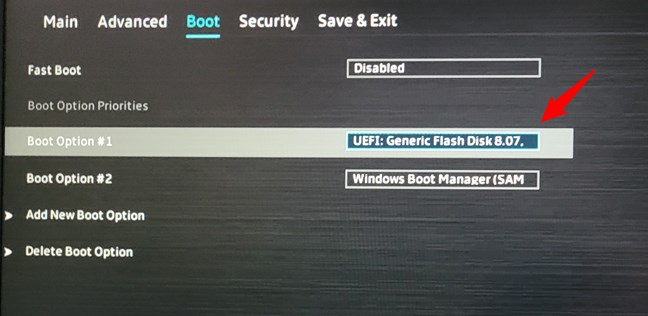
Moving the USB flash drive to the top of the boot order list
After you’ve selected the USB flash drive as the first boot option, save your settings (usually done by pressing F10 on your keyboard) and Exit the BIOS/UEFI environment. Your computer will restart and then automatically boot from the USB flash drive.
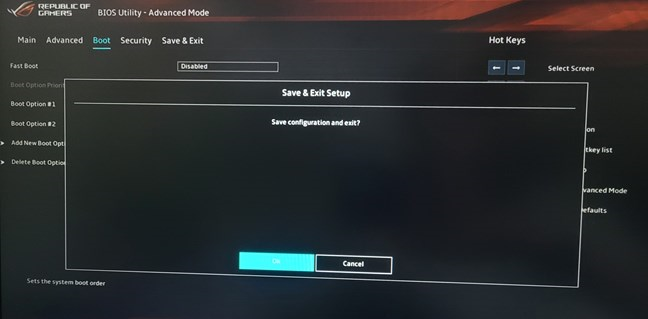
Saving the settings in BIOS/UEFI
IMPORTANT: If your computer uses UEFI, you might not be able to make the previous settings. In that case, you must first disable (temporarily) the Secure Boot option. This option can also have different names depending on what the manufacturer wanted: Legacy Boot or Legacy Support, CSM or Launch CSM, and so on. Choose to enable the options that start with Legacy or which have CSM in their names.
What’s your favorite method to boot from a USB flash drive?
Now you know a couple of different ways to boot your computer using a USB flash drive. Which of them is your favorite? Do you use the options built into Windows 10 and Windows 11, or do you prefer to do it from BIOS/UEFI? Did you manage to boot your PC from a USB drive? If you did not, what went wrong? Let us know in the comments section below.
Download Article
Download Article
- Windows
- macOS
- Q&A
- Tips
|
|
|
A bootable USB flash drive is useful for installing an operating system or diagnosing system problems. But once you have your bootable USB flash drive, how can you boot from it? This wikiHow teaches you how to start up your Windows PC or Mac from a USB flash drive.
-

As long as your USB drive is bootable, it’ll be easy to boot from it when restarting your PC.
-
You can do this by clicking the Start menu and selecting Settings or the gear icon.
Advertisement
-
It’s the two curved arrows at the end of the list.
-
It’s in the left panel.
-
This is in the right panel.
-
It’s the icon with a screwdriver and a wrench.
-
It’s the option with a computer chip and a gear.
- If you don’t have this option, you will need to restart your computer and get to the BIOS using your hardware’s default key. As soon as you see the logo, you will need to hit either F1, F2, F6, F10, or Del to enter the BIOS menu—the key you need to press should appear quickly on the screen (look for «Press X to enter setup»).
-
Your PC will now reboot into the BIOS/UEFI, which is where you’ll tell your PC you want to boot from your USB flash drive.
-
Every manufacturer has a different BIOS/UEFI setup, so you may have to browse around to find a menu called Boot, Boot Order, or Boot Options. You’ll know you’re in the right place once you see a list of different types of drives (such as optical drive, removable drive, USB drive, etc.).
- If you’re using a Lenovo PC, for example, you’ll select the Boot tab at the top.
- You may have to select a menu called Advanced, Storage, or System Configuration to find the Boot or Boot order menu.
-
This area is going to look different depending on the manufacturer. Your goal is to make the device that’s called something like «USB drive» or «Removable Drive» the first item in the boot order.
- If you don’t see an option to change the order of the drives, you may just need to switch on a setting that enables «USB Boot» or similar.
-
You can usually do this by selecting a tab or option called Save & Exit, or by pressing F10. Once you confirm and exit, your PC will reboot from the USB drive.
- Be sure to remove the flash drive when you’re done using it. Otherwise your PC will try to boot from it the next time you have to reboot.


Advertisement
-
As long as your USB drive is bootable, it’ll be easy to boot from it when restarting your Mac.
-
The process to boot from a USB drive is different depending on the type of processor inside of your Mac. To find out:
- Click the Apple menu at the upper-left corner and select About This Mac.[1]
- If you see «Chip» followed by a name like «Apple M1» (or similar), you have an Apple Silicon chip.
- If you see «Processor» followed by a name that starts with «Intel,» you have an Intel processor.
- Click the Apple menu at the upper-left corner and select About This Mac.[1]
-
If your Mac is on now, click the Apple menu and select Shut Down.
-
The process is different depending on your processor:
-
Apple Silicone: Press and hold the Power button until you see «Loading startup options.» At that point, let go of the button.[2]
- Intel: Press and hold the Option key as you restart your Mac. Keep holding down the Option key until you see a list of available startup disks.
-
Apple Silicone: Press and hold the Power button until you see «Loading startup options.» At that point, let go of the button.[2]
-
Your Mac will now boot from the USB drive.
- This won’t permanently change the boot order. The next time you start up your Mac, it’ll start from your regular hard drive as normal.


Advertisement
Add New Question
-
Question
Can I use and boot from an existing O/S (XP) hard drive in a USB enclosure with Windows 10?
Yes, as long as there is enough available storage to support Windows 10.
-
Question
How can I tell if my computer booted from the flash drive, if the hard drive is second priority?
The windows installation screen should appear when you are planning on installing a new Windows.
-
Question
What can cause my computer to display multiple colors after installing Windows 7?
If you’re booting from a copy of Windows 7 on a USB drive, the most likely culprits are a corrupted copy of Windows, which just requires a reinstall, or damage done to the USB, which may be present on either the drive or the computer’s port itself. Or the monitor may just be having some issues of its own. If you get these colors when doing hardware intensive tasks like gaming, exporting video files or any other GPU-intensive tasks, the driver may be crashing which can be caused system errors or by overheating of the card.
See more answers
Ask a Question
200 characters left
Include your email address to get a message when this question is answered.
Submit
Advertisement
-
If you are still unable to boot from your USB drive, it’s likely that the drive is not bootable.
Thanks for submitting a tip for review!
Advertisement
References
About This Article
Article SummaryX
1. Insert a bootable USB flash drive.
2. Go to Settings > Update & Security > Recovery > Restart Now.
3. Click Troubleshoot and select UEFI Firmware Settings.
4. Click Restart.
5. Open the Boot or Boot Order menu.
6. Make USB or Removable Drive the first option in the boot order.
7. Save and exit.
Did this summary help you?
Thanks to all authors for creating a page that has been read 469,689 times.