
No sound after updating Windows! Don’t be upset; follow the best fixes listed below & troubleshoot Realtek HD audio manager problems.
For Windows users, encountering audio issues is not new. After each Windows update, some or the other user faces audio-related issues. This leaves users with no sound; if you can relate to it and are looking for ways to fix the Realtek audio driver problem, you are right.
Quick Tip- When manually downloading the latest Realtek audio driver from the official website, ensure your operating system’s correct name and version is selected. Realtek high-definition audio comes preinstalled on Windows 11 and 10, but this doesn’t mean Realtek audio is not working issue cannot be encountered. If you are facing the issue, here are the best ways to fix sound and not working issues.
Common Realtek Audio Issues
- Missing Audio Manager Icon
- Conflicts with preinstalled Microsoft Drivers
- Windows 11, 10, no audio devices are installed
- The audio service is not responding
- No sound
Besides, there are other sound problems that Windows users face. This troubleshooting guide will cover all this and the best ways to fix these issues.
Download and Install Advanced Driver Updater.
Why is there a Realtek High Definition Audio on My PC?
The Realtek HD Definition Audio is the popular sound driver for Windows. It helps choose the audio configuration for the speaker system, and the software also allows adjusting the volume for individual speakers.
However, due to certain reasons, you may face issues with Realtek High Definition Audio.
6 Common Reasons That Cause Realtek Audio Problems
1. Outdated Realtek audio driver.
2. There is a conflict between installed Microsoft and Realtek audio drivers.
3. Audio service is either not running or responding.
4. Misconfigured audio settings.
5. Incorrect output device for audio is selected.
6. Disable audio service.
How to Fix Realtek Audio Issues in Windows 11, 10
Whether you face audio problem issues after installing the latest Windows update or uninstalling a driver, try these 8 ways to troubleshoot the issue.
Basic Troubleshooting
You should always check the device and cable connections before updating the drivers and trying other technical fixes.
- Check the output audio device whether working or not.
- Ensure the output device is receiving power.
- Correct output should be selected on Windows 11 and 10.
- Use the volume controls to ensure the sound is not muted.
- Disconnect and reconnect the output device, and also use the alternate port to ensure the connection is proper.
After following these steps, try the following methods if the audio is still not there.
1. Update Realtek High-Definition Audio on Windows 11 and 10
Common sound problems on Windows are outdated, corrupt, or missing drivers. To fix this issue, downloading and installing the latest driver is recommended. This can be done either manually or automatically.
To download and update the latest driver manually, visit the sound card manufacturer and look for the right driver download. Before this, you must collect information about the operating system’s version, your motherboard’s model, or the sound card. Once you have, only then can you download the correct driver.
Update Audio Drivers using Manufacturer website –
- Search for the audio driver’s manufacturer website on a browser. Click on it.
- Enter your device’s serial number.
- Click the ‘Detect’ button for automatic identification.
- Select your product manually from the list.
- Browse products for general information or resources.
- Download the audio driver on your computer.
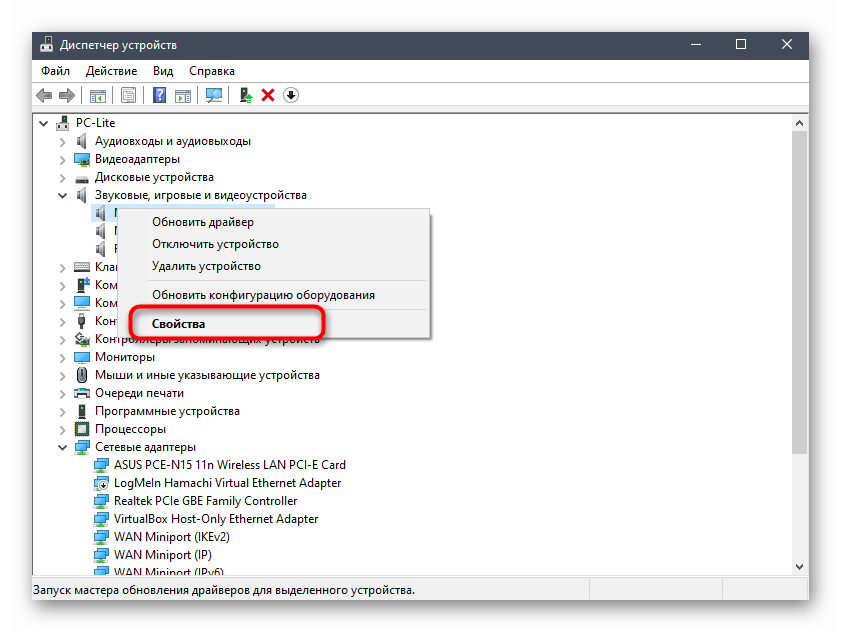
Update Audio Drivers using Device Manager –
Another way to update drivers on your computer is to use the Device Manger.
- Open Device Manager.
- Right click on the device, in this case, audio device.
- Select ‘Update Driver’.
- Choose “ Search automatically for updated driver software”.
- Now follow the on-screen instructions to complete the update.
Suppose this sounds like too much work, or you don’t have the technical expertise to collect all this information. In that case, you can try Advanced Driver Updater, a third-party driver updating utility.
This tool lets you download and install compatible drivers without collecting system or device information. Not only this, but Advanced Driver Updaters also keep a backup of old drivers for security reasons. It is easier to use as you have to click Start Scan Now, wait for the scanning to finish, and update the driver.
Also Read: Advanced Driver Updater Review
Here are the detailed steps on how to use Advanced Driver Updater
1. Download and install Advanced Driver Updater

2. Run the professional tool and click Start Scan Now to perform the scanning for outdated Realtek sound drivers.

3. Wait for the scanning to finish.

4. After that, click the Update driver option and update the driver.
Note : If you are using a trial version of the product, you will have to update each driver by clicking the Update driver option. However, if you want to update all drivers in a go, you need to upgrade to the Pro version as it offers an Update All feature. Not only this, but the excellent driver updating utility also comes with a money-back guarantee.
Read more at the official website
5. After updating the driver, restart the system to apply changes.
Now try to play a video or song; the Realtek sound not working issues should not be fixed.
See This- How To Update And Download Realtek 802.11 N WLAN Adapter Driver- Windows 11, 10
Method 2. Disable Audio Enhancement
Changes made to Audio Enhancements might conflict with sound on Windows 11 and 10. Therefore, it is recommended to disable audio enhancement. To do so, follow the steps below:
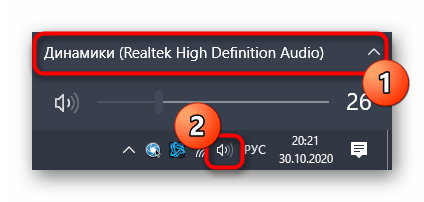
1. Right-click the Volume icon present in System Tray.
2. Select Open Sound settings > Device properties > Additional device properties.
3. This will open a new window; click the Enhancements tab and uncheck the box next to Disable all enhancements > Apply > Ok

This should troubleshoot Realtek audio problems on your PC.
3. Enable/ Restart Windows Audio Service
Ensure Windows Audio service is enabled to fix high-definition audio devices not working. To do so, follow the steps below:
1. Press Windows + R to open the Run window
2. Type services.msc > Ok
3. Look for Windows Audio service > right-click > Properties

4. Click the down arrow next to Startup type and select Automatic > Start > Apply > Ok
Note: If the service is already running and set to Automatic, you need to restart it. To do so, look for Windows Audio service > right-click > Restart.

Now try to play the sound; this should fix Realtek audio speakers’ not working issues.
Also, Read- How To Update Realtek Bluetooth Driver – Windows 11,10
Method 4. Disable Microsoft UAA Bus Driver
Usually, when two high-definition audio drivers run on the system, a conflict occurs. Therefore, to fix the issues with Realtek audio speakers not working, we must disable Microsoft UAA Bus Driver. To do so, follow the steps below:
1. In the Windows search bar, type Device Manager
2. Look for System Devices > double click to expand it
3. Select Microsoft UAA Bus Driver for High Definition Audio.
Note: If it is not on the list, it is already disabled. This means you can skip this step and move to the next one.
4. If you see it > right-click > Disable device.
5. Restart the system to apply changes; now, try to play the sound. Realtek audio driver issues should be fixed.
Method 5. Use a Generic high-definition Audio Device Driver
You can fix Realtek audio driver issues by switching to a generic driver. To learn how to do that, follow the steps below:
1. In the Windows search bar, type Device Manager
2. Search for Audio inputs and outputs
3. Double-click to expand all the audio drivers
4. Right-click the Realtek audio device > select Update driver from the list
5. Next, select Browse my computer for driver software

6. After that, choose Let me pick from a list of available drivers on my computer

7. Select High Definition Audio driver from the list > Next > follow on-screen instructions.
This will load the default sound driver, and the problem with the Realtek audio driver will be solved.
Check This- How to Download Realtek Ethernet Controller Driver
Method 6. Change Default Sound Format
By altering the default sound format, you can fix high-definition audio devices not working. To do so, follow the steps below:
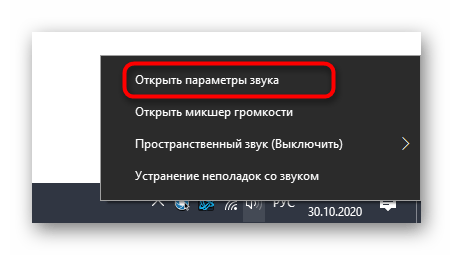
1. Right-click the sound icon present in the system tray.
2. Select Open Sound settings
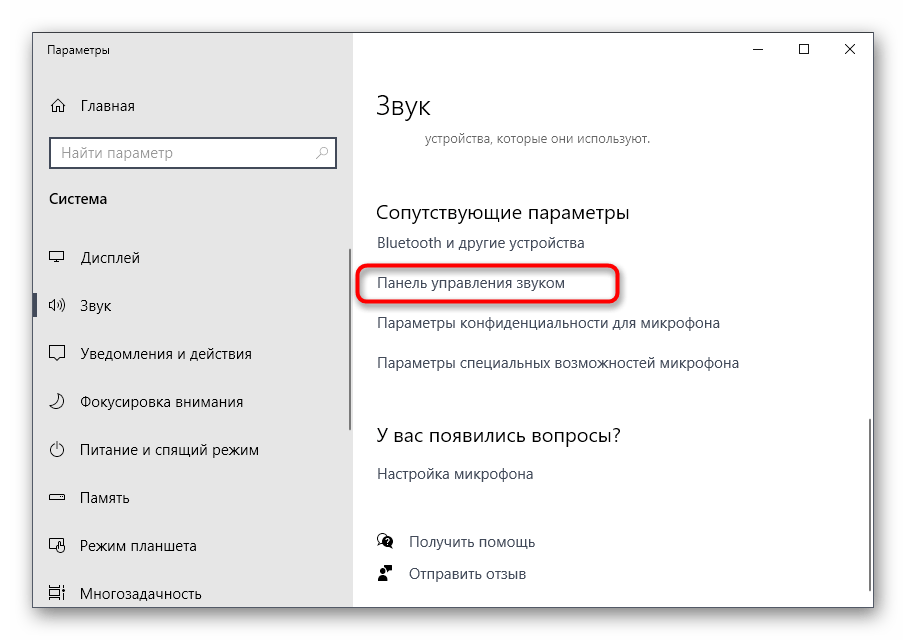
3. In the new window that opens, click Device Properties.

4. Click the Additional device properties option

5. This will open a new pop-up window here; click the Advanced tab
6. Next, click the down arrow and select the following depending on the speaker configuration:
24bit/44100 Hz
24bit/192000Hz
7. Click Apply > Ok to save changes.
This should fix Realtek audio speakers not working problems. If this doesn’t work, let’s move to the next step.
Method 7. Reinstall Sound Driver
1. Type Device Manager in the Windows search bar
2. Look for audio inputs and outputs. Double-click to expand it.
3. Right-click the sound driver > select Uninstall device from the context menu

4. Once done, click the computer icon with lens (Scan for hardware changes)

5. Now, restart the system. Windows will automatically install the default driver.
This should fix the issue, and the speaker Realtek audio not working problem should be resolved.
Method 8. Select the Correct Output Device
When an incorrect output device is selected, you might face Realtek audio driver problems. We need to switch to the correct output device to fix it. To do so, follow the steps below:
1. Right-click the volume icon present in System Tray.

2. Select Open Sound settings from the context menu.
3. Set Speakers or Headphones as the output device

Now, check your system, the Realtek audio speakers are not working, and the problem should be resolved. If you still face the issue, try updating Windows. If you are using an older version, there are chances that you are facing the issue due to some bug. Updating Windows will help resolve it. Press Windows + I to open Windows Settings > Click Windows Update > Check for updates > Download & Install and restart the PC.
See Also-How to Fix Microsoft Teredo Tunneling Adapter Missing
Frequently Asked Questions
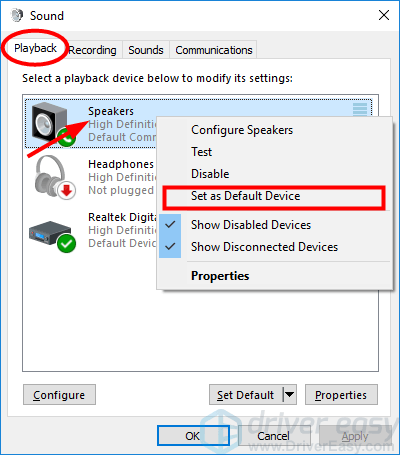
Q1. How do I fix Realtek’s no sound?
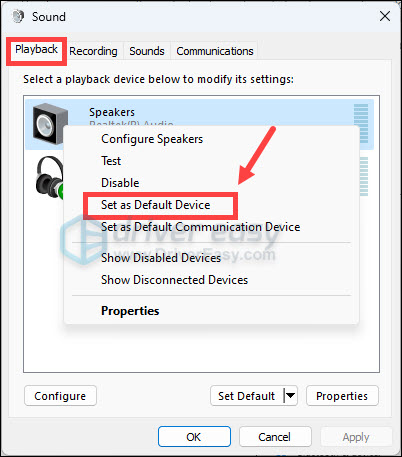
To fix Realtek’s no sound issue, set the speakers as default. To do so, follow these steps:
1. Press Windows + R and open the Run window.
2. Type mmsys.cpl > press enter.
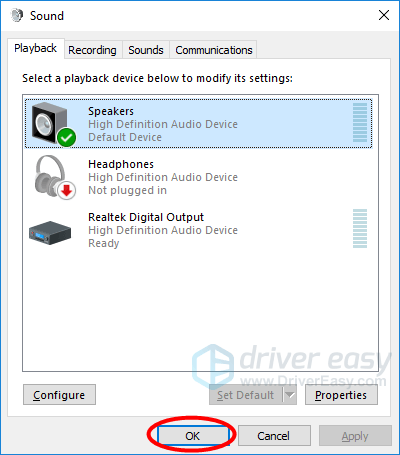
3. Click the Playback tab > right-click Speakers > Set as Default Device > Apply > Ok.
4. Exit the Sound Settings window and reboot the PC.
Now check you should not face an audio issue.
If this doesn’t help, automatically update the Realtek Audio driver using Advanced Driver Updater.
Q2. How do I repair and fix Realtek audio driver Windows 10?
To repair and fix Realtek Audio Driver try the following fixes:
1. Check cables, volume, speaker, and headphone connections
2. Update Realtek High-Definition Audio.
3. Disable Audio Enhancement.
4. Enable/Restart Windows Audio Service.
5. Disable Microsoft UAA Bus Driver.
6. Use a Generic High-Definition Audio Device Driver.
7. Change Default Sound Format.
8. Reinstall Sound Driver.
9. Select Correct Output Device.
10. Run the Audio Troubleshooter.
Q3. How do I get my sound back on Windows 10?
Use a generic driver to get the sound back and fix Realtek audio driver issues.
1. Right-click the Windows Start icon,> select Device Manager
2. Go to Audio inputs and outputs> double-click on it.
3. Right-click the Realtek audio device > select Update driver from the list
5. Choose the second option, “Browse my computer for driver software.”
6. Select, “Let me pick from a list of available drivers on my computer.”
7. Select High Definition Audio driver from the list > and follow on-screen instructions.
Q4. Why is there no sound on my Windows 10?
There are chances that the audio device is muted, has been disabled, or the driver is outdated. To fix the problem, unmute the audio device, enable it and update the driver through Device Manager or Advanced Driver Updater.
Q5. How do I fix a corrupted Realtek driver?
The easiest way to fix a corrupted Realtek driver is to reinstall and update the driver. You can do it manually through Device Manager or use Advanced Driver Updater, a driver updating tool, to update corrupt and problematic drivers.
Q6. How do I fix my Realtek audio?
To fix issues with Realtek audio, you can try the following techniques:
1. Update Realtek driver
2. Disable Audio-Enhancement
3. Restart Windows Audio Service
4. Disable Microsoft UAA Bus Driver
5. Modify Default Sound Format
Fix – Realtek Audio Driver Problems
You can quickly troubleshoot Realtek audio problems on your system using these fixes. Alongside these fixes, we suggest checking whether the speakers are correctly connected. Also, ensure that the speaker is not muted. This will help resolve Realtek speakers not working.
We hope using these steps, you can fix the problem with sound. To keep drivers updated and avoid facing such issues in the future, use Advanced Driver Updater, the best driver updater to update outdated drivers in a go. We’d love to hear from you; please share your feedback in the comments section. If you have any product-related queries, contact the support team.
Recommended :
12 Best (Free & Paid) Driver Updater Software To Fix Driver Issues on Windows
How to Download & Update Realtek PCIe GbE Family Controller Driver
How To Download & Update Realtek Audio Driver on Windows 11/10
Many Realtek audio device users are having problems with producing sound through the Realtek Digital Output. When it is set as the default device, the sound from the speakers connecting to their computer cannot work properly.
If you are having this issue, don’t worry. The following methods can help you bring the sound of your speakers back.
- Set the Speakers as Default Device
- Disable audio enhancements
- Reinstall the Realtek audio driver
- Update the Realtek audio driver
1. Set the Speakers as Default Device
It may not be necessary for you to use Realtek Digital Output. Digital Outputs refer to high-definition digital audio devices, which do not use regular (analog) cables to connect to computers. For example, a TV with an HDMI connection, or a high-definition audio system, like a home theater system, uses the digital output.
So if you are using regular speakers and you (or your computer) have set Realtek Digital Output as Default Device, the sound of your computer may not be able to play normally. You should set the Speakers as Default Device to get the normal sound. To do so:
on Windows 10
- Right-click on the speaker icon on your taskbar, and then select Playback devices.
- In the Sound window, select the Playback tab, right-click on Speakers, and then select Set as Default Device.

- Hit OK.
on Windows 11
- On your keyboard, press the Windows logo + I keys simultaneously to open Settings.
- From the left navigation panel, select System, then click Sound from the right.

- Scroll down and click More sound settings.

- Under the Playback tab, right-click your speaker and select Set as Default Device.

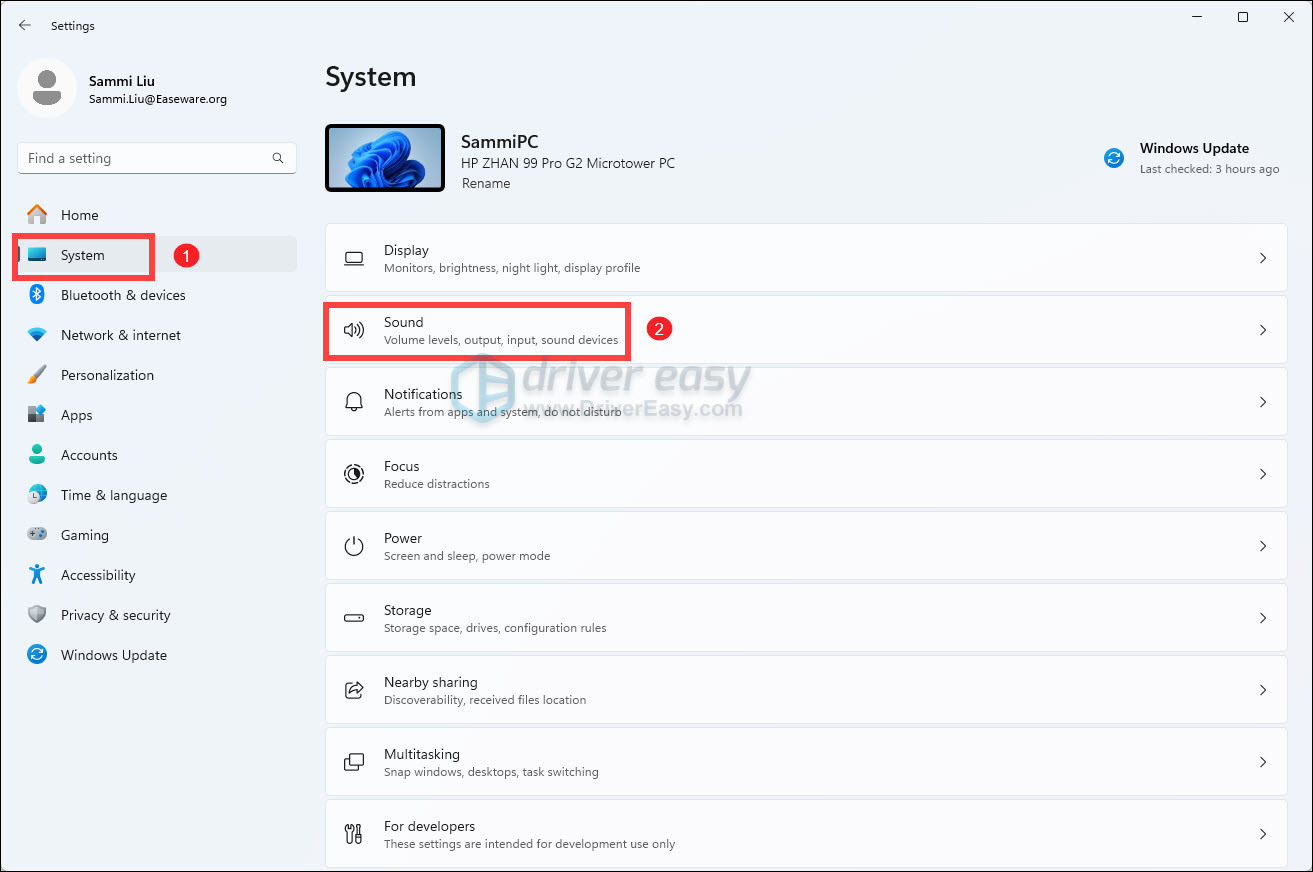
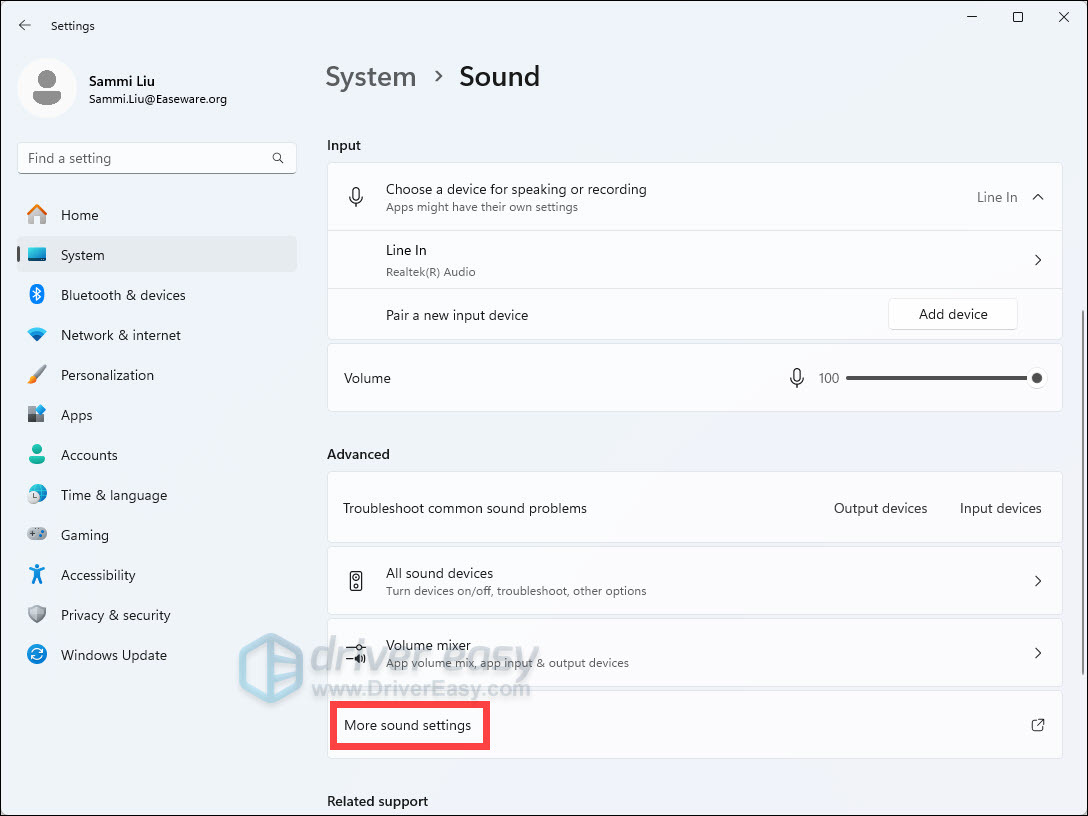
Your speakers are now set as the default audio output device. If this method works for you, you will hear the sound of your computer from your speakers again.
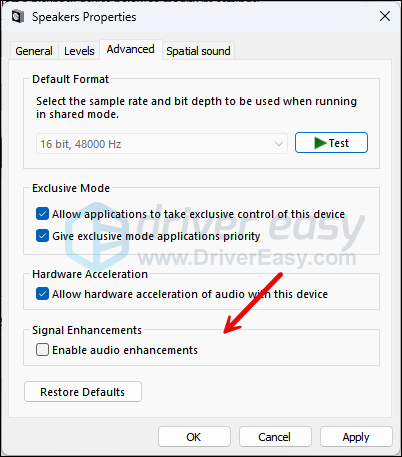
2. Disable audio enhancements
Audio enhancement packages are aimed at enhancing your audio performance. But this feature can sometimes cause some problems. When your Realtek digital output has no sound, try disabling audio enhancements to see if it helps. Here’s how to do this:
- On your keyboard, press the Windows logo key and R at the same time. Type in mmsys.cpl and press Enter.
- Navigate to the Playback tab. Right-click your default sound device here and choose Properties.
- Navigate to the Enhancements tab, then tick the box for Disable all sound effects. Then click OK to save the change.
- For some sound cards, the options may differ. So you can try to see if there’s an Advanced tab, where you can untick the box for Enable audio enhancements.
Now do a test to check if disabling audio enhancements helped you solve the issues. If not, please move on.
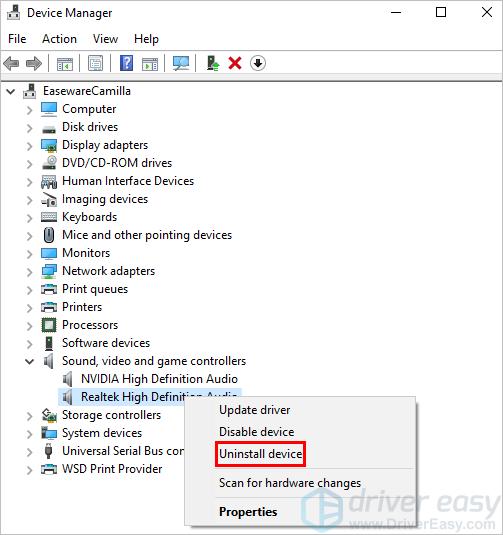
3. Reinstall the Realtek audio driver
A wrong or incorrect Realtek audio driver could also be the culprit to the Realtek digital output not working problem. If this is your case, you can reinstall the Realtek audio driver to see if it helps. To do so:
- On your keyboard, press the Windows key and the R key at the same time, then type devmgmt.msc and hit Enter.

- Double-click to expand the Sound, video and game controllers category, then right-click your sound card and select Uninstall device.

- Tick the box for Delete the driver software for this device if you’re on Windows 10, 8.1 and 7.
- Tick the box for Attempt to remove the driver for this device and click Uninstall if you’re on Windows 11.
- Restart your computer for the last working audio driver to be installed by Windows automatically.

If this doesn’t work for you, please move on to the next fix below.
4. Update the Realtek audio driver
You may be using a wrong or outdated audio driver if there is no sound from your Realtek Digital Output. You should update the Realtek audio driver to see if this fixes the problem.
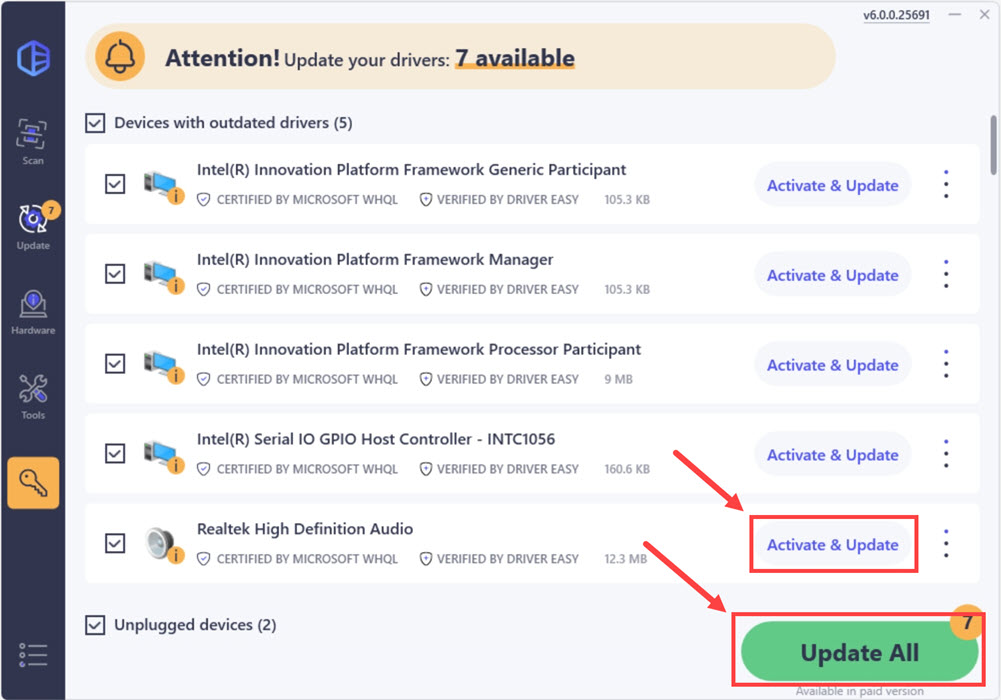
One easy and credible way to do so is to use Driver Easy.
Driver Easy will automatically recognize your system and find the correct drivers for it. You don’t need to know exactly what system your computer is running, you don’t need to risk downloading and installing the wrong driver, and you don’t need to worry about making mistakes when installing.
You can update your drivers automatically with either the 7 days free trial or the Pro version of Driver Easy. It takes just 2 clicks, and you get full support and a 30-day money-back guarantee with the Pro version:
- Download and install Driver Easy.
- Run Driver Easy and click the Scan Now button. Driver Easy will then scan your computer and detect any problem drivers.

- Click the Activate & Update button next to the flagged device to automatically download and install the correct version of this driver.
Or click Update All to automatically download and install the correct version of all the drivers that are missing or out of date on your system (You’ll need the Pro version for this – when you select Update All, you’ll get a prompt to upgrade. If you’re not prepared to purchase the Pro version yet, Driver Easy provides a 7-day trial at no cost, granting access to all Pro features like fast downloads and easy installation. No charges will occur until after your 7-day trial period ends.)

- After updating, restart your computer to take effect.

If you need assistance, please contact Driver Easy’s support team at support@drivereasy.com.
80
80 people found this helpful
Все способы:
- Способ 1: Проверка устройства воспроизведения
- Способ 2: Установка устройства по умолчанию
- Способ 3: Использование автоматического средства исправления неполадок
- Способ 4: Откат звукового драйвера
- Способ 5: Установка новых звуковых драйверов
- Вопросы и ответы: 2
Способ 1: Проверка устройства воспроизведения
Realtek Digital Output — устройство воспроизведения, которое при использовании определенного комплектующего устанавливается в качестве основного. К перечню проблем, возникающих во время работы такого оборудования, относится и пропажа звука. В таких случаях в первую очередь необходимо проверить, действительно ли было выбрано правильное устройство воспроизведения. Для этого нажмите по значку звука в трее, разверните список оборудования и определите подходящее.
Дополнительно можно кликнуть по значку правой кнопкой мыши и выбрать пункт «Открыть параметры звука».
Так вы отследите не только громкость, но и чувствительность динамика, поняв, воспроизводится ли звук на этом оборудовании в принципе. Если изменение средства вывода не принесло никакого результата, приступайте к выполнению следующих методов.

Способ 2: Установка устройства по умолчанию
Сразу же советуем приступить к проверке выбранного устройства для вывода звука по умолчанию, чтобы оно соответствовало используемому. Этот вариант окажется эффективным, если изначально параметры настраивались для уже отключенного девайса или по каким-то другим причинам они были сброшены.
- В этом же меню настройки звука нажмите по кликабельной надписи «Панель управления звуком», которая расположена в блоке «Сопутствующие параметры».
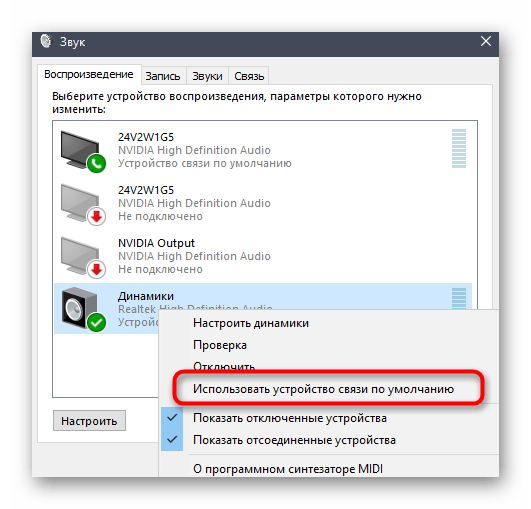
- Найдите значок с именем «Realtek Digital Output» и щелкните по нему правой кнопкой мыши.
- Примените настройку «Использовать устройство связи по умолчанию».

После этого ничего не помешает перейти к проверке звука, воспроизведя музыку или включив какое-нибудь видео на компьютере.
Способ 3: Использование автоматического средства исправления неполадок
В Windows есть автоматическое средство исправления неполадок, позволяющее решать проблемы, связанные с различным оборудованием и другими системными компонентами. Сюда относится и аудио, поэтому этот инструмент может оказаться полезным при отсутствии звука в Realtek Digital Output.
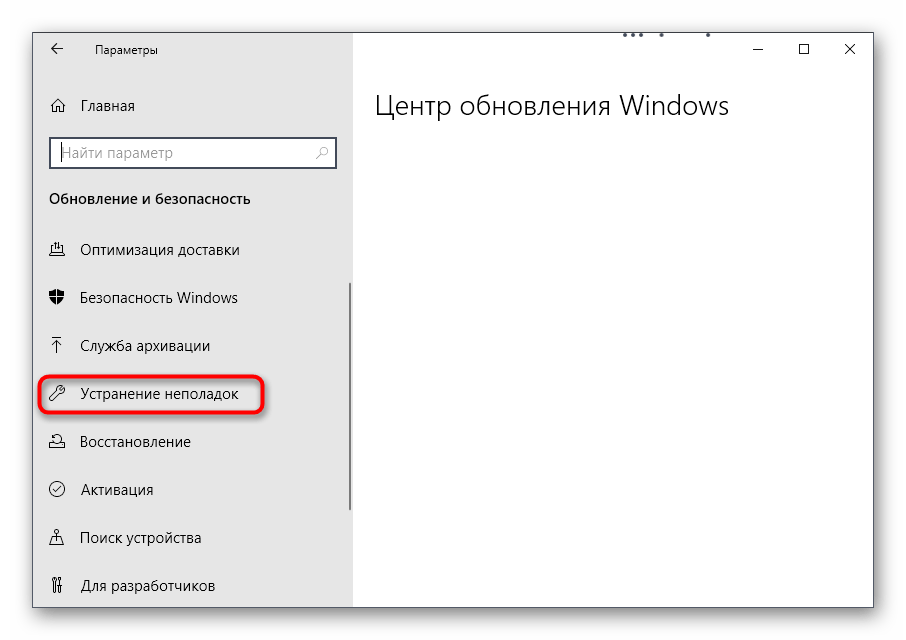
- Откройте «Пуск» и перейдите в приложение «Параметры».
- Нажмите по плитке «Обновление и безопасность».
- Выберите раздел «Устранение неполадок».
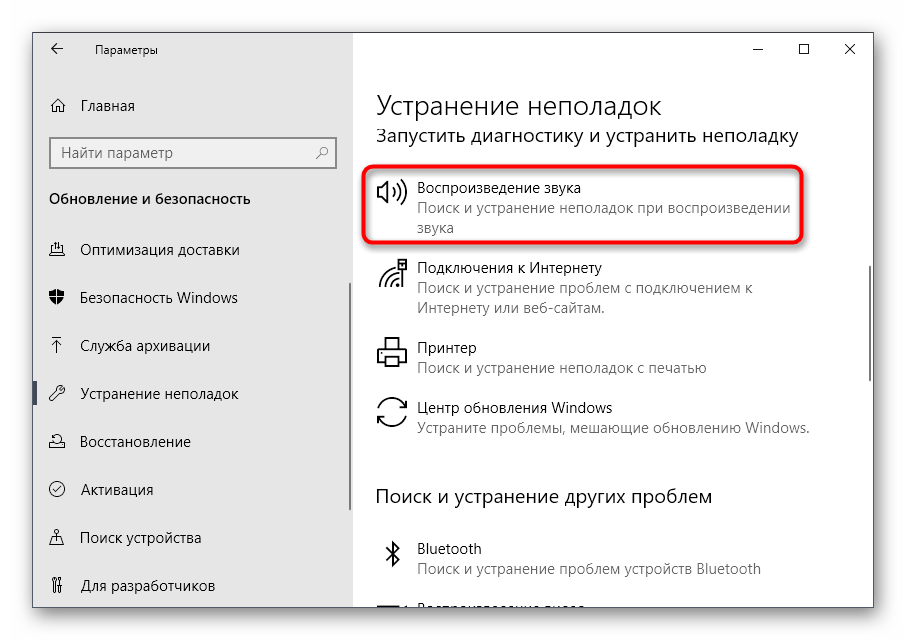
- Найдите средство диагностики «Воспроизведение звука» и запустите его.
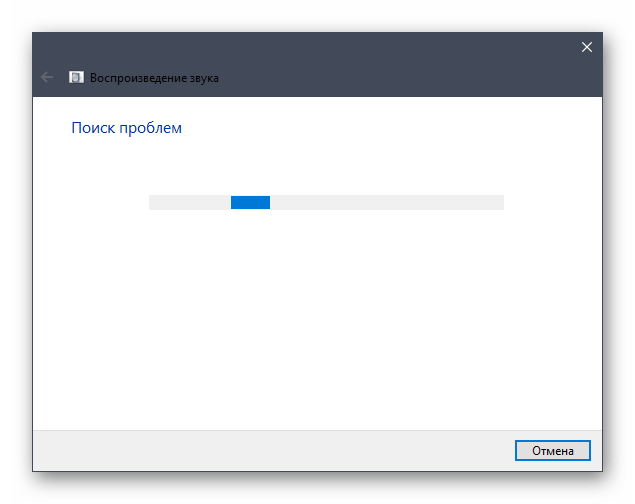
- Ожидайте окончания проверки, занимающего несколько минут, а затем ознакомьтесь с полученной информацией и примите новые настройки, если средство предложит изменения.


Способ 4: Откат звукового драйвера
Следующая рекомендация особо полезна пользователям Windows 10, где звуковой драйвер был установлен автоматически операционной системой. Он не всегда соответствует требуемому или же процесс проходит не совсем корректно, что провоцирует появление проблемы с пропажей звука. Драйвер следует откатить, а затем проверить, как это повлияет на воспроизведение.
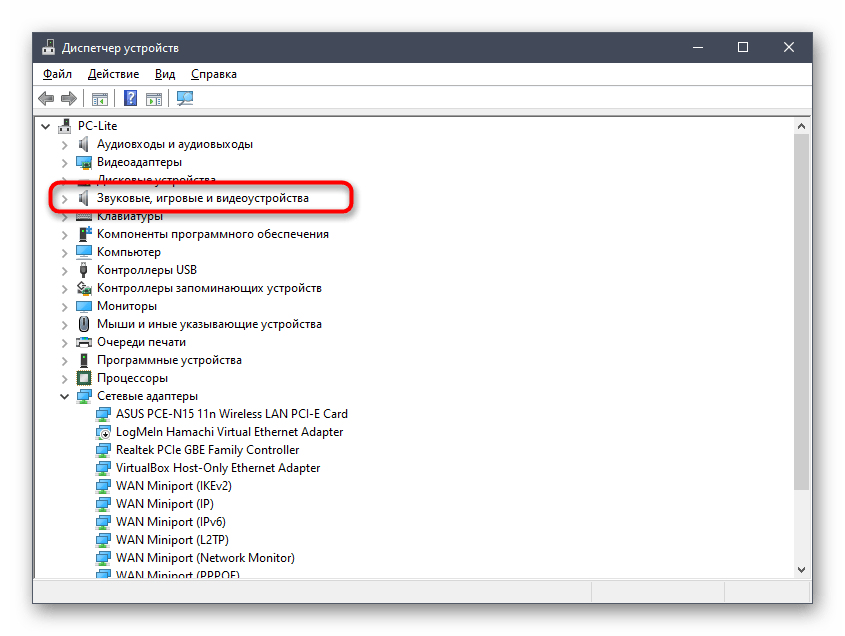
- Для этого сделайте правый клик мышкой по кнопке «Пуск» и в контекстном меню выберите пункт «Диспетчер устройств».
- Разверните категорию «Звуковые, игровые и видеоустройства».
- Щелкните ПКМ по «Realtek Digital Output» и выберите «Свойства».
- Перейдите на вкладку «Драйвер» и используйте функцию «Откатить», подтверждая удаление текущего драйвера.

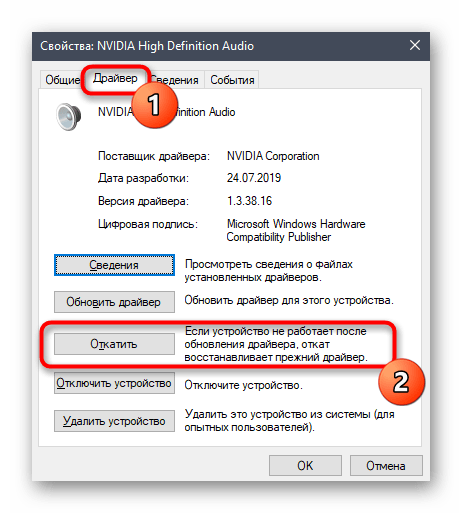
Изменения должны вступить в силу сразу же, и вполне вероятно, что устройство Realtek Digital Output отобразится в том меню с новым названием. Не пугайтесь этого, просто проверьте звук. Если он все еще отсутствует, обратите внимание на следующий метод, тоже связанный с драйверами.
Способ 5: Установка новых звуковых драйверов
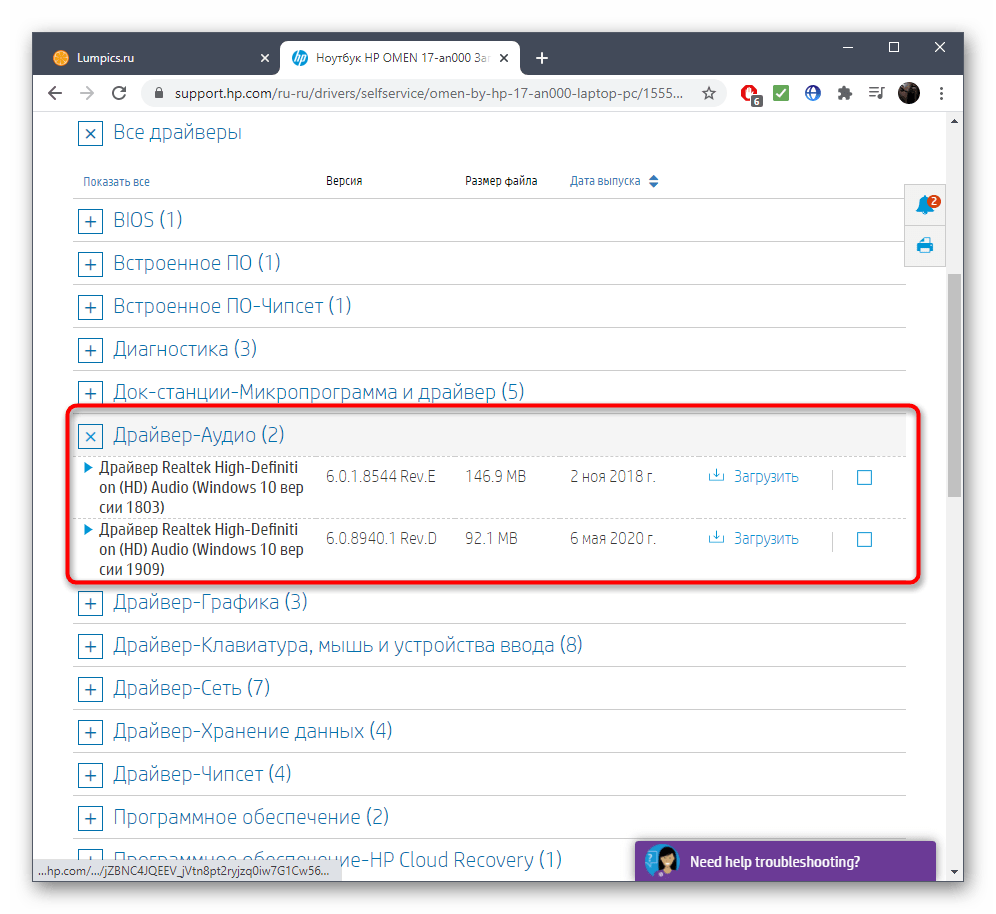
Автоматическая инсталляция драйверов звука в ОС не всегда работает правильно, поэтому ее нельзя считать лучшим средством получения файлов. Сейчас все еще оптимальным вариантом является скачивание ПО с официального сайта производителя материнской платы или ноутбука, но можно воспользоваться сторонним ПО или выполнить поиск по ID оборудования. Обо всех этих вариантах читайте в другой статье по ссылке ниже, где подберите подходящий метод и реализуйте его.
Подробнее: Скачиваем и устанавливаем звуковые драйвера для Realtek
Если ни один из приведенных методов не принес должного результата, рекомендуем проверить физическую исправность устройства воспроизведения — колонок или наушников. Иногда может помочь переустановка или восстановление Windows, но практика показывает, что чаще всего неполадки вызваны неправильной работой драйверов или ошибками при настройке звуковых устройств в Виндовс.
Наша группа в TelegramПолезные советы и помощь
После установки драйверов, звука нет, как его вернуть?
После переустановки системы, установил оригинальный драйвер звук Realtek, но звука нет. Главное если зайти в параметры звука, то динамики вроде бы включены но не активны:
spoiler

Пробовал удалять старый драйвер скачивать новый и устанавливать…, для обновления использовал программу Driver Booster, но все равно ничего не помогает. Динамики включены но не активны, помогите решить данную проблему!
-
Вопрос задан
-
3876 просмотров
Пригласить эксперта
1. Прекратите использовать малварь Driver Booster.
2. Скачайте драйвер с сайта производителя оборудования. (я бы на вашем месте сначала переустановил винду).
Уточните год выпуска материнской платы.
На старые изделия лучше всего встает драйвер 2017 года (0008-64bit_Win7_Win8_Win81_Win10_R281)
Вашу проблему в нем можно решить в приложении настройки — отключить автоопределение подключения переднего разъема (делается странно — через иконку папки).
Если материнка более-менее 5-6 лет от роду — там ставьте новый и ищите Realtek Audio Concole — это уже метро-приложение.
Еще с реалтеком есть косяк — чтоб установить драйвер — оно предлагает сперва удалить старый и перезагрузится, после чего винда успевает поставить свой и установка не срабатывает. Поэтому сперва удалите драйверы и реалтека и винды (в диспетчере устройств), отключите интернет, и выполните установку без интерента.
удаляете драйвер устройства, перезагрузка.
аудиодрайвер качаете с сайта производителя и ставите руками.
а так в вашем случае актуальный способ накатить драйвера чтоб всё работало это так —
Ставите винду, потом сразу обновляете систему, все более менее актуальные драйвера встанут сами.
Всё что не встало качаете с сайта производителя и ставите руками.
Войдите, чтобы написать ответ
-
Показать ещё
Загружается…
Минуточку внимания
В последнее время некоторые пользователи Windows 10 могут испытывать проблемы со звуком из-за ошибки отсутствия устройства вывода звука. Это может быть вызвано многими возможными факторами, такими как ошибки обновления Windows 10 связанные с пакетом обновлений октября 2018 года, неизвестное аудио устройство или отсутствие аудио драйверов. По словам Microsoft основная причина связанна с обновлением, а именно «аудиодрайвер Intel был неправильно отправлен на устройства через Центр обновления Windows», несовместимые аудиодрайверы также могут быть одной из причин.
Решения, приведенные ниже, помогут вам решить проблему со звуком, вызванную обновлением драйверов через Windows Update, аудиоустройства с кодом ошибки — не установлен аудио драйвер, нет аудиоустройства и т.д.
Надеемся, что эти решения помогут вам вернуть звук.
1. Проверьте внешние условия и устройства
2. Исправьте с помощью Diver Booster Fix No Sound Tool
3. Используйте встроенную функцию устранения неполадок Windows
4. Переключите режим вывода звука
5. Разное Realtek HD Audio Manager
6. Удалить неправильный драйвер
7. Обновите аудио драйвер
8. Откат состояния Аудиоустройства к предыдущему состоянию
Эти решения применимы к проблеме звука в Windows 10/8.1/8/7/Vista/XP.
Прежде всего, самое важное — создать точку восстановления системы в разделе инструменты Driver Booster, прежде чем пытаться использовать следующие решения. Если что-то плохое случится, вы можете восстановить вашу систему до состояния предыдущей точки восстановления.
Бесплатно скачать, чтобы создать точку восстановления системы в Driver Booster >
Выполните следующие действия:


Решение 1: Убедитесь, что все внешние условия в порядке
Если на вашем ПК вдруг пропал звук, это может быть аппаратная проблема, связанная с некоторыми внешними факторами.
1. Проверьте батарею и громкость ваших аудиоустройств, убедитесь, что вы включили все регуляторы громкости.
2. Проверьте устройство вывода звука (внешний динамик, микрофон, наушники и т.д.)
§ Проверьте, правильно ли подключено устройство вывода звука и находится ли соединительный провод между устройством вывода звука и компьютером в нормальном состоянии.
§ Проверьте, работает ли устройство вывода звука нормально. Вы можете заменить его на другую гарнитуру, чтобы проверить работоспособность.
3. Некоторые динамики, наушники или приложения имеют свой собственный регулятор громкости. Пожалуйста, проверьте их все и убедитесь в работоспособности.
4. Если вы используете настольный компьютер, пожалуйста, убедитесь, что устройства подключены к правильным разъемам.
Например:
Обычно разъемы имеют цветовые различия: зеленый разъем-для наушников, красный-для микрофона. Если нет разницы в цвете, будут даны соответствующие подсказки.
Гнезда на передней панели с разницей в цвете:
Гнезда на задней панели с разницей в цвете:
Гнезда без разницы в цвете:
Ноутбук 2-в-1:
Если нет никаких проблем со всем оборудованием или внешними проблемами, пожалуйста, читайте дальше.
Решение 2. Используйте инструмент Исправить отсутствие звука в Driver Booster
Однако, когда возникает ошибка «Устройство вывода звука не установлено/не обнаружено», это, скорее всего, будет внутренней проблемой. Если вы установили последнюю версию Driver Booster, вы можете автоматически решить проблему со звуком, выполнив следующие действия:
Шаг 1: Откройте Driver Booster
Шаг 2. Нажмите значок «Инструменты» в левой части главного экрана.
Шаг 3: Выберите инструмент «Исправить отсутствие звука».
Шаг 4: посмотреть, все ли работает.

Инструмент может решить следующую проблему:
— Аудио служба отключена
— Аудиоустройство отключено
— Проблема с выводом звука через HDMI / DisplayPort
— Переключение режима вывода звука (AC97 / HD Audio)
— Устройство вывода звука изменено
— Устройство вывода звука по умолчанию изменено
Если инструмент не может решить проблему со звуком, попробуйте Решение 3.
Решение 3: Использовать встроенную функцию устранения неполадок Windows
Windows 7 / Windows 8
Шаг 1: Откройте Панель управления, выберите Мелкие значки как на скриншоте

Шаг 2: Найдите и нажмите «Устранение неполадок»
Шаг 3: выберите «Устранение неполадок воспроизведения звука»

Windows 10
Шаг 1. Щелкните правой кнопкой мыши значок звука на панели задач.
Шаг 2: Выберите «Устранение неполадок со звуком»
Шаг 3: После обнаружения отобразится связанная проблема, и, пожалуйста, следуйте инструкциям, предложенным для устранения проблемы.
Решение 4: Переключите Режим Вывода Звука
Некоторые проблемы со звуком вызваны изменением режима вывода звука (AC97 / HD Audio), следующие шаги помогут вам вручную изменить режим обратно.
Откройте Панель управления, чтобы увидеть, есть ли Realtek HD Audio Manager или Диспетчер Realtek HD.
— Если нет Realtek HD Audio Manager или Диспетчер Realtek HD, пожалуйста, выполните решение 6 .
— Если Realtek HD Audio Manager или Диспетчер Realtek HD находится в Панели управления, пожалуйста, продолжайте выполнять следующие действия.
Шаг 1: Откройте Панель управления (установите вид как маленькие значки см. Решение 3)
Шаг 2: Нажмите Realtek HD Audio Manager или Диспетчер Realtek HD в Панели управления.

Шаг 3: Нажмите значок шестеренки в правом верхнем углу окна и выберите Option или настройки.

Шаг 4: Выберите AC97 Front panel, а затем проверьте, появился ли звук.

Если Решение 4 не может решить проблему, попробуйте Решение 6.
Решение 5: Разное Realtek HD Audio Manager
Если у вас более старая версия Realtek HD Audio, панель Realtek HD Audio Manager может выглядеть так же, как на рисунке ниже. Пожалуйста, следуйте инструкциям, как показано на рисунке.
1. Нажмите значок файла в верхнем правом углу.
2. Установите флажок Отключить обнаружение разъема на передней панели.
Если звук все еще не работает, попробуйте снова использовать инструмент «Исправить отсутсвие звука».

Решение 6: Удалить неправильный драйвер
Обновление Windows и обновление драйвера другими программами может привести к тому, что аудиоустройство не будет работать должным образом. Следующие шаги помогут вам удалить текущий неправильный драйвер.
Шаг 1. Откройте диспетчер устройств (нажмите «Windows + R»> введите «devmgmt.msc»> нажмите Enter)
Шаг 2: Разверните Звуковые, видео и игровые контроллеры, вы увидите аудиоустройства.
Шаг 3: щелкните правой кнопкой мыши соответствующее аудиоустройство* и выберите Удалить устройства* .
Какое аудиоустройство следует удалить*:
— Если ваша система использует HDMI или DI (Display Port) для вывода звука , вы должны иметь одно из трех аудиоустройств (Nvidia High Definition Audio, AMD High Definition Audio, Intel(R) Display Audio), пожалуйста, удалите аудиоустройство, которое у вас есть .
— Если ваша система не использует HDMI или DI (Display Port) для вывода звука, удалите другое аудиоустройство (за исключением Nvidia High Definition Audio, AMD High Definition Audio, Intel(R) Display Audio) под контроллерами звука, видео и игры.
Советы *:
Во время процесса удаления, пожалуйста, убедитесь, что проставлена галочка “ удалить программное обеспечение драйвера для этого устройства” .

Для получения дополнительной информации о HDMI или DP (порт дисплея).
Перезагрузите компьютер после удаления, чтобы применить изменения и, если проблема сохранилась, пожалуйста, попробуйте решение 7.
Решение 7: Обновите аудио драйвер
Если для вашего аудиоустройства не установлен драйвер или текущий драйвер неверен, вы можете выполнить следующие действия, чтобы установить правильный драйвер.
1. Если проблема со звуком все еще существует после перезагрузки компьютера, пожалуйста, попробуйте обновить аудио драйверы, как показано ниже:
Шаг 1: Откройте Диспетчер устройств и разверните звуковые, видео и игровые контроллеры (просто повторите первые 2 шага решения 6 ).
Шаг 2. Щелкните правой кнопкой мыши соответствующее аудиоустройство и выберите «Обновить драйверы», чтобы проверить, вернулась ли ваша аудиосистема в нормальное состояние.

Шаг 3: Нажмите Автоматически поиск обновленных драйверов, чтобы проверить наличие обновлений для вашего драйвера.

2. Если под контроллерами Звуковые, видео и игровые устройства нет аудиоустройства, выполните следующие действия:
Шаг 1: Найдите и разверните Другие устройства или неизвестные устройства
Шаг 2: Щелкните правой кнопкой мыши на нужное устройство и выберите Обновить драйвер

3. Если вы не используете Driver Booster в качестве средства обновления драйверов, вы можете попробовать его с помощью самого простого решения в один клик для автоматического обновления драйверов.

Если проблема остается после обновления, пожалуйста, повторите решение 4.
Если у вас все еще есть проблема после всех шагов выше, Пожалуйста, загрузите DBInfoHelper > Двойной щелчок мыши > run this tool > нажмите’> Save report to Desktop ‘ > найдите > db_info_xxxx.zip на рабочем столе > отправьте полученный zip-файл на наш электронный адрес> dbfeedback@iobit.com
Решение 8: Откат состояния Аудиоустройства к предыдущему состоянию
Если в Диспетчере устройств нет аудиоустройства, вы можете попробовать это решение.
Шаг 1: Перейдите Диспетчер устройств. В открывшемся окне Диспетчера устройств щелкните правой кнопкой мыши по названию своего компьютера (самая верхняя строчка) и в контекстном меню выберите пункт Установить старое устройство

Шаг 2: Нажмите кнопку «Далее«, чтобы загрузить » мастер добавления оборудования”

Шаг 3: Выберите «Поиск и автоматическая установка оборудования (рекомендуется)» > нажмите “ > Далее”

Шаг 4. Нажмите «Далее» (даже если Мастер не обнаружил нового оборудования на вашем компьютере)

Шаг 5: Затем вы увидите общие типы оборудования> найдите и выберите > Звуковые, видео и игровые устройства > нажмите > Далее

Шаг 6: выберите производителя аудио драйвера, который вы хотите установить> нажмите > Далее

Шаг 7: Нажмите «Далее», чтобы установить драйвер

Шаг 8: Когда вы найдете свое аудиоустройство, попробуйте описанные выше решения.
Приложение : Как отключить обновление драйверов в Центре обновления Windows
Мы получили много отзывов от наших пользователей о том, что после обновления Windows не было звука. В этом случае мы рекомендуем временно отключить обновления драйверов в обновлении Windows.
Windows 10
Примечание. Это не относится к Windows 10 Home.
Шаг 1: Перейдите в раздел Поддержка Windows
Шаг 2: Нажмите выделенный текст, чтобы загрузить инструмент

Шаг 3: Откройте скачанный инструмент и нажмите «Next»

Шаг 4: Дождитесь завершения

Шаг 5: Нажмите кнопку «Hide updates»

Шаг 6: Выберите элементы обновления, которые вы хотите скрыть (рекомендуется скрыть все элементы) > > нажмите кнопку «Далее»


Windows 7
Шаг 1: Возьмите ссылку на инструкции
Шаг 2: Откройте настройки установки устройства и настройте их, как показано ниже:

Windows 8/8.1
Перейдите в Панель управления > > Система и безопасность > > Система > выполните действия, описанные на следующем рисунке.

Читайте также:
Как обновить драйверы звуковой карты, где скачать драйверы звуковой карты?