
Though code 10 error: this device cannot start, can happen to any hardware device, but most of the cases occur to audio devices and USB devices. That is why this tutorial focuses on High Definition Audio.
Cannot hear sound from the speaker or headphone? Or when you go to the Realtek High Definition audio in device manager, it shows you that this device cannot start in Windows 10?
This code 10 error results from the driver issue or problem, such as driver missing or corrupted. In other words, fix the High Definition audio driver cannot start issue can depend on solving the driver compatibility problem.
Therefore, if no audio with this device cannot start error comes to Windows 10, it is a good choice for you to refer to this passage.
Solutions:
- 1: Open Windows Audio Services
- 2: Uninstall High Definition Audio Driver
- 3: Update HD Audio Drivers
- 4: Modify Registry Entry
- 5: Disable PCI Lock
Solution 1: Open Windows Audio Services
Code 10 error is created by the failed communication between device manager and the hardware device or because of the outdated or corrupted device drivers. Furthermore, if you have disabled Windows audio services, it will cause the Realtek High Definition Audio not start.
As Windows audio is a Windows-based program and if it is disabled, the audio device will function improperly. So when it is shown to us that the High Definition audio cannot start, you would better try to open the Windows audio services and Windows Audio Endpoint Builder. Therefore, you need to make sure your audio service is turned on and won’t cause HD audio error 10 with no sound.
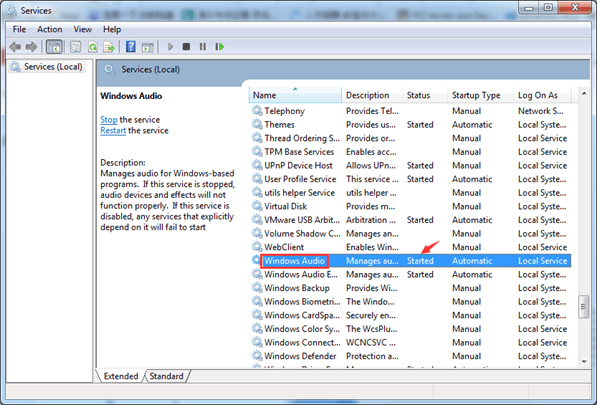
1. Press Windows + R to open the run box and then enter services.msc in the box. Click OK to move on.
2. In Services window, locate Windows Audio and then right click it to Start it if it has not yet opened.
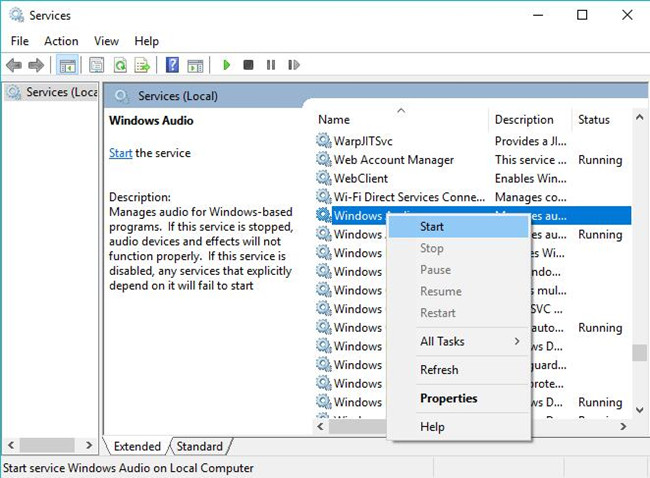
Here if you have started Windows Audio service, it is also necessary to change its startup type for Windows 10.
3. Right click Windows Audio to open its Properties.
4. In Window Audio Properties, under the General tab, find out Startup type and then change it to Automatic.
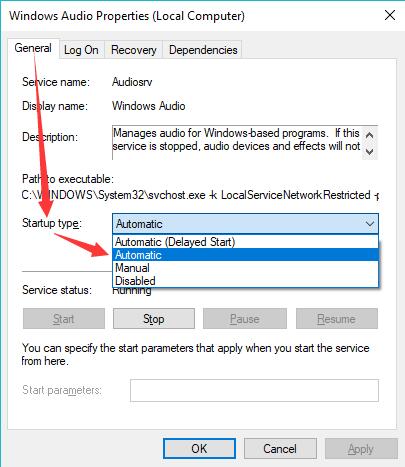
5. Then hit Apply and OK to save changes. After that, check whether there is sound from your audio device.
But if the error still persists, you can go ahead to find the final solution.
Solution 2: Uninstall High Definition Audio Driver
Now that it presents that this Realtek High Definition audio cannot start on Windows 10, so it is your instinct to uninstall this Realtek High Definition audio driver and then reinstall it on your PC.
1: Enter Device Manager.
2: Expand Sound, video, and game Controller.
3: Locate Realtek High Definition Audio driver and right click it to Uninstall it.
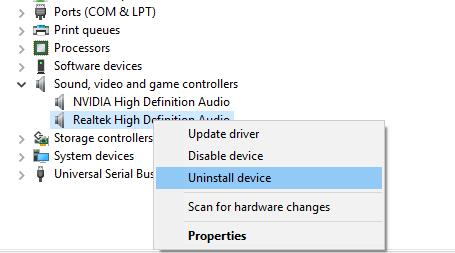
4: Reboot your computer to let it take effect.
Finally, Windows 10 will help you reinstall the Realtek HD audio drivers without the operation of yourself.
But maybe sometimes, this way of downloading the audio driver by Windows 10 cannot make the HD audio driver start to work, so you would better update this Realtek HD audio driver in a comprehensive way.
Solution 3: Update HD Audio Drivers
There is the quickest way to update the Realtek HD audio driver to the latest version in order to fix the code 10 error. To be more specific, you are able to use Driver Booster to update the audio driver for you.
As a professional and safe driver downloading and updating tool, you can find drivers of all sorts, Realtek HD audio driver is just a piece of cake. So you may as well download Driver Booster to your PC.
It is worth noting that Driver Booster is able to fix Device Manager code errors, with no exception for error code 10 with Realtek High Definition audio device.
1. Download, install and run Driver Booster on Windows 10.[
2. After installing and running it, hit Scan on it to start searching for outdated, missing, and corrupted drivers.

You can see your Realtek HD audio driver is listed in to-be-updated list in Driver Booster.
3. Then find out Sound, video and game controllers to Update the HD audio driver for Windows 10.
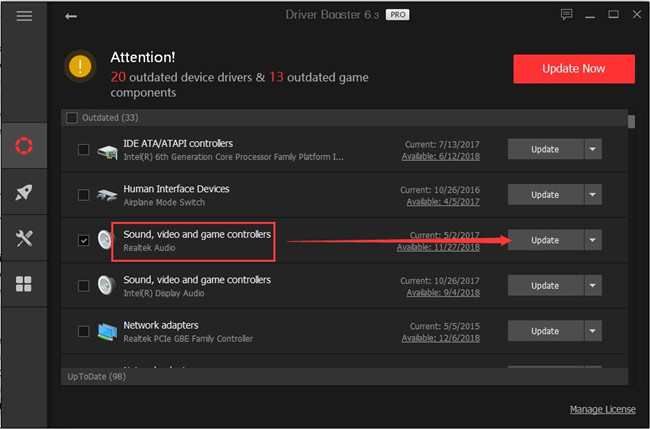
With the updated High definition audio driver, such as Realtek audio driver and sound device, if you noticed in Device Manager the error code 10 remains next to your HD audio device, move on to fix this device cannot start error on Windows 10.
4. In the left side of Driver Booster, find out Tools and then choose to Fix device error.
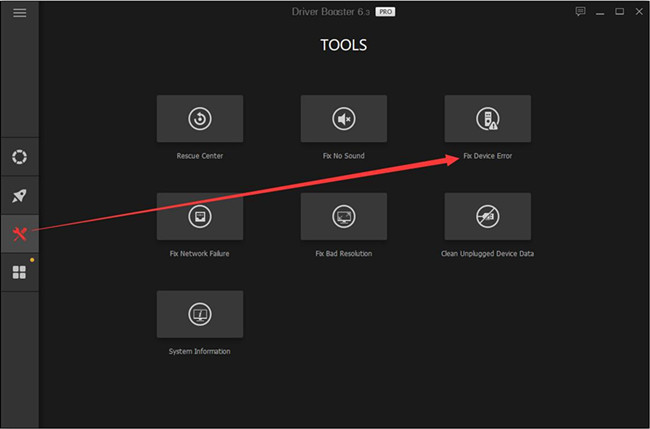
5. Then as you can see, Driver Booster is detecting and trying to fix the error code 10.
The moment Driver Booster updated HD audio driver and managed to fix this device cannot start code 10, you can use your microphone or speaker again to see if there is sound from the audio devices.
Solution 4: Modify Registry Entry
In terms of this error code 10 with High definition audio device, you can also make an attempt to change the registry entries. But before that, you may as well back up your data on Windows 10.
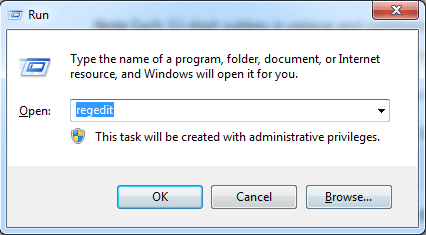
1. Press Windows + R to activate the Run box and then type in regedit in the box. Lastly, hit OK to move on.
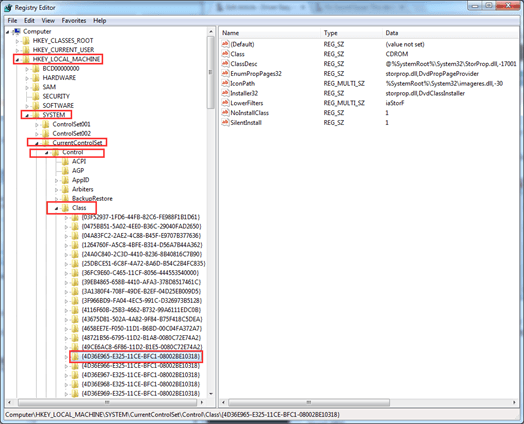
2. In Registry Editor, navigate to here.
HKEY_LOCAL_MACHINE\SYSTEM\CurrentControlSet\Control\Class\{4D36E965-E325-11CE-BFC1-08002BE10318}
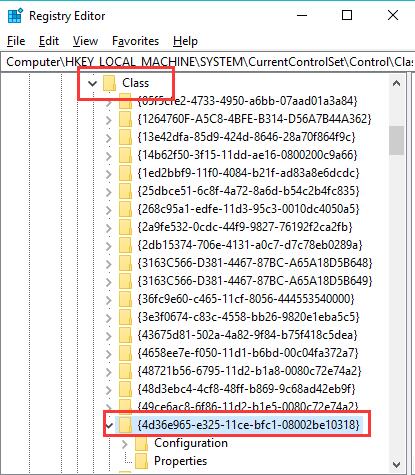
3. Then under this key, on the right pane, find and right click its subkey UpperFilters to Delete it.

4. Locate LowerFilters and right click it to Delete it as well.
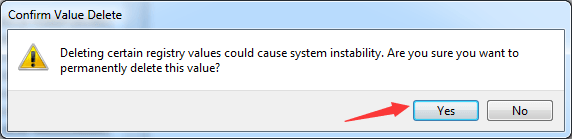
5. Confirm to remove these two subkeys by hitting Yes.
6. Reboot Windows 10 to take effect.
If possible, the time you boot up again, there won’t be high definition audio device code 10 this device cannot start on Windows 10.
Solution 5: Disable PCI Lock
Though PCI Lock on your PC can prevent you from reallocating input and output, it does sometimes cause errors including Realtek code 10 on Windows 10. On that occasion, you would better try to turn off it to see if it works for this device cannot start error.
1. Search msconfig in the search box and then press Enter to get into System configuration.
2. In System Configuration, under the boot tab, hit Advanced options.
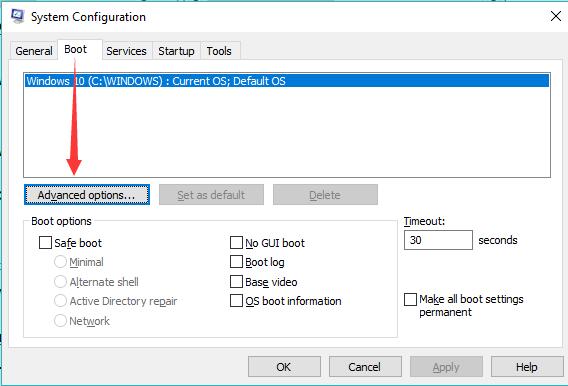
3. Then find out PCI Lock and then uncheck it to disable it.
After that, check in Device Manager if error code 10 with High definition persists and whether you are able to hear sound from microphone or speaker.
In a word, this post will help you get rid of high definition audio device error code 10. This device cannot start code 10 can be fixed if you can find a way suitable.
More Articles:
3 Ways to Update Realtek Audio Drivers for Windows 10/11
Fix Realtek HD Audio Manager Won’t Open or Missed on Windows 10/11
5.1 Channel Surround Sound Not Working on Windows 10/11
This device cannot start. (Code 10) – High Definition Audio Device
If you see your sound card with the code 10 error in Device Manager, don’t worry. You can fix the error easily by following the instructions in this article.
First, you need to ensure that the Windows Audio service is started. Follow steps below to check for it.
1) On your keyboard, press the Windows key and R at the same time to invoke the run box.
2) Type services.msc and click OK.
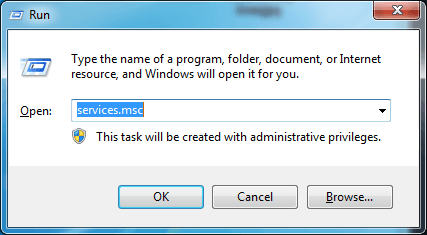
3) Locate Windows Audio.
4) Check to see if the Status is “Started”.
If It’s Started, move on to follow the methods below.
If it’s not Started,double-click on it to open the “Properties” window. In the General tab, set the Startup type as Automatic.

5) Restart your PC for the changes to take effect.
If the Windows Audio is started, try below 3 methods to fix the issue. You may not have to try them all. Just work from the top down until you find the one that works.
Method 1: Update the Sound Card Driver
Method 2: Uninstall the Sound Card Device
Method 3: Manually Fix Corrupted Registry Entries
Method 1: Update the Sound Card Driver
The problem might be caused by missing, outdated or corrupted drivers. Update the sound card driver to the latest version and see if the sound is working again.
If you don’t have time, patience or computer skills to update the drivers manually, you can do it automatically with Driver Easy.
Driver Easy will automatically recognize your system and find the correct drivers for it. You don’t need to know exactly what system your computer is running, you don’t need to risk downloading and installing the wrong driver, and you don’t need to worry about making a mistake when installing.
You can update your drivers automatically with either the FREE or the Pro version of Driver Easy. But with the Pro version it takes just 2 clicks (and you get full support and a 30-day money back guarantee):
1) Download and install Driver Easy.
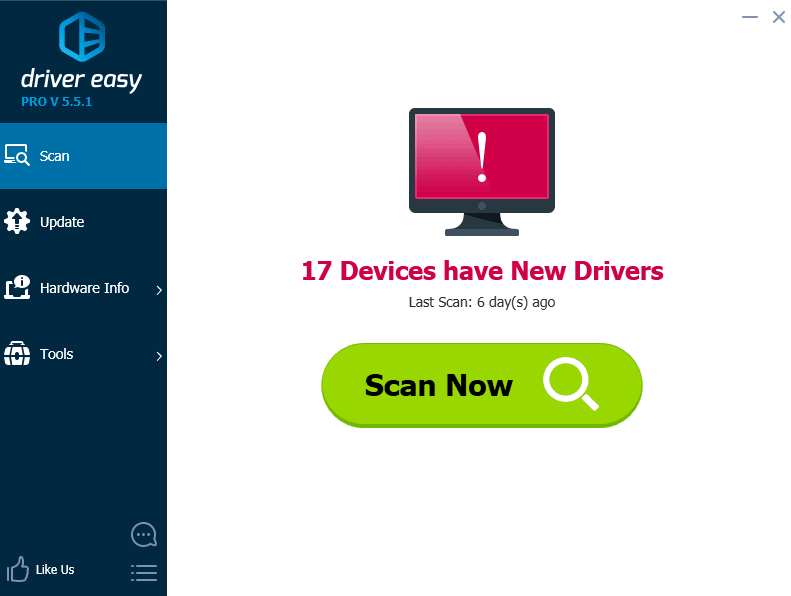
2) Run Driver Easy and click Scan Now button. Driver Easy will then scan your computer and detect any problem drivers.
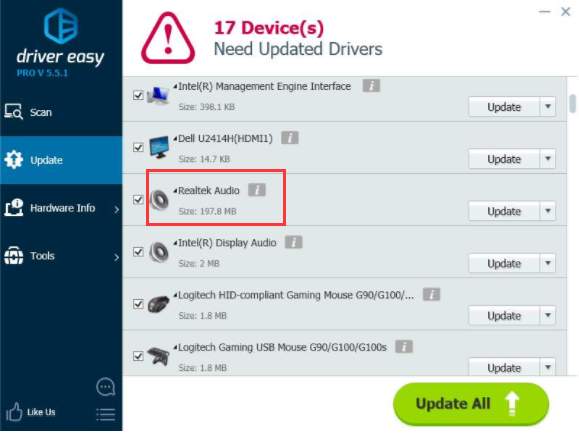
3) Click the Update button next to a flagged audio driver to automatically download and install the correct version of this driver (you can do this with the FREE version). Or click Update All to automatically download and install the correct version of all the drivers that are missing or out of date on your system (this requires the Pro version – you’ll be prompted to upgrade when you click Update All).
Here take Realtek audio for example. Driver Easy will detect the audio card in your computer according to the specific device.
Method 2: Uninstall the Sound Card Device
Uninstalling the device sometimes may help fix the Code 10 error. To uninstall the sound card device, please follow steps below.
1) In Device Manager, double-click to expand “Sound, video and game controllers” branch.
2) Right-click on the every sound device under this branch and click Uninstall to uninstall the sound device.
3. You might be required to confirm the uninstallation. When the Confirm window pops up, check the “Delete the driver software for this device” checkbox and click OK.
4. Restart your PC and check to see if the problem is resolved.
Method 3: Manually Fix Corrupted Registry Entries
IMPORTANT: To perform this, you’ll need to be logged into Windows as an administrator. Please follow the steps below carefully, as serious problems might occur if you modify the registry incorrectly. It is recommended to back up the registry so you can restore them to previous status if a problem occurs.
Follow these steps:
1) On your keyboard, press the Windows logo key and R at the same time to invoke the run box.
2) Type regedit and click OK.
3) In the left pane, locate and then click the registry subkey “HKEY_LOCAL_MACHINE\SYSTEM\CurrentControlSet\Control\Class\{4D36E965-E325-11CE-BFC1-08002BE10318}“
4) Right-click UpperFilters.
If you do not see UpperFilters there, find and right-click LowerFilters. (Note: If you do not see the UpperFilters or LowerFilters registry entry, this method is not for you.)
5) Click Delete on the context menu.

6) When you are prompted to confirm the deletion, click Yes.
7) Restart your PC and check to see if the problem is resolved.
Try methods here and the Code 10 error should resolve.
89
89 people found this helpful
Jun. 23, 2022 / Updated by
Daphne to
Windows 10
Imagine how frustrating it would be if there is no sound when you are about to play games, watch movies or listen to music on your computer. It is really irritating. These days, many users are plagued by audio issues, especially the “No Audio Output Device is installed” issue after Windows 10 updates. Microsoft has released a patch KB4468550 to address the “No Audio Output Device is installed” issue. But there are still a number of users who come to us for help with audio issues. One of these common audio issues is the High Definition Audio Device cannot start (Code 10) or High Definition Audio Controller cannot start (Code 10) issue.
When the High Definition Audio Device cannot start issue occurs, you can see a yellow circle with an exclamation mark under your audio device in the Device Manager. And when you double click the device, you can also see the error message “The device cannot start. (Code 10)” in the Device status section.

If you encounter this issue, don’t fret. Here are several effective methods you can try to get rid of the High Definition Audio Device cannot start issue. Read on to try them one by one.
Method 1. Make Sure the Windows Audio Service Is Started
The High Definition Audio Device cannot start (Code 10) issue may occur if the Windows Audio service is not started. Therefore, if you come across this issue, the first method you can try is to check whether the Windows Audio service is started or not. Do like this:
Step 1. Press Windows + R to launch Run.
Step 2. Type “services.msc” into the Run dialog box and hit Enter.
Step 3. Scroll down to find Windows Audio and check if its Status is “Running”. If no, right click it and select Start from the pop-up menu to start it.

Step 4. Double click Windows Audio and check if the Startup type in the General tab is set as Automatic. If no, set it as Automatic.
Step 5. Restart your computer for the changes to take effect.
Method 2. Uninstall the Audio Device on Your Computer
According to some users who went through the High Definition Audio Device cannot start (Code 10) issue, uninstalling the audio device like High Definition Audio Device plays an important role in resolving the issue. To uninstall the audio device on your computer, you can take the steps below.
Step 1. Launch the Device Manager.
Step 2. Scroll down to find Sound, video and game controllers and double click it to expand it.
Step 3. Right click on the audio device under it (for example, the Realtek High Definition Audio) and select Uninstalldevice from the pop-up menu to uninstall the device.

Step 4. After uninstalling the audio device successfully, restart your computer.
When you reboot your computer, Windows will reinstall the audio device automatically.
Method 3. Update the Audio Driver to Get Rid of Code 10
Outdated audio driver may also lead to the High Definition Audio Device cannot start (Code 10) issue. In this case, you can get rid of the issue by updating the audio driver. These posts are for your reference:
-
How to Download and Update Audio Driver for Windows 10
-
Conexant Audio Drivers Download and Update for Windows 10, 8.1, 8, 7
-
HP Audio Drivers Download and Update on Windows 10, 8.1, 8, 7, XP, Vista
-
Download and Update Lenovo Audio Drivers for Windows 10, 8.1, 8, 7, Vista, XP
-
Asus Realtek Audio Drivers Download and Update for Windows 10/8.1/8/7/Vista/XP
-
Top 2 Ways to Download Intel High Definition Audio Drivers on Windows 10, 8.1, 8, 7, Vista, XP
-
One-Click Realtek High Definition Audio Driver Download & Install for Windows 10, 8.1, 8, 7, XP, Vista
Regarding to the easiest and fastest way to update drivers, the professional driver download utility – Driver Talent can do you a favor. It will help you download, install, update and repair all your drivers quickly and safely. Click on the Download Now button below to get it directly. And follow the guide below to update your audio driver right now.
Download Now
Step 1. Launch Driver Talent and click the Scan button to perform a full scan on your computer. Then all the iffy drivers on your computer will be listed, including your outdated audio driver.

Step 2. If your audio driver is detected as outdated, click the Update button in the right of it to update it.

Step 3. Restart your computer after updating the driver successfully.
If there is still no sound, try the Audio Repair tool. You can access this tool from Driver Talent > Windows Assistant > Audio Repair.

Method 4. Modify the Registry to Troubleshoot the Issue
Sometimes, this method can work to resolve the High Definition Audio Device cannot start (Code 10) issue. Follow the steps below carefully. And you’d better back up the registry before you make any changes. Then if something goes wrong after the modification, you can restore them to the previous status quickly.
Step 1. Press Windows + R to launch Run.
Step 2. Type “regedit” into the Run dialog box and hit Enter to launch the Registry Editor.
Step 3. Navigate to: Computer\HKEY_LOCAL_MACHINE\SYSTEM\CurrentControlSet\Control\Class.
Step 4. Find {4D36E96C-E325-11CE-BFC1-08002BE10318} under the Class and click it to expand it.

Step 5. Find the registry values titled UpperFilters and LowerFilters in the right pane, and then right click them and select Delete from the pop-up menu to delete them. Select Yes when you are prompted to confirm the deletion. (Note: If you don’t see the UpperFilters registry value or the LowerFilters registry value, this method is not for you. And if there is just one of them on your registry, delete that one and move on.)
Step 6. Close the Registry Editor and restart your computer for the changes to take effect.
Method 5: Disable and re-enable the USB controller
Fortunately, the steps to disable and re-enable the USB controller are simple and will not damage your PC. Let’s go through the steps here:
Step 1: Click «Start» and then go to the «Control Panel» tab. Select «System» and then «Hardware Tab«.
Step 2: After opening the «Device Manager» page, click «Universal Serial Bus Controller» to expand it.

Step 3: Right-click on each and select «Uninstall«.
Step 4: After the uninstallation is complete, restart the PC. The machine will reinstall all USB controllers.
Step 5: Insert the USB device, it should install without any problems.
Tip: Please check whether the USB device is running on other PCs. If it is, the USB controller is not working properly.
Method 6: Perform Windows Update
Performing a Windows update can avoid this Windows error because it will update the operating system with the latest security patches. Microsoft often brings users updates to make the most of its operating system by fixing bugs and improving performance. Also, if your system has been updated but has not been implemented, the result of the older version may be error code 10. This is how you can check and update.
Step 1: Click «Start» and then go to the settings icon.
Step 2: In «Settings«, click the «Update and Security» option.
Step 3: Now, go to «Windows Update» from the left panel, and click «Check for Updates» in the Windows Update pop-up window.

Step 4: A new window will pop up to notify that the update has started and the installation progress bar will be displayed.
Step 5: Once you see a message on the screen instructing to restart the computer to complete the installation process, restart the PC.
The error should now disappear.
The High Definition Audio Device cannot start issue should be gone after you try the methods above. If you know other methods to get rid of this issue, welcome to share them with us in the comment section below. To learn more solutions to other audio issues, you can get to the Sound Issue section on this site.
Company
Driver Talent is a professional Windows driver download and update utility from drivethelife.com, a professional team of OSToto Co., Ltd. Since the establishment in 2009, the team has been working hard to develop computer and Internet software so as to improve the work and lives of people. Our products are well received by people from all over the word.
Our Spirit
“User-centric Design, Technology Fundamental, Principles Open”
Our Products
Driver Talent, Driver Talent for Network Card, ExplorerMax
Recommended Download
|
ExplorerMax |
Driver Talent for Network Card | |||
| Smart and advanced file explorer tool for Windows platforms | Download & Install Network Drivers without Internet Connection | |||
|
30-day Free Trial |
Free Download |
What Is «Code 10 This Device Cannot Start» Error?
The «This device cannot start (Code 10)» error is a common error message that appears in the Windows Device Manager when a hardware device fails to start or is not functioning properly.
This error code indicates that the device driver is unable to start, and it can be caused by a variety of reasons such as outdated or corrupt drivers, hardware problems, conflicts with other devices, or issues with the Windows registry. This error can affect any type of hardware device, including sound cards, graphics cards, USB devices, network adapters, WIFI, Bluetooth, keyboard, and more.
It’s worth noting that the symptoms of the «This device cannot start (Code 10)» error can vary depending on the affected hardware device and the cause of the error. Some of the symptoms that may indicate this error:
- The affected device may not be recognized by your computer or may appear as «Unknown Device» in the Device Manager.
- The device may fail to function as expected or may not work at all.
- The affected device may have a yellow exclamation mark next to it in the Device Manager.
- Your computer may freeze or crash intermittently.
- You may experience slow performance or other issues with your computer.

In addition to the «This device cannot start (Code 10)» message, another error message may appear together, for example:
The specified request is not a valid operation for the target device.
The requested operation was unsuccessful.
The I/O request was canceled.
Insufficient system resources exist to complete the API.
Indicates a revision number encountered or specified is not one known by the service. It may be a more recent revision than the service is aware of.
The network address used in the request is invalid.
STATUS_DEVICE_POWER_FAILURE
An invalid parameter was passed to a service or function.
Extra end collection found or end collection not found.
The I/O device is configured incorrectly or the configuration parameters to the driver are incorrect.
The driver was not loaded because it failed its initialization call.
Access Denied. A process has requested access to an object, but has not been granted those access rights.
Causes Of This Device Cannot Start Code 10 Error
The «Code 10 This Device Cannot Start» error occurs when a hardware device in Windows is unable to start. The Code 10 error can be triggered by a variety of reasons related to drivers, hardware, conflicts, Windows registry, malware or virus infections, and power supply issues. There are several reasons why this error may occur:
- Driver issues: The most common cause of the Code 10 error is an issue with the device driver. This can be due to outdated, corrupted or missing drivers.
- Hardware issues: A malfunctioning or damaged device can also cause the Code 10 error.
- Conflict with other devices: If the device is in conflict with another device in the system, such as another hardware device that is using the same resources or interrupt request (IRQ), it can lead to the Code 10 error.
- Issues with the Windows registry: Problems with the registry can cause issues with device drivers, which can result in the Code 10 error.
- Malware or virus infections: Malware or viruses can cause system file damage or corruption, which can affect device drivers and result in the Code 10 error.
- Power supply issues: If the device is not getting enough power, it may not function properly, and the Code 10 error may appear.
It’s important to resolve this error as it can prevent you from using the affected device or cause other problems with your computer. In this section, we’ll present several methods to help you deal with the error safely.
Method #1: Restart Your Computer and The Device
Sometimes the error is caused by a temporary glitch, so restarting your computer and the device may help resolve the issue.
Method #2: Try a Different USB Port
If the device is connected through USB, try connecting it to a different USB port. Sometimes the USB port you’re using may not be working properly.
Method #3: Use Windows Troubleshooter
Windows has a built-in troubleshooter that can help identify and fix device-related issues. Here’s how you can use it:
Step 1. Open the Start menu and type «Troubleshoot settings» in the search box. Click on the «Troubleshoot settings» option that appears.
Step 2. Click «Additional troubleshooters» button, and then you will see a list of troubleshooters available for different categories like Playing Audio, Internet Connections, Bluetooth, Printer, Keyword, etc.
Step 3. Click on the troubleshooter that corresponds to the problem you’re experiencing. For example, if you’re having issues with your Internet connection, click on «Internet Connections» and then click «Run the troubleshooter» button.
Step 4. Follow the prompts provided by the troubleshooter. This may involve answering some questions about the problem you’re experiencing, or the troubleshooter may automatically detect and fix the problem.
If the troubleshooter is able to fix the problem, you should see a notification that says «Troubleshooting has completed» with a message describing what was fixed. If the troubleshooter was not able to fix the problem, it may provide some recommendations for further action.
Method #4: Check for Hardware Issues
Check if there are any physical issues with the device, such as loose or damaged connections. As to data storage devices, such as hard drive, USB flash drive, SD cards, SSDs, etc., you may need to check if there are bad sectors for them. DiskGenius Free Edition can help you view S.M.A.R.T. information, check & repair bad sectors, recover data, etc.
Method #5: Install Windows Updates
In some cases, updating Windows can help resolve issues related to missing or outdated drivers, which can cause the «This device cannot start code 10» error. Windows updates often include bug fixes and driver updates, so it’s possible that updating Windows could fix the issue.
However, if the error is caused by a specific device driver that needs to be updated or reinstalled, then updating Windows alone may not be enough to fix the issue. In that case, you may need to manually update or reinstall the device driver.
Method #6: Update / Reinstall Drivers for the Device
Step 1. Right-click the Start menu and click «Device Manager» option to open Device Manager.
Step 2. Find the device with the error and right-click it, then select «Uninstall device».
Step 3. After the device is uninstalled, restart your computer.
Step 4. When your computer starts up again, it should automatically detect and reinstall the device driver. If not, you can manually reinstall the driver by downloading it from the manufacturer’s website and following the instructions to install it.
Method #7: Roll Back Drivers
If updating the drivers doesn’t work, try rolling back to the previous version of the driver. Here’s how to roll back drivers:
Step 1. Open Device Manager.
Step 2. Find the device with the error and right-click it, then select «Properties».
Step 3. Go to the «Driver» tab and select «Roll Back Driver».
Step 4. Follow the instructions to complete the rollback process.
Method #8: Restore Windows to a Previous Status
Restoring Windows to a previous point time can potentially fix the «This device cannot start code 10» error if the error started to occur after a recent change, such as a driver or software update. System Restore is a built-in feature of Windows that allows you to restore your computer to a previous state, where everything was working correctly.
However, it’s important to note that this method may not work in all cases and may not be the best solution if you have installed a lot of software or made many changes to your system since the restore point was created. In that case, it may be better to try other troubleshooting methods, such as updating or reinstalling the device driver.
How to Recover Lost Data Caused by Code 10 This Device Cannot Start?
If you have lost data due to a Code 10 error, there are a few steps you can take to try to recover the unsaved or lost data:
Step 1. Check the Autosave feature: Many software applications have an autosave feature that automatically saves your work at regular intervals. Check if the application you were working in has this feature and if it saved any versions of your work.
Step 2. Check the temporary files folder: When you are working on a document, temporary files are often created and stored in a temporary files folder. Check this folder for any files that may contain your unsaved work.
Step 3. Check Cloud Storage: If you were working on a document stored in a cloud storage service such as Dropbox or Google Drive, check the service’s web interface to see if an earlier version of the document was saved.
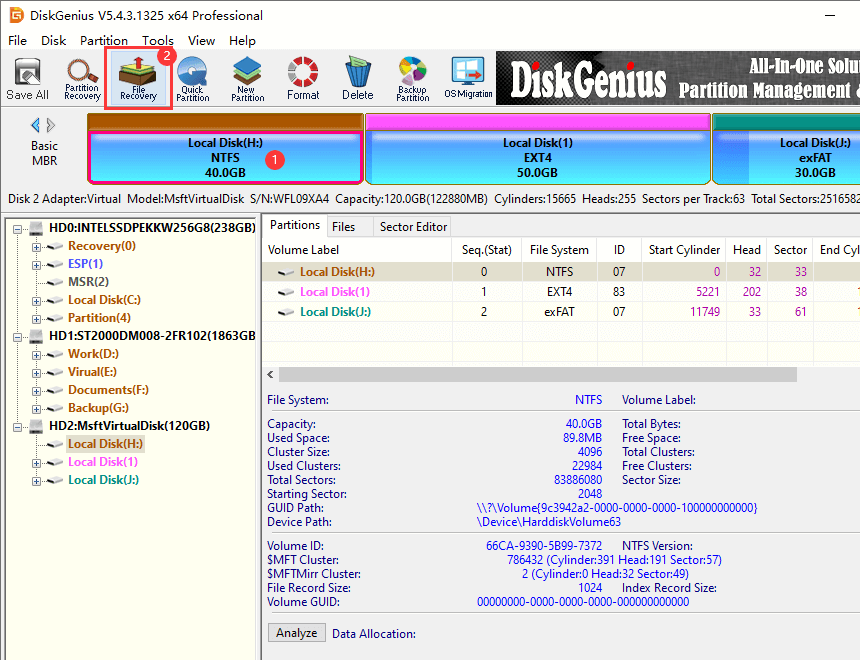
Step 4. Use File Recovery Software: There are many file recovery programs available that can help you recover unsaved or lost data due to Code 10 errors. These programs scan your hard drive for any recoverable files and allow you to restore them. Here are steps to recover deleted or lost files using DiskGenius:
1. Install and launch DiskGenius. Then you can find the drive where lost files were located. Select the drive and click «File Recovery» button.
2. Click «Start» button on the «Recover files» window. Then DiskGenius starts to scan the drive and look for lost files.
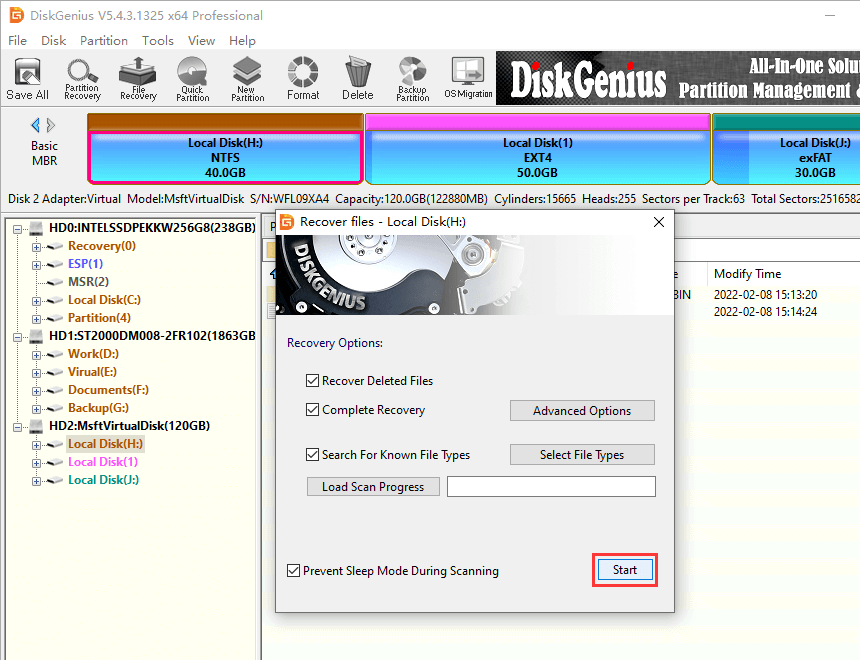
3. Let the scanning finish.
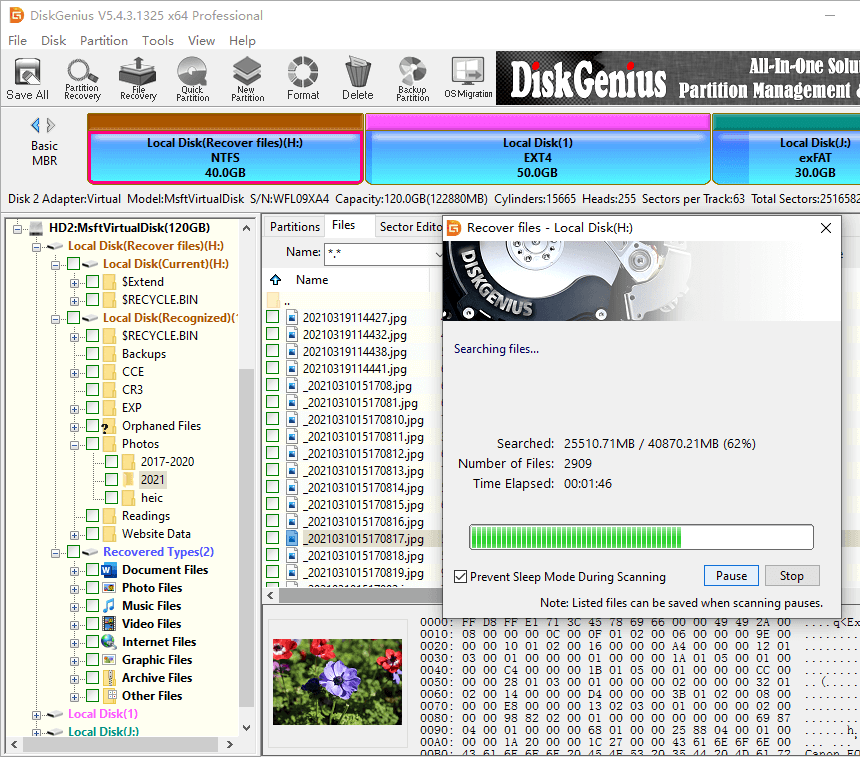
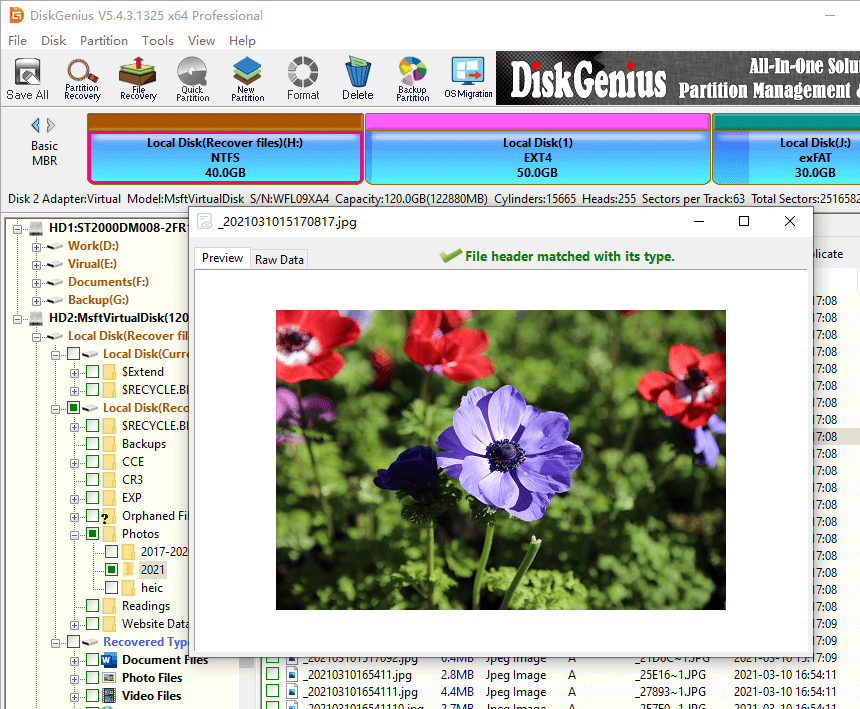
4. Preview lost files. File preview can help locate wanted files and check if they are still recoverable.
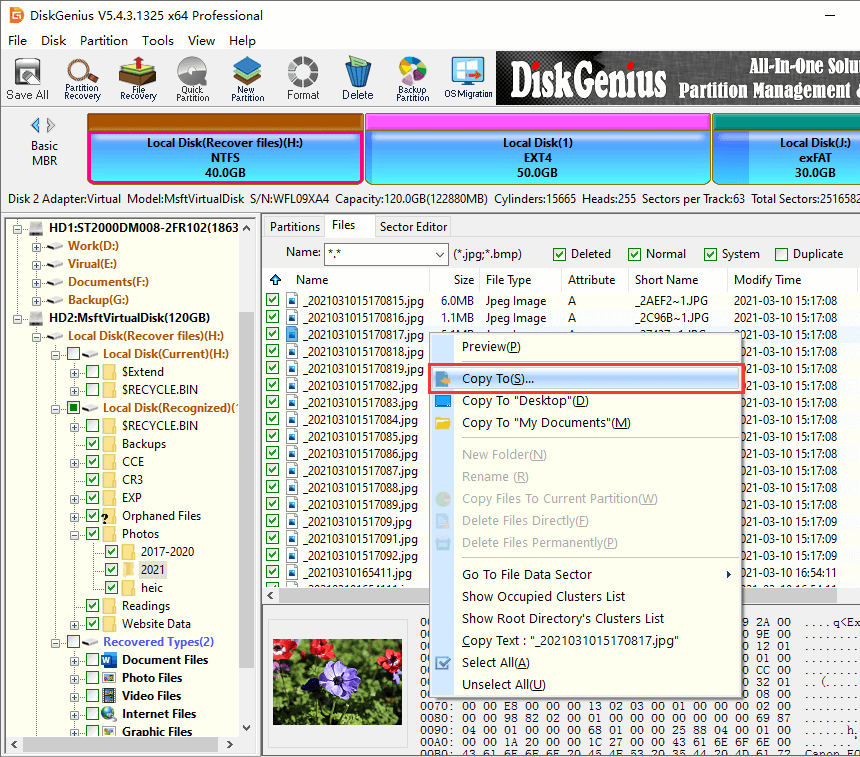
5. Export files you want to recover to a different drive.
Conclusion
As discussed above, the «this device cannot start code 10» error can happen to many devices and it can be caused by different factors. Moreover, this error can be fixed easily via a few steps. If none of the fixes mentioned in this page work on your computer, you may need to contact the manufacturer for further assistance or consider replacing the device.
Frequently Asked Questions
1. What is error code 10 on Realtek?
The Realtek driver code 10 is a common error code that appears in the Device Manager of Windows when there is a problem with the Realtek audio device driver. This error indicates that the driver is not working properly, and the device may not function as expected. The error code 10 can be caused by a variety of issues, such as outdated or corrupted drivers, conflicts with other hardware devices, or faulty hardware. To resolve the Realtek driver code 10 error, you can try updating or reinstalling the Realtek audio driver, checking for conflicts with other hardware devices, or replacing the faulty hardware component.
2. What is code 10 on WIFI driver?
Code 10 on a WIFI driver usually indicates a driver issue or a problem with the wireless network adapter itself. Here are some possible causes and solutions for code 10 on a WIFI driver: outdated or corrupted drivers, device conflicts, damaged wireless network adapter, faulty USB ports, etc.
3. What is error code 10 on SSD?
Error code 10 on an SSD usually indicates a driver issue or a problem with the storage device itself. Here are some possible causes and solutions for error code 10 on an SSD: driver issues, damaged SSDs, faulty motherboards, malfunctioning SATA cable, etc.
4. What is error code 10 on motherboard?
Error code 10 on a motherboard can indicate various issues related to devices connected to it. This error code is usually related to a driver issue or a problem with the device itself. Here are some common causes and solutions for error code 10 on a motherboard: Outdated or corrupted drivers, device conflicts, faulty hardware, malfunctioning motherboard, etc. The exact cause and solution may vary depending on the specific device and motherboard. If you are unsure of how to proceed or if the issue persists, it is recommended that you seek professional assistance.
5. What is code 10 STATUS_DEVICE_POWER_FAILURE?
Code 10, also known as «Device Cannot Start» is a generic error code that can occur in the Windows Device Manager. This error indicates that the device driver for a particular hardware device on your computer has failed to start or has encountered an error.
In the case of the «STATUS_DEVICE_POWER_FAILURE» error, it specifically indicates that the device is not starting because it has encountered a power failure or is not receiving enough power to function properly.
This error can be caused by a number of different factors, such as a faulty hardware component, outdated or corrupted device drivers, conflicts with other hardware or software on your system, or issues with your power supply.
To resolve this error, you can try updating your device drivers, checking your power supply and connections, and troubleshooting any hardware or software conflicts. If the issue persists, it may be necessary to replace the faulty hardware component.
6. What is error code 10 on keyboard driver?
If you are encountering error code 10 on your keyboard driver in the Windows Device Manager, it means that the driver for your keyboard is not functioning properly and is unable to start. This error code can occur due to various reasons, such as outdated or corrupted drivers, conflicts with other hardware or software on your system, or issues with your computer’s registry.
7. What is error code 10 on Seagate external hard drive?
If you encounter error code 10 on a Seagate external hard drive, it usually means that the driver for the device is not functioning correctly or has become corrupt. The error can also indicate that the device is not receiving enough power or that there is a hardware issue with the drive itself. Here are some fixes to the problem: try connecting the external hard drive on a different USB port, update the driver, backup files and format the drive, etc.
8. How to reset Realtek?
To reset the Realtek audio driver to its default settings, you can try the following steps:
Step 1. Open the Windows Control Panel and select «Hardware and Sound» or «Sound».
Step 2. Locate your Realtek audio device and right-click on it, then select «Properties».
Step 3. In the Properties window, select the «Advanced» tab. Under the «Default Format» section, select the «Restore Defaults» button.
Step 4. Click «Apply» and then «OK» to save the changes. Restart your computer for the changes to take effect.
This should reset the Realtek audio driver to its default settings. However, keep in mind that this will also reset any custom settings that you may have configured for your audio device, such as volume levels, equalizer settings, and so on.
9. How do I fix a hard drive that won’t boot Windows 10?
If your hard drive won’t boot Windows 10, here are some steps that you can try to fix the issue:
- Check the boot order: Make sure that the hard drive is set as the first boot device in your computer’s BIOS settings. To access the BIOS, restart your computer and press the key indicated on your screen to enter the BIOS setup.
- Run Startup Repair: Boot your computer from a Windows 10 installation media such as a USB drive or DVD, and select «Repair your computer» instead of installing Windows. Select «Troubleshoot» > «Advanced options» > «Startup Repair.» The tool will scan your system and attempt to fix any issues preventing Windows from booting.
- Connect the hard drive to another computer as a secondary drive. Then scan the hard drive using DiskGenius to check if there are bad sectors on the drive.
10. How do I fix my hard drive that won’t start?
If your hard drive won’t start, here are some steps that you can try to fix the issue:
- • Check the power and data connections: Make sure that the hard drive is properly connected to your computer’s power and data cables. Try disconnecting and reconnecting the cables to ensure a good connection.
- Check the BIOS settings: Make sure that the hard drive is enabled in the BIOS settings of your computer. To access the BIOS, restart your computer and press the key indicated on your screen to enter the BIOS setup.
- Run hardware diagnostic tests: Most hard drive manufacturers provide free diagnostic software that can help you identify hardware issues with your drive. Download and run the diagnostic tool for your hard drive manufacturer to determine if there are any issues with the drive.
- Try booting from a different device: If you are unable to boot from the hard drive, try booting your computer from a different device, such as a CD or USB drive. This will help you determine if the issue is with the hard drive or with your computer’s boot process.
- Use data recovery software: If the hard drive is not physically damaged and the issue is with the boot sector or file system, you may be able to recover your data using data recovery software. There are many free and paid data recovery software options available.
11. How do I turn off Windows 10 error?
If you are referring to turning off the Windows error reporting feature in Windows 10, you can do so by following these steps:
Step 1. Type «services » into the searching box and click Services app.
Step 2. Scroll down the list of services and find «Windows Error Reporting Service.» Right-click on the service and select «Properties».
Step 3. In the Properties window, click on the «Stop» button to stop the service.
Step 4. Change the «Startup type» to «Disabled» from the drop-down menu. Click «Apply» and then «OK» to save the changes.
This will disable the Windows error reporting feature in Windows 10. Note that disabling this feature will prevent Microsoft from receiving error reports and may impact their ability to diagnose and fix issues in Windows 10. It is recommended that you only disable this feature if you are experiencing persistent errors and have exhausted other troubleshooting options.
12. How do I fix corrupted drivers in Windows 10?
One way to repair a corrupted driver is to use the built-in System File Checker (SFC) tool. The SFC tool can help you scan and repair corrupt system files, including drivers. If the SFC tool does not fix the issue, you can try updating or reinstalling the driver. In some cases, it may be necessary to perform a clean install of Windows 10 to resolve driver issues. However, this should be considered a last resort, as it will erase all data on your system drive. Make sure to backup important files before proceeding.
13. What is error code 10 on ADB driver?
When you connect an Android device to your computer, you may encounter an «error code 10» on the ADB (Android Debug Bridge) driver. This error typically indicates that the ADB driver is not working properly and cannot establish a connection with the Android device. The most common causes of the ADB error code 10 include: outdated or missing ADB driver, incompatible USB connection mode, USB debugging not enabled, or conflicting drivers.
To resolve the ADB error code 10, you can try updating or reinstalling the ADB driver, enabling USB debugging on the Android device, ensuring the correct USB connection mode is selected, and disabling conflicting drivers or software.
More topics
- Fixed: Windows Cannot Initialize the Device Driver for This Hardware (Code 37)
- Fixed: A Device Which Does Not Exist Was Specified HDD/SSD/USB
- Fix Unreadable USB/Pen Drive with Free USB Repair Tool in Windows 11/10
- How to Format SD Card to FAT32 in Windows 11/10/8/7? (2023 Updated)
В случае, если рядом с именем устройства в диспетчере устройств Windows отображается желтый восклицательный знак, а в свойствах устройства указано «Запуск этого устройства невозможен. (Код 10)». Также может показываться дополнительная информация, например «Такой запрос не поддерживается», «Превышение времени ожидания устройства» или другая, как правило, проблему можно исправить, но не всегда сделать это легко.
В этой инструкции подробно об исправлении ошибки «Запуск этого устройства невозможен» код 10 для различных типов устройств в Windows 11/10 и предыдущих версий системы, с большой вероятностью один из методов позволит решить возникшую проблему.
Простые способы исправить ошибку «Код 10» в диспетчере устройств

Прежде всего стоит попробовать следующие простые шаги для исправления рассматриваемой проблемы:
- Если ошибка «Запуск этого устройства невозможен» возникает в Windows 11/10 или 8.1, при этом только после завершения работы или режима сна, но исчезает после перезагрузки, причем независимо от того, о каком устройстве идет речь, помочь может одно из следующих действий:
- Отключение функции «Быстрый запуск».
- Ручная установка драйверов чипсета, Intel Management Engine (для Intel компьютеров и ноутбуков), управления электропитанием (часто необходимы для ноутбуков). Следует скачать эти драйверы с официального сайта производителя ноутбука или материнской платы (если у вас ПК) и вручную установить их. Важно: даже если у вас установлена Windows 11/10, а на официальном сайте драйверы для предыдущей версии системы, все равно следует их установить.
- Если проблема возникла с USB устройством, попробуйте подключить его в другой разъем на компьютере или ноутбуке, можно также попробовать другой тип разъема (USB 2.0 вместо 3.0 и наоборот). При использовании USB-хабов, попробуйте подключить устройство напрямую к разъему.
- Для некоторых устройств, в свойствах которых в диспетчере устройств присутствует вкладка «Управление электропитанием» помогает снятие отметки «Разрешить отключение этого устройства для экономии энергии», применение настроек и перезагрузка компьютера.
- Откат драйвера устройства. Откройте свойства устройства в диспетчере устройств, на вкладке драйвер проверьте активность кнопки «Откатить». Если кнопка активна — используйте её.
- Обновление драйвера устройства. Важно: обновление — это не нажать «Обновить драйвер» в диспетчере устройств (он с большой вероятностью сообщит, что драйвер не требует обновления, даже если это не так), а вручную скачать последнюю версию драйвера с сайта производителя устройства и установить его.
- Удаление проблемного устройства в диспетчере устройств (правый клик по устройству — удалить), а затем использование пункта «Действие» — «Обновить конфигурацию устройства» в главном меню диспетчера устройств.
Дополнительно в случае, если проблема возникает с USB устройством или Wi-Fi адаптером, при этом не регулярно (то есть может исчезать), попробуйте такой вариант: зайдите в Панель управления — Электропитание, нажмите «Настройка схемы электропитания» рядом с названием текущей схемы, а затем перейдите в раздел «Изменить дополнительные параметры питания».
В следующем окне обратите внимание на параметры адаптера беспроводной сети (если проблема с Wi-Fi адаптером) и «Параметры USB».
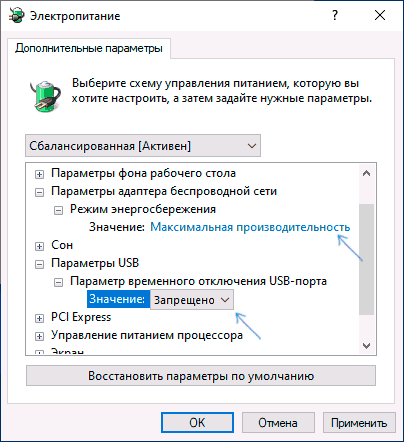
Установите значения «Максимальная производительность» и «Запрещено», как на изображении выше, а затем примените настройки и перезагрузите компьютер.
Исправление ошибки «Запуск этого устройства невозможен» в редакторе реестра
Следующий метод решения проблемы — использование редактора реестра. Перед этим рекомендую создать точку восстановления системы или резервную копию реестра, они помогут в случае, если что-то пойдет не так.
Шаги будут следующими:
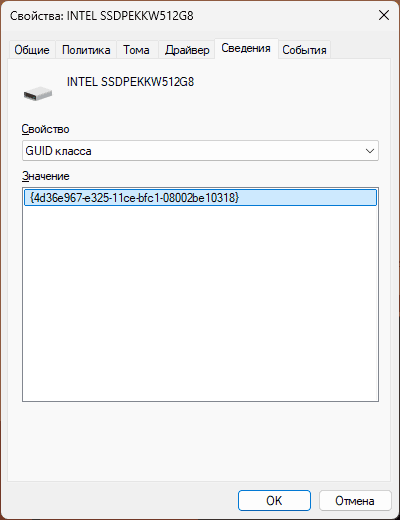
- В диспетчере устройств откройте свойства устройства с ошибкой, перейдите на вкладку «Сведения» и выберите пункт «GUID класса». Не закрывайте окно, эти сведения нам потребуются на 3-м шаге.

- Запустите редактор реестра, для этого можно нажать клавиши Win+R и ввести regedit.
- Перейдите в раздел реестра (папки слева):
HKEY_LOCAL_MACHINE\SYSTEM\CurrentControlSet\Control\Class\GUID_класса
- В правой части окна реестра удалите значения UpperFilters и LowerFilters при их наличии, нажав по ним правой кнопкой мыши и выбрав пункт «Удалить».

- Закройте редактор реестра и перезагрузите компьютер.

Наиболее часто требуемые разделы (но лучше уточнить в диспетчере устройств):
- {36fc9e60-c465-11cf-8056-444553540000} — USB-контроллеры
- 4d36e972-e325-11ce-bfc1-08002be10318 — сетевые адаптеры
- 4d36e968-e325-11ce-bfc1-08002be10318 — видеокарты
- 4d36e96c-e325-11ce-bfc1-08002be10318 — аудио и видео устройства
- 4d36e96f-e325-11ce-bfc1-08002be10318 — мыши
- 4d36e96b-e325-11ce-bfc1-08002be10318 — клавиатуры
- 6bdd1fc6-810f-11d0-bec7-08002be2092f — камеры и сканеры
- 4d36e967-e325-11ce-bfc1-08002be10318 — жесткие диски
- 4d36e96a-e325-11ce-bfc1-08002be10318 — контроллеры жестких дисков
- 4d36e96d-e325-11ce-bfc1-08002be10318 — модемы
- 4d36e978-e325-11ce-bfc1-08002be10318 — последовательные и параллельные порты
- 4d36e97b-e325-11ce-bfc1-08002be10318 — контроллеры SCSI и RAID
- 4d36e97d-e325-11ce-bfc1-08002be10318 — системные шины и мосты
После внесения изменений не забывайте о перезагрузке компьютера.
В случае, если предложенные решения не сработали, но у вас есть точки восстановления системы на дату, когда проблема не проявляла себя, можно попробовать использовать их, возможно, это поможет исправить проблему. Также вы можете выполнить сброс системы или автоматическую переустановку.