
Все способы:
- Способ 1: Панель задач
- Способ 2: Панель управления
- Способ 3: Исполняемый файл Диспетчера Realtek HD
- Решаем проблемы с запуском Диспетчера Realtek HD
- Добавление Диспетчера Realtek HD в автозапуск
- Переустановка драйвера Realtek
- Альтернативная настройка звука
- Вопросы и ответы: 34
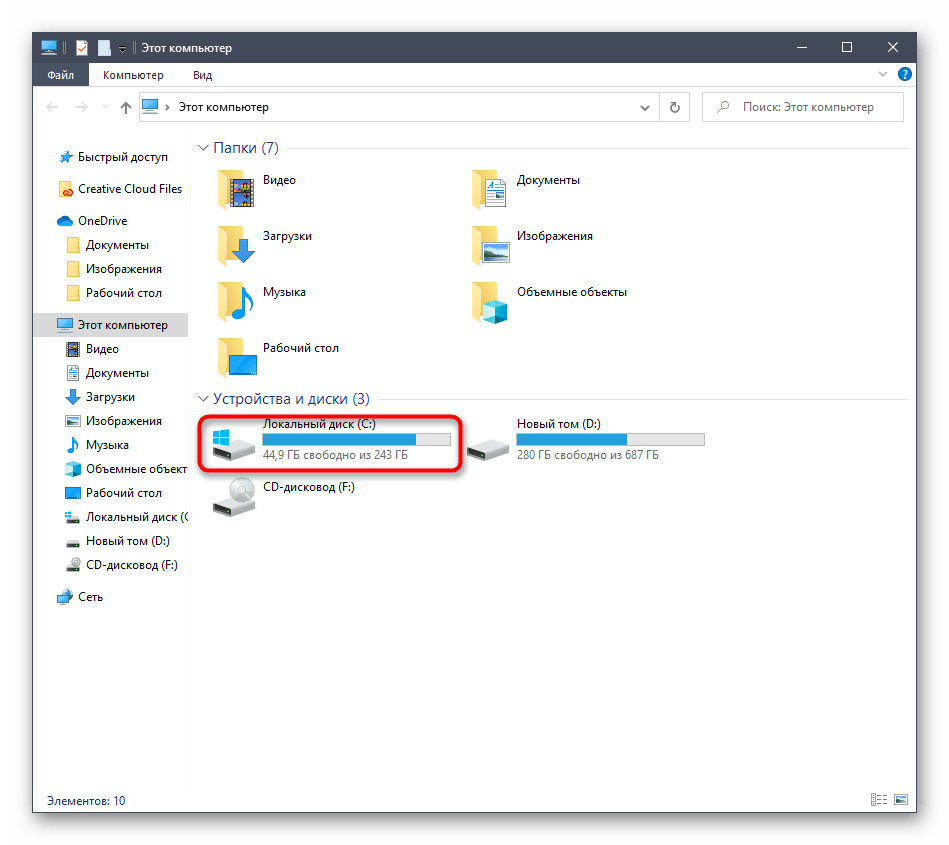
Сейчас практически все материнские платы оснащаются встроенной звуковой картой. В большинстве случаев производителем такого оборудования выступает компания Realtek, поставляя и программное обеспечение, предназначенное для настройки звука. После установки соответствующих драйверов некоторые пользователи сталкиваются с задачей открытия этого ПО с графическим интерфейсом для изменения конфигурации. В Windows 10 существует несколько методов выполнения этой операции. Сегодня мы расскажем не только о них, но и приведем известные методы исправления неполадок, если вдруг Диспетчер Realtek HD по каким-то причинам не открывается.
Перед началом разбора способов мы хотим уточнить, что рассматриваемая сегодня панель управления звуком появится в ОС только после установки соответствующих драйверов, загруженных с официального сайта Realtek или со страницы поддержки материнской платы либо ноутбука. Если вы еще не сделали это, рекомендуем изучить приведенную далее инструкцию, где вы найдете детальное описание всех доступных способов инсталляции ПО, включающее в себя Диспетчер Realtek HD.
Читайте также: Скачиваем и устанавливаем звуковые драйвера для Realtek
Способ 1: Панель задач
Если вы обратите внимание на нижнюю панель в Windows 10, а именно на правую ее часть, то заметите там ряд системных и сторонних значков, отвечающих за быстрый вызов фоновых приложений. Если Диспетчер Realtek HD был добавлен в автозапуск и уже находится в активной фазе своей работы, открыть графическое меню можно через эту панель, что делается буквально в несколько кликов.
- Посмотрите на панель задач. Если значок Диспетчера отсутствует в первой строке, нажмите на пиктограмму в виде стрелки вверх, чтобы отобразить дополнительные приложения.
- Там отыщите иконку, показанную на скриншоте ниже, и нажмите по ней левой кнопкой мыши.
- Подождите несколько секунд, чтобы окно управления открылось. После этого можете приступать к настройке звука.

Иногда интересующая вас иконка не показывается на панели задач в связи с тем, что ее отображение было отключено в системных настройках или данный параметр по каким-то причинам сброшен. Рекомендуем проверить это, выполнив следующие действия:
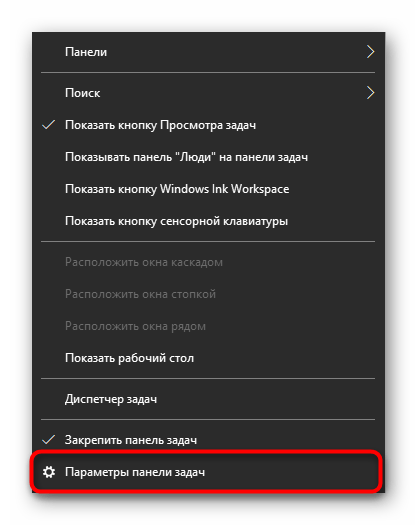
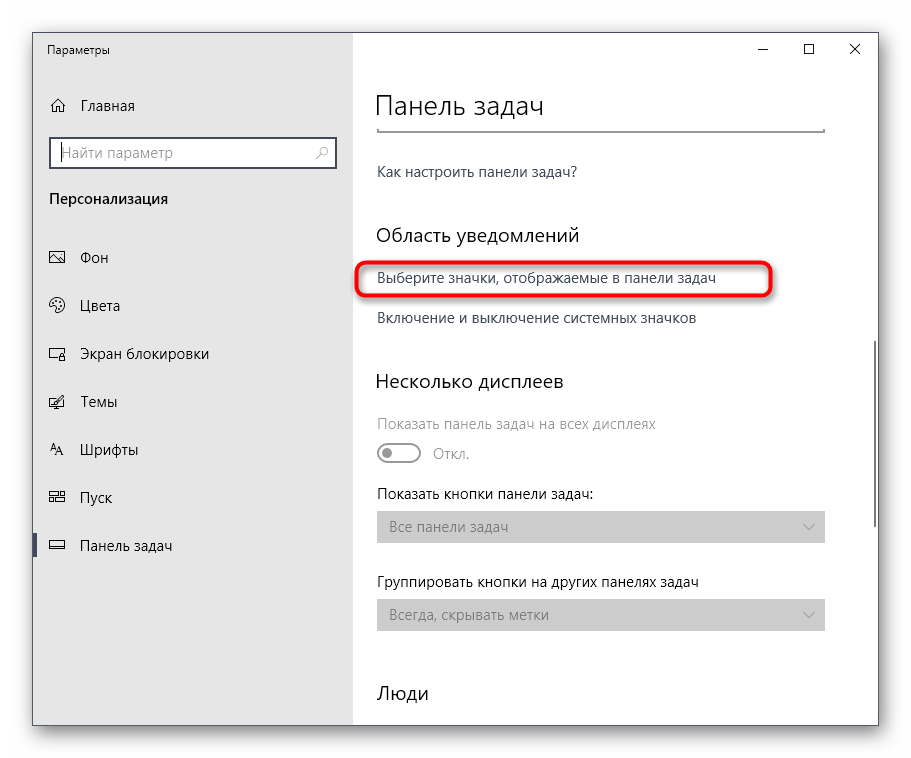
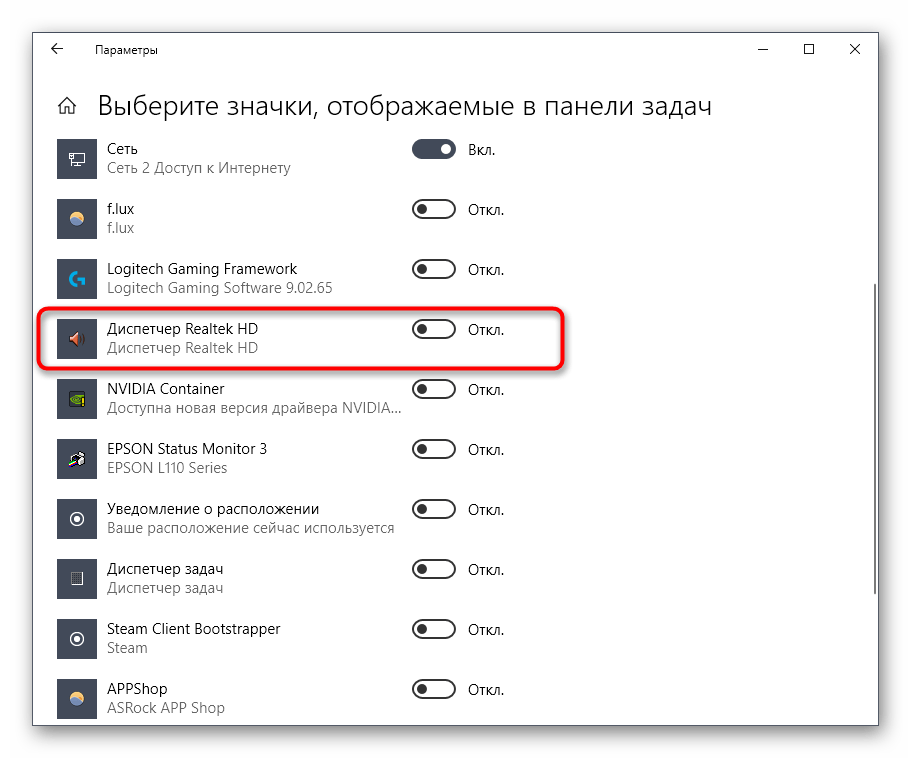
- Щелкните по пустому месту на панели правой кнопкой мыши и в контекстном меню выберите последний пункт «Параметры панели задач».
- В открывшемся окне опуститесь немного вниз и щелкните по надписи «Выберите значки, отображаемые в панели задач».
- Отыщите там «Диспетчер Realtek HD» и убедитесь в том, что ползунок установлен в положении «Вкл.». Если это не так, просто передвиньте его и можете закрыть данное окно, проверив отображение значка.
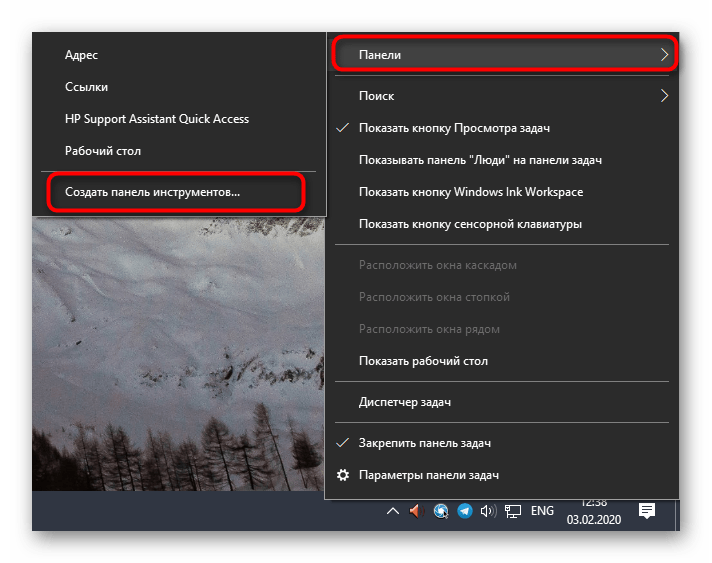
В завершение этого метода хотим отметить, что в некоторых ситуациях отображение рассмотренного значка на панели задач невозможно или же Диспетчер постоянно завершает свою работу, не функционируя в фоновом режиме. Тогда пользователю предлагается создать новую панель инструментов, задав путь к исполняемому файлу Диспетчера Realtek HD, чтобы в любой момент начать работу с этим приложение. Это подойдет даже в тех ситуациях, когда вы просто не хотите, чтобы это ПО функционировало постоянно в фоновом режиме.
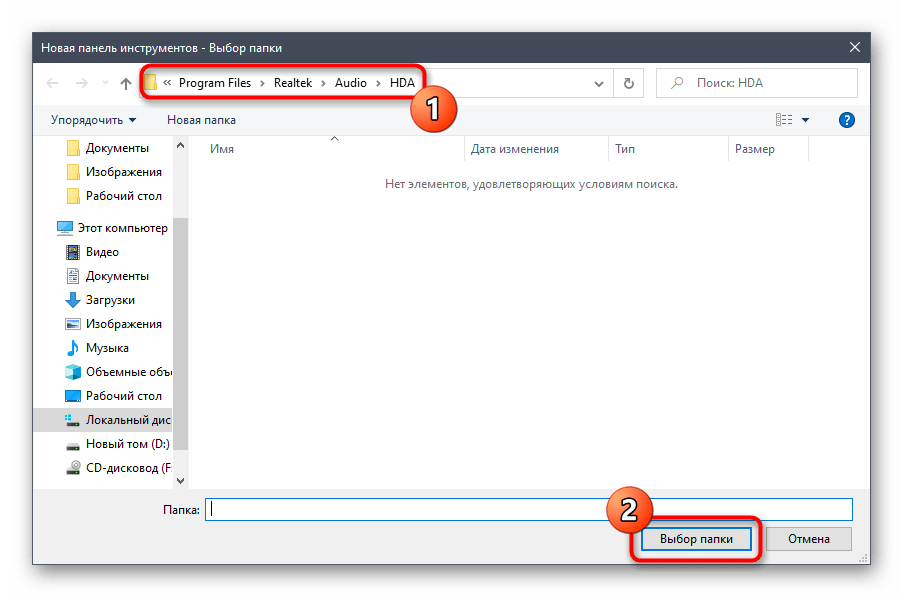
- Для этого щелкните ПКМ по свободному месту на панели задач, наведите курсор на «Панели» и выберите пункт «Создать панель инструментов».
- В открывшемся окне обозревателя перейдите по пути
C:\Program Files\Realtek\Audio\HDAи нажмите на «Выбор папки». - Теперь на панели задач отобразится значок с надписью «HDA». Нажмите на стрелки вправо возле него и выберите один из исполняемых файлов, чтобы запустить работу Диспетчера.

Только что вы узнали о самом простом варианте запуска Диспетчера Realtek HD. Если вдруг не получилось найти ни значок, ни папку с самой программой, сразу перемещайтесь к разделу с решением проблем, чтобы исправить данную ситуацию. В случае, когда этот способ не подходит, ознакомьтесь с двумя представленными далее.
Способ 2: Панель управления
После установки всех необходимых драйверов в Панель управления Windows 10 добавляется отдельный раздел, через который осуществляется запуск рассматриваемой сегодня программы. Если вы заинтересованы в выполнении этого способа, осуществите следующие действия:
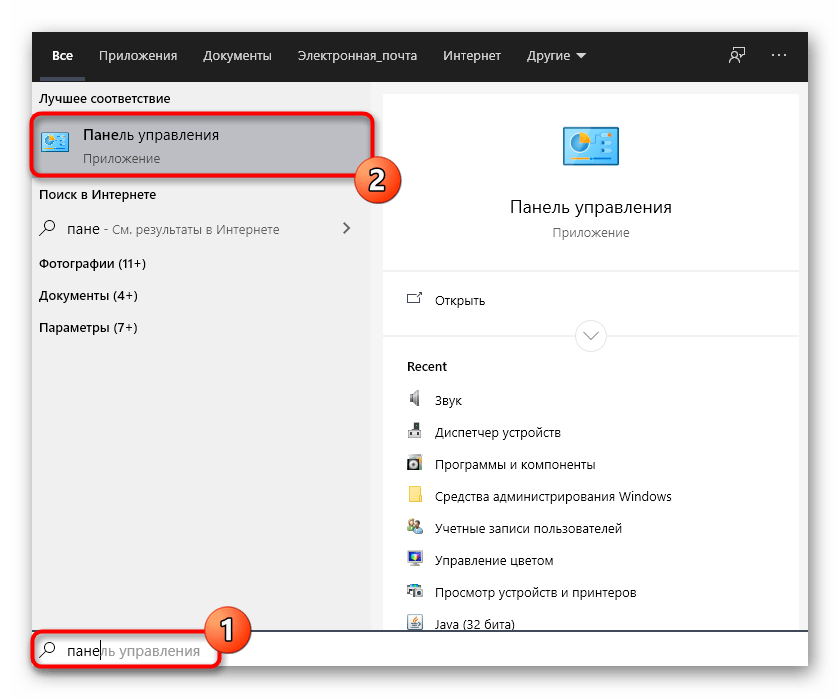
- Откройте «Пуск» и через поиск отыщите приложение «Панель управления».
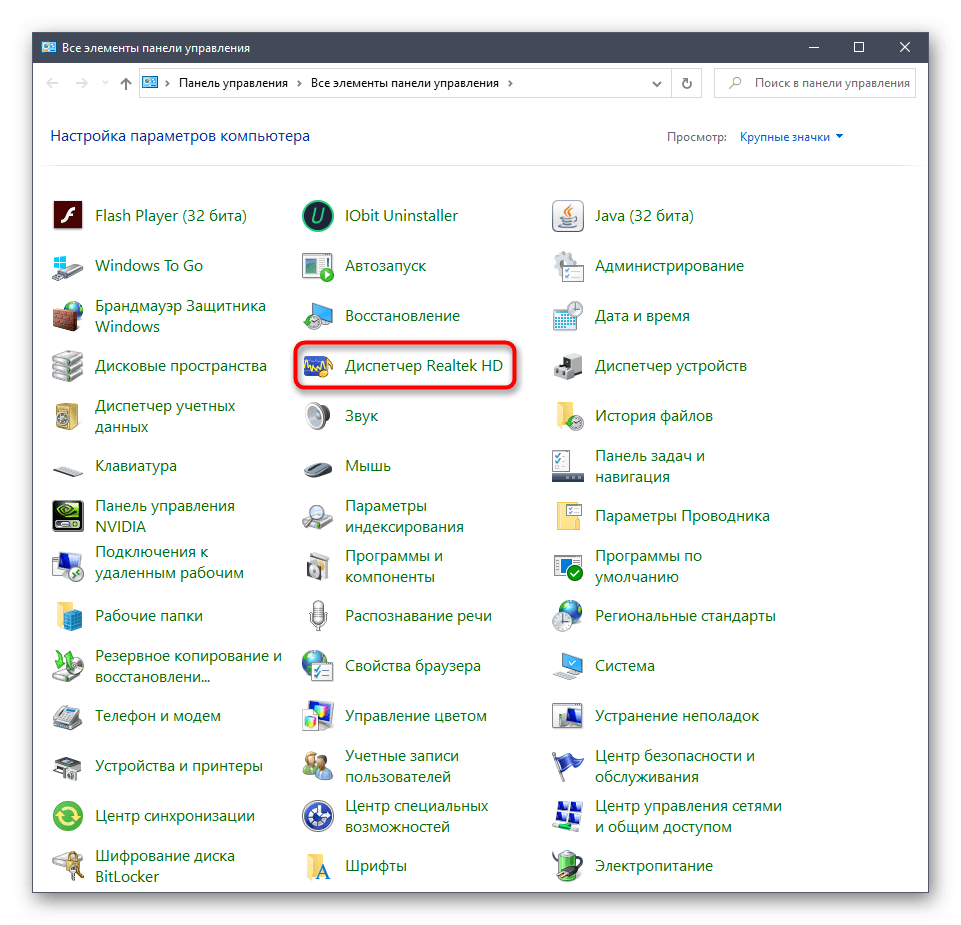
- Здесь отыщите строку «Диспетчер Realtek HD» и щелкните по ней левой кнопкой мыши.
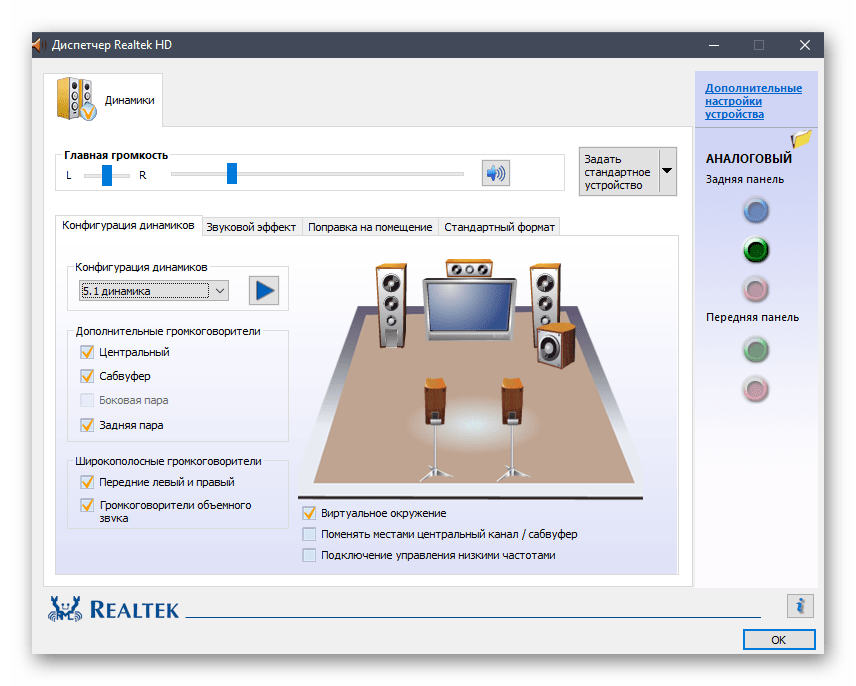
- Теперь вы можете приступить к настройке звука через открытое меню.
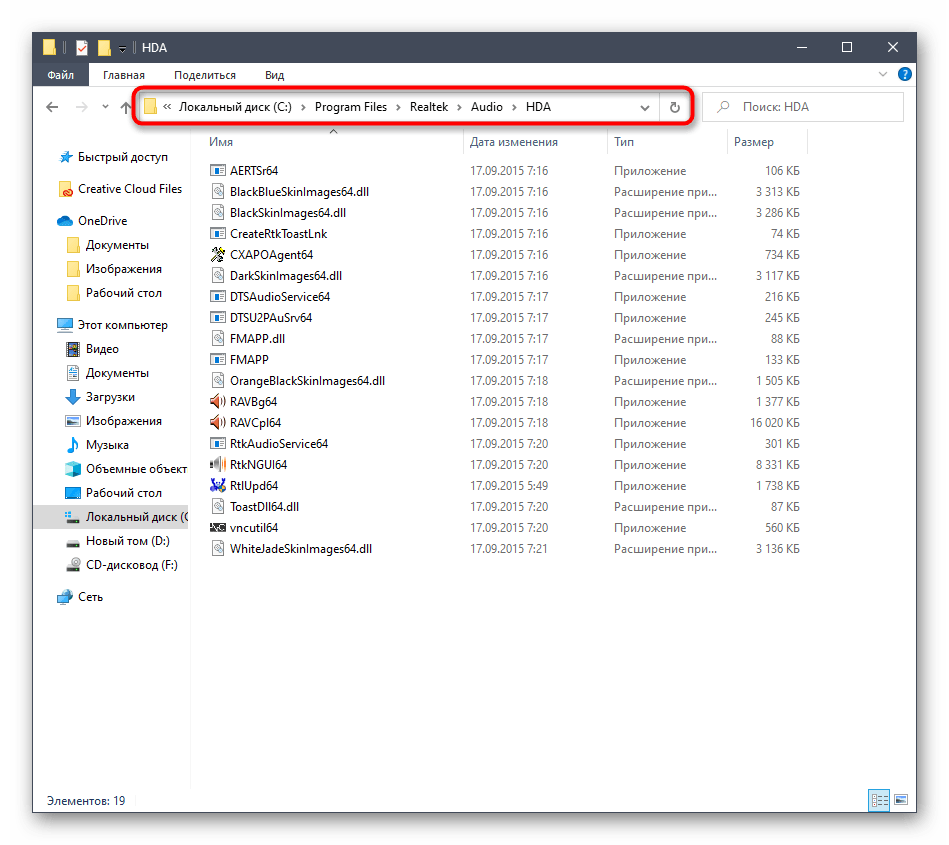
Способ 3: Исполняемый файл Диспетчера Realtek HD
Во время ознакомления с первым методом вы могли заметить, что при создании панели инструментов происходит обращение к корню папки, где хранится программное обеспечение от Realtek. Находящийся там исполняемый файл можно использовать, чтобы открыть меню настройки звука. Для этого придется выполнить всего несколько простых шагов.
- Откройте Проводник и перейдите к системному разделу, куда обычно инсталлируются программы.
- Перейдите по пути
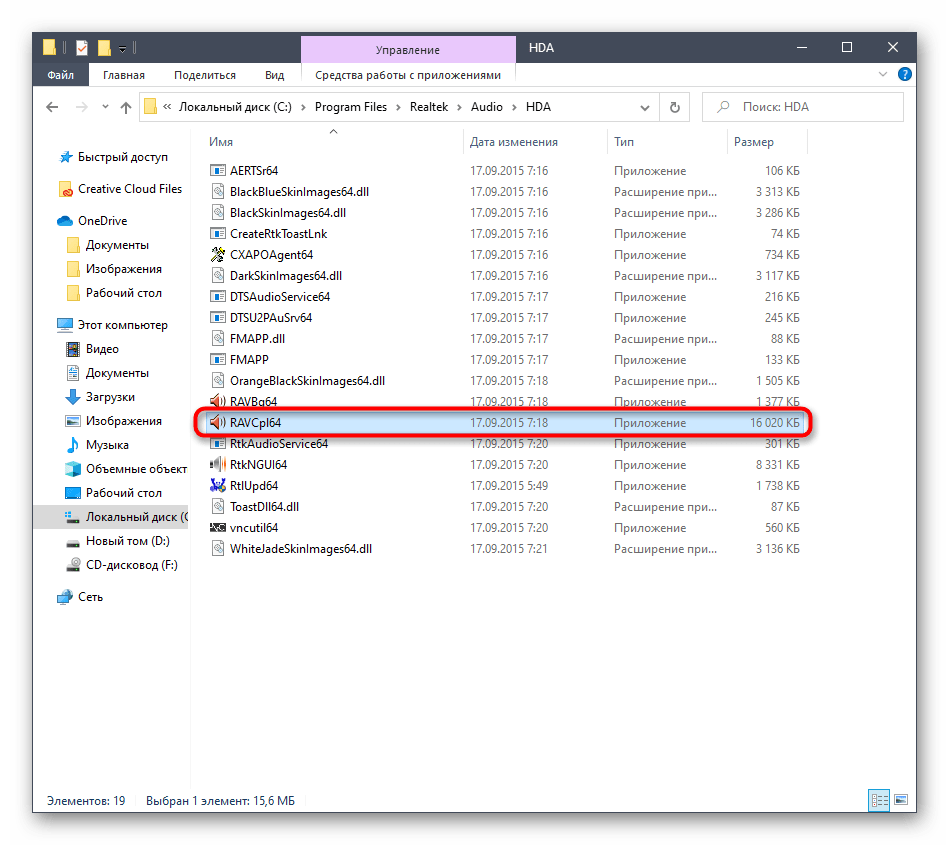
Program Files\Realtek\Audio\HDA, чтобы попасть в корень необходимого каталога. - Здесь запустите исполняемый файл «RAVCpl64» для открытия графическое меню. Если после нескольких секунд ожидания меню так и не отобразилось, попробуйте нажать на «RAVBq64» или «RtkNGUI64».
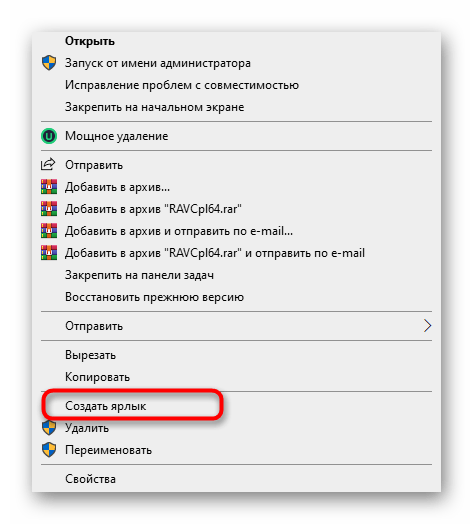
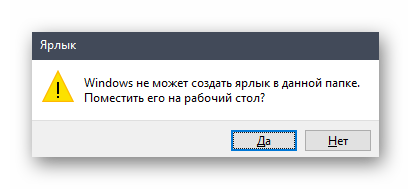
- При необходимости более быстрого запуска данного приложения щелкните по нему ПКМ и в контекстном меню выберите пункт «Создать ярлык».
- Подтвердите его помещение на рабочий стол.
- Теперь доступен более быстрый переход к графическому меню через значок на рабочем столе.
Это были все методы, которые позволяют запустить Диспетчер Realtek HD. Вам осталось только подобрать подходящий для себя, чтобы быстро открывать графическое меню и производить конфигурацию динамиков или микрофона. Если же во время этого процесса возникли какие-либо проблемы, мы предлагаем ознакомиться с возможными решениями далее.
Решаем проблемы с запуском Диспетчера Realtek HD
В большинстве случаев проблемы с запуском рассматриваемого приложения связаны с некорректным функционированием звукового драйвера, а постоянное закрытие Диспетчера вызывает отсутствие его в автозагрузке. Давайте разберемся со всем этим более детально.
Добавление Диспетчера Realtek HD в автозапуск
Приложения автозапуска в Windows загружаются вместе со стартом операционной системы и функционируют в фоновом или активном режиме. Если приложение Realtek отсутствует в этом списке, оно будет завершать свою работу после каждой перезагрузки системы и, соответственно, значок на панели задач тоже пропадет. Исправить эту ситуацию можно банальным добавлением ПО в автозапуск, что осуществляется так:
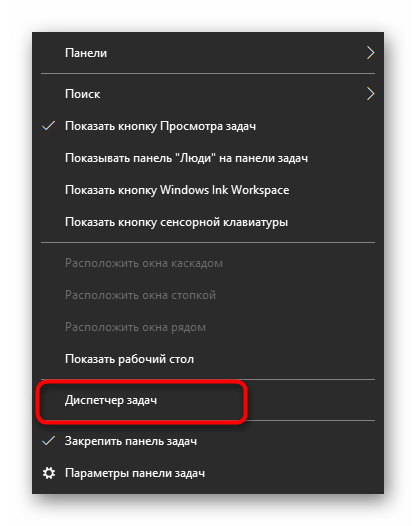
- Щелкните по пустому месту на панели задач ПКМ и в контекстном меню выберите пункт «Диспетчер задач».
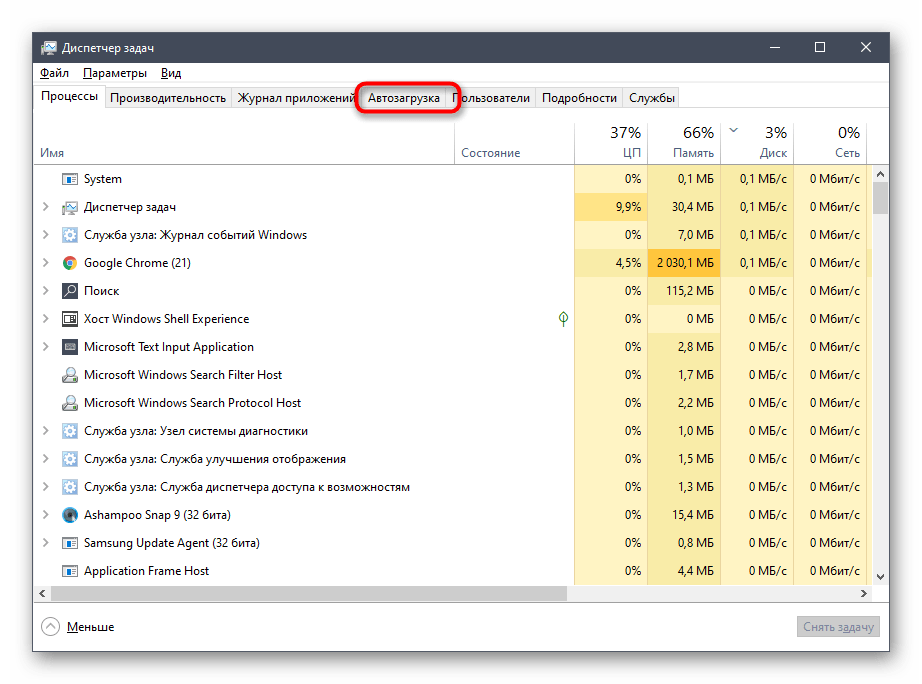
- В открывшемся окне перейдите на вкладку «Автозагрузка».
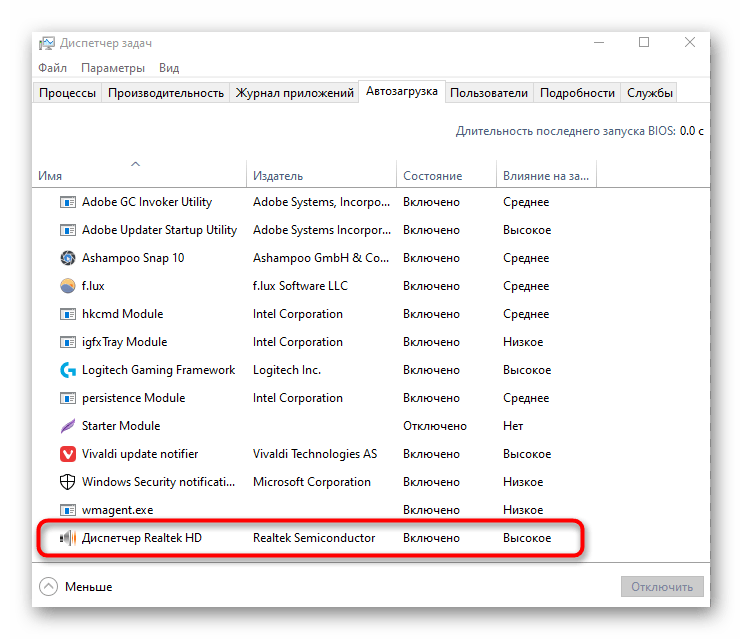
- Отыщите там «Диспетчер Realtek HD» и задайте ему состояние «Включено».
Теперь вы будете уверены в том, что приложение запустится автоматически после перезагрузки операционной системы и переход к нему можно выполнить через соответствующий значок на панели задач.
Переустановка драйвера Realtek
Иногда проблемы запуска панели управления звуком связаны с устаревшими или неправильно установленными драйверами. В таком случае лучше их переустановить. Для этого сначала удаляется старый драйвер, а лучше всего это сделать через меню Приложения.
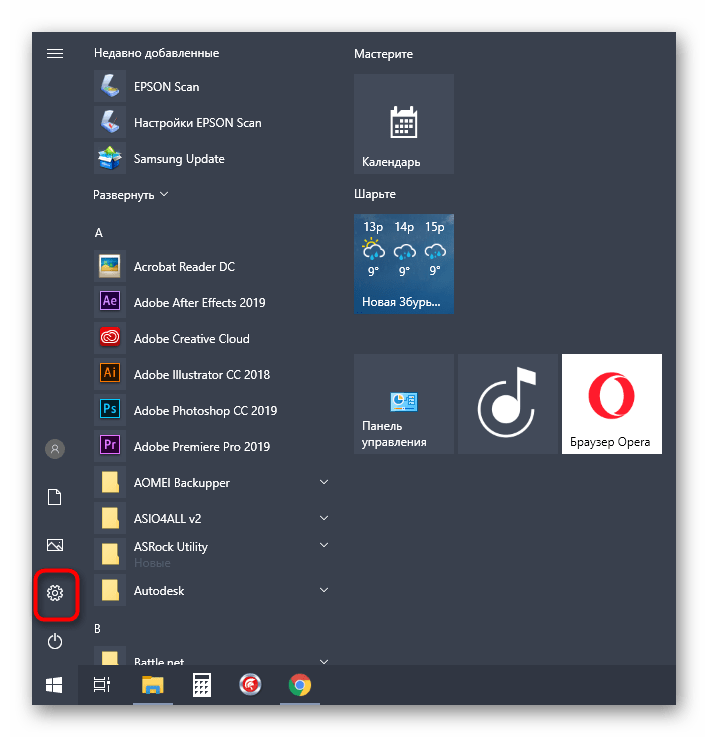
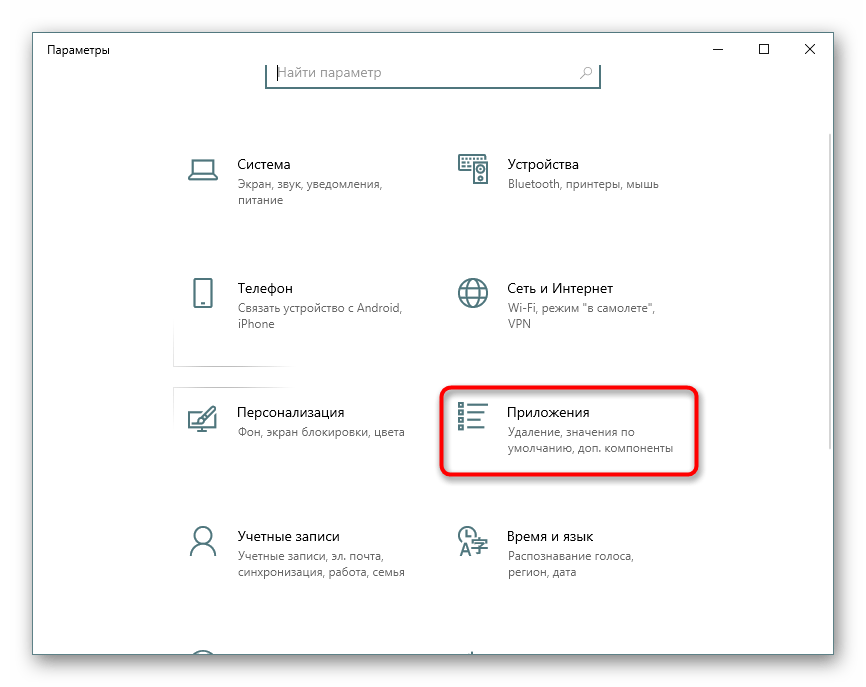
- Откройте «Пуск» и перейдите в «Параметры».
- Там выберите раздел «Приложения».
- Отыщите строку «Realtek High Definition Audio Driver» и дважды кликните по ней левой кнопкой мыши.
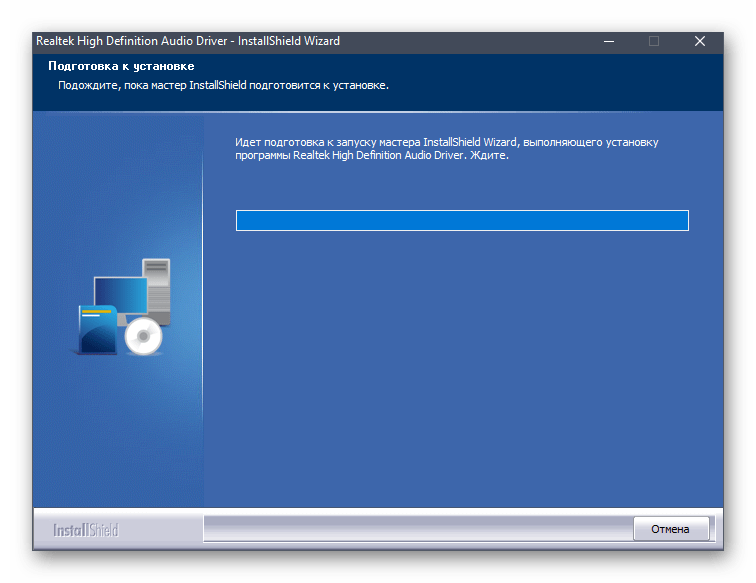
- После этого ожидайте окончания подготовки к деинсталляции.
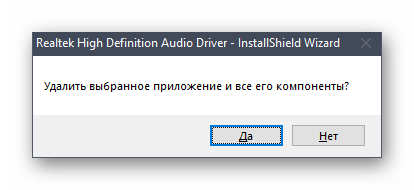
- Подтвердите удаление выбранного приложения и всех его компонентов.

Остается только повторно инсталлировать соответствующий драйвер. Ссылку на инструкцию по этой теме мы оставили в начале данной статьи. Воспользуйтесь ей, чтобы произвести правильную установку.
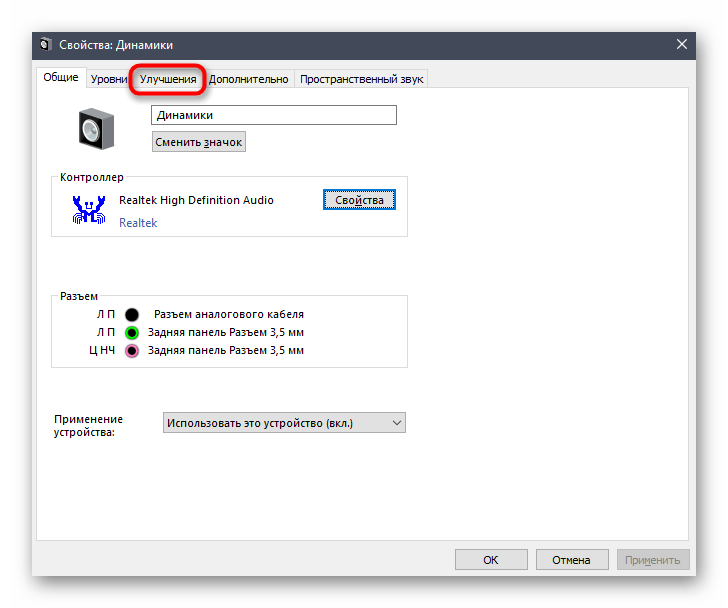
Альтернативная настройка звука
Иногда приведенные выше инструкции не приносят никакого результата и рассматриваемое приложение все еще не хочет запускаться. Это может быть связано со спецификой функционирования драйвера или программными особенностями самой материнской платы. Однако имеется альтернативный метод настройки звука с помощью опций драйвера, которые тоже позволяют управлять эффектами и эквалайзером.
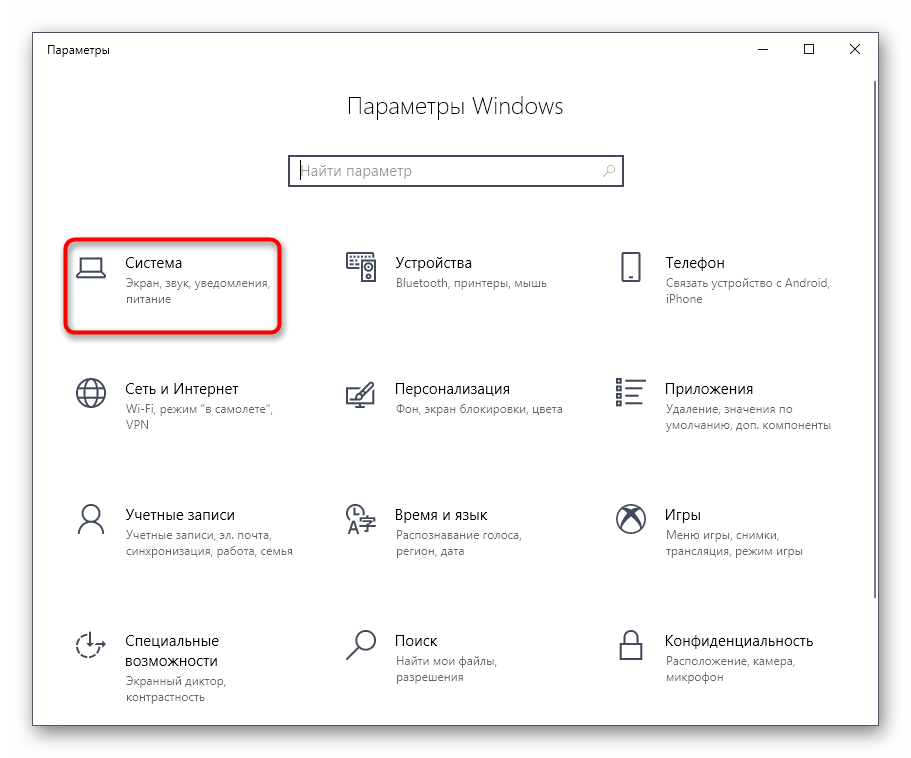
- Для этого откройте «Пуск» и перейдите в меню «Параметры», кликнув по значку в виде шестеренки.
- Здесь вас интересует пункт «Система».
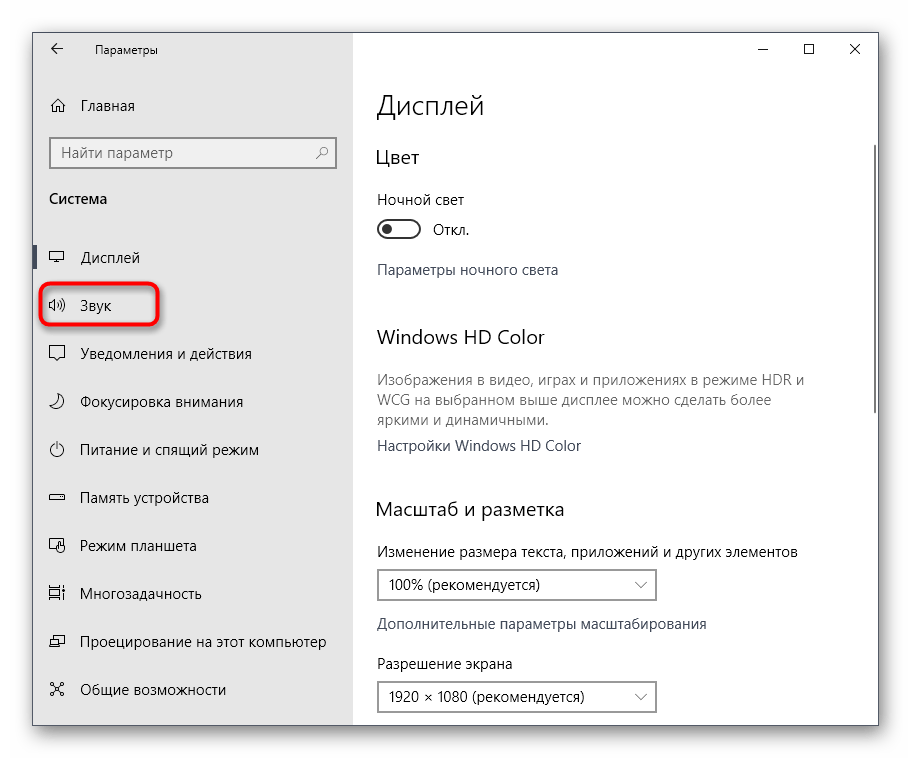
- Через левую панель переместитесь в категорию «Звук».
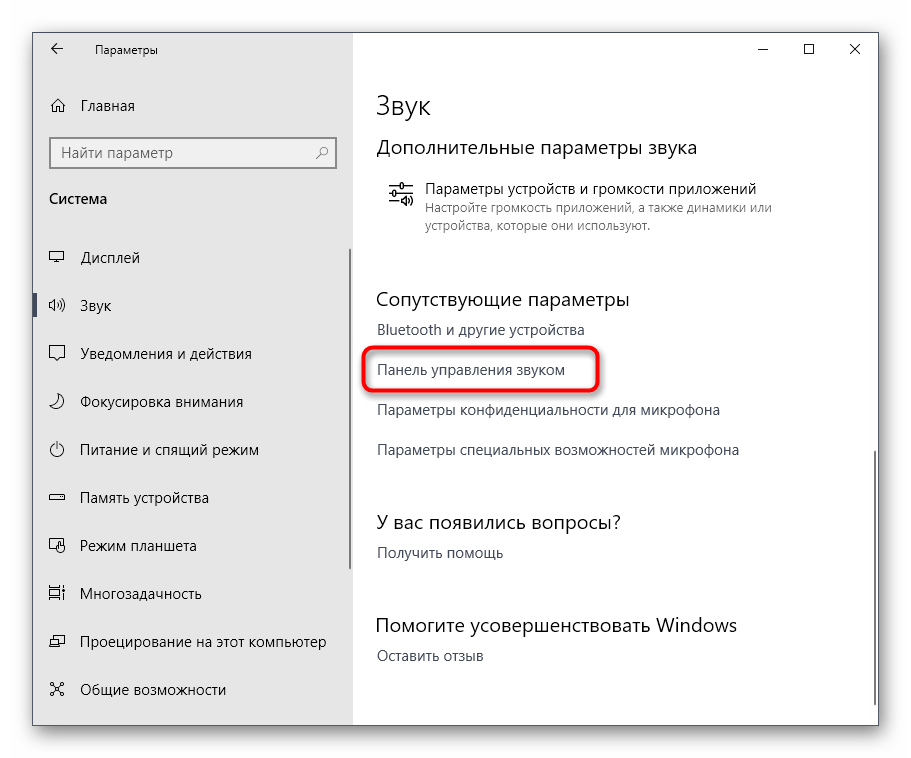
- Отыщите надпись «Панель управления звуком» и нажмите по ней ЛКМ.
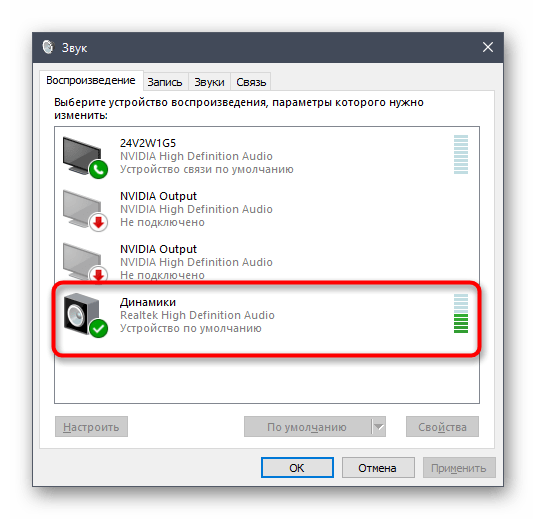
- Выберите необходимый источник воспроизведения и дважды кликните по нему левой кнопкой мыши.
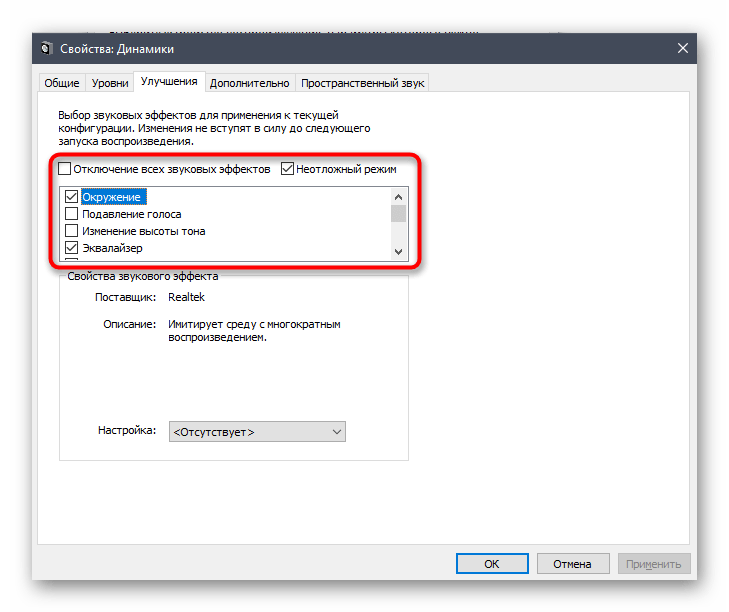
- Переместитесь на вкладку «Улучшения».
- Здесь вы видите список всех доступных эффектов. Отметьте галочками нужные, чтобы активировать их.
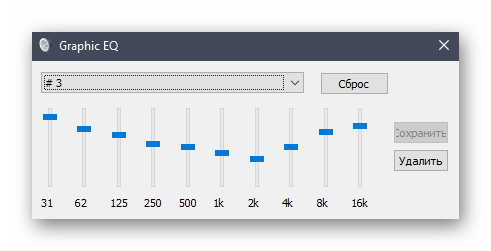
- Обратите особое внимание на «Эквалайзер». Для него существует ряд заготовленных настроек, а также имеется возможность создать свой профиль.
- В таком случае нужно будет вручную настроить все доступные ползунки частот.

В рамках сегодняшнего материала вы узнали о доступных методах запуска Диспетчера Realtek HD, а также разобрались со способами решения возникших проблем. После этого можно смело переходить к настройке звука и микрофона. Если вы впервые сталкиваетесь с такой задачей, советуем изучить отдельные инструкции по этим темам далее.
Читайте также:
Увеличение громкости микрофона в Windows 10
Настройка наушников на компьютере с Windows 10
Проверка микрофона в Windows 10
Решение проблем с собственным эхо в наушниках на Windows 10
Наша группа в TelegramПолезные советы и помощь
Realtek High Definition Audio Manager is a popular utility to handle volume, listening, and recording experiences in Windows desktop. The application comes in the operating system as pre-installed program to manage audio accessories like speakers, microphones, headphones. The Realtek HD Audio Manager detects accessories and configures them very easily and also allows users to control from computer.
Realtek being the first sound choice for many users has improved a lot in recent times. Basically, it’s HD Audio Manager is a tool that lets you configure audio and manage other related settings to produce great sound results. If you don’t know how to access this program, then you are in the right place. Just explore the below methods and see which one is easier for you –
How to Open Realtek HD Audio Manager
Here is How to Open Realtek HD Audio Manager in Windows 11 or 10 –
First of all, if you don’t have the application on your computer then go to this link and install it._
1] Through File Explorer
One of the common ways to know the availability of Realtek HD Audio Manager is to find its executable file in the File Explorer. This is how you need to proceed to access it –
- Launch File Explorer using “Win+E” shortcut key together.
- Once the window shows up, navigate to the below-given path –
C:\Program Files\Realtek\Audio\HDA
- After HDA folder display all the items, locate and double-click RAVCpl64.exe.
- Once User account control dialog prompts, select Yes.
- The Realtek HD Audio Manager will straight away show up on the PC screen.
As an alternative, open Run dialog box by hitting “Winlogo+R” shortcut keys. Insert the following path and click OK to access HDA folder –
C:\Program Files\Realtek\Audio\HDA
2] Open Realtek HD Audio Manager via Taskbar
Windows 11 and 10 always have some programs that run immediately after every boot. These startup items display their own icons on the system tray to ensure easy navigation. So, if you prefer to run this audio manager automatically on every boot, then enable it via Task Manager. Go through the below instructions to accomplish the task –
- Do a right-click on the Start and from the list of options choose Task Manager.
- Once the console comes into view, highlight the Startup tab.
- Find out and right-click Realtek HD Audio Manager and choose Enable.
- Restart Windows 10 PC and upon startup, you will see its icon on the system tray.
3] From Control Panel
However, Settings app provides several ways to customize and modify system settings, Control Panel is still the traditional component. Therefore another most reliable way to open Realtek HD Audio Manager is from Control Panel. Below are the directions for the same –
- Fire up taskbar search box, type control panel and hit Enter.
- Once you access Control Panel, make the icons view either by Small or Large.
- After the applets become clearly visible, find and click Realtek HD Audio Manager.
4] Create Desktop Shortcut
To always have Realtek HD Audio Manager on your fingertips, the quick way is to have it on your desktop. Simply create a desktop shortcut of RAVCpl64.exe executable file and launch it as per your preference. Hence, go through the given sequence of steps –
- Click File Explorer icon on the taskbar and go to the below-mentioned path –
C:\Program Files\Realtek\Audio\HDA
- Quickly locate and execute a right-click on RAVCpl64.exe file. Hover over Send to and choose Desktop (create shortcut).
- Minimize all the windows and you will see RAVCpl64’s shortcut file on the desktop. So just perform a double-click on it and open Realtek HD Audio Manager in Windows 11 and 10.
Methods:
1] Through File Explorer
2] Via Taskbar
3] From Control Panel
4] Create Desktop Shortcut
That’s all!!
Do you have a problem with your Realtek HD Audio Manager on your Windows 10 computer? Let us assist you by providing some information on how to download, install or reinstall your audio manager.
Realtek HD Audio is an audio driver for system sound that supports DTS, Dolby, and Surround Sound. It is not mandatory to install Realtek HD Audio, but it is very helpful.
The application used for managing audio settings on the PC is called RealTek HD Audio Manager. This application allows you to configure your microphone/speaker settings and try out different sound effects as well.

In this article we have compiled several methods that will serve as a complete guide to download, install or reinstall Realtek HD Audio Manager on your computer.
Table of Contents
Reinstall Realtek HD Audio using the Device Manager
- Open the Device Manager. You can do this by simply pressing the Windows key + X + M.
- Here you will see a list of several categories. The one that you need to explore at the moment is the Sound, video, and game controllers category. Once you expand this category, you will find the Realtek HD Audio Definition option.
- Right-click on Realtek HD Audio Definition and click the uninstall button.

- Once the application is successfully uninstalled, you need to click on the Action tab in the toolbar of the Device Manager window.
- In the action tab, select the Scan for Hardware Changes option and wait for Windows to complete the scan.

- Once you press this option, Windows will search for Realtek HD Audio Driver automatically. The Realtek HD Audio Manager will be installed along with it as well.


Download the Realtek HD Audio Manager and driver
If the above method does not work for you, you have nothing to worry about. Hopefully you will be able to manually download and install the application on your computer. Let’s look at how you can download and install this audio manager manually.
- Visit Realtek’s official download page and download the software version that is suitable for your operating system and processor type. If you have a 32-bit or 64-bit processor running on either Windows 10, 8, or 7, you can download this version.
- Once you download the correct version, the next step is to run the executable file on your system.

- Now follow the instructions in the application installation dialogue box to install it on your computer.

This will install RealTek Audio Driver 2.82 on your system. It will install the driver as well as RealTek Audio Manager. If you are running Windows 10, you should get an updated Realtek audio driver from Windows Update. Otherwise, you can download the latest update patch from Microsoft from the following link:
Download RealTek Audio Driver update Version 6.0.9098.1 (For Windows 10 Version 1903 or later)
Download RealTek Audio Driver update Version 6.0.9098.1 (For Windows 10 Version 1809 or later)
Download RealTek Audio Driver update Version 6.0.9098.1 (For Windows 10 Version 1803 or later)
The installation of this update will update the driver to the latest version (up to January 2021).

Troubleshooting Realtek HD Audio Manager
There are times when simply installing or reinstalling the audio driver will not work. Generally, we can troubleshoot the problem of the driver not getting installed correctly in a few common situations.
Let’s discuss the fixes here.
Fixing driver conflicts
Realtek audio drivers can conflict with existing audio drivers (even if they are from Microsoft). For generic sound, Microsoft installs UAA Bus Driver for High Definition Audio. It should be disabled or removed before we can install Realtek audio drivers.
- Open up the Device Manager and double-click on System devices.
- Look for Microsoft UAA Bus Driver for High Definition Audio option
- Right-click on this option and select “Disable” from the menu that appears
- Now, open up “Settings” by typing it in the search bar of your taskbar.
- Once the Settings window opens, click on Apps & Features
- Now, select the “Realtek High Definition Audio Driver” and choose the Uninstall option to completely remove the driver from your system before trying to reinstall it.
- Once you uninstall the driver, consider reinstalling it and check whether it’s working or not.
Enable RealTek Audio on system startup
- Open up the Task Manager by right-clicking on your taskbar and selecting “Task Manager” from the list of options that appear
- Click on “Startup” from the list of tabs in the Task Manager
- Now, consider searching for the Realtek HD Audio Manager
- Once you locate the Realtek HD Audio Manager, check the Status tab in front of it.
- If the status is Disabled, you will have to enable it. You can do that by right-clicking on the Realtek HD Audio Manager in the list and selecting the Enable option from the list of options that appear.
- Once you have enabled it, consider restarting your system for the Realtek HD Audio Manager to be completely enabled, up, and working.
Error: Install Realtek HD Audio Driver Failure [Error OxC0000374]
Some users have reported that they are facing the error code OxC0000374 while trying to install the Realtek HD Audio Driver. However, you should know that the error code can be different for different users and cases.
This problem can happen due to different reasons. Different causes can create an error like this. However, sometimes, these issues appear when you have a dead sound card. Keep in mind that you will not be able to apply a software fix to clear this issue if you are having problems with your physical sound card. The only solution to a dead sound card is replacing it with a brand new one.
In case of a dead sound card, Windows will show you a yellow exclamation mark with an “Unknown device” label. You won’t be able to install the drivers for your sound card because the hardware is not responding to the system. Hence, none of the solutions that we have mentioned here will work for you if your sound card needs to be replaced.
Find malfunctioning sound drivers and update them
If you are unable to install the sound card drivers, consider updating them directly through the Device Manager through the following procedure:
- Search for Device Manager in the Windows Search option next to the Start icon in the Taskbar
- Once the Device Manager opens up, start looking for the Sound driver option
- After finding the Sound options, consider inspecting them for a bit and see whether any of them have a question mark or an exclamation mark in front of them
- If any of the drivers on that list have an exclamation or a question mark, right-click on that driver.
- By right-clicking on the driver, a list of options will appear. Select the Update Driver option from this list
- Once you select this option, you may have to provide a confirmation.
Once the driver is updated, consider restarting your system to see if the problem has been resolved. If the error is not resolved, consider continuing with this second method.
Adding legacy hardware through Device Manager
Another method that is applicable to tackle this situation is adding legacy hardware. However, this method is only considered when you are trying to fix the missing Sound, video, and game controllers from the Device Manager.
- Open up the device manager by pressing Windows Key + X and then pressing the M key from the keyboard when the list of options appears on the lower-left corner of your pc screen.
- Once the Device Manager opens up, click on select the Action tab from the toolbar and choose the Add legacy hardware option from the drop-down menu.
- A window will appear. Click Next and choose the option you want to go with from the menu that appears in the Add Hardware window.
- Once the list of hardware is displayed, select the driver you want to install and proceed.
Once the driver is installed, reboot your system and test it to confirm whether it works or not. If it does not, you can consider disabling the UAA Bus Driver and reinstalling the Realtek HD Audio Driver. These drivers usually conflict with each other and once the UAA driver is removed, Realtek HD Audio Driver works normally.
The Last Resort
If none of the above solutions work for you, you can consider rolling back to a previous system restore point where the Realtek HD Audio Manager and its driver were working properly on your computer system.
If there is no system restore point on your computer, your System Restore utility will not be able to do anything to resolve the issues you are facing with either your Realtek HD Audio Manager or your Realtek HD Audio Driver. However, if you use this option with a previously saved point, your data won’t be affected.
Understand that this solution is the last option and do it only if none of the methods that we mentioned in this article are working for you.
- To restore your system to a previous state, start by pressing opening up the Run utility with Windows Key + X and then R later on when the menu appears.
- Now, type “rstrui” in the run “Open” box and hit the Enter key.
- Once the System Restore Window appears in front of you, click the “Next” button.
- If you have created any System Restore points in the past, you will be able to see them in the list that appears in the System Restore utility window.
- Check the “Show more restore points” option to display all of the system restore points that you have created.
- Now, select the restore point that is most suitable for you depending upon the time when it was created and click on the Next button option.
- However, make sure not to select a restore point where the audio drivers were not working correctly or were missing from the system. There’s no use reverting to this kind of state.
- Once you have confirmed your restore point, click the Next button.
- Once you click the Next button, Windows will start to restore your system to a point that is discussed in the “Description” field. Click the “finish” button and wait for the process to complete.
The above were some methods that you can implement if you are unable to find the Realtek HD Audio Manager on your PC or if it is not working correctly. If any of the above procedures are not working for you, maybe it’s time to replace your sound card to continue experiencing sounds from your computer system. Remember, applying software fixes to a hardware problem is never going to work and is a waste of time as well. Hence, make sure that you have confirmed that the sound card is working perfectly fine before applying the above methods.
Conclusion
Realtek HD Audio Manager is an important utility and often comes pre-installed in the latest version of Windows like Windows 10 and and most probably Windows 11. However, there might be some problems that are forcing the audio manager to not function properly on your system. In such situations, you need to follow the simple step-by-step guide mentioned in the article.
Just implement any of the above strategies, and hopefully, your Realtek HD Audio Driver will come to life again by integrating with the Realtek HD Audio Manager. If it does not, maybe replacing the whole sound card might be a better option that could save you a lot of time. Anyone can follow the above steps to install the Realtek HD Audio Manager and fix these minor issues themselves.
Среди частых вопросов пользователей последних версий Windows — загрузка и установка приложения Realtek Audio Console (или Realtek Audio Control), а также решение проблем с его работой, если оно было установлено.
В этой инструкции подробно о способах скачать и установить Realtek Audio Console, а также о причинах, по которым при установке приложения могут возникнуть проблемы.
Информация про Realtek Audio Console и необходимые условия для работы приложения
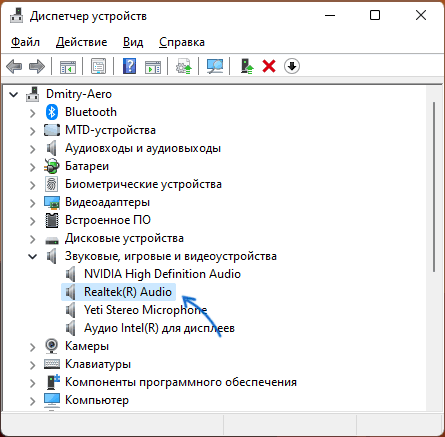
Прежде чем устанавливать Realtek Audio Console необходимо учесть важный нюанс: это приложение предназначено для звуковых карт Realtek, работающих с новыми драйверами DCH или UAD (Universal Audio Driver). Определить версию текущего драйвера в Windows 11 и Windows 10 легко:
- Нажмите правой кнопкой мыши по кнопке пуск и выберите пункт «Диспетчер устройств» в контекстном меню.
- Посмотрите название вашей звуковой карты в разделе «Звуковые, игровые и видеоустройства».
- Если вы видите Realtek(R) Audio — это говорит о том, что у вас установлен драйвер DCH/UAD и Realtek Audio Console может использоваться.

- Если указано: Realtek High Definition Audio — это говорит о том, что установлен старый драйвер и для управления должно использоваться приложение Realtek HD Audio Manager.
В случае, если у вас используется традиционный (старый) вариант драйвера, вы можете попробовать обновить драйвер прямо в диспетчере устройств: нажмите правой кнопкой мыши по Realtek High Definition Audio, выберите пункт «Обновить драйвер», затем — «Найти драйверы на этом компьютере» — «Выбрать драйвер из списка доступных драйверов на компьютере» и посмотрите, есть ли в списке совместимых устройств Realtek(R) Audio. При наличии — выберите и установите его.
И дополнительный нюанс: в случае если на компьютере установлен новый драйвер Realtek, как правило, установка Realtek Audio Console выполняется автоматически, и вы увидите его в списке установленных приложений. Если же этого не произошло, есть следующие варианты скачать и установить приложение.
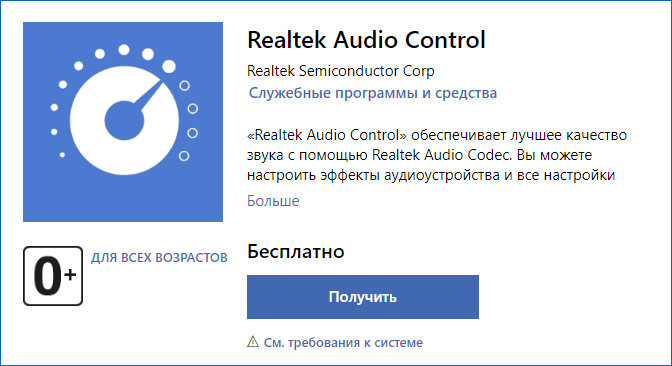
Как скачать Realtek Audio Console из магазина Microsoft Store
Если выполнять поиск по приложениям в Microsoft Store, приложение, которое в магазине имеет название Realtek Audio Control, вы не найдёте. Однако можно воспользоваться прямой ссылкой:
- Перейдите по ссылке на приложение Realtek Audio Control в Microsoft Store
- Нажмите кнопку «Получить» (если будет предложено открыть в приложении магазина, согласитесь) и установите приложение.

- После установки оно появится в списке приложений под именем Realtek Audio Console.
Напомню, что приложение будет работать лишь при наличии соответствующих драйверов Realtek. В некоторых случаях вы можете получить сообщение об ошибке при подключении к службе RPC, решение описано в инструкции Невозможно подключиться к службе RPC при запуске Realtek Audio Console — как исправить?
Установка Realtek Audio Console вместе с драйверами звуковой карты
Если после установки или переустановки Windows 11 или Windows 10 вы не устанавливали драйверы вручную, при этом имеете не самый старый компьютер или ноутбук, загрузка и установка драйвера звука с официального сайта производителя может решить проблему:
- Найдите официальную страницу поддержки вашей материнской платы (если это ПК) или ноутбука.
- В разделе загрузок найдите драйвер Audio и скачайте его.

- После установки проверьте, появилось ли приложение Realtek Audio Console.
- В некоторых случаях оно появляется не сразу, а загружается из Интернета.
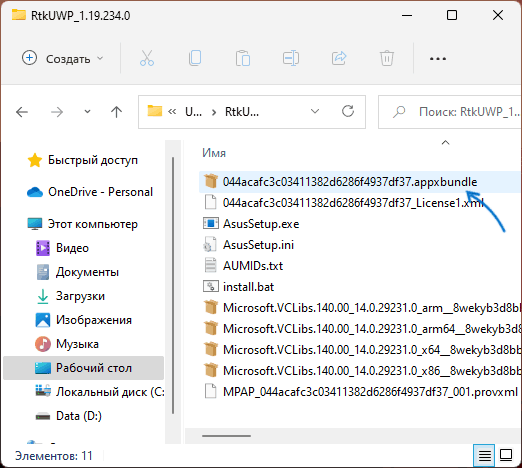
- В некоторых драйверах файлы приложения можно найти внутри архива. К примеру, если открыть архив с драйверами Audio некоторых материнских плат Asus (на примере — B560M), то в нём можно найти папку UWP, распаковать её и запустить файл appxbundle оттуда для установки Realtek Audio Console.


Неофициальный источник Realtek Audio Console и драйверов UAD (DCH)
На GitHub доступен проект, где выкладываются неофициальные сборки драйверов Realtek Universal Audio Driver и приложения Realtek Audio Console. Если другие методы установки для вас не работают, можно попробовать этот вариант:
- Зайдите на страницу https://github.com/pal1000/Realtek-UAD-generic/releases
- Ссылка на установщик Realtek Audio Console находится в разделе Realtek Audio Control app, после распаковки потребуется запустить файл setup.cmd из папки с распакованным архивом.

- Ниже, в разделе Assets вы найдете архив с последней сборкой драйвера Realtek, необходимого для работы приложения. Учитывайте, что он может не работать для достаточно старых звуковых карт Realtek.

В случае, если Realtek Audio Console не запускается, хотя все условия для его работы выполняются, причинами могут быть:
- Отключенные элементы Realtek в автозагрузке.
- Отключенные службы Realtek в списке служб.
- Наличие и работа дополнительных приложений и служб улучшения звука от производителя.
Надеюсь, инструкция поможет или решить проблему и установить Realtek Audio Console или разобраться, почему это не удавалось сделать.
-
Home
-
News
- Realtek HD Audio Manager Download for Windows 10/11
By Alisa |
Last Updated
This page includes a Realtek HD Audio Manager download guide for Windows 10/11. MiniTool software, offers some free software for Windows computer, e.g. MiniTool Power Data Recovery, MiniTool Partition Wizard, MiniTool MovieMaker, etc.
What Is Realtek HD Audio Manager?
Realtek HD Audio Manager (Realtek High Definition Audio Manager) is the application used to control sound play on Windows computers. It acts as a control panel for your audio adapters. When you add new microphones/speakers/headsets, etc. to your computer, Realtek HD Audio Manager will automatically detects them and let you set up them.
Wonder where to find Realtek HD Audio Manager and where to get Realtek HD Audio Manager downloaded for your Windows 10/11 computer? This post gives a guide.
Check If Your Computer Has Realtek HD Audio Manager
Generally in Windows 10/11, Realtek HD Audio Manager is installed along with Realtek HD audio driver. Normally Windows 10/11 OS has automatically installed Real HD audio driver, and you can find the Realtek HD Audio Manager in Control Panel, but if you can’t find it, you can check how to download Realtek HD Audio Manager for Windows 10/11 PC below.
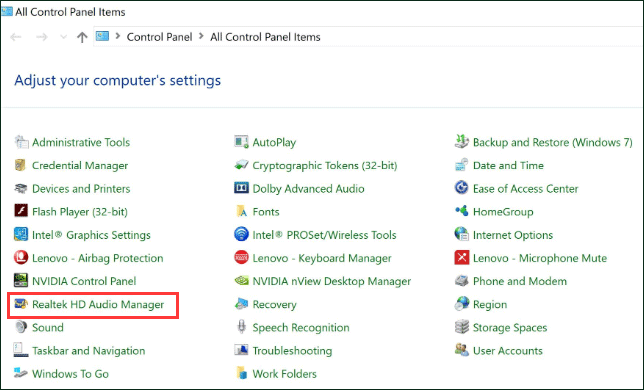
To check if your computer has installed Realtek HD Audio Manager, you can press Windows + R, type control panel, and press Enter to open Control Panel on Windows 10/11.
Next you can type realtek in the search box in Control Panel, and click Realtek HD Audio Manager in the list to open Realtek HD Audio Manager on your Windows 10/11 computer. Alternatively, you can also click Hardware and Sound, and click Realtek HD Audio Manager to open it.
However, if the Realtek HD Audio Manager is missing on Windows 10/11 and you can’t find it in Control Panel, you can get Realtek HD Audio Manager downloaded on your Windows computer. Check how to do it below.
Realtek HD Audio Manager Download for Windows 10/11
Way 1. Download from Realtek Website
You can download Realtek HD Audio Manager from Realtek official website. You can open Realtek HD Audio Manager download page and find the corresponding driver for your Windows 10/11 system. Click the Download icon to download Realtek HD Audio Driver for your computer. You can download Realtek HD Audio driver for Windows 10 64bit or 32bit based on your own needs.
After downloading, you can click the downloaded exe file, and follow the instructions to install the Realtek HD Audio Driver.
Since Realtek HD Audio Manager will be installed along with Realtek HD Audio driver. After you installed the driver, then the Realtek HD Audio Manager application is also installed.
Way 2. Reinstall Realtek Audio Driver
- You can press Windows + X, and select Device Manager to open Device Manager on Windows 10.
- In Device Manager, expand Sound, video and game controllers category, and right-click Realtek High Definition Audio.
- Then you can choose Update driver to update the outdated Realtek Audio driver.
- Or you can click Uninstall device to delete the Realtek High Definition Audio device from your computer. Restart your computer and it will automatically download and install Realtek HD Audio driver and Realtek HD Audio Manager, if not, try Way 1 to manually download and reinstall Realtek HD Audio Manager on Windows 10.
Conclusion
This post introduces how to get Realtek HD Audio Manager downloaded for your Windows 10/11 computer. Hope it helps. For other Windows 10/11 issues, MiniTool software provides data recovery, disk partition management, system backup and restore, video editing, video converting, video downloading, and some other solutions.
About The Author
Position: Columnist
Alisa is a professional English editor with 4-year experience. She loves writing and focuses on sharing detailed solutions and thoughts for computer problems, data recovery & backup, digital gadgets, tech news, etc. Through her articles, users can always easily get related problems solved and find what they want. In spare time, she likes basketball, badminton, tennis, cycling, running, and singing. She is very funny and energetic in life, and always brings friends lots of laughs.