
Techwalla may earn compensation through affiliate links in this story. Learn more about our affiliate and product review process here.

How to Uninstall the Realtek HD Audio Driver
Image Credit:
g-stockstudio/iStock/Getty Images
Even though the Realtek HD audio driver on your computer is technically a piece of software, you cannot uninstall it through «Programs and Features» in the Control Panel that you would use for other programs. Instead, you will have to use Device Manager. This program manages all of the various drivers that are installed on your computer, including the one that operates your Realtek HD audio device.
Step 2
Click «Control Panel.»
Step 4
Click «Device Manager.»
Step 5
Right-click on the «Realtek HD» icon and click «Uninstall» to uninstall this particular audio driver on your computer.
Fix Realtek Driver Issues!
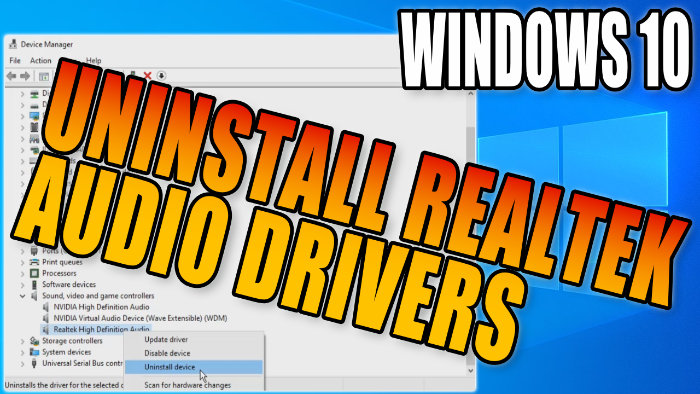
Realtek Audio Drivers are probably the most commonly used sound driver on the Windows 10 operating system. This guide will show you how to uninstall the Realtek audio drivers on your Windows 10 PC or laptop. Sometimes you may encounter issues with your sound. So by uninstalling the Realtek drivers and reinstalling them to your PC you may be able to solve your problem.
If you were to remove an audio driver as I show you in this guide, or if you were to install a new sound card/sound device to your computer then Windows will choose the best audio driver it can detect for your system and install it for you. But you can also still install a new audio driver of your choice, which will override the driver that Windows chose for you.
You need to have a sound driver installed on your Windows 10 computer to be able to hear sound. If you cannot hear sound from your computer then it could be an issue with the driver or it could be that you do not currently have a sound driver installed. But as I said above, usually Windows is pretty good at detecting your hardware and should have installed a driver for your sound card automatically.
Why Remove Realtek Audio Driver?
If you have been having issues with your sound in Windows 10 for example:
- Sound fuzzy
- Sound glitchy
- No sound
- Static sound
Then uninstalling the Realtek audio driver and using Windows 10 recommended audio driver could help resolve the issue. Or you could try installing the Realtek driver again.

Can You Install Realtek Audio Driver Again?
Yes, you can install the Realtek audio driver again after you have uninstalled it from your Windows 10 computer.
How To Manually Uninstall Realtek audio driver:
Below are the steps to manually remove the Realtek audio driver from your Windows 10 computer.
1. Right-click on the Windows start menu icon (In the bottom left-hand corner of the screen) > Open Device Manager

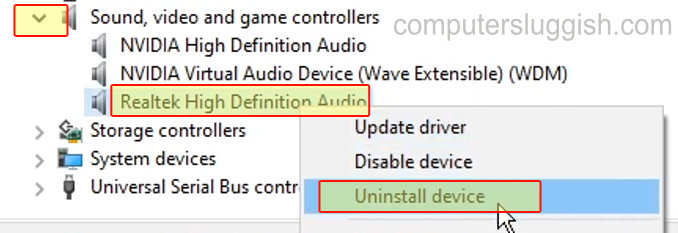
2. Go to ‘Sound, video and game controllers‘ > Expand the drop-down menu
3. Right-click on ‘Realtek High Definition Audio‘ > Click on Uninstall device
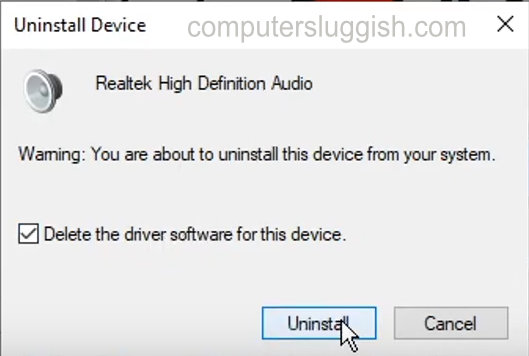
4. Tick the box that says ‘Delete the driver software for this device’ > Press Uninstall
5. Press Yes to restart your PC (make sure everything is saved before restarting your PC and it may be worth creating a system restore point)
I hope the above guide has helped you remove the Realtek audio drivers from your Windows 10 computer. If you found this guide helpful and enjoyed it then I am sure you would like all of our other Windows 10 guides.
Check out the video tutorial here on How To Uninstall The Realtek Audio Drivers In Windows 10 PC, if you are getting stuck.
Check out our latest guides:
-
Home
-
News
- How to Stop Win 10 from Automatically Installing Realtek Drivers
By Alisa |
Last Updated
Windows 10 will automatically update Realtek audio drivers if it finds that your Realtek drivers are not up to date. However, if you find Realtek driver can’t work well, you can uninstall it permanently and stop Windows 10 from automatically installing Realtek audio drivers after uninstalling it.
Bad or outdated drivers can cause problems in your Windows 10 system. Therefore, Windows 10 forces to update most device drivers in your system to make your OS work efficiently.
Realtek audio driver are sound drivers in your computer. Realtek Audio Manager comes with Realtek audio driver letting you manage sound settings. If the Realtek audio driver can’t work well, you can uninstall it. However, some people complain that each time they uninstalled the Realtek driver, it automatically reinstalled. How to stop Window 10 from automatically installing Realtek audio drivers? Check the solutions below.
How to Stop Windows 10 from Automatically Installing Realtek Audio Drivers
Way 1. Via Control Panel
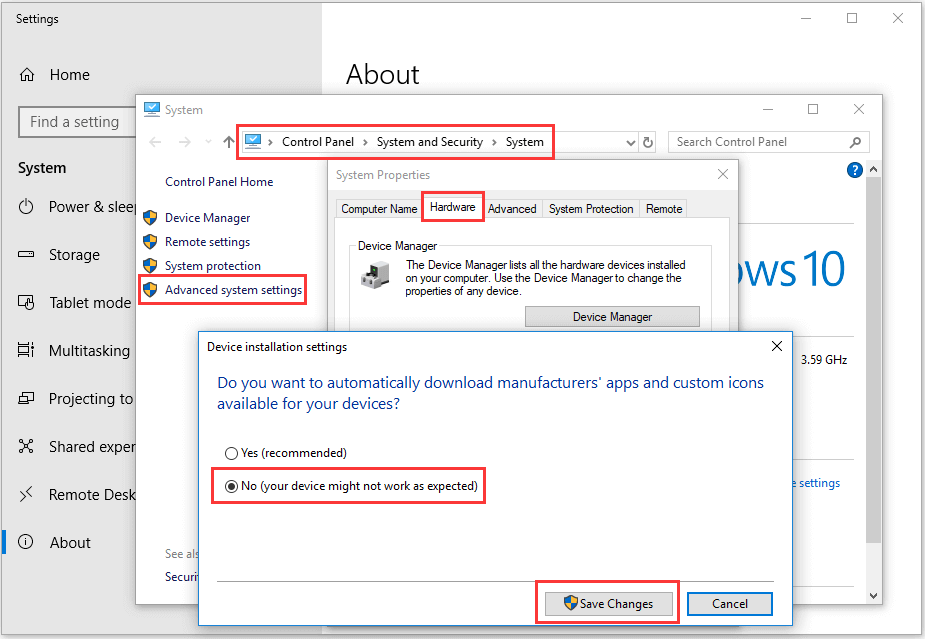
Step 1. Open Control Panel on Windows 10. You can press Windows + R, type control panel in Run dialog, and press Enter to open Control panel.
Step 2. In Control Panel window, you can click System and Security -> System -> Advanced System Settings -> Hardware -> Device Installation Settings. Tick “No (you device might not work as expected)” option, and click Save Changes. This will disable Windows 10 from automatically installing Realtek drivers.
Step 3. Next you can press Windows + R, type devmgmt.msc in Run box and press Enter to open Device Manager on Windows 10.
Step 4. In Device Manager window, you can expand “Sound, video and game controllers” and right-click Realtek HD Audio Device and select Disable. Then you can right-click Realtek HD Audio Device again and select Update Driver. Choose “Browse my computer for driver software” option in the pop-up window. Select Microsoft own High Definition Audio Device.
Step 5. Restart your computer and you will see your computer is using Microsoft High Definition Audio Device now.
Tip: If you want to adjust sound settings, you can right-click the Sound icon at the system tray, click Sound and click Playback, right-click your speakers and select Properties. In its properties window, you can click Advanced tab and change the audio sample rate and bit depth if you want.
Way 2. Roll Back Realtek Audio Driver
You can roll back your Realtek driver, Windows 10 will remember this action and will not automatically reinstall Reatek driver any longer.
Step 1. You can press Windows + R, type devmgmt.msc in Run dialog, and press Enter to open Device Manager window.
Step 2. Next you can expand Sound, video and game controllers category, right-click Realtek HD Audio Device and select Properties.
Step 3. Click Driver tab and click Roll Back Driver button to roll back to the previously installed driver.
Bottom Line
If you want to stop Windows 10 from automatically installing Realtek audio drivers, you may try the ways in this post. If you have better ways, please chare with us.
MiniTool Software is a top software developer. Till now, it has released some useful tools incl. MiniTool Power Data Recovery, MiniTool Partition Manager, MiniTool ShadowMaker, MiniTool MovieMaker, MiniTool Video Converter, MiniTool uTube Downloader, etc.
About The Author
Position: Columnist
Alisa is a professional English editor with 4-year experience. She loves writing and focuses on sharing detailed solutions and thoughts for computer problems, data recovery & backup, digital gadgets, tech news, etc. Through her articles, users can always easily get related problems solved and find what they want. In spare time, she likes basketball, badminton, tennis, cycling, running, and singing. She is very funny and energetic in life, and always brings friends lots of laughs.
How to uninstall Realtek High Definition Audio Driver from your system
Realtek High Definition Audio Driver is a software application. This page contains details on how to uninstall it from your computer.
It is produced by Realtek Semiconductor Corp..
Further information on Realtek Semiconductor Corp. can be seen here.
The application is often located in the C:\Program Files\Realtek\Audio\HDA directory. Take into account that this location can vary being determined by the user’s choice.
You can uninstall Realtek High Definition Audio Driver by clicking on the Start menu of Windows and pasting the command line C:\Program Files\Realtek\Audio\HDA\RtlUpd64.exe. Keep in mind that you might get a notification for administrator rights.
Realtek High Definition Audio Driver’s main file takes around 220.70 KB (226000 bytes) and its name is DTSAudioService64.exe.
The following executables are installed together with Realtek High Definition Audio Driver. They take about 39.41 MB (41324944 bytes) on disk.
- CreateRtkToastLnk.exe (73.64 KB)
- DTSAudioService64.exe (220.70 KB)
- EP64.exe (3.77 MB)
- RAVBg64.exe (3.45 MB)
- RAVCpl64.exe (18.67 MB)
- RtkAudioService64.exe (262.55 KB)
- RtkNGUI64.exe (10.59 MB)
- RtlUpd64.exe (2.39 MB)
…click to view all…
The information on this page is only about version 6.0.9205.1 of Realtek High Definition Audio Driver.
Click on the links below for other Realtek High Definition Audio Driver versions:
- 6.0.1.7339
- 6.0.1.6093
- 6.0.1.6309
- 6.0.1.5985
- 6.0.1.7844
- 4.49
- 5.10.0.5918
- 6.0.1.7261
- 5.10.0.6537
- 6.0.1.7561
- 6.0.1.7202
- 6.0.1.6971
- 5.10.0.7116
- 6.0.1.7801
- 5.10.0.6278
- 6.0.1.8164
- 5.10.0.5329
- 5.10.0.6870
- 6.0.1.8438
- 6.0.8967.1
- 6.0.1.6318
- 6.0.1.6383
- 6.0.1.7005
- 6.0.1.7312
- 5.10.0.5397
- 6.0.1.8480
- 6.0.8795.1
- 5.10.0.6695
- 6.0.1.5519
- 6.0.1.8040
- 5.10.0.7064
- 6.0.1.6339
- 3.00
- 5.10.0.5527
- 5.10.0.5905
- 4.74
- 6.0.1.8558
- 6.0.1.8673
- 6.0.1.7587
- 5.10.0.6039
- 5.10.0.6101
- 5.10.0.6305
- 6.0.9326.1
- 5.10.0.5680
- 6.0.1.8318
- 5.10.0.6171
- 6.0.1.7877
- 6.0.1.7719
- 6.0.1.6505
- 6.0.1.5767
- 5.10.0.6098
- 6.0.1.6066
- 6.0.8810.1
- 6.0.1.6240
- 5.10.0.6782
- 6.0.1.8067
- 6.0.1.8393
- 6.0.1.8573
- 6.0.1.7368
- 6.0.1.5680
- 6.0.8838.1
- 6.0.1.5515
- 6.0.8686.1
- 6.0.1.5715
- 6.0.9147.1
- 6.0.1.7492
- 6.0.1.7192
- 6.0.1.7759
- 6.0.1.6019
- 6.0.1.8096
- 5.10.0.6267
- 5.10.0.6000
- 4.55
- 2.92
- 6.0.1.8219
- 6.0.9509.1
- 6.0.1.5464
- 5.10.0.5776
- 6.0.1.5837
- 6.0.1.7880
- 6.0.1.6871
- 6.0.1.6156
- 6.0.1.8466
- 6.0.1.6186
- 5.10.0.6804
- 5.10.0.5901
- 4.63
- 6.0.8730.1
- 6.0.1.8049
- 6.0.1.5958
- 6.0.1.7867
- 6.0.1.7606
- 6.0.1.8426
- 6.0.1.6733
- 5.10.0.5730
- 6.0.1.6721
- 5.10.0.6772
- 6.0.1.8007
- 6.0.1.7490
- 6.0.1.7566
…click to view all…
If you are manually uninstalling Realtek High Definition Audio Driver we suggest you to check if the following data is left behind on your PC.
Folders left behind when you uninstall Realtek High Definition Audio Driver:
- C:\Program Files\Realtek\Audio\HDA
The files below remain on your disk by Realtek High Definition Audio Driver’s application uninstaller when you removed it:
- C:\Program Files\Realtek\Audio\HDA\BlackBlueSkinImages64.dll
- C:\Program Files\Realtek\Audio\HDA\BlackSkinImages64.dll
- C:\Program Files\Realtek\Audio\HDA\CreateRtkToastLnk.exe
- C:\Program Files\Realtek\Audio\HDA\DarkSkinImages64.dll
- C:\Program Files\Realtek\Audio\HDA\DTSAudioService64.exe
- C:\Program Files\Realtek\Audio\HDA\EP64.exe
- C:\Program Files\Realtek\Audio\HDA\OrangeBlackSkinImages64.dll
- C:\Program Files\Realtek\Audio\HDA\RAVBg64.exe
- C:\Program Files\Realtek\Audio\HDA\RAVCpl64.exe
- C:\Program Files\Realtek\Audio\HDA\RtkAudioService64.exe
- C:\Program Files\Realtek\Audio\HDA\RtkNGUI64.exe
- C:\Program Files\Realtek\Audio\HDA\RtlUpd64.exe
- C:\Program Files\Realtek\Audio\HDA\ToastDll64.dll
- C:\Program Files\Realtek\Audio\HDA\vncutil64.exe
- C:\Program Files\Realtek\Audio\HDA\WhiteJadeSkinImages64.dll
Use regedit.exe to manually remove from the Windows Registry the keys below:
- HKEY_LOCAL_MACHINE\Software\Microsoft\Windows\CurrentVersion\Uninstall\{F132AF7F-7BCA-4EDE-8A7C-958108FE7DBC}
A way to remove Realtek High Definition Audio Driver from your PC with the help of Advanced Uninstaller PRO
Realtek High Definition Audio Driver is a program marketed by Realtek Semiconductor Corp..
Frequently, people try to erase this program. This is hard because uninstalling this by hand takes some know-how related to removing Windows applications by hand. One of the best QUICK approach to erase Realtek High Definition Audio Driver is to use Advanced Uninstaller PRO. Take the following steps on how to do this:
1. If you don’t have Advanced Uninstaller PRO on your system, add it. This is good because Advanced Uninstaller PRO is the best uninstaller and general tool to optimize your PC.
DOWNLOAD NOW
- go to Download Link
- download the setup by clicking on the green DOWNLOAD NOW button
- set up Advanced Uninstaller PRO
2. Start Advanced Uninstaller PRO. It’s recommended to take some time to get familiar with Advanced Uninstaller PRO’s design and wealth of tools available. Advanced Uninstaller PRO is a powerful package of tools.
3. Press the General Tools category

4. Press the Uninstall Programs button

5. All the programs existing on the PC will be made available to you
6. Navigate the list of programs until you find Realtek High Definition Audio Driver or simply click the Search feature and type in «Realtek High Definition Audio Driver». If it exists on your system the Realtek High Definition Audio Driver app will be found very quickly. Notice that when you select Realtek High Definition Audio Driver in the list of applications, the following information about the program is shown to you:
- Star rating (in the left lower corner). The star rating explains the opinion other people have about Realtek High Definition Audio Driver, ranging from «Highly recommended» to «Very dangerous».
- Reviews by other people — Press the Read reviews button.
- Technical information about the program you are about to uninstall, by clicking on the Properties button.
7. Click the Uninstall button. A confirmation dialog will appear. Confirm the removal by pressing the Uninstall button. Advanced Uninstaller PRO will automatically remove Realtek High Definition Audio Driver.
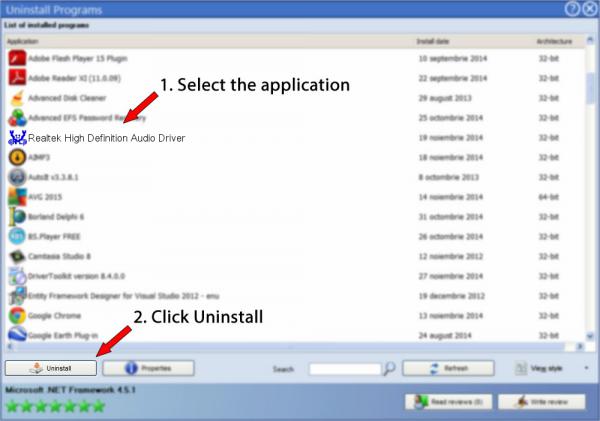
8. After uninstalling Realtek High Definition Audio Driver, Advanced Uninstaller PRO will offer to run an additional cleanup. Click Next to go ahead with the cleanup. All the items of Realtek High Definition Audio Driver that have been left behind will be detected and you will be able to delete them. By uninstalling Realtek High Definition Audio Driver using Advanced Uninstaller PRO, you can be sure that no Windows registry items, files or directories are left behind on your system.
Your Windows computer will remain clean, speedy and ready to serve you properly.
Disclaimer
This page is not a piece of advice to remove Realtek High Definition Audio Driver by Realtek Semiconductor Corp. from your computer, nor are we saying that Realtek High Definition Audio Driver by Realtek Semiconductor Corp. is not a good application for your computer. This text simply contains detailed instructions on how to remove Realtek High Definition Audio Driver supposing you want to. Here you can find registry and disk entries that Advanced Uninstaller PRO discovered and classified as «leftovers» on other users’ computers.
Last update on: 2021-09-06 06:44:23.647