
Все способы:
- Способ 1: Приложение «Параметры»
- Способ 2: Поиск в меню «Пуск»
- Способ 3: «Панель управления»
- Способ 4: Исполняемый файл диспетчера звука
- Вопросы и ответы: 9
Обратим ваше внимание на то, что стандартный эквалайзер поддерживается практически во всех версиях драйверов для встроенных звуковых карт. Если при помощи способов ниже вам не удалось отыскать соответствующую функцию, возможно, понадобится обновить звуковой драйвер. Это можно сделать вручную, используя инструкции из приведенной ниже статьи.
Подробнее: Установка драйверов стандартными средствами Windows
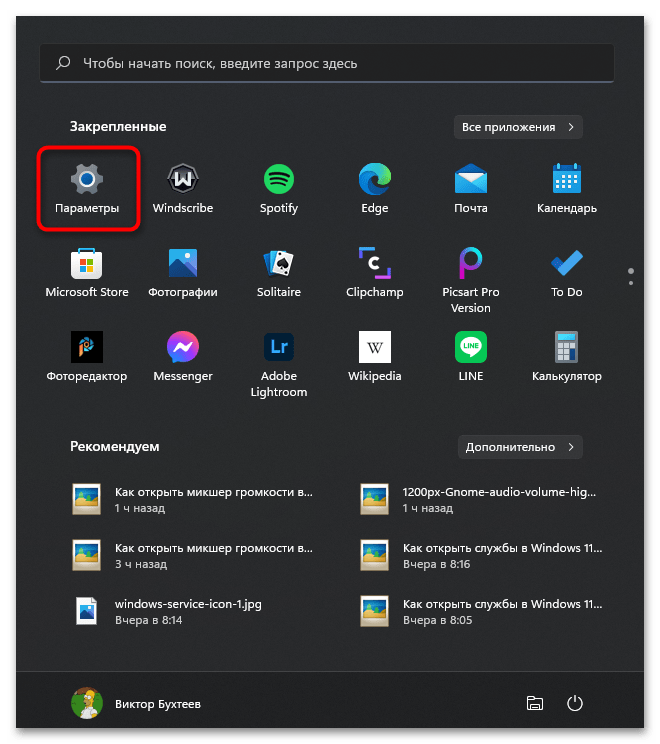
Способ 1: Приложение «Параметры»
Пользователи часто обращаются к приложению «Параметры» в Windows 11 для доступа к различным системным настройкам. В нем есть кнопка, позволяющая перейти к отдельному окну для управления звуковыми устройствами, через которое вы и сможете включить эквалайзер для его дальнейшей настройки. Полностью реализация этого метода выглядит следующим образом:
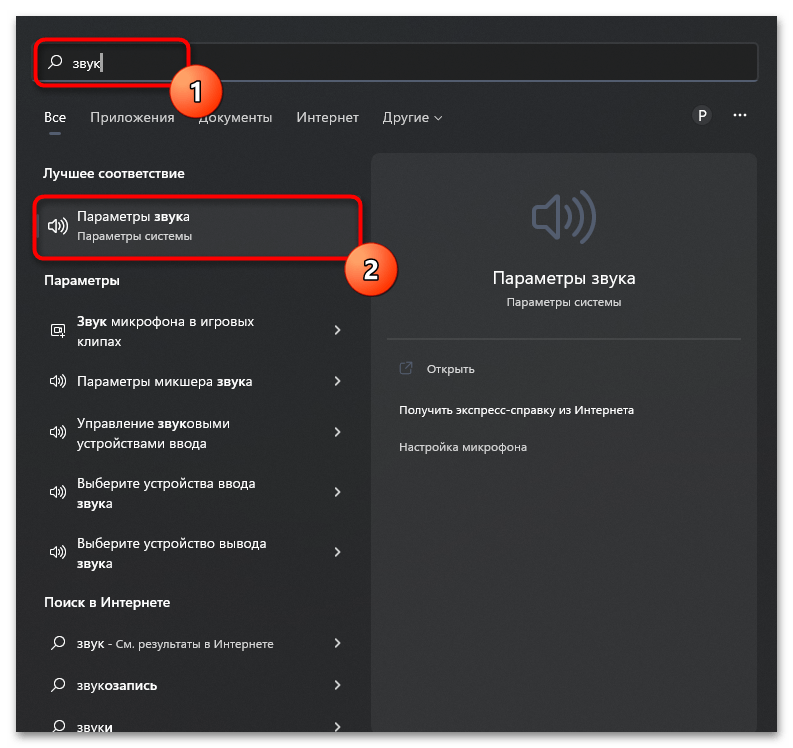
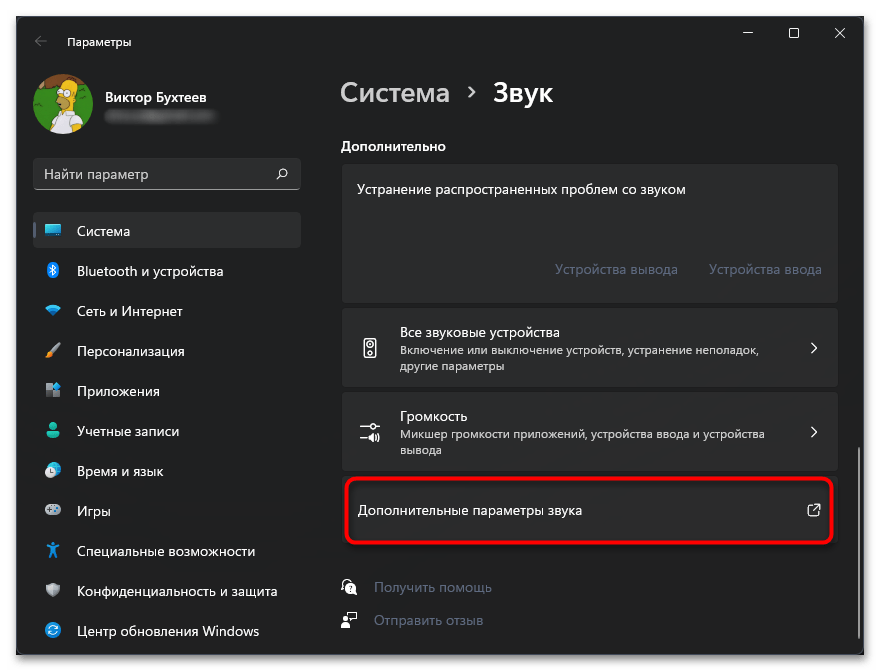
- Откройте меню «Пуск», посмотрите на список закрепленных значков и найдите в нем «Параметры».
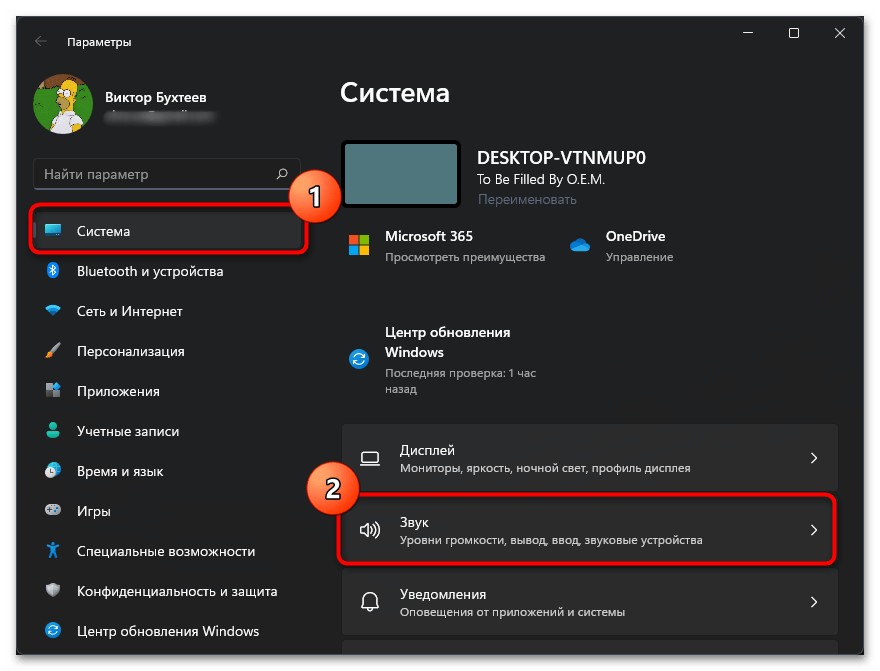
- После перехода к новому окну выберите раздел «Система» и в области справа отыщите категорию «Звук».
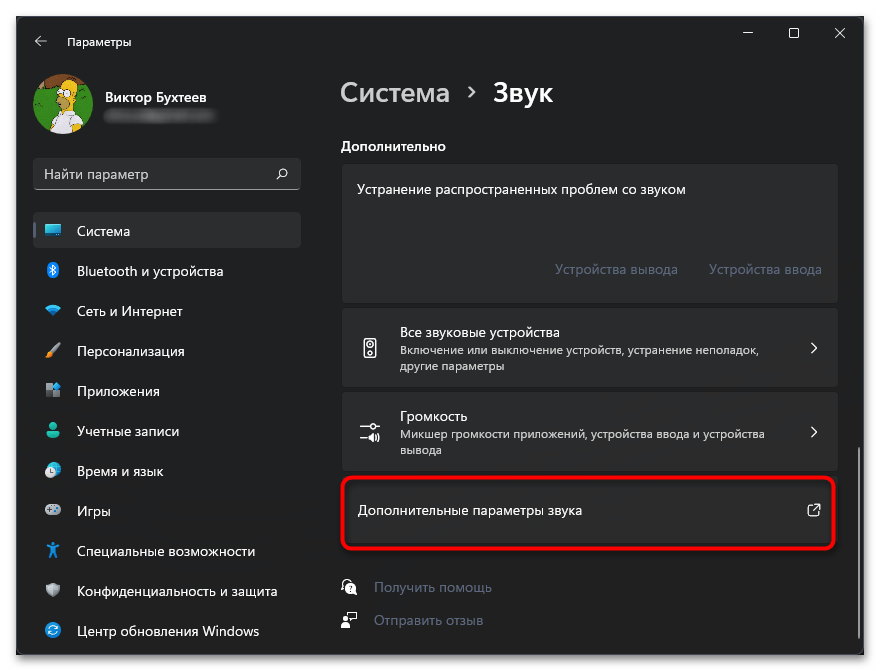
- Как только откроете ее, можете опуститься, чтобы отыскать кнопку «Дополнительные параметры звука».
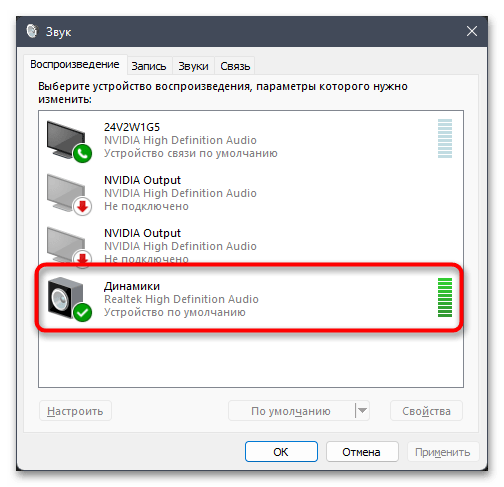
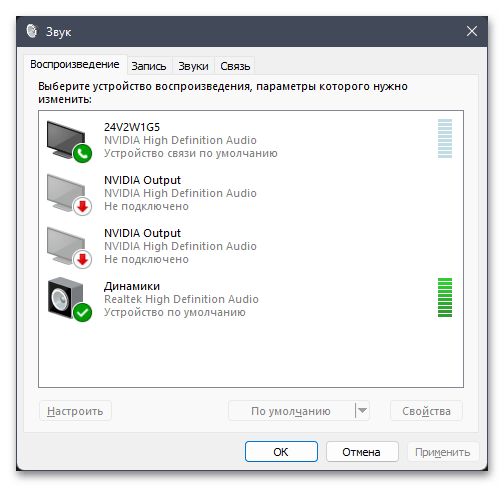
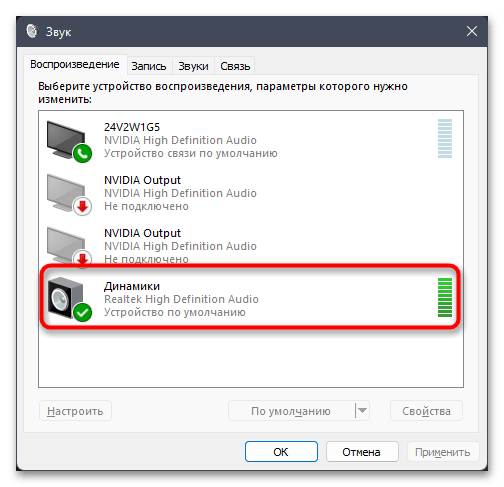
- Она отвечает за переход к окну «Звук», в котором в первую очередь следует отыскать используемое устройство воспроизведения. Возле него будет стоять зеленая галочка, поэтому вам понадобится только дважды кликнуть левой кнопкой мыши по этому оборудованию.
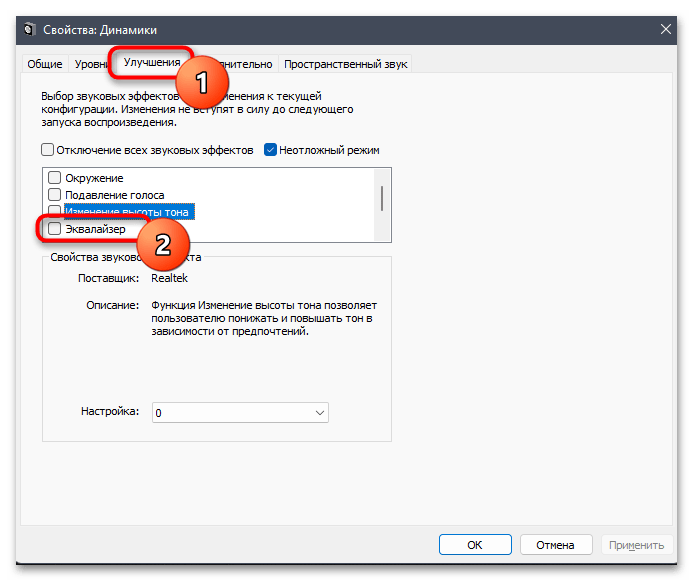
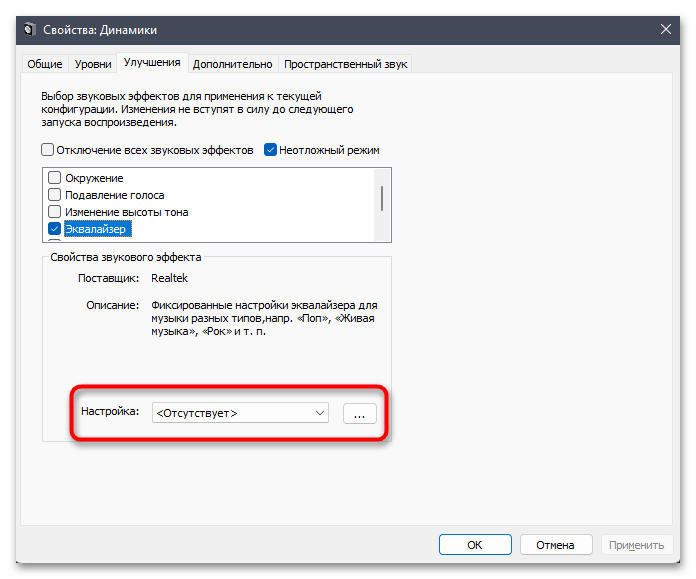
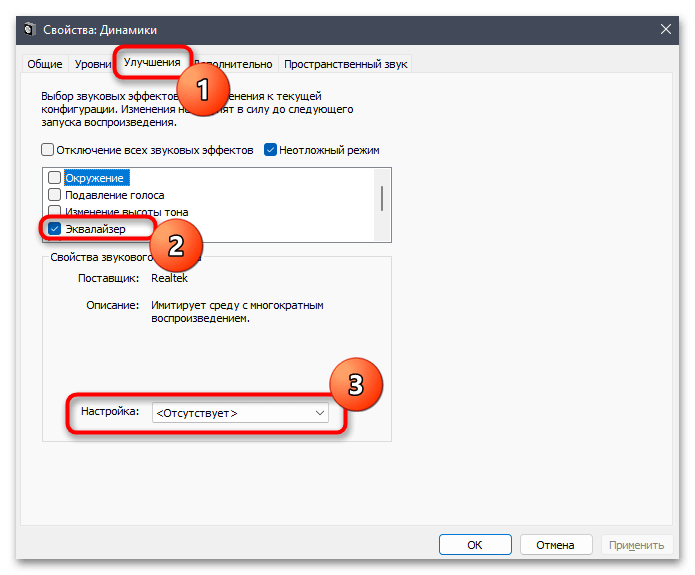
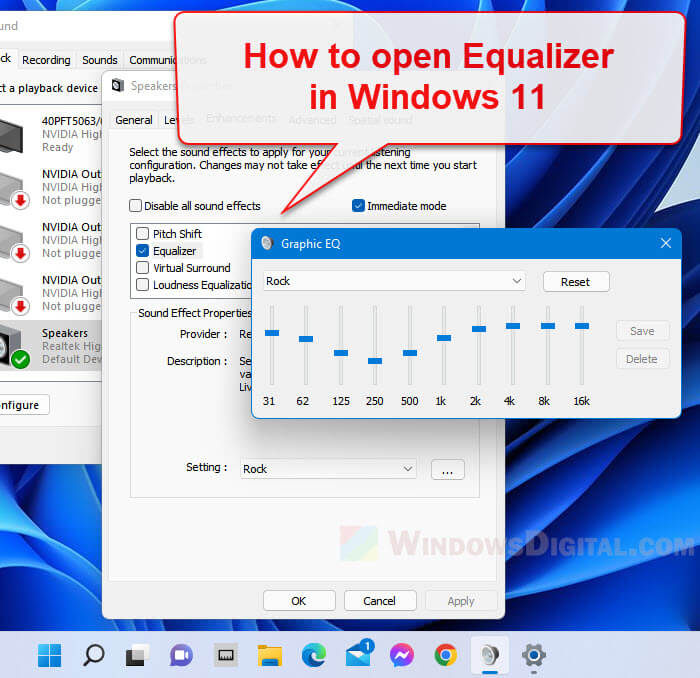
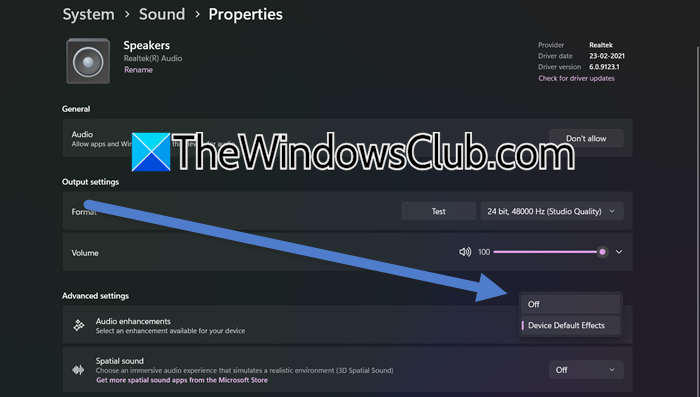
- В окне со свойствами устройства воспроизведения перейдите на вкладку «Улучшения» и активируйте галочку возле пункта «Эквалайзер».
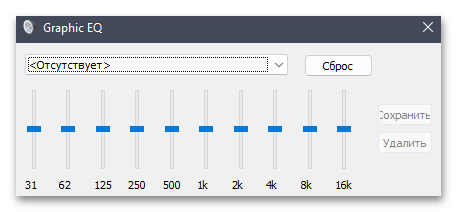
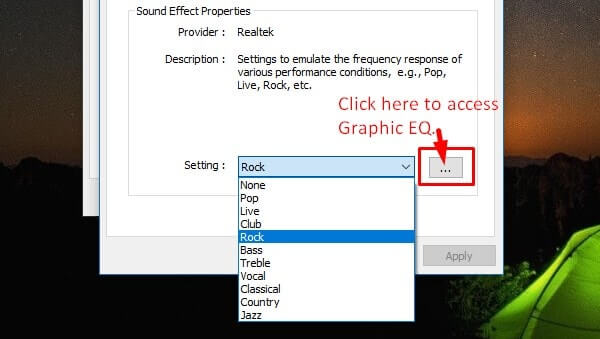
- Теперь вы можете выбрать одну из стандартных настроек эквалайзера или нажать по кнопке с тремя точками для открытия ползунков настройки частот.
- Регулируйте их или прямо здесь меняйте профили, чтобы подобрать оптимальный вариант эквалайзера. Кстати, изменения вступают в силу сразу же, поэтому вы можете параллельно прослушивать музыку, добиваясь нужного результата. Перед выходом не забудьте сохранить новый профиль.
Способ 2: Поиск в меню «Пуск»
Отдельно затронем метод, который по принципу реализации похож на предыдущий, но позволяет открыть эквалайзер буквально на пару шагов быстрее. Для этого понадобится использовать поиск в меню «Пуск», тем самым сразу переходя к необходимой категории настроек в приложении «Параметры».
- Откройте меню «Пуск» и в строке поиска введите «Параметры звука». Перейдите по появившемуся соответствию.
- В новом окне нажмите по плитке «Дополнительные параметры звука».
- Вы будете перемещены в то же самое окно, о котором шла речь в способе выше, сможете выбрать устройство воспроизведения и активировать для него эквалайзер с дальнейшей установкой своих настроек.
Способ 3: «Панель управления»
Открыть то же самое меню с настройками можно и через «Панель управления», если этот, более старый, метод вам кажется удобнее. Результат все равно будет один и тот же, незначительно поменяется только алгоритм выполняемых действий. Однако можно получить доступ и к дополнительным настройкам звукового драйвера, о чем тоже будет сказано далее.
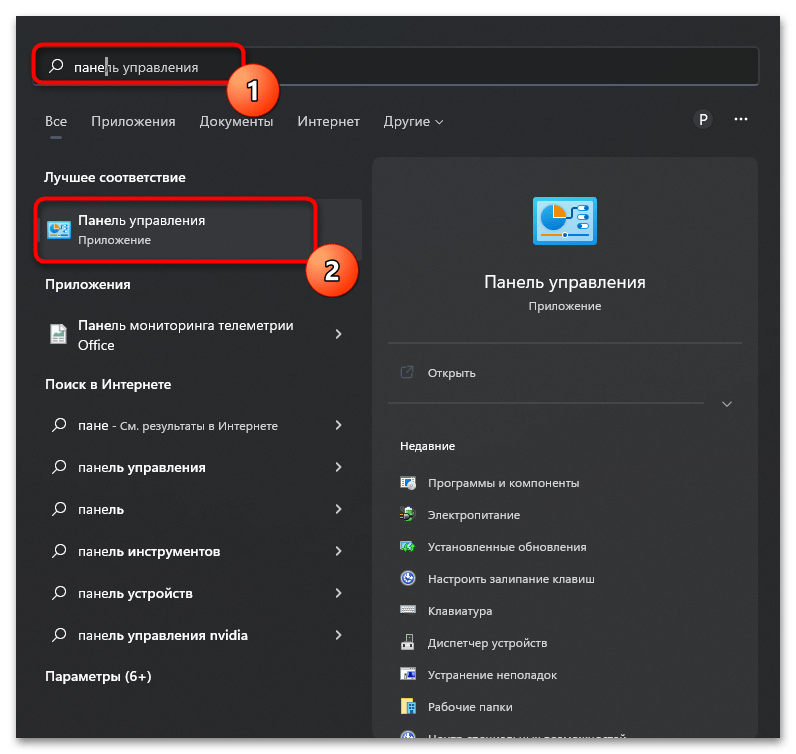
- Перейдите в меню «Пуск» и через поиск отыщите «Панель управления».
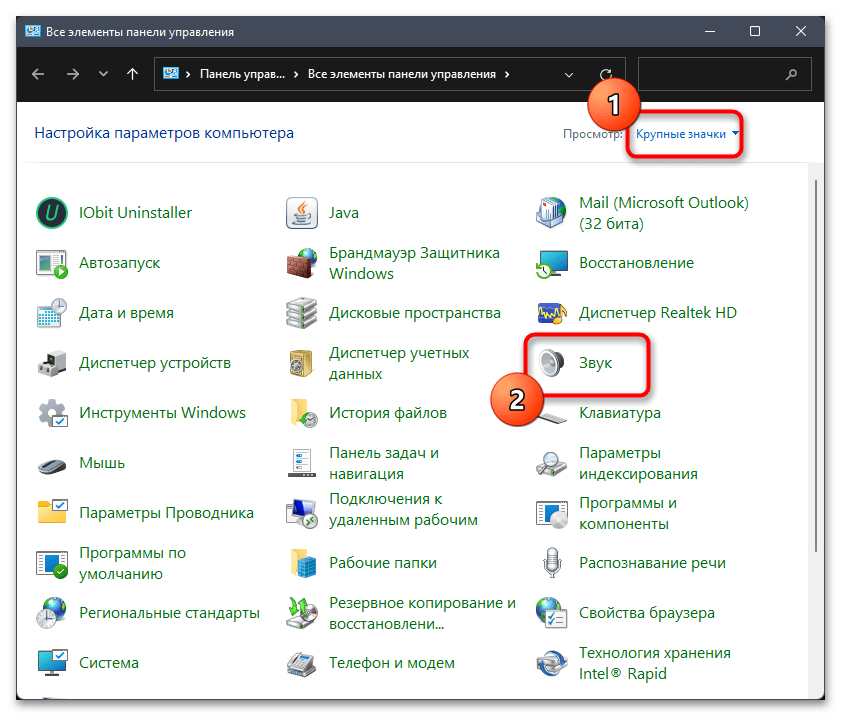
- После перехода к соответствующему приложению установите тип просмотра в состояние «Крупные значки» и щелкните по названию пункта «Звук».
- Далее выберите устройство воспроизведения, для которого хотите активировать эквалайзер, дважды щелкнув по нему левой кнопкой мыши.
- Перейдите на вкладку «Улучшения», поставьте галочку возле пункта «Эквалайзер» и приступайте к настройке. Вы можете как выбрать один из заготовленных профилей, так и создать его самостоятельно, регулируя частотные ползунки.
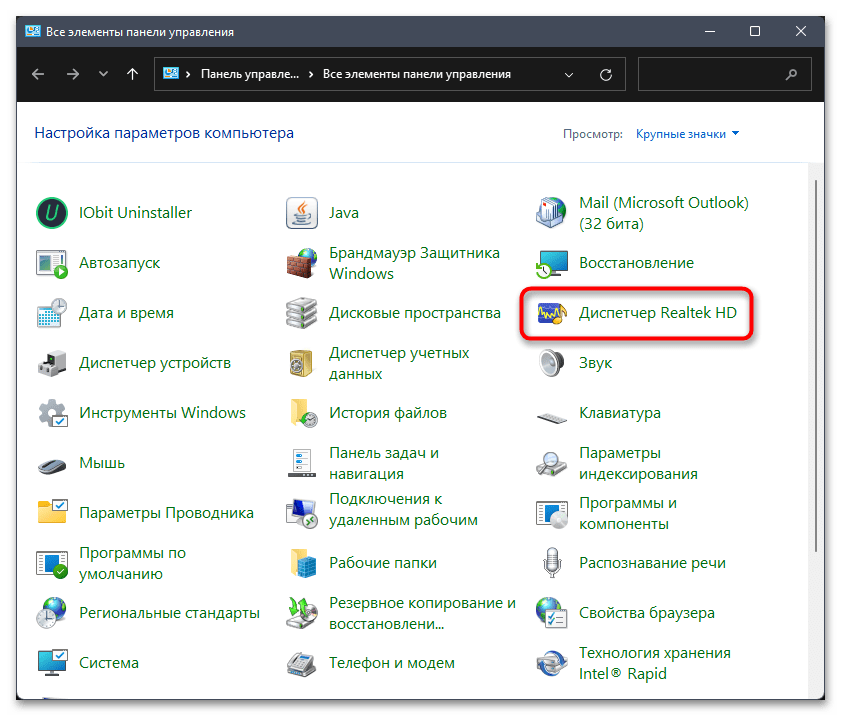
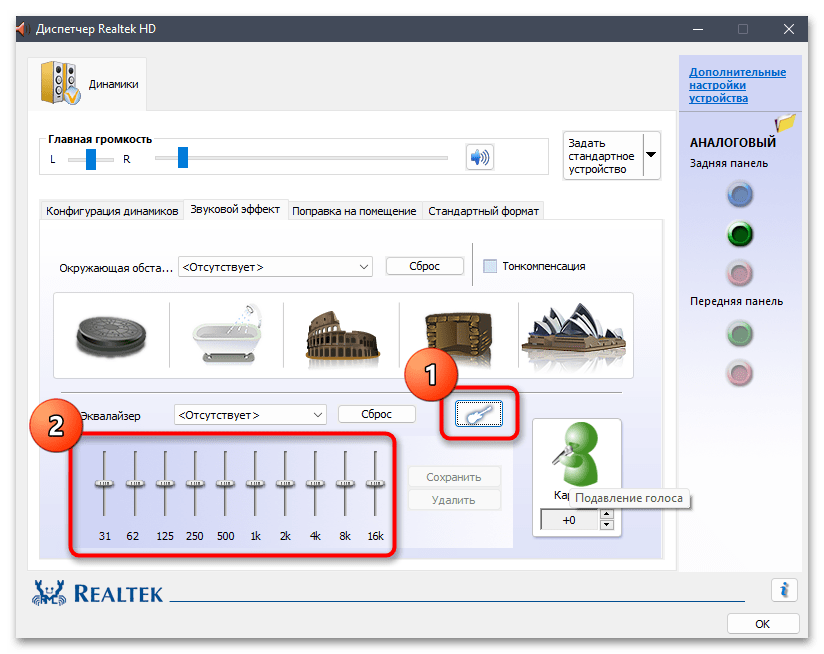
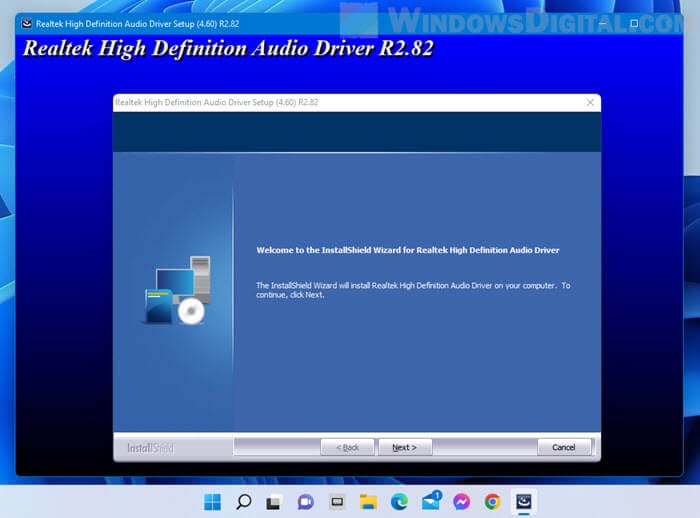
- Часто после установки звукового драйвера в «Панели управления» появляется дополнительный значок, позволяющий перейти к его настройкам. В большинстве случаев он называется «Диспетчер Realtek HD», поскольку самый популярный производитель встроенных звуковых карт — Realtek. Если у вас ноутбук или подключена внешняя звуковая карта, при поиске таких приложений отталкивайтесь от характеристик устройства.
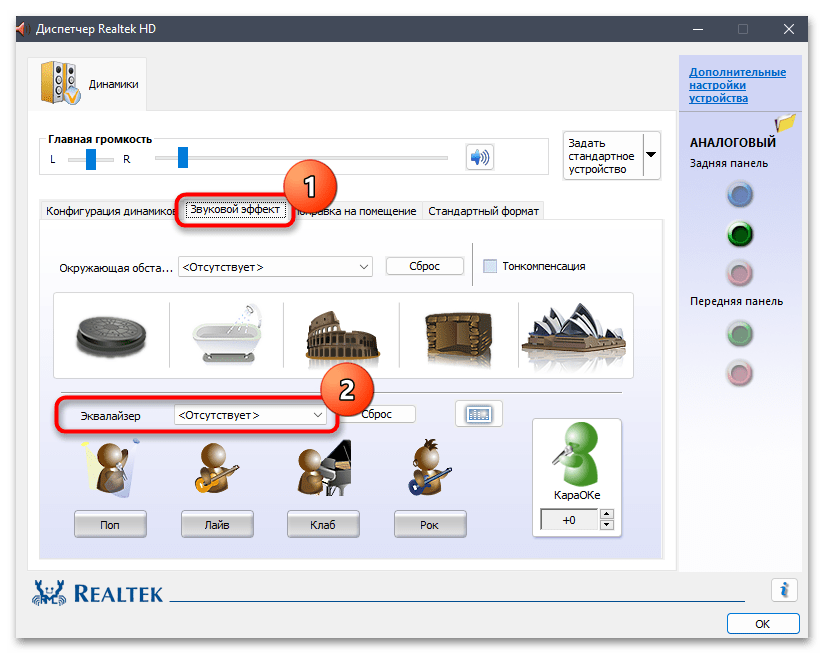
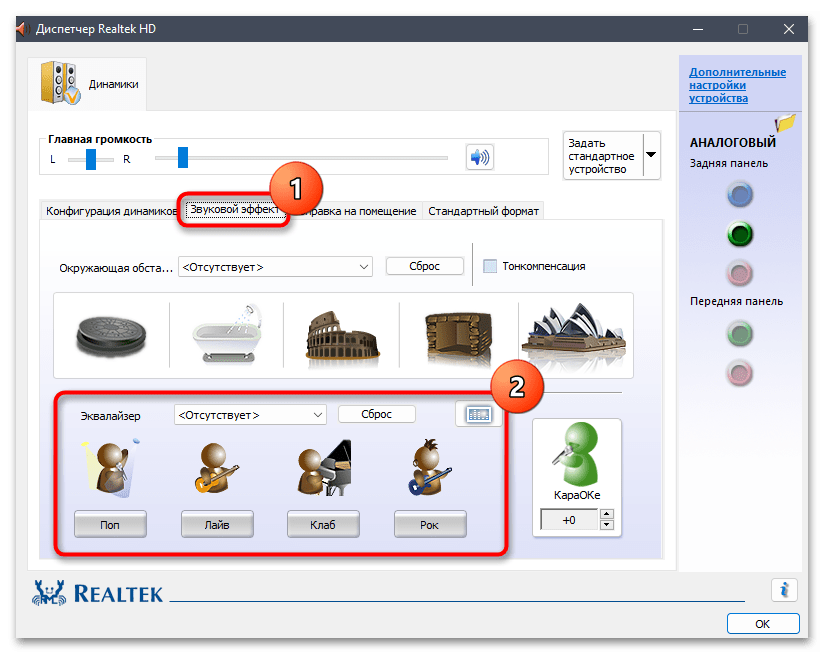
- В диспетчере звука понадобится выбрать вкладку «Звуковой эффект» и активировать эквалайзер.
- Вместо выбора профиля можно нажать по соответствующей кнопке справа, чтобы отобразить ползунки регулирования. После изменения не забудьте задать название для своего профиля и сохранить его.
Способ 4: Исполняемый файл диспетчера звука
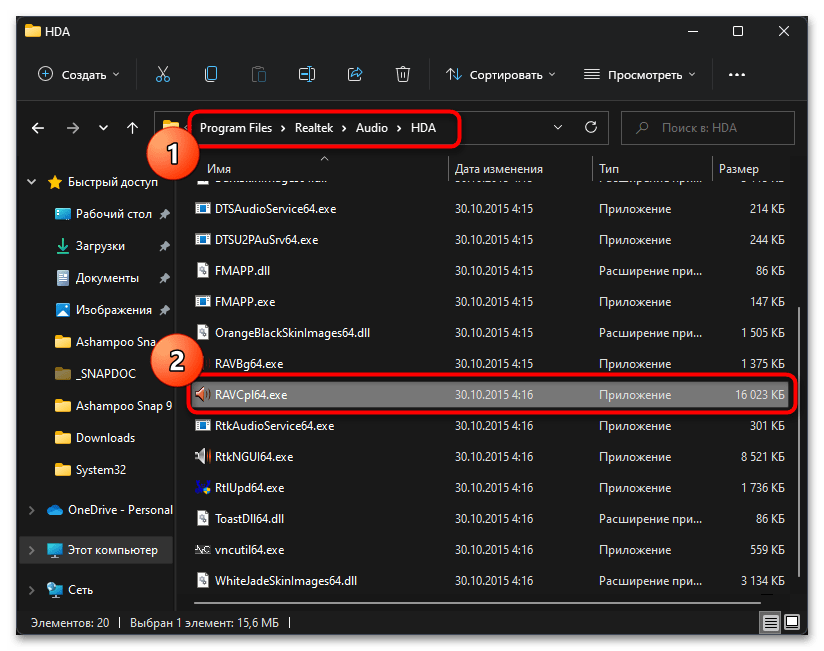
В конце предыдущего метода мы говорили о запуске диспетчера звука от производителя звуковой карты, который устанавливается в Windows 11 вместе с драйверами. Если его значок в «Панели управления» отсутствует, можно отыскать исполняемый файл для запуска вручную, что осуществляется следующим образом:
- Откройте «Проводник» и перейдите по пути
C:\Program Files\Realtek\Audio\HDA. Папка с драйвером аудио может отличаться от текущей, если в вашем компьютере или ноутбуке встроена другая звуковая карта, однако мы остановимся на самом популярном варианте. В каталоге найдите исполняемый файл для запуска диспетчера, который в данном случае называется «RAVCpl64.exe». - В новом окне перейдите на вкладку «Звуковой эффект» и выберите одну из заготовок. Можно и развернуть все ползунки эквалайзера для ручной настройки звука.
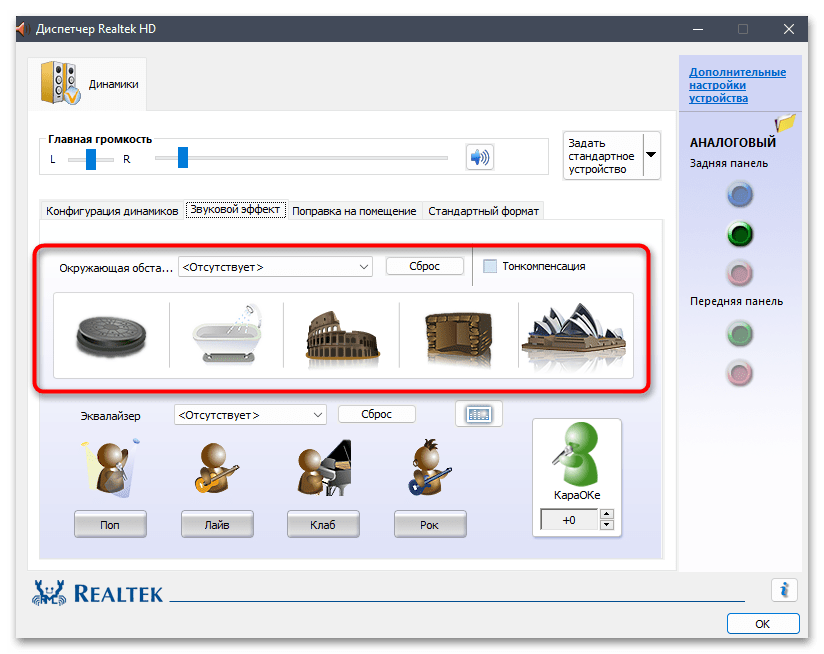
- Обратите внимание и на дополнительные функции, предлагаемые разными драйверами. Часто можно включить улучшения для конкретных задач или активировать окружающую обстановку, если это будет необходимо.
Читайте также: Что делать, если не запускается Realtek HD в Windows
Наша группа в TelegramПолезные советы и помощь
Windows 11 comes with several new audio features and settings including the new Enhanced Audio setting that is able to automatically improve sound quality when turned on. It also includes several audio enhancements such as Bass Boost, Virtual Surround, Room Correction and Loudness Equalization. However, Sound Equalizer enhancement is not included in Windows 11 by default.
This guide will show you how to add the audio Equalizer Settings in Windows 11 Sound Control Panel. We will also show you 2 other popular third party sound equalizer software for Windows 11 you can use if the former doesn’t work.
Also see: How to Boost Volume Above 100% in Windows 11
How to open sound equalizer settings in Windows 11
To add the Equalizer enhancement (as shown in the screenshot above) to the Sound Control Panel in Windows 11, follow the steps below.
1. You need to first download and install Realtek HD Audio Codecs Software Driver. On the download page, select the setup with the description that best matches your Windows version (Windows 10 version will work for Windows 11, and Windows 11 are usually 64-bit). If the download is too slow, you can download from an alternative source instead at: https://realtek-download.com/download-hd/.
See also: How to Update Realtek Drivers in Windows 11
2. Once downloaded, run the installer to install the Realtek High Definition Audio Codecs Software Driver. When the installation has completed, restart your computer.
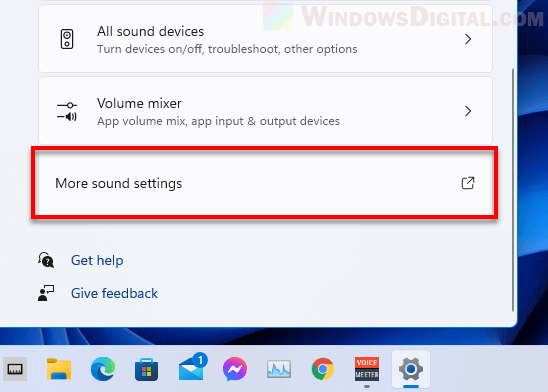
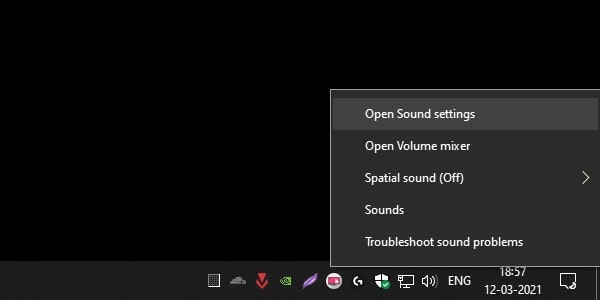
3. Once restarted, to open the sound equalizer settings in Windows 11 via Advanced Sound Settings, right-click the Sound icon from the taskbar and select Sound settings.
4. In the Sound settings window, scroll down and look for “More sound settings” option and select it.
5. In the Sound control panel window, right-click the Speaker or Headphones you are currently using, and then select Properties.
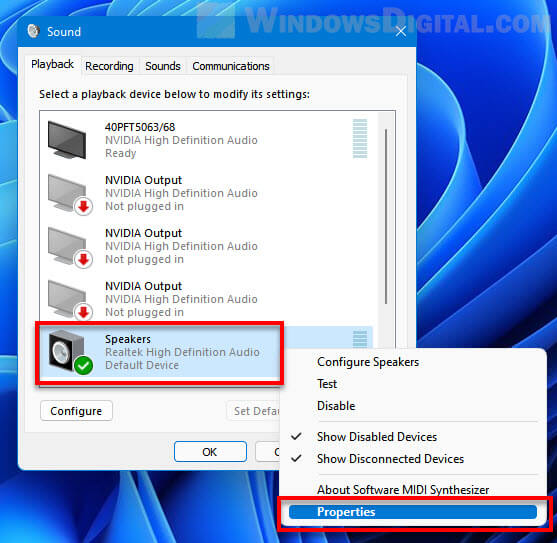
6. Next, select the Enhancements tab. Make sure “Disable all sound effects” option is disabled (otherwise you will not be able to enable any audio enhancement including the equalizer settings). In the list of enhancements, enable Equalizer. While selecting Equalizer, you can change the Windows 11 sound equalizer setting to a preset setting such as Rock, Live, Pop, Classical, Bass, Treble, Powerful, etc.
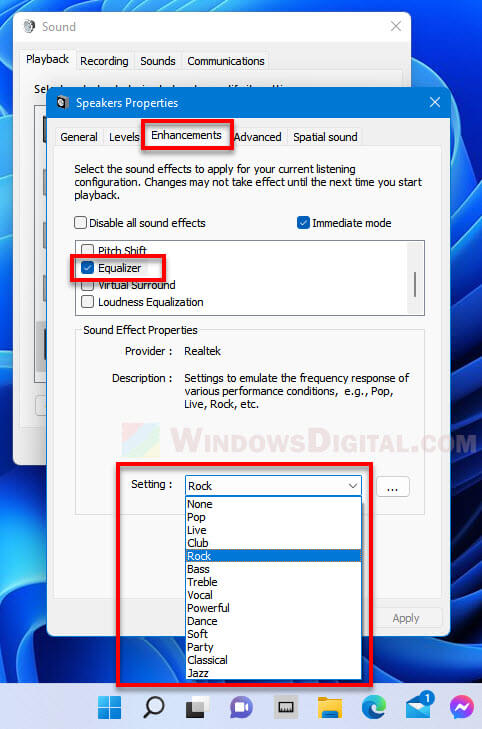
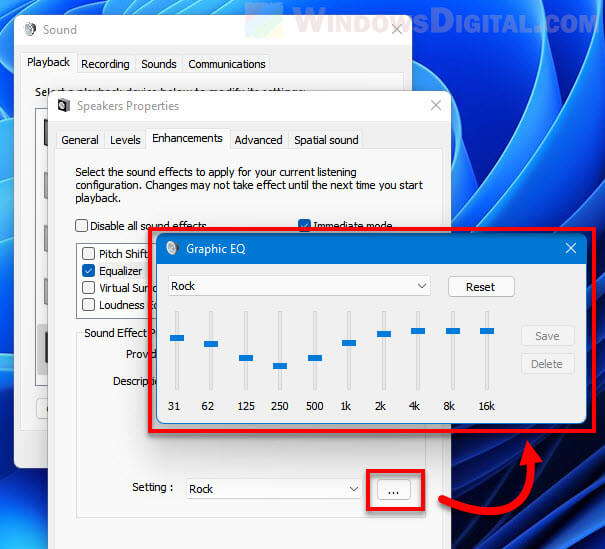
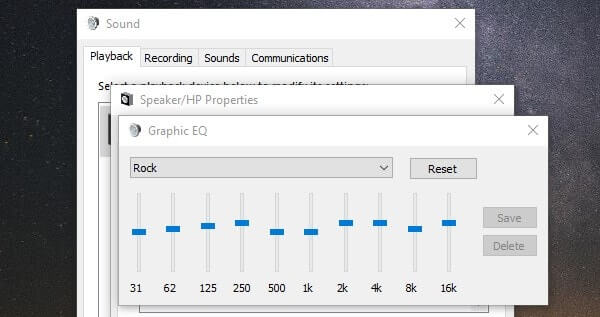
To manually customize your own sound equalizer setting, click the triple dotted option button next to the preset Setting to open the graphical equalizer (Graphic EQ) window. From there you can adjust the audio equalizer settings to your preference in Windows 11.
Also read: How to Change Volume of Different Apps on Windows 11
Other audio equalizer software for Windows 11
Since there is no built-in sound equalizer in Windows 11, we will have to rely on a third party audio equalizer software. The easiest way to get sound equalizer settings in Windows 11 is by installing Realtek HD Audio Driver as shown in the instructions above.
If that doesn’t work or if the audio equalizer by Realtek does not satisfy your need, you can try to use other audio equalizer software instead. Listed below are 2 of the most popular and free sound equalizer software for Windows 11.
Equalizer APO
While there are many audio enhancer software that provides graphical equalizer feature for Windows 11, most of these software are usually not free. However, there is a simple equalizer tool that is actually open-source and free to use, and is one of the most popular sound equalizer tools for Windows. It is called Equalizer APO.
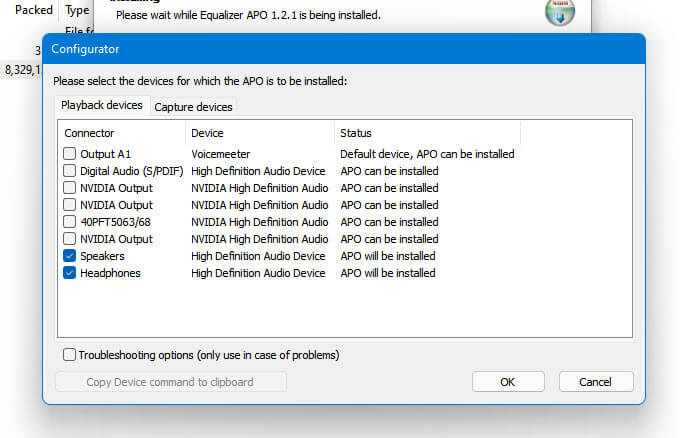
You can get Equalizer APO from https://equalizerapo.com/download.html. When you install the software, the setup will prompt you to select the playback devices you want to use with APO.
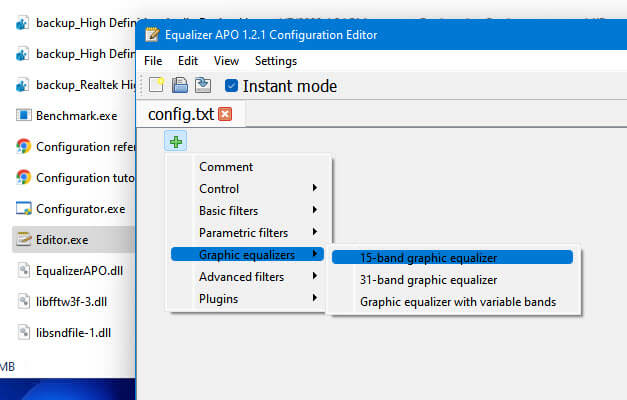
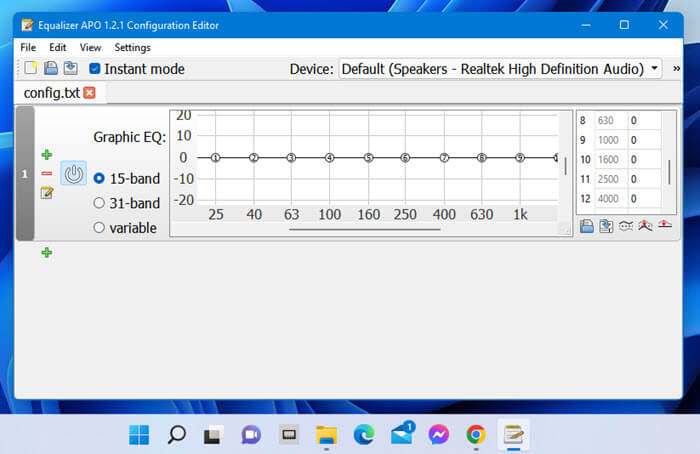
Once installed, to open the graphical equalizer in APO, go to its installation folder (usually at “C:\Program Files\EqualizerAPO“) and open the Editor.exe file. In the Equalizer APO Configuration Editor window, click the add button (plus) and select Graphic equalizers > 15-band, 31-band, or graphic equalizer with variable bands (whatever you prefer).
From there you can adjust the sound equalizer for Windows 11. Once you have done adjusting the sound equalizer, Click File > Save in the Equalizer APO Configuration Editor window to save the changes.
Related: How to Increase or Boost Microphone Volume in Windows 11
FxSound
FxSound is another extremely easy to use and free audio enhancer software that also provides graphical equalizer for Windows 11. It provides a very user-friendly interface that even users who are not very computer-literate would be able to use the tool. You can get FxSound from https://www.fxsound.com/.
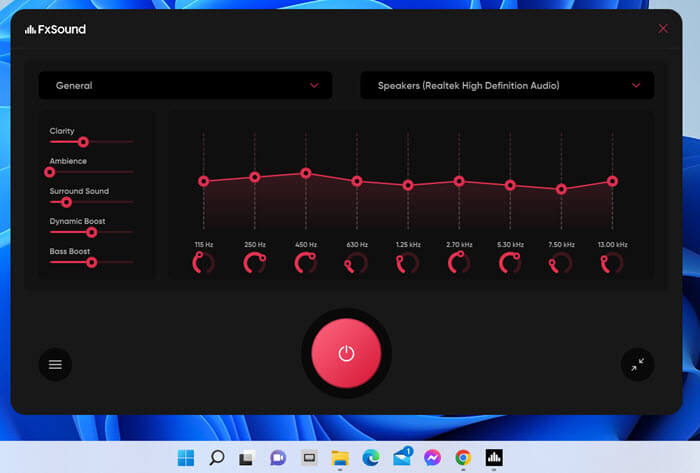
There is no specific guide needed for this tool. As soon as you open the tool, you will immediately see all the available sound enhancement options and graphic EQ on the main interface of the app. You just need to choose the speaker or headphones you want to apply the settings to and then click the power button to activate the changes.
Frequently Asked Questions
How do I change the equalizer in Windows 11?
You need to install the required audio codec software driver first, and then access the equalizer settings via Sound Control Panel in Windows 11.
How do I adjust bass and treble in Windows 11?
After installing the required audio codec, you can use the equalizer settings via Sound Control Panel to adjust the bass and treble in Windows 11.
Where is the equalizer in Windows 11?
The equalizer settings in Windows 11 can be found via Sound Settings > More Sound Settings > Speaker Properties > Enhancements > Equalizer, after you’ve installed the required audio codec driver.
If you have noticed that in the Realtek Audio Console, there is no Equalizer in Windows 11/10, you are not alone. Many users are in the same boat, and this can be due to various reasons. It can be outdated drivers, incorrect settings, or even software conflicts. Fortunately, there are several ways to resolve the issue which we are going to explore in this article.

If Realtek Audio Console has no Equalizer in Windows 11/10, execute the solutions mentioned below.
- Disable DTSAPO3Service
- Update or reinstall the audio driver
- Install Custom Realtek audio drivers
- Roll back to the previous version of the driver
- Enable or disable Audio Enhancement
- Reinstall Realtek software
- Use Realtek alternatives
Let’s get started with the troubleshooting guide.
1] Disable DTSAPO3Service
DTSAPO3Service can often override or interfere with Realtek’s built-in features and, therefore, cause conflicts between DTS audio processing and the Realtek Audio Console. In this solution, we will disable the service to regain control over audio settings.
- Click Win + R to open the Run dialog box, type services.msc, and hit the OK button.
- Find DTSAPO3Services, double-click on it, and navigate to the Startup Type drop-down menu.
- Set it to Disabled mode, click on the Stop button, and hit the Apply and OK buttons to save the changes.
Once done, check whether the Equalizer is visible. If it is still missing, slide to the next solution.
2] Update or reinstall the audio driver
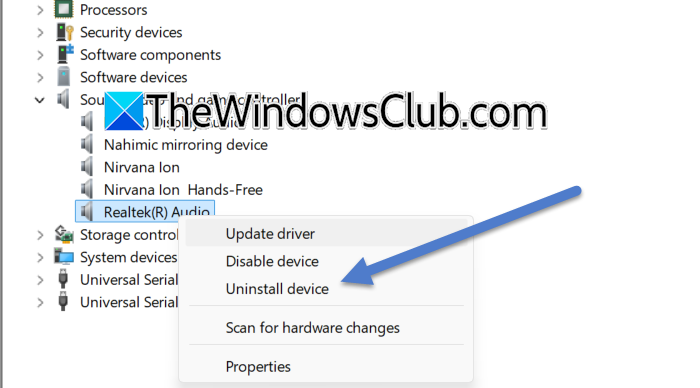
Next up, you need to check if there is an update available for your audio drivers and install it. You can download the latest version of the Audio driver and see if that helps. In case that is to no avail, let us remove the current installation of the audio driver and install a fresh one. To do so, follow the steps mentioned below.
- Open the Device Manager.
- Expand Sound, video, and game controller.
- Right-click on the Realtek audio driver and select Uninstall device.
- Click Yes when the prompt appears.
- Finally, run the Audio driver we asked you to download earlier to install it.
Hopefully, this will do the job for you.
3] Install Custom Realtek audio drivers
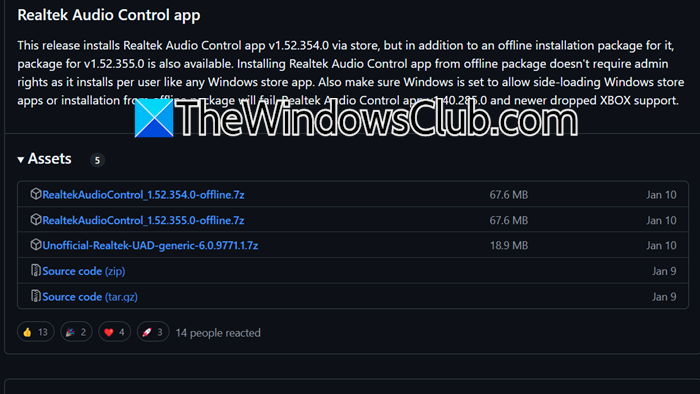
When standard drivers fail to provide full functionality or compatibility, installing custom Realtek audio drivers is necessary. To proceed, first uninstall any existing Realtek drivers and remove premium audio software, if any, as such apps may interfere with Realtek features. Once done, visit github.com to view Realtek UAD Github page to download the required files and refer to the instructions provided for the proper installation. Navigate to the next solution if the issue persists after installing the custom Realtek audio drivers.
4] Roll back to the previous version of the driver

If the issue started right after updating the driver, it could be due to compatibility issues or bugs introduced by recent updates. To rule out this possibility, follow the steps mentioned below, as we will roll back to the previous version of the driver.
- Click Win + X to open the Quick Link Menu, and select Device Manager.
- Next, expand the Sound, video, and game controllers category and right-click on the audio device.
- Once the Properties window appears on the screen, navigate to the Driver tab, and click on the Roll Back Driver option.
See if the Equalizer is available; proceed to the next step if the issue persists.
5] Enable or disable Audio Enhancement
Audio Enhancement is a feature that improves sound quality by applying processing effects. These enhancements can sometimes cause conflicts. In our situation, we recommend disabling the feature to revert to basic sound processing to resolve conflicts or compatibility issues that may cause the equalizer to disappear. However, if it is disabled, enable it to potentially restore the equalizer.
- Open the Control Panel, go to Sound, and go to the Playback tab.
- Right-click on the default device and then navigate to the Advanced tab.
- In the Signal Enhancement section, uncheck the Enable audio enhancement option to disable it, and if it was already disabled, tick the box to enable it.
- Lastly, click the Apply and OK buttons to save the changes.
- Alternatively, users can navigate to Settings > System > Sound. Under the Output section, select the audio device, navigate to the Audio Enhancement option, and set it to Off.
After completing the process, see if the Equalizer is now accessible. If it’s still missing, continue with the next solution.
6] Reinstall Realtek software
A corrupted installation or stubborn residual files can prevent the equalizer from appearing in the Realtek Audio Console. However, this can be easily fixed through a fresh installation, which removes corrupted configurations and reinstalls necessary drivers. Here’s how to do the same.
- Click Win + I to open Settings, go to Apps, and then click on Installed apps.
- Find the Realtek Software, and click on the three dots option.
- Select Uninstall and follow the on-screen procedure to do the same.
- Now, go to the Microsoft Store, download Realtek Audio Console, and follow the steps to complete the process.
The problem should be resolved.
7] Use Realtek Alternatives
Last but not least, don’t fret if the equalizer continues to be invisible in the Realtek Console; there are several options available in the market that users can explore. Dolby Atmos stands out as one of the top-notch contenders, which is known for its premium sound quality and advanced customization features, and therefore provides immersive audio experiences. Next, we have EqualizerAPO, which is favored by users for its lightweight nature and extensive audio customization capabilities.
There are more options, such as FxSound, previously known as DFX Sound, which offers user-friendly presets and customizable settings, whereas Boom 3D excels in delivering 3D surround sound and comes equipped with an auto-calibration feature. Lastly, we have EasyEffects, an open-source tool that offers flexibility and advanced features like a parametric equalizer and dynamic range compression.
Read: Realtek Audio Console not detecting Headphones
How to fix Realtek audio No sound in Windows 11?
To fix the No audio issue in Realtek audio, proceed by checking connections and volume settings. If there are no issues with the settings, run the Audio Troubleshooter, ensure that Realtek is set as the default, and update the drivers. If needed, restart the Windows Audio services, and hopefully, there won’t be any problems regarding the sound.
Read: Realtek Audio Console doesn’t support for this machine
What equalizer setting is best for music?
The best equalizer settings vary from person to person since they depend on personal preference and genre. However, a flat ‘EQ’ where all frequency bands remain at their default levels is often recommended for the most accurate and natural sound reproduction.
Also Read: Realtek Audio Console Connector Retasking greyed out.
An equalizer is a sound engineering tool, that helps to adjust the output of different frequencies. For music lovers (Audiophiles), EQ is definitely a useful tool to manage audio frequencies. If you’re looking for an equalizer for Windows 11/10, then this article will end your search here. Yes, Microsoft offers a few audio enhancement options, but that is not enough for everyone. With the default EQ, you get only a few options like Bass Boost, Virtual Surround, Room Correction, and Loudness Equalization. Definitely, these will give some basic tweaks to audio output. Though, if you’re using Realtek drivers, then you can get some good equalization options.
What is Audio Equalizer?
If you don’t know what equalizer or equalization is – Equalizers are software or hardware filters that allow to equalize or adjust the loudness of specific frequencies. In past, many hardware instruments were required to balance audio frequencies. But now the same work can be done, by using some equalizer software.
Equalizer also lets you cut or boost/enhance the levels of specific audio frequency ranges. Basically does provides more granular control of the sound volume. Yes, there are many equalizer Apps or Tools available for Windows that can help to perform equalizing tasks in just a few seconds. But first, you have to make sure that your audio drivers are up-to-date.
Instruction to check or update audio drivers.
1. First, right-click on the start button of Windows, then from the menu, click on Device Manager.
(Or you can press Windows+X hotkey to open the WinX menu)
2. Now in the device manager, double click on the “Sound, video, and game controllers” to expand all installed sound drivers.
3. To check whether the driver is updated or not – Right-click on the installed driver and select the Update driver option.
4. In update drivers setup windows click on “Search automatically for updated driver software”.
5. Done, Now windows will automatically search and update new sound drivers.
If you’ve built a PC recently, then go to the motherboard manufacturer’s site and download and install the audio driver manually. Similarly, laptop users can go to the laptop manufacturer’s site, to download audio drivers.
Free and Best Equalizer for Windows 11/10
1. Default Windows Audio Equalizer
Yes, as I mentioned earlier in the article Windows comes with few Audio Equalization options. So, before moving to some third-party apps, let’s get to know how you can access those. Though, the older version of Windows used to come with graphic Realtek EQ. But now you will get Microsoft’s Audio Equalizer. Because Realtek has created a distinguish App for Audio equalizers. But for Microsoft Equalizer, the Microsoft High Definition Audio driver should be active.
Follow these steps to access the default windows audio equalizer.
1. Right-click on the speaker icon and then click on Open Sound settings.
2. Windows 10 settings App will get open, make sure the correct audio output device is selected. And then click on Device properties.
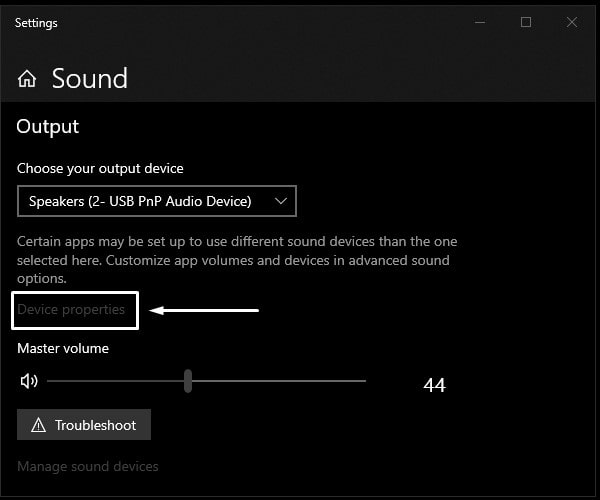
3. Click on Additional device properties. (You”ll find the option under Related Settings.)
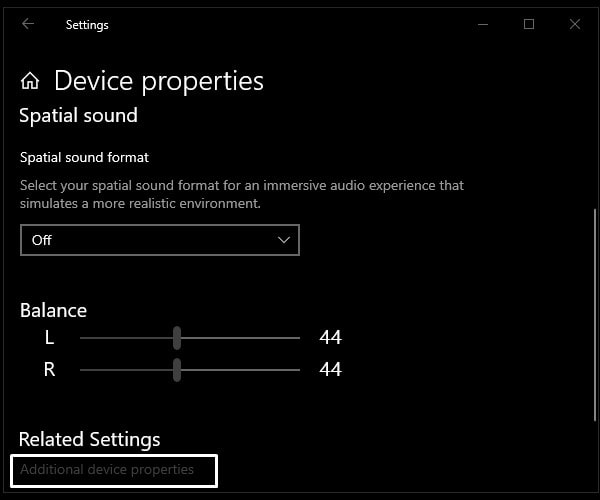
4. Speaker properties window will get an open click on Enhancements.
5. If the Enhancement provider is Microsoft then you will get only four equalization options. Select any enhancement of your choice and then click on Apply.

Realtek Equalizer
Though, If the Realtek driver is installed for your speaker. Then, you might get an equalizer by Realtek. That comes with ten band equalizers – pop, live, rock, bass, jazz, club, treble, vocal, classical, and country.
1. In the Enhancements tab, you can see a few sound effects lists.
2. From the list, mark the Equalizer option and then click on it once to select it.
3. After selecting the equalizer option, you will be able to see some setting options.

4. From there you can choose a different band equalizer. And, to access Graphic EQ, click on the three dots (…) button.
With this default equalizer, you can balance sound from 31 dB to 16k dB. The sound effect you will select or customize, manually will get applied to all system sounds.
But, the bad part about this default equalizer is, that every time you need to go through the whole process to make changes. That’s the reason, I suggest you check out other free equalizers for windows 10.
2. Realtek Audio Console
If the Realtek Equalizer option is missing in the enhancement tab. Then you can install Realtek Audio Control App from Microsoft Store. This App provides the best audio experience with Realtek Audio Codec. Basically, you can control all audio device settings in the App. Though, if you’ve installed the latest audio drivers, then this App will get auto-installed. The best part is there is a sound effect section in App. In which 13 equalizers are available to select.
1. Install Realtek Audio Control App from Microsoft Store.
2. Open App, and then from the left pane, click on “Realtek Digital Output”.
Here you will find the Equalizer section. From the drop-down menu, you can select any equalizer of your choice.
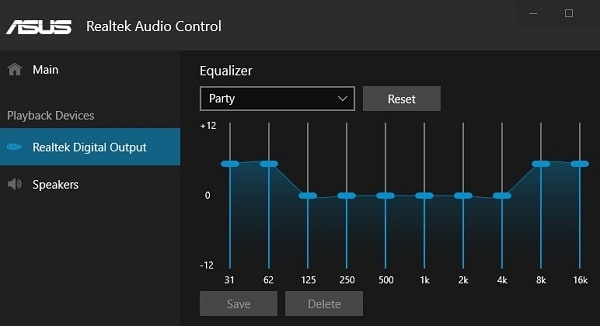
Even, you can manually control sound frequency. Also, you can select an audio environment as well.
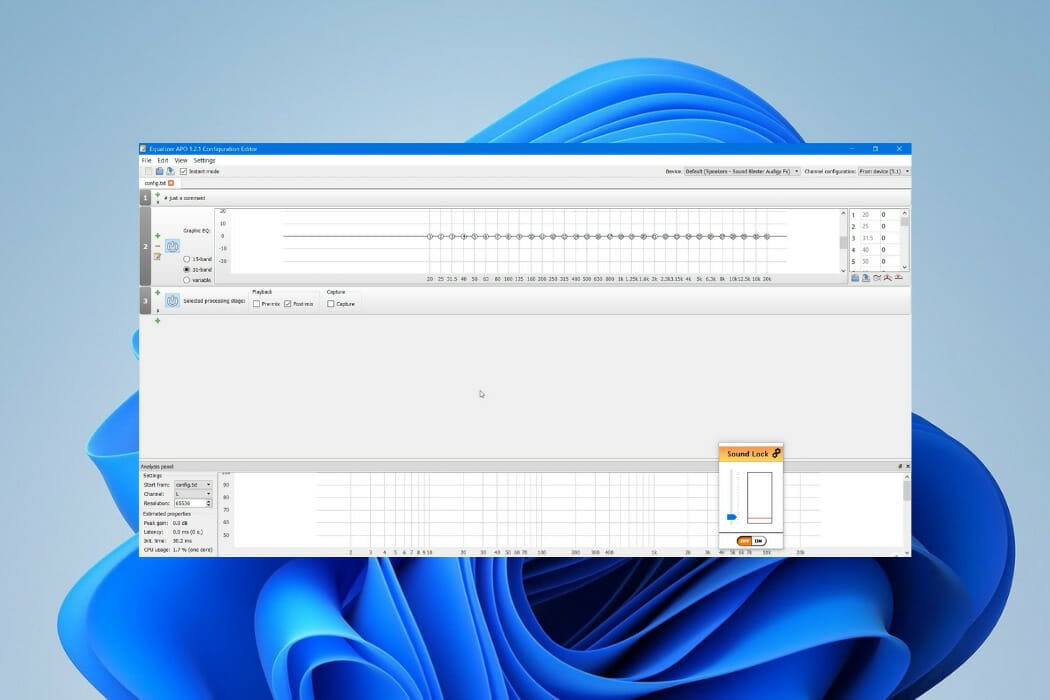
3. Equalizer APO
If you’re looking for a global sound equalizer, Which can work system-wide. Then it is the best windows 10 equalizer, for you. This tool not only allows you to balance sound, but you can also enhance the quality of the sound. While installing the tool or software it allows to choose device and channel configuration. Also, the APO tool detects automatically, which device of yours supports APO and Which does not.
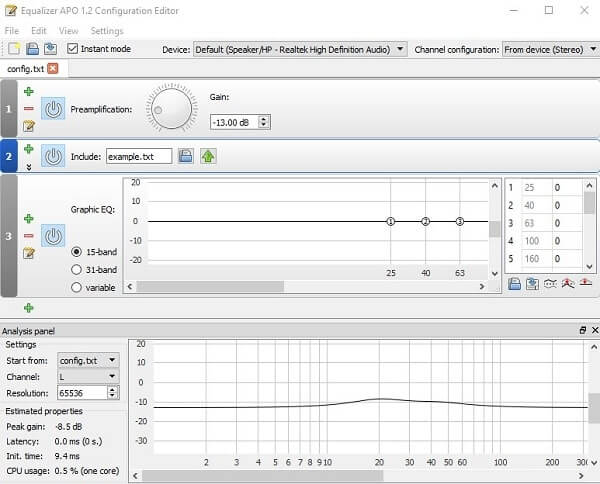
This tool also comes with the Graphic EQ feature, which comes with two bands 15 and 30. The software comes with an analysis panel, which shows real-time peak gain, latency, and CPU usage. The software comes with low latency and low CPU usage, which makes it suitable for interactive applications. It supports the VTS plugin and can be integrated into the Voicemeeter. The installation process of this software is basic and you can do it yourself easily.
But, One thing you need to know – is the software doesn’t create any shortcuts, to access software directly. You need to go into the installation directory to run the program. In the installation directory use Configurator to select the device. (reboot required after selecting the device) And you can equalize sound using the editor application, which appears in the installation directory.
Download APO Equalizer
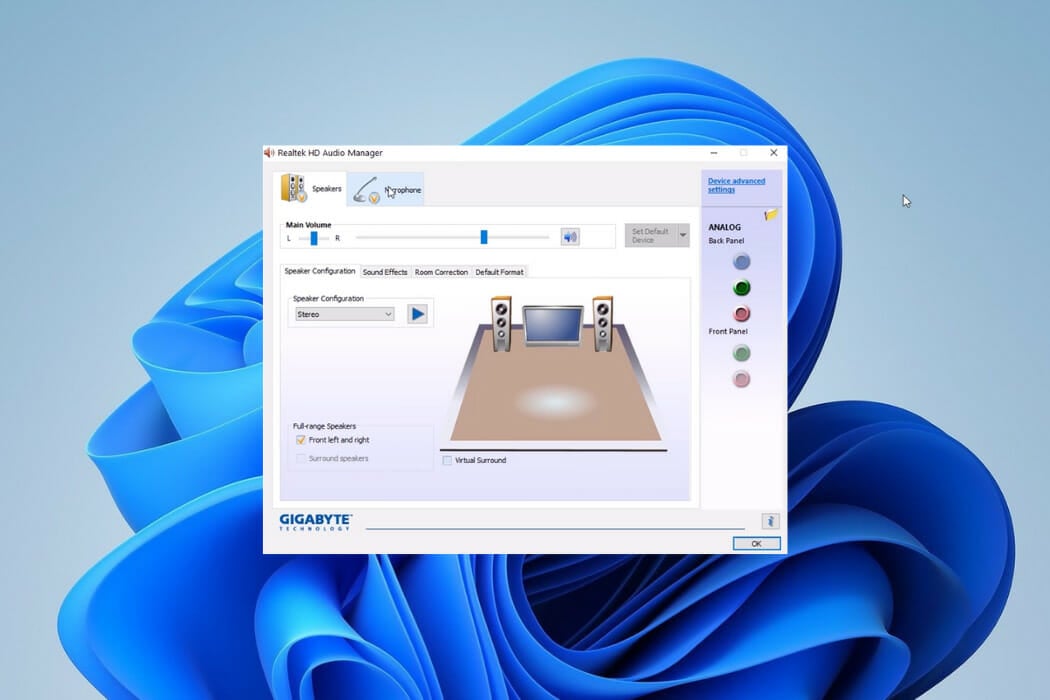
4. Realtek HD Audio Manager
Like the default equalizer, Windows 11/10 comes with DTS audio control or Realtek HD audio manager. Although you will get the same options that you get in Realtek Audio Console. This open-source equalizer allows the user to change sound settings for playback devices and recording devices. This equalizer also comes with ten bands graphic equalizer, you can also manually equalize sound. This audio manager also allows canceling of background noise, using the “adaptive noise reduction” feature.

As I mentioned before, it comes preinstalled, So you don’t need to download it. To access this sound equalizer follow this small instruction.
- First, Go to this computer directory C:\Program Files\Realtek\Audio\HDA
- Now, run the RtkNGUI64.exe file, to launch Realtek HD Audio Manager.
It comes with a 31 dB to 16L dB band range, Which makes it, the best equalizer for PC. The software comes with environment preset options, including underwater, pipe, forest, room, and many others. Like APO, speaker configuration is also available, you can configure speaker settings in stereo, 5.1 speakers, and Quadraphonic. This advanced option doesn’t come with a default HD audio manager, you need to download the updated version of it.
5. Viper’s Audio
It is another open-source best music equalizer for PC. The installation procedure of this Windows 10 equalizer is similar to equalizer APO. The software comes with three-mode – music, movie, and freestyle. You can also set Pre-Volume and Post-Volume from -120.00 dB to 15.56 dB. The surround sound option allows choosing room sizes from smallest, small, mid-size, large, and largest. The software comes with a compressor and equalizer option, an equalizer allows to balance of sound from 65dB to 20k dB.
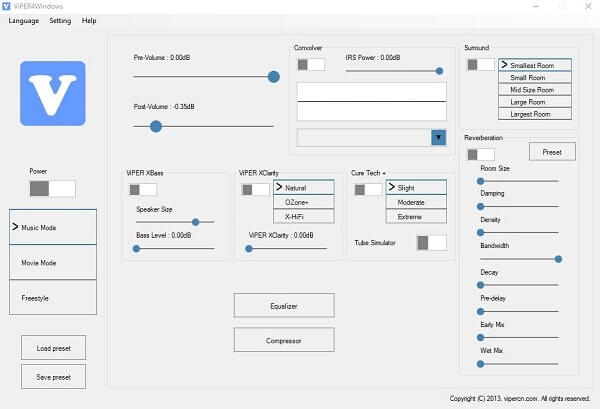
Also, it comes with some preset equalizers – super bass, soft bass, rock music, classical, pop, jazz, and many more. You can also load an external presets and can save presets created by you. You can also find out some advanced options like 3D surround sound and convolver. After installing ViPER’s Audio, it asks to choose the audio device and to reboot the system. Once you reboot the system you can access the equalizer by going into the installation directory. To open the equalizer, run ViPER4WindowsCtrlPanel.exe, and you can start using the equalizer.
6. Voicemeeter Banana
Voicemeeter Banana is another free equalizer for Windows. It is basically Advanced Audio Mixer Application with Virtual I/O to mix and Virtual Audio Device. With Voicemeeter, you can manage any audio devices and apps. If you do lots of podcasts or upload videos on YouTube then you should definitely try Voicemeeter Banana Application.
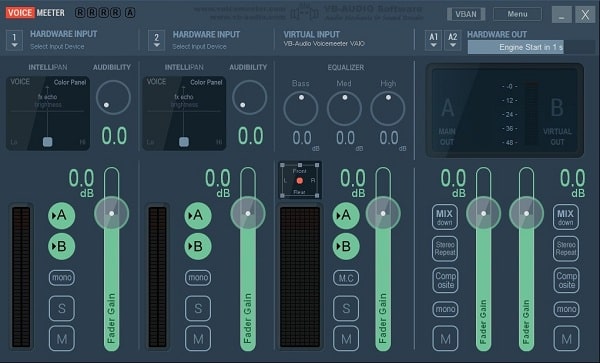
Well yes, this App is not an equalizer only, it is an audio mixer to adjust audio output as well as input. So, if you’re using Discord, Twitch, or any podcast application, then with Voicemeeter Banana, you can make the sound less distorted and crisper. From the Master section, you can manage equalizer settings. This App is donationware, yes you don’t have to pay. But, if you like, then you can donate to developers.
Download Voicemeeter Banana
7. FxSound Free
It is the replaced version of “DFX audio enhancer”, but still provides the same audio experience. FxSound brings you crystal clear sound, bass effects, and real-time music optimization. Also, it provides a studio-quality music experience, without purchasing an expensive sound system. This audio equalizer tool also allows increased bass of your system, beyond your system capability. The installation procedure is easy like normal software installation.
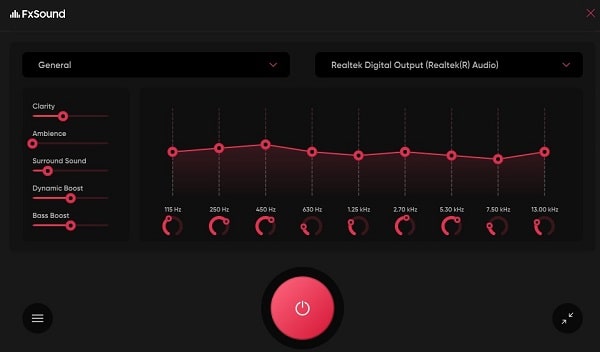
The software run in the background and all you have to do is listen to music on Spotify. Or watch a video on YouTube to enjoy a good listening experience. It also comes with customizing equalizer tool and sound effects option. Overall, it is one of the best windows 11 audio equalizer Software.
Install FxSound for Windows
8. DFX Audio Enhancer
DFX Audio Enhancer is the older version of the FxSound sound equalizer for Windows 11. The user interface of DFX gives an old Windows XP vibe. But, it gives so many options to improve sound quality. You can control audio fidelity, ambiance, 3D surround sound, dynamic boost, and hyper bass with it.
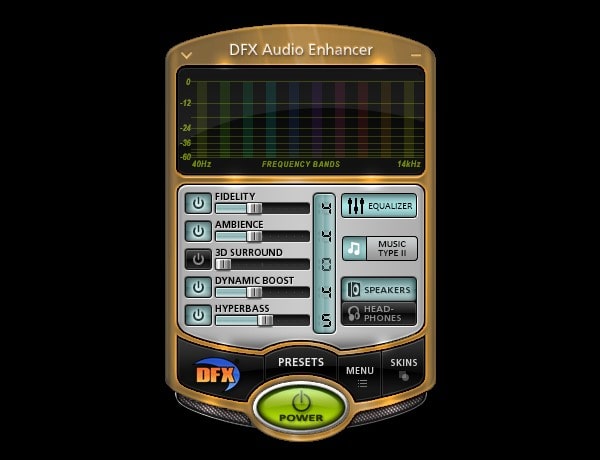
Yes, DFX Audio Enhancer also comes with multiple skins options. Like, Charcol, ClassicBlue, ClassicRed, and Universal. DFX installer might ask you to install additional software with it. So, don’t forget to uncheck it. It comes with a power button, that lets you turn on/off the audio enhancer with a single click. Moreover, it has an Equalizer, which is good enough.
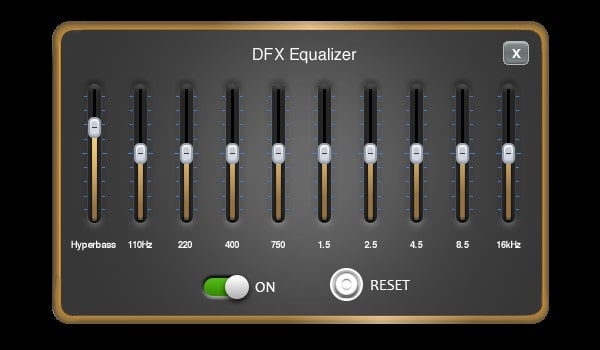
But, if you want to enhance headphone audio then you have to buy the pro version. Else, you can use it for speakers for free. Also, you have to select your speaker first by going into the sound settings of Windows 11. Else, you will hear no sound in Windows 11. Although, I still suggest you install FxSound because it is completely free to use. And, yes, you can download DFX from a third-party website, because it is old software.
Summing – up
Still, many graphic equalizers are available for Windows 11 and Windows 10. But some of them come with the trial version and locked features. And, these mentioned equalizer is free and more than enough to balance sound. But if you’re still confused that, which equalizer, you should download FxSound. Then I suggest you try the default equalizer or Realtek Audio Console App. But if you need some advanced option then the best is ViPER’s Audio.
Readers help support Windows Report. We may get a commission if you buy through our links.
Read our disclosure page to find out how can you help Windows Report sustain the editorial team. Read more
This article will show you the best free equalizer for Windows 11 that you can use without restrictions. So, if you want to improve the quality of your sound, keep reading:
Best free equalizers for Windows 11
Boom3D – built in surround features, bass boosters (30-day free trial)
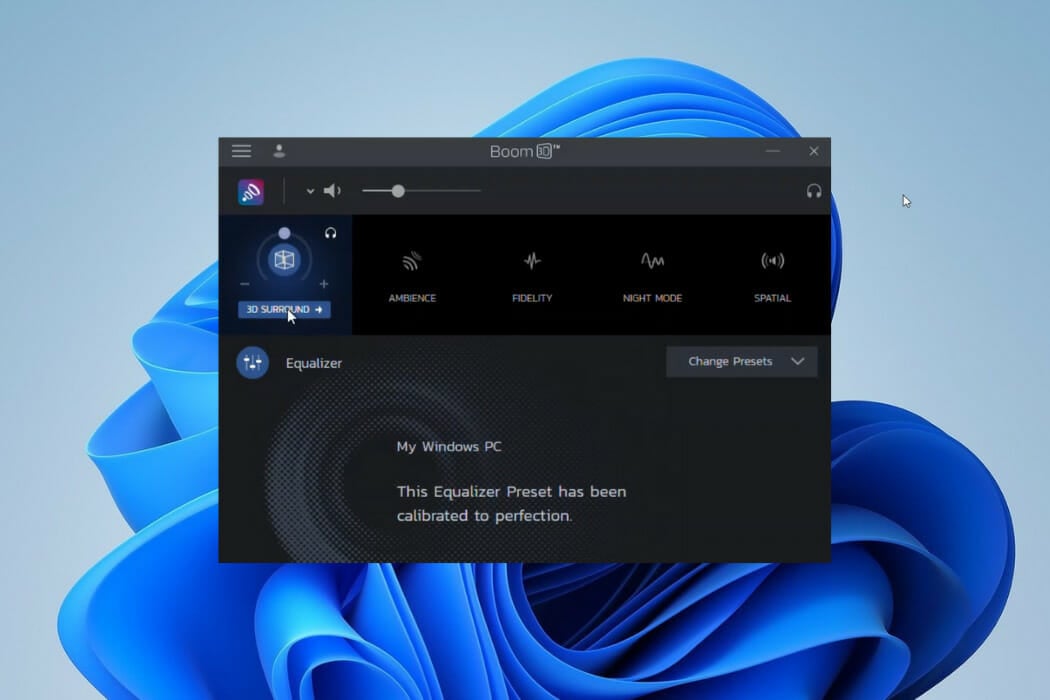
Boom 3D is a pro audio enhancer. Even though it is not entirely free, you could get some of the best audio equalizing features during its 30 days free trial period.
As the name implies, you will be able to play your songs with the most amazing 3D effects on any streaming service, media, or headphones.
The surround feature converts your PC into an incredible music booster, adding deep bass and clarity to every sound. You could get the exact effects the musician intended and more.
You will have access to 31-band equalizers and a wide range of presets.
Additional features:
- Boom volume booster
- State-of-the-art audio player
- Apps volume controller
Boom3D
If you need the best sounds on every streaming platform, this audio equalizer is an excellent choice.
FXSound – Built-in presets, real-time sound adjustment
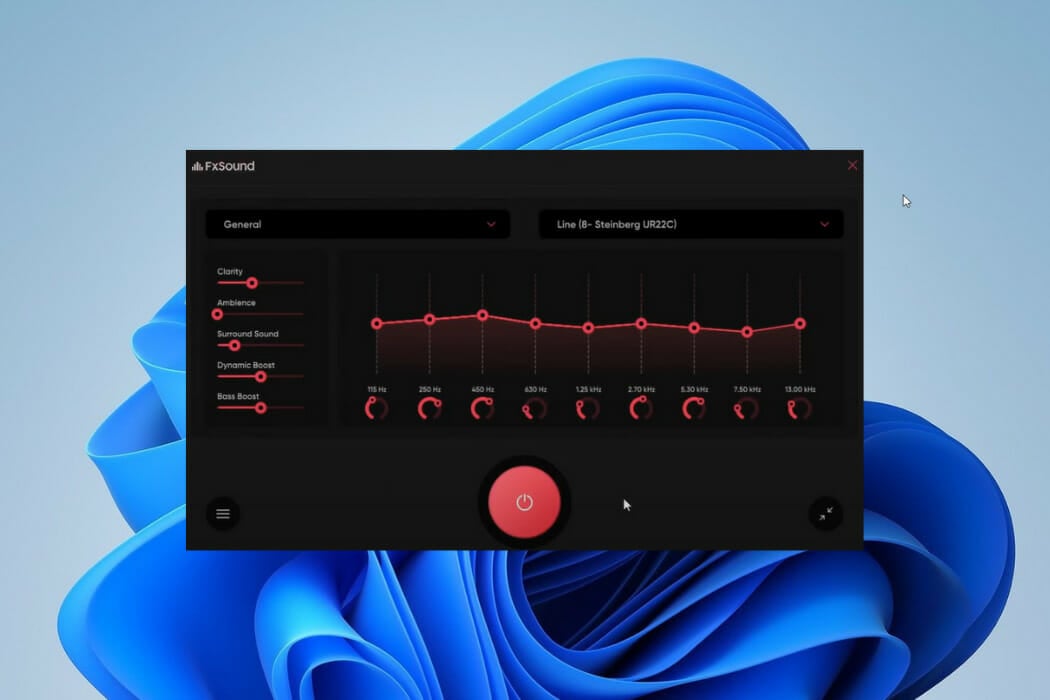
FX Sound provides an easy learning curve if you have ever used traditional audio equalizers. In addition, it provides a simple tunable for adjusting sounds.
Sliders are conspicuously missing on the new FxSound app, and you will only have to hit the ON button for the app to produce real-time enhancement of sound.
On this app, you will have options for several presets, including music, games, video streaming, etc. It is an easy-to-use option if you have no prior sound processing knowledge. Users of FX Sound will be able to include a variety of effects, including surround sound, ambiance, and clarity.
Its downside will be the compatibility issues with extreme audiophiles, attributed to a capacity of 10 bands ranging between 110Hz and 15KHz. The preloaded presets compensate for the small band capacity.
Additional features:
- Unique visualizer
- Dynamic boost options
- A preamplifier volume control
⇒ Get FXSound
Viper4Windows – In-depth customization, and extensive control over sound settings
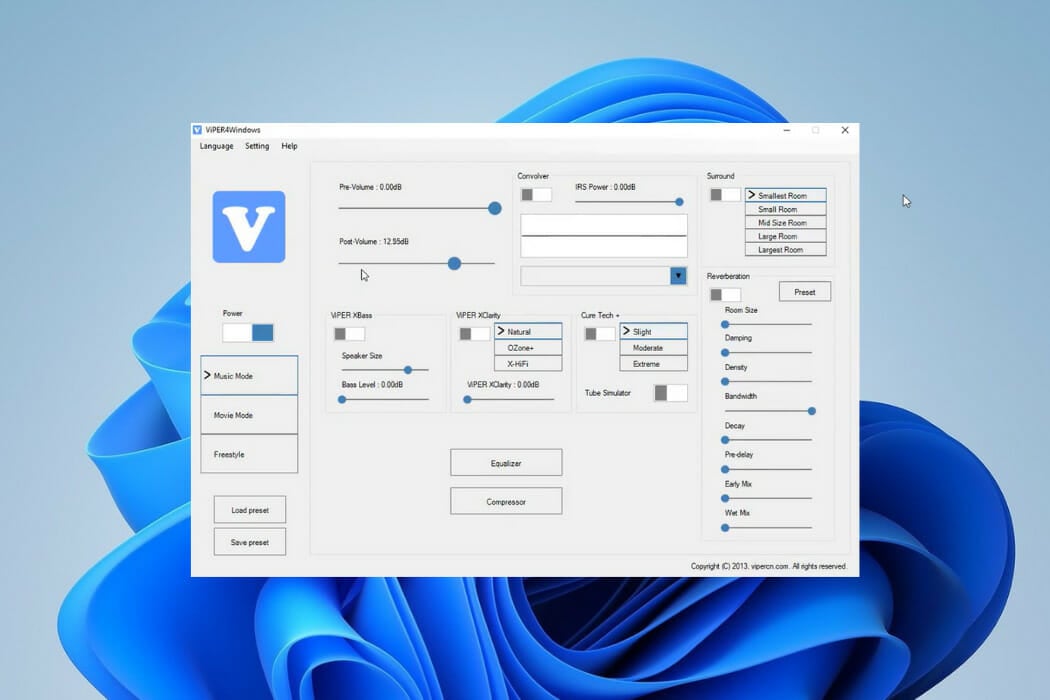
Viper4Windows is a powerful sound equalizer for Windows 11. You can load it on the sound card as the audio processing object and save it on audio-enhancing hardware.
You will be fond of it because it gives them the freedom to choose target output devices and allows custom sound presets for varying scenarios, including Rock Music, Super Bass, and Jazz Music.
Compared to FX Sound, it has a broader band range. You will be able to customize through 18 bands ranging between 120dB and 13dB.
It has a surrounding feature for sound effects to accommodate small, mid-size, large, and large rooms.
Viper4Windows’ ViPER XClarity feature helps to stabilize distortions in noise. This feature gives you three options: Ozone+, Natural, and X-Hifi, and includes an adjustment bar for setting distortion.
Additional features:
- Speaker size and bass level control
- A compressor for pitch selection
- Reverberation effects
⇒ Get Viper4Windows
Equalizer APO – Open source and powerful equalizer
Equalizer APO is yet another excellent Windows 11 free audio equalizer. It is open source, and the several sound filters will be a great addition to boosting music quality on your PC.
With this sound equalizer, you can do more than real-time effects. With the option to save your settings as config.txt, you can apply settings whenever you need them.
This sound equalizer has a low latency rate, and you will be able to use its settings and filters for VoIP apps, music streaming apps, and computer games.
Overall, Equalizer APO works great on Windows 11, so it’s worth checking out.
Additional features:
- Integration with voice meeter
- Robust filter options
- A wide range of channels
⇒ Get Equalizer APO
Graphic Equalizer Studio – Easy to use for loudness equalization

More than some of the other audio equalizers on this list, Graphic Equalizer Studio requires some knowledge of audio processing to successfully tweak the sounds.
For example, while broadcasting songs, treble and bass responses may not be the same between tracks.
You may use it along with a limiter and compressor to get the best out of its dynamic audio range. When you enable its auto-correct feature, it will automatically detect min and max amplitudes.
Using this equalizer, all your playlists should sound better.
Additional features:
- Q-factor adjustment for different configurations
- Real-time audio processing
- Auto-correct included
⇒ Get Graphic Equalizer Studio
Realtek HD Audio Manager – straightforward and easy, perfect for beginners
Realtek HD Audio Manager has a highly customizable equalizer set of 10 bands. Options for sound effects are grouped into Environment and Equalizer.
The Equalizer sound effect has bands that range between 31dB and 16k dB and permits customization for future use. You would find its many presets handy. Its newly introduced Karaoke is used to maintain the current track’s pitch.
Realtek HD Audio Manager’s Environment sound effect includes Underwater, Living room, Sewer Pipe, Forest, and more. Once you select any of these, it will create the corresponding sound effect.
Overall, the Realtek equalizer for Windows 11 offers great features, so you should consider it.
Additional features:
- Room sound correction
- Swap Center, and Bass Management
- Virtual Surround
⇒ Get Realtek HD Audio Manager
DFX Audio Enhancer – Highly customizable with 3D surround & dynamic sound
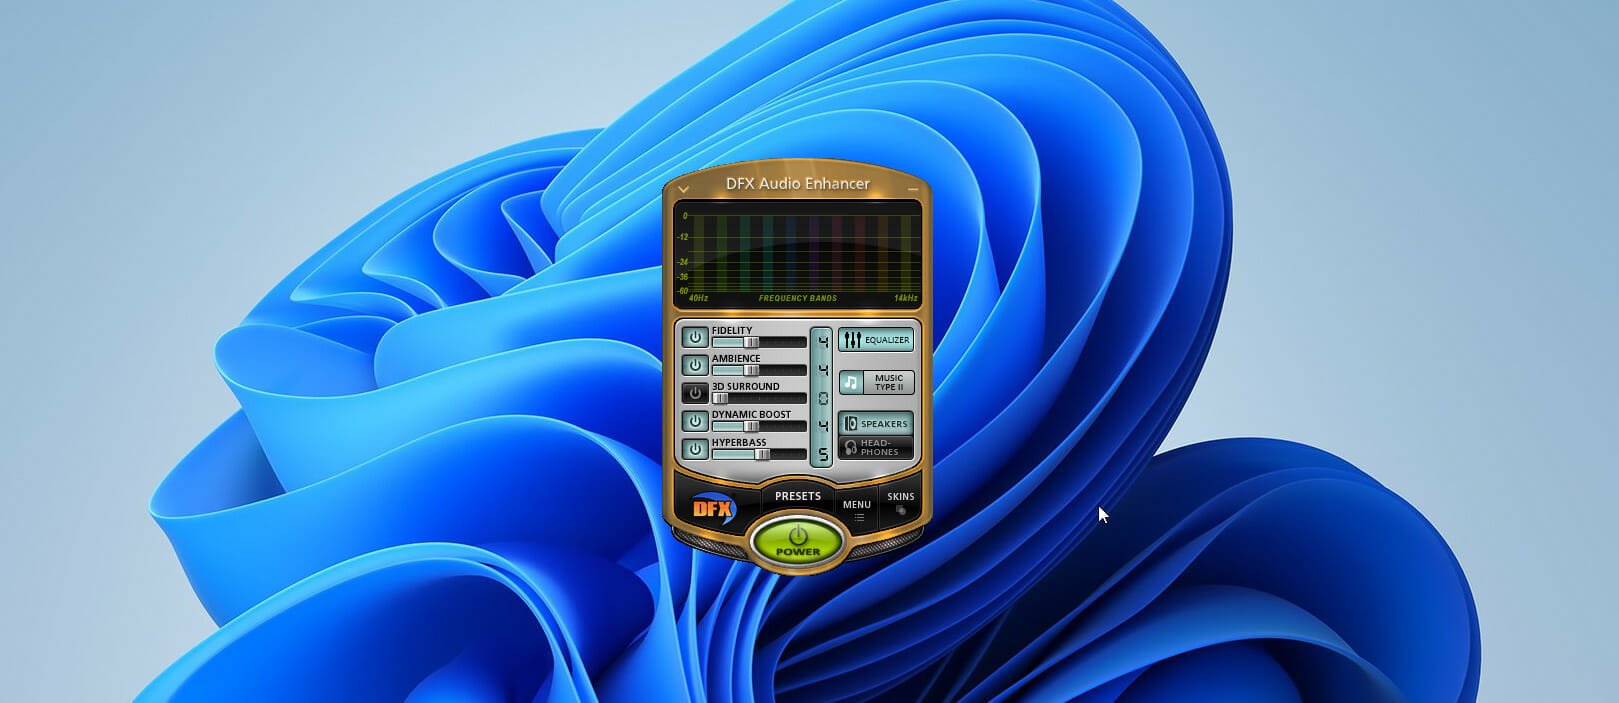
DFX Audio Enhancer is a basic sound equalizer for Windows 11. It will add different features to the sound to improve the quality. It is more popular for producing solid effects like Fidelity, 3D surround, Dynamic boost, and Ambience.
With the 3D surround, it generates real-life effects to mimic different surroundings. The hyper boost arguments perceived audio loudness while maintaining the sound distortion.
To add to the aesthetics, it has the option for different skins like Factory_classicblue, Factory_charcoal, etc. During installation, you must take care not to install other software that is not needed but come in the installer.
Additional features:
- Light Processing
- Streamcast options
- Dynamic boost
⇒ Get DFX Audio Enhancer
Can I enhance the audio features on Windows 11?
You may not be interested in downloading a free equalizer app and would prefer to work with the inbuilt sound features of Windows 11. In this case, optimizing the sound settings on Windows 11 will be your best bet.
- How to Improve Sound Quality on Laptop & PC [Windows 10/11]
- 5+ best virtual surround sound software [2022 Guide]
- Recent Windows 11 update lets you disable profanity filter in voice typing
- Microsoft wants Windows 10 users to upgrade to Windows 11 or Copilot + PCs
- Windows 11 KB5055627 update makes File Explorer more fluid
- A few keyboard settings are moving from Control Panel to Settings app in Windows 11
You will be able to access the sound settings by right-clicking on the sound icon, then tinkering with the different settings to get what appeals to you.
Does Windows 11 have a built-in equalizer?
Windows 11 does not come with a built-in standalone equalizer for general audio control, but you can enhance your audio experience using some built-in sound settings.
These settings include basic sound adjustments like spatial audio, sound enhancements (bass boost, virtual surround, loudness equalization), and tweaks to specific playback devices.
If you want full control, you’ll have to download a third-party tool.
Summary
These are some of the best free equalizers that you can use on Windows 11, but if you need a free equalizer for Windows 10, you can also use these tools because they are backward compatible.
If you never used an equalizer before, we have a great guide on how to add a sound equalizer to Windows 10, so be sure to check it out.
We are curious to know which of these free equalizers works best for you. Please let us know in the comments.
Loredana Harsana
Windows Software Expert
Loredana is a passionate writer with a keen interest in PC software and technology. She started off writing about mobile phones back when Samsung Galaxy S II was on top of the world and she fell in love with tech of all sorts.
Whenever she’s not at her work desk, you’ll find her enjoying refreshing tea flavors, spilling stories on paper, and listening to the radio.