
Kerberos Configuration and Hardening on Windows Server
This repository provides a step-by-step guide for configuring and hardening Kerberos authentication on Windows Server. Kerberos is a secure and widely used authentication protocol in Active Directory environments.
Table of Contents
- Introduction
- Prerequisites
- Configuration Steps
- Step 1: Configure Kerberos Policies
- Step 2: Enable Strong Encryption
- Step 3: Harden Kerberos Settings
- Step 4: Synchronize Clocks
- Validation
- Maintenance and Monitoring
- License
Introduction
Kerberos is the default authentication protocol in Active Directory (AD). Properly configuring and hardening Kerberos is essential to:
- Secure authentication processes.
- Prevent attacks like Pass-the-Ticket and Golden Ticket.
This guide will help you configure and secure Kerberos on a Windows Server.
Prerequisites
- A Windows Server functioning as a Domain Controller (DC).
- Active Directory Domain Services (AD DS) environment.
- Administrator privileges on the DC.
Configuration Steps
Step 1: Configure Kerberos Policies
- Open Group Policy Management (
gpmc.msc). - Navigate to Default Domain Policy or alternatively, you can create a new Group Policy Object (GPO) for Kerberos settings by right-clicking on the domain and selecting Create a GPO in this domain, and Link it here…..
- Modify Kerberos Policy Settings:
Navigate to Computer Configuration → Policies → Windows Settings → Security Settings → Account Policies → Kerberos Policy.- Enforce user logon restrictions: Enabled.
- Maximum lifetime for service ticket: Set to 10 hours or lower.
- Maximum lifetime for user ticket: Set to 10 hours or lower.
- Maximum lifetime for user ticket renewal: Set to 7 days or lower.
- Maximum tolerance for computer clock synchronization: Set to 5 minutes or lower.

Step 2: Enable Strong Encryption
- Open Active Directory Users and Computers (
dsa.msc). - Navigate to the Domain Controllers Organizational Unit (OU).
- Edit the properties of the Domain Controller account:
- Go to the Account tab.
- Enable «This account supports Kerberos AES 256 bit encryption».
Alternatively, use powershell :
#Run the Command:
Set-ADComputer -Identity "SVR-DC" -KerberosEncryptionType "AES256"

#Verify the Changes:
Get-ADComputer -Identity "SVR-DC" -Property KerberosEncryptionType | Select-Object KerberosEncryptionType

- Update the Default Domain Policy:
Navigate to Computer Configuration → Policies → Windows Settings → Security Settings → Local Policies → Security Options- Network Security: Configure encryption types allowed for Kerberos → check AES128_HMAC_SHA1, AES256_HMAC_SHA1 and Future encryption types.

Step 3: Harden Kerberos Settings
- Disable DES encryption:
- In Group Policy, navigate to Computer Configuration → Windows Settings → Security Settings → Local Policies → Security Options.
- Uncheck DES and RC4 options in Network Security: Configure encryption types allowed for Kerberos.

- Restrict Kerberos delegation:
- Use Active Directory Users and Computers.
- Set «Trust this user for delegation to specified services only» under the Delegation tab for each account.
- Enable auditing for Kerberos events:
- Open Local Security Policy (
secpol.msc). - Navigate to Advanced Audit Policy Configuration > Account Logon.
- Enable:
- Audit Kerberos Authentication Service = success .
- Audit Kerberos Service Ticket Operations = success.
- Open Local Security Policy (

Step 4: Synchronize Clocks
Kerberos relies on time synchronization for ticket validation. Use an NTP server to ensure accurate time:
w32tm /config /syncfromflags:manual /manualpeerlist:"time.windows.com"
w32tm /resync

Validation
- Use the
klistcommand to verify Kerberos tickets:

- Test by accessing a service (e.g., shared folder or web application) to confirm proper ticket generation and encryption.
Maintenance and Monitoring
- Review Kerberos event logs in Event Viewer:
- Navigate to Windows Logs → Security.
- Regularly update security patches and encryption algorithms.

190
[libdefaults] ticket_lifetime = 36000 default_realm = EXAMPLE.COM kdc_timesync=1
[realms] EXAMPLE.COM = {
kdc = 192.168.0.1:88
}
13.На виртуальной машине DC запустить оснастку «Active Directory Users & Computers» (Start Programs Administration Tools).
14.В контекстном меню контейнера «Users» выбрать пункт «New User».
Указать «First Name» и «User logon name» — «root», указать пароль «P@ssw0rd», убедиться, что не отмечен пункт «User must change password at next logon».
15.В консоли виртуальной машины WS-Linux выполнить команду kinit от имени пользователя «root», на запрос ввода пароля ввести «P@ssw0rd». После чего ввести команду klist и убедиться, что ее вывод аналогичен выводу, изображенному на рис. 7.8.
Рис. 7.8. Вывод билетов пользователя в ОС Linux
Клиент Kerberos встроен во все ОС Windows семейства NT5, а реализация KDC — во все серверные версии NT5. Однако изначально реализация Kerberos не рассматривалась Microsoft как самостоятельное решение (а лишь только как средство аутентификации в AD), поэтому в стандартной поставке Windows отсутствуют утилиты для работы с Kerberos напрямую. Некоторые возможности предоставляют инструменты из пакетов Support Tools и Resource Kit.
Служба KDC активизируется в серверной ОС только при повышении роли сервера до контроллера домена AD. Как уже отмечалось, контроллер до-
191
мена AD — это KDC и LDAP-серверы, плюс некоторые утилиты администрирования этих серверов. Сущность Kerberos создается параллельно с созданием учетной записи пользователя, при этом происходит прямое отображение имени пользователя в сущность Kerberos (пользователю user домена example.com будет сопоставлена сущность «user@EXAMPLE.COM»).
Сложнее обстоит ситуация с учетными записями сервисов. Поскольку имя пользователя Windows не может содержать символ «/», то прямого соответствия быть не может. Для разрешения этой проблемы в схеме каталога определен специальный многозначный атрибут — servicePrincipalName. Минус заключается в том, что все эти сущности Kerberos используют один и тот же ключ.
Для обеспечения взаимодействия с Unix-системами пакет Windows Support tools содержит утилиту для создания сущностей Kerberos и экспортирования их ключей в виде keytab-файла. Данная утилита обладает достаточно большим количеством параметров, рассмотрим те из них, которые необходимы при создании keytab-файла.
Вызов утилиты будет иметь вид:
ktpass –princ <сущность> -crypto des-cbc-md5 +desOnly –out <keytab-файл> +rndPass -mapuser <user> -mapop set
Ниже приведены комментарии по каждому из параметров: -princ <сущность> — задает сущность Kerberos;
-crypto — задает, для какой криптосистемы следует генерировать ключ (в настоящее время реализации от Microsoft и MIT пересекаются только по режиму шифрования des-cbc-md5);
+desOnly — указывает, что в базе KDC должен генерироваться ключ только для алгоритма DES;
-out <keytab файл> — имя keytab-файла; +rndPass — генерация случайного ключа;
-mapuser <user> — указывает, с каким пользователем AD связать данную сущ-
ность Kerberos;
-mapop set — указывает, что необходимо заменить сущность по умолчанию (а
не добавить к списку servicePrincipalName).
Для мониторинга кэша билетов Kerberos используется утилита kerbtray из пакета Windows Resource Kit. После запуска эта утилита размещает свою иконку в системном трее, и по двойному нажатию левой клавиши мыши выводит на экран окно со списком билетов пользователя и информации в них.
7.3.4. Пример реализации системы SSO
Применение протокола Kerberos для аутентификации достаточно распространено как в сервисах Microsoft, так и в сервисах других производителей. Например, Kerberos используется для аутентификации клиента перед
192
web-сервером. Рассмотрим ее на примере модуля mod_auth_kerb для webсервера Apache.
Выполнение следующего задания создаст защищенную web-страницу на сервере Apache, при этом аутентификация для пользователей домена AD будет происходить прозрачно.
ВЫПОЛНИТЬ!
16.На виртуальной машине WS-Linux открыть текстовым редактором файл
«/etc/apache2/sites-available/default», в разделе <Directory /var/www> ука-
зать следующие директивы (комментарии, указанные после символа «#», набирать не надо):
#подключить модуль mod_auth_kerb AuthType Kerberos
#расположение keytab-файла
Krb5Keytab /etc/apache2/http.keytab
#разрешить аутентификацию
#при помощи сеансового ключа
KrbMethodNegotiate on
#запретить аутентификацию уровня Basic KrbMethodK5Passwd off
#разрешить доступ только
#аутентифицированным пользователям
Require valid-user
17.На виртуальной машине DC запустить «Windows Support Tools Shell» (Start Programs Windows Support tools Command Prompt)
18.Создать сущность Kerberos, соответствующую учетную запись и keytabфайл для web-сервера Apache. Для этого создать пользователя wslinux_http при помощи оснастки «Active Directory Users and Computers».
Создать файл «keytab» при помощи следующей команды:
ktpass –princ HTTP/ws-linux.example.com@EXAMPLE.COM –crypto des-cbc-md5 +desOnly
–ptype KRB5_NT_PRINCIPAL –out c:\http.keytab +rndPass
–mapuser ws-linux_http@example.com –mapop set
19.Скопировать файл «http.keytab» в каталог «/etc/apache2» виртуальной ма-
шины WS-Linux.
20.Перезапустить web-сервер Apache при помощи команды
/etc/init.d/apache2 force-reload

193
21.На виртуальной машине DC запустить и настроить обозреватель Internet Explorer. Для этого в меню Tools Internet Options выбрать закладку «Security», выбрать зону «Local Intranet», нажать кнопку «Sites», нажать кноп-
ку «Advanced», добавить к списку сайтов строку «*.example.com». В раз-
деле «Security level for this zone» нажать кнопку «Custom level».
Убедиться, что в подразделе «logon» раздела «User authentication» выбран пункт «Automatic logon only in Intranet zone». Перейти на закладку «Advanced». Убедиться, что в разделе «Security» активизирована опция «Enable Integrated Windows Authentication». Если она не была выбрана, то вы-
брать и перезагрузить виртуальную машину.
22.Запустить утилиту kerbtray.exe (Start Programs Windows Resource Kit Tools Command Shell, набрать в консоли kerbtray). Просмотреть текущий список билетов пользователя, вызвав окно утилиты при помощи иконки в системном трее (иконка в виде билета зеленого цвета).
23.В адресной строке обозревателя набрать «http://ws-linux.example.com». Убедиться, что в обозревателе отобразилась стартовая страница webсервера Apache.
24.Убедиться, что в списке билетов пользователя добавился билет «HTTP/wslinux.example.com@EXAMPLE.COM».
25.На рабочей станции WS-Linux выполнить команду
tail /var/log/apache2/access.log
26. В выводе команды найти запись, аналогичную представленной на рис. 7.9.
Рис. 7.9. Запись в лог-файле web-сервера Apache о доступе Kerberos-сущности
«Administrator@EXAMPLE.COM»
27.Попробовать зайти на web-страницу с основной рабочей станции (может понадобиться перенастройка IP-адреса виртуального сетевого подключения VMWare VMNet1, адрес должен быть из сети 192.168.0/24), убедиться, что в окне обозревателя выводится сообщение об ошибке 401 (Unauthorized).
7.4.Создание единого пространства безопасности на базе
Active Directory
Рассмотренные выше технологии позволяют создать распределенную систему с единой базой аутентификационных и авторизующих данных. Аутентификационные данные — это сущности Kerberos, которые связаны с объектами LDAP, хранящими авторизующую информацию (идентификаторы пользователей, членство в группах и т. п.).
Соседние файлы в предмете [НЕСОРТИРОВАННОЕ]
- #
- #
- #
- #
- #
- #
- #
- #
- #
- #
- #
The Kerberos protocol is a significant improvement over previous authentication technologies. It uses strong cryptography and third-party ticket authorization to minimize the risk of cybersecurity incidents.
In this article, we share useful tips on performing Kerberos authentication using the Local Security Authority (LSA) API based on our own experience. We also introduce our KerberosSkeleton open-source project that can be used as a template for your future projects.
This article will be useful for developers who want to implement Kerberos authentication for Windows servers without using the Security Support Provider Interface (SSPI). It’s written for programmers who already have basic knowledge of the Kerberos protocol and know what Kerberos authentication is.
Contents:
- What is Kerberos and why do we need it?
- Implementing Kerberos authentication with the KerberosSkeleton open-source project
- Obtaining TGT and TGS tickets
- Retrieving the SPN from a server
- Retrieving TGT and TGS tickets for authentication
- Working with the server library
- Conclusion
What is Kerberos and why do we need it?
Kerberos is a network authentication protocol created at the Massachusetts Institute of Technology (MIT). The main advantage of this protocol is that it doesn’t transmit unencrypted tickets across the network during authentication, thus eliminating the possibility of password interception.
The Kerberos protocol can be used in various situations, including when:
- implementing Single Sign-On (SSO) technology
- establishing encrypted connections between servers and clients
- authenticating users when logging on to a Windows system
- authenticating with web services
In this article, we’re not going to focus on the Kerberos protocol, as we assume you’re already familiar with the ways it works. You can find more basic information about this protocol in the Windows Dev Center.
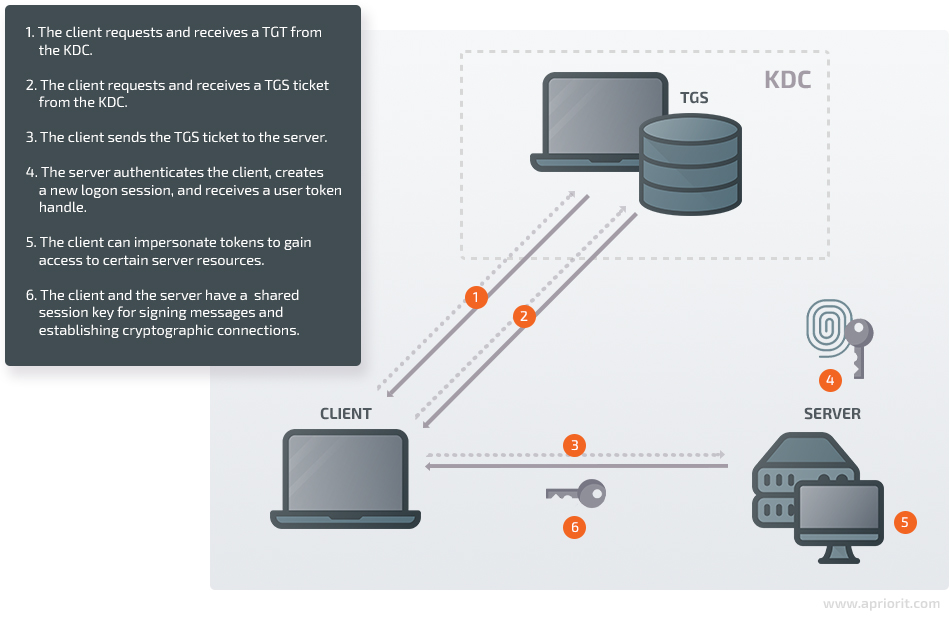
The basic working principle of the Kerberos protocol is the following:
- The client requests and receives a ticket-granting ticket (TGT) from the key distribution center (KDC).
- The client requests and receives a ticket-granting service (TGS) ticket from the KDC.
- The client sends the TGS ticket to the server they want to authenticate on.
- Using the TGT and TGS tickets, the server authenticates the client, creates a new logon session, and receives a user token handle.
- Using this user token handle, the client can impersonate tokens to gain access to certain server resources.
- Once the authentication process is over, the client and the server will have a shared session key that can be used to sign messages and establish cryptographic connections.
For programmers working with Kerberos authentication, Microsoft has created a Security Support Provider Interface (SSPI) API.
However, if you don’t want to use the SSPI API, there’s an alternative solution. You can implement Kerberos authentication using an API for interacting with the Local Security Authority (LSA) service — a system service for creating a logon session on a local computer. This method can be used, for instance, with Credential Provider features for logging in to the system without entering a password.
As with the SSPI API, with the LSA API the Kerberos protocol is mostly implemented inside the API functions:
- Establishing connections to the KDC
- Sending messages to the KDC
- Receiving messages from the KDC
- Authenticating users using TGT and TGS tickets
- And so on
At the same time, you can interact with the LSA service only through the API provided by the system. Direct interactions with the LSA service are impossible.
Since we don’t have the source code for the LSA service, how it interacts with the KDC remains unclear. However, after examining the LSA API, we can assume it should look somewhat like this:

Let’s take a closer look at implementing Kerberos authentication for Windows using the KerberosSkeleton open-source project.
Implementing Kerberos authentication with the KerberosSkeleton open-source project
To illustrate how to perform Kerberos authentication using the LSA API, our team has created the KerberosSkeleton open-source project and placed all the code and class diagrams on GitHub.
Primary objectives of the KerberosSkeleton project:
- Demonstrate the code in this article
- Show how to use Kerberos authentication when debugging
- Prepare for future projects related to Kerberos authentication
The KerberosSkeleton project is available under the MIT license and can be freely used in commercial and open-source projects — for example, as a template for your own project.
To learn Kerberos authentication through debugging with the KerberosSkeleton project, use a PC running Visual Studio (VS) 2015, as the project is implemented on it.
If you want to perform real Kerberos authentication — not unit tests — make sure you have access to a Windows PC and to a Windows Server PC. These systems must belong to the same domain.
To test out Kerberos authentication with the help of KerberosSkeleton, follow these steps:
1. Open the KerberosSkeleton.sln file in VS 2015.
2. Build two projects: ServerApp and ClientApp. You should get two .exe files: ServerApp.exe and ClientApp.exe.
3. Copy the ServerApp.exe file to a Windows Server system (for example, Windows Server 2016).
4. Open the command-line interface on the Windows Server system and run ServerApp.exe with the -spn option. It should look like this:
ShellScript
ServerApp.exe -spn5. Copy the output. This string should have the following format:
ShellScript
host / <dnsHostName>.<dnsDomainName> @ <dnsDomainName>6. Copy the ClientApp.exe file to a Windows client — for example, to a Windows 10 PC — that belongs to the same domain as the Windows Server.
7. Open the command-line interface on the Windows client and run ClientApp.exe with two parameters:
- -spn
- the output from ServerApp.exe
It should look like this:
ShellScript
ClientApp.exe -spn host/ <dnsHostName>. <dnsDomainName>@ <dnsDomainName>8. After that, you should see two .bin files next to ClientApp.exe in the same folder:
- krbtgtTicket.bin, which is a TGT
- serviceTicket.bin, which is a TGS ticket
9. Copy these tickets to the Windows Server system and place them next to ServerApp.exe (in the same folder).
10.Open the command-line interface on the Windows Server system and run ServerApp.exe with the -auth parameter:
ShellScript
ServerApp.exe -auth11. If the tickets are valid, you’ll receive a grammatically dubious message saying “Success completed task of the authentication.”
12. If the tickets aren’t valid, you’ll receive a message saying “Failed task of the authentication.”
The Kerberos project also contains unit tests for learning how to use the LSA API for Kerberos authentication in debug mode.
Note that we used mock objects in the KerberosSkeleton project instead of implementing functionality for:
- sending messages to the client/server
- receiving messages from the client/server
- parsing messages from the client/server
- packing messages into requests/responses
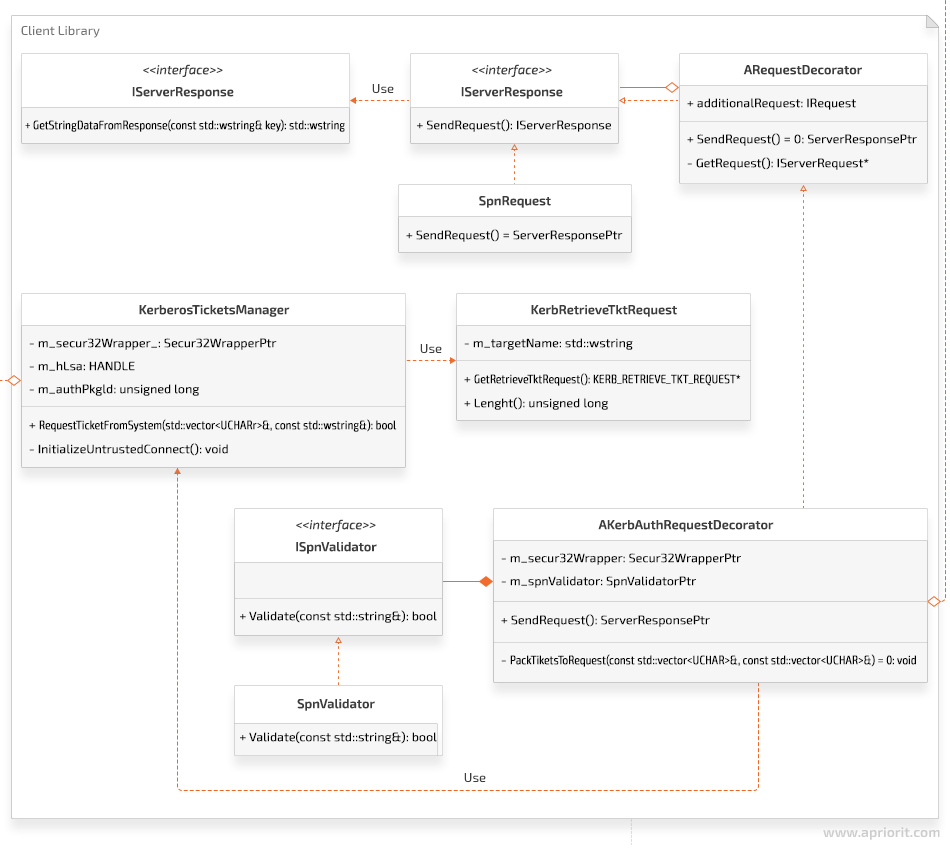
In the next section, we discuss how to obtain TGT and TGS tickets and show what the class diagram in the client library of the KerberosSkeleton project looks like.
Obtaining TGT and TGS tickets
Now, let’s explore how to receive TGT and TGS tickets and see how this process looks in the ClientLib class diagram.
To obtain a TGT, you don’t need any additional information other than you already have, since this ticket is intended specifically for the client. But to get a TGS ticket, you need to transfer the Service Principal Name (SPN) to the KDC. The SPN tells the KDC which service you want to authenticate with. In response, the KDC will make a ticket that can only be read by this service.
Apart from KDC requests, a client has to send two requests to the server to perform Kerberos authentication. The first request is required to receive the SPN. The second is needed for authentication. In order to wrap these two queries in one, choose the Decorator pattern.
The class diagram for the client library of the KerberosSkeleton project looks like this:
Next, we’ll learn how to retrieve the SPN from a server.
Retrieving the SPN from a server
After receiving a client request to retrieve an SPN response, a server forms the response and returns it to the client. The SPN response format must fit the format used in Active Directory for registering the service. In the KerberosSkeleton project, the SPN response format looks like this:
ShellScript
host/ <dnsHostName>. <dnsDomainName>@ <dnsDomainName>Obtaining the SPN on the client side of the KerberosSkeleton project consists of the following steps:
- Create an object that implements the IServerRequest interface needed for sending an SPN request to the server.
- Create a KerbAuthRequestDecorator object. Its constructor is needed for passing the object created in the previous step.
- Call the SendRequest method from the KerbAuthRequestDecorator object. To send the SPN request, this object calls the SendRequest method of the spnRequest object. A message for receiving the SPN response is sent in the body of the method. Once the the response is received, an object of the class IServerResponse is created. This object contains the SPN.
- The KerbAuthRequestDecorator object analyzes the result. The SPN has to match the spn format. Otherwise, an exception terminates the authentication process with an error.
- If the SPN matches the spn format, the KerbAuthRequestDecorator object generates an authentication request.
Let’s see how all these steps look in code. The example below shows the code in which we create an object of the KerbAuthRequestDecorator class. The SPN request is passed in the constructor.
C++
TEST(KerbAuthRequestDecorator, success)
{
    int functionToFailing = 0;
    Secur32::Secur32WrapperPtr secur32Wrapper(new MockSecur32Wrapper(functionToFailing));
    ServerRequestPtr spnRequest(new MockServerRequest(Mock::RequestType::SPN_Request));
    SpnValidatorPtr spnValidator(new SpnValidator());
    ServerResponsePtr authResponse;
    KerbAuthRequestDecoratorPtr kerbAuthenticator;
    ASSERT_NO_THROW(kerbAuthenticator.reset(new KerbAuthRequestDecorator(std::move(spnRequest),
                                                                   std::move(secur32Wrapper),
                                                                 std::move(spnValidator))));
    ASSERT_NO_THROW(authResponse = kerbAuthenticator->SendRequest());
    ASSERT_EQ(authResponse->GetStringDataFromResponse(L"auth"), L"Some authentication response");
}
In this example:
1. ServerRequestPtr is the type specified in the IServerRequest.h file.
C++
typedef std::unique_ptr<iserverrequest> ServerRequestPtr;2. SpnValidatorPtr is the type determined in the ISpnValidator.h file (the SPN validator interface).
C++
typedef std::unique_ptr <ISpnValidator> SpnValidatorPtr;3. Secur32::Secur32WrapperPtr is the type set in ISecur32Wrapper.h. The main goal of this class is to provide access to the system API for interacting with the LSA service.
C++
typedef std::unique_ptr <ISecur32Wrapper> Secur32WrapperPtr;The spnRequest and secur32Wrapper objects are implemented in a mock object, since we didn’t implement the client–server connection features in the KerberosSkeleton project.
The code below shows what happens in the SendRequest method of the AKerbAuthRequestDecorator class, which is a base class for KerbAuthRequestDecorator.
C++
ServerResponsePtr AKerbAuthRequestDecorator::SendRequest()
{
  IServerRequest* spnRequest = GetRequest();
  ServerResponsePtr spnResponse;
  TicketData serviceTicket;
  TicketData krbtgtTicket;

  const ULONG ticketFlags = GetKerberosTicketFlags();
  static const std::wstring krbtgtName = L<krbtgt>;
  static const std::wstring SPN_KEY = L<SPN>;
  spnResponse = spnRequest->SendRequest();
  const std::wstring servicePrincipalName = spnResponse->GetStringDataFromResponse(SPN_KEY);
  bool isSpnDataValid = m_spnValidator->Validate(servicePrincipalName);
  if (!isSpnDataValid)
  {
    throw KerberosException(
      KerberosException::ErrorType::INVALID_SPN_DATA,
      <KerbAuthRequestDecorator::SendRequest: spn data is invalid>);
  }
}
Let’s explore what’s shown in the code in detail:
1. Get a pointer to the SPN request.
2. Create a smart pointer to IServerResponse (ServerResponsePtr). This smart pointer will take over the object after calling the spnRequest->SendRequest function.
3. Create two empty std::vector<unsigned char> objects. TicketData is a typedef for the std::vector object. TicketData objects will be filled out later.
4. Create the ticketFlags variable and assign it the number 0x60A00000, which is a result of calling the GetKerberosTicketFlags function. Here’s an example of this function:
C++
ULONG AKerbAuthRequestDecorator::GetKerberosTicketFlags()const
{
    return KerberosTicketOptions::Forwardable | KerberosTicketOptions::Forwarded |
           KerberosTicketOptions::Renewable | KerberosTicketOptions::Pre_authent;
}
For more details about the types of flags and their meanings, explore the Microsoft documentation: Event 4768(S, F): A Kerberos authentication ticket (TGT) was requested. The ticketFlags variable will be used later after receiving the tickets.
5. Create two strings: krbtgtName and SPN_KEY.
- krbtgtName is the name of the ticket that must be used when receiving a TGT.
- SPN_KEY is the key that helps you to get an SPN from the response.
6. Use a pointer to SPN Request to send a request to the server. The server processes this request, generates an SPN, and responds to the client. The client receives the response from the server and records the received data to the spnReponse variable.
7. To get the SPN as a string, call the GetStringDataFromResponse method with SPN_KEY as a function parameter to get the SPN from the response, not something else.
8. After receiving SPN as a string, validate it for compliance with a specific format. To do this, call the Validate method on the m_spnValidator variable, passing the SPN received from the server. Use regular expressions — std::regex and std::cmatch — for SPN validation.
9. In the end, check the result of validations. If the validation is successful, move on to authentication. Otherwise, throw an exception, which will terminate the authentication process.
Once you receive the SPN string, you have all the information you need to get a TGS ticket. TGT and TGS tickets will later be packed in an authentication request to the server.
Retrieving TGT and TGS tickets for authentication
To receive TGT and TGS tickets, perform the following steps:
- Establish a connection to the LSA service and receive the LSA HANDLE data type.
- Get a unique identifier for the authentication package (used when requesting tickets).
- Fill out the KERB_RETRIEVE_TKT_REQUEST structure to obtain a TGT.
- Get a TGT by parsing KERB_RETRIEVE_TKT_RESPONSE. Free up memory occupied by KERB_RETRIEVE_TKT_RESPONSE.
- Fill out the KERB_RETRIEVE_TKT_REQUEST structure to receive a TGS ticket.
- Get a TGS ticket by parsing KERB_RETRIEVE_TKT_RESPONSE. Free up memory occupied by KERB_RETRIEVE_TKT_RESPONSE.
- Close the LSA service connection by closing the LSA HANDLE.
We implemented the KerberosTicketsManger class to receive Kerberos tickets in the KerberosSkeleton project. The main method of this class — RequestTicketFromSystem — accepts two parameters:
- std::vector, in which the received ticket will be written
- a string in which the target name of the ticket is indicated; the value of this string indicates which ticket you will receive
In our case:
- To get a TGT, use the krbtgt string as a second parameter.
- To receive a TGS ticket, use the SPN string received earlier as the second parameter.
Let’s explore how it will look in code:
C++
ServerResponsePtr AKerbAuthRequestDecorator::SendRequest()
{
  IServerRequest* spnRequest = GetRequest();
  ServerResponsePtr spnResponse;
  TicketData serviceTicket;
  TicketData krbtgtTicket;
  const ULONG ticketFlags = GetKerberosTicketFlags();
  static const std::wstring krbtgtName = L<krbtgt>;
  static const std::wstring SPN_KEY = Lu0022SPNu0022;
  spnResponse = spnRequest->SendRequest();
  const std::wstring servicePrincipalName = spnResponse->GetStringDataFromResponse(SPN_KEY);
  bool isSpnDataValid = m_spnValidator->Validate(servicePrincipalName);
  if (!isSpnDataValid)
  {
    throw KerberosException(
      KerberosException::ErrorType::INVALID_SPN_DATA,
      <AKerbAuthRequestDecorator::SendRequest: spn data is invalid>
    );
  }
  typedef std::unique_ptrt<kerberosticketsmanger> KerberosTicketsMangerPtr;
  const KerberosTicketsMangerPtr kerbTicketsManger(new KerberosTicketsManger(m_secur32Wrapper));
  kerbTicketsManger->SetTicketFlags(ticketFlags);
  kerbTicketsManger->RequestTicketFromSystem(serviceTicket, servicePrincipalName);
  kerbTicketsManger->SetCacheOptions(KERB_RETRIEVE_TICKET_AS_KERB_CRED);
  kerbTicketsManger->RequestTicketFromSystem(krbtgtTicket, krbtgtName);
  const ServerRequestPtr authRequest = PackTicketsToRequest(serviceTicket, krbtgtTicket);
  ServerResponsePtr authResponse = authRequest->SendRequest();
  return authResponse;
}
The first thing to do is create a KerberosTicketsManger object.
- Call SetTicketFlags.
- Get the TGS ticket by calling the RequestTicketFromSystem method, passing a vector that contains the result of calling RequestTicketFromSystem and the SPN string.
- Set a new value for cacheOptions by calling SetCacheOptions.
- Receive a TGT by calling the RequestTicketFromSystem method, passing a vector that contains the result of calling RequestTicketFromSystem and the krbtgt string.
Although the Kerberos documentation tells us to get a TGT first and only then get a TGS ticket, we did the opposite. In fact, when receiving a TGS ticket in the API functions, several operations take place:
- Getting a TGT and recording it to the cache
- Getting a TGS ticket by using the TGT from the cache
- Recording the received TGS ticket to the out parameter of the API function
Thus, when receiving a TGS ticket, you already have a TGT in the cache. Therefore, when there’s a second request for a TGT, the ticket is not requested from the KDC but is taken from the cache.
Let’s go back to the SendRequest function and take a closer look at it.
When you create a KerberosTicketsManger object, a connection is established with the LSA service in the object’s constructor:
C++
void KerberosTicketsManger::InitializeUntrustedConnect()
{
    HANDLE hLsa = NULL;
    NTSTATUS ticketsStatus = m_secur32Wrapper->LsaConnectUntrusted(&hLsa);
    if (STATUS_SUCCESS != ticketsStatus)
    {
      throw KerberosException(
        KerberosException::ErrorType::FAILED_LSACONNECTUNTRUSTED,
        <KerberosTicketsManger::InitializeConnection: LsaConnectUntrusted failed>
      );
    }
    m_hLsa = LsaHandlePtr(hLsa, GetLsaHandleDeleter());
    LSA_STRING lsaStrAuthPkg = {};
    lsaStrAuthPkg.Length = static_castt<ushort>(strlen(MICROSOFT_KERBEROS_NAME_A));
    lsaStrAuthPkg.MaximumLength = static_castt<ushort>(strlen(MICROSOFT_KERBEROS_NAME_A));
    lsaStrAuthPkg.Buffer = MICROSOFT_KERBEROS_NAME_A;
    ticketsStatus = m_secur32Wrapper->LsaLookupAuthenticationPackage(m_hLsa.get(),
    &lsaStrAuthPkg,
    &m_authPkgId);
    if (STATUS_SUCCESS != ticketsStatus)
    {
      throw KerberosException(
        KerberosException::ErrorType::FAILED_LSALOOKUPAUTHENTICATIONPACKAGE,
        <KerberosTicketsManger::InitializeConnection: LsaLookupAuthenticationPackage failed>
      );
    }
}
Let’s explore how the connection is established step by step:
- The LsaConnectUntrusted function establishes a connection to the LSA service. If everything is done correctly, you’ll receive LSA HANDLE.
- Create a smart pointer for LSA HANDLE, which is a field of the m_hLsa class. In the KerberosTicketsManger destructor, when destroying the m_hLsa object, the LsaDeregisterLogonProcess method will be called.
- Create the LSA_STRING structure, where the MICROSOFT_KERBEROS_NAME_A macro is equal to the Kerberos string.
- Call the LsaLookupAuthenticationPackage function. If the function call is successful, at the output you’ll get a unique identifier of the authentication package — this is a field of the m_authPkgId class.
Next, you need to call two methods: SetTicketFlags and RequestTicketFromSystem. There’s no need for exploring the SetTicketFlags function in detail, as nothing complicated happens there. Only the class field will change.
Let’s take a look at the RequestTicketFromSystem method in detail:
C++
void KerberosTicketsManger::RequestTicketFromSystem(TicketData& vecTicket,
const std::wstring& tgtName)const
{
  KerbRetrieveTktRequest kerbRetrieveTktRequest(tgtName);
  ULONG responseLen = static_castt<ulong>(-1);
  NTSTATUS protocolStatus = STATUS_ACCESS_DENIED;
  KERB_RETRIEVE_TKT_RESPONSE* pResp = NULL;
  kerbRetrieveTktRequest.SetTicketFlags(m_ticketFlags);
  kerbRetrieveTktRequest.SetCacheOptions(m_cacheOptions);
  NTSTATUS ticketsStatus = m_secur32Wrapper->LsaCallAuthenticationPackage(
    m_hLsa.get(),
    m_authPkgId,
    reinterpret_cast<pvoid>(kerbRetrieveTktRequest.GetRetrieveTktRequest()),
    kerbRetrieveTktRequest.Length(),
    reinterpret_cast<PVOID*>(&pResp),
    &responseLen,
    &protocolStatus
  );
  typedef std::unique_ptr<KERB_RETRIEVE_TKT_RESPONSE, LsaBufferDeleter> LsaBufferDeleterPtr;
  const LsaBufferDeleterPtr ticketPtr(pResp, GetLsaBufferDeleter());
  if (STATUS_SUCCESS != ticketsStatus)
  {
    throw KerberosException(
      KerberosException::ErrorType::FAILED_LSACALLAUTHENTICATIONPACKAGE,
      <KerberosTicketsManger::RequestTicketFromSystem: LsaCallAuthenticationPackagen               failed>);
  }
  if (STATUS_SUCCESS != protocolStatus)
  {
    throw KerberosException(
      KerberosException::ErrorType::INVALID_PROTOCOLSTATUS,
      <KerberosTicketsManger::RequestTicketFromSystem: ProtocolStatus failed>);
  }
  if (pResp == NULL)
  {
    throw KerberosException(
      KerberosException::ErrorType::INVALID_RETURNBUFFER,
      <KerberosTicketsManger::RequestTicketFromSystem: Buffer equal NULL in response>);
  }
  UCHAR* pEncodedTicketBeg = ticketPtr->Ticket.EncodedTicket;
  UCHAR* pEncodedTicketEnd = ticketPtr->Ticket.EncodedTicket + ticketPtr->Ticket.EncodedTicketSize;
  vecTicket.clear();
  vecTicket.assign(pEncodedTicketBeg, pEncodedTicketEnd);
}
If the LsaCallAuthenticationPackage function is called successfully, you’ll get a pointer to the KERB_RETRIEVE_TKT_RESPONSE structure. Then, using the Ticket.EncodedTicket field of this structure, you can get the data for the requested ticket.
Let’s explore the parameters passed to the LsaCallAuthenticationPackage function:
1. You can get the LSA HANDLE – m_hLsa.get() parameter when calling the LsaConnectUntrusted function.
2. The m_authPkgId parameter is the unique identifier of the authentication package. You get it when calling the LsaLookupAuthenticationPackage API function.
3. Then you have a pointer to the KERB_RETRIEVE_TKT_REQUEST structure. To fill out this structure, you should use such values as the Kerberos ticket name (the krbtgt string or spn string), ticketFlags, and cachedOptions. Note: the data in the output structure (KERB_RETRIEVE_TKT_RESPONSE.Ticket.EncodedTicket) depends on the data we include to the KERB_RETRIEVE_TKT_REQUEST structure.
4. The next parameter is the size of the KERB_RETRIEVE_TKT_REQUEST structure.
5. The fifth parameter is a pointer to the KERB_RETRIEVE_TKT_RESPONSE structure pointer. When the LsaCallAuthenticationPackage function is executed successfully, memory will be allocated for the KERB_RETRIEVE_TKT_RESPONSE structure and it will be filled out with the corresponding data. Free up the memory occupied by this structure by calling the LsaFreeReturnBuffer API function. To call the LsaFreeReturnBuffer method, create a smart pointer to the KERB_RETRIEVE_TKT_RESPONSE structure pointer.
6. The next parameter, responseLen, is a pointer to the unsigned long variable, in which the size of the received KERB_RETRIEVE_TKT_RESPONSE structure will be recorded.
7. The last parameter is NTSTATUS, which indicates the completion status of the authentication packet.
Let’s take a closer look at the creation and filling of the KERB_RETRIEVE_TKT_REQUEST structure.
To create this structure and fill it out, use the implemented KerbRetrieveTktRequest class, which is a wrapper for the KERB_RETRIEVE_TKT_REQUEST structure. The main method of this class is the GetRetrieveTktRequest method, which returns a pointer to the KERB_RETRIEVE_TKT_REQUEST structure.
Here’s the code of the GetRetrieveTktRequest function:
C++
KERB_RETRIEVE_TKT_REQUEST* KerbRetrieveTktRequest::GetRetrieveTktRequest()
{
  KERB_RETRIEVE_TKT_REQUEST* ret = NULL;
  ret = reinterpret_cast<KERB_RETRIEVE_TKT_REQUEST*>(<m_retrieveTktRequestData[0]);
  LUID luidLogonId;
  memset(&luidLogonId, 0, sizeof(LUID));
  SecHandle hSec;
  memset(&hSec, 0, sizeof(SecHandle));
  ret->MessageType = KERB_PROTOCOL_MESSAGE_TYPE::KerbRetrieveEncodedTicketMessage;
  ret->LogonId = luidLogonId;
  ret->TargetName.Length = static_cast<ushort>(m_targetName.length() * sizeof(wchar_t));
  ret->TargetName.MaximumLength = static_cast<ushort>(m_targetName.length() * sizeof(wchar_t));
  ret->TargetName.Buffer = (wchar_t*)(ret + 1);
  memcpy(ret->TargetName.Buffer, m_targetName.c_str(), ret->TargetName.Length);
  ret->TicketFlags = m_ticketFlags;
  ret->CacheOptions = m_cacheOptions;
  ret->EncryptionType = 0;
  ret->CredentialsHandle = hSec;

  return ret;
}
Once TGT and TGS tickets are created, they’re packed into an authentication request and this request is sent to the server. The operations to be performed on the server side are discussed in the following section.
Working with the server library
There are two operations that need to be performed on the server side:
- When receiving a request for an SPN: create an SPN and send it to the client
- When receiving an authentication request: pull both the TGT and TGS tickets from the request, process authentication using both TGT and TGS tickets, and send authentication result to the client.
To organize the process of handling client requests, we used the Strategy pattern. This is what the server library of the KerberosSkeleton project looks like:
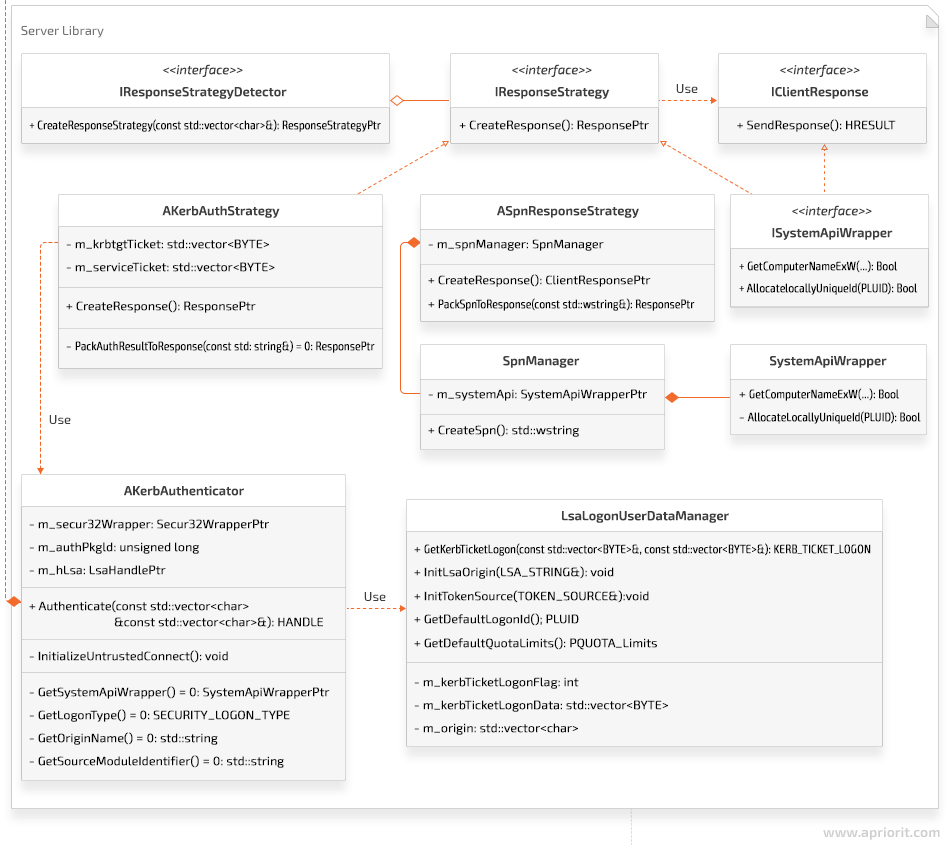
Note that in the ASpnResponseStrategy object, when receiving a string in the format host/<DnsHostname>.<DnsDomain>@<DnsDomain>, only the GetComputerNameExW system API function is used to receive the DnsHostname and DnsDomain parameters.
Let’s explore how the KerbAuthStrategy method works in detail. Say the server detects an authentication request, pulls TGT and TGS tickets, and creates a class object inherited from the AkerbAuthStrategy object. Let’s try to understand the logic that detects the request type and creates an appropriate action strategy by taking a look at the unit test:
C++
TEST(TestKerbAuthStrategy, success)
{
  TicketData serviceTicket = CreateKerbTicketFromString(<Some server ticket>);
  TicketData krbtgtTicket = CreateKerbTicketFromString(<Some krbtgt ticket>);
  ClientResponsePtr response;
  KerbAuthStrategyPtr kerbAuthStrategy(new KerbAuthStrategy(serviceTicket, krbtgtTicket, 0));
  ASSERT_NO_THROW(response = kerbAuthStrategy-u003eCreateResponse());
  const std::string& authenticationResult = kerbAuthStrategy->GetAuthenticationResult();
  ASSERT_EQ(authenticationResult, <success authentication>);
}
Everything seems pretty simple: the KerbAuthStrategy class object is created and then its CreateResponse method is called. This is what the CreateResponse method looks like:
C++
ClientResponsePtr AKerbAuthStrategy::CreateResponse()
{
    ClientResponsePtr response;
    try
    {
        KerbAuthenticatorPtr kerbAuthenticator = GetKerbAuthenticator();
        m_hToken = TokenHandlePtr(kerbAuthenticator-u003eAuthenticate(GetServiceTicket(),
        GetKrbtgtTicket()), &::CloseHandle);
        response = PackSpnToResponse(<success authentication>);
    }
    catch (const KerbException::KerberosException& /*ex*/)
    {
    //TO DO: write to the log file here.
        response = PackSpnToResponse(<failed authentication>);
        m_hToken.reset(nullptr);
    }
    return response;
}
Here, an object of the KerbAuthenticator class is created. A connection with the LSA service is established in the constructor of this class the same way as in the client.
After connecting to the LSA service, LSA HANDLE (m_hLsa) and the unique authentication packet identifier (m_authPkgId) are also written in the fields of the KerbAuthenticator class.
Then the Authenticate method of the KerbAuthenticator object is called. This method accepts TGT and TGS tickets as parameters.
Let’s take a closer look at the Authenticate method:
C++
HANDLE AKerbAuthenticator::Authenticate(const TicketData& serviceTicket, const TicketData& krbtgtTicket)
{
    const LsaLogonUserDataManagerPtr lsaLogonUserDataManager(
      new LsaLogonUserDataManager(
        GetSystemApiWrapper(),
        GetOriginName(),
        GetSourceModuleIdentifier()
      )
    );
    ULONG kerbTicketLogonLen = 0;
    KERB_TICKET_LOGON * pKerbTicketLogon = lsaLogonUserDataManager->GetKerbTicketLogon(
      serviceTicket,
      krbtgtTicket,
      kerbTicketLogonLen
    );
    LSA_STRING lsastrOriginName = {};
    lsaLogonUserDataManager->InitLsaOrigin(lsastrOriginName);
    TOKEN_SOURCE sourceContext = {};
    lsaLogonUserDataManager->InitTokenSource(sourceContext);
    PLUID logonId = lsaLogonUserDataManager->GetDefaultLogonId();
    PQUOTA_LIMITS quotaLimits = lsaLogonUserDataManager->GetDefaultQuotaLimits();
    PKERB_TICKET_PROFILE profileBuffer = NULL;
    HANDLE hToken = nullptr;
    ULONG profileBufferLen = -1;
    NTSTATUS subStatus = -1;
    NTSTATUS status = m_secur32Wrapper->LsaLogonUser(
      m_hLsa.get(),
      &lsastrOriginName,
      GetLogonType(),
      m_authPkgId,
      pKerbTicketLogon,
      kerbTicketLogonLen,
      NULL, // additional local groups
      &sourceContext,
      reinterpret_cast<PVOID*>(&profileBuffer),
      &profileBufferLen,
      logonId,
      &hToken,
      quotaLimits,
      &subStatus
    );
    typedef std::unique_ptr<KERB_TICKET_PROFILE, LsaBufferDeleter> LsaProfileBufferPtr;
    const LsaProfileBufferPtr profileBufferPtr(profileBuffer, GetLsaBufferDeleter());
    if (status != STATUS_SUCCESS)
    {
        throw KerberosException(
            KerberosException::ErrorType::FAILED_LSALOGONUSER,
            <AKerbAuthenticator::Authenticate: LsaLogonUser failed>
        );
    }
    return hToken;
}
The LsaLogonUser system function accepts many parameters. Let’s explore their meanings and origins:
1. Get the LSA HANDLE – m_hLsa.get() parameter when calling the LsaConnectUntrusted function.
2. lsastrOriginName is a parameter that identifies who is trying to log in. The origin name can vary. In the KerberosSkeleton project, the origin name is an exmln string.
3. The SECURITY_LOGON_TYPE enum sets the type for a logon request. In the KerberosSkeleton project, this value is SECURITY_LOGON_TYPE::Network.
4. The m_authPkgId parameter passes the unique identifier of the authentication packet. To get this parameter, call the LsaLookupAuthenticationPackage function.
5. The pointer to the KERB_TICKET_LOGON structure is called pKerbTicketLogon. For creating and filling this structure, the LsaLogonUserDataManager class was created. To get a pointer to the KERB_TICKET_LOGON structure, call GetKerbTicketLogon from the LsaLogonUserDataManager class. Here’s what the GetKerbTicketLogon function code looks like:
C++
KERB_TICKET_LOGON* LsaLogonUserDataManager::GetKerbTicketLogon(
  const TicketData& serviceTicket,
  const TicketData& krbtgtTicket,
  ULONG& length
){
    length = sizeof(KERB_TICKET_LOGON) +
             static_cast<ulong>(serviceTicket.size()) +
             static_cast<ulong>(krbtgtTicket.size());
    m_kerbTicketLogonData.resize(length, 0);
    KERB_TICKET_LOGON* pKerbTicketLogon = NULL;
    pKerbTicketLogon = reinterpret_cast<KERB_TICKET_LOGON*>(&m_kerbTicketLogonData[0]);
    pKerbTicketLogon->MessageType = KerbTicketLogon;
    pKerbTicketLogon->Flags = m_kerbTicketLogonFlag;
    pKerbTicketLogon->ServiceTicketLength = static_cast<ulong>(serviceTicket.size());
    pKerbTicketLogon->TicketGrantingTicketLength = static_cast<ulong>(krbtgtTicket.size());
    pKerbTicketLogon->ServiceTicket = reinterpret_cast<puchar>(pKerbTicketLogon + 1);
    memcpy(pKerbTicketLogon->ServiceTicket, &serviceTicket[0], serviceTicket.size());
    pKerbTicketLogon->TicketGrantingTicket = pKerbTicketLogon->ServiceTicket + serviceTicket.size();
    memcpy(pKerbTicketLogon->TicketGrantingTicket, &krbtgtTicket[0], krbtgtTicket.size());
    return pKerbTicketLogon;
}
As you can see from the code, TGT and TGS tickets are copied to this structure, and the corresponding pointers are written to the ServiceTicket and TicketGrantingTicket fields.
6. You can see the size of the KERB_TICKET_LOGON structure, kerbTicketLogonLen.
7. The next parameter is a pointer to TOKEN_GROUPS. In this parameter, it’s required to transmit additional group identifiers. In the KerberosSkeleton project, this parameter is equal to NULL.
8. The sourceContext parameter is a pointer to the TOKEN_SOURCE structure and identifies the source module. To create it, you need a string that identifies the source module. This string, just like originName, can vary. In the KerberosSkeleton project, it’s looks like this: m_srcModuleIdentifies = “exm”. Here is the code that fills TOKEN_SOURCE in the KerberosSkeleton project:
C++
void LsaLogonUserDataManager::InitTokenSource(TOKEN_SOURCE& srcContext)constn{
    memset(&srcContext, 0, sizeof(TOKEN_SOURCE));
    const char* tmp = m_srcModuleIdentifies.c_str();
    strncpy_s(srcContext.SourceName,
              TOKEN_SOURCE_LENGTH,
              m_srcModuleIdentifies.c_str(),
              TOKEN_SOURCE_LENGTH - 1);
    if (!m_systemWrapper->AllocateLocallyUniqueId(&srcContext.SourceIdentifier))
    {
        DWORD error = ::GetLastError();
        // TO DO: Write to logs the error code;
        throw KerbServerException(
           KerbServerException::FAILED_INIT_TOKENSOURCE,
           <LsaLogonUserDataManager::LsaLogonUserDataManager: Failed on allocation then local unique Id>);
    }
}
Note that the size of the m_srcModuleIdentifies string shouldn’t be more than 8 bytes. Also, note that AllocateLocallyUniqueId is a system API.
9. The profileBuffer parameter is a pointer to the KERB_TICKET_PROFILE structure. This is an out parameter that results from the execution of the LsaLogonUser function. When exiting the Authenticate function, you need to free the memory occupied by this structure by creating a profileBufferPtr smart pointer. In the profileBufferPtr destructor, the LsaFreeReturnBuffer system API will be called.
10. Then we pass a pointer to an unsigned long, in which the size of the KERB_TICKET_PROFILE structure, profileBufferLen, will be written.
11. The logonId parameter is a pointer to the LUID structure. This is an out parameter, which contains the unique identifier for the logon session.
12. The hToken parameter is also an out parameter and a pointer to HANDLE. This parameter records the new user token created for this session. You’ll have to return this parameter from the Authenticate function. Note that after you use HANDLE and no longer need it, you should call the CloseHandle API function to eliminate leaks. In the KerberosSkeleton project, this is achieved by creating a smart pointer to HANDLE, in the destructor of which the CloseHandle API function is called.
13. The quotaLimits parameter is also an out parameter, which will be filled out once the hToken parameter is equal to the main token. In this case, process quota limits will be situated in this parameter.
14. The last parameter is NTSTATUS. This parameter is an additional result of executing the LsaLogonUser function— subStatus. This value is set only if the user account information is valid but the logon request is rejected. At the same time, this parameter will contain additional information indicating the reason for failure. This parameter can take one of the following values:
- STATUS_INVALID_LOGON_HOURS
- STATUS_INVALID_WORKSTATION
- STATUS_PASSWORD_EXPIRED
- STATUS_ACCOUNT_DISABLED
In our description of work with the server library, we have shown a class diagram for the server library of the KerberosSkeleton project, explored how the KerbAuthStrategy and Authenticate methods work, and taken a closer look at the parameters of the LsaLogonUser system function.
If you’re interested in learning more about different API types, check out our article about ways to implement the Places API.
Conclusion
In this article, we have explored what to pay attention to when using Kerberos authentication and how to perform authentication with the KerberosSkeleton project. We focused on an alternative method of authentication with the LSA service API and without using the SSPI API.
We hope the open-source KerberosSkeleton project will help you better understand this alternative way of implementing Windows Kerberos authentication and will become a template for your future project. You can also check out the UML architecture of the KerberosSkeleton project.
Introduction
This article describes the single sign-on (SSO) setup between Joget Workflow and Microsoft Active Directory using Kerberos and SPNEGO.
Kerberos is a network authentication protocol designed by the Massachusetts Institute of Technology (MIT) for SSO in client-server environments, while SPNEGO (Simple and Protected GSS-API Negotiation Mechanism) extends Kerberos SSO to web applications.
This plugin source code is available in a new open source repository at https://github.com/jogetoss/. JogetOSS is a community-led team for open source software related to the Joget no-code/low-code application platform. Projects under JogetOSS are community-driven and community-supported, and you are welcome to contribute to the projects.
Test Environment
-
Joget Server: Joget Workflow v5 Enterprise on Apache Tomcat 8 and Java 8
-
Windows Server: Windows Server 2012 R2 Datacenter (running on VirtualBox within a NAT Network, downloaded from https://www.microsoft.com/en-us/evalcenter/evaluate-windows-server-2012-r2)
-
Windows Client PC: IE11 on Windows 10 (running on VirtualBox within a NAT Network, downloaded from https://developer.microsoft.com/en-us/microsoft-edge/tools/vms/)
Test Settings
-
Windows Server COMPUTER NAME is WIN-TKDH9LCHUUO
-
WINDOWS DOMAIN is windows.local
-
DOMAIN USER is joget
-
JOGET DOMAIN is joget.windows.local
-
This article assumes familiarity with the basics of Windows Server and Windows 10 system and network administration
-
This setup is tested within a local VirtualBox environment. Actual setup on a different environment should be adapted accordingly.
Kerberos SSO Setup Configuration
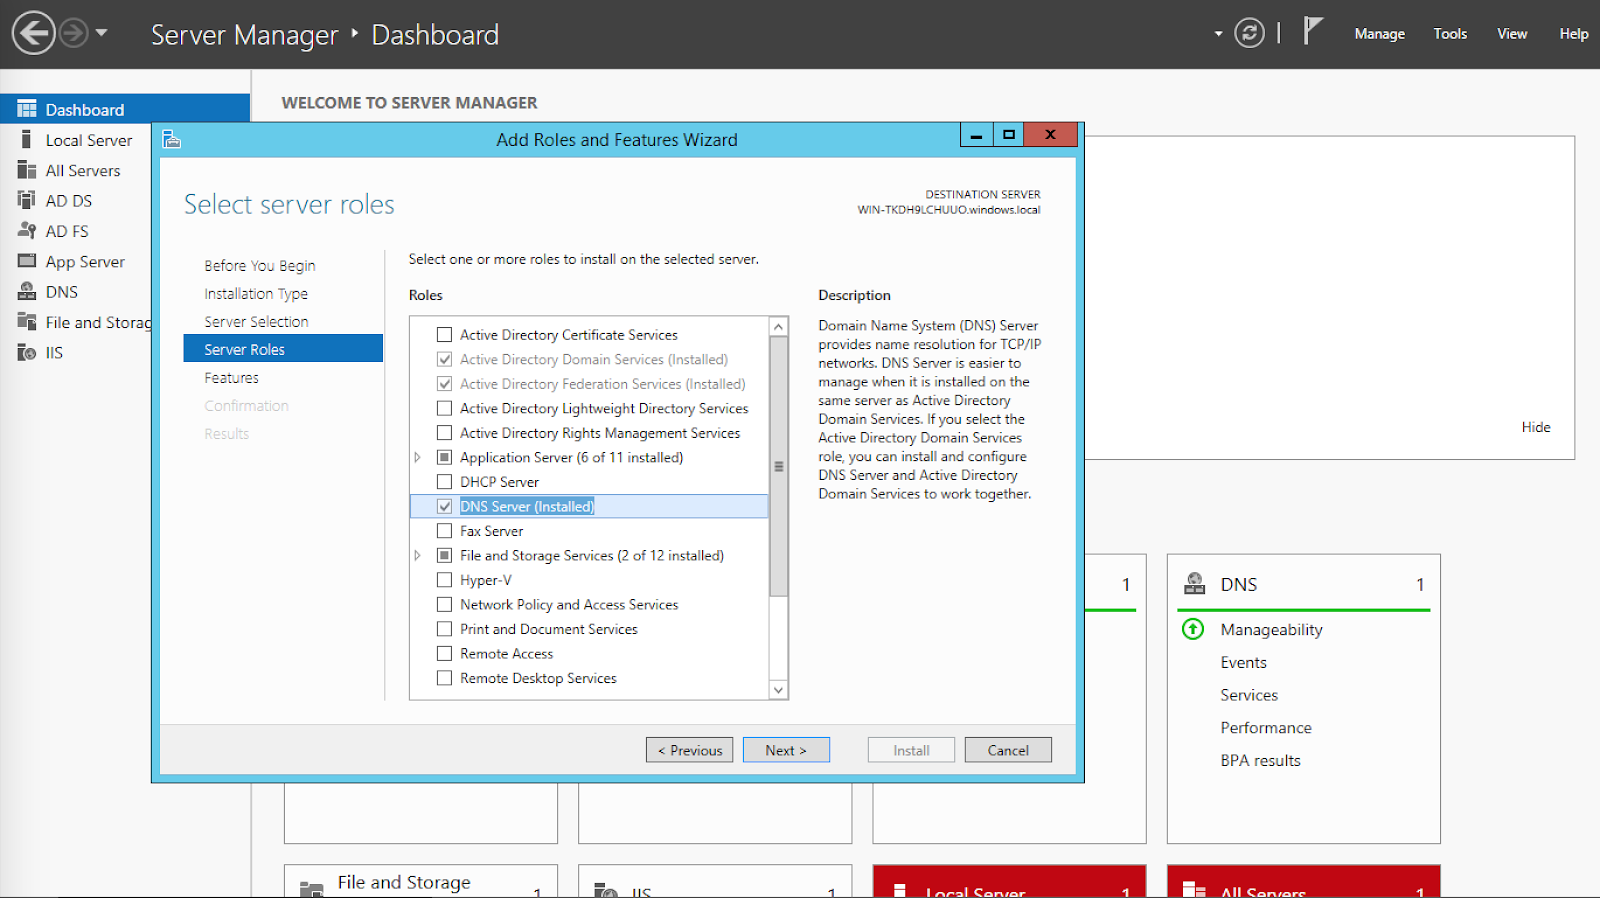
1. Setup Windows Server Kerberos Key Distribution Center (KDC):
1.1 Install DNS Server
-
Go to Server Manager > Add roles and features to install the DNS Server.

-
In the Network and Sharing Center, configure the network adapter so that the Preferred DNS server is 127.0.0.1.

-
In the DNS Manager, right click on the server name and Configure a DNS Server to create a forward lookup zone for windows.local.


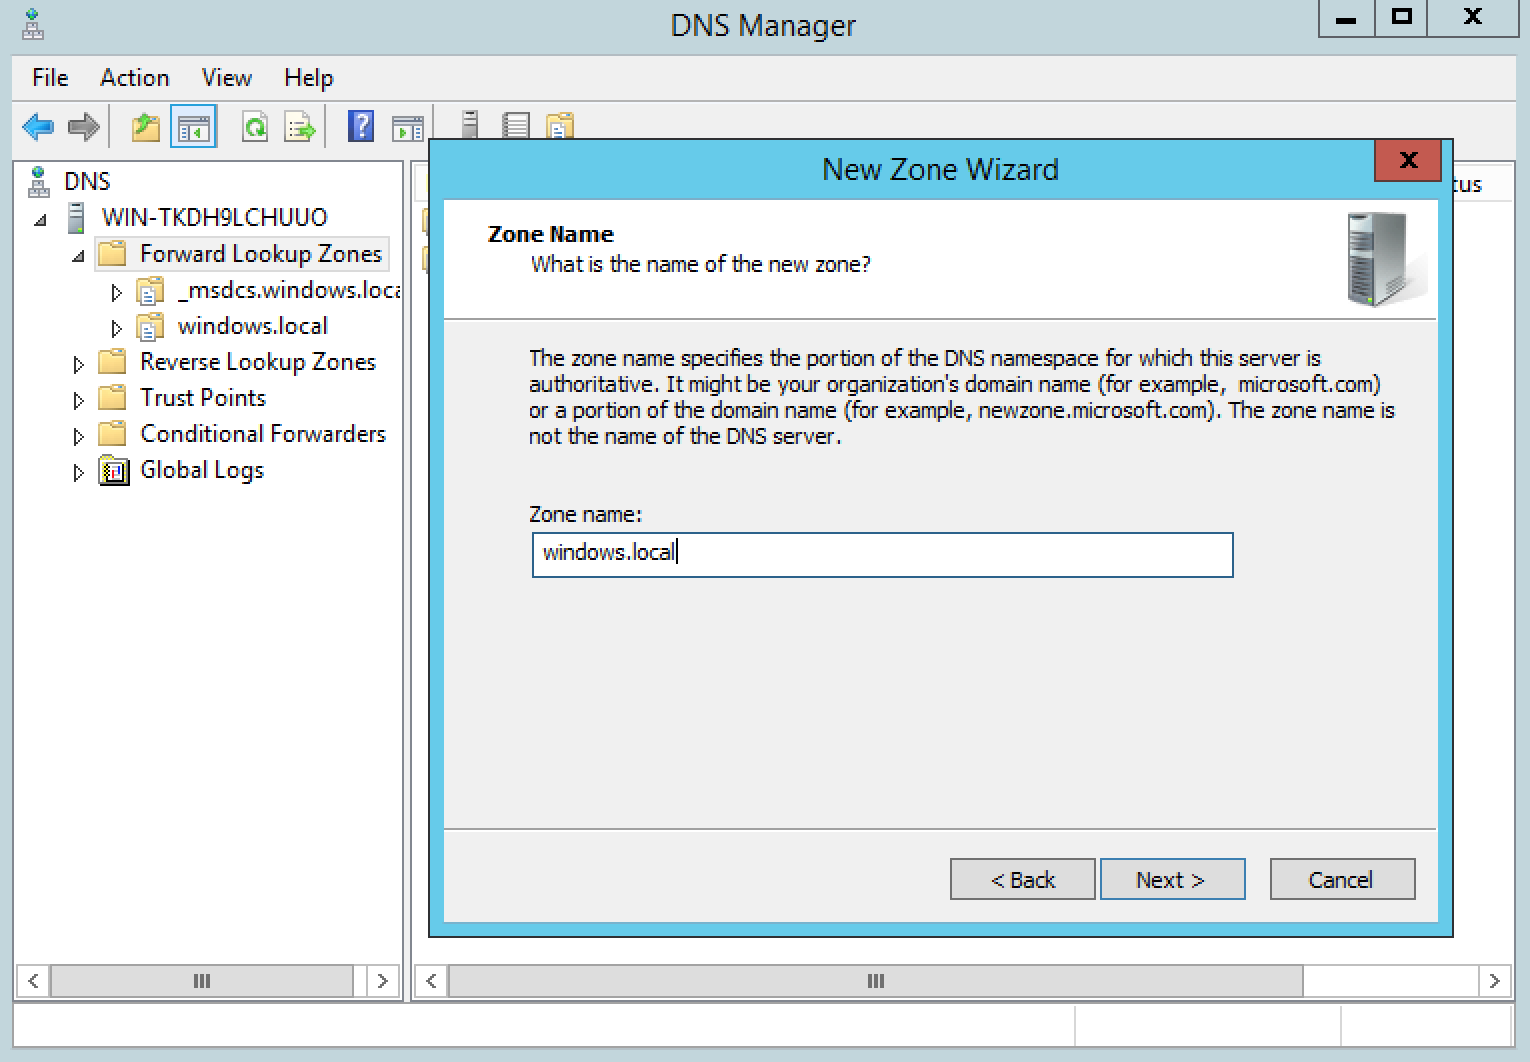
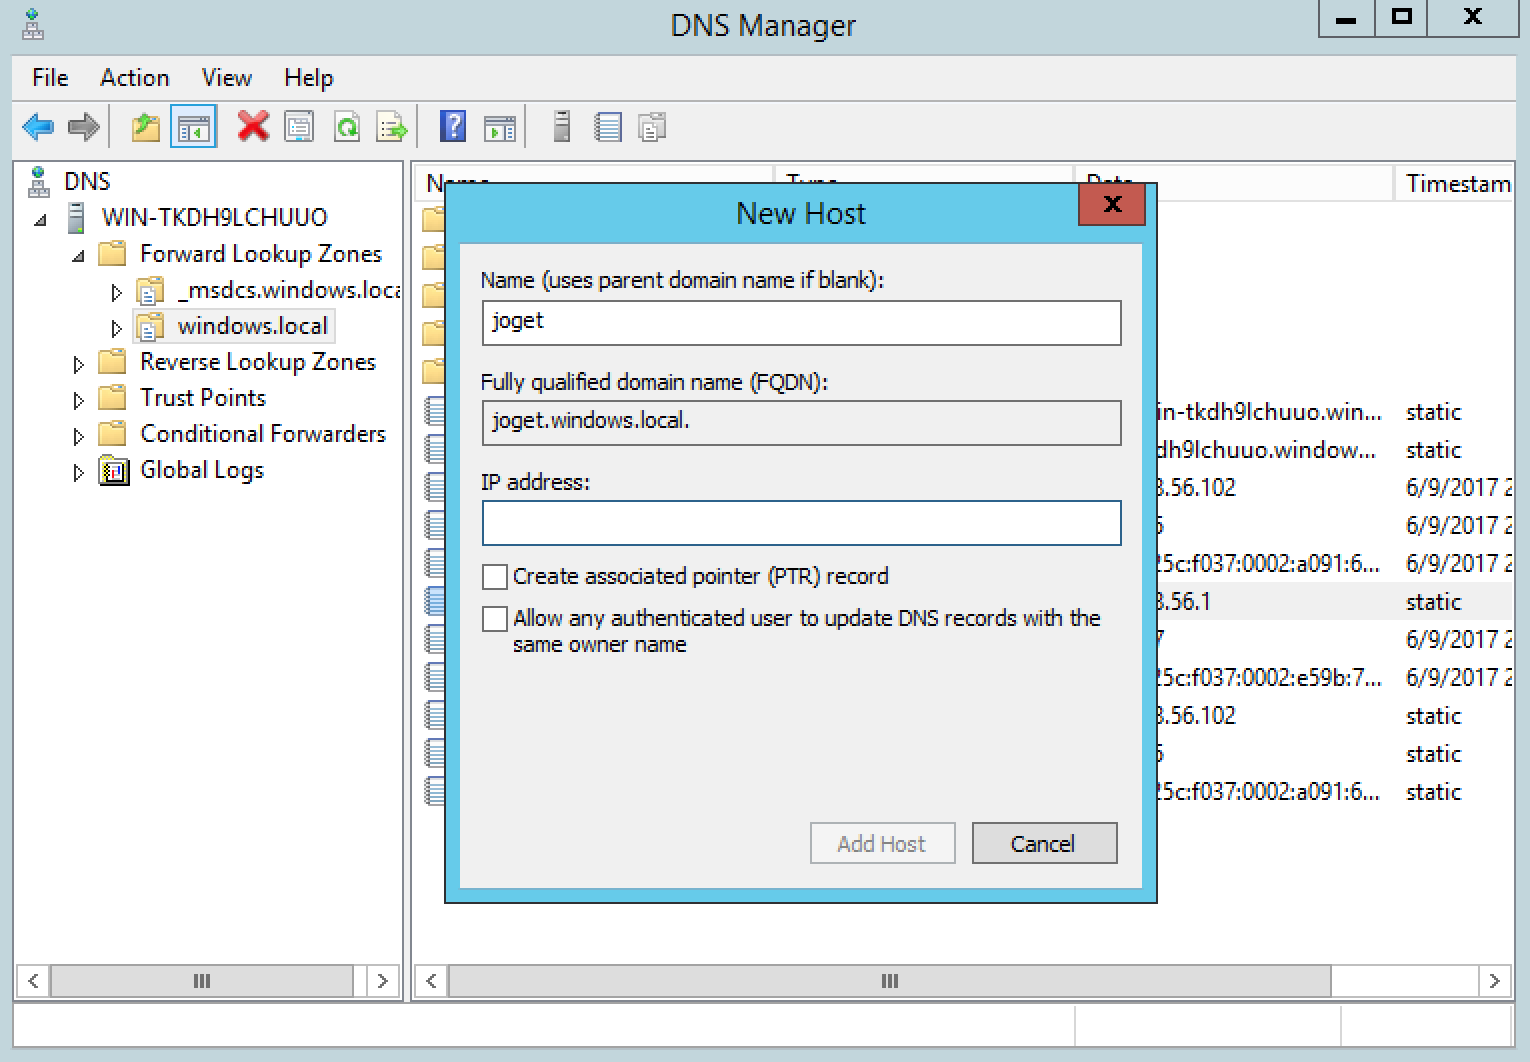
1.2 Add Joget Domain Name into the Windows Server DNS
-
In the windows.local DNS zone, add an A record for joget to point to the Joget server IP.
-
Test ping to ensure that joget.windows.local resolves to the correct IP.


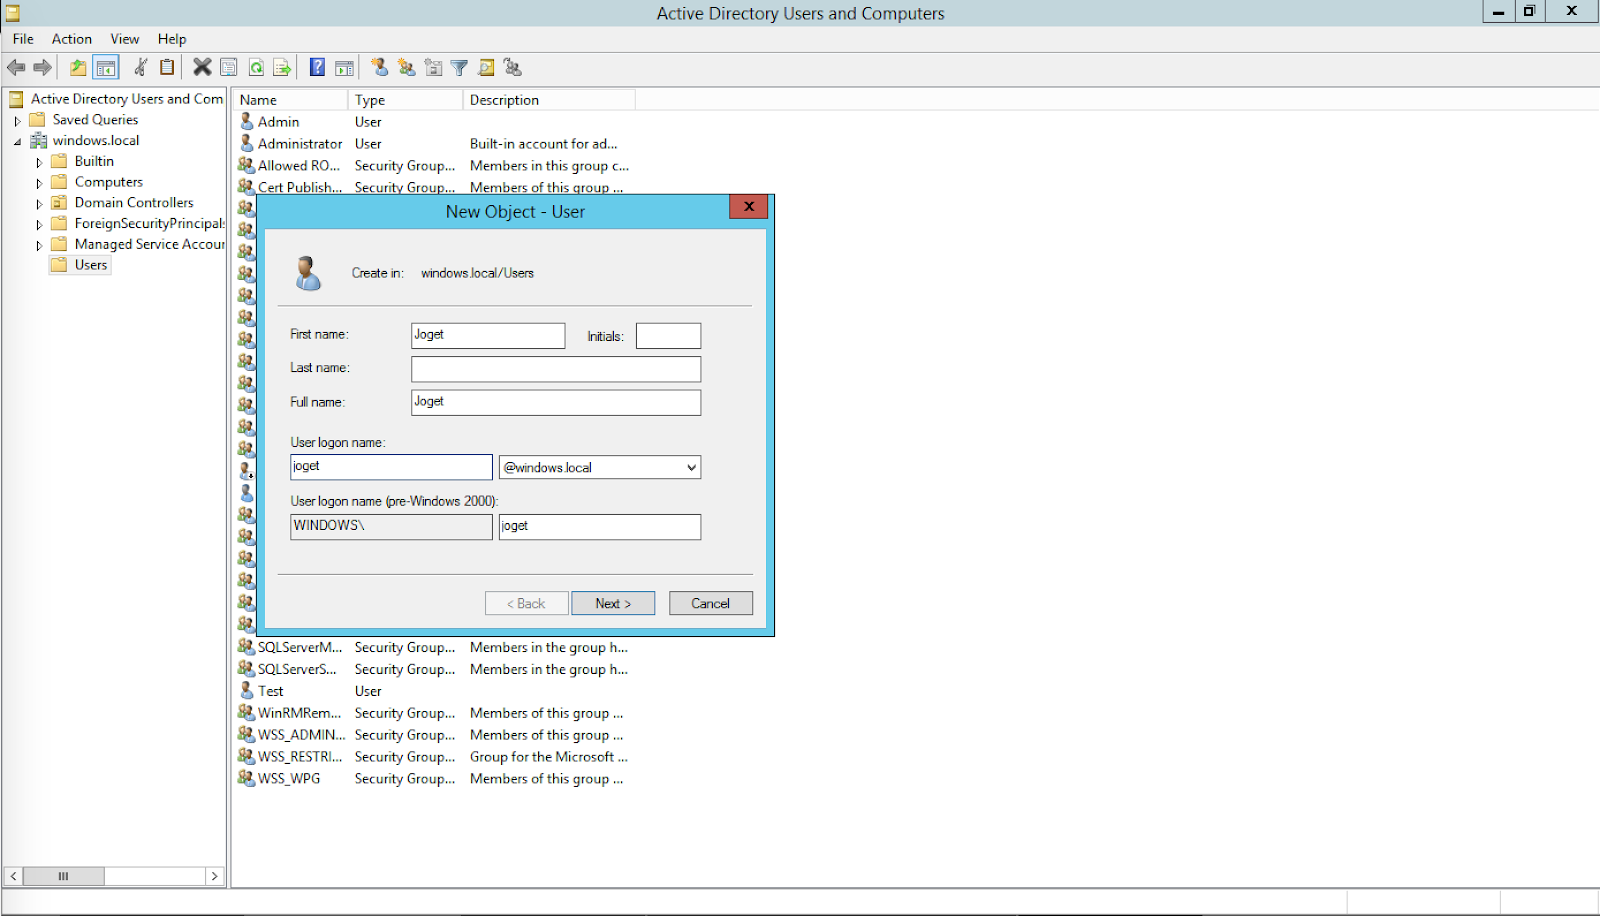
1.3 Create a Windows Domain User for the Service
-
In Active Directory Users and Computers, create a domain user joget. This is the user account to be mapped to the service name used by the Joget server.

1.4 Register Service Principal Name (SPN)
-
In PowerShell, execute: setspn -s HTTP/{JOGET DOMAIN} {DOMAIN USER} e.g.
setspn -s HTTP/JOGET.WINDOWS.LOCAL joget
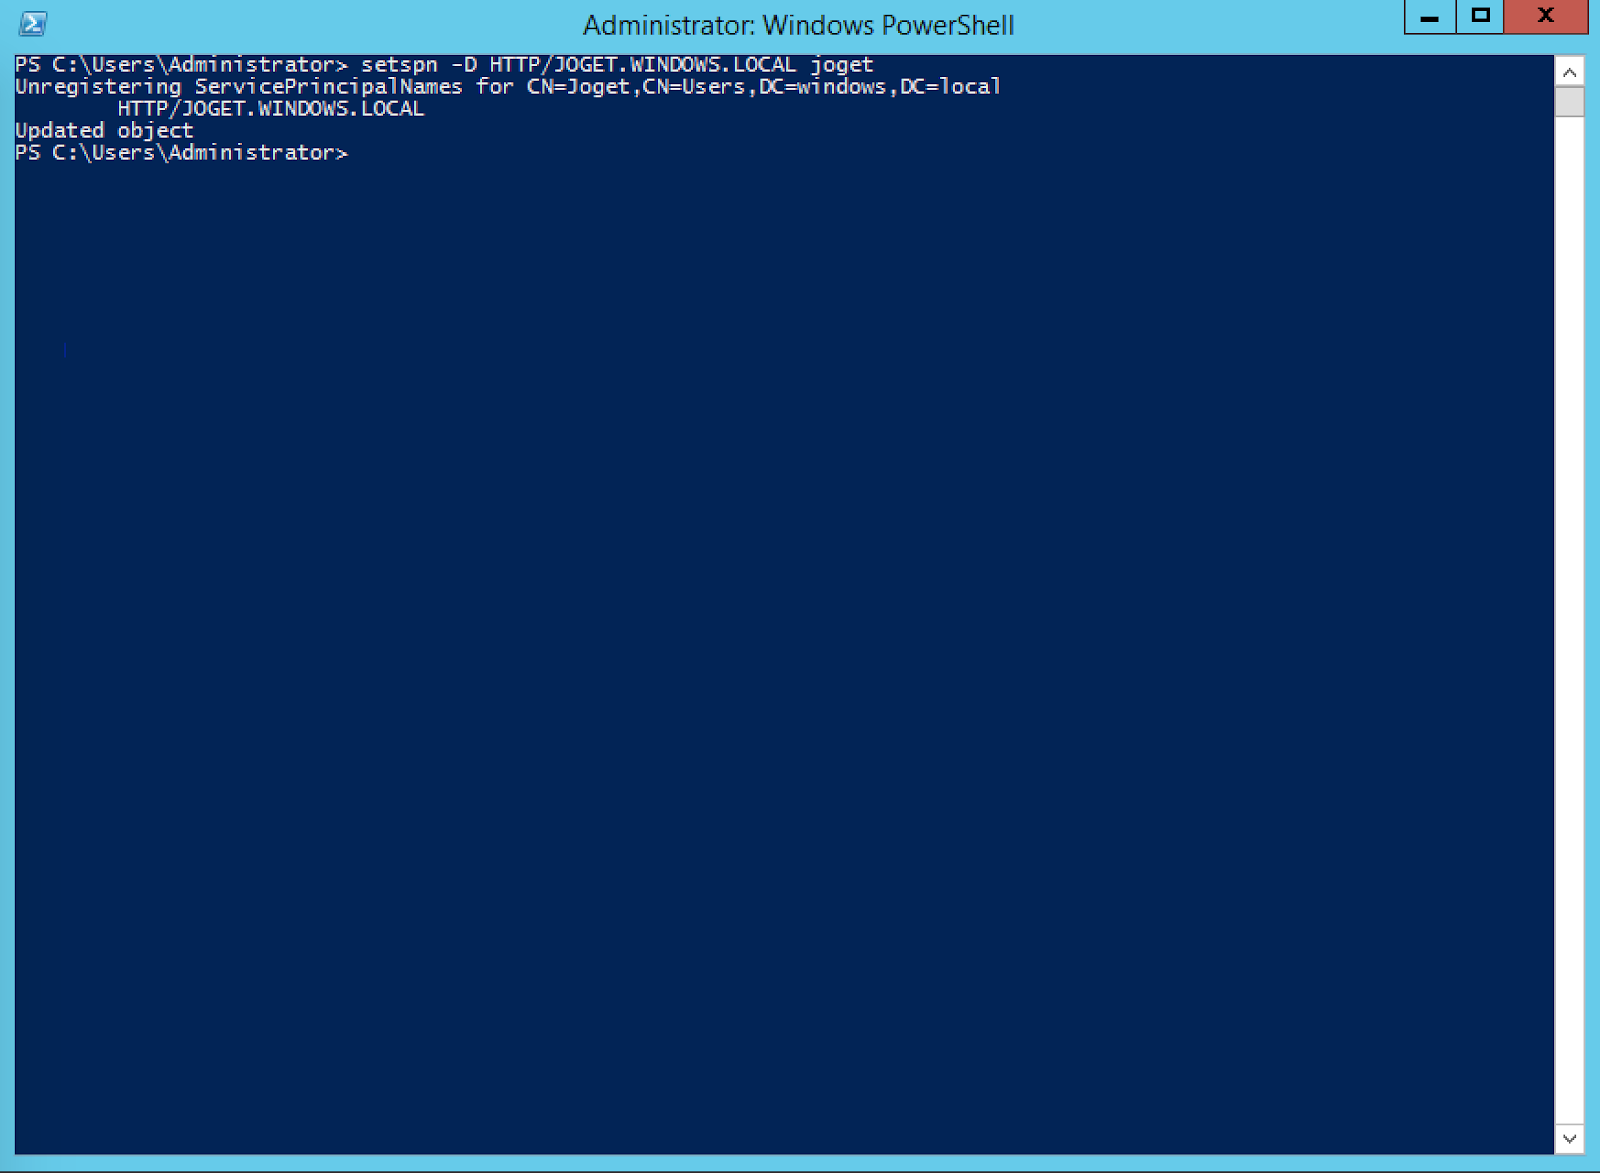
In PowerShell, check that the SPN has been registered
should display
Registered ServicePrincipalNames for CN=Joget,CN=Users,DC=windows,DC=local:
         HTTP/JOGET.WINDOWS.LOCAL
2. Setup Joget Server for Kerberos
2.1 Add Windows Domain to Hosts File
-
Edit /etc/hosts (Linux or macOS) or C:\Windows\System32\drivers\etc\hosts (Windows) and add the server IP e.g.
192.168.56.102 windows.local win-tkdh9lchuuo win-tkdh9lchuuo.windows.local
NOTE: This step is not required if the Joget Server is using the Windows Server as the DNS server.
2.2 Create Kerberos Identification (Keytab) File
Using Windows
-
In PowerShell on the Windows Server, generate a keytab file using the Ktpass tool:
ktpass -out joget.keytab -mapuser joget@WINDOWS.LOCAL -pass Pass@word1 -crypto all -ptype KRB5_NT_PRINCIPAL -princ HTTP/joget.windows.local@WINDOWS.LOCAL
-
Copy the generated joget.keytab file into the Joget server e.g. at C:\Joget-v5-Enterprise\wflow\joget.keytab
-
Java 8 may be required for the Kerberos authentication to work with the ktpass generated keytab. Download and install JDK 8, and edit the tomcat-run.bat startup script to update the JAVA_HOME path accordingly.

Using Linux
-
Install the krb5-user package
sudo apt-get install krb5-user
and configure the realm as WINDOWS.LOCAL and the KDC as WIN-TKDH9LCHUUO.WINDOWS.LOCAL:88
-
In a terminal, run
kinit joget@WINDOWS.LOCAL
IMPORTANT NOTE: The domain must be UPPER CASE
The command should run without error -
Confirm the configuration in /etc/krb5.conf
[libdefaults]
default = WINDOWS.LOCAL
default_realm = WINDOWS.LOCAL
dns_lookup_realm = true
dns_lookup_kdc = true

[realms]
   WINDOWS.LOCAL = {
       kdc = WIN-TKDH9LCHUUO.WINDOWS.LOCAL:88
       default_domain = WINDOWS.LOCAL
   }

[domain_realm]
   .windows.local = WINDOWS.LOCAL
   windows.local = WINDOWS.LOCAL
IMPORTANT NOTE: The domain must be UPPER CASE
-
In a terminal, generate a keytab file using:
ktutil
 ktutil: add_entry -password -p HTTP/JOGET.WINDOWS.LOCAL@WINDOWS.LOCAL -k 1 -e arcfour-hmac-md5
 Password for HTTP/JOGET.WINDOWS.LOCAL@WINDOWS.LOCAL:
 ktutil: wkt /etc/joget.keytab
-
List the SPNs in the keytab using:
ktutil
 ktutil: rkt /etc/joget.keytab
 ktutil: list
Using macOS
-
In a terminal, run
kinit joget@WINDOWS.LOCAL
IMPORTANT NOTE: The domain must be UPPER CASE
The command should run without error, or just a warning “Encryption type arcfour-hmac-md5(23) used for authentication is weak and will be deprecated” -
Edit /etc/krb5.conf
[libdefaults]
default = WINDOWS.LOCAL
default_realm = WINDOWS.LOCAL
dns_lookup_realm = true
dns_lookup_kdc = true

[realms]
   WINDOWS.LOCAL = {
       kdc = WIN-TKDH9LCHUUO.WINDOWS.LOCAL:88
       default_domain = WINDOWS.LOCAL
   }

[domain_realm]
    .windows.local = WINDOWS.LOCAL
    windows.local = WINDOWS.LOCAL
IMPORTANT NOTE: The domain must be UPPER CASE
-
In a terminal, generate a keytab file using:
ktutil -k joget.keytab add -p HTTP/JOGET.WINDOWS.LOCAL@WINDOWS.LOCAL -e arcfour-hmac-md5 -V 1
-
List the SPNs in the keytab using:
ktutil -k joget.keytab list
-
Keep a copy of the generated joget.keytab file e.g. in /etc/joget.keytab
3. Configure Kerberos Directory Manager Plugin
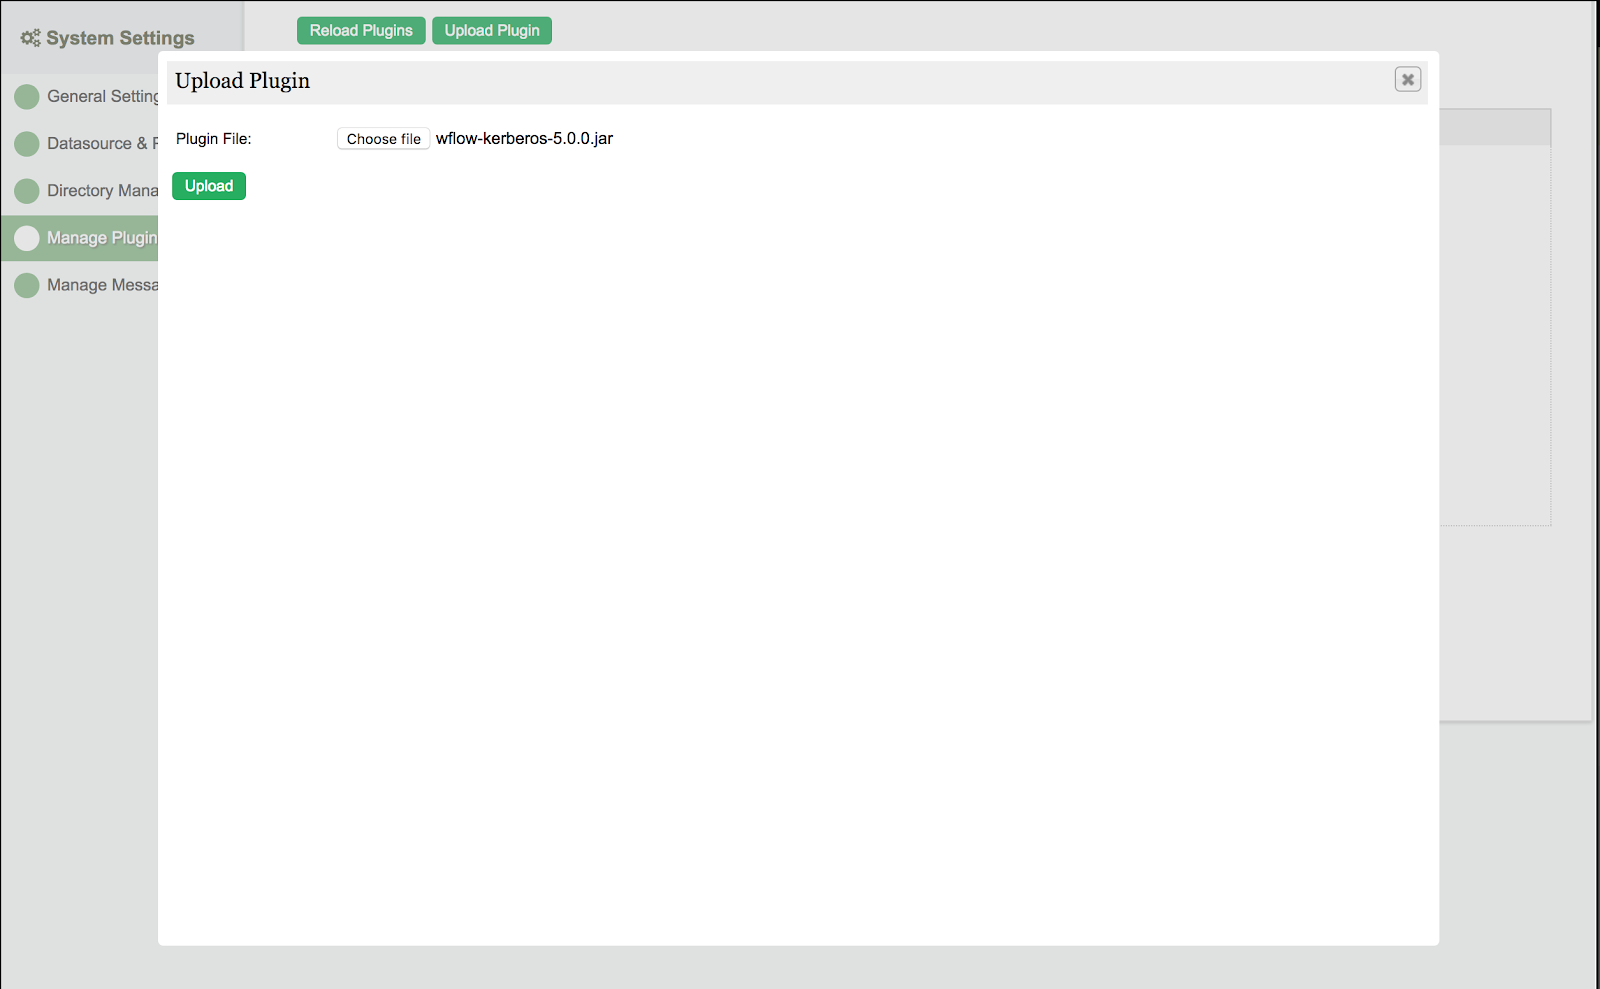
3.1 Upload Kerberos Directory Manager Plugin
-
Download the Kerberos Directory Manager plugin from the Joget Marketplace and upload it in Settings > Manage Plugins.

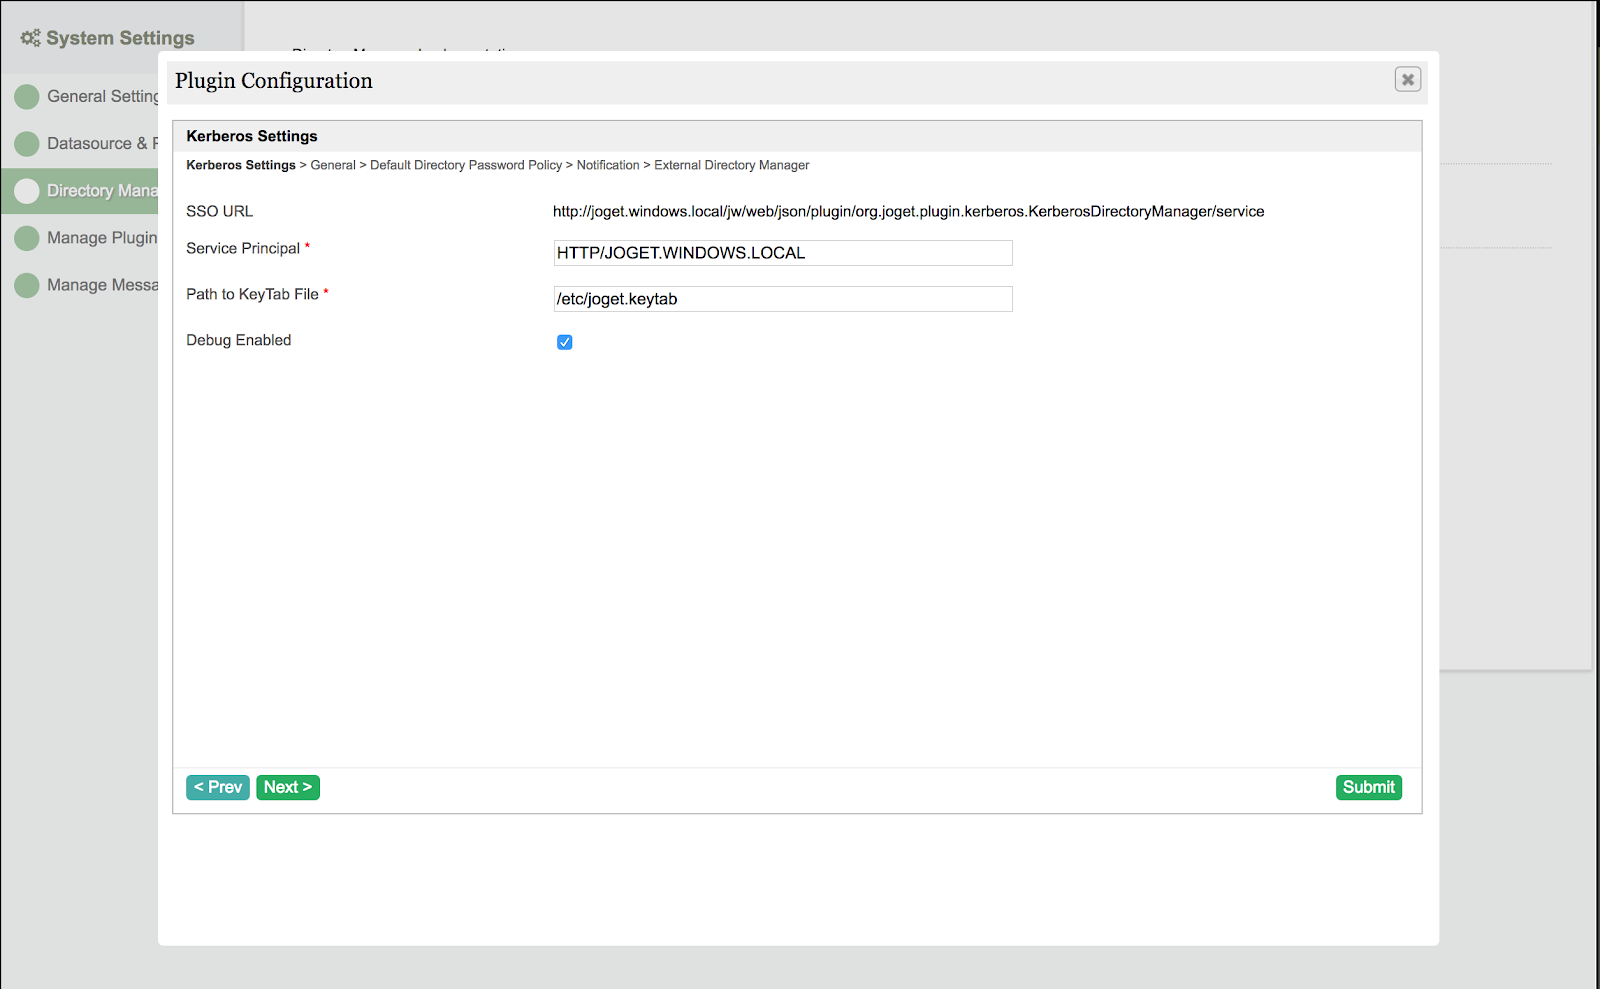
3.2 Configure Kerberos Directory Manager Plugin
-
In Settings > Directory Manager, select the Kerberos Directory Manager plugin, and key in the appropriate values in the configuration:
-
Service Principal: HTTP/JOGET.WINDOWS.LOCAL
-
Path to Keytab File: /etc/joget.keytab (Linux) or C:/Joget-v5-Enterprise/wflow/joget.keytab (Windows)
-
Debug Enabled: View debugging messages in the logs

-
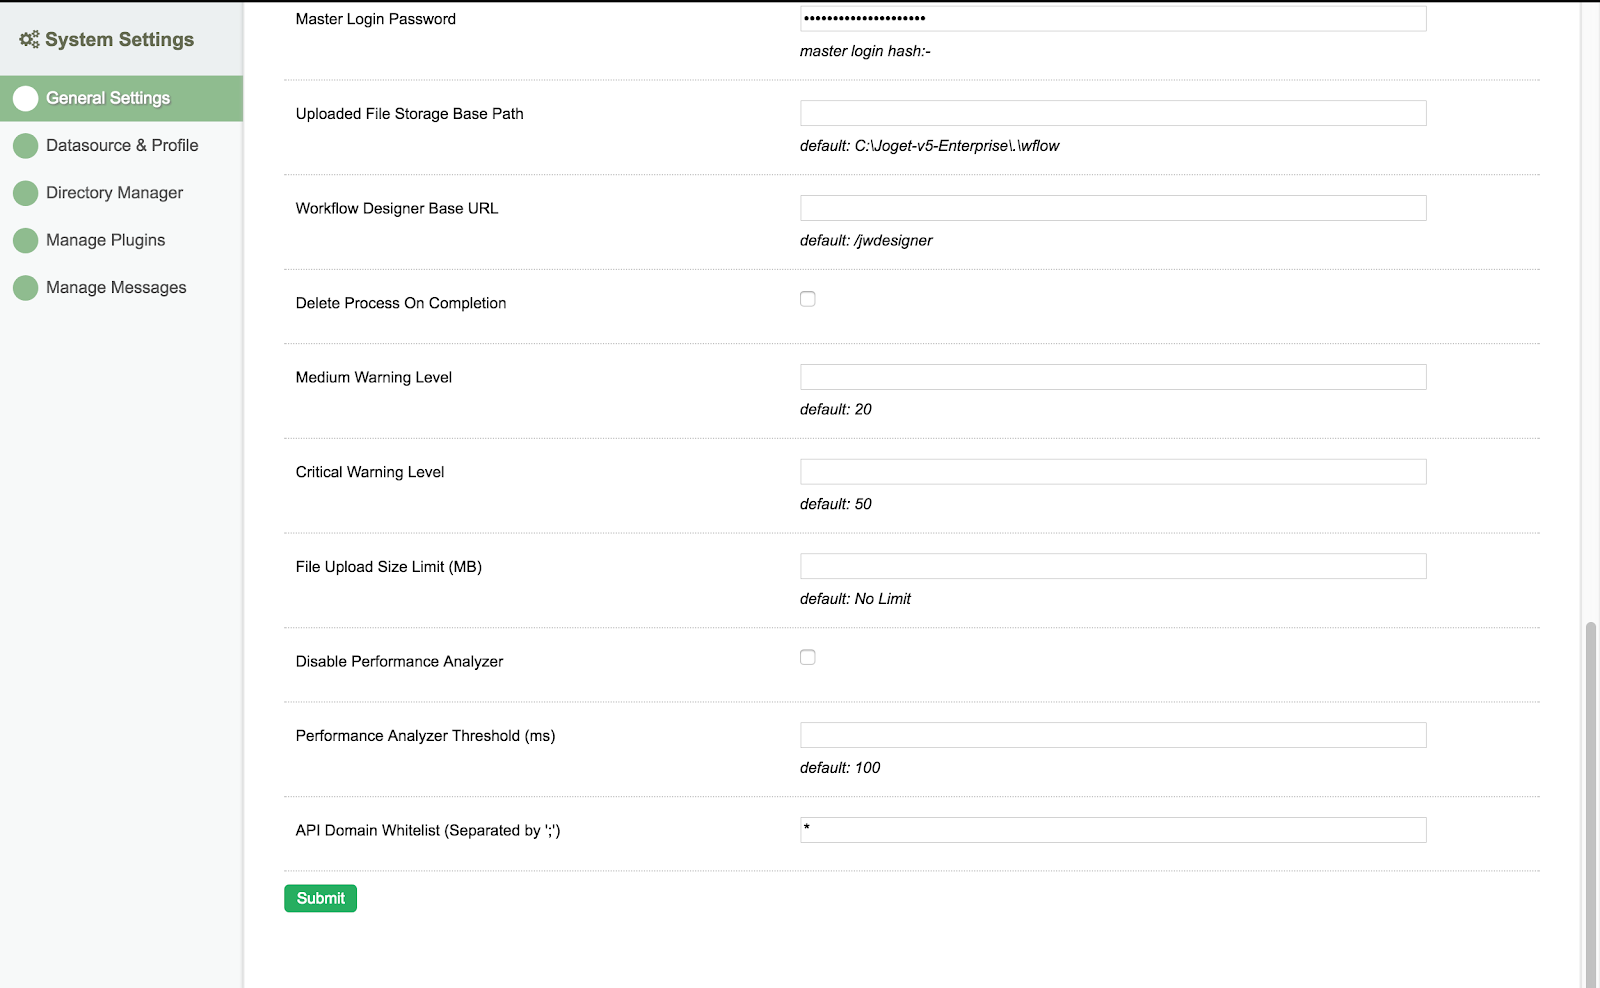
3.3 Configure API Domain Whitelist
-
In Settings > General Settings, set the API Domain Whitelist to * to allow SSO requests to the Kerberos Directory Manager.
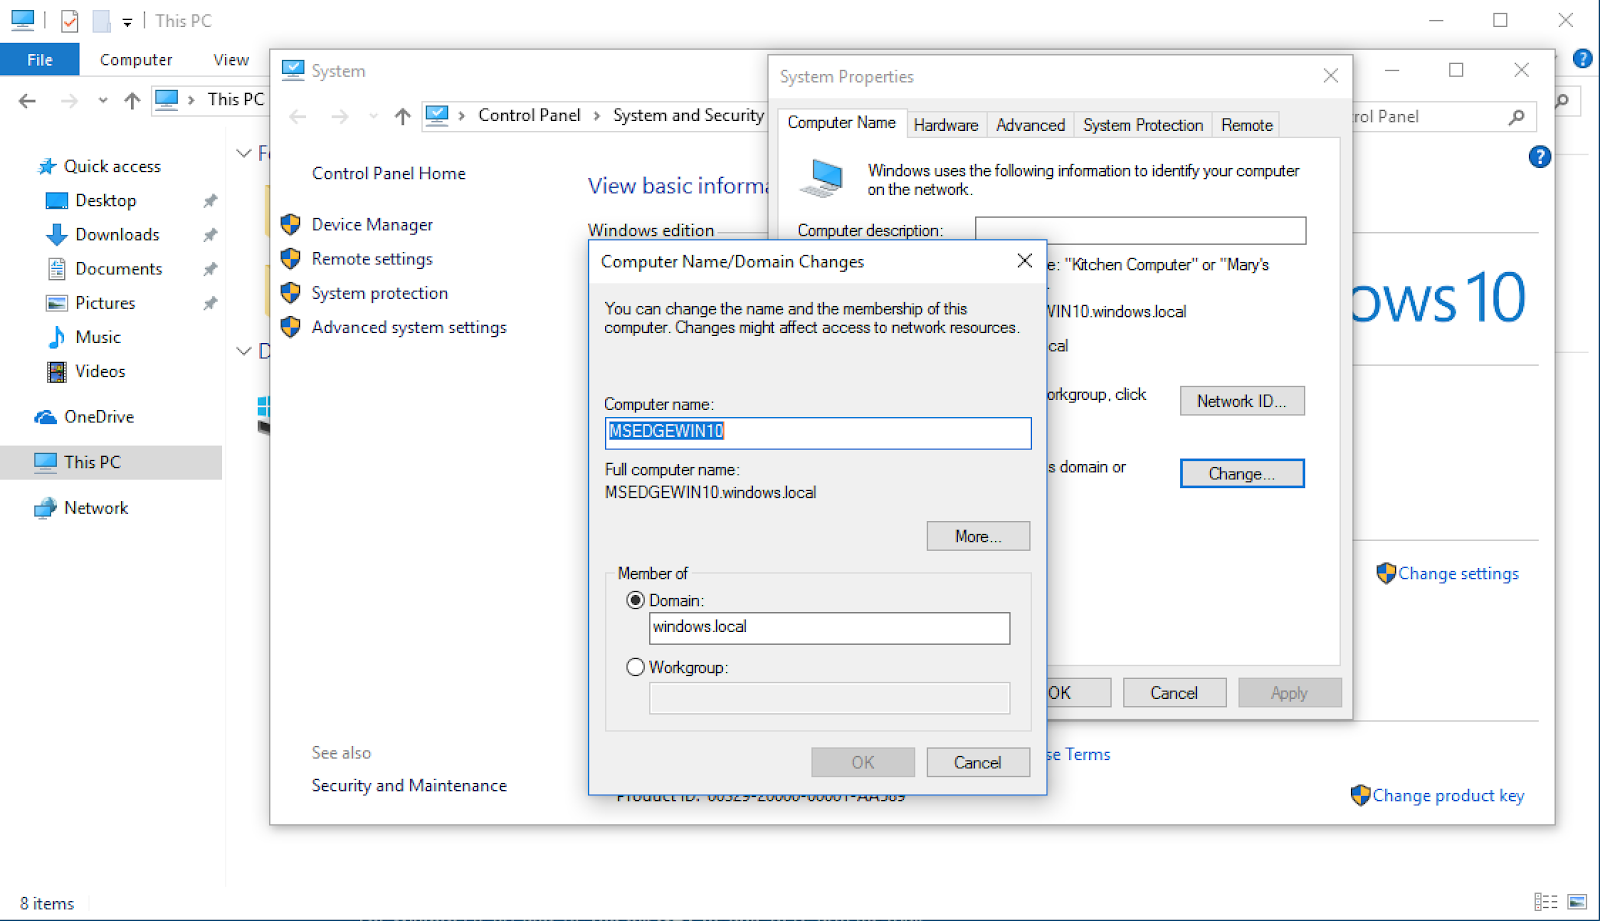
4.1 Add Client PC to Windows Domain
-
Ensure that the Windows Server is reachable on the network from the Client PC.
-
Set the DNS server to the IP address of the Windows Server.

-
Ping the windows domain name to test.

-
Click on File Explorer, right click on the This PC and choose Properties. Click on Change Settings next to the computer name. Click on Change and set the Domain e.g. windows.local, keying in the domain administrator login when prompted. Restart after joining the domain is successful, and login as a domain user.


4.2 Setup Browser for Windows Authentication
-
In IE, click on Internet Options > Security > Local intranet site > Advanced and add the Joget domain e.g. http://joget.windows.local


4.3 Test the SSO
-
Using the Kerberos Directory Manager plugin approach, access http://joget.windows.local/jw/web/json/plugin/org.joget.plugin.kerberos.KerberosDirectoryManager/service to SSO.
Please note that for the SSO to work properly:
-
the client PC and Joget server must reside on different machines
-
the Windows server and client PC must reside on the same Windows domain
-
Resources
Introduction to Kerberos and SPNEGO
-
http://thekspace.com/home/component/content/article/54-kerberos-and-spnego.html
-
https://developer.ibm.com/answers/questions/246107/what-is-the-difference-between-kerberos-and-spnego.html?lnk=hm
-
http://web.mit.edu/kerberos/www/index.html
Configuring Kerberos on Windows Server
-
https://technet.microsoft.com/en-us/library/hh831553(v=ws.11).aspx
-
https://msftplayground.com/2009/08/configure-kerberos-authentication/
-
https://technet.microsoft.com/en-us/library/cc731241(v=ws.11).aspx
-
https://technet.microsoft.com/en-us/library/hh831553(v=ws.11).aspx
-
https://msftplayground.com/2009/08/configure-kerberos-authentication/
Kerberos with Java and Spring
-
https://venkatsadasivam.com/2009/08/29/single-sign-on-in-java-platform/
-
http://docs.spring.io/spring-security-kerberos/docs/1.0.1.RELEASE/reference/htmlsingle/
-
http://projects.spring.io/spring-security-kerberos/
-
https://tomcat.apache.org/tomcat-8.0-doc/windows-auth-howto.html
-
http://docs.oracle.com/javase/jndi/tutorial/ldap/security/gssapi.html
-
http://docs.oracle.com/javase/8/docs/technotes/guides/security/jgss/lab/part1.html#PART1
-
https://docs.oracle.com/cd/E23943_01/web.1111/e13707/sso.htm#SECMG481
-
https://stackoverflow.com/questions/25289231/using-gssmanager-to-validate-a-kerberos-ticket
В этой статье мы рассмотрим примеры базовой настройки протокола аутентификации Kerberos для пула приложений IIS v10 на сервере с ОС Windows Server 2022. При этом мы отдельно поговорим о разных вариантах настройки в зависимости от типа учётной записи, в контексте которой выполняется пул приложений IIS. Кроме того, попробуем рассмотреть задачу подключения к веб-сервису IIS (фронтенд) стороннего файлового ресурса (бэкенд) и делегирования аутентификации пользователей от фронтенда к бэкенду.
Чтобы не запутаться в структуре изложения, будем использовать следующий план:
Этап 1. Базовая настройка Kerberos для IIS
-
- Вариант 1. Пул IIS выполняется в контексте учётной записи самого веб-сервера
- Вариант 2. Пул IIS выполняется в контексте сервисной учётной записи gMSA
Этап 2. Настройка разных типов делегирования аутентификации на примере IIS
- Тип 1. Полное делегирование (Unconstrained Delegation)
- Тип 2. Ограниченное делегирование (Constrained Delegation)
- Вариант 1. Пул IIS выполняется в контексте учётной записи самого веб-сервера
- Вариант 2. Пул IIS выполняется в контексте сервисной учётной записи gMSA
- Тип 3. Ограниченное делегирование на основе ресурсов (Resource Based Constrained Delegation)
- Общие выводы по типам делегирования
На первом и втором этапе плана мы рассмотрим конкретные примеры настройки, исходя из двух разных вариантов работы пула приложений IIS:
Вариант 1. Пул IIS выполняется в контексте учётной записи самого веб-сервера:

Вариант 2. Пул IIS выполняется в контексте сервисной учётной записи gMSA:

Этап 1. Базовая настройка Kerberos для IIS
Разные варианты запуска пула приложений IIS требуют разных действий по настройке поддержки Kerberos. Например, пул IIS может выполняться в контексте учётной записи самого веб-сервера (ApplicationPoolIdentity), в контексте учётной записи пользователя или в контексте сервисной учётной записи gMSA.
Вариант 1. Пул IIS выполняется в контексте учётной записи самого веб-сервера
1) Регистрируем в домене уникальную запись SPN вида HTTP/<fqdn> для доменной компьютерной учётной записи веб-сервера. Поиск и регистрацию SPN можно выполнить как с помощью утилиты setspn, так и с помощью PowerShell.
Пример команды для получения всех зарегистрированных SPN-записей для объекта типа компьютер:
Get-ADComputer -Identity "<имя учётной веб-сервера>" -Properties ServicePrincipalNames | Select-Object -ExpandProperty ServicePrincipalNames
В следующем примере регистрируем пару SPN-записей для компьютерной учётной записи веб-сервера:
Set-ADComputer -Identity "WEB03" -ServicePrincipalNames @{Add='HTTP/SRV-Web.holding.com','HTTP/SRV-Web'}
2) Настраиваем в IIS пул приложений (Application Pool), используя в расширенных настройках пула в свойстве «Identity» значение «ApplicationPoolIdentity«.

3) В свойствах сайта в методах аутентификации выключаем анонимную аутентификацию, и включаем аутентификацию Windows.
В свойствах аутентификации Windows убедимся в том, что провайдер «Negotiate» выставлен как приоритетный (в самом верху списка провайдеров). Если NTLM в чистом виде не нужен, можем его вообще удалить из списка включенных провайдеров.

Провайдер «Negotiate» будет приоритетно работать с протоколом Kerberos с возможностью понижения до протокола NTLM.
4) В редакторе правки конфигурации сайта «Configuration Editor» выбираем секцию system.webServer/security/authentication/windowsAuthentication. Здесь проверим, что опция «useAppPoolCredentials» выключена (False), а опция «useKernalMode» включена (True).

5) На клиентской машине проверяем отрабатывает ли аутентификация Kerberos.
Перед проверкой, для чистоты эксперимента, на стороне веб-сервера перезапустим службу IIS (команда iisreset), а на клиентской машине закроем веб-браузер и очистим кеш билетов Kerberos в контексте текущего пользователя (команда klist purge).
После этого на клиенте снова откроем браузер и сначала просто пробуем открыть стартовую страницу сайта. Сайт должен открываться без каких-либо запросов аутентификации или ошибок.
В этот момент на клиентской системе с помощью команды klist можно проверить все кэшированные билеты Kerberos и убедиться в том, что в их списке появился билет для веб службы с SPN вида HTTP/srv-web.holding.com.
Дополнительно можем скачать диагностическую страницу, описанную в статье «Microsoft Learn : ASP.NET Authentication test page». Ссылка на архив на странице первоисточника битая, поэтому вот копия.
Распаковываем содержимое архива в корневой каталог сайта в подкаталог /authpage и переходим в клиентском браузере по ссылке srv-web.holding.com/authpage/default.aspx

Как видим, доменный пользователь успешно аутентифицировался на веб-сайте с использованием аутентификации Kerberos.
После проверки на забываем удалить подкаталог /authpage из корневого каталога сайта.
Вариант 2. Пул IIS выполняется в контексте сервисной учётной записи gMSA
1) Создаём в домене сервисную учётную запись gMSA и разрешаем ей вход на веб-сервер. Пример создания учётной записи с помощью PowerShell можно найти в статье Вики.
2) Регистрируем в домене уникальную запись SPN вида HTTP/<fqdn> для доменной учётной записи gMSA. Обратите внимание на то, что если SPN записи веб-службы ранее были заданы в свойствах учётной записи веб-сервера, то эти прежние SPN записи должны быть удалены, прежде чем их добавлять в свойства gMSA. Важно, чтобы соблюдалась уникальность SPN в рамках всего домена.
Проверим SPN-записи для компьютерной учётной записи веб-сервера и для учётной записи gMSA:
Get-ADComputer -Identity "WEB03" -Properties ServicePrincipalNames | Select-Object -ExpandProperty ServicePrincipalNames
Get-ADServiceAccount -Identity "s-S004$" -Properties ServicePrincipalNames | Select-Object -ExpandProperty ServicePrincipalNames
В следующем примере мы удаляем пару SPN из компьютерной учётной записи веб-сервера (если, конечно, это требуется) и добавляем эту же пару записей в учётную запись gMSA, от имени которой в нашем случае работает пул IIS:
Set-ADComputer -Identity "WEB03" -ServicePrincipalNames @{Remove='HTTP/SRV-Web.holding.com','HTTP/SRV-Web'}
Set-ADServiceAccount -Identity "s-S004$" -ServicePrincipalNames @{Add='HTTP/SRV-Web.holding.com','HTTP/SRV-Web'}
3) Настраиваем пул IIS для запуска от имени gMSA. При этом в окне указания учётной записи Identity не указываем пароль, а лишь указываем имя gMSА в формате вида DOMAIN\gMSA$.

4) В свойствах сайта в методах аутентификации выключаем анонимную аутентификацию, и включаем аутентификацию Windows.
В свойствах аутентификации Windows убедимся в том, что провайдер «Negotiate» выставлен как приоритетный (в самом верху списка провайдеров). Если NTLM в чистом виде не нужен, можем его вообще удалить из списка включенных провайдеров.

5) В редакторе правки конфигурации сайта «Configuration Editor» выбираем секцию system.webServer/security/authentication/windowsAuthentication. Здесь включаем опцию «useAppPoolCredentials» (True), и убеждаемся в том, что включена опция «useKernalMode» (True).
В некоторых статьях можно найти мнение о том, что опцию useKernalMode при работе пула от gMSA нужно выключать. Но есть также информация о том, что опцию useKernalMode при включённой опции useAppPoolCredentials можно не изменять, так как включённая опция useAppPoolCredentials имеет приоритет над опцией useKernalMode.

6) На клиентской машине проверяем отрабатывает ли аутентификация Kerberos.
Перед проверкой на стороне веб-сервера перезапустим службу IIS (команда iisreset), а на клиентской машине закроем веб-браузер и очистим кеш билетов Kerberos текущего пользователя (команда klist purge).
Снова переходим по ссылке srv-web.holding.com/authpage/default.aspx и смотрим, что покажет нам тестовая страница.

Обратим внимание на то, что теперь в поле Windows identity отображается учётная запись gMSA, от имени которой работает пул IIS.
Этап 2. Настройка разных типов делегирования аутентификации на примере IIS
Описанной выше базовой настройки достаточно лишь для того, чтобы реализовать простую прямую аутентификацию Kerberos между клиентом и веб-сервером. Конфигурация усложняется в том случае, если возникает потребность предоставить доступ аутентифицированному клиенту веб-сервера к какому-либо стороннему ресурсу, находящемуся за веб-сервером, например, к базе данных на другом сервере с SQL Server или к файловой шаре на другом файловом сервере. В этом случае для поддержки, так называемого Double Hop, требуется настройка делегирования Kerberos. То есть, на уровне учётных записей домена мы должны разрешить фронтенд службе (веб-серверу) олицетворять пользователей на бэкенд службе (например, файловом сервере).
С точки зрения Kerberos можно выделить три типа делегирования:
- Полное делегирование (Unconstrained Delegation);
- Классическое ограниченное делегирование (Constrained Delegation);
- Ограниченное делегирование на основе ресурсов (Resource Based Constrained Delegation).
Тип 1. Полное делегирование (Unconstrained Delegation)
Для включения этого типа делегирования нужно обладать правами уровня администратора домена или привилегией SeEnableDelegationPrivilege. Включение этого типа делегирования влияет на содержимое атрибута userAccountControl (включается флаг TRUSTED_FOR_DELEGATION).
В графической оболочке в свойствах учётных записей компьютеров на вкладке «Delegation» определяется вариантом «Trust this computer for delegation to any service (Kerberos only)».

В свойствах учётных записей пользователей вкладка «Delegation» отображается только для пользователей, имеющих зарегистрированные SPN-записи в атрибуте servicePrincipalName. Здесь вариант полного делегирования называется по аналогии — «Trust this user for delegation to any service (Kerberos only)».

Для сервисных учётных записей gMSA нет возможности управлять делегированием в графической оболочке, но можно сделать это с помощью PowerShell. Приведу примеры команд, используемых для управления делегированием gMSA.
Проверяем, включено ли полное делегирование:
Get-ADServiceAccount -Identity "s-S004$" -Property TrustedForDelegation
Включаем полное делегирование:
Set-ADServiceAccount -Identity "s-S004$" -TrustedForDelegation $true
Отключаем полное делегирование:
Set-ADServiceAccount -Identity "s-S004$" -TrustedForDelegation $false
Важно понимать то, что «Unconstrained Delegation» это самый «древний» и самый худший, с точки зрения безопасности, вариант делегирования Kerberos. Поэтому следует отказаться от его использования. Об опасности этого варианта написано не мало статей, например, «Semperis : Unconstrained Delegation in Active Directory Leaves Security Gaps».
Тип 2. Ограниченное делегирование (Constrained Delegation)
Для включения этого типа делегирования нужно обладать правами уровня администратора домена или привилегией SeEnableDelegationPrivilege.
Фактически это делегирование настраивается с помощью изменения содержимого атрибута msDS-AllowedToDelegateTo для учётной записи, от имени которой работает фронтенд служба. В этот атрибут вписываются бэкенд службы в формате SPN, в сторону которых фронтенд службе разрешено транслировать учётные данные аутентифицированных пользователей.
Порядок настройки ограниченного делегирования опять же зависит от того, в контексте какой учётной записи выполняется пул приложений IIS.
Вариант 1. Пул IIS выполняется в контексте учётной записи самого веб-сервера
Например, у нас есть сайт IIS, пул которого работает в контексте учётной записи самого веб-сервера (Identity = ApplicationPoolIdentity) и мы подключаем в качестве виртуального каталога этого веб-сайта IIS файловую шару с отдельного файлового сервера, чтобы аутентифицированные пользователи сайта могли скачивать файлы с этой шары через этот виртуальный каталог.
В этом случае нам потребуется в свойствах компьютерной учётной записи веб-сервера выбрать вариант «Trust this computer for delegation to specified services only» > «Use Kerberos only» и в поле описания служб добавить службу cifs от файлового сервера.

При этом обратите внимание на то, что для возможности скачивания файлов с файлового сервера через веб-службу, нам потребуется обеспечить право на чтение в соответствующей файловой шаре как самим конечным пользователям, так и учётной записи веб-сервера. Если этого не сделать, то при попытке перехода по URL-ссылке, ведущей в подкаталоги шары файлового сервера, мы будем получать от веб-сервера ошибку HTTP 500. Как я понял, это связано с тем, что IIS пытается найти и прочитать файл web.config в конечном подкаталоге, и если учётной записи пула приложений IIS не хватает прав на чтение, чтобы выполнить эту операцию, то мы и получаем эту самую 500 ошибку.
После настройки делегирования, если мы заглянем в свойства атрибута msDS-AllowedToDelegateTo у учётной записи веб-сервера, то увидим указанные нами бэкенд службы через вкладку «Delegation».

В принципе этой настройки достаточно, чтобы делегирование заработало и пользователи, успешно прошедшие аутентификацию Kerberos на веб-сайте IIS, могли скачивать файлы шары файлового сервера через виртуальный каталог веб-сайта.
Вариант 2. Пул IIS выполняется в контексте сервисной учётной записи gMSA
Если пул IIS работает в контексте учётной записи gMSA, то нам потребуется настроить делегирование не для учётной записи веб-сервера, а для учётной записи gMSA. Сделать это можно с помощью PowerShell, так как это описано в статье «Microsoft Learn : Configuring Kerberos delegation for group Managed Service Accounts».
Чтобы проверить текущие настройки делегирования для учётной записи gMSA, выполним команду вида:
Get-ADServiceAccount -Identity "s-S004$" -Properties TrustedForDelegation,TrustedToAuthForDelegation,msDS-AllowedToDelegateTo
Чтобы включить ограниченное делегирование с использованием только протокола аутентификации Kerberos выполним команду вида:
Set-ADAccountControl -Identity "s-S004$" -TrustedForDelegation $false -TrustedToAuthForDelegation $false
Это аналогично выбору переключателя «Trust this computer for delegation to specified services only» > «Use Kerberos Only«).

Это как раз то, что нужно сделать нам, исходя из нашего примера с фронтендом на веб-сервере и бэкендом на файловом сервере.
В тех случаях, когда нужно включить ограниченное делегирование с использованием любых протоколов аутентификации, используется команда следующего вида:
Set-ADAccountControl -Identity "s-S004$" -TrustedForDelegation $false -TrustedToAuthForDelegation $true
Это аналогично выбору переключателя «Trust this computer for delegation to specified services only» > «Use Any Authentication Protocol«. Обратите внимание на то, что в этом случае в атрибуте userAccountControl включается флаг TRUSTED_TO_AUTH_FOR_DELEGATION.

Следующим шагом нам нужно заполнить перечень SPN для разрешённых бэкенд служб в атрибуте msDS-AllowedToDelegateTo учётной записи gMSA. В нашем примере это делается следующей командой:
Set-ADServiceAccount -Identity "s-S004$" -Add @{'msDS-AllowedToDelegateTo'='cifs/FSCL02','cifs/FSCL02.holding.com'}
По окончании настройки снова проверяем свойства учётной записи gMSA:
Get-ADServiceAccount -Identity "s-S004$" -Properties TrustedForDelegation,TrustedToAuthForDelegation,msDS-AllowedToDelegateTo

Соответственно, если теперь в графической оболочке заглянем в свойства учётной записи gMSA, то увидим заполненный атрибут msDS-AllowedToDelegateTo (редактировать его при необходимости, можно и здесь, а не через PowerShell).

Обратите внимание на то, что, в рамках нашего примера, для возможности скачивания файлов с файлового сервера через веб-службу, нам потребуется обеспечить право на чтение в соответствующей файловой шаре как самим конечным пользователям, так и учётной записи gMSA, от имени которой выполняется пул IIS на веб-сервере.
Для вступления изменений в силу на веб-сервере перезапустим IIS командой iisreset (или просто перезагрузим веб-сервер).
Теоретически проделанной настройки должно быть достаточно, чтобы делегирование заработало и пользователи, успешно прошедшие аутентификацию Kerberos на веб сайте IIS, могли скачивать файлы шары файлового сервера через виртуальный каталог веб-сайта. Но фактически это не так, так как на практике при ограниченном делегировании доступа к файловой службе (CIFS) мы столкнёмся с проблемой, описанной в статье «KB2602377 : Constrained delegation for CIFS fails with ACCESS_DENIED error».
Эта статья предлагает нам 2 обходных решения.
Первое обходное решение — это не использовать для ограниченного делегирования к службе CIFS сервисную учётную запись, а использовать учётную запись компьютера. То есть предполагается, что в нашем случае пул IIS (фронтэнд-служба), обращающийся к внешней сетевой шаре (бэкенд-служба) должен работать не в контексте gMSA, а в контексте системы (в IIS в свойствах пула параметр Identity = ApplicationPoolIdentity).
Если же всё-таки по каким-то причинам нам нужно, чтобы пул IIS работал от имени gMSA, то можно воспользоваться вторым обходным решением из вышеупомянутой статьи. Это решение подразумевает то, что помимо выполнения настройки делегирования для gMSA, нам потребуется сделать дополнительную «костыльную» настройку делегирования для компьютерной учётной записи веб-сервера.

После сделанных изменений перезагружаем веб-сервер WEB03.
В конечном итоге, в рассматриваемом нами примере, для того, чтобы заработало делегирование к CIFS для учётной записи gMSA (s-004$), используемой для пула IIS на веб-сервере (WEB03) с подключением к шаре стороннего файлового сервера (FSCL02), потребуется реализовать следующую «костыльную» и абсурдную, на мой взгляд, конфигурацию:

После этого пользователи веб-сервера действительно смогут скачивать файлы через виртуальный каталог, ссылающийся на шару на файловом сервере.
В случае, если нам потребуется вернуть учётную запись gMSA в исходное состояние и полностью отключить делегирование, то можно использовать команды следующего вида:
Set-ADAccountControl -Identity "s-S004$" -TrustedForDelegation $false -TrustedToAuthForDelegation $false
Set-ADServiceAccount -Identity "s-S004$" -Clear 'msDS-AllowedToDelegateTo'
Тип 3. Ограниченное делегирование на основе ресурсов (Resource Based Constrained Delegation)
Ограниченное делегирование на основе ресурсов Resource Based Constrained Delegation (RBCD) — это технология, доступная начиная с Windows Server 2012.
Если при использовании классического Constrained Delegation нам требуется настройка атрибутов msDS-AllowedToDelegateTo и userAccountControl для учётной записи, от имени которой работает фронтенд-служба (в нашем примере это учётная запись пула IIS и/или самого веб-сервера), то при настройке RBCD используется обратный подход, то есть делегирование настраивается в свойствах учётной запись бэкенд-сервиса (в нашем примере это учётная запись файлового сервера).
Более того, классическое Constrained Delegation для настройки требует привилегии уровня администратора домена, а для настройки RBCD достаточно иметь лишь доступ на изменение учётной записи бэкенд-сервиса (файлового сервера). При этом в ходе настройки делегирования нет необходимости указывать SPN служб, то есть доверительные отношения выстраиваются на уровне учётных записей домена (подразумевается доверие любых служб в рамках отношений между бэкендом и фронтендом). Разумеется, это имеет как свои плюсы, так и свои минусы, но концептуально RBCD позиционируется, как более простой и удобный тип делегирования, чем классическое Constrained Delegation. Например, RBCD позволяет управлять делегированием между разными доменами Active Directory, в то время как классическое делегирование работает лишь в рамках одного домена.
Этот тип делегирования работает с помощью управления атрибутом msDS-AllowedToActOnBehalfOfOtherIdentity и настраивается только через PowerShell с помощью параметра -PrincipalsAllowedToDelegateToAccount в командлетах Set-ADUser, Set-ADComputer, Set-ADServiceAccount.
Рассмотрим типичные команды, используемые для настройки RBCD.
Проверяем текущее состояние настроек RBCD для учётных записей разного типа:
Get-ADComputer -Identity "<имя учётной записи компьютера бэкенд-службы>" -Properties PrincipalsAllowedToDelegateToAccount
Get-ADServiceAccount -Identity "<имя учётной записи gMSA бэкенд-службы>$" -Properties PrincipalsAllowedToDelegateToAccount
Настраиваем делегирование на примере служб, работающих от имени учётных записей gMSA:
Set-ADServiceAccount -Identity "<имя учётной записи gMSA бэкенд-службы>$" -PrincipalsAllowedToDelegateToAccount $(Get-ADServiceAccount -Identity "<имя учётной записи gMSA фронтенд-службы>$")
Если нужно делегировать несколько фронтэнд-служб, то можно воспользоваться конструкцией следующего вида
$BackendSVC = "<имя учётной записи gMSA бэкенд-службы>$"
$FrontendSVC1 = Get-ADServiceAccount -Identity "<имя учётной записи gMSA фронтэнд-службы 1>$"
$FrontendSVC2 = Get-ADServiceAccount -Identity "<имя учётной записи gMSA фронтэнд-службы 2>$"
$Frontends = @($FrontendSVC1,$FrontendSVC2)
Set-ADServiceAccount -Identity $BackendSVC -PrincipalsAllowedToDelegateToAccount $Frontends
Экспериментируя с настройкой RBCD можно обнаружить не совсем очевидную особенность, которую можно отнести к разряду недостатков. Дело в том, что в атрибут msDS-AllowedToActOnBehalfOfOtherIdentity нельзя записать несколько значений разного типа. То есть, либо мы туда пишем учётные записи типа компьютер, либо учётные записи типа gMSA. При попытке указания коллекции из учётных записей разного типа, мы получим от PowerShell ошибку следующего вида:
Set-ADComputer : An AD Property Value Collection may only contain values of the same type. Specified value of type 'Microsoft.ActiveDirectory.Management.ADComputer' does not match the existing type of 'Microsoft.ActiveDirectory.Management.ADServiceAccount'...
Вернёмся к нашему примеру, с вариантом, в котором для учётной записи gMSA (s-S004), от имени которой выполняется пул IIS на веб-сервере (WEB03), требуется разрешить передачу учётных данных пользователей веб-сервера на сторонний файловый сервер (FSCL02). В этом примере команда настройки RBCD будет иметь следующий вид:
Set-ADComputer -Identity "FSCL02"-PrincipalsAllowedToDelegateToAccount $(Get-ADServiceAccount "s-S004$")
И опять же, с теоретической точки зрения, такой настройки должно быть достаточно, чтобы пользователи смогли скачивать файлы с шары файлового сервера через веб-приложение IIS. Однако, на практике это работать не будет, предположительно, всё из-за той же проблемы, которую мы упомянули ранее со ссылкой на статью KB2602377. То есть, в этом случае, чтобы делегирование заработало, опять потребуется сделать дополнительную «костыльную» настройку делегирования для компьютерной учётной записи веб-сервера.

После сделанных изменений перезагружаем веб-сервер WEB03.
В конечном итоге, в рассматриваемом нами примере, для того, чтобы заработало делегирование RBCD, потребовалось реализовать следующую, опять же «костыльную», конфигурацию:

После этого пользователи веб-сервера действительно смогли скачивать файлы через виртуальный каталог, ссылающийся на шару на файловом сервере.
В случае, если нам потребуется вернуть учётную запись бэкенда в исходное состояние и полностью отключить делегирование RDCB, то для очистки атрибута msDS-AllowedToActOnBehalfOfOtherIdentity можно использовать команду следующего вида:
Set-ADComputer -Identity "FSCL02" -PrincipalsAllowedToDelegateToAccount $null
Общие выводы по типам делегирования
Итак, мы рассмотрели три типа делегирования и теперь можно оценить ситуацию в целом.
Однозначно можно сказать, что следует воздерживаться от применения на практике полного делегирования (Unconstrained Delegation), и если где-то требуется настройка делегирования, то всегда правильней использовать ограниченное делегирование (Constrained Delegation). Что-же касается ограниченного делегирования на основе ресурсов (Resource Based Constrained Delegation), то от него у меня двоякие впечатления. С одной стороны RBCD более прост и действительно может оказаться полезен, например, в междоменных отношениях. С другой стороны, потеря контроля над чувствительными операциями делегирования со стороны администраторов домена в пользу администраторов отдельно взятых ресурсов, может привести к неприятным ситуациям с точки зрения информационной безопасности. В качестве наглядного примера можно ознакомится со статьёй «Decoder’s Blog : Donkey’s guide to Resource Based Constrained Delegation Exploitation – from simple user to (almost) DA».
Есть также справедливое мнение, что, в принципе, все три типа делегирования потенциально опасны, и степень рисков может напрямую завесить о правильности выбора типа делегирования и корректности настройки делегирования: «harmj0y : Another Word on Delegation».
Если у вас возникнет желание оценить уровень «развязности» настройки делегирования в текущей доменной инфраструктуре, то получить сводную картину по учётным записям с настроенным делегированием поможет скрипт, позаимствованный из статьи «Microsoft Learn : Get rid of accounts that use Kerberos Unconstrained Delegation».
Что же касается примера с делегированием IIS->FS, которое мы сквозным образом рассматривали в ходе этой статьи, то у меня сложилось впечатление, что, в данном конкретном случае, для запуска пула IIS будет более правильно использовать контекст самой системы веб-сервера(Identity = ApplicationPoolIdentity), нежели контекст учётной записи gMSA. Так как преимущества, которые нам даёт использование gMSA, в данном конкретном случае, из-за костылей KB2602377 «помножаются на ноль», делая конечную конфигурацию более громоздкой и менее безопасной.
Дополнительные источники информации:
- Jawahar Ganesh S : Setting up Kerberos Authentication for a Website in IIS
- Microsoft Learn : Troubleshoot Kerberos failures — Internet Information Services
- Database Administrators Stack Exchange : how to stop using sql server login credentials in a linked server?
- Microsoft Learn : Making the second hop in PowerShell Remoting — PowerShell
- hackndo : Kerberos Delegation
- Patrick Keisler : Setup Kerberos Constrained Delegation for Group Managed Service Accounts
- Josh Corrick : Kerberos Constrained Delegation with Group Managed Service Accounts
- Mark Southwell : Resource Based Kerberos Constrained Delegation
- Nichlas Falk : Re-becoming the securest constrained delegation we never weren’t
- Jeff Warren : Resource-Based Constrained Delegation Abuse
- Daniel López Jiménez : You Do (Not) Understand Kerberos Delegation