
Если какой-то из дисков HDD или SSD на вашем компьютере отображается как динамический, при этом функции динамических дисков вами не используются, вы можете преобразовать его в базовый несколькими способами: как без потери данных (сложнее), так и с их потерей (легко, встроенными средствами Windows).
В этой инструкции подробно о том, как преобразовать динамический диск в базовый в Windows 11, Windows 10 и других версиях системы, а также о том, что это за тип диска.
Как сделать динамический диск базовым встроенными средствами системы
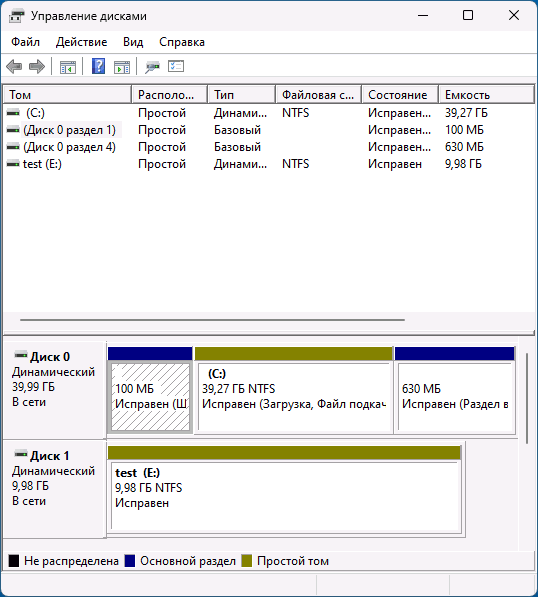
Если каких-либо важных данных ни на одном из разделов диска нет, вы можете преобразовать динамический диск в базовый в утилите «Управление дисками» или в командной строке. В первом случае шаги будут следующими:
- Нажмите правой кнопкой мыши по кнопке «Пуск» и выберите пункт «Управление дисками», либо нажмите клавиши Win+R на клавиатуре, введите diskmgmt.msc и нажмите Enter
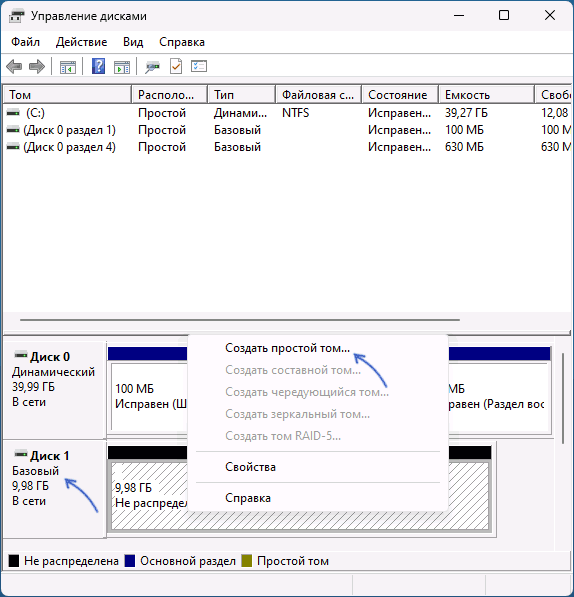
- В Управлении дисками удалите все разделы с динамического диска: для этого нажмите по соответствующему разделу правой кнопкой мыши и выберите пункт «Удалить том», повторите то же самое для всех разделов диска.

- После того, как разделов на диске не останется, он автоматически будет преобразован в «Базовый», вам останется создать новые разделы на нем, нажав правой кнопкой мыши по пространству «Не распределено» и выбрать пункт «Создать простой том».
- Если диск всё ещё динамический, но не содержит разделов, нажмите по имени диска правой кнопкой мыши: теперь опция «Преобразовать в базовый диск» должна быть активна.


Обычно, если данные с диска не требуются, этого способа достаточно, в том числе и для динамического диска, который отображается как «Чужой» или «Недопустимый» (обычно после подключения диска с другого компьютера, либо изменения конфигурации дисков).
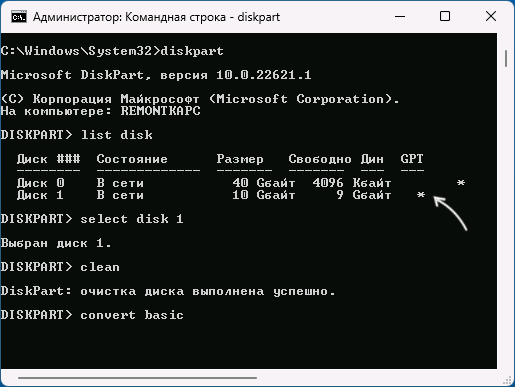
Также вы можете преобразовать диск в базовый в командной строке:
- Запустите командную строку от имени администратора.
- Введите команды
diskpart
list disk
и обратите внимание на номер диска, который нужно преобразовать (далее — N).
- Введите команды (все данные будут удалены):
select disk N
clean
- Сразу после очистки диска он должен автоматически стать базовым, но вы можете проверить, так ли это, введя команду convert basic

- Далее вы можете создать разделы на диске в «Управлении дисками» или здесь же, в diskpart, например, для создания раздела NTFS, занимающего всё свободное пространство достаточно ввести следующе команды:
create partition primary
format fs=ntfs quick
Преобразование динамического диска в базовый без потери данных
Если вам требуется сделать динамический диск базовым, при этом не потерять данные, потребуется использовать сторонние программы для работы с разделами дисков. К сожалению, в большинстве таких утилит функция преобразования диска в базовый недоступна в бесплатной версии, но варианты есть.
Внимание: все описанные способы подойдут для случаев, когда ваш динамический диск не был объединен вами с другими динамическими дисками (не используются «Составной том», «Чередующийся том» или том RAID-5)
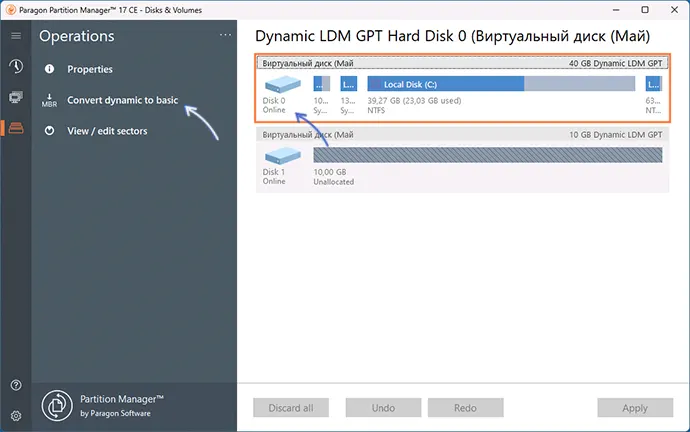
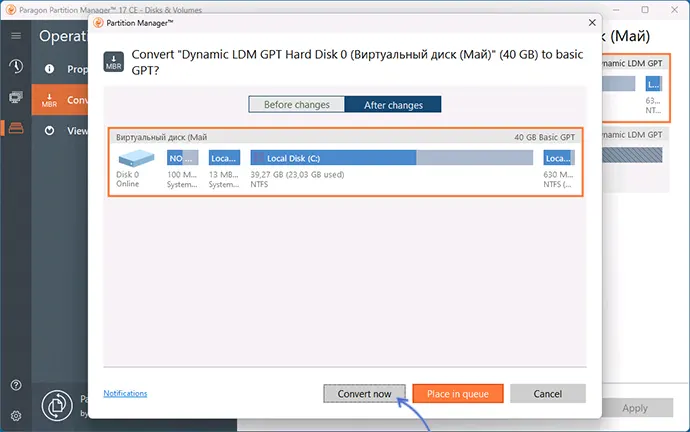
Paragon Partition Manager Community Edition
Бесплатная версия Paragon Partition Manager, доступная на официальном сайте позволяет выполнить преобразование динамического диска в базовый:
- После установки и запуска программы выберите нужный диск (весь диск, а не отдельный раздел на нём) и нажмите «Convert dynamic to basic».

- Нажмите кнопку «Convert now» для запуска конвертации в следующем окне.
- Если преобразуется системный диск, вам будет предложено перезагрузить компьютер, нажмите «Restart the computer».

- После перезагрузки начнется процесс преобразования динамического диска в базовый, после чего система загрузится как обычно, но уже с базовым диском.

Некоторые нюансы использования этой утилиты:
- Если программа запросила перезагрузку, но после неё ничего не произошло и система загрузилась в обычном режиме, попробуйте отключить Secure Boot на время преобразования дисков.
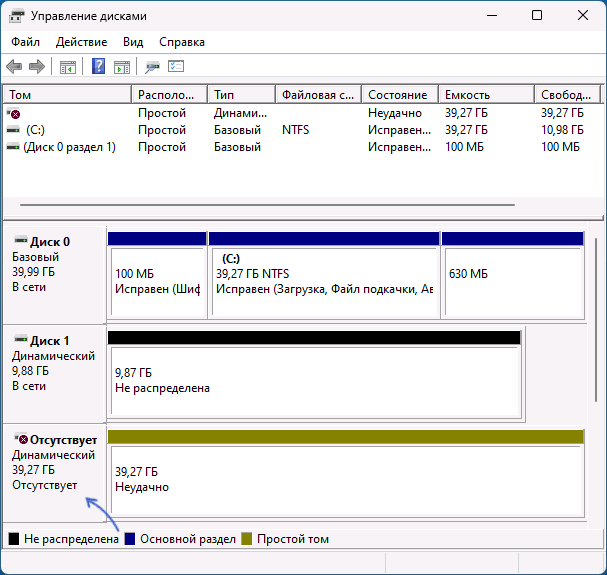
- Если после преобразования в окне «Управление дисками» вы видите, что нужный диск стал базовым, но появился еще один динамический диск, для которого указано «Отсутствует» — нажмите по тому правой кнопкой мыши и выберите «Удалить том», несуществующий диск пропадёт из списка.

Средства работы с разделами дисков в WinPE
Почти все популярные образы дисков с утилитами на базе WinPE содержат утилиты для работы с разделами дисков, который подойдут и для нашей задачи. Самый популярный из таких образов (но в ином контексте) и процесс записи на флешку описан в этой статье.
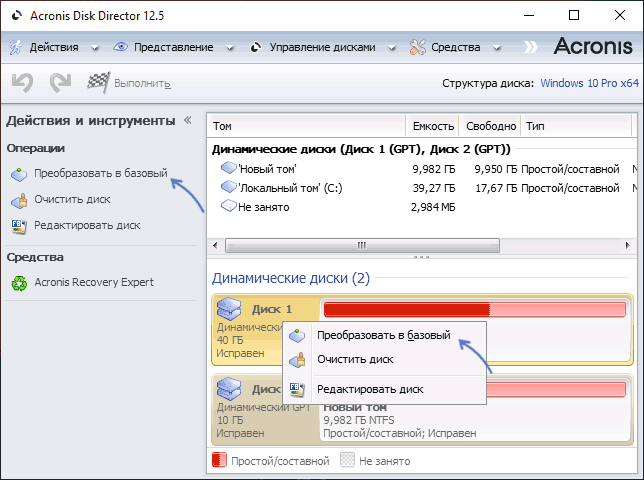
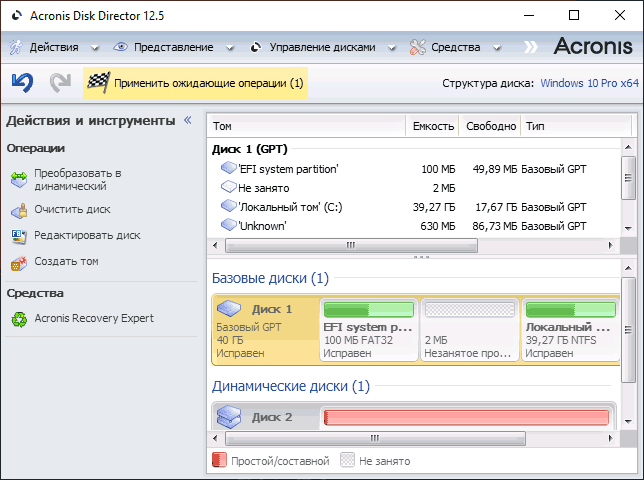
Например, для преобразования диска в базовый в Acronis Disk Director в WinPE достаточно:
- Выбрать диск (не раздел на нём), а затем опцию «Преобразовать в базовый» в панели слева или в контекстном меню диска.

- Нажать «Применить ожидающие операции» и дождаться конвертации.
Похожи действия будут в DiskGenius:
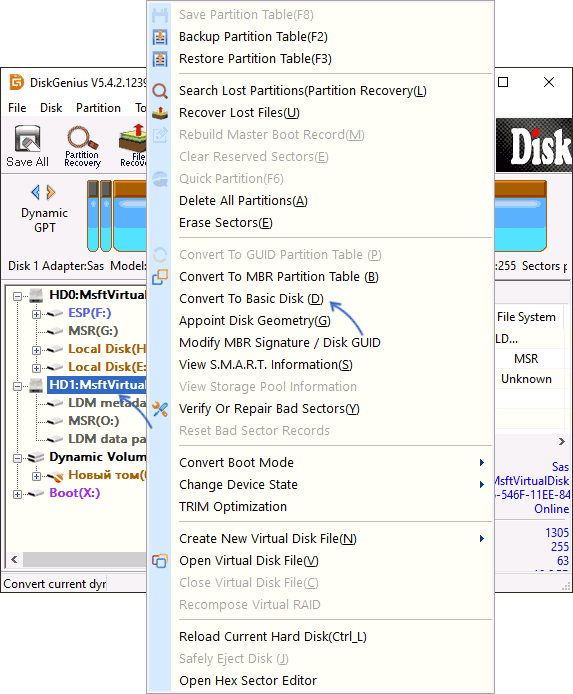
Нажмите правой кнопкой мыши по диску, который требуется преобразовать и выберите опцию «Convert To Basic Disk», подтвердите преобразование.
Диск не конвертируется в базовый
Возможные причины проблем преобразования динамического диска в базовый:
- Диск имеет размер более 2 Тб и схему разделов MBR. Решение — преобразовать его в GPT, в Windows 10 и Windows 11 — это возможно сделать встроенными средствами системы с помощью инструмента mbr2gpt.exe
- Большинство ошибок при преобразовании средствами Windows, такие как «Ошибка службы виртуальных дисков. Диск не пуст» бывают вызваны тем, что на диске остались разделы.
- Ошибка «Недопустимое имя пакета» при преобразовании диска говорит о наличии неподдерживаемых двухбайтовых символов в имени компьютера. Решение — изменить имя компьютера.
Если вы столкнулись с другими ошибками в процессе конвертации, опишите их в комментариях ниже статьи, я постараюсь подсказать решение.
Динамический диск в Windows — специальный тип диска, который позволяет использовать дополнительные функции по сравнению с базовым диском. В частности:
- Чередующиеся и составные тома (разделы, находящиеся на нескольких физических дисках).
- Зеркальные тома и программные тома RAID-5 для дублирования данных на нескольких дисках.
- Размещение до 2000 динамических томов как на GPT, так и на MBR дисках.
Это может быть удобно, но не всегда: например, работа дисков может нарушаться при изменении их конфигурации или подключении к другому компьютеру (например, определение динамического диска как «Чужой» или «Недопустимый»), в некоторых случаях возможны проблемы с доступом к данным на таких дисках извне ОС, где они были настроены.
Поэтому в большинстве случаев, кроме ситуации, когда пользователь точно значет, зачем ему требуется «Динамический диск», для домашнего использования оптимальным вариантом будет использование базовых дисков. А часть функций, доступных для динамических дисков можно использовать по-новому, подробнее: Дисковые пространства Windows 11 (подойдет и для Windows 10).
Find your dynamic disk 1 invalid in Disk Management but many important files are saved on it? How to repair invalid dynamic disk without data loss? Don’t worry. Here we will show you four possible solutions to reactivate your invalid dynamic disk without bringing any damage to the disk data.
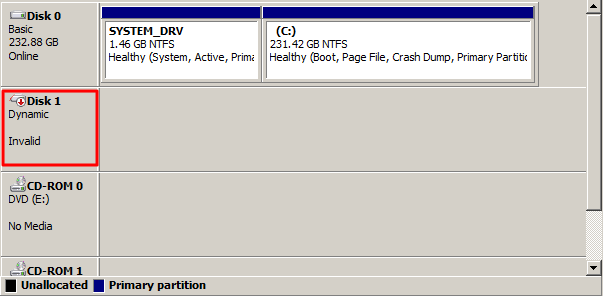
Dynamic Disk Is Invalid in Disk Management
In most cases, you may access Disk Management to check related disk information when encountering any disk error in Windows. Invalid dynamic disk issue is one of the most common issues that you can find in Disk Management, as shown below:
From this picture, you know your disk 1 is a dynamic disk but it is in “invalid” status, at this time, it is not allowed to access the data on this hard drive. Besides, you can also find diskpart disk 0 status invalid issue if you open diskpart.
Why dynamic disk shows invalid in Disk Management? Generally speaking, there are two main factors.
OS Doesn’t Support Dynamic Disk
All Microsoft Home Editions of operating systems don’t support dynamic disks, including Windows Vista Home Basic Edition, Vista Home Premium Edition, Windows 7 Home Basic Edition, Windows 7 Home Premium Edition and the systems before Windows 2000, such as Windows 98, NT and MS-DOS.
For example, you have converted your hard drive to a dynamic disk with Windows 7 Professional Version. Recently you buy a new computer with Windows 8 Home Version, and you want to continue using the dynamic disk on the new computer, however, you find this disk is in an invalid state when entering into Windows 8 Disk Management.
Dynamic Disk Information Isn’t Recorded
It is possible that a part of dynamic disk information is stored in the registry. When adding a dynamic disk to another computer, the system registry doesn’t make a record for dynamic disk information. So it is necessary to import dynamic disk information to the system registry first of all to another computer.
In addition, corrupted partition table, bad sector, etc. can cause the dynamic disk to be invalid. Well then, what should you do if the dynamic disk shows invalid in Disk Management? Get the answers from the following paragraphs.
Recover Data from Your Invalid Dynamic Disk
When the dynamic disk invalid problem happens on Windows 10/8/7, it is most likely that you are worried about the disk data. You may ask: are my files lost and cannot be got back? Actually, they are still on the dynamic disk and can be recovered by using a piece of third-party software.
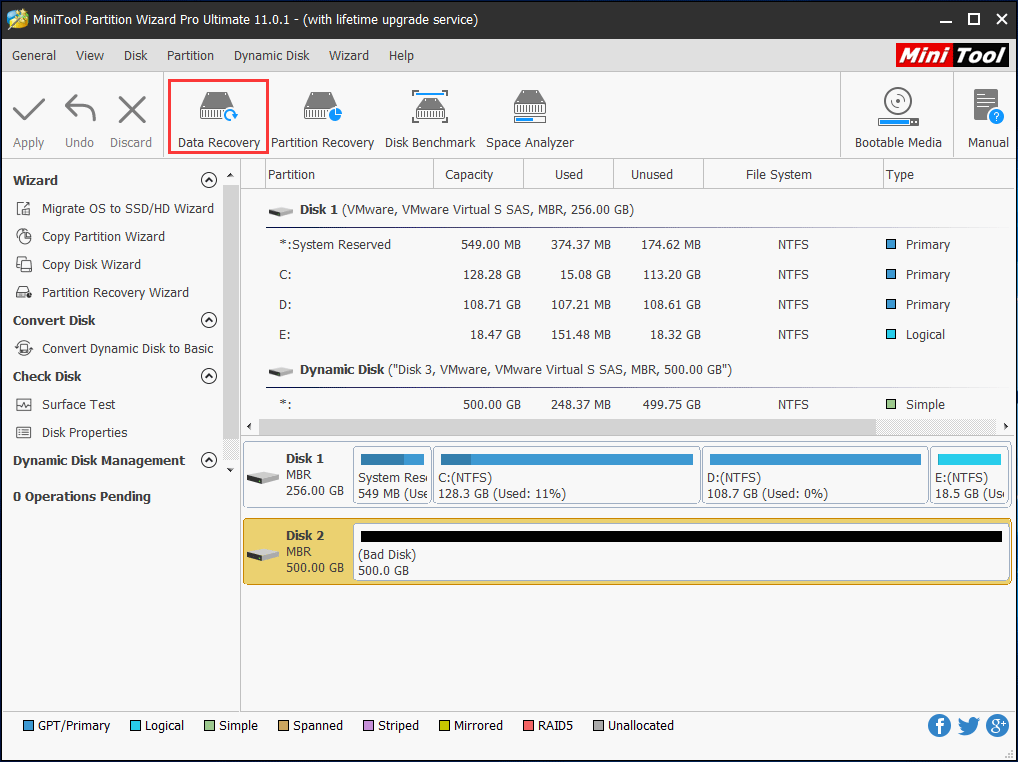
How to recover data if there are some important files on this dynamic disk? MiniTool Partition Wizard is worth recommending. It has a powerful feature called Data Recovery, enabling you to recover data from invalid disk easily.
This partition magic is designed to own six editions, including Free, Professional, Pro Ultimate, Server, Enterprise, and Technician. And each edition is different from others. Click to know the comparison.
To recover files from the hard drive that has dynamic disk invalid problem, you need to get MiniTool Partition Wizard Pro Ultimate Edition or an advanced edition. And then, start the data recovery.
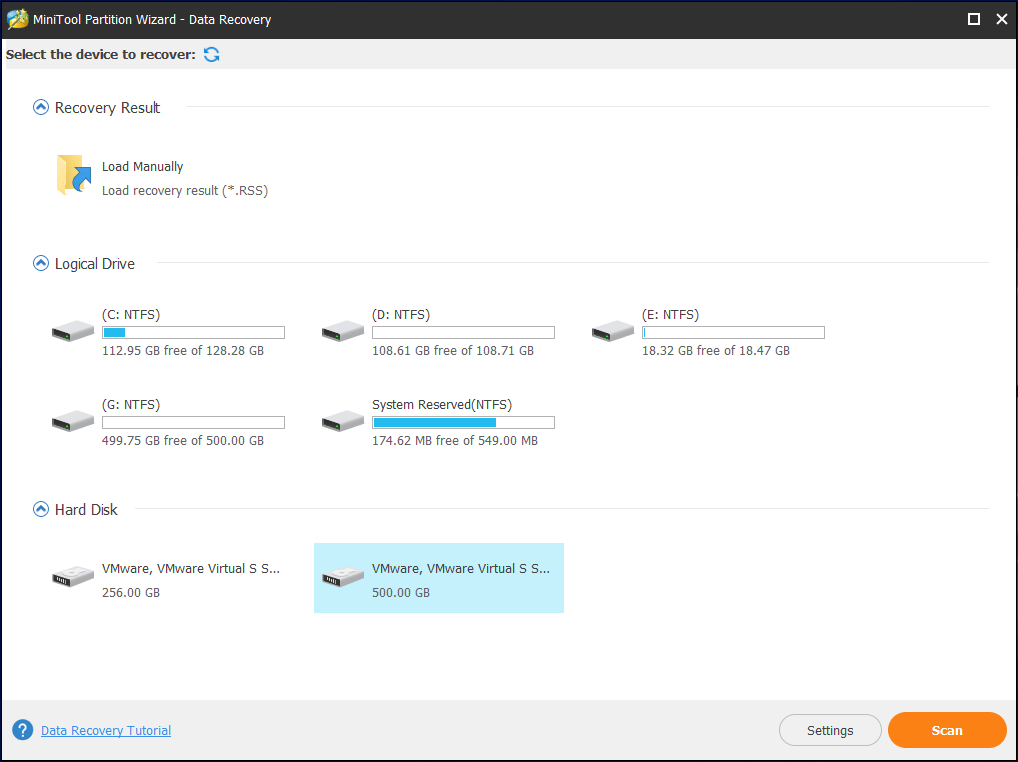
Step 1: Launch MiniTool Partition Wizard Pro Ultimate to its main interface. Then, click the invalid dynamic disk and select Data Recovery feature in the toolbar.
Step 2: After the feature is enabled, you need to choose the target disk to scan.
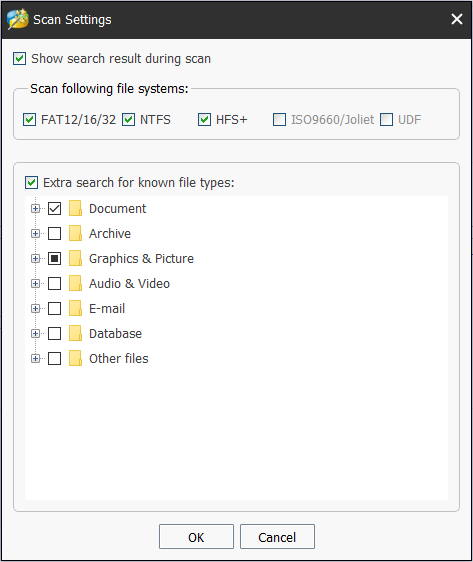
Tip: The Settings option allows you to make advanced settings so as to show the specified search result during the scan process.
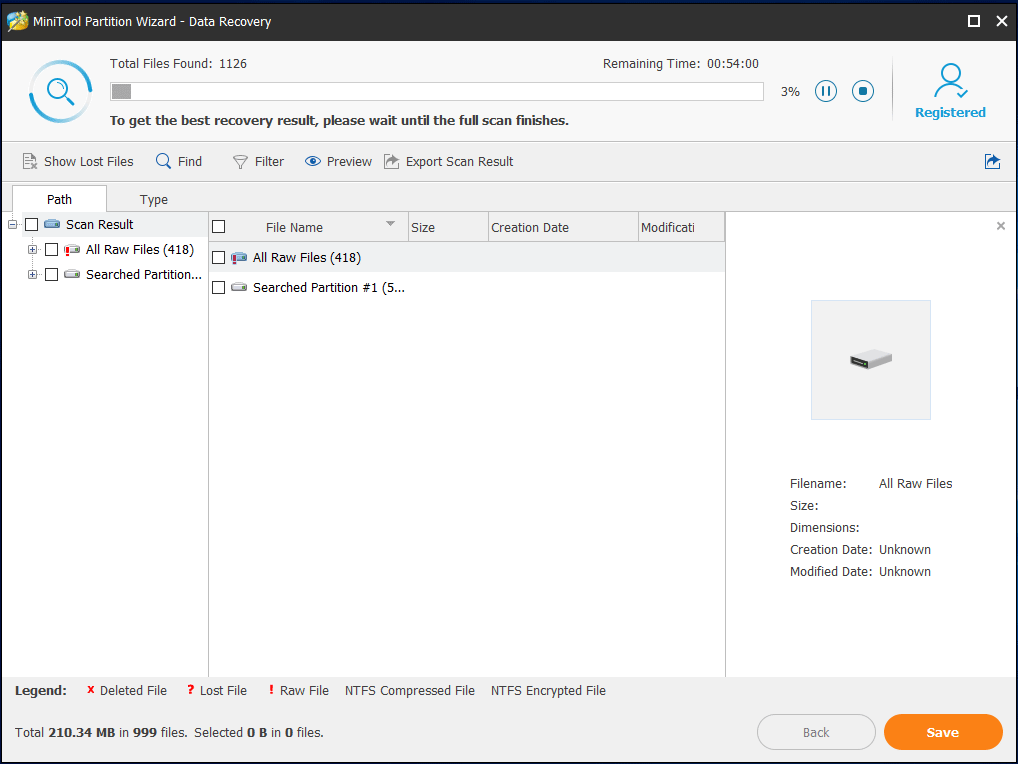
Step 3: Then, MiniTool Partition Wizard will start to scan the invalid dynamic disk. To get the best recovery result, you had better wait patiently until the full scan finishes.
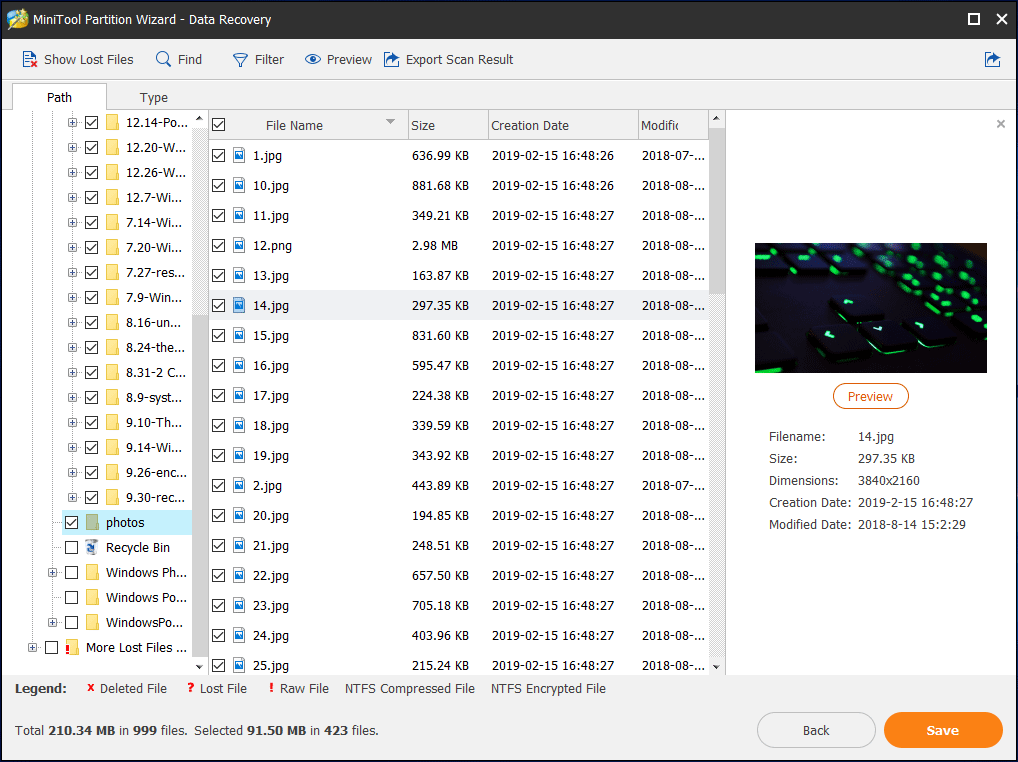
Step 4: After a few minutes, the scan completes. Just go to find the files that you need, check these items, and then click the Save button to save them to another hard drive.
After completing the data recovery, you can take measures to fix the disk invalid problem. How to repair invalid dynamic disk without data loss? Try the following solutions.
Disk 1 Dynamic Invalid Fix
Solution 1: Dynamic Disk Invalid Reactivate CMD
Firstly, you may choose to reactivate dynamic disk via command prompt. Just type cmd in the search box, right-click on the tool to run it as administrators. Then, type the following command lines.
- diskpart
- list disk
- select disk n: n means the disk number of invalid dynamic disk.
- online disk
Sometimes, you can easily reactivate dynamic disk via command prompt. However, in most cases, dynamic disk invalid reactivate way is not useful. Or, you may consider doing that via Disk Management. Whereas when you right-click Reactivate Disk feature, you will receive such an error “This operation is not allowed on the invalid disk pack“.
If you fail to repair invalid dynamic disk without data loss free by this way, try the next solution – to convert to basic disk from dynamic disk.
Solution 2: Convert Invalid Dynamic Disk to Basic
Use MiniTool Partition Wizard
In order to make sure that data on the target dynamic disk is safe, the method of converting to basic disk is very important. Is there any simple way? Of course, you can try a professional partition and disk management software to do this work without data loss.
Here, MiniTool Partition Wizard is also a good recommendation to manage your partition and disk well, including basic disk and dynamic disk. For converting to basic disk without losing data from dynamic disk, this dynamic disk partition manager is quite useful.
Warning:
1. If dynamic disk invalid issue is caused by changing the operating system, MiniTool Partition Wizard can successfully convert the invalid disk to basic disk. Otherwise, this partition manager doesn’t work.
2. MiniTool Partition Wizard Free Edition doesn’t support dynamic disk management, so if you want to convert invalid dynamic disk to basic, it is suggested to use its Professional Edition or a more advanced edition.
How to repair invalid dynamic disk without data loss using this dynamic disk converter? Step-by-step guidance is as follows:
Step 1: Please launch MiniTool Partition Wizard Professional Edition and then in the main interface, you can see all disks listed. Please select the target dynamic disk which shows bad disk here. Then click Convert Dynamic Disk to Basic from Convert Disk menu in the left pane.
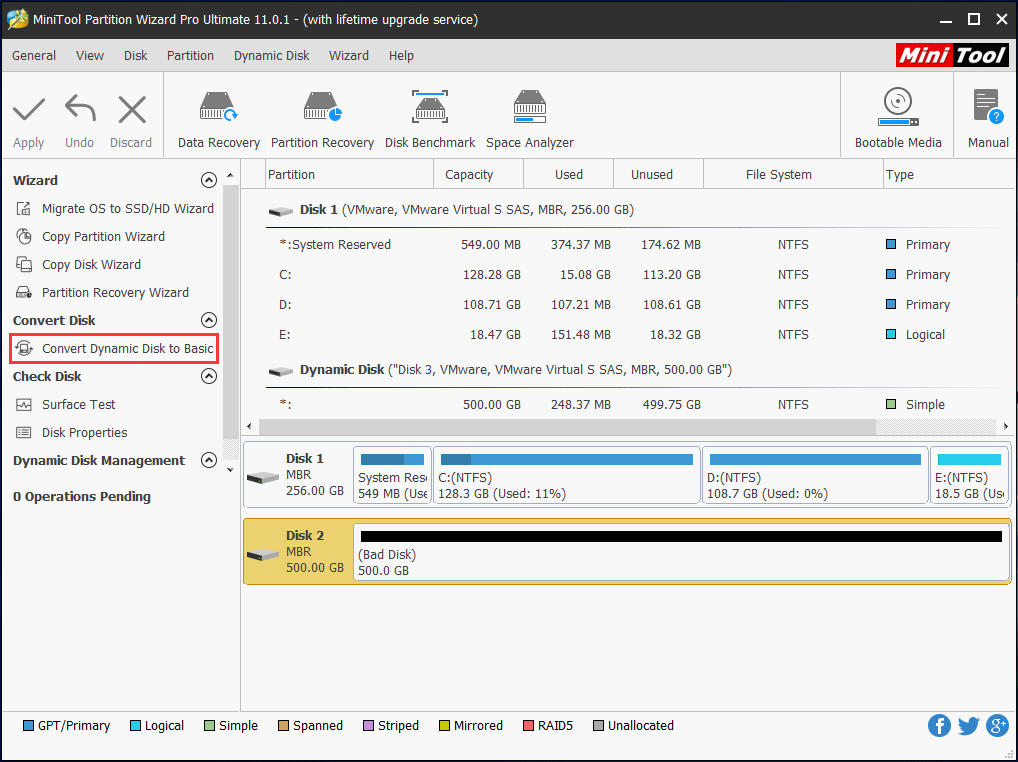
Step 2: Then you can preview the dynamic disk will become a basic disk. Then click Apply to make this operation effective to repair invalid dynamic disk without data loss.
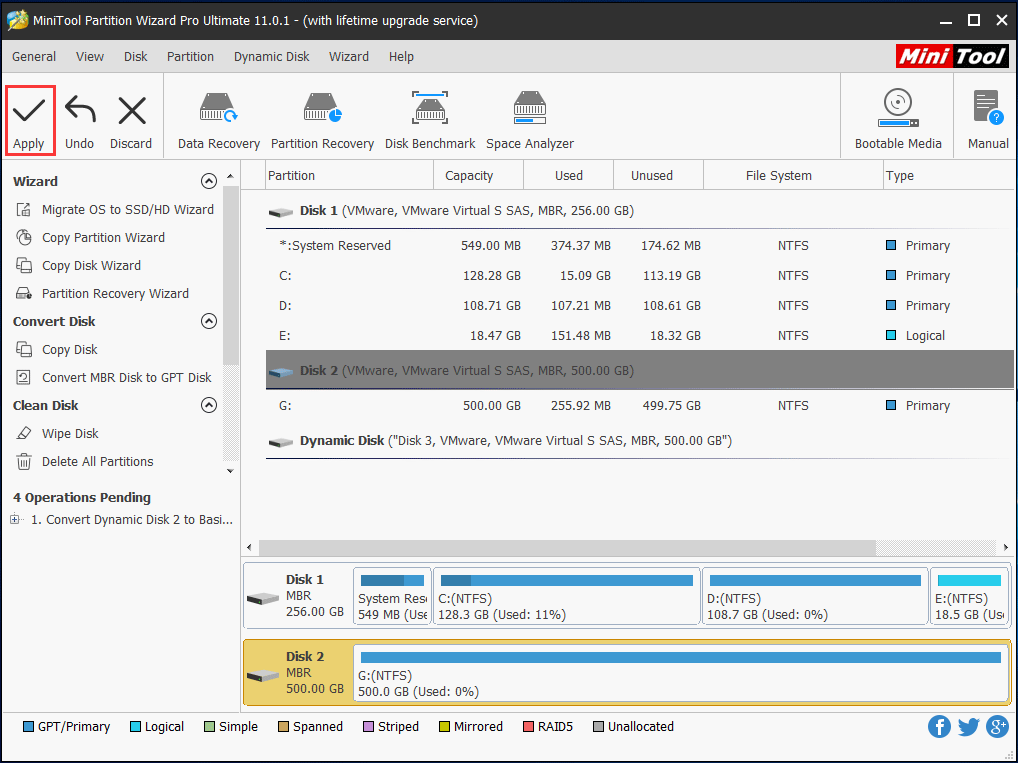
Then, MiniTool Partition Wizard will inform you to close all other applications before you apply the pending changes. Click Yes to begin the conversion process.
Run Disk Management
When it comes to the conversion between the dynamic disk and basic disk, some of you probably say: “Can I use Disk Management to do this work? Whether data is safe or not? Any suggestion?” Please look at the guide below to find the answers.
Step 1: First of all, please run Disk Management by pressing Win + R keys to input compmgmt.msc and then clicking OK to run this disk management tool.
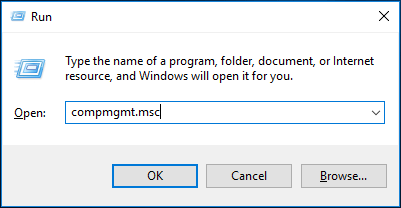
Step 2: Then right-click the dynamic disk which is invalid, two options including Reactivate disk and Convert to Basic Disk can be used. Please select the second feature to do the conversion.
We believe you may agree with me:
Converting dynamic disk to basic disk causes data loss with Disk Management.
If you have recovered data, you can try this tool. Or if there are no important files on your dynamic disk, you can run Windows Disk Management to do the conversion.
On the contrary, it is not recommended to use this free tool which will lead to data loss if many files are saved on the invalid dynamic hard disk before recovering data. Just use MiniTool Partition Wizard to convert to basic disk without losing data.
Sometimes, you may fail to convert the specified dynamic disk to a normal state from invalid. Just try the next ways.
Solution 3: Import Dynamic Disk Information to another Computer
When mentioning importing dynamic disk information to another PC, many of you don’t know how to do this work. This article How to safely import a dynamic disk can help you. However, it is not simple for this work. In addition, during the process of information importing, the invalid dynamic disk issue often occurs because it is possible that the operating system is not compatible.
Solution 4: Upgrade to Windows Professional Version
There is no doubt that dynamic disk can not be used in all Windows Home Versions, just like the first reason explains. Therefore, you can upgrade your Windows operating system to Professional Version or a more advanced version from Home Version, and then you are allowed to use the dynamic disk for data storage.
In addition, perhaps you will consider reinstalling OS and then connect the dynamic disk to the new system, nevertheless, this way is time-consuming and you need to reinstall applications or programs.
“Here are 4 ways can be used to repair dynamic disk invalid. Just choose a proper one according to your needs. And you can share them with your friends on Twitter.”Click to Tweet
Tips of Dynamic Disk Invalid
An Analysis to Basic Disk and Dynamic Disk
You may be curious why the dynamic disk is easy to be invalid. Most of you know basic disk and dynamic disk are two different disk types in Windows. In fact, the disk management mode of the dynamic disk is not the same as the basic disk.
As you know, basic disk refers to a disk that contains partitions for data storage. Windows, Linux and Mac operating systems all support basic disk, moreover, some SD cards also support the management mode of the basic disk.
However, dynamic disk provides features that the basic disk doesn’t have. For instance, the ability to create different volumes, including simple volume, spanned volume, striped volume, mirrored volume, and RAID 5 volume.
Besides, mirrored volume and RAID 5 volume own an outstanding feature, that is the fault tolerance. Nevertheless, the compatibility of the dynamic disk is not good compared to a basic disk. Consequently, the possibility that dynamic disk encounters such an invalid issue is very high.
What You Learned
When experiencing “dynamic disk is in invalid status” issue, what can you learn? Pay attention to the three points now:
- Please don’t use dynamic disks for data storage in Windows Home Version.
- It is a good solution to convert your dynamic disk to basic disk. Before you do, recovering data from the target disk is a good choice.
- In addition, after fixing this issue, in order to protect data, we suggest you should make a backupof the disk data. To do this, you can use the professional Windows backup software, MiniTool ShadowMaker. This post – How to Back up Files on Windows 10? Try These Top 4 Ways shows you more information.
Bottom Line
Here comes to the end of this article. Right now you must have had a deep understanding of what is dynamic disk invalid issue, why does this issue occur and how to repair invalid dynamic disk without data loss, especially MiniTool Partition Wizard helps you a lot. Hope it can help you when meeting such a problem.
If you have any suggestion to disk 1 dynamic invalid fix or any question regarding MiniTool Partition Wizard, welcome to leave a comment below or email us via [email protected]. Thanks in advance.
Updated on Apr 28, 2025
| Workable Solutions | Step-by-step Troubleshooting |
|---|---|
| Method 1. Reconnect the Dynamic Invalid Disk | Step 1: Shut down the computer; Step 2: Remove the dynamic disk from your computer…Full steps |
| Method 2. Convert a Dynamic Disk (Invalid) to a Basic Disk — Partition Manager | Step 1: Install and open EaseUS Partition Master on your Windows computer; Step 2: RemoveSelect the disk that you want…Full steps |
| Method 3. Upgrade Windows OS | The other straightforward way to resolve the disk with the dynamic invalid error is to upgrade your computer OS…Full steps |
| Method 4. Reactivate Disk using Diskpart CMD | Step 1: Right-click the Windows icon, type cmd in the Search box; Step 2: Right-click Command Prompt…Full steps |
Are you looking for a way to repair or recover invalid dynamic disk on Windows 10/8/7? This page explains the causes of why dynamic disk shows invalid in Disk Management and offers practical ways to guide you to fix this error and repair your dynamic disk back to work normally again.
What Is an Invalid Dynamic Disk
Does disk management show invalid dynamic disk error someday when you finished installing a new Windows OS on an HDD or SSD? It’s weird. Now you may wonder which step went wrong.
So what is an invalid dynamic disk? In a word, your disk 1, disk 2, or disk 0 is a dynamic disk and suddenly it shows as Dynamic invalid in Disk Management on Windows 10, 8, or Windows 7 computer. You should know that an invalid dynamic is inaccessible but don’t worry about the data. When a disk becomes invalid, Windows may not be able to access the disk but the saved data is safe. After fixing the error, you can re-access and make use of the saved data on the disk again.
To fully convert or make the invalid dynamic disk work gain, you should first learn the causes and then pick up the right solution to get rid of this error from your disk. Follow the next two parts to learn how to make your dynamic invalid disk work again.
What Causes Dynamic Disk Invalid
There are multiple reasons that may cause this error on a dynamic disk. Here we gathered top * causes that may turn your dynamic disk into the invalid state:
#1. Connection Issue
- Improperly connecting the dynamic disk to a computer.
- Problematic disk cable causes connection problems between disk and computer, such as bad SATA cable.
- Switching dynamic disk to a new computer but not it is not correctly connected.
#2. OS Is Not Compatible to Dynamic Disk
- The current running Windows OS doesn’t support dynamic disks, such as Windows 7 Home/Windows 7 Home Basic Edition, Windows Vista, etc.
- On dual-boot OS, one Windows OS recognizes the dynamic disk, while the other OS doesn’t. The dynamic disk shows invalid while running on the other OS.
Windows incompatibility issue is one of the typical reasons that causes invalid dynamic disk error. So how to get rid of this issue, making the invalid dynamic disk work again? In the next part, practical fixes and solutions will be available to help you out. If you like those tutorial, click the buttons to share it with other people in need.
As a matter of fact, Windows operating systems, especially all Home Editions of Windows 10, 8, 7 XP, or Vista, are not supported to install on a dynamic disk. To correct invalid dynamic disk error, you can reconnect the disk, upgrade Windows OS, or convert dynamic disk to a basic disk. Pick up one method and follow the tutorial steps below to see how to remove this error from your disk without losing any data now.
Method 1. Reconnect the Dynamic Invalid Disk
Works to: Resolve dynamic invalid disk error caused by improper disk connection.
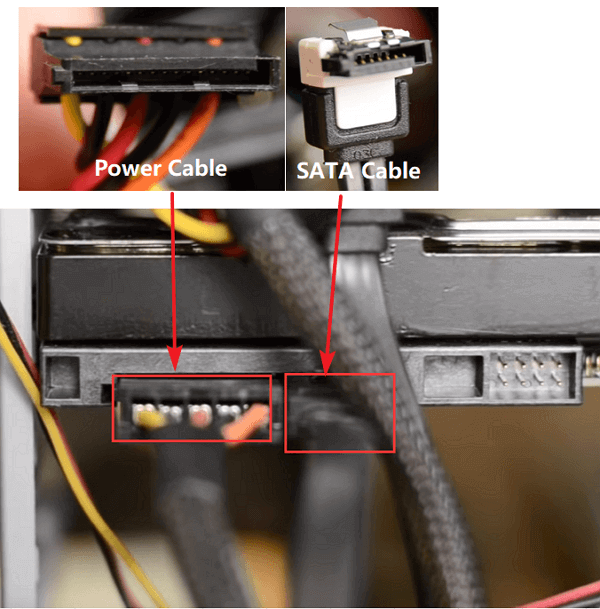
Step 1. Shut down the computer.
Step 2. Remove the dynamic disk from your computer and unplug the SATA cable and power cable.
Step 3. Reconnect the dynamic disk to your computer correctly with the SATA cable and power cable.
Step 4. Reboot PC to check if the dynamic disk still displays as invalid in Disk Management.
If yes, switch a new SATA cable and Power cable, and repeat the above steps again to reconnect the disk to your computer. If the problem gets resolved, congratulation.
After trying all these steps but the invalid error still exists on your computer, you can move on and try the following methods for help.
Method 2. Convert a Dynamic Disk (Invalid) to a Basic Disk
Works to: Fix Windows OS incompatible issue that causes dynamic disk invalid.
If your Windows OS doesn’t support the Dynamic disk, a direct solution to resolve this error is to convert a dynamic disk to a basic disk, making the disk compatible with the current OS.
Some of you may want to know whether it will cause data loss while converting the invalid dynamic disk to the basic disk, right? With a reliable third-party Windows partition manager like EaseUS Partition Master, the answer is NO.
EaseUS Partition Master provides a secure disk conversion option for all Windows users. It enables you to switch a basic disk to dynamic or convert a dynamic disk to a basic disk without losing any data. In only 3 steps, you can easily convert the disk to basic, getting rid of the invalid dynamic disk issue from your computer:
Step 1. Install and open EaseUS Partition Master and go to Disk Converter.
Step 2. Select the disk conversion mode that suits your need:
- Convert Basic to Dynamic: change a Basic disk to Dynamic.
- Convert Dynamic to Basic: change a Dynamic disk to Basic.
Step 3. Select the target disk — Basic or Dynamic, confirm you’ve select the correct disk and click «Convert» to start.
Convert Basic to Dynamic Disk
Convert Dynamic to Basic Disk
Method 3. Upgrade Windows OS
Works to: Fix OS incompatible issue that makes dynamic disk incompatible.
The other straightforward way to resolve the disk with the dynamic invalid error is to upgrade your computer OS or reinstall the Windows OS to a compatible version.
If you are using old Windows 7 or Windows Vista on your computer, we would like to recommend you to upgrade your computer to the latest Windows 10. If you have no access to upgrade Windows OS to Windows 10, refer to this page for help: How to Clean Install Windows 10.
Method 4. Reactivate Disk using Diskpart CMD
Works to: Resolve invalid dynamic disk by reactivating the disk; pre-condition: Windows OS is compatible with the dynamic disk.
If your Windows computer supports dynamic disk and you don’t want to convert the disk to a basic version, you can apply Diskpart CMD with reactivating disk command to resolve this error.
Here are the steps:
Step 1. Right-click the Windows icon, type cmd in the Search box.
Step 2. Right-click Command Prompt and select «Open as Administrator» to continue.
Step 3. Type the following command line and hit enter each time:
- diskpart
- list disk
- select disk X (replace X with the disk number of your dynamic disk)
- online disk
Step 4. After this, you can type exit to close the Diskpart window.
By then, re-open Disk Management to check if the dynamic disk is displaying correctly. If the invalid error still lingers, open Disk Management and right-click the target dynamic disk, and select «Reactivate Disk».
Bonus Tips: Recover Dynamic Disk Data, Re-create Disk Partition
Note that if none of the above methods works to resolve the dynamic invalid disk issue, you have the last shot which is to restore saved dynamic disk data and recreate partitions on the disk, and resave data back to the disk. Here is the process:
#1. Recover Data from Invalid Dynamic Disk
If you have saved many important data on the disk, using reliable data recovery software like EaseUS Data Recovery Wizard to scan your device and find all data.
EaseUS Data Recovery Wizard enables you to efficiently scan and restore all data from your disk in only 3 steps:
Step 1. Select the drive where you lose your data and click «Search for Lost Data».
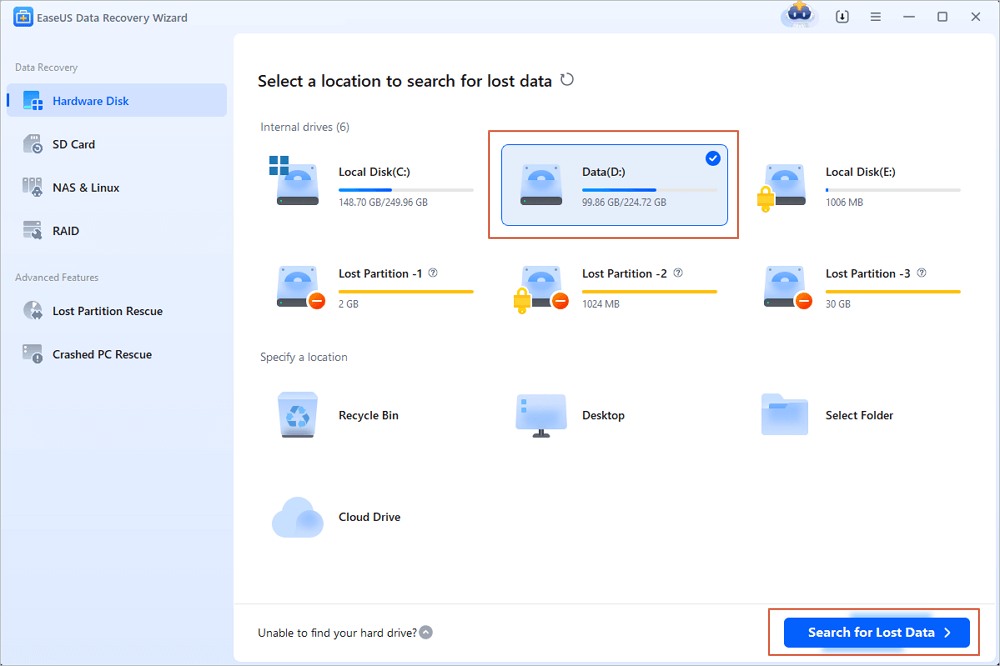
Step 2. Use «Filter» or «Search» to find the lost files when the scan completes.
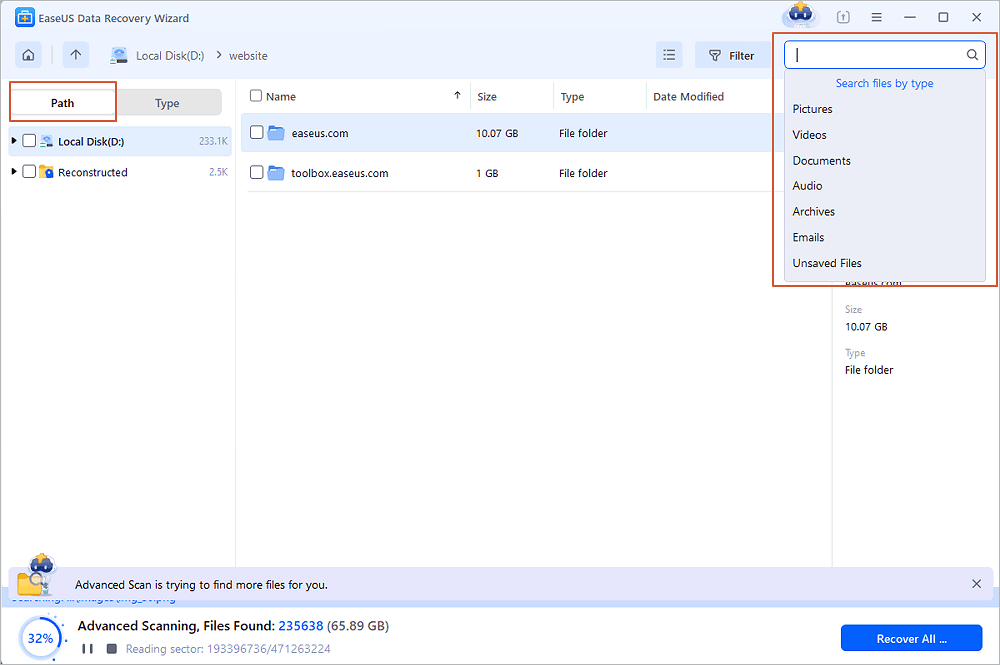
Step 3. Select all the files you want and click «Recover». Then, browse another secure location to save them.
💡Tip: You can restore data on the local disks, external hard drives, and also the cloud storage.

After restoring the data, remember to save the data to an external hard drive, which will be more secure.
#2. Delete all existing partition on dynamic disk
Step 1. Open Disk Management and right-click on the dynamic disk partition, select delete volume.
Step 2. Repeat the process to delete all existing partitions on the disk.
If disk management doesn’t work to delete the volumes on the invalid disk, you can try EaseUS Partition Master with its delete all partitions feature for help.
#3. Recreate volume on the disk
After deleting all partitions on the dynamic disk, you can then use Disk Management to recreate new volumes on the disk.
Step 1. Open Disk Management, right-click on the unallocated space of your target disk, and select «New Simple Volume».
Step 2. Set a new drive letter for the partition, set NTFS as its file system, reallocate partition size, etc., to the partition.
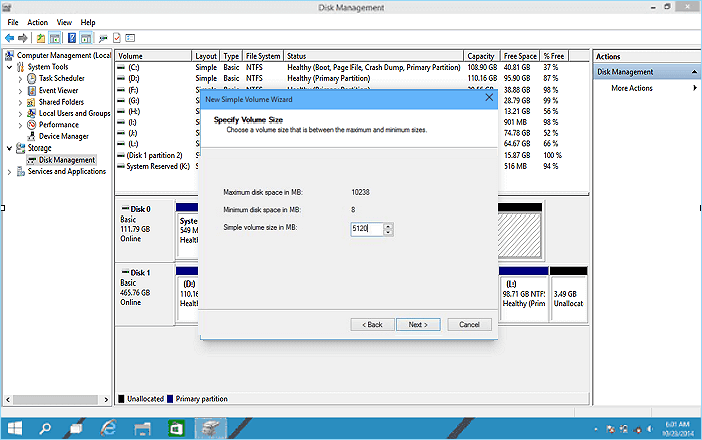
Step 3. Follow the on-screen guidelines and finish the process.
If you want to create more than one partition on the target disk, repeat the process to create more partitions.
Когда вы обнаружите, что ваш жесткий диск отображается как динамический и находится в «недействительном» состоянии в окне «Управление дисками Windows», вы также не сможете получить доступ к данным на диске. В этом случае вы можете использовать 5 эффективных решений, чтобы избавиться от этой проблемы.
Как правило, когда вы сталкиваетесь с какими-либо ошибками диска в Windows, вы можете получить доступ к управлению дисками, чтобы проверить соответствующую информацию о диске. Проблема с недопустимым динамическим диском — одна из самыхost общие проблемы, которые вы можете увидеть в окне «Управление дисками».

В наше время мost компьютеры настроены на базовый диск, который управляет разделом с таблицей разделов. Такой диск совместим с различными системами и платформами. Однако динамический диск используется узко и имеет гораздо более низкую совместимость. Таким образом, как правило, возникают всевозможные проблемы, в том числе то, что динамический диск становится недействительным. Ориентируясь на эту проблему, здесь мы предложим вам 5 соответствующих решений.
1. Обновите версию Windows на вашем ПК
Если ваша операционная система Windows не поддерживает динамический диск, он, безусловно, станет недействительным. Например, динамический диск нельзя использовать во всех домашних версиях Windows. Поэтому вам необходимо обновить текущую операционную систему Windows до более продвинутой версии, например Профессиональной версии. Тогда вы сможете использовать динамический диск.
2. Преобразование диска в базовый в разделе «Управление дисками» после восстановления данных
Как упоминалось выше, базовый диск поддерживается во многих системах. Следовательно, мost эффективным способом является преобразование диска в базовый. Однако таким образом вы потеряете данные диска. Таким образом, вы должны сначала выполнить восстановление данных, например восстановление PST. А затем преобразовать динамический диск в базовый. Это можно сделать в «Управлении дисками».
- Сначала найдите «compmgmt.msc» в «Starменю».
- Затем нажмите «Ввод», чтобы получить доступ к управлению дисками.
- Затем найдите и щелкните правой кнопкой мыши недопустимый динамический диск.
- После этого в контекстном меню выберите «Преобразовать в базовый диск».
3. Повторно активируйте недействительный диск с помощью команд
Кроме того, вы можете попытаться повторно активировать недействительный диск с помощью команд Diskpart. Выполните следующие действия:
- Введите «cmd» в строке поиска «Starменю».
- Затем запустите «cmd» от имени администратора.
- Затем во всплывающем окне командной строки введите «diskpart» и нажмите «Enter».
- После этого введите «список дисков» и нажмите кнопку «Ввод».
- Позже уточните номер недопустимого диска.
- Затем введите «выбрать диск » и нажмите «Ввод».
- Наконец, введите «онлайн» и снова нажмите «Ввод».
4. Импорт информации о динамическом диске на другой компьютер
Кроме того, вполне вероятно, что некоторая информация о динамическом диске не записана в системном реестре Windows. Таким образом, Windows не может нормально идентифицировать и получить доступ к диску. В этом случае вы можете импортировать информацию о динамическом диске на другой компьютер. Но эта работа немного сложна, поэтому лучше обратиться к профессионалам.
5. Восстановите недействительный динамический диск с помощью сторонних инструментов.
Кроме того, вы можете прибегнуть к стороннему инструменту. В настоящее время данные повсюду. Соответственно, индустрия восстановления данных постоянно развивается. Таким образом, на современном рынке должно быть много программного обеспечения для ремонта дисков и восстановления данных. Вы можете просто выбрать авторитетного и опытного, чтобы попробовать.
Об авторе:
Ширли Чжан — эксперт по восстановлению данных в DataNumen, Inc., которая является мировым лидером в области технологий восстановления данных, включая sql-повреждение и программные продукты для ремонта Outlook. Для получения дополнительной информации посетите www.datanumen.com
Fixing Disk Error in Windows 10 can seem like a daunting task, but it’s simpler than it appears. The process involves checking for disk errors and using built-in Windows tools to repair any issues. Start by using the Error Checking tool to scan the disk, followed by using the Command Prompt to execute a more in-depth check with the Check Disk utility. These steps will help you identify and fix errors, ensuring your system runs smoothly.
Fixing Disk Error in Windows 10
Fixing disk errors in Windows 10 is essential for maintaining your computer’s health and performance. By following these steps, you’ll be well on your way to resolving any pesky disk issues.
Step 1: Open File Explorer
First, open File Explorer by clicking on the folder icon in your taskbar or pressing the Windows key + E.
Once in File Explorer, you’ll have access to all drives on your computer. This is where you’ll begin the process of checking for disk errors.
Step 2: Right-click on the Drive
Right-click on the drive you want to check, usually the C: drive, and select “Properties.”
The Properties menu provides several tabs with options for managing your disk. Here, you’ll find tools specifically designed to check for errors.
Step 3: Navigate to the Tools Tab
In the Properties window, click on the “Tools” tab, where you’ll see the option to perform an error check.
The Tools tab is a treasure trove of utilities. The error-checking section is where you’ll start your initial scan for issues.
Step 4: Click on “Check” under Error Checking
Click on the “Check” button in the Error Checking section to start the disk check.
This will initiate a basic scan to identify any surface-level issues. It may prompt you to scan the drive immediately or schedule a scan for the next restart.
Step 5: Run Check Disk from Command Prompt
If issues persist, open Command Prompt as an administrator and type “chkdsk C: /f /r” to perform a thorough check and repair.
This command digs deeper, scanning for bad sectors and attempting repairs. It may take some time, so be patient.
After completing these steps, your computer will either fix the detected errors or provide you with a report. If errors were fixed, your system should run more smoothly. If issues persist, you might need to look into advanced repairs or seek professional help.
Tips for Fixing Disk Error in Windows 10
- Regularly back up important data to protect against potential data loss during disk repairs.
- Run disk checks as part of your routine system maintenance to catch issues early.
- Use tools like Disk Cleanup to remove unnecessary files that may contribute to disk errors.
- Keep your Windows 10 updated, as updates often include fixes for known issues.
- Consider investing in a reliable third-party disk management tool for additional features and options.
Frequently Asked Questions
What causes disk errors in Windows 10?
Disk errors can be caused by hardware failures, corrupted files, or improper shutdowns, among other reasons.
Can disk errors lead to data loss?
Yes, disk errors can lead to data corruption, which may result in the loss of important files.
Is it safe to use third-party disk repair tools?
While third-party tools can offer additional features, it’s important to use reputable software to avoid further issues.
How long does a Check Disk scan take?
The duration of a Check Disk scan depends on the size of the drive and the number of errors found. It can range from a few minutes to several hours.
What should I do if disk errors persist after following these steps?
If disk errors persist, consider seeking professional assistance or replacing the hard drive if it’s a hardware issue.
Summary
- Open File Explorer.
- Right-click on the Drive.
- Navigate to the Tools Tab.
- Click on “Check” under Error Checking.
- Run Check Disk from Command Prompt.
Conclusion
In conclusion, fixing disk errors in Windows 10 is a crucial part of maintaining your computer’s performance and longevity. While it might seem technical at first, the built-in tools in Windows 10 simplify the process. Routine checks and maintenance can prevent these issues from escalating into more significant problems.
Remember, your computer’s health is much like your own. Just as regular check-ups with a doctor can catch potential health issues early, regular disk checks can prevent data loss and system failures. Be proactive. Implementing these steps into your regular computer maintenance routine can save you time, frustration, and even money in the long run.
For those interested in diving deeper, numerous resources are available online that offer more advanced solutions and insights into disk management. Whether you’re a tech enthusiast or a casual user, understanding how to fix disk errors in Windows 10 empowers you to keep your system running smoothly. So, go ahead and give it a try. Your computer will thank you!
Matt Jacobs has been working as an IT consultant for small businesses since receiving his Master’s degree in 2003. While he still does some consulting work, his primary focus now is on creating technology support content for SupportYourTech.com.
His work can be found on many websites and focuses on topics such as Microsoft Office, Apple devices, Android devices, Photoshop, and more.