
When i run cmd reagentc /info i recieve this message.
REAGENTC.EXE: The target Windows installation was not found.


Expected answer from the command:
state of winRE: disabled or enabled.
If target system does not set via /target the command should use current running system.

I`ve found this issue trying to create partition with Windows RE.
https://www.tenforums.com/general-support/172567-how-recreate-windows-recovery-partition-3.html
It was checked by two clear installations of tyni11 2311 on two different machines.
Issues is not critical.
As workaround i use distribution disk of Tiny11 with WinRE and enable F8 boot legacy menu.
bcdedit /set {current} bootmenupolicy Legacy
https://www.tenforums.com/tutorials/22455-enable-disable-f8-advanced-boot-options-windows-10-a.html
Thank you for Tiny! It is clear perfect!
In this post, I’m going to show you how to fix windows re image was not found in windows 11/10.
There could be multiple causes of this issue and there is not a one click fix for windows errors so you have to try and test every method.
This post will automatically fix the following problems:
-reagentc.exe the windows re image was not found
-reagentc /enable not working
-could not find the recovery environment
These three are the main reasons why you are getting this issue. So, I’ll help you to fix it in a simple manner.
Let’ see it.
Table of Contents
- Frustrating Story
- Quick fixes for Reagentc.exe Windows re image was not found.
- How to fix windows re image was not found?
- Method 1: Enable WinRE
- Method 2: Fix reagentc /enable not working
- Method 3: Install Windows directly
- 4. Fix Winre.wim corrupted or missing
- 5. Create a recovery drive and use it to reset
- 6. System Restore
- 7. Bootable Drive
- 8. Use third party software
- Summary
Frustrating Story
My PC was running slow and having some errors so I decided to reset my Windows 11 PC.
But when I was resetting my PC I got this error: could not find the recovery environment insert your windows installation or recovery media.
I really didn’t know what just happened here. Because I didn’t do anything stupid to windows for getting this type of error.
So I just checked online and on YouTube too. But they were just saying that you just need to fix system errors and scan your PC using antivirus.
Saying something like this is so stupid. I mean it’s a Windows reset error and they are saying that you just need to scan your PC for viruses.
There might be a chance of viruses doing this kind of system errors. I’m not completely denying it, but casually saying you just need to scan your PC for Windows error is so questionable.
Anyway, after spending almost half an hour, I found the correct method to fix «Could not find the recovery environment on Windows 11 PC».
There are mainly two causes behind this issue:
1. winRE is disabled
2. winRE is not found
But don’t worry my friends, I have some 100% working methods.
Yes, you will know how to fix windows re image was not found or could not find recovery environment in windows 11 after reading this post.
I will show you the easiest methods through which you can fix this windows 11 reset error.
So let’s start.
«Windows RE image was not found» error may occur if the Windows RE (Recovery Environment) image is missing or corrupt. To fix this issue, you can try the following steps:
1. Use the Windows installation media: If you have a Windows installation media, such as a USB drive or DVD, you can use it to repair the Windows RE image. Boot from the installation media and choose the «Repair your computer» option. Then select «Troubleshoot,» «Advanced options,» and «Command Prompt.»
2. Rebuild the BCD (Boot Configuration Data) store: In the Command Prompt, you can run the following commands to rebuild the BCD store:
bootrec /fixmbr
bootrec /fixboot
bootrec /scanos
bootrec /rebuildbcd
3. Restore the Windows RE image from a backup: If you have a backup of the Windows RE image, you can restore it to fix the issue.
4. Perform a fresh installation of Windows: If the above steps do not resolve the issue, you may need to perform a fresh installation of Windows to restore the Windows RE image.
Note: Before trying the above steps, it is recommended to backup your important data.
These are just Quick fixes for those who have knowledge of windows computer in deep. But for those who don’t know how to fix windows re image was not found in Windows 11/10, read the following methods in detail.
How to fix windows re image was not found?
Video Guide:
At a normal circumstances, first two methods are enough to fix windows RE image was not found issue but if your PC is stupid and fkd up then I don’t know what will work for you.
But you can try all of these methods one by one and see which works best for you.
1. Enable WinRE
The main cause is Windows re image was not found in Windows 11. So, we’ll try to fix it first.
Here you need to open CMD as an administrator.
After that, you need to put the following command:
reagentc /info
You will see the winRE status.
If it is disabled, you just need to enable it, that’s it.
To enable the winRE, you need to put the following command. Into the CMD.:
reagentc /enable
You will see the successful message.
Now go to your Windows 11 reset options and see if it is working or not.
And 90% of the time this method works.
If you see any error message something like this: «windows re image was not found»
Then you need to go to method 2 to fix this problem.
2. Fix reagentc /enable not working
If you get any error like this reagentc.exe the windows re image was not found that means Reagentc /enable is not working for your PC.
You have to fix reagentc.exe the windows re image was not found issue by setting WinRE.
Watch method 2 of the above video to fix this error: Windows re image was not found.
CMD commands:
bcdedit /enum all
bcdedit /set {current} recoverysequence {GUID}
After applying method 2, try to reset your PC and see if it is working or not.
And I’m sure it will definitely work. Because this is the easiest method that I found on the Internet after searching for a couple of hours.
If you are still facing Windows 11 reset error or this «could not find recovery environment» error then the last option you can do is re-install Windows 11 manually.
3. Install Windows directly
You can fix Windows re image was not found in Windows 11 by reinstalling windows 11.
As I said earlier, this will automatically fix reagentc.exe the windows re image was not found windows 10/11 issue.
Here you need to download one tool called the media creation tool.
It’s a tool from Microsoft officially to install or upgrade to Windows 11.
Download Windows 10
Download Windows 11
Again, you can watch the above video, to know how to use the media creation tool.
If you’re facing windows update problems, you can also fix them using this method.
Here are the simple steps on how to use it:
1. Download this tool
2. Run the setup
3. Go through instructions
4. Select ‘Upgrade this PC’
5. Install Windows
This will download and install the latest setup of windows 11 from the Microsoft server.
Also, it will set all the windows 11 settings to default in order to reset your currently installed settings in windows 11.
You just need to wait till it completes the process of reinstallation and it’s an automatic process so don’t worry about it.
That’s it.
The above three are the most common methods that I found on the internet to fix could not find the recovery environment in windows 11.
But here are some of the working methods that I found on Microsoft and other windows troubleshooting sites.
4. Fix Winre.wim corrupted or missing
This Windows re image was not found in Windows 11 error might occur due to missing or corrupted winRE file. So let’s see how to fix it.
Just open the CMD as an administrator and run this command:
reagentc /setreimage /path C:\Recovery\WindowsRE
IT will set the default for this Winre.wim automatically.
Now again type this reagentc /info in the CMD to check the winre path.
And if it shows the Windows RE location then it’s better to assume that our problem has been solved and you can proceed to reset your PC.
5. Create a recovery drive and use it to reset
Well, this is nothing but a bootable drive method to fix windows re image was not found in Windows 11.
You can use pendrive to create this recovery drive. It will just backup your system files to that drive and then you can use it to reset your PC or repair it using advanced options.
Just type create a recovery drive and you will see that option in the search box.
Open it and follow the instructions given on the screen and it will create that drive easily.
Read this guide from Microsoft to know exactly how to do it: Create a recovery drive
It’s easy actually.
6. System Restore
If you can’t reset your PC try restoring using the system restore to revert back to the safest point from the previously created points.
Obviously, it won’t reset your PC because it will just revert back to the safest point possible to restore the system.
If you or any program have accidentally deleted or corrupted that windows RE location then it may solve it by setting the default path and reverting the system to the clean system files.
7. Bootable Drive
This is just installing the windows setup into the external drive and then we can use it to reset or repair our PC.
It is generally the safest way to recover any windows computer using this method since we are installing a fresh windows with an external drive. Internal drives are already corrupted and faulty so external bootable drives are definitely a better option.
Watch videos on Youtube to know how to create a bootable drive and reset your PC.
8. Use third party software
There are software and programs available to fix could not find the recovery environment in windows 11.
They will guide you on how to fix could not find the recovery environment error with proper instructions while performing these fixations. You can watch youtube videos regarding this and follow the steps to fix your problem.
So, that’s all from my side.
These are the proven methods to fix could not find the recovery environment error in Windows 11/10 PC.
Summary
Windows RE (Recovery Environment) is a bootable environment that is included with Windows operating systems.
It is used to diagnose and troubleshoot issues with the system, as well as perform tasks such as resetting the system, refreshing the system, and restoring from a system image.
The Windows RE image is stored in the Windows installation and can be used to boot the system into the recovery environment if the main operating system is not functioning properly.
In the event that the Windows RE image is missing or corrupt, the system may fail to boot or display an error message indicating that the Windows RE image was not found.
In such cases, you can use the steps outlined in my previous answer to restore the Windows RE image.
All the methods that I’ve mentioned above are officially supported in windows 10/11. You can use those to fix windows re image was not found in Windows 11/10 pc.
Здравствуйте! Купил ноутбук с установленной Windows 8.1 и удалил на нём среду восстановления (скрытый раздел в самом начале жёсткого диска, размером 300 Мб), также удалил раздел с заводскими настройками и только потом узнал, что оба данных раздела могут понадобиться при восстановлении ноутбука. Выход из положения нашёл такой — раздел с заводскими настройками создал по этой вашей статье, а вот как восстановить или создать заново среду восстановления Windows 8.1?
Как создать заново среду восстановления Windows 8.1
Автор Владимир!
Привет друзья! В прошлой статье мы создали с вами свой раздел восстановления с эталонным образом Windows 8.1, содержащим все ваши программы, и привязали этот образ к среде восстановления. Теперь, при возникновении сложных системных проблем, вы можете откатить компьютер с Windows 8.1 к эталонному образу с помощью обычной среды восстановления и вам даже не понадобится установочный диск с Win 8.1.
После выхода статьи нам на почту пришло много писем от читателей, у которых по каким-либо причинам отсутствует скрытый раздел 300 Мб со средой восстановления (раздел 300 Мб создаётся при установке системы на жёсткий диск GPT, а на MBR создаётся раздел 350 Мб), а это значит, что советом из нашей статьи они воспользоваться не смогут, но выход есть. В сегодняшней статье я покажу вам, как заново создать среду восстановления на ноутбуке или компьютере с Windows 8.1.
Итак, Управление дисками моего ноутбука с БИОСом UEFI и установленной Windows 8.1.
Удаляю скрытый раздел с заводскими настройками и скрытый раздел среды восстановления 300 Мб
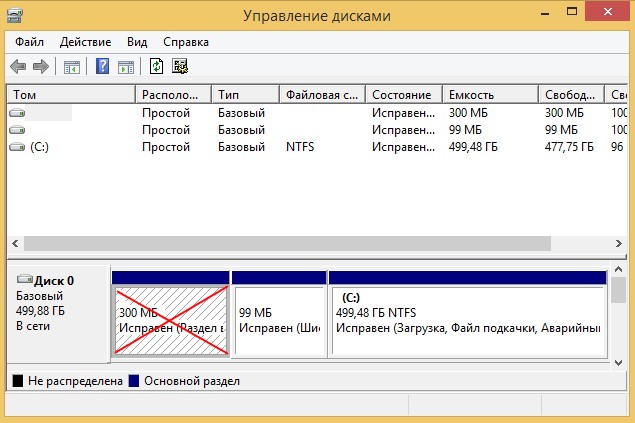
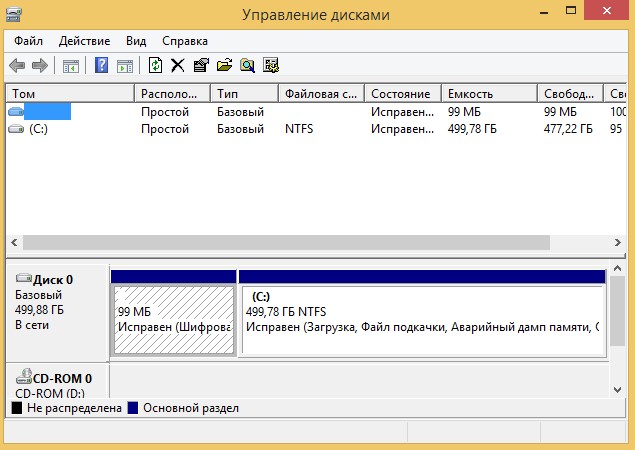
В итоге, на жёстком диске ноутбука остаётся скрытый раздел 100 Мб Исправен (Шифрованный (EFI) системный раздел) FAT32, содержащий файлы конфигурации хранилища загрузки (BCD) папку Boot с менеджером загрузки Windows 8.1 (файл bootmgr), а также раздел (C:) с установленной Windows 8.1.
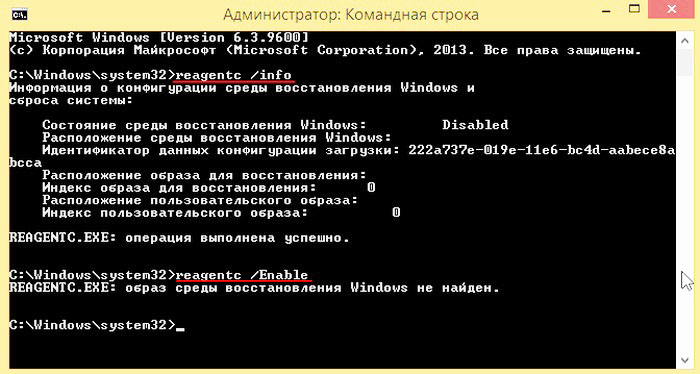
То, что среда восстановления у нас отсутствует можно проверить в командной строке.
Запускаем командную строку от имени администратора и вводим команду:
reagentc /info (программа REAgentC.exe используется для настройки образа загрузки среды восстановления Windows и образа для восстановления). Как видим, среда восстановления у нас отключена,
Состояние среды восстановления Windows: DisabledДавайте попробуем включить среду восстановления командой:
reagentc /Enable
и это не получается, так как среду восстановления мы полностью удалили с жёсткого диска.
REAGENTC.EXE образ среды восстановления Windows не найден
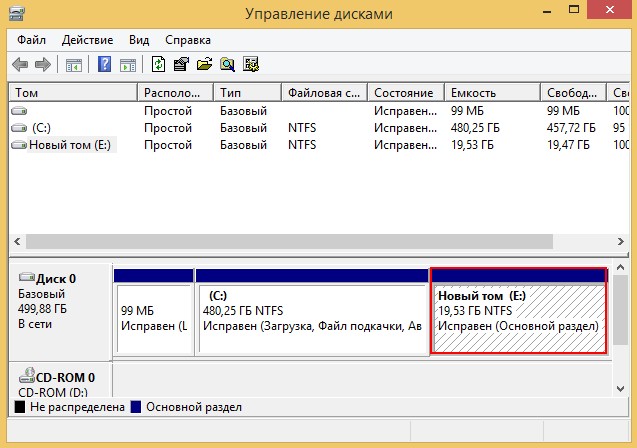
Создаём раздел со средой восстановления заново! Друзья, для данного раздела будет достаточно размера 350 Мб, но я создам раздел побольше — 20 Гб, так как позже размещу на этом разделе ещё и раздел восстановления с файлом-образом WIM, содержащим эталонную Windows 8.1.
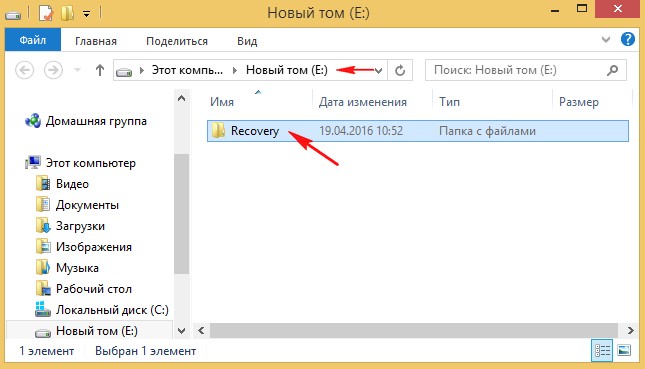
Итак, раздел создан и имеет букву диска (E:)
Заходим на диск (E:) и создаём на нём папку Recovery
Устанавливаем бесплатную программу-архиватор 7-Zip, ссылка на официальный сайт
http://www.7-zip.org/
Скачиваем на официальном сайте Майкрософт ISO-образ Windows 8.1 и подсоединяем его к виртуальному дисководу, открываем его.
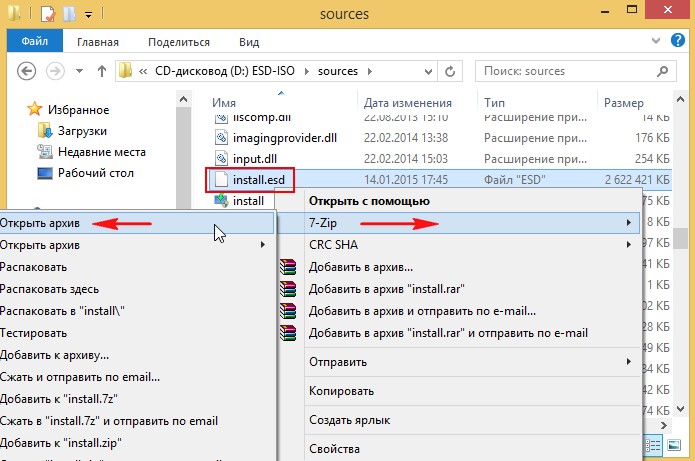
В папке sources дистрибутива Windows 8.1 находим файл install.esd, щёлкаем на нём правой мышью и выбираем:
7-Zip—>Открыть архив
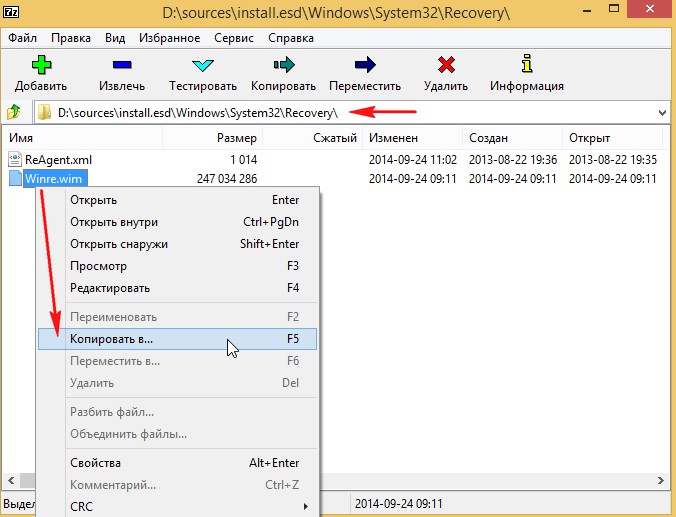
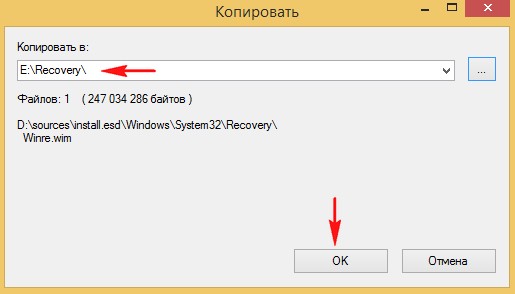
В открывшемся файле-образе install.esd открываем папку X:\sources\install.esd\Windows\System32\Recovery\ (где X: буква виртуального дисковода) и находим файл Winre.wim (образ для восстановления Windows), щёлкаем на нём правой мышью и выбираем Копировать в…
Жмём на кнопку проводника.

В открывшемся проводнике находим и указываем созданную нами на диске (E:) папку Recovery и жмём ОК.
ОК.
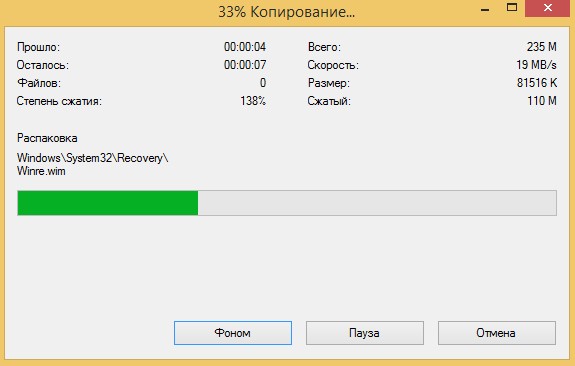
Происходит копирование файла Winre.wim в папку Recovery, находящуюся на диске (E:).
Файл имеет атрибут «скрытый» и «системный» и просто так вы его не увидите, чтобы увидеть файл, включите в системе
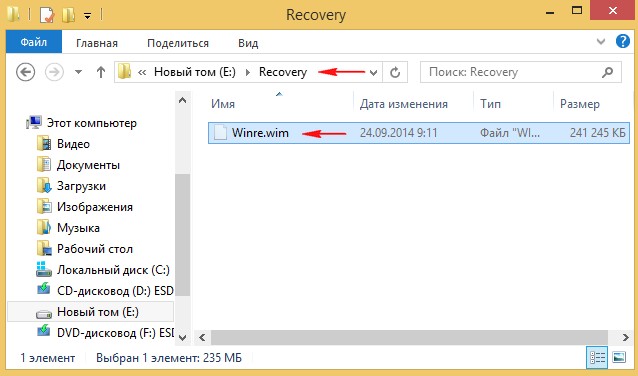
отображение скрытых и системных файлов.
Открываем командную строку от имени администратора и вводим команду:
reagentc /setreimage /path E:\recovery (данная команда подключает среду восстановления к созданной нами папке Recovery с файлом Winre.wim (образ для восстановления Windows).
reagentc /Enable (включает среду восстановления)
reagentc /info (данной командой проверяем состояние среды восстановления, видим, что среда восстановления включена, и находится на разделе (E:):
Состояние среды восстановления Windows: Enabled
Расположение среды восстановления Windows: \\?\GLOBALROOT\device\hardd
isk0\partition4\Recovery\WindowsRE

Статьи по этой теме:
1. Создание WIM-файла программы Acronis True Image 2017 (AcronisBootablePEMedia.wim). Замена среды восстановления Windows 10 программой Acronis True Image 2017
2. Как заменить среду восстановления Windows 10 другим инструментом. Как вызывать среду восстановления клавишей F8 при загрузке
,
If you try to enable the Windows Recovery Environment on a Windows 11/10 based computer and you receive the error «The Windows RE image was not found», continue reading below to fix the problem.
Problem details: After issuing the «reagentc /enable» command to enable Windows RE, the following error may occur: «REAGENTC.EXE: Windows RE image not found».

Why is the error «Windows RE image not found» occurring?
To be able to activate the Windows Recovery Environment (also known as «Windows RE» or «WinRE), the following two (2) files are required to be present in this location on disk: «C:\Windows\System32\Recovery«.
- ReAgent.xml
- Winre.wim

If any of these files are missing*, then when you run the command «reagentc /enable» to enable WinRE, you will get the error «Windows RE image not found». To solve the problem, follow the steps mentioned below.
* Note: Usually the missing file is the «Winre.wim» which is the WinRE image that contains the files needed to activate Windows RE.
How to FIX: «REAGENTC.EXE: Windows RE image not found» error in Windows 11/10.
Step 1. Download Windows ISO file.
To obtain the above mentioned files (Reagent.xml & Winre.wim), that needed to enable WinRE, you need a Windows ISO file according your Windows version. (Windows 10 or Windows 11)
If you don’t own a Windows ISO file, then, according to your Windows version, proceed to download Windows 10 or Windows 11 in a ISO file using the instructions on this article.
Step 2. Extract Required files from a Windows 10/11 ISO file.
Once you have the Windows ISO file, apply the below steps to extract the «Reagent.xml» & «Winre.wim» files from it.
1. Download and install the 7-Zip file archiver.
2. Then, right-click and choose Mount or double-click on the Windows.iso file to mount it (open it), in File Explorer.

3. Explore the contents of the mounted ISO file and open the «sources» folder.

4. Right-click on the install.esd file (or on install.wim file) and select 7-Zip > Open archive.

5a. Now double-click to open any of the numbered folders (e.g. the «1» in this example), and…

5b. …navigate to this location:
- Windows\System32\Recovery\
6a. Then click the Extract button from the menu, and…

6b. …select to copy the ReAgent.xml & Winre.wim files to the «C:\sources\» folder and click OK.

7. When the extraction is completed, click Close and then then close the 7-Zip app.
8a. Now navigate and open the «C:\Sources» folder.
8b. Select the extracted files («Reagent.xml» & «Winre.wim«), and then right-click and select Copy (or Cut).

8c. Then navigate to the following location, and…
- C:\Windows\System32\Recovery\
8d. …Paste the copied files inside the «Recovery» folder.
* Notes:
1. When asked, choose to Replace all files in the destination and then click Continue.
2. Important: In case of error in any of the remaining steps, copy again these files to «C:\Windows\System32\Recovery\» folder.

9. Once you copy the Reagent.xml & the Winre.wim files on «C:\Windows\System32\Recovery\» folder, open command prompt as administrator and issue the following command to enable the Windows Recovery Environment. The Windows Recovery Environment should be successfully enabled now.
- reagentc /enable

- Related article: How to Create a Recovery Partition if Missing on Windows 10/11.
That’s it! Let me know if this guide has helped you by leaving your comment about your experience. Please like and share this guide to help others.
If this article was useful for you, please consider supporting us by making a donation. Even $1 can a make a huge difference for us in our effort to continue to help others while keeping this site free:
- Author
- Recent Posts
Konstantinos is the founder and administrator of Wintips.org. Since 1995 he works and provides IT support as a computer and network expert to individuals and large companies. He is specialized in solving problems related to Windows or other Microsoft products (Windows Server, Office, Microsoft 365, etc.).