
This guide will help you get started on setting up your very first React Native for Windows app.
Make sure you have installed all of the development dependencies.
For information around how to set up React Native, see the React Native Getting Started Guide.
Interested in migrating to React Native’s New Architecture? New Architecture support in React Native for Windows is now available to preview in 0.76. Note there are several key changes, so if you’d like to be an early adopter, check out the information in the New Architecture Guide.
Create a new React Native project
Remember to call @react-native-community/cli init from the place you want your project directory to live.
npx --yes @react-native-community/cli@next init <projectName> --version ^0.78.0
Navigate into this newly created directory
React Native will have created your project in a new sub-directory, which you must enter before continuing.
cd <projectName>
Add React Native Windows to your project’s dependencies
Using Yarn (Recommended)
Using NPM
yarn add react-native-windows@^0.78.0
npm install --save react-native-windows@^0.78.0
Initialize the React Native Windows native code and projects
Lastly, initialize the React Native for Windows application with the init-windows command:
npx react-native init-windows --overwrite
Note: RNW templates contain a customized
metro.config.jsfile, which is meant to merge cleanly into the default config provided by the standard React Native project template. If you are starting a new app, overwritingmetro.config.jsshould have no impact. However, if you are adding Windows to an existing app with an already modifiedmetro.config.jsfile, please make sure to back up and re-apply your modifications after adding RNW.
Running a React Native Windows App
Make sure a browser is launched and running before running a React Native Windows app.
Also ensure your system meets all the requirements to build a Windows app as well.
-
Without Using Visual Studio
In your React Native Windows project directory, run the run-windows command:
npx react-native run-windowsA new Command Prompt window will open with the React packager as well as your React Native for Windows app. This step may take a while during first run since it involves building the entire project and all dependencies. You can now start developing! :tada:
-
Using Visual Studio
- From the root of the project directory, run the autolink-windows command, which will automatically link your app’s dependencies:
npx react-native autolink-windows - Open the solution file in the application folder in Visual Studio (e.g.,
AwesomeProject/windows/AwesomeProject.slnif you usedAwesomeProjectas<projectName>) - Select the
Debugconfiguration and thex64platform from the combo box controls to the left of theRunbutton and underneath theTeamandToolsmenu item. - Run
yarn start(ornpm start) from your project directory, and wait for the React Native packager to report success. - Click the
Runbutton to the right of the platform combo box control in VS, or select theDebug->Start without Debuggingmenu item. You now see your new app and Chrome should have loadedhttp://localhost:8081/debugger-ui/in a new tab. PressF12orCtrl+Shift+Iin Chrome to open its Developer Tools. :tada:
- From the root of the project directory, run the autolink-windows command, which will automatically link your app’s dependencies:
-
With VS Code
- Open your applications folder in VS Code.
- Install the React Native Tools plugin for VS Code.
- Create a new file in the applications root directory,
.vscode/launch.jsonand paste the following configuration:
{ "version": "0.2.0", "configurations": [ { "name": "Debug Windows", "cwd": "${workspaceFolder}", "type": "reactnative", "request": "launch", "platform": "windows" } ] }- Press
F5or navigate to the debug menu (alternatively pressCtrl+Shift+D) and in the Debug drop-down select «Debug Windows» and press the green arrow to run the application.
Authoring Native Modules
See Native Modules and React Native Windows.
Building a standalone React Native Windows App
Follow these steps to build a version of your app that you can install or publish to the store. This version will package your bundle and assets into the APPX package so you don’t need to run Metro.
- Open the solution in Visual Studio
- Select the Release configuration from the Configuration Manager drop-down.
- Build the solution. You can now launch without first launching Metro.
- If you want to build an APPX package to share or publish, use the Project > Publish > Create App Packages… option.
The Debug configuration uses the Web Debugger by default, which means the application’s JavaScript code runs in Chrome.
If you’re getting different runtime behavior between the Release and Debug configurations, consider disabling theUseWebDebuggersetting inApp.cpporApp.xaml.csto get the same behavior in the Debug configuration.
See also this article for additional details: https://techcommunity.microsoft.com/t5/windows-dev-appconsult/getting-started-with-react-native-for-windows/ba-p/912093#
Время на прочтение2 мин
Количество просмотров50K
Доброго времени суток!
Решив начать разрабатывать приложения на React Native, я столкнулся с проблемами разворачивания окружения. Сегодня я хочу поделиться опытом его настройки.
Конечно, на официальном сайте есть подробное описание, но следуя только этим рекомендациям, было довольно сложно сделать все настройки.

Итак, начнём:
Node, Python2, JDK
- Установить NodeJS. У меня последняя версия на момент написания статьи 10.11.0
- Установить Python2 и JavaSE. Использовался jdk-10.0.2
React Native CLI
- Установим React Native CLI
npm install -g react-native-cli
Android development environment
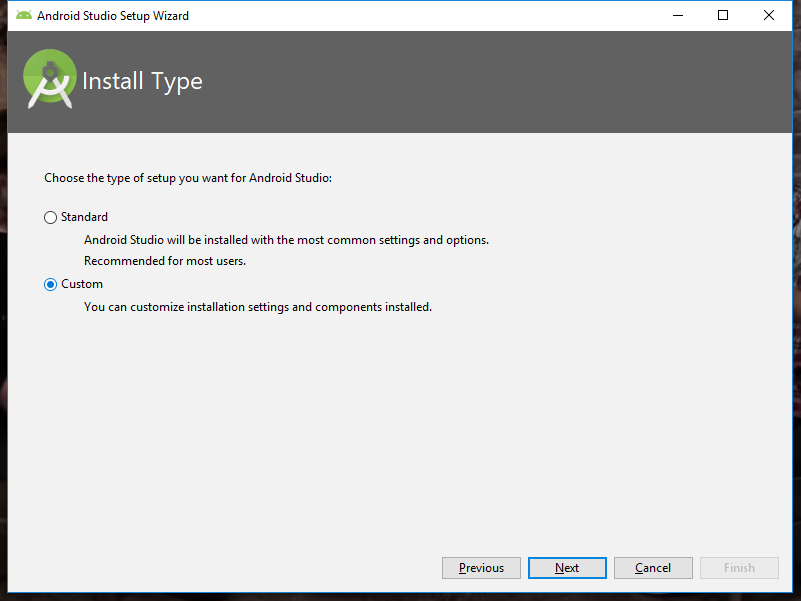
- Скачиваем и устанавливаем Android Studio
После запуска выбираем кастомную установку

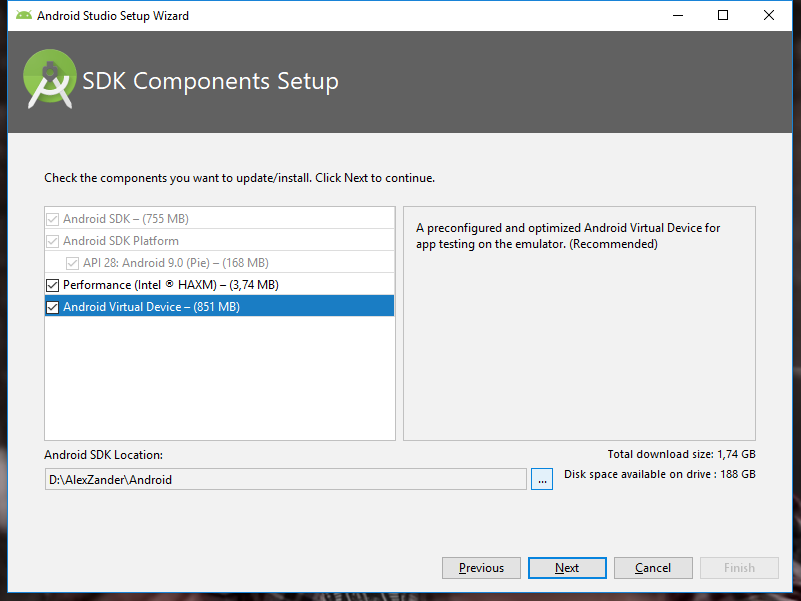
Далее отмечаем галочкой «Android Virtual Device» и указываем пусть до папки Android — либо оставляем как есть C:\Users\%USERNAME%\AppData\Local\Android\Sdk
Главное, чтобы в пути не было кириллицы!Особенно с этим могут возникнут проблемы в будущем. Например, у меня имя пользователя системы было на кириллице «C:\Users\Александр», и после запуска приложения grandle не мог найти путь, т. к. путь выглядел как «C:\Users\????????\…»
Нажимаем «далее». Оставляем рекомендуемый объем оперативной памяти, нажимаем далее и устанавливаем.
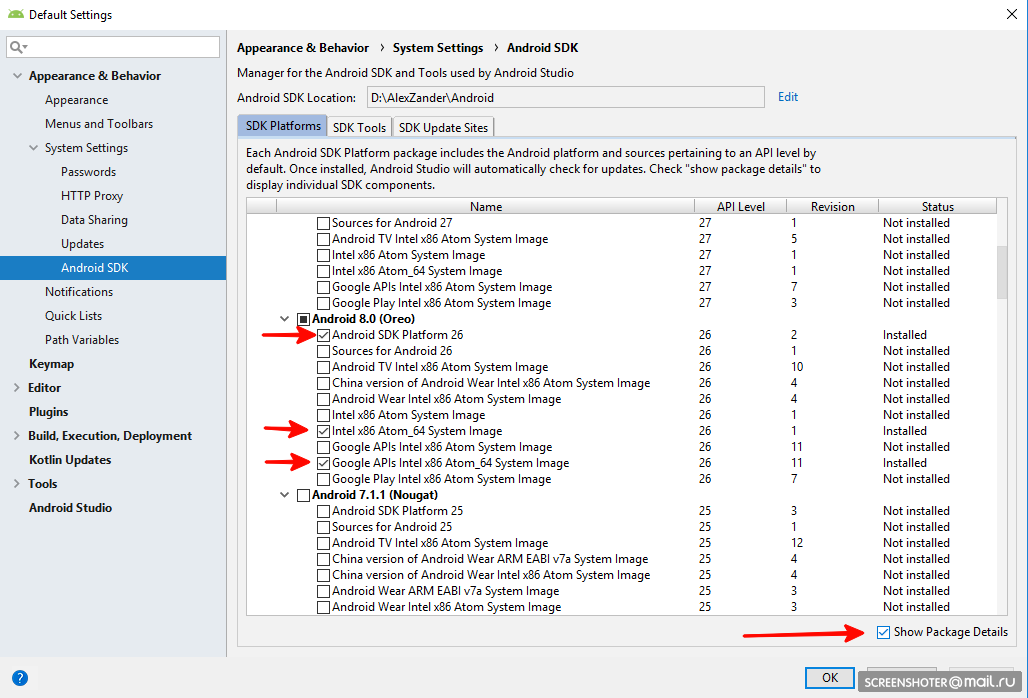
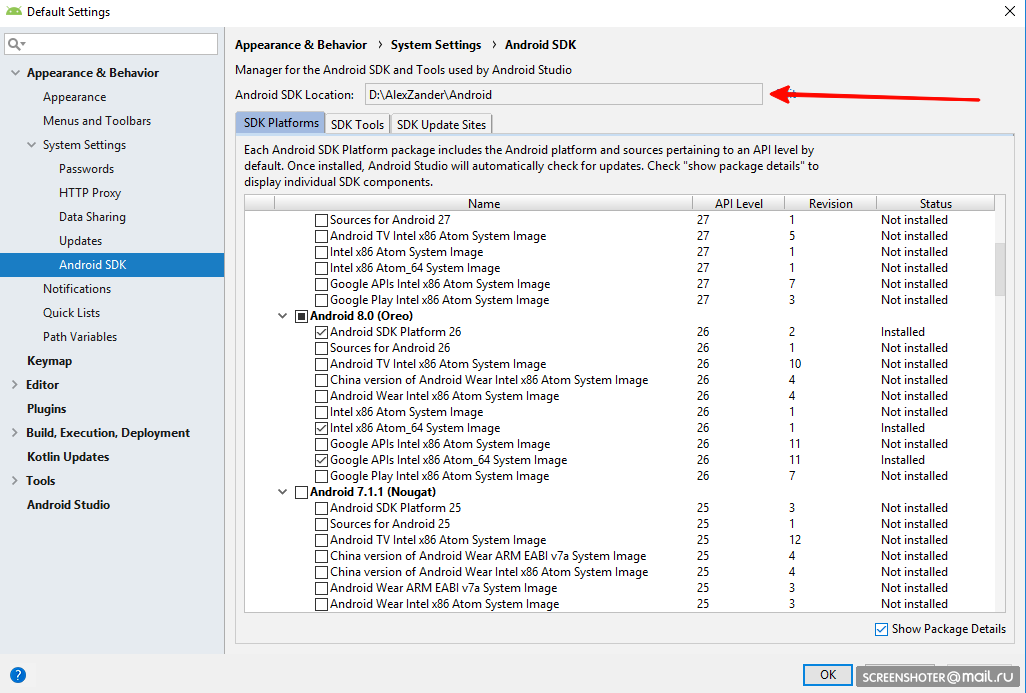
- Android SDK — открываем студию и переходим в настройки
Appearance & Behavior → System Settings → Android SDK.На вкладке «SDK Platforms» включаем галочку «Show Package Details» и для «Android 8.0 (Oreo)» устанавливаем:
- Android SDK Platform 26
- Intel x86 Atom_64 System Image
- Google APIs Intel x86 Atom_64 System Image
Теперь выбираем вкладку «SDK Tools», включаем галочку «Show Package Details»
и устанавливаем пакет- «28.0.3»
Нажимаем
"Apply".
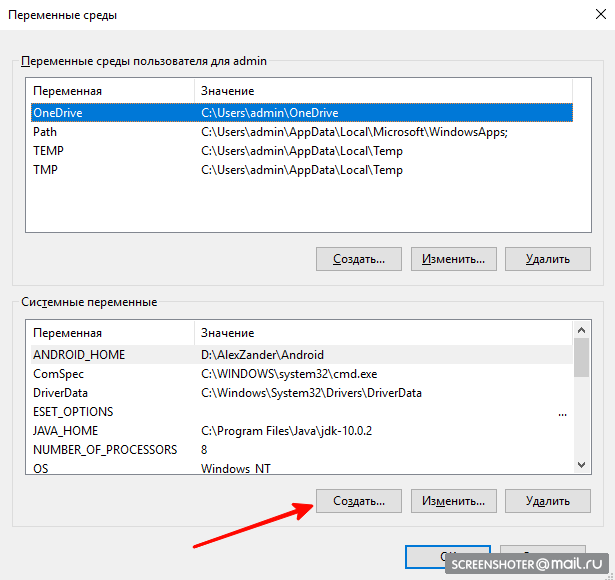
Переменные среды
- ANDROID_HOME
Создадим переменную для ANDROID_HOME:
- Имя переменной ANDROID_HOME
- Значение переменной (можно посмотреть в Android Studio)
- JAVA_HOME
По аналогии создадим переменную JAVA_HOME:- Имя переменной: JAVA_HOME
- Значение переменной: C:\Program Files\Java\jdk-(версия)
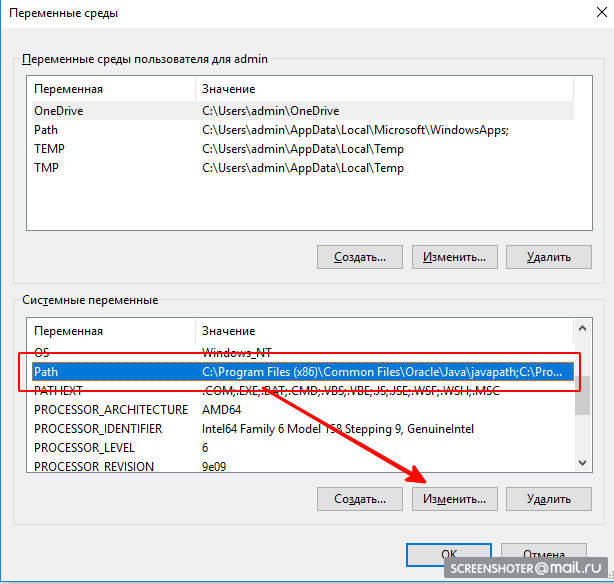
- Изменим системную переменную Path:
Добавим 4 значения:
- %JAVA_HOME%\bin
- %ANDROID_HOME%
- %ANDROID_HOME%\platform-tools
- %ANDROID_HOME%\watchman
Создаем приложение и запускаем эмулятор
- Переходим в удобную для нас папку в консоли и набираем:
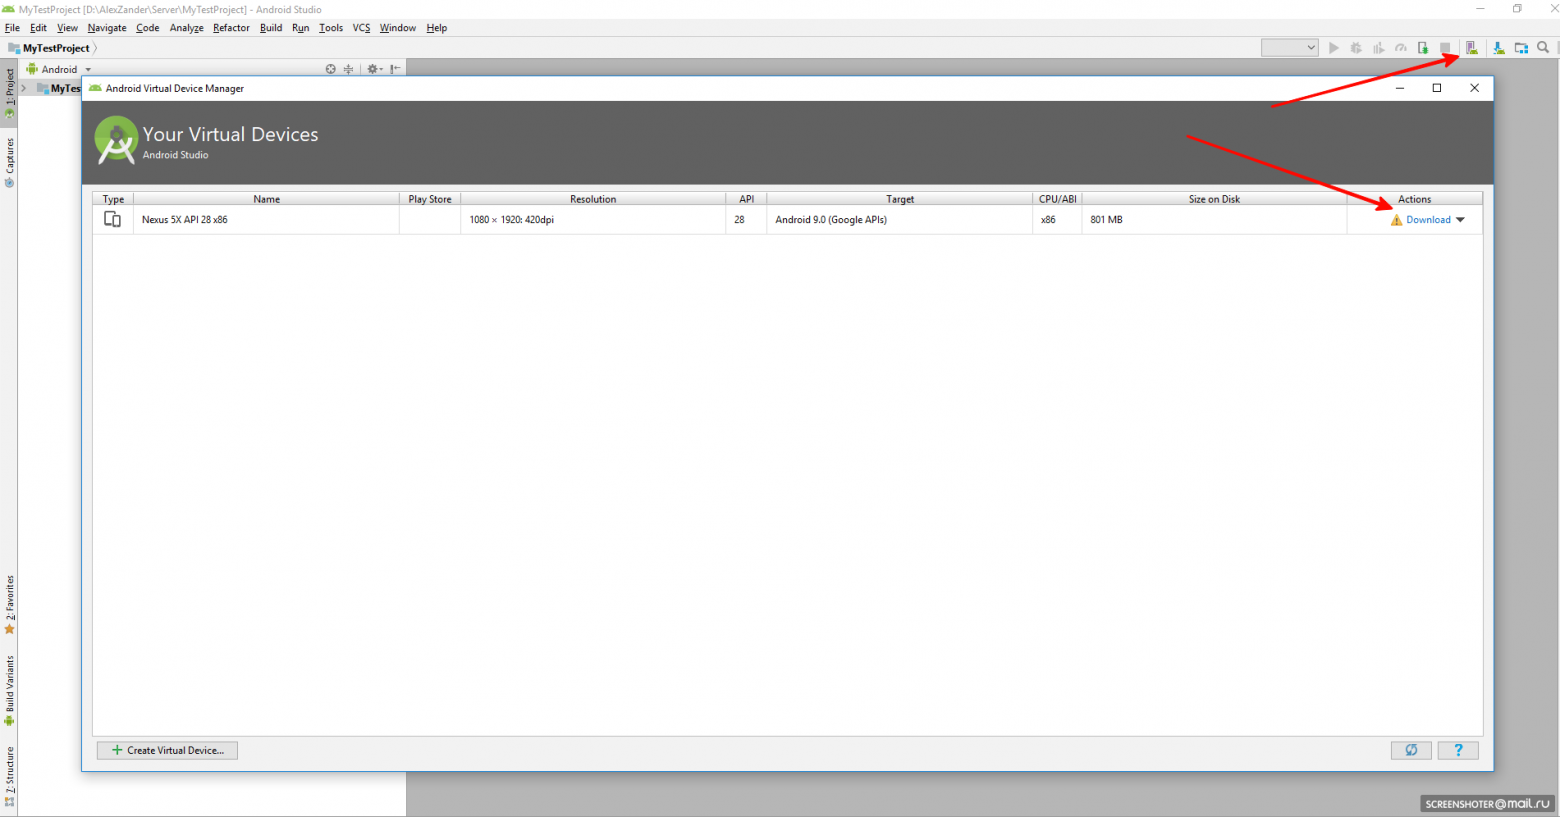
react-native init MyTestProject - Открываем в Android Studio наш проект и открываем AVD Manager
Если AVD не скачан, скачиваем и запускаем
- Далее переходим в консоли в папку с приложением и набираем:
react-native run-androidПосле чего нашел приложение запустилось.
В этой статье использовались официальное руководство от React Native
+ личный опыт!Надеюсь, эта статья поможет тем, кто столкнулся с проблемами или решил начать разрабатывать нативные приложения на React
.
React Native — это платформа, позволяющая создавать мобильные приложения на основе JavaScript и React. Разработана Facebook и применяется во многих мировых проектах, среди которых Instagram, Discord, Pinterest, Bloomberg, Wix и другие.
Приложения на React Native имеют согласованный интерфейс: учитесь один раз — пишите где угодно.
Благодаря репозиторию React Native for Windows приложения на React можно писать для UWP (Universal Windows Platform), а значит под все устройства, которые поддерживают Windows 10 (ПК, планшеты, Xbox, устройства смешанной реальности).
Узнать подробней и начать изучать этот проект можно по его документации. Так же можно ознакомиться с React Native в целом. Следить за последними событиями можно в блоге.
React Native for Windows — это open source проект. Вы сможете помочь им, предложив какую-нибудь фичу или решив имеющуюся проблему.

React Native for Windows
Website
·
Documentation
·
Release notes
See the official React Native website for an introduction to React Native.
React Native is a framework developed by Meta that enables you to build world-class application experiences on native platforms using a consistent developer experience based on JavaScript and React. The focus of React Native is on developer efficiency across all the platforms you care about — learn once, write anywhere.
This repository adds support for the Windows 10 SDK, which allows you to build apps for all devices supported by Windows 10 including PCs, tablets, 2-in-1s, Xbox, Mixed reality devices etc.
Visit the official React Native for Windows + macOS website to learn more.
🛣️ Roadmap
Check out our blog if you’d like to stay up to date on the status of React Native for Windows and check out current and past roadmaps.
New Architecture
Fabric is the new rendering system for React Native, designed to share more rendering logic cross-platform. RNW’s existing Paper renderer is built on UWP XAML, dropping down into native Composition as need be; the new RNW Fabric renderer targets Composition from the start but has the ability to host islands of XAML for advanced native controls. Apps on the new architecture will be WinAppSDK Win32 by default. For more details on our roadmap to Fabric, check out this pinned issue.
🖼️ React Native Gallery
Make sure to also check out the React Native Gallery, our interactive sample experience showing everything you can do with React Native for Windows.

📋 Getting Started
See the Getting Started Guide on our React Native for Windows + macOS website to build your first React Native for Windows app.
Requirements
You can run React Native Windows apps only on devices supported by the Windows 10 SDK.
For a full and detailed list of the system requirements and how to set up your development platform, see our System Requirements documentation on our website.
Logging Issues
Search the existing issues and try to make sure your problem doesn’t already exist before opening a new issue. If your issue doesn’t exist yet, provide as much information as possible so we can better help you. Include the information requested by the appropriate issue template.
Documentation
React Native has great documentation. React Native for Windows adds its own separate Windows and macOS documentation for desktop platform information like API docs and blog updates.
Examples
- Using the CLI in the Getting Started guide will set you up with a sample React Native for Windows app that you can begin editing right away.
- Check the samples repo for more standalone samples.
- The React Native Gallery app demonstrates various components in an interactive way.
- Check out the React Native Developer Blog to see examples from past conference talks, blog posts, and more.
- For more sample code browse the RNTester folder in the GitHub web UI.
📢 Contributing
See Contributing guidelines for how to setup your fork of the repo and start a PR to contribute to React Native for Windows.
Not sure where to start? The good first issue and help wanted labels are the best starting points.
Code of Conduct
This project has adopted the Microsoft Open Source Code of Conduct. For more information see the Code of Conduct FAQ or contact opencode@microsoft.com with any additional questions or comments.
As we know, React is a free and open-source JavaScript library written by Facebook to create highly dynamic web UIs. Facebook later created React Native for developing cross-platform native mobile apps by using React as the core interface for developers, which allowed them to build native mobile apps for Android and iOS with a single React syntax-based codebase.
React typically renders its component changes to DOM (Document Object Model), but it can also render components as HTML for server-side rendering (SSR) requirements. For React Native, there was Proton Native, which generated cross-platform desktop applications and let you render native UI elements with the Qt and wxWidgets UI toolkits, but which is no longer actively maintained.
While there is still an active fork of it, in this article, we’ll cover a more stable, actively maintained, and popular project: react-native-windows. This is Microsoft’s extension of React Native for Windows and macOS backends and makes it so that the same React Native-based frontend will natively render on Windows and macOS with platform-specific UI elements.
I will explain how you can develop Windows desktop applications using the react-native-windows project. We’ll also cover how your React Native syntax turns into a native desktop application with the framework’s internal modules.
Setting up the developer environment
Make sure that your computer has the following Windows version installed:
- Windows 10.0.16299.0 (a.k.a., 1709, Redstone 3, or Fall Creators Update) or higher
If your computer passes the above requirement, you can run the following command in an elevated (as in, with administrator privileges) PowerShell window to install the required dependencies.
Set-ExecutionPolicy Unrestricted -Scope Process -Force; iex (New-Object System.Net.WebClient).DownloadString('https://raw.githubusercontent.com/microsoft/react-native-windows/master/vnext/Scripts/rnw-dependencies.ps1')
The above command will turn on developer mode and install Visual Studio, the Chocolatey package manager, and Node.js LTS version. Additionally, it’s great if your computer has a physical memory of 8GB or higher because the Windows build processes typically need above-average physical memory to run.
The above script file recommends having 16GB of physical memory. You can continue with the tutorial if the second execution of the above script gives an output like below.

Creating a React Native Windows app
First, create a new React Native project with the following command. This command will auto-generate a basic React Native app.
npx react-native init rnApp --template react-native@^0.64.0
The official React Native package supports only Android and iOS backends, so you’ll need to run the following command to enable the Windows backend.
npx react-native-windows-init --overwrite
Now we can run our newly created React Native app as a truly native Windows app with the following command. This command will trigger a debug build from the current project’s source code.
npx react-native run-windows
Also, you can add the --useHermes option to use the Hermes JavaScript engine instead of the default Chakra.
The first build process may take quite a while to complete because it will compile many C++ source files. If the build process stops with an error, you can run the same command with the --logging option to find those errors.
You may also want to take note of the following solutions for common errors that might show up during your build process:
- If the build process takes a lot of time, or there are compilation errors related to Chakra, use the
--useHermesoption - If the build process throws an error about missing Windows 10 SDK, install it from the Visual Studio Installer
- If the build process fails with a certificate error, follow these steps to create a new certificate for your autogenerated UWP project with Visual Studio
- Some modules have issues with paths that have spaces. Make sure that your project path doesn’t contain any spaces
Once the build process has completed, you will see a UWP version of your React Native app, as shown below.
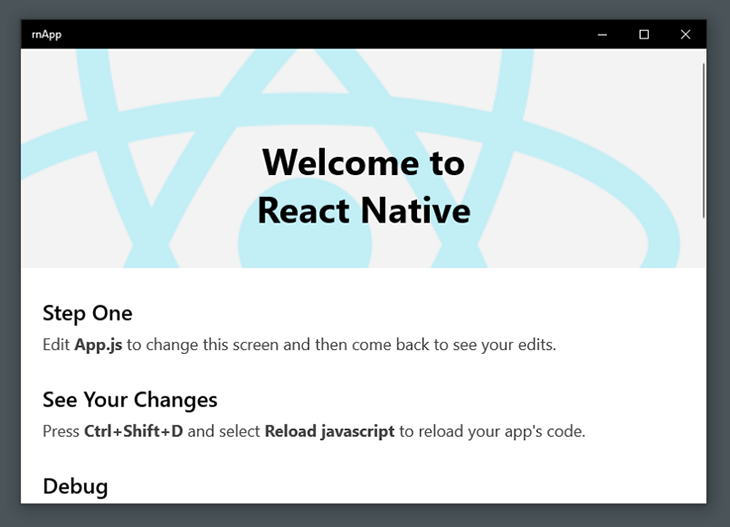
The hot-reload feature is enabled. Also, the run-windows command will open the React Native Debugger on Chrome. You can use Chrome DevTools to set up breakpoints for your app’s JavaScript source files.
Now, let’s learn what is happening behind the scenes.
Inside React Native Windows
The React Native core has several basic pre-defined React components like View, Text, Image, TextInput, and ScrollView. The official React Native runtime can render truly native UI building blocks for Android and iOS operating systems. The React Native team initially made the native rendering module fully extendable. Therefore, the developer community was able to extend it for other platforms as well.
The react-native-windows project added Windows application target support. It can generate a Windows application with a truly native UWP GUI from your typical React Native project. UWP applications work on all popular Windows platforms such as Windows 10, Windows 10 Mobile, Xbox One system software, and Windows Mixed Reality.
However, the JavaScript portion of your application runs on a JavaScript engine similar to the original React Native project. The react-native-windows project initially used the Chakra JavaScript engine, and they later integrated Facebook’s Hermes JavaScript engine to improve performance.
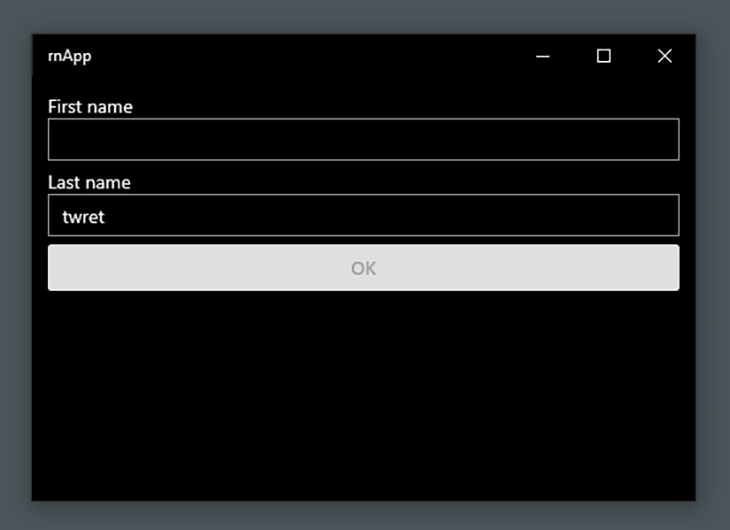
Developing a simple application using react-native-windows
We are going to make a simple UWP app that will show a greeting message when you submit your first and last name. Add the following code into your App.js file.
import React from 'react';
import type {Node} from 'react';
import {
  SafeAreaView,
  ScrollView,
  StyleSheet,
  Text,
  TextInput,
  Button,
  useColorScheme,
  View,
  Alert,
} from 'react-native';
const App: () => Node = () => {
  const isDarkMode = useColorScheme() === 'dark';
  const [firstName, setFirstName] = React.useState('');
  const [lastName, setLastName] = React.useState('');

  const styles = StyleSheet.create({
    dark: {
      color: '#fff',
      backgroundColor: '#000',
    },
    light: {
      color: '#000',
      backgroundColor: '#fff',
    },
    formItem: {
      marginBottom: 6,
    }
  });

  const backgroundStyle = {
    backgroundColor: isDarkMode ? styles.dark : styles.light,
  };

  const showFullName = () => {
    Alert.alert(`Hello ${firstName} ${lastName}`);
  };
return (
    <SafeAreaView style={backgroundStyle}>
      <ScrollView
        contentInsetAdjustmentBehavior="automatic"
        style={backgroundStyle}>
        <View style={{padding: 12}}>
          <Text style={backgroundStyle}>First name</Text>
          <TextInput
            style={styles.formItem}
            value={firstName}
            onChangeText={setFirstName}
          />
          <Text style={backgroundStyle}>Last name</Text>
          <TextInput
            style={styles.formItem}
            value={lastName}
            onChangeText={setLastName}
          />
          <Button
            style={styles.formItem}
            title='OK'
            onPress={showFullName}
            disabled={!firstName || !lastName}>
          </Button>
        </View>
      </ScrollView>
    </SafeAreaView>
  );
};
export default App;
Now, reload the current app via React Native Debugger. You will see an application like the below, styled according to your theme settings.
When you click on the OK button after filling in the text inputs, you will get a message box with a greeting, as shown below.
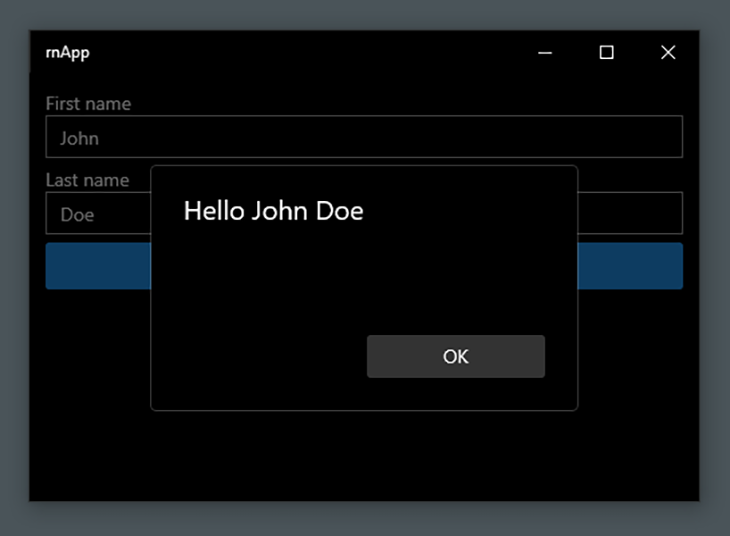
We used several React Native core components and core APIs in this example application, as well as React’s useState Hook to get the current user inputs. As you can see, we finally got native UWP UI elements from React Native components.
Complex layout implementations are also supported with the react-native-windows extension because it supports a Yoga-friendly syntax.
The React Native developer community has also made various remarkable libraries, and several libraries support react-native-windows as well. In other words, some popular React Native libraries will work on Android, iOS, and Windows applications.
Application distribution is possible by opening the UWP application source with Visual Studio.
Conclusion
The react-native-windows project was started alongside the early development stage of the official React Native project. Microsoft has also recently started work on react-native-macos to extend React Native for macOS backends.
The react-native-windows project indeed renders platform-specific UI elements from a JavaScript-based codebase. Therefore, if you are looking for a way to build high-quality Windows desktop apps with React Native, it is the best solution out there.
LogRocket: Instantly recreate issues in your React Native apps

LogRocket is a React Native monitoring solution that helps you reproduce issues instantly, prioritize bugs, and understand performance in your React Native apps.
LogRocket also helps you increase conversion rates and product usage by showing you exactly how users are interacting with your app. LogRocket’s product analytics features surface the reasons why users don’t complete a particular flow or don’t adopt a new feature.
Start proactively monitoring your React Native apps — try LogRocket for free.