
Теневое shadow подключение к RDP/RDS сеансам позволяет администраторам подключиться к сессии любого пользователя для просмотра рабочего стола пользователя и взаимодействия с ним. Режим Remote Desktop Shadowing (теневого подключения) работает во всех современных версиях Windows, начиная с Windows 2012 R2 и Windows 8.1 (кроме версии Windows Server 2012, в которой стек rdp перенесен из режима ядра в пользовательский режим). В этой статье мы рассмотрим, как настроить и использовать RDS Shadowing для подключения к RDP сессиям пользователей в Windows Server 2016 и Windows 10
Содержание:
- Использование Remote Desktop Shadow из графического GUI
- Групповые политики управления теневыми подключениями к RDS сессиям в Windows
- Теневое подключение RDS Shadow из PowerShell
- Как разрешить обычном пользователям использовать теневое подключение?
В Windows Server 2016/Windows 10 в стандартном RDP клиенте (mstsc.exe) есть несколько специальных параметров, которые можно использовать для удаленного теневого (RDS Shadow) подключения к RDP сессии любого пользователя:
Mstsc.exe [/shadow:sessionID [/v:Servername] [/control] [/noConsentPrompt] [/prompt]]
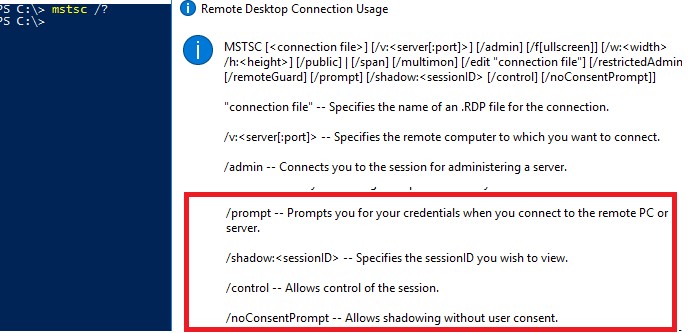
- /shadow:sessionID – подключиться к RDP сессии пользователя по ID;
- /v:servername – можно указать имя удаленного хоста (RDP/RDS терминального сервера). Если имя сервера не указано, выполняется подключение к локальным сеансам на текущем хосте;
- /control – включает возможность взаимодействия с сеансом (рабочим столом) пользователя. Администратор может управлять мышкой пользователя, вводить данные с клавиатуры. Если эта опция не указана, используется режим просмотра сессии пользователя;
- /noConsentPrompt – опция позволяет администратору принудительно подключиться к любой сессии, не запрашивая у пользователя подтверждение на подключение;
- /prompt – позволяет использовать для подключения другую учетную запись, отличную от текущей. Запрашивается имя и пароль пользователя для подключения к сеансу.
Теневые сеансы можно использовать для подключения к сессиям пользователей на компьютерах и серверах как в домене Active Directory, так и в рабочей группе. Кроме того, не обязательно обладать правами администратора на RDS хосте, на котором работает пользователь. Администраторы могут делегировать полномочия RDS Shadowing любым, даже не-административных учетным записям (об этом ниже).
Использование Remote Desktop Shadow из графического GUI
Подключиться к сессии пользователя можно с помощью утилиты mstsc.exe или графической консоли Server Manager. Для этого в консоли Server Manager на RDS сервере перейдите в раздел Remote Desktop Services -> выберите свою коллекцию, например QuickSessionCollection.

В списке справа будет перечислен список пользователей у которых имеются сессии на данном RDS сервере. Щелкните правой кнопкой по сессии нужно пользователя, выберите в контекстном меню Shadow (Теневая копия).
Вы можете подключиться только к активной сессии пользователя. Если сессия находится в состоянии Disconnected (отключена по таймауту), подключиться к такой сессии нельзя:
Shadow Error - The specified session is not connected.
Появится окно c параметрами теневого подключения. Возможен просмотр (View) и управление (Control) сессией. Кроме того, можно включить опцию Prompt for user consent (Запрашивать согласие пользователя на подключение к сессии).
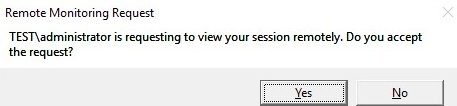
Если выбрана опция «Запрашивать согласие пользователя», в сессии у пользователя появится запрос:
Запрос на удаленное наблюдение/ Remote Monitoring Request
Winitpro\administrator запрашивает удаленный просмотр вашего сеанса. Вы принимаете этот запрос?
Winitpro\administrator is requesting to view your session remotely. Do you accept the request?
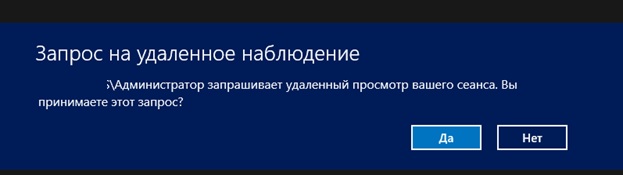
Если пользователь подтвердит подключение, то администратор увидит его рабочий стол в режиме просмотра, но не сможет взаимодействовать с ним.
Совет. Для отключения от сессии пользователя и выхода из shadow-режима, нужно нажать ALT+* на рабочей станции или Ctrl+* на RDS сервере (если не заданы альтернативные комбинации).
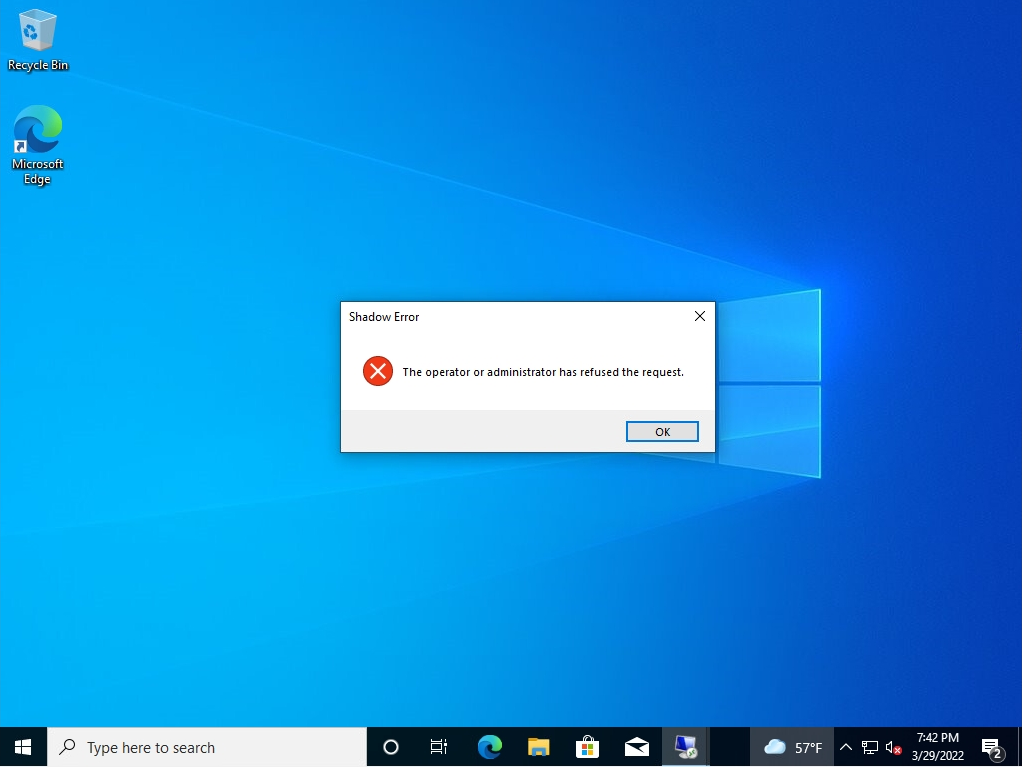
Если пользователь отклонил административное Shadow RDS подключение, появится окно:
Shadow Error: The operator or administrator has refused the request.
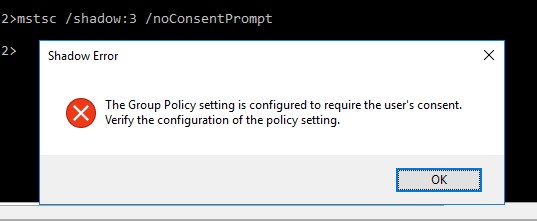
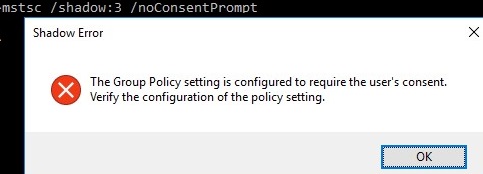
Если попытаться подключиться к сессии пользователя без запроса подтверждения, появится ошибка, сообщающая, что это запрещено групповой политикой:
Shadow Error: The Group Policy setting is configured to require the user’s consent. Verify the configuration of the policy settings.
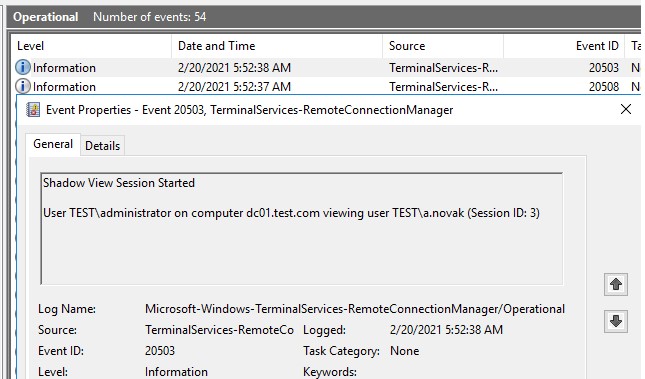
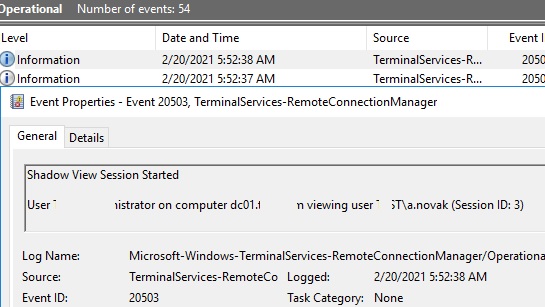
Если вам нужно вести аудит RDS Shadow подключений к пользователям, используйте в качестве фильтра следующие события из журнала Microsoft-Windows-TerminalServices-RemoteConnectionManager/Operational:
- Event ID 20508: Shadow View Permission Granted
- Event ID 20503: Shadow View Session Started
- Event ID 20504: Shadow View Session Stopped
Групповые политики управления теневыми подключениями к RDS сессиям в Windows
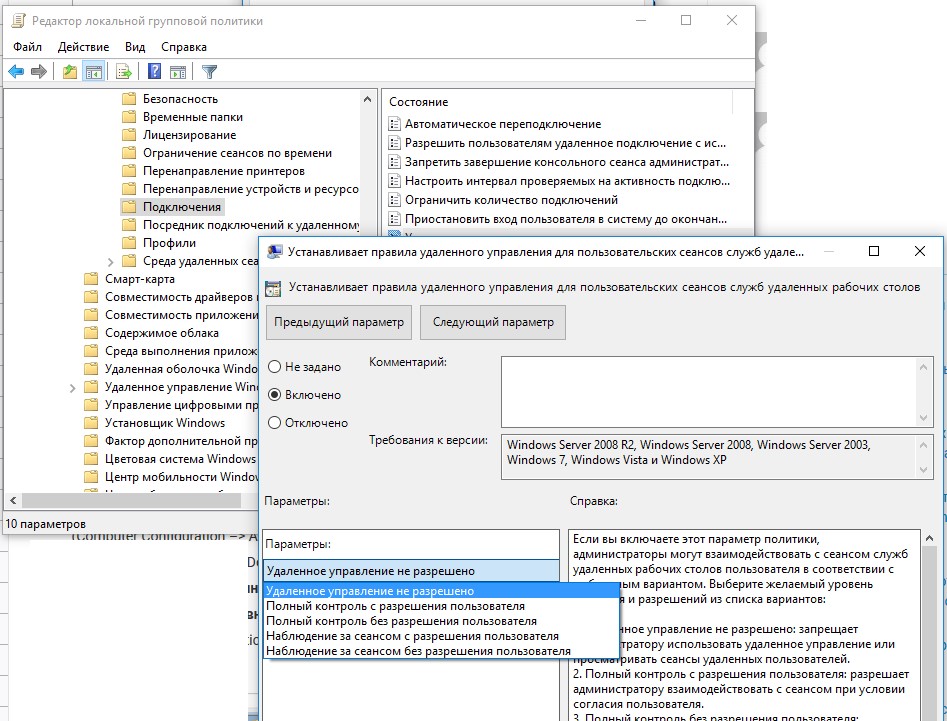
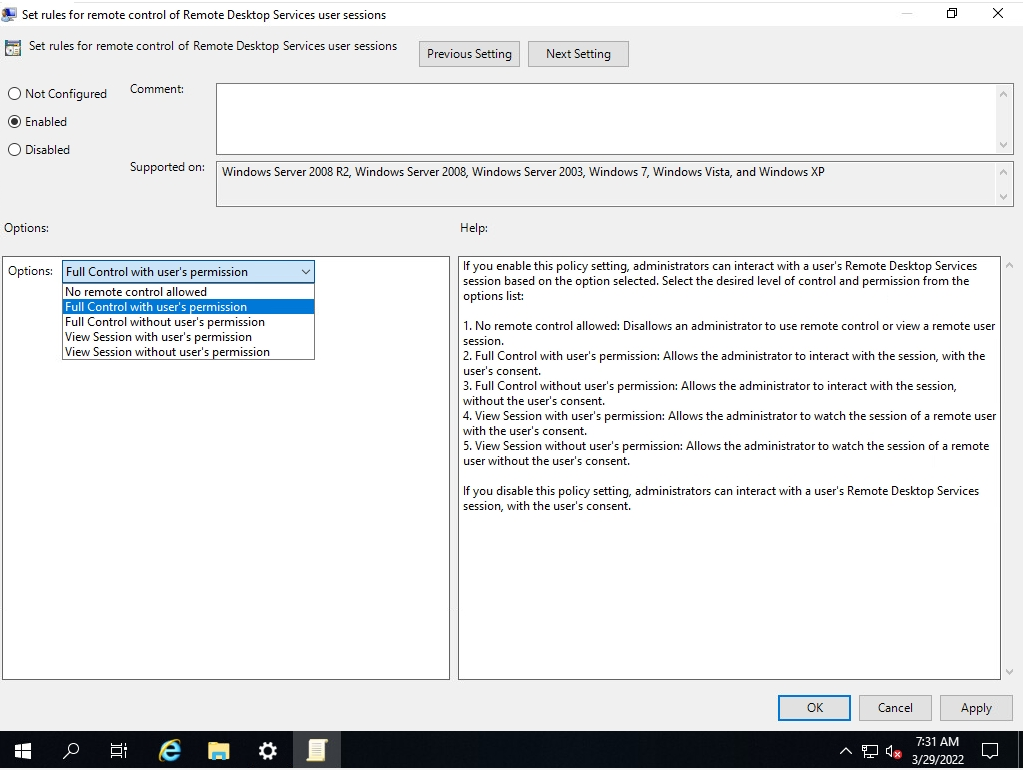
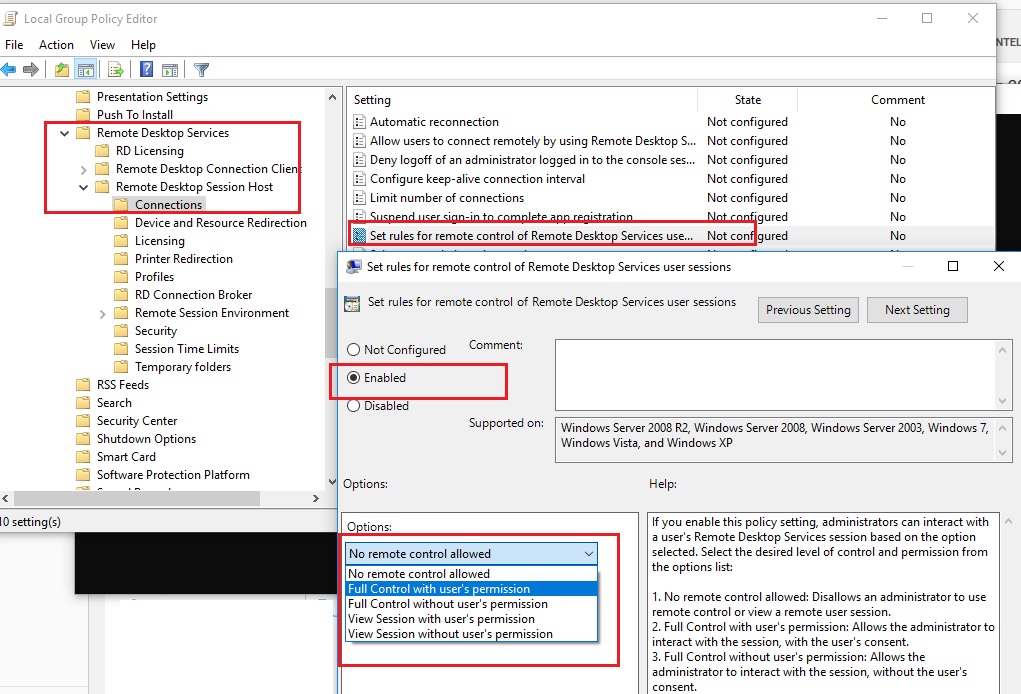
Параметры удаленного управлениями RDS сессиями пользователя настраиваются отдельным параметром групповых политик — Set rules for remote control of Remote Desktop Services user sessions (Установить правила удаленного управления для пользовательских сеансов служб удаленных рабочих столов). Данная настройка находится в разделе Policies -> Administrative Templates -> Windows components -> Remote Desktop Services -> Remote Session Host -> Connections (Административные шаблоны –> Компоненты Windows –> Службы удаленных рабочих столов – Узел сеансов удаленных рабочих столов –> Подключения) в пользовательской и компьютерной секциях GPO. Данной политике соответствует DWORD параметр реестра Shadow в ветке HKLM\SOFTWARE\Policies\Microsoft\Windows NT\Terminal Services (значения этого параметра, соответствующие параметрам политики указаны в скобках).
Этой политикой можно настроить следующие варианты теневого подключения RD Shadow:
- No remote control allowed — удаленное управление не разрешено (значение параметра реестра
Shadow = 0
); - Full Control with users’s permission — полный контроль сессии с разрешения пользователя (
1
); - Full Control without users’s permission — полный контроль без разрешения пользователя (
2
); - View Session with users’s permission – наблюдение за сеансом с разрешением пользователя (
3
); - View Session without users’s permission – наблюдение за сеансом без разрешения пользователя (
4
).
Вы можете настроить правила удаленного подключения в домене из консоли управления GPO
gpmc.msc
с помощью рассмотренного параметра политики, либо групповой политикой, вносящей изменения напрямую в реестр системы (последний вариант позволяет более тонко нацелить политику на компьютеры с помощью Group Policy Item Level Targeting).
Теневое подключение RDS Shadow из PowerShell
Воспользоваться функционалом теневого подключения к сессии пользователя через теневое подключение Remote Desktop Services можно и из Powershell.
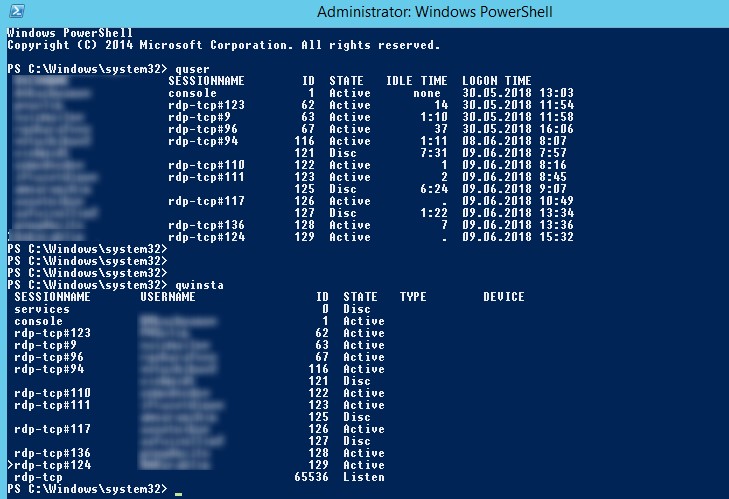
В первую очередь нужно получить список пользовательских сессий на терминальном RDS сервере (сессии пользователей будут сгруппированы в группы в зависимости от их статуса):
Get-RDUserSession | ft Username, UnifiedSessionId, SessionState, HostServer, ApplicationType -GroupBy Sessionstate

На данном сервере мы обнаружили три активных RDP сессии пользователей. Чтобы подключиться к сессии пользователя с ID сессии 3, выполните команду:
Mstsc /shadow:3 /control /noConsentPrompt
Также для получения списка всех RDP сессии на сервере (или десктопной редакции Windows 10 к которой разрешены множественные RDP подключения) можно использовать команду:
quser
Или
qwinsta
На экране отобразится список RDP сессий, их ID и статус: активная сессия (Active) или отключенная (Disconnected).
Для получения списка сессий на удалённом сервере выполните команду:
query session /server:servername
Чтобы подключиться к сессии пользователя на удаленном сервере, используйте команду:
Mstsc /v:rdsh2:3389 /shadow:3 /control
Для более удобного теневого подключения к RDP сессиям пользователей можно использовать следующий скрипт. Скрипт предложит ввести имя удаленного компьютера и выведет список всех пользователей с активными RDP сеансами. Вам нужно будет указать ID сеанса, к которому нужно подключится через Shadow сессию:
shadow.bat
@echo off
set /P rcomp="Enter name or IP of a Remote PC: "
query session /server:%rcomp%
set /P rid="Enter RDP user ID: "
start mstsc /shadow:%rid% /v:%rcomp% /control
Можно поместить данный файл в каталог %Windir%\System32. В результате для теневого подключения к пользователю достаточно выполнить команду shadow.
Для подключения к консольной сессии можно использовать такой скрипт:
@echo off
set /P rcomp="Enter name or IP of a Remote PC: "
for /f "tokens=3 delims= " %%G in ('query session console /server:%rcomp%') do set rid=%%G
start mstsc /shadow:%rid% /v:%rcomp% /control
Также для теневого подключения можно использовать следующий PowerShell скрипт с простым графическим интерфейсом (rdp_shadow_connection.ps1):
Add-Type -assembly System.Windows.Forms
$Header = "SESSIONNAME", "USERNAME", "ID", "STATUS"
$dlgForm = New-Object System.Windows.Forms.Form
$dlgForm.Text ='Session Connect'
$dlgForm.Width = 400
$dlgForm.AutoSize = $true
$dlgBttn = New-Object System.Windows.Forms.Button
$dlgBttn.Text = 'Control'
$dlgBttn.Location = New-Object System.Drawing.Point(15,10)
$dlgForm.Controls.Add($dlgBttn)
$dlgList = New-Object System.Windows.Forms.ListView
$dlgList.Location = New-Object System.Drawing.Point(0,50)
$dlgList.Width = $dlgForm.ClientRectangle.Width
$dlgList.Height = $dlgForm.ClientRectangle.Height
$dlgList.Anchor = "Top, Left, Right, Bottom"
$dlgList.MultiSelect = $False
$dlgList.View = 'Details'
$dlgList.FullRowSelect = 1;
$dlgList.GridLines = 1
$dlgList.Scrollable = 1
$dlgForm.Controls.add($dlgList)
# Add columns to the ListView
foreach ($column in $Header){
$dlgList.Columns.Add($column) | Out-Null
}
$(qwinsta.exe | findstr "Active") -replace "^[\s>]" , "" -replace "\s+" , "," | ConvertFrom-Csv -Header $Header | ForEach-Object {
$dlgListItem = New-Object System.Windows.Forms.ListViewItem($_.SESSIONNAME)
$dlgListItem.Subitems.Add($_.USERNAME) | Out-Null
$dlgListItem.Subitems.Add($_.ID) | Out-Null
$dlgListItem.Subitems.Add($_.STATUS) | Out-Null
$dlgList.Items.Add($dlgListItem) | Out-Null
}
$dlgBttn.Add_Click(
{
$SelectedItem = $dlgList.SelectedItems[0]
if ($SelectedItem -eq $null){
[System.Windows.Forms.MessageBox]::Show("Выберите сессию для подключения")
}else{
$session_id = $SelectedItem.subitems[2].text
$(mstsc /shadow:$session_id /control)
#[System.Windows.Forms.MessageBox]::Show($session_id)
}
}
)
$dlgForm.ShowDialog()
Данный скрипт отобразить графическую форму со списком активных RDP сеансов на локальном сервере. Вам останется только выбрать учетную запись пользователя и нажать Connect.
Вы можете использовать теневое подключение к пользователю не только в Windows Server с ролью Remote Desktop Services, но и для подключения к рабочим столам пользователей на компьютерах с Windows 10 .
Как разрешить обычном пользователям использовать теневое подключение?
В рассмотренных выше примерах для использования теневого подключения к RDP сессиям пользователей необходимы права локального администратора на RDS сервере. Однако вы можете разрешить использовать теневое (shadow) подключение и для непривилегированных пользователей (не предоставляя им прав локального администратора на компьютере/сервере).
К примеру, вы хотите разрешить членам доменной группы AllowRDSShadow использовать теневое подключение к RDP сессиям. Выполните команду в cmd.exe с правами администратора:
wmic /namespace:\\root\CIMV2\TerminalServices PATH Win32_TSPermissionsSetting WHERE (TerminalName='RDP-Tcp') CALL AddAccount 'corp\AllowRDSShadow',2
В январе 2018 года после установки обновления KB4056898 (патч Windows против Meltdown и Spectre) пользователи столкнулись, что в Windows Server 2012 R2 перестал работать теневой доступ. При попытке выполнить теневое подключение к чужой сессии появляется сообщение «Неопознанная ошибка» (в логах присутствует ошибка
STATUS_BAD_IMPERSONATION_LEVEL
). Аналогичная проблема возникала и на RDS ферме на базе Windows Server 2016.
Для решения проблемы нужно установить отдельные обновления:
- для Windows Server 2016 — KB4057142 (от 17 января 2018)
- для Windows Server 2012 R2 — KB4057401 (от 17 января 2018)

Windows Server 2019
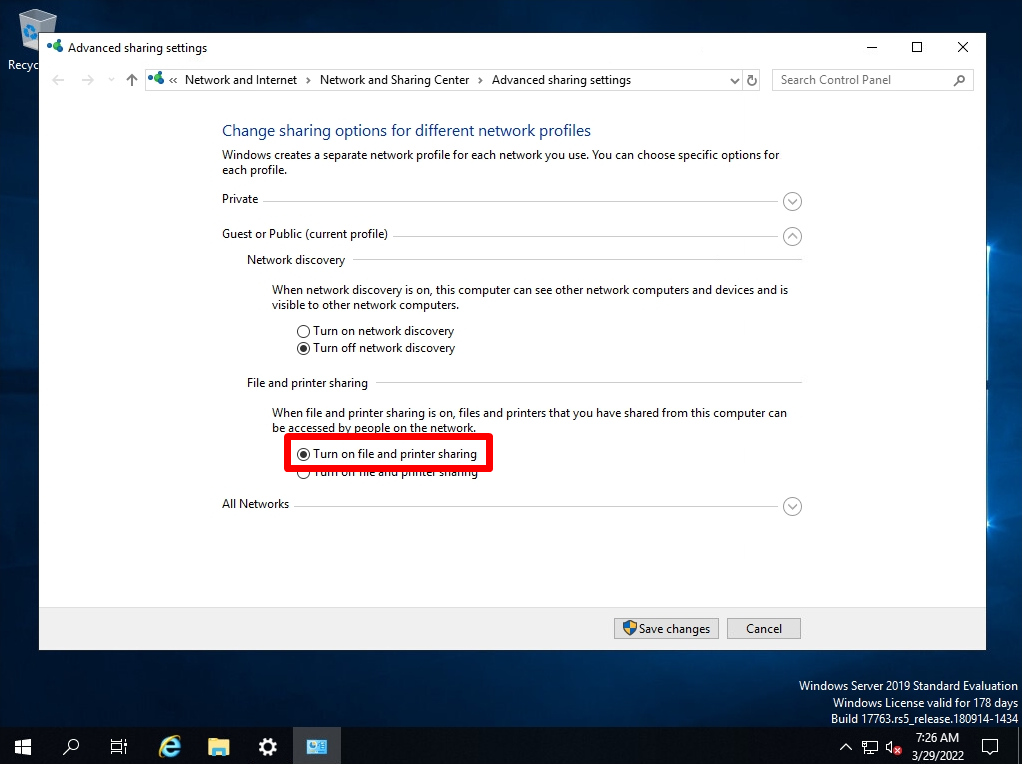
The remote desktop session shadowing setting of Windows Server 2019 is a function that allows two people to share the screen of the remote desktop destination from a terminal such as Windows 10. To enable it, change the “File and Printer Sharing Settings” in the Network and Sharing Center and the “Set rules for remote control of Remote Desktop Services user sessions” item in Group Policy on the Windows Server 2019 side.
As a usage scene that recommends session shadowing, when building or changing settings of Windows Server, there are cases where multiple people want to see the same screen and check if there are any mistakes before setting. The demand for working remotely is increasing. We recommend that you use it as needed.
Windows Server 2019:Change prerequisite settings
Enable Windows Server 2019 File and printer sharing as a prerequisite for using Remote Desktop Session Shadowing.
As a prerequisite for using Remote Desktop Session Shadowing, enable “Set rules for remote control of Remote Desktop Services user sessions” in the Group Policy setting of Windows Server 2019.
[Computer Configuration]
-[Administrative Templates]
-[Windows Components]
-[Remote Desktop Services]
-[Remote Desktop Session Host]
- [Connections]
-[Set rules for remote control of Remote Desktop Services user sessions]
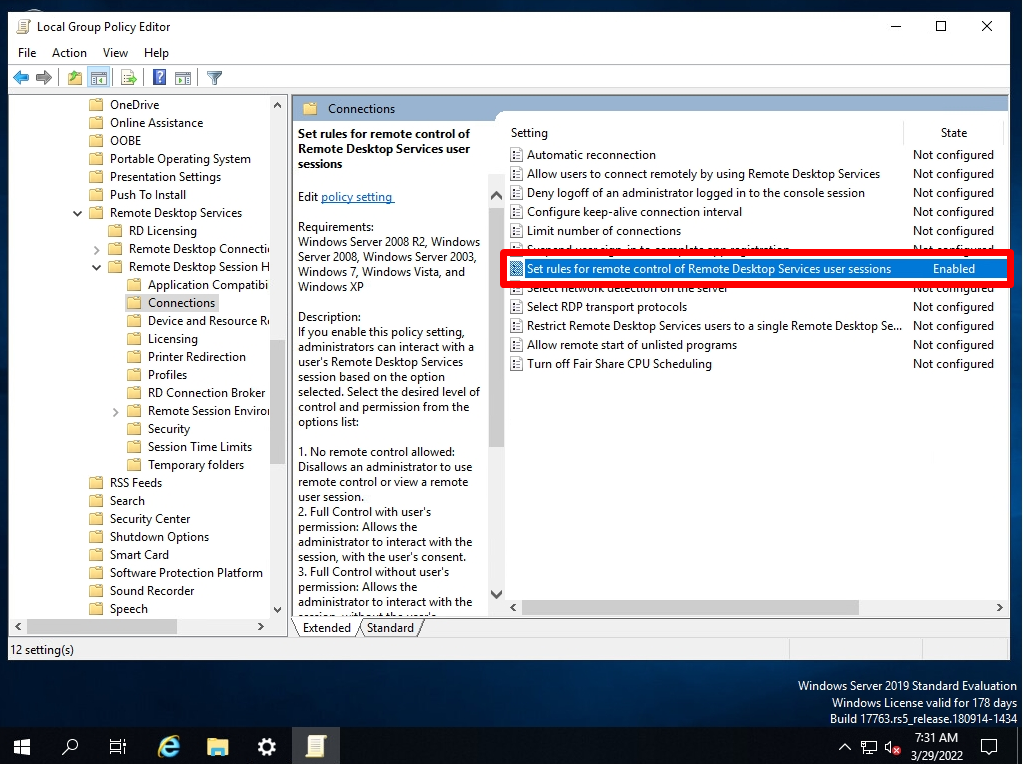
Set the setting value set in Group Policy according to the situation.
*In this article, full control is selected and option settings are changed with the permission of the user.
Windows Server 2019:Check Session ID
To share the screen of the remote desktop destination, you need to connect with the same Session ID. Make an RDP connection to Windows Server 2019 and check the Session ID.
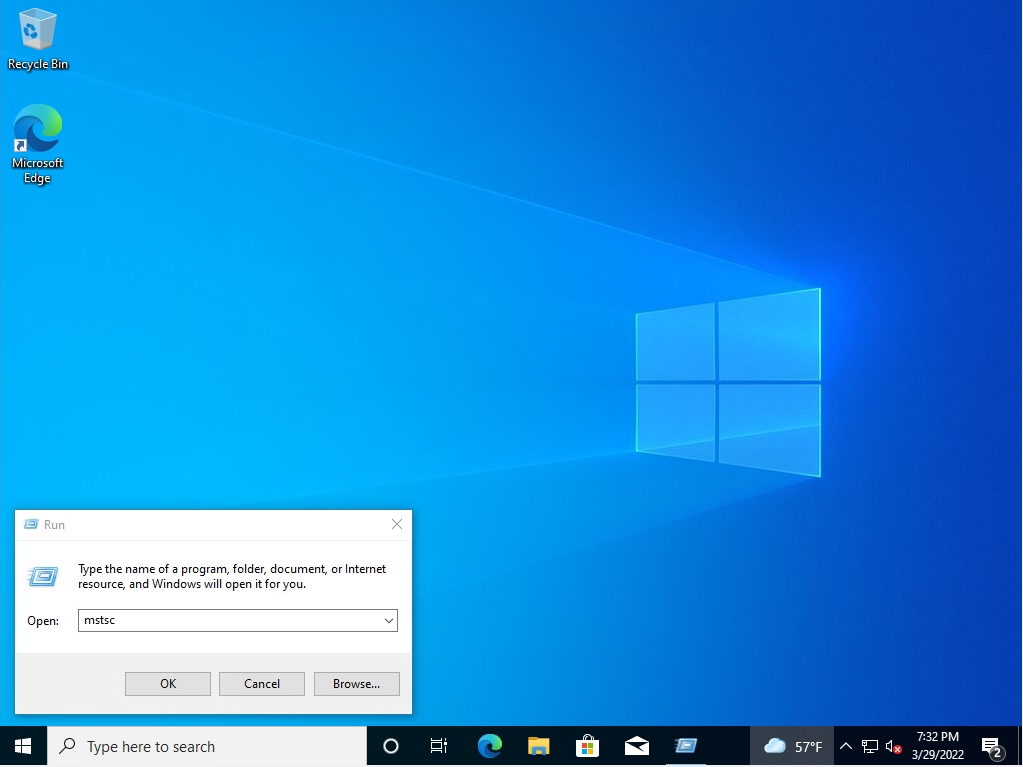
Step 1:
Select “Run” on the connection source terminal.
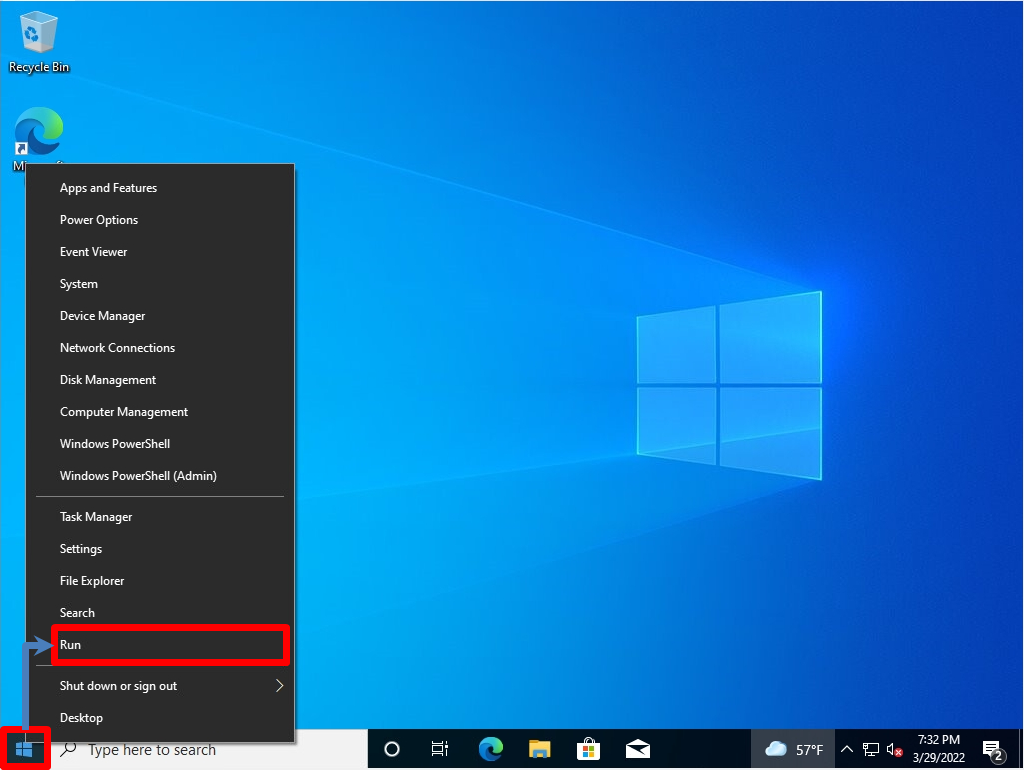
Step 2:
Enter mstsc -> select OK.
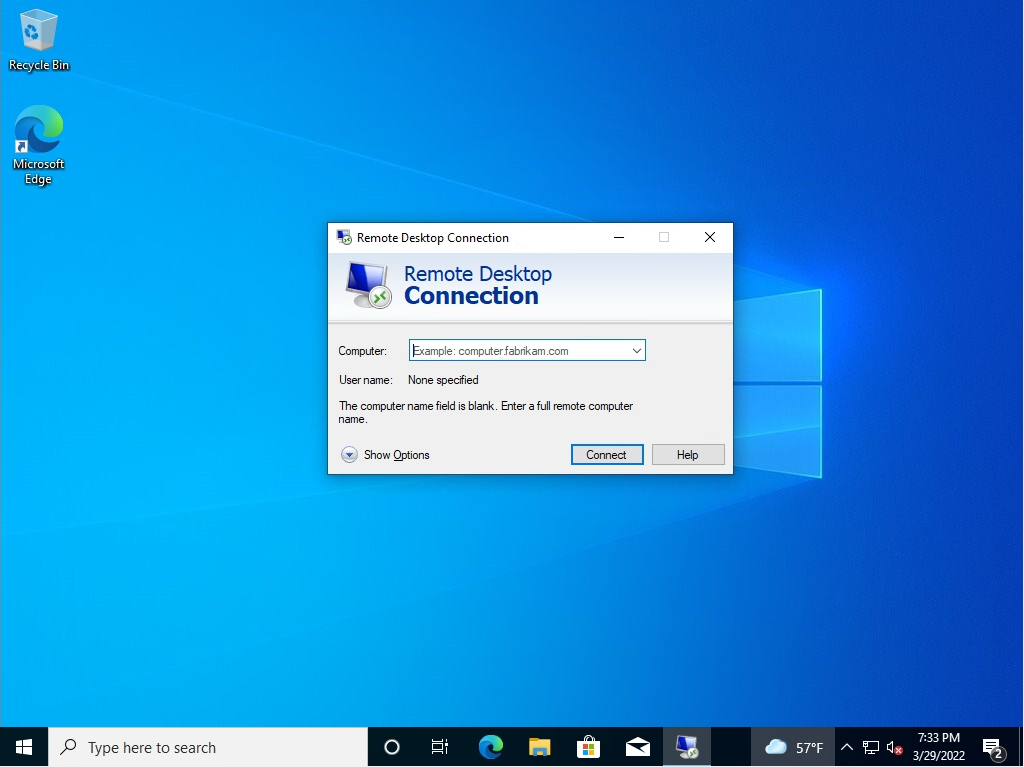
Step 3:
Enter the computer name or IP address of the remote connection destination and select the connection.
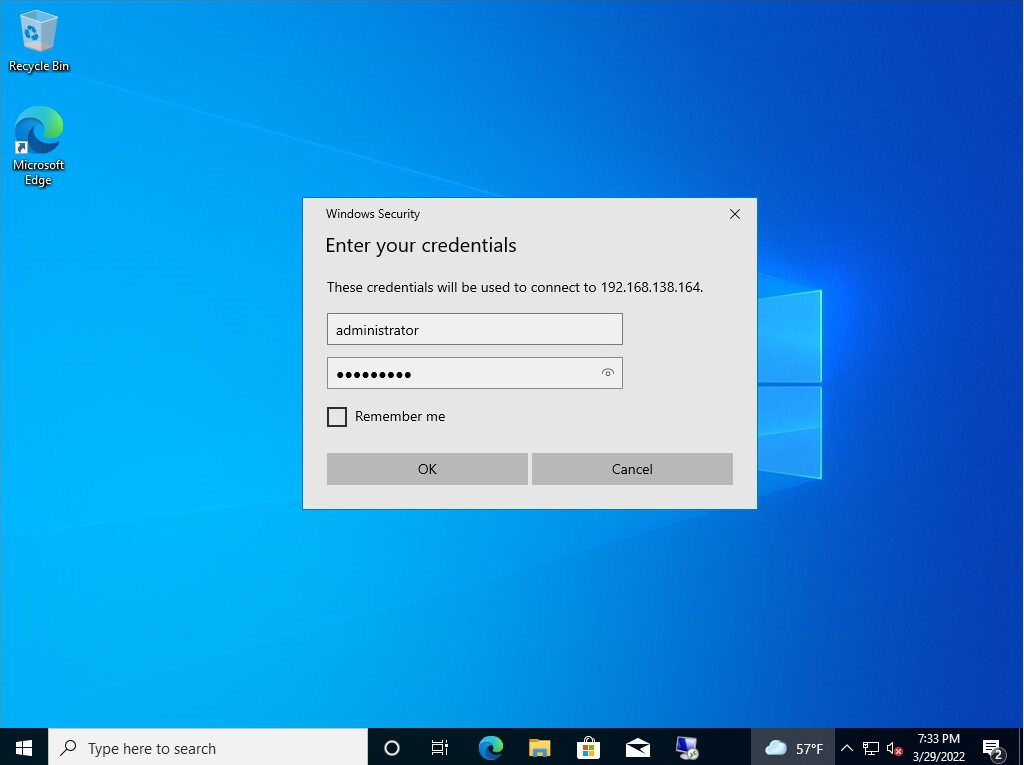
Step 4:
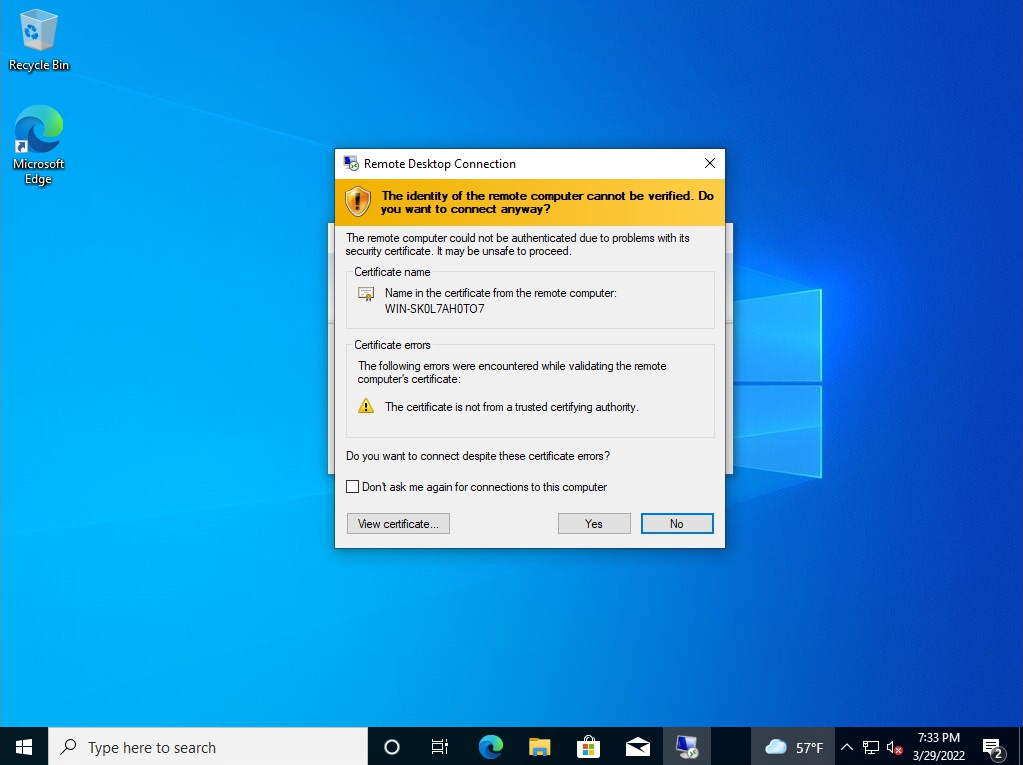
Enter the account password to connect to on the credentials entry screen.
Select “Yes” when the security certificate screen is displayed.
Step 5:
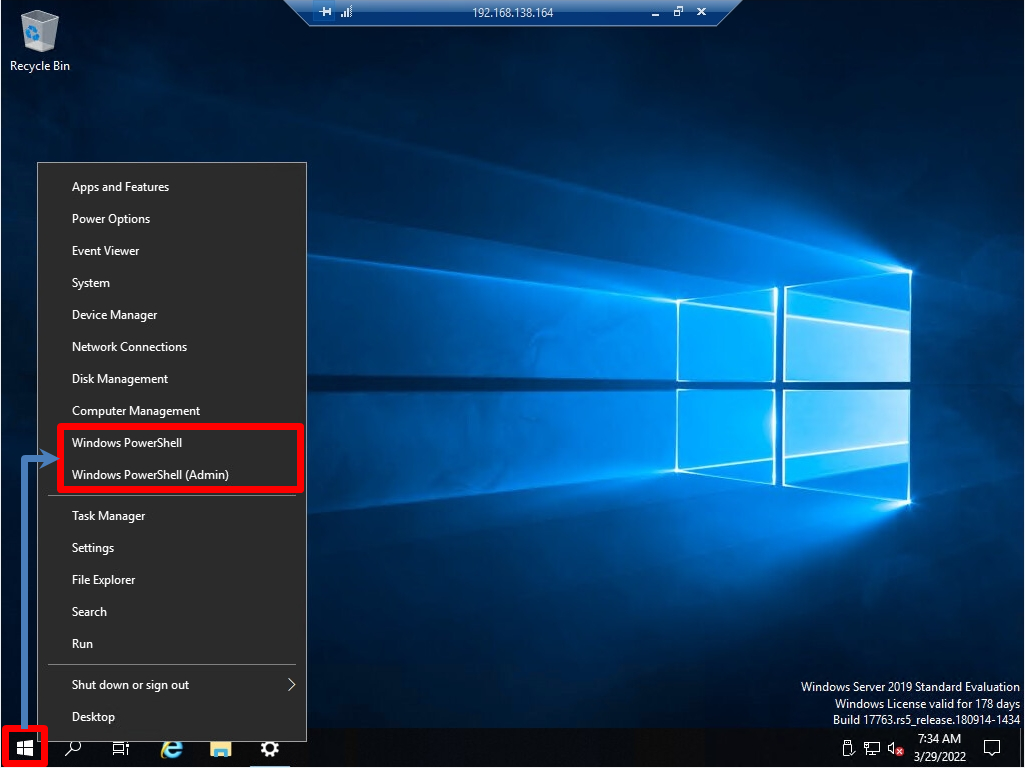
Right-click the Windows mark at the bottom left of the Windows Server 2019 desktop to which you want to connect remotely -> select Windows PowerShell.
Step 6:
Execute the “query session” command to check the session ID. The ID is displayed in the format of rdp-tcp# [ID].

Share the screen of the remote desktop destination from the client terminal
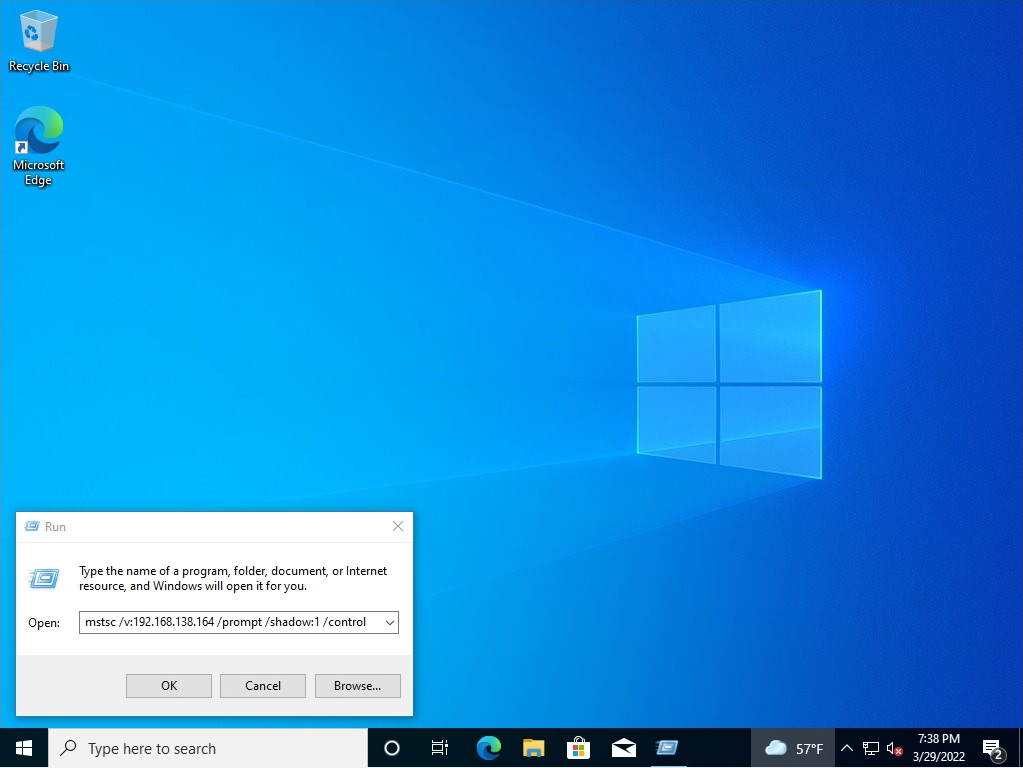
Step 1:
Select “Run” on the second person’s device.

Step 2:
Enter and execute the command in the following format.
mstsc /v:[IP address or host name of remote connection destination] /prompt /shadow: [session ID] /control
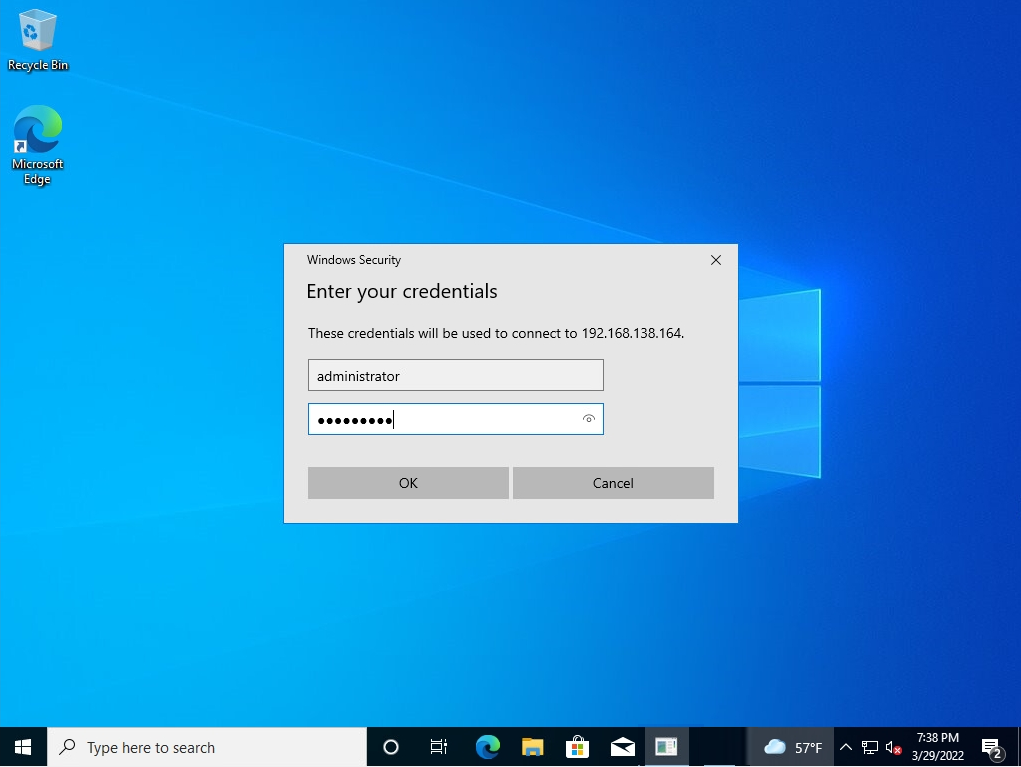
Step 3:
Credential entry screen:Enter the account password to connect to.
Step 4:
The acceptance of the remote control request is displayed on the screen of the terminal that is already remotely connected. Select “Yes”.
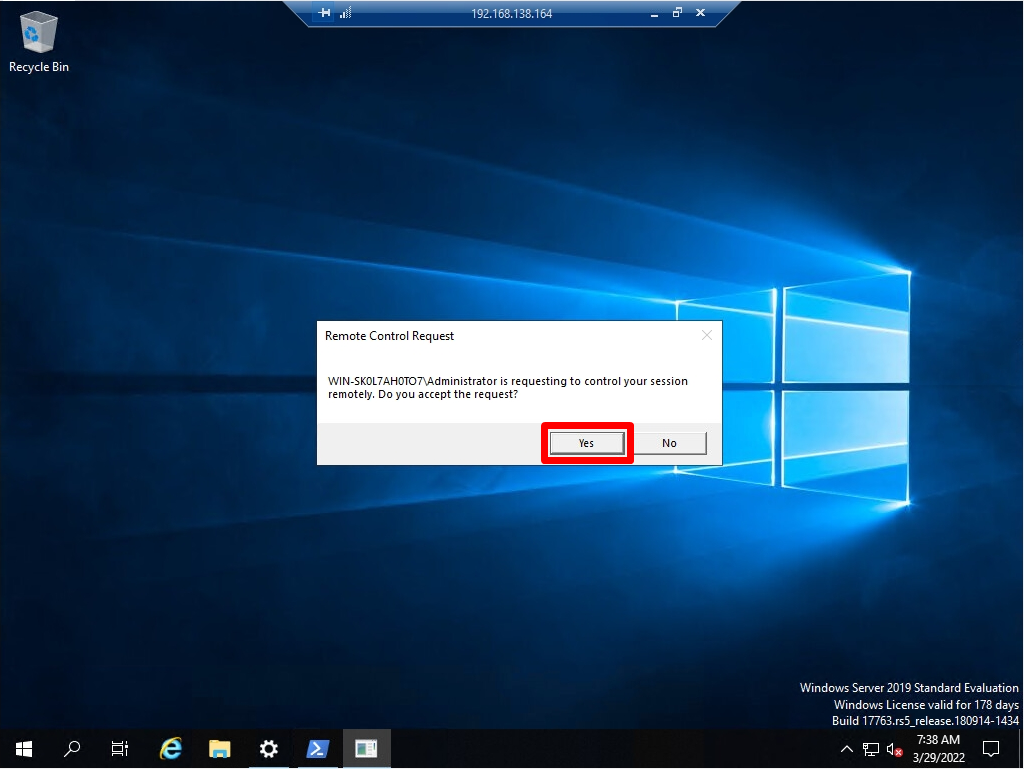
If the remote control request is rejected, or if it does not respond for about 25-30 seconds and is not accepted, “The operator or administrator has refused the request.” is returned.
Step 5:
Confirm that you can share the screen of the remote desktop destination.
Shadow session mode allows RDS administrators to view and interact with the user’s desktop. Remote Desktop Shadowing mode works on all modern versions of Windows starting from Windows Server 2012 R2 and Windows 8.1 (except for Windows Server 2012, due to the transfer of the RDP stack from kernel to user mode). In this article, we’ll look at how to configure and use RDS Shadowing to connect and manage active RDP user sessions on Windows Server 2016 and Windows 10.
Contents:
- Shadow Connection Options in the Windows RDP Client (mstsc.exe)
- Using Remote Desktop Shadow from the Windows GUI
- Configuring RDS Shadow Rules on Windows Using GPO
- Shadowing RDP Session with PowerShell
- How-to Allow Non-admin Users to Shadow RDS Sessions?
Shadow Connection Options in the Windows RDP Client (mstsc.exe)
On Windows Server 2016/Windows 10, the built-in RDP client (mstsc.exe) has several special options that can be used to remotely shadow connect to an active RDP session of any user:
Mstsc.exe [/shadow:sessionID [/v:Servername] [/control] [/noConsentPrompt] [/prompt]]
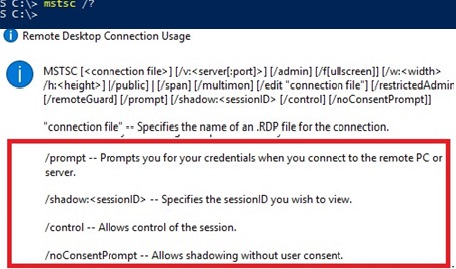
- /shadow:ID – connect to the user’s RDP session with the specified ID;
- /v:servername – you can specify the hostname or IP address of the remote RDP/RDS host. If not set, connections are made to local user sessions on the current host;
- /control – allows to interact with the user session (desktop). The administrator can control the user’s mouse, input data from the keyboard. If this parameter is not set, the user’s session view mode is used;
- /noConsentPrompt – the option allows the administrator to force the connection to any session without asking the user to confirm the connection;
- /prompt – allows to connect with other credentials. The user name and password are requested to connect to the remote computer.
Shadow sessions can be used to connect to user sessions on computers and servers in both an Active Directory domain and a workgroup. In addition, it is not necessary to have administrator privileges on the RDS host on this the user’s RDP session is running . Administrators can delegate RDS Shadowing permissions to any user account, even for non-admins (more on this below).
Using Remote Desktop Shadow from the Windows GUI
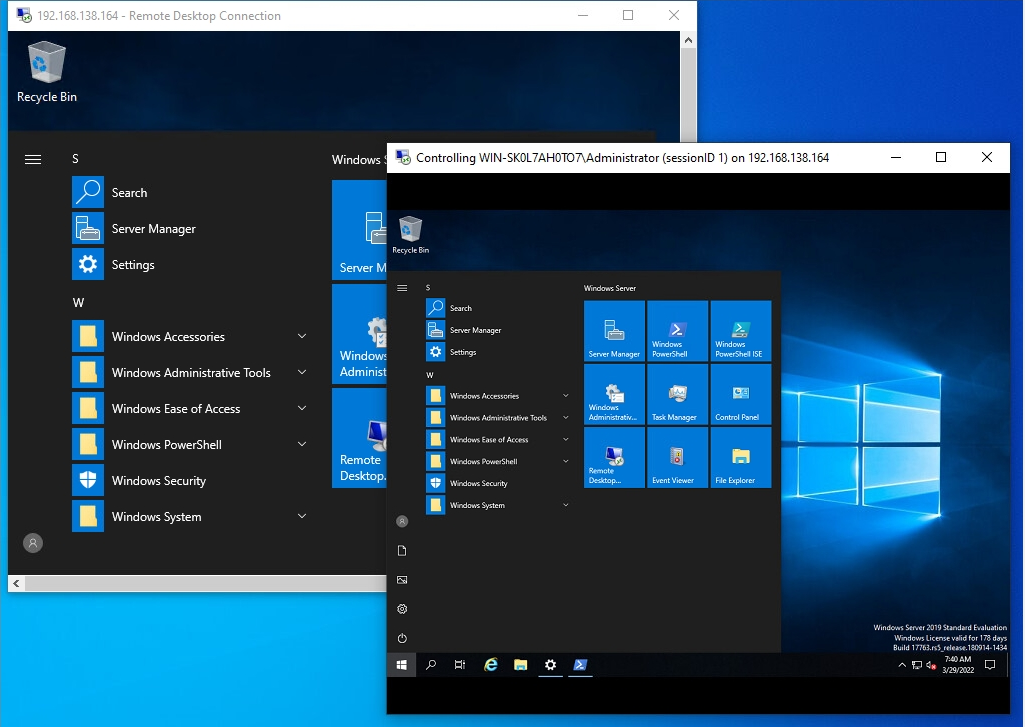
You can connect to a user session using mstsc.exe or directly from Server Manager graphical console. To do it, open the Server Manager console on the RDS server, go to the Remote Desktop Services section -> select your collection, for example QuickSessionCollection.
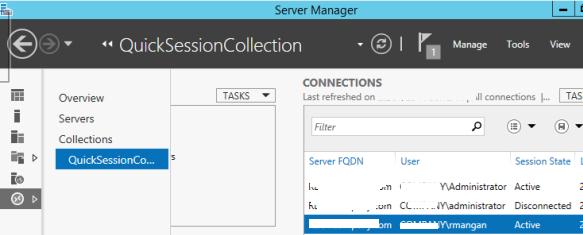
The list on the right will contain a list of users who have sessions on this RDS server. Right-click on the user session you want, select Shadow from the drop-down menu.
You can only connect to an active user session. If the session is in a disconnected state (due to the RDS session limit/timeout settings), you cannot connect to such a session:
Shadow Error - The specified session is not connected.
A window with Shadow connection parameters will appear. You can either View or Control a user’s RDP session. You can also check Prompt for user consent option.
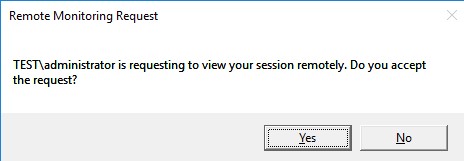
If this option is checked, the following request appears in the user’s RDP session:
Remote Monitoring Request
woshub\administrator is requesting to view your session remotely. Do you accept the request?
If the user confirms the connection, the administrator will see his desktop in View mode, but won’t be able to interact with it.
Tip. To disconnect from a user session and exit the Shadow mode, press ALT+* on the workstation or Ctrl+* on the RDS server (if no alternative combinations are not set).
If a user rejects the administrative Shadow RDS connection, the following message appears:
Shadow Error: The operator or administrator has refused the request.
If you attempt to connect to a user’s session without prompting for confirmation, you receive an error message:
Shadow Error: The Group Policy setting is configured to require the user’s consent. Verify the configuration of the policy settings.
If you need to audit RDS shadow connection events for user sessions, use the following filtered events from the Microsoft-Windows-TerminalServices-RemoteConnectionManager/Operational log:
- Event ID 20508: Shadow View Permission Granted;
- Event ID 20503: Shadow View Session Started;
- Event ID 20504: Shadow View Session Stopped.
Configuring RDS Shadow Rules on Windows Using GPO
The settings for remote connections to RDS user sessions are configured using the Group Policy parameter Set rules for remote control of Remote Desktop Services user sessions, which is located under the User and Computer sections of the GPO: Policies -> Administrative Templates -> Windows components -> Remote Desktop Services -> Remote Session Host -> Connections. This policy corresponds to the DWORD Shadow parameter under the registry key HKLM\SOFTWARE\Policies\Microsoft\Windows NT\Terminal Services (the values of this parameter corresponding to the policy settings are specified in brackets).
This policy can be used to configure the following RD Shadow connection options:
- No remote control allowed (corresponds to the value of the registry parameter
Shadow = 0); - Full Control with user’s permission (
1); - Full Control without user’s permission (
2); - View Session with user’s permission (
3); - View Session without user’s permission (
4).
To set the parameter of this policy directly through the registry, you can use the command:
reg add "HKEY_LOCAL_MACHINE\SOFTWARE\Policies\Microsoft\Windows NT\Terminal Services" /v Shadow /t REG_DWORD /d 4
You can configure rules for remote shadow connections in the AD domain from the gpmc.msc console using the policy parameter described above, or by using Group Policy Preferences, which directly modify the registry parameter (the latter option allows you to more accurately target the policy to specific computers using the Group Policy Item Level Targeting).
Shadowing RDP Session with PowerShell
You can also use the Remote Desktop Services Shadow features to connect to a user’s session from PowerShell. First of all, you need to get a list of sessions on the RDS host (user sessions will be grouped according to their state):
Get-RDUserSession | ft Username, UnifiedSessionId, SessionState, HostServer, ApplicationType -GroupBy Sessionstate

There are three active RDP user sessions on this server. Let’s connect to the user session with the session ID 3:
Mstsc /shadow:3 /control
Also, to get a list of all RDP sessions on the server (or on the Windows 10 desktop to which multiple RDP connections are allowed), you can use the command:
quser
or
qwinsta
The screen will display a list of RDP user sessions, their IDs and states: Active or Disconnected.
To show the list of sessions on a remote server, run the following command:
query session /server:servername
To connect to a user session on a remote server, use the command:
mstsc /v:rdsh2:3389 /shadow:3 /control
The dynamic port range (RPC) 49152 to 65535 is used to establish a remote shadow connection session instead of the default TCP/3389 RDP port.
For more convenient shadow connection to RDP user sessions, you can use the following batch script. It prompts you to enter the name of the remote RDS server, displays a list of all sessions and prompts you to specify the session (ID) to which you want to connect to:
shadow.bat
@echo off
 set /P rcomp="Enter name or IP of a Remote PC: "
 query session /server:%rcomp%
 set /P rid="Enter RDP user ID: "
 start mstsc /shadow:%rid% /v:%rcomp% /control
You can save this bat file in the %Windir%\System32 directory. As a result, you just need to run the shadow command to start the shadow connection.
To connect to the console session, you can use this script:
shadow_console.bat
@echo off
 set /P rcomp="Enter name or IP of a Remote PC: "
 for /f "tokens=3 delims= " %%G in ('query session console /server:%rcomp%') do set rid=%%G
 start mstsc /shadow:%rid% /v:%rcomp% /control
You can also use the following PowerShell script with a simple GUI (shadow_user_rdp_session.ps1) for shadow connection:
Add-Type -assembly System.Windows.Forms
 $Header = "SESSIONNAME", "USERNAME", "ID", "STATUS"
 $gForm = New-Object System.Windows.Forms.Form
 $gForm.Text ='Shadow Session Connect'
 $gForm.Width = 400
 $gForm.AutoSize = $true
 $dBttn = New-Object System.Windows.Forms.Button
 $dBttn.Text = 'Control'
 $dBttn.Location = New-Object System.Drawing.Point(15,10)
 $gForm.Controls.Add($dBttn)
 $dList = New-Object System.Windows.Forms.ListView
 $dList.Location = New-Object System.Drawing.Point(0,50)
 $dList.Width = $gForm.ClientRectangle.Width
 $dList.Height = $gForm.ClientRectangle.Height
 $dList.Anchor = "Top, Left, Right, Bottom"
 $dList.MultiSelect = $False
 $dList.View = 'Details'
 $dList.FullRowSelect = 1;
 $dList.GridLines = 1
 $dList.Scrollable = 1
 $gForm.Controls.add($dList)
 foreach ($column in $Header){
 $dList.Columns.Add($column) | Out-Null
 }
 $(qwinsta.exe | findstr "Active") -replace "^[\s>]" , "" -replace "\s+" , "," | ConvertFrom-Csv -Header $Header | ForEach-Object {
 $dListItem = New-Object System.Windows.Forms.ListViewItem($_.SESSIONNAME)
 $dListItem.Subitems.Add($_.USERNAME) | Out-Null
 $dListItem.Subitems.Add($_.ID) | Out-Null
 $dListItem.Subitems.Add($_.STATUS) | Out-Null
 $dList.Items.Add($dListItem) | Out-Null
 }
 $dBttn.Add_Click(
 {
 $SelectedItem = $dList.SelectedItems[0]
 if ($SelectedItem -eq $null){
 [System.Windows.Forms.MessageBox]::Show("Select a user session to connect ")
 }else{
 $session_id = $SelectedItem.subitems[2].text
 $(mstsc /shadow:$session_id /control)
 #[System.Windows.Forms.MessageBox]::Show($session_id)
 }
 }
 )
 $gForm.ShowDialog()
This script displays a simple graphical form with a list of active RDP sessions on the local host. You just need to select a user account and click the Connect button.
To run PowerShell scripts (*.ps1) on the computer, you need to configure the PowerShell Execution policy.
You can use the shadow user connection not only on Windows Server with the Remote Desktop Services role, but also to connect to users’ desktops running Windows 10 (Using Remote Desktop Session Shadowing Mode in Windows 10).
How-to Allow Non-admin Users to Shadow RDS Sessions?
In the examples above, using the shadow connection to RDS user sessions requires local administrator privileges on the RDS server. However, you can allow a non-admin user to shadow RDP sessions without granting local admin permissions on the computer/server.
For instance, you want to allow members of the AllowRDSShadow group to use a shadow connection to RDP user sessions. Open the elevated command prompt (cmd.exe) and run the command:
wmic /namespace:\\root\CIMV2\TerminalServices PATH Win32_TSPermissionsSetting WHERE (TerminalName=”RDP-Tcp”) CALL AddAccount “woshub\AllowRDSShadow”,2
Вы можете использовать возможности теневых подключений (Remote Desktop Shadowing) для удалённого подключение к сессиям пользователей на компьютерах Windows. Это функционал является по сути аналогом Remote Assistance и позволяет администраторам удаленно просматривать и взаимодействовать с рабочим столом пользователей как на десктопных версиях (Windows 11 или 10), так и на RDS серверах Windows Server.
Remote Desktop Shadowing часто используется администраторами для оказания поддержки пользователям RDS ферм Windows Server.
Настройка клиентов Windows для удаленного подключения через теневые сессии
Вам нужно определенным образом настроить компьютеры, к которым вы хотите подключаться через теневое подключение.
-
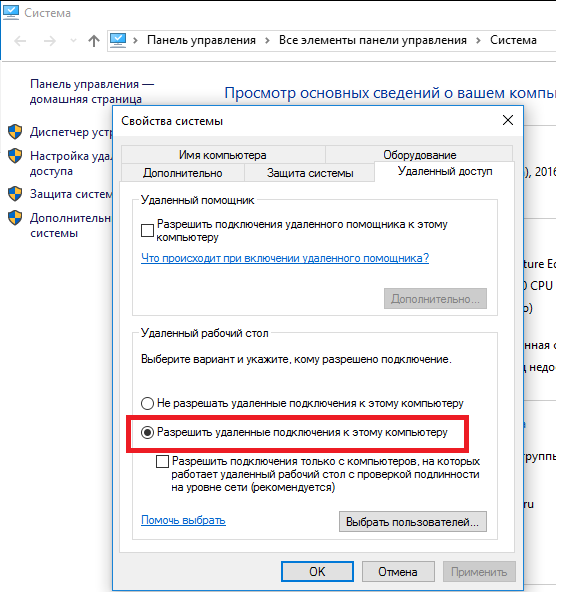
- Включите удаленный рабочий стол (RDP) на компьютерах пользователей (вручную или через GPO);

- Ваша учетная запись должна обладать правами локального администратора на компьютере пользователей (вы можете добавить пользователя в группу администраторов вручную или с помощью групповых политик);
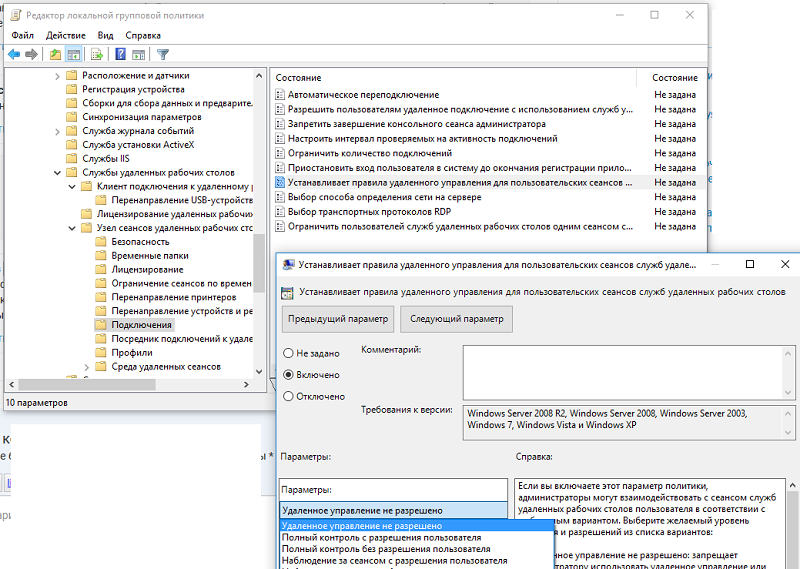
- Настройте режим теневого подключения (нужно ли запрашивать подтверждение пользователя, и возможно управления в сессии или только наблюдение). Можно настроить режим через групповую политику “Установить правила удаленного управления для пользовательских сеансов служб удаленных рабочих столов” (Set rules for remote control of Remote Desktop Services user sessions) в разделе Конфигурация компьютера -> Административные шаблоны –> Компоненты Windows –> Службы удаленных рабочих столов –> Узел сеансов удаленных рабочих столов –> Подключения (Policies -> Administrative Templates -> Windows components -> Remote Desktop Services -> Remote Session Host -> Connections).
Доступны 5 режимов:
0 – запретить удаленное управление;
1 — полный контроль с разрешения пользователя;
2 — полный контроль без разрешения пользователя;
3 — наблюдение за сеансом с разрешения пользователя;
4 — наблюдение за сеансом без разрешения пользователя. - Вы можете включить нужный режим напрямую в реестре. Отредактируйте реестр вручную или с помощью команды (в этом примере мы установили 4 режим – разрешить просмотр сеанса пользователя без уведомления): reg add «HKEY_LOCAL_MACHINE\SOFTWARE\Policies\Microsoft\Windows NT\Terminal Services» /v Shadow /t REG_DWORD /d 4
По умолчанию данный теневое подключение выполняется в режиме полного контроля с разрешения пользователя.
- Включите удаленный рабочий стол (RDP) на компьютерах пользователей (вручную или через GPO);
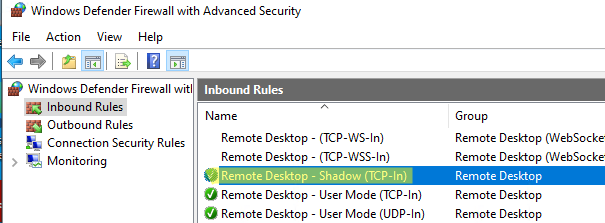
- Настройте правила Windows Defender Firewall, разрешающие трафик теневых подключений по сети. Для трафика session shadowing в Windows вместо стандартного порта 3389/RDP используются порты 139/TCP, 445/TCP и диапазон динамических RPC портов (49152 по 65535). Чтобы разрешить входящий трафик теневых подключений, нужно включить два преднастроненных правила в Windows: File and Printer Sharing (SMB-In) и Remote Desktop — Shadow (TCP-In) . Последнее правило разрешает удаленный доступ к процессу RdpSa.exe . Вы можете включить правила Windows Defender на компьютерах пользователей через GPO или с помощью PowerShell командлета Enable-NetFirewallRule.

Удаленное подключение к сессии пользователя Windows через RDP Shadowing
Рассмотрим, как удаленно подключиться рабочему столу сессии другого пользователя на удаленном компьютере Windows через теневые подключения RDP. В этом примере показано, как подключиться с компьютера Windows 11 к сессии пользователя на рабочей станции пользователя с Windows 10.
Для теневого подключения к сессии пользователя используется стандартная RDP утилита mstsc.exe. Формат команды такой:
Mstsc.exe /shadow:<ID сессии> /v:<Имя или IP адрес компьютера>
Также можно использовать одну из опций:
- /prompt – запросить имя и пароль пользователя, под которым выполняется подключение (если не указано, подключение выполняется под текущим пользователем).
- /control – режим взаимодействия с сеансом пользователя. Если параметр не задан, вы подключитесь в режиме просмотра (наблюдения) сессии пользователя, т.е. вы не сможете управлять его мышью и вводить данные с клавиатуры;
- /noConsentPrompt – не запрашивать у пользователя подтверждение на подключение к сессии.
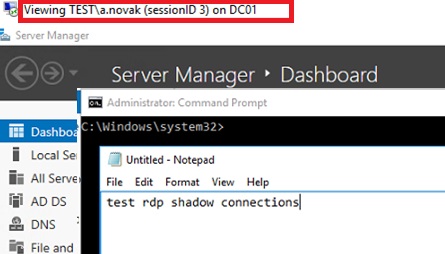
Теперь нужно узнать имя пользователя и ID его сессии на удаленном компьютере (если пользователь работает непосредственно за консолью компьютера, то ID его сессии всегда будет равно 1).
Выведем список сессий пользователей на удаленном компьютере (это может быть как десктопный компьютер с Windows 11/10 или Windows Server с ролью Remote Desktop Services Host (RDSH).
qwinsta /server:wks-w10b01
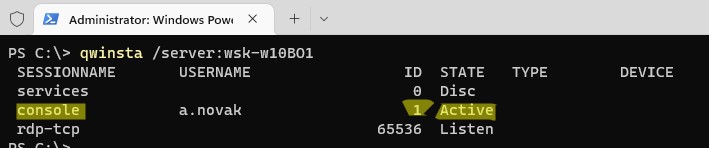
В данном примере видно, что на компьютере залогинен один пользователь a.novak, который работает непосредственно за компьютером ( SESSIONNAME=console ). Идентификатор сессии ID=1.
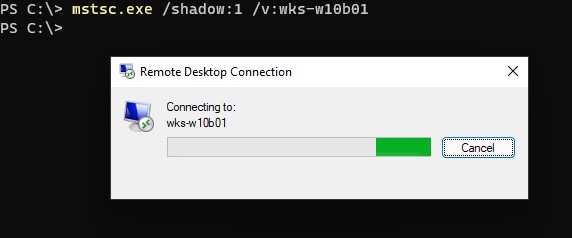
Чтобы подключиться к рабочему столу этого пользователя через теневое подключение, выполните команду:
mstsc.exe /shadow:1 /v:wks-w10b01
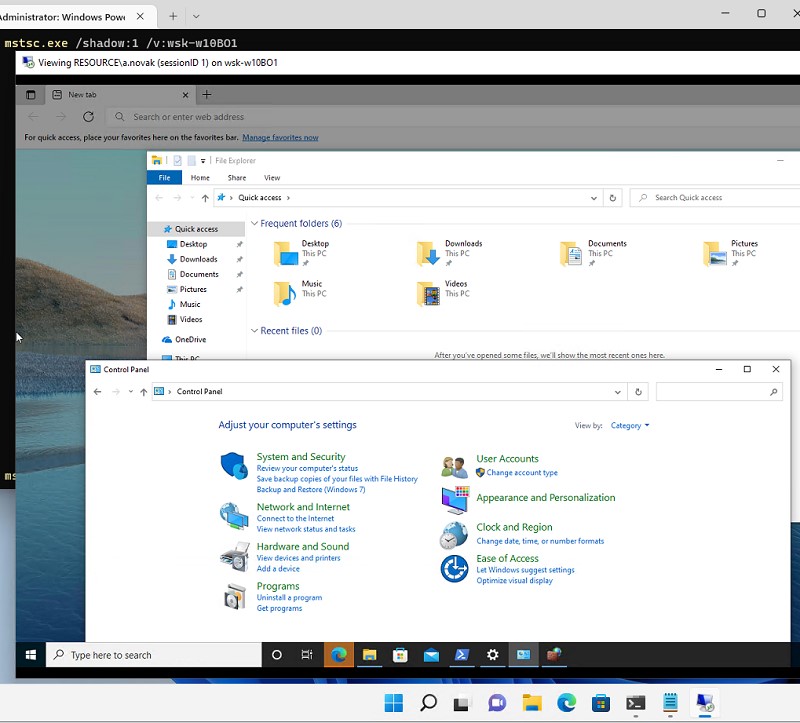
На экране пользователя Windows появится запрос подтверждения подключения администратора к его сеансу:
Запрос на удаленное подключение
Username запрашивает удаленный просмотр вашего сеанса. Вы принимаете этот запрос.

Если служба TermService на удаленном компьютере отключена, то при попытке удалённого подключения через RDP shadow появится ошибка:
The version of Windows running on this server does not support user shadowing

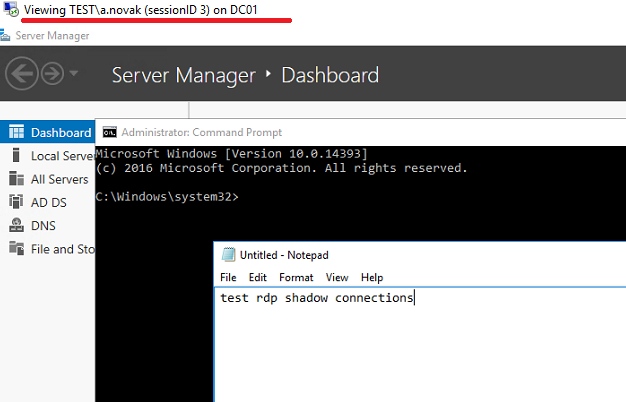
Если пользователь разрешит соединение, вы подключитесь к его консольному сеансу и увидите его рабочий стол. Вы будете видеть все действия пользователя, но не сможете взаимодействовать с его сессией. Если вы хотите управлять его сессией, добавьте в команду параметр /control. В этом случае надпись в заголовке окна сменится с Viewing username (sessionID 1) on computername на Controlling…
В данном случае вы непосредственно подключились к консольной сессии пользователя без блокировки его сеанса. При удаленном подключении к Windows 10 через обычный RDP, то сессия локального отключается (даже если вы включите возможность использования нескольких одновременных RDP сессий в Windows 10).
Если сессия пользователя заблокирована, или появляется запрос повышения привилегий UAC, то без использования режима mstsc /control окно с теневой сессией становится черным и на нем появляется символ паузы.
Теневая сессия переходит в приостановленное состояние, если у пользователя появляется запрос UAC на Secure desktop. После того, как пользователь подтвердит действие UAC, ваша сессия возобновится.
PromptOnSecureDesktop это один из параметров, доступных в групповых политиках UAC.
Чтобы развернуть окно теневой сессии во весь экран, воспользуйтесь комбинацией клавиш Ctrl + Alt + Break.
Для завершения теневой сессии нажмите на компьютере alt+* (или ctrl+* на RDS сервере).
Вы можете оповестить пользователя о том, что кто-то удаленно подключится к его сессии через теневое подключение с помощью следующего PowerShell скрипта:
while($true){
if (Get-Process -Name «RdpSa» -ErrorAction SilentlyContinue){[console]::beep(1000,500);Write-Host «RdpSa is running at $(Get-Date)»}
Start-Sleep -Seconds 1
}
В данном примере мы оповещаем пользователя звуковым оповещением, но вы можете вывести всплывающее уведомление на рабочий стол. Можно запустить этот PowerShell скрипт как службу Windows.
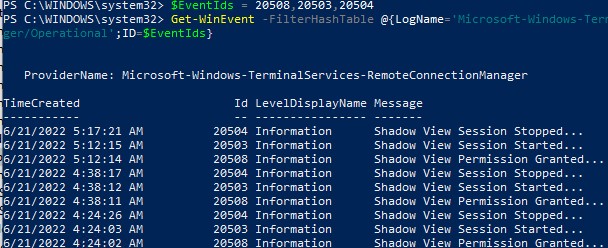
Вы можете получить историю теневых подключений к компьютеру пользователя из журнала событий Windows. Все интересующие вас логи находятся в разделе Microsoft-Windows-TerminalServices-RemoteConnectionManager/Operational:Event Viewer
- Event ID 20508 — Shadow View Permission Granted
- Event ID 20503 — Shadow View Session Started
- Event ID 20504 — Shadow View Session Stopped
Вы можете получить логи теневых подключений к компьютеру с помощью PowerShell:
$EventIds = 20508,20503,20504
Get-WinEvent -FilterHashTable @{LogName=’Microsoft-Windows-TerminalServices-RemoteConnectionManager/Operational’;ID=$EventIds}
Функционал теневого подключения Remote Desktop Shadowing работает в Windows 11/10/ 8.1 и Windows Server 2022/2019/2016/2012 R2. Таким образом Remote Desktop Shadowing можно использовать как аналог Remote Assistance (Удаленный помощник) или TeamViewer/Anydesk для локальной или корпоративной сети.
Rds Shadowing Require User Consent Despite Noconsentprompt Windows Enables you to remotely control an active session of another user on a remote desktop session host server. syntax shadow { | } [ server:] [ v]. In this article, we’ll look at how to configure and use rds shadowing to connect and manage active rdp user sessions on windows server 2016 and windows 10. contents: shadow connection options in the windows rdp client (mstsc.exe).
Unable To Shadow Remote Desktop Session In Windows Server 2012 Dell This post is about how to shadow a user session if the windows remote desktop server is not connected to a domain. if the server is connected to a domain, you can go to server manager, rds manager, and right click on current sessions to shadow and connect. From the 9.0 release and higher, you can remotely control a user session from the vdi app. to start, see here. to shadow the rds server console (session 0) in an rds server session, and not be prompted for permission, you must set the local group policy on the server that runs remote desktop services. Right click sets rules for remote control of terminal services user sessions, and then click properties. this is the gpo, if you need non admins to shadow sessions change the security groups to the ones you want. Learn how to use the shadow feature to monitor or control rdp user sessions on a remote desktop services (rds) server using trugrid’s secure rdp solution.
Shadow Is Scrolled When Using Remote Desktop Client Microsoft Q A Right click sets rules for remote control of terminal services user sessions, and then click properties. this is the gpo, if you need non admins to shadow sessions change the security groups to the ones you want. Learn how to use the shadow feature to monitor or control rdp user sessions on a remote desktop services (rds) server using trugrid’s secure rdp solution. Yes, it is possible to shadow only a remoteapp session in a windows environment. It’s a pretty simple script that allows you to either shadow an rds session, or control it. it first asks you if you’d like to shadow or control the session, then asks you for the host name or ip address of the rds server, then it displays all rds sessions on that server.
Remote Desktop Services Shadowing Beyond The Shadowed Session Pt Swarm Yes, it is possible to shadow only a remoteapp session in a windows environment. It’s a pretty simple script that allows you to either shadow an rds session, or control it. it first asks you if you’d like to shadow or control the session, then asks you for the host name or ip address of the rds server, then it displays all rds sessions on that server.
Remote Desktop Services Shadowing Beyond The Shadowed Session Pt Swarm
Remote Desktop Services Shadowing Beyond The Shadowed Session Pt Swarm