
Протокол RDP с защитой на уровне сети (SSL), к сожалению, не получил широкого распространения среди системных администраторов, предпочитающих защищать терминальные соединения другим способом. Возможно это связано с кажущейся сложностью способа, однако это не так, в данном материале мы рассмотрим как просто и без затруднений организовать такую защиту.
Онлайн-курс по устройству компьютерных сетей
На углубленном курсе «Архитектура современных компьютерных сетей» вы с нуля научитесь работать с Wireshark и «под микроскопом» изучите работу сетевых протоколов. На протяжении курса надо будет выполнить более пятидесяти лабораторных работ в Wireshark.
Какие преимущества дает нам защита RDP при помощи SSL? Во первых надежное шифрование канала, проверку подлинности сервера на основании сертификата и проверку подлинности пользователя на уровне сети. Последняя возможность доступна начиная с Windows Server 2008. Проверка подлинности на уровне сети позволяет повысить безопасность сервера терминалов за счет того, что проверка происходит еще до начала сеанса.
Проверка подлинности на уровне сети производится до подключения к удаленному рабочему столу и отображения экрана входа в систему, это снижает нагрузку на сервер и значительно увеличивает его защиту от злоумышленников и вредоносных программ, а также снижает вероятность атак типа «отказ в обслуживании».
Для полноценного использования всех возможностей RDP через SSL клиентские ПК должны работать под управлением Windows XP SP3, Windows Vista или Windows 7 и использовать RDP клиент версии 6.0 или более поздней.
При использовании Windows Server 2003 SP1 и более поздних версий, будут доступны шифрование канала при помощи SSL (TLS 1.0) и проверка подлинности сервера, клиентские ПК должны иметь версию RDP клиента 5.2 или более позднюю.
В нашей статье мы будем рассматривать настройку терминального сервера на базе Windows Server 2008 R2, однако все сказанное будет справедливо и для Windows Server 2003 (за исключением отсутствующих возможностей).
Для успешной реализации данного решения в вашей сети должен находиться работающий центр сертификации, настройку которого мы рассматривали в предыдущей статье. Для доверия сертификатам выданным данным ЦС на терминальный сервер необходимо установить сертификат ЦС (или цепочку сертификатов) в хранилище Доверенные корневые центры сертификации.
Затем следует выполнить запрос сертификата подлинности сервера со следующими параметрами:
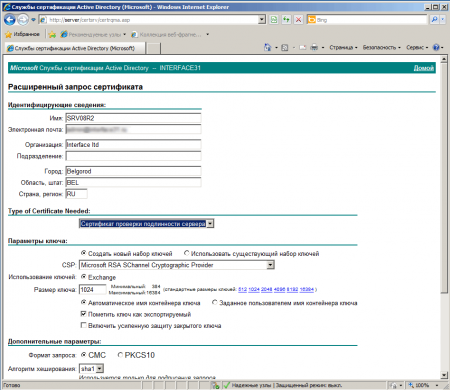
Имя — полное имя терминального сервера (т.е. server.domain.com если сервер входит в домен domain.com)
- Тип сертификата — Сертификат проверки подлинности сервера
- Установите опцию Создать новый набор ключей
- CSP — Microsoft RSA SChannel Cryptographic Provider.
- Установите флажок Пометить ключ как экспортируемый.
- Для ЦС предприятия установите флажок Использовать локальное хранилище компьютера для сертификата. (В автономном ЦС данная опция недоступна).
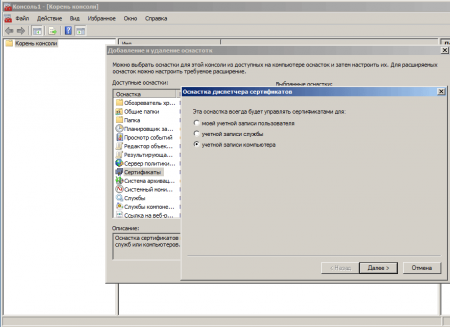
Отправьте запрос центру сертификации и установите выданный сертификат. Данный сертификат должен быть установлен в локальное хранилище компьютера, иначе он не сможет быть использован службами терминалов. Чтобы проверить это запустим консоль MMC (Пуск — Выполнить — mmc) и добавим оснастку Сертификаты (Файл — Добавить или удалить оснастку) для учетной записи компьютера.
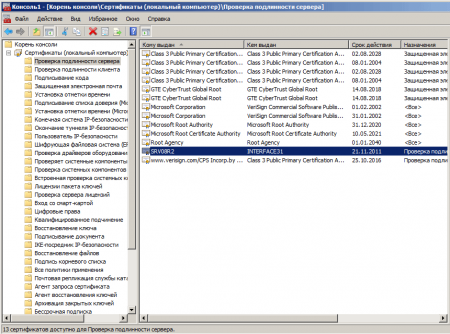
В корне консоли выберите Сертификаты (локальный компьютер) нажмите Вид — Параметры и установите режим просмотра Упорядочить сертификаты по назначению. Выданный сертификат должен находиться в группе Проверка подлинности сервера.
Если вы получали сертификат с помощью изолированного (автономного) ЦС (сеть не имеет доменной структуры) то он по умолчанию будет установлен в хранилище учетной записи пользователя и придется выполнить ряд дополнительных действий.
Откройте Internet Explorer — Свойства обозревателя — Содержимое — Сертификаты, выданный сертификат должен быть установлен в хранилище Личные.
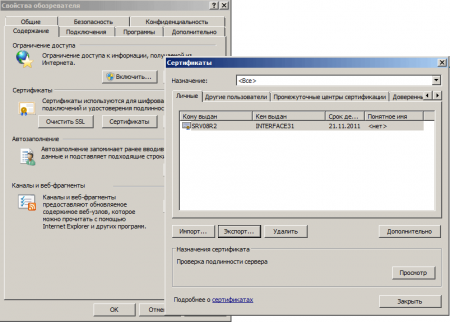
Произведите его экспорт. При экспорте укажите следующие опции:
- Да, экспортировать закрытый ключ
- Удалить закрытый ключ после успешного экспорта
После чего удалите сертификат из данного хранилища. В оснастке Сертификаты (локальный компьютер) выберите раздел Проверка подлинности сервера, щелкните на него правой кнопкой мыши Все задачи — Импорт и импортируйте сертификат.
Теперь в Администрирование — Службы удаленных рабочих столов откройте Конфигурация узла сеансов удаленных рабочих столов ( в Windows Server 2003 Администрирование — Настройка служб терминалов).
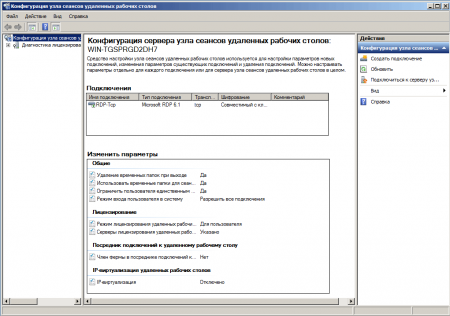
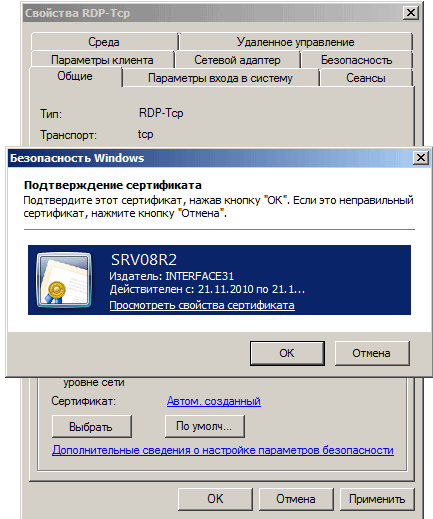
Выберите необходимое подключение и откройте его свойства. В самом низу нажмите кнопку Выбрать и выберите полученный на предыдущем шаге сертификат (в Windows Server 2003 это окно выглядит несколько по другому).
После выбора сертификата укажите остальные свойства:
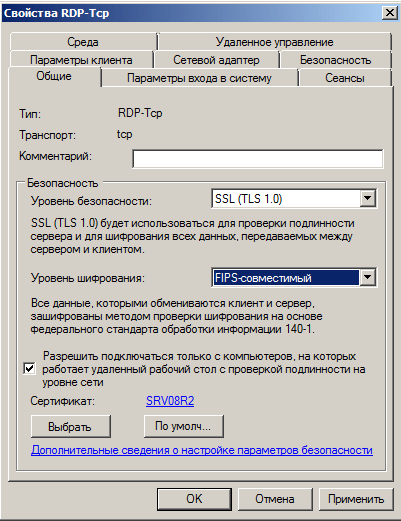
- Уровень безопасности SSL
- Уровень шифрования Высокий или FIPS—совместимый
- Установите флажок Разрешить подключаться только с компьютеров… (недоступно в Windows Server 2003)
Сохраните введенный параметры, на этом настройка сервера закончена.
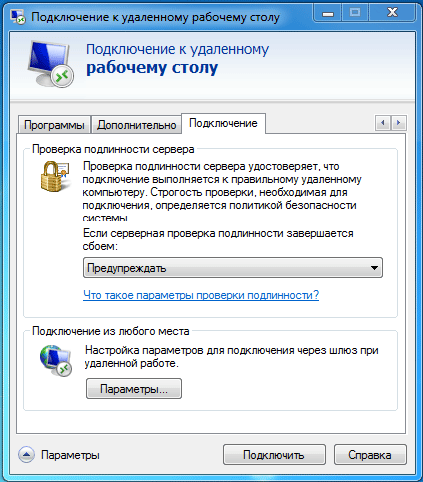
На клиентском ПК создайте подключение к удаленному рабочему столу, в качестве адреса используйте полное имя сервера, которое указано в сертификате. Откройте свойства подключения и на закладке Подключение — Проверка подлинности сервера установите опцию Предупреждать.
Чтобы данный ПК доверял сертификатам выданным нашим центром сертификации не забудьте установить на него сертификат ЦС в хранилище Доверенные корневые центры сертификации.
В Windows 7 (при использовании RDP клиента версии 7) данный сертификат требуется установить в хранилище учетной записи компьютера, для этого импортируйте его через оснастку Сертификаты (локальный компьютер) в консоли MCC, аналогично тому, как это делали выше. В противном случае подключение будет невозможно и вы получите следующую ошибку:
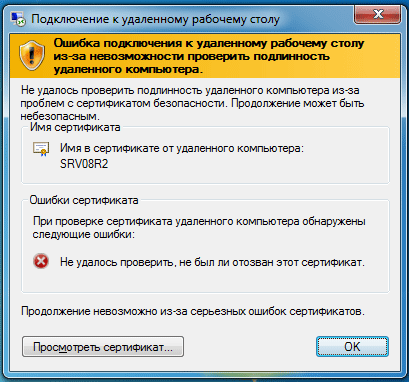
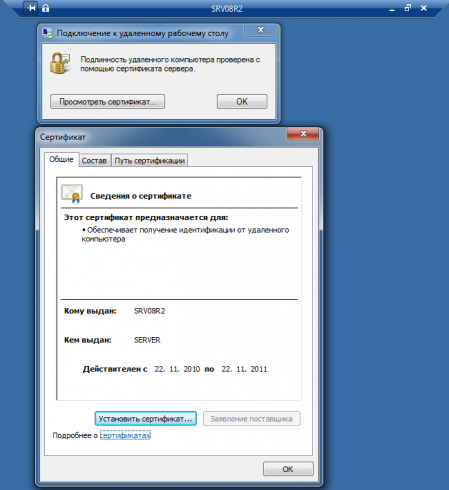
Установив сертификат ЦС можете пробовать подключиться, обратите внимание, что имя пользователя и пароль будет предложено ввести еще до создания RDP сессии. При успешном соединении обратите внимание на замок в заголовке окна, который свидетельствует о работе через SSL. Нажав на него можно просмотреть информацию о сертификате.
После удачного подключения советуем изменить опцию Предупреждать на закладке Подключение — Проверка подлинности сервера на Не соединять, разрешив таким образом подключения только к доверенным серверам.
И напоследок капля дегтя в бочке меда. Терминальные службы Windows не умеют проверять подлинность подключающихся клиентов, поэтому если стоит такая необходимость следует использовать дополнительные методы защиты, такие как SSH туннель или IPSec VPN.
Онлайн-курс по устройству компьютерных сетей
На углубленном курсе «Архитектура современных компьютерных сетей» вы с нуля научитесь работать с Wireshark и «под микроскопом» изучите работу сетевых протоколов. На протяжении курса надо будет выполнить более пятидесяти лабораторных работ в Wireshark.
Symptoms
Consider the following scenario:
-
You have a computer that is running Windows 7, Windows Server 2008 R2, Windows Vista or Windows Server 2008.
-
You try to establish a Remote Desktop Protocol (RDP) connection to a terminal server on this computer.
-
The RDP connection is configured to use Secure Socket Layer (SSL) authentication and Credential Security Support Provider protocol (CredSSP).
In this scenario, the RDP connection fails.
Notes
-
This issue occurs when the server certificate on the terminal server is issued by an intermediate certification authority (CA) without the authority information access extension.
-
In Windows 7 and Windows Server 2008 R2, the «Terminal Services» is renamed as «Remote Desktop Services.»
Cause
The CredSSP protocol does not provide the certificate chain information that is embedded in the server certificate. This problem occurs if the following two conditions are true:
-
The server certificate is issued by an intermediate CA that is embedded in the root CA.
-
The server certificate does not contain authority information access extensions that enable dynamic download of the chain information.
In this situation, the CertGetCertificateChain function cannot retrieve the full certificate chain of the server certificate. Therefore, the RDP connection fails.
Resolution
Hotfix information
A supported hotfix is available from Microsoft. However, this hotfix is intended to correct only the problem that is described in this article. Apply this hotfix only to systems that are experiencing the problem described in this article. This hotfix might receive additional testing. Therefore, if you are not severely affected by this problem, we recommend that you wait for the next software update that contains this hotfix.
If the hotfix is available for download, there is a «Hotfix download available» section at the top of this Knowledge Base article. If this section does not appear, contact Microsoft Customer Service and Support to obtain the hotfix.
Note If additional issues occur or if any troubleshooting is required, you might have to create a separate service request. The usual support costs will apply to additional support questions and issues that do not qualify for this specific hotfix. For a complete list of Microsoft Customer Service and Support telephone numbers or to create a separate service request, visit the following Microsoft Web site:
http://support.microsoft.com/contactus/?ws=supportNote The «Hotfix download available» form displays the languages for which the hotfix is available. If you do not see your language, it is because a hotfix is not available for that language.
Prerequisites
To apply this hotfix, you must be running one of the following operating systems:
-
Windows Vista Service Pack 1 (SP1)
-
Windows Vista Service Pack 2 (SP2)
-
Windows Server 2008
-
Windows Server 2008 Service Pack 2 (SP2)
-
Windows 7
-
Windows Server 2008 R2
For more information about how to obtain a Windows Vista service pack, click the following article number to view the article in the Microsoft Knowledge Base:
935791 How to obtain the latest Windows Vista service pack
For more information about how to obtain a Windows Server 2008 service pack, click the following article number to view the article in the Microsoft Knowledge Base:
968849 How to obtain the latest service pack for Windows Server 2008
Registry information
To use the hotfix in this package, you do not have to make any changes to the registry.
Restart requirement
You may have to restart the computer after you apply this hotfix.
Hotfix replacement information
This hotfix does not replace a previously released hotfix.
File information
The global version of this hotfix installs files that have the attributes that are listed in the following tables. The dates and the times for these files are listed in Coordinated Universal Time (UTC). The dates and the times for these files on your local computer are displayed in your local time together with your current daylight saving time (DST) bias. Additionally, the dates and the times may change when you perform certain operations on the files.
Windows Vista and Windows Server 2008 file information notes
Important Windows Vista hotfixes and Windows Server 2008 hotfixes are included in the same packages. However, only «Windows Vista» is listed on the Hotfix Request page. To request the hotfix package that applies to one or both operating systems, select the hotfix that is listed under «Windows Vista» on the page. Always refer to the «Applies To» section in articles to determine the actual operating system that each hotfix applies to.
-
The files that apply to a specific product, SR_Level (RTM, SPn), and service branch (LDR, GDR) can be identified by examining the file version numbers as shown in the following table.
Version
Product
SR_Level
Service branch
6.0.600 1. 22xxx
Windows Vista and Windows Server 2008
SP1
LDR
6.0.600 2. 22xxx
Windows Vista and Windows Server 2008
SP2
LDR
-
Service Pack 1 is integrated into the release version of Windows Server 2008.
-
The MANIFEST files (.manifest) and the MUM files (.mum) that are installed for each environment are listed separately in the «Additional file information for Windows Server 2008 and for Windows Vista» section. MUM files and MANIFEST files, and the associated security catalog (.cat) files, are extremely important to maintain the state of the updated components. The security catalog files, for which the attributes are not listed, are signed with a Microsoft digital signature.
For all supported x86-based versions of Windows Server 2008 and of Windows Vista
|
File name |
File version |
File size |
Date |
Time |
Platform |
|---|---|---|---|---|---|
|
Credssp.dll |
6.0.6001.22765 |
16,384 |
16-Sep-2010 |
16:04 |
x86 |
|
Tspkg.dll |
6.0.6001.22765 |
62,464 |
16-Sep-2010 |
16:07 |
x86 |
|
Tspkg.mof |
Not Applicable |
964 |
04-Mar-2010 |
06:05 |
Not Applicable |
|
Credssp.dll |
6.0.6002.22489 |
16,384 |
16-Sep-2010 |
17:44 |
x86 |
|
Tspkg.dll |
6.0.6002.22489 |
62,976 |
16-Sep-2010 |
17:46 |
x86 |
|
Tspkg.mof |
Not Applicable |
964 |
03-Apr-2009 |
21:46 |
Not Applicable |
For all supported x64-based versions of Windows Server 2008 and of Windows Vista
|
File name |
File version |
File size |
Date |
Time |
Platform |
|---|---|---|---|---|---|
|
Credssp.dll |
6.0.6001.22765 |
19,456 |
16-Sep-2010 |
15:04 |
x64 |
|
Tspkg.dll |
6.0.6001.22765 |
78,848 |
16-Sep-2010 |
15:09 |
x64 |
|
Tspkg.mof |
Not Applicable |
964 |
26-Feb-2010 |
04:28 |
Not Applicable |
|
Credssp.dll |
6.0.6002.22489 |
19,456 |
16-Sep-2010 |
17:20 |
x64 |
|
Tspkg.dll |
6.0.6002.22489 |
78,848 |
16-Sep-2010 |
17:23 |
x64 |
|
Tspkg.mof |
Not Applicable |
964 |
03-Apr-2009 |
21:07 |
Not Applicable |
|
Credssp.dll |
6.0.6001.22765 |
16,384 |
16-Sep-2010 |
16:04 |
x86 |
|
Tspkg.dll |
6.0.6001.22765 |
62,464 |
16-Sep-2010 |
16:07 |
x86 |
|
Tspkg.mof |
Not Applicable |
964 |
04-Mar-2010 |
06:05 |
Not Applicable |
|
Credssp.dll |
6.0.6002.22489 |
16,384 |
16-Sep-2010 |
17:44 |
x86 |
|
Tspkg.dll |
6.0.6002.22489 |
62,976 |
16-Sep-2010 |
17:46 |
x86 |
|
Tspkg.mof |
Not Applicable |
964 |
03-Apr-2009 |
21:46 |
Not Applicable |
For all supported IA-64-based versions of Windows Server 2008
|
File name |
File version |
File size |
Date |
Time |
Platform |
|---|---|---|---|---|---|
|
Credssp.dll |
6.0.6001.22765 |
46,080 |
16-Sep-2010 |
16:00 |
IA-64 |
|
Tspkg.dll |
6.0.6001.22765 |
177,152 |
16-Sep-2010 |
16:05 |
IA-64 |
|
Tspkg.mof |
Not Applicable |
964 |
25-Feb-2010 |
07:54 |
Not Applicable |
|
Credssp.dll |
6.0.6002.22489 |
46,080 |
16-Sep-2010 |
17:23 |
IA-64 |
|
Tspkg.dll |
6.0.6002.22489 |
177,152 |
16-Sep-2010 |
17:27 |
IA-64 |
|
Tspkg.mof |
Not Applicable |
964 |
03-Apr-2009 |
21:08 |
Not Applicable |
|
Credssp.dll |
6.0.6001.22765 |
16,384 |
16-Sep-2010 |
16:04 |
x86 |
|
Tspkg.dll |
6.0.6001.22765 |
62,464 |
16-Sep-2010 |
16:07 |
x86 |
|
Tspkg.mof |
Not Applicable |
964 |
04-Mar-2010 |
06:05 |
Not Applicable |
|
Credssp.dll |
6.0.6002.22489 |
16,384 |
16-Sep-2010 |
17:44 |
x86 |
|
Tspkg.dll |
6.0.6002.22489 |
62,976 |
16-Sep-2010 |
17:46 |
x86 |
|
Tspkg.mof |
Not Applicable |
964 |
03-Apr-2009 |
21:46 |
Not Applicable |
Windows 7 and Windows Server 2008 R2 file information notes
Important Windows 7 hotfixes and Windows Server 2008 R2 hotfixes are included in the same packages. However, hotfixes on the Hotfix Request page are listed under both operating systems. To request the hotfix package that applies to one or both operating systems, select the hotfix that is listed under «Windows 7/Windows Server 2008 R2» on the page. Always refer to the «Applies To» section in articles to determine the actual operating system that each hotfix applies to.
-
The MANIFEST files (.manifest) and the MUM files (.mum) that are installed for each environment are listed separately in the «Additional file information for Windows Server 2008 R2 and for Windows 7» section. MUM and MANIFEST files, and the associated security catalog (.cat) files, are extremely important to maintain the state of the updated components. The security catalog files, for which the attributes are not listed, are signed with a Microsoft digital signature.
For all supported x86-based versions of Windows 7
|
File name |
File version |
File size |
Date |
Time |
Platform |
|---|---|---|---|---|---|
|
Credssp.dll |
6.1.7600.20741 |
17,408 |
23-Jun-2010 |
07:53 |
x86 |
|
Tspkg.dll |
6.1.7600.20741 |
65,024 |
23-Jun-2010 |
07:54 |
x86 |
|
Tspkg.mof |
Not Applicable |
964 |
10-Jun-2009 |
21:40 |
Not Applicable |
For all supported x64-based versions of Windows 7 and of Windows Server 2008 R2
|
File name |
File version |
File size |
Date |
Time |
Platform |
|---|---|---|---|---|---|
|
Credssp.dll |
6.1.7600.20741 |
22,016 |
23-Jun-2010 |
08:14 |
x64 |
|
Tspkg.dll |
6.1.7600.20741 |
86,016 |
23-Jun-2010 |
08:19 |
x64 |
|
Tspkg.mof |
Not Applicable |
964 |
10-Jun-2009 |
21:01 |
Not Applicable |
For all supported IA-64-based versions of Windows Server 2008 R2
|
File name |
File version |
File size |
Date |
Time |
Platform |
|---|---|---|---|---|---|
|
Credssp.dll |
6.1.7600.20741 |
49,664 |
23-Jun-2010 |
09:53 |
IA-64 |
|
Tspkg.dll |
6.1.7600.20741 |
187,392 |
23-Jun-2010 |
09:53 |
IA-64 |
|
Tspkg.mof |
Not Applicable |
964 |
10-Jun-2009 |
21:06 |
Not Applicable |
Status
Microsoft has confirmed that this is a problem in the Microsoft products that are listed in the «Applies to» section.
More Information
For more information about the Credential Security Support Provider, visit the following Microsoft website:
Introduction to the Credential Security Support ProviderFor more information about how to configure authority information access extensions and certificate revocation list (CRL) distribution point extensions, visit the following Microsoft website:
Guidelines for configuring authority information access and CRL distribution point extensionsFor more information about the CertGetCertificateChain function, visit the following Microsoft website:
824684 Description of the standard terminology that is used to describe Microsoft software updates
Additional file information
Additional file information for Windows Vista and for Windows Server 2008
Additional files for all supported x86-based versions of Windows Vista and of Windows Server 2008
|
File name |
Update.mum |
|
File version |
Not Applicable |
|
File size |
2,590 |
|
Date (UTC) |
17-Sep-2010 |
|
Time (UTC) |
07:35 |
|
Platform |
Not Applicable |
|
File name |
X86_b8ade2469865a8ba3e9f30095f2cd7e5_31bf3856ad364e35_6.0.6002.22489_none_3a0bfab7d96aea48.manifest |
|
File version |
Not Applicable |
|
File size |
704 |
|
Date (UTC) |
17-Sep-2010 |
|
Time (UTC) |
07:35 |
|
Platform |
Not Applicable |
|
File name |
X86_c31e6581c958102673b10394bc5488b1_31bf3856ad364e35_6.0.6001.22765_none_bee6d2dfeeb5ed88.manifest |
|
File version |
Not Applicable |
|
File size |
704 |
|
Date (UTC) |
17-Sep-2010 |
|
Time (UTC) |
07:35 |
|
Platform |
Not Applicable |
|
File name |
X86_microsoft-windows-security-credssp_31bf3856ad364e35_6.0.6001.22765_none_c405fb88bad9b9de.manifest |
|
File version |
Not Applicable |
|
File size |
12,936 |
|
Date (UTC) |
16-Sep-2010 |
|
Time (UTC) |
16:22 |
|
Platform |
Not Applicable |
|
File name |
X86_microsoft-windows-security-credssp_31bf3856ad364e35_6.0.6002.22489_none_c5dacec0b80cac40.manifest |
|
File version |
Not Applicable |
|
File size |
12,936 |
|
Date (UTC) |
16-Sep-2010 |
|
Time (UTC) |
18:09 |
|
Platform |
Not Applicable |
Additional files for all supported x64-based versions of Windows Vista and of Windows Server 2008
|
File name |
Amd64_6e0011d7adf4d02214de7b36ed4c9b23_31bf3856ad364e35_6.0.6001.22765_none_6864a1f5a2c8f87b.manifest |
|
File version |
Not Applicable |
|
File size |
1,056 |
|
Date (UTC) |
17-Sep-2010 |
|
Time (UTC) |
07:35 |
|
Platform |
Not Applicable |
|
File name |
Amd64_ba70a9b268c8fba80f434d39484ec95e_31bf3856ad364e35_6.0.6002.22489_none_df782982b5308436.manifest |
|
File version |
Not Applicable |
|
File size |
1,056 |
|
Date (UTC) |
17-Sep-2010 |
|
Time (UTC) |
07:35 |
|
Platform |
Not Applicable |
|
File name |
Amd64_microsoft-windows-security-credssp_31bf3856ad364e35_6.0.6001.22765_none_2024970c73372b14.manifest |
|
File version |
Not Applicable |
|
File size |
12,958 |
|
Date (UTC) |
16-Sep-2010 |
|
Time (UTC) |
15:21 |
|
Platform |
Not Applicable |
|
File name |
Amd64_microsoft-windows-security-credssp_31bf3856ad364e35_6.0.6002.22489_none_21f96a44706a1d76.manifest |
|
File version |
Not Applicable |
|
File size |
12,958 |
|
Date (UTC) |
16-Sep-2010 |
|
Time (UTC) |
17:41 |
|
Platform |
Not Applicable |
|
File name |
Update.mum |
|
File version |
Not Applicable |
|
File size |
2,608 |
|
Date (UTC) |
17-Sep-2010 |
|
Time (UTC) |
07:35 |
|
Platform |
Not Applicable |
|
File name |
X86_microsoft-windows-security-credssp_31bf3856ad364e35_6.0.6001.22765_none_c405fb88bad9b9de.manifest |
|
File version |
Not Applicable |
|
File size |
12,936 |
|
Date (UTC) |
16-Sep-2010 |
|
Time (UTC) |
16:22 |
|
Platform |
Not Applicable |
|
File name |
X86_microsoft-windows-security-credssp_31bf3856ad364e35_6.0.6002.22489_none_c5dacec0b80cac40.manifest |
|
File version |
Not Applicable |
|
File size |
12,936 |
|
Date (UTC) |
16-Sep-2010 |
|
Time (UTC) |
18:09 |
|
Platform |
Not Applicable |
Additional files for all supported IA-64-based versions of Windows Server 2008
|
File name |
Ia64_757a900359c898a32a7866833c2beb07_31bf3856ad364e35_6.0.6001.22765_none_082e213ff9ba03ed.manifest |
|
File version |
Not Applicable |
|
File size |
1,054 |
|
Date (UTC) |
17-Sep-2010 |
|
Time (UTC) |
07:35 |
|
Platform |
Not Applicable |
|
File name |
Ia64_bd12e438823291aa327ef1930faf2323_31bf3856ad364e35_6.0.6002.22489_none_e632b2e453020af5.manifest |
|
File version |
Not Applicable |
|
File size |
1,054 |
|
Date (UTC) |
17-Sep-2010 |
|
Time (UTC) |
07:35 |
|
Platform |
Not Applicable |
|
File name |
Ia64_microsoft-windows-security-credssp_31bf3856ad364e35_6.0.6001.22765_none_c4079f7ebad7c2da.manifest |
|
File version |
Not Applicable |
|
File size |
12,947 |
|
Date (UTC) |
16-Sep-2010 |
|
Time (UTC) |
16:19 |
|
Platform |
Not Applicable |
|
File name |
Ia64_microsoft-windows-security-credssp_31bf3856ad364e35_6.0.6002.22489_none_c5dc72b6b80ab53c.manifest |
|
File version |
Not Applicable |
|
File size |
12,947 |
|
Date (UTC) |
16-Sep-2010 |
|
Time (UTC) |
17:45 |
|
Platform |
Not Applicable |
|
File name |
Update.mum |
|
File version |
Not Applicable |
|
File size |
1,932 |
|
Date (UTC) |
17-Sep-2010 |
|
Time (UTC) |
07:35 |
|
Platform |
Not Applicable |
|
File name |
X86_microsoft-windows-security-credssp_31bf3856ad364e35_6.0.6001.22765_none_c405fb88bad9b9de.manifest |
|
File version |
Not Applicable |
|
File size |
12,936 |
|
Date (UTC) |
16-Sep-2010 |
|
Time (UTC) |
16:22 |
|
Platform |
Not Applicable |
|
File name |
X86_microsoft-windows-security-credssp_31bf3856ad364e35_6.0.6002.22489_none_c5dacec0b80cac40.manifest |
|
File version |
Not Applicable |
|
File size |
12,936 |
|
Date (UTC) |
16-Sep-2010 |
|
Time (UTC) |
18:09 |
|
Platform |
Not Applicable |
Additional file information for Windows 7 and for Windows Server 2008 R2
Additional files for all supported x86-based versions of Windows 7
|
File name |
Update.mum |
|
File version |
Not applicable |
|
File size |
1,880 |
|
Date (UTC) |
23-Jun-2010 |
|
Time (UTC) |
11:21 |
|
Platform |
Not applicable |
|
File name |
X86_25fc7fbb43bc71b987734df5ac65d480_31bf3856ad364e35_6.1.7600.20741_none_fb7620039ca7e5b6.manifest |
|
File version |
Not applicable |
|
File size |
694 |
|
Date (UTC) |
23-Jun-2010 |
|
Time (UTC) |
11:21 |
|
Platform |
Not applicable |
|
File name |
X86_microsoft-windows-vssapi_31bf3856ad364e35_6.1.7600.20741_none_d56e1578fc1602de.manifest |
|
File version |
Not applicable |
|
File size |
12,389 |
|
Date (UTC) |
23-Jun-2010 |
|
Time (UTC) |
11:24 |
|
Platform |
Not applicable |
Additional files for all supported x64-based versions of Windows 7 and of Windows Server 2008 R2
|
File name |
Amd64_78ebec17cb9f6fb08348f638d21e6e42_31bf3856ad364e35_6.1.7600.20741_none_4fd03bee333a533a.manifest |
|
File version |
Not applicable |
|
File size |
1,038 |
|
Date (UTC) |
23-Jun-2010 |
|
Time (UTC) |
11:21 |
|
Platform |
Not applicable |
|
File name |
Amd64_cd524ea83ae113ca33f22adc302c32bc_31bf3856ad364e35_6.1.7600.20741_none_b362264800266ca5.manifest |
|
File version |
Not applicable |
|
File size |
698 |
|
Date (UTC) |
23-Jun-2010 |
|
Time (UTC) |
11:21 |
|
Platform |
Not applicable |
|
File name |
Amd64_db27a3b9a2106db2c72a563fb2f385c5_31bf3856ad364e35_6.1.7600.20741_none_6af0bca2ffd19880.manifest |
|
File version |
Not applicable |
|
File size |
698 |
|
Date (UTC) |
23-Jun-2010 |
|
Time (UTC) |
11:21 |
|
Platform |
Not applicable |
|
File name |
Amd64_microsoft-windows-vssapi_31bf3856ad364e35_6.1.7600.20741_none_318cb0fcb4737414.manifest |
|
File version |
Not applicable |
|
File size |
12,393 |
|
Date (UTC) |
23-Jun-2010 |
|
Time (UTC) |
11:27 |
|
Platform |
Not applicable |
|
File name |
Update.mum |
|
File version |
Not applicable |
|
File size |
2,114 |
|
Date (UTC) |
23-Jun-2010 |
|
Time (UTC) |
11:21 |
|
Platform |
Not applicable |
|
File name |
Wow64_microsoft-windows-vssapi_31bf3856ad364e35_6.1.7600.20741_none_3be15b4ee8d4360f.manifest |
|
File version |
Not applicable |
|
File size |
11,453 |
|
Date (UTC) |
23-Jun-2010 |
|
Time (UTC) |
11:27 |
|
Platform |
Not applicable |
Additional files for all supported IA-64-based versions of Windows Server 2008 R2
|
File name |
Ia64_b068f97b4192c2b60545d6febfc0442e_31bf3856ad364e35_6.1.7600.20741_none_99af44c375b833ef.manifest |
|
File version |
Not applicable |
|
File size |
696 |
|
Date (UTC) |
23-Jun-2010 |
|
Time (UTC) |
11:21 |
|
Platform |
Not applicable |
|
File name |
Ia64_db27a3b9a2106db2c72a563fb2f385c5_31bf3856ad364e35_6.1.7600.20741_none_0ed3c51547723046.manifest |
|
File version |
Not applicable |
|
File size |
697 |
|
Date (UTC) |
23-Jun-2010 |
|
Time (UTC) |
11:21 |
|
Platform |
Not applicable |
|
File name |
Ia64_microsoft-windows-vssapi_31bf3856ad364e35_6.1.7600.20741_none_d56fb96efc140bda.manifest |
|
File version |
Not applicable |
|
File size |
12,391 |
|
Date (UTC) |
23-Jun-2010 |
|
Time (UTC) |
11:21 |
|
Platform |
Not applicable |
|
File name |
Update.mum |
|
File version |
Not applicable |
|
File size |
1,690 |
|
Date (UTC) |
23-Jun-2010 |
|
Time (UTC) |
11:21 |
|
Platform |
Not applicable |
|
File name |
Wow64_microsoft-windows-vssapi_31bf3856ad364e35_6.1.7600.20741_none_3be15b4ee8d4360f.manifest |
|
File version |
Not applicable |
|
File size |
11,453 |
|
Date (UTC) |
23-Jun-2010 |
|
Time (UTC) |
11:21 |
|
Platform |
Not applicable |
Эта статья позволит разобраться, как администраторы могут управлять SSL/TLS сертификатами, которые используются для защиты RDP подключений в Windows. Мы рассмотрим, как заменить самоподписанный TLS сертификат RDP на доверенный сертификат. Если у вас развернут собственный центр сертификации (Certificate Authority, CA), на нем можно настроить специальный шаблон для выпуска RDP сертификатов, а через GPO можно автоматически выпускать и привязывать SSL/TLS сертификаты к службе Remote Desktop Services.
Содержание:
- Предупреждение о самоподписанном сертификате RDP
- Как вручную установить (заменить) SSL сертификат для RDP?
- Создаем шаблон RDP сертификата в центре сертификации (CA)
- Настройка групповой политики для выдачи RDP сертификатов
- Подписываем RDP файл и добавляем отпечаток доверенного RDP сертификата
Предупреждение о самоподписанном сертификате RDP
По умолчанию в Windows для защиты RDP сессии генерируется самоподписанный сертификат. При первом подключении к RDP/RDS хочту через клиент mstsc.exe, у пользователя появляется предупреждение:
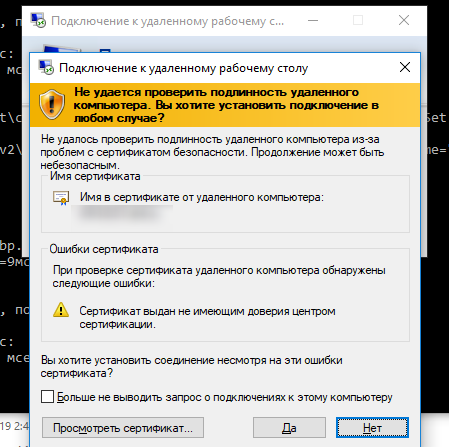
Не удалось проверить подлинность удаленного компьютера из-за проблем с сертификатом безопасности.
Ошибка сертификата: сертификат выдан не имеющим доверия центром сертификации.
Чтобы продолжить установление RDP подключении пользователь должен нажать кнопку Да. Чтобы RDP предупреждение не появлялось каждый раз, можно включить опцию Больше не выводить запрос о подключениях к этому компьютеру.
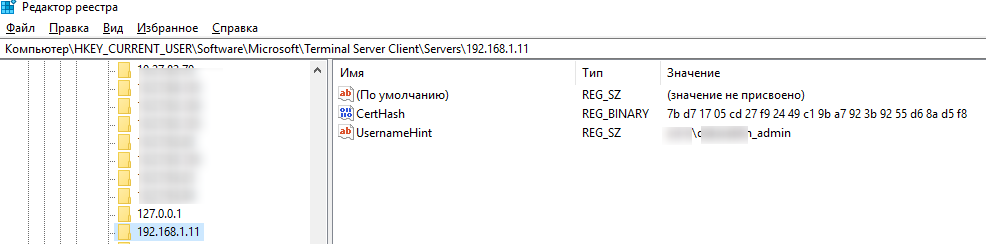
В этом случае отпечаток RDP сертификата будет сохранен на клиенте в параметре CertHash в ветке реестра с историей RDP подключений (HKEY_CURRENT_USER\Software\Microsoft\Terminal Server Client\Servers\). Если вы скрыли уведомление о невозможности проверить подлинность RDP сервера, чтобы сбросить настройки, удалите ключ с отпечатком сертификата из реестра.
Несмотря на то, что для подключения используется самоподписанный сертификат, ваше RDP подключение защищено, а трафик зашифрован.
Как вручную установить (заменить) SSL сертификат для RDP?
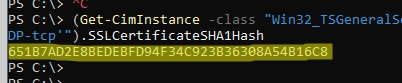
Как определить какой SSL сертификат привязан и используется сейчас для RDP? Откройте консоль PowerShell и выполните:
(Get-CimInstance -class "Win32_TSGeneralSetting" -Namespace root\cimv2\terminalservices -Filter "TerminalName='RDP-tcp'").SSLCertificateSHA1Hash
Команда вернет отпечаток (thumbprint) сертификата, который сейчас назначен для RDP.
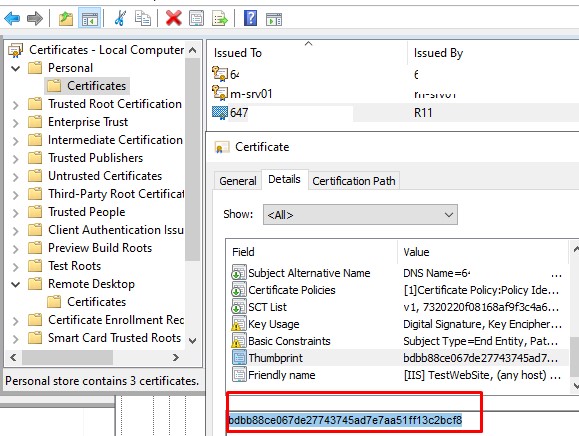
Откройте консоль управления сертификатами компьютера (
certlm.msc
) и перейдите в раздел Remote Desktop -> Certificates. Отройте свойства сертификата, перейдите на вкладку Details и проверьте отпечаток сертификата (поле Thumbprint) соответствует тому, которое вы получили в консоли.

Если вы получили сторонний доверенный SSL сертификат (это может быть сертификат коммерческого CA или бесплатный Let’s Encrypt сертификат), можно заменить им самоподписанный сертификата RDP.
Вам понадобится сертификат в формате PFX (с закрытым ключом), который нужно импортировать в Personal хранилище сертификатов компьютера. В моем случае это сертификат Let’s Encrypt, который уже выпущен для IIS через утилиту WACS под Windows (сертификат находится в секции Web Hosting -> Certificates).
Скопируйте сертификат в секцию Personal -> Certificates. Скопируйте значение отпечатка сертификата.
Чтобы заменить старый сертификат RDP на новый, вставьте скопированный отпечаток SSL сертификата в следующую команду:
$certHash = "bdbb88ce067de27743745ad7e7aa51ff13c2bcf8"
Set-ItemProperty -Path "HKLM:\SYSTEM\CurrentControlSet\Control\Terminal Server\WinStations\RDP-Tcp" -Name "SSLCertificateSHA1Hash" -Value $certHash
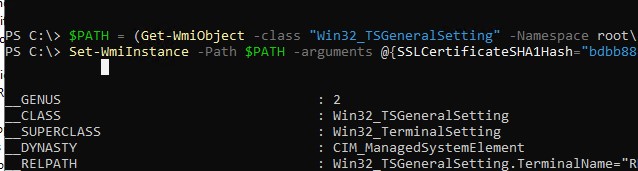
Чтобы применить новые настройки, перезапустите службу:
Restart-Service -Name TermService -Force
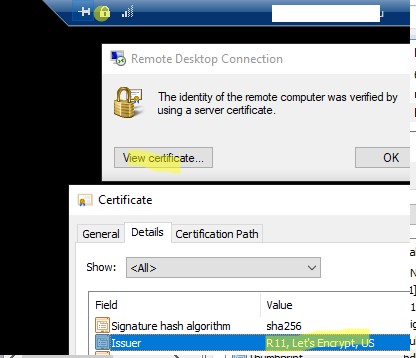
Затем подключитесь к RDP хосту еще раз, щелкните по замочку в верхней панели и убедитесь, что теперь для RDP используется доверенный TLS сертификат.
Обратите внимание, что сертификаты let’s encrypt выдаются на 90 дней. По умолчанию каждые 60 дней такие сертификаты перевыпускаются автоматически. Поэтому нужно через планировщик задач запускать PowerShell скрипт для замены сертификата для RDP.
Создаем шаблон RDP сертификата в центре сертификации (CA)
Если у вас развернут корпоративный центр сертификации Microsoft Certificate Authority (CA), можно настроить автоматическую выдачу доверенных SSL/TLS сертификатов для RDP службы на всех компьютерах и серверах в Windows домене.
Создадим на CA новый тип шаблона сертификата для RDP/RDS серверов.
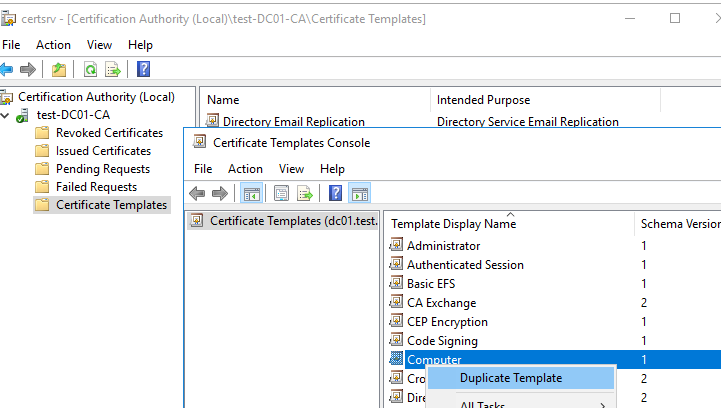
- Запустите консоль Certificate Authority и перейдите в секцию Certificate Templates;
- Сделайте копию шаблона сертификата Computer (Certificate Templates -> Manage -> Computer -> Duplicate);

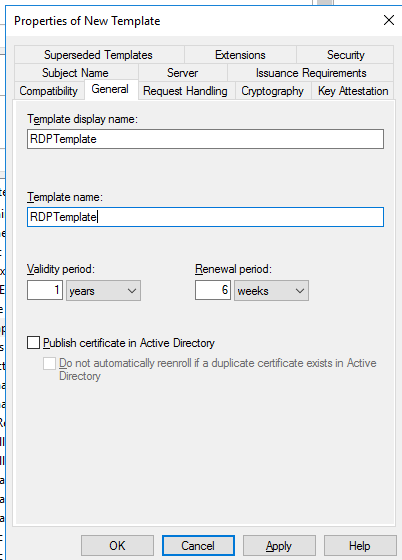
- На вкладке General укажите имя нового шаблона сертификата – RDPTemplate. Убедитесь, что значение поля Template Name полностью совпадает с Template display name;
- На вкладке Compatibility укажите минимальную версию клиентов в вашем домене (например, Windows Server 2016 для CA и Windows 10 для клиентов). Тем самым будут использоваться более стойкие алгоритмы шифрования;
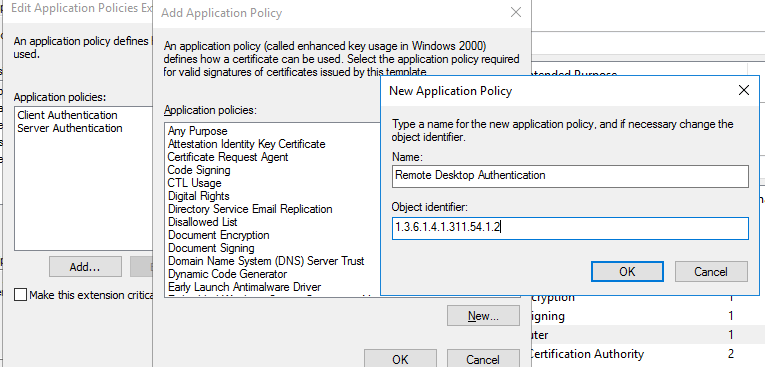
- Теперь на вкладке Extensions в политике приложений (Application policy) нужно ограничить область использования такого сертификата только для Remote Desktop Authentication (укажите следующий object identifier — 1.3.6.1.4.1.311.54.1.2).
- В настройках шаблона сертификата (Application Policies Extension) удалите все политики кроме Remote Desktop Authentication
- Чтобы использовать данный шаблон RDP сертификатов на контролерах домена, откройте вкладку Security, добавьте группу Domain Controllers и включите для нее опцию Enroll и Autoenroll
- Сохраните шаблон сертификата;
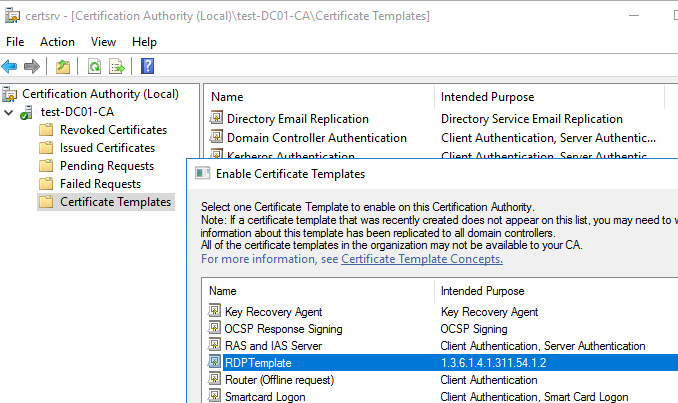
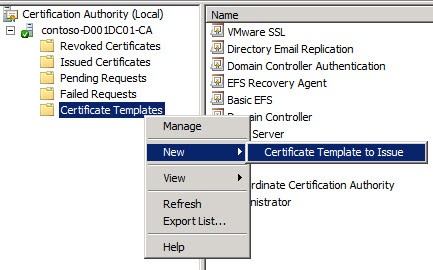
- Теперь в оснастке Certificate Authority, щёлкните по папке Certificate Templates, выберите New -> Certificate Template to Issue -> выберите созданный шаблон RDPTemplate.
Настройка групповой политики для выдачи RDP сертификатов
Теперь нужно настроить доменную GPO, которая будет автоматически назначать RDP сертификат компьютерам/серверам согласно настроенного шаблона.
Предполагается, что все компьютеры домена доверяют корпоративному CA, т.е. корневой сертификат через GPO добавлен в доверенные.
- Откройте консоль управления доменными групповыми политиками gpmc.msc, создайте новый объект GPO и назначьте его на OU с RDP/RDS серверами или компьютерами, для которых нужно автоматически выдавать TLS сертификаты для защиты RDP.
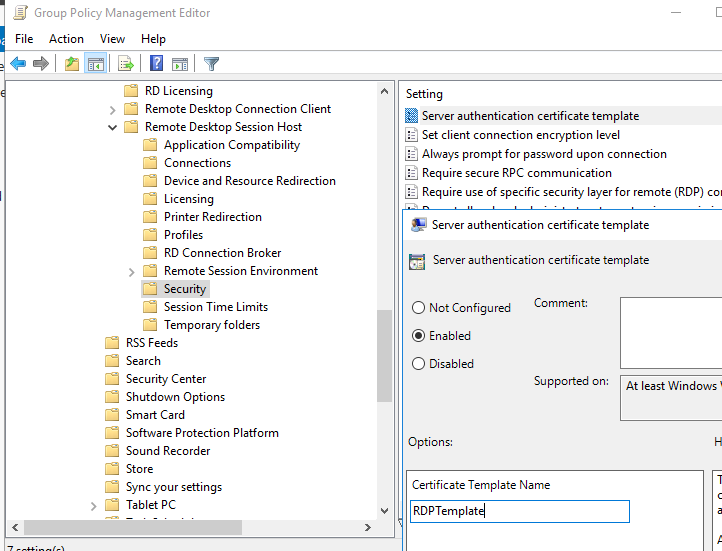
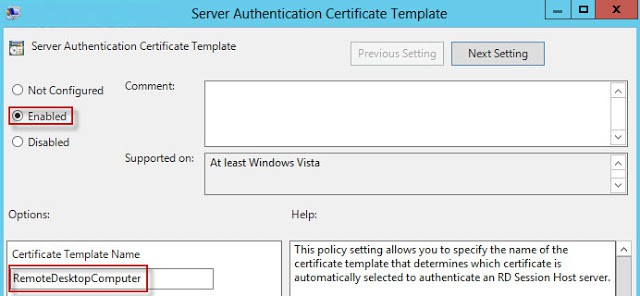
- Перейдите в раздел GPO: Computer Configuration -> Policies -> Administrative Templates -> Windows Components -> Remote Desktop Services -> Remote Desktop Session Host -> Security. Включите политику Server Authentication Certificate Template. Укажите имя шаблона CA, который вы создали ранее (RDPTemplate);
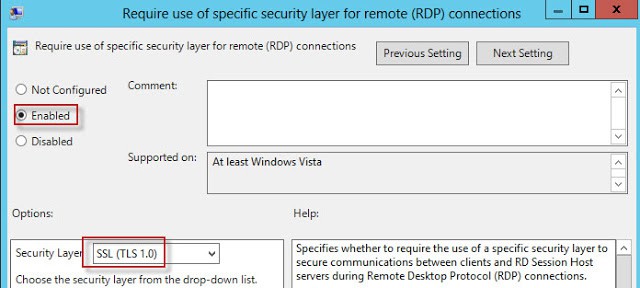
- Затем в этом же разделе GPO включите политику Require use of specific security layer for remote (RDP) connections и установите для нее значение SSL;
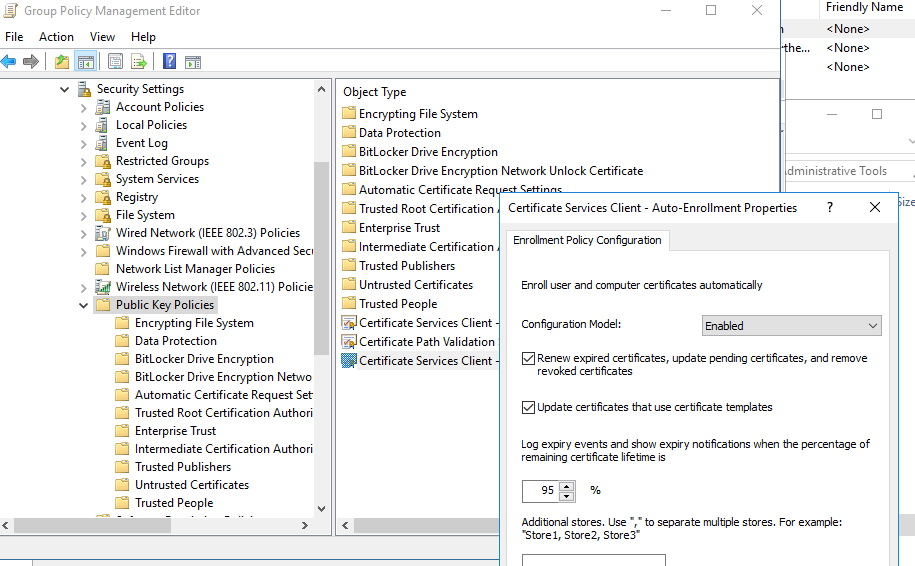
- Для автоматического продления RDP сертификата, перейдите в раздел GPO Computer configuration -> Windows settings -> Security Settings -> Public Key Policies и включите политику Certificate Services Client – Auto-Enrollment Properties. Выберите опции “Renew expired certificates, update pending certificates and remove revoked certificates” и “Update certificates that use certificate templates”;

-
- Если вы хотите, чтобы клиенты всегда проверяли сертификат RDP сервера, нужно включить политику Configure Authentication for Client = Warn me if authentication fails (секция GPO Computer Configuration -> Policies -> Administrative Templates -> Windows Components -> Remote Desktop Settings -> Remote Desktop Connection Client);
- Если нужно, можете через политики файервола открыть входящий RDP порт TCP/UDP 3389;
Осталось обновить политики на клиенте, запустить консоль сертификатов компьютера (Certlm.msc), и проверить, что в разделе Personal -> Certificates появился сертификат для Remote Desktop Authentication, выданный вашим CA.
Если политики не применились воспользуйтесь, для диагностики GPO утилитой gpresult и этой статьей.


Для применения нового RDP сертификата, перезапустите службу Remote Desktop Services:
Get-Service TermService -ComputerName msk-dc01| Restart-Service –force –verbose
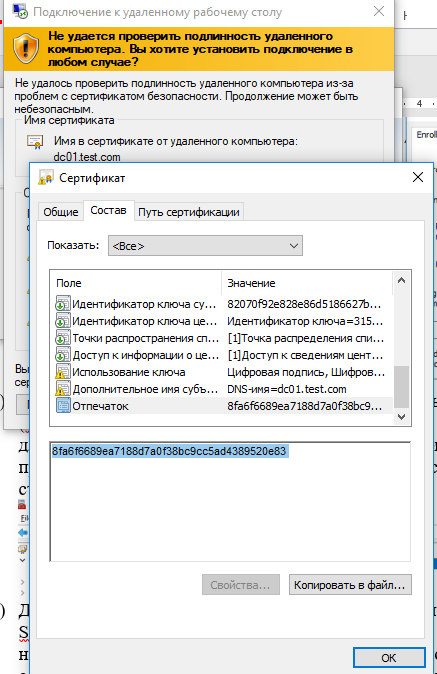
Теперь при RDP подключении к серверу перестанет появляться запрос на доверие сертификату (чтобы появился запрос о доверии сертификату, подключитесь к серверу по IP адресу вместо FQDN имени сервера, для которого выпущен сертификат). Нажмите кнопку “Посмотреть сертификат”, перейдите на вкладку “Состав”, скопируйте значение поля “Отпечаток сертификата”.
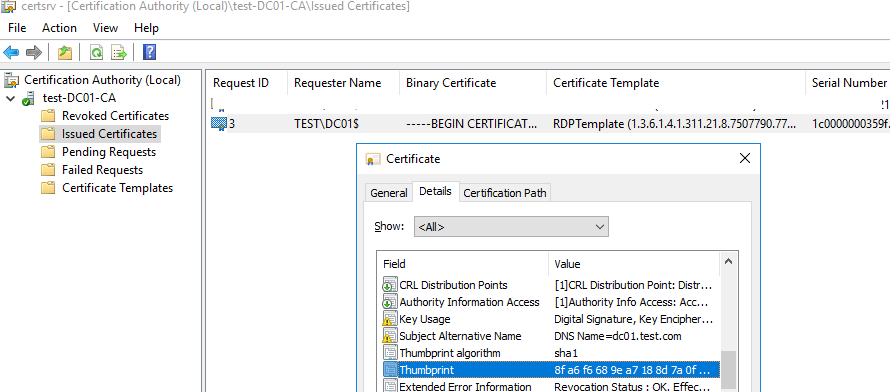
Также можете в консоли Certification Authority в секции Issued Certificates проверить, что по шаблону RDPTemplate был выдан сертификат определённому Windows компьютеру/серверу. Также проверьте значение Thumbprint сертификата:
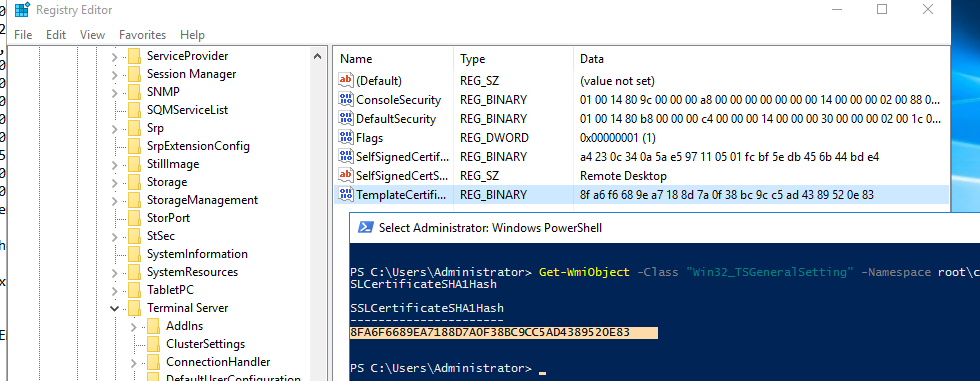
Теперь сравните полученные данные с отпечатком сертификата, который используется службой Remote Desktop Service. Вы можете посмотреть значение отпечатка сертификата службы RDS в реестре (ветка HKLM:\SYSTEM\CurrentControlSet\Control\Terminal Server\WinStations, параметр TemplateCertificate) или командой PowerShell:
Get-WmiObject -Class "Win32_TSGeneralSetting" -Namespace root\cimv2\terminalservices|select SSLCertificateSHA1Hash
Подписываем RDP файл и добавляем отпечаток доверенного RDP сертификата
Если у вас отсутствует CA, но вы хотите, чтобы при подключении к RDP/RDS серверу у пользователей не появлялось предупреждения, вы можете добавить сертификат сервера в доверенные на компьютерах пользователей.
Как описано выше получите значение отпечатка (Thumbprint) RDP сертификата:
Get-WmiObject -Class "Win32_TSGeneralSetting" -Namespace root\cimv2\terminalservices|select|select SSLCertificateSHA1Hash
Используйте этот отпечаток для подписывания .RDP файла с помощью RDPSign.exe:
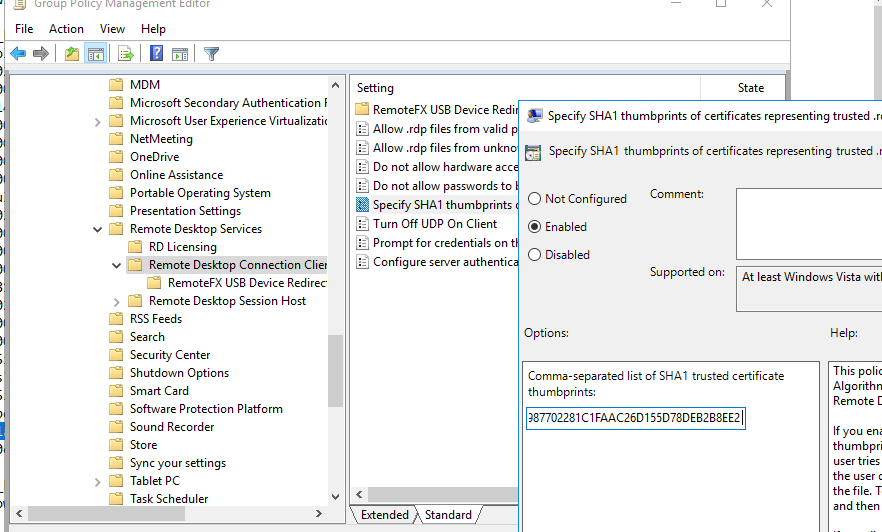
rdpsign.exe /sha256 65A27B2987702281C1FAAC26D155D78DEB2B8EE2 "C:\Users\root\Desktop\rdp.rdp"
Теперь через GPO добавьте этот отпечаток сертификата в доверенные на компьютерах пользователей. Укажите отпечатки (через точку с запятою) в политике Specify SHA1 thumbprints of certificates representing trusted .rdp publishers (Указать отпечатки SHA1 сертификатов, представляющих доверенных издателей RDP) в секции Computer Configuration -> Policies -> Administrative Templates -> Windows Components -> Remote Desktop Settings -> Remote Desktop Connection Client.
Чтобы работал прозрачных RDP вход без ввода пароля (RDP Single Sign On), нужно настроить политику Allow delegation defaults credential и указать в ней имена RDP/RDS серверов (см. статью).
For Windows Server 2016/2019 and Windows 10, see my new post: Trusted Remote Desktop Services SSL Certs for Win10/2019
For Windows environments that want extra security, one of the features that has been around for ages is requiring TLS 1.0 for Windows RDP (Remote Desktop) connections. This functionality requires a certificate on the server, since TLS is based on the usage of X.509 certificates. Installing a RDP SSL certificate is easy.
By default Windows will create a self-signed certificate automatically for use with RDP. But as we all know, self-signed certificates are nearly worthless, and could easily be intercepted for man-in-the-middle attacks. So one should reconfigure Windows to use a trusted certificate. Thankfully this is fairly easy, and once configured, pushed down to all servers via GPO for automated deployment.
I’ve validated that this procedure works both on Windows Server 2008 R2 and Windows Server 2012. It may work on Windows Server 2008.It requires the use of a Microsoft enterprise online certificate authority. Again, I’ve used both Windows Server 2008 R2 and Windows Server 2012 CAs with success. Not surprising, since certificates are industry standard. For the purposes of this article I’ll use Windows Server 2008 R2 CA, and Windows Server 2012 “target” server.
The general process is first creating a new Certificate Authority certificate template that has an extended key usage to limit its use to only Remote Desktop TLS sessions. Second, we configure a GPO setting to automatically configure servers to request a certificate via this template, and use it for RDP TLS. Refresh GPO on the target server, and finally we attempt to connect via a stand-alone computer to verify it sees the certificate that we deployed.
Installing a RDP SSL Certificate
1. On your Microsoft certificate authority server open the Certificate Templates console.
2. Duplicate the Computer template and use the Windows Server 2003 Enterprise format (Server 2008 v3 templates will NOT work).
3. Change the template display name to RemoteDesktopComputer (no spaces). Verify the Template Name is exactly the same (no spaces). You can use a different name if you want, but both fields must match exactly.

4. Now we need to create an application policy to limit the usage to RDS authentication, then remove the other application uses for the certificate. On the extensions tab click on Application Policies then click on Edit.
5. Click on Add, then click on New. Set the value of Name to Remote Desktop Authentication. Change the object identifier to 1.3.6.1.4.1.311.54.1.2.
6. From the Application Policies list, select Remote Desktop Authentication.
7. Back on the certificate template properties, remove all other entries. Only Remote Desktop Authentication should be present.
8. If you wish, you can modify the validity period of the certificate, making it say two years instead of the default of one.
9. You probably want to secure your domain controllers as well, so for that we need to modify the security setting on the template. Open the Security tab and add the group Domain Controllers and give the group Read and Enroll (not Autoenroll).
10. Open the MMC snap-in for managing your Certificate Authority and locate the Certificate Templates node. Right click, select New, then Certificate Template to Issue. Choose the RemoteDesktopComputer template.
11. Next up is configuring the GPO to utilize the new template. You can modify any GPO you wish, or create a new one. Obviously the scope of the GPO should cover any servers that you want to secure with TLS. This could be a server baseline GPO, domain GPO, or whatever you want.
12. In the GPO editor locate the node Computer Configuration\Policies\Administrative Templates\Windows Components\Remote Desktop Services\Remote Desktop Session HostSecurity. Modify the Server Authentication Certificate Template setting. Enable the policy and enter the certificate template name that exactly matches what you created in your CA.
13. In the same GPO node, configure the Require use of specific security layer for remote (RDP) connections to use SSL (TLS 1.0).
14. Wait for the GPO to replicate, then refresh the GPO on a test server. Wait a minute, then open the Certificates MMC snap-in for the computer account. Look in the PersonalCertificates store for a certificate that has the Intended Purposes of Remote Desktop Authentication. If it’s not there, wait a minute, and refresh. If it never appears, something is wrong. Look at the gpresult to make sure your GPO is being applied to the server.

15. Once the certificate appears, double click on the certificate to open it. On the Details tab look at the first few characters of the thumbprint value and remember them.
16. To make sure the RDP service is aware of the new certificate, I restart the Remote Desktop Services service.
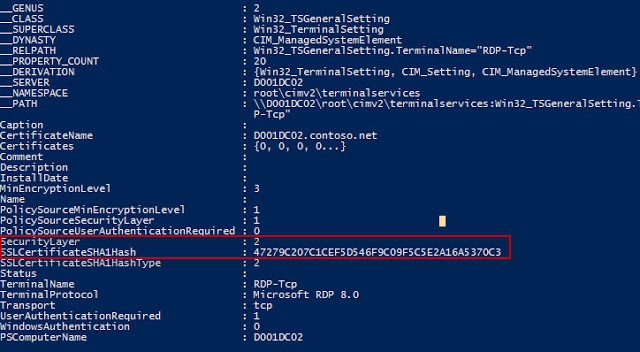
17. Open an elevated PowerShell prompt and run this command:
Get-WmiObject -class “Win32_TSGeneralSetting” -Namespace root\cimv2\terminalservices -Filter “TerminalName=’RDP-tcp’”
Validate that the Security Layer value is 2 and that the thumbprint matches the certificate. If both of those settings are correct, then you are good to go!
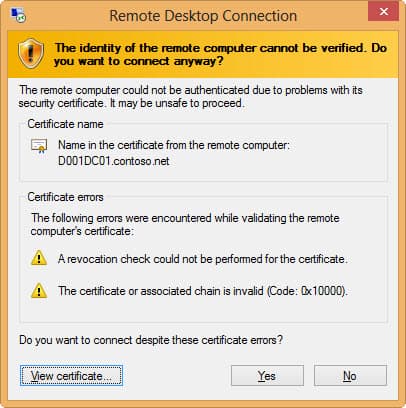
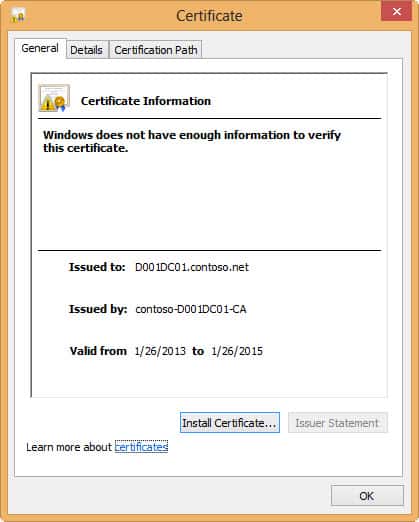
As a quick test I attempted to connect to this server from a non-domain joined computer that did not have the root certificate for my CA. I configured the RDP client to warn on any security issues. As expected, the client threw errors about the CRL not being available, and that it didn’t trust the chain. I also viewed the certificate and verified it was the correct one.
It seems Windows 8 has much more stringent certificate checking than Windows 7. The screenshots below are from Windows 7, in case you didn’t recognize the chrome. When using a Windows 7 non-domain joined computer to access the same TLS protected server, I got NO certificate warnings. That was even with the RDP 8 add-on hotfix. I’m glad to see Win8 does thorough certificate validation.
Connecting to the same server from a domain-joined computer that trusted the root CA resulted in no security warnings and a successful connection. If you look at a Wireshark capture you can also validate that CRL information is being exchanged between the computers, which means TLS is being used.

You’ve probably noticed by now that URLs on the Internet start with the two prefixes HTTP and HTTPS! This is more common on websites that contain forms for posting information. But what is the difference between HTTP and HTTPS? The difference between these addresses is whether or not to use an SSL certificate. Additional S means that the website is secure and encrypted and the information you exchange with it will only remain between you and the website. In this article, we are going to teach you How to Install SSL on Windows RDP Server. If you want to buy a Windows VPS server or Admin RDP, we suggest you check, test, and use the plans presented on our website. It should be noted that these servers are with immediate delivery.
What are the Benefits of using SSL?
The main benefits of using SSL are listed below:
1) Increase Information Security: To protect users’ personal information, it is better to respect your audience and receive this certificate.
2) Increase User Trust: Because non-SSL websites are tagged as Not Secure, this can make it difficult for users to easily trust your website. Especially when they want to buy products. So it is better to enable SSL for your website to increase their trust.
3) Improving Website SEO: The security of users’ information is important to Google, so using an SSL certificate in your website SEO is effective. Because Google is paying attention to this certificate and has officially recommended that you use it. Therefore, using this certificate can improve your position in search results.
4) Require for Receiving a Direct Payment Gateway: To receive a direct payment gateway from banks, your website must have a two-star symbol. SSL is also required to receive the two-star symbol. So if you are thinking of getting a direct gateway, first get the SSL protocol.
How to Install SSL on Windows RDP
To Install SSL on Windows RDP, just follow the steps below.
First type Administrative Tools in the Start menu and select Internet Information Services Manager (IIS) after opening the Administrative Tools window.
In this step, you have to click on your server’s hostname on the left side of the Connections pane.
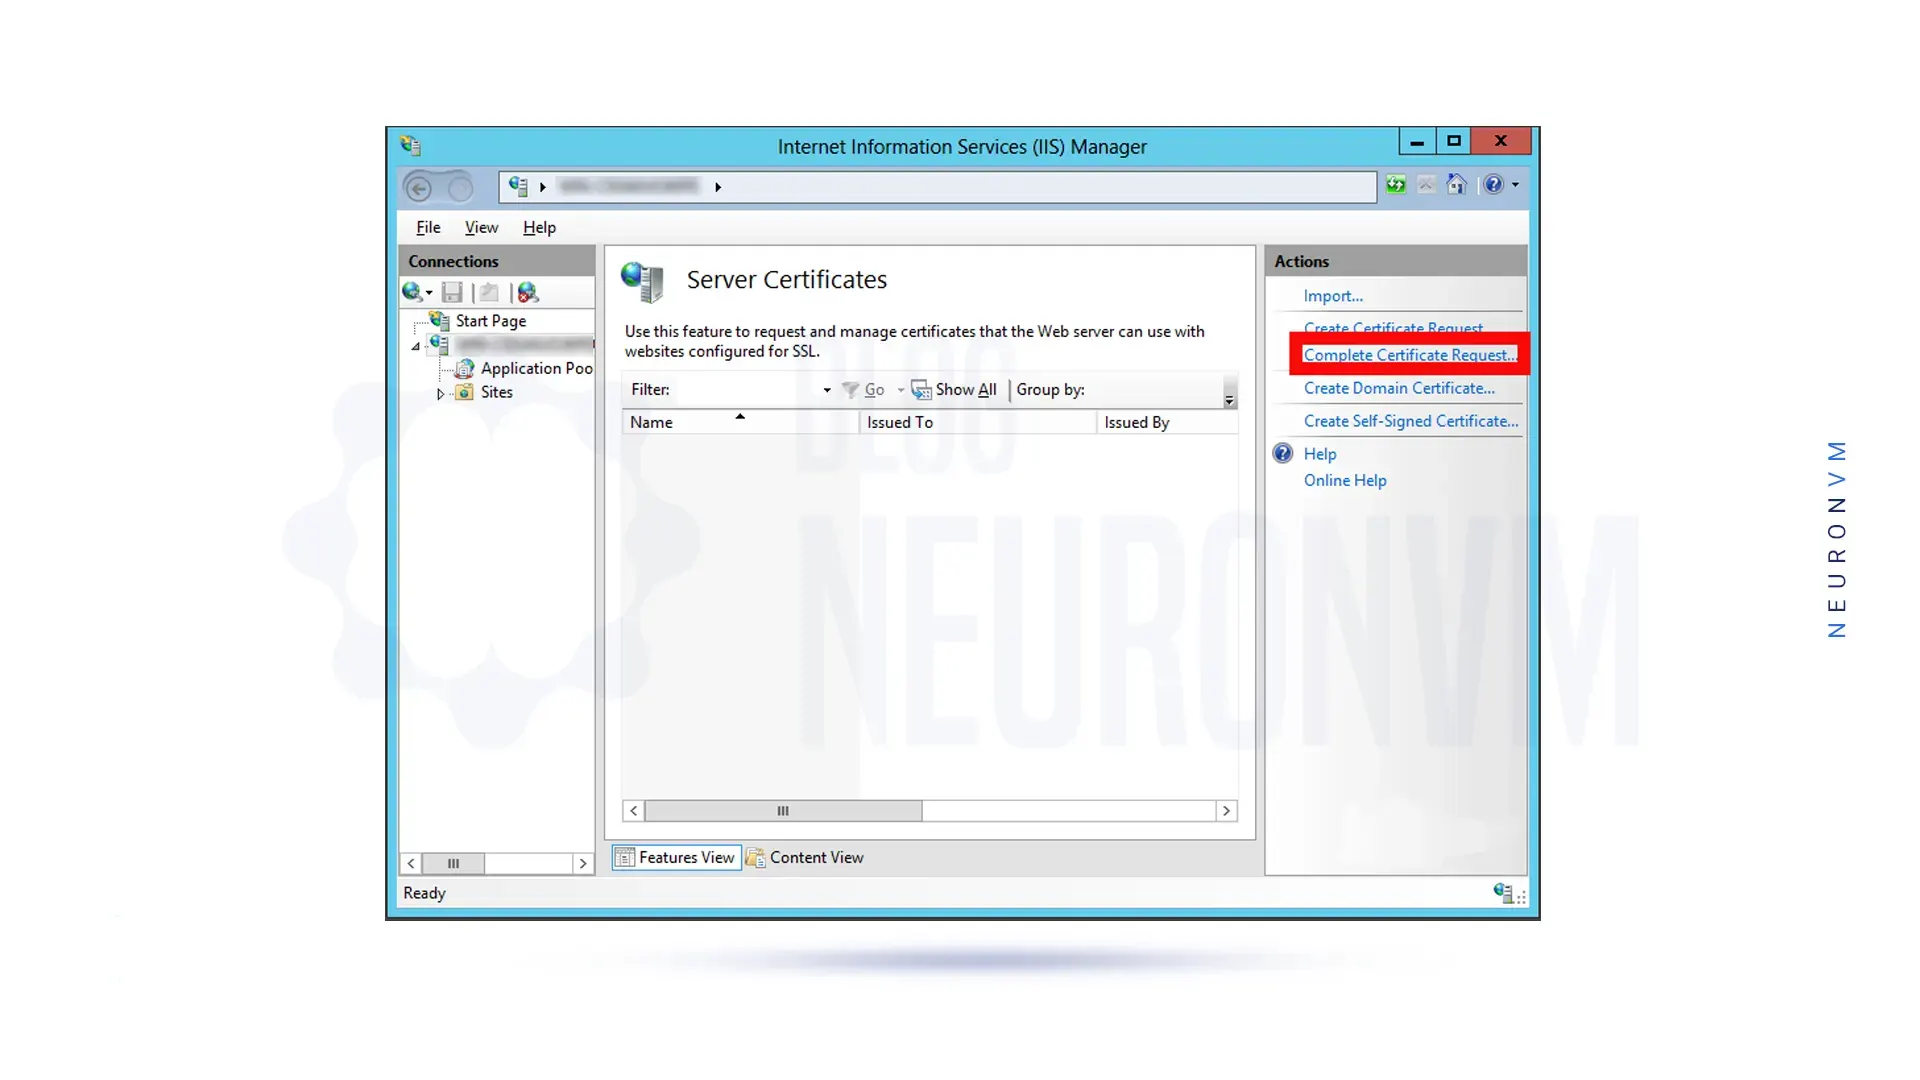
You will see various options for your server in the middle. Then you have to Double-click on the Server Certificates icon.
On the right pane of the window in the Actions section, click Complete Certificate Request.
Now to go to the .cer certificate file that you received from your Certificate Authority (CA), you need to click on the three dots (…) on the Specify Certificate Authority Response page.
At this stage, you must name your certificate refer to it, and select the appropriate certificate store.
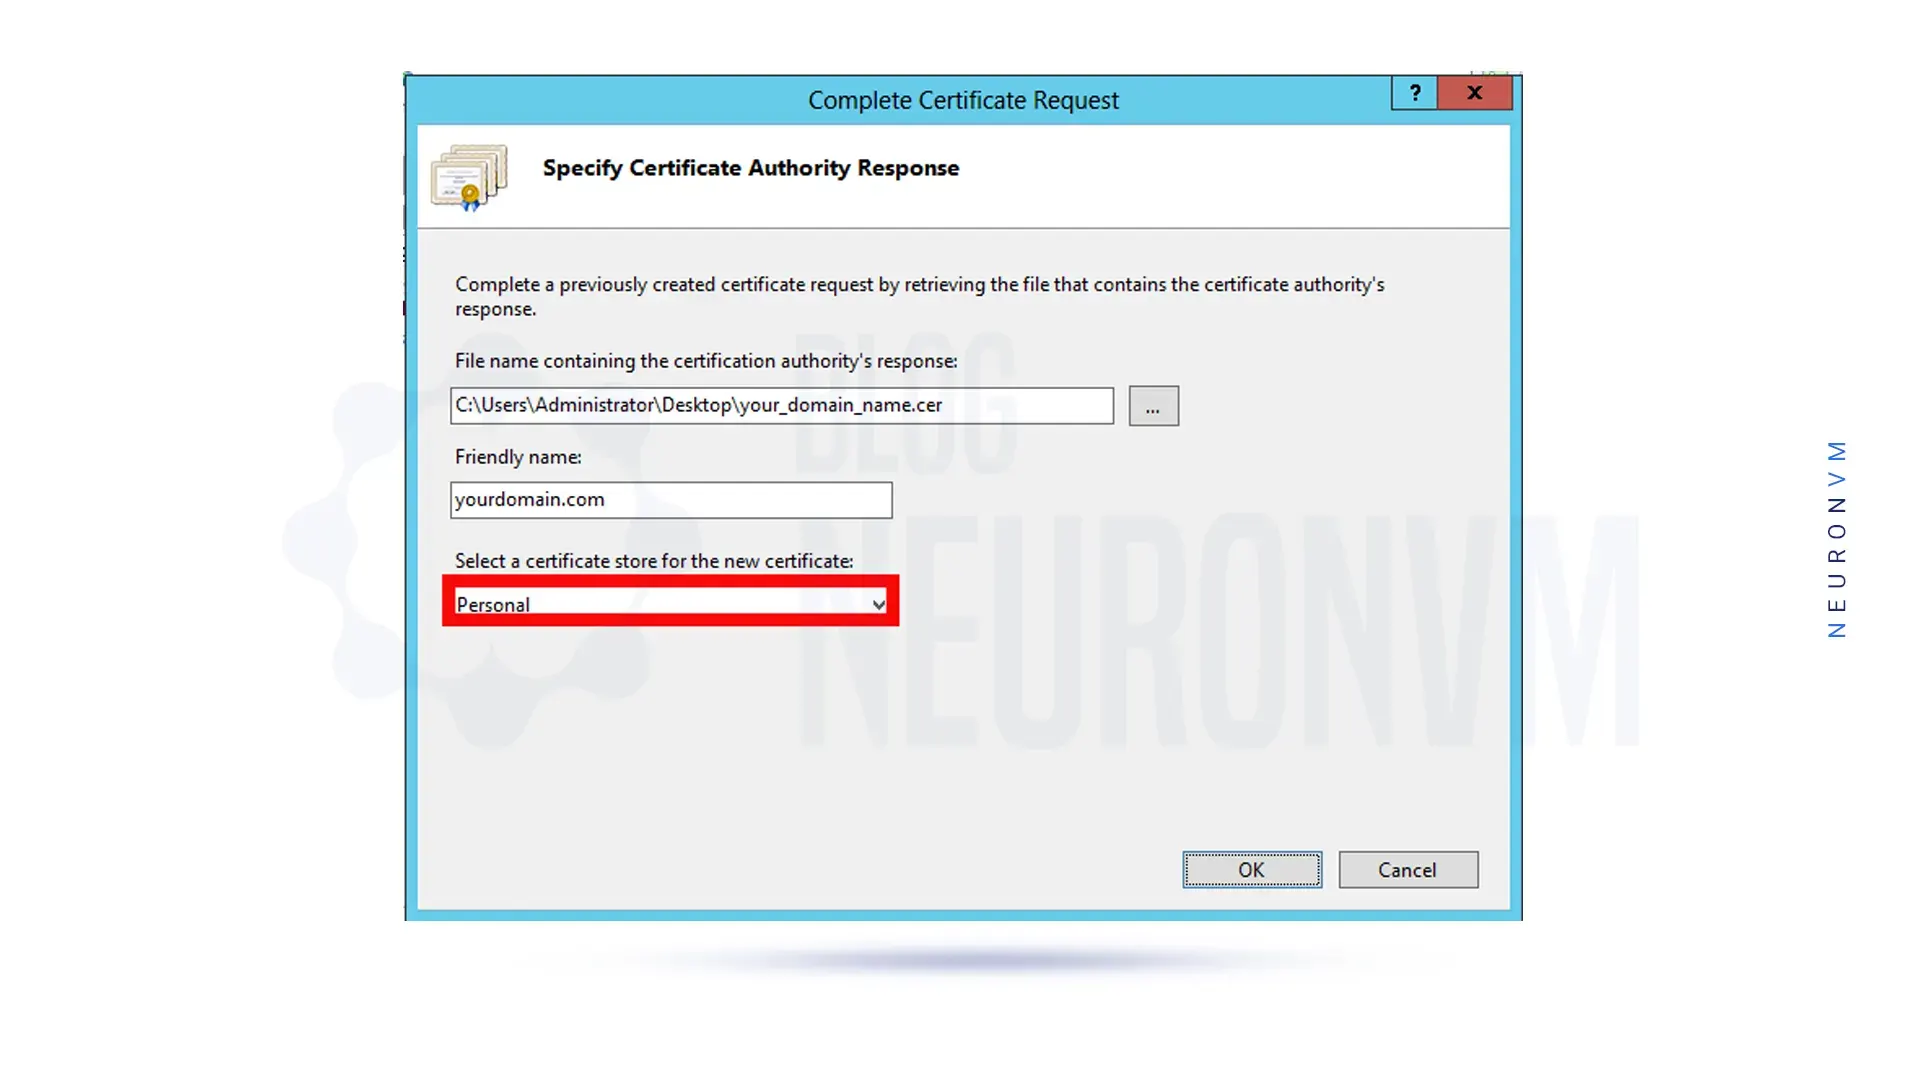
Now you must click on OK.
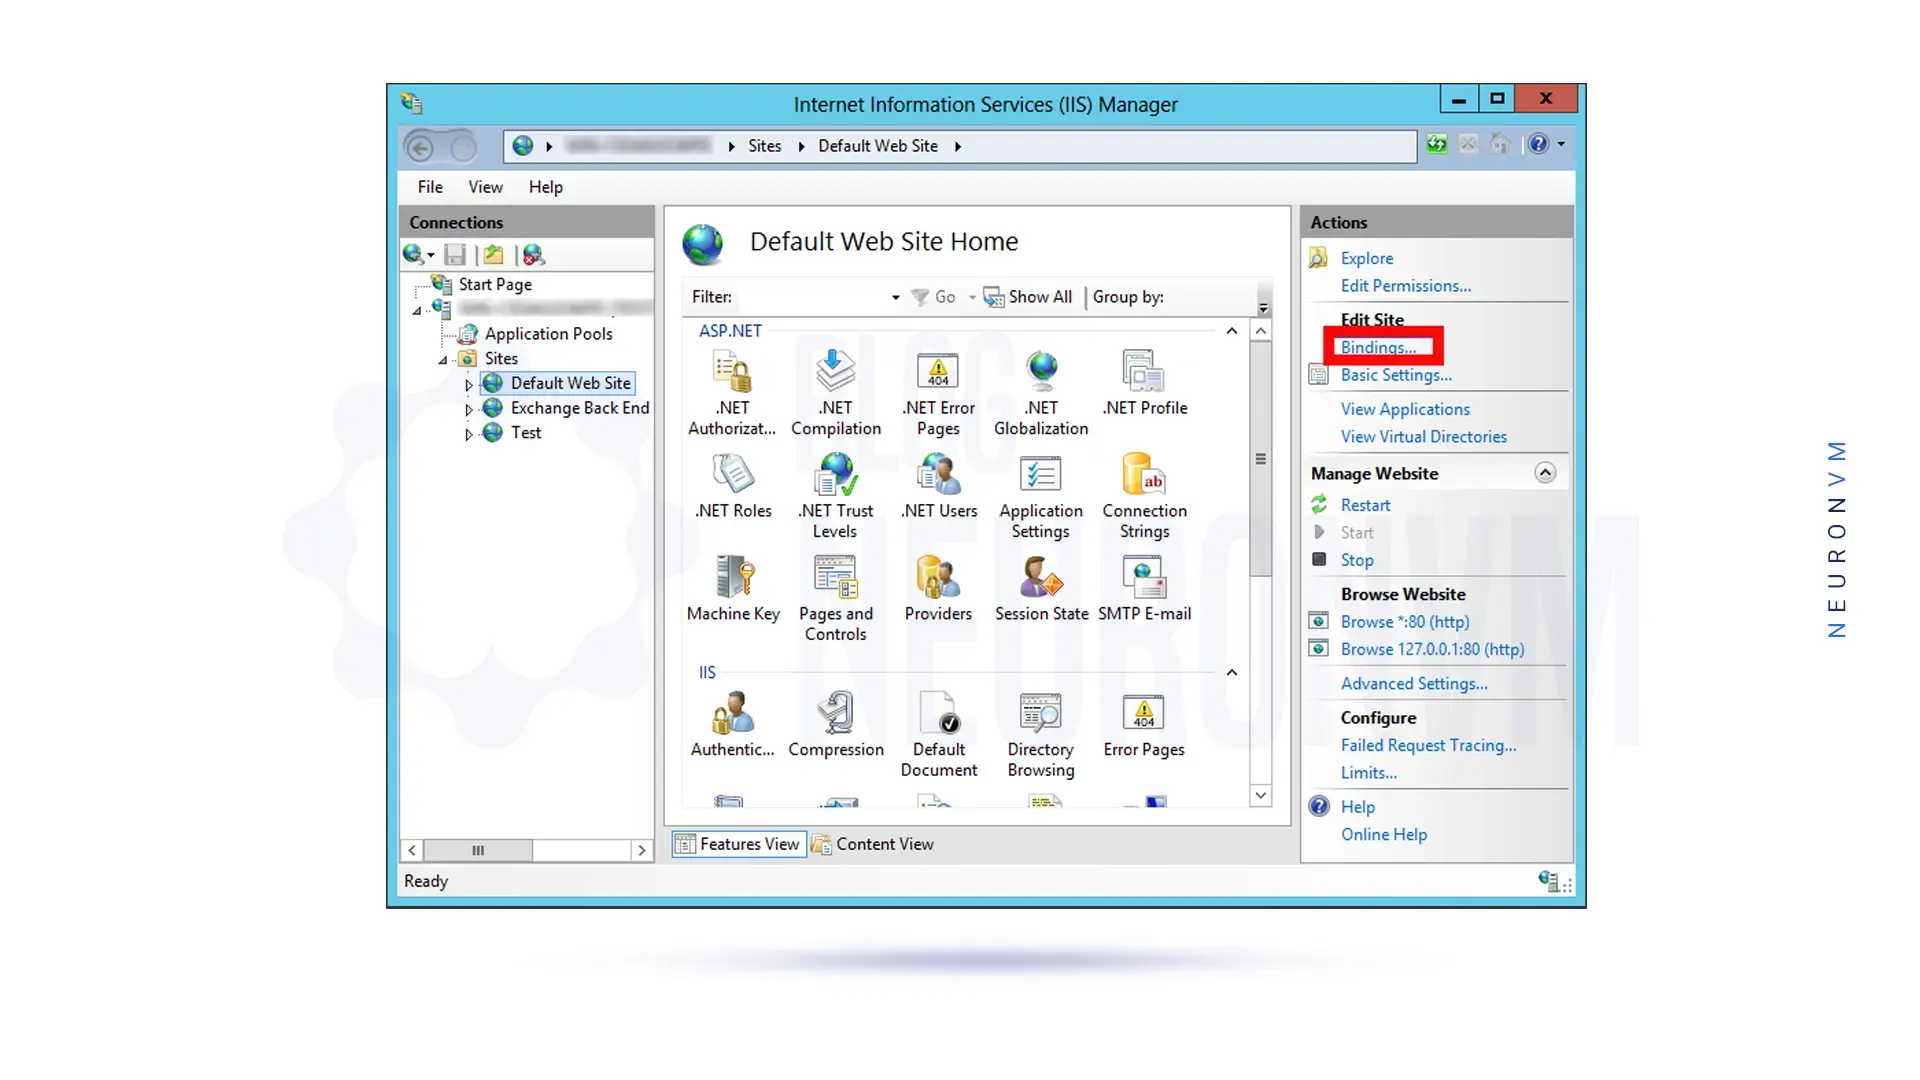
You should go back to IIS Manager and expand your server name on the left pane. Then expand the sites and select the desired website to install the SSL certificate.
Then click on Bindings … in the Actions pane on the right side of the window.
After opening the window, first, click on HTTPS and then edit.

In this step, from the Edit Site Binding window, select the SSL certificate with the name of your choice.
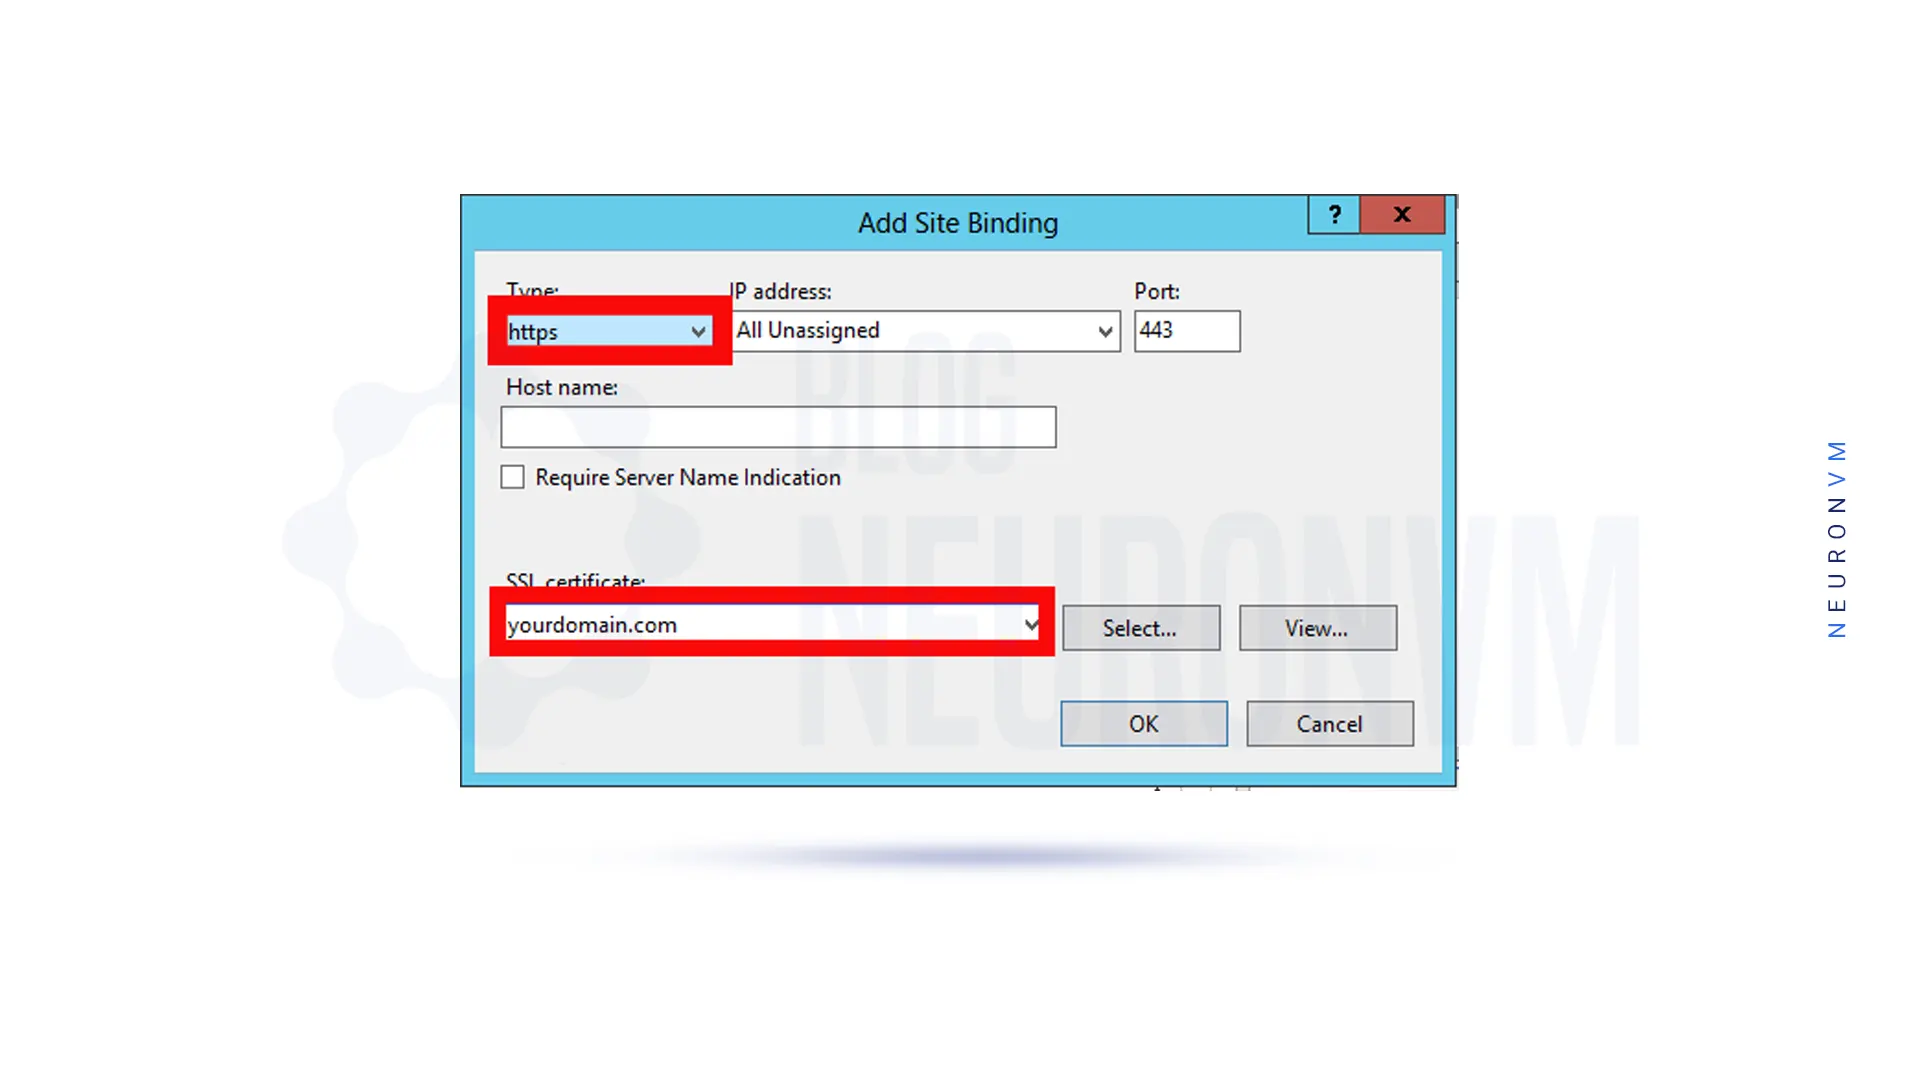
You have to click OK again.
If you want to check the new SSL expiration date and verify its installation, go to the SSL Checker tool.
Conclusion
Securing your Windows RDP connection with SSL is crucial to safeguard sensitive information during remote sessions. By following the steps outlined in this guide, you can install an SSL certificate on your Windows RDP server, establishing an encrypted connection between the client and the server. This process involves obtaining an SSL certificate from a trusted CA, generating a CSR, installing the certificate using IIS Manager, configuring RDP to utilize the SSL certificate, and finally, testing the installation. By implementing SSL on your Windows RDP, you enhance the security and privacy of your remote connections, mitigating the risks associated with unauthorized access and data interception.