
Протокол Remote Desktop Protocol (RDP) позволяет удаленно подключиться к рабочему столу компьютера с Windows и работать с ним, как будто это ваш локальный компьютер. По умолчанию RDP доступ в Windows запрещен. В этой статье, мы покажем, как включить и настроить RDP доступ в Windows 10 и Windows Server 2016/2019.
Содержание:
- Включаем удаленный рабочий стол в Windows 10
- Как включить RDP доступ с помощью PowerShell?
- RDP доступ к Windows Server 2016/2019
- Включение RDP с групповых политик в домене Active Direcrtory
- Как удаленно включить RDP на компьютере Windows?
Включаем удаленный рабочий стол в Windows 10
Самый простой способ включить RDP доступ в Windows – воспользоваться графическим интерфейсом.
Откройте свойства системы через панель управления, или выполнив команду SystemPropertiesRemote.
Перейдите на вкладку Remote Settings (Удаленный доступ), включите опцию Allow remote connection to this computer (Разрешить удалённые подключения к этому компьютеру).
В целях безопасности желательно разрешить подключение только с клиентов RDP с поддержкой протокола NLA (Allow connections only from computers running Remote Desktop with Network Level Authentication/ Разрешить подключение только с компьютеров, на которых работает удаленный рабочий стол с проверкой подлинности на уровне сети).

Сохраните изменения, нажав ОК.
По умолчанию право на подключение к компьютеру через RDP есть только у членов группы локальных администраторов. Если вам нужно разрешить RDP доступ другим пользователям, нажмите кнопку Select Users.
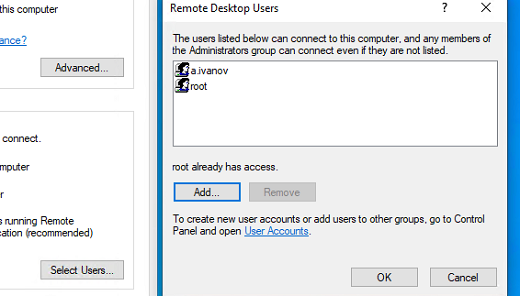
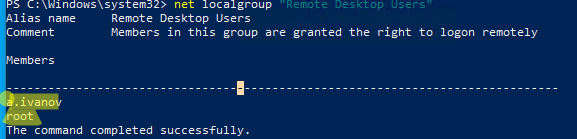
Все пользователи, которых вы укажете здесь будет добавлены в локальную группу Remote Desktop Users. Вы можете в командной строке вывести список пользователей в этой группе:
net localgroup "Remote Desktop Users"
или
net localgroup “Пользователи удаленного рабочего стола”
Чтобы добавить нового пользователя в группу доступа RDP, выполните:
net localgroup "Remote Desktop Users" /add publicuser
В русской версии Windows измените название группы на “Пользователи удаленного рабочего стола”.
В новых билдах Windows 10 классическая панель для включения RDP доступа теперь спрятана и Microsoft рекомендует пользоваться новой панелью Setting.
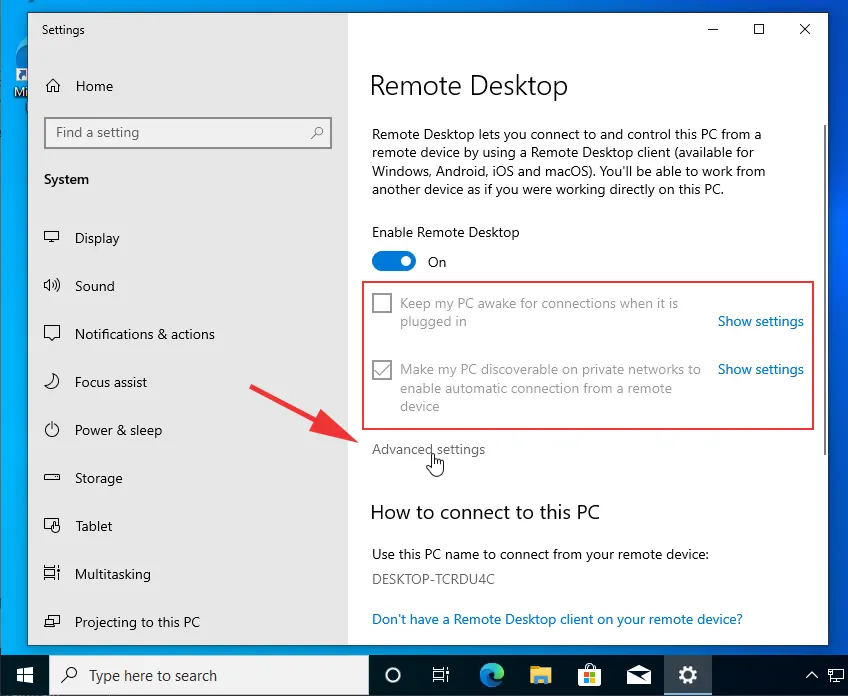
- Перейдите в Settings -> System —> Remote Desktop;
- Включите опцию Enable Remote Desktop;

- Подтвердите включение RDP на компьютере.
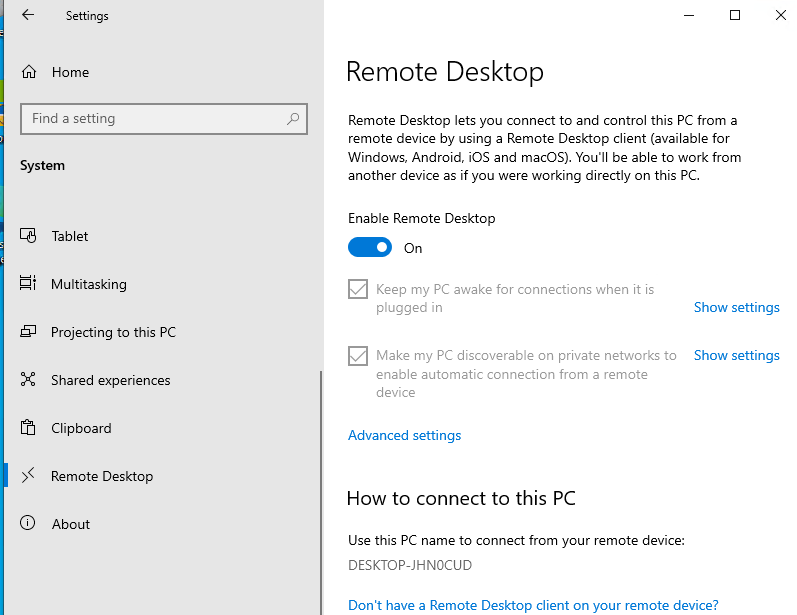
Обратите внимание, что вы не можете включить RDP доступ к редакции Windows 10 Home. RDP сервер работает только на Windows 10 Pro и Enterprise. Впрочем, есть обходное решение.
Обратите внимание, что по умолчанию при включении Remote Desktop, включаются две опции:
- Keep my PC awake for connection when it is plugged in ;
- Make my PC discoverable on private networks to enable automatic connection from a remote device
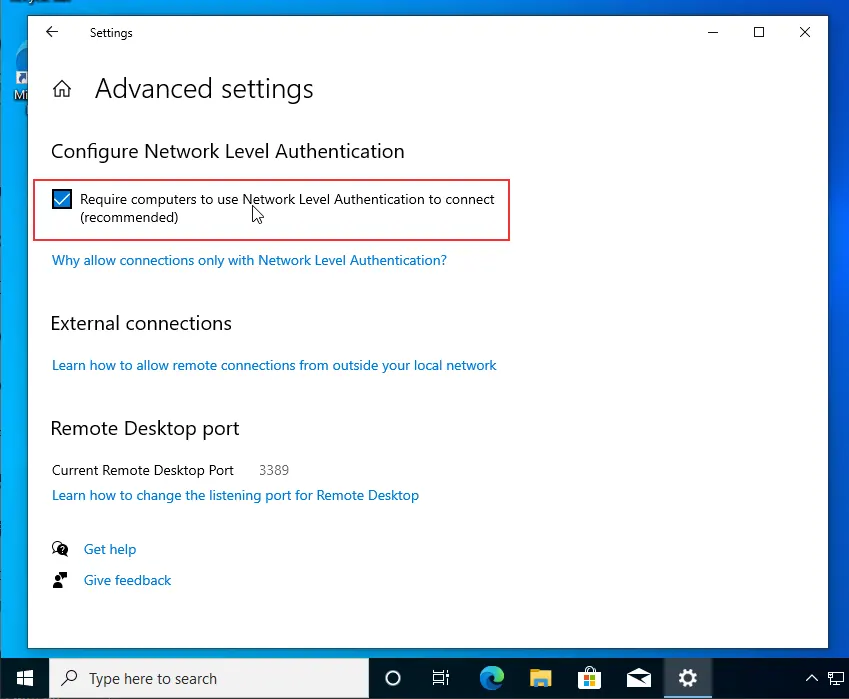
На жмите на ссылку “Advanced settings”. Здесь можно включить использование протокола “Network Level Authentication” для RDP подключений (рекомендуется).
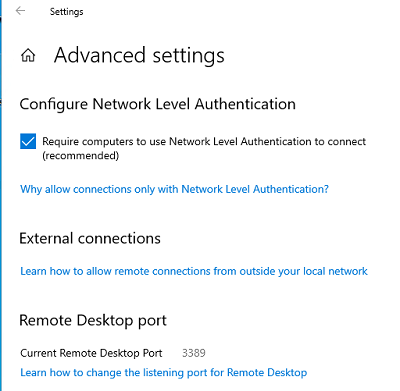
Если на компьютере включен Windows Defender Firewall (брандмауэр), то нужно проверить, что в нем разрешены входящие RDP подключения. По умолчанию для RDP подключений используется порт TCP
3389
, а в последних билдах Windows также используется
UDP 3389
( см. статью про кейс с черным экраном вместо рабочего стола при RDP доступе).
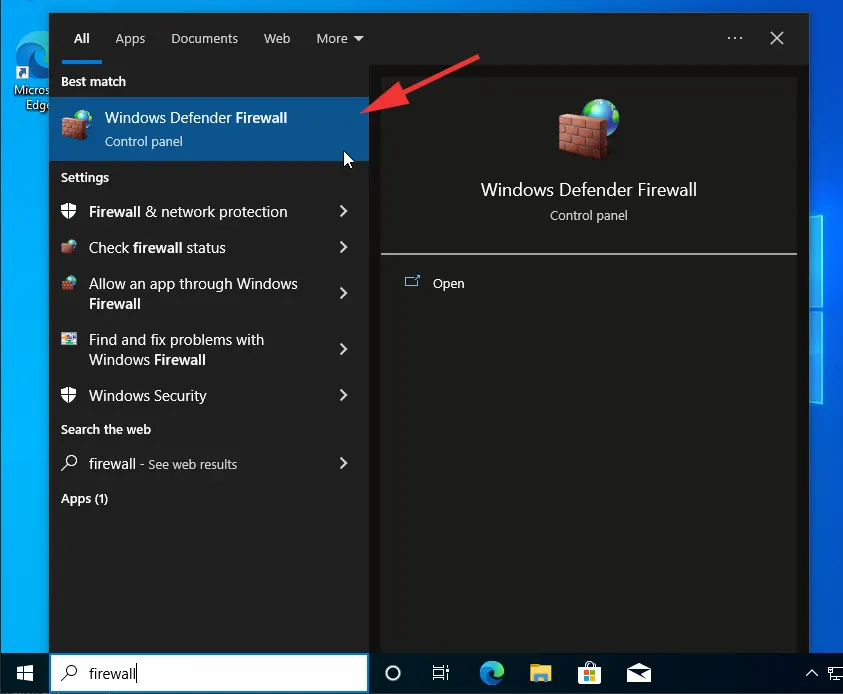
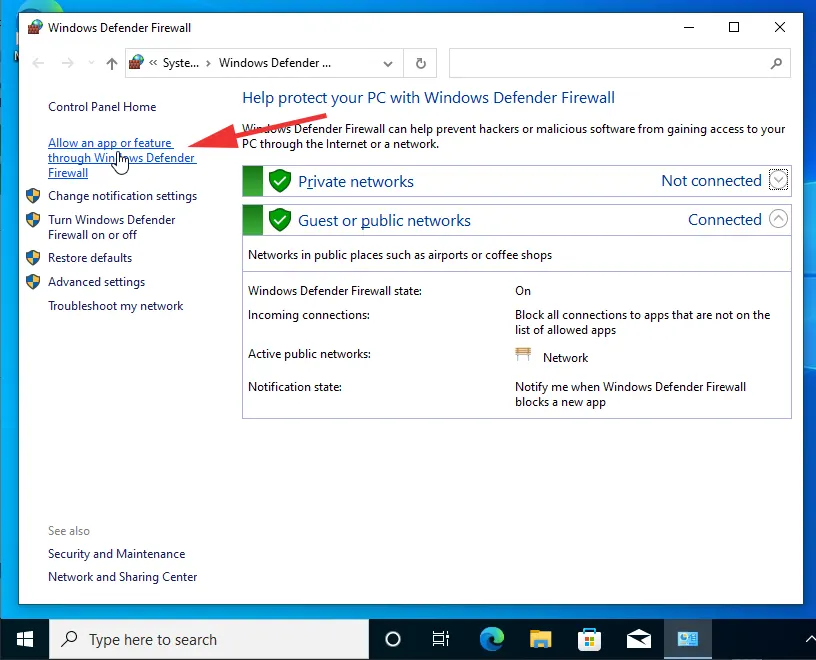
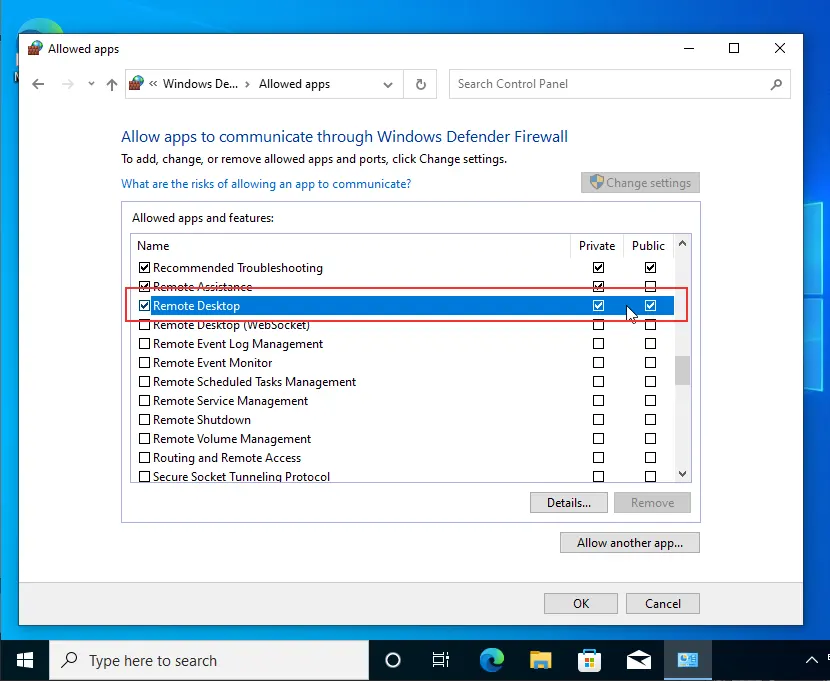
Перейдите в панель управления и выберите элемент Windows Defender Firewall. Откройте список стандартных правил брандмауэра Windows, щелкнув в левом столбце по ссылке Allow an app or feature through Windows Firewall.
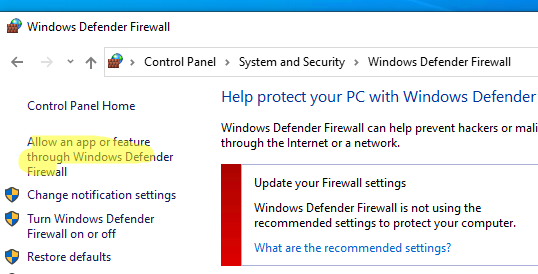
Проверьте, что правило Remote Desktop включено для профиля Private (домашняя или рабочая сеть) и, если необходимо, для профиля Public (общедоступные сети).
Подробнее про типы сетей и профили брандмауэра Windows здесь.
Если нужно, вы можете дополнительно ограничить длительность RDP сессий с помощью GPO.
Теперь к данному компьютеру можно подключится с помощью RDP клиента. Встроенный RDP клиент Windows –
mstsc.exe
. Он сохраняет всю историю RDP подключений с компьютера. Поддерживается копирование файлов между локальным и удаленным компьютером прямо через буфер обмена RDP.
Также вы можете использовать менеджеры RDP подключений, такие как RDCMan или mRemoteNG, или альтернативные клиенты.
Для удобства пользователей пароль для RDP подключения можно сохранить в Windows Credential Manager.
Как включить RDP доступ с помощью PowerShell?
Вы можете включить RDP доступ в Windows с помощью пары PowerShell команд. Это гораздо быстрее:
- Запустите консоль PowerShell.exe с правами администратора;
- Включите RDP доступ в реестре с помощью командлета Set-ItemProperty:
Set-ItemProperty -Path 'HKLM:\System\CurrentControlSet\Control\Terminal Server' -name "fDenyTSConnections" -value 0Чтобы закрыть RDP доступ, измените значение fDenyTSConnections на 1.
- Разрешите RDP подключения к компьютеру в Windows Defender Firewall. Для этого включите предустановленное правило :
Enable-NetFirewallRule -DisplayGroup "Remote Desktop"
- Если нужно добавить пользователя в группу в локальную группу RDP доступа, выполните:
Add-LocalGroupMember -Group "Remote Desktop Users" -Member 'a.petrov'

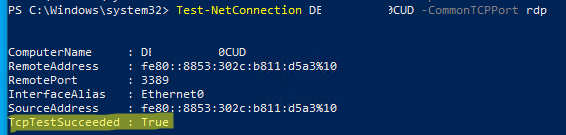
Чтобы проверить, что на компьютере открыт RDP порт, воспользуйтесь командлетом Test-NetConnection:
Test-NetConnection -ComputerName deskcomp323 -CommonTCPPort rdp
RDP доступ к Windows Server 2016/2019
В отличии от десктопной редакции Windows 10, в Windows Server по умолчанию поддерживается два одновременных RDP подключения. Эти подключения используются администраторами для управления сервером.
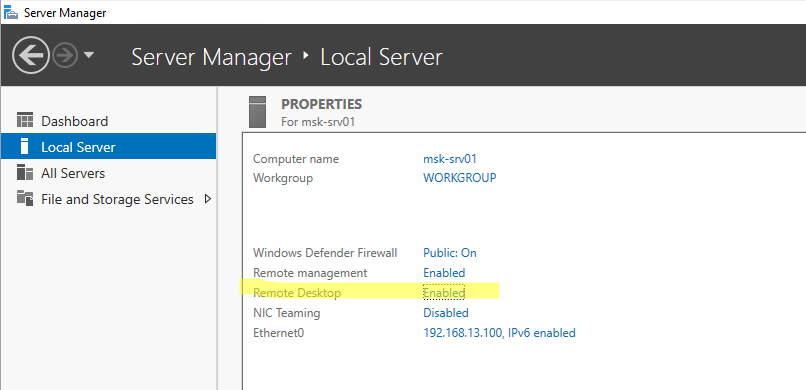
Включается RDP в Windows Server аналогично. Через SystemPropertiesRemote, через Server Manager или командами PowerShell, рассмотренными выше.
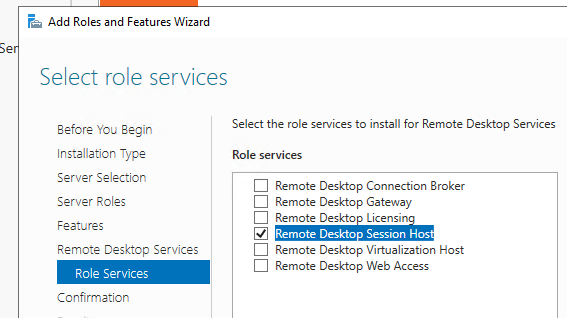
Вы можете использовать Windows Server в качестве терминального сервера. В этом случае множество пользователей могут одновременно подключаться к собственному рабочему столу на сервере. Для этого нужно установить и настроить на сервере роль Remote Desktop Session Host. Это требует приобретения специальных RDS лицензии (CAL). Подробнее о RDS лицензировании здесь.
Для дополнительно защиты RDP сессий можно использовать SSL/TLS сертификаты.
Включение RDP с групповых политик в домене Active Direcrtory
Если вам нужно включить RDP доступ сразу на большом количестве компьютеров, можно воспользоваться групповыми политиками (GPO). Мы подразумеваем, что все компьютеры включены в домен Windows.
- Запустите консоль управления доменными GPO
gpmc.msc
; - Создайте новую (или отредактируйте уже существующую) групповую политику и привяжите ее к целевой OU с компьютерами или серверами;
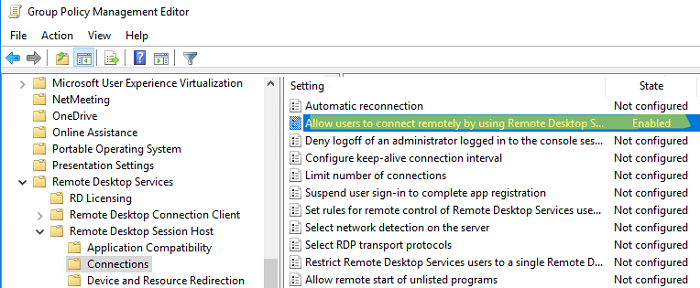
- Переключитесь в режим редактирования политики и перейдите в секцию GPO Computer Configuration -> Administrative Templates -> Windows Components -> Remote Desktop Services -> Remote Desktop Session Host -> Connections;
- Найдите и включите политику Allow Users to connect remotely by using Remote Desktop Services, установив ее в Enable;
- Обновите параметры групповых политик на клиентах;
- После применения данной политики вы сможете подключится ко всем компьютерам по RDP (политика применится как к десктопным клиентам с Windows 10, так и к Windows Server). Если нужно, вы можете более тонко нацелить политики на компьютеры с помощью WMI фильтров GPO.
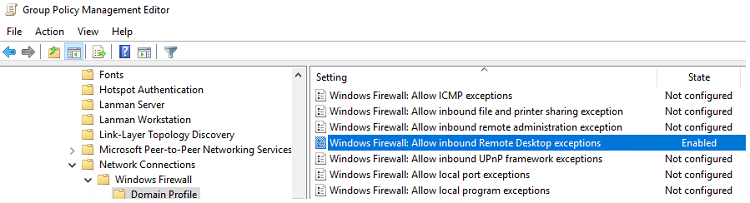
- Если на компьютерах включен Windows Defender Firewall, нужно в этой же GPO разрешить RDP-трафик для доменного профиля. Для этого нужно активировать правило Windows Firewall: Allow inbound Remote Desktop Exceptions (находится в разделе Computer Configuration -> Administrative Templates -> Network -> Network Connections -> Windows Firewall -> Domain Profile).
Подробнее о настройке правил брандмаура Windows через GPO рассказано здесь.
Как удаленно включить RDP на компьютере Windows?
Также вы можете удаленно включить RDP на любом компьютере Windows. Для этого у вас должен быть удаленный доступ к этому компьютеру (через PowerShell или WMI) и ваша учетная запись состоять в группе локальных администраторов на этом компьютере.
Вы можете удаленно включить RDP через реестр. Для этого на удаленном компьютере должна быть включена служба Remote Registry (по умолчанию она отключена). Чтобы запустить службу:
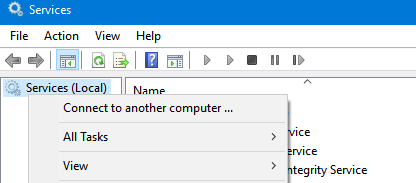
- Запустите консоль управления службами (
services.msc
); - Выберите Connect to another computer и укажите имя удаленного компьютера;
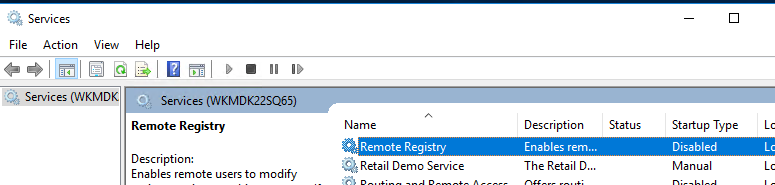
- Найдите в списке службу Remote Registry, измените тип запуска на Manual (ручной) и затем запустите службу – Start.
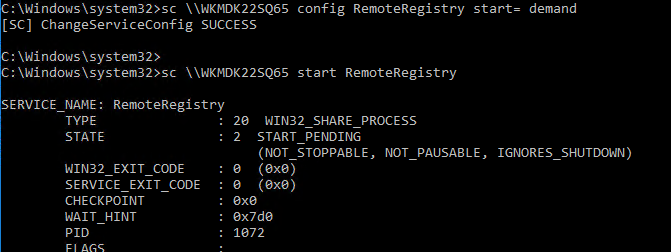
Тоже самое можно выполнить удаленно из командной строки с помощью встроенной утилиты
sc
(позволяет создавать, управлять или удалять службы Windows):
sc \\WKMDK22SQ65 config RemoteRegistry start= demand
sc \\WKMDK22SQ65 start RemoteRegistry
Затем на локальном компьютере
- Запустите редактор реестра
regedit.exe - Выберите в меню Файл пункт Connect Network Registry (Подключить сетевой реестр)
- Укажите имя или IP адрес удаленного компьютера, на котором нужно включить службу RDP;
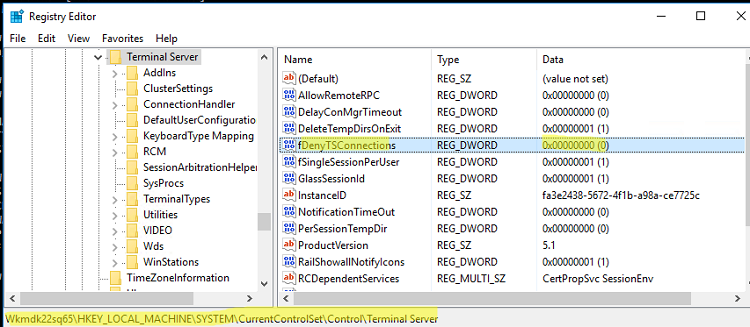
- Перейдите в раздел
HKEY_LOCAL_MACHINE\SYSTEM\CurrentControlSet\Control\Terminal Server
; - Найдите параметр fDenyTSConnections (тип REG_DWORD). Если данный ключ отсутствует – создайте его. Измените его значение на 0, чтобы включить RDP.
Для отключения RDP доступа нужно изменить значение fDenyTSConnections на 1.
Сразу после этого без перезагрузки удаленный компьютер должен стать доступным по RDP.
Но гораздо быстрее можно включить RDP в реестре удаленого компьютера через командную строку:
REG ADD "\\WKMDK22SQ65\HKLM\SYSTEM\CurrentControlSet\Control\Terminal Server" /v fDenyTSConnections /t REG_DWORD /d 0 /f
Если на удаленном компьютере настроен PowerShell remoting, вы можете выполнить на нем удаленную команду через Invoke-Command:
Invoke-Command -Computername WKMDK22SQ65 -ScriptBlock {Set-ItemProperty -Path "HKLM:\System\CurrentControlSet\Control\Terminal Server" -Name "fDenyTSConnections" –Value 0}
Если в Windows установлен OpenSSH сервер, вы можете подключиться к нему любым ssh клиентом и внести изменения в реестр в локальной ssh сессии.
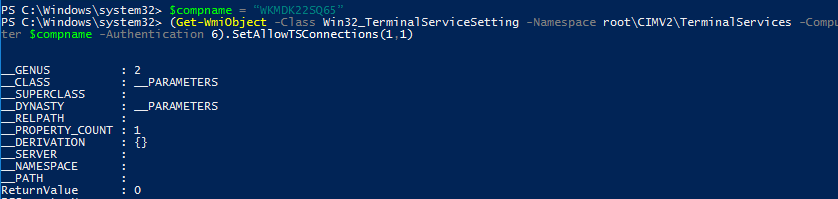
Также вы можете подключиться к удаленному компьютеру и включить RDP через WMI:
$compname = “WKMDK22SQ65”
(Get-WmiObject -Class Win32_TerminalServiceSetting -Namespace root\CIMV2\TerminalServices -Computer $compname -Authentication 6).SetAllowTSConnections(1,1)
Remote Desktop Services (RDS), known as Terminal Services in Windows Server 2008 and earlier,[1] is one of the components of Microsoft Windows that allow a user to initiate and control an interactive session[2] on a remote computer or virtual machine over a network connection.
Remote Desktop Services
| Other names | Terminal Services |
|---|---|
| Developer(s) | Microsoft |
| Operating system | Microsoft Windows |
| Service name | TermService |
| Type | Remote desktop software |
| Website | docs |
RDS is Microsoft’s implementation of thin client architecture, where Windows software, and the entire desktop of the computer running RDS, are made accessible to any remote client machine that supports Remote Desktop Protocol (RDP). User interfaces are displayed from the server onto the client system and input from the client system is transmitted to the server — where software execution takes place.[3] This is in contrast to application streaming systems, like Microsoft App-V, in which computer programs are streamed to the client on-demand and executed on the client machine.
RDS was first released in 1998 as Terminal Server in Windows NT 4.0 Terminal Server Edition, a stand-alone edition of Windows NT 4.0 Server that allowed users to log in remotely. Starting with Windows 2000, it was integrated under the name of Terminal Services as an optional component in the server editions of the Windows NT family of operating systems,[4] receiving updates and improvements with each version of Windows.[5] Terminal Services were then renamed to Remote Desktop Services with Windows Server 2008 R2[6] in 2009.
RemoteFX was added to RDS as part of Windows Server 2008 R2 Service Pack 1.
Windows includes four client components that use RDS:
- Quick Assist (Windows 10 and later) and Windows Remote Assistance (Windows XP through Windows 8.1)
- Remote Desktop Connection (RDC)
- Fast user switching
- Windows Subsystem for Linux (via MSRDC)
The first two are individual utilities that allow a user to operate an interactive session on a remote computer over the network. In case of Remote Assistance, the remote user needs to receive an invitation and the control is cooperative. In case of RDC, however, the remote user opens a new session on the remote computer and has every power granted by its user account’s rights and restrictions.[3][7][8] Fast User Switching allows users to switch between user accounts on the local computer without quitting software and logging out. Fast User Switching is part of Winlogon and uses RDS to accomplish its switching feature.[9][10] Third-party developers have also created client software for RDS. For example, rdesktop supports Unix platforms.
Although RDS is shipped with most editions of all versions of Windows NT since Windows 2000,[4] its functionality differs in each version. Windows XP Home Edition does not accept any RDC connections at all, reserving RDS for Fast User Switching and Remote Assistance only. Other client versions of Windows only allow a maximum of one remote user to connect to the system at the cost of the user who has logged onto the console being disconnected. Windows Server allows two users to connect at the same time. This licensing scheme, called «Remote Desktop for Administration», facilitates administration of unattended or headless computers. Only by acquiring additional licenses (in addition to that of Windows) can a computer running Windows Server service multiple remote users at one time and achieve virtual desktop infrastructure.[6][9]
For an organization, RDS allows the IT department to install applications on a central server instead of multiple computers.[11] Remote users can log on and use those applications over the network. Such centralization can make maintenance and troubleshooting easier. RDS and Windows authentication systems prevent unauthorized users from accessing apps or data.
Microsoft has a long-standing agreement with Citrix to facilitate sharing of technologies and patent licensing between Microsoft Terminal Services and Citrix XenApp (formerly Citrix MetaFrame and Citrix Presentation Server). In this arrangement, Citrix has access to key source code for the Windows platform, enabling its developers to improve the security and performance of the Terminal Services platform. In late December 2004 the two companies announced a five-year renewal of this arrangement to cover Windows Vista.[12]
The key server component of RDS is Terminal Server (termdd.sys), which listens on TCP port 3389. When a Remote Desktop Protocol (RDP) client connects to this port, it is tagged with a unique SessionID and associated with a freshly spawned console session (Session 0, keyboard, mouse and character mode UI only). The login subsystem (winlogon.exe) and the GDI graphics subsystem is then initiated, which handles the job of authenticating the user and presenting the GUI. These executables are loaded in a new session, rather than the console session. When creating the new session, the graphics and keyboard/mouse device drivers are replaced with RDP-specific drivers: RdpDD.sys and RdpWD.sys. The RdpDD.sys is the device driver and it captures the UI rendering calls into a format that is transmittable over RDP. RdpWD.sys acts as keyboard and mouse driver; it receives keyboard and mouse input over the TCP connection and presents them as keyboard or mouse inputs. It also allows creation of virtual channels, which allow other devices, such as disc, audio, printers, and COM ports to be redirected, i.e., the channels act as replacement for these devices. The channels connect to the client over the TCP connection; as the channels are accessed for data, the client is informed of the request, which is then transferred over the TCP connection to the application. This entire procedure is done by the terminal server and the client, with the RDP mediating the correct transfer, and is entirely transparent to the applications.[13] RDP communications are encrypted using 128-bit RC4 encryption. From Windows Server 2003 onwards, it can use a FIPS 140 compliant encryption scheme, or encrypt communications using the Transport Layer Security standard.[3][14]
Once a client initiates a connection and is informed of a successful invocation of the terminal services stack at the server, it loads up the device as well as the keyboard/mouse drivers. The UI data received over RDP is decoded and rendered as UI, whereas the keyboard and mouse inputs to the Window hosting the UI is intercepted by the drivers, and transmitted over RDP to the server. It also creates the other virtual channels and sets up the redirection. RDP communication can be encrypted; using either low, medium or high encryption. With low encryption, user input (outgoing data) is encrypted using a weak (40-bit RC4) cipher. With medium encryption, UI packets (incoming data) are encrypted using this weak cipher as well. The setting «High encryption (Non-export)» uses 128-bit RC4 encryption and «High encryption (Export)» uses 40-bit RC4 encryption.[15] When setting the Security Layer to ‘SSL (TLS 1.0)’, Transport Layer Security up to version 1.2 is available.[16]
Terminal Server is the server component of Terminal services. It handles the job of authenticating clients, as well as making the applications available remotely. It is also entrusted with the job of restricting the clients according to the level of access they have. The Terminal Server respects the configured software restriction policies, so as to restrict the availability of certain software to only a certain group of users. The remote session information is stored in specialized directories, called Session Directory which is stored at the server. Session directories are used to store state information about a session, and can be used to resume interrupted sessions. The terminal server also has to manage these directories. Terminal Servers can be used in a cluster as well.[3]
In Windows Server 2008, it has been significantly overhauled. While logging in, if the user logged on to the local system using a Windows Server Domain account, the credentials from the same sign-on can be used to authenticate the remote session. However, this requires Windows Server 2008 to be the terminal server OS, while the client OS is limited to Windows Server 2008, Windows Vista and Windows 7. In addition, the terminal server may be configured to allow connection to individual programs, rather than the entire desktop, by means of a feature named RemoteApp. Terminal Services Web Access (TS Web Access) makes a RemoteApp session invocable from the web browser. It includes the TS Web Access Web Part control which maintains the list of RemoteApps deployed on the server and keeps the list up to date. Terminal Server can also integrate with Windows System Resource Manager to throttle resource usage of remote applications.[5]
Terminal Server is managed by the Terminal Server Manager Microsoft Management Console snap-in. It can be used to configure the sign in requirements, as well as to enforce a single instance of remote session. It can also be configured by using Group Policy or Windows Management Instrumentation. It is, however, not available in client versions of Windows OS, where the server is pre-configured to allow only one session and enforce the rights of the user account on the remote session, without any customization.[3]
Remote Desktop Gateway
edit
The Remote Desktop Gateway service component, also known as RD Gateway, can tunnel the RDP session using a HTTPS channel.[17] This increases the security of RDS by encapsulating the session with Transport Layer Security (TLS).[18] This also allows the option to use Internet Explorer as the RDP client. The official MS RDP client for macOS supports RD Gateway as of version 8. This is also available for iOS and Android.
This feature was introduced in the Windows Server 2008 and Windows Home Server products.
In October 2021, Thincast, the main contributor of the FreeRDP project, published the first Remote Desktop Gateway solution running natively on Linux.[19]
- Remote Desktop Gateway
- Enables authorized users to connect to virtual desktops, Remote-App programs, and session-based desktops over a private network or the Internet.
- Remote Desktop Connection Broker Role
- Allows users to reconnect to their existing virtual desktop, RemoteApp programs, and session-based desktops. It enables even load distribution across RD Session Host servers in a session collection or across pooled virtual desktops in a pooled virtual desktop collection, and provides access to virtual desktops in a virtual desktop collection.
- Remote Desktop Session Host
- Enables a server to host RemoteApp programs as session-based desktops. Users can connect to RD Session Host servers in a session collection to run programs, save files, and use resources on those servers. Users can access Remote Desktop Session Host server by using the Remote Desktop Connection client or by using RemoteApp programs.
- Remote Desktop Virtualization Host
- Enables users to connect to virtual desktops by using RemoteApp and Desktop Connection.
- Remote Desktop Web Access
- Enables users to access RemoteApp and Desktop Connection through the Start Menu or through a web browser. RemoteApp and Desktop Connection provides users with a customized view of RemoteApp programs, session-based desktops, and virtual desktops.
- Remote Desktop Licensing
- Enables a server to manage RDS client access licenses (RDS CALs) that are required for each device or user to connect to a Remote Desktop Session Host server. RDS CALs are managed using the Remote Desktop Licensing Manager application.[20]
RemoteApp (or TS RemoteApp) is a special mode of RDS, available in Windows Server 2008 R2 and later, where remote session configuration is integrated into the client operating system. The RDP 6.1 client ships with Windows XP SP3, KB952155 for Windows XP SP2 users,[21] Windows Vista SP1 and Windows Server 2008. The UI for the RemoteApp is rendered in a window over the local desktop, and is managed like any other window for local applications. The end result of this is that remote applications behave largely like local applications. The task of establishing the remote session, as well as redirecting local resources to the remote application, is transparent to the end user.[22] Multiple applications can be started in a single RemoteApp session, each with their own windows.[23]
A RemoteApp can be packaged either as a .rdp file or distributed via an .msi Windows Installer package. When packaged as an .rdp file (which contains the address of the RemoteApp server, authentication schemes to be used, and other settings), a RemoteApp can be launched by double clicking the file. It will invoke the Remote Desktop Connection client, which will connect to the server and render the UI. The RemoteApp can also be packaged in a Windows Installer database, installing which can register the RemoteApp in the Start menu as well as create shortcuts to launch it. A RemoteApp can also be registered as handler for file types or URIs. Opening a file registered with RemoteApp will first invoke Remote Desktop Connection, which will connect to the terminal server and then open the file. Any application which can be accessed over Remote Desktop can be served as a RemoteApp.[22]
Windows 7 includes built-in support for RemoteApp publishing, but it has to be enabled manually in registry, since there is no RemoteApp management console in client versions of Microsoft Windows.[24]
Windows Desktop Sharing
edit
In Windows Vista onwards, Terminal Services also includes a multi-party desktop sharing capability known as Windows Desktop Sharing. Unlike Terminal Services, which creates a new user session for every RDP connection, Windows Desktop Sharing can host the remote session in the context of the currently logged in user without creating a new session, and make the Desktop, or a subset of it, available over RDP.[25] Windows Desktop Sharing can be used to share the entire desktop, a specific region, or a particular application.[26] Windows Desktop Sharing can also be used to share multi-monitor desktops. When sharing applications individually (rather than the entire desktop), the windows are managed (whether they are minimized or maximized) independently at the server and the client side.[26]
The functionality is only provided via a public API, which can be used by any application to provide screen sharing functionality. Windows Desktop Sharing API exposes two objects: RDPSession for the sharing session and RDPViewer for the viewer. Multiple viewer objects can be instantiated for one Session object. A viewer can either be a passive viewer, who is just able to watch the application like a screencast, or an interactive viewer, who is able to interact in real time with the remote application.[25] The RDPSession object contains all the shared applications, represented as Application objects, each with Window objects representing their on-screen windows. Per-application filters capture the application Windows and package them as Window objects.[27] A viewer must authenticate itself before it can connect to a sharing session. This is done by generating an Invitation using the RDPSession. It contains an authentication ticket and password. The object is serialized and sent to the viewers, who need to present the Invitation when connecting.[25][27]
Windows Desktop Sharing API is used by Windows Meeting Space and Windows Remote Assistance for providing application sharing functionality among network peers.[26]
Network Level Authentication
edit
Network Level Authentication (NLA) is a feature of RDP Server or Remote Desktop Connection (RDP Client) that requires the connecting user to authenticate themselves before a session is established with the server.
Originally, if a user opened an RDP (remote desktop) session to a server it would load the login screen from the server for the user. This would use up resources on the server, and was a potential area for denial of service attacks as well as remote code execution attacks (see BlueKeep). Network Level Authentication delegates the user’s credentials from the client through a client-side Security Support Provider and prompts the user to authenticate before establishing a session on the server.
Network Level Authentication was introduced in RDP 6.0 and supported initially in Windows Vista. It uses the new Security Support Provider, CredSSP, which is available through SSPI in Windows Vista. With Windows XP Service Pack 3, CredSSP was introduced on that platform and the included RDP 6.1 Client supports NLA; however CredSSP must be enabled in the registry first.[28][29]
The advantages of Network Level Authentication are:
- It requires fewer remote computer resources initially, by preventing the initiation of a full remote desktop connection until the user is authenticated, reducing the risk of denial-of-service attacks.
- It allows NT Single sign-on (SSO) to extend to RDP Services.
- It can help mitigate Remote Desktop vulnerabilities that can only be exploited prior to authentication. [30]
- No support for other credential providers
- To use Network Level Authentication in Remote Desktop Services, the client must be running Windows XP SP3 or later, and the host must be running Windows Vista or later [31] or Windows Server 2008 or later.
- Support for RDP Servers requiring Network Level Authentication needs to be configured via registry keys for use on Windows XP SP3.
- Not possible to change password via CredSSP. This is a problem when «User must change password at next logon» is enabled or if an account’s password expires.
- Requires «Access this computer from the network» privilege, which may be restricted for other reasons.
- The IP addresses of the clients trying to log in will not be stored in the security audit logs, making it harder to block brute force or dictionary attacks by means of a firewall.
- Smart card authentication from one domain to another using a remote desktop gateway is not supported with NLA enabled on the end client.
Remote Desktop Connection is a primary client for Remote Desktop Services. RDC presents the desktop interface (or application GUI) of the remote system, as if it were accessed locally.[32] Microsoft Remote Desktop was created in 2012 by Microsoft as a client with a touch-friendly interface. Additionally, several non-Microsoft clients exist.
- BlueKeep (security vulnerability)
- Windows MultiPoint Server
- Microsoft NetMeeting, a discontinued Microsoft product also provides Shared-desktop feature, in the similar time-frame of Windows NT Terminal Services Edition
- Virtual Network Computing
- ^ «Windows Remote Desktop Services spotlight». Retrieved 2010-11-18.
- ^ QuinnRadich (19 August 2020). «Remote Desktop Sessions — Win32 apps». docs.microsoft.com. Retrieved 2022-07-09.
- ^ a b c d e «Technical Overview of Terminal Services in Windows Server 2003». Microsoft. Archived from the original on 2003-01-26. Retrieved 2007-07-23.
- ^ a b «Remote Desktop Connection». PC World. IDG. 17 August 2011.
- ^ a b «Whats new in Terminal Services in Windows Server 2008». Retrieved 2007-07-23.
- ^ a b Russel, Charlie; Zacker, Craig (2009). «4: Remote Desktop Services and VDI: Centralizing Desktop and Application Management» (PDF). Introducing Windows Server 2008 R2. Redmond, WA: Microsoft Press. Archived from the original (PDF) on 29 August 2017. Retrieved 11 January 2014.
- ^
«How to change the listening port for Remote Desktop». Retrieved 2010-11-18. - ^
«Frequently Asked Questions about Remote Desktop». Microsoft. Retrieved 2007-07-23. - ^ a b
Russinovich, Mark; Solomon, David A.; Ionescu, Alex (2012). Windows Internals (6th ed.). Redmond, WA: Microsoft Press. pp. 20–21. ISBN 978-0-7356-4873-9. - ^
«Architecture of Fast User Switching». Support. Microsoft. 15 January 2006. Retrieved 11 January 2014. - ^ «Remote Services». Log me in 123.
- ^ «Citrix and Microsoft Sign Technology Collaboration and Licensing Agreement». Citrix. 2004-12-21. Archived from the original on 2011-07-05. Retrieved 2012-04-13.
- ^
«How Terminal Services Works». Microsoft. 2003-03-28. Retrieved 2007-07-23. - ^ «Configuring authentication and encryption: Terminal Services». 8 October 2009.
- ^ «Connection Configuration in Terminal Server». Support (5.0 ed.). Microsoft. 22 June 2014.
- ^ «Incorrect TLS is displayed — Windows Server». 5 June 2024.
- ^ «Terminal Services Gateway (TS Gateway)». Microsoft TechNet. Retrieved 2009-09-10.
- ^ «Remote Desktop Protocol». Microsoft Developer Network (MSDN). Retrieved 2009-09-10.
- ^ «RD Gateway Documentation». Thincast. Retrieved 2021-10-17.
- ^ TechNet: Remote Desktop Licensing
- ^ «Description of the Remote Desktop Connection 6.1 client update for Terminal Services in Windows XP Service Pack 2». Retrieved 2010-11-18.
- ^ a b «Terminal Services RemoteApp (TS RemoteApp)». Retrieved 2007-07-23.
- ^ «Terminal Services RemoteApp Session Termination Logic». Retrieved 2007-10-02.
- ^ «How to enable RemoteApp (via RDP 7.0) within VirtualBox or VMWare running Windows 7, Vista SP1+ or Windows XP SP3». Retrieved 2010-11-18.
- ^ a b c «Windows Desktop Sharing». Retrieved 2007-10-11.
- ^ a b c «Windows Desktop Sharing API». Retrieved 2007-10-11.
- ^ a b «About Windows Desktop Sharing». Retrieved 2007-10-11.
- ^ «Description of the Credential Security Support Provider (CredSSP) in Windows XP Service Pack 3». Archived from the original on 2017-09-18.
- ^ «Description of the Remote Desktop Connection 6.1 client update for Terminal Services». Microsoft. 2011-09-23. Retrieved 2020-05-07.
- ^ Simon Pope (2019-05-14). «Prevent a worm by updating Remote Desktop Services (CVE-2019-0708)». Microsoft Security Response Center. Retrieved 2020-05-07.
- ^ «Configure Network Level Authentication for Remote Desktop Services Connections». Microsoft TechNet. 2009-11-17. Retrieved 2020-05-07.
- ^ «Technical Overview of Terminal Services in Windows Server 2003». Microsoft. Archived from the original on 2003-01-26. Retrieved 2007-07-23.
- Welcome to Remote Desktop Services
- «Configure Network Level Authentication for Remote Desktop Services Connections». Microsoft TechNet. 17 November 2009.
- «What types of Remote Desktop connections should I allow?». Microsoft Corporation. Archived from the original on 2016-06-08.
Where is Remote Desktop Connection located in Windows 10? Remote Desktop Connection (RDC) is a powerful feature in Windows 10 that allows you to connect to another personal computer remotely over a network connection. Whether you’re accessing your office computer from home or helping a friend with their PC issues, RDC is an essential tool for many users. But before you can use it, you need to know where to find it. This guide will walk you through the different methods to locate Remote Desktop Connection in Windows 10 and provide tips for using it effectively.
Remote Desktop Connection is a feature built into Windows 10 that enables users to connect to another computer over the internet or a local network. It’s commonly used by IT professionals, remote workers, and anyone needing to access files or programs on another computer without physically being there.
RDC uses the Remote Desktop Protocol (RDP) to allow one computer to remotely control another. Once connected, you can use the remote computer as if you were sitting right in front of it. This includes accessing files, running applications, and even troubleshooting issues.
Locating Remote Desktop Connection in Windows 10
1. Using the Start Menu
The simplest way to find Remote Desktop Connection is through the Start Menu.
- Press on the Start button (Windows icon) in the bottom-left corner of your screen.
- Type Remote Desktop Connection into the search bar.
- Once the search results appear, click on the Remote Desktop Connection app.
- This method is quick and direct, making it the go-to for most users.
2. Using the Run Command
Another efficient way to access Remote Desktop Connection is by using the Run command.
- Click Windows + R on your keyboard to open the Run dialog box.
- Type mstsc and press Enter.
- The mstsc command is a shortcut for launching Remote Desktop Connection, and this method is particularly useful for users who prefer using keyboard shortcuts.
3. Accessing via the Control Panel
Remote Desktop Connection can also be found within the Control Panel.
- Click on the Start button and type Control Panel into the search bar, then press Enter.
- In the Control Panel, select System & Security.
- Click on System.
- On the left-hand side, click on Remote settings.
- Under the Remote tab, you will find settings for Remote Desktop, where you can configure it and access the connection.
4. Using the Windows Settings App
The Windows Settings app provides another way to access Remote Desktop features.
- Press on the Start button & select Settings (gear icon).
- Navigate to System.
- Scroll down and click on Remote Desktop on the left sidebar.
- Here, you can enable or disable Remote Desktop and find a link to open the Remote Desktop Connection app.
5. Searching for Remote Desktop Connection Using Cortana
Cortana, the Windows 10 virtual assistant, can also help you locate RDC.
- Click on the Cortana icon (circle) or press Win + C to activate it.
- Say or type, “Open Remote Desktop Connection.”
- Cortana will find and open the application for you.
6. Finding RDC in the Windows System Folder
For users who want to access Remote Desktop Connection directly from the file system:
- Open File Explorer by pressing Win + E.
- Navigate to C:\Windows\System32.
- Scroll down or search for mstsc.exe.
- Double-clicking on mstsc.exe will launch the Remote Desktop Connection app.
Setting Up Remote Desktop on Windows 10
Before using Remote Desktop Connection, ensure that the computer you want to connect to is set up to allow remote connections.
1. Enable Remote Desktop Protocol on the Host Computer
- Open Settings by pressing Win + I.
- Go to System > Remote Desktop.
- Toggle the switch under Enable Remote Desktop to On.
- Note down the computer’s name, as you’ll need it to connect remotely.
2. Configure Firewall Settings
Ensure that the Windows Firewall allows Remote Desktop Protocol connections.
- Open the Control Panel & select System & Security.
- Click on Windows Defender Firewall.
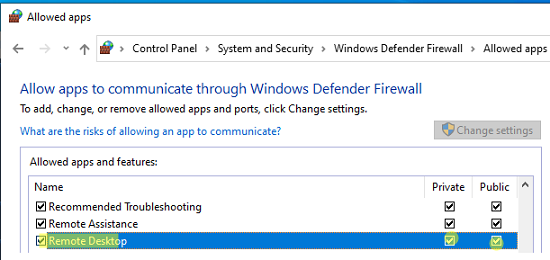
- Select Permit an app or feature through Windows Defender Firewall.
- Scroll down to find Remote Desktop and ensure both Private and Public boxes are checked.
3. Check Network Settings
For remote connections outside of your local network, you may need to configure your router to allow Remote Desktop traffic.
- Log into your router’s web interface.
- Set up port forwarding for port 3389 (the default port for RDP).
- Ensure that the remote computer has a static IP address or use a dynamic DNS service.
Troubleshooting Common RDC Issues
Even with RDC set up, you might encounter some issues. Here are some common problems & how to fix them:
1. RDC Can’t Connect to the Remote Computer
If RDC fails to connect:
- Check the network connection: Ensure both computers are connected to the internet.
- Verify the computer name: Double-check the computer name you’re trying to connect to.
- Check the firewall: Ensure that RDC is allowed through the firewall on both computers.
2. Remote Desktop is Disabled
If you receive an error stating that Remote Desktop is not enabled:
- Revisit the Remote Desktop settings on the host computer and ensure the feature is turned on.
3. Display Issues
If the remote desktop display is incorrect:
- Adjust the display settings before connecting by clicking Show Options in the RDC window. You can set the resolution and color depth here.
4. Credential Problems
If you’re prompted that your credentials didn’t work:
- Re-enter your username & password, ensuring there are no typos.
- Ensure the account has the correct permissions to access the computer remotely.
Tips for Secure Remote Desktop Usage
Remote Desktop Connection, while convenient, can expose your computer to security risks if not used carefully. Here are few tips for ensuring a secure connection:
1. Use Strong Passwords
Ensure that the account you’re using to connect remotely has a strong, unique password.
2. Enable Network Level Authentication (NLA)
NLA adds an additional layer of security by requiring the user to authenticate before establishing a session.
- Enable NLA by going to System > Remote Desktop and checking the option for NLA.
3. Limit the Number of Users
Restrict access to Remote Desktop by limiting the number of users who can log in remotely. Only allow specific user accounts to connect.
4. Use a VPN
For added security, use a Virtual Private Network (VPN) when connecting to a remote computer. This ensures that your connection is encrypted and more difficult to intercept.
5. Keep Your System Updated
Regularly update both the remote and local computers to ensure they have the latest security patches.
Conclusion
Remote Desktop Connection is a versatile tool in Windows 10 that allows users to connect to and control other computers remotely. Whether you’re using it for work, IT support, or personal access, knowing where to find RDC and how to set it up is essential. By following the steps outlined in this guide, you well-equipped to locate and use Remote Desktop Connection effectively and securely. Remember to keep security best practices in mind to protect your connection and data from potential threats.
При работе с компьютером возникают такие ситуации, когда необходимо предоставить удаленный доступ по сети интернет к компьютеру. Для систем на базе семейства Windows данная функция называется удаленным рабочим столом и для большинства редакций она включена по умолчанию. Сегодня же мы разберемся с тем, как же включить удаленный рабочий стол в Windows 10 и позволить подключаться к нашему компьютеру по сети.
Нажмите на кнопку Пуск и начните вводить слово «System«. Вам будет почти сразу предложено открыть меню настройки системы.
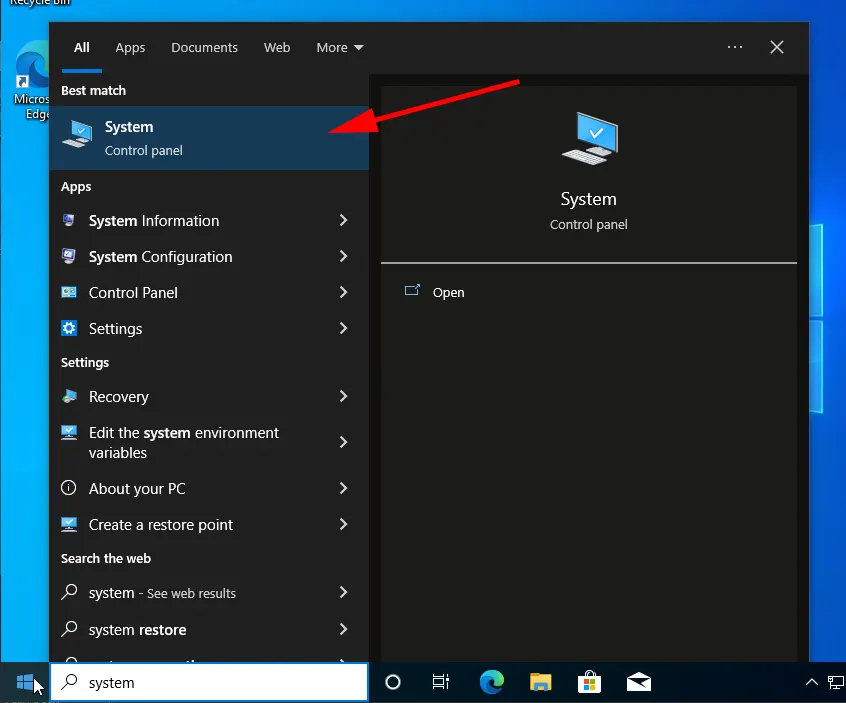
Перейдите в меню «Remote Desktop«
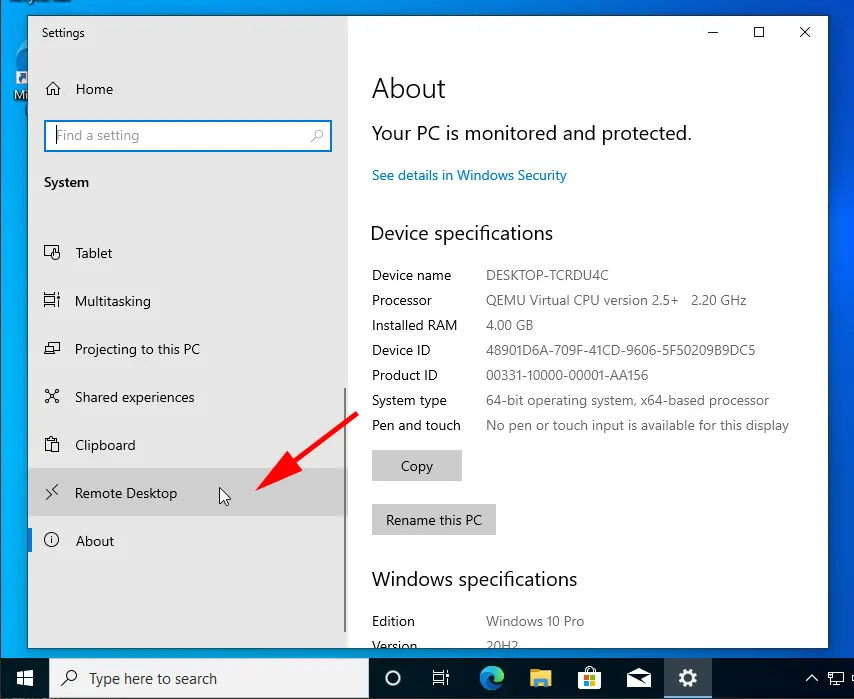
Нажмите на переключатель «Enable Remote Desktop«.
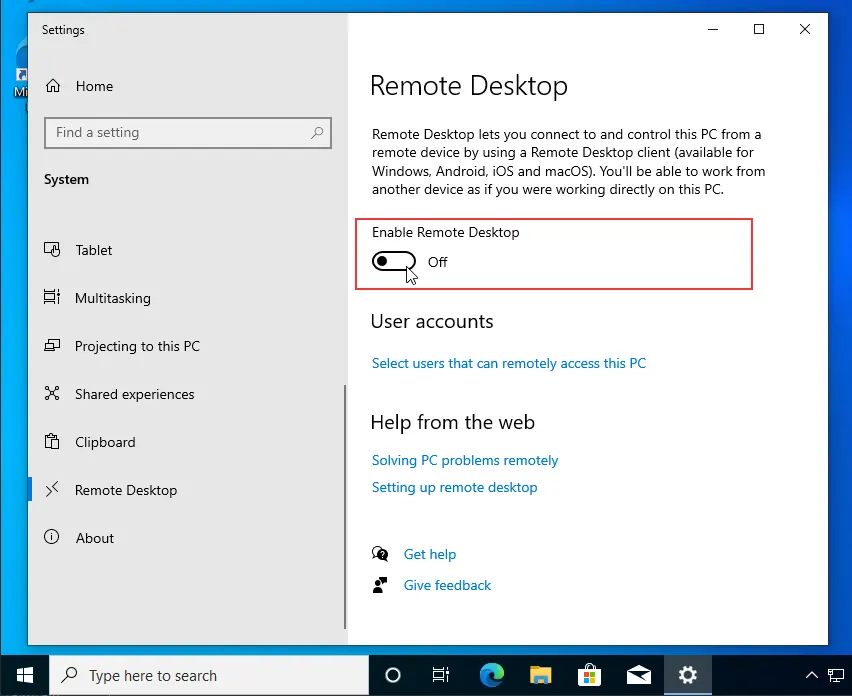
Это позволило нам включить службу удаленного рабочего стола Windows 10. Далее, нам необходимо настроить службу удаленного рабочего стола для правильной работы и подключения к сервису. В том случае, если вам необходимо всегда держать ваш компьютер в активном состоянии и доступным для автоматического обнаружения по локальной сети, то вы можете установить соответствующие ползунки в активное состояние, предварительно настроив обнаружение компьютера по сети. Установив нужные нам параметры переходим в раздел «Advanced settings«.
Убедитесь, что параметр безопасности подключения «Network Level Authentication» отмечен как активный.
После включения удаленного рабочего стола в системе Windows 10, нам необходимо разрешить входящие подключения в Windows Firewall. Для этого откройте Пуск и введите «Windows Firewall«, после чего нажмите на предложенный вариант.
В новом окне нажмите на пункт «Allow an app or feature through Windows Defender Firewall«.
В списке сервисов найдите «Remote Desktop«. В том случае, если параметры зон не отмечены галочками — вам необходимо отметить их и сохранить изменения.
Так же вы можете перейти в список всех правил входящих соединений и в списке правил найти правила связанные с «Remote Desktop (TCP/UDP-In)«. Убедитесь, что данные правила отмечены зеленой галочкой и в состоянии Enabled указано «Yes«
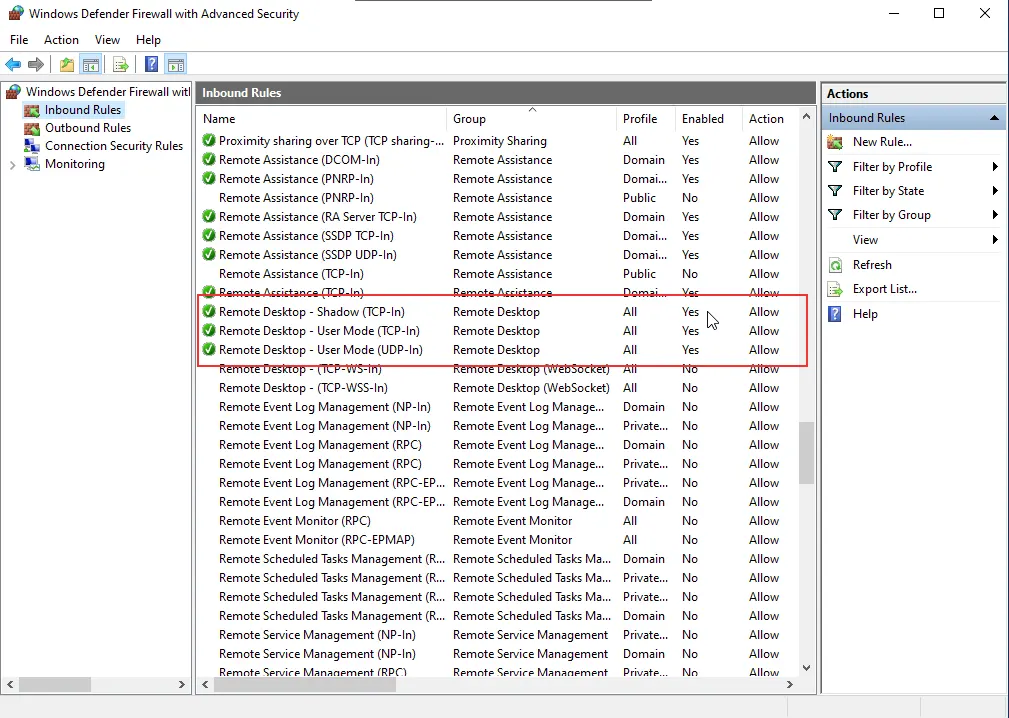
В том случае, если они неактивны, вам необходимо выбрать правило, либо выделить несколько сразу, и нажать правой кнопкой мыши по нему, после чего нажать на кнопку включения «Enable Rule«

Этих действий достаточно для того, чтобы включить удаленный рабочий стол в Windows 10.
Надеемся, что данный материал будет полезен для вас и хотим напомнить, что мы предоставляем услуги аренды удаленного рабочего стола на Windows 10.
https://finerdp.com/ru/rdp-server
Поддержка RDP — протокола удаленного рабочего стола присутствует в Windows начиная с версии XP, однако далеко не все знают, как пользоваться (и даже о наличии) Microsoft Remote Desktop для удаленного подключения к компьютеру с Windows 10, 8 или Windows 7, в том числе и не используя никаких сторонних программ.
В этой инструкции описывается, как использовать удаленный рабочий стол Microsoft с компьютера на Windows, Mac OS X, а также с мобильных устройств Android, iPhone и iPad. Хотя процесс мало чем отличается для всех этих устройств, за исключением того, что в первом случае все необходимое является частью операционной системы. См. также: Лучшие программы для удаленного доступа к компьютеру.
Примечание: подключение возможно только к компьютерам с редакцией Windows не ниже Pro (при этом подключаться можно и с домашней версии), но в Windows 10 появилась новая очень простая для начинающих пользователей возможность удаленного подключения к рабочему столу, которая подойдет в тех ситуациях, когда она требуется однократно и необходимо подключение через Интернет, см. Удаленное подключение к компьютеру с помощью приложения Быстрая помощь в Windows 10.
Перед использованием удаленного рабочего стола
Удаленный рабочий стол по протоколу RDP по умолчанию предполагает, что вы будете подключаться к одному компьютеру с другого устройства, находящегося в той же локальной сети (В домашних условиях это обычно означает подключенного к тому же роутеру. Есть способы подключения и по Интернету, о чем поговорим в завершении статьи).
Для подключения требуется знать IP адрес компьютера в локальной сети или имя компьютера (второй вариант работает только в случае, если включено сетевое обнаружение), а с учетом того, что в большинстве домашних конфигураций IP-адрес постоянно меняется, прежде чем начать, рекомендую назначить статический IP адрес (только в локальной сети, к вашему провайдеру Интернета этот статический IP не имеет отношения) для компьютера, к которому будет выполняться подключение.
Могу предложить два способа сделать это. Простой: зайдите в панель управления — Центр управления сетями и общим доступом (или правый клик по значку соединения в области уведомлений — Центр управления сетями и общим доступом. В Windows 10 1709 пункт отсутствуют в контекстном меню: открываются параметры сети в новом интерфейсе, внизу которых есть ссылка для открытия Центра управления сетями и общим доступом, подробнее: Как открыть Центр управления сетями и общим доступом в Windows 10). В разделе просмотра активных сетей, кликните по подключению по локальной сети (Ethernet) или Wi-Fi и нажмите кнопку «Сведения» в следующем окне.
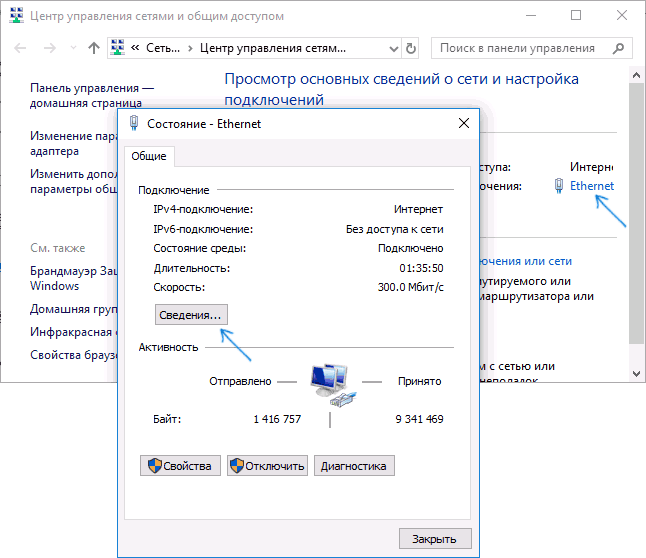
Из этого окна вам потребуется информация об IP-адресе, шлюзе по умолчанию и DNS серверах.
Закройте окно сведений о подключении, и нажмите «Свойства» в окне состояния. В списке используемых подключением компонентов выберите Протокол Интернета версии 4, нажмите кнопку «Свойства», после чего введите параметры, полученные ранее в окно конфигурации и нажмите «Ок», затем еще раз.
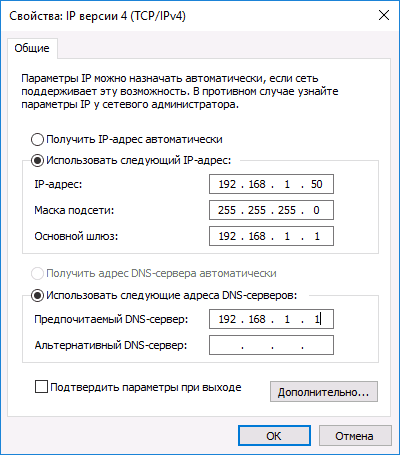
Готово, теперь у вашего компьютера статический IP адрес, который и потребуется для подключения к удаленному рабочему столу. Второй способ назначить статический IP адрес — использовать настройки сервера DHCP вашего роутера. Как правило, там имеется возможность привязки конкретного IP по MAC-адресу. В детали вдаваться не буду, но, если вы умеете самостоятельно настроить роутер, с этим тоже справитесь.
Разрешение подключения к удаленному рабочему столу Windows
Еще один пункт, который следует выполнить — включить возможность подключений RDP на компьютере, к которому вы будете подключаться. В Windows 10 начиная с версии 1709 разрешить удаленное подключение можно в Параметры — Система — Удаленный рабочий стол.
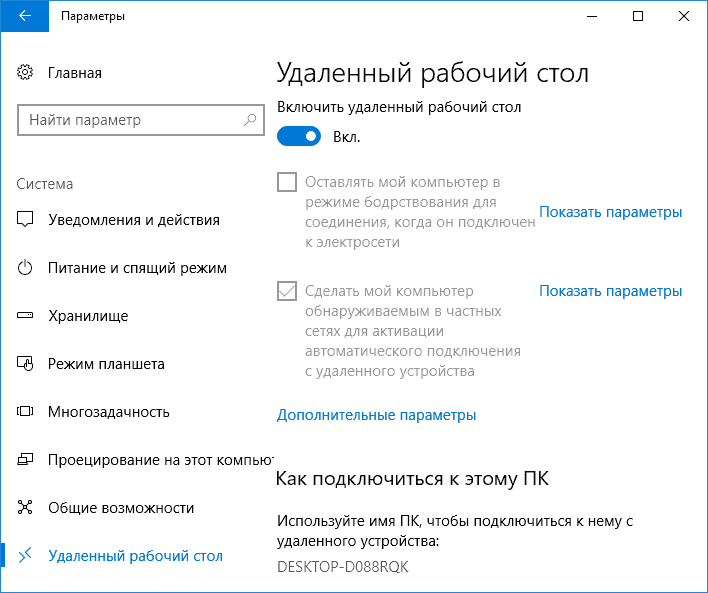
Там же, после включения удаленного рабочего стола отобразится имя компьютера, по которому можно подключиться (вместо IP-адреса), однако для использования подключения по имени вы должны изменить профиль сети на «Частная» вместо «Общедоступная» (см. Как изменить частную сеть на общедоступную и наоборот в Windows 10).
В предыдущих версиях Windows зайдите в панель управления и выберите пункт «Система», а затем в списке слева — «Настройка удаленного доступа». В окне параметров включите «Разрешить подключения удаленного помощника к этому компьютеру» и «Разрешить удаленные подключения к этому компьютеру».
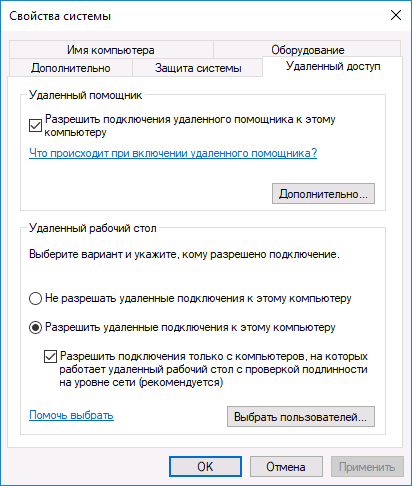
При необходимости, укажите пользователей Windows, которым нужно предоставить доступ, можно создать отдельного пользователя для подключений удаленного рабочего стола (по умолчанию, доступ предоставляется тому аккаунту, под которым вы вошли и всем администраторам системы). Все готово, для того чтобы начать.
Подключение к удаленному рабочему столу в Windows
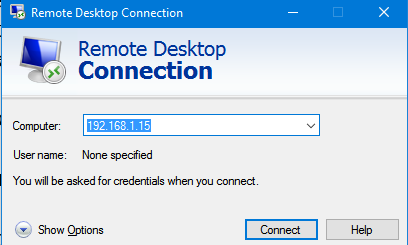
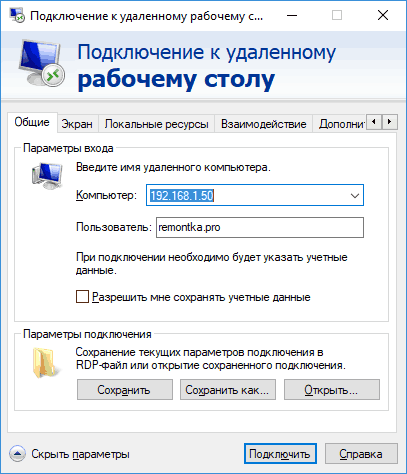
Для того, чтобы подключиться к удаленному рабочему столу, вам не требуется устанавливать дополнительные программы. Просто начните вводить в поле поиска (в меню пуск в Windows 7, в панели задач в Windows 10 или на начальном экране Windows 8 и 8.1) «подключение к удаленному рабочему столу», для того чтобы запустить утилиту для подключения. Или нажмите клавиши Win+R, введите mstsc и нажмите Enter.
По умолчанию, вы увидите только окно, в которое следует ввести IP-адрес или имя компьютера, к которому нужно подключиться — вы можете ввести его, нажать «Подключить», ввести имя пользователя и пароль на запрос данных аккаунта (имя и пароль пользователя удаленного компьютера), после чего увидите экран удаленного компьютера.

Можно также настроить параметры изображения, сохранения конфигурации подключения, передачи звука — для этого нажмите «Показать параметры» в окне подключения.
Если все было сделано правильно, то через короткое время вы увидите экран удаленного компьютера в окне подключения удаленного рабочего стола.
Microsoft Remote Desktop в Mac OS X
Для подключения к компьютеру Windows на Mac, вам потребуется скачать приложение Удаленный рабочий стол (Microsoft Remote Desktop) из App Store. Запустив приложение, нажмите кнопку со знаком «Плюс», чтобы добавить удаленный компьютер — дайте ему имя (любое), введите IP-адрес (в поле «PC Name»), имя пользователя и пароль для подключения.
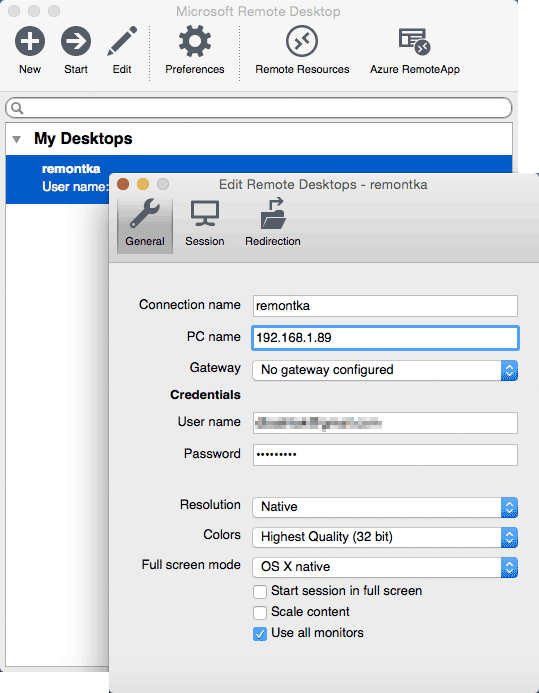
При необходимости, установите параметры экрана и другие детали. После этого, закройте окно настроек и дважды кликните по имени удаленного рабочего стола в списке для подключения. Если все было сделано правильно, вы увидите рабочий стол Windows в окне или на полный экран (зависит от настроек) на вашем Mac.
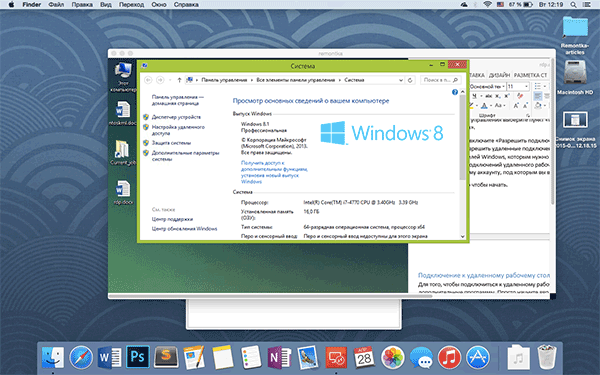
Лично я использую RDP как раз в Apple OS X. На своем MacBook Air я не держу виртуальных машин с Windows и не устанавливаю ее в отдельный раздел — в первом случае система будет тормозить, во втором я значительно сокращу время работы от аккумулятора (плюс неудобство перезагрузок). Поэтому я просто подключаюсь через Microsoft Remote Desktop к своему крутому настольному ПК, если мне требуется Windows.
Android и iOS
Подключение к удаленному рабочему столу Microsoft почти ничем не отличается для телефонов и планшетов Android, устройств iPhone и iPad. Итак, установите приложение Microsoft Remote Desktop для Android или «Удаленный рабочий стол (Майкрософт)» для iOS и запустите его.
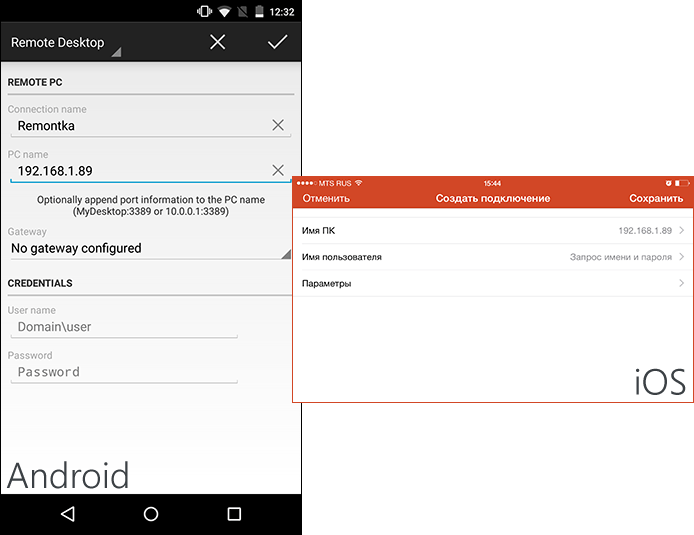
На главном экране нажмите «Добавить» (в версии для iOS далее выберите «Добавить ПК или сервер») и введите параметры подключения — так же, как и в предыдущем варианте это имя подключения (на ваше усмотрение, только в Android), IP-адрес компьютера, логин и пароль для входа в Windows. При необходимости задайте другие параметры.
Готово, можно подключаться и удаленно управлять компьютером с вашего мобильного устройства.
RDP через Интернет
На официальном сайте Microsoft присутствует инструкция о том, как разрешить подключения удаленного рабочего стола через Интернет (только на английском). Заключается она в пробросе на роутере порта 3389 на IP адрес вашего компьютера, а затем — подключение к публичному адресу вашего роутера с указанием данного порта.
На мой взгляд, это не самый оптимальный вариант и безопасней, а может и проще — создать VPN подключение (средствами роутера или Windows) и подключаться по VPN к компьютеру, после чего использовать удаленный рабочий стол так, как если бы вы находились в той же локальной сети (правда, проброс портов все равно потребуется).